popeye2sea
-
Posts
1,935 -
Joined
-
Last visited
Content Type
Profiles
Forums
Gallery
Events
Everything posted by popeye2sea
-
An interesting option.
-
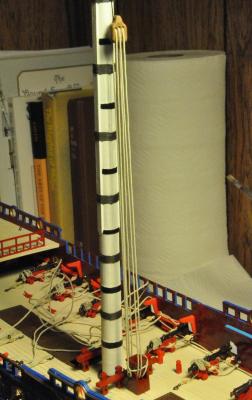
I understand that I could just eliminate much of the line. But that would defeat the purpose of having the proper working length of halyard available. My goal with this build is to have all of the lines workable, belayed and coiled, not fixed with glue. I was really curious what was done on the actual ship. A hanging coil of this size would be extremely unwieldy. And I am not sure coiling on deck would be a viable option. Anyone have any insights?
-
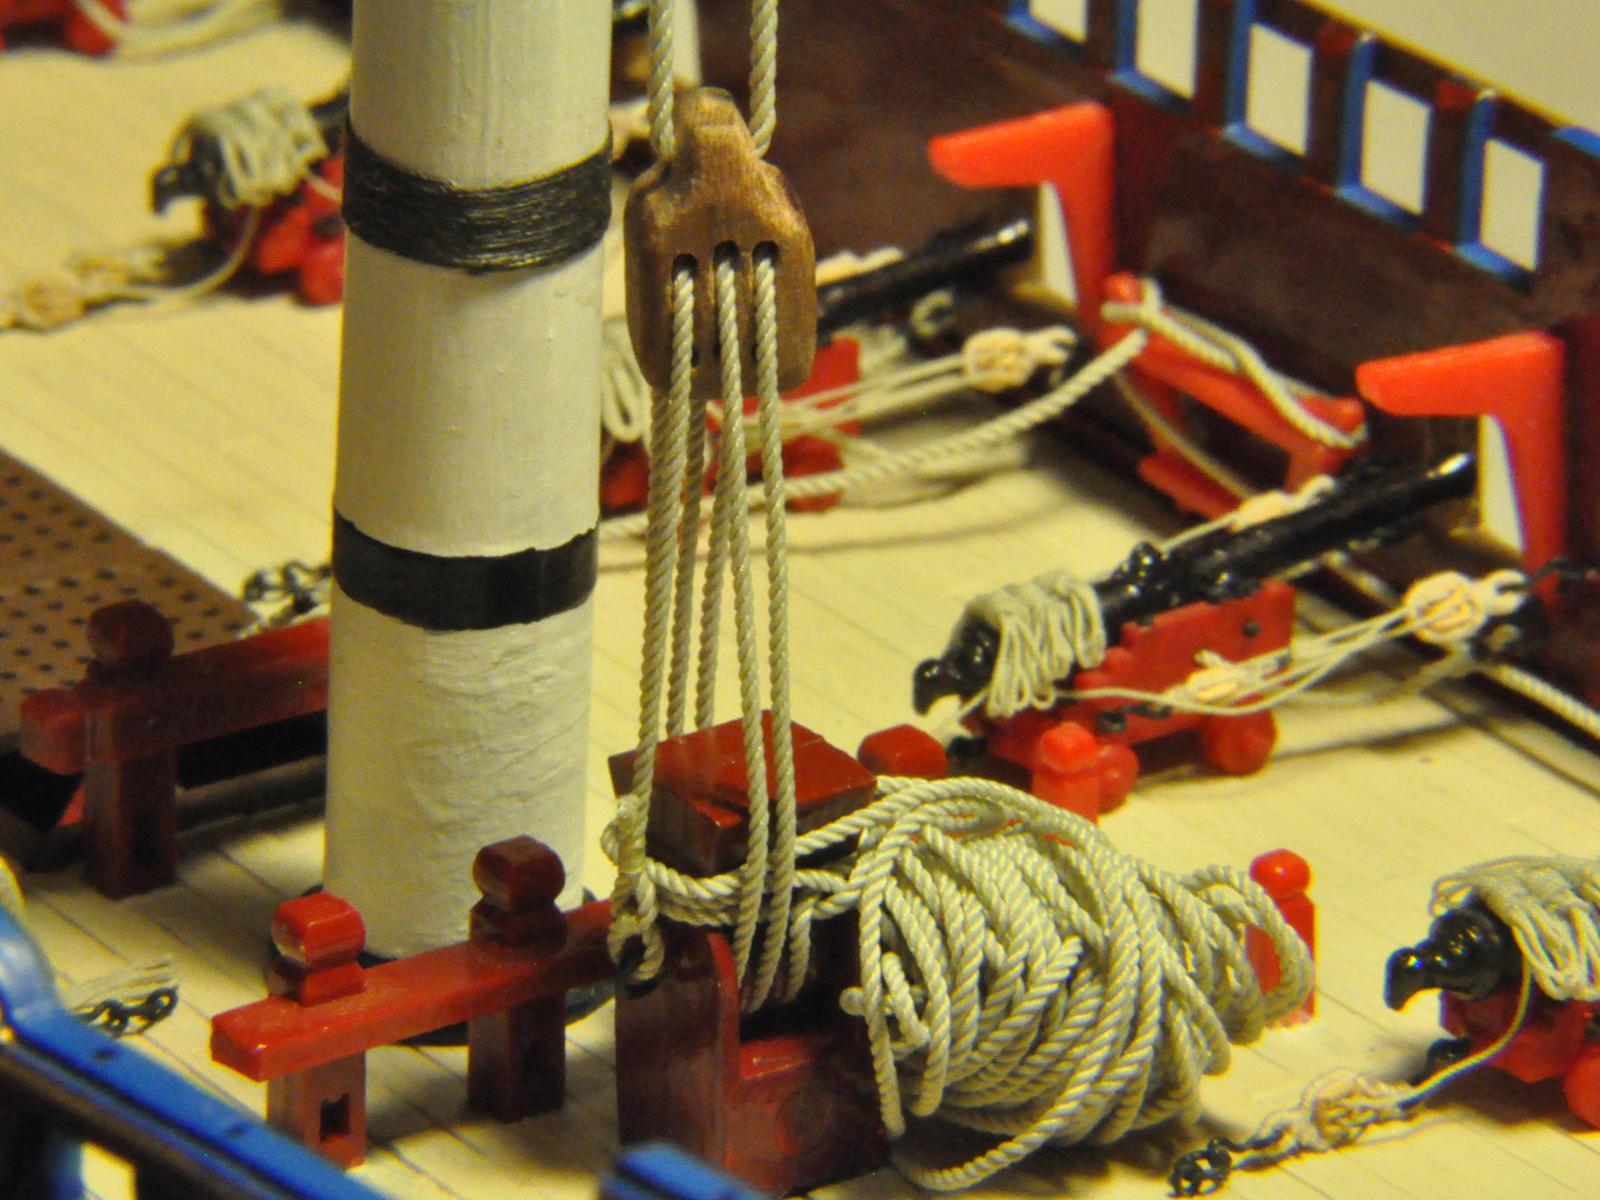
I am working on the main yard tye and halyard. The question is this. Once you figure out the lengths of the tye and halyard needed to hoist the yard from the rail to the raised position, you end up with a really long halyard. What did they do with all of the remaining halyard that ends up on deck? Was it coiled and left on the deck? Was it hung from the knight, as I have shown below? It is a lot of line. Don't mind the sloppy coil, it's very temporary. Help Regards,

-
 Ok folks, next question. In moving forward with setting up the lines in the waist area. I am working on the main yard tye and halliard. The question is this. Once you figure out the lengths of the tye and halliard needed to hoist the yard from the rail to the raised position, what did they do with all of the remaining halliard that ends up on deck? Was it coiled and left on the deck? Was it hung from the knight, as I have shown below? It is a lot of line. Don't mind the sloppy coil, it's very temporary. Help!!! Regards,
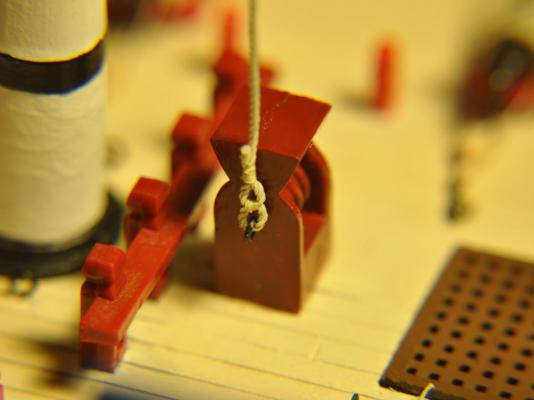

- 196 replies
-
- 13
-

-
- plastic
- soleil royal
- (and 2 more)
-
Flags of the french ancien regime navy
popeye2sea replied to Nwanda's topic in Nautical/Naval History
Nwanda, do consider that the Soleil Royal was the flagship of Admiral Ann Hilarion, Le Compte de Tourville, so flying the white flag with gold fleur-de-lis may be appropriate. I think it was also the flag ship of the entire French fleet -
I suppose there is another way to fix this. I could make sure that I make the sail with a seam centered instead of a cloth. Then it would work out fine. In the meantime...here is a stropped clew block with a long and short eye to go around the yard And here it is rose lashed to the yard. Regards,

- 196 replies
-
- 11
-
-
- plastic
- soleil royal
- (and 2 more)
-
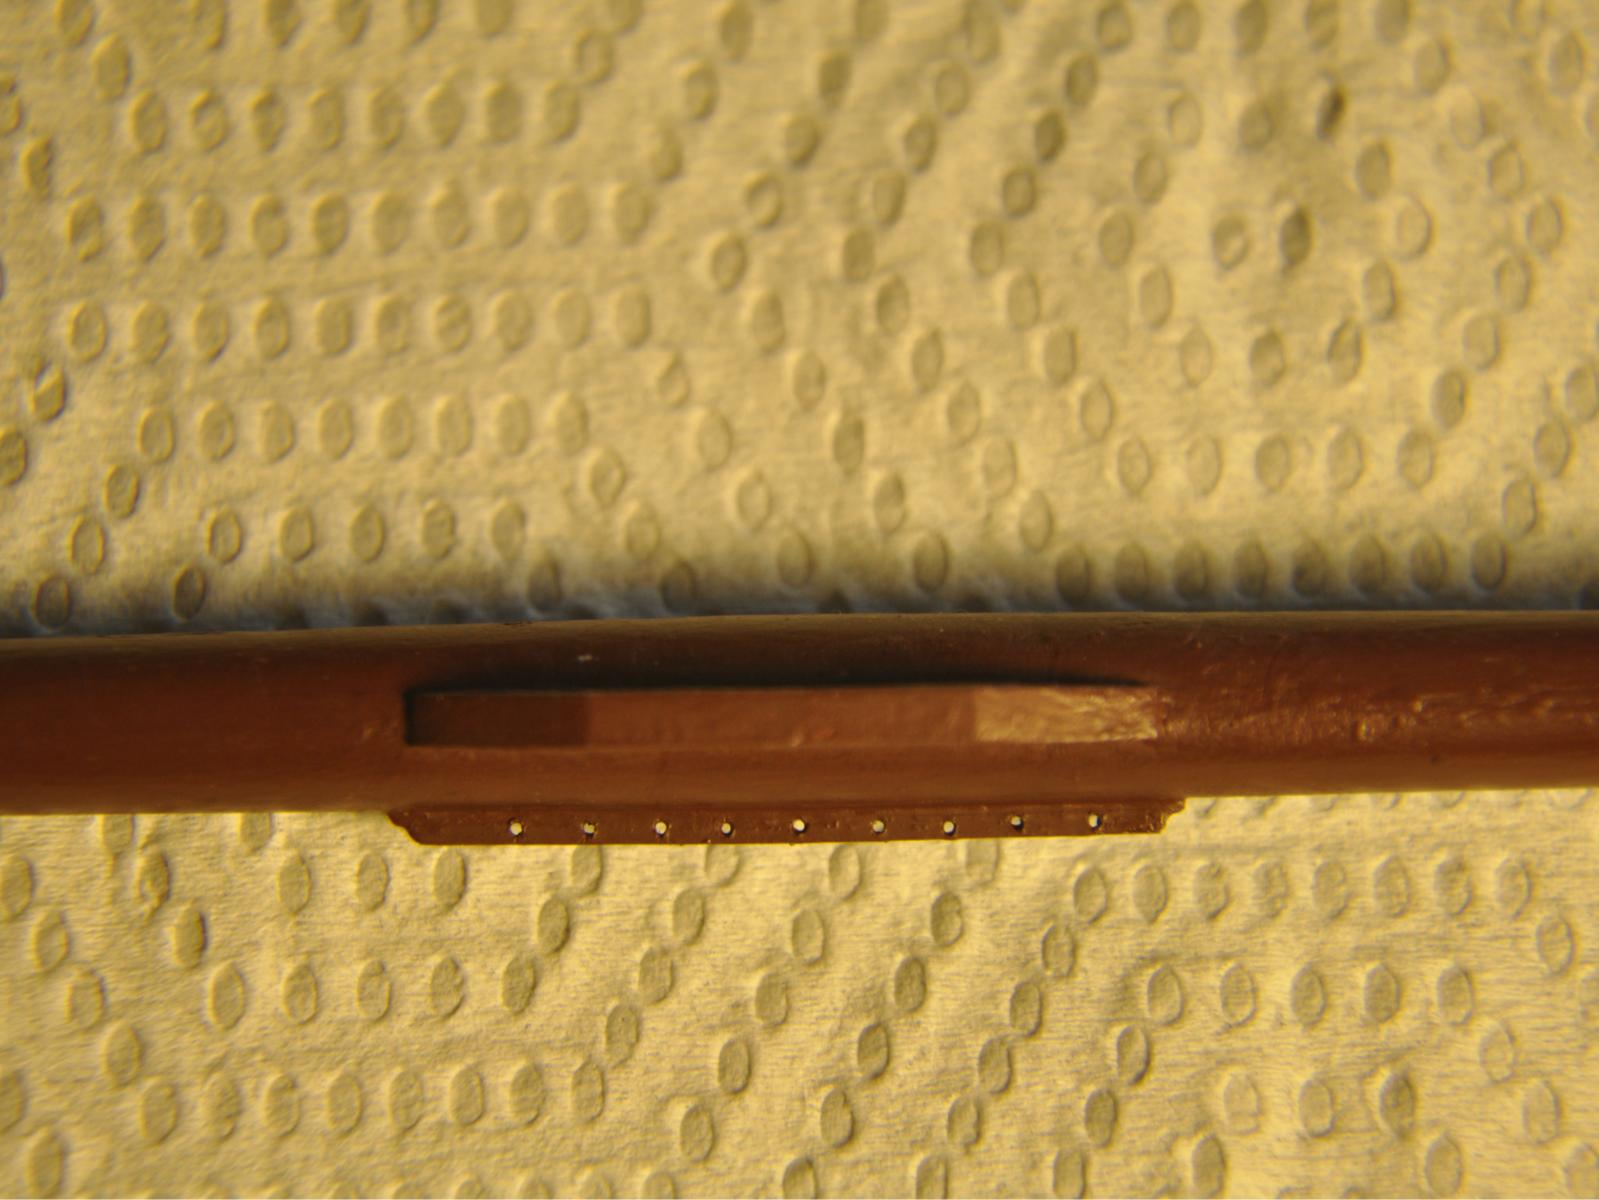
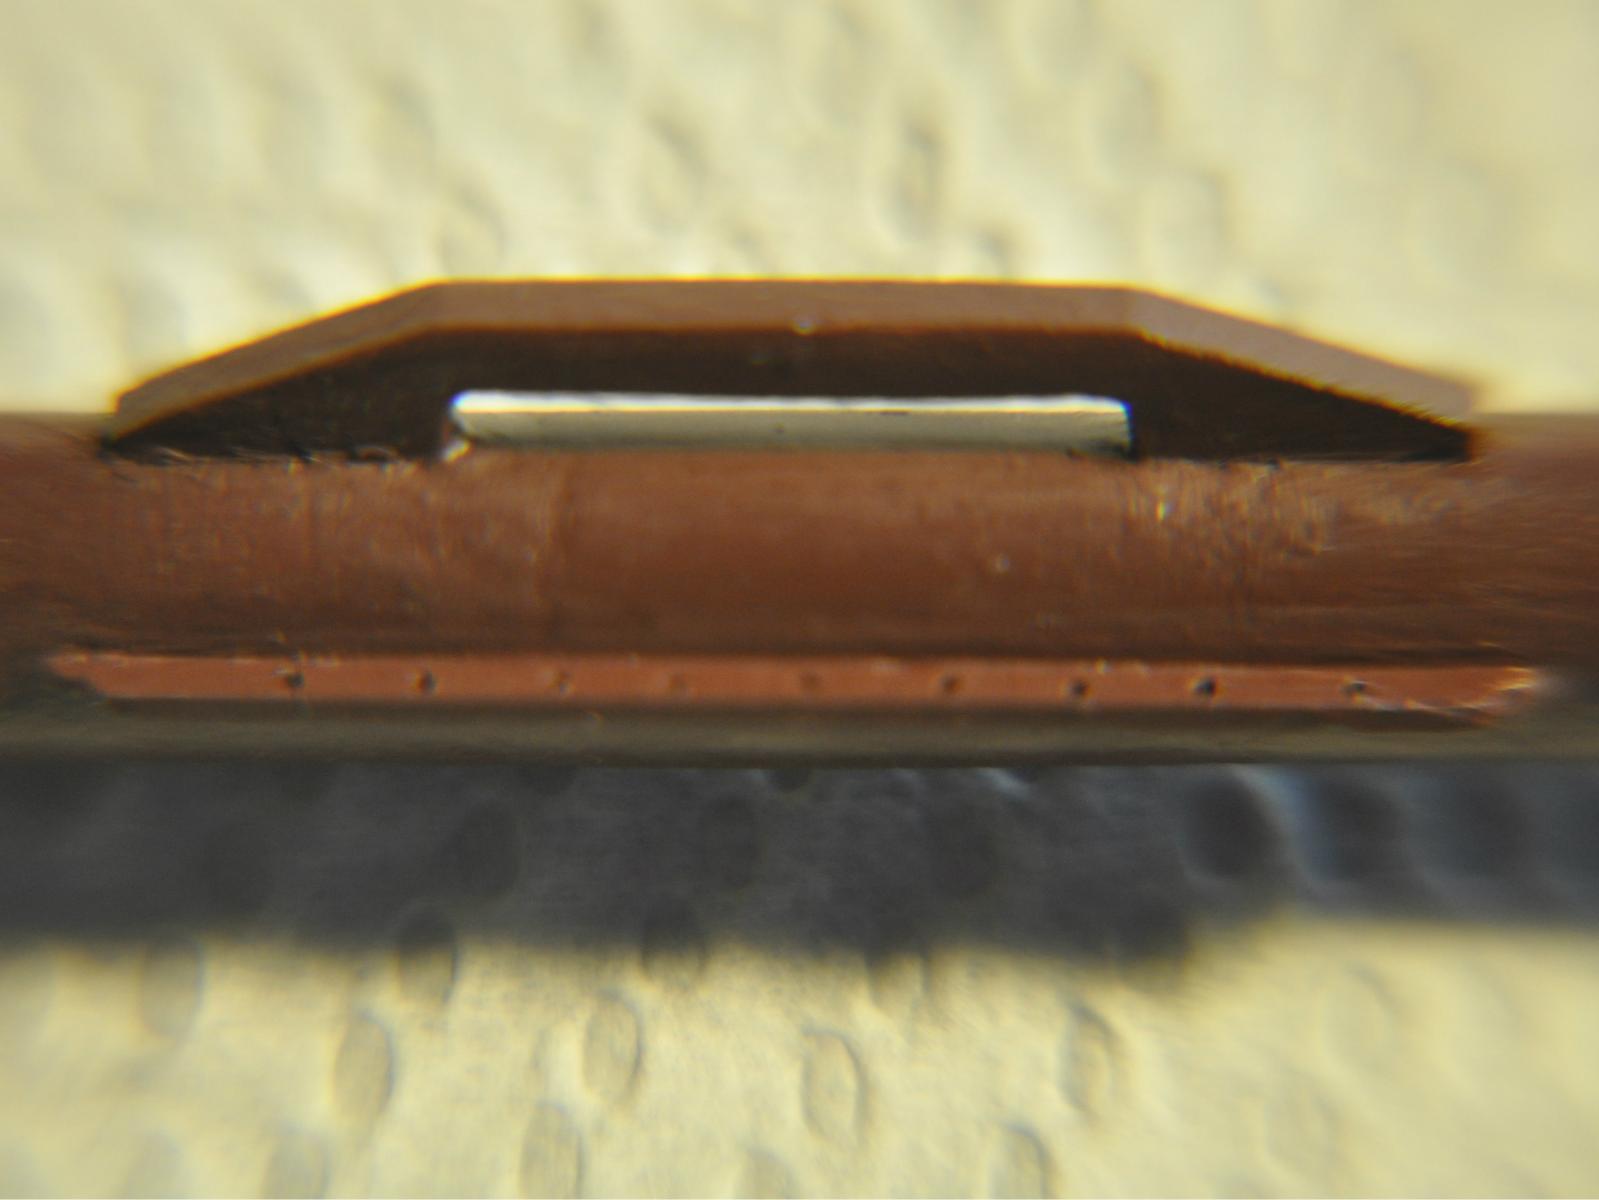
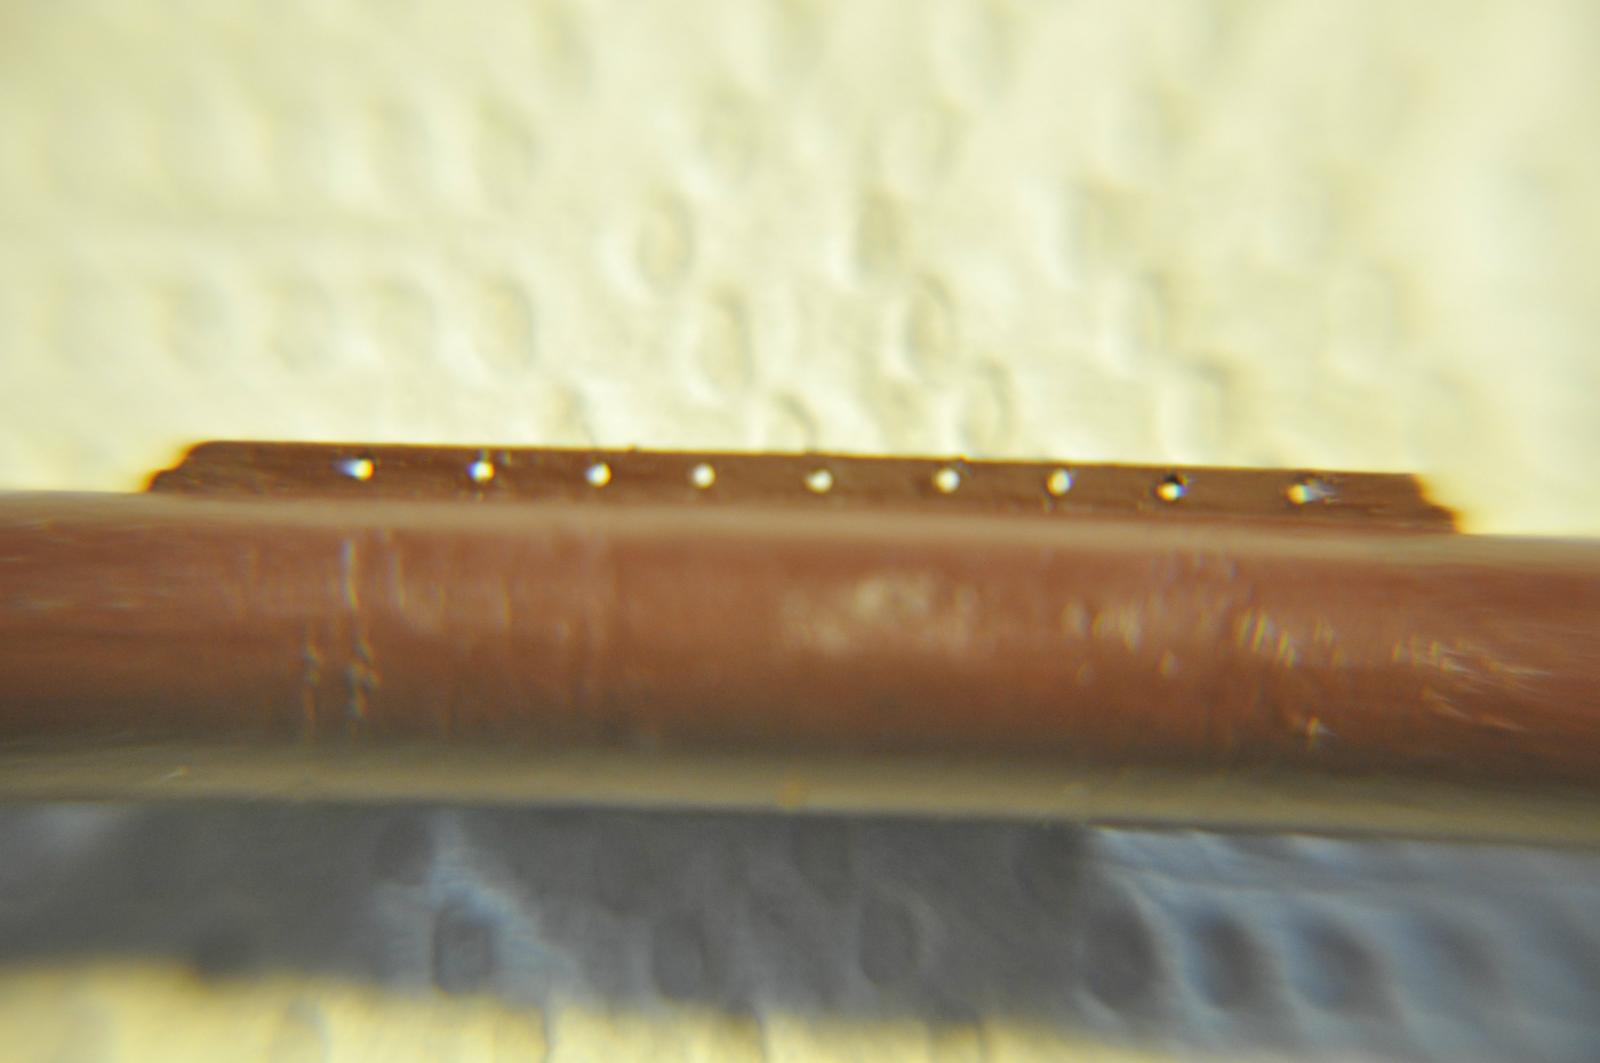
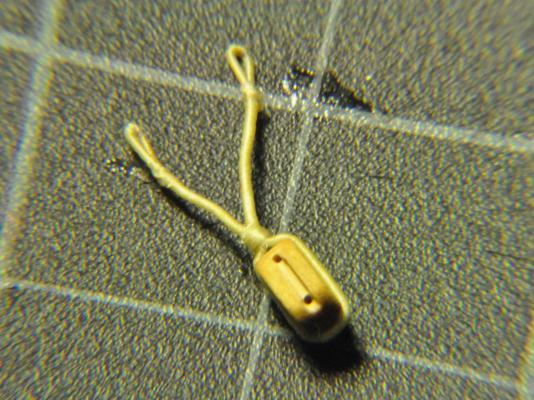
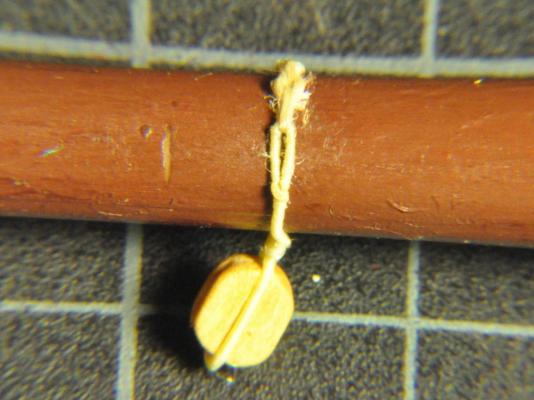
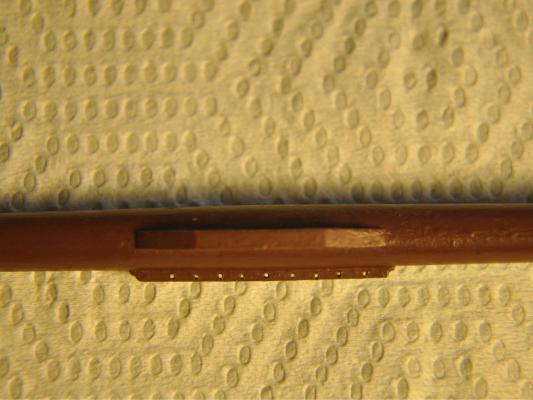
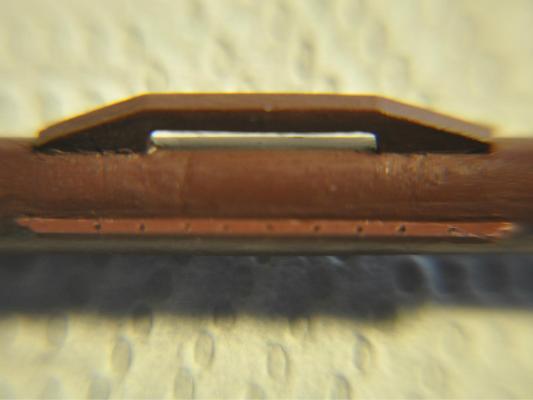
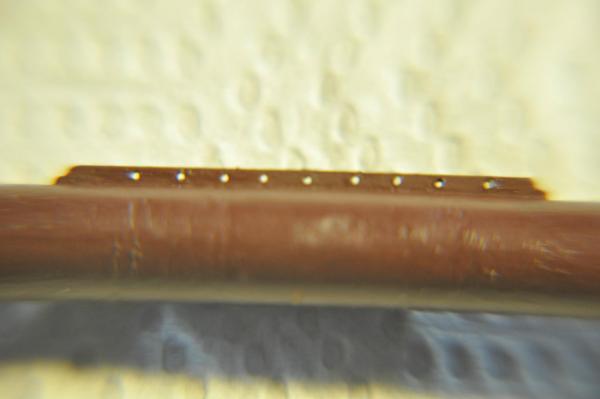
OK, so some of you may ask, why is he bouncing ahead to working on the yards before the masts are even stepped. Well, there is a method to my madness. Or perhaps it's just madness. I don't know. I just finished the final rigging of the guns in the waist. And now I need to put some of the rigging in that belays in the waist because once the decks, masts, and shrouds are shipped this area will be particularly hard to reach. These lines include the sheets and braces for the fore and main course, the main yard halliard, and the spritsail sheet. In order to get the lengths of these lines correct I have to temporarily put the yards in place in their proper braced in orientation. Not only that but since the course will be clewed up I have to place the clew line blocks in their proper locations to see where the sheets will be. So, then I figured if I am going to do that I should just start working on the other furniture to go on the yard. Which leads me to be making things like cleats, boom irons and the roband bending strips shown below. During the period of this ship, sails were bent directly to the yards and hung underneath the yard. Jack stays had not been invented yet. The robands go around the yard. In the center of the yard, where the cleat is, this does not work so a strip with holes to take the robands was added beneath the yard. The holes are spaced a scale 12" apart because there were two robands per sail cloth, which was about 24 inches wide. Here is my take on bending strips: And looking at these pictures I realize that I will probably have to strip the bending strip off and make a new one. The holes should be shifted 1/16 inch to the right so that they will line up with the center cloth of the sail. Perhaps it really is madness after all. Regards,
- 196 replies
-
- 11
-
-
- plastic
- soleil royal
- (and 2 more)
-
According to R.C. Anderson in his Rigging of Ships in the age of the Spritsail Topmast, studdingsail booms are mentioned in the Treatise on Rigging, 1625 for either side of the main and fore sails. He also feels that they were rare before 1660. The Establishment of 1686 gives English ships main and main topsail stunsails. He feels that they were added to the fore mast slightly later by the English (1690) and slightly earlier by the French and Dutch (1670). Interestingly, the Dutch carried their stunsail booms abaft the yards, all others carried them forward.
- 196 replies
-
- 2
-
-
- plastic
- soleil royal
- (and 2 more)
-
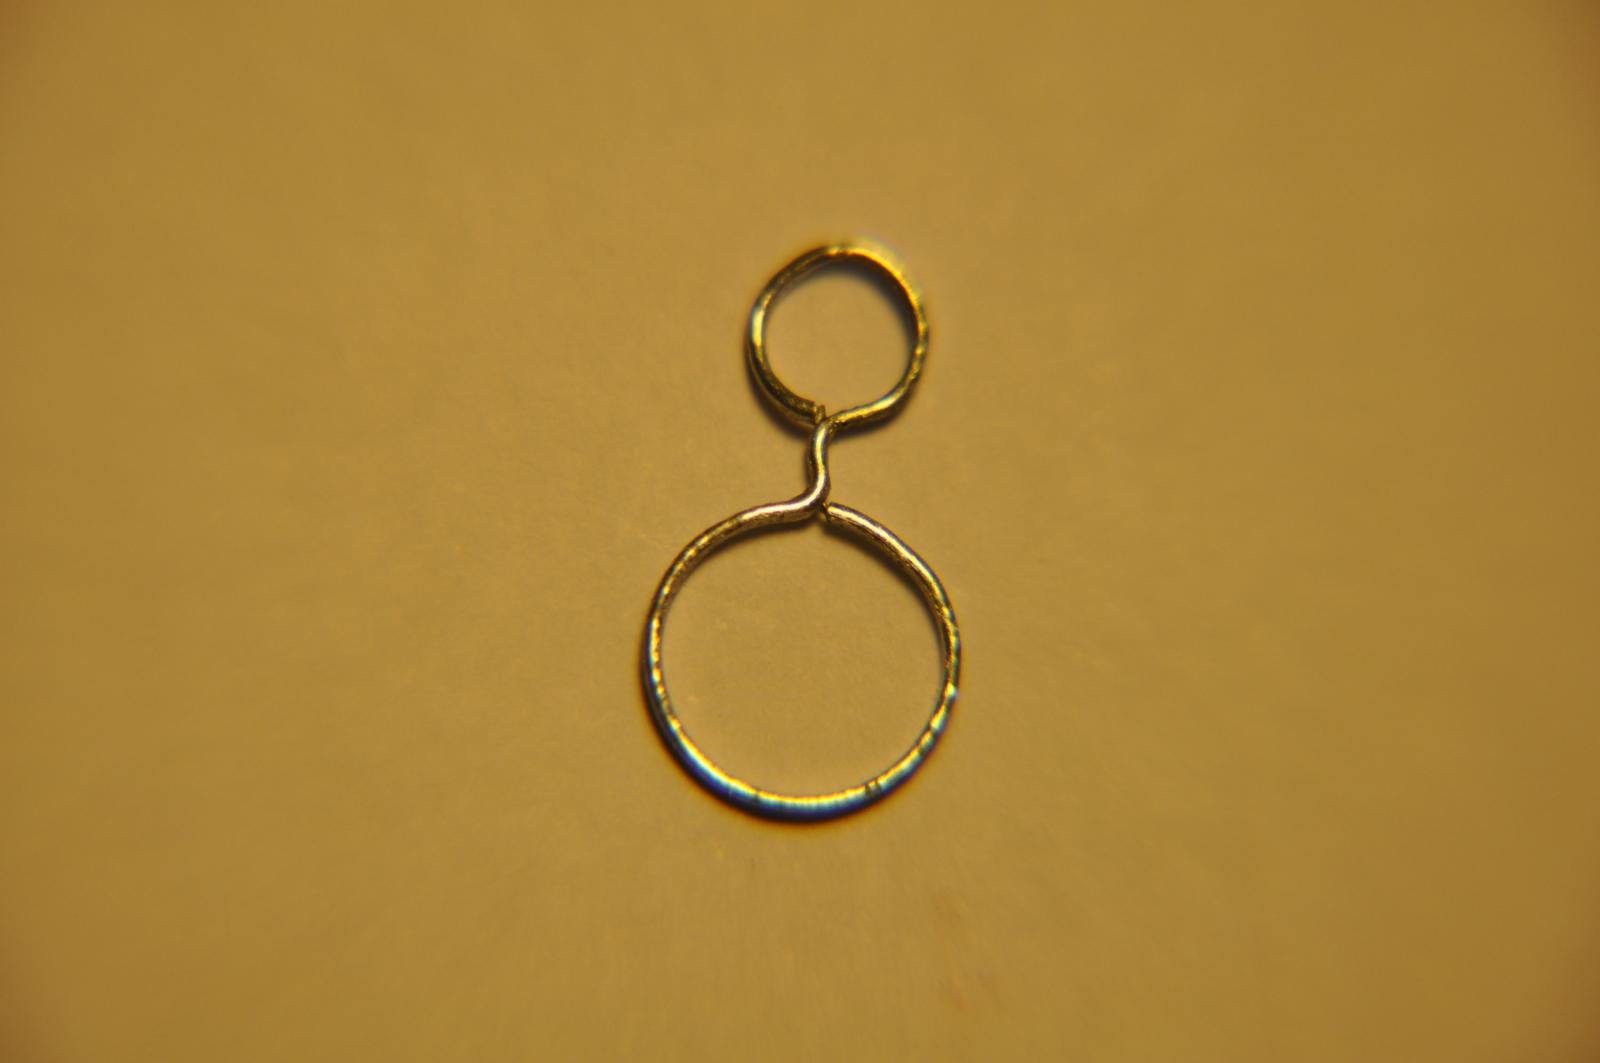
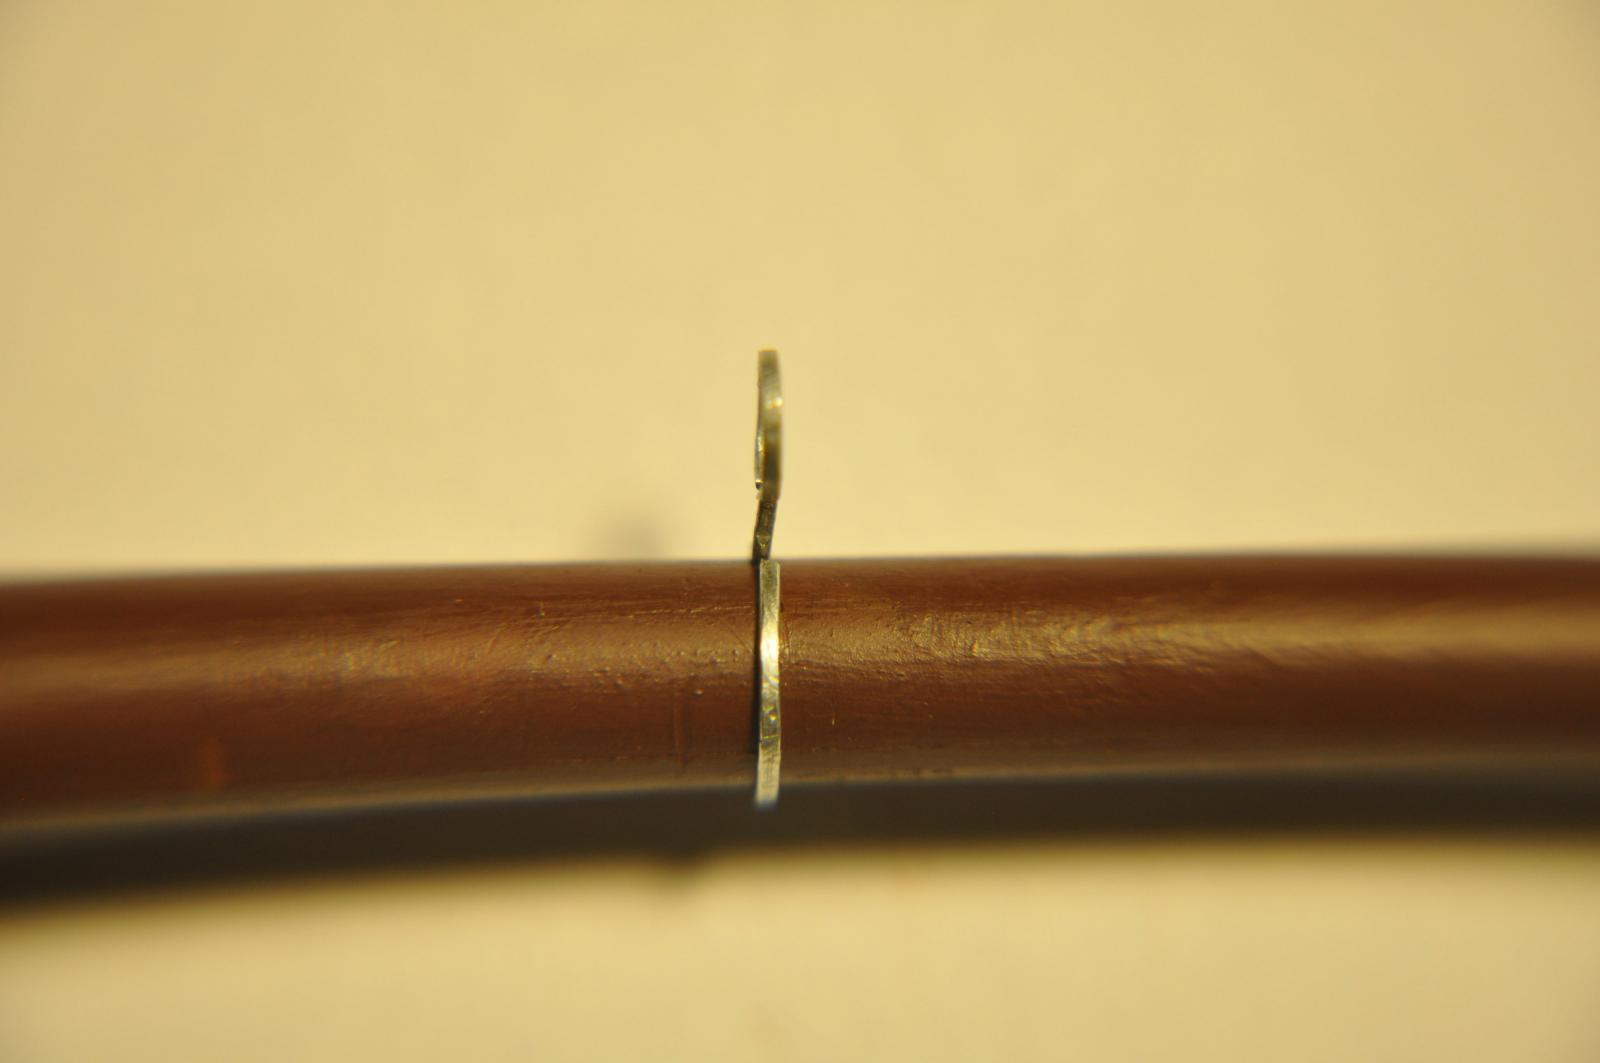
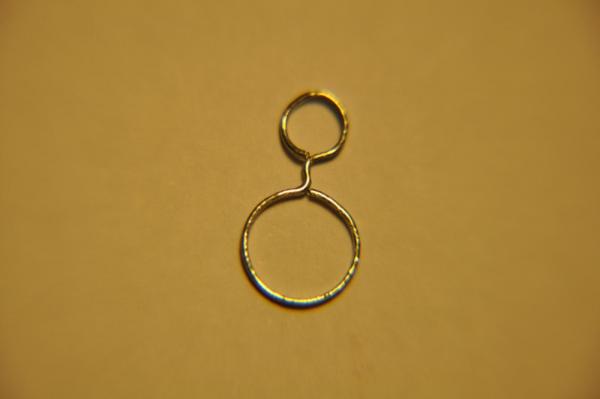
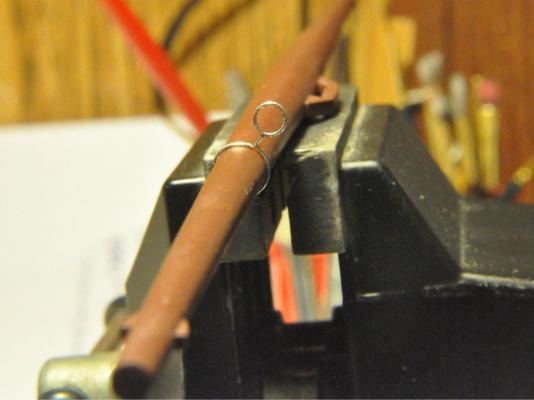
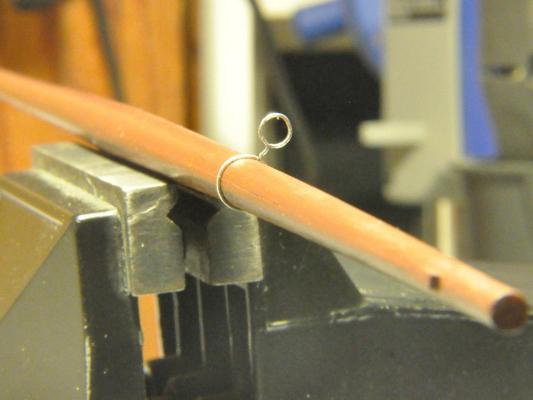
Slow going in the shipyard....but progress is still being made. Here is my attempt at making inner studding sail boom irons. These are made from 24 gauge steel wire. I start with a z-shaped bend in the wire (90 degree bends). The section in the middle is the measurement of the distance required between the yard and the boom. Then I flattened both ends from the bend outwards on an anvil. The length of each flattened end is determined by the circumference of the yard and the boom. Then bend the flattened ends to make a hoop for the yard and boom. A final adjustment to make everything straight and the iron is done. The piece still needs to be soldered closed and blackened. I will solder the hoops slightly smaller so that they are a jam fit at the proper place on the yard and boom. The last photo shows the boom temporarily in place. The outer boom iron will be replaced with my own also. That one will be a smaller version of the inner. R.C. Anderson suggests that the style of outer boom iron shown in this photo did not come into use until the eighteenth century by the English. Hope you enjoy


- 196 replies
-
- 13
-
-
- plastic
- soleil royal
- (and 2 more)
-
There be a lot of fancy words used there... we're not but humble pirates.
- 396 replies
-
- 8
-
-
- Idea
- Bright Idea
- (and 1 more)
-
Top two are much better looking. And more realistic too!
- 110 replies
-
- 1
-
-
- heller
- le superbe
- (and 2 more)
-
Personally, I am trying to make the rigging of my build as real as possible. Down to proper eyes, lashings and seizings. Overkill....maybe. Adding a lot of time to the build...definitely. Proving to myself that I can do it and enjoying the ride...priceless
-
On my build I put the lower eyebolts aligned vertically to take the breeching. Actually I used ring bolts. The ring hangs naturally from a vertical eye. On the upper eybolts I aligned them horizontally in order to drop the hook on the gun tackle into.
- 110 replies
-
- 1
-
-
- heller
- le superbe
- (and 2 more)
-
Lucas, be aware that Heller intends those eyebolts to be the anchor points for the shroud deadeye chains. Heller wants you to simulate the chains with line tied to those eyebolts. It is too late for my build, but if I had known about it earlier I would not have installed these eyebolts and made proper chains with their anchor bolts and back links. As it is now I will be soldering links together and fitting them in place after the channels and deadeyes are in place. A much more fiddely task. Regards,
- 110 replies
-
- 1
-
-
- heller
- le superbe
- (and 2 more)
-
First time rigging - being organized
popeye2sea replied to RichardG's topic in Masting, rigging and sails
I agree with Jay (Modeler12). Spend the time to learn the names and the functions of the different lines. You will find that the name will often describe the lines location and function. I made a spreadsheet for the rigging plan also for the following reasons: 1. To get the proper sizes of line 2. To get the proper sizes and locations of blocks 3. To itemize how much line and how many blocks I needed to purchase or make. 4. To organize and order the rigging process 5. To correct errors in the rigging plan 6. To translate from the french instructions It will all fall into place. There is a definite logic to the rigging plan. When you understand the purpose of the lines, it all just makes sense. Certain groups of lines do certain things and they all work as a system, often in opposing fashion. One line will hoist, while the other lowers. One will hold the mast forward, while the other back. One will brace a yard in to port, the other to starboard. Regards, -
Using a sheave on a double block as a becket???
popeye2sea replied to Captain Al's topic in Masting, rigging and sails
Seems like it would throw the block out of alignment with the line and make the block jam easier. -
H.M.S. Victory, Heller, 1/100, Onward and Upwards.
popeye2sea replied to Izzy Madd's topic in Plastic model kits
I am assuming that the Heller Victory and Heller Soleil Royale use the same quality of parts for their 1:100 scale kits. For my Soleil Royale I am using the lower masts as is. They seem sturdy enough. Even the top masts seem to be ok. Anything above that I will be replacing with wood. The plastic is too bendy. The bowsprit and any yards that are molded in two halves I am using but I am filling them with brass rod to stiffen them and add weight. Upper yards I have not made a decision on. When I get to that point I'll determine if they are too flexible. Studding sail booms will remain plastic. There will be no rigging on these for my build. -
What you are describing is a strop, and you find them on all blocks. They are essentially a long loop of rope, (or grommet). One way to make them is to lay up a grommet as shown above, or another way would be to take a few round turns with some thread around two pins. The distance between the pins will determine the length of the strop. Next serve the thread turns together so that you have what looks like a single rope with an eye at each end over the pins. You now have a basic strop. What you do with it next depends on where it is being used. If you are stropping a block with an eye to go around a thimble or a yard arm, then all you need to do is take the two eyes of the strop and lash them together. You now have a continuous loop. You can make the whole strop more uniform in appearance if you wish by serving over the two eyes at this point. Put your block, or block and thimble into the loop, position the eyes at the point where the seizing between the block and thimble will go, and clap on your round seizing. You now have a perfectly served strop on your block and thimble. A variation would be to seize the strop together at the top of the block leaving two tails with the eyes at the ends. You can then take the ends around a yard and lash the eyes together on the other side. If you go this route, I would finish the eyes by serving them first. Regards,
-
Here is a short list of the books I go to regularly: Falconer's New Universal Dictionary of the Marine, 1815 Darcy Lever, The Young Sea Officers Sheet Anchor, 1819 R. C. Anderson, The Rigging of Ships in the Days of the Spritsail Topmast 1600-1720, 1927 David Steel, The Art of Rigging, updated by Capt. George Biddlecomb, 1848 John Harland, Seamanship in the Age of Sail, 1984 James Lees, The Masting and Rigging of English Ships of War 1625-1860, 1979 and for rope work Hervey Garrett smith, The Arts of the Sailor, 1953
-
Need help finding the source for a picture
popeye2sea replied to trippwj's topic in Nautical/Naval History
Plan of a race built galleon, from Matthew Bakers Fragments of Ancient English Shipwrighty, c. 1582- 1 reply
-
- 1
-
-
I agree. She looks spectacular in the sunlight.
- 2,250 replies
-
- 2
-
-
- model shipways
- Charles W Morgan
- (and 1 more)
-
I stand corrected. Just goes to show that you can never do enough research. Regards,
-
That would be 3 right hand lay ropes made up into a left hand lay cable. Anchor cable was never wormed or parcelled except for a temporary service clapped on at the point where it passed through the hawse holes to prevent chafe. Too much water would be trapped in the rope if it was wormed and parcelled and that would promote rot. Sometimes a length of chain was used for the first portion near the anchor in order to help set the anchor and reduce damage from the cable resting on the sea bed.
- 29 replies
-
- 2
-
-
- Rope making
- z twist
- (and 2 more)
-
Your best sail cloth and technique
popeye2sea replied to steven sturgis's topic in Masting, rigging and sails
A question about silkspan. Can it achieve the draped and folded look of clewed up sails? Or will it be too stiff? I want to show my ship in the process of reducing to battle sail. -
Rat lines revisited, a different approach
popeye2sea replied to Modeler12's topic in Masting, rigging and sails
I think this is one of those personal preference items. It is my understanding the all line was tarred as part of the laying up process. However, shrouds and stays and the like received an extra measure of tar in the serving process. So, in appearance, the ratlines should be lighter in color than the shrouds, but to what degree I do not know.