HOLIDAY DONATION DRIVE - SUPPORT MSW - DO YOUR PART TO KEEP THIS GREAT FORUM GOING!
×


popeye2sea
-
Posts
1,935 -
Joined
-
Last visited
Content Type
Profiles
Forums
Gallery
Events
Everything posted by popeye2sea
-
 Don't be too hard on yourself. That happens all the time in the real world too. You would be surprised how often the lowering of the ensign at evening colors is botched because someone did not disentangle the halyard prior to trying to lower the flag. The flag very often whips around the two parts of the halyard and becomes fouled on itself.
 -
Proper lead of lower sheets and tacks
popeye2sea replied to popeye2sea's topic in Masting, rigging and sails
Does anyone have some insight on this? Since the inboard portion of the line runs beneath the quarter deck I need to figure out what to do with it before I fasten the quarter deck down. -
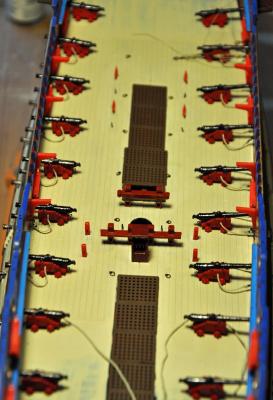
This item is on my build log also but I thought I would post it here: This is the spar deck of the Soleil Royal of 1669. One thing I noticed with the way that the kevels are placed is that it would be extremely difficult to work the lines belayed here. The lines that go to these kevels are the sheets and tacks for the courses and the sprit sail. Another problem... the main sheets come inboard well aft near the quarter galleries and then belay amidships on one of the kevels. Do I run the sheet over the tops of the cannon barrels or down on the deck beneath the barrels. Either way it looks like they would foul on the cannons when worked. Perhaps this is the reason why the sails set for battle did not include the lower courses?

-
Jay, I'm pretty sure there is no way that the mizzen topsail brace would lead to the spanker gaff. All of the braces for the mizzen yards lead forward to the main mast
-
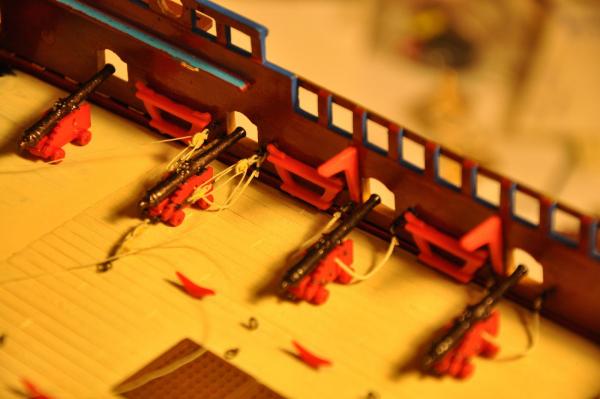
Lest anyone think that the shipyard has closed, let me assure you that after a brief time off for the holidays the laborers have been put back to work diligently forging iron and stropping blocks for the cannons. Unfortunately, I only get a couple of hours of work a week on the ship. Progress has been slow! ( I do hope that his royal highness King Louis does not object! Thirty plus years is a long time to wait for completion of a ship ) Progress thus far: All cannons mounted on the full gun deck. These are pinned in place through the bottom of the carriage and the deck so that I did not have to scrape the paint under each wheel and glue. The breeching ropes are seized to the ring bolts prior to gluing the ring bolts to the hull through holes I drilled near the base of each gun port. Additional holes were drilled and eye bolts installed at the sides of each port for the gun tackles. Ring bolts were also installed in the deck for the train tackles. One cannon has been fully rigged so far. I still have to coil the ropes. The cannons on this side are run in and the coiled ropes will be layed over the top of the gun. On the other side, where the cannons are run out for firing, the tackle falls will be faked down on the deck. One thing I noticed with the way that the kevels are placed is that it would be extremely difficult to work the lines belayed here. The lines that go to these kevels are the sheets and tacks for the courses and the sprit sail. Another problem... the main sheets come inboard well aft near the quarter galleries and then belay amidships on one of the kevels. Do I run the sheet over the tops of the cannon barrels or down on the deck beneath the barrels. Either way it looks like they would foul on the cannons when worked. Perhaps this is the reason why the sails set for battle did not include the lower courses? Still to come...16 more cannons on the fo'c'sle, quarter deck and cabin deck( not sure what the deck between the quarter deck and poop deck was called). Enjoy
- 196 replies
-
- 11
-

-
- plastic
- soleil royal
- (and 2 more)
-
Correct hitch and advice on rigging a flag needed
popeye2sea replied to Gabek's topic in Masting, rigging and sails
One other point to consider. If they were anything like the ones we use today the halyard is all one rope. That is to say when the flags are bent on the halyard forms a continuous loop. When no flags are present the toggle on the downhaul end is attached to the loop of the uphaul end. Both parts of the halyard are made fast on the same cleat -
The shipyard is always open, but I only get a couple of hours a week to work on the model. Plus cannon rigging is getting tedious.
- 2,250 replies
-
- 1
-
-
- model shipways
- Charles W Morgan
- (and 1 more)
-
Chains and deadeye lanyards look great, John! Based on that the rest of your rigging should be first rate.
- 2,250 replies
-
- 1
-
-
- model shipways
- Charles W Morgan
- (and 1 more)
-
Mid July, sometime around the 20th. I'll know more after the meeting coming up in February.
-
John, You should think about coming up to Boston again in July. The Morgan will be sailing in. I'm on the coordinating committee so I'll keep you posted.
- 2,250 replies
-
- 3
-
-
- model shipways
- Charles W Morgan
- (and 1 more)
-
Landlubber Mike's technique for furled sails
popeye2sea replied to Landlubber Mike's topic in Masting, rigging and sails
Google Chrome translated the page, but very poorly. The general meaning is discernible though. -
Landlubber Mike's technique for furled sails
popeye2sea replied to Landlubber Mike's topic in Masting, rigging and sails
Mike, I find it even more amazing when you read further and find that the model is made that way (with removable masts) for delivery purposes. I would hate to have to re-rig that ship. -
This could mean that the eye was welded closed.
-
Perhaps you could seize the end to one of the turns at a number of points.
-
Morope will practically fall apart when cut because it is nylon. Nylon rope has no "memory" or stiffness to hold the lay at all. That is also why it is easier to splice cotton or hemp rope. The lay of these ropes will be preserved to some extent when separating strands.
-
jibboom guy pendant - standing or running rigging?
popeye2sea replied to GaryKap's topic in Masting, rigging and sails
Think of the Jib boom as a mast put over on an angle. The bob stays are the equivalent of a back stay, and the guys are the equivalent of the shrouds. The lead through thimbles on the spritsail yard gives the required spread angle to hold the jib from side to side and the tackles have the same function as dead eyes and lanyards for a shroud. -
Thanks John. Merry Christmas and Happy New Year to you and yours also. May it be healthy and prosperous.
-
You may want to try faking the rope down on the deck, which is probably the way a working line was laid out for running anyway. It consists of laying the rope down in long figure eights so that the half turns at the ends overlap. Since the turns at each end are in opposite directions there are no kinks put into the rope and it will run free. BTW the round coil is called a flemish coil http://www.youtube.com/watch?v=wUBHtbWLmxo
-
The shroud has three seizings clapped on. The first is a throat or cross seizing put on where the end of the shroud crosses behind the standing part (when looking from the outside of the ship). On this seizing the turns of the seizing are vertical. Then the end of the shroud is brought up beside the standing part and two additional round seizings are put on the first is called a middle seizing and the second is called an end seizing. The end of the shroud is whipped and cut off just above the end seizing. You will end up with a small gap above and below the throat seizing due to the diameter of the rope. For right hand laid rope the shroud passes around the dead eye counter-clockwise. For left hand laid rope the shroud passes around the dead eye clockwise. The laniard starts from the hole in the upper deadeye furthest from the end of the shroud.
-
Steels, Elements and Practices of Rigging and Seamanship has a detailed description of how made masts are constructed
-
So, now your a bricklayer too? Fantastic work. It really amazes me how many skills we learn and employ in miniature in order to build these models.
- 2,250 replies
-
- 1
-
-
- model shipways
- Charles W Morgan
- (and 1 more)
-
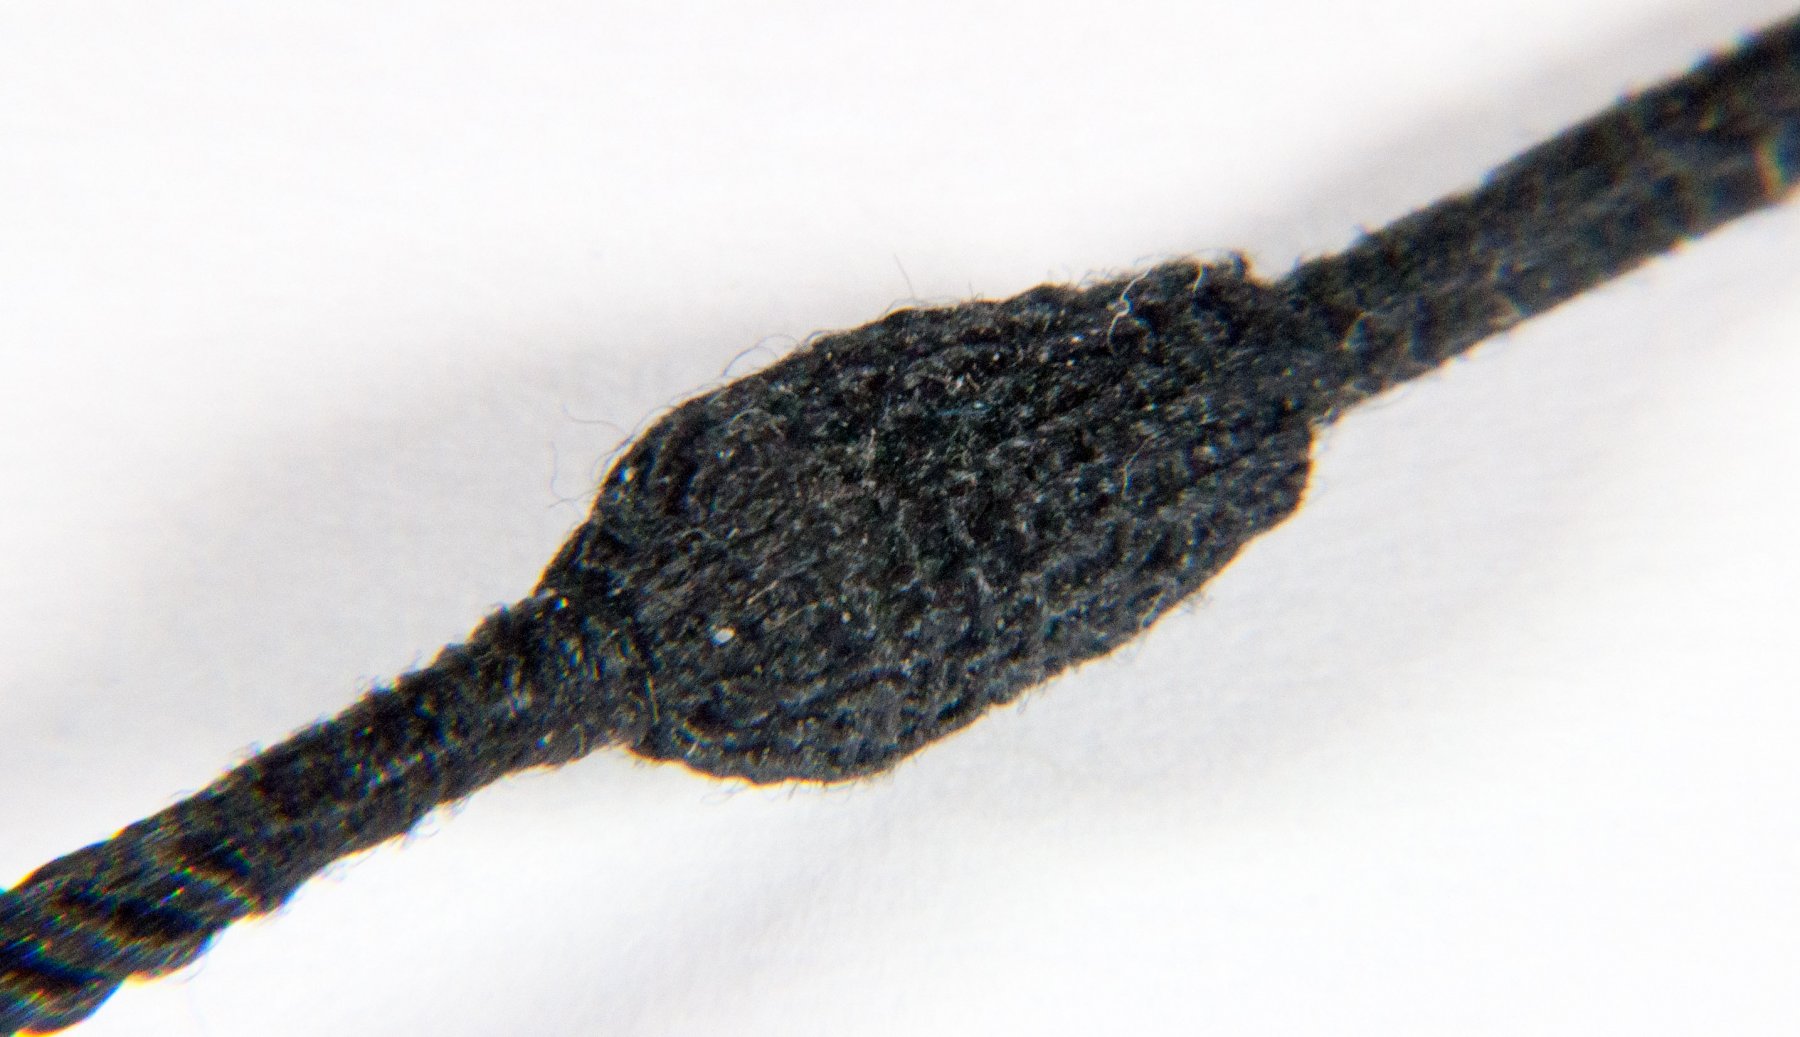
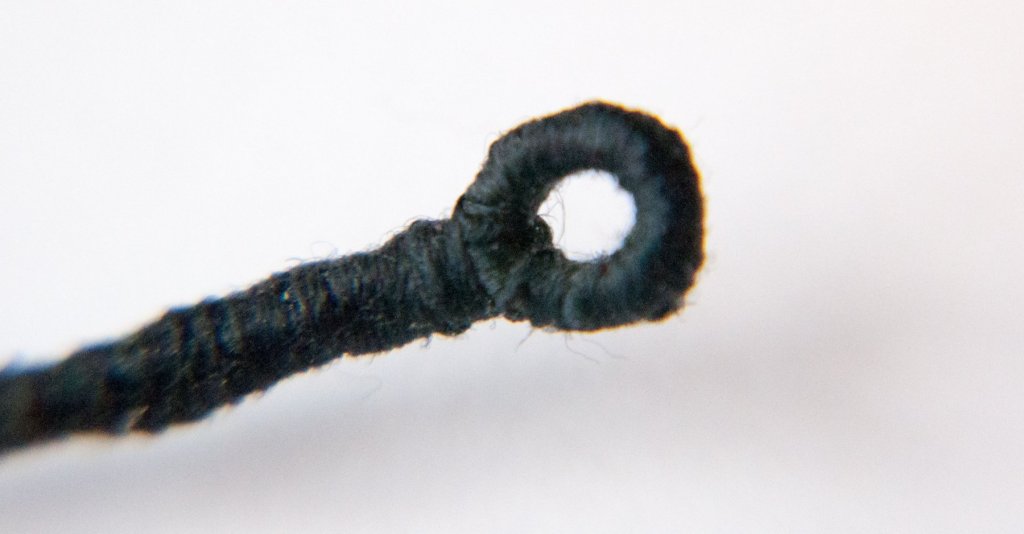
My general principle with the rigging is to try and do all of it without resorting to glue. That means rigging as close as possible to the real thing: whippings, seizings, ends tucked into or under strands, etc. That mouse will never come apart, it's woven together. The ends of the serving lines are pushed through the strands of the stay with a needle. Tension on the stay will just hold it tighter.
- 196 replies
-
- 1
-
-
- plastic
- soleil royal
- (and 2 more)
-
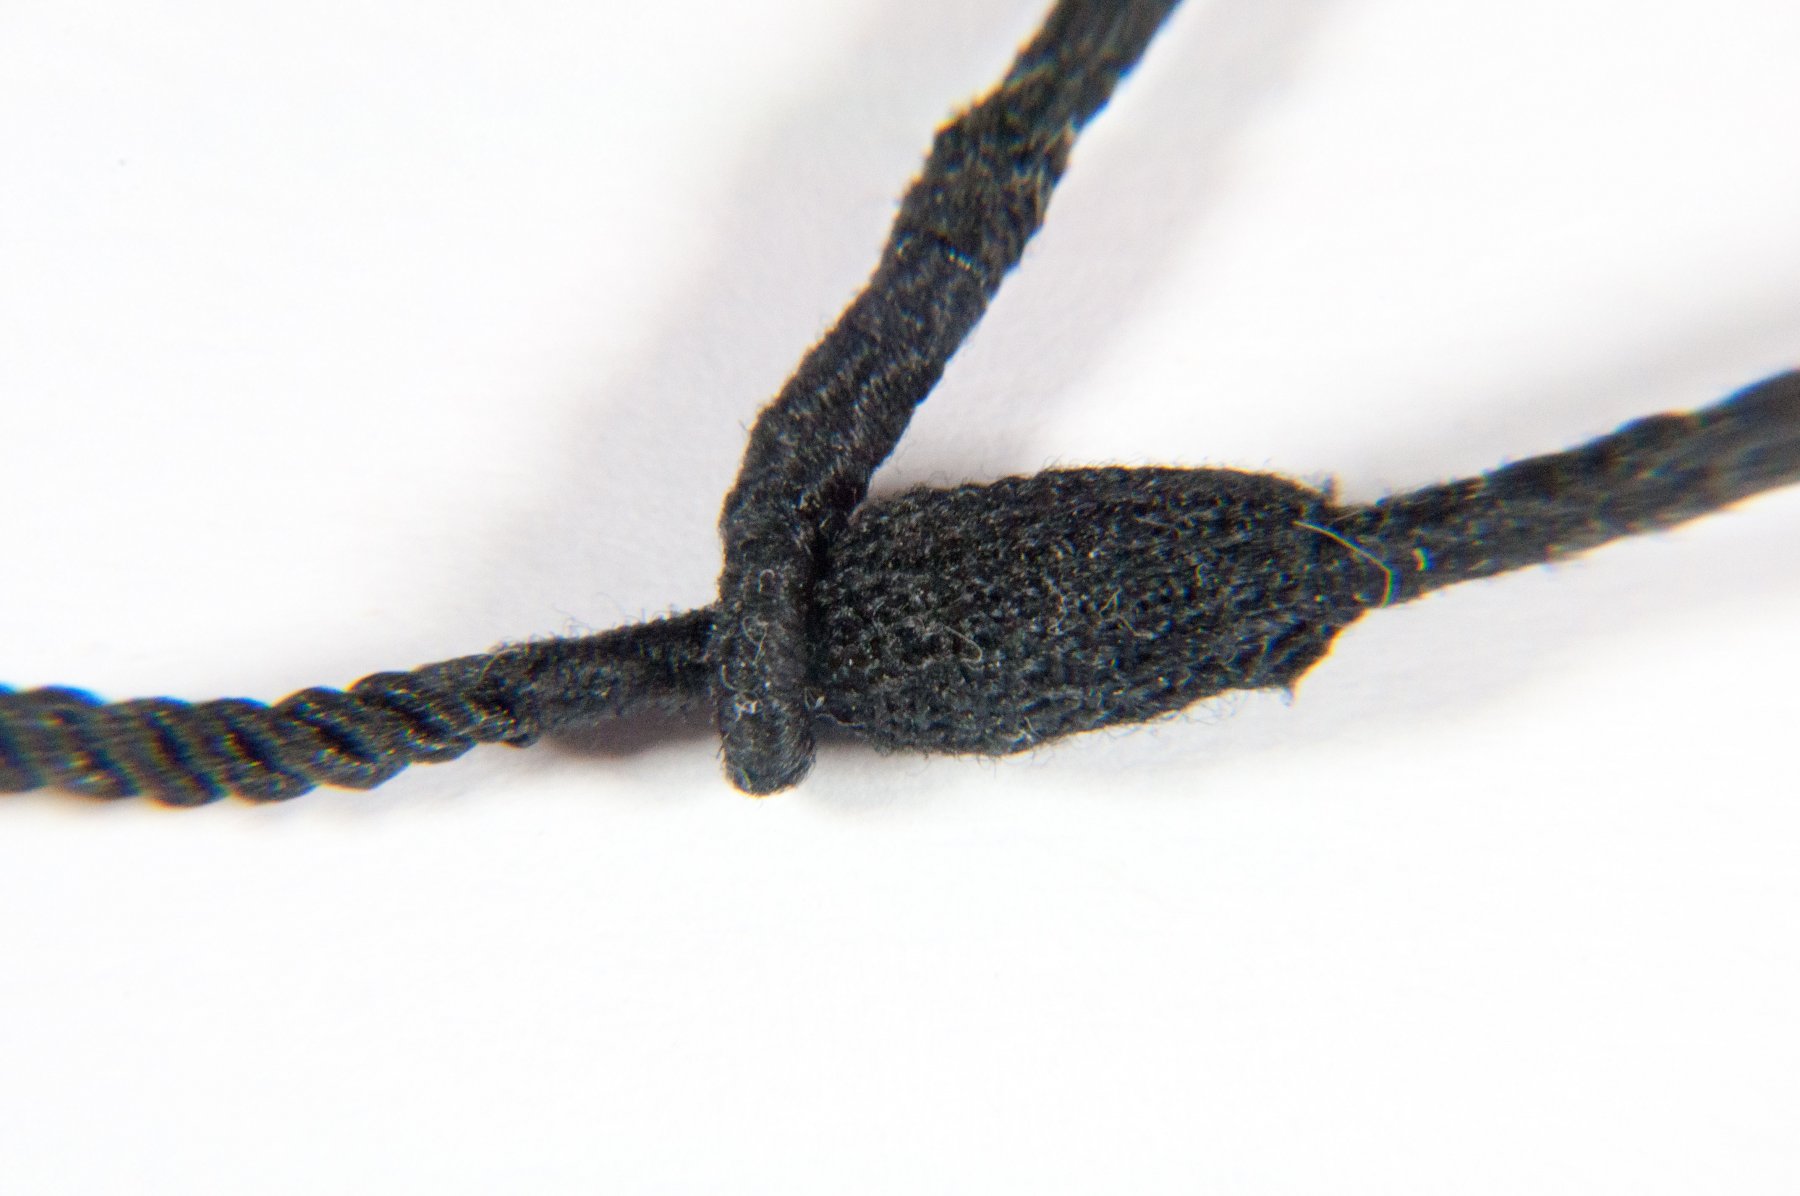
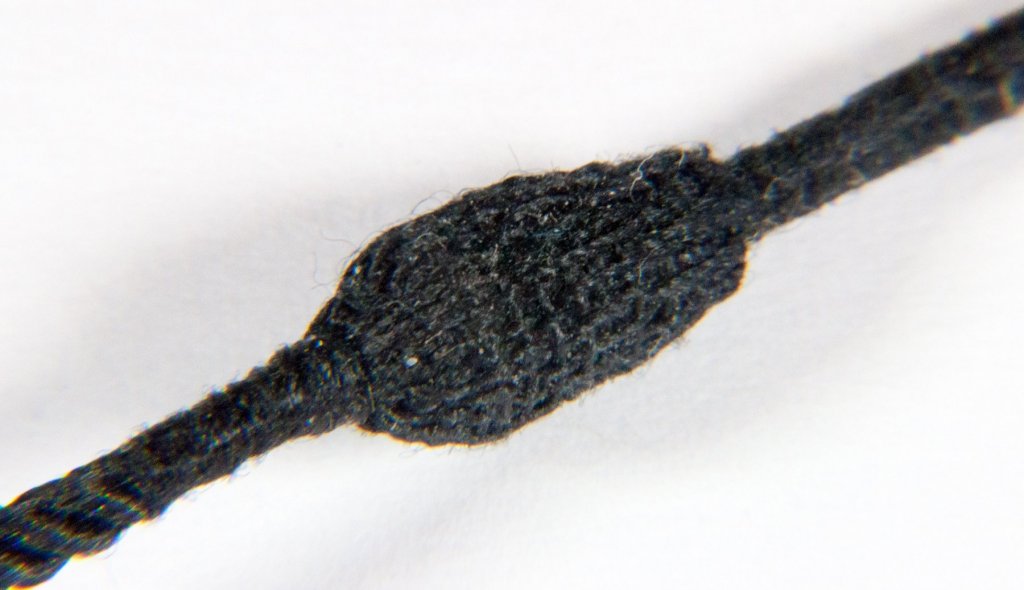
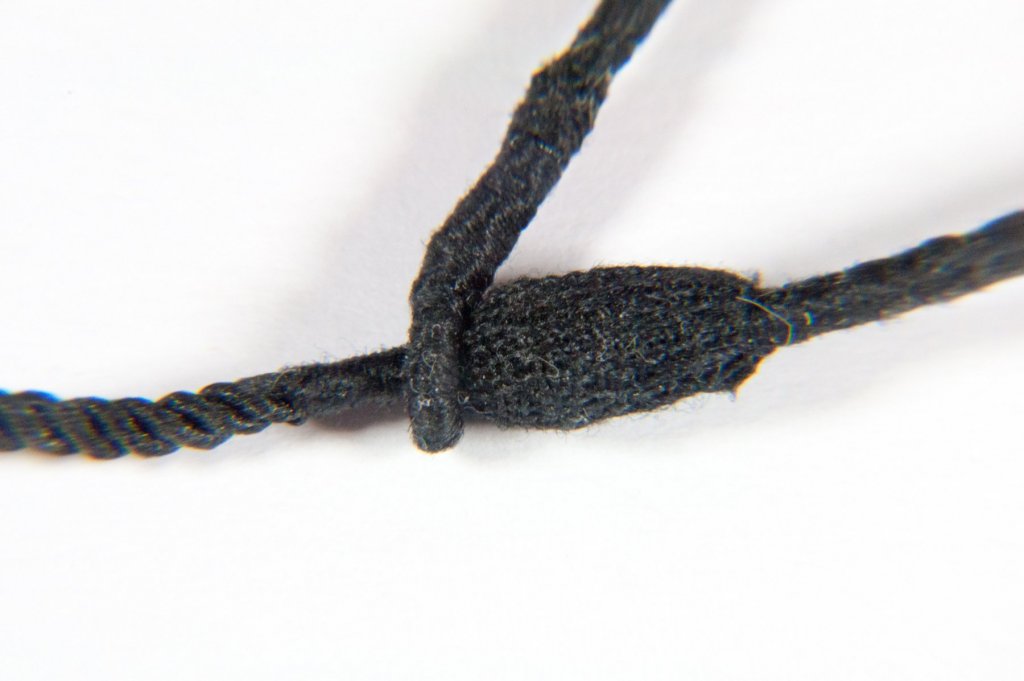
Hello all, I got tired of making bolts for my cannon carriages so I decided to put the riggers to work starting to prepare the rigging. Decided to start with the main stay: Here is a summary of the process The line I am using is Morope. An eye is turned in on the end with a circumference just large enough for the stay to pass through. Morope is tricky to unlay for splicing because it is nylon. When cut it will just fall apart I separated the strands with a toothpick and touched a drop of CA to each before cutting so that the strands would not unravel. The eye was then serviced with sewing thread with the serving continued over the splice. The stay was then wormed for one third of its length from the eye. I did not bother with parcelling. The mouse was then raised on the stay to it's proper shape and size with sewing thread then pointed over to finish. The mouse is several hours worth of work with the needle and thread I hope you enjoy
- 196 replies
-
- 8
-
-
- plastic
- soleil royal
- (and 2 more)
-
John, I think Evergreen Scale Models sells styrene sheet stock that is made to look like brick.