popeye2sea
-
Posts
1,935 -
Joined
-
Last visited
Content Type
Profiles
Forums
Gallery
Events
Everything posted by popeye2sea
-
Would it be difficult to reeve the crowsfeet through the euphroe and the top with the euphroe up close to the top and then haul out to the stay using the tackle, adjusting tension on individual legs as you go?
-
 The Naval Apprentice's Kedge Anchor. Young Sailor's assistant.(1st edition 1841) by William Brady. FYI - The Young Sea Officers Sheet Anchor by Darcy Lever, a republishing of the 1819 2nd edition, covers more or less the same information and is available from amazon for about $14.00.
- 446 replies
-
- 1
-

-
- Revell
- Constitution
- (and 1 more)
-
I works for any unit of measure because it is a ratio. As long as you convert both sides of the equation to the same unit you can calculate it. The method as Bob state above is to put the same unit of measure on both sides of the equation and cross multiply. Wayne is doing the same thing, just doing part of it in his head and not realizing. 1/8" scale is the same as saying 1/8" = 1ft. original ratio = 1/8'= 12"/1 putting 1 foot into inches cross multiply 1 x 1 = 1 and 8 x 12 = 96 = 1:96
-
Not sure if they would be following the same procedures that we use today but the precedence of the flags in this example does point in that direction. The Union Jack on the the jackstaff (forward) and the Red Ensign (aft) would have been standard usage for all ships in that squadron. The highest ranking official present (Royal Standard) would take precedence at the main. The next in precedence (Admiralty) would be at the fore, and whatever lower official rated the union jack to show his rank would be at the mizzen. Henry
-
On the actual ship the jeers would have been rove with the yard athwart the bulwarks on the fo'c'sle. The yard would then be swayed up using the jeers, and the truss tackles would be bowsed down to snug the yard in to the mast. That should give you plenty of support and room to rig the jeers. Plus you will end up with a realistic amount of halyard to belay/coil.
-
Also, if this model is of the 1797 configuration as stated in the text, it has incorrect bulwarks. As built in 1797 the ship had open rails.
-
I'll be happy to help in any way I can. But, at the rate I am going you will probably be overtaking my progress within a couple of months.
-
In the second picture the ship looks to be hove to with her fore topsail aback. She is not going anywhere.
-
Constitution is scheduled to enter the drydock in March 2015. The Navy is waiting to conclude the war of 1812 bicentennial celebrations with a commemoration of the victory over the HMS Cyane and HMS Levant of Feb. 20, 1815. The ship will be open for visitors until she actually is moved into the drydock and then the Navy is hoping to have parts of the ship open during the drydock period depending on safety concerns. Between now and March the ship will begin un-rigging and sending down her spars and masts. All the carronades have been removed from the spar deck already. I am hoping to get and post a set of pics of the various stages of the refit.
-
I assume your referring to the standing part (the end that is not hauled on) and how it attaches to stays or shrouds. If the line is paired, like with braces that originate on a stay, then some countries used an eye spliced into the brace and then seized one above the other onto the stay. Others preferred using a short pendant with an eye splice into each end that was middled and clove hitched to the stay. The standing parts of the braces were then seized to the eyes of the pendants. In general, I believe they would be fastened with an eye splice seized to the stay, backstay, or shroud. A clove hitch, or any other hitch, would not have been considered a secure enough fastening. Lines like up hauls for jib and stay sails would be attached like this to their stays.
-
It depends on where and what is being done. Also depends on when and what country. Do you have anything more specific you need answered.
-
In general, kevels being made more stout than belaying pins or cleats, and attached more securely to the ship, were used for heavier lines such as sheets and tacks.
-
In addition to hoisting gear they were used to heave taut the lanyards for the shrouds.
-
The magnification is 3.5x and the working distance is 420mm
-
The four letter international call sign is assigned according to agreements specified in the code. All ships, shore facilities or stations that can transmit radio signals have one. They are assigned in blocks designated for each country. For instance those starting in N are US Naval Vessels; those starting in W are US civilian radio stations east of the Mississippi; those starting in K are US radio stations west of the Mississippi. I'll see if I can dig up the reference I used to have showing what blocks are for what countries. Ship and coastal stations used two letter call signs from 1900 until the end of 1907, then three letter call signs started on January 1, 1908. Four letter call sign began to appear about 1923.
-
Trusses and Lifts and Jeers, Oh My (Fair American)
popeye2sea replied to GaryKap's topic in Masting, rigging and sails
You are right. That looks completely wrong. Those lifts would chafe to pieces if led that way. I would assume that the plan is missing a couple of blocks on pendants at the cap. -
No, but I do make the point that political in-fighting, lack of congressional funding, and pork barrel projects has not changed at all since then.
-
I do re-enactments of the war of 1812 aboard USS Constitution and this book has been invaluable in researching for what I teach about the ship.
-
From what I remember of the portholes on the ships I served on, none of the hinged portions of the ports or the dead lights were on the outside of the bulkhead. The only thing you saw from the outside was the hole surrounded by a ring of bolt heads, all of which were painted to match the hull or bulkhead. All of the brass parts were inboard and depending on where you were in the ship were highly polished, i.e: the ones in the wardroom vs. those in a less important passageway. The interior portions consisted of two covers hinged at the top. One was the glass (the light) and the other was a steel cover (the dead light). The four brass dogs went through slots on both. A hook above the porthole secured the cover or light when opened.
-
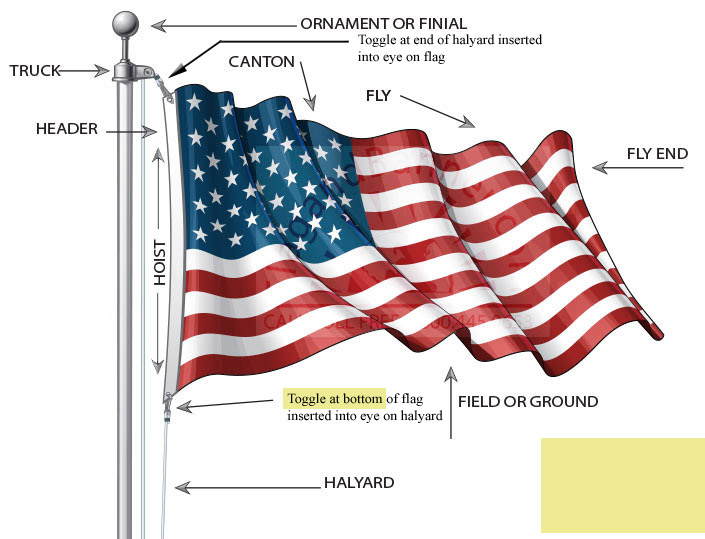
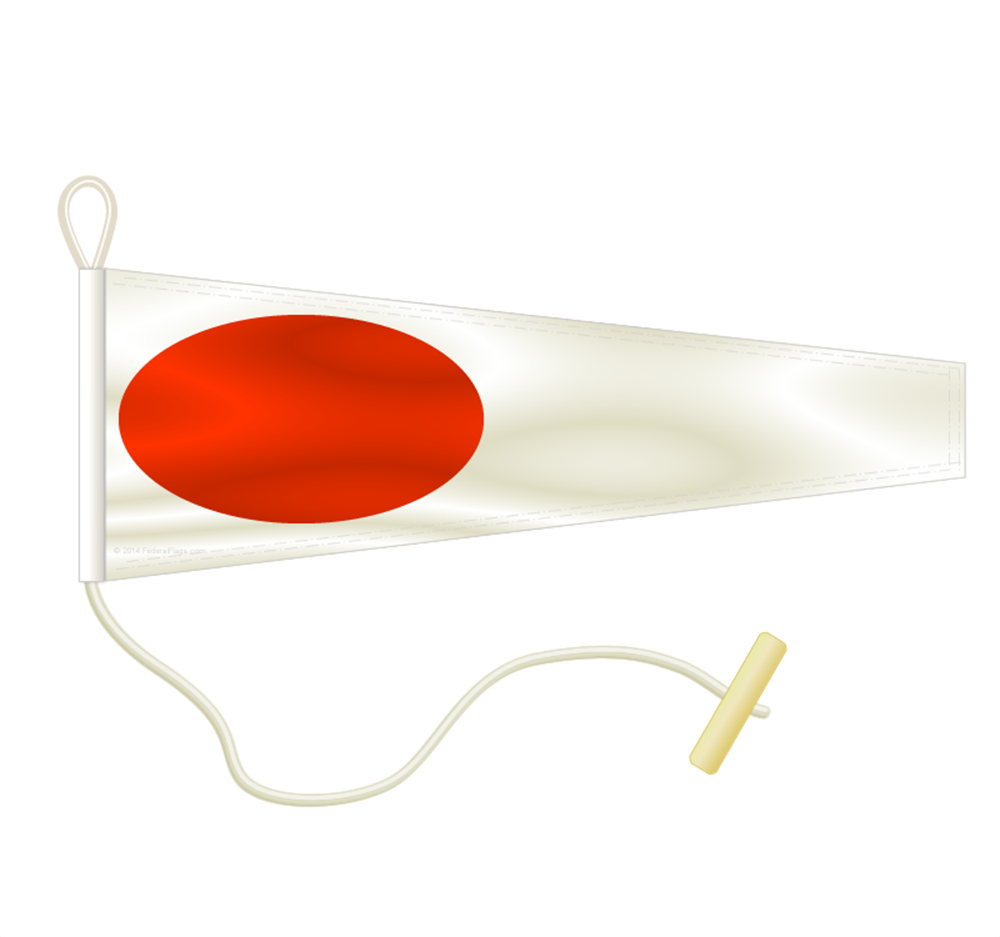
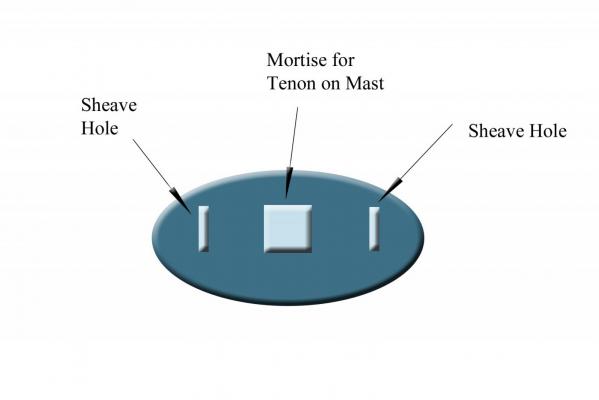
As was mentioned above. The truck was fitted to the top of the mast with a mortise. Kind of like the way that the cap fits on top of the lower mast. The shape of the truck is an oval (or a rectangle with rounded ends) with the narrow sides fore and aft. The ends have a sheaves let into them to take the halyards. The truck could be topped with a round finial for decoration. Pardon my crude pictures Flag with eye and toggle Flag halyard detail Mast truck


-
To answer the last part of your question. The halyard actually has two ends. The upper end has a toggle and the lower end an eye. When no flag is bent on it indeed forms a continuous loop. The top of the flag would have an eye and the bottom of the flag has a toggle spliced on a short tail rope. So to bend a flag onto the halyard the toggle from the halyard is put through the eye of the flag and the eye of the halyard is attached to the toggle on the bottom of the flag. Thus you maintain the continuous loop but now you have a flag hooked in between the two parts of the halyard. Both parts are belayed together on the same pin.
-
Making small nails with round head
popeye2sea replied to Aleksei Domanov's topic in Metal Work, Soldering and Metal Fittings
Much easier than the way I was doing it with a small ball peen hammer and anvil. Thank you!! -
Stockholm, it was Victor Borge in his skit where he adds one to every number in a story.
-
Those lines look to be halyards. Their purpose is to raise or lower the yards into position. Lines number 11, 13, 14 and 15 are all halyards. Lines number 12 are lifts. They control the horizontal angle of the yards (one end higher or lower than the other).
-
The following is excerpted from Steel's Elements and Practices of Rigging. Ropes should be made of nothing inferior to Riga or the best Petersburgh hemp, well hatchelled, to clear the ends, which else, in spinning, would run in with the long hemp. One pint or more of oil, according to the quality of the hemp, should be used to every hundred weight, to oil the ends, (which is done with a wad of hemp,) that they may pass free in hatchelling, and from the sides of the spinner when spinning. After the hemp is properly cleaned by the hatchell, it is spun into yarn. In spinning, the spinner must be careful to hold his hand close; otherwise the yarn will be neither round nor smooth. The spinning-wheel must be kept turning a constant regular pace, that the yarn may be spun with a regular turn or twist; for, if slack-spun, it will break in warping or straining up. 60 In general, every yarn or thread for cordage should be spun the length of one hundred and sixty fathoms, and weigh from three and a half to four pounds; it should then be wound upon winches, and warped into hauls for tarring. The yarn for tarring has a slight turn put into it,* and is laid by the side of the tar-kettle: a piece of rope is then tied to one end of the haul, and carried under the step in the tar-kettle, through the nipper and round the capstern, which, being turned, draws the yarn through the kettle, from whence it is hauled off and placed in the yarnhouse. The tar must be well boiled before used, and kept gently boiling while the yarn is in the kettle. (Some think a brisk boiling makes brighter yarn.) If too hot, and the yarn not kept clear of the bottom, it will burn; if too cold, it will make it overweigh and clog. That all parts of the yarn may be equally tarred, the capstern should be kept regularly going; for if, by accident, it should stop, the yarn would burn; to prevent which, the step that keeps the yarn down must be instantly raised, and the yarn taken out. Yarn for cables requires more tar than for hawser-laid ropes. For running and standing rigging, the less tar the better, provided the thread is well covered. After yarn is tarred, it is laid in the yarn-house, for a day or two, to harden, before the hauls are opened, for making into ropes or strands for cables. -end- Ropes made up from tarred yarns were considered to be stronger than untarred. Perhaps there were exceptions, but I think that all rope was tarred to some degree or another. I also think that people are assuming that the tar was applied after the rope was laid up. It was actually applied to the yarns before twisting into strands. I also think that is why the standing rigging is darker. I believe that those ropes were tarred again after being laid in order to make them more impervious to the wet.