HOLIDAY DONATION DRIVE - SUPPORT MSW - DO YOUR PART TO KEEP THIS GREAT FORUM GOING! (Only 13 donations so far - C'mon guys!)
×


JPett
-
Posts
881 -
Joined
-
Last visited
Content Type
Profiles
Forums
Gallery
Events
Everything posted by JPett
-
 Ahoy Frank I am not pro painter but will share with you what I, as another newbie have learned. After much experimentation and the advice of many others; I now use Winsor & Newton Artisan Water Mixable Oil Colors http://www.winsornewton.com/na/shop/oil-colour/artisan-water-mixable-oil-colour They can be purchased at a very reasonable price at Hobby Lobby or Micheals Crafts with their 40% off coupon They have colors that are perfect for ship modeling They clean up with water and you can mix them with many things to achieve different looks. They love wood and dry in a fairly short time. Drying times can be slowed with additional products. You can paint them thinned with water (Use distilled water) directly on wood to allow for the subtle tones of the wood to effect the finished appearance or treat the wood and painted as a second coat to get a solid color. Here is a link to my log. I used Yellow Ochre on the gunwale, and Mars Black on the wales, First I painted the Yellow directly on the wood. I did multiple thin coats until I got the depth of color I liked. Then I used a soft cotton cloth and rubbed it to get a burnished look. Then I used a wipe on poly (WOP) also doing the wales. A light sanding followed. Next I taped the line for the wales and using the WOP went over the tape lines to seal them. This prevents the black paint from 'bleeding" or weeping into the yellow. another light sanding of this WOP followed. Always work from light to dark; the darker color can effect or show through the lighter color if it is under it but will always cover it. Then I painted the wales Black over the WOP to get a solid color. Then I sealed the whole deal with another coat of WOP. After this dried I used a kitchen sponge with a scrubber (Blue) to knock down the shine and get a dull slightly weathered look. http://modelshipworld.com/index.php/topic/45-rattlesnake-by-jpett-model-shipways-ms2028-scale-164th/?p=126457 Painting is easy. Get good brushes too and learn to treat them with respect. Sealing tape lines is very important. I always tape with painters tape or Tamiya. Use a very thin piece of tape to get the line and then another thicker one to protect the other color. I always seal it with either future floor wax and more recently the WOP. Always let things dry, never rush and most importantly NEVER experiment on your ship. Use scrap and test until you can repeat the look you want at least twice. Three times is better. Once is never a guarantee. Good luck, I hope this helps, and have fun PS: Don't rush it either. Let each coat dry before starting the next and give it some extra time before sanding, applying WOP or tape for lines. I usually give it a few days before the WOP to prevent any smearing and start with a super light coat which I do not work back and forth over the two colors. .
 -
Ahoy Augie Happy Anniversary. I too will join the peanut gallery in congratulating you. The pear really compliments your work and those scarph joints really look great. Somehow I think this is just the beginning of something much bigger :) :)
- 2,191 replies
-
- 1
-

-
- confederacy
- Model Shipways
- (and 1 more)
-
What glue to use?
JPett replied to rshousha's topic in Painting, finishing and weathering products and techniques
Ahoy Mates I have some questions I use the Original Titebond http://www.titebond.com/product.aspx?id=d4d28015-603f-4dfc-a7d9-f684acc71207 Now this product is not waterproof and as a newbie I love this stuff. I can easily undo any work. I have diluted it up to 50% and it holds just fine, this is a model ship after all, and the coat both parts and let them dry trick works great. Clean up/ prep for basswood wood is easy with some isopropyl alcohol. Any other clean up just needs water. I just recently used my heat gun to remove a deck I glued 9 months ago. It was very thin wood fully glued to a plywood surface and it peeled right up. I did gouge the deck with my hobby knife but that was my fault and thankfully of no consequence. . Now my question. Am I asking for trouble down the road, say 10, maybe 20 years from now. Will the humidity in the air cause this glue to fail -
Painting Brass Chain
JPett replied to RandyEvers's topic in Painting, finishing and weathering products and techniques
Ahoy Randy http://modelshipworld.com/index.php/topic/6977-the-blacken-it-trials/?p=205420 Perhaps this will help -
Ahoy Jon See looks beautiful, Here are some links you might find useful. http://carvingbook.weebly.com/ http://modelshipworld.com/index.php/topic/1356-sovereign-of-the-seas-by-bill-short-sergal-1637-scale-178-port-side-as-built-starboard-side-as-presented-to-king-charles-i-for-approval/?p=25964 As for the stern there was a discussion on this in my log which was lost in the 02/13 crash. It seems that many privateers may have resorted to some trickery such as enlarging the transom so that another ship may think twice about engaging. The false window also supports this. It was agree that ME may have exaggerated this a little too much on their model. The Hahn plans show a slightly less enhanced version. I often wondered how this extension would effect the ship. With the ship heeled over in high seas this extension would either be quickly removed or cause the ship to bear off every-time a wave passed. Either way I like what you have done. http://www.dlumberyard.com/Plans/rattlesnake.pdf
-
Ahoy Fishface Thx "I think" I definitely agree that the table clamp is a good idea. As for your build. It only needs to be as precise as it needs to be. I say this because it does not need to be "purr"-fect, but it is best if this part of your build is right. By right, I mean the bulkheads are square to the keel and at the correct height. Your keel also needs to be straight which some are not "right out of the box" Remember that everything is correctable First check your keel by drawing a straight line on a piece of paper and then placing the keel next to it Then using something you know is square "like legos"; Check your bulkheads. http://modelshipworld.com/index.php/topic/6710-hm-bomb-vessel-granado-by-joe-v-caldercraft-164/?p=196273 Next; use the deck to check that the bulkheads are at the right height. I think this is the puzzle you referred to. How does it sit against the bulkheads. You might need to put some pins in it. http://modelshipworld.com/index.php/topic/7424-scotland-by-sygreen-corel-scale-164-first-wooden-build/?p=222855 Does your deck show a graceful curve from side to side and as it sweeps up in both the bow and stern making contact with each bulkhead If it does not; mark the bulkhead that is causing the problem and see why. Don't just sand it down. Use a piece of planking and check the sides. Is this same bulkhead a problem here too. If so; it needs to be moved not sanded. You will find that sanding is necessary but remember this. Once sanded it is gone forever and if your wrong you have just created another repair for yourself. Always double triple check and sand once. I had to learn this the hard way. The really hard way 'lol"
-
Ahoy Fishface Congratz; and welcome to model shipbuilding Add me to the request for pics. Try to include this "thinkamegig" too, I'm curious
-
Ahoy Ben The way i see it; Its really just one big repair until its done. With each repair we learn a little more and make room for that information by forgetting what we learned on the last mistake.
-
Ahoy Fishface The Corel kits are like every other kit in that they are lacking something. In your case it is the instructions. For the newbie shipwright, Corel has to have what can only be described as the most entertaining instructions in the industry. Yes every bit of information is actually in there, but for the newbie, finding it is sometimes more difficult then constructing the model. Someone there must love a great mystery. Before you spend any money, consider this Download and read some of the free instructions found at many "other" kit manufacturers sites, and then apply them to your build. The basics of model shipbuilding are pretty much the same provided you stick with your ship type, Solid hull, POF, or POB. Use these to fill in the holes I highly recommend Model Expo as they have some of the best instructions and practicums in the industry. They are also all free. ME sponsors this site and a link can be found on bottom right of the home page along with our other great sponsors.
-
Ahoy Fishface I hope you meant Basswood and are "NOT" ordering balsa wood to replace that bulkhead
-
Ahoy Fishface POB is "plank on bulkhead". Your kit is POB The kits are not complicated. They do require some research, planning and lots of patience. All of them, even the easiest. It is all part of the fun. You will learn many things building model ships, the least of which will be how to build a model ship
-
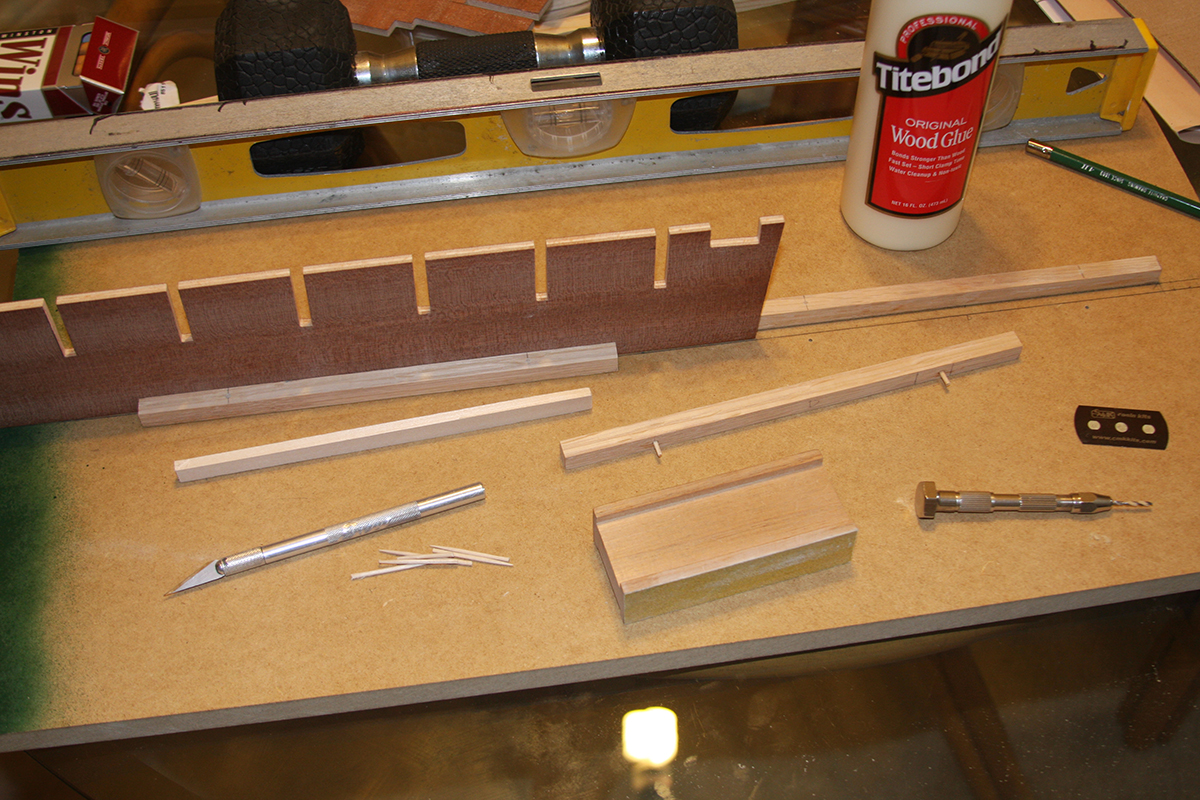
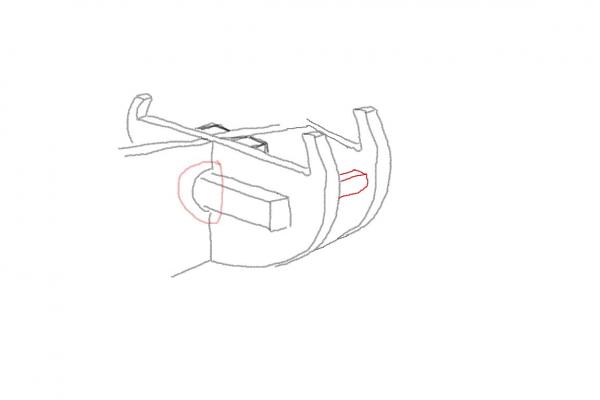
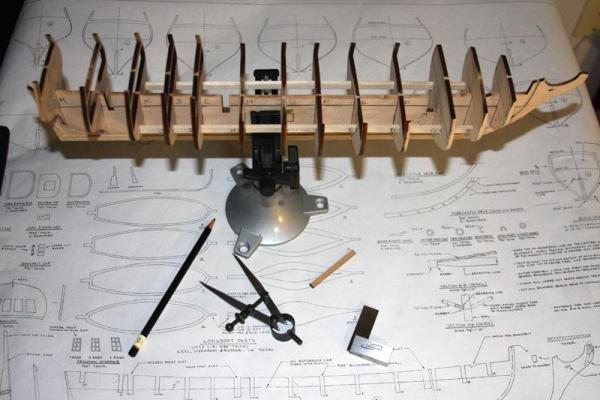
Ahoy Fishface You can then also add a piece of wood to "connect" the bulkhead to the following one. This is common practice among POB shipbuilding. It makes the hull stronger for planking. Just make sure the wood is a good fit. Too tight and it will bend your keel as it pushes on the bulkheads. Too loose and it will pull on them. Always start from the center, do one on each side, checking the hull for a twist with something straight as you do each one. Checking the hull could be done using something as simple as a straight line drawn on a piece of paper or a jig. The jig is the best, it can be used for multiple things during the build. Just don't use your eyes. Picture 1 Upgrade connecting bulkheads. (Thx to crebostar for the original) 2 My hull with bulkheads all connected 3 making a jig

-
Ahoy Fishface Ahh the joys of model shipbuilding Worry not Repairs are half the fun. Either repair it or replace it. Your choice. Crebostar has some good advice.
-
Ahoy JB Here is what I used http://modelshipworld.com/index.php/topic/45-rattlesnake-by-jpett-model-shipways-ms2028-scale-164th/?p=5884 The third image shows my "plank cutting tool" Its made from some electrical hanging brackets I found @ Home Depot. Cost with the hardware was around 3 bucks As for your planking measurements I tried that way and wish you luck. What ended up working for me was this http://modelshipworldforum.com/resources/Framing_and_Planking/Lining%20Off%20your%20hull%20for%20planking.pdf I used battens instead of the string but the using the little strips of paper and marking off the planks on the hull worked for me. Its tedious and slow but you'll make up the time when you plank. Beer and Netflix is how I got through it. Good luck
-
Ahoy Jon Really enjoying your log I am with Russ, She looks great. I am not sure I agree with you painting over it, but you are the captain. I love the way you handled the stern with that stealer.
-
Ahoy Fishface NP. It really is the bane of the newbie shipbuilding that such a crucial step should be first. Remember they don't need to be taken apart, just adjusted. Once you get some Legos or other squaring device you should check the entire build.Take the time to get this right and you will thank yourself later. What you learn here will only help you through out the entire build.
-
Ahoy JB I hope you don't mind me addressing you as JB. I can not see any laser burn on the edges of your bulkheads. I was just suggesting that before committing to planking you check the shape of your bulkheads and make sure you have not changed them. It is simple to do and can save you a lot of aggravation Are you measuring for the plank widths
-
Ahoy JB I am no pro but I did have a similar issue. It took me quite a few hours to get this right. I think it ran into weeks. I made some templates and checked my work, You can use the bass wood that the bulkheads came from or if your plans show the bulkheads, use them to make cardboard templates. I also downloaded some manuals from the Model Expo site for solid hull kits which rely heavily on using templates. If you have over sanded this is very easy to correct. I would also suggest using thinner battens. 1/32 x 3/32 basswood bends much easier and does not need to be soaked like the planking will.
-
Ahoy fishface Ahh the joys of model shipbuilding If this is your glue http://www.creativemodels.co.uk/vitalbond_original_wood_glue_titebond_120ml-p-29794.html You might be able to dissolve the glue with water. I use the original Titebond which is easily un-bonded with water and a small paint brush. Sometimes I will add some heat via a small hobby heat gun I own but a hair drier will also work. You can also add some isopropyl alcohol to the mix to strengthen it. Just don't go crazy with the water or you may damage the plywood. Glue some scrap wood together and then try de-bonding this first. Never use your kit as the test dummy. A small amount is all you need and then let it soak in, wiggle and reapply. Two or three applications will let you know whether it will work or not. Brute force is not needed. You can also search the site, there are plenty of posts on undoing mistakes Search for Legos after that. Their great for aligning bulkheads PS: Spend the time to make this right. Everything else depends on it Good luck with your kit
-
Where is a good place to buy from? - moved by moderator
JPett replied to wdretired's topic in Wood ship model kits
Ahoy Mates I would suggest clicking on this link http://modelshipworld.com/ Scroll down and you will find a list of companies on the bottom right who take some of their profits and use them to sponsor a great site that could only exists as a result of this generosity. Something to consider on your next purchase -
Ahoy Augie Beautiful work, "Only at the end do you realize the power of the Dark Side"
- 2,191 replies
-
- 2
-
-
- confederacy
- Model Shipways
- (and 1 more)
-
Ahoy Mates I am surprised that no one has mentioned the Corel kit. I purchased it and although currently it is way over my head I can not complain. Yes it is an older kit. Yes the instructions are from Uranus, but it comes with some of the best wood I have seen in any kit> well less the rear transom and some of the trim which is a hokey pressed something or other. But these can be replaced or remade. Considering I paid almost a thousand dollars less then the Caldercraft for my kit on sale @ Model Expo I think it deserves a mention here as best for the buck. Pictures of some completed kits http://modelshipworld.com/index.php/gallery/image/3236-1-small/ http://modelshipworld.com/index.php/gallery/image/2107-victory2/ My review http://modelshipworld.com/index.php/topic/3709-hms-victory-by-jpett-corel-198/?p=104762
-
Forming sail bellow aboard your models. (Moved by moderator)
JPett replied to jud's topic in Masting, rigging and sails
Ahoy Mates http://modelshipworld.com/index.php/topic/152-le-superbe-by-blue-ensign-heller-plastic-built-as-le-praetorian-after-boudriot/?p=16686 I believe this technique could be modified to create a fully rigged model under power -
Ahoy Bluenose I have never had any real luck soldering PE with either a torch or iron. The entire surface conducts heat making it very difficult to control the flow of the solder. I did attend a conference where a demo using resistance soldering was shown: This works https://www.americanbeautytools.com/
-
Ahoy Ben I have always found inspiration in your logs. This one however takes the biscuit. Simply amazing