JPett
-
Posts
881 -
Joined
-
Last visited
Content Type
Profiles
Forums
Gallery
Events
Everything posted by JPett
-

HMS Victory by JPett - Corel - 1:98
JPett replied to JPett's topic in - Kit build logs for subjects built from 1751 - 1800
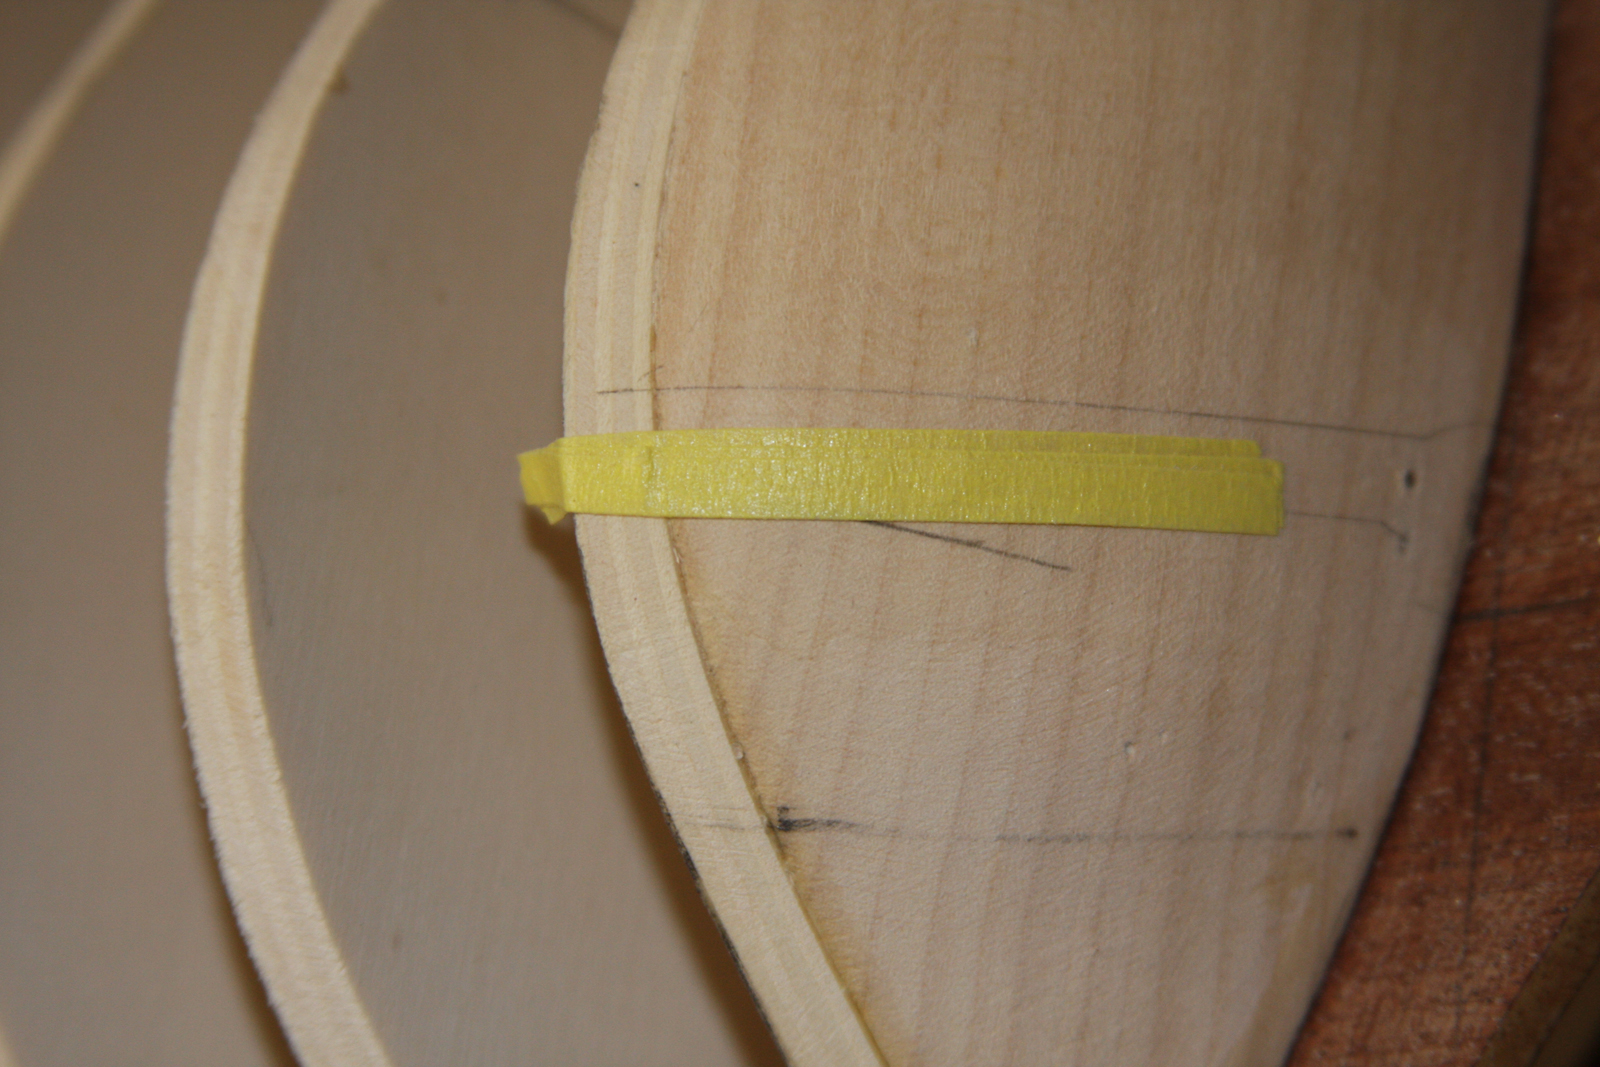
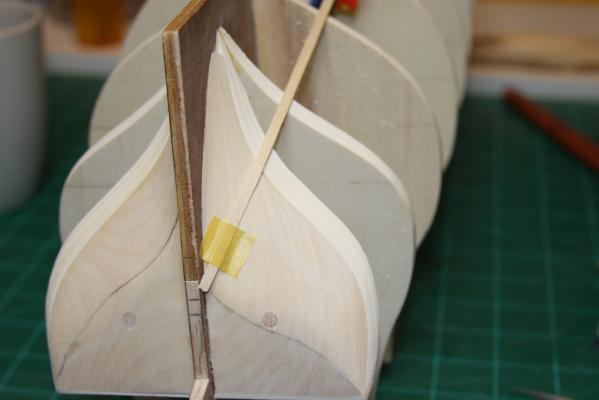
Ahoy Mates Thank you for the likes Having your friends "like" what your doing really helps. Especially when your not sure what your doing Speaking of which Back to the build First I marked the path that the plank wanted to follow. Then I decided that because I could not subtract wood safely I would use positive numbers and then multiply by -1 I used painters tape to slightly raise areas on the filler and tested with the plank to see how it was affected; paying attention to the any change in direction the tape caused. I would love to say my big brain got it on the first try but I wasn't even close. Anyways I found that by slightly raising the bottom near the bulkhead the plank's preferred course moved in the desired direction. Once this was discovered I very carefully started to sand the area opposite of the tape; again checking with the plank. The pic shows the plank properly positioned although there is still a very slight klinker at the bulkhead it is very close. I may or may not fix this but just let the plank drift up to reduce the klinker and then do the final repair when I sand the first planking. The stern is not going to be so easy. Testing there did not go well at all. Suggestions welcome. I might need to actually add wood to correct this and if this is so I will just plank it "as is" and then lie more planks over those and then sand it back down to the correct shape for the final planking
-
HMS Victory by JPett - Corel - 1:98
JPett replied to JPett's topic in - Kit build logs for subjects built from 1751 - 1800
Ahoy Nigel First and foremost: Thank you. I consider it my good fortune to have someone of your caliber follow my build. As for the strength issue when considering the two layers of planking. "As is" Corel's keel, bulkhead, and stringer combination has created a mass that could be considered a deadly weapon. It really is a testament to the strength of a box. With the hull being so rigid I was hoping to do the first layer of planking as a guide for the second working out the steelers. drop planks and my planking skills. On the wales the kit uses different widths which should stagger the seams. I do agree that crossing the seams would create additional strength but I am not sure that much strength is needed. Currently without any planks this hull is as rigid as my fully planked Rattlesnake. I plan to put some treenails in the first layer to "lock" it down to the bulkheads; just to be safe. Also Thank you for the tip on the Walnut. i had previously purchased a sheet from ME and sadly you are spot on. It is a beautiful piece but isn't even close -
HMS Victory by JPett - Corel - 1:98
JPett replied to JPett's topic in - Kit build logs for subjects built from 1751 - 1800
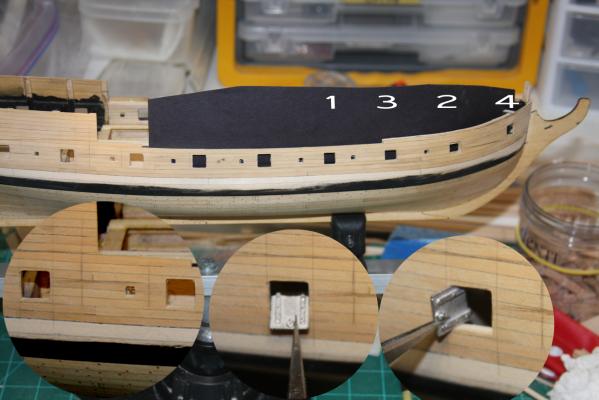
Ahoy Mates Mark: The idiot club does have a lot of members. I am on the board. Really it isn't a horrible thing but does highlight why many prefer scratch. Having someone someones else do the thinking (here it is Corel) does have it's drawbacks. Back to the Build Speaking of idiots and the things that can occur when they think I am always trying to learn and perhaps I have too much fascination for the working of the world. With this in mind; I have decided to try and take advantage of this situation to better understand the dynamics of hull shape and plank direction Here it is more filler shape as it seems the hull shape is fine. See pic 1. The sweep of the plank as it lies on the bulkheads is excellent. I used my mounted pencil jig and marked the hull where the last Wale plank should be. Where it follows the contour I designed in my fillers "not so good". My pencil jig allows me to achieve a much higher level of accuracy then the method I previously used. This is highlighted where I marked the false cannon support which I now see is 2mm too high. We will let this slide. As this is just the first layer of planking I have room to play and play we will In the stern you can see I need to make an adjustment to get the plank to come up more as it wraps around the filler In the bow i have the exact opposite. The plank needs to come down a bit to hit its mark. I tried "brute force" and the plank started to clinker. Where as i could buy some Walnut sheets and spile these planks on the second planking I want to see if I can make some adjustments to my fillers and correct this. I also have some room here. I can make minor changes when I sand this first layer to alter the direction of next layer of planks. The last pic shows I still have a ways to go learning to sand. While sanding the deck to match the outline of the bulkheads I beefcaked the bulkheads and now need to repair them. When will I learn "not" to do this "lol"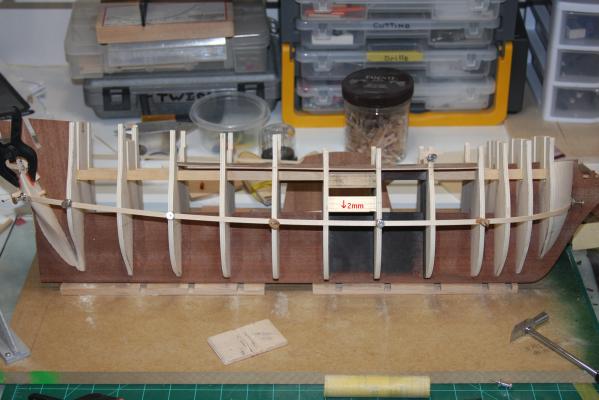

-
Ahoy Mike If you are intimidated by this task you are not alone. I would suggest the same procedure you used on the frames. Get some scrap wood
- 969 replies
-
- 2
-

-
- hahn
- oliver cromwell
- (and 1 more)
-
Ahoy Jon Congratz It really looks great. Don't worry too much about the ruff spots. We all have them and I agree they add to the build. As much as we try to achieve perfection I find it sterile and lacking personality. They also seem to blend in after a while. Trust me, pay them no mind. As for painting I have had very good results coloring the wood. I use water based paints and thin them so they soak into the wood and dye the wood verses painting which covers the wood. Then I protect it with a coat of poly. It has it drawbacks. You can not dye two colors next to each other and get a nice line. I do dye and then paint. Each has it merits and your the captain so do what pleases you. Just be sure to test whatever you choose on something other then your kit. I make sure I can repeat whatever I try at least twice before I do it for real. Looking forward to seeing your lady all dolled up and strutting her stuff.
-
Ahoy Scott That's not a mast, but I am still jealous You really did a great job on your hull and completed it. It is truly something to be proud of "Congratz" Good luck with the masts
- 264 replies
-
- 1
-
-
- rattlesnake
- model shipways
- (and 1 more)
-
HMS Victory by JPett - Corel - 1:98
JPett replied to JPett's topic in - Kit build logs for subjects built from 1751 - 1800
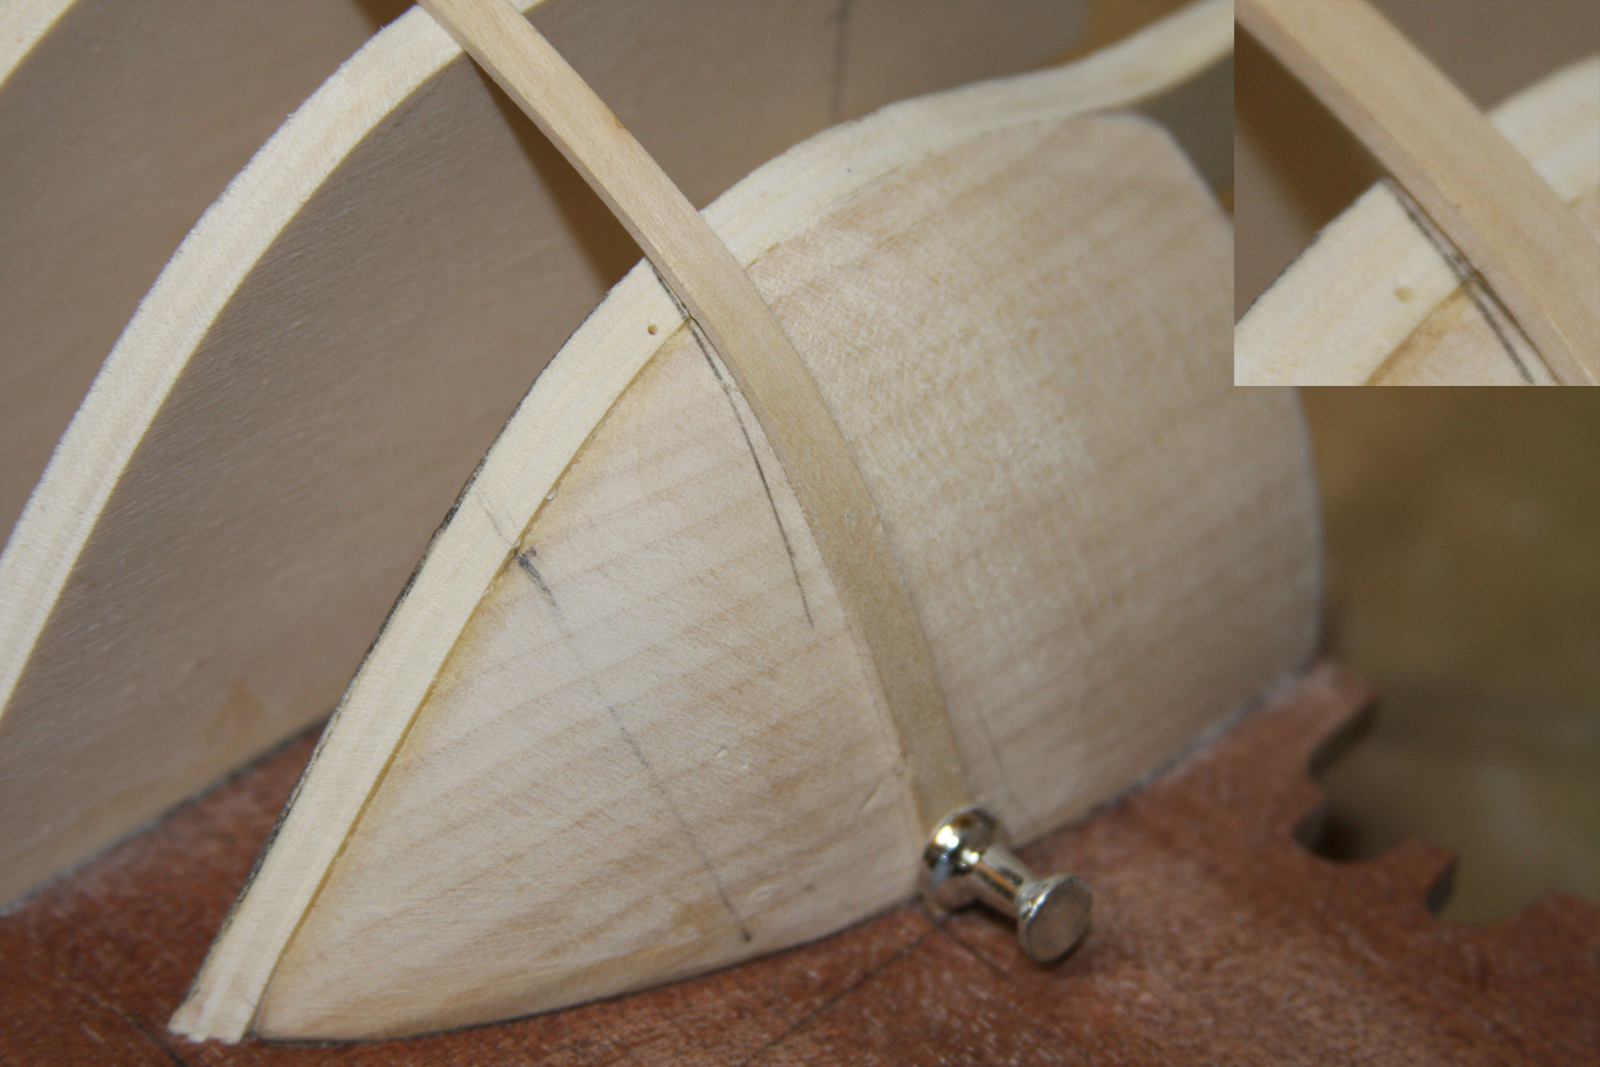
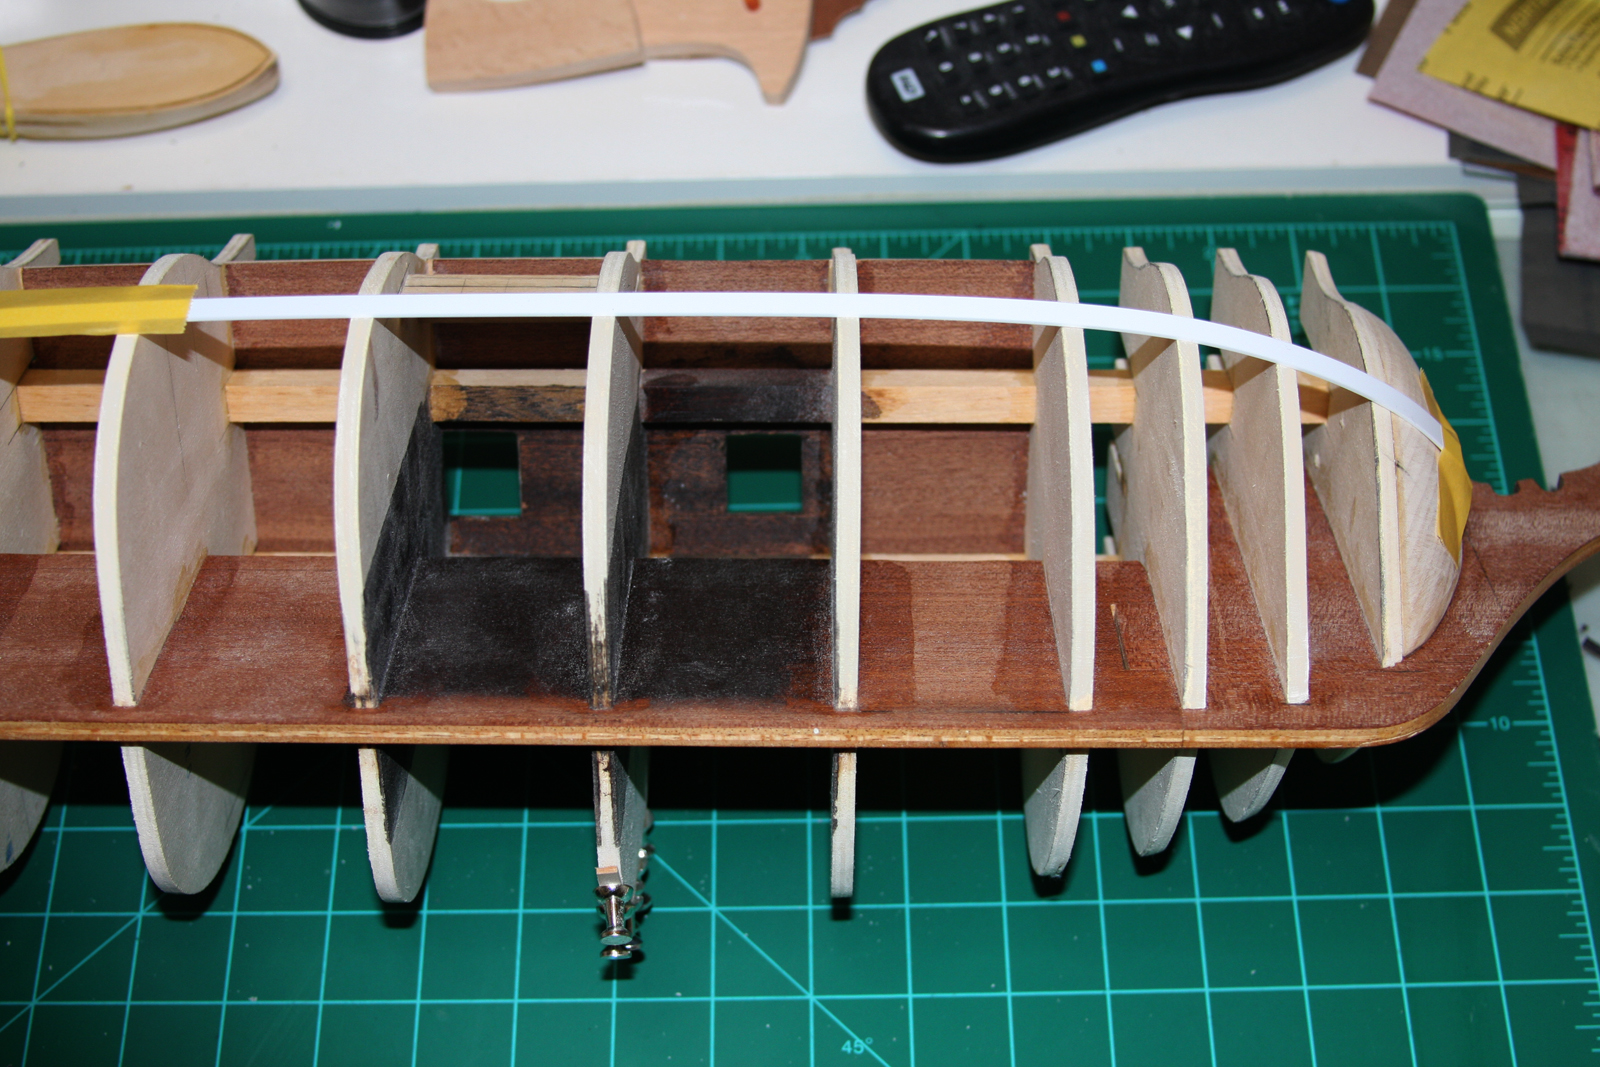
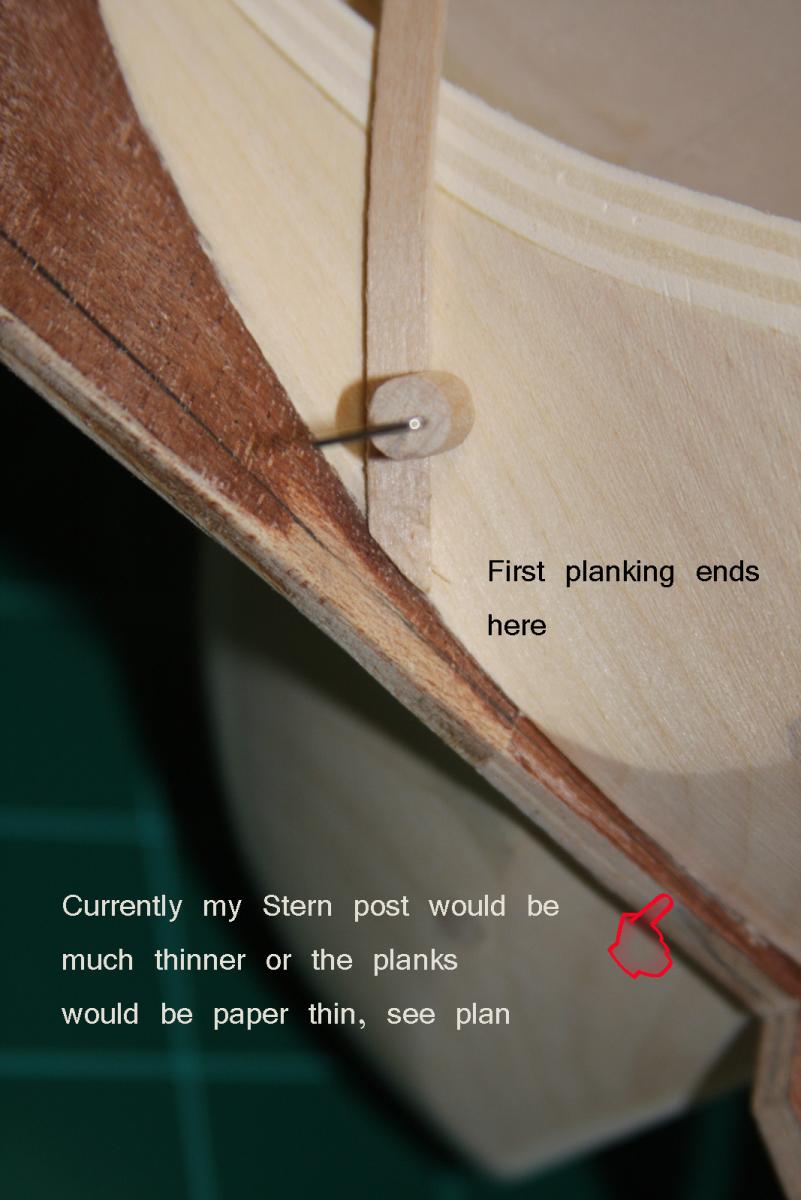
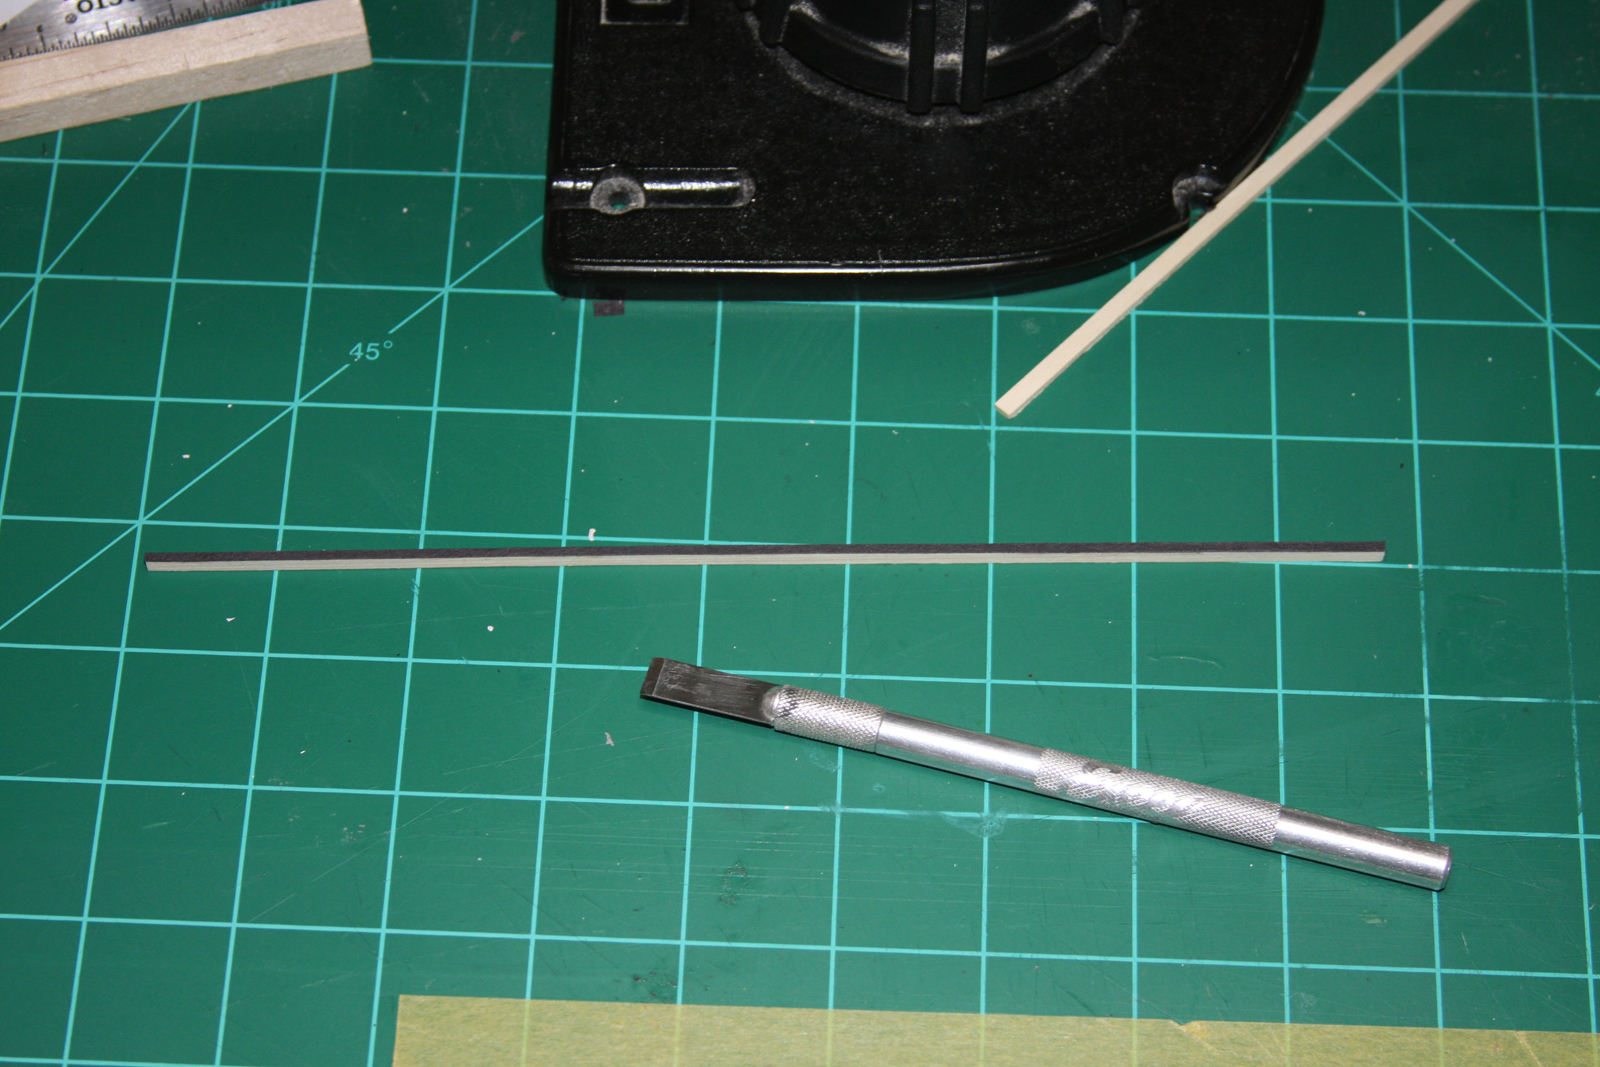
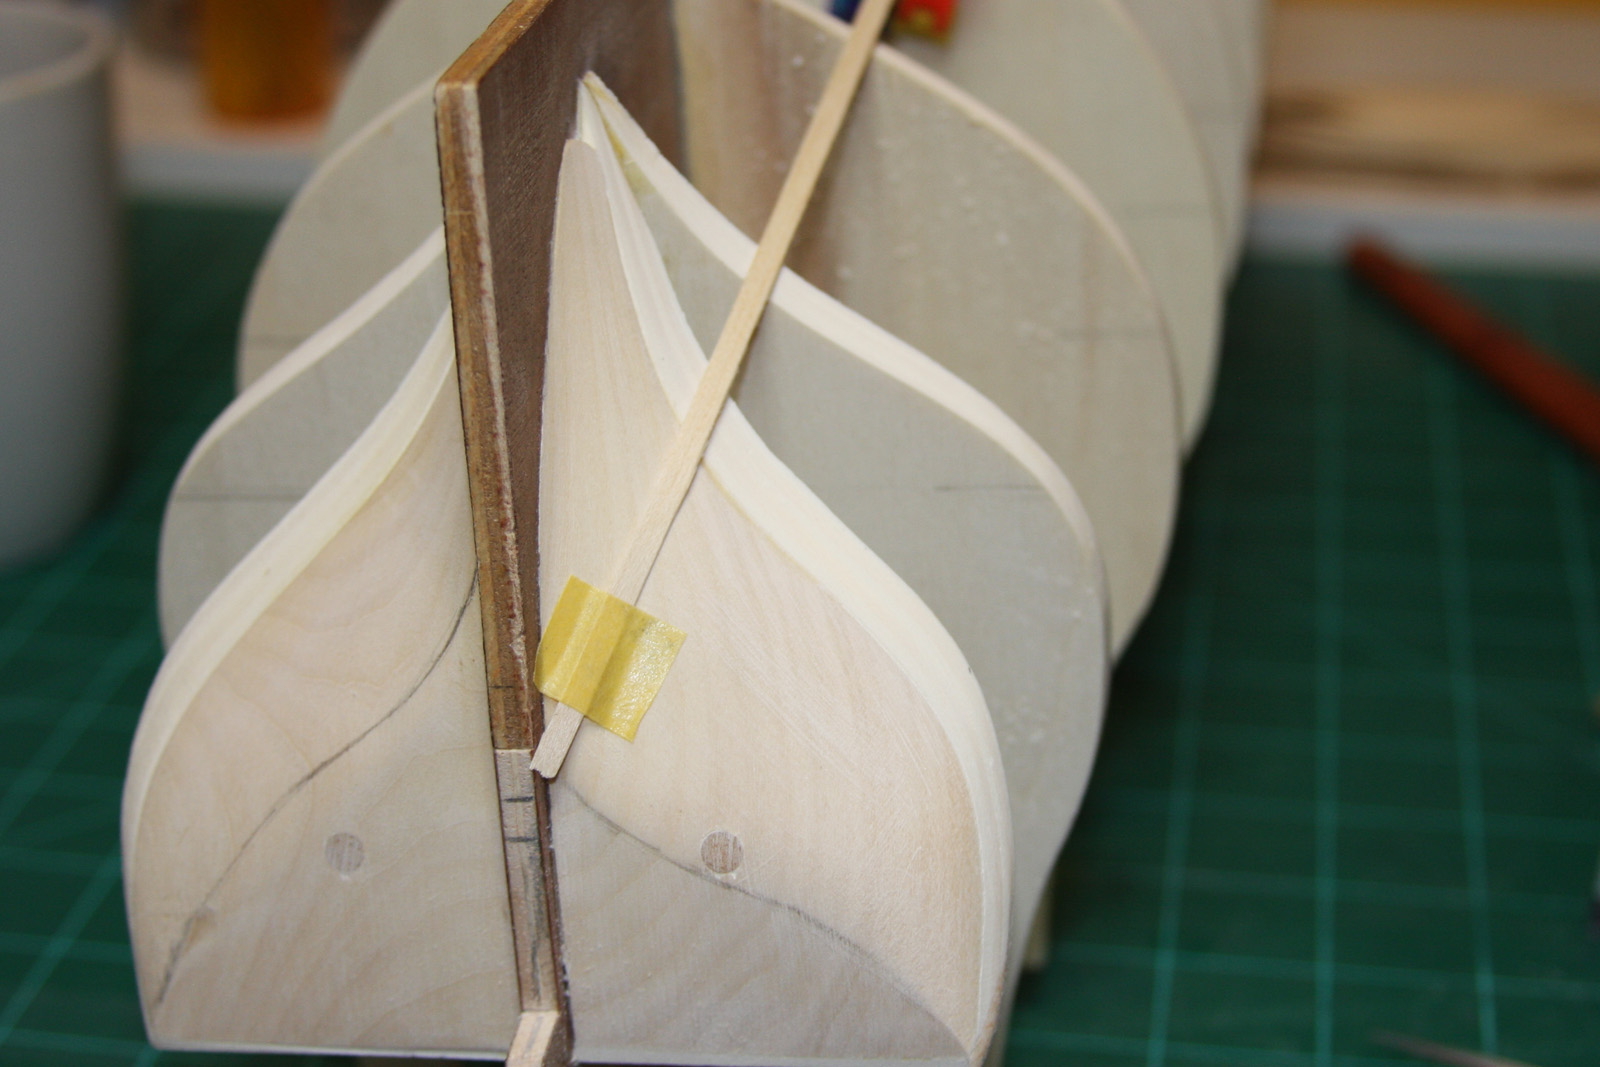
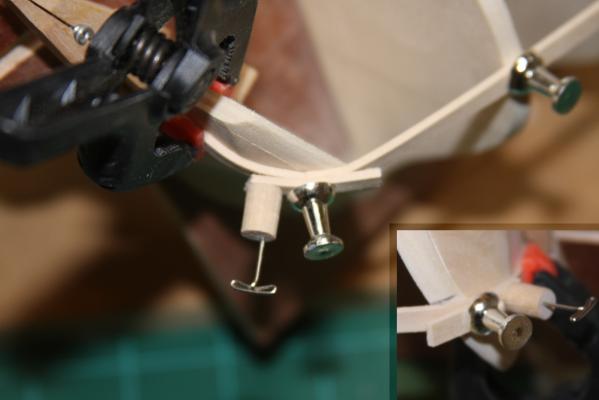
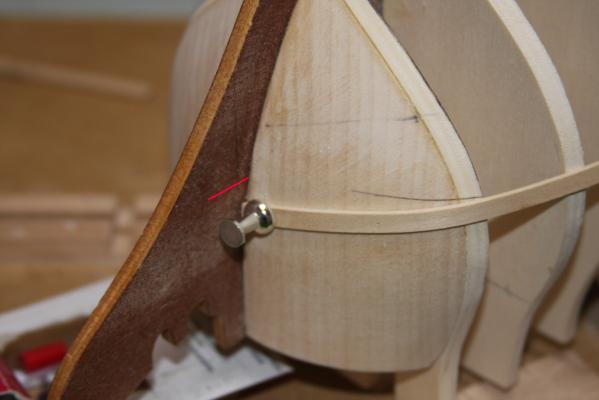
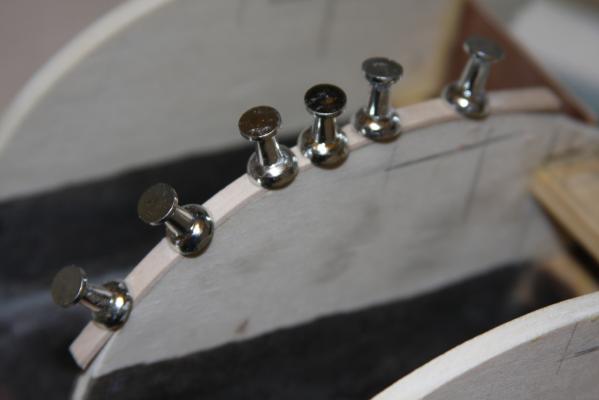
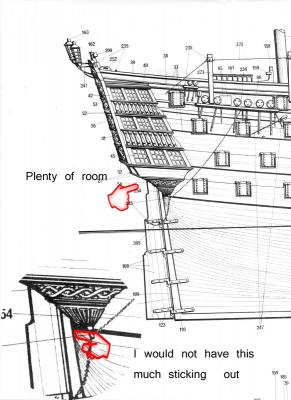
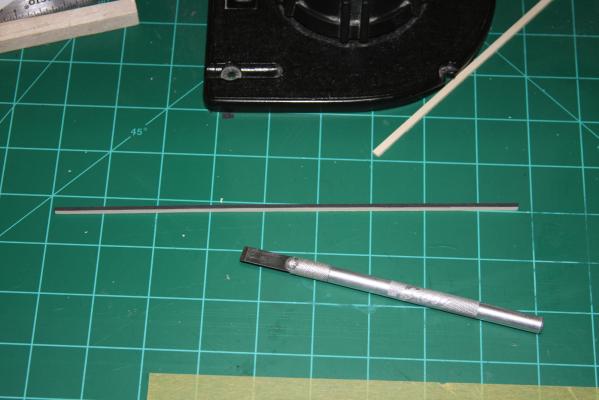
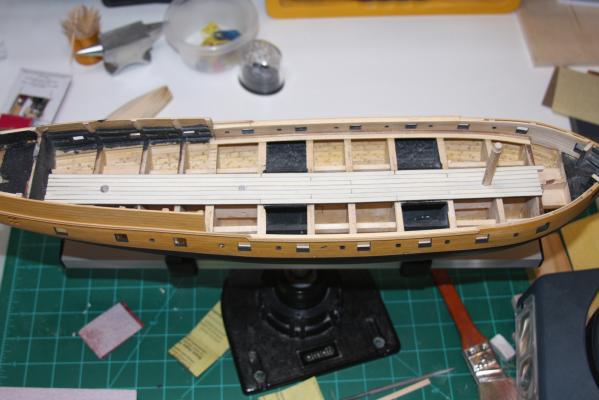
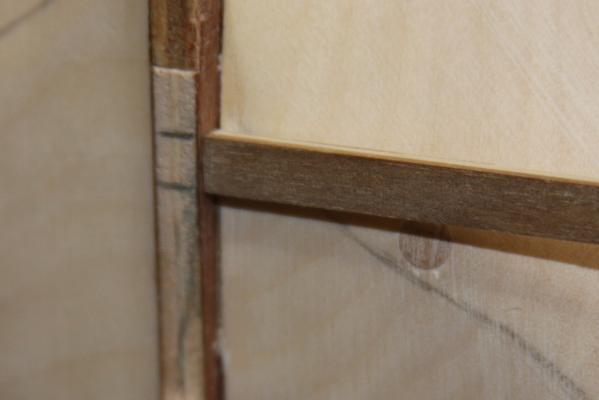
Ahoy Mates Just an update and some pics to show what i am thinking, seeing, and doing First I have found Evergreen Strip styrene to be very useful for tuning my hull. This strip is their .040 x.250 which bends much like a wet plank. Not much side to side and plenty to form around the bulkheads to check for discrepancies. Most hobby store carry it I have also found these push pins. The are of a slightly higher quality then normal and can be hammered in with my hobby hammer after a starter hole is drilled. They can be removed and reinserted and hold planks firmly. Much better then the suggested nails that many kits include for planking. I need to find more. In the pic you can see I have a bulkhead that is low. So far it is the only one. You may or may not be able to see that my highlighting of the bulkhead corners worked really well. It was done with the side of a 4B pencil. I do not think I over sanded any bulkheads. I may or may not have over sanded the stern fillers just a bit. I did completely remove my pencil marks on the last bulkhead when doing the stern fillers but I was aware of it and only just barely removed them. I followed the shape of the filler. I also had an issue with that bulkhead not being centered. I did build out the short side but ended up sanding 99% of it away and reducing the other side as per the fillers. In the third pic i have been running some planking tests. You can see i have decided the first planking will terminate at the end of the filler. Hey maybe I was "half right" in my rant The final planking will continue onto the keel end. I am not sure if I want to remove the full width of the stern post or a slightly shorter version and loose a scale point for having my rudder back (2 to 3mm) The plans show there is room and I don't think anyone will notice. It would also help me, the planks that come around the filler on my build would need to be thinned considerably to allow the stern post to protrude as much as shown in the plans near the top. Currently I have about 1mm after planking. Hence my thought to just maybe extend the stern post rather then continue reducing the fillers or thinning the planks so much. I will make this call after the first planking when it will be hardest to remove the stern post material from the keel. . Because this really bothers me I need to address it. Call me weak. With this in mind I am going to commence planking instead of doing the gunport cannon supports as I should. I will do from the wales down. I am thinking 4 belts. I will start from the first belt down, then from the center up. I am hoping that while these planks are drying I can finish the cannon supports. I do not want to plank belts 4 and then 3 with those not done and feel I should know if this will work after two belts. If this is all starting to sound confusing. like a possible disaster, or the start of some 2 year adventure. Your not alone "lol" PS: I am also going to plank the first layer like it is a single planked hull and document it like i did in my Ratt build. I feel that anytime you get a free chance to screw up your planking you should take full advantage of it. I am hoping for steelers and drop planks galore.

-
Thanks again Nigel Would there be any difference if i were to reduce the thickness of the first layer of planking to nothing slightly further back. This would mean that I would have maximum thickness of only the second planking to reduce. I would hate to sand through it to the first planking. It will need to be very thin and lifting it up with the first planking only sounds like trouble After patiently spending months to get this far i now finding myself fighting the urge to start planking
-
HMS Victory by JPett - Corel - 1:98
JPett replied to JPett's topic in - Kit build logs for subjects built from 1751 - 1800
Ahoy Mates Dragzz: As my fix here involves sanding down the first layer it might help you too Augie: Do I hear you making another challenge. Beef: I looked long and hard at that. I do not think my skill set is up to it. There is no room for error and I am Mr. Error Back to the build I posted in the planking section and NMBrook has responded with what maybe the best way. http://modelshipworld.com/index.php/topic/8365-question-planking-corels-hms-vic/?p=247800 I am going to cut out the part of the keel that represents the Stern post. Then taper the cutout similar to what you would do when you cut a rabbet but just not stopping, having it taper all the way to the edge. Then plank the first layer "short" sanding it flush to the keel as far back as i can: How short I am not sure yet. I will do the second layer of planking terminating it at the cut out. Then add a piece of wood to represent the keel post sanding the planking down to match this wood. I could use a piece of 7mm walnut which would give me 1mm step on each side where it will meet the original keel on the bottom. I would taper it to meet the 5mm Rudder. Realize the keel post sits on top of the "keel" wood that runs the full of the hull (I am sure this has a name) Then I could use a thin laminate and cover all the kit supplied plywood used for the keel as Ferit suggested earlier to match the 7mm thickness of the stern post. This of course means I will need to redo my jig as the kit will no longer fit. This would also disqualify my OOB goal. There was a purpose here and I think that I have proven that I do not have enough discipline when it comes to "the extras". On this build it could easily get way "way" out of hand and my reason for doing this kit strictly OOB. Stay tuned, I have to think about all of this The big problem for me is this is causing me to want to rush into the planking to resolve this and doing the gunports second would be harder. We all know how that is a specialty of mine -
Ahoy NMBrook Thanks for chiming in. This dilemma has caused quite a work stoppage in my shipyard. So are you saying that my thinking to terminate the planking at the filler is incorrect. This would not bother me BTW. It is only the correct or best procedure I am looking for. If I am understanding you correctly what Corel would like to see is the first planking coming into the hull short of the stern post and feathered to the keel. The second coming over this and then being tapered to around 1mm and terminating at a point to create the keel post leaving a raised seam stepping down to the keel post. I would think this method might cause additional grief and be further highlighted in an undesirable way when any Rudder hardware is installed; but do see it as a workable solution. I like your suggestion to just remove the part that represents the stern post on the keel and replace it. Please feel free to correct me but it would need to be cut into the keel as the keel post would normally be sitting on top of the lower wood that runs the length of the hull. Perhaps I can taper the keel here a bit first to allow for some of the second planking to recess. Perhaps I could also use a slightly thicker piece of wood and taper it to meet the rudder. This would still allow me to cover the rest of the exposed keel with a thin laminate and take care of a few other shortcoming of the kit. . Thank you
-
Ahoy Mates I have been struggling with the stern fillers on my Corel HMS Victory for too long and would like to know if what I am thinking is correct Facts: The keel is 5mm ply with a thin last layer of walnut. I would assume that Corel did this because some of it is to be exposed. There are no additional pieces to make up the stern post and the supplied keel matches the outline including it The rudder is also made up of 5mm wood and matches the keel thickness prior to any planking The plans clearly all show a keel post ---------------------------------------------------------- Normally I would think that this would mean that you would cut a rabbet but this is a double planked kit. This leaves me which one other possibility and the reason for my post Has anyone ever built a kit where the planking terminated in the stern the same as it does in the bow. It seems to make sense on this kit. If I were to shape the stern fillers so the planks wrapped around them and all ran into the keel as they do in the bow I would be left with a finished piece of wood (the keel) coming up to the rudder at the correct thickness. Then I could scribe in the keel post and caulking to match my planking. Sadliy it might be a little late for me and I have other plans explained in my log but the purpose of this post is to know if this method would be something a kit manufacturer would consider "normal" and possibly aide future builders of this kit. The Corel instructions say to use normal planking methods. Is this normal. I don't think it would look bad. The gar-board plank would be the only one that might give you a small problem
-
HMS Victory by JPett - Corel - 1:98
JPett replied to JPett's topic in - Kit build logs for subjects built from 1751 - 1800
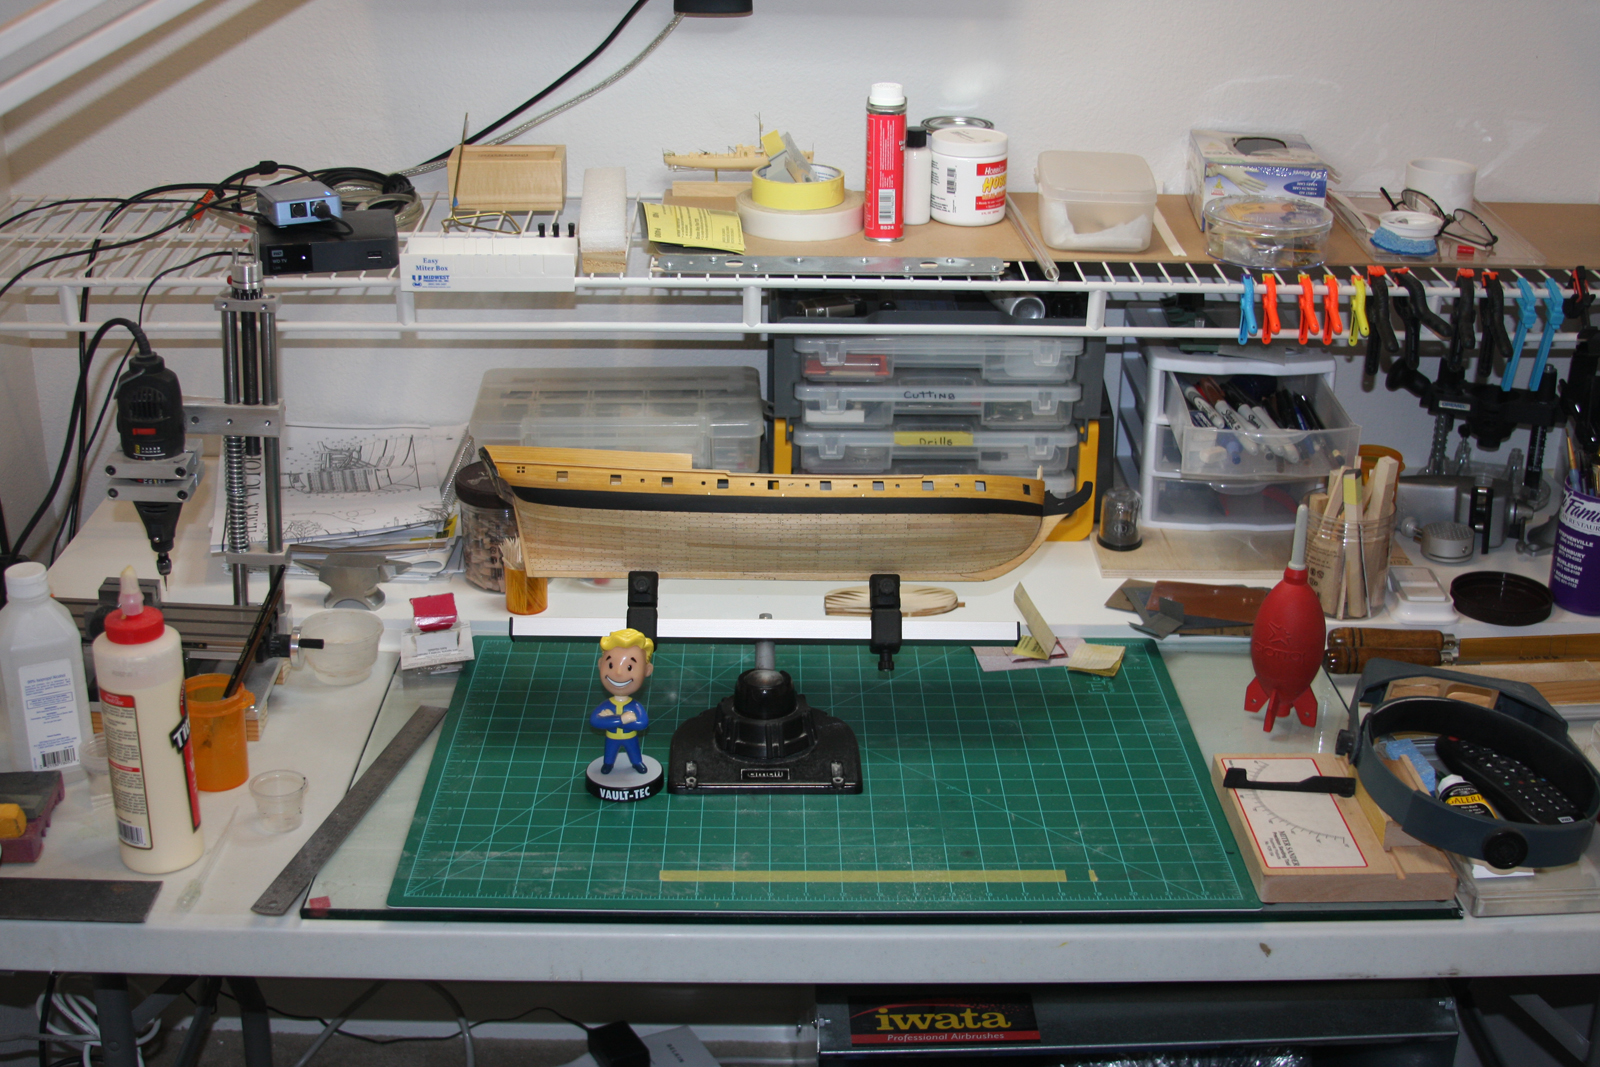
Ahoy Mates Mog: I find myself doing just that "way too much" Dragzz: I thought so too "until today' Back to the build DANGER WILL ROBERTSON Well it seems that I may have made a blunder here on my build. I have been postulating these rear fillers for many hours. Something was just not right. Well today I think I may have found that thing that's 'not right" The keel on Corel's Vic is 5mm wide. This is the same thickness as the material for the rudder. Hummmm So if I add the planking thickness to this equation it means I must sand it to zero to meet the rudder. Even so where is the Keel post: there is no kit supplied part. Or does the planking terminates before the keel post and the keel is the post. It is my belief that the rear fillers on this "KIT" should have been shaped similar to the bow fillers where as "all the planks turn into the hull" and terminate as they come back to the keel the same as they do in the bow. Fake planks are then scribed into the keel along with the keel post. It all makes sense. Although one could argue that that is not correct practice in real shipbuilding as the planks on the lower half should lie against the hull up to a point and then turn into the keel this is a kit and kits are always full of compromises. I do believe this being one Corel choose here. Trust me i have looked at this from all angles including the one through my drink. It has been a very upsetting day in the shipyard. What to do: After much thought I have decided to have the kit try and stop my Tundra tires from rolling forward. After failing that I will repeat the test in reverse. "lol" Just kidding but it did cross my mind and make me laugh. I think i can fix this by planking the hull as it would be on a real ship or most other kits (NOT WHAT COREL INTENDED) and then heavily fairing the planking into the stern post/keel end. Next remove/cut away any planking that covers the space that would be occupied by the stern post; insuring any planking here has been been sanded down to 1 mm. This would be followed by a complete "redo" of the keel post and entire exposed keel stem to stern with a 1mm walnut veneer. I might have to taper the end of the keel a bit where I remove the planking before applying the veneer so it meets the Rudder at the correct thickness. Or I could do the Rudder in slightly thicker wood. I could also do something nice here with the bow by using multiple pieces. . If you have a better solution I would love to hear it. Either way unless I hear a better plan I will start planking the lower half of the hull to confirm my plan. My fall back will be copper and paint There is always a way If I were to start this kit anew I might cut a rabbet where the stern post is or really just do it Corel's way which would not look bad Lets see how my idea works. EDIT: My original thinking was wrong regarding that all the planking should terminate at the filler: Please disregard it. I am terminating the first layer here. Read on -
Wappen von Hamburg by andy - Corel
JPett replied to andy's topic in - Kit build logs for subjects built from 1501 - 1750
Ahoy Andy The planking looks nice. Vise grips, I would have never thought. Do you do anything to prevent the jaws from damaging the wood. It really is a good idea. I am surprised the hobby companies have not come up with a plastic version just for planking. With some jaw options it could be a seller. Where's my 3D printer -
Ahoy Dragzz Why does the whole block need to go. Is it that bad I would think you could just put a little wood on the top of that filler and then sand it to get the correct angle for the deck. Maybe I am not seeing something
-
Ahoy Dragzz I like everything I see except maybe the poop. I know you have lots of room with the first layer of planking but will you be able to cover that up. Is the poop deck at the right angle. It looks like it has shifted and is now on the same plane as the keel Is the plank is pulling it down ??? If it is you might be able to just cut the plank to correct the poop, you would just have a small gap from the cut but that would be easy to fill. You may or may not need a clamp, not sure. Hopefully someone else can check my thinking and post a comment
-
Ahoy Mates I use a Dremel to push pretty much anything through my drawplate. If it fits in the chuck its a treenail in about 5 seconds.
-
Ahoy Mates I am a big fan of the treenail (who would have thought) Just like many of the other "slightly out of scale items" we joyfully add to our builds; treenails represent an important aspect of the actual construction of these ships, add interest to your build and look great. If your abilities are up to the task you should always consider including some
-
Ahoy Kenny In defense of your students who i am sure will one day see the truth in your reference I say "wisdom is like a great wine". As for you build: Mog is also correct in that the upper deck supports are very weak on those bulkheads. Cut out the filler piece and then put it back in with tape or some other easily removed means. Its a wood grain thing As for the other issue; it has only been highlighted on my build and then revisited on Zev's I can not say for certain exactly what is is. Perhaps we can solve it on yours for future members. It is not a big horrible thing either but more of one of those small issues that causes work you don't need to do. It seems that either the plans are wrong or the machine that cuts the bulkheads is getting some bad information. Either way what you may or may not find is a slight misalignment with one or more bulkheads that will need to be addressed prior to planking. Zev seems to think it might be the slot that is cut to receive the keel. As I said it is minor and only seems to apply to one or two bulkheads but when you do your bulkheads save yourself some extra work by taking some measurements and confirming they are correct. It could also have just been a mistake both I and Zev both made. We were newbies. 1) place the parts over the plans to confirm they are correct 2) using a measuring tool confirm the keel slot is centered on the plans (if all the parts match up) Calipers would be my choice 3) put all the bulkheads on the hull temporarily and check their alignment As you can see i am not asking you to do anything that your not supposed to do but just reminding you to be throughout or "take the time' to make sure you do this the best you can Should you find something, then I would ask you to please post it PS: if you need any help with this you will find that while the people here may not all be following the same path they are heading in the right direction. Just my opinion but this site does seem to attract very good souls.
-
Ahoy Kenny Nice signature In your profile there is a section where you can customize that and attach it to all your posts. You can also link your build so when you post in other logs they can easily find your work. As for your build. I had some minor issues with the bulkheads. Which will be one of your first big projects. It seems it might be an fault in the kit. Zev suffered from it too. It was well documented in my "old" log but sadly this was lost when MSW went aground in the storm of 02 13. At that time we all thought it was just me. Regardless: I highly recommend you do these two things. Take extra time when doing the bulkheads, Don't rush into construction here. And build a jig to support your keel, This will not only ensure your model is true but allow you to take accurate measurements which is always important in any project.
-
Ahoy Kenny Welcome to the Ratt pack As i see or maybe don't see and will assume you have not yet started but will wish you well and follow along. My build is in my signature below. Feel free to PM me
-
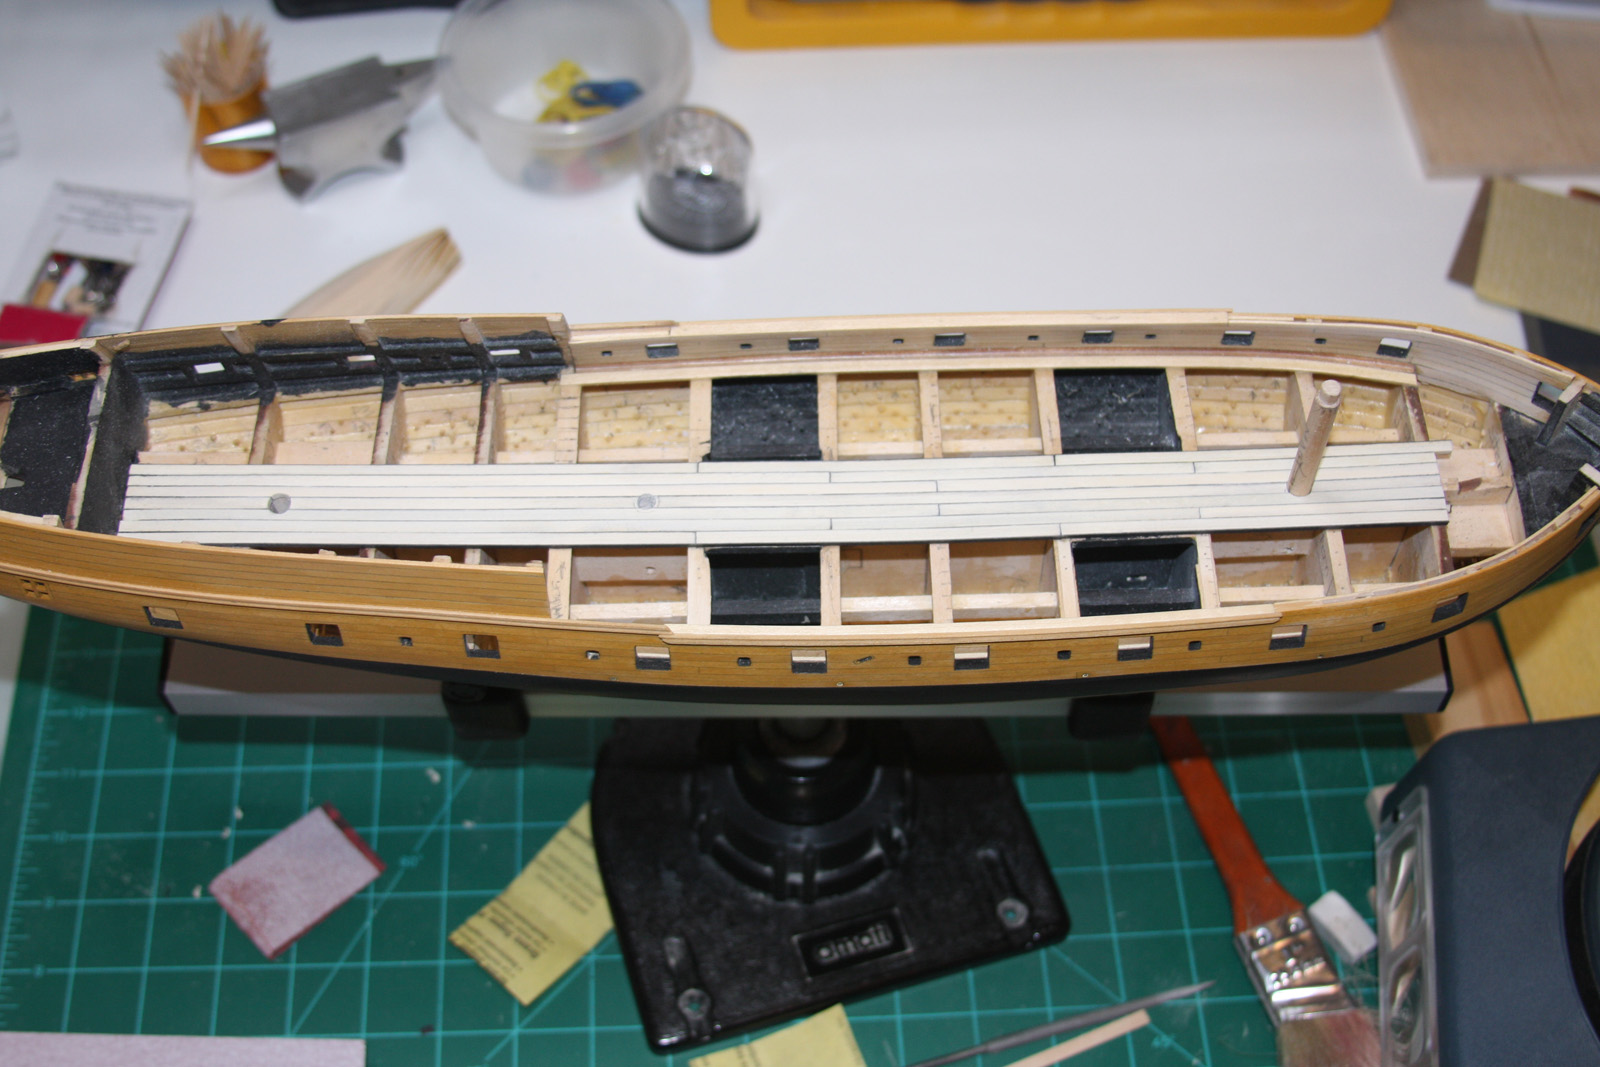
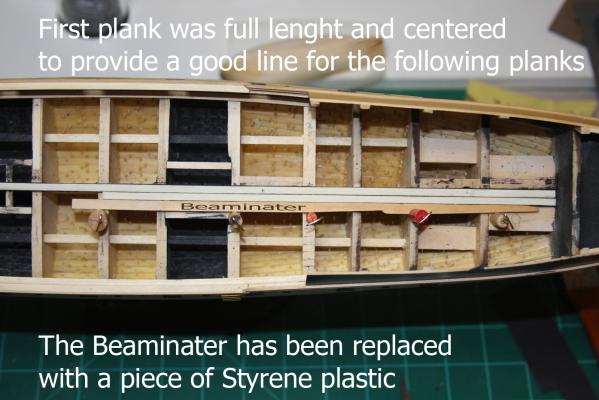
Ahoy Mates Beef Wellington: He came to the shipyard after losing a fight with a 4 year old. His head was reattached and he has been there ever since. I have the lunchbox too. I am a big fan. JSGerson: I used dry transfers. I like the gold leaf and the raised letters. It was really easy to do. Mark: Why, why, why. You know I always follow the plans to a "T" Dragzz: just don't take as much time as I do. Back to the build I had started experimenting with the deck while I was doing the gunwales but after lying a few rows of planking I was not happy. I ran into the same problem on my other build. Skipping over the openings for the gratings and keeping a nice straight run for that first row of planks was not something I can currently do with my skill set. So once again the shipyard grinded into that other less productive gear and I ripped up my work. This time using a full length plank to get a good line for the others to follow. I also bought a drill bit to do the mast holes. It took way to long to file out the holes on my first attempt. It was slightly smaller and designed to drill without splintering the wood. When it finally went through the harder maple and hit the basswood I almost drilled a new feature in my hull. Use caution and a very slow speed if you try this. The plans call for the center to be split. I used a center plank. On my first attempt the center was split and this led to a half plank to meet the gunwales. Hopefully, I just took care of that. I am edge gluing 70lb black construction paper and each plank is it's own little project. As it should be. This is however a slow process. I am estimating it will take me 50 hours to complete the deck. We should all know that this means 100 with beer, movies, and postulating. I am however really happy with the results. The thicker caulk line looks much better then pencil, and contrasts the maple nicely: I replaced the kit wood and am doing a 3 plank pattern, where I did a 4 on the hull. Treenails are coming. For anyone considering this route: I first prep the plank. Cutting it to size, cleaning it up and sanding in a slight chime to meet the previous plank. The plank is fit first and only after confirming all the steps needed for the plank to be properly positioned/installed is the paper added. I might be doing this backwards but I have the paper on the outside of the last plank. Either way with paper; redo's should be avoided at all cost. Replacing the paper or damaging it on an already installed plank is not an easy fix. I did manage a cheat by adding a pencil line where I damaged some paper. I clamp and glue the plank to the paper with PVA and then use a downward chopping method to trim off the excess with my chisel blade. Using a slicing action with the standard blade would sometimes tear the paper and ruin it. Like I said, this method is slow. You will need a good supply of blades or a blade sharpener which I use. Then I fold and glue the paper to one end where it will meet the next plank in that row. Next I edge sand the corners to get a nice clean plank. I have replaced the Beaminater (See my hull planking technique) with a piece of Styrene plastic which does not stick in any way to the paper. It is impossible not to get glue on the paper while installing the plank. I use a combination of sideways and downward pressure to plank. I will also wet the paper on the previously installed plank to soften any glue from that install. A hard spot on that paper can prevent the next plank from butting up. I use the Original Titebond which is not waterproof and easily softens "even after drying" with some water. Up to now I have been using un-tapered planks but according to the plans (See M.) the next band of planks will need to taper to match the curve of the gunwale. This should be interesting and my next post Thanks for stopping by

-
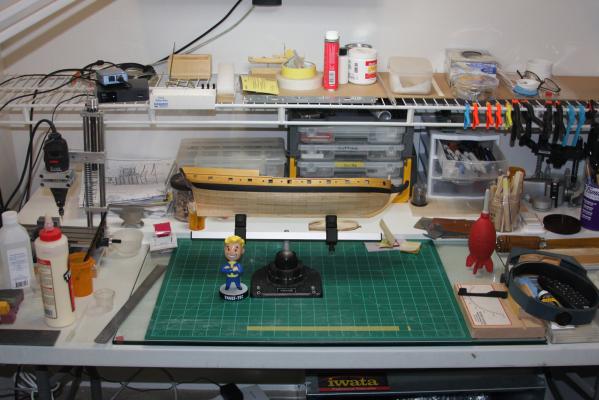
Ahoy Mates SRC: With all the carbon we are dumping the ice is beating me by miles Dragzz: No, The Ratt has always been my priority. The Vic is my mistress Russ; Thx again, I am hoping that I will be able to do something about the windows I cut out. The more I work on them the more I think I need to work on something else. My skills are just not up to it yet. I am getting there though Micheal: Yes, activity is a good thing. I often wonder if sometimes too much is not the best thing for the grey stuff. Scott: Thank you, I would love to have that blue on my build but I just can't make it work like you did Popeye: I am sure the dinosaurs saw that space rock as just a little hiccup too. "LOL" All kidding aside it really is just a big learning experience for me; which I really enjoy. Having a finished ship on my shelf does sound nice though. Maybe one day. Martin: Speaking of finished ship on his shelf. I am jealous. And now i find out you won the prize ship. Even more so. Good luck with that build. It really looks like a great kit. Back to the build HAPPY DAYS :) :) Well it really was an interesting journey doing these gunports. Full of happiness and despair. Like an endless roller-coaster that has finally come to rest they have now been complete. The starboard side actually came out better and I did touch up the port although it does not look as good, it does looks good enough. At some point I really need to move forward and i think that time passed around Christmas of last year. This one really was a whopper As for anyone following this build I am posting what I learned in hopes it will save others from my folly. First and I believe this was already mentioned but it is important. The ports do not need to be exactly right when framed (just close and not larger then required); you can give yourself some room by using slightly wider wood then suggested in the plans. Once installed you can view them all together and then make adjustments either before or after planking. After being the harder of the two. The key for me was looking at them all as one facet of the ship. Fixating on one port only led me down the wrong path. There is a lot of discussion regarding the orientation of gunports. Where as there is, I am sure cases where the ports are not square to the bulkheads I have found through considerable research they are not the majority. While some may look like this on the plans in most cases it is because the plans are 2D and we live in 3D. Yes it is not easy to get them to look right, much easier to just tilt them a bit and this is your choice as you are the captain of your ship. Some are titled on my port side and the first one on the starboard too. Not because they should be but because that was the best i could do. I am however very happy with what I have achieved and think any further action will only lead to major repairs. When adjusting your ports I found it best to do them in groups never finishing one before all of them are at least 85% done. It is more important to get the orientation right first and then slowly expand them using a jig. I used one of the white metal lids included with the kit. To get them aligned I put my kit in the jig. Once in the magical jig i was able to mark my hull with reference lines which made cutting out the ports much easier. I did not just mark the ports but made lines to guide me while doing them. With the hull planked a mistake here would be hard to repair. My last window is actually slightly larger. That is where I learned to do them in groups and not one at a time. I also learned not to do them in order but to skip around. Adjusting one between two that are right is much easier. In a nut shell: I found it was easier to get the ports correct in a smaller version and then scale them up using a jig. The key being to start small get the look you are happy with first. Next stop is deck planking. In usual JPett fashion we will be expanding this into a project. i put in some basswood so that I could cut into it to terminate the planking. I will be using paper for caulking. I am not sure if I will be trying any of those fancy planks on the gun deck. I might on the upper decks. First pic shows the Ratt in the jig Second shows reference lines, port jig and the order i used to do the ports Third show that in celebration we have cleaned the shipyard. Thanks for stopping by and comments as always are welcome
-
HMS Victory by JPett - Corel - 1:98
JPett replied to JPett's topic in - Kit build logs for subjects built from 1751 - 1800
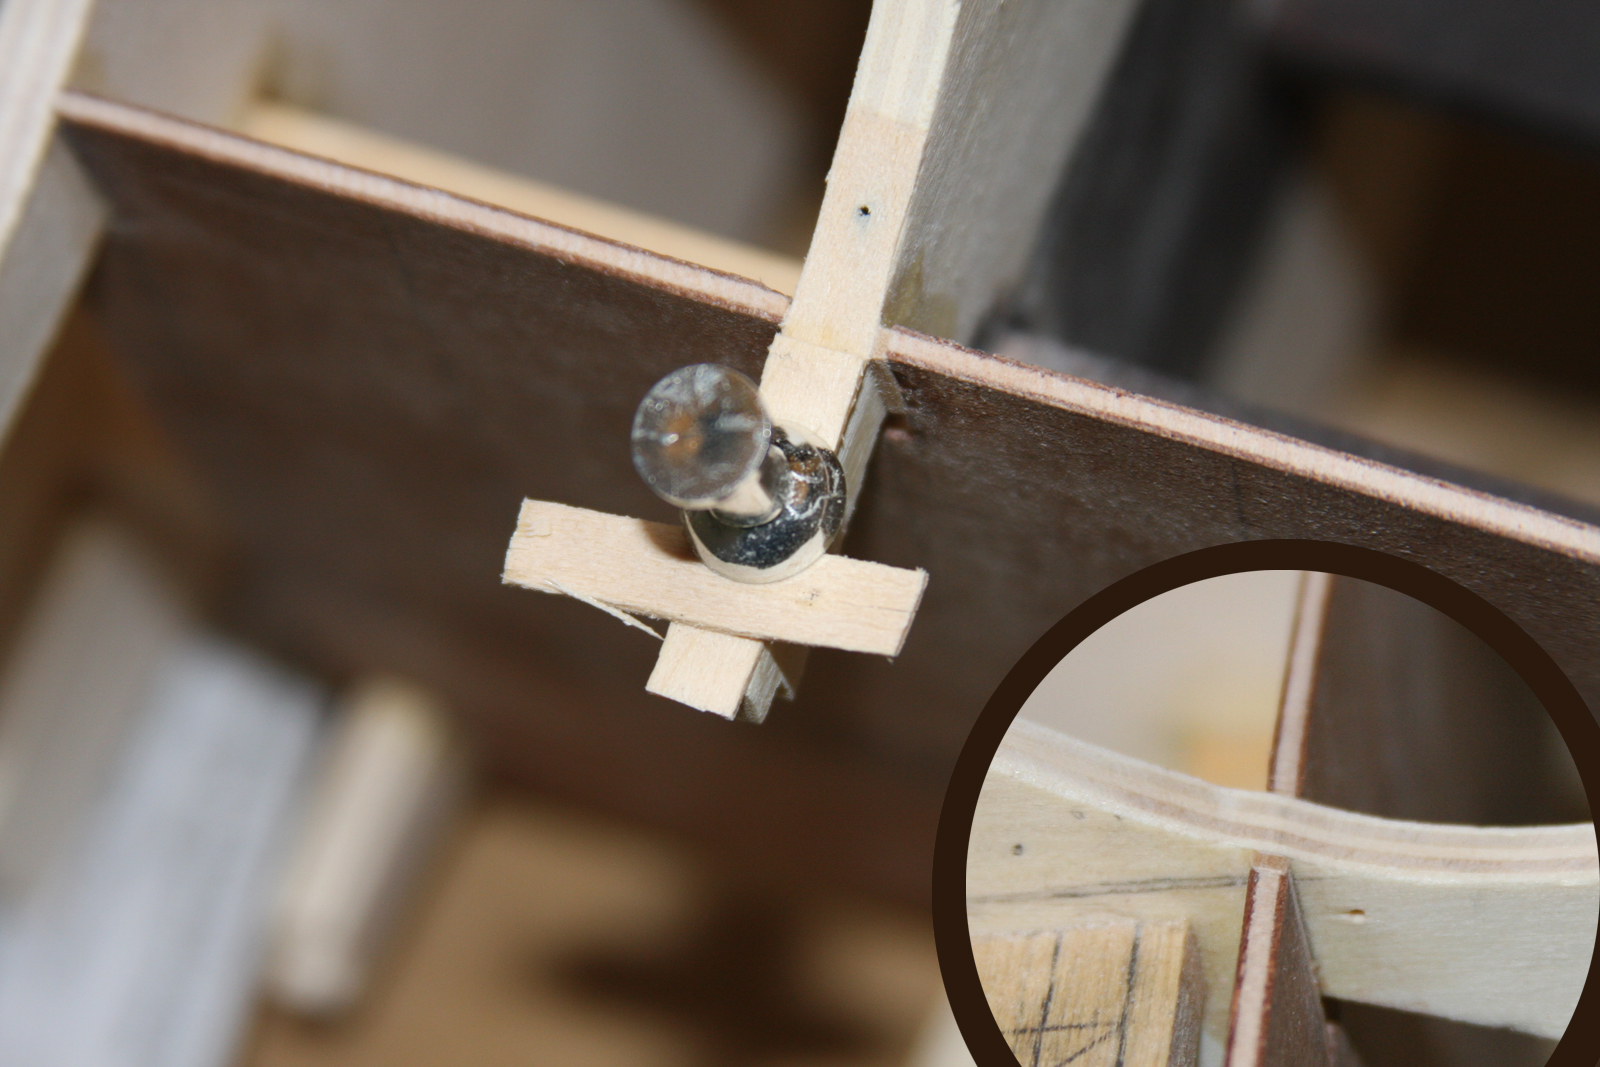
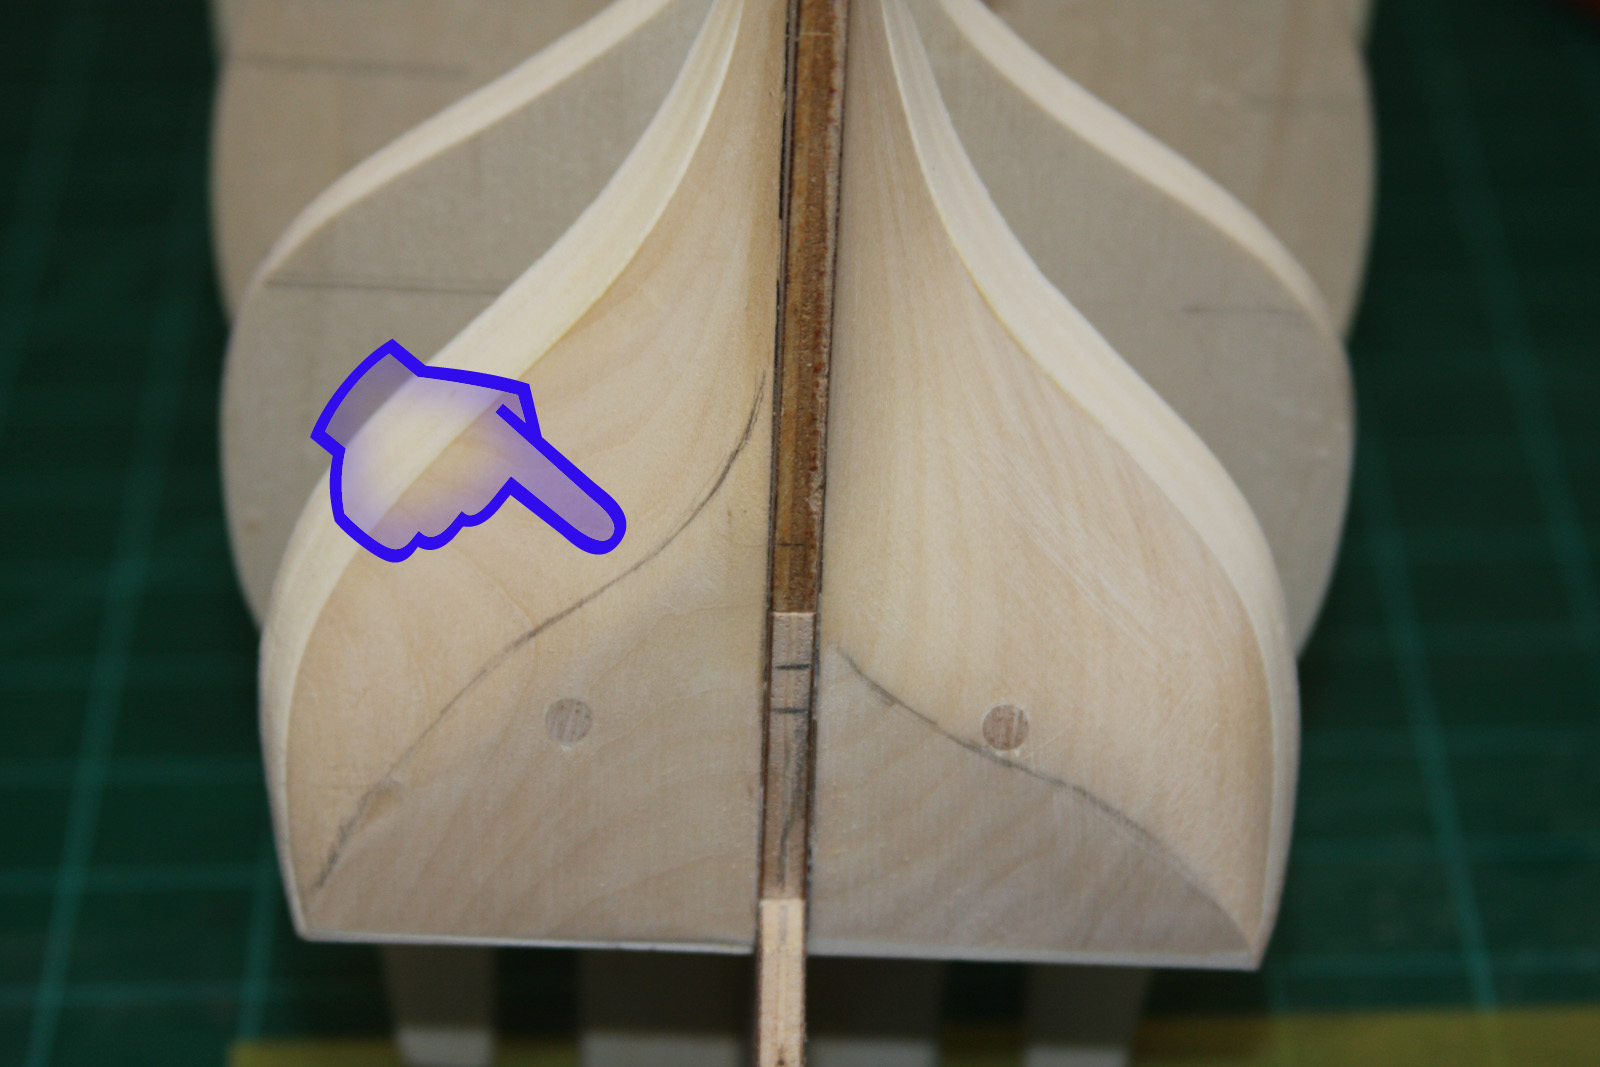
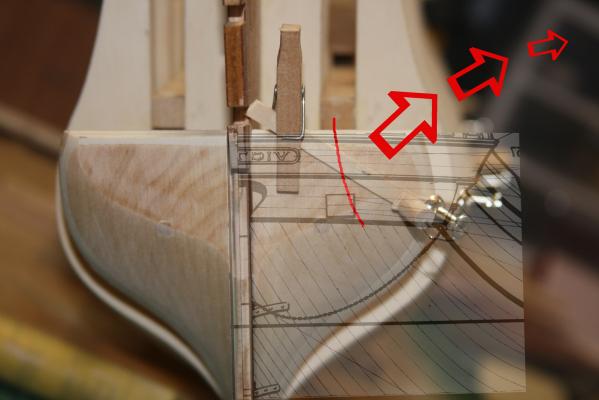
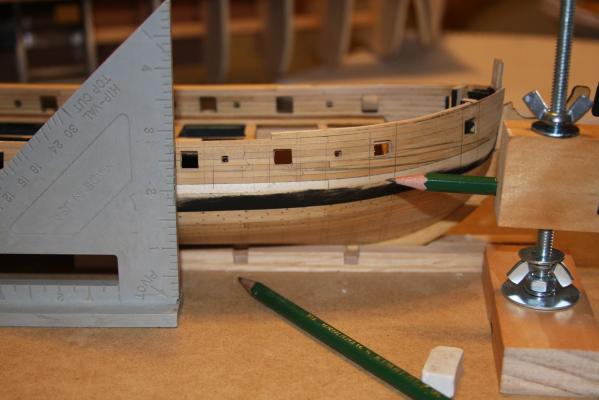
Ahoy Mates Dragzz: your a better man then I. Not knowing what I am doing; I did not have the courage to bring out those guns. GuntherMT: Welcome to my build. This would not be the first time I did something backwards on my build. Bill Hime: Ditto on my last reply and thx for stopping by. I am primarily using 320 and 400 sandpaper, I have some 150 but use it sparingly. I don't trust myself with anything stronger. Slow would be an understatement. Back to the build: Well in typical JPett fashion we are totally over thinking these fillers ' I think" After spending over 2 hours with my little battens and sandpaper I have made yet another change. It seems to me that the "tuck' of this filler should allow for the planking to lie flat up to the point where the thickness of the two layers of planking matches the space between the filler and the stern. Only here it should curve in to meet the keel. Should it do so where the gap exceeds the space taken by the planking there would be a space on the finished hull.. Like I said, it is entirely possible that there is way to much thinking going on here and the reason for this post Please let me know what you think Note for those following: I sanded the filler to match the stern on the top where the planking curves into the stern and enough so that the two layers planking will fit without having to sand one layer down to nothing. See the pic in my previous post. This required me to take quite a bit off the filler. I believe that this could have been prevented by having bulkhead 14 positioned slightly more forward as i see this could have been done on my build. There is some space and I would recommend using the stern fillers to position this bulkhead In the pic I have highlighted the "tuck" You can see that on one side where it used to be bring the planks into the stern well before the two marks. The marks show where the thickness of the planking matches the space between the ends of the keel and the filler. On the other side i have raised the position where the planks will still lie flat up to just before this point. The second image shows my batten and the new path of the planks The third my "Vic SticK" which is a jig I made using the two layers of planking for the kit. i seem to have developed an obsession with these little jigs. They all have names "lol" Please feel free to comment, Suggestions are always welcome here and I have no problem with criticism provided it is accompanied with a suggestions. I can always glue some wood back on and consider my time spent learning.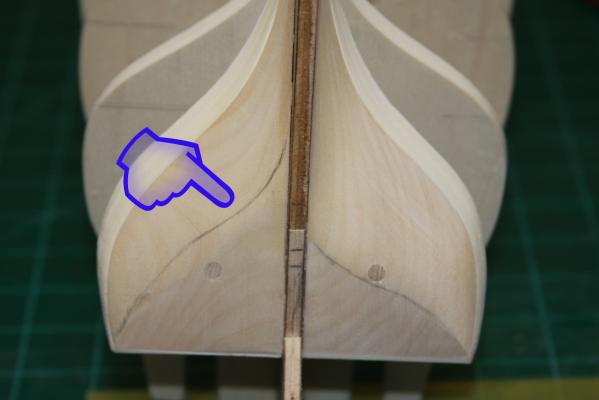
-
Ahoy Dragzz I will second Popeye. Clean and I will add "sharp". That deck looks great. Your progression here is amazing Looks like planking time is right around the corner
-
Ahoy Micheal Happy belated B-day. Somehow I missed that Your selfie, for a better word really puts into perspective the "scale" of your work.