JPett
-
Posts
881 -
Joined
-
Last visited
Content Type
Profiles
Forums
Gallery
Events
Everything posted by JPett
-

Treenails
JPett replied to wallyh's topic in Planking Techniques's Click Here for Topics dedicated to planking!!!!
Ahoy Aussie I started with round toothpicks but now use anything I can fit in the Dremel chuck. The toothpick is a perfect size however. Just cut your choice of wood into strips 2mm by 2mm and and about the length of a toothpick then plug them into the chuck. I generally use the largest collet in the chuck.. Then start pushing them through the draw-plate on the flat side. The length and how many treenails will be determined by your wood choice and the size of the treenail you want. I have actually used non wood items too. . With softer woods you might only be able to do enough for one treenail at a time. I can push hardwoods through about an inch all the way down to the smallest hole but usually don't. Its just not worth the effort. Once I install a few treenails the wood just goes back in the Dremel for another round. I make a few, install a few, and then make some more. Once you find your rhythm you can do quite a few in a very short amount of time. When I make the treenails out of strips I usually have a piece of sandpaper near by. Once I turn on the Dremel it only takes a second to put a point on the wood to help guide the first pass. I also use the flex shaft but have made them with out it. -
Treenails
JPett replied to wallyh's topic in Planking Techniques's Click Here for Topics dedicated to planking!!!!
Ahoy Hornet You can't beat the speed. I can sit and make hundreds in less time then it took me to pull 20 Plus you can spin down woods like Mahogany and basswood that you could probably never pull -
Ahoy Augie Real Life???? Hummmm, now there's a loaded comment I think it might be best for me to just abide by the rules and wish you well
- 2,191 replies
-
- 1
-

-
- confederacy
- Model Shipways
- (and 1 more)
-
Treenails
JPett replied to wallyh's topic in Planking Techniques's Click Here for Topics dedicated to planking!!!!
Ahoy Wally I use a Dremel. Adds warp drive to the draw plate The holes you drill should be slightly larger then the treenails. Without glue they should slide right in and come out with ease. Dilute wood glue, dip the treenail and send it home. The water will cause the wood to swell and make for a tight fit. once dry I use a pair of sprue cutters to snip them off. Then sand. Remember: Your kit is not for testing. That's what all those scraps are for. -
Treenails
JPett replied to wallyh's topic in Planking Techniques's Click Here for Topics dedicated to planking!!!!
Ahoy Mates Anyone who follows my builds knows I like treenails. This whole argument about scale amuses me. Really how many rigging components are anywhere near scale; but we all seem to enjoy adding them. Build something you enjoy looking at, not something that is going in a museum as a scale replica, or to meet the expectations of others. Having a treenail out of scale or slightly more visible would not even make the list of mistakes on most builds. Nor would it rate when compared to the mistakes the manufacturer has already built into most kits. Many scratch builder use treenails so we won't even go there One additional note about treenails: They will strengthen your kit considerably and prevent planks from springing years down the road, which for me makes them worth the effort . Not to mention they can look really good and represent that actual construction method used. Brought to you by the committee to stop treenail abuse -
HMS Victory by JPett - Corel - 1:98
JPett replied to JPett's topic in - Kit build logs for subjects built from 1751 - 1800
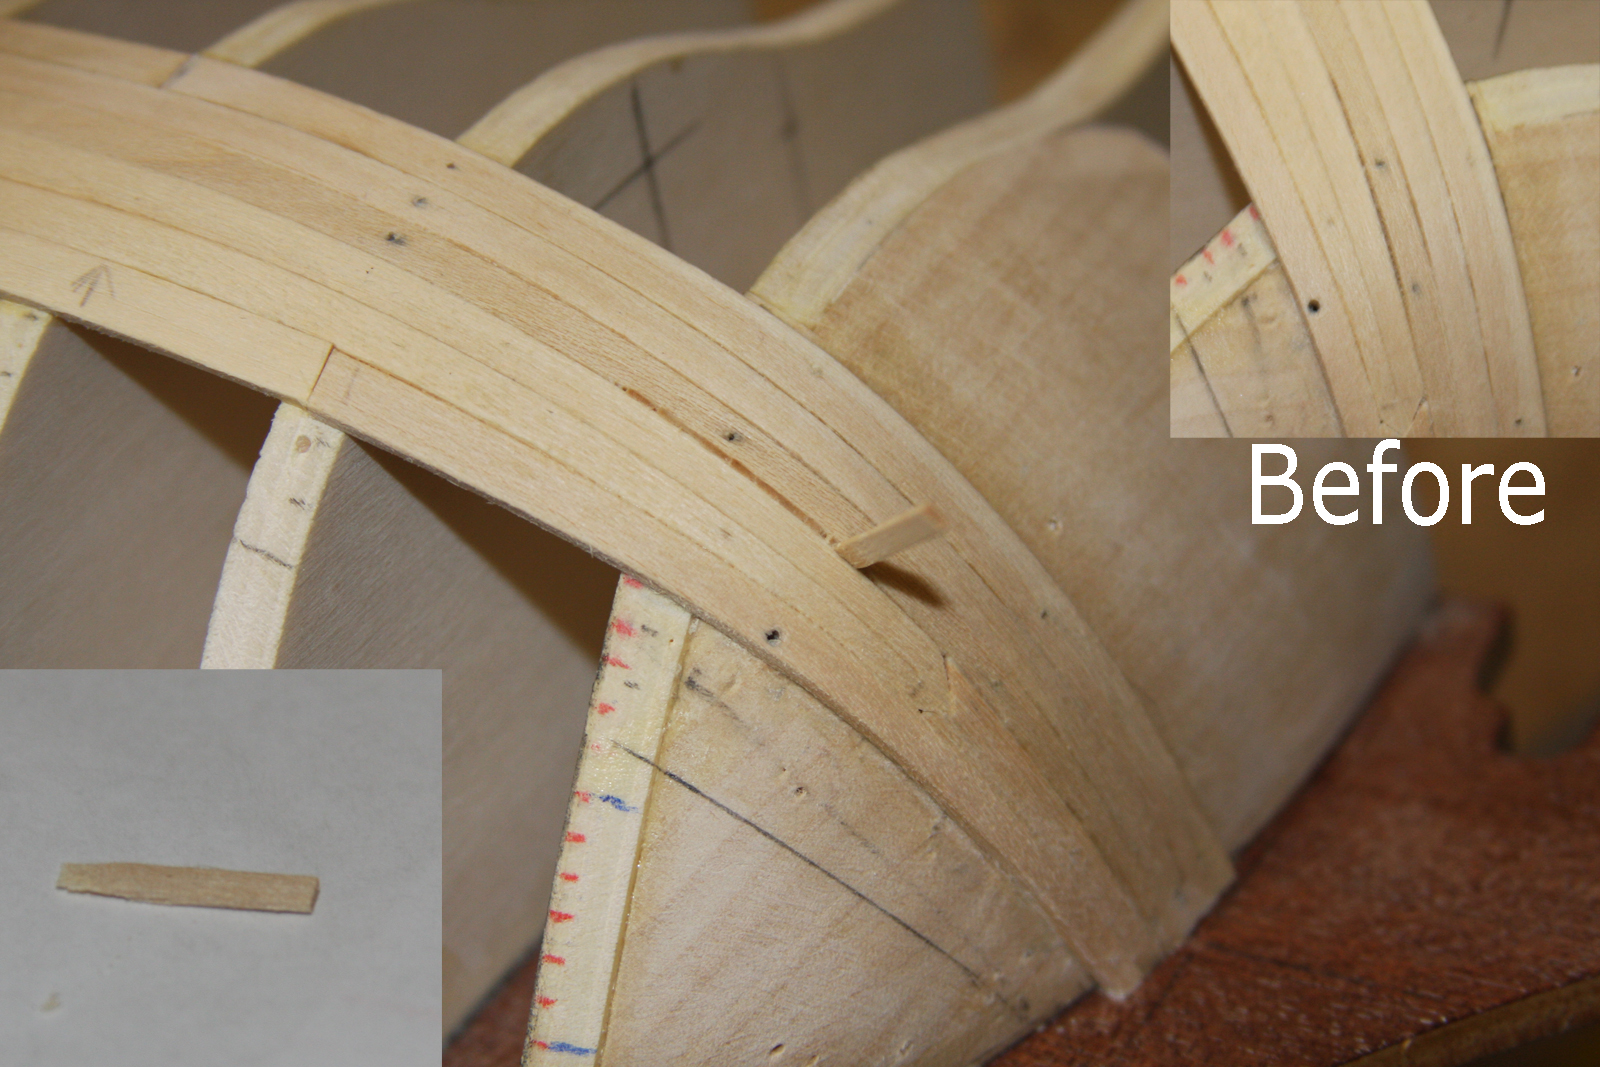
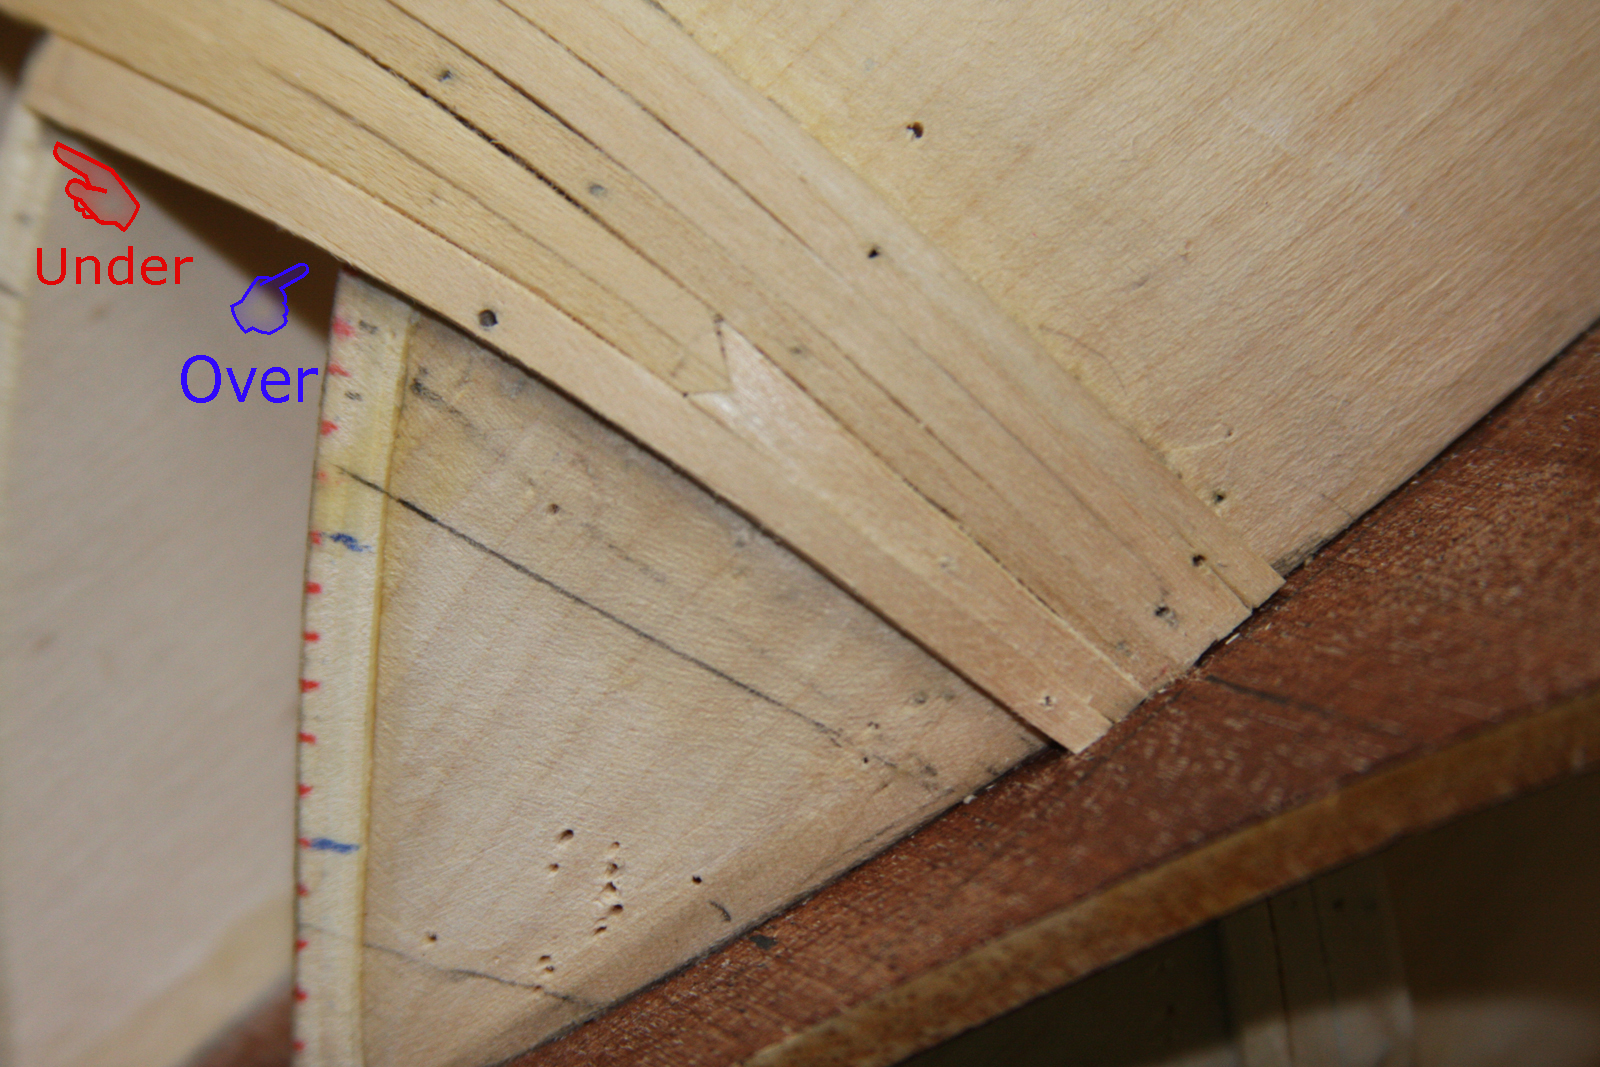
Ahoy Mates Mike: Thx, I am hoping this will all be gone soon except the experience I gain from it Dragzz: Please delete some messages, your mailbox is full Back to the build Just posting this so I don't forget it. I use my log as a notebook of sorts While waiting for a plank to soak I decided to address a small gap in the bow planking. It really was not necessary but more of an experiment. I really should have been doing treenails. Originally my plan for these was to use the sawdust and PVA trick when I did my final sanding They are just little 1/32 by 3/32 scraps sanded into a wedge. Flat tree nails. If I have another opportunity to try this I think I might use a wider piece and put it so the grain follows the planks. The edge grain looks a little dark to do this on any final planking. I have not sanded it yet and it is still wet too. I just snipped them off with my plastic sprue cutters
-
Ahoy Bill You can download the instructions for the kit here http://www.jotika-ltd.com/Pages/1024768/Manuals_Victory.htm I have found these instruction very useful for my build Caldercraft estimates the build time for this kit to be 2400 to 3000 hours. For someone like me who works between 4 and 8 hours a week it would take me roughly 9 years. This does not take into account JPett speed, or reverse. better make that 18 to be safe,
-
HMS Victory by JPett - Corel - 1:98
JPett replied to JPett's topic in - Kit build logs for subjects built from 1751 - 1800
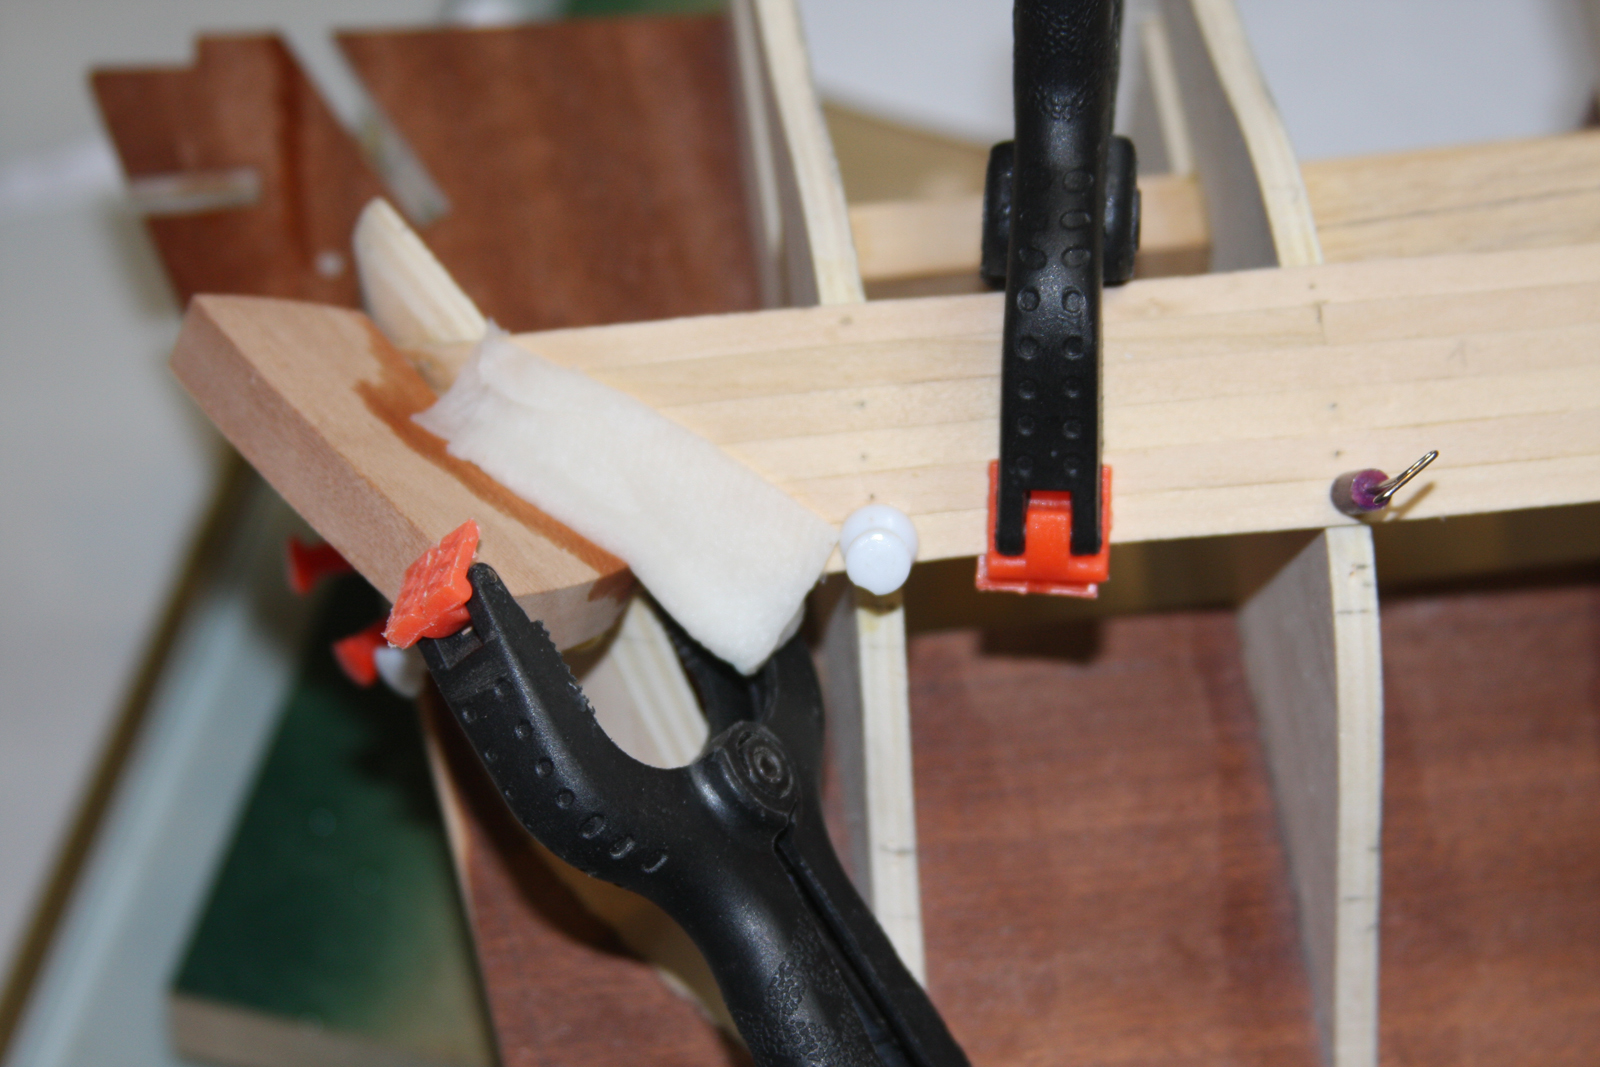
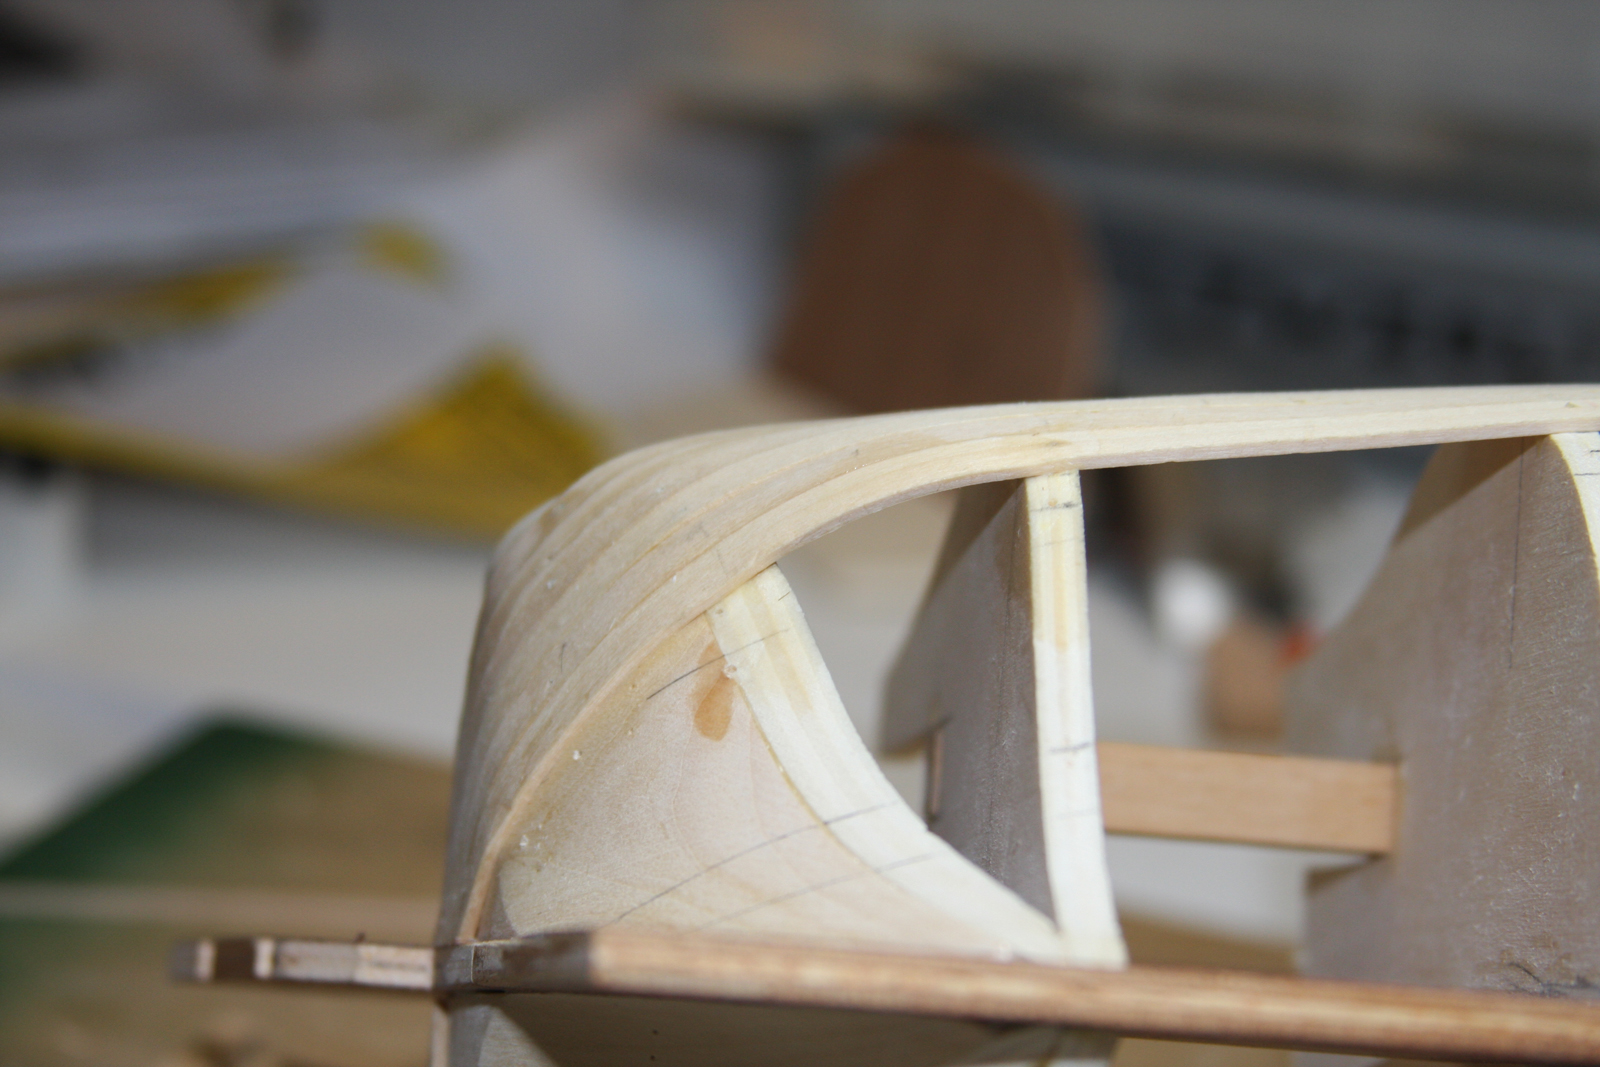
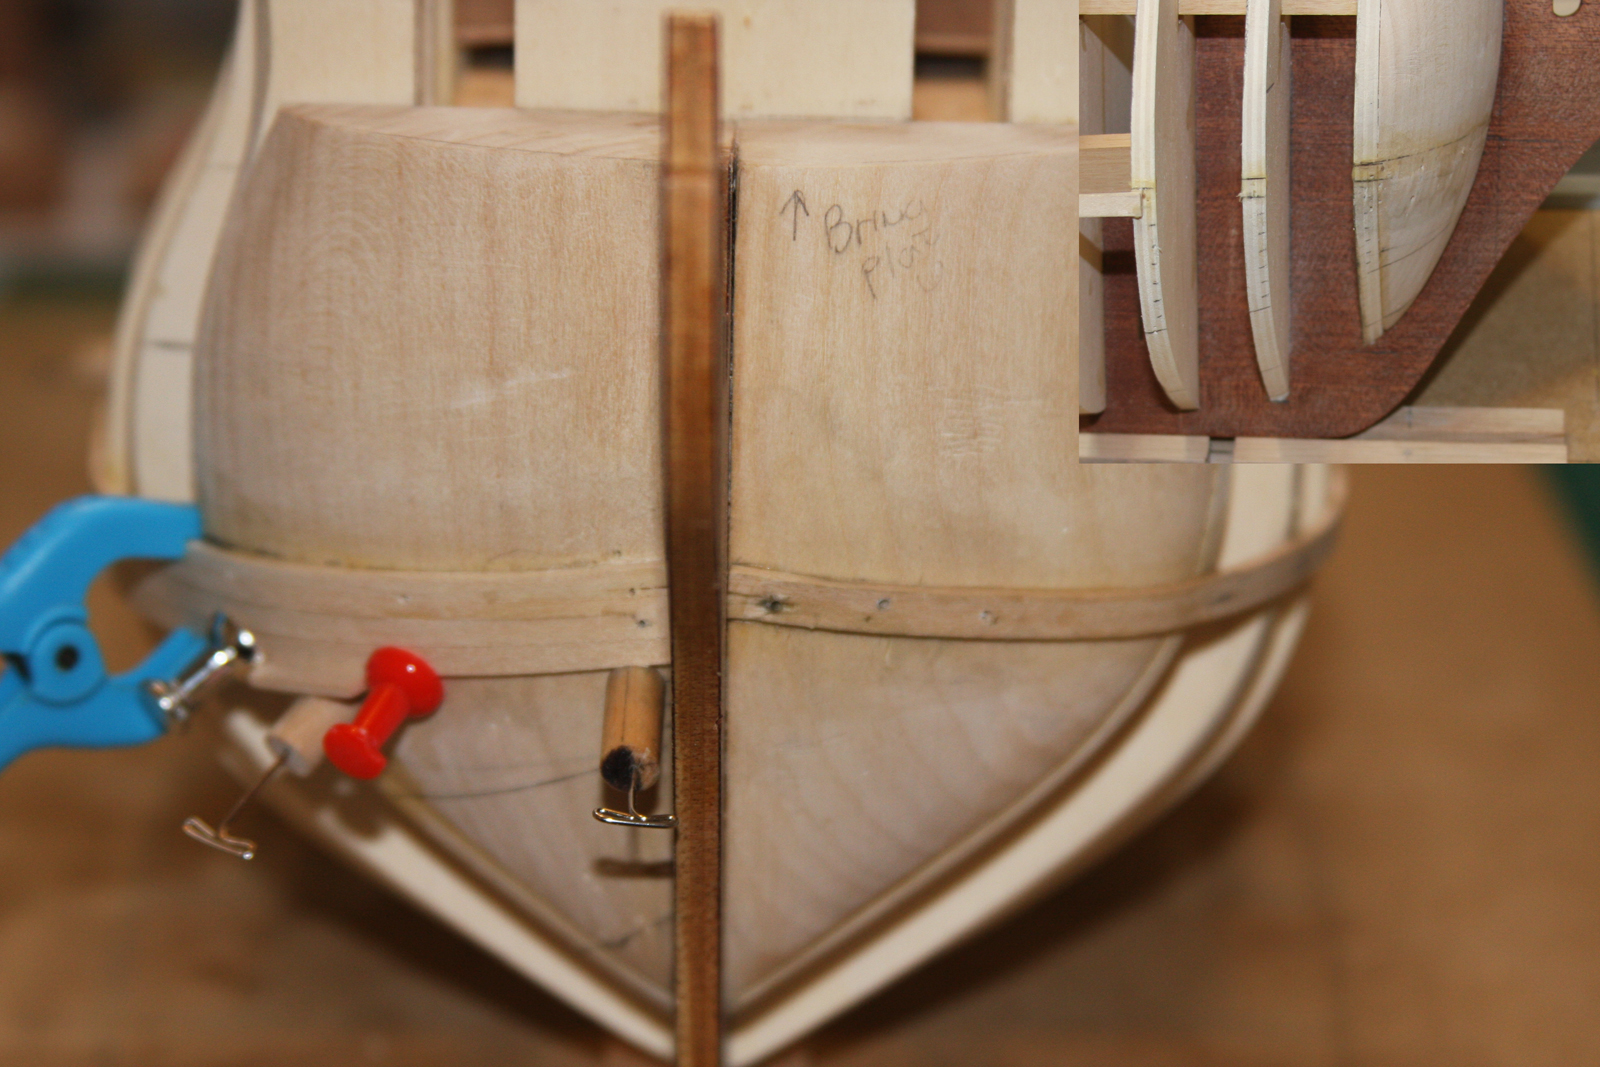
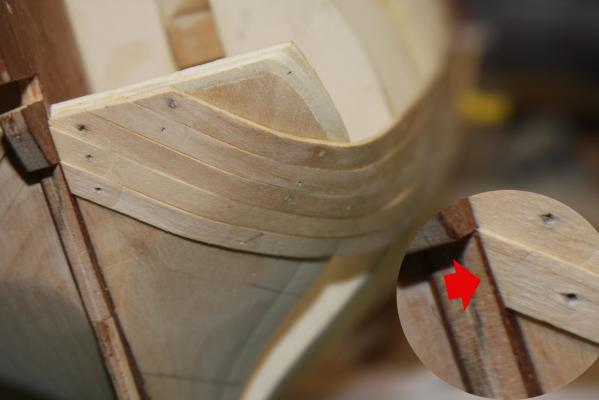
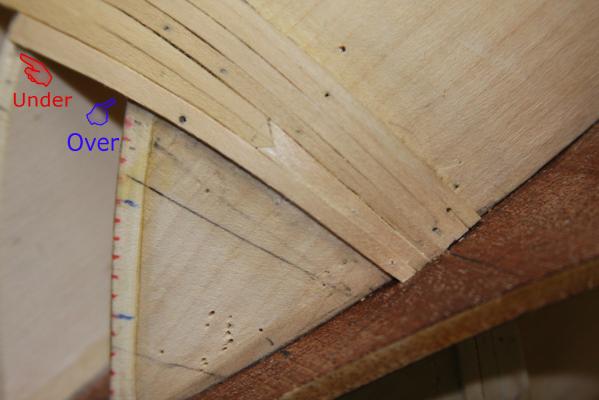
Ahoy Mates Thx for the likes and comments Neptune: Welcome aboard; I see that you have build this kit. Your company and comments are most appreciated Nigel: Thank you. I do agree that spiling would actually be much easier here but I have this whole OOB thing going on for this build. I am contemplating gluing two of the kit supplied pieces of planking together and then spiling that. On a side note I have just found the kit supplied wheel. That is going to be a big problem. Mark: I am hell bent on correcting the kinkering and not sanding it out. Sjors: Always a pleasure. I am a persistent "bass turd". That is my real strength. I am still working on the "skill" thing. Back to the build I am posting this for anyone who might be using my log as some sort of reference for their build. There seems to be a point where the planks need to transition around what I would call the hip of the stern. (We could talk jeans here). I am getting a lot of kinkering: More then what would be safe to sand out even if I were to sand .. What I have found is that after forming and installing these planks individually that I can come back to them and reform them again but now as a group. First I clamp a wet paper towel to the area and let that sit for 15 to 20 minutes. I re-wet the towel, then nuke the area with my heat gun. When I start to smell glue I start making adjustments. By only wetting and heating certain areas and leaving others bonded I have found that I can now form sections instead of just planks to create a smoother surface. I did not take any "before" images but if you look at my last post, the image of the stern shows the start of the klinkering (its out of focus) which got really bad on the final plank for this belt. . The image shows how I used a piece of kit wood to "persuade" these planks as a group. This set up was nuked with the heat gun. The wood traverses four planks which all had some klinkering to a degree. It took multiple sessions applying pressure and heat in different areas to get this wood to lie as it does in the final image

-
HMS Victory by JPett - Corel - 1:98
JPett replied to JPett's topic in - Kit build logs for subjects built from 1751 - 1800
Ahoy Mates Augie: And it will be without the plans tonight Dragzz: Fun is the only reason to be here. Thx for the pics too. I would have never thought that planking the bow would have been the solution. Just shows what I "don't know" Back to the Build Well with one mystery solved, and thank you Mark for making the effort: the shipyard is knee deep in planking. I have completed my first "drop" plank and while it did come out "OK" I do not think it would be appropriate on the finished planking. I will repeat this on the Port side only maintain a consistency in my problems planking. The drop plank did relieve some of the klinkering but after installing it I see that I am over the line on bulkhead 1 and under on B2. I had this same problem on the Ratt. I have also re-re-re done the measurements and belts. I have way too many of these tick strips, they are like Tribbles in my shipyard, and still do not get this belt thing. Its so bad I had to switch to colored pencils. Thankfully this is just the first planking. My new brainstorm is to finish this belt which now only consists of 5 planks, i have 4 belts now 5,6,6,6, then redo the belts one more time. This time only doing 3 bulkheads 4,7, and 10; dividing them into three equal belts then do the battens marking the other bulkheads as per how the battens lie. I am very happy with my planking so far. I work each plank as its own small project. My order is to taper the wood, cut it just a bit longer, soak it and then use "brute strength and superstition" to make them comply. With my little trick to soften them kinking planks has become a thing of the past. After they dry i use sandpaper to fit them. I only work one side so I always have one true side. I do work the true side of the plank above the new plan when i think i can get some more room. I have made up some special sanding sticks to alter already installed planks. I am also only using the Original Titebond which is not waterproof. This allows me to go back and make small adjustments after installation to reduce my final sanding. By adding water and a little heat; the glue debonds allowing me to make corrections. I might be getting a little too carried away with this. I am however slightly concerned about the plethora of seams in the bow and whether this will have any negative effects on the final planking. I might just tree nail the crap out of the bow just to be safe. The stern is still a mystery but it does look like it is coming along. Only time will tell here. I am trying to make sure the wood has full contact with the fillers because it looks like I will be sanding the planks pretty thin to allow for a stern post. Until next time. Thanks for stopping by and comments are always welcome.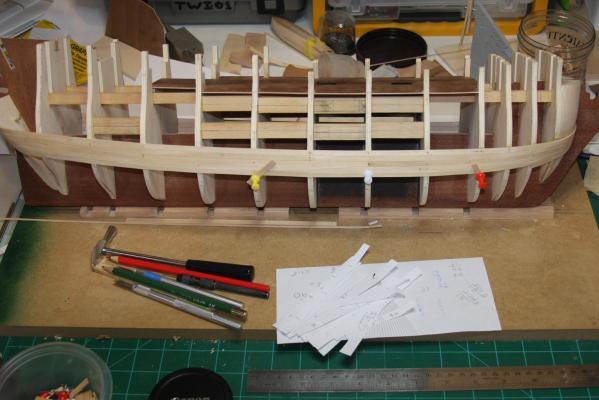
-
Ahoy Joe You will be missed.
-
Ahoy Scott WOW There are no other words
-
Ahoy Mates I would like to share with you a trick I have recently found. I take no credit for the discovery of this method but am only posting it as i have found it to be very useful Bending planks around the stern or bow of a ship can be difficult and after kinking many planks I have found that if you "work" the plank first you will be less likely to put a kink in it on your hull All I do is soak the plank in warm water for 10 to 15 minutes. Then I bend it around a 2" PVC connector. Slowly at first and once I get it to bend around this 2.5" circle; I flip the wood and bend it the opposite way. I repeat this, flipping the plank each time until it becomes soft and forms easily around this size circle. It will get more and more pliable with each pass. Then I switch to a large prescription bottle (smaller diameter circle) and repeat the bending process flipping the plank and bending it both ways. Again slowly at first. You will find that after working the plank in this way it will bend much easier on your ship and make the turns needed in the bow or stern without kinking. If I am not mistaken, as I am no expert in this field; all your are doing is softening up the lignin bonds in the wood. For harder or thicker wood; I will sometimes repeat the entire process, I have soaked wood up to three times, working it around my jigs each time and then bending it easily and successfully on my ship where as before it would have kinked.
-
- 6
-
-
HMS Victory by JPett - Corel - 1:98
JPett replied to JPett's topic in - Kit build logs for subjects built from 1751 - 1800
Ahoy Mark You are so right Yuck This picture is courtesy of http://www.eltallerdelmodelista.com/victory-corel-sm23-p-9348.html?language=en I am sure they do not mind me reposting it PS: As it this is an OOB build we will be doing this. I think if I match the wood carefully and cut it to show the parts that should make up the bow highlighting the seams with black paper caulking or dying the glue it will look acceptable and still be OOB Mystery solved: I will still be looking for this in the plans and will post it should I find it. Corel's plans are a puzzle but I am finding that the information always does seem to be there.
-
HMS Victory by JPett - Corel - 1:98
JPett replied to JPett's topic in - Kit build logs for subjects built from 1751 - 1800
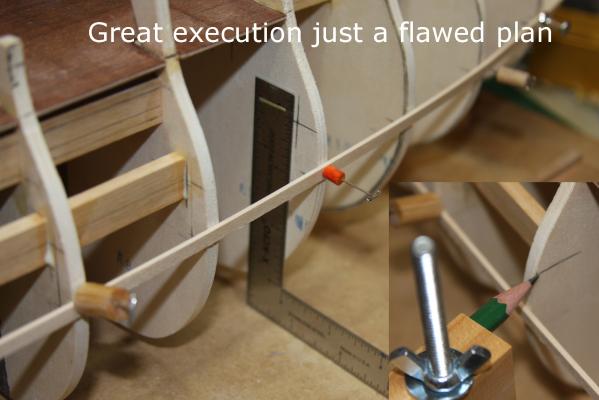
Ahoy Mates Augie: They are planking strips 5 mm by 1 mm My query is does Corel expect me to also plank the the plywood keel in the bow (the large expanse). This would not look very good nor would it follow any know method of shipbuilding, Kit or otherwise. I do agree that the exposed wood here would look much better covered in a way to represent it's actual construction. Sadly I can not find "or have not yet found" any image on the plans, mention in the little book or wood in the kit to do this. In my first post for this log I show all the included wood By adding the planking to the lower keel and I am now sure the keel post; one would think that something must also be added on the bow so that the keel thickness is consistent throughout the build (aside from any tapering) That is my quandary So "YES" Back to the build I keeping with my usual method of the great execution of a flawed plan I have found that after starting my planking i have done my belts wrong "AGAIN". Yes I did this same thing on my Ratt. Thankfully I caught my error much sooner this time and do not think it will cause me the headache it caused on the Ratt. My mistake is that I did not do plank widths for all the belts before starting to check my belts. I see now that the planks in the lowest belt would need to thin more then necessary and then flare out to full width tho meet the stern post. Sound familiar. With this in mind I will be redoing my belts and posting some pics. I do not think you need to do all the plank widths before starting but you do need to do some for each belt Bow, mid, and stern. Although I seem to be getting better at fighting the urge to lie a plank before its time; I see I still suffer from this dreaded infliction that causes so much suffering for so many in the world of shipbuilding. . -
HMS Victory by JPett - Corel - 1:98
JPett replied to JPett's topic in - Kit build logs for subjects built from 1751 - 1800
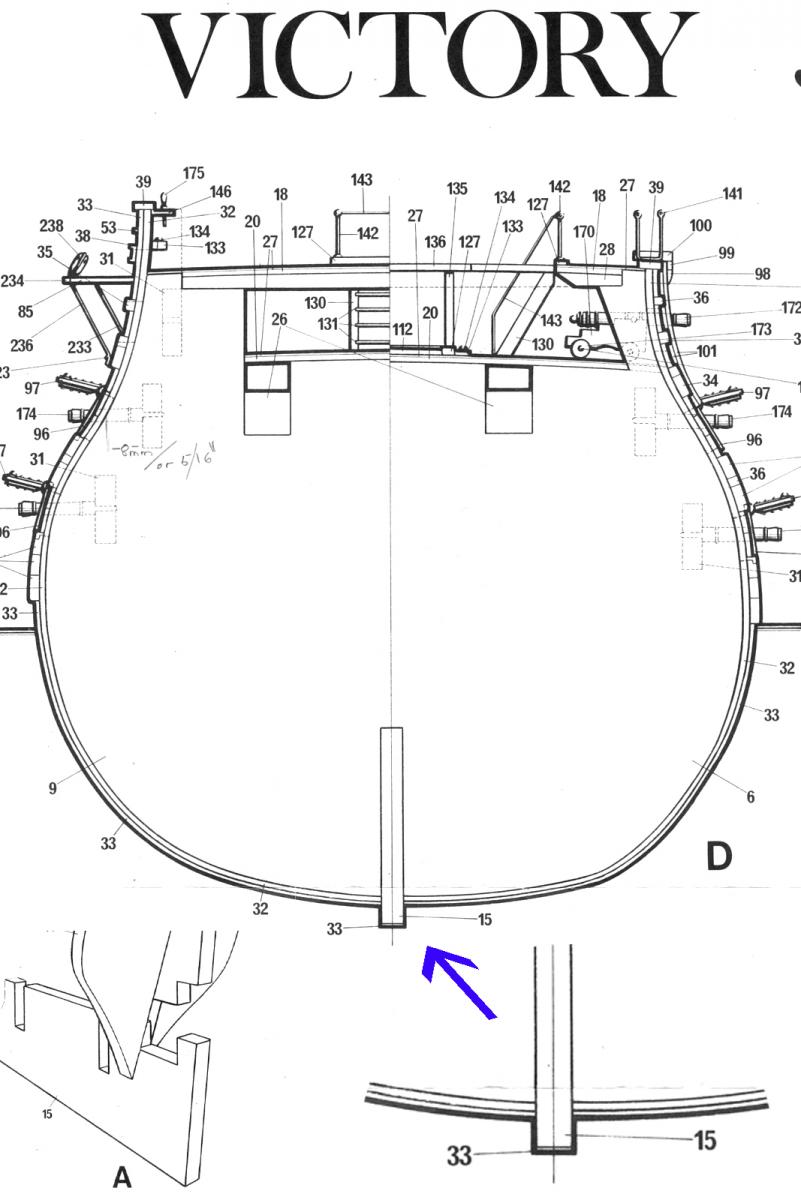
Ahoy Mates Bob: What a pleasure to have you aboard. As I think I have told you before but will mention it again. It was your original Bluenose log that got me interested in this hobby. It has a greatly influenced me on how I post my builds. So there you have it. We can all blame Bob Back to the build Ahh the mystery deepens Planking is proceeding well. I am half way through my first belt. Without jinxing myself I would like to report that planking Corel's Victory so far has been an absolute pleasure. The supplied wood for the first layer bends like licorice after soaking for 15 minutes and then being worked over my PVC and pill bottle. Not so pleasurable but more like solving hieroglyphics prior to finding the one ring to rule them all; or was that a stone, has been Corel's instructions. To further exacerbate the mystery of the stern post I bring you this tidbit I found last night. On the very bottom of this image on plate 5, it shows #15 which is the rear and mid section of the plywood keel. Covering this on three sides is a piece of #33 which you can see also covers the lower half of the hull. It is the finish planking which means that the plywood keel is to be covered. While you might think this is a good thing, and it does solve the stern post debacle it now becomes a not so good thing in the bow. I have not yet found any images showing the large expanse of wood representing the bow/cut water of the plywood keel covered; nor does the kit include any wood wide enough to achieve this. Either way I will have to take this one step at a time. Thankfully I have a few months to work this out. If anyone wants to spoil my little mystery by exposing the secret, please feel free to use my log.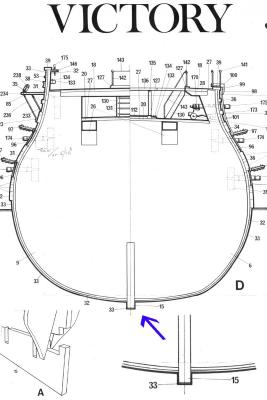
-
Ahoy Kenny I have found that by comparing the images showing your lighting technique to the body sections on the plans really "highlights" its effectiveness. It really is a very good idea. Thx for sharing it
-
Ahoy Kenny It looks really good so far. Your doing a great job. While I would agree that this is a really good idea I would still check the fairing of the hull with battens as described in the manual before making any changes. It is so much harder to put the wood back on. I use the 1/32 by 3/32 kit supplied wood. The battens will show you if you have installed and sanded the bulkheads correctly. plus if you will need to spile any planks. See the section on belts Figure 21 page 17. Spend time on these next few steps. It will determine whether planking will be fun or a tour of that other place.
-
HMS Victory by JPett - Corel - 1:98
JPett replied to JPett's topic in - Kit build logs for subjects built from 1751 - 1800
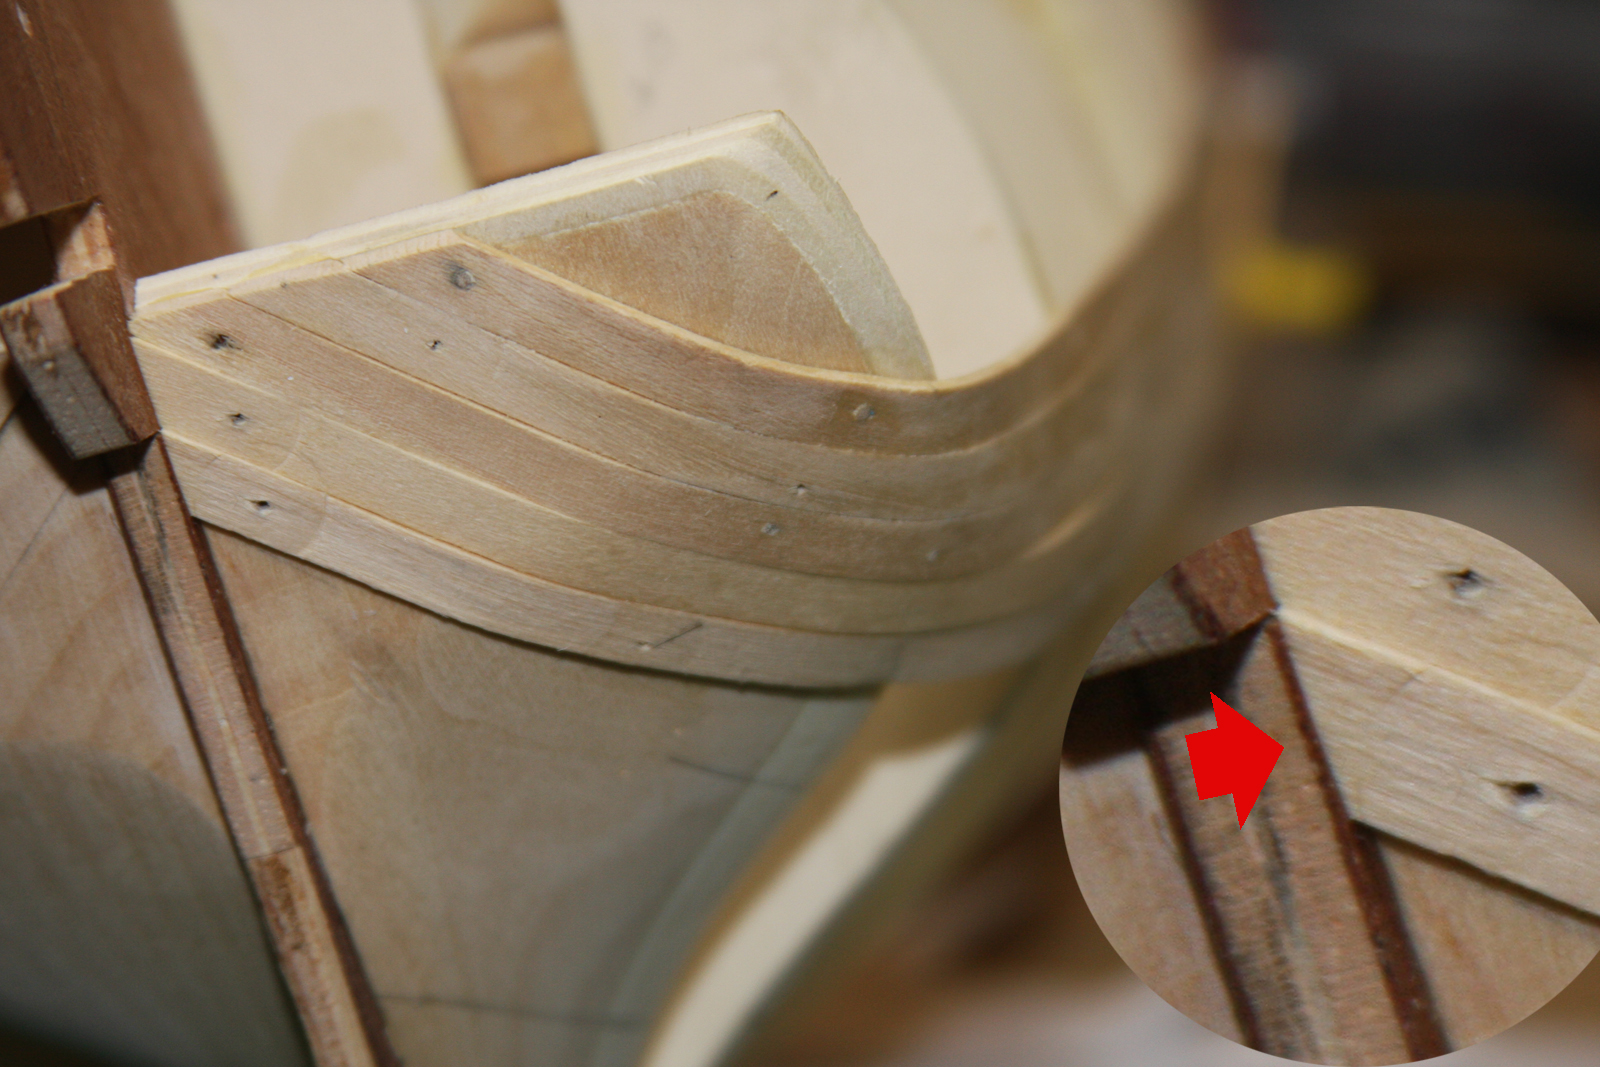
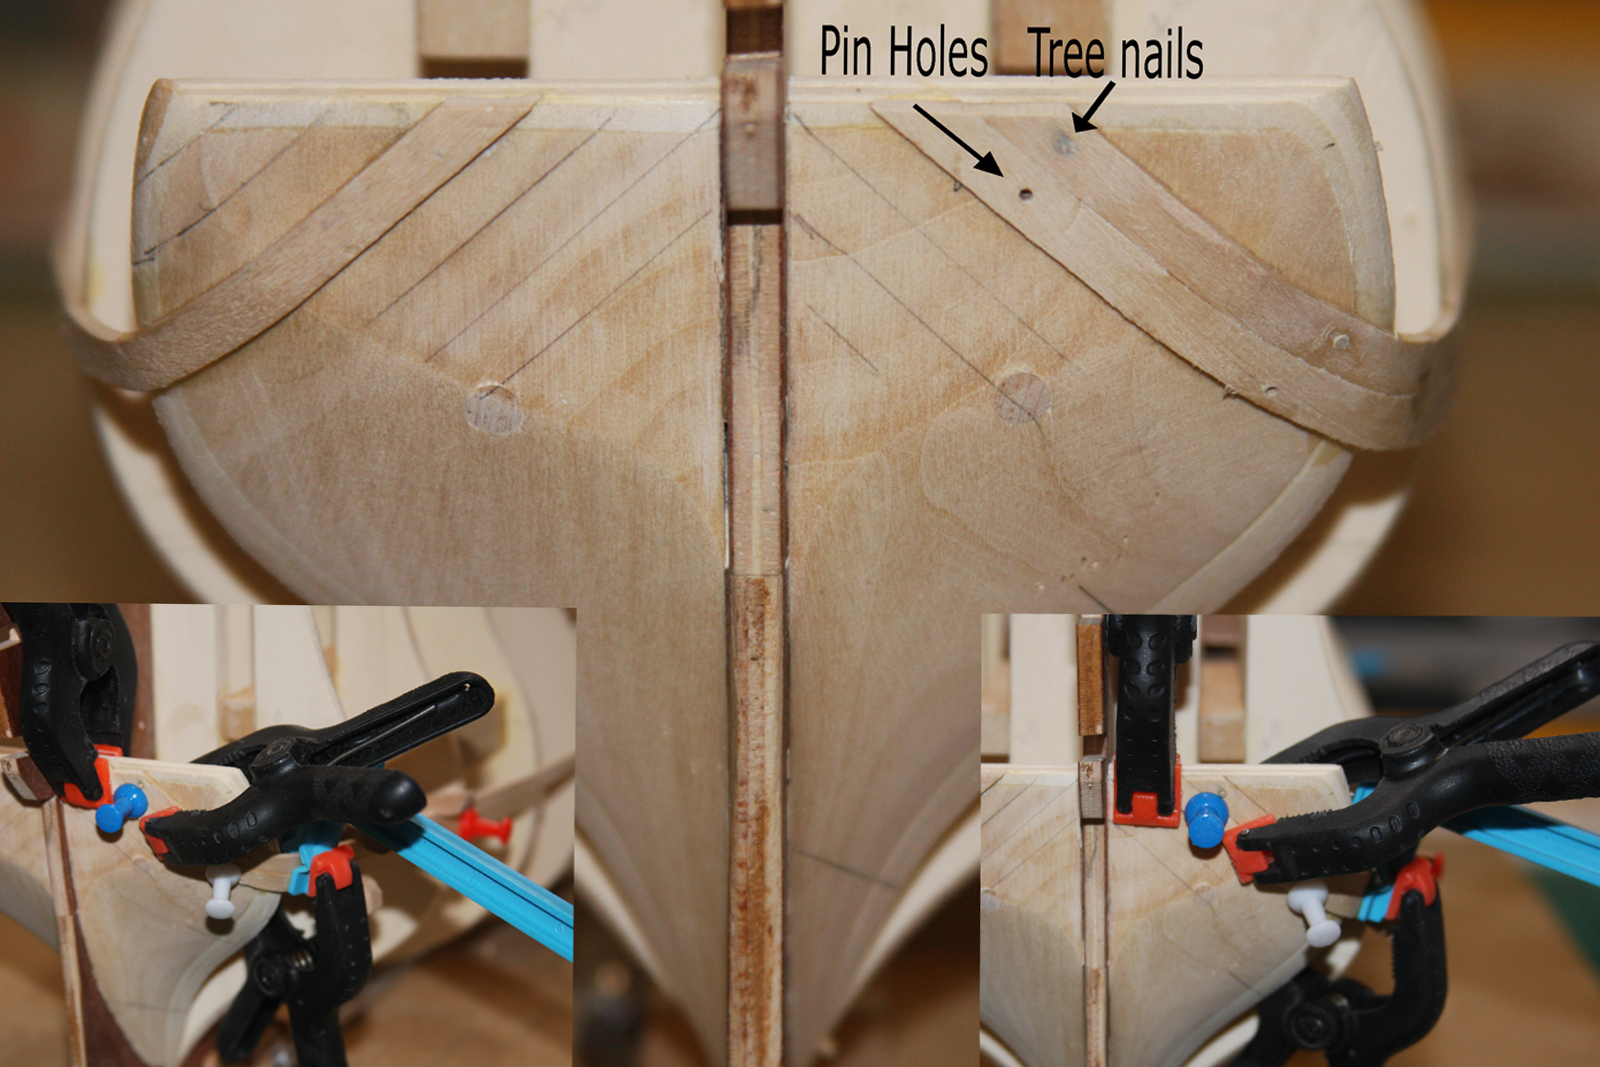
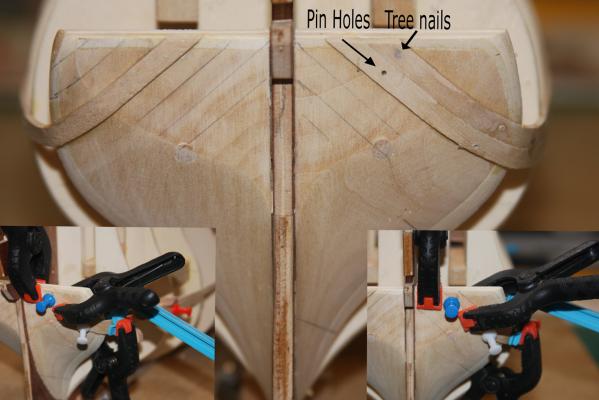
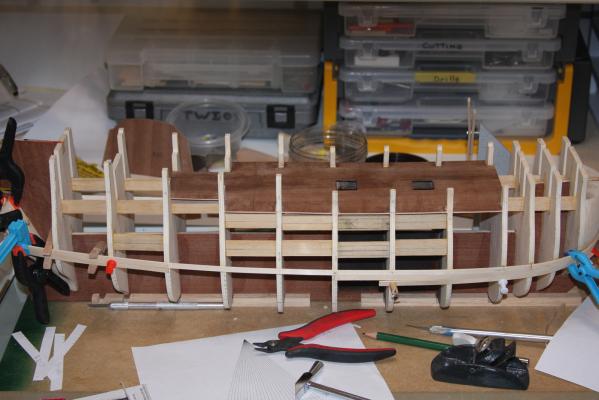
Ahoy Mates Scott: Yes, its an ADHD thing Sjors: Thx, not too sure about the falling thing though. Dragzz: Taking time is something I don't have a problem with. Now taking too much time, that is a different story. Slow would be an exaggeration to explain my progress. Back to the build Planking has commenced. I have found that planking is one of my favorite things to do in shipbuilding I spent a lot of time making sure the first two planks which represent the last wale plank were correct. I knew from my last endeavor that this first plank would determine the run of ship. Normal procedure in my shipyard seems to be to do one side, followed by the other. Then after doing the second side finding flaws with the first and redoing it. Actually it went even further here: After making corrections to the first I then proceeded to find more things on the second (see pics). As I stated getting this right and starting off on the right foot is "to me" very important. Any time spent making these repairs always comes back to me during planking. I am not a big fan of this work but I know that it lets me enjoy the planking stage. One of my fixes was to raise the point in the bow. Although I took careful measurements from the plans and spent some time on it: it just did not look correct. I made the call to go with what I "with lack my experience" thought was correct and not what I was seeing on the plans. I am sure there will be retribution but this is the first layer of planking; and we have some room to experiment. My adjustments in the last post did reduce the klinkering but not enough and the planks that followed let me know if I did not change this I would be spiling sooner then I would prefer. In the pics you will also see that I have started on the cannon supports which also do not follow the plans. This was me just being stupid. I am not sure if this mistake will cause a problem but will need to check these after the first layer of planking. I really need to develop a habit of referring to the plans more before I start anything. I did look at the plans , just not all of them. Checking this sheet is even mentioned in the little book which makes my mistake even dumber. What I did was to measure the height of the gunport and put the wood between the bulkheads at that height on both bulkheads and at a depth 8mm or 5/16" on center. It should be fine where there is a single gunport between the bulkheads but might require a correction on any that have two. What I missed was the wood should not be at the same height on each bulkhead. Thankfully the port supports I have completed so far are in an area that has very little sweep. I also used a full length filler where the entry is supposed to be. The plans show this has a half filler which I will not be doing. I could hear it rattling inside the hull after I knocked it off. After I finished with the planking off course. I will have to give this some more thought. The rest of these will need to follow the sweep which will make them considerably harder to install. I am not good at measuring and then cutting angles but I guess it is time to improve that skill too. I also have the first two that I installed which are 2mm too low to contend with. These are not easily removed and I am thinking of recessed holes or washers to adjust the cannons should they need it. I can always remove/cut out the planking around that bulkhead if I remember to check them before starting the second layer. In the pics you will see that I am following Chucks planking method using the fan and tick strips to mark every plank. I made a slight change where he uses string to create the belts. I like the 1/32 by 3/32 basswood. It tends to let me know how much klinkering my paths will cause and allows me to adjust them to reduce it. It was here that I made the call to change my first plank. I am going with 3 belts 7, 7 and 8 planks. For anyone following this build that equals 22 which is considerably less then shown on the plans. This difference has caused me a bit of a conundrum in the stern as I do not know how to plot the planks here. My measurements tell me that the space I need to cover here is equal to the width of 25.5 planks. Where this totally confused me on my first build I now know that because the planks will be terminating here at an angle their widths will be greater. This does not however mean I know at what width and where so I will be winging this area on this first layer. It will be a learning experience that thankfully I have the good fortune to experience and then cover with the second layer. I was hoping for a drop plank in the bow but my measurements tell me otherwise. I purposely measured for one less plank where the filler meets the keel on the first belt to cause one. I am also using a plane to shape the planks. A really cheap POS I found at home depot and spent a few hours tuning. I might upgrade it. I am really hoping to improve my skills with this tool, I really don't see how they could get any worst. I am enjoying it but can see I need a jig of some sort to hold the plank. That and cheap ones really are worthless. At least this one is Planking in the stern is also not as bad as I expected. The planks don't seem to mind the bend I have created for them. I use a piece of PVC pipe first then switch to a prescription pill bottle to preform them. I actually have found that if work them, bending them repeatedly around my forms; flipping them over and bending them in both direction they soften up and have no problems with the complexly of this stern. I am also using a rather large pin that I predrill and actually hammer in to persuade planks. I need to miss less with the hammer. The pins leave a rather large hole that is perfect for a treenail. We all know how much I like tree nails. Not as much as I like beer but it is on that list. Thanks for stopping by and comments are welcome. Please do not hesitate to critique my work. All I ask is that it is constructive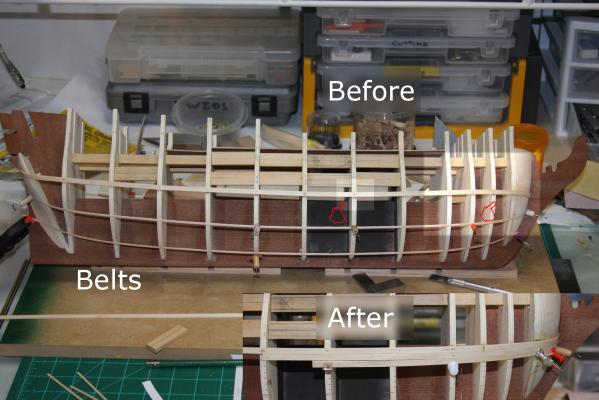

-
Ahoy Scott and Kenny While the top of the wale does follow a line similar to the outside edge of the deck it does not follow it precisely. If you look at the plans you will see that it starts at the deck in the bow then drops slightly below midship and then rises slightly above it in the stern. I only know this because I followed the deck line and it caused my window in the stern to be off. On the plans that show the "inside view of the bulwarks" , the image just below that shows the deck as two broken lines that are both above and below the wale. They are marked "top of deck center" and "side" with the side also showing the position of the scuppers
- 264 replies
-
- 1
-
-
- rattlesnake
- model shipways
- (and 1 more)
-
paint or stain
JPett replied to lionfish's topic in Painting, finishing and weathering products and techniques
Ahoy Mates I have thinned paint and used it as stain to color wood. I use Winson and Newton Artisan Water mixable Oil Colour http://www.winsornewton.com/na/shop/oil-colour/artisan-water-mixable-oil-colour I use mineral spirits to thin it for use on wood. Takes a little bit longer to dry but I feel it penetrates better. Then I clear coat it with poly The only problem with this method is I can not get a fine line to delineate so must use paint to transition it. After doing the poly top coat, I tape it off and do a paint line. I usually work around trim or the wales so where I do have a paint line it looks accurate. I am sure it would be the same for anyone trying to use different stains. I find the yellow ocher produces a nice period color but still shows off the wood. -
Ahoy Kenny If i am not mistaken almost all ships used a tiller back then. The wheel was really just an optional accessory to change the rigging that moved it. The Ratt was a base model, no power steering. It is an interesting subject. We see it as a convenience, they might have seen it as something else that could fail and cause a major problem. Just my thoughts, I looked at your pics and I see that you marked the WL on the Bulkheads and Keel. Provided they are in alignment (IE: connecting) then I would just add a spacer to bring the false keel up. Use caution when sanding the deck. It is very easy to sand out, Not so easy to sand back in. I sanded my deck flat; it took me a month to fix. I could be wrong but I think Scott is just using the straight edge on that level. Maybe he will chime in and let us know
-
Ahoy Dragzz Thanks for posting this So you are planking over your ports and coming back to them, cutting them out a second time. How is this working for you. Inquiring minds want to know. I also see the uppermost plank meets the top of the filler perfectly. Did you start here or measure and plank up to it. Lastly: How is it bending Corel's walnut. Your planking looks really good coming around the bow. Actually It all looks really good
-
Ahoy Brian I do not have the mill but do have the same XY table on my Vanda lay set up. I was thinking of having the outside of the wheel knurled so you could grip it and turn them with your fingers.
-
Ahoy Dragzz I am a big "fan" of the hobby heat gun for forming planks. For unruly planks, I soak them and then wrap the area in a wet paper towel then aluminium foil and nuke them with the gun. Just don't burn your fingers on them If you use PVA glue it will also debond joints (wet the area first) I use a paint brush and apply water and heat to undo my screw ups.