HOLIDAY DONATION DRIVE - SUPPORT MSW - DO YOUR PART TO KEEP THIS GREAT FORUM GOING! (Only 13 donations so far - C'mon guys!)
×


JPett
-
Posts
881 -
Joined
-
Last visited
Content Type
Profiles
Forums
Gallery
Events
Everything posted by JPett
-
 Ahoy Dragzz Your first planking looks really good I would highly recommend doing the belts and marking off the hull as per the planking tutorial. Its might seem like a lot of work and is: but actually ends up being a lot less work in the end. I learned that the hard way on my Ratt.
 -
Ahoy Mark I think your being smart. The stand for the ship is more important right now. While a Dremel is fabulous tool it can be money whore and is not necessary to construct a model ship. Disclaimer: I own a Dremel and love it. I have the flex shaft too. They are a lot of fun and can do a lot. http://modelshipworld.com/index.php/topic/1643-x-y-attachment-for-dremel/?p=239341
-
Wappen von Hamburg by andy - Corel
JPett replied to andy's topic in - Kit build logs for subjects built from 1501 - 1750
Ahoy Andy Thanks A lot of people complain about Corel's instructions. If it helps I have found that the "little book" is just a basic guide directing you to the plate # and illustrations which need to be followed. The illustrations are truly the instructions. I am building the Corel Vic and spend many nights sitting in bed with the little book and the plans. Their really are not bad but do require that you have a basic understanding and you do seem to have that covered. It is also important to read the entire book before starting. On my build I found a few things towards the end that have me making some changes in the beginning. I am not following their construction order as a result of this either. I also had a problem with inventory. No quantities and some part numbers or "plate reference numbers" are truly just a reference because they use the same material as another making inventory somewhat confusing or at least more work then it already is. Good luck and happy sanding: I am looking forward to your progress. The sooner you get ahead of me the better off I will be -
Ahoy Mates Although there might be many ways to skin this cat trying it with the part is not one of them. Anytime I run into a difficult task I experiment with something other then the part first. With laser cut kit parts there is always plenty of unused wood on the same sheet.
-
Wappen von Hamburg by andy - Corel
JPett replied to andy's topic in - Kit build logs for subjects built from 1501 - 1750
Ahoy Andy Your Sovereign build was beautiful , I only found it at the end but thoroughly enjoyed reading it. Thank you for taking the time to post, Looks like I have a set of box seats for this one. Ground floor too Could I request some pics of what is included in the Corel kit before you start -
X-Y Attachment for Dremel
JPett replied to Martin W's topic in Modeling tools and Workshop Equipment
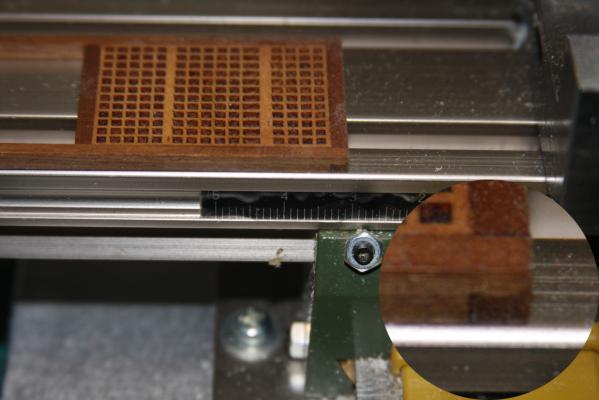
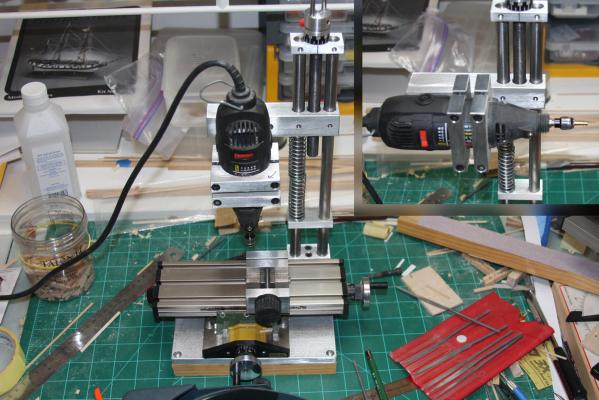
Ahoy Mates Well I received the Z axis and like my Drill Press Plus it is robustly build and slightly lacking in the polish that you get with larger manufacturers. It is easily installed and converts my Drill Press Plus into a precision mill. Swapping between the drill press and Z axis takes less then 3 minutes. I have had enough time to comment objectively on this tool and for the money will give it 4.5 stars out of 5 overall It is not a Sherline but with a total cost of under 275 for the Drill Press Plus, Z Axis and Proxxon table, for me I do not think I could have done any better. It drills, mills, sands, grinds, I have even used it as a lathe and stand for my flex shaft attachment. I purposely took this picture showing it sitting in the mess my shipyard becomes during some projects. Its small foot print is one of its best qualities and makes it something I don't think twice about using. As I had no prior milling experience, the Vanda Lay has also been an excellent introduction to using this type of tool. Some may question why you might want a mill for ship building, I think my pics say it all. I would have never been able to create these extras on my ship using standard hand tools. Some I am sure could, but not me and these touches add a level of detail to my projects that I really enjoy. None were really that difficult either.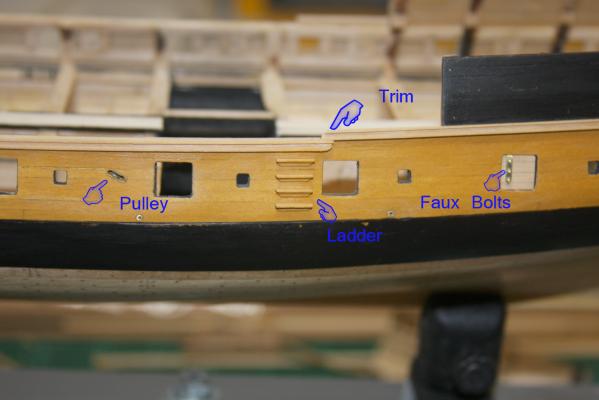
-
Ahoy Dee Very nice, thanks for sharing
-
Ahoy Chuck Do not underestimate what will be required to construct this kit. Solid hull shipbuilding is not the easy way. There are quite a few logs here where very talented people have produced some highly respectable solid wood hull kits. I for one would love to see a review of your kit before you start if that is possible. I will also wish you the best on your journey and look forward to seeing your log
-
Ahoy Brenticus I thought I would post a pic to help you out if you use quality transfers, follow the instructions, you will find that they are very easy to use , provide a scale "raised" appearance and look great. You can also clear coat them too as they are pretty resilient and "yes" they come in gold. These letters are only 5/64" high and 11 letters looks to be 34/32" across This took me about a half an hour and was my first take. I might just be done Well after I hit them with a few coats of some WOP and shave off a 16" on the right.
-
Ahoy Mates I may have found my Ratt cannons @ our new sponsor http://www.agesofsail.com/ecommerce/am4175-12-amati-dummy-cannon.html?SID=g7eb7n35jpc53g9snjhjsu7151 I ordered 10 of these plus 2 each of the others and a toy I will post some pics when they arrive Hopefully of them installed They also carry replacement wood for kits.
-
Ahoy Mates I thought maybe a picture might help I would be willing to do the half cannon: ME used to sell those too. I do not see me replacing all of them so they match but leaning more towards just using 10 if I can't find the others Thanks for the likes and comments

-
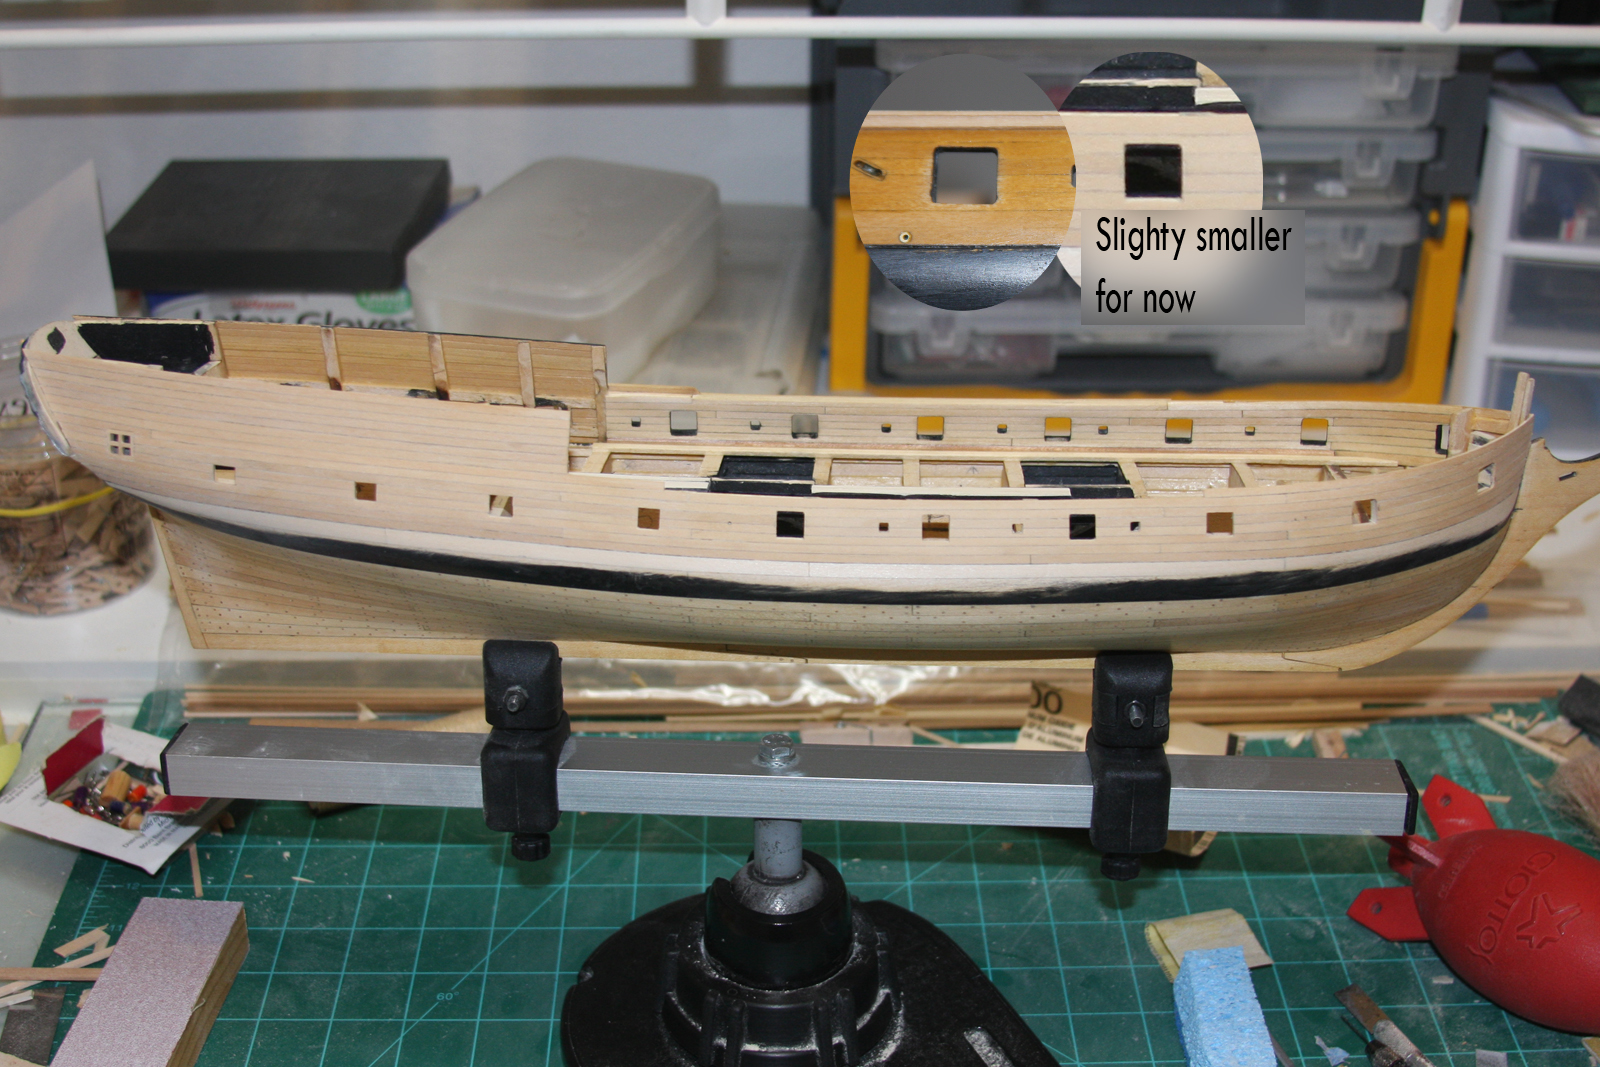
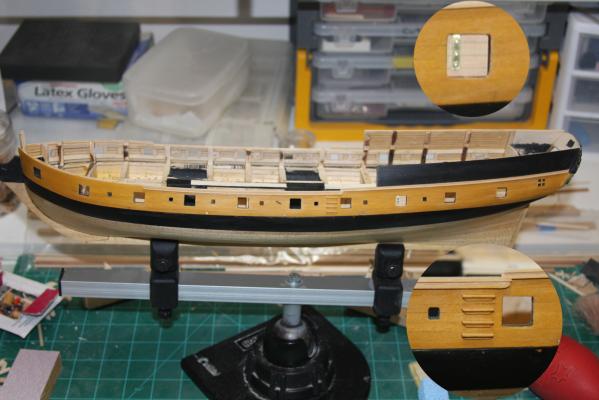
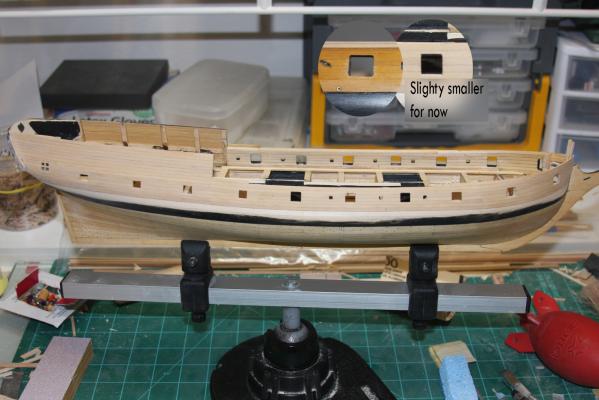
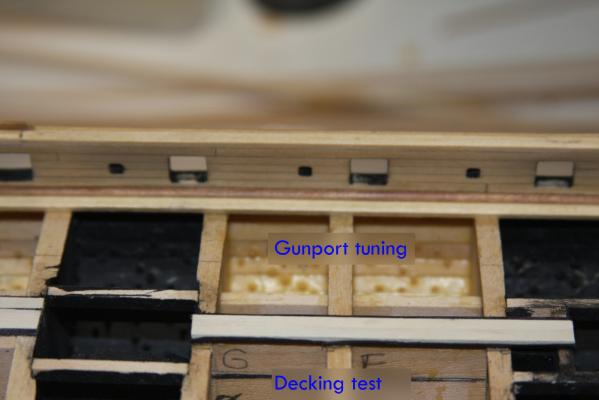
Ahoy Mates Well its been quite a while since my last post but that does not mean nothing has transpired in the shipyard. We can say for a few months it was next to nothing but the shipyard never really shut down. As anyone who has been following my log knows, I seem to have a slightly unhealthy obsession with gunports and their appearance. This is combined with my ignorance and undeveloped skills, but overcome with by a level of determination that borders on insanity. It has taken me quite a while to reach this point. The gun port framing was done six times on one side. This BTW was a mistake as I learned that the position of gunports does not have to be determined by the framing but can be adjusted in the final filing and sanding after planking if you prepare it this way. On my build around "take 4" I made the framing for a slightly smaller port using slightly wider pieces of wood. then I finished them to the proper size and orientation with a file and sandpaper after the planking. Care and caution must be exercised as any wood removed can not be easily replaced but for me this way has more options and yields better results in much less time First I painted the interior sills red which I loved on everybody else's ship but for some reason I did not care for on my Ratt. Probably because I am only doing the sills. Black was brought out but the Red put up quite a stink and did not leave with out a fight. I use long paper strips to transfer measurements from the port side ports to the starboard side ports which will remain slightly smaller until the inner gunwale is planked. I mark the paper and then cut those marks with my Xacto knife so I can accurately transfer/mark the other side of the paper. Port is a mirror to starboard so you need to flip your ruler. It all sounds so simple now "lol" After an accident in the shipyard I learned a nice trick to paint the inside of the gunports. Apply a thin coat of WOP to the surrounding "wood colored" area first then paint. This way you can come back and easily sand away stray paint to get a sharp line. Any paint on the wood finish just sits on top of the WOP and sands away easily leaving a sharp crisp line. A fresh coat of WOP prevents any paint from soaking into the wood like it did on my initial attempt. This is much harder to correct BTW. In one of the pics you can see where I have gone back and re-re-re-filed the line for the lower sills which was not up to par after sanding. The black really shows any irregularities in your work. I will re-coat with WOP, and repaint until I get get the clean "straight" line I want. Its a side project. I spent a lot of time with the trim. What you see here is "take 4" on the trim and "take 6" on that fancy step down "thingy" which I think I will now go with. I was burning the midnight oil with the Vanda Lay trying to come up with something here. I made both the trim and steps with the Vanda Lay. Although the trim does not follow the plan it does look "acceptable" to me. My stern window position is too high and has the "scale" trim running into it. It 's not a very good look and after multiple attempts I have decided that a "trimming of the trim" is my best option. I was however able to duplicate this window and its height on the starboard side. In shipbuilding; it isn't whether or not you can perform the task but whether you can repeat it on the other side that counts. Speaking of which I did make one more try, to save the step in my wale plank by adding a piece of wood which has now been completely removed, I am finding that many things I did wrong in the beginning are still haunting me and I expect this to continue just a little bit more. Like in chess I see it pays to be a few moves ahead in shipbuilding. I still have some minor issues with the poop and stern decks, but after that I am telling myself that my earlier mistakes should only cause minor issues. Well; less me cutting out the transom windows but I am working to resolve that now. I am also experimenting with a slightly "weathered" look which I have found a blue kitchen scrubber sponge to be very useful for (see insert). In one of my painting accidents I recently also found that simulated gunpowder residue can be created using flat black oil paint and a wide feathered brush. This also adds another nice weathering effect, although I am not sure if I will use it on this kit: We will see. I am now starting to experiment with decking using paper for chalking and my gunports. Can you say ADHD. I really like the paper and found that just bending the gunport hinge around the lid looks much better then creating a full on hinge at this scale. I am not a big fan of the cluttered but its historically accurate and functioning look that I seemed to be able to create so well with my previous attempts. Sometimes less really is more Last but not least. There is concern as to whether I will be able to show 20 guns. I have 10 of the nice brass ones and can not currently secure anymore. I called Frank and Chucks are too big too. If anybody has a lead as to where I can get ten more of these brass cannons please let me know Thanks for stopping by
-
Ahoy Dragzz Your progress is amazing
-
HMS Victory by JPett - Corel - 1:98
JPett replied to JPett's topic in - Kit build logs for subjects built from 1751 - 1800
Ahoy Sjors Thanks for stopping by. I considered replacing them with basswood but in hindsight I am glad I did not. The stern filler is a complex shape and would be very fragile had it been made out of basswood. I also think Corel used this harder wood so that you could put fasteners into it during planking which I think will be very helpful when it comes time to make these bends. I even think they included some nails with the kit. I might use screws -
Ahoy Jeff Go to You-Tube and search for Warhammer. Those guys are the bomb when it comes to painting small scale details and have posted a ton of stuff.
-
Ahoy Andy She really is coming along great. I love your rigging As for a light I found the clamp on fixture with the magnifier very helpful. I started with the cheap one Fry's sells and have since upgraded to the overpriced one Uline sells http://www.uline.com/BL_8980/Industrial-Illuminated-Magnifier
-
HMS Victory by JPett - Corel - 1:98
JPett replied to JPett's topic in - Kit build logs for subjects built from 1751 - 1800
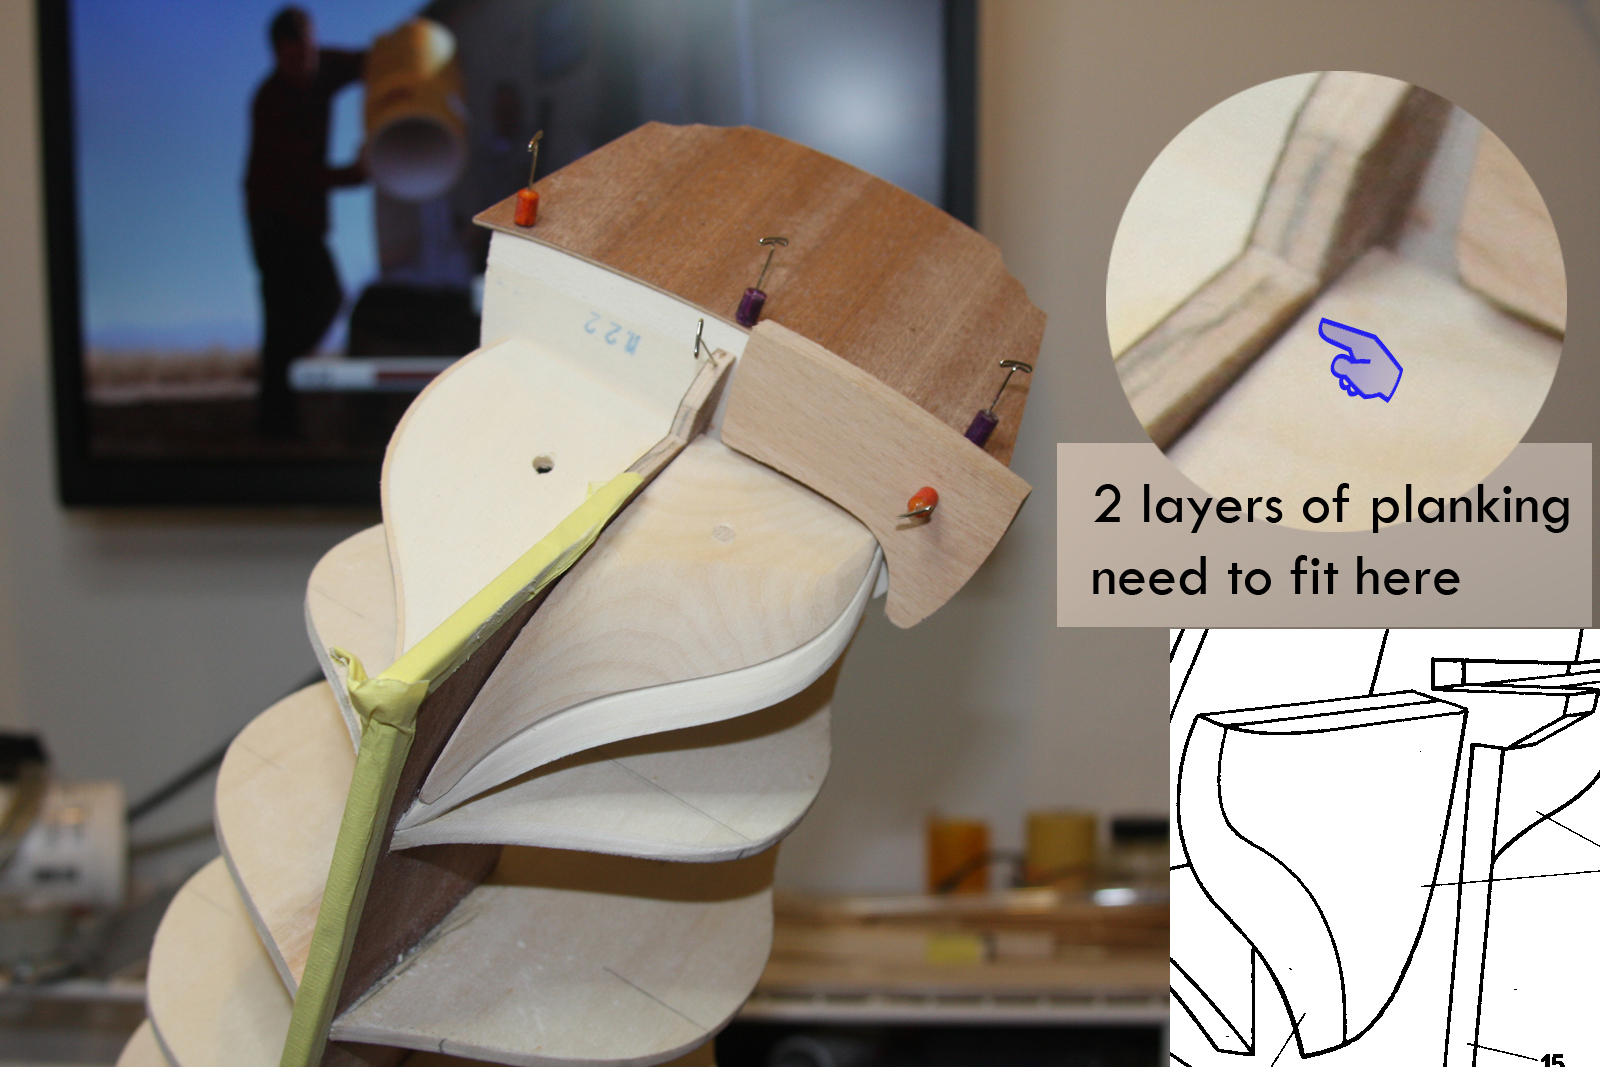
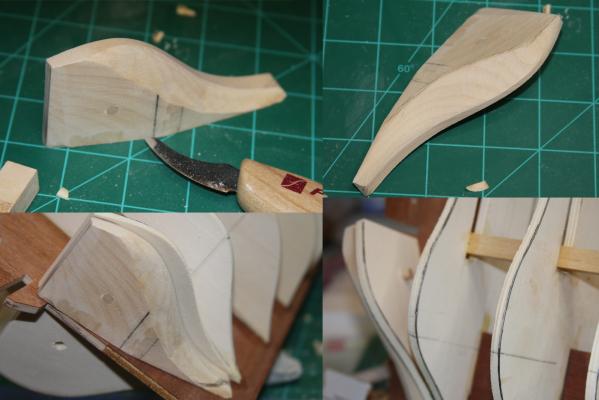
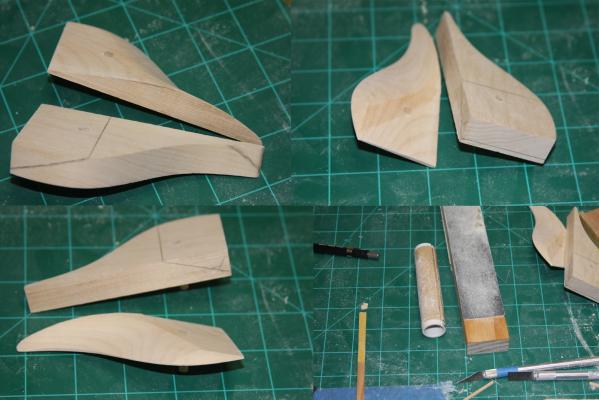
Ahoy Mates Dragzz: Yes, the tool has already proved very useful in tests to position the mounts for the false cannons (part 31) I have completely changed my approach to a much simpler way. I will cover this in another post BW: I have added some basswood and built out the bulkhead. I am actually quite messy with the glue but always clean it up. I use one brush to apply it and another larger one to mop it up. Augie: Thanks, I hope your somewhere nice with the Admiral, reading this on your phone Lawrence: Truth be told, had you not taken the time to post this in your log I may not have ever seen it, So Thank you Julian: Welcome aboard. I would agree that starting with the Corel Vic isn't just jumping into the deep end but doing so from a cliff. It has been done with success but I agree that starting with something simpler is a good idea. I am following this build with my first one. Once I get this one to the planking stage; please note construction will grind down. I really found I liked planking and want to start here before I forget what I just learned doing my Ratt. I plan to spend 6 months to a year perhaps even more planking this kit. This way I can sit back and really enjoy it; the right way, one plank at a time. Most of my build time will then go to finishing up my first kit. Back to the build I am posting some pics to show my thinking and how I approached this stage of the build. I find rear fillers to be very challenging. I received a lot of help on my first build, THX MSW; which really influenced my work on these fillers. Hopefully I can share some of that information with my post here. I have also decided to post before I start on the port filler to show a comparison between the almost finished and untouched blocks. I am now at the point where the starboard side needs to be glued for the final sanding and want to use it to carve the port side. Doweling the fillers really worked out well for me and i highly recommend it. I did way to much sanding on this side but now with a confirmed shape I should be able to speed things along with more carving. In one of the pics you will see a round sanding tool. This was very helpful and is just a piece of PVC cut to fit between my thumb and pointer, split down the center to accept sandpaper. I also did a mock up of the stern area. I found that parts 50 and 51 actually show the final curve of the fillers. I need to give some thought as to how much more to reduce the upper part of the fillers. And how much to sand down the first layer of planking so the finished planks butt up to the keel where the rudder is mounted. I am wondering if it might also be easier to thin those planks before attempting to make that bend during planking too. The pencil marks on the bulkheads are my heavy hand alert and the yellow tape is my Oops prevent "er" . PS: Yes that is Pinkman putting out the generator fire. Netflix is a must for filler sanding. I started it from the beginning and yes it took me that long.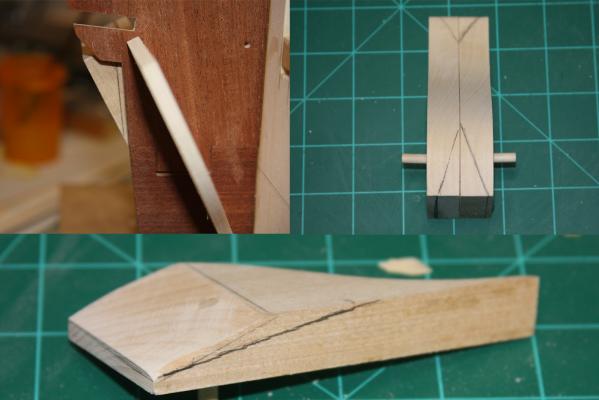

-
Ahoy Brenticus I like the Dry Transfer Decals for lettering on my models. http://woodlandscenics.woodlandscenics.com/show/category/DecalsGraphics
-
Ahoy Dragzz Sounds like you have the luxury of some time to research. With that planking job I see in your future this just might turn out to be a good thing Here" a few of my favorites "lol" http://modelshipworldforum.com/resources/Framing_and_Planking/Lining%20Off%20your%20hull%20for%20planking.pdf The instructions for the Ratt are full of information which we both know is sorely lacking in Vic's little book. Planking Tutorial DRAFT r6.pdf MS2028_Rattlesnake-Instructions-Complete.pdf
-
Ahoy Scott I don't see any problems with the coils. Once completed your kit will be on display I would even go as far as to say "it would be a very good way" to show a ship.
-
Ahoy Augie "Sir" Beautiful work, and thanks for all the tips. Is the sander new for the shop Have a safe trip with the Admiral too, You being the rear on that team and all. See you in October
- 2,191 replies
-
- 1
-

-
- confederacy
- Model Shipways
- (and 1 more)
-
Ahoy Mates Just a little reminder regarding the rotary "power" tools. Don't forget to include a good pair of safety glasses. I would rate these puppies as one of the most dangerous when it comes to your eyes.
-
double planking glue
JPett replied to leroy's topic in Building, Framing, Planking and plating a ships hull and deck
Ahoy Mates While I am a big fan of PVA I did find when i did my second planking with walnut a little bit of CA proved very helpful http://modelshipworld.com/index.php/topic/939-1949-chris-craft-racer-by-jpett-dumas-kit-no-1702/?p=24482 -
Ahoy Scott Nice job on the boat. That one's not an easy gig
-
Ahoy Dragzz I think slow is the right speed for this work, It really looks good and keep up the good work.