


fnkershner
-
Posts
1,595 -
Joined
-
Last visited
Content Type
Profiles
Forums
Gallery
Events
Posts posted by fnkershner
-
-
No Stand. What I did was use the marker to place a small dot on the hull on the laser line. You might also want to test your line by rotating the model to make sure your line is the same from port to starboard. If you are spray painting as Per was you can just lay masking tape on the laser line. If you go to my Syren log you will see a picture of the whole setup. Model on the bench with the laser on a tripod facing the model.
And Per thanks for giving me some space on your log.
")
PS Mike that looks like a nice T38 in your avatar. Both Per & I have built one.
- Nirvana, popeye the sailor and Elijah
-
 3
3
-
Ok maybe its time to come clean here. Per & I have been discussing the best way to mark the waterline on a model. My wife has one of these levels that projects a laser line across the room. She uses it when hanging pictures in the house. I borrowed it to try out on my model. As Per describes above you need to get your model level both from side to side and front to back. Now in the case of my Syren, the plans show that she is just a bit lower in the Bow. so being level is not always the right solution.
Once you have your model setup correctly you need a tripod or a similar stool to put the laser on and project the line across the model. I have found this is the best way to project the water line on any model.
And for Christmas and for all his help I sent him a laser to use on his Bluenose. The result is what you see above.
One suggestion - for those models that the waterline is not even with the deck as the Bluenose is. I used the plans and created a mark on the model with a black marker that was at the bow and where the Waterline ended. I also created a similar mark at the stern. I then adjusted the laser until it touched both marks. Give it a try.
-
-
-
Any News on Vol 2? I agree with all comments above it is a beautiful book I am very much looking forward to Vol 2. the very nice people at SeaWatchBooks tell me they are waiting for some final words from Grant. Please tell me when this will be completed. Vol 1 is one of my most prized books.
-
Isn't that Laser just the thing! Merry Christmas.

- popeye the sailor, Nirvana and Elijah
-
3
-
Dave what did you use for Hanks on the jibs? I can't wait to see what you do with the fisherman sail. That took me quite awhile to figure out the running rigging. A very unusual sail.
Nice work by the way! She really is a beautiful lady.
- Elijah, genericDave and Nirvana
-
3
-
Jim please PM me with an email address. We have a lot to talk about.
I will make sure you are included.
PS you and I were certified the same year.
-
Derek - Jack just said it all better than I can. I can only add that if you do everything as he has mentioned and then add a coat of Wipe On Poly you should be good.
-
Jim - I see you are in WA. You should come to one of our club meetings. Do I have you on the distribution list for our Newsletter?
For those who don't know I am the president of the Puget Sound Ship Modelers (PSSM)
And thanks to all the comments.
PS This is the first model I am doing almost exclusively with CA. I started this way because I had a deadline. Now that the deadline has past. I am still doing it just for fun.
-
Anyone see the new Ratline tool by MS. Any experience?
-
Rusty - I was worried that Sanding would just spread the issue. most of the problem is from CA + Graphite. Can you tell me more about Scraping? I tried using a single sided Razor blade. It didn't seem to help much. Maybe I just need to work at it more.
PS Note to self - DO NOT Grab a single sided razor blade without reading glasses on. I just go the bandages off this weekend. I sliced my finger very nicely.
I hope to finish the deck this coming weekend.
-
Rusty - You are one of the best builders on this site. I am glad to see you redo your Syren. I hope to learn from you. Since you built yours from scratch before the kit was available. Maybe you can offer some insight on a few things.
First off, is it safe to assume you use Blocks from Chuck? If so can you offer an inventory list of your blocks and the sizes?
Also for the stern decorations, did you carve them? are yours from wood or Metal?
Last question (for now
) Have some very nice Cherry. Can you recommend somewhere on the deck furniture that I might use Cherry?
-
As far as the name goes, may I suggest Decal Paper. This is what I used on my Bluenose. You can use any color you like and pick your font. It works with almost all Computer printers.
- Nirvana and Don Quixote
-
2
-
I think that is the trade name. If you go to a model railroad store I am sure they have it. There is lots of info on this site about this stuff. You will need to clean your metal parts thoroughly and you will need to make sure the part is completely dry after soaking. there are lots of approaches. I use finger nail remover for the cleaning step. and I let is dry for at least 12 hours then I drop it in the bath of Blackin-It. let that sit for about 4 hours. Then wash thoroughly with water (to stop the chemical reaction). And dry with soft cloth. I have never used it on anything other than Brass or Copper. I am told it works on other metals. I suggest you experiment.
- thibaultron and mtaylor
-
2
-
Rich - On different Model I had to use pins to mount this rail. the combined pull of the lines made it come loose. And you can imagine the difficulty finding this out later when rigging.
Your Belaying pins look nice did you round them off from the pins provided? Mine look pretty square.
-
Derek - May I suggest you try Blackin-It instead of paint for you Cannon parts. Also I have used Epoxy often. But for this project I would suggest CA glue it is much easier.
- thibaultron and Canute
-
2
-
-
Ok I get it. But most of it will be covered by planking. Nice wood. I hope it wasn't costly.
-
Peter - I know we are often our own worst critics. I punish myself over my work. From where I sit it look wonderful. All I can offer is what I have done. I started the treenailing. but I didn't finish because I had a deadline to achieve. Also like you I was anxious to see how it looked. Since then I have gone back and I am now finishing. I decided to use a number 74 drill (slightly larger than my previous effort) and I am using a different putty. I intend to put on 2 coats of the Oak stain and 1 coat of the Wipe on Poly. As Jim mentions above I am not sure when I will do the Poly.
-
Jim - what are you using for the lintels and sills? looks like a different wood. Maybe Cherry?
-
-
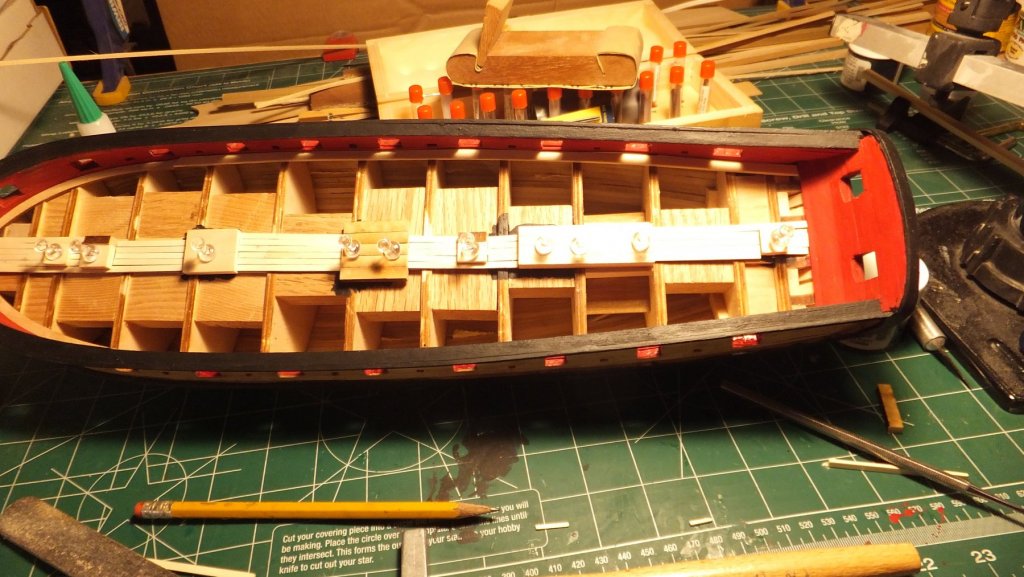
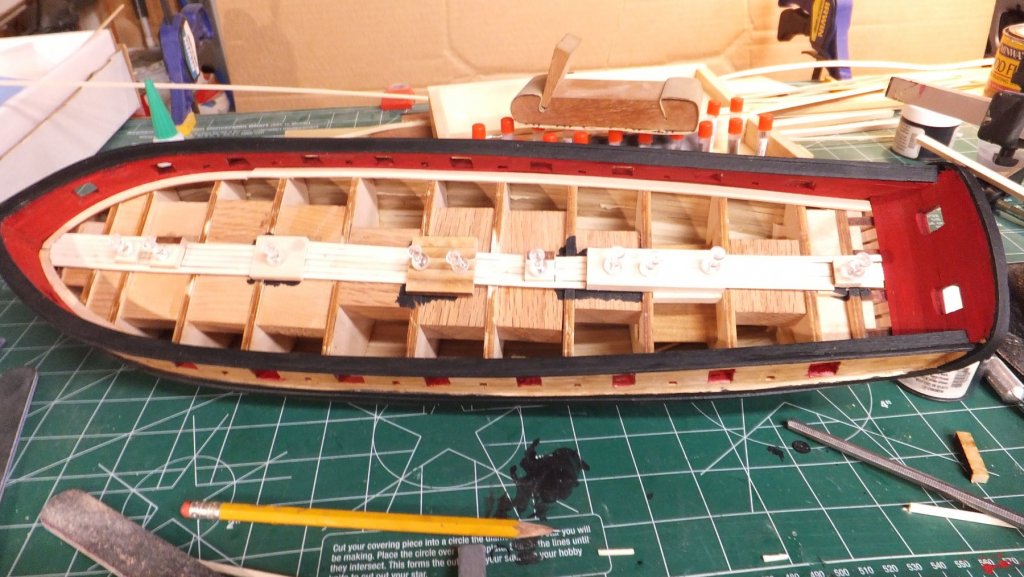
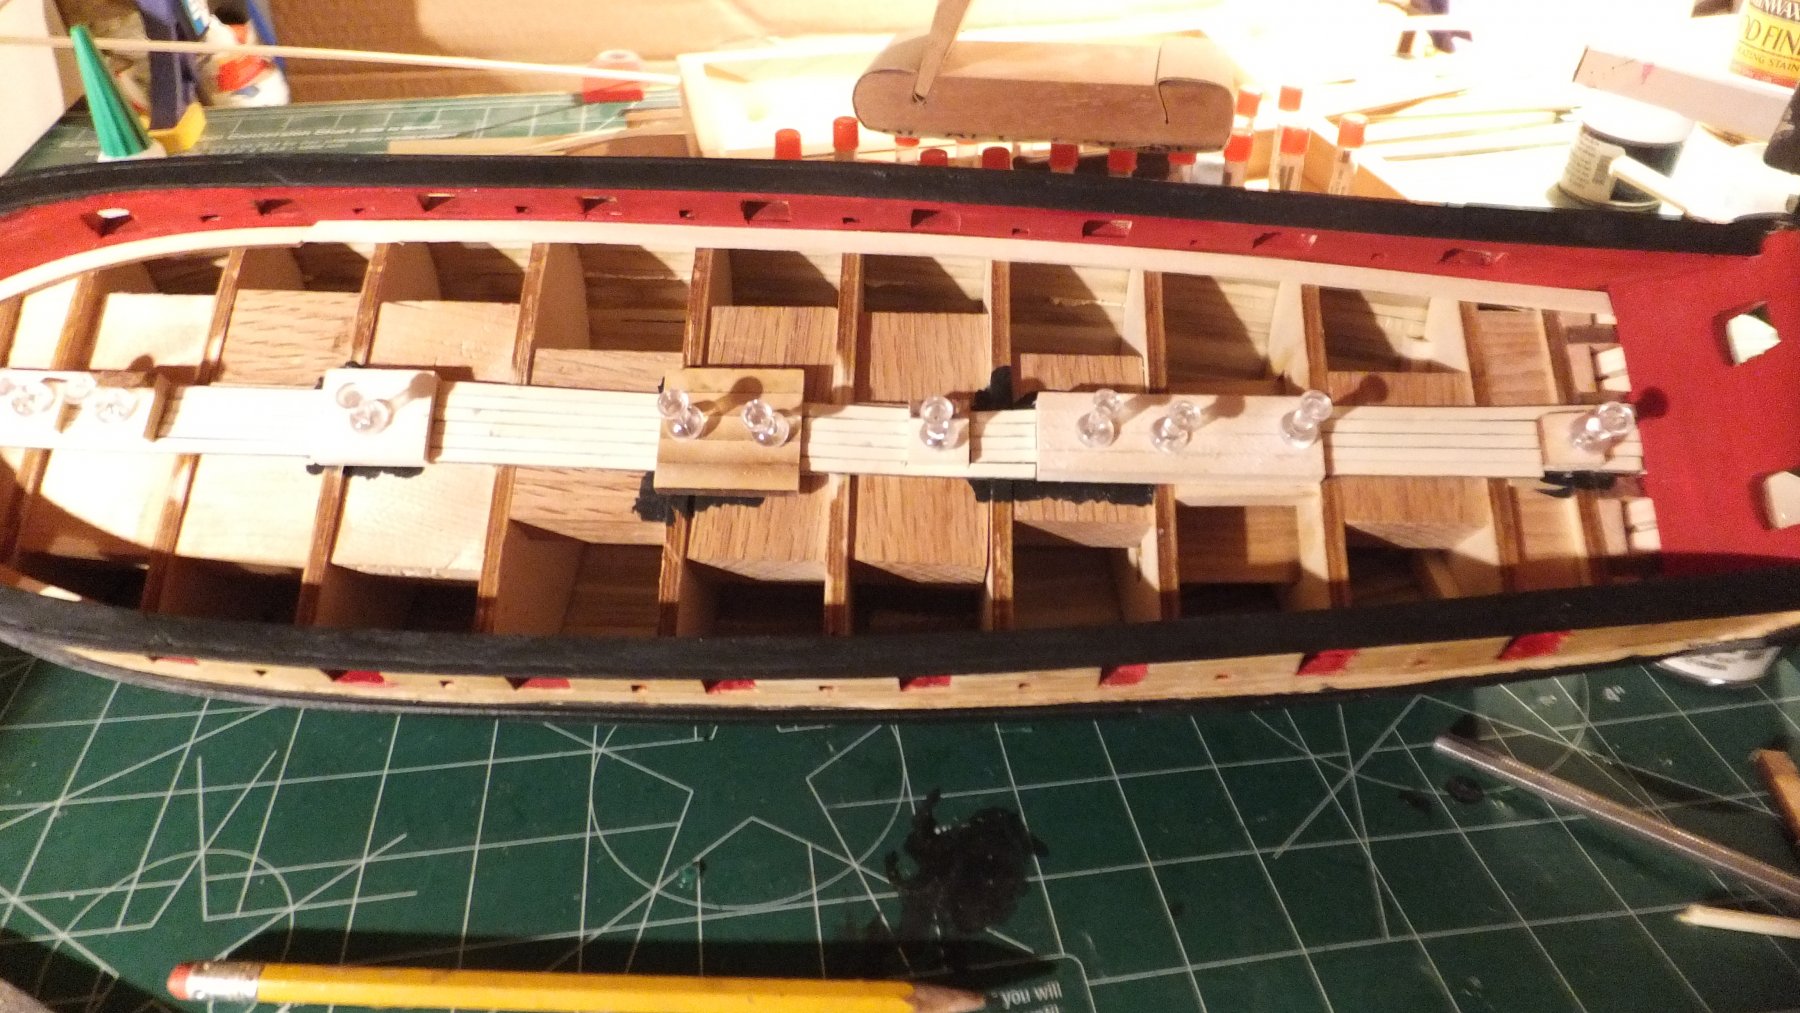
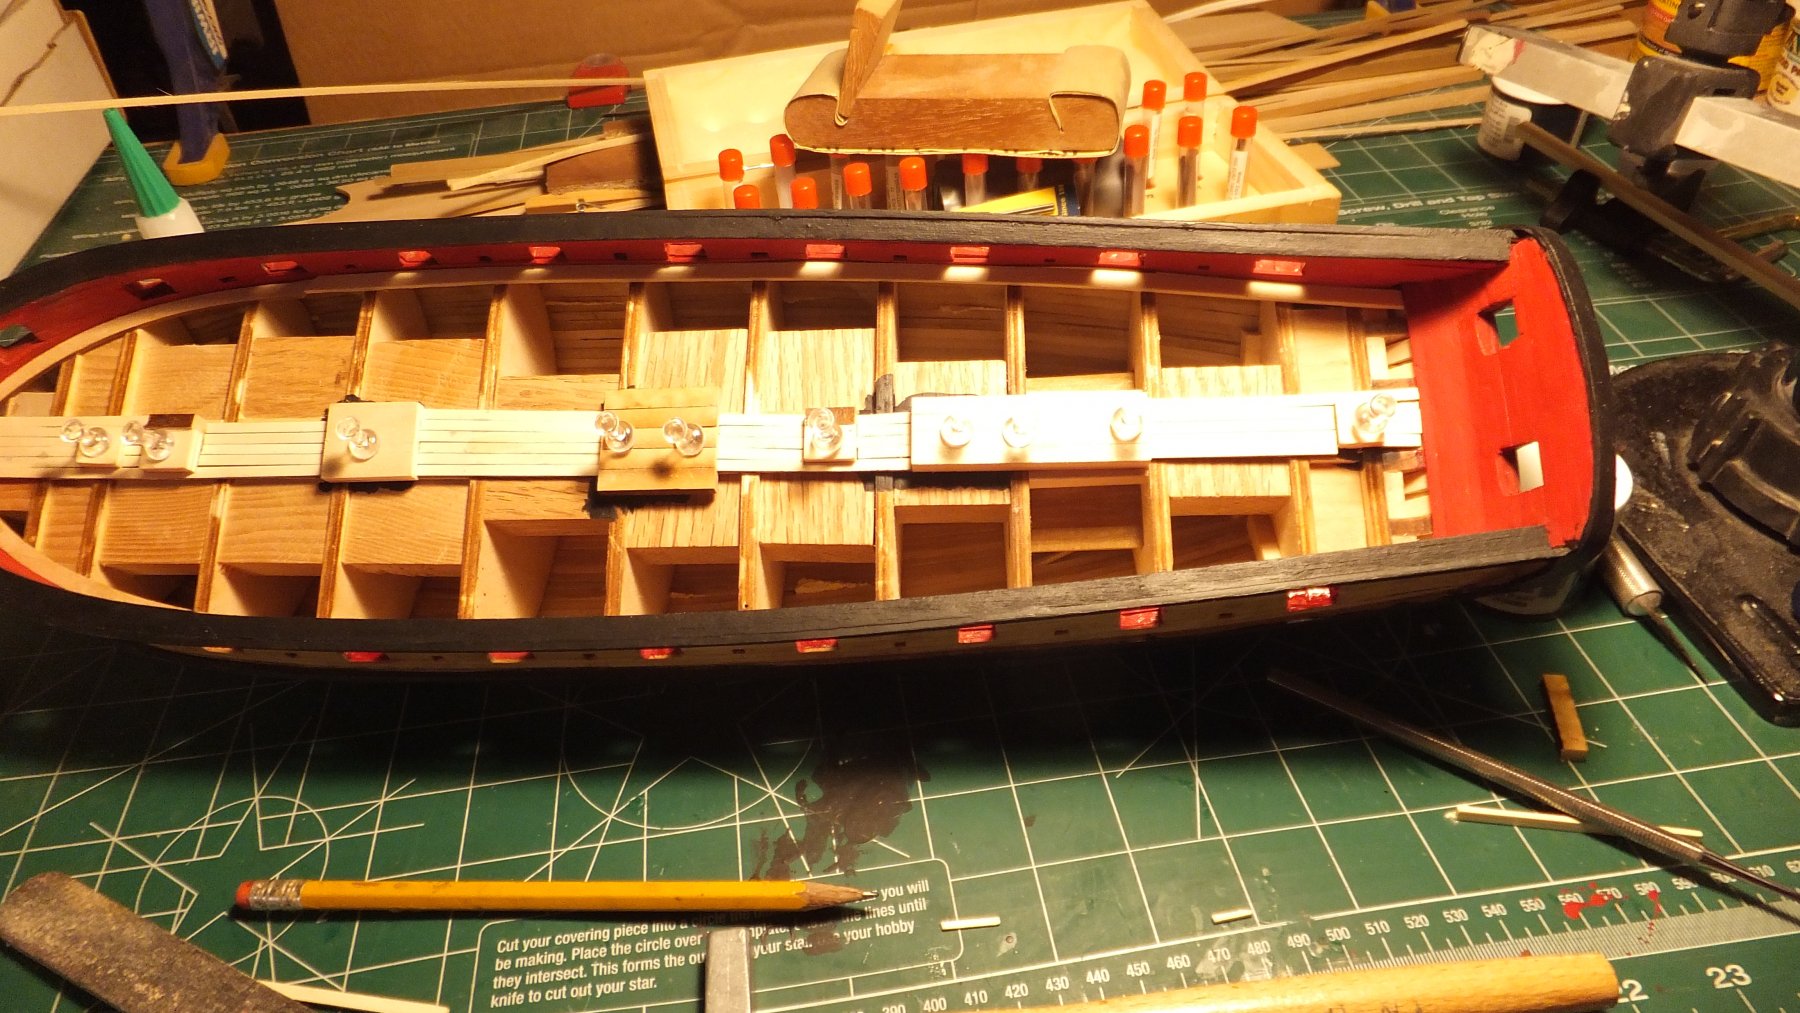
ok here are the pictures I promised. They are all the same. I am just playing with lighting to find the best solution so they don't look washed out. Planking the deck continues. Starboard is done, working on Port. Any suggestions how you clean up the smudges and excess CA?

-
Let me see if I can help. When raising the anchor. The actual anchor rope (line) does not go around the barrel of the windlass. There are a couple of reasons for this. One is the anchor line is too big in diameter and it is very messy. So a messenger is used. This is a smaller line that is attached to the Anchor line with a tool called nippers. So as the windlass goes around you often have to pause and release and reattach the nippers. Also once the Anchor is raised the anchor line is made fast by tying the messenger to the grating etc. Remember the Anchor is one of the heaviest items on the ship and could do a lot of damage.
- mtaylor, Piet, popeye the sailor and 5 others
-
8

Going From A 2D Drawing To A 3D Printed Part Tutorial using SketchUp
in CAD and 3D Modelling/Drafting Plans with Software
Posted
I have recently gained access to a workshop with several 3D printers. They use TinkerCAD as the software. I have been playing with TinkerCAD. So now I have some questions and maybe you can help. Is there a way to scan a part of the plans for one of my model kits. then pull that scan into TinkerCAD or some other program and then convert to a 3D drawing so that I can try to print it?