


fnkershner
-
Posts
1,595 -
Joined
-
Last visited
Content Type
Profiles
Forums
Gallery
Events
Posts posted by fnkershner
-
-
Per - Shapeways does print using Metal. I don't know if these designs are available and what the cost would be. But it is an option. And from my point of view once they are painted or blackened who will know the difference.
Jim - Just last night I joined a Maker Space. I presented to the problem of the quarter badges and the stern decorations. They showed me a 1/2 Micron router bit! They asked me to create a design document and we could give it a try. They seemed pretty confident it could be done.
So anyone out there interested in helping create a CAD design file for either the quarter badges or the stern decorations let me know.
PS after my tour of this Maker Space I have found my 2nd home.
-
I want to Thank everyone who has contributed to this discussion. For me it has been an exciting and steep learning curve. but very rewarding. Terry - I want to apologize I did not see your post until recently. If you go to my Syren build log you will see that I have temporarily solved my immediate challenge. But I have dove much deeper. I am now using Fusion 360 to make designs for 3D printing, CNC, & Laser cutting. I have become a member of the local Maker Space where they have all the tools I could imaging. They even have a CNC lathe where I could turn my cannons out of metal rod. I look forward to many long hours in that workshop building a multitude of different projects.
- thibaultron and mtaylor
-
 2
2
-
Attention Syren Builders!! I may have solved the Carronade issue.
 Read below -
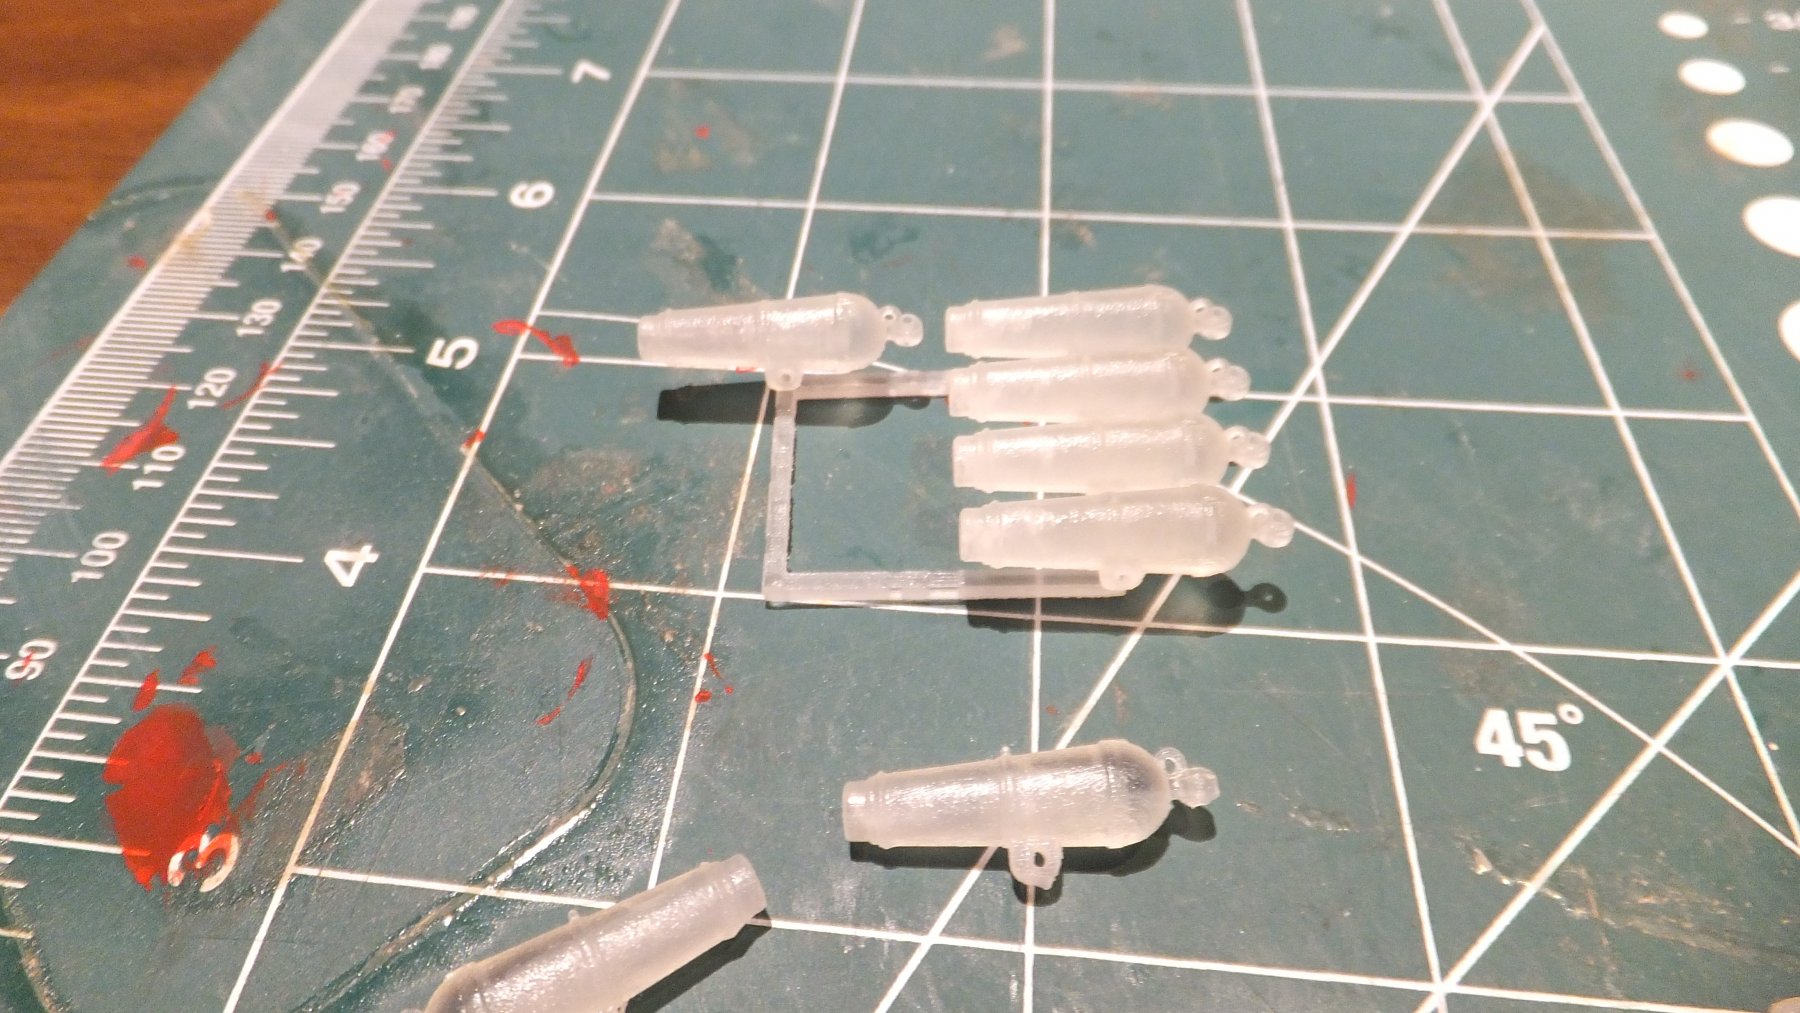
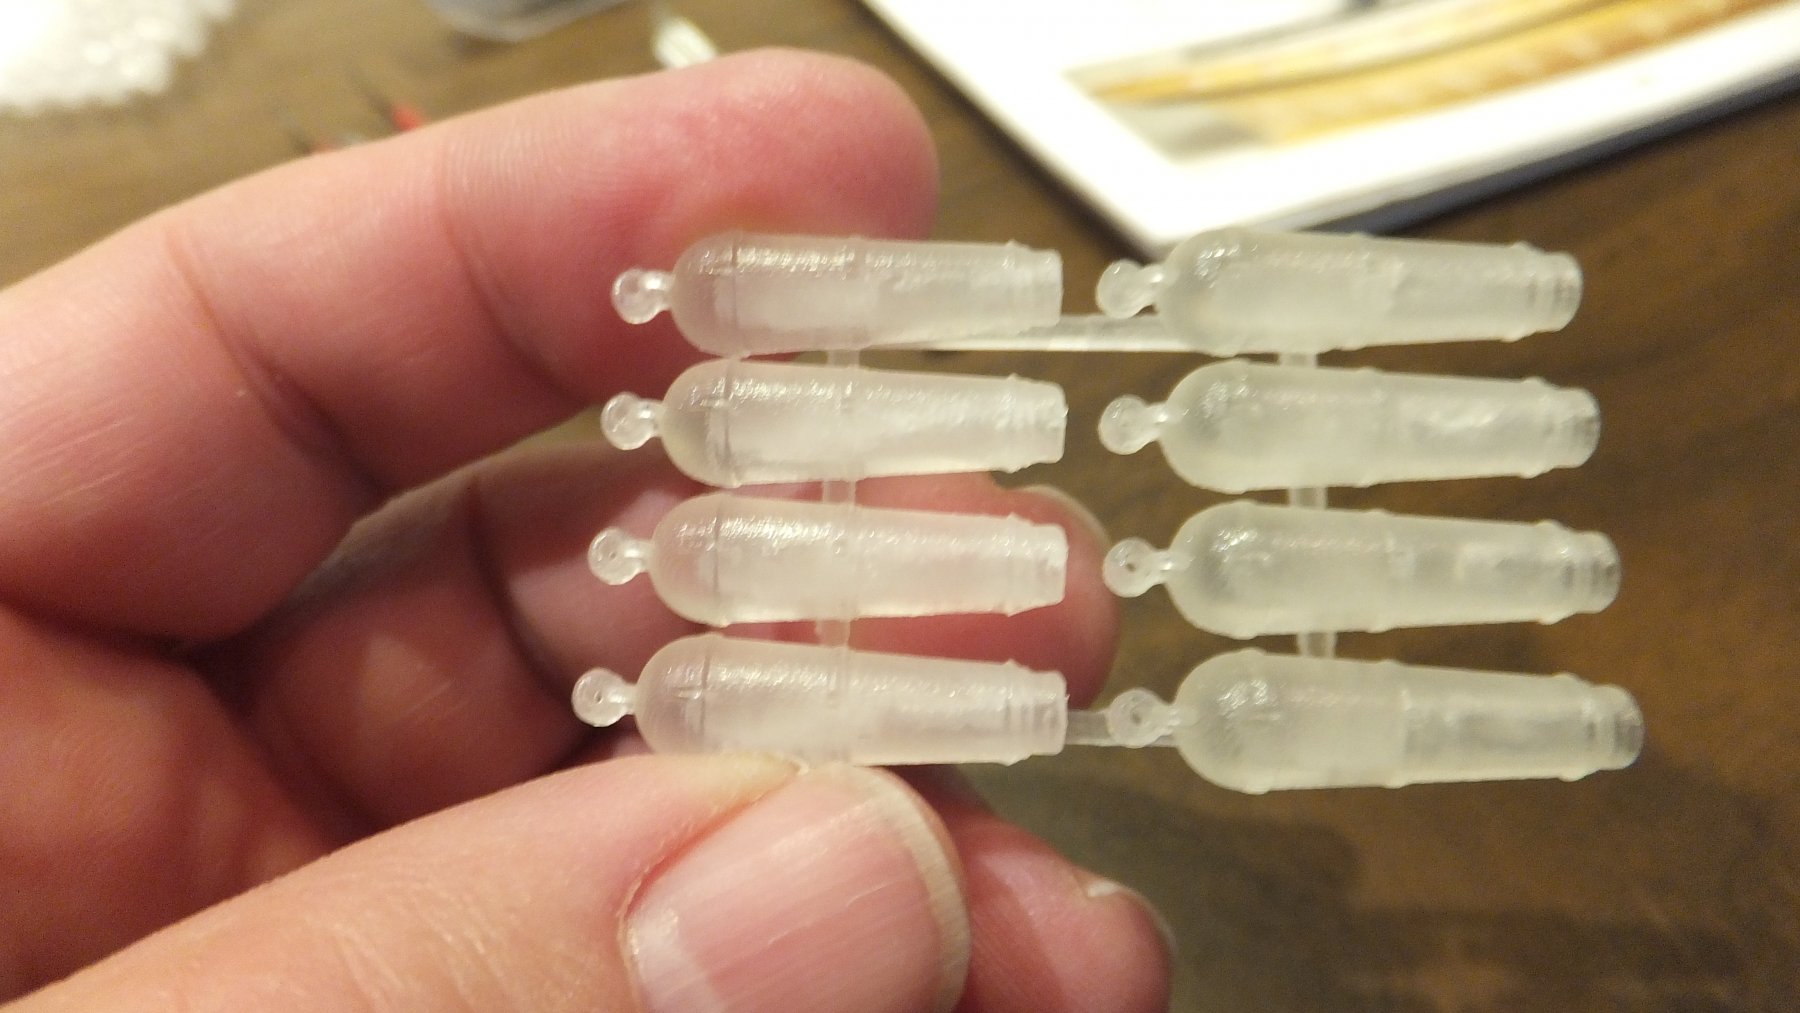
As many of you know I have been working to find a solution to the terrible Carronades that are provided with the Syren kit. Well as you will see from the pictures below. I have a low cost solution. I have been working with several others to create a CAD drawing for the these carronades so that they can be 3D printed. Many of you may know about Shapeways.com.
This is a web site that offers 3D printing services. There is a section for model ships. The number of available parts is amazing. I was able to make contact with one of the designers of the parts offered there and share with him the plans for the Syren Carronade. He already had USN Carronades to offer, but they were the wrong scale and had slight differences. I explained to him what I wanted and he has now created a set that is exactly what is called for in this kit. He has drilled to hole for the elevation screw, added the eye for the breaching rope, and had the pivot mount as part of the design. He charges $12.80 for a set of 8 carronades that are 1:64 scale. I have just received mine yesterday. I cleaned them as instructed and I have painted 1 set. I am very pleased with the result. You can see for yourself below.
They require a very little amount of sanding after the cleaning. As you can see the paint needs some touch up. but I am excited about the results.


- jwvolz, Peter Bloemendaal, jjolls and 10 others
-
13
-
I see another modeler using pill bottles for Chuck's parts! I have an idea, why don't we all ship our pill bottles to Chuck so he can fill them up.
 Just kidding.
- Rustyj, jablackwell and Chuck
-
3
-
Such excellent work! You have inspired me to give this kit another try. I was quite disappointed with the quality and just shelved it. The fake copper plates are just the beginning of poor equipment.
So I have a couple questions -
I see you used India ink instead of paint. can you comment on this? it looks great. did you just brush it on?
Did you use the deadeyes that come with the kit?
Can you talk aobut your design in the cockpit. Very attractive. How did you work it out?
I will be following you with great interest. Thank you!
-
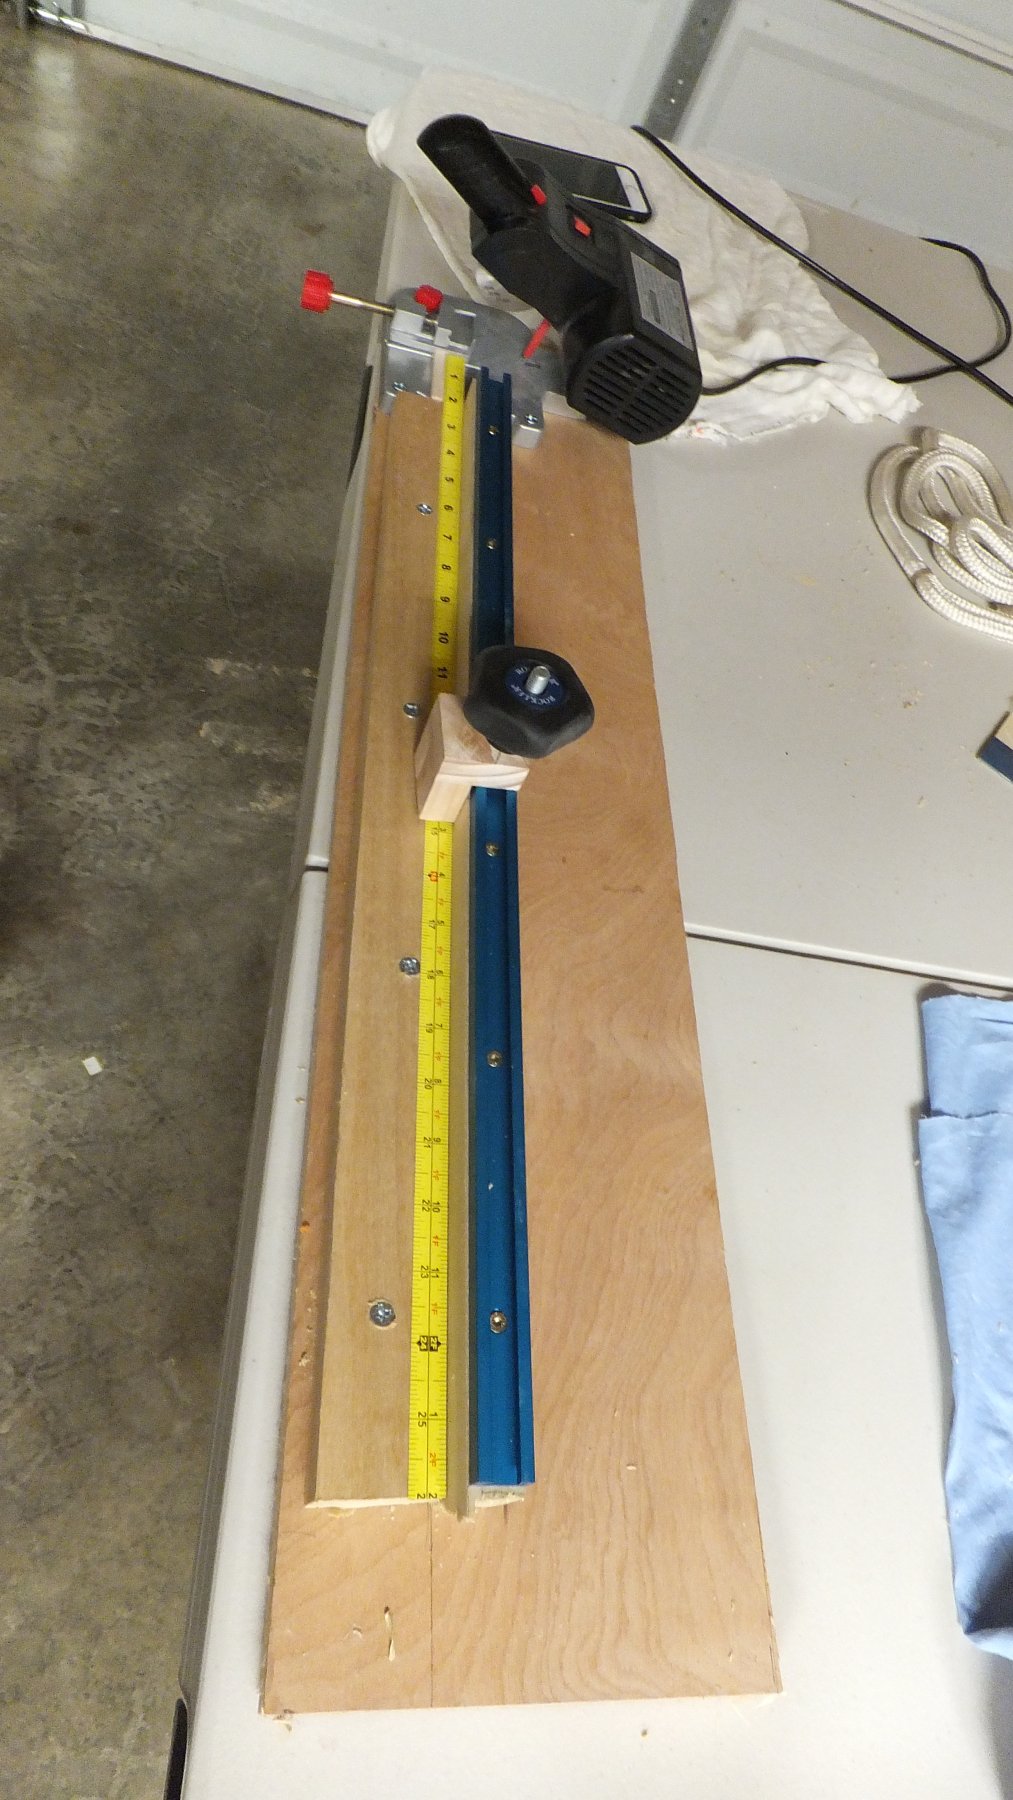
As promised here is a Picture of the other Jim inspired Jig. And about 1/2 a day of garage cleaning and its back to modeling!!
Dang it got cropped. So here is the same picture but rotated.

.thumb.JPG.5cdaa2cd7895158b1ad7f0fb40e4063a.JPG)
-
I have decided to order the plans from the Smithsonian, and give this a try. And no I am not going to the dark side just major bashing.
-
Let me be another person to welcome you to the club. Good luck. you have quite a journey ahead of you.

-
Jim - I have almost finished the other jig for my Chop Saw then it is back to modeling. I will post a picture this weekend. Also cleaning out the shipyard (garage)
-
Boy did I have to dig to find my own log. So just a quick update.
First let me bring everyone up to date on my quest for suitable Carronades. I have found USN Carronades on Shapeways.com. I sent a note to the creator and he is recreating them in the correct scale. they only cost $7.43 for 8. There is a shipping charge. but this sounds like the way to go. I should receive my first batch next week. For my own education I continue to try to find a way to do my own printing. I hope I have found the answer. We will see tomorrow.
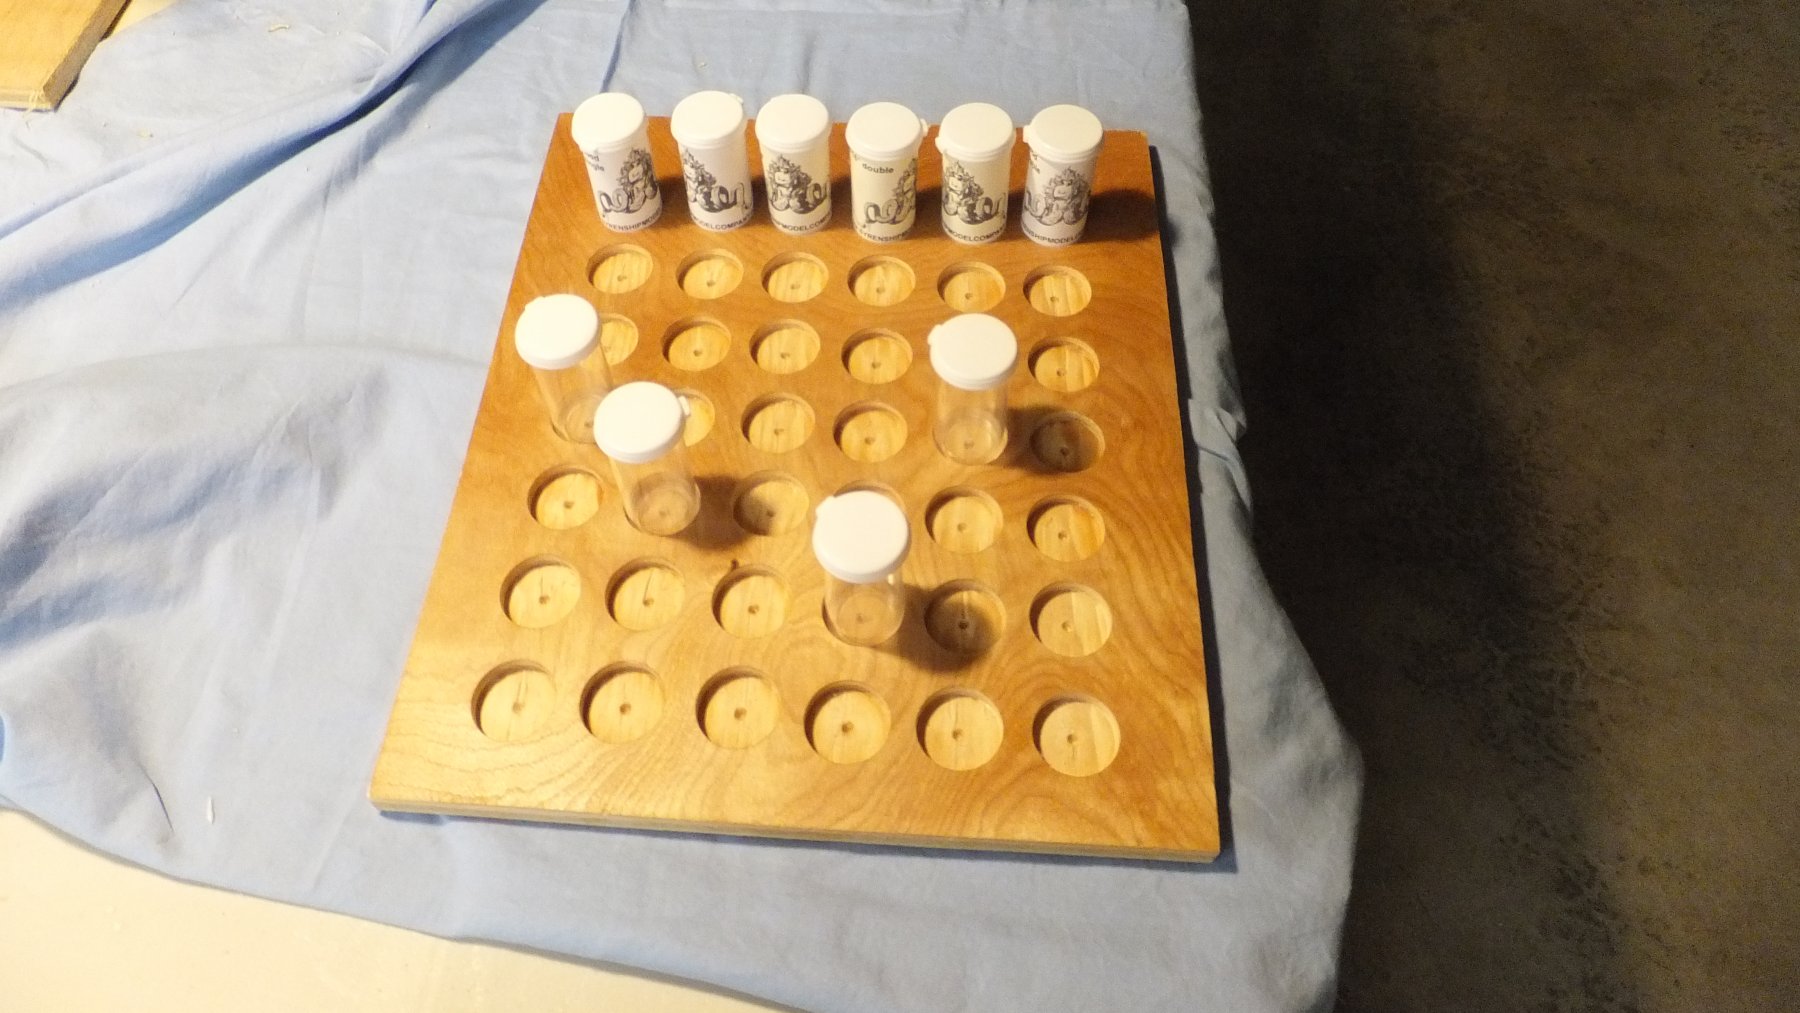
Lately I have been working on building a couple ideas I got from Jim. See the pictures below. This piece of plywood fits perfectly in the drawer to my work station. As you can see I am a proud customer of Syrenshipmodels.com.
More to come soon.


- Ryland Craze, robdurant, Dubz and 2 others
-
5
-
Everything is compared to your masters. This way you don't have to measure each one and you don't introduce human error. Also if you have an error it is consistent and sanding will fix. So carefully make one for the foredeck to the size you want. Then make all the rest using that one as a pattern. I would create a jig for my chop saw or a similar solution. Then do the same for the Aft-deck.
-
Wow! Now I don't feel so bad. this is the model in the Museum? My treenailing is better than than! How do you maneuver and fight the ship with the steering rigging at chest height? Also look at the huge size of those cleats. And Jim you are right where is the binnacle?
-
Rusty - I know this question has nothing to do with your current build. But as I was looking at these pictures, this came to me. Jim & I have been discussing what appears to be an error in the plans. If you build the tiller as the plans call for there is not enough room for the Wheel, Binnacle and Companionway. I would like your opinion on this? Your deck look excellent and the spacing from stern cannons to Companionway looks just right.
-
As the Graphite, I went to an art store and bought a pencil made 100% of graphite. I have found that depending on the amount of caulking I was spending lots to time sharpening that #2. The other benefit of the art pencil is you can try different hardnesses to suit your taste. Good luck and enjoy the Syren. I am just beginning the copper plating. I will be posting an update once that is done.
-
I ordered the wax from MS. 1 order will last a life time. Once it is waxed I run it over either a light bulb or the warm shield of the workshop light. It doesn't take much heat to melt the wax into the line. I do this will all rigging. I have not yet had a chance to use any of Chuck's line so we will see if I need wax for his rope.
- mtaylor, Canute and thibaultron
-
3
-
I just looked at this log from beginning to end. You have done an amazing job. The detail and accuracy is wonderful! Congratulations on an outstanding build.
-
Jesse - There were 3 purposes for these rolls in the cranes as you have them -
1. They needed airing out. Things got pretty smelly below decks. So smelly that they would burn pots of Tobacco as a room freshener!
2. Since most sailors could not swim they worked as life preservers. they weren't very good at this. They would most often float for about 1 hr. but it was better than nothing.
3. As mentioned above they did help somewhat with splinters. More damage was done to human skin from wood splinter than from any cannon ball. They also would stop grape shot.
The bosun would require that they were rolled very tight and tied with a marlinspike hitch. This continued in the Royal Navy until the early 20th century.
PS if they didn't have tobacco available they would use pots of vinegar! Now imagine Vinegar as an air freshener?!
-
Remember that they were bed rolls. So if you want to do the math. How much is 6 ft in this scale. Personally I think they are fine.
-
-
Ok further update on my journey. I attended my class yesterday. The class was billed as Tinker CAD & 3d printing. I found that all 3 of the printers in the workshop were down for 1 reason or another. I also found that the TinkerCAD training was geared for a beginner. Someone who had never seen CAD or a computer. So frustration for me. I explained my project. I also asked why TinkerCAD instead of SketchUP. He said tinker CAD was easier to learn and teach. But he agreed SketchUP was better. Then he tried to sell me his services. He offered to design my Carronade and print it for a price. That was not my plan. I wanted to use this opportunity to learn CAD and 3D printing.
So My question to you is can you suggest SketchUP training. Most of what I see on the web is intended for a business and priced accordingly. I don't see much for the hobbyist. I will continue my search for access to a quality 3D printer. Grrr
- mtaylor, thibaultron and Canute
-
3
-
Nice clean Build! Wonderful job! She a beautiful lady. Mine sits in the entryway to our house is a case. Yours is even better.
- genericDave, Elijah and Nirvana
-
3
-
-
I don't see why not. Stay tuned.
One comment - I have been advised that it is much cheaper to create a prototype with 3D printing, use that to create a mold. Then finally mold the product using Resin. If you try to 3D print a full set the cost will be high.
-

.JPG.5abebabc1ee381e1a190735d111440d4.JPG)
US Brig Syren by fnkershner - Model Shipways - 1:64
in - Kit build logs for subjects built from 1801 - 1850
Posted
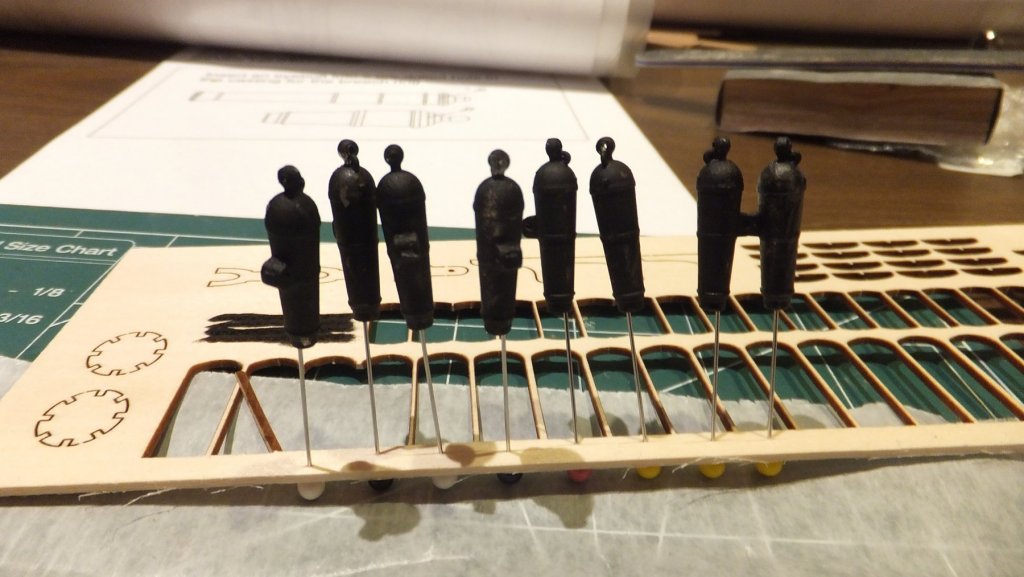
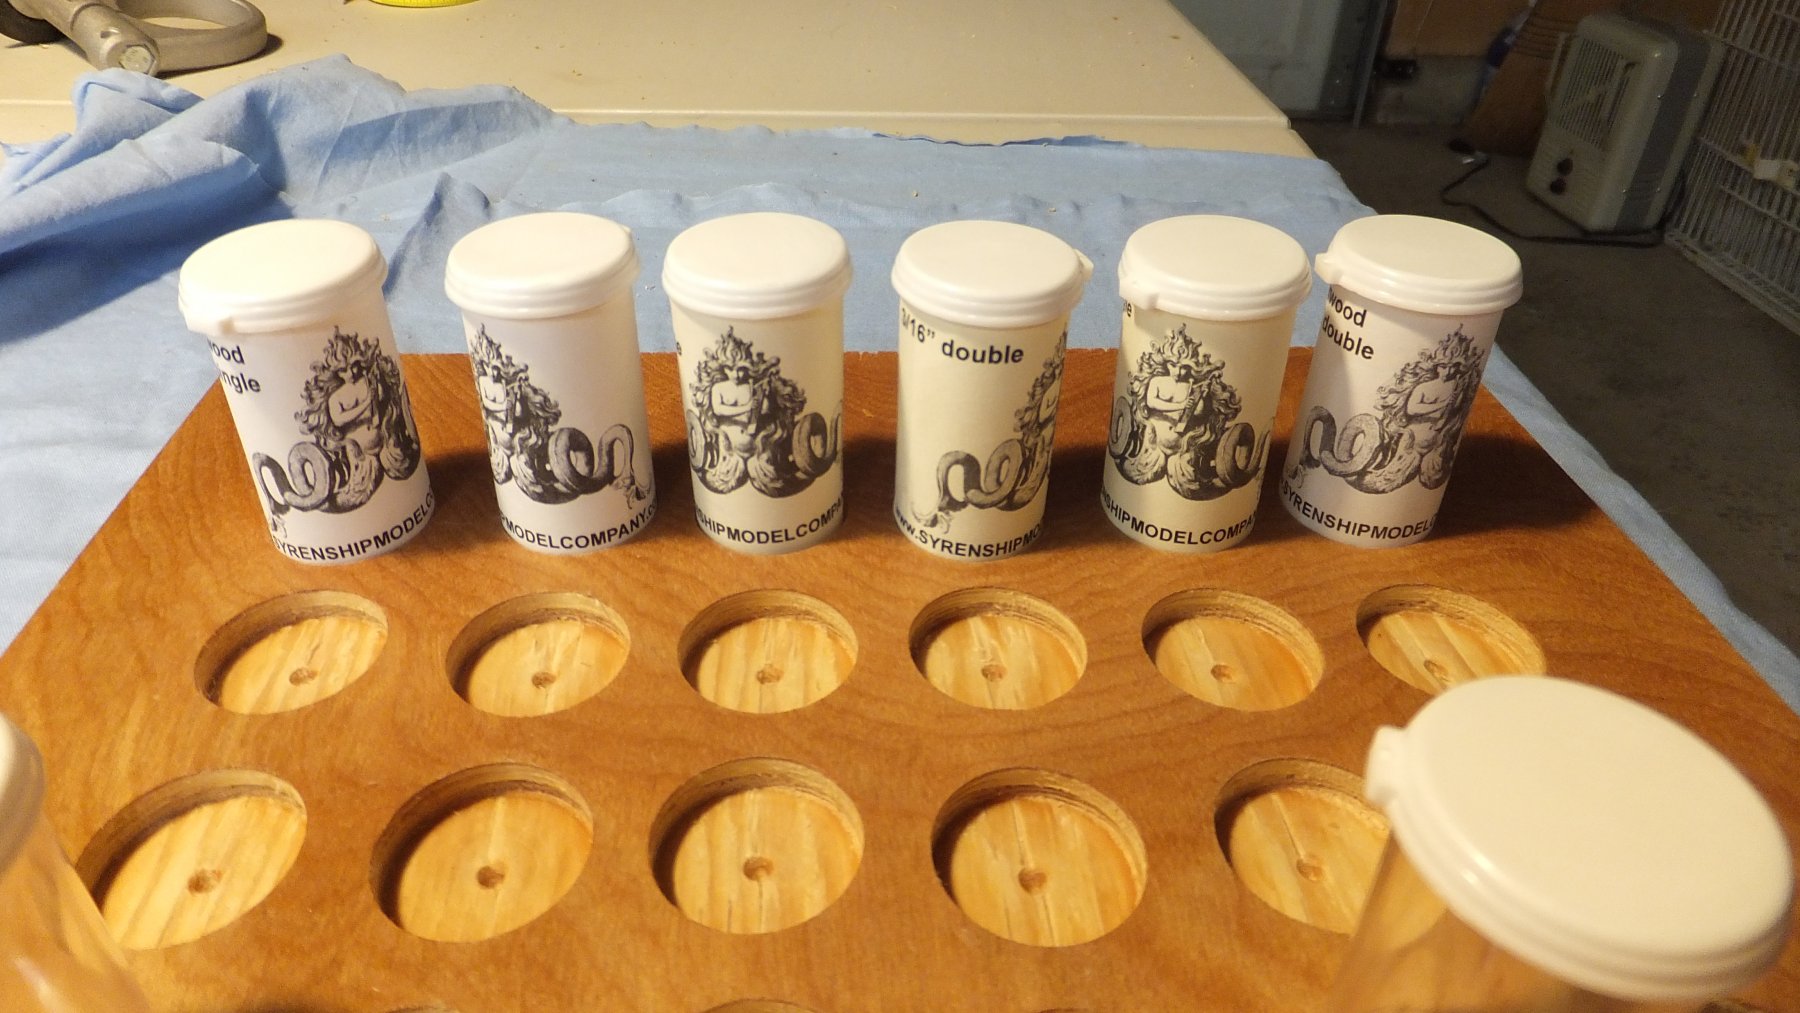
Ok just so you don't think I have disappeared here is small update. I just received a large delivery from the Syren ship model company!
 So I decided to take a small break from Treenailing and copper planking and assemble these suckers. Besides my good friend Per wants to see the results. So here you go. By the way the suckers are SMALL! And when Chuck says you may have to redrill the holes in the 3mm Deadeyes. He should have said You WILL have to redrill the holes. As you can see I still need to do some finish work and I left the 3 mm deadeyes in the stencil until the holes are drilled.
I would also like to comment on these little pieces of sawdust that are supposed to be used to mount the carronades on the sled. OMG even with a magnifying hood they are hard to see. And they have a hole drilled in them? Are you sure? Any suggestions on how to mount them to the Carronades would be appreciated. I may just use a very short piece of wire thru the holes to hold them. For now as you can see they are on a pin so I don't lose them.
Enjoy!