fnkershner
-
Posts
1,595 -
Joined
-
Last visited
Content Type
Profiles
Forums
Gallery
Events
Everything posted by fnkershner
-
Sarah the next meeting is March 16th. I saw your post about Galaxy I will give it a go.
-
So after listing all the shortcoming of these plans. Let me walk thru the changes I am mulling over and get feedback and suggestions. 1. Of course I will create a true Windlass if I can find some plans or a diagram. 2. The outhouses go. Maybe replaced by cannons. At any rate the last pair of cannons will be removed and placed further forward. 3. Likely Mount the ships bell on the Main mast. 4. Have the bow sprit go thru the deck and at least appear to be tied to the foremast or something under the deck. 5. Switch the fife rails to be a U shape crossing aft of the masts. 6. Install a stove Pipe for the cook forward of the Foremast. I haven't decided what else should go forward of the foremast I would love suggestions. Maybe a small grating for ventilation. 7. Between the masts I will create a large main Hatch. not sure about anything else. The cannon shot will be moved closer to the cannons themselves. 8. Move the pumps closer the the Main Mast. 9. Enlarge the Cabin to be most of the space from the main mast to the tiller. Redesign the companion way to be more accurate. 10. Remove the capstan and the Hatch aft of the capstan. 11. Redesign the binnacle. 12. Add preventer tackle to the tiller. If anyone sees something I have missed please share.
-
Thanks Sarah! You should come to our next meeting. I would love to compare notes.
-
Grr, too many daves working on Bluenoses. or am I jsut getting old? Unfortnately you are too far away to come use our new rope walk to make the rope for your shrouds. But I tell you what - I am dying to make some rope with the rope walk. I will look up the diameter you need and give it a go. If you trust me I will ship you the results.
-
Gil the Pot Belly stove isn't the same without you! As you know we don't get much modeling done during meetings. And next month may be the last meeting in the current club house.
-
That works for me! Thanks
-
Augie - Could you or maybe Chuck estimate the size of the base of a display case for the Syren? I am going to be selling my full size Tablesaw as I prepare to down size. I thought i might cut some wooden bases before she goes.
-
Dave - We missed you at yesterday's meeting. I would suggest you hold off on these Catheads. I installed mine way to early. They are made of such soft metal they keep bending etc. I had to replace them twice. Might be better to leave them until later. PS if you haven't noticed Jim says our Rope Walk has been shipped you might want to make your shrouds this way. See you at the next meeting.
-
Note to Moderators - I can't seem to find out how to edit the title of this Thread. I mistakenly said Corel when I should have said AL.
-
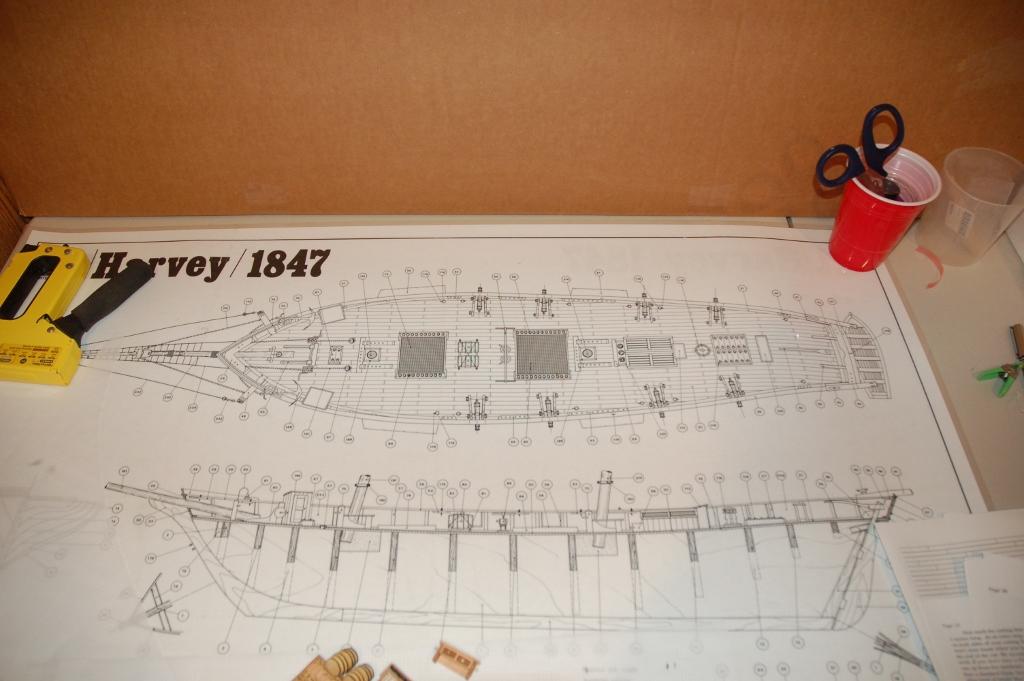
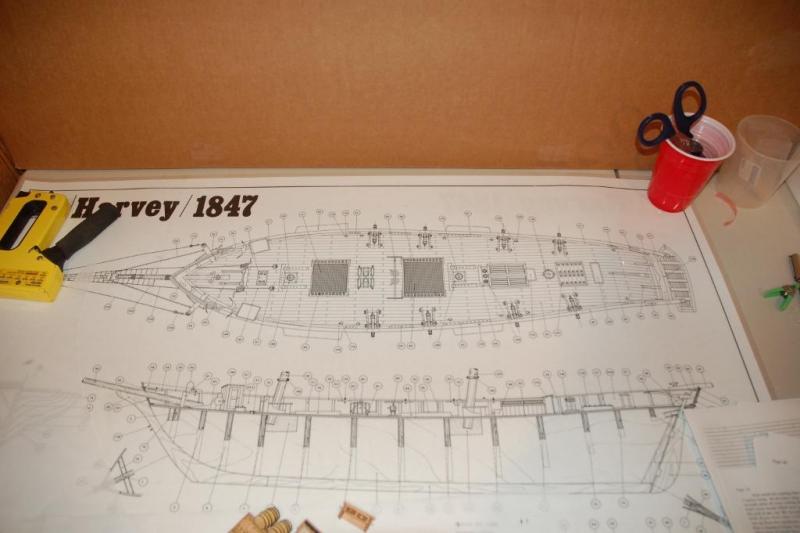
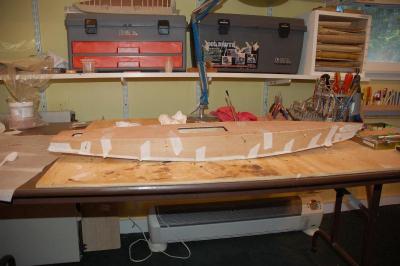
Ok while the glue dries let me take a slight detour and take advantage of all the wisdom on this forum. The picture below shows the deck plans according to the kit. There are many problems with these plans. I intend to make significant changes and I would like to hear from all of you. So let me walk you from bow to stern on the issues and then list Ideas I have for modifications. 1. At the bow there is a hand crank to raise the anchor. This uses chain over a round drum and if it was to scale would only allow 4 men to crank. I intentionally do not call this a windlass. This should be a true windlass. Also I doubt they used Chain for the anchor. This would have been quite expensive. 2. There are outhouses on the bow. And they are completely out of scale. I don't know of any ship of this period that had outhouses on the deck. 3. The ship's bell is mounted on the bow sprit. When it should be aft near the helm. 4. The foot of the Bowsprit is not secured enough to take the strain of this rig. 5. The fife rail on the foremast (& main mast) should be aft of the mast not forward. We need to take into accout the rake of the mast. So these are the problems just from the bow to the Foremast. Now from Foremast to Main 6. We have a huge Grating with shot garlands along each edge. Gratings were for ventilation. What are we ventilating? This is more likely should be a Cargo Hatch or similar. The shot garlands are too far from the cannons. 7. The Elm Tree pumps are too far forward to do much good. They should be closer to the main mast so that they reach to the bottom of the bilge. 8. Again we have another grating. not likely for this ship. 9. Again the fife rail is backwards (got inturrupted by the phone) Now from the Main to the Stern the following problems exisit - 10. We have a main cabin with sky lights the full length of the roof - Unlikely 11. we have a Capstan that is so close to the companion way it would never turn. And why is the Capstain aft of all the rigging? And why have a Capstain at all. This ship had a crew of maybe 60. It is more likley that it would have only a windlass. 12. Now we have a hatch aft of the capstan. Really? what is stored here? There isn't much hold space. 13. Lastly we have a bench that passes for a binacle. but quite unlike any binacle I have ever seen. 14. Oh and yes, thanks to CapnHarv the cannons are out of place as well. They should be further forward where the bouyancy could support the weight. So now I begin the task of resdesigning the deck furniture.
-
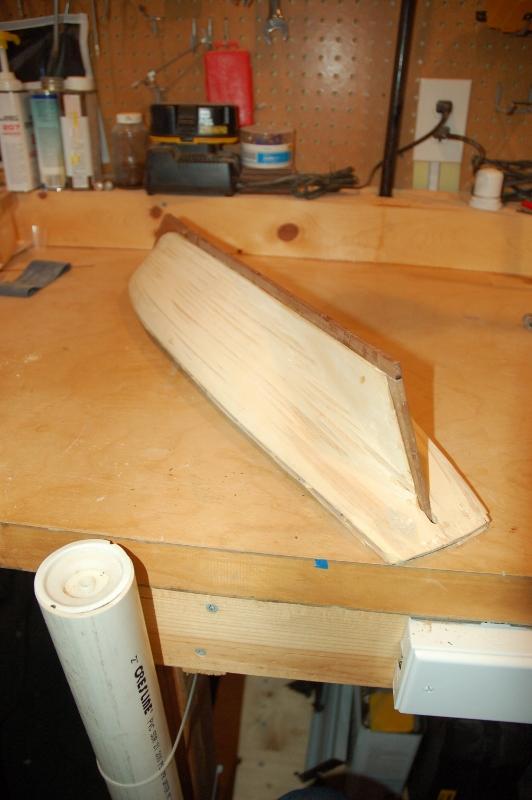
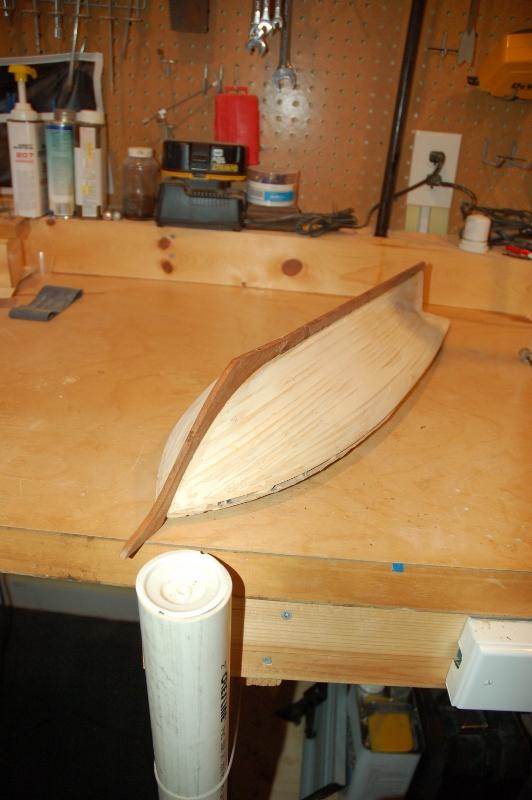
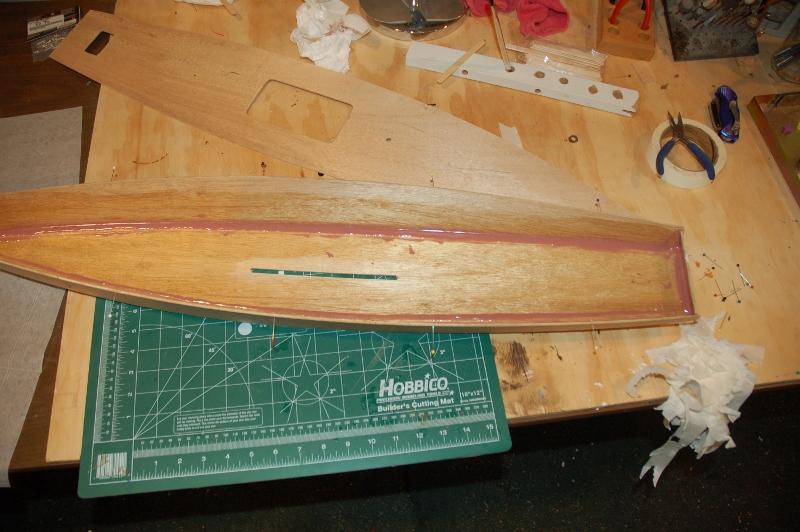
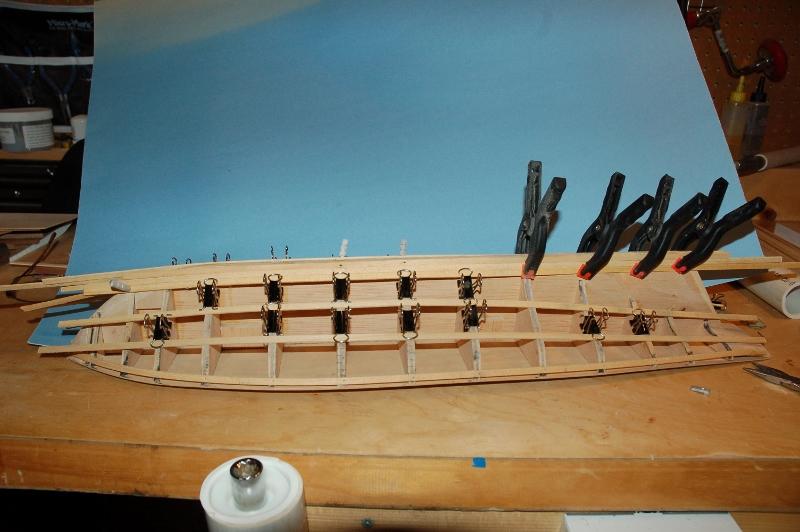
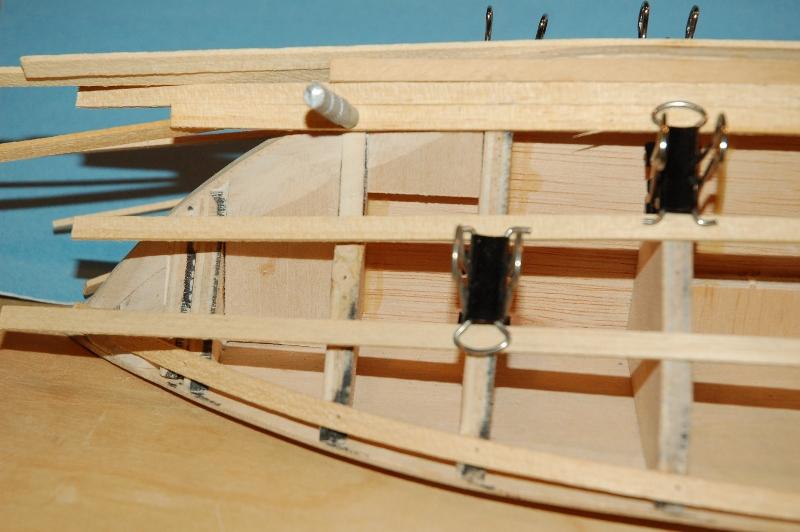
Next I planked the deck. again the intructions say to add the waterway, bulwarks, & 2nd planking. Then add the stem & Keel. I decided that the Keel would need a bit of reinforcing and the 2nd layer of planking would not look right without installing the keel first. So I drilled small holes thru the keel, Stem, & prow. I then inserted T pins & cut them flush. I used PVA almost everywhere. But I used CA on the pins to make sure the pins held in the former. I also took this opportunity to drill holes for the long screws for the pedistals I am going to use for mounting.

-
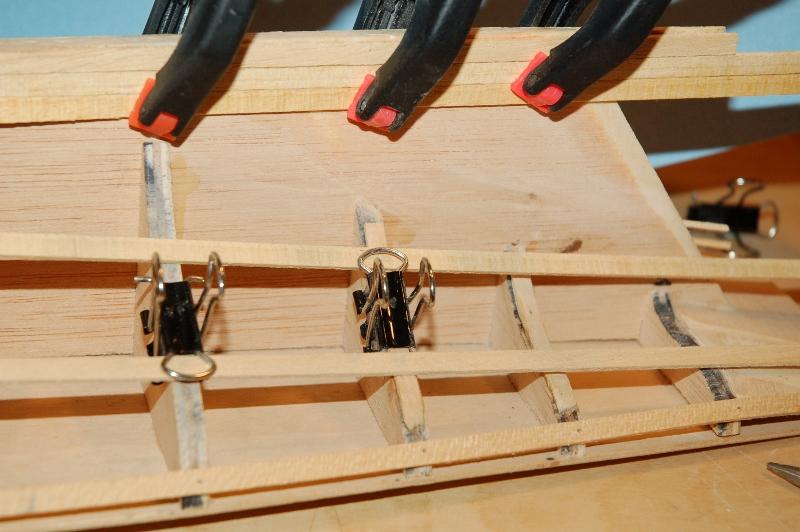
I have finished the first layer of planking and added filler. The instructions say to lay 2 rows of planks from the deck down. I laiad 1 and then started with the garboard strake. I had 3 stealers in the stern and I probably should have had at least 1 drop plank in the bow.
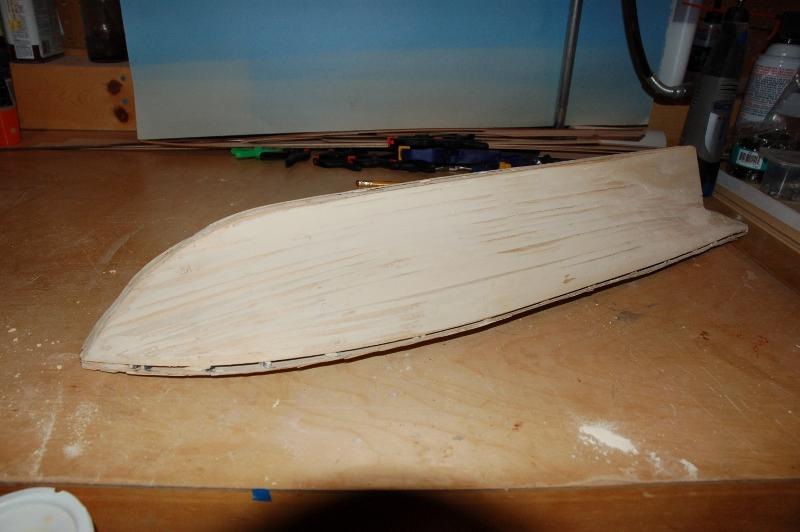
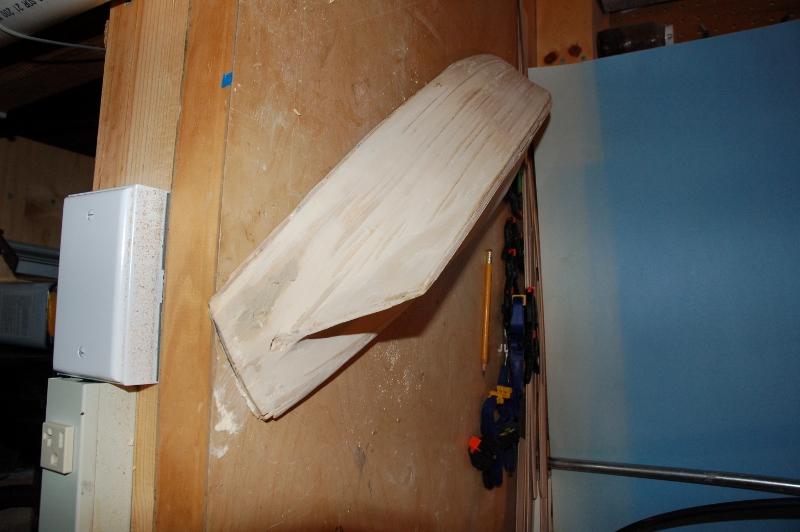
-
Well I am just getting started so there isn't much to show yet.
-
Jim oh Jim will you please release me from my purgatory. I am pining away for the delivery of my machine.
-
About 25 years ago I bought this kit in a Hobby store in CA. It has been through 2 moves since and we are preparing to move again, and I will temporarily loose my shop. So I thought it was high time to finish something. Along the way I have lost a few pieces and picked up another copy of this kit off of ebay. Before the forum upgrade there were a couple build logs of this kit. Unfortunately I don't see them now. I became very discouraged when I relalized the significant errors in this kit. This is AL's version of the Baltimore Clipper. This is a period of US history in which I am very interested. Even the historical information is pure fantasy. But enough about the flaws. It is still an attractive model. There was also a build log here that really inspired me. It was a Kit bash of this kit and renamed the Lady Anne. This is what got me to restart. She will be the Lady Caroline (the admiral's name is Carol). So let us begin -
-
Chuck will you please slow down. The admiral will not let me buy another kit designed by you until I finish the last one. And all you do is continue to design outstanding models!!!
- 162 replies
-
- 2
-

-
- 18th century longboat
- model shipways
- (and 1 more)
-
Harvey I am there every other Saturday. Stop by
-
What do I start on RC Sailboat electronics wise?
fnkershner replied to DSiemens's topic in RC Kits & Scratch building
It is very common to have the sheets for both the jib and the main controled by one servo. It is actually hard for the operator to trim sails if they are not linked. you would have to trim one at a time with the same joy stick. Sort of like patting your head and rubbing your stomach at the same time. You can do it but why go to the extra effort. Now where you get into a different issue is when you have more than 2 sails. Tacking and jibing all sails can be tricky. On most R/C sailboats the Jib has a boom since at this scale it is hard to keep the jib filled. So if you have both Jib and Stay sail Tacking will be interesting. I have heard of R/C boats that also have a spinnaker but I am not sure how that is rigged. Maybe with a turtle. -
I have a 4 inch diameter piece of PVC pipe. I have a rubber boot over one end and a pipe clamp so that it is water proof. The pipe is 4 ft long. I fill this with water and zip tie it to the leg of my bench. When I am planking my hull I select about a dozen planks and put them in this tube. I cover it with a wieght. it is so convienent to lift off the cap and a wood strip pops up. I never bother with hot water or any other solution. I make sure the strips have soaked 20 to 30 min and I keep the pipe stoaked with strips. One caution - don't leave strips in there too long they will eventually sink to the bottom. I also find that I don't have to soak the second layer because it is so thin.
-
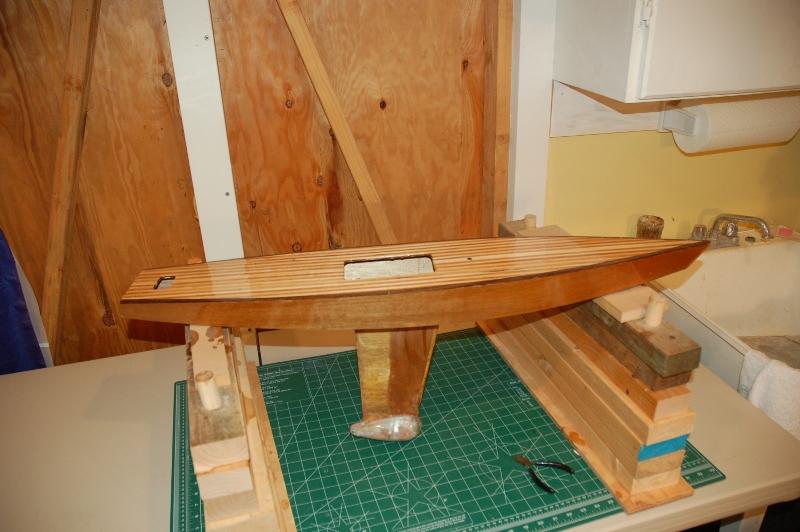
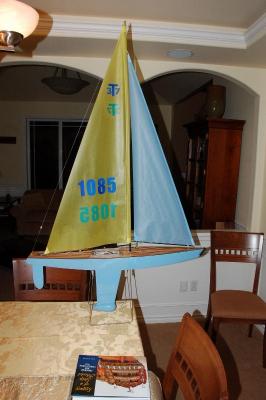
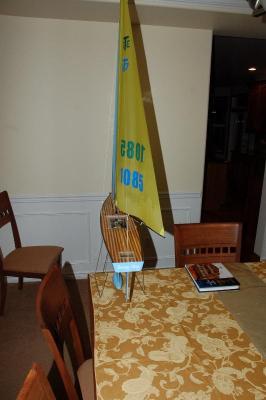
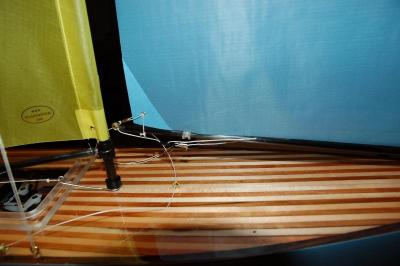
All that remains is the electronics and the rigging. There are those in the club who have completed their kit in 2 weeks. Now I must admit I used a secret weapon. I have a niece who works in a auto body shop. I just gave her the model and the jib. She did all the sanding and paint matching. And here you see the finished product. Now all I need is to learn to sail her as well as she looks.

- 6 replies
-
- 1
-
-
- tippecanoe
- t37
- (and 2 more)
-
So in one short day you have a completed Hull. the longest part of this is waiting for the Epoxy to set. Now you install the Keel and seal the boat with a light coat of epoxy. The Keel is a fin keel with Fishing weights bolted to the bottom. you will need to cover all of this with epoxy. It is not necessary to plank the deck or paint the hull. But if you have a background in static modeling can you leave the deck plain?

-
The assembly is rather simple you use the pins to hold everything in place and then cover the joint with masking tape and apply epoxy. The deck is placed in the hull to help hold everything in the proper shape. Once the sides are epoxied in place you do the same thing to attach the deck. But you stare the boat upside down so that the epoxy runs into the crack between the sides and the deck.

-
This is my abbreviated build log for my T37. The kit is made out of 1/16" thin Mahogany Plywood. For under $300 you recieve everything you need except Sandpaper and batteries. all the electronic and epoxy are included. Will Lesh is the designer and owner of Tippecanoe boats. He has the same guarentee as Model Shipways. He is just one those quality people that you find in the hobby. He has many different boats available but I would say the T37 is the most popular. It has become recognised as an official one design class of the AMYA (American Model Yatching Association). If you plan to race your boat I suggest you inquire about the racing upgrade. So lets get started! All of the plywood parts are laser cut so there is very little rough edge to sand. But I did start by light sanding of all parts. The you use straight pins to create a line along the bottom of the sides that is 1/16" from the edge. This will hold the bottom in place while the Eposy sets.

-
I am getting the itch to work on my Syren. there is so much good work to draw from thanks!
-
Wow! I am so glad you reposted this. I will remember what you did with these quarter galleries when I get there and hope to do as well.