Supplies of the Ship Modeler's Handbook are running out. Get your copy NOW before they are gone! Click on photo to order.
×
.JPG.ca33079f5815b861e67b9c2cccd37982.JPG)

Blue Ensign
-
Posts
4,551 -
Joined
-
Last visited
Content Type
Profiles
Forums
Gallery
Events
Everything posted by Blue Ensign
-
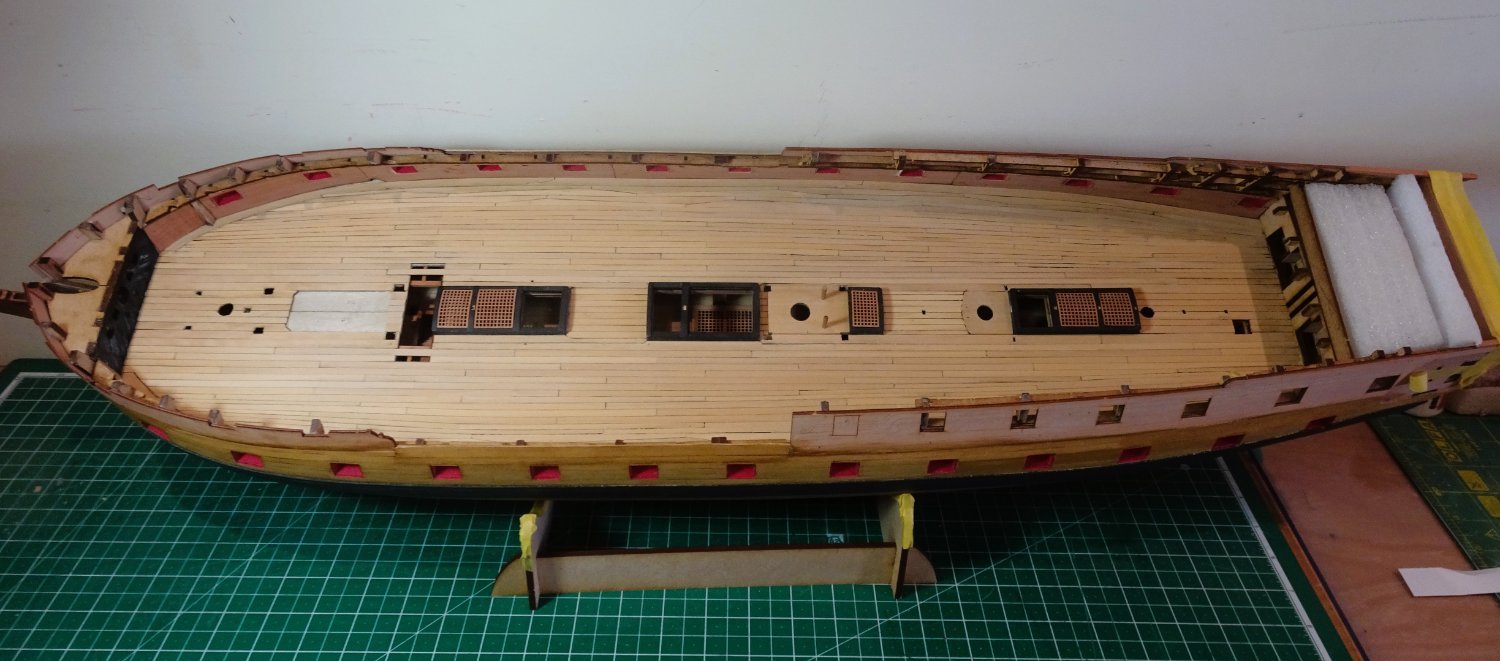
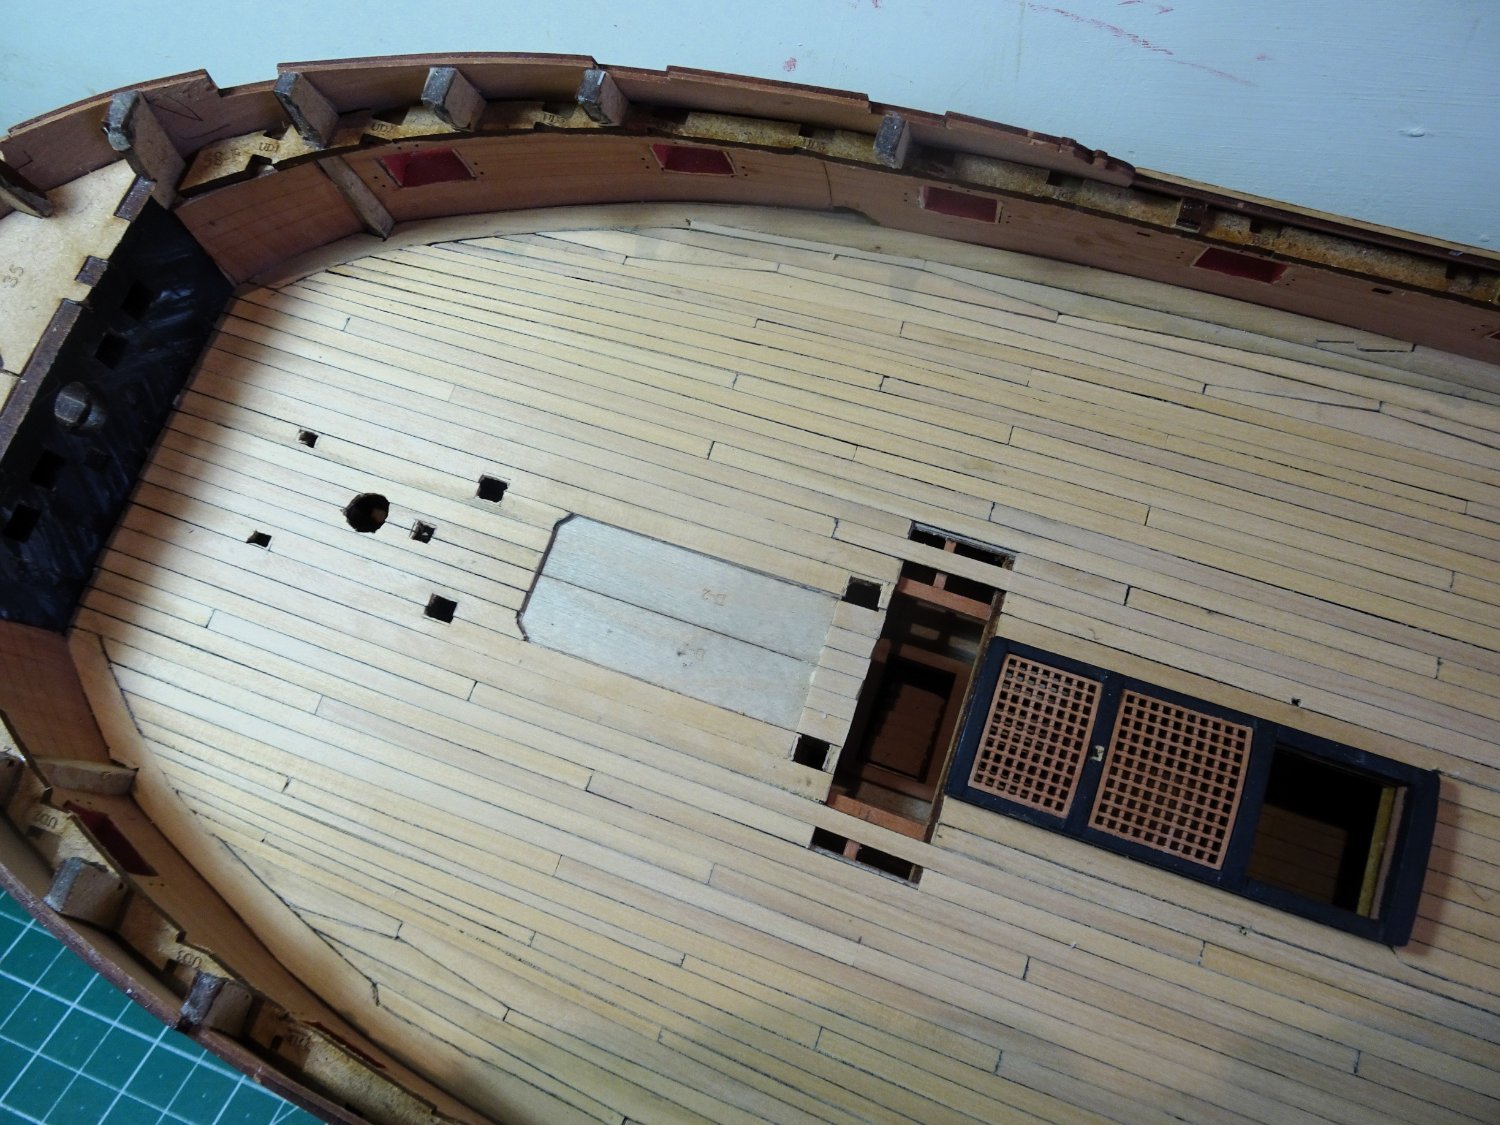
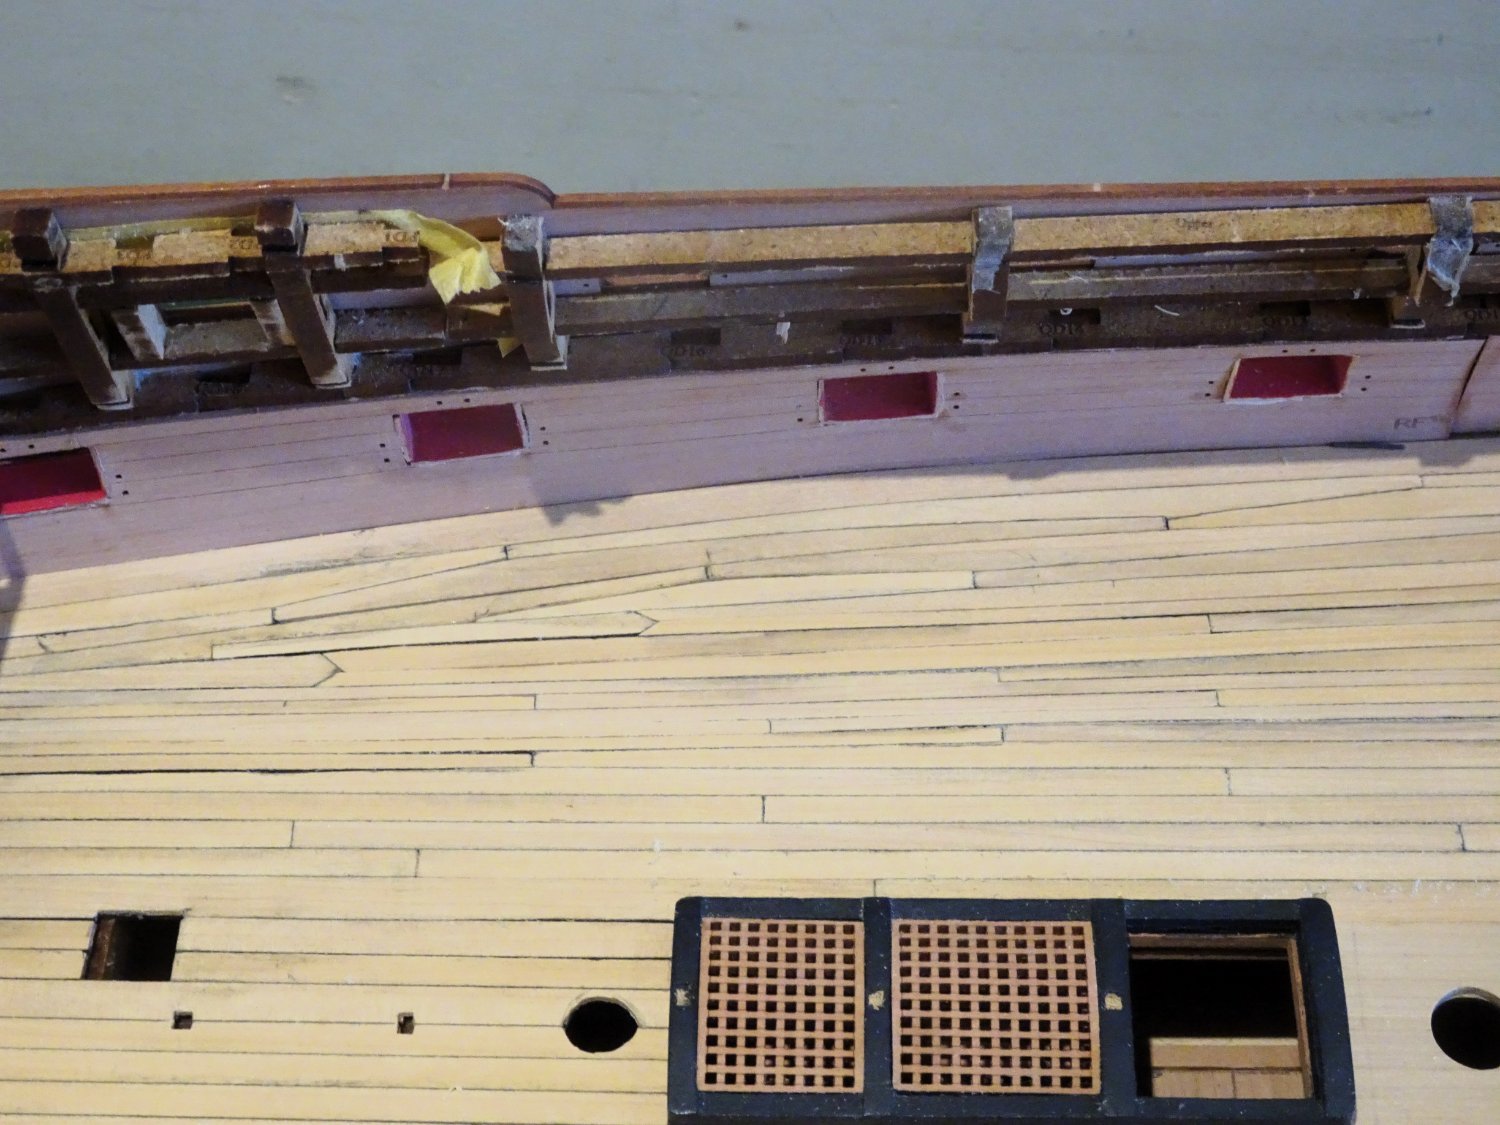
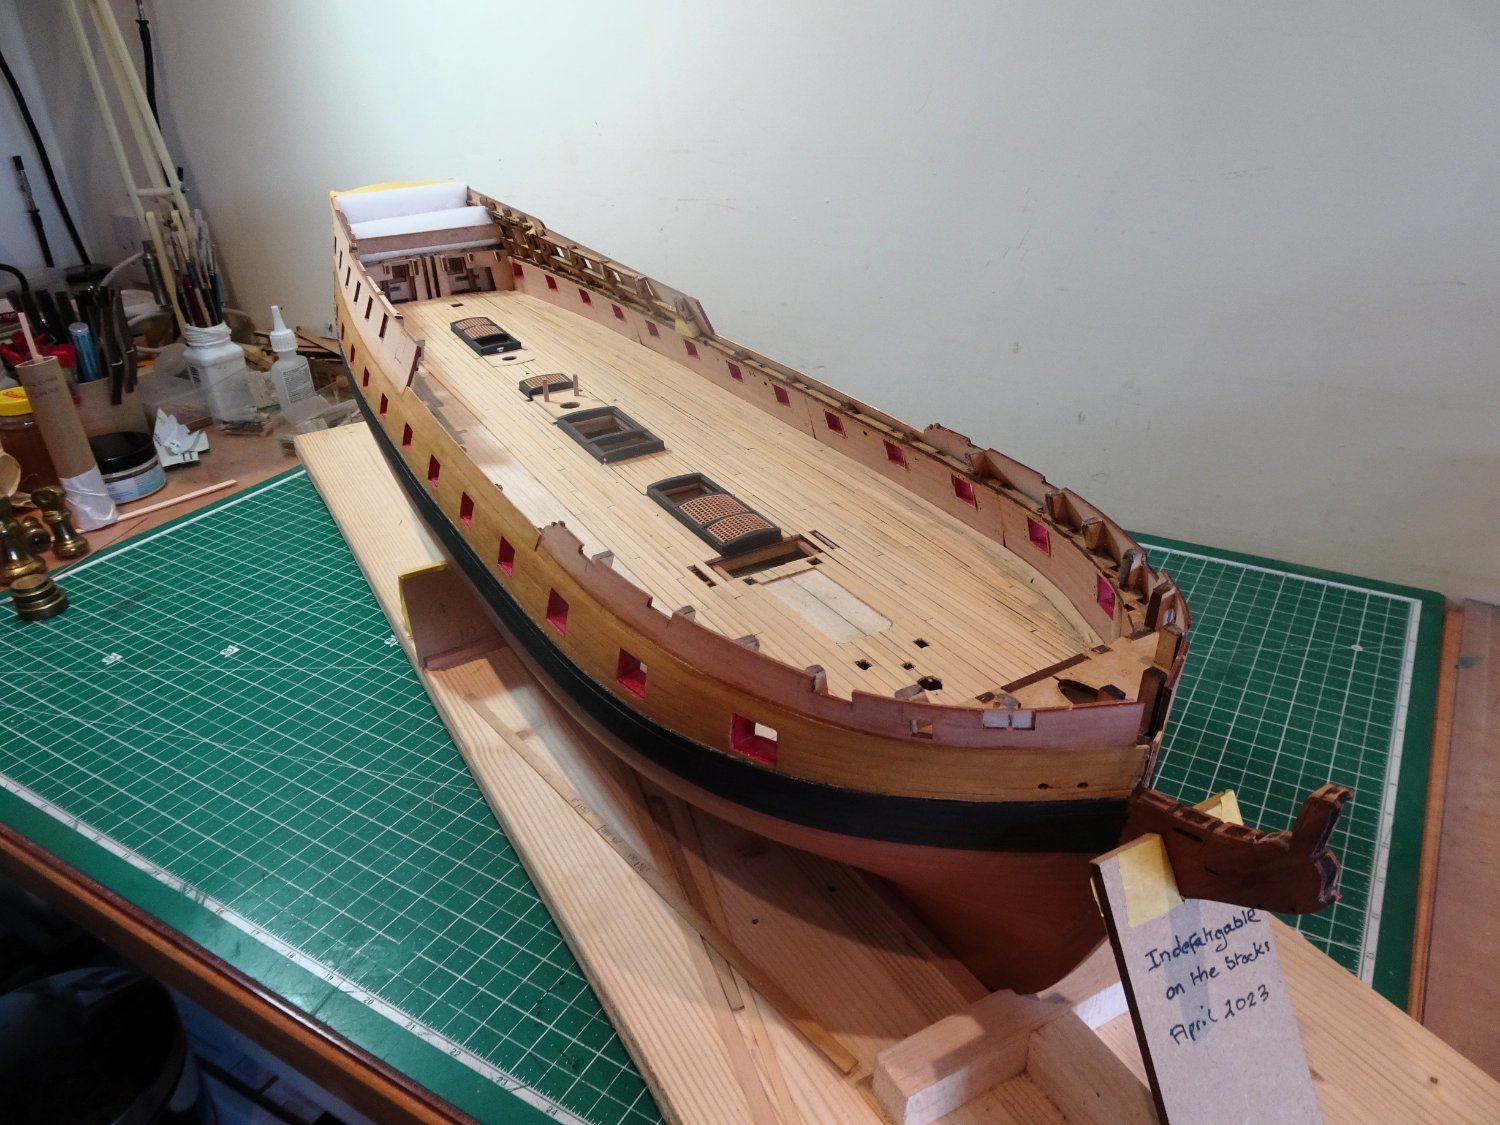
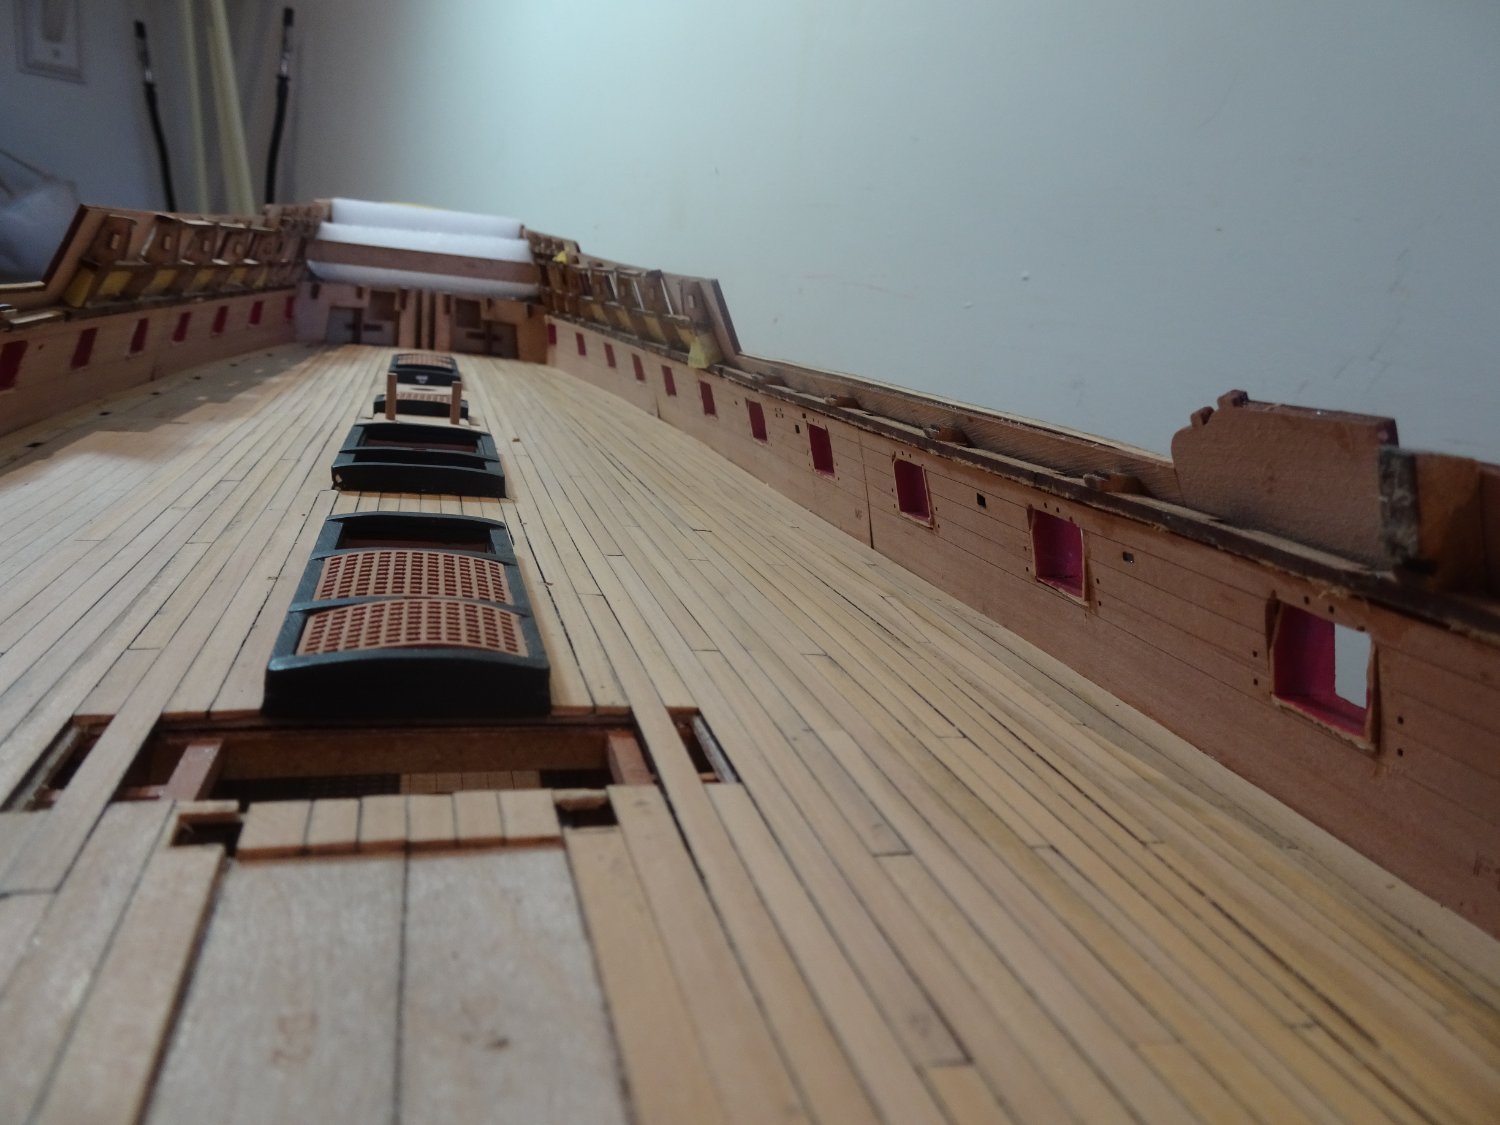
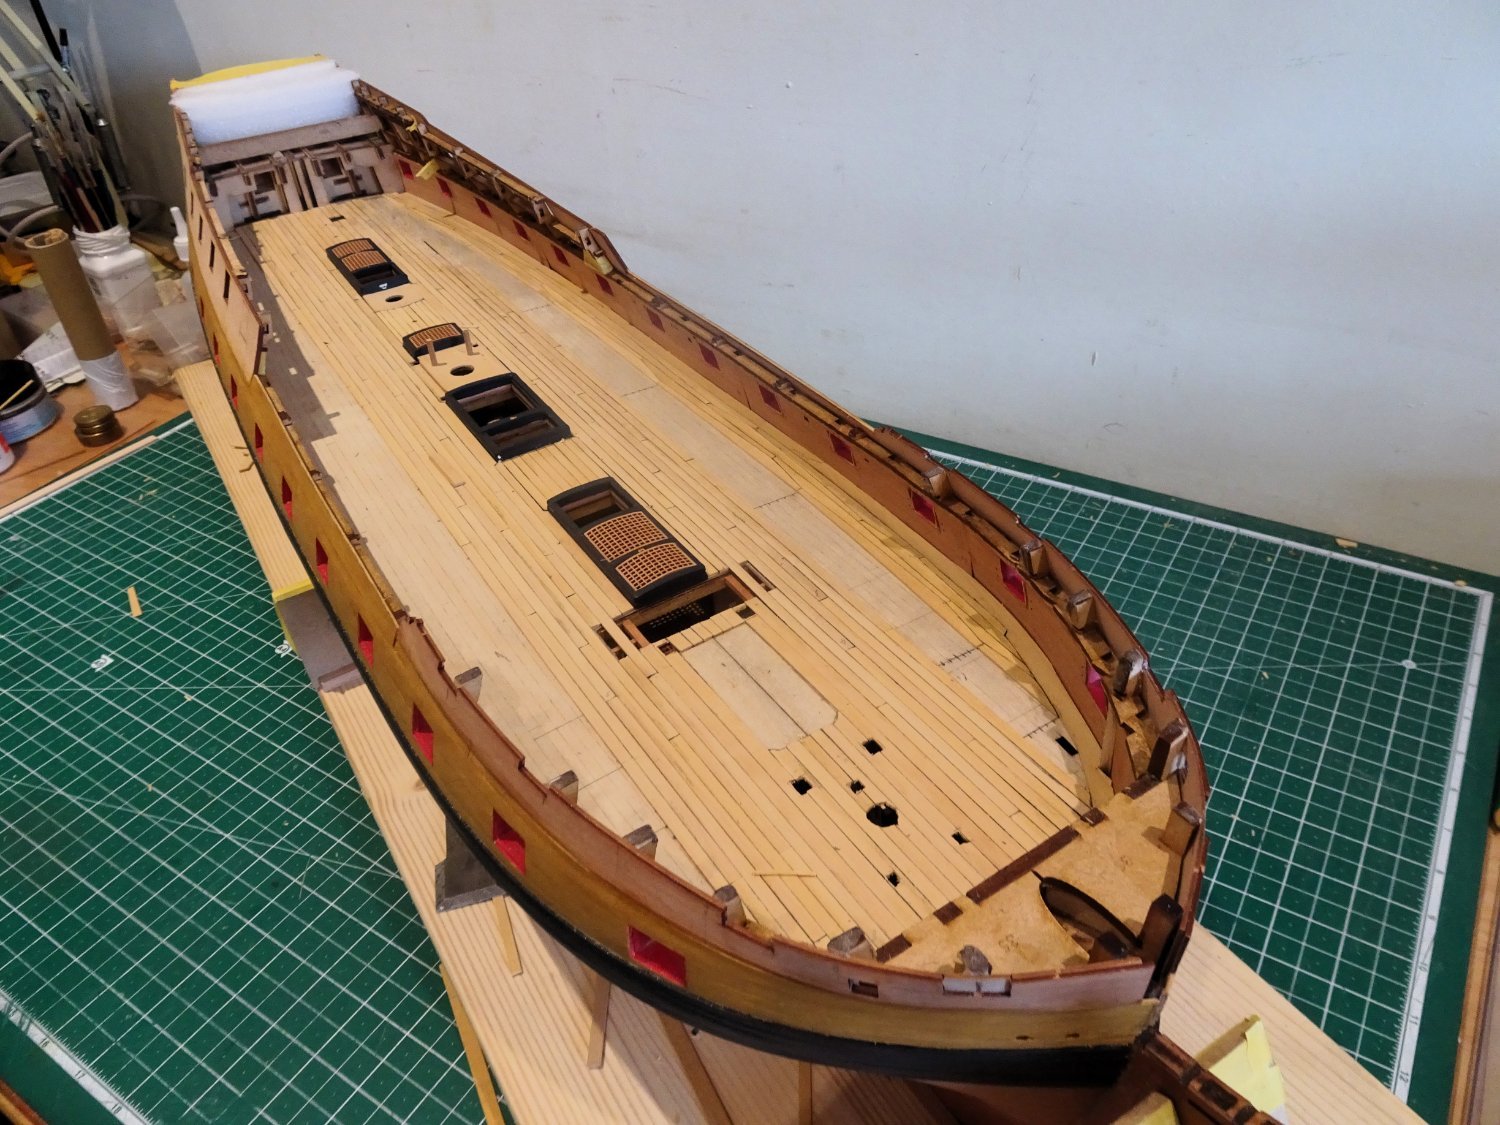
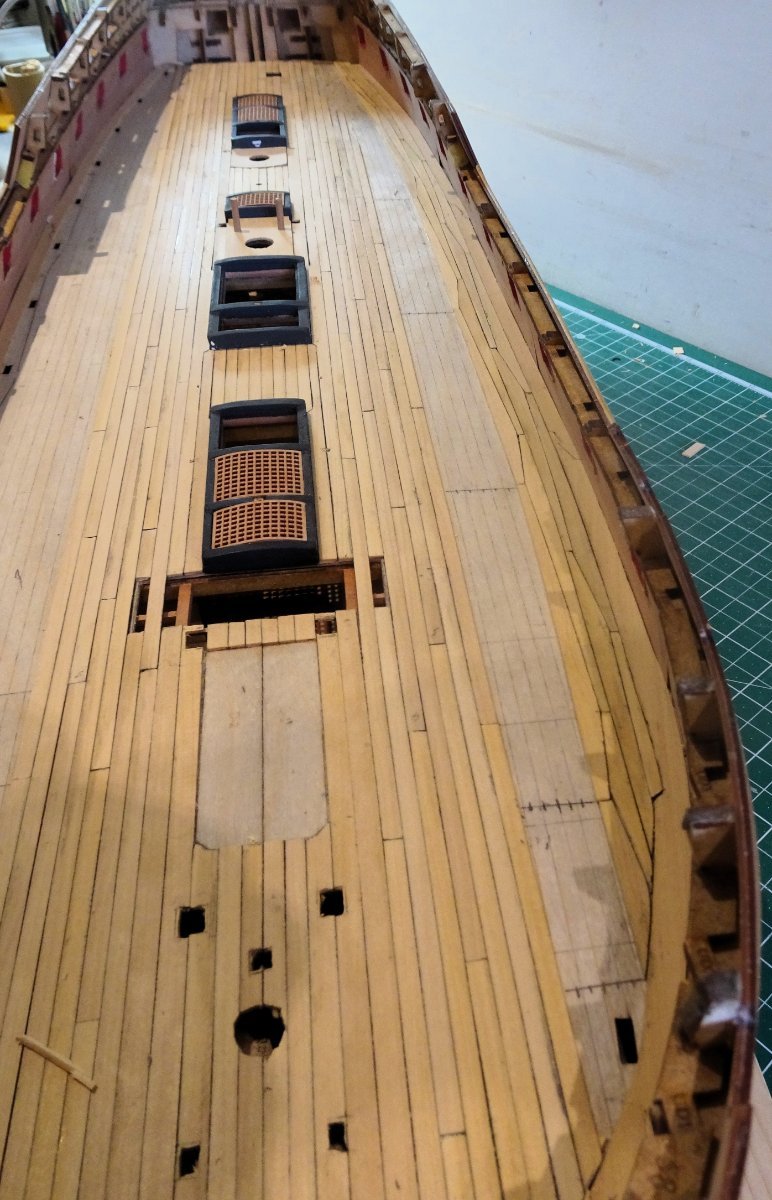
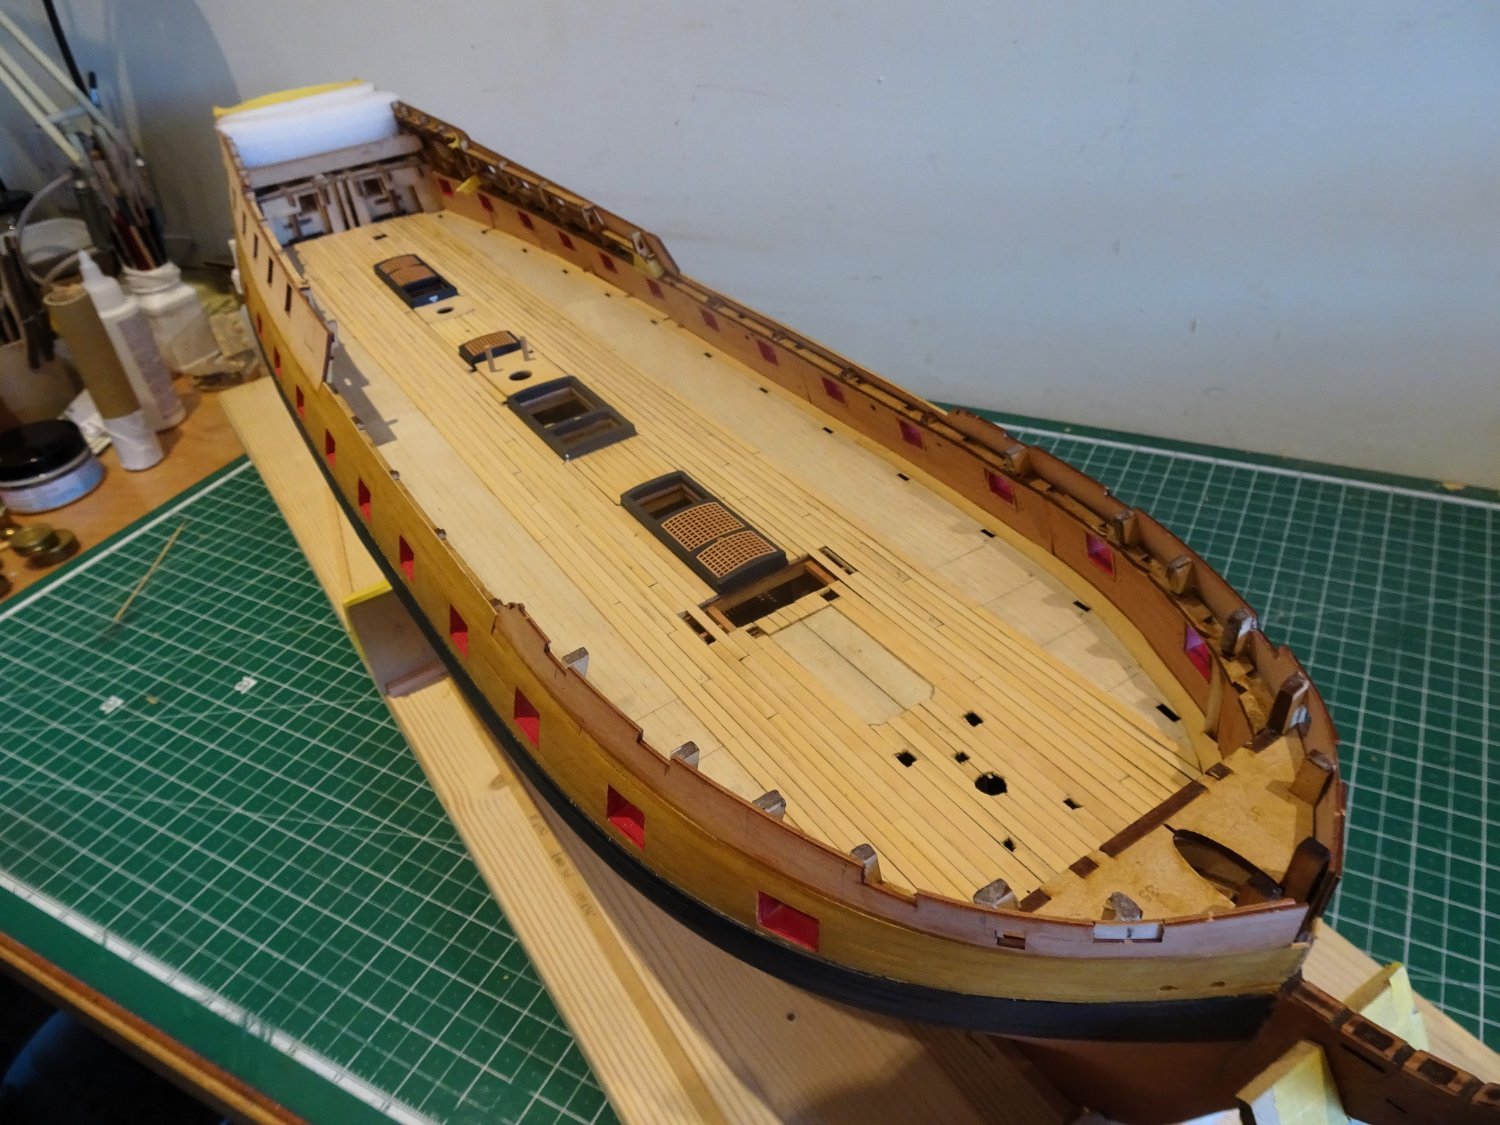
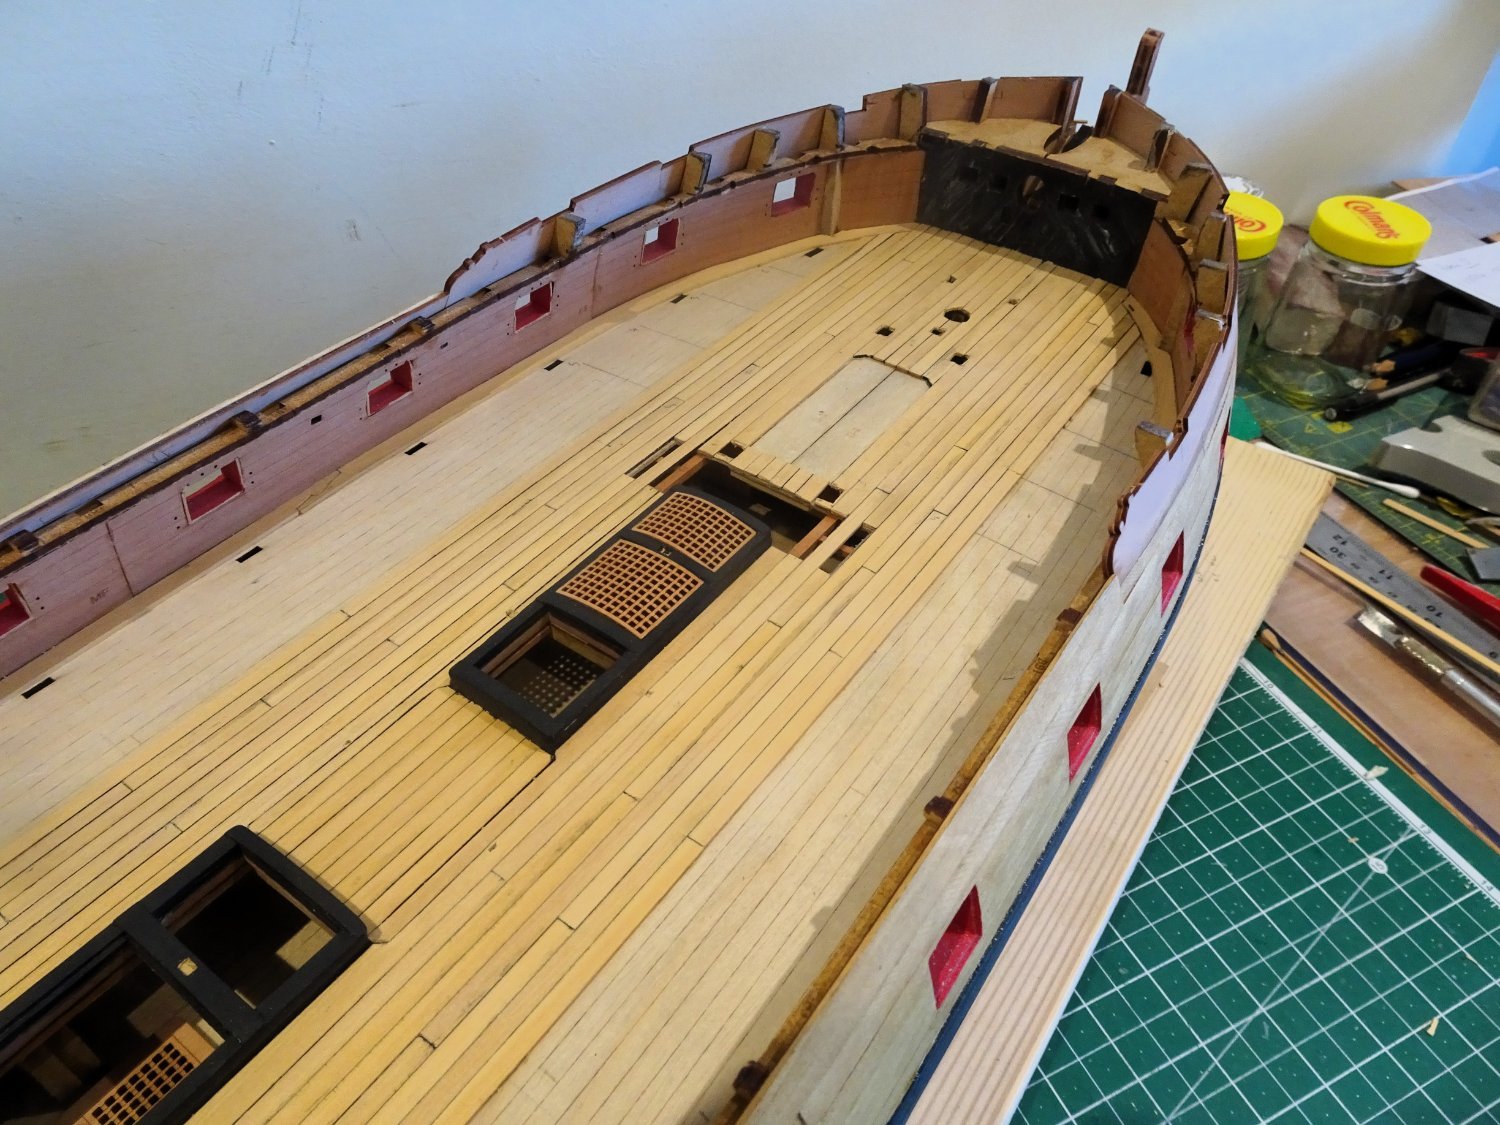
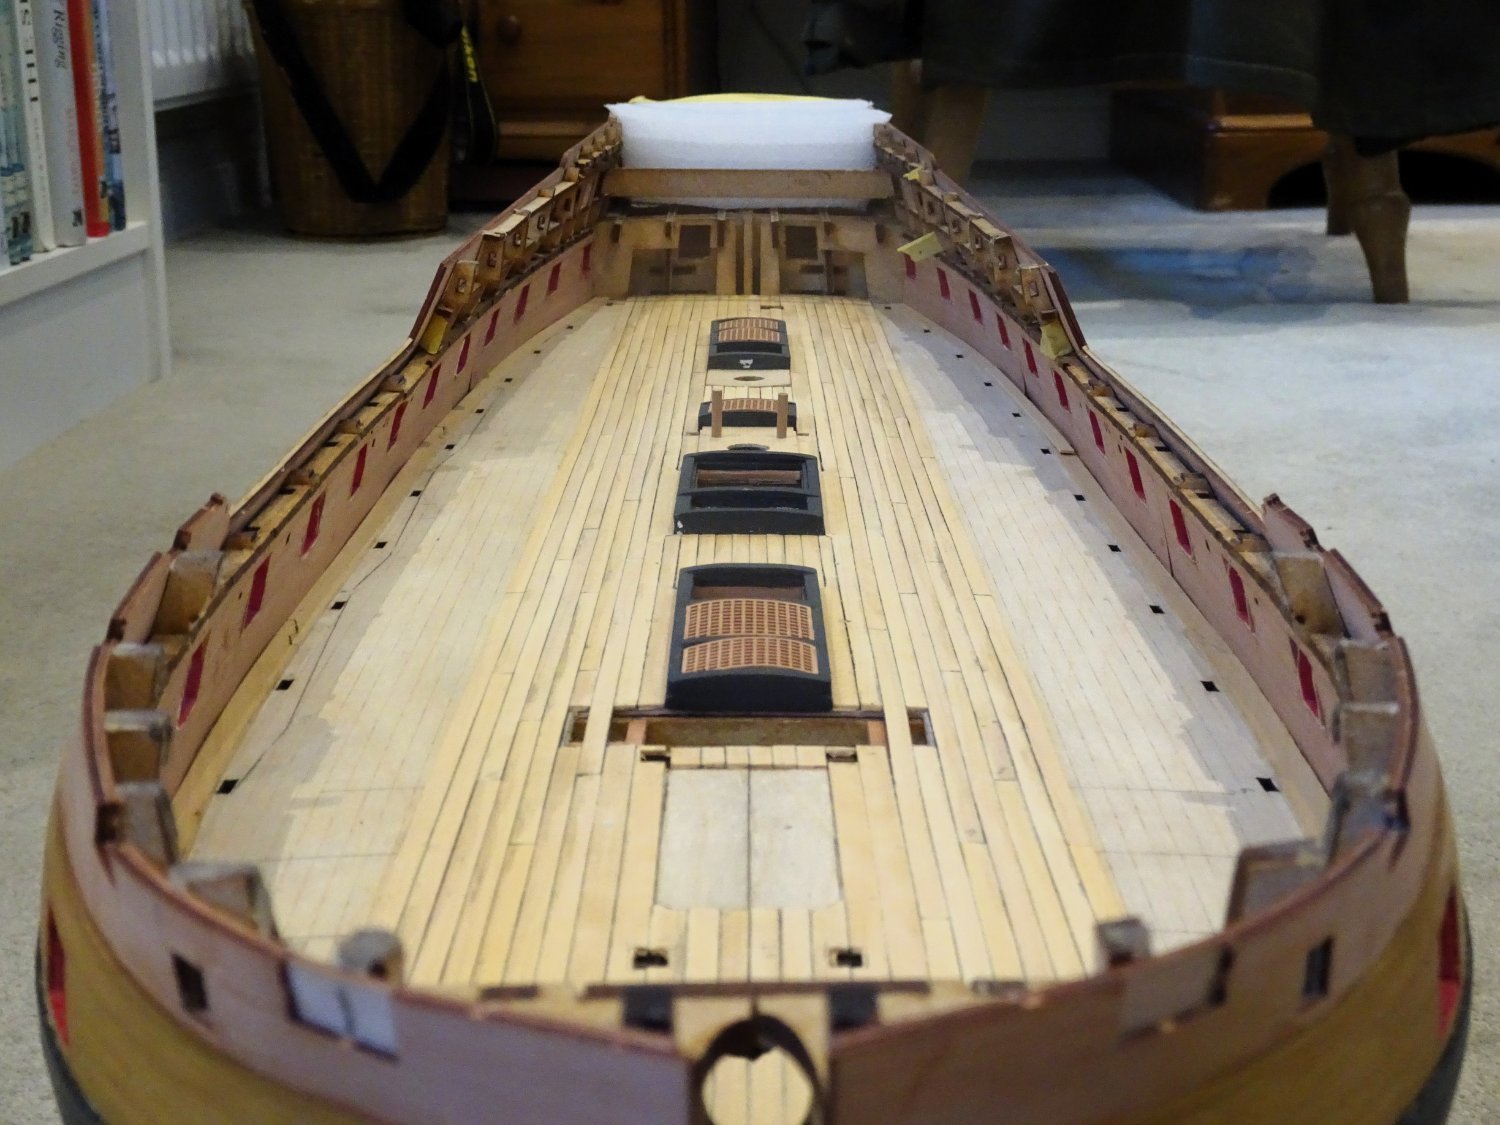
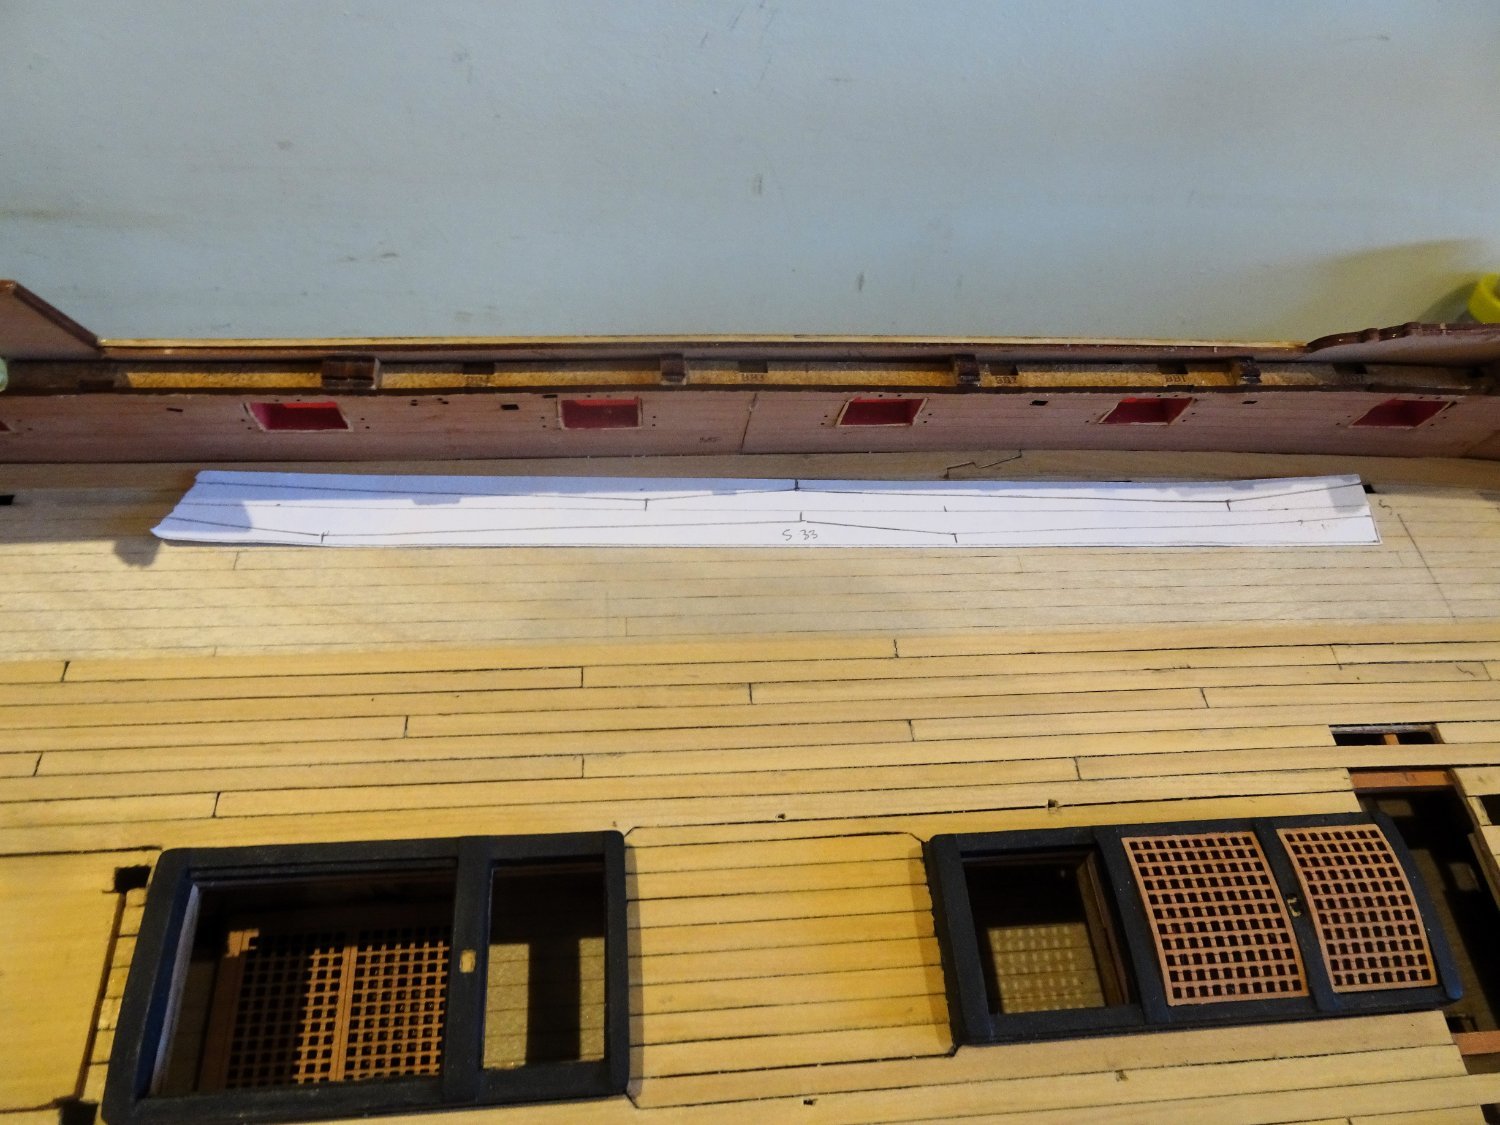
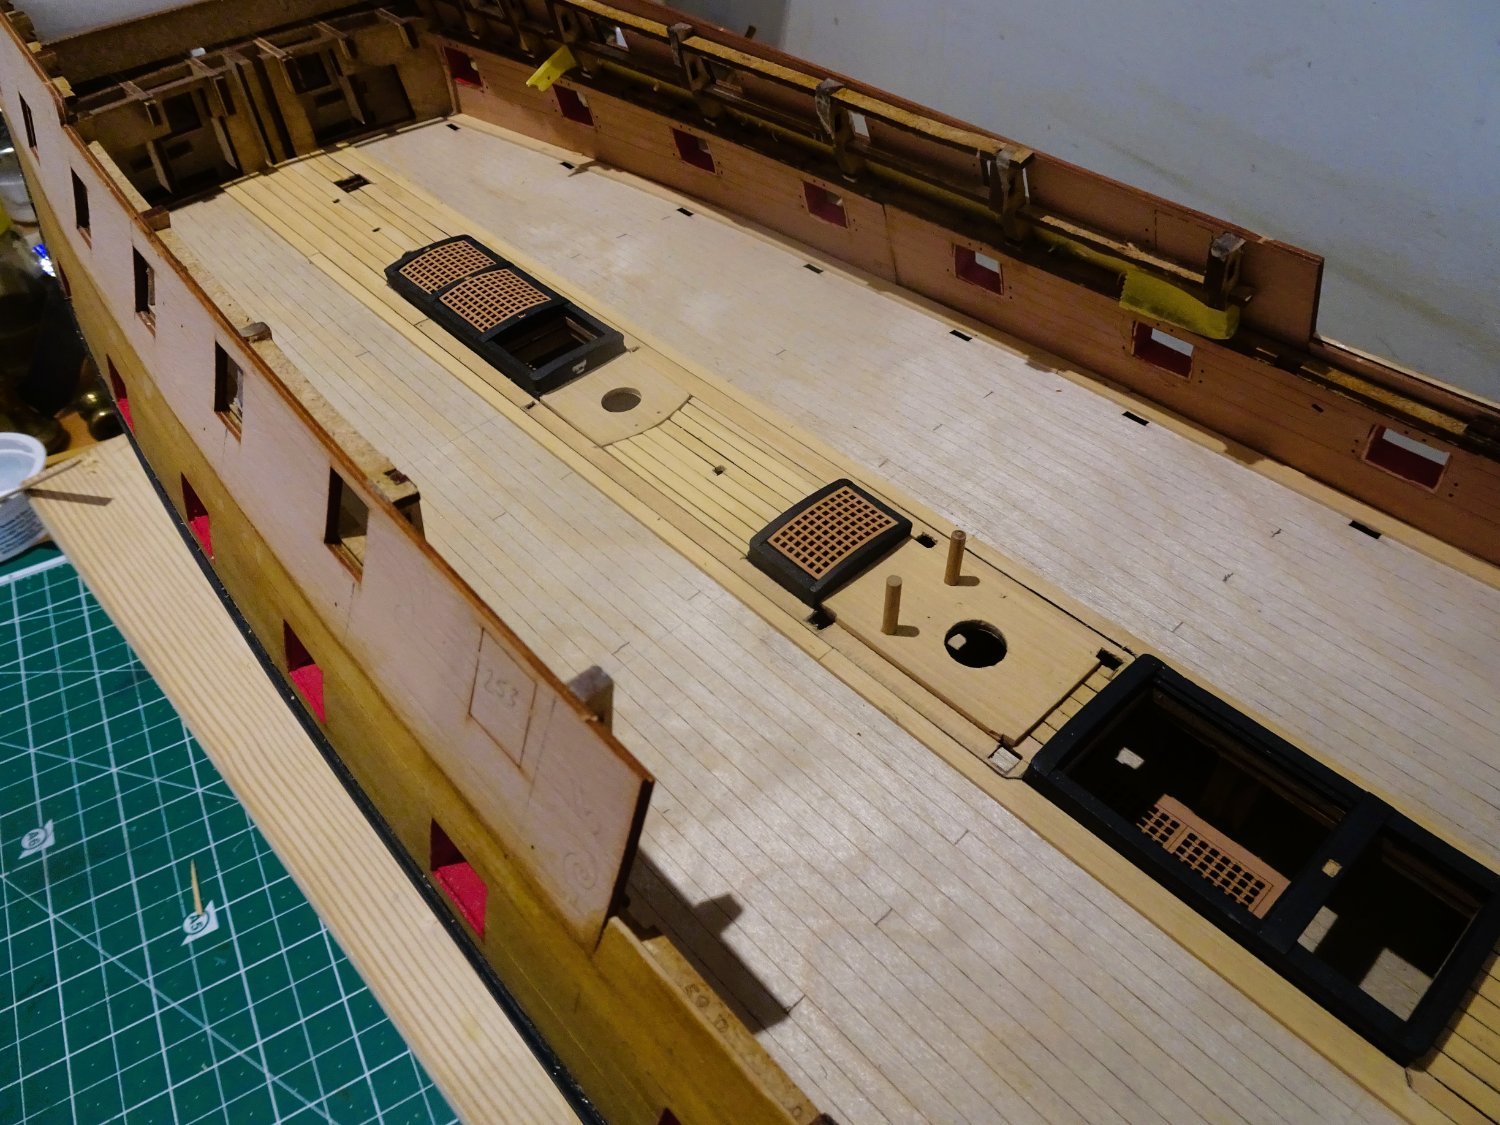
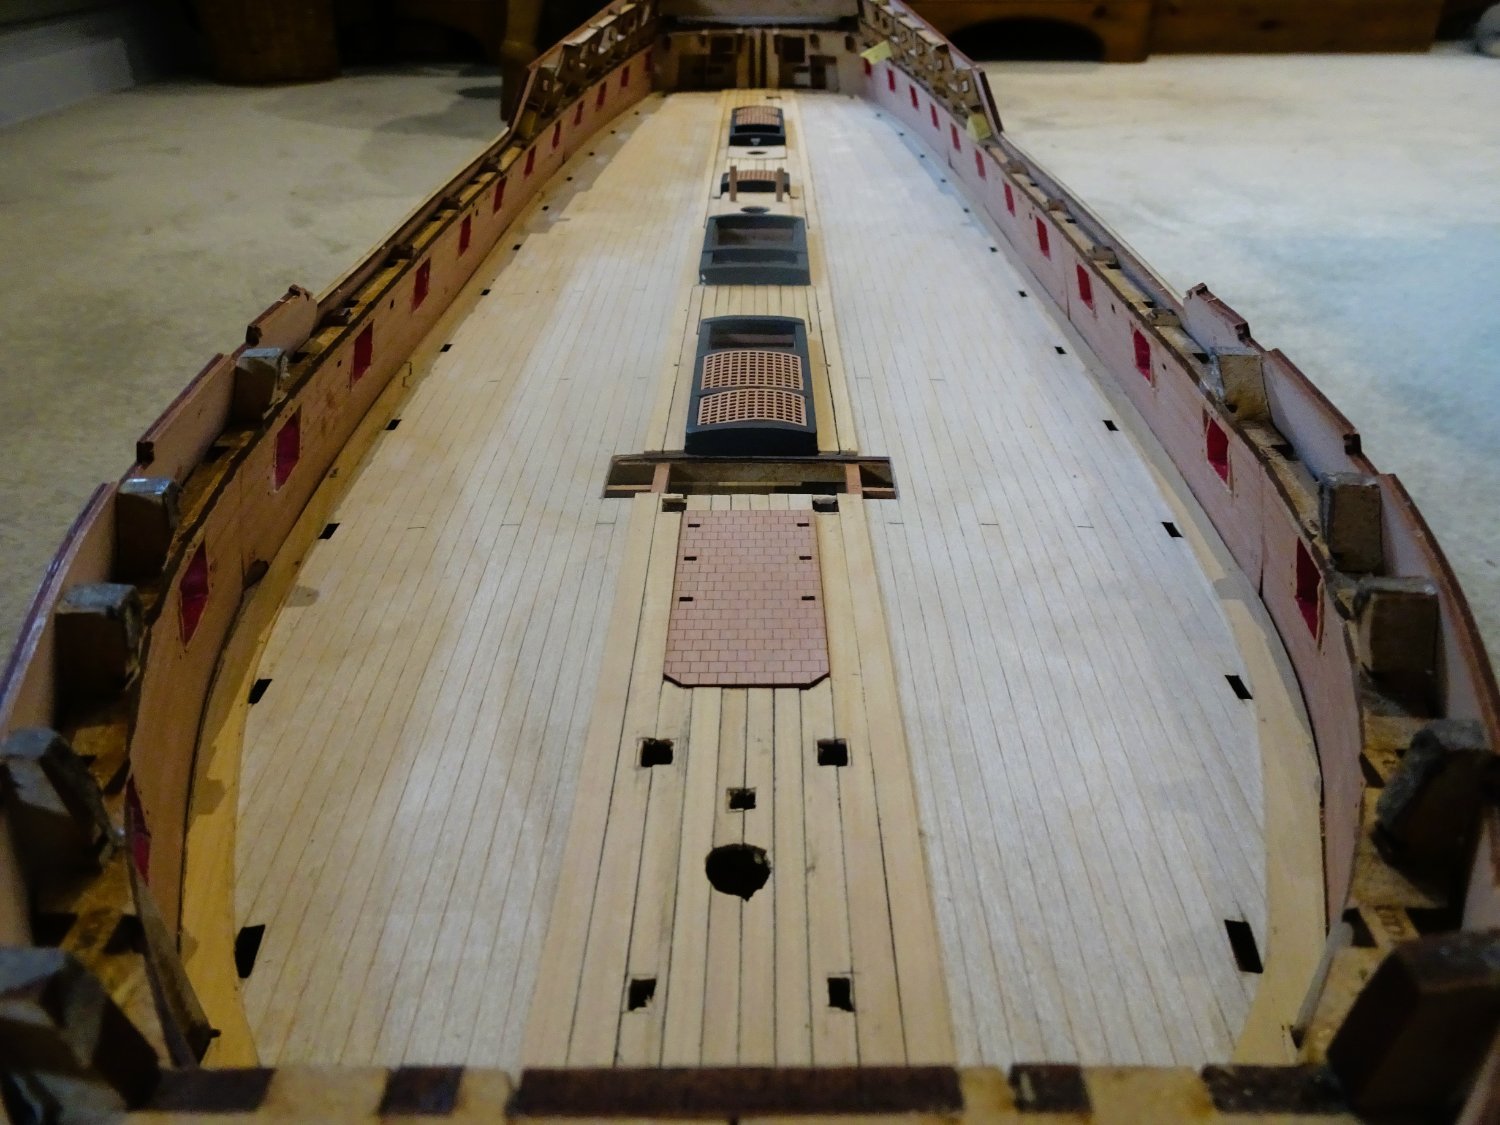
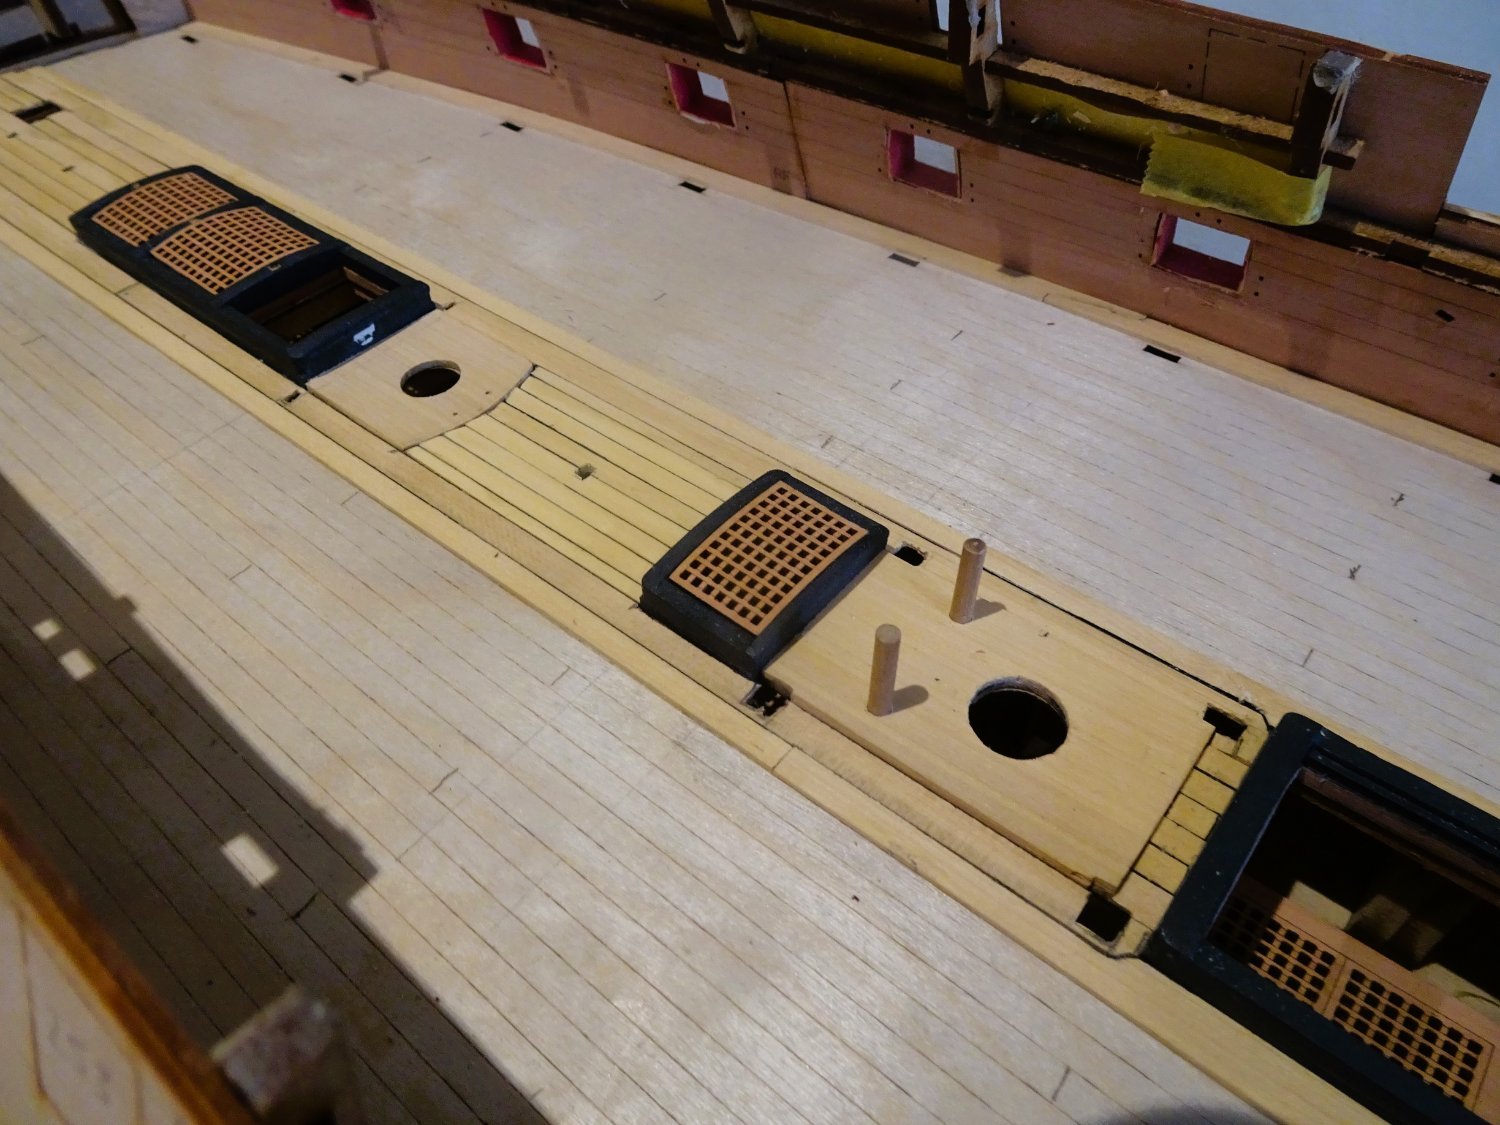
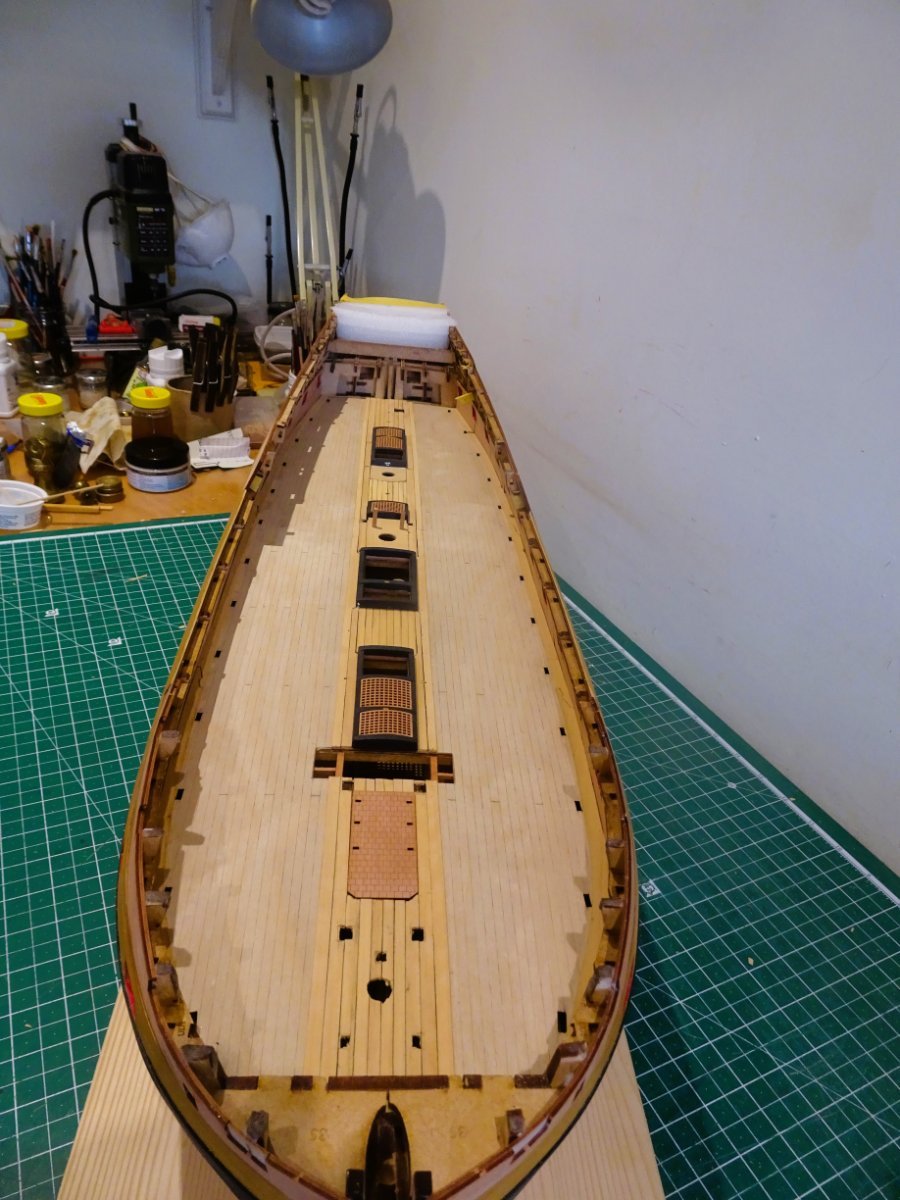
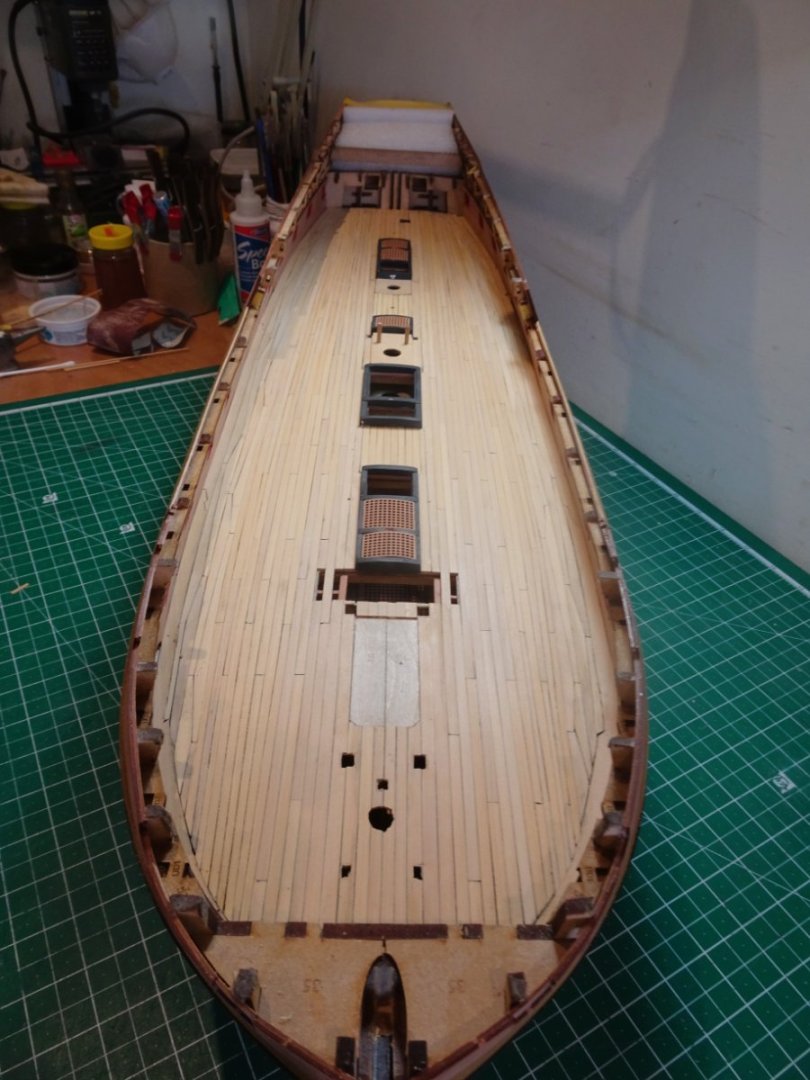
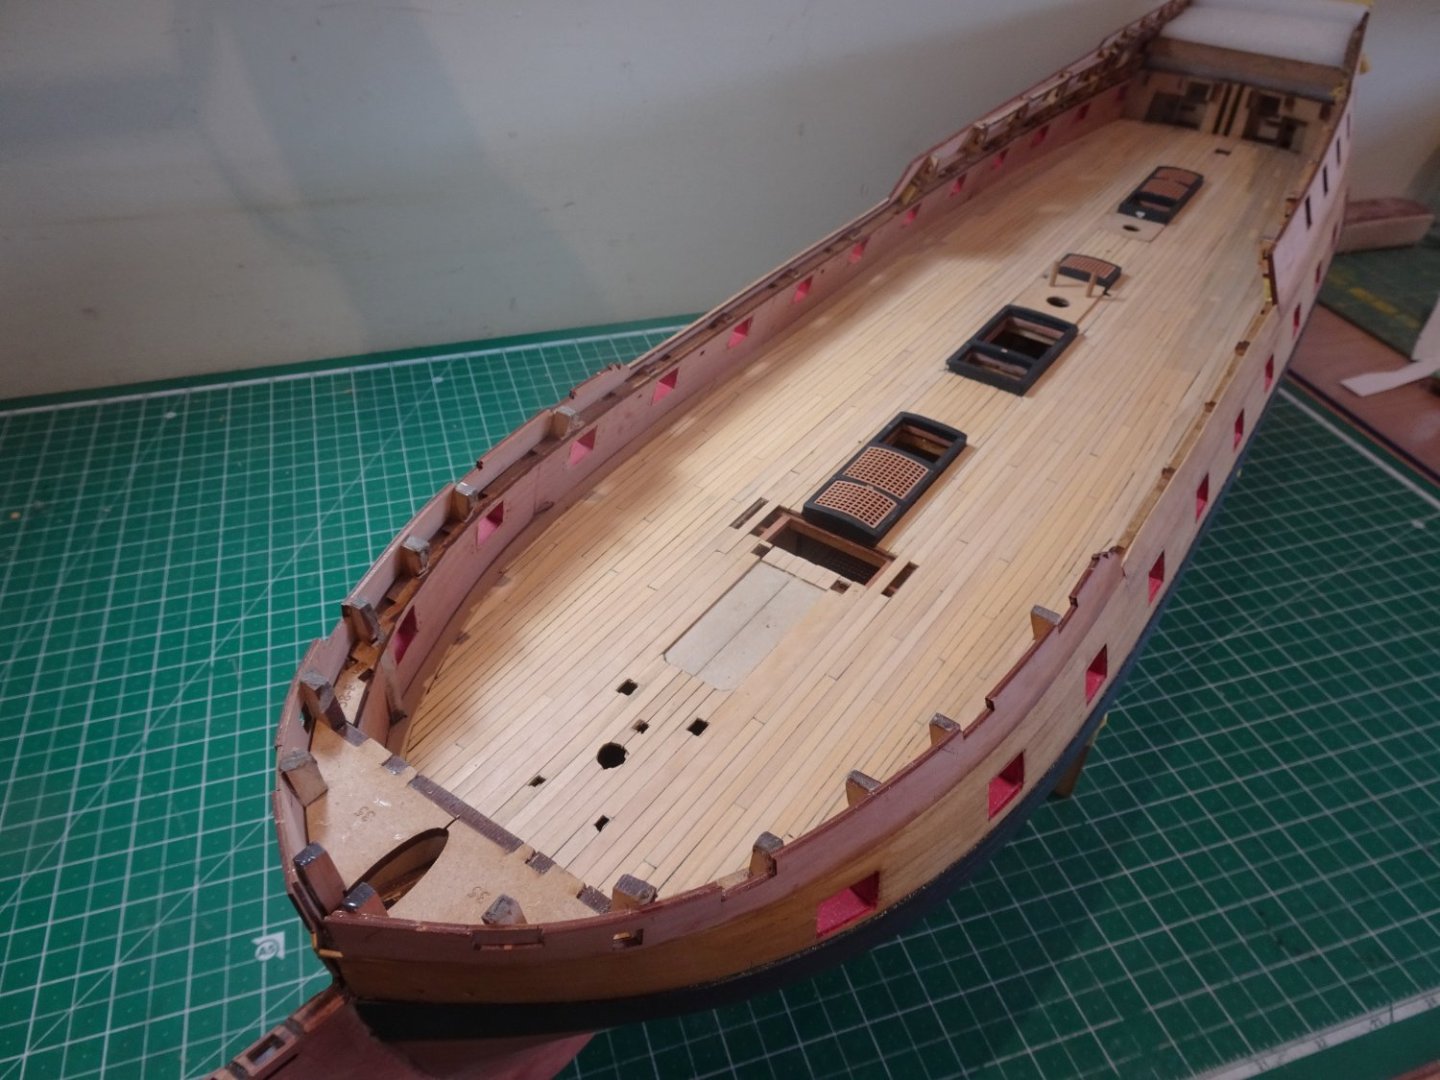
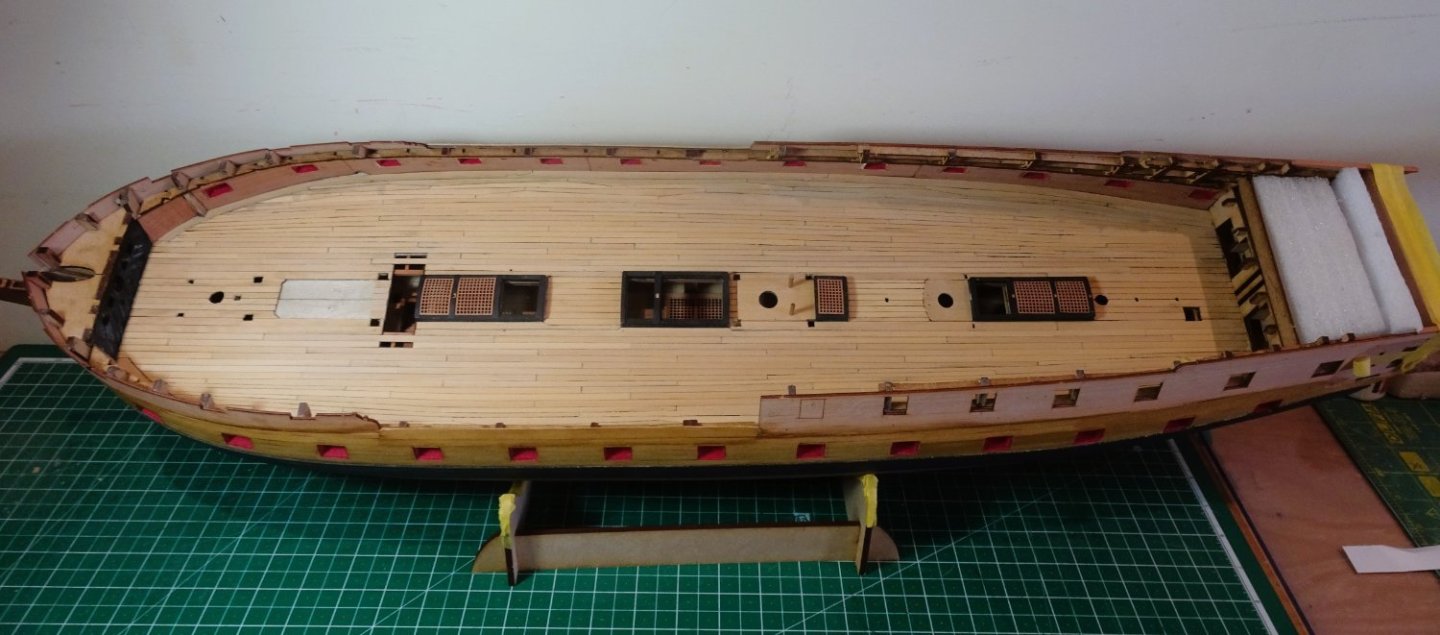
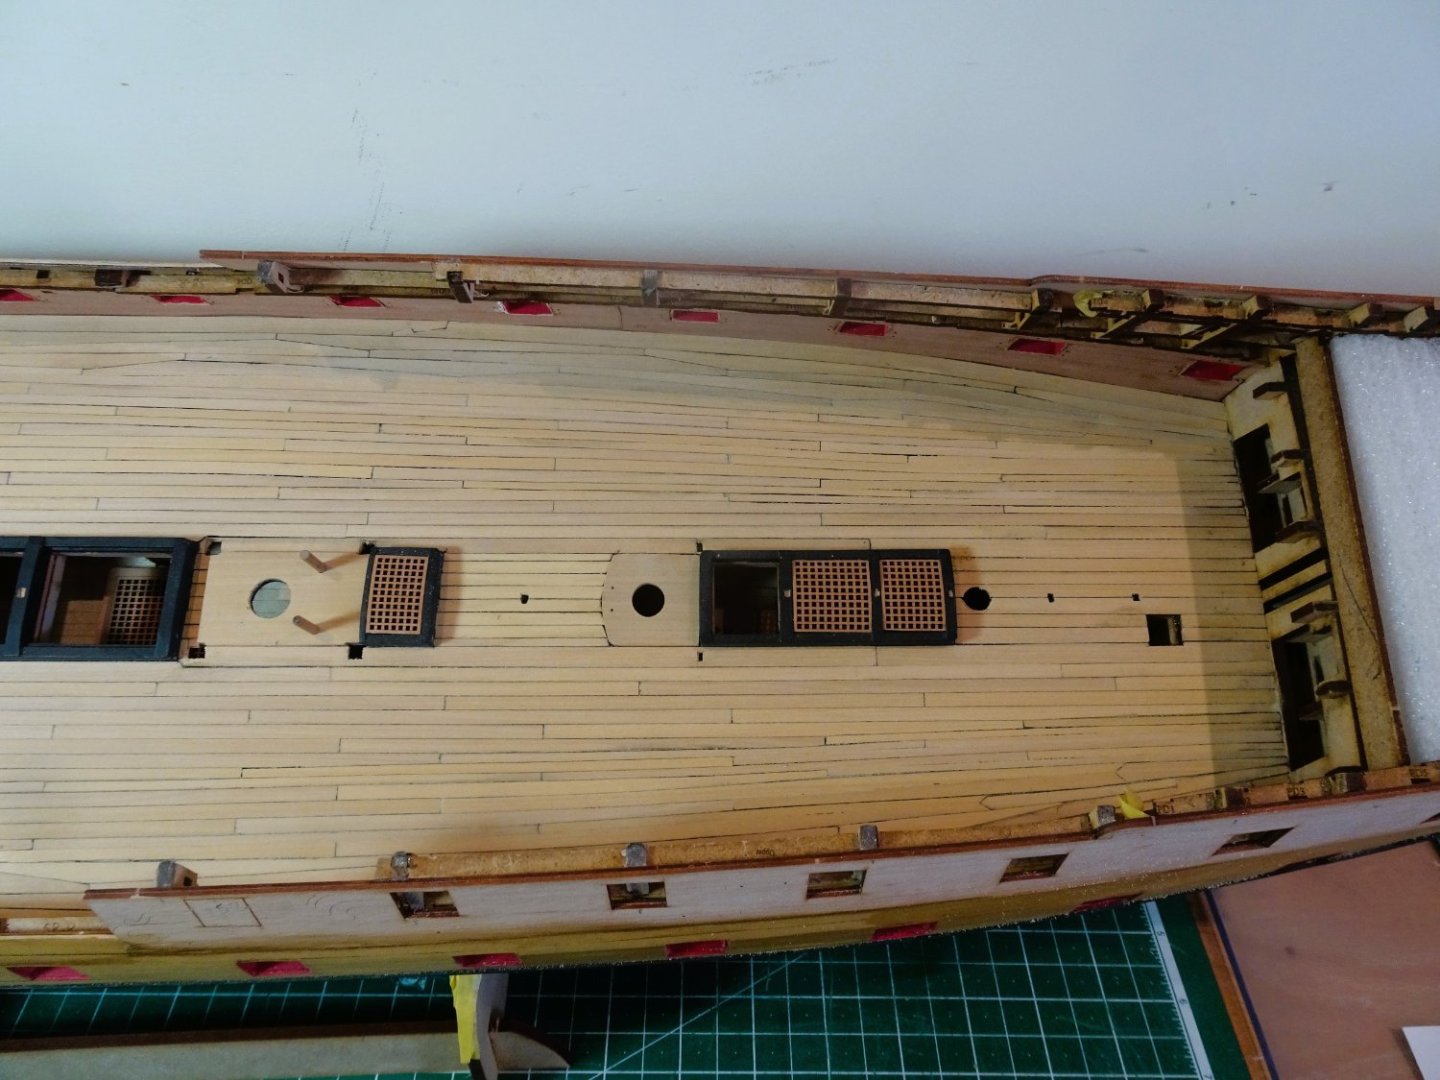
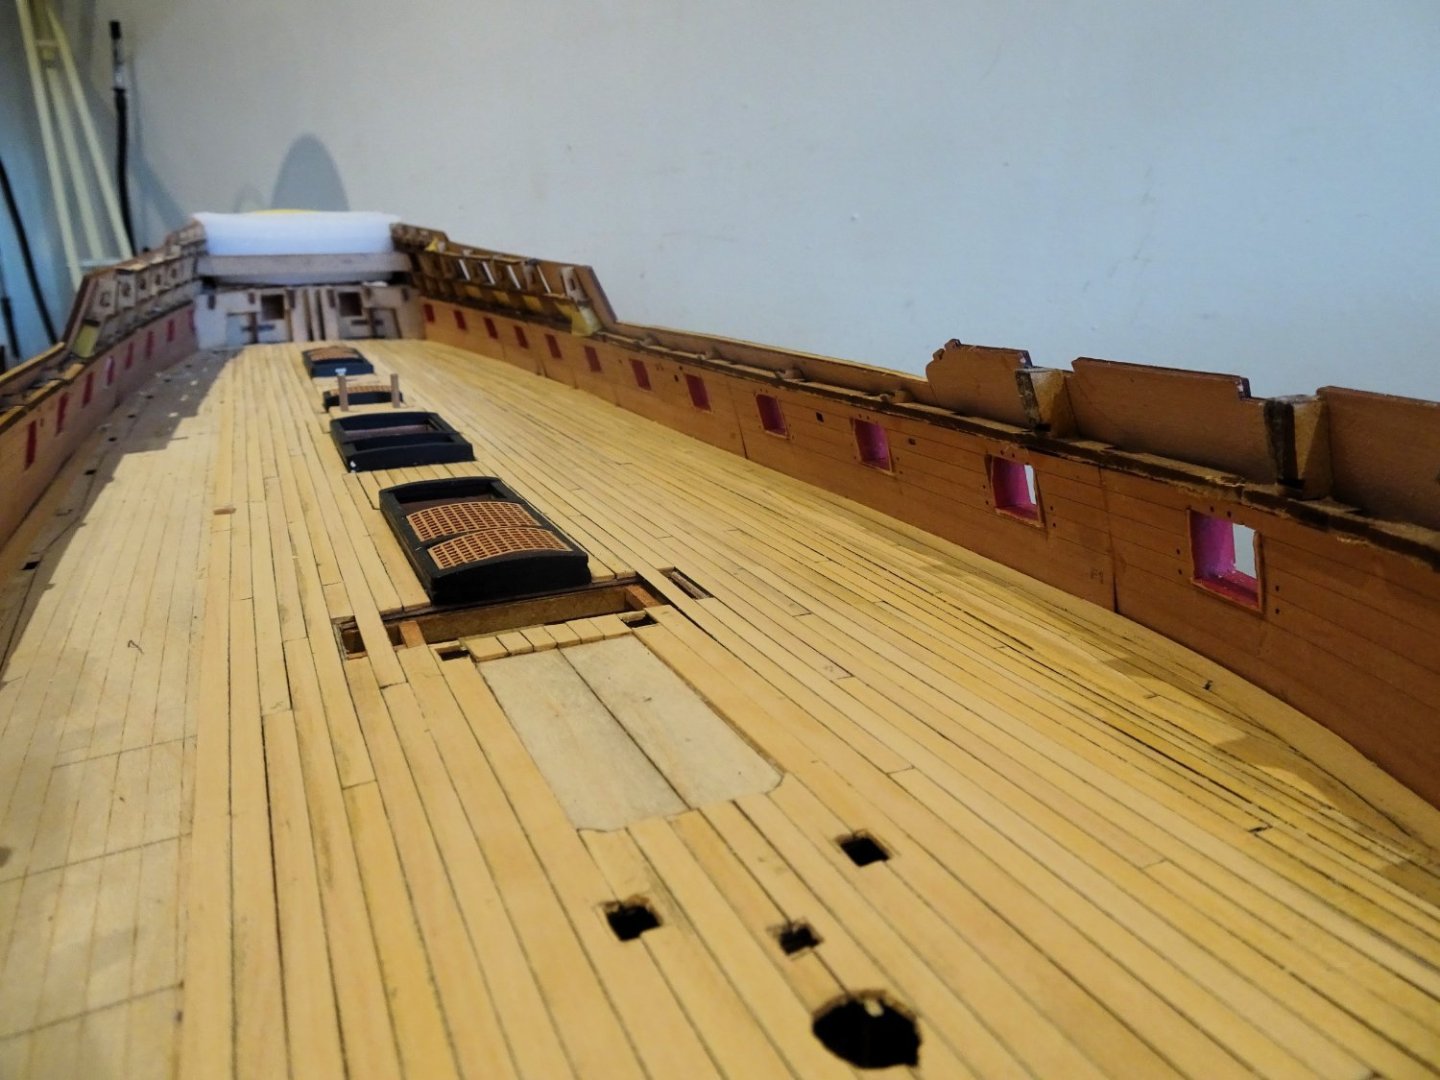
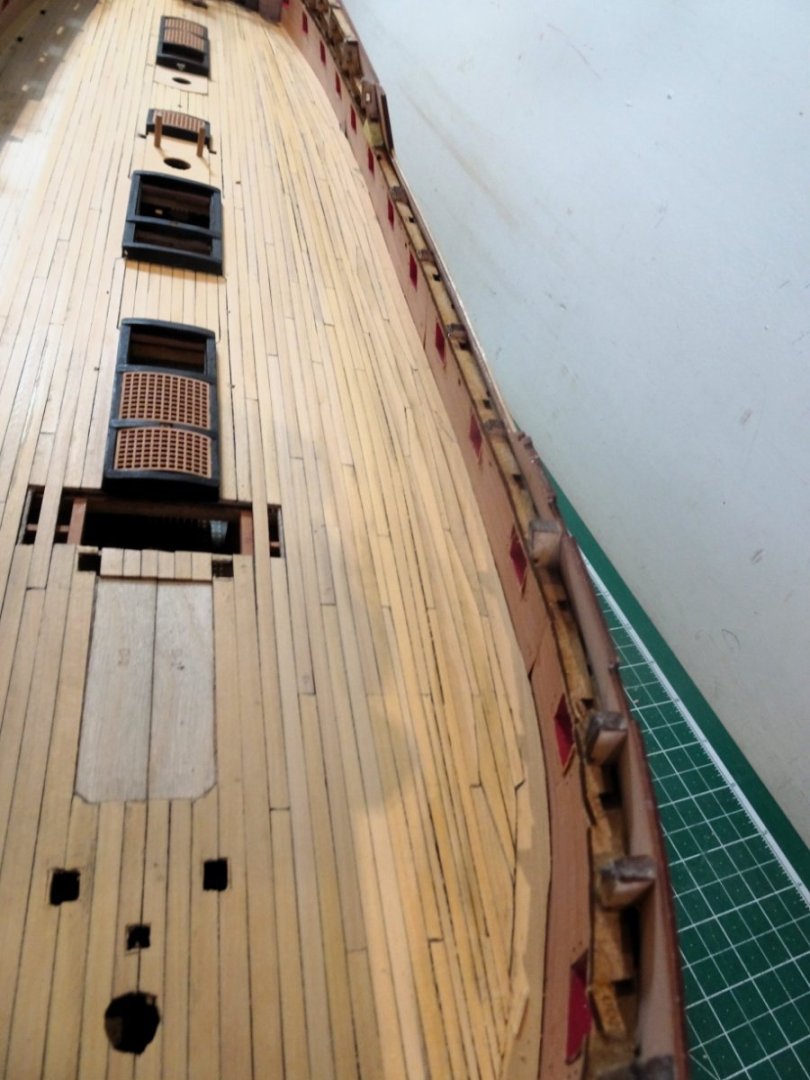
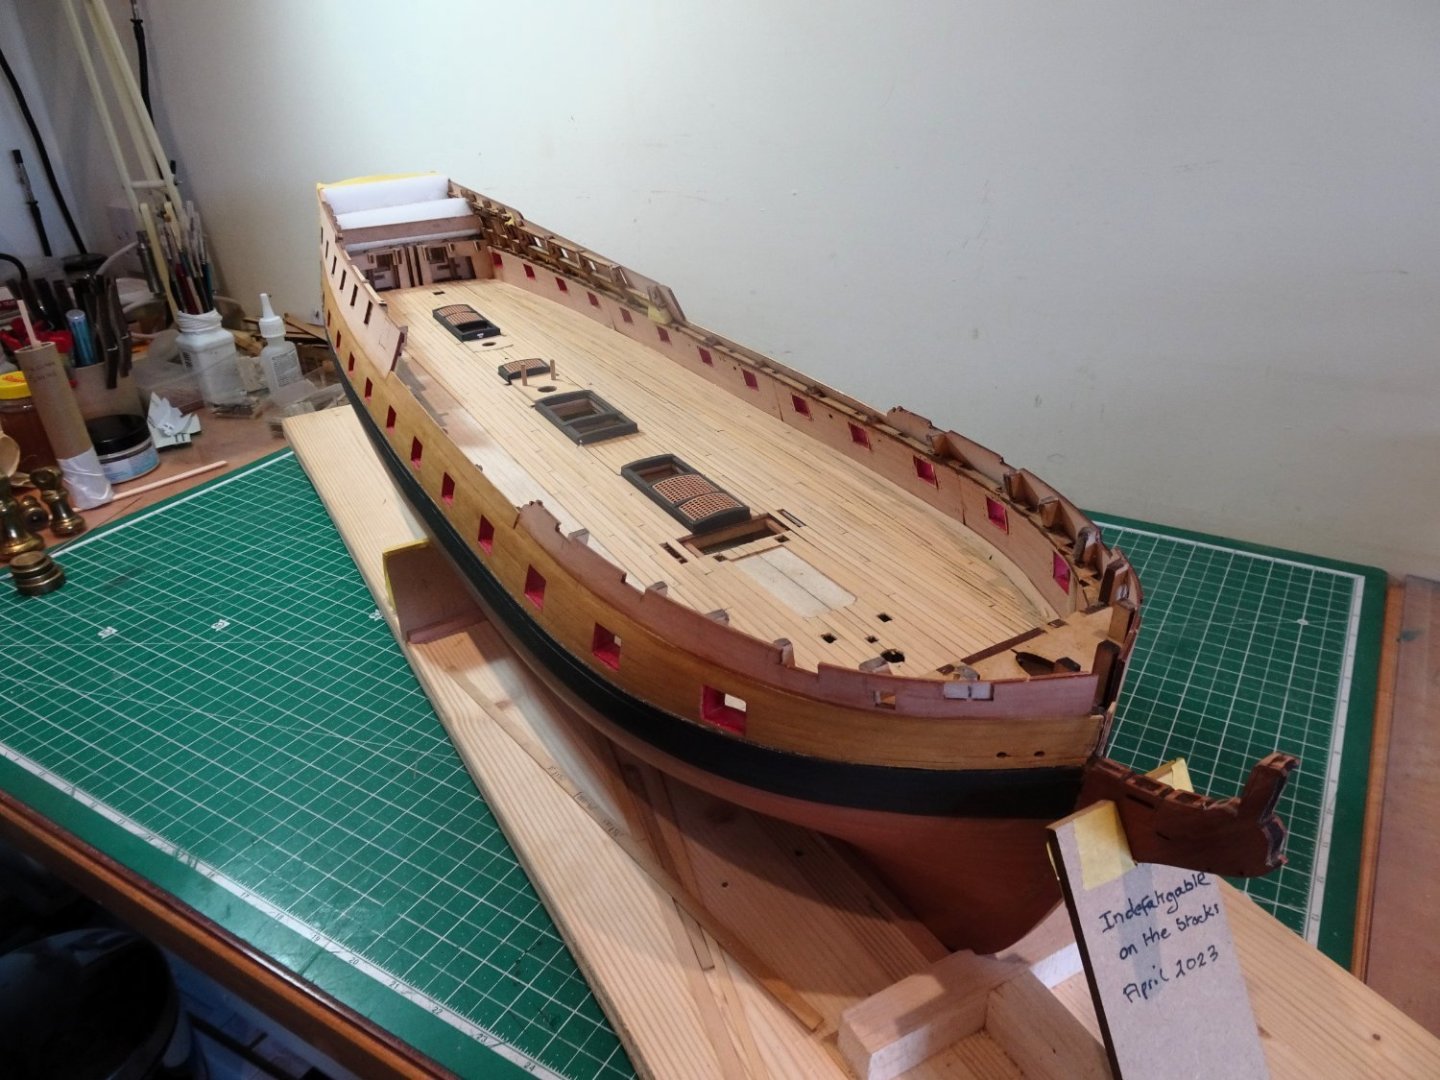
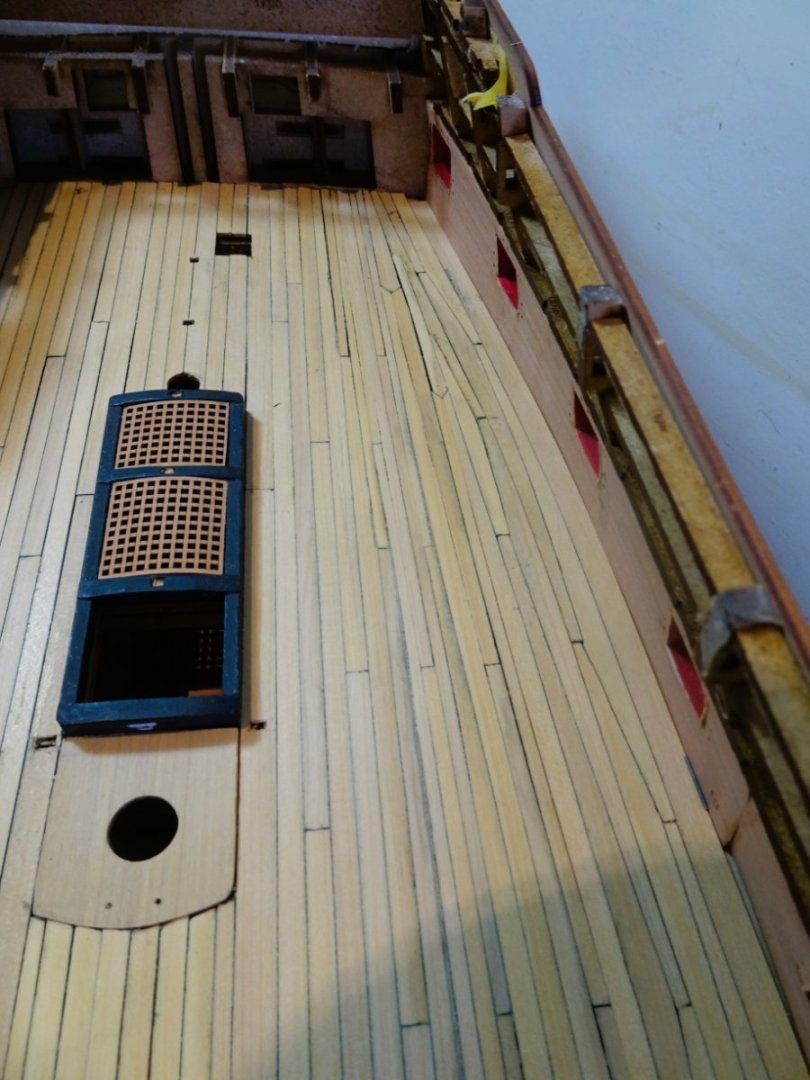
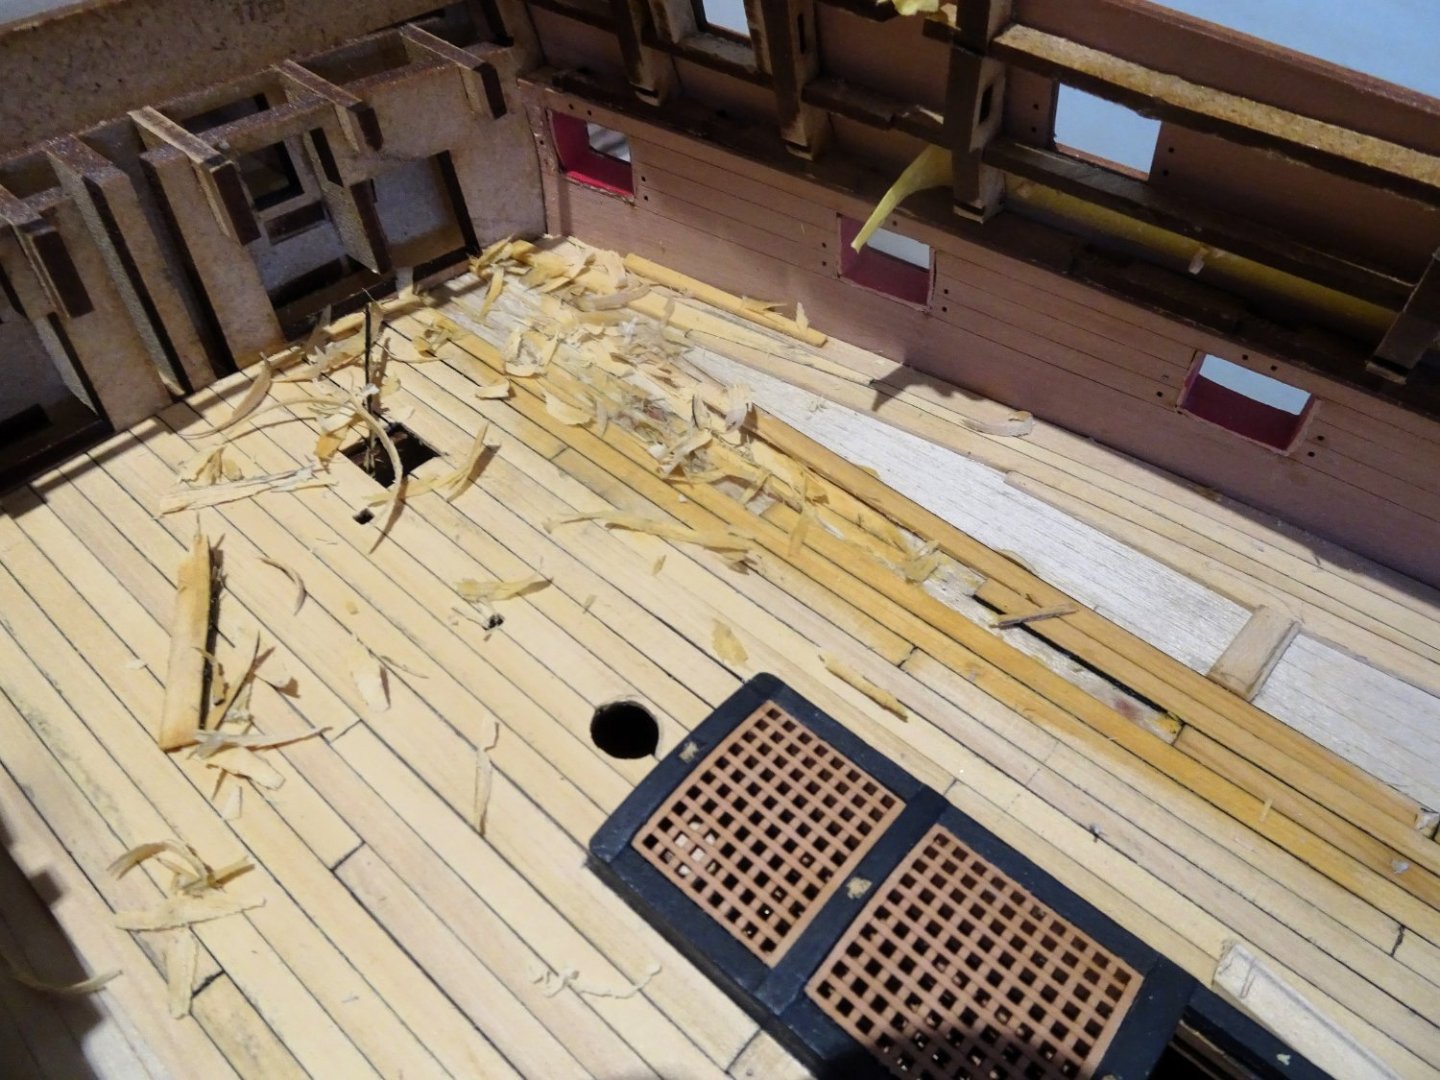
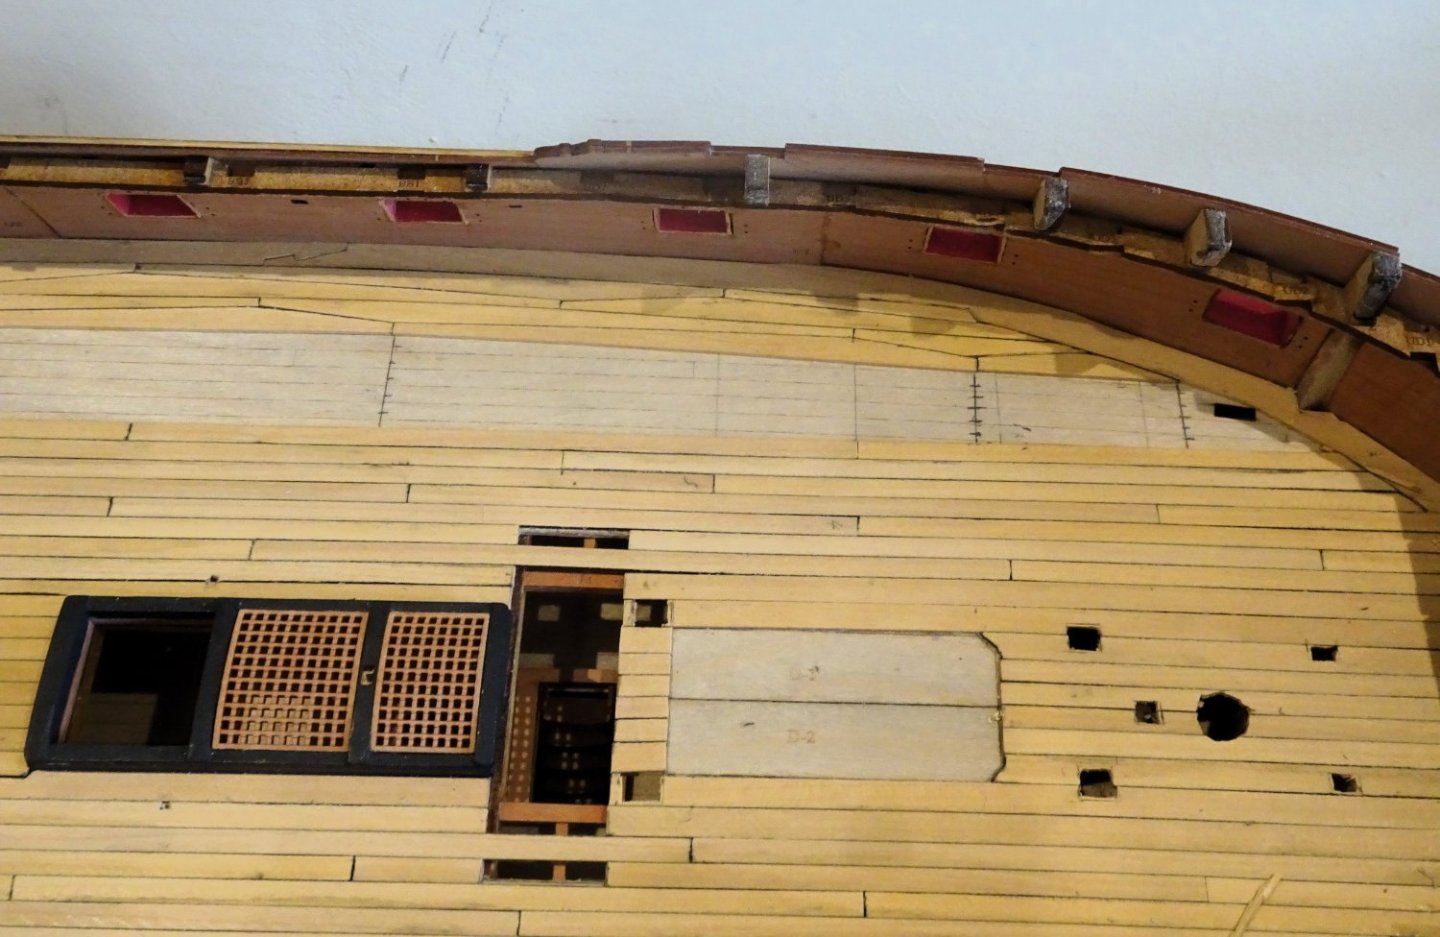
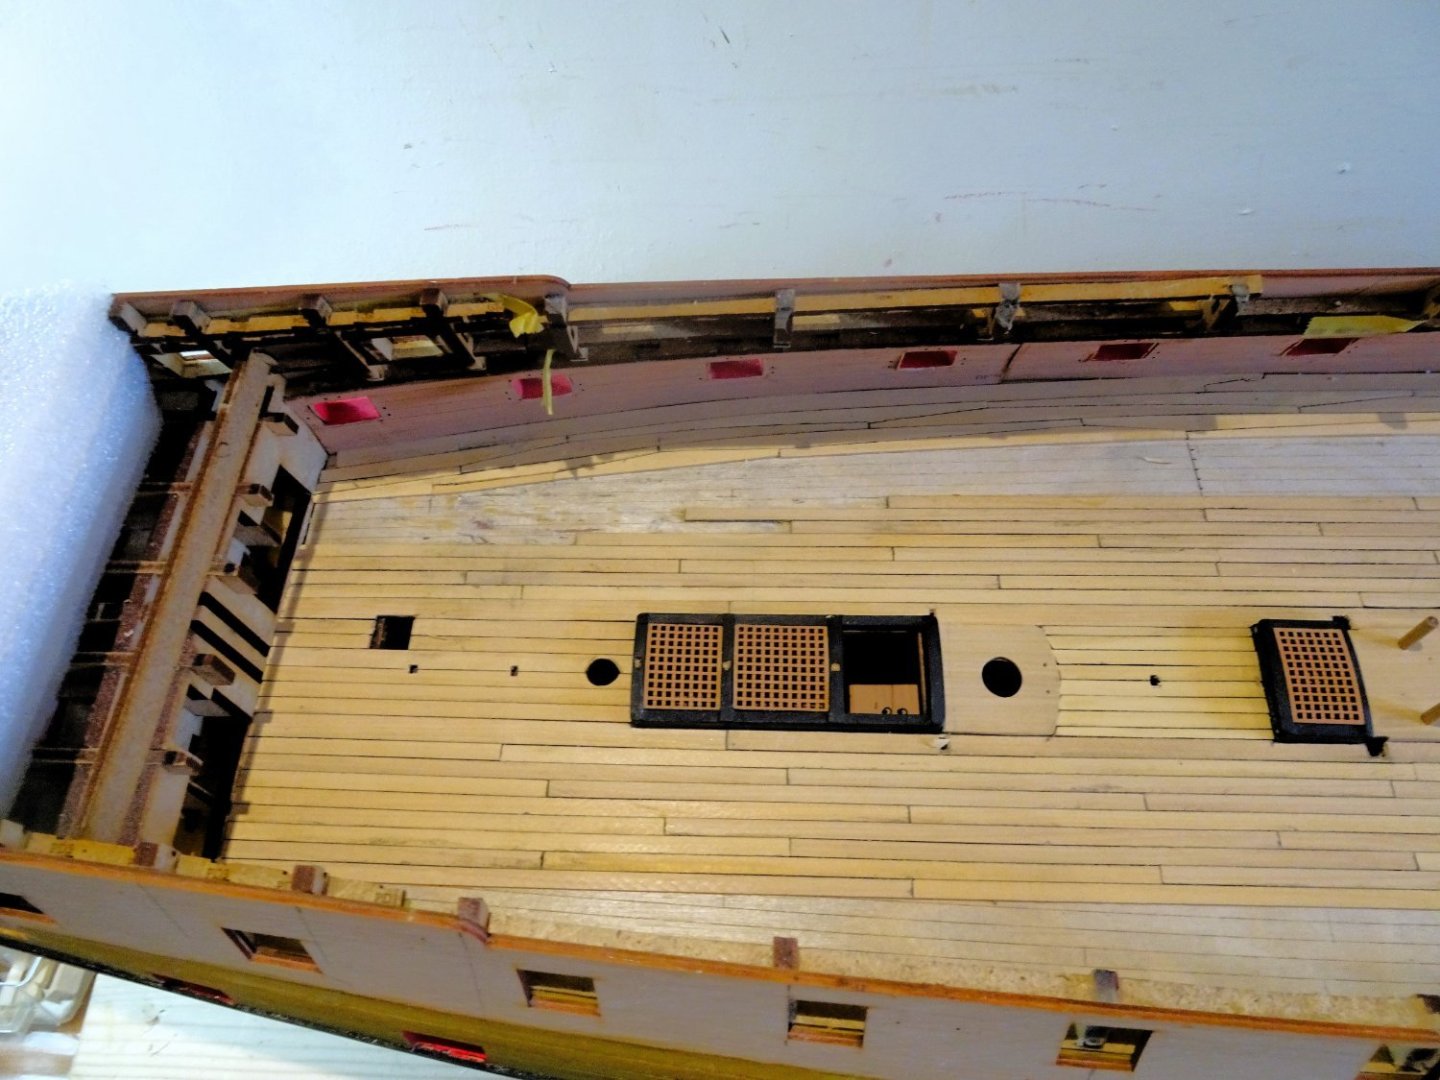
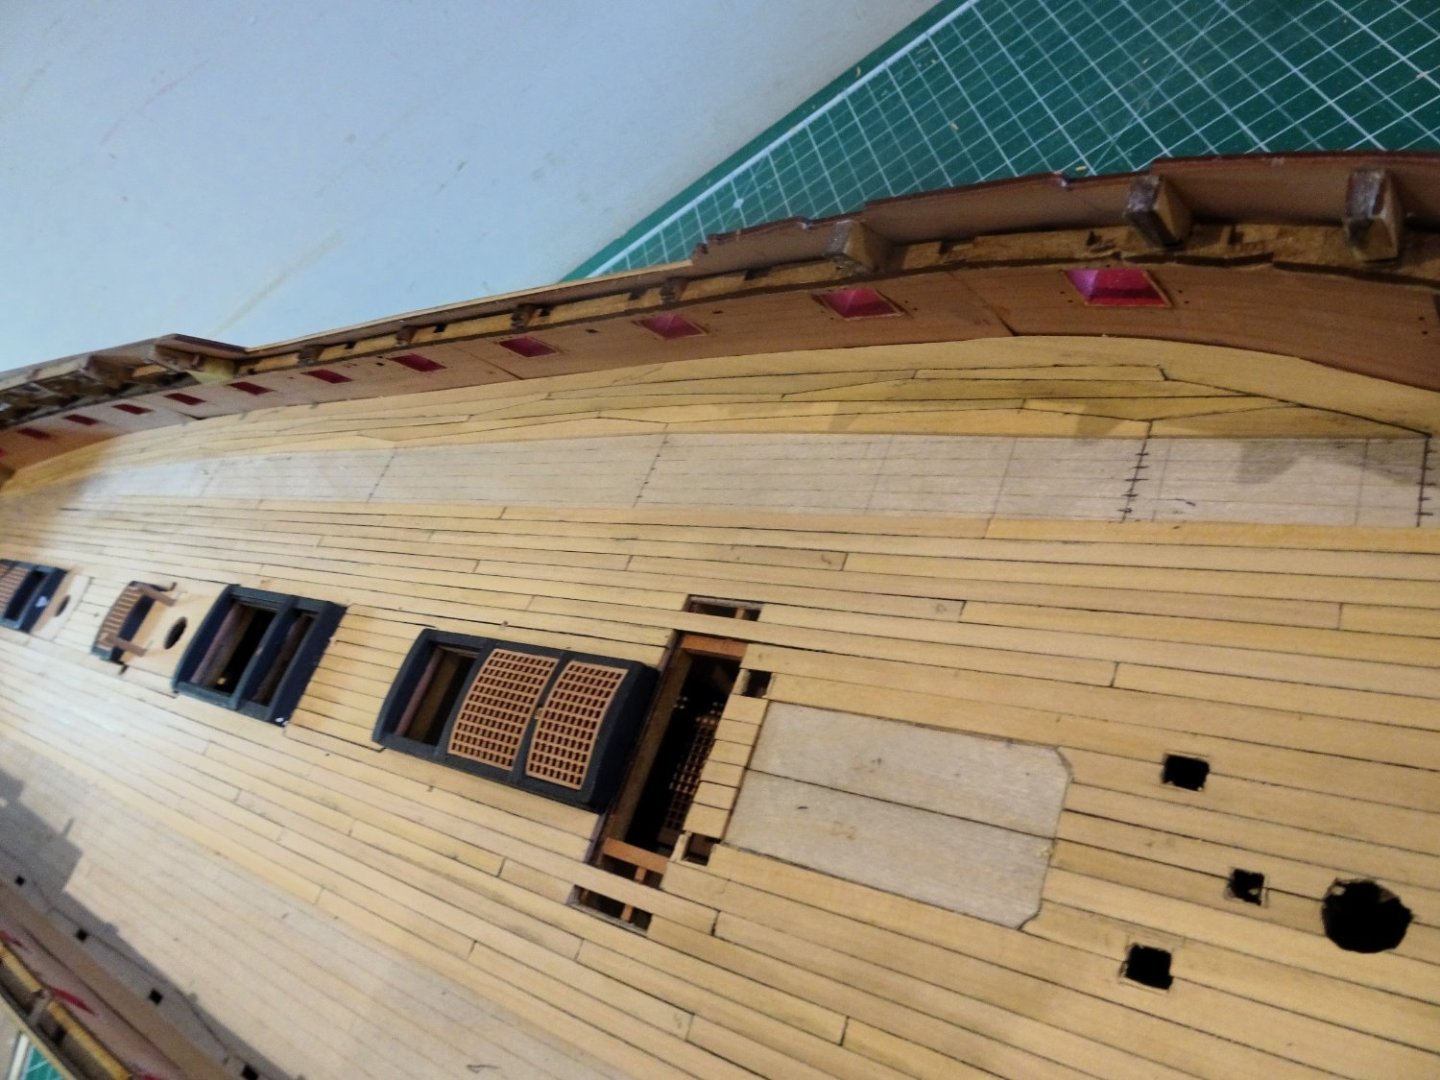
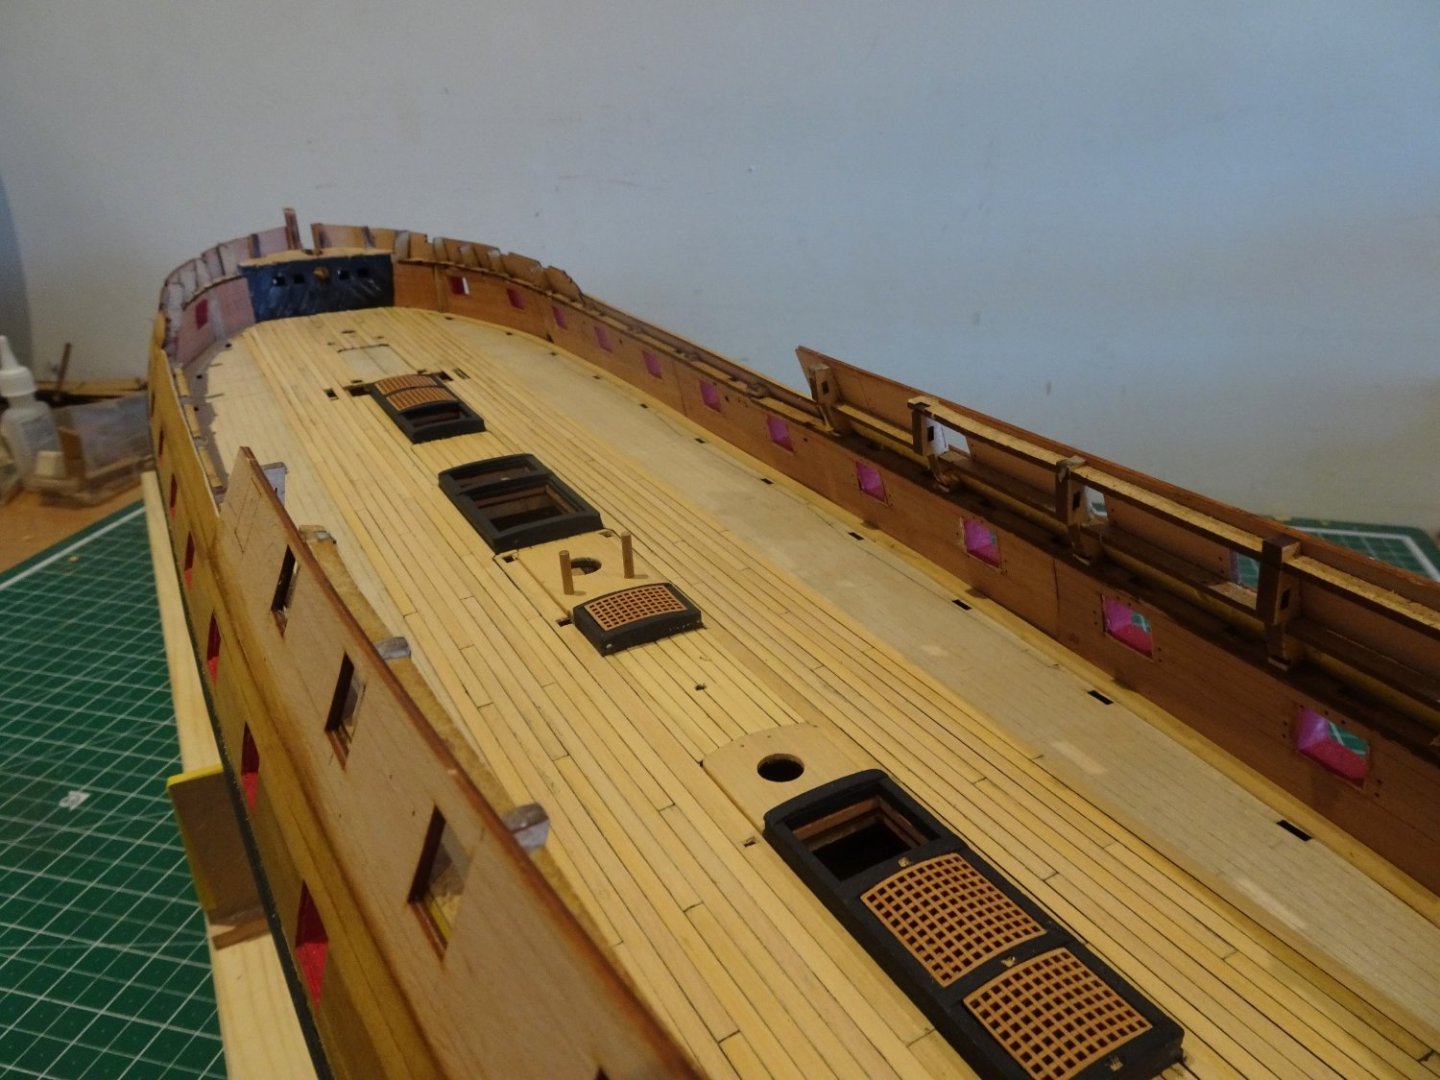
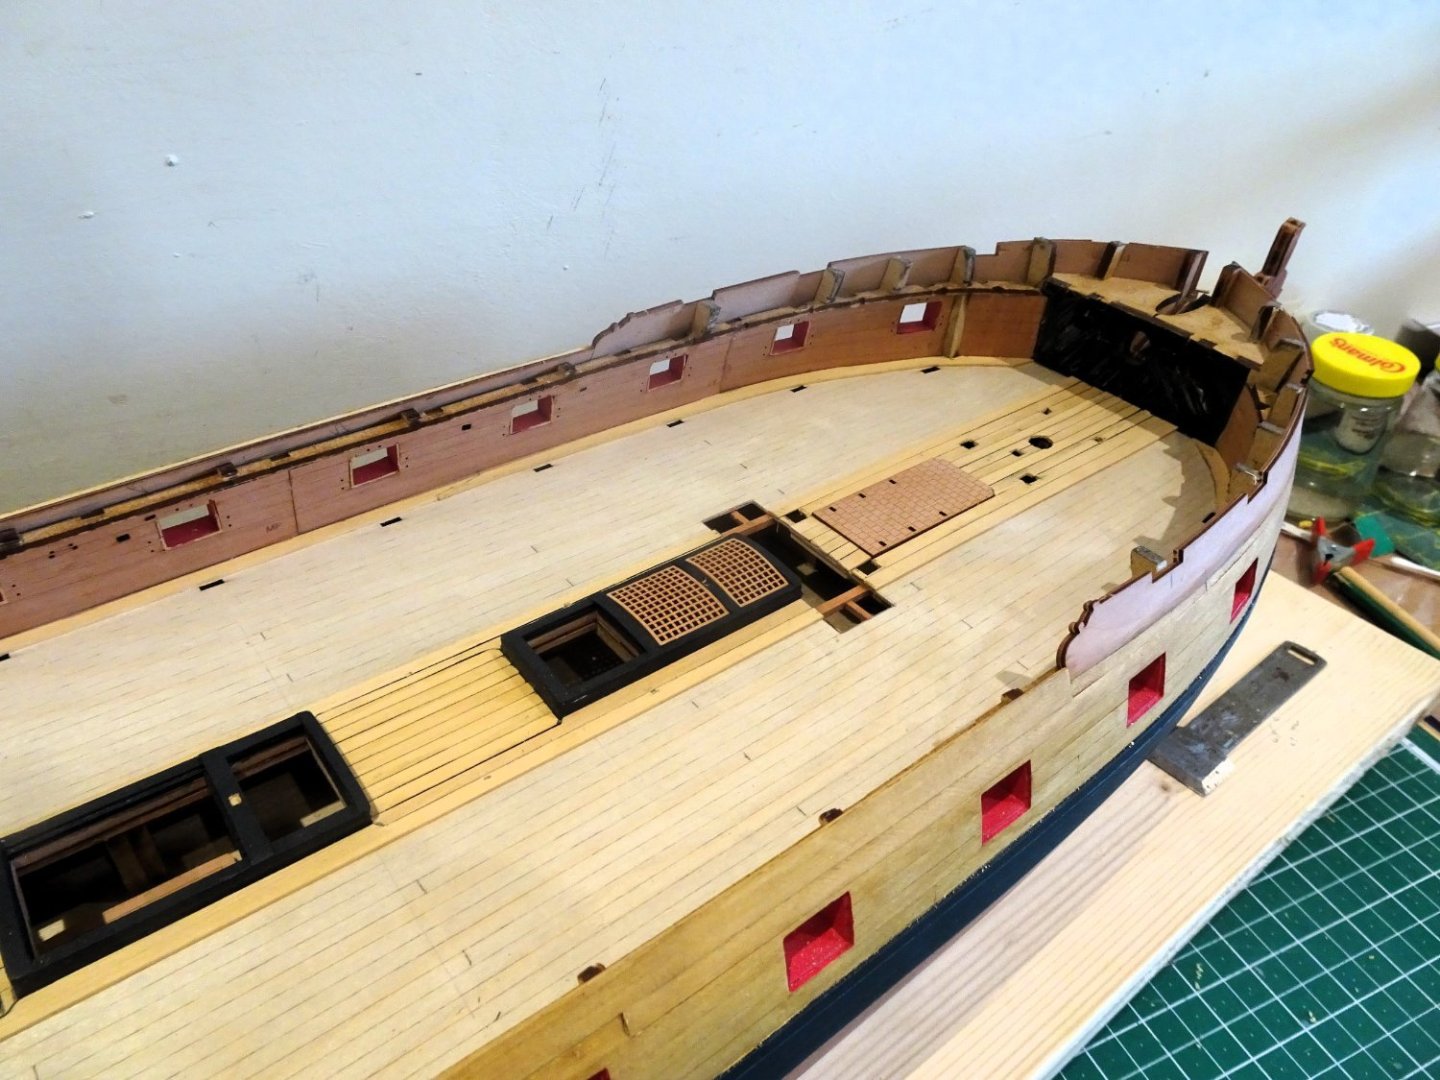
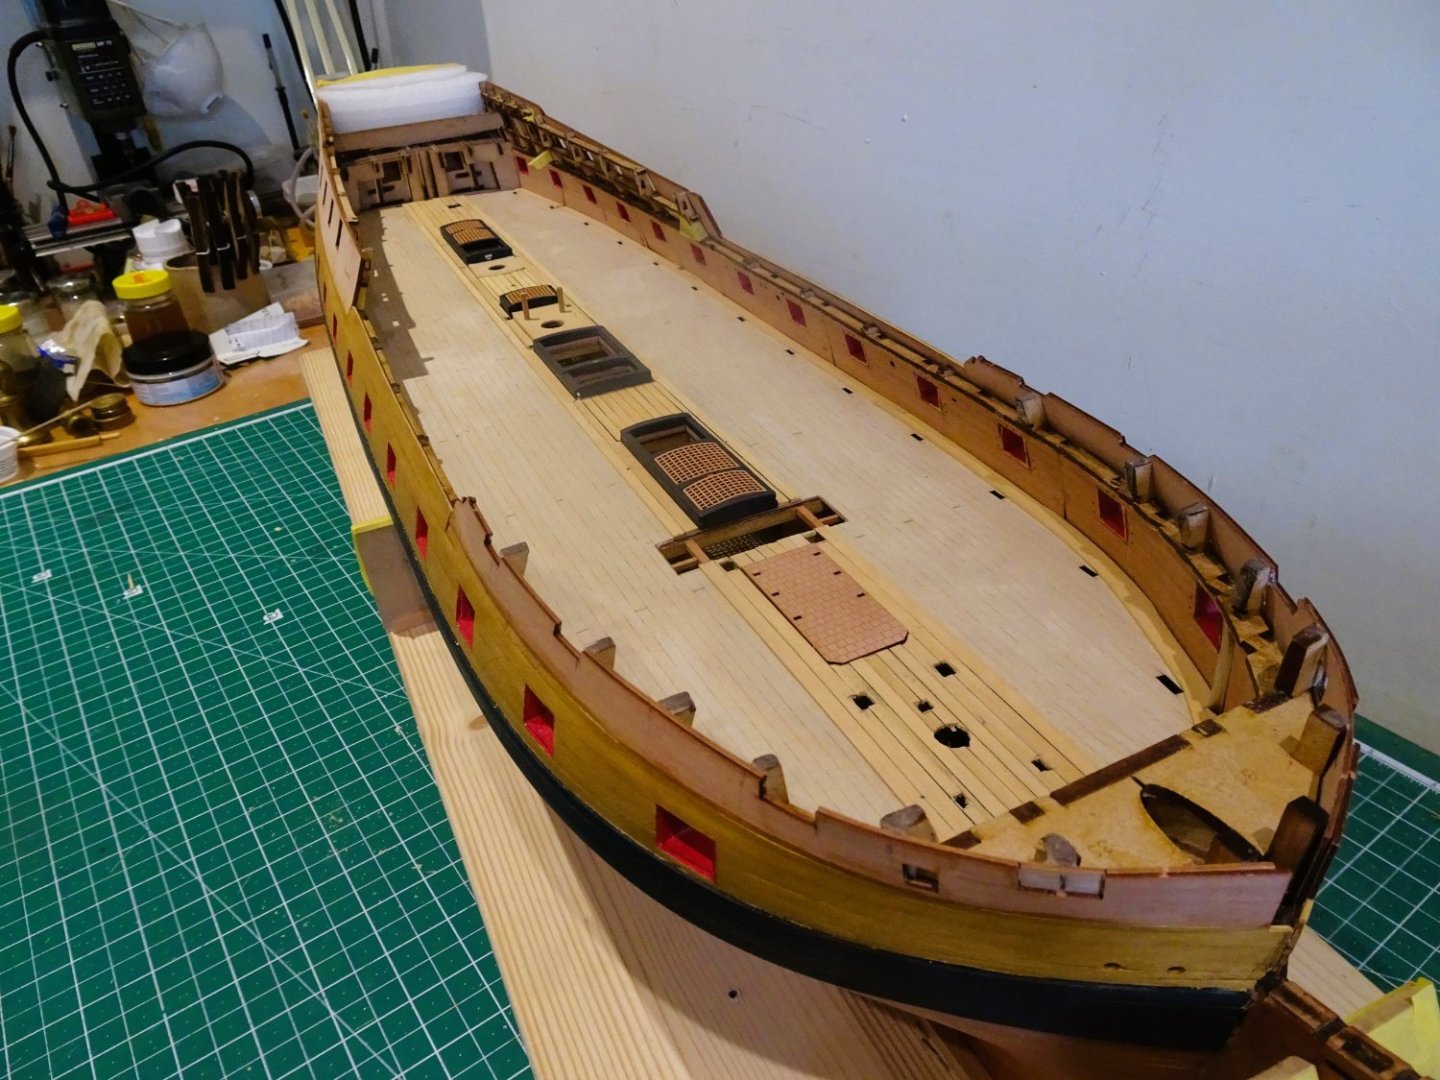
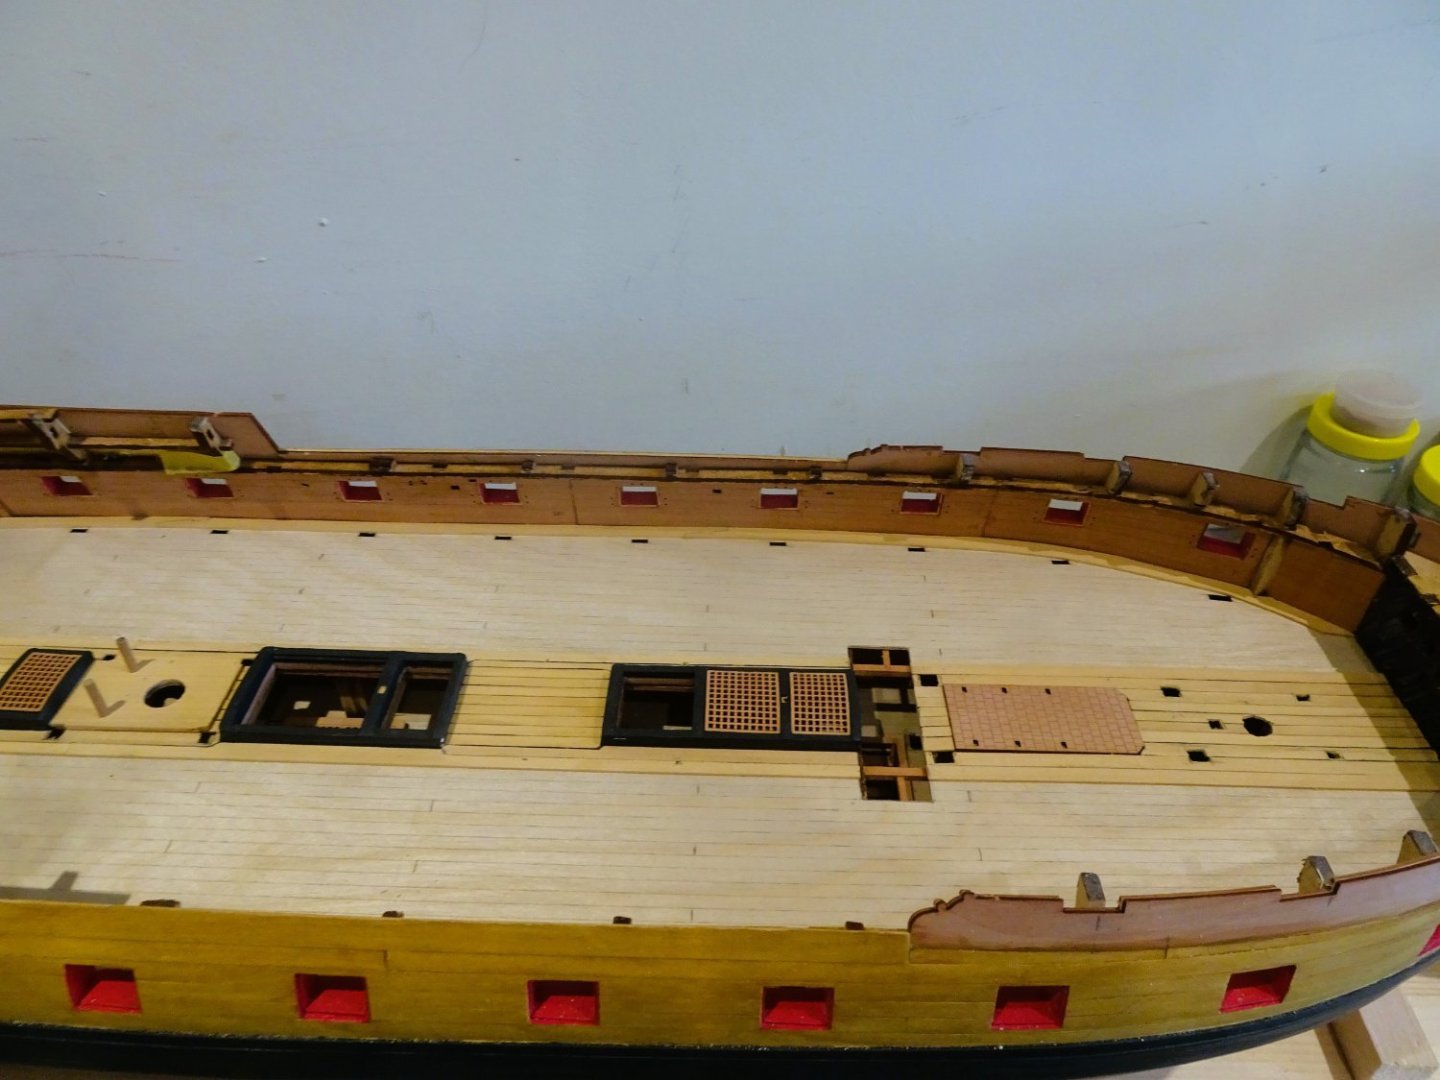
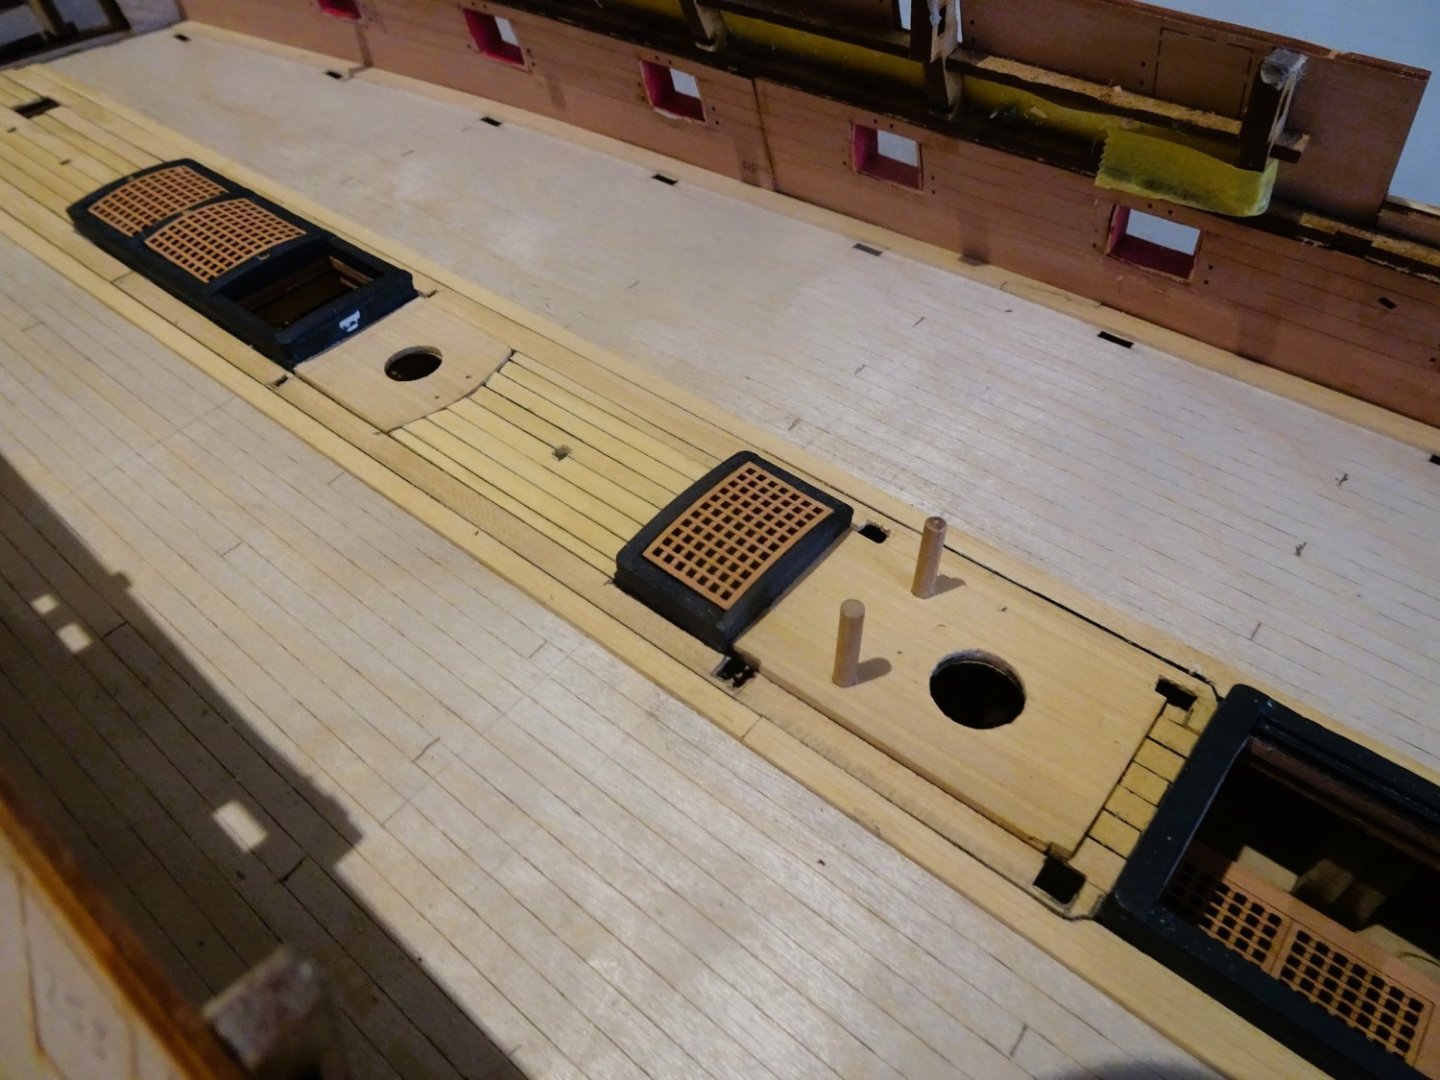
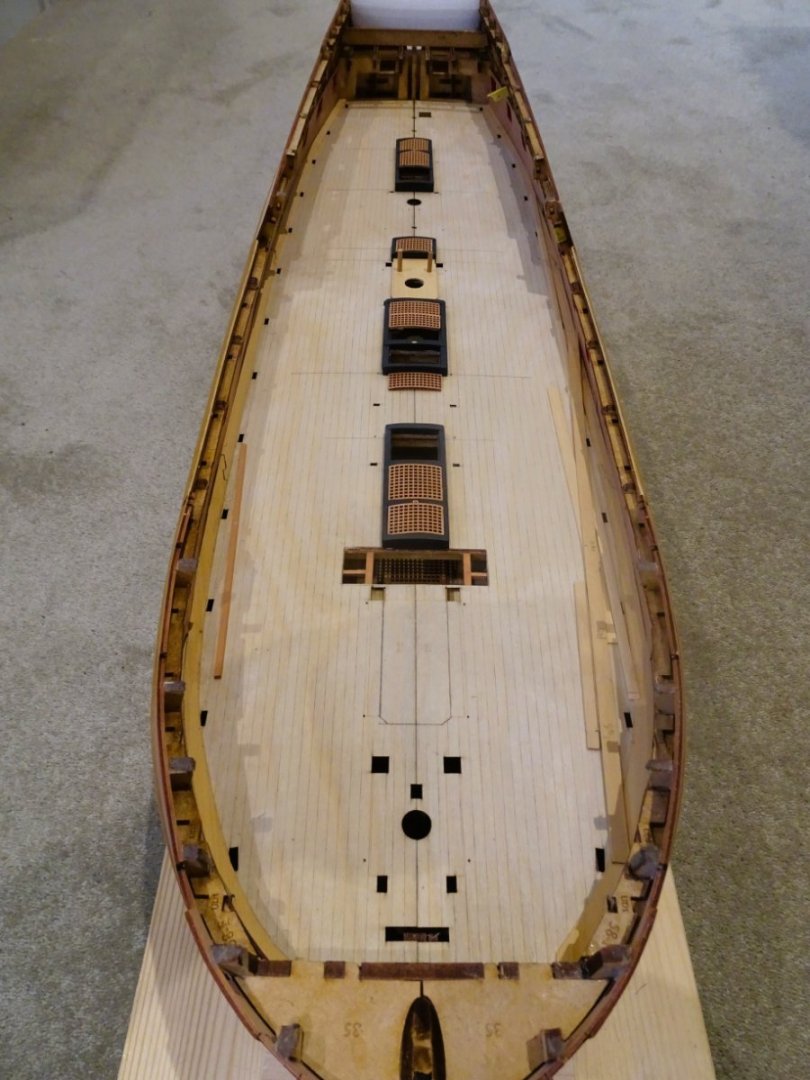
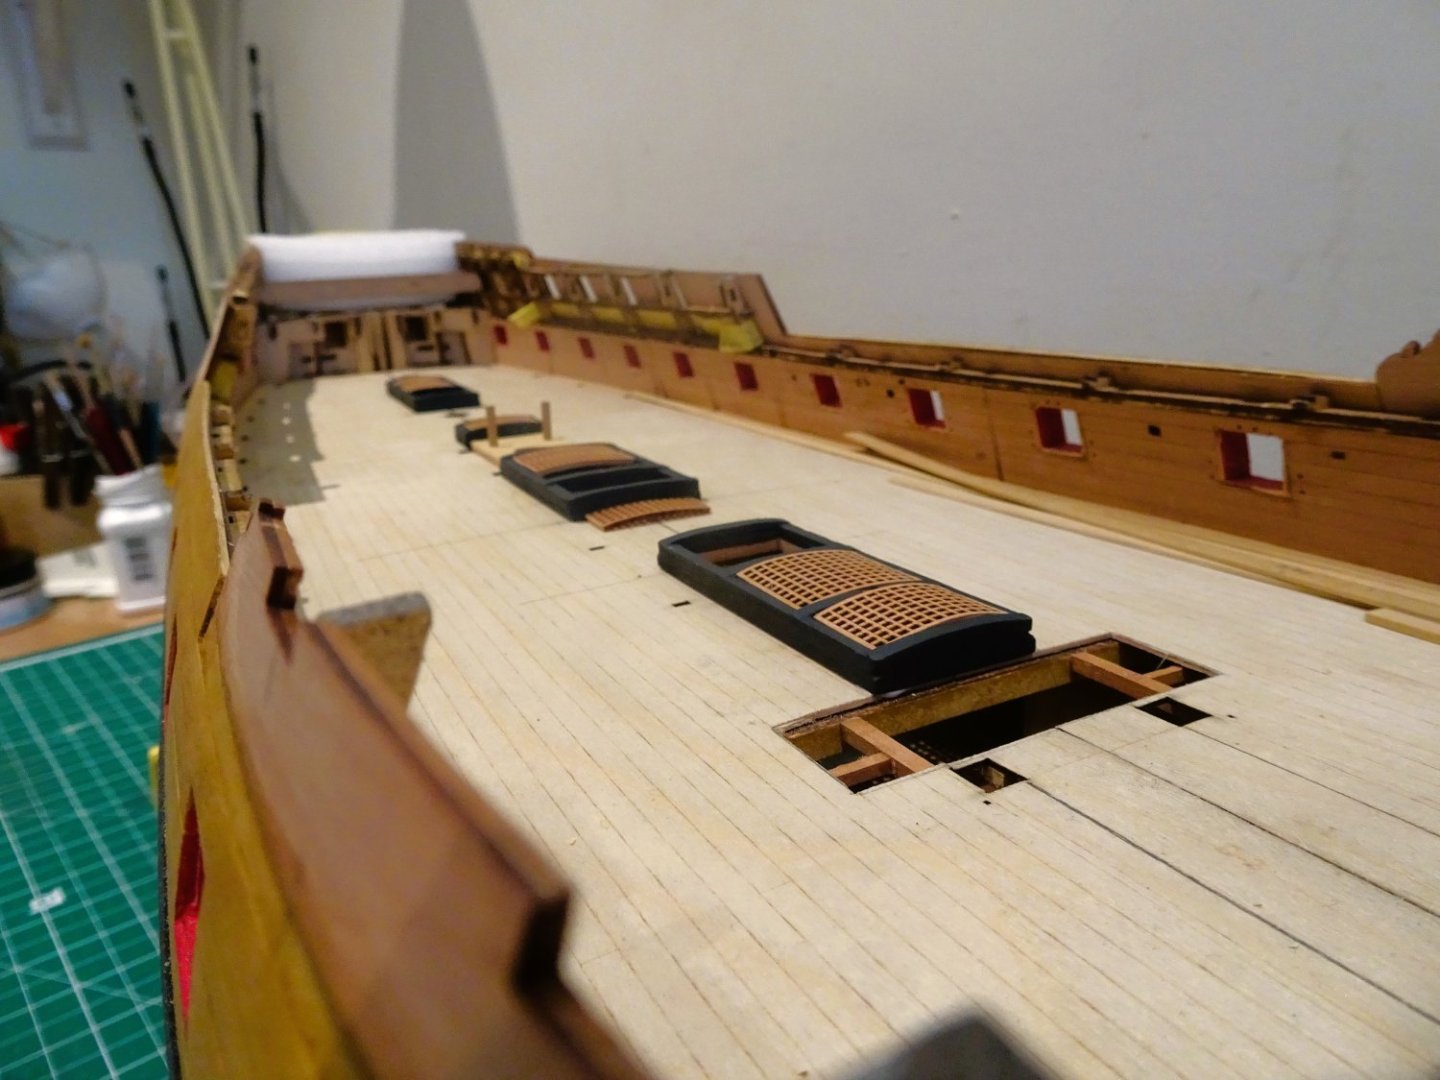
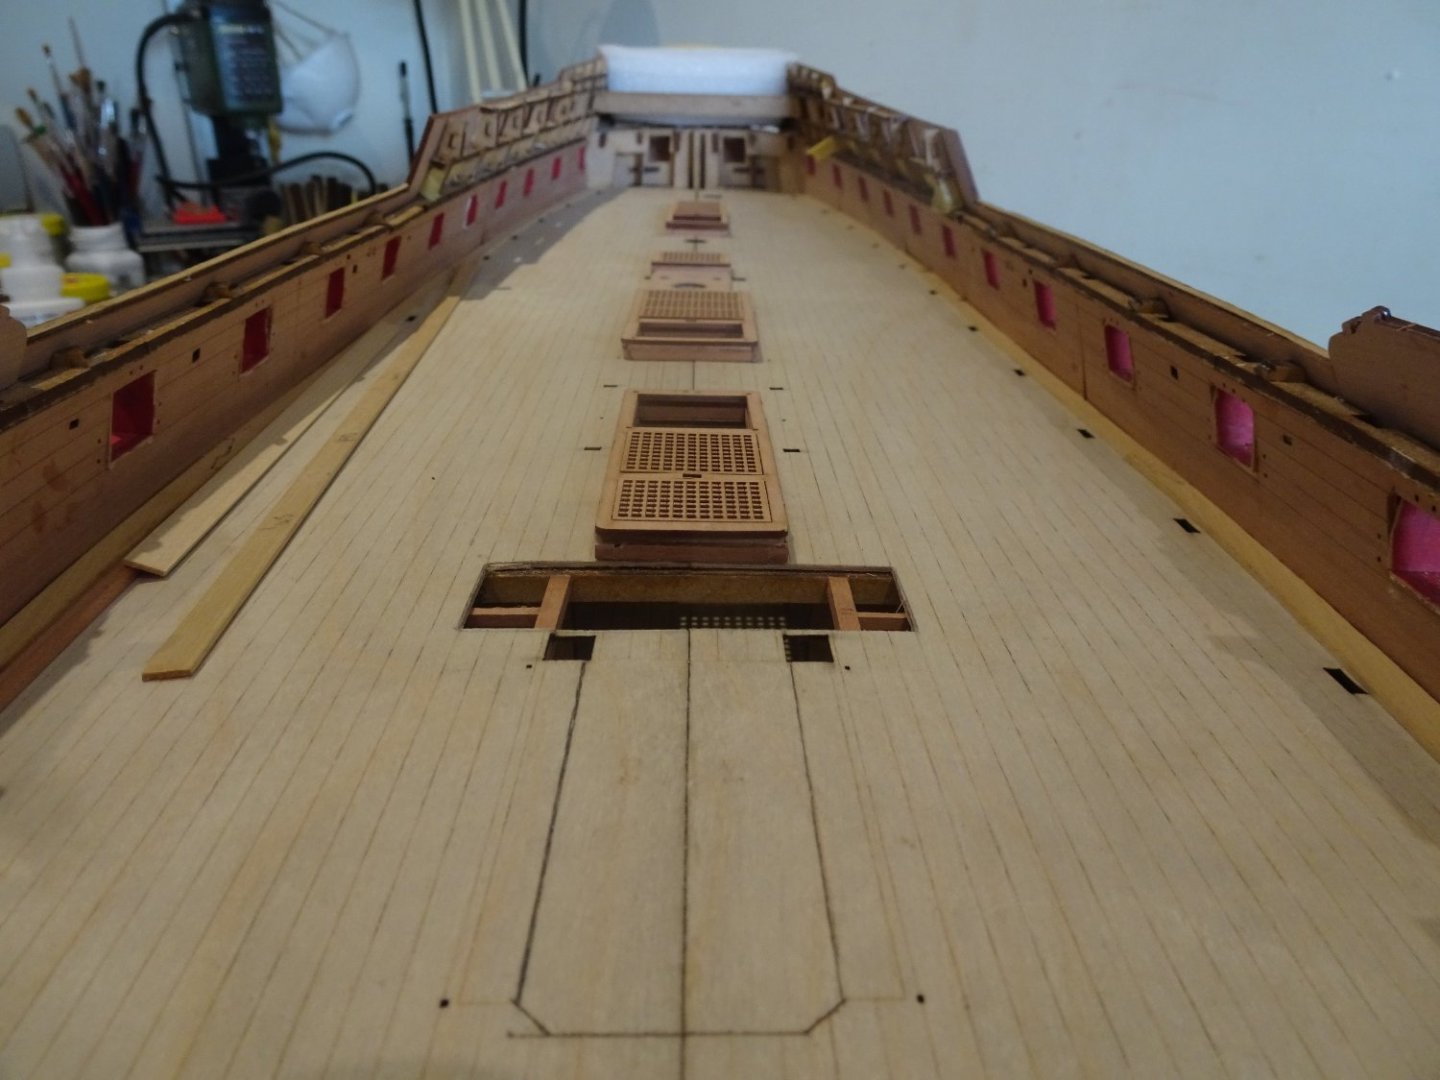
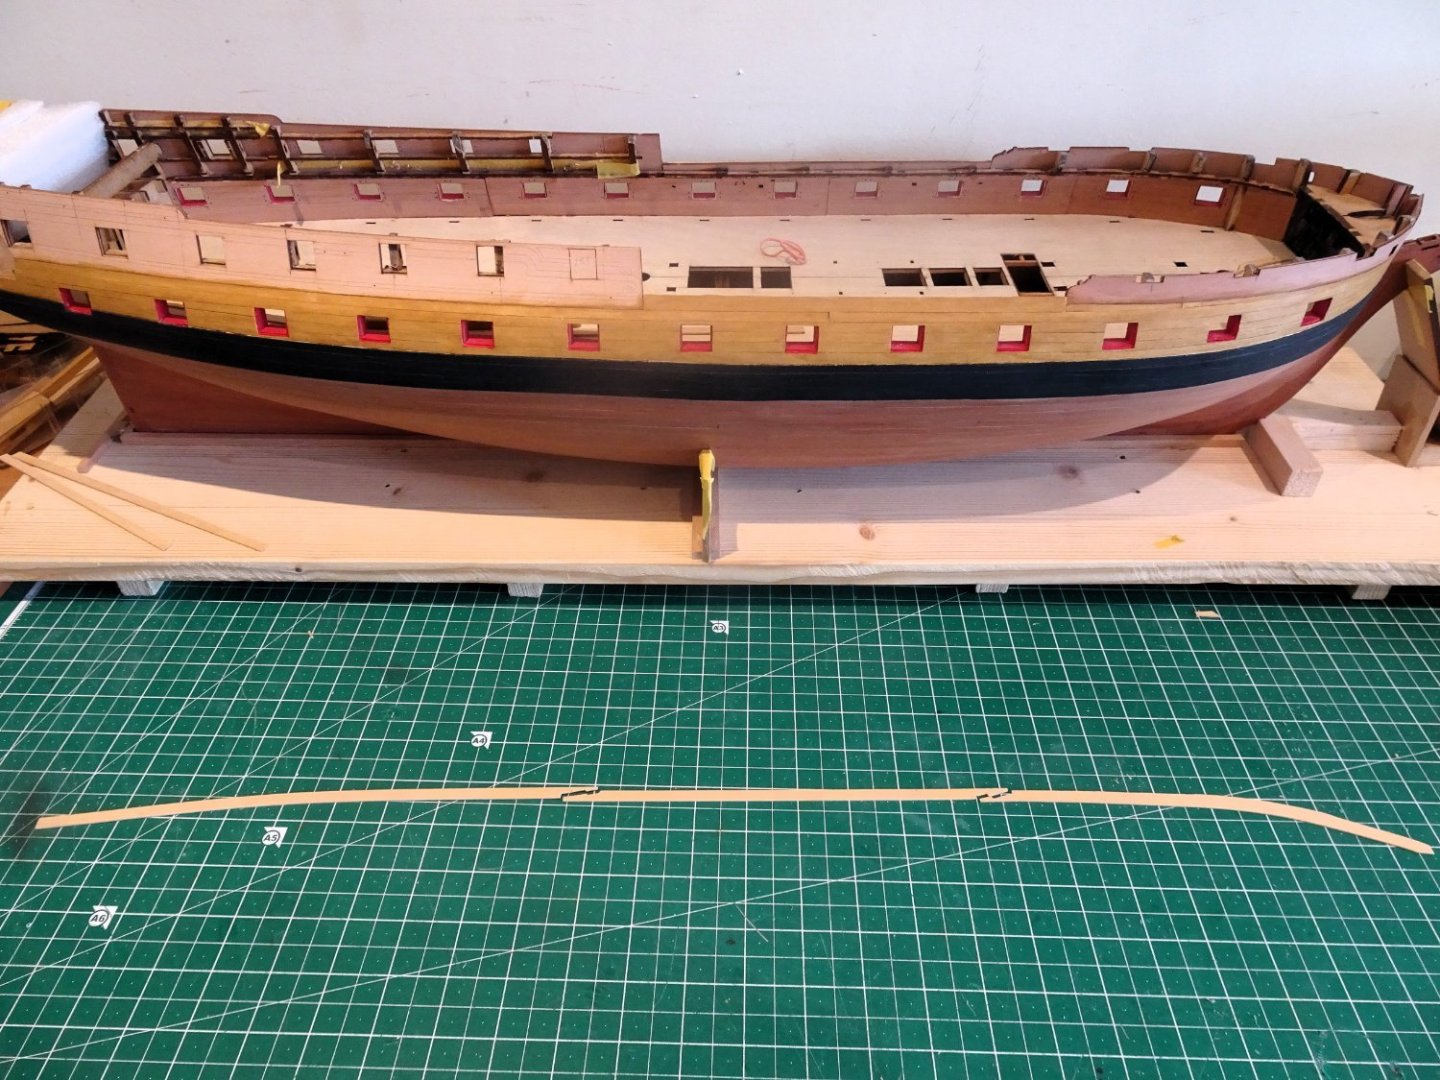
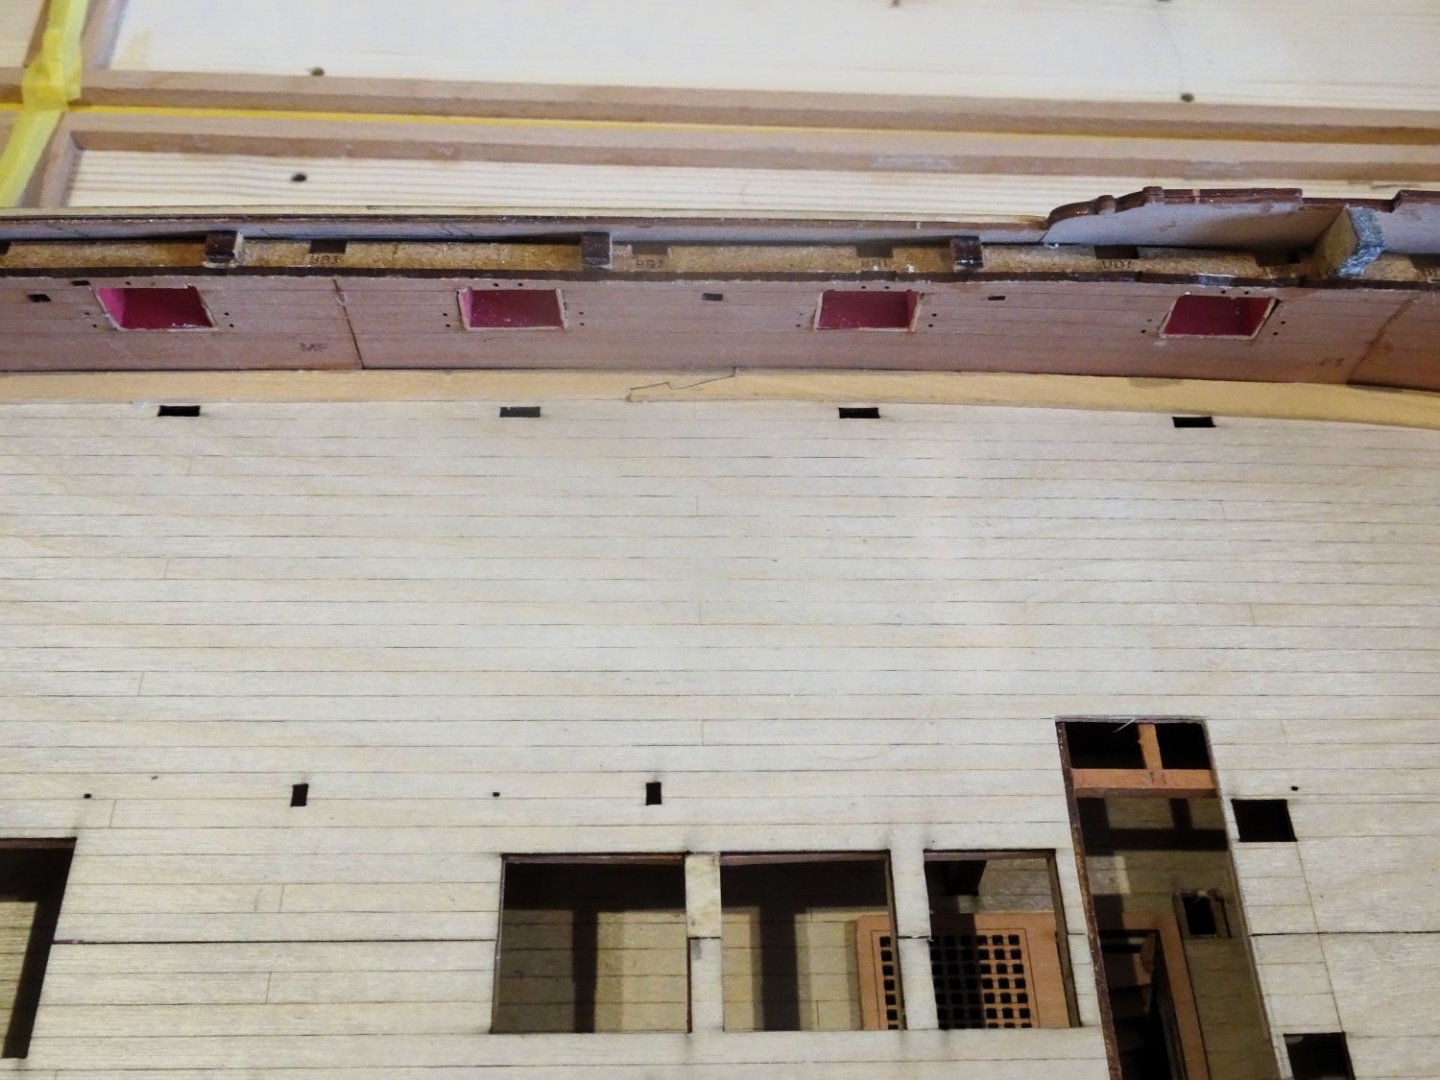
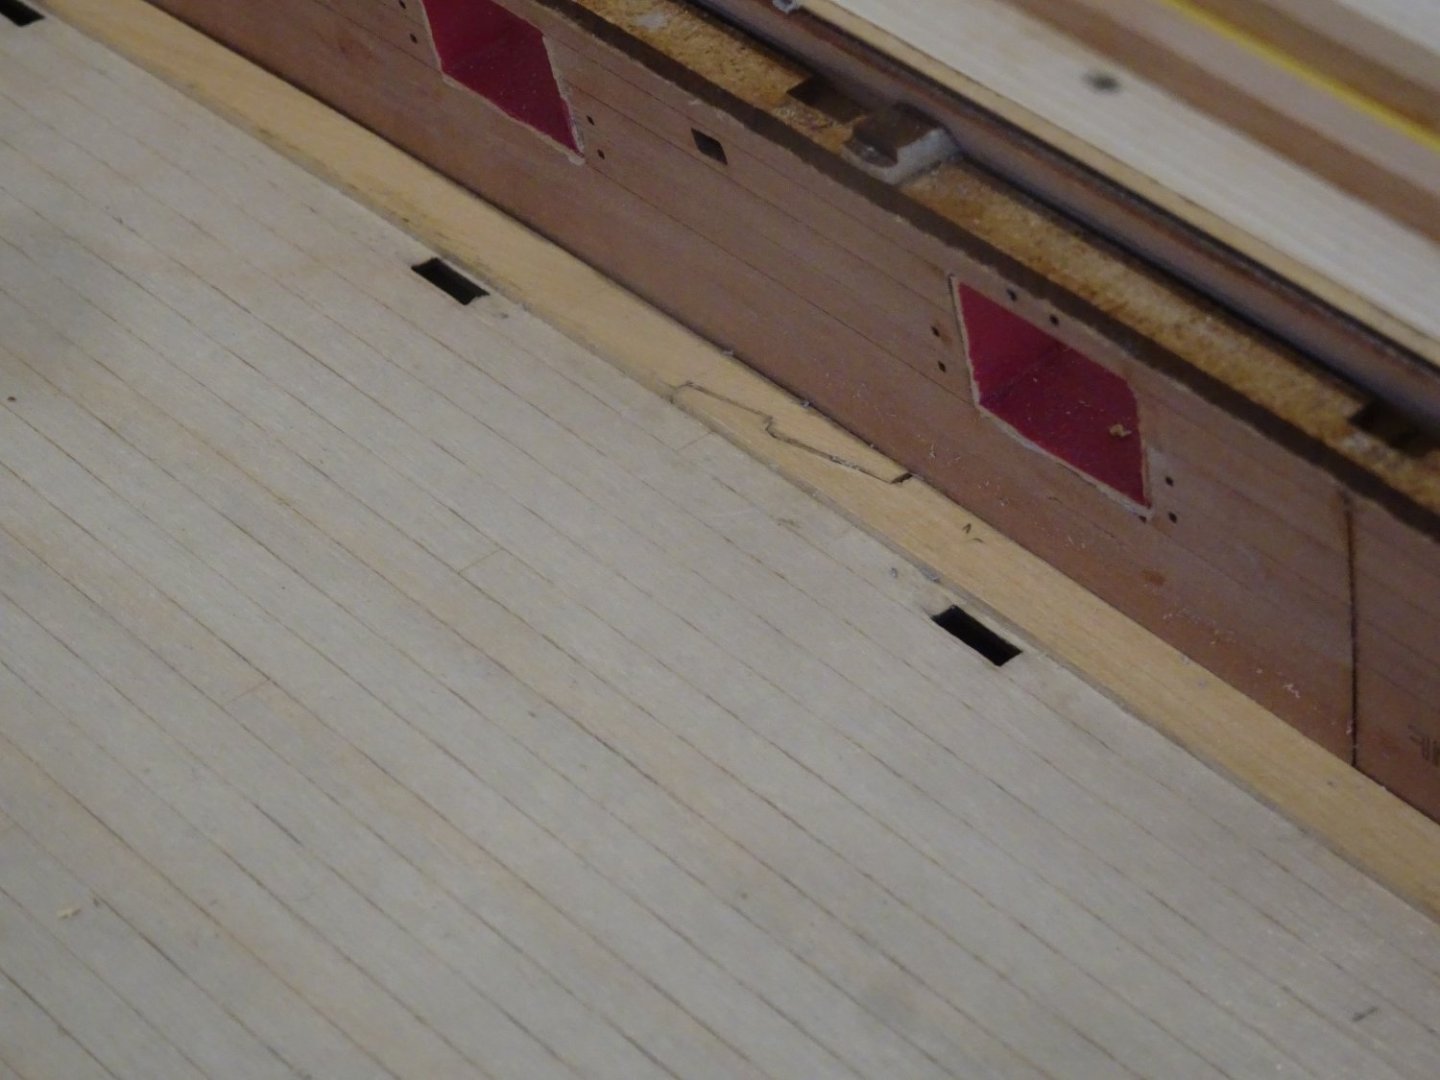
 Thankyou Glenn and Shipman. @ Glenn - Not even thought about gun fixing yet, but there are ways and means, other than deck slots. @ Shipman - It's the aesthetics that appeal to me but tricky to provide in a kit with laser parts, even for someone with such ingenuity as Mr Watton. Post Fifty-seven Completion of gundeck planking. Four more days and the last strakes are put into place. 1593 The final strakes meet the top & butt planking and require individual spiling for a good fit. 1602 The deck now requires scraping (not sanding) and my tool of choice is an old plane blade. It has the right weight and feel for drawing along the deck. 1610 1611 1613 Quite amazing the improvement a good scraping makes to a deck, and with 1mm depth of board there is little fear of over doing it. 1607 1606 1609 Not quite done yet, I now need to enlarge the mortises and trial fit the deck impediments before the deck is given a final scrape and a matt varnish finish. B.E. 02/08/2023
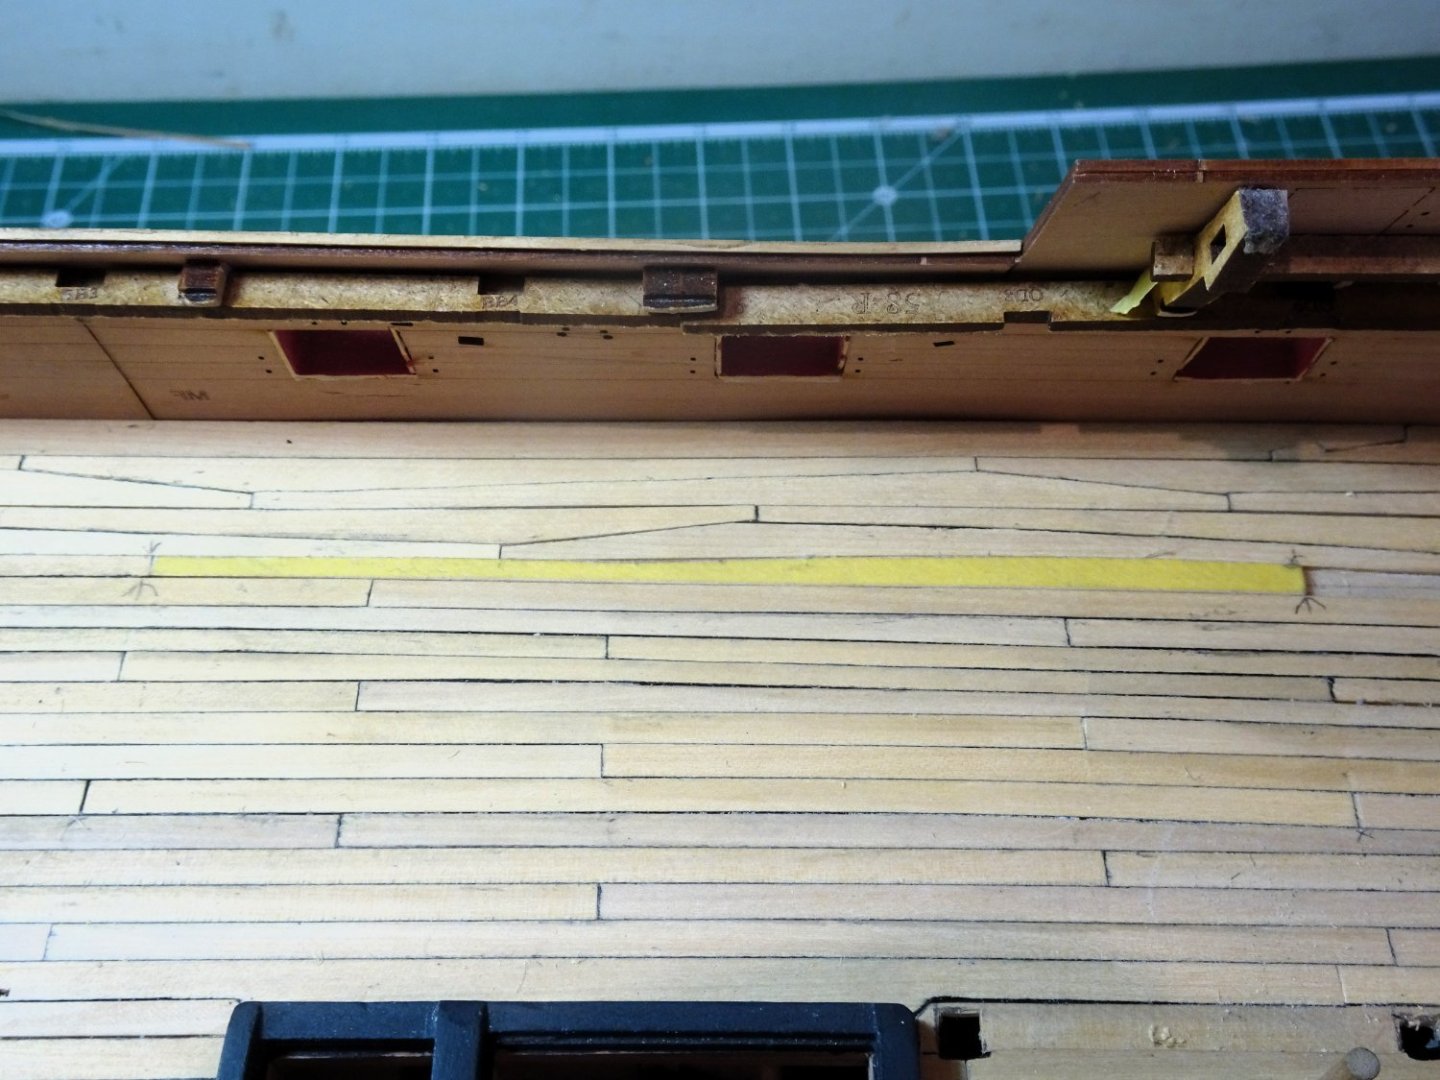


- 648 replies
-
- 22
-

-
- Indefatigable
- Vanguard Models
- (and 1 more)
-
A very fine job, and well worth the effort, well done.👍 B.E.
- 562 replies
-
- 5
-

-
-
- vanguard models
- alert
- (and 2 more)
-
The headworks look so much better Kevin,👍, I like the shading you've achieved on the figure's cloak, well done. B.E.
- 443 replies
-
- 3
-
-
- Indefatigable
- Vanguard Models
- (and 1 more)
-
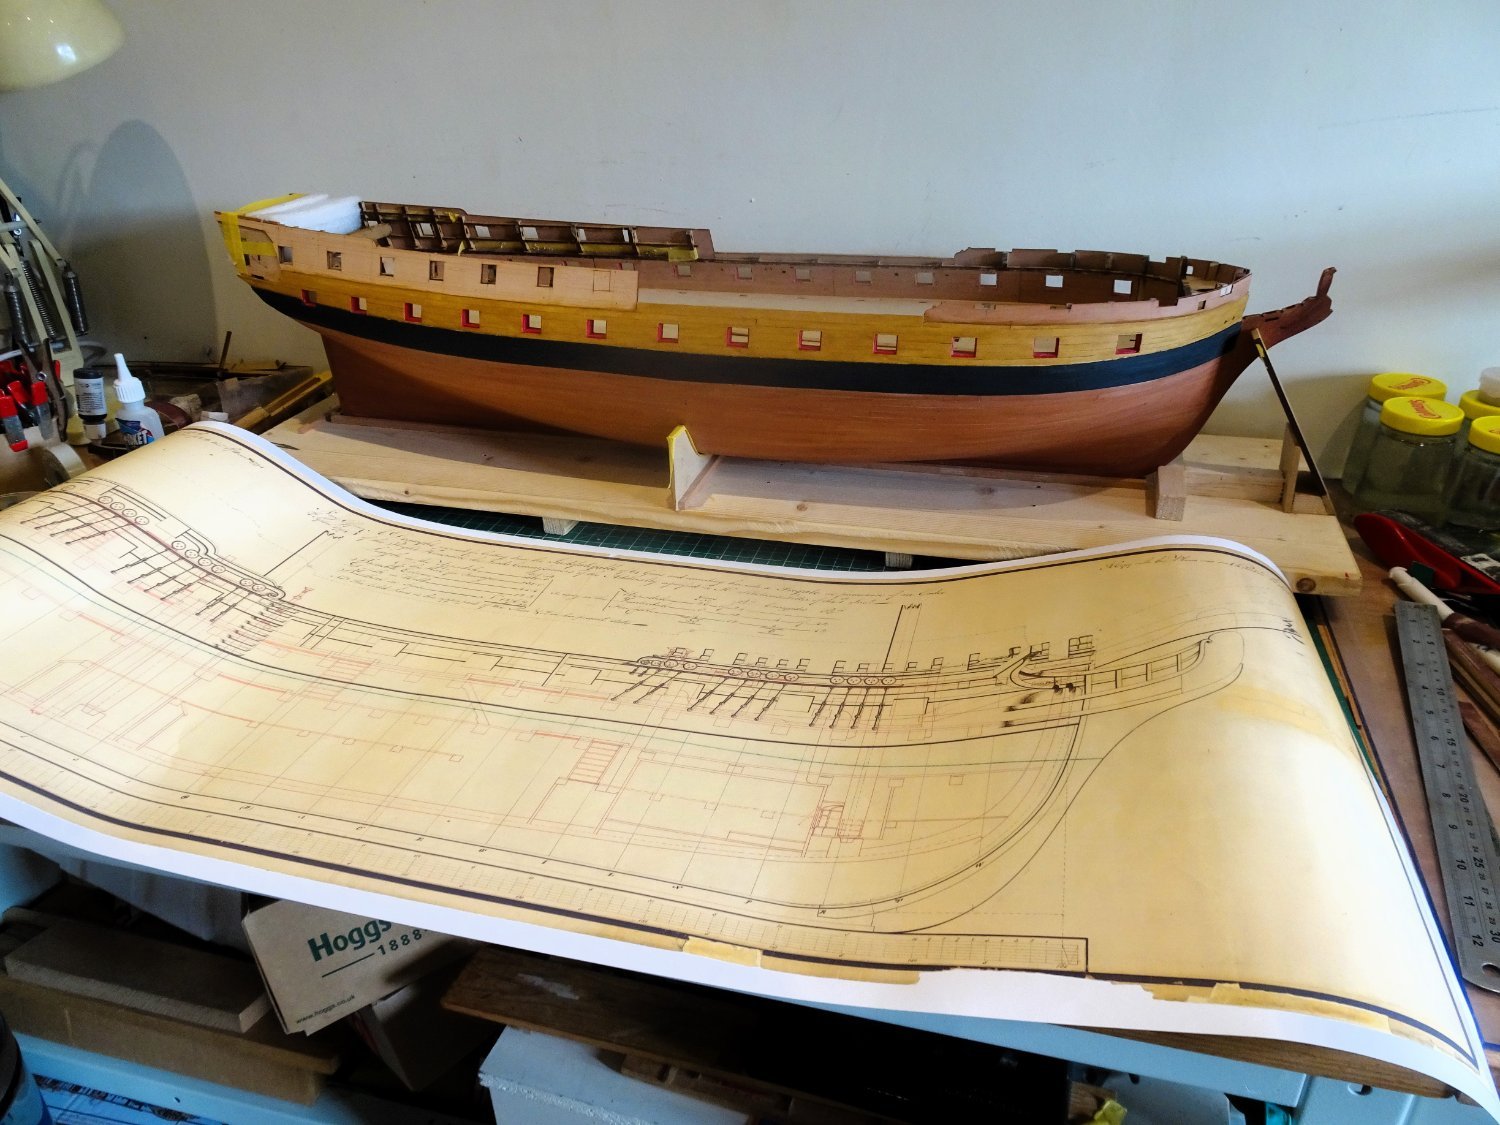
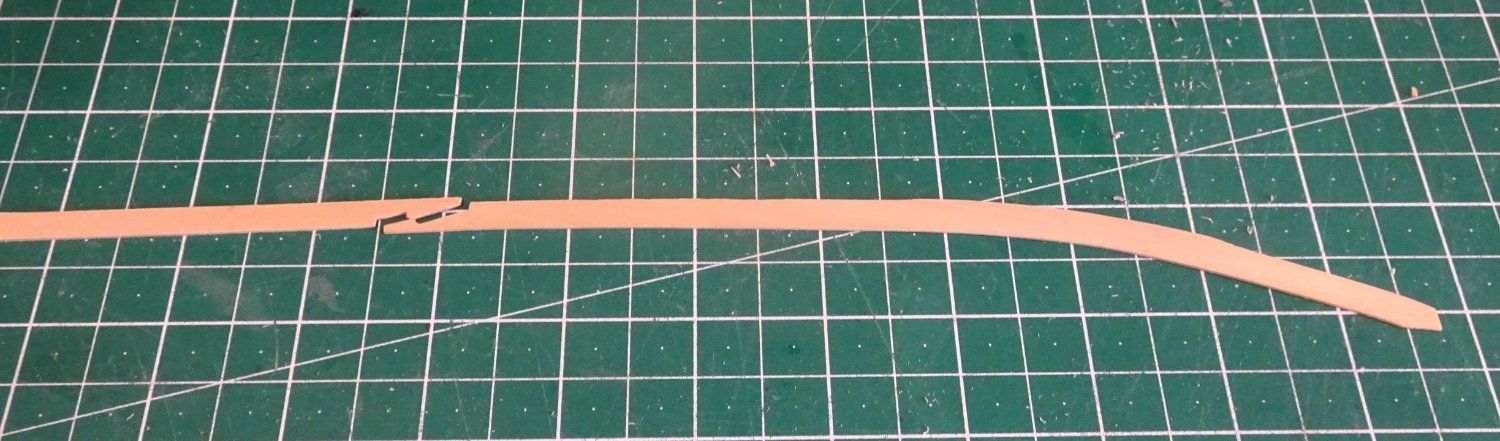
Post Fifty-six …and more deck planking. Another three days, and the Port side planking is completed. 1569 By removing a number of the existing planks I had hoped to then infill to the top and butt without too much trouble. In retrospect it would have been far better not to plank beyond the central belt before fitting the t&b strakes. The result is that the available space towards the stern was insufficient to accommodate the required number of planks, without an eclectic mix of shapes and sizes. 1584 As Mr Spock may say it’s planking Jim but not as we know it. 1576 So Guys what d’ye think. - Don’t give up the day job Boss! Unfortunately this is my day job now, but on balance I decided not to rip it all up and start again, that would throw me short of planking, and I'm otherwise ok with what will be the visible element. 1570 Spot the double drop planks, necessary because of lack of planking foresight. Annoying, but on the positive side the suspect area will be mostly hidden by the Qtr deck and aftermost 24 pounder guns. 1578 1582 The forward end of the planking and the top and butt strakes are ok. 1579 I generally enjoy deck planking, I find it therapeutic, but one of the downsides with 'Indy' is because of the hull size, and high bulwarks, the planking has to be done standing up. Leaning over the hull, gives me back, neck, and shoulder ache, but it will all be worth it in the end.🤞 Onto the Starboard side, and more hours of fun. B.E. 29/07/2023


- 648 replies
-
- 16
-
-
- Indefatigable
- Vanguard Models
- (and 1 more)
-
Cheers Kevin, it feels like I'm making it up as I go along at the moment, but hopefully it will come right in the end.🤞 B.E.
- 648 replies
-
- 2
-
-
- Indefatigable
- Vanguard Models
- (and 1 more)
-
Post Fifty-six That Top and Butt deck planking. Having a jig on hand gave me the impetus to play around with Top and Butt. 1553 Having cut out a stock of planks I found it useful to play around applying them to the deck in the manner of a jigsaw puzzle to help visualise of what is required, particularly at the bow and stern. 1559 I concluded it was doable and I started at the bow. 1556 At the stern I realised that some de-constructed was required to avoid running out of planking space. 1562 Removing some of the already laid planks not too troublesome with the application of water and use of a sharp micro chisel. 1560 Tapering of the planks as they run towards the stern, will be required, ideally with a finished butt width of not less than 3mm. Removal of further existing planks will also be involved. 1564 Tick strips will be used to facilitate the tapering. 1563 1557 A fair bit of extra work, but I’m fairly content with progress. B.E. 27/07/2023


- 648 replies
-
- 18
-

-
-
- Indefatigable
- Vanguard Models
- (and 1 more)
-
Post Fifty-five Planking cont’d I am now outside of the central run of planking, and from this point on I will be using 4mm planks. I have decided on 30’ planks equating to around 140mm at scale, using a three-butt shift pattern. Planking continues and the photos below show the state of play after a couple of days solid work. 1536 1533 1534 1532 1531 1540 I now need to decide on the form of the strakes that abut the margin plank. I am aware that two strakes of Top and Butt deck planking for the outer strakes were used during this period. Goodwin (Construction and Fitting…) makes mention of this style of planking the gundeck but indicates that most vessels were planked with parallel strakes. He adds that the practise was probably adopted towards the end of the 18thc and its purpose to resist athwartships compression when the vessel was in heavy seas. I have no knowledge whether 'Indy' was so planked, but I suspect that with a full battery of 24 pounders on a ‘64’ hull it may have been the case. The only visual reference source I have is Vol 11 of the TFFM for the sixth-rate sloop. The book contains drawings of Top and butt planking combined with hooded planks. 1545 At this point I don’t have a clear idea of how to approach the fitting of t&b particularly at the curvature of the margin plank towards the bow. 1546 Another important issue is if I manage to cobble together a set of t&b, how will that impact on planking the remaining space. 1544 The simple option would be to continue the planking and joggle the planks ends into the margin. I’m tempted, but I do have a jig for t&b….. I’ll take some time out and have a play around. B.E. 25/07/2023


- 648 replies
-
- 22
-
-
- Indefatigable
- Vanguard Models
- (and 1 more)
-
There's something looking a little awry with the headworks Kevin. Should not the Main Rail (top rail) sit behind the Hair bracket that runs up from the upper cheek? B.E.
- 443 replies
-
- 4
-
-

-
- Indefatigable
- Vanguard Models
- (and 1 more)
-
Very nicely presented Chris, and well worth completing. You must hold the record for the MSW longest build on the stocks to be completed award. I thought my Pegasus build of seven years was a marathon. Regards, B.E.
- 69 replies
-
- 6
-
-
- fly
- victory models
- (and 2 more)
-
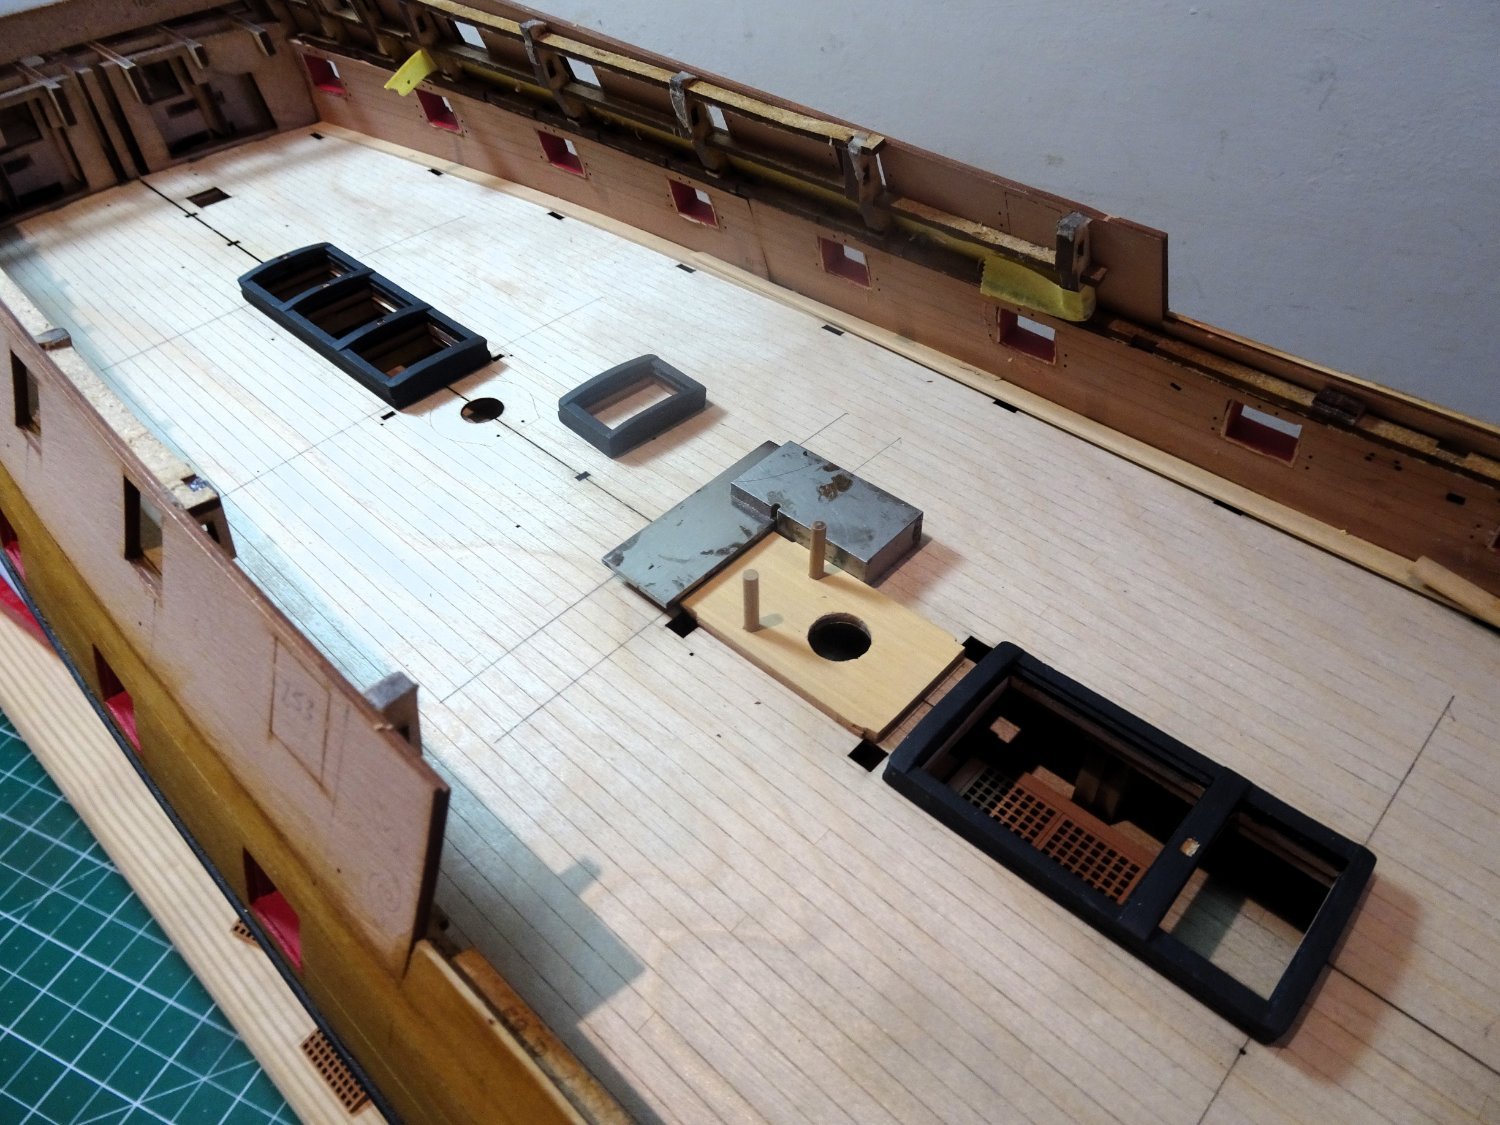
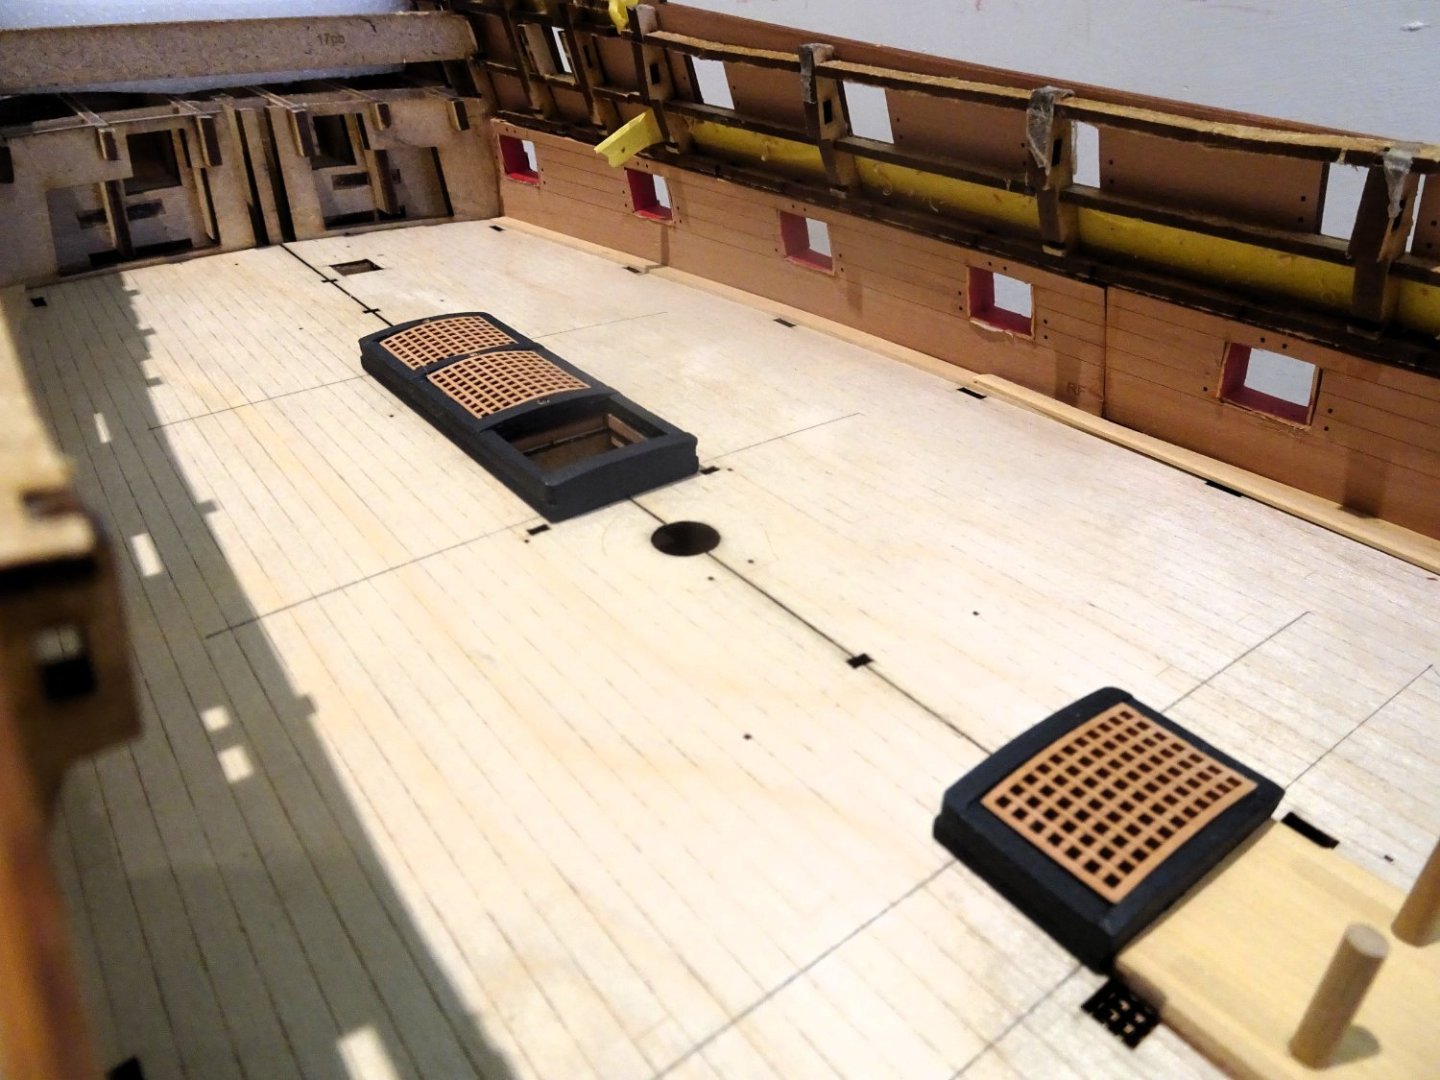
Post Fifty-four Onto the deck planking A very wet weekend in these ‘ere parts allowed for good progress in planking the gundeck. Before I start, I forgot to mention the Capstan step for the Upper deck, or lower Capstan. The kit provided part (278) looked a little unusual to me, of a shape reminiscent of a toilet seat. 1512 Of minor relevance if the area is to be decked over, but in my version it is likely to be unplanked. I replaced the kit version with a more conventional set-up, made from Box sheet. The kit version sits atop it in this photo. For the deck planking I am using 1mm Boxwood strip obtained from Hobbycraft EU. The main supply is of 4mm width but I will also be using 5mm and 6mm widths in various areas. 1517 I start the job at the stern and work forward; for this first phase I am planking between and around the centre line deck fittings. 1515 When it came to the brick base for the Gally stove I wasn’t too sure whether to plank around the base guidelines on the sub deck or fit the base atop the planking. The manual pics which used the engraved deck pattern indicates that the base is inset the deck pattern. I decided to temporarily fit a dummy brick base, and plank around it. One of the tenets or principles of deck planking is that very thin strips are undesirable, such as abutting the coamings of hatches. These would present areas of weakness subject to rot. In these areas broader planks are required, so a range of planking widths are required. If the fittings are applied post decking then it is often a question of pot luck where the planking lines fall. 1523 1529 The broader planks bordering the Main and Fore hatchways can be seen in the above shots. 1520 I have used 4mm,5mm,and 6mm strips in completing this area. 1522 1524 1525 1527 Once past the central section the planking tends to regularise., until at least it approaches the margin/waterway planks. At that point there is another decision to be made. B.E. 23/07/2023


- 648 replies
-
- 18
-
-
- Indefatigable
- Vanguard Models
- (and 1 more)
-
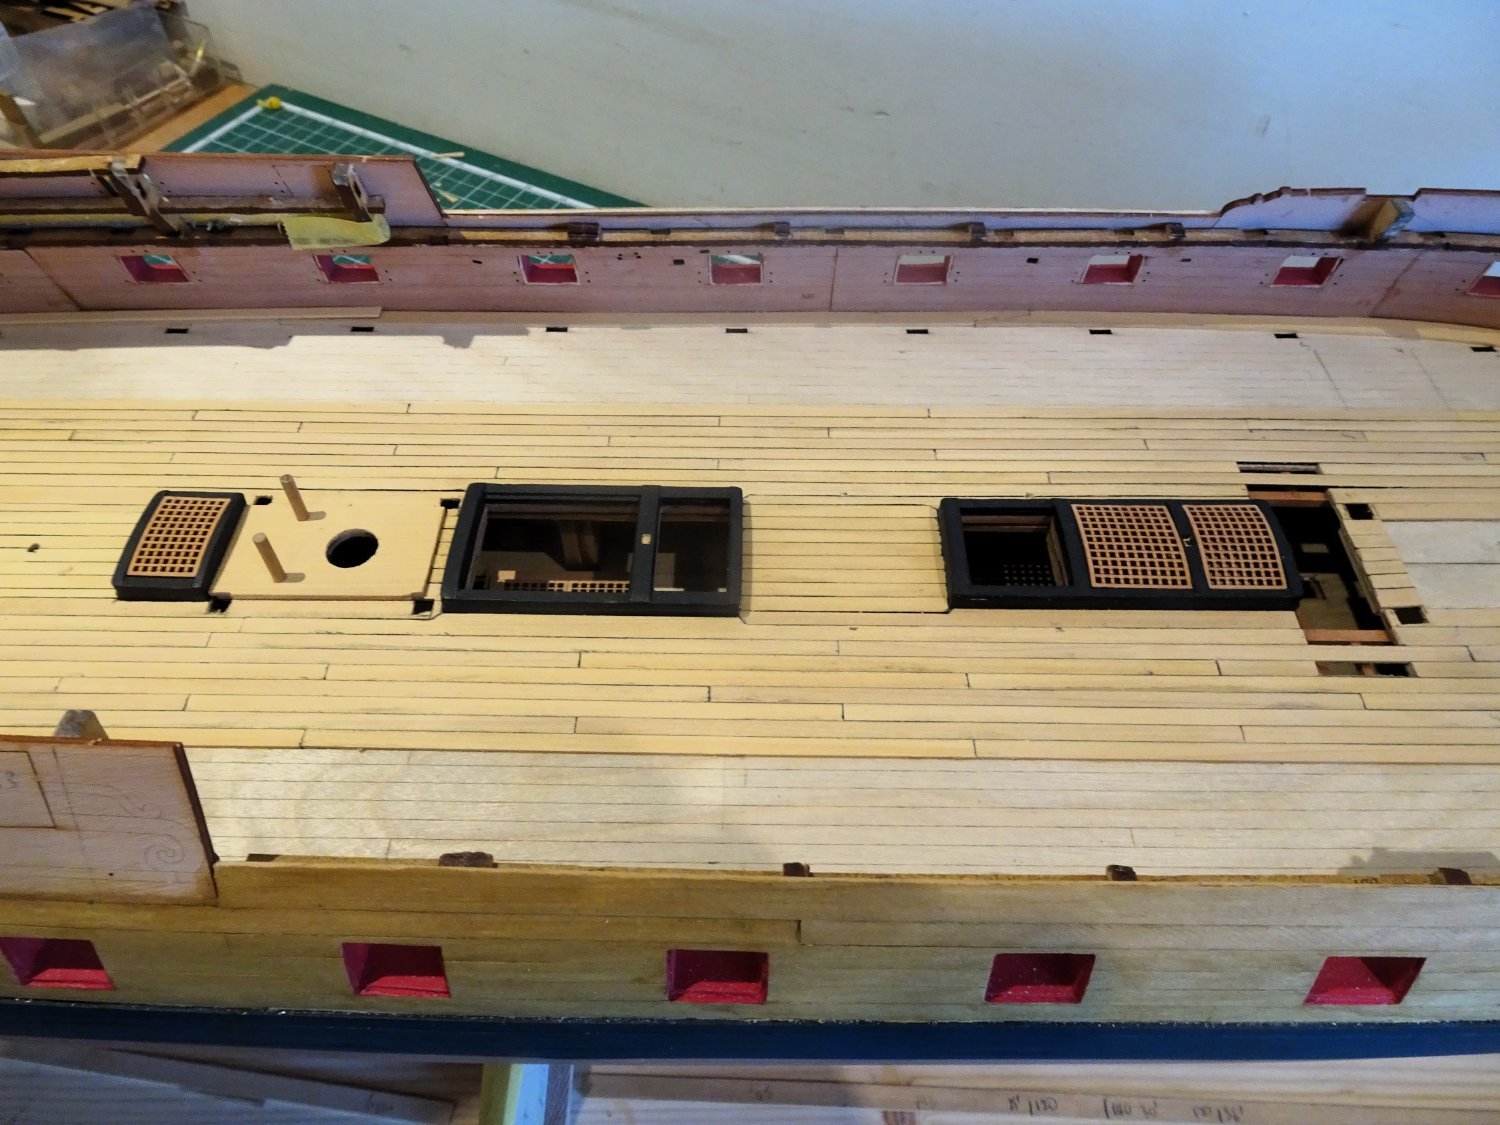
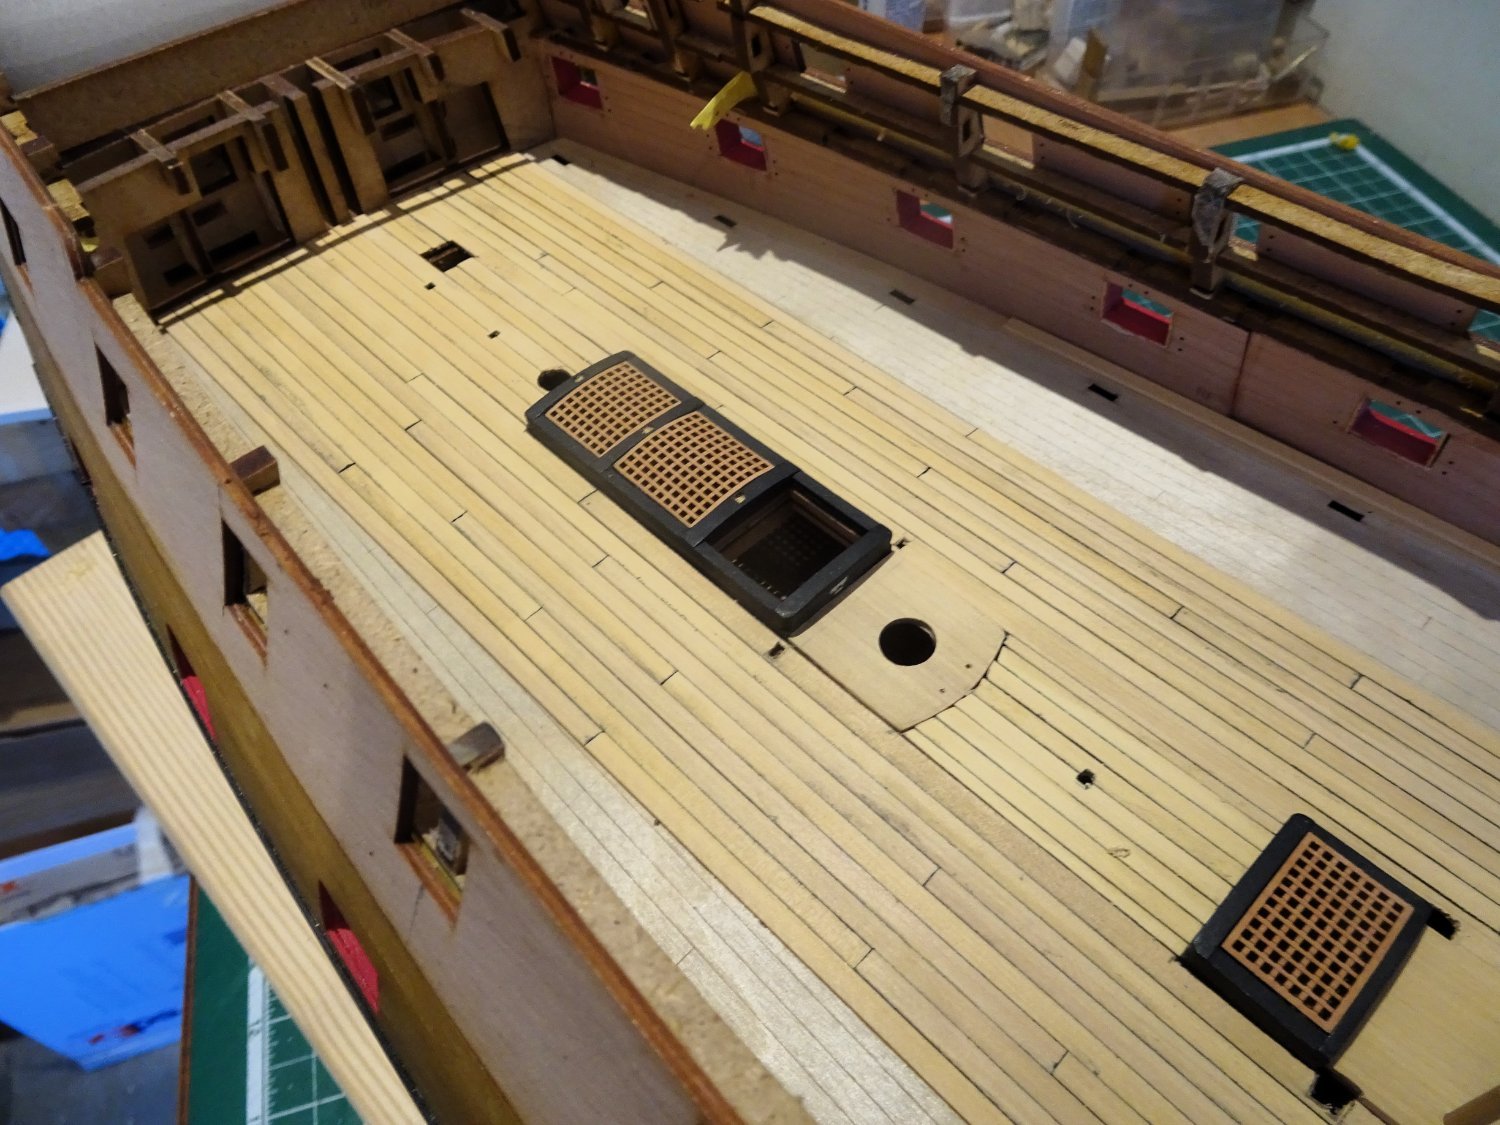
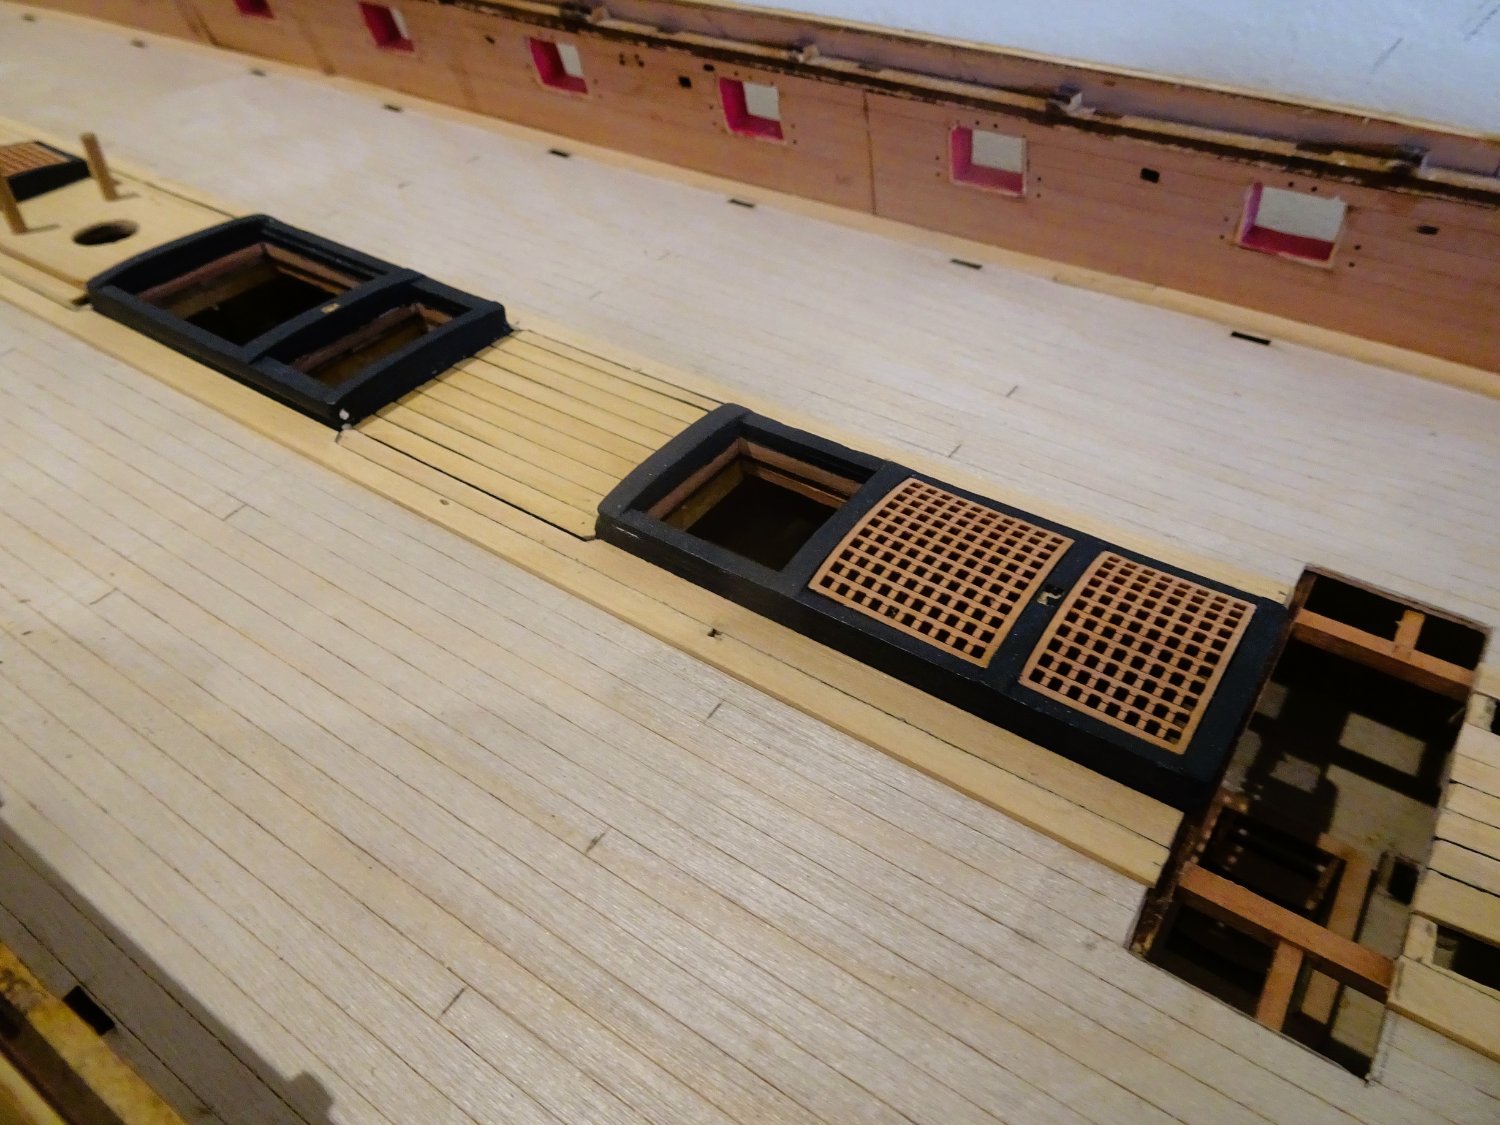
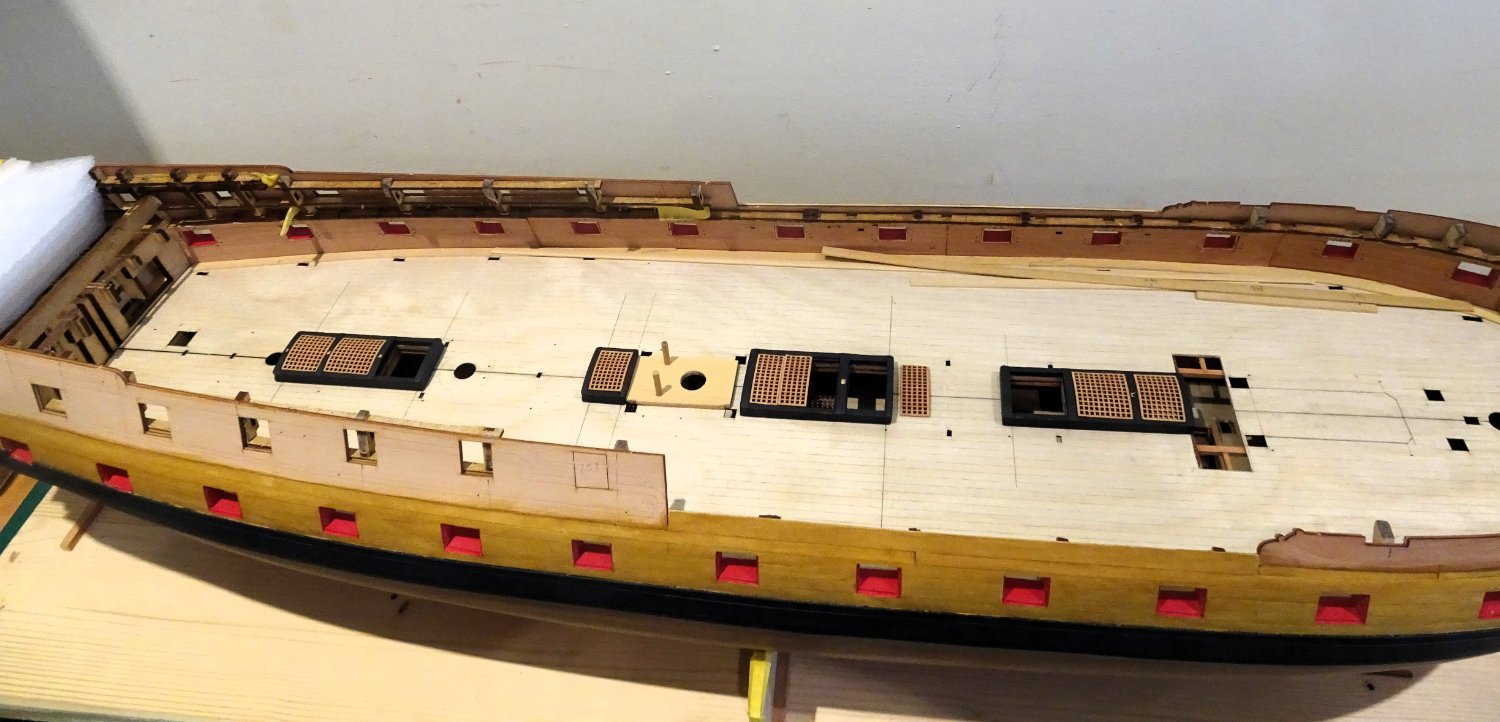
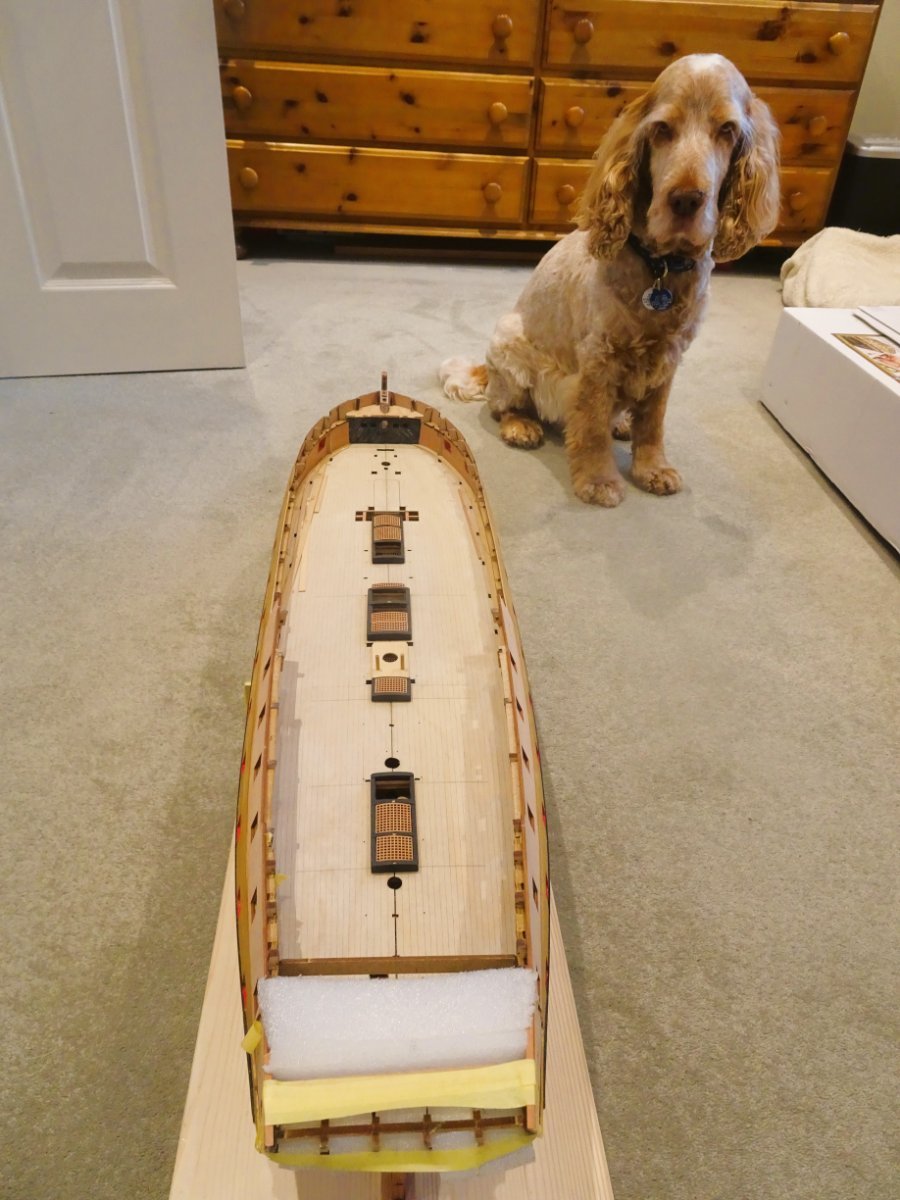
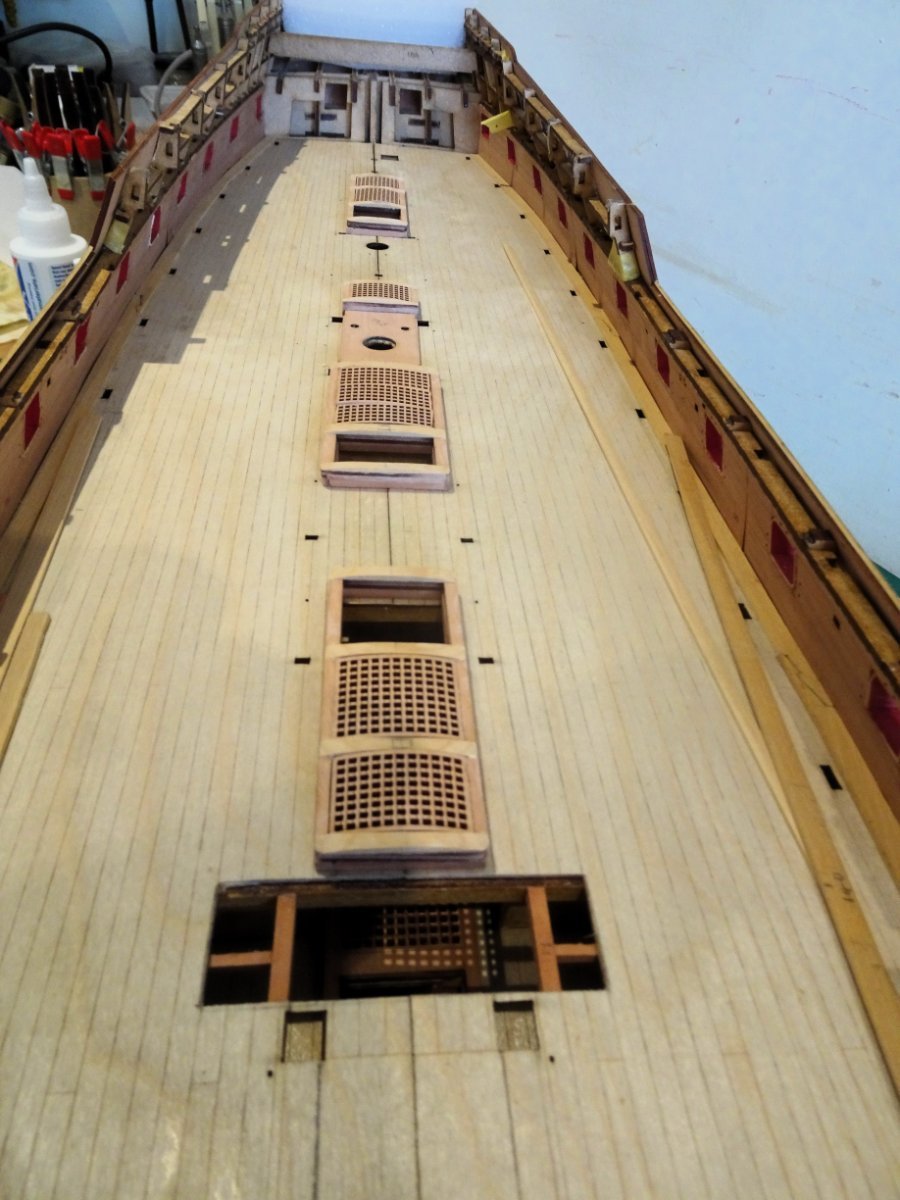
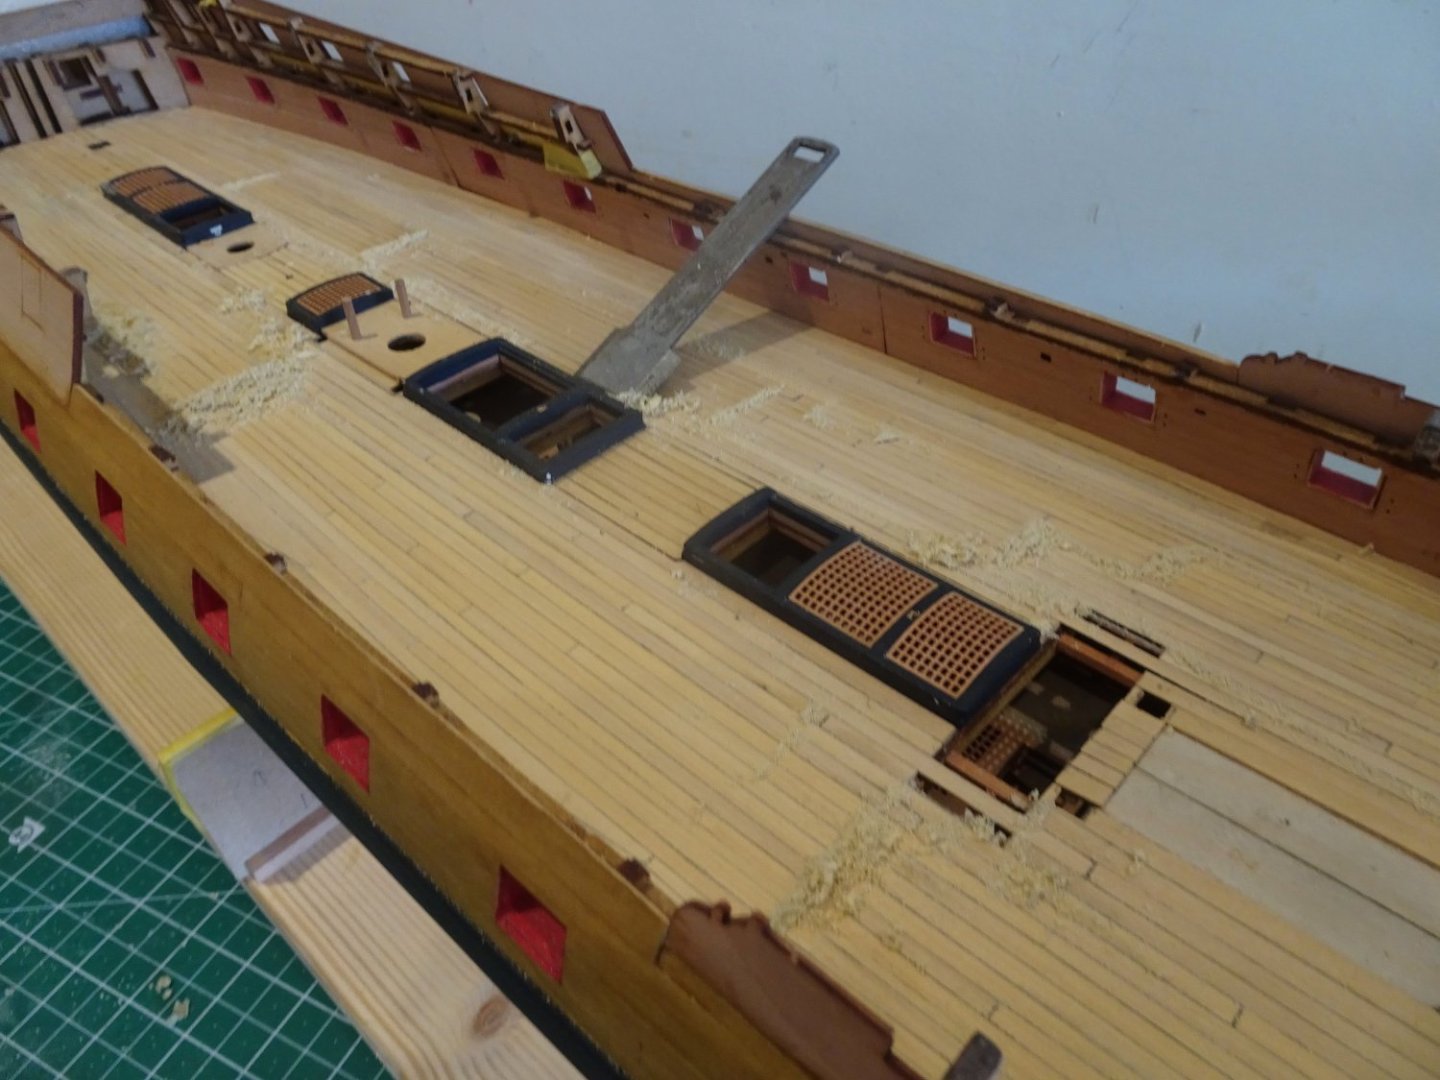
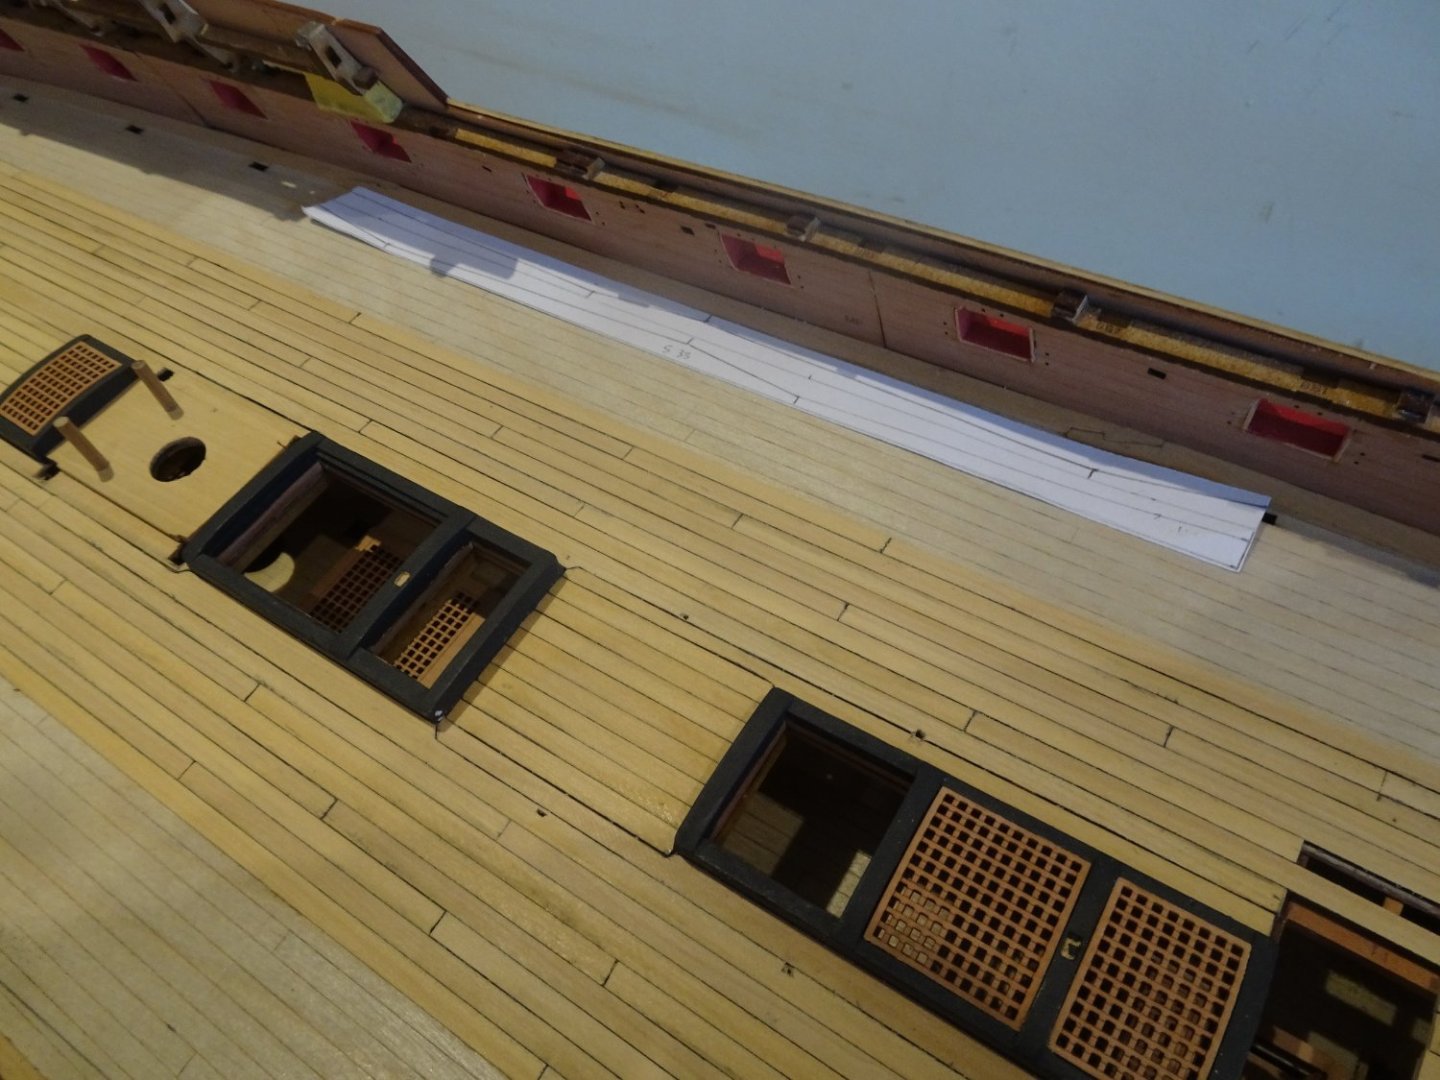
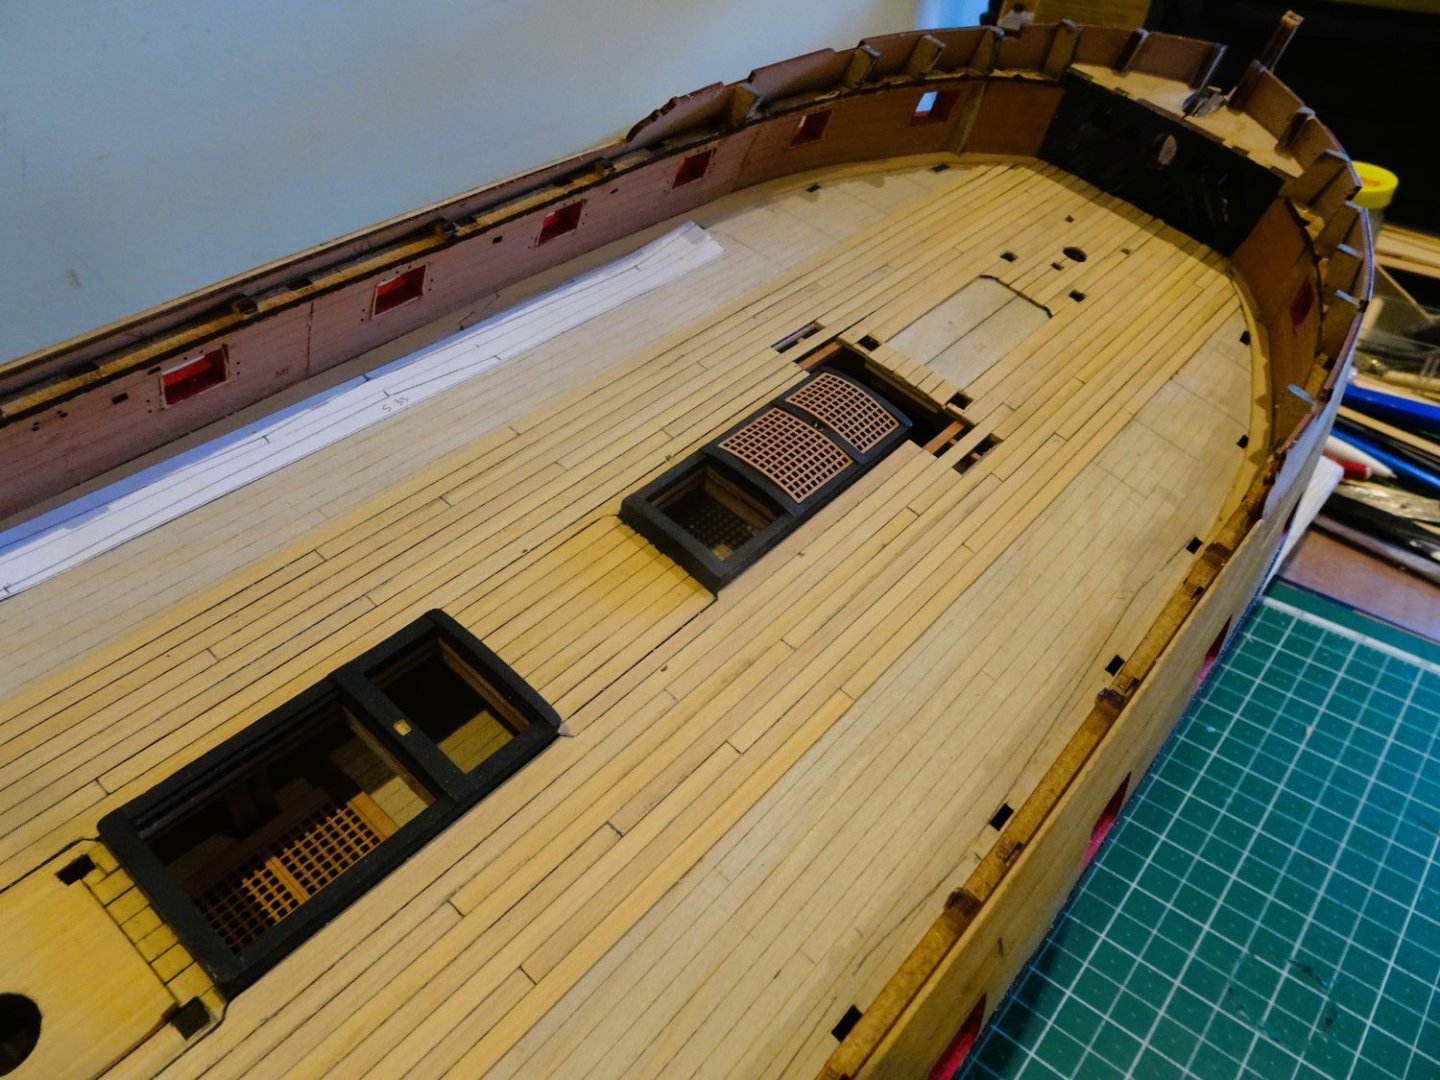
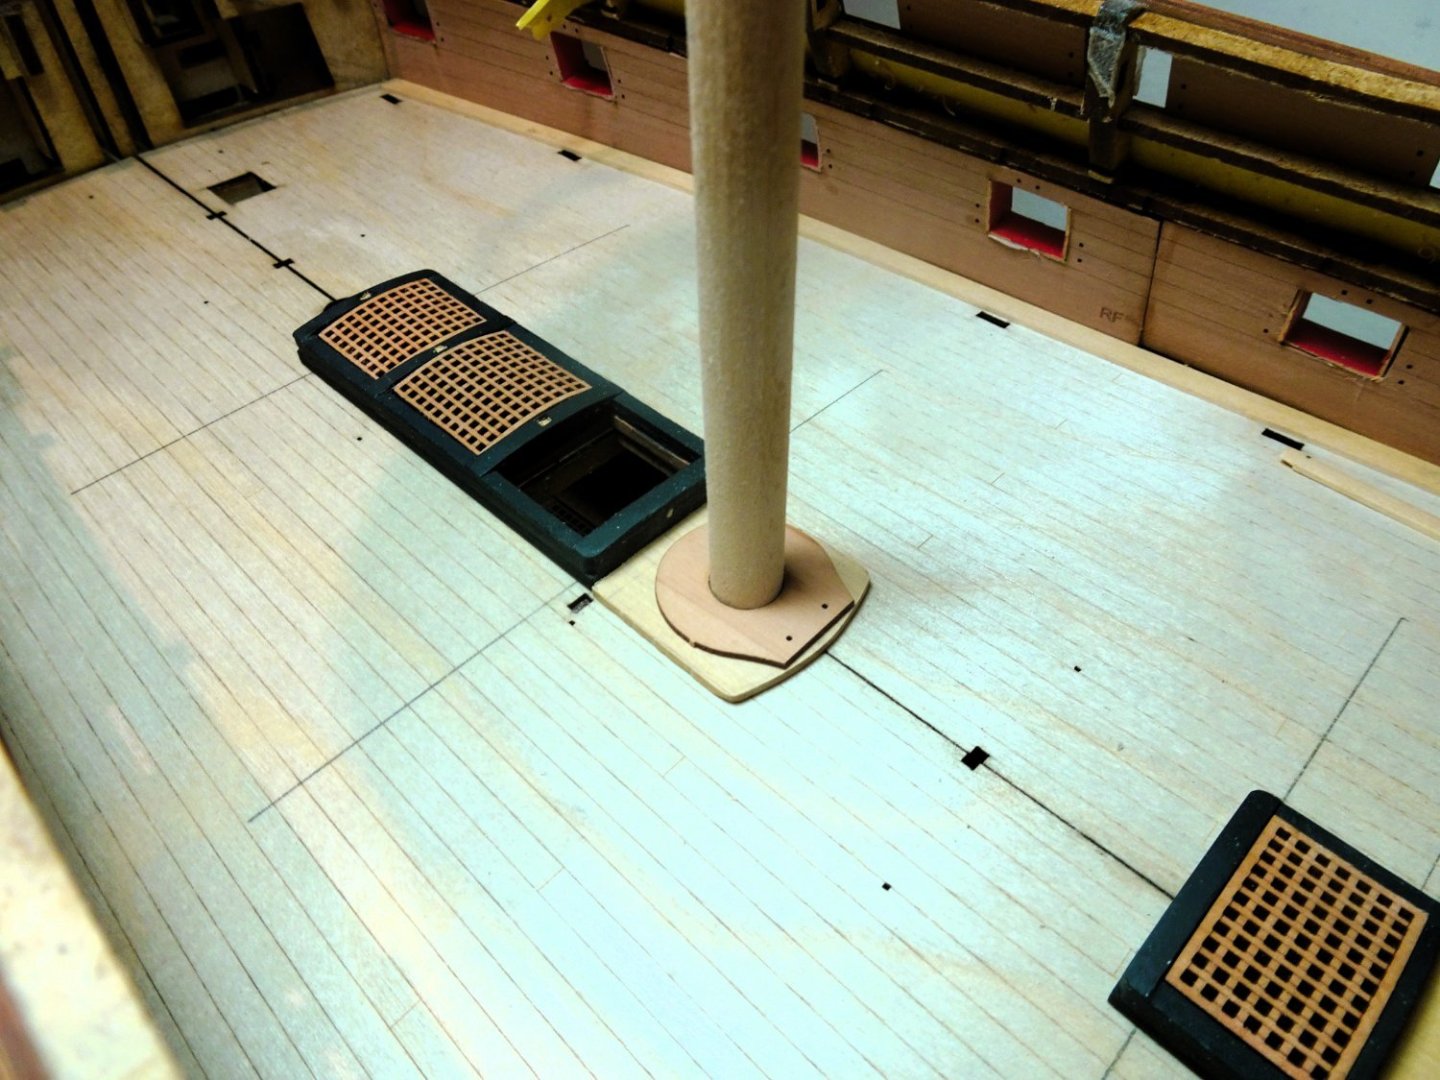
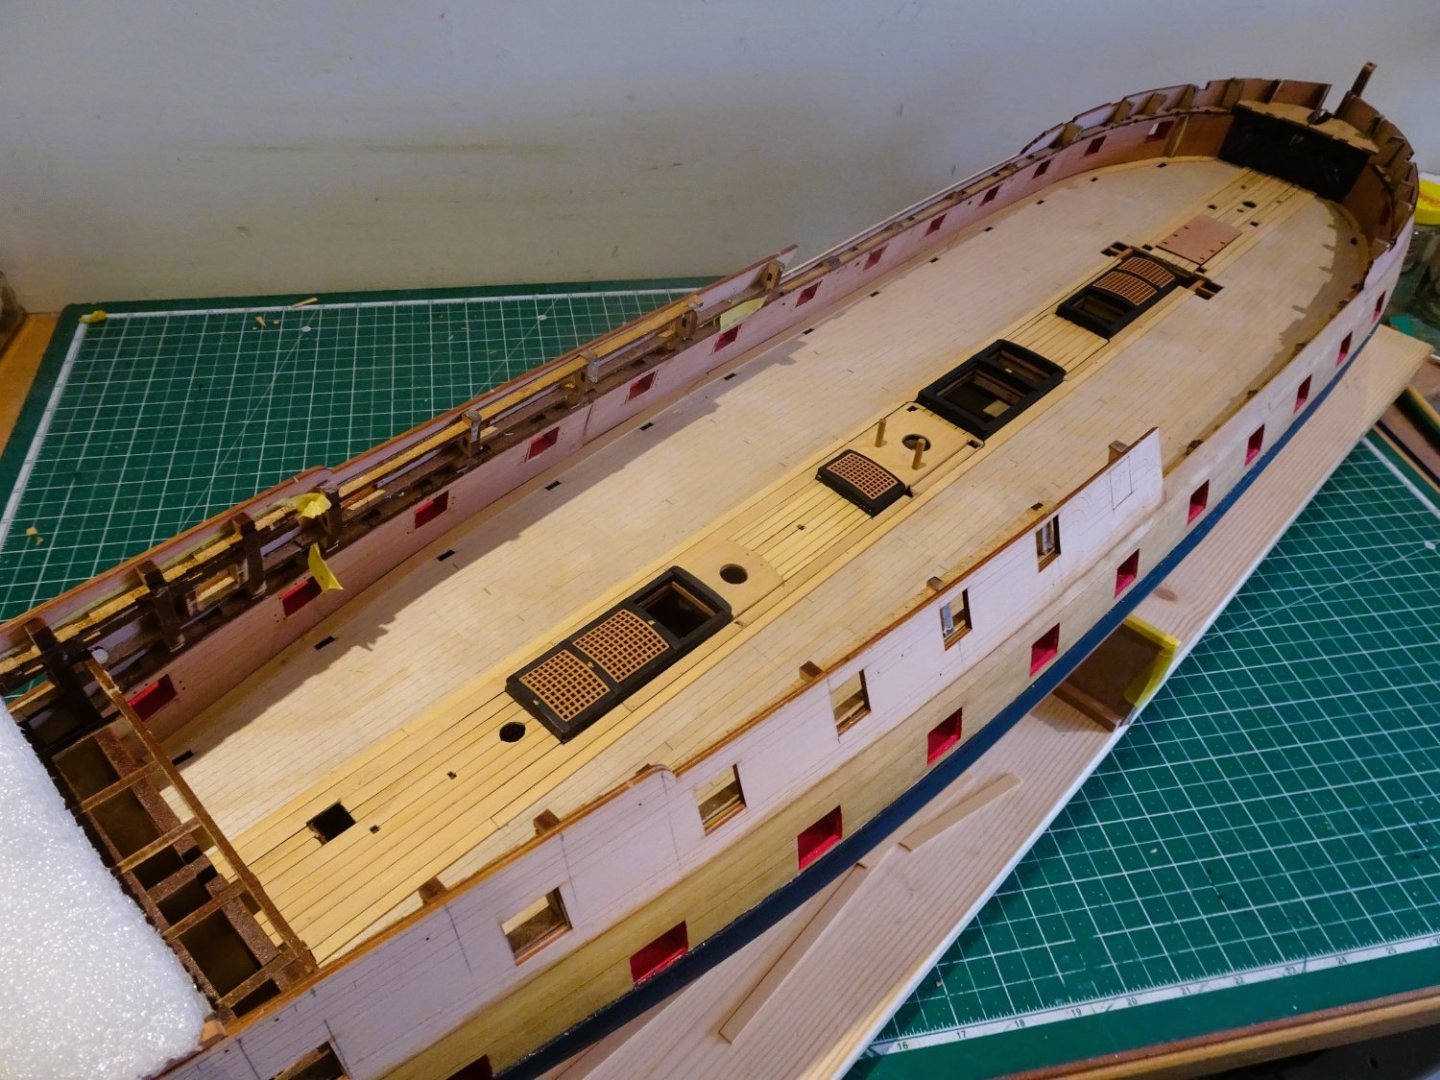
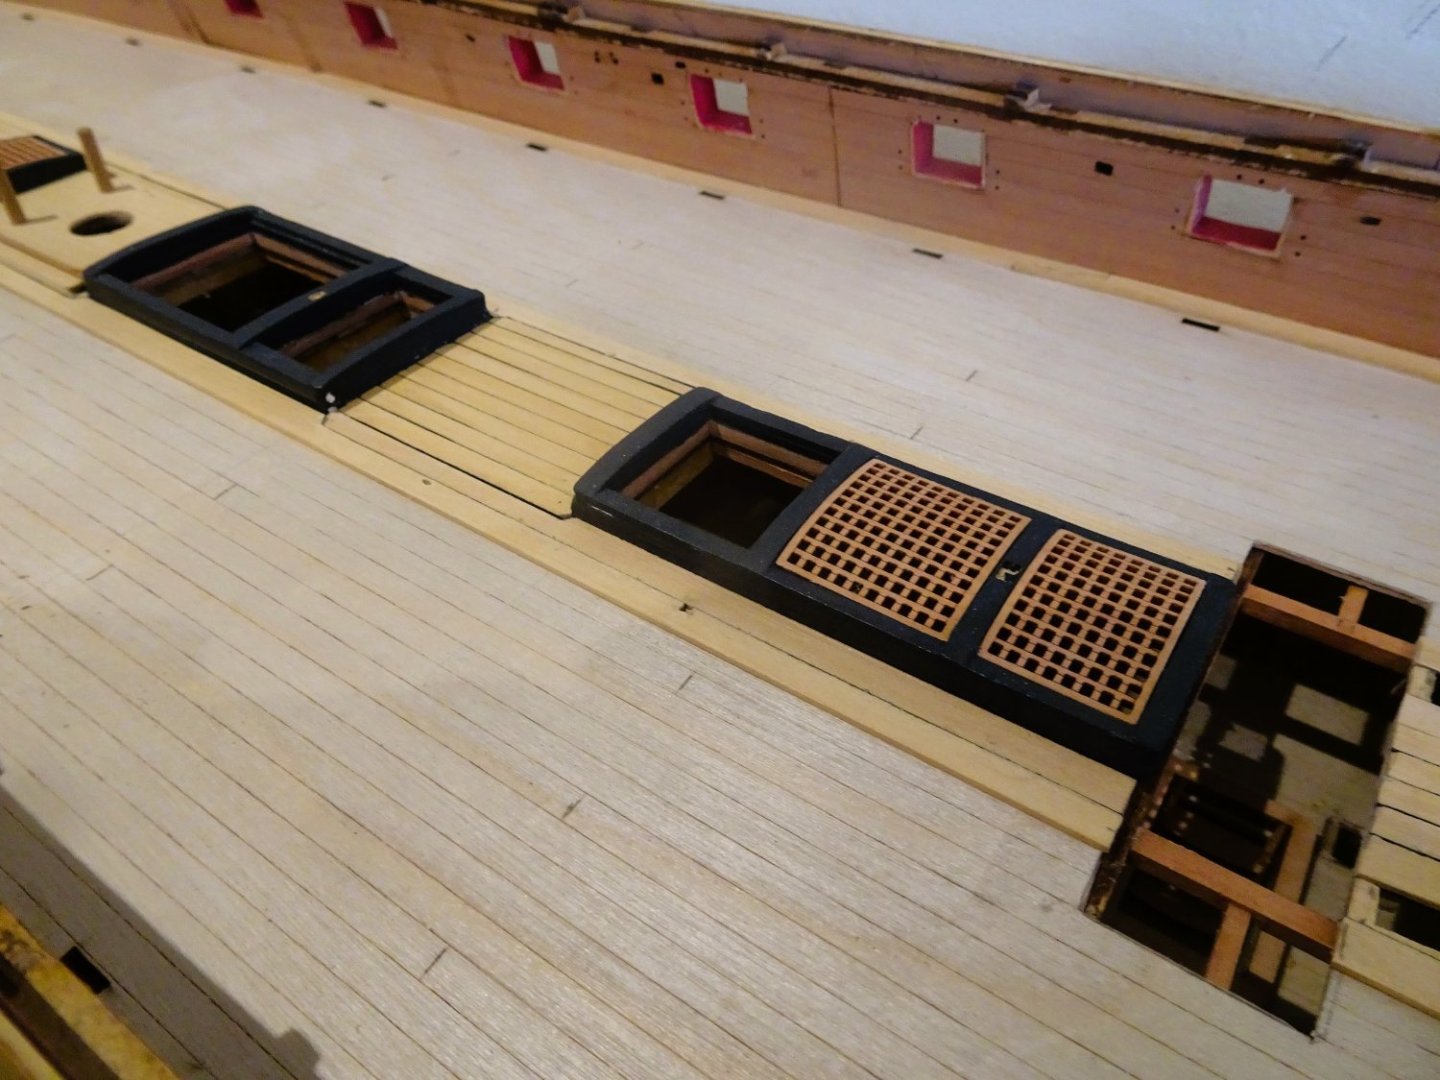
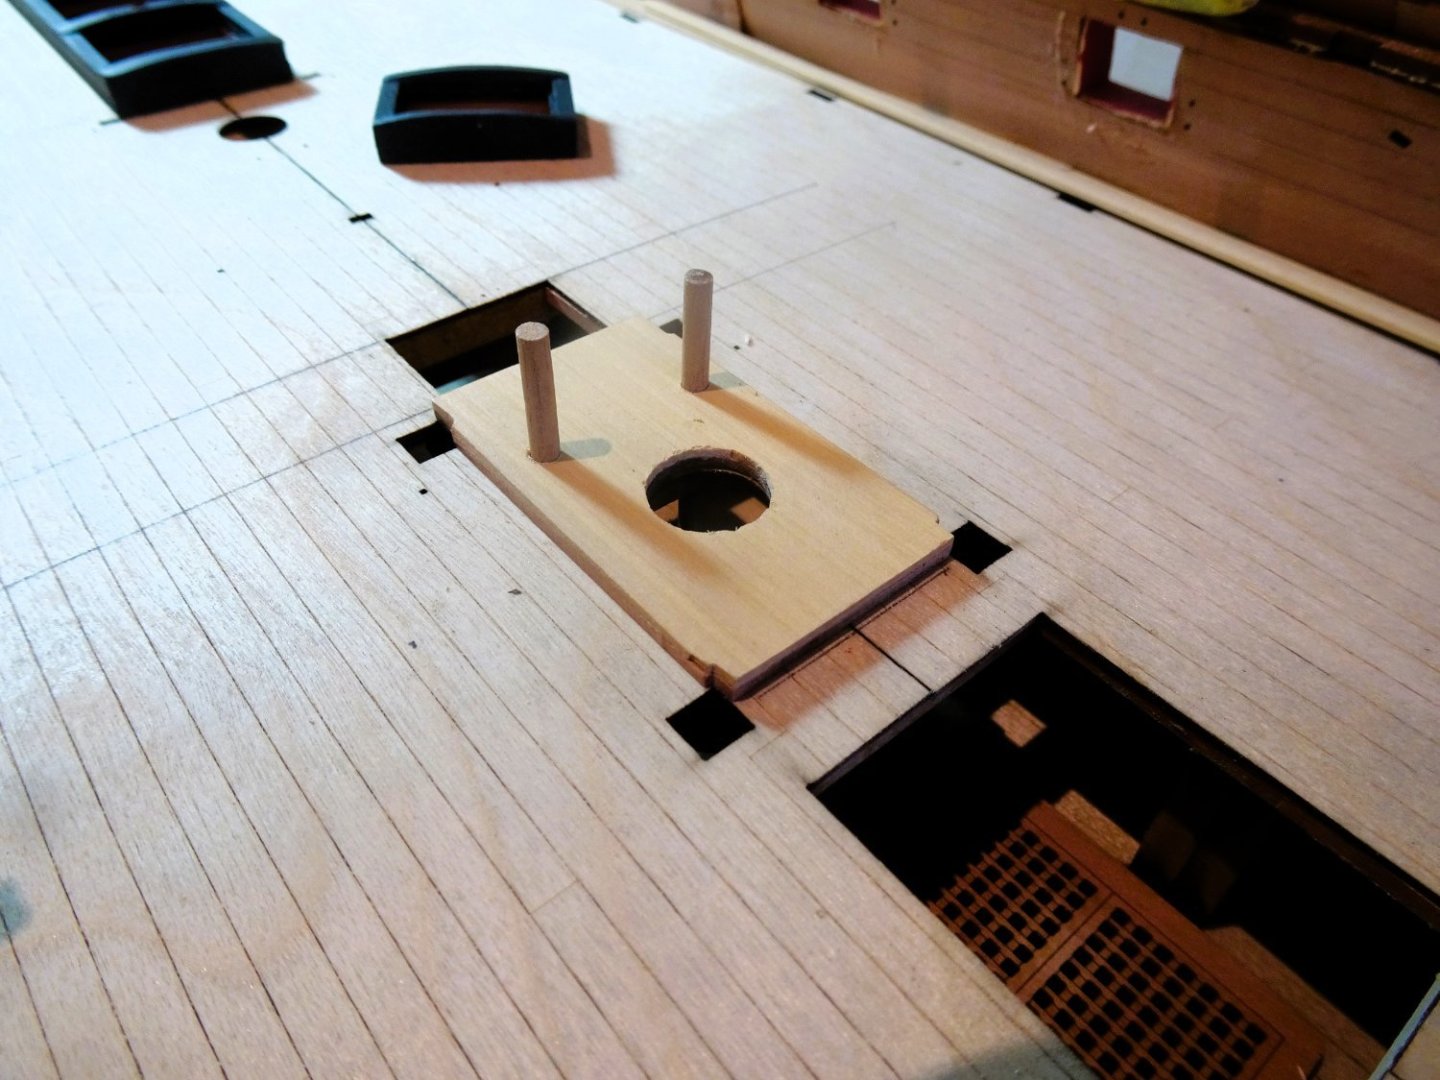
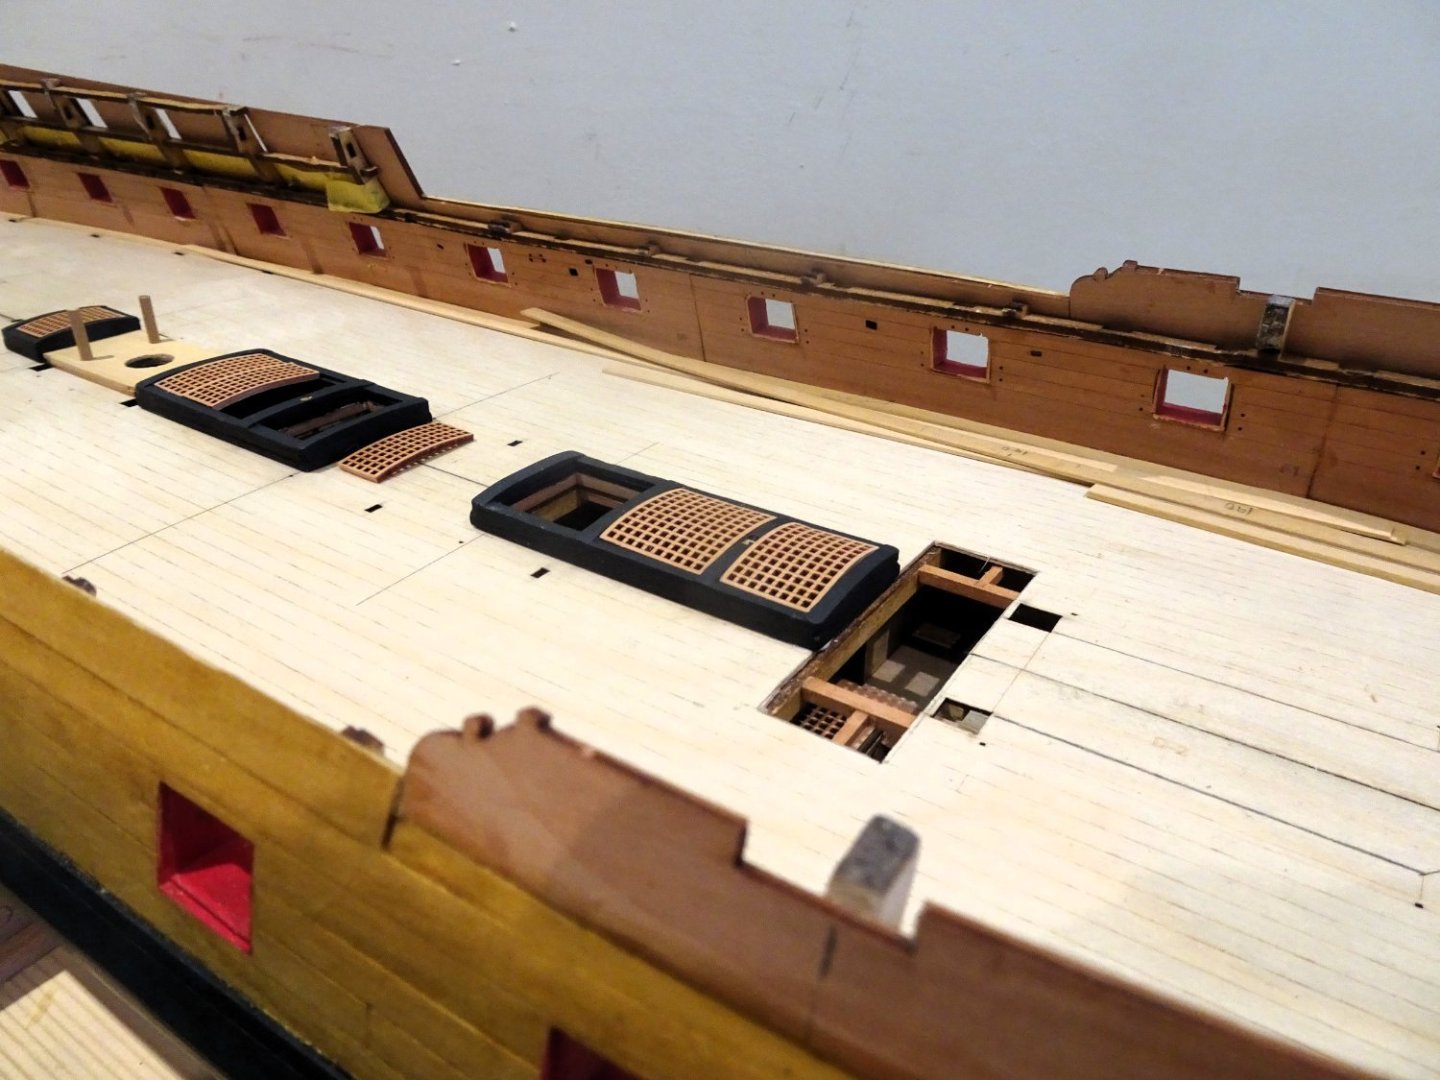
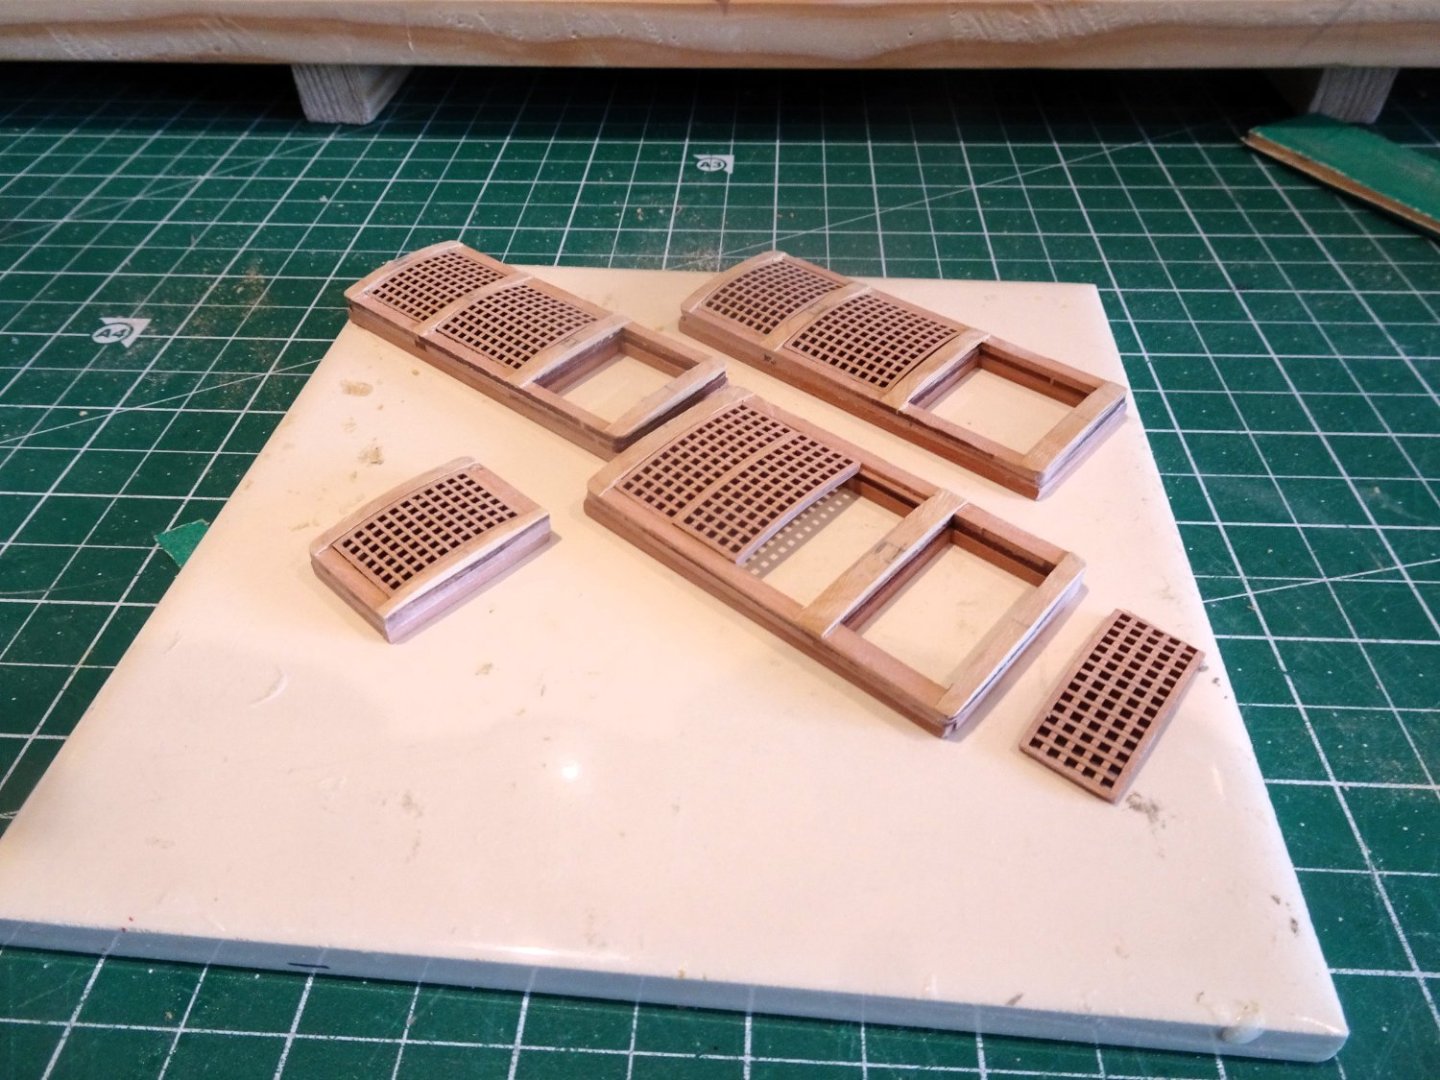
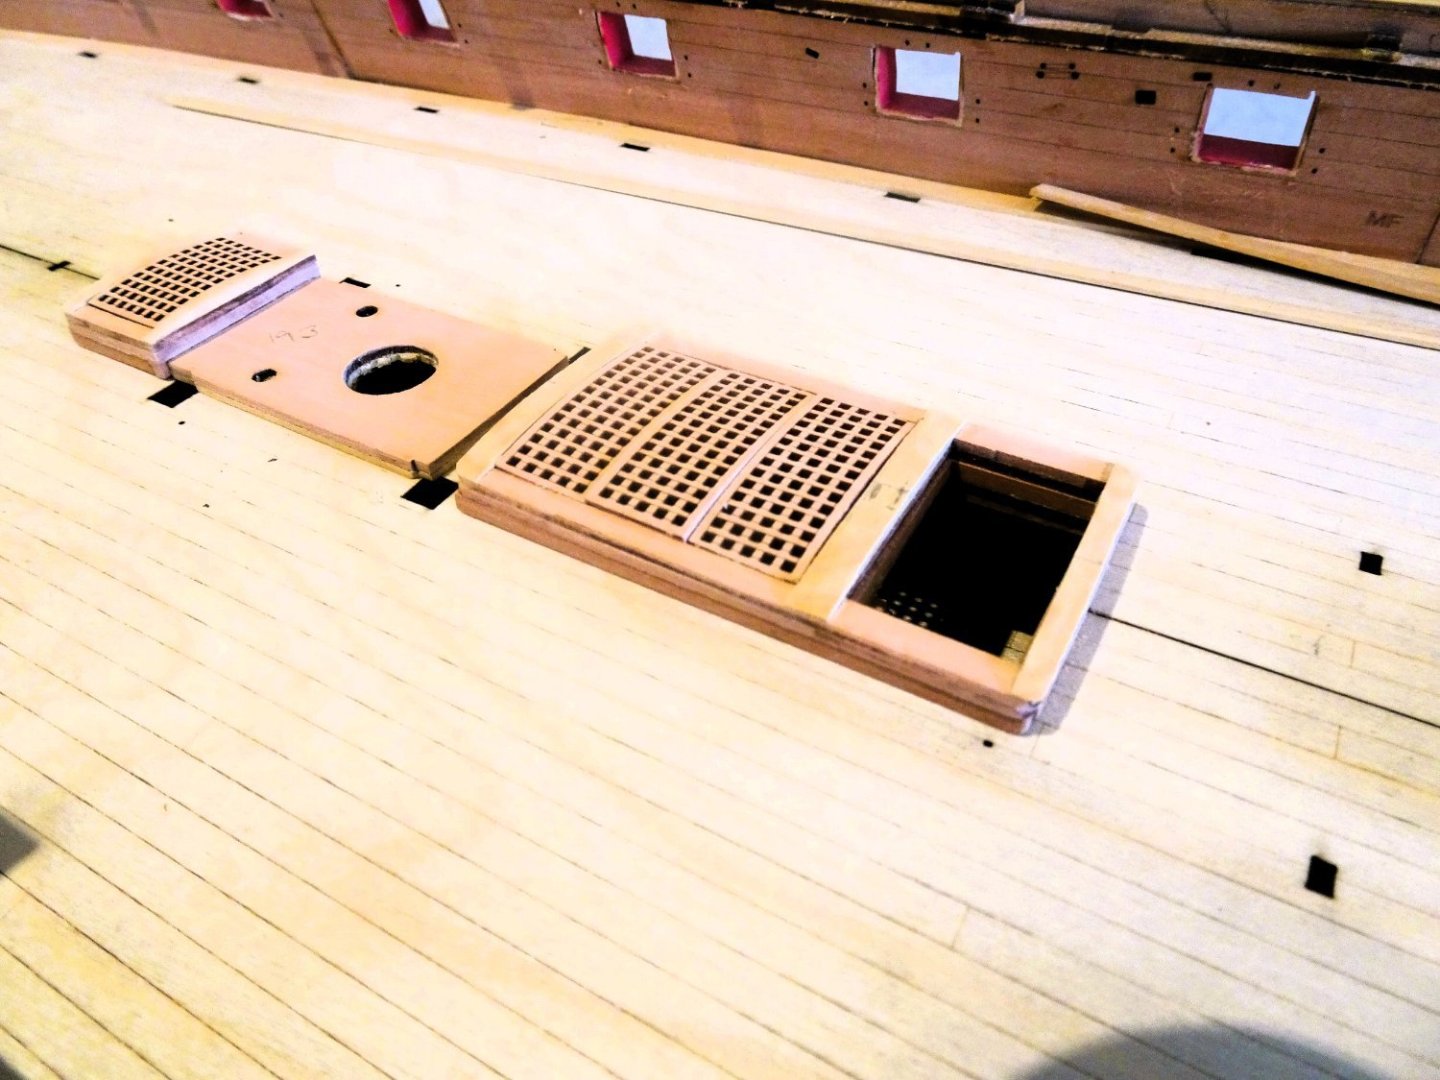
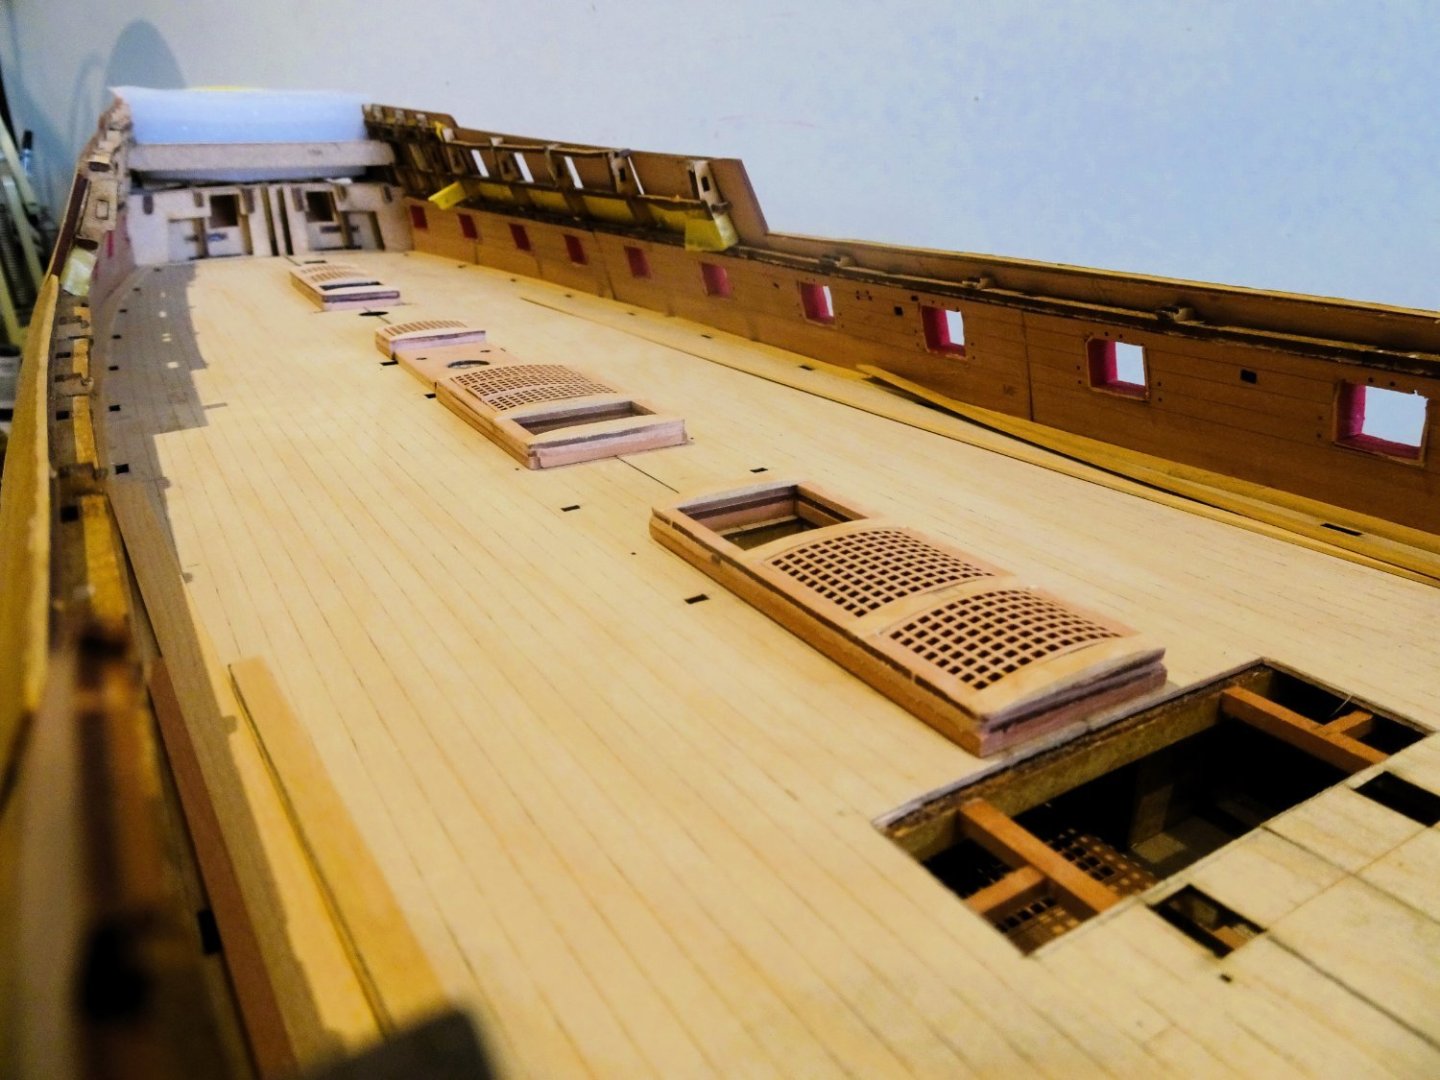
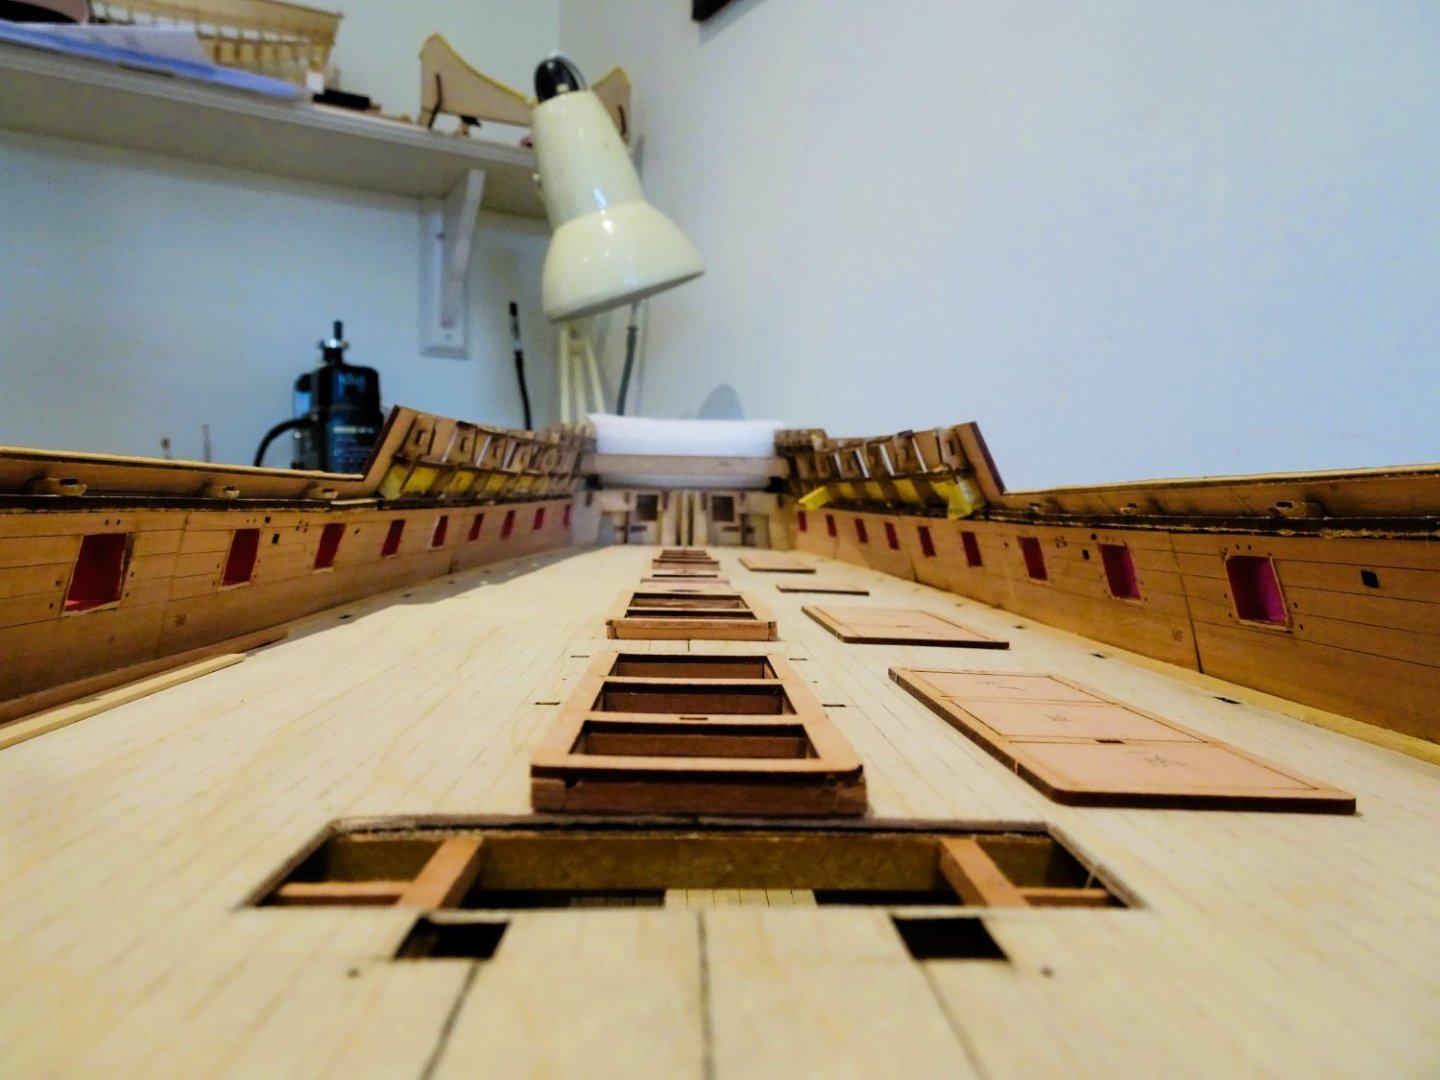
Thanks for your comments and 'likes' guys 👍 Post Fifty-three Completion of gundeck hatches. 1491 The modified hatches are painted, and the gratings given the w-o-p treatment. 1495 I always approach the gluing of fittings along the centre line with some anxiety. Particularly on a large length of deck as on Indy it can be tricky to ensure that they are all in true alignment. I spend a lot of time dry fitting the hatch sets before I commit to glue. Whether you plank before or after, this same issue will be encountered. Fitting the hatches before planking allows for a more accurate and interesting deck layout around the coamings, albeit a more fiddly and time-consuming approach. 1493 I start by fixing the mainmast partner base. On the kit this is attached to the hatchway abaft the Mainmast, (193) but I separated them. This base also has the holes to take the elmtree pumps. I use small diameter round dowel to secure the base in the correct position, this will also double up as pump fixings. As on the original these pump trunks run thro’ all decks to the bilges, pity they ain’t hollow. The sets are now glued into place on the deck centre -line. 1499 The hatchway aft of the Mainmast butts against the partners. This is followed by the aft ladderway set. 1498 The main and Fore sets follow. 1502 1511 At each stage I sight along the deck and from all angles to check the run. 1506 The run is also sighted from distance along the floor. With this it’s not the getting down that’s the problem, it’s getting back up again, taking this behemoth with you. 🙄 1508 Time to move on Wills. B.E. 21/07/2023


- 648 replies
-
- 20
-
-
- Indefatigable
- Vanguard Models
- (and 1 more)
-
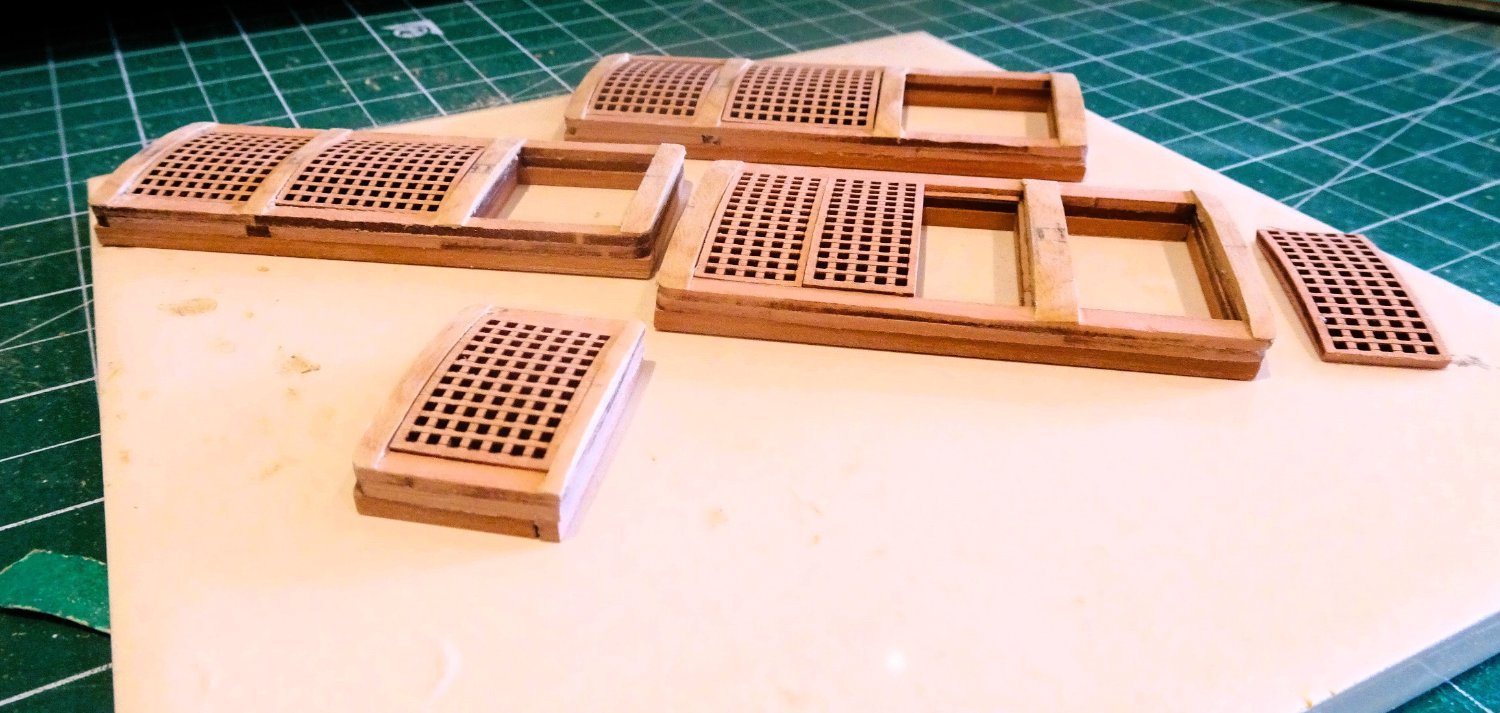
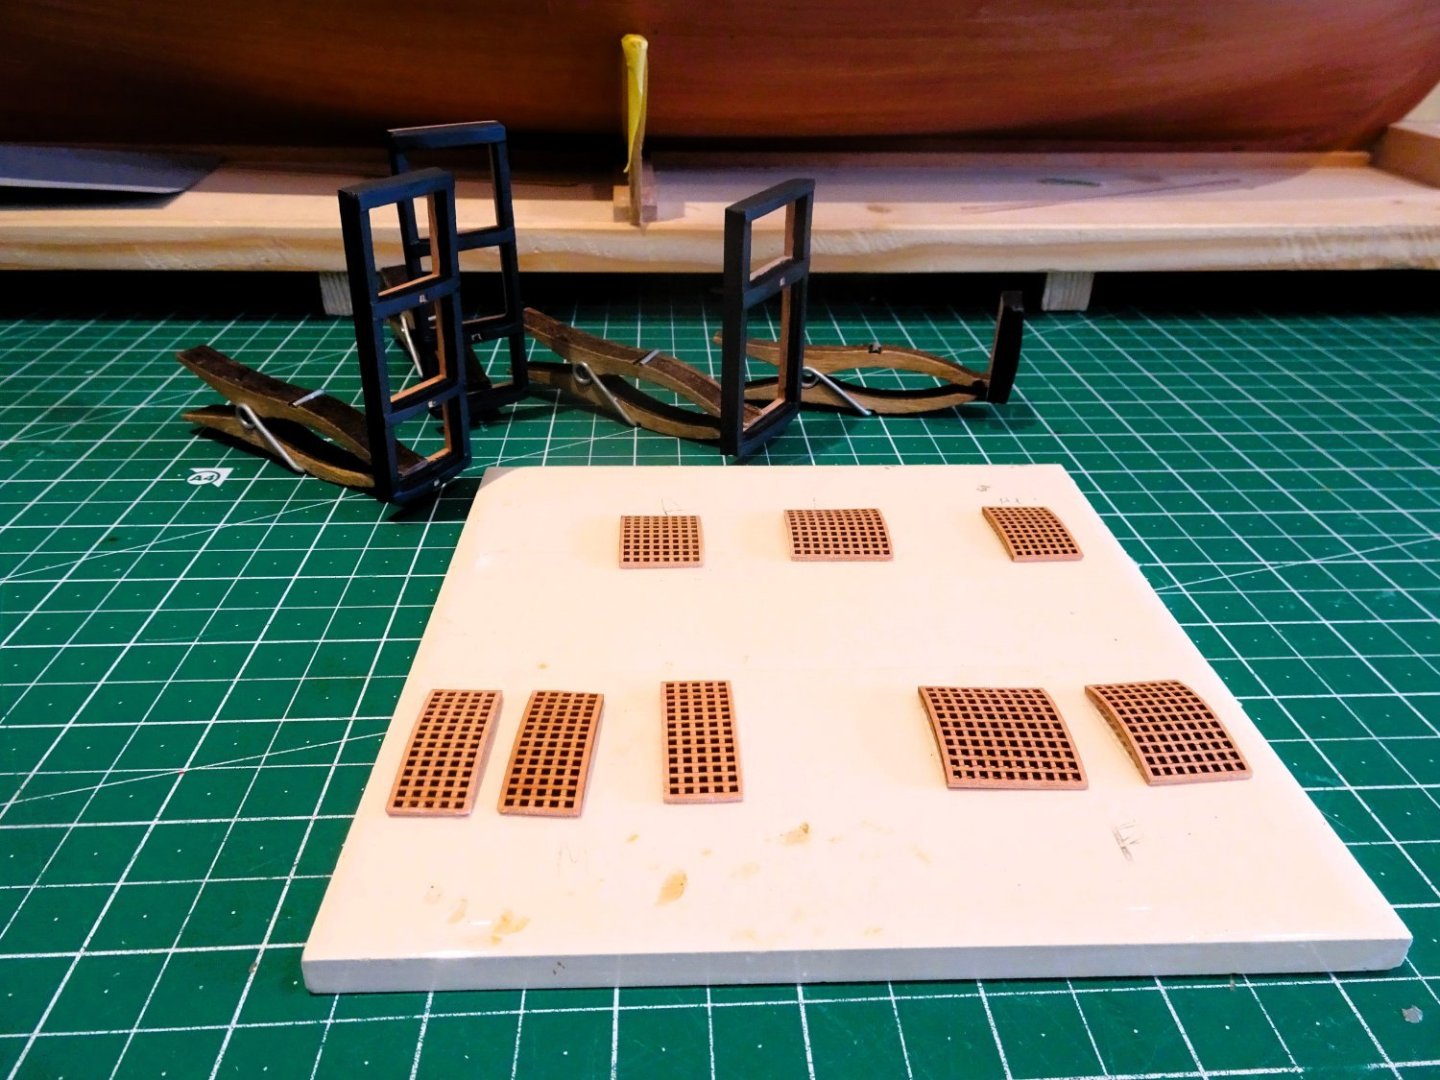
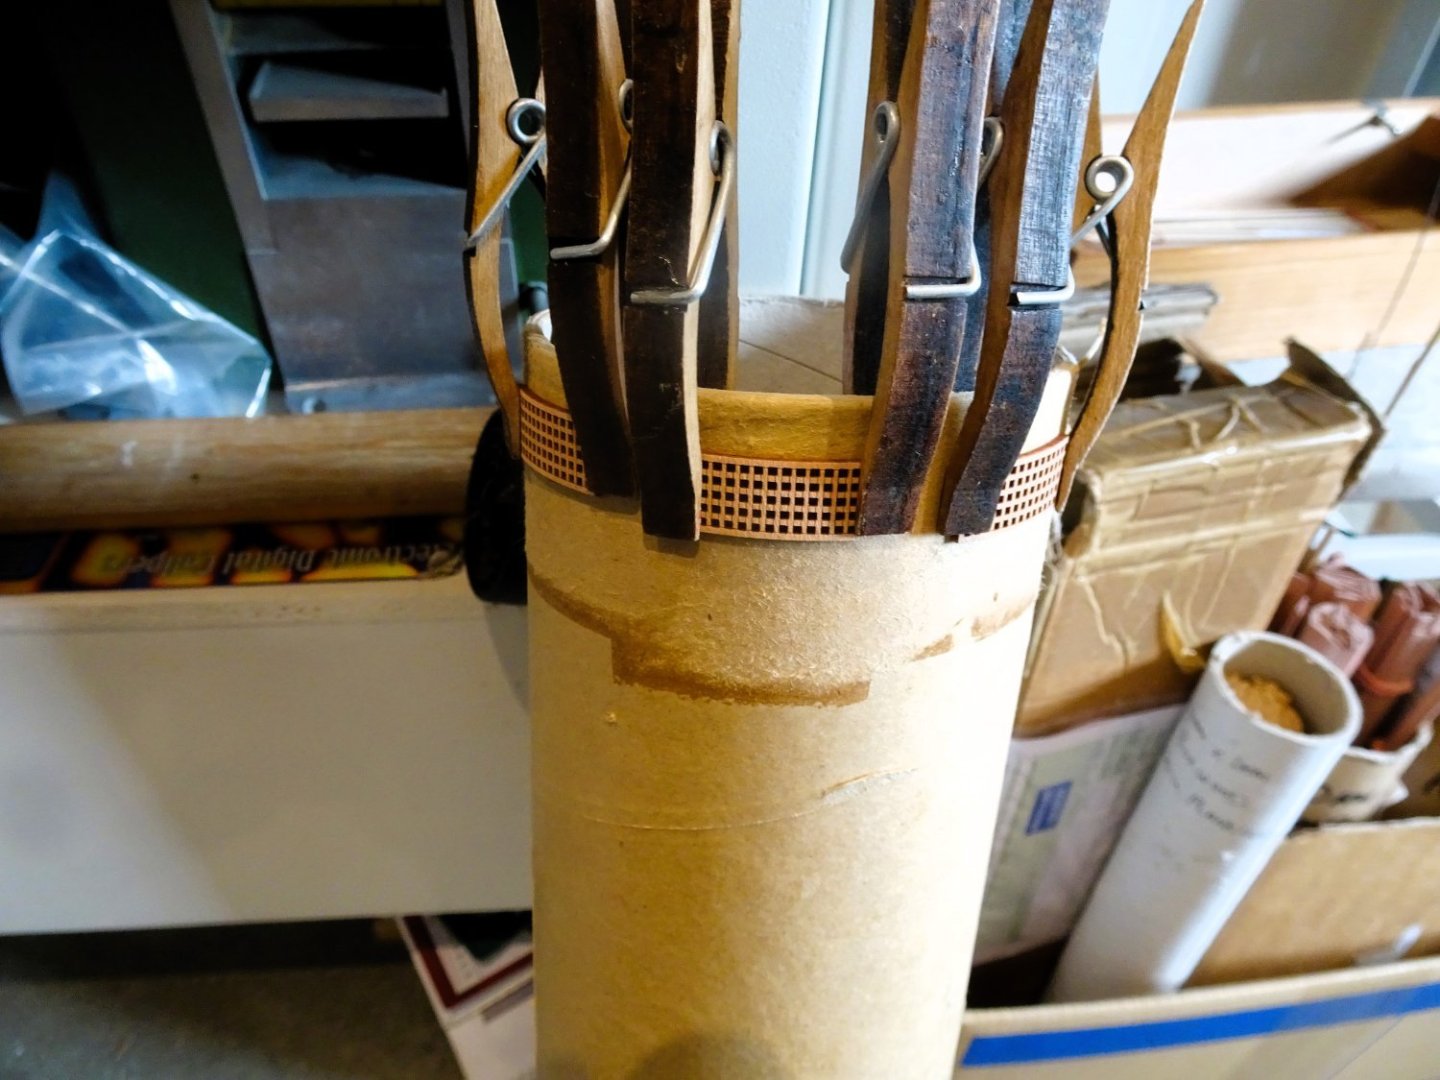
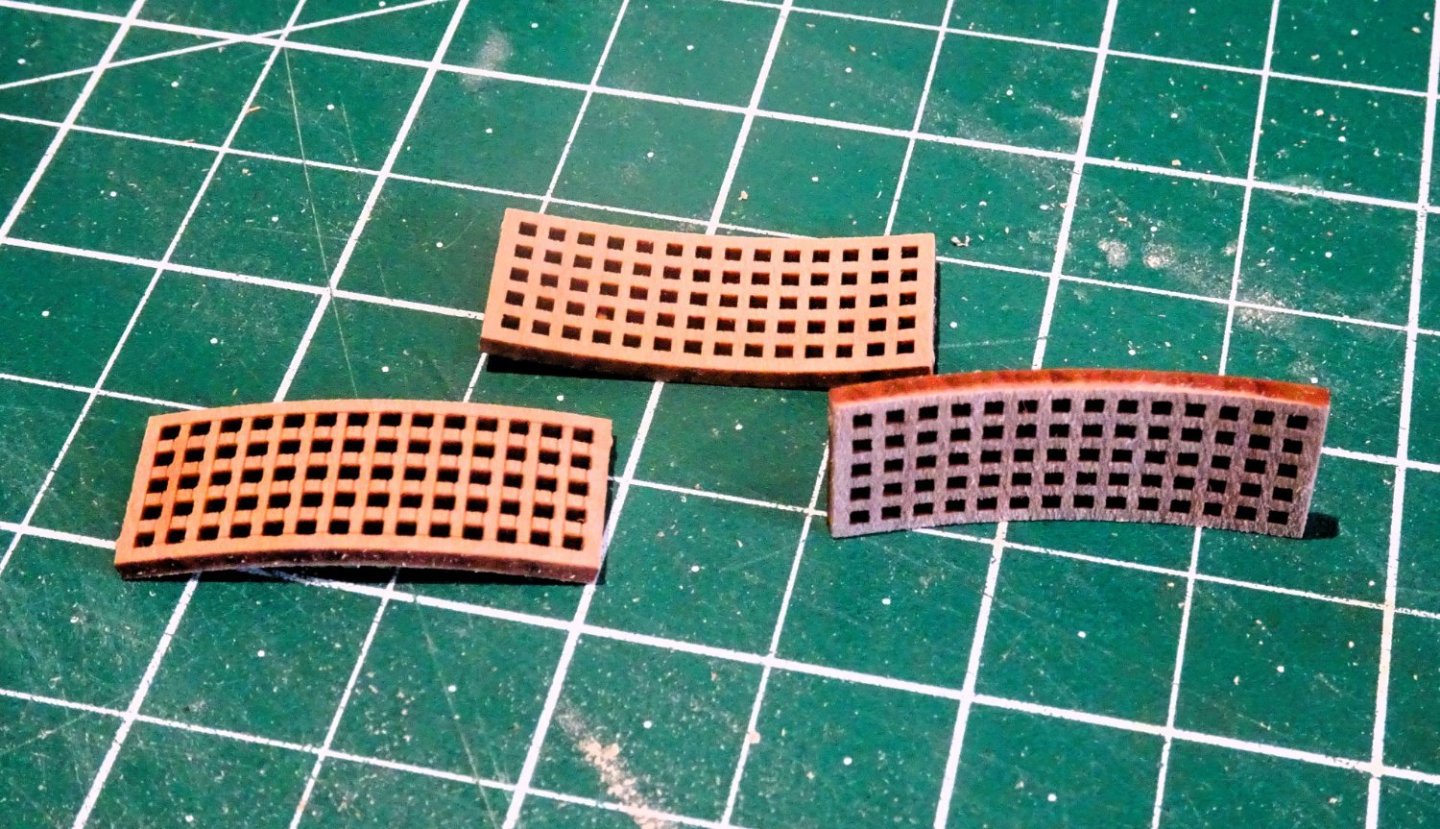
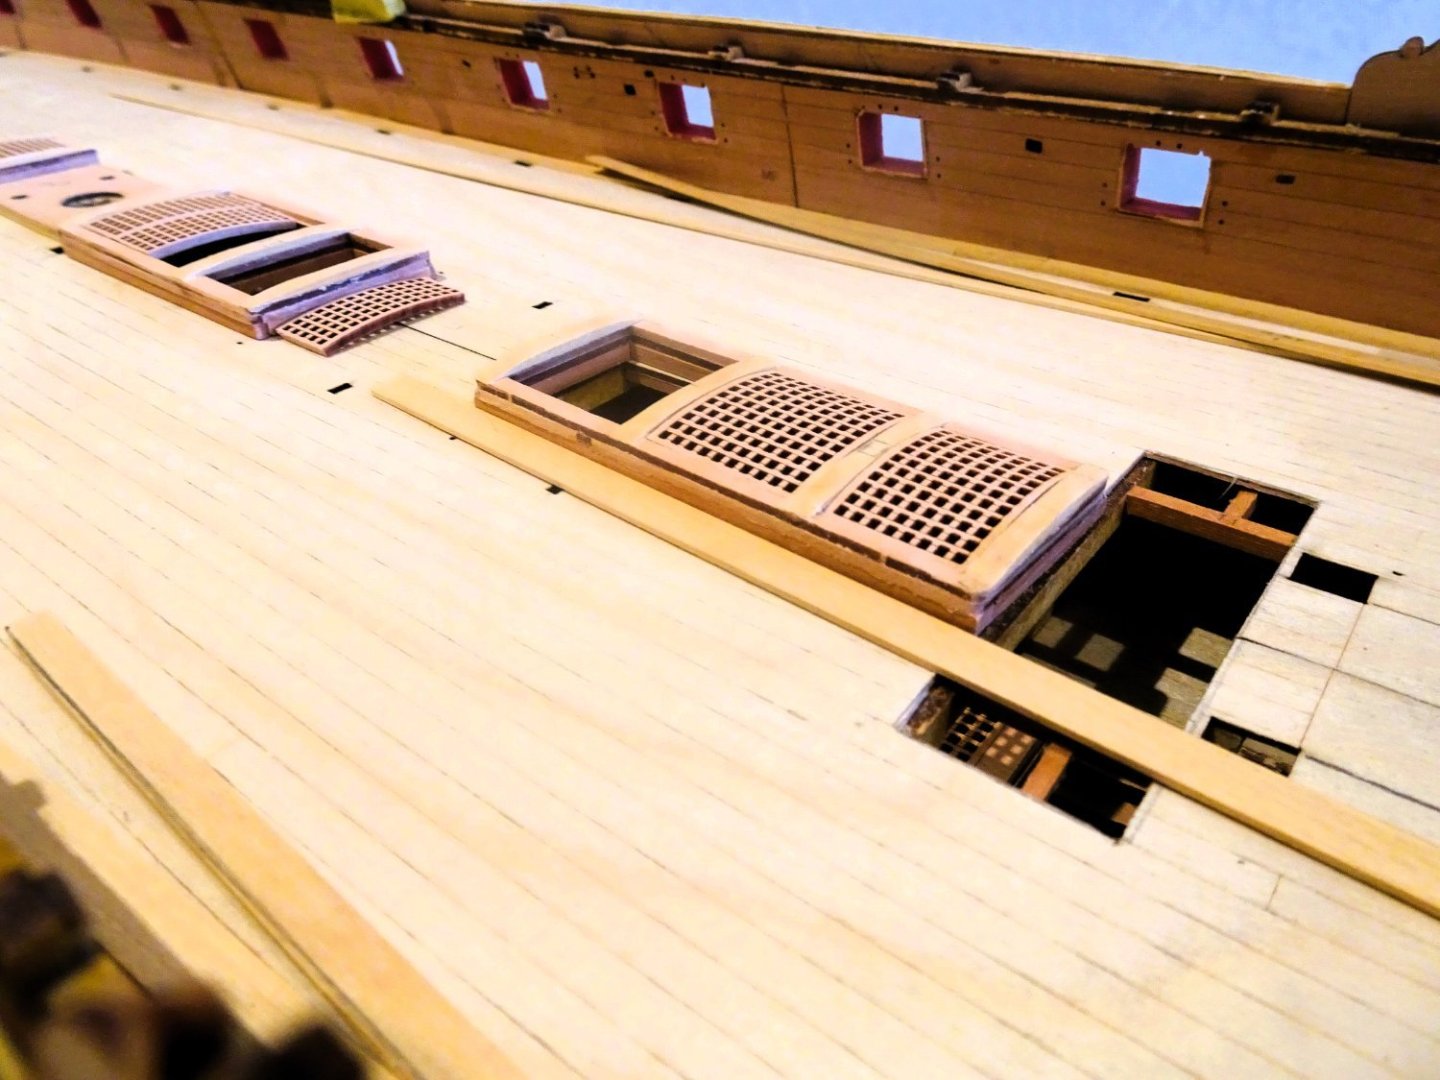
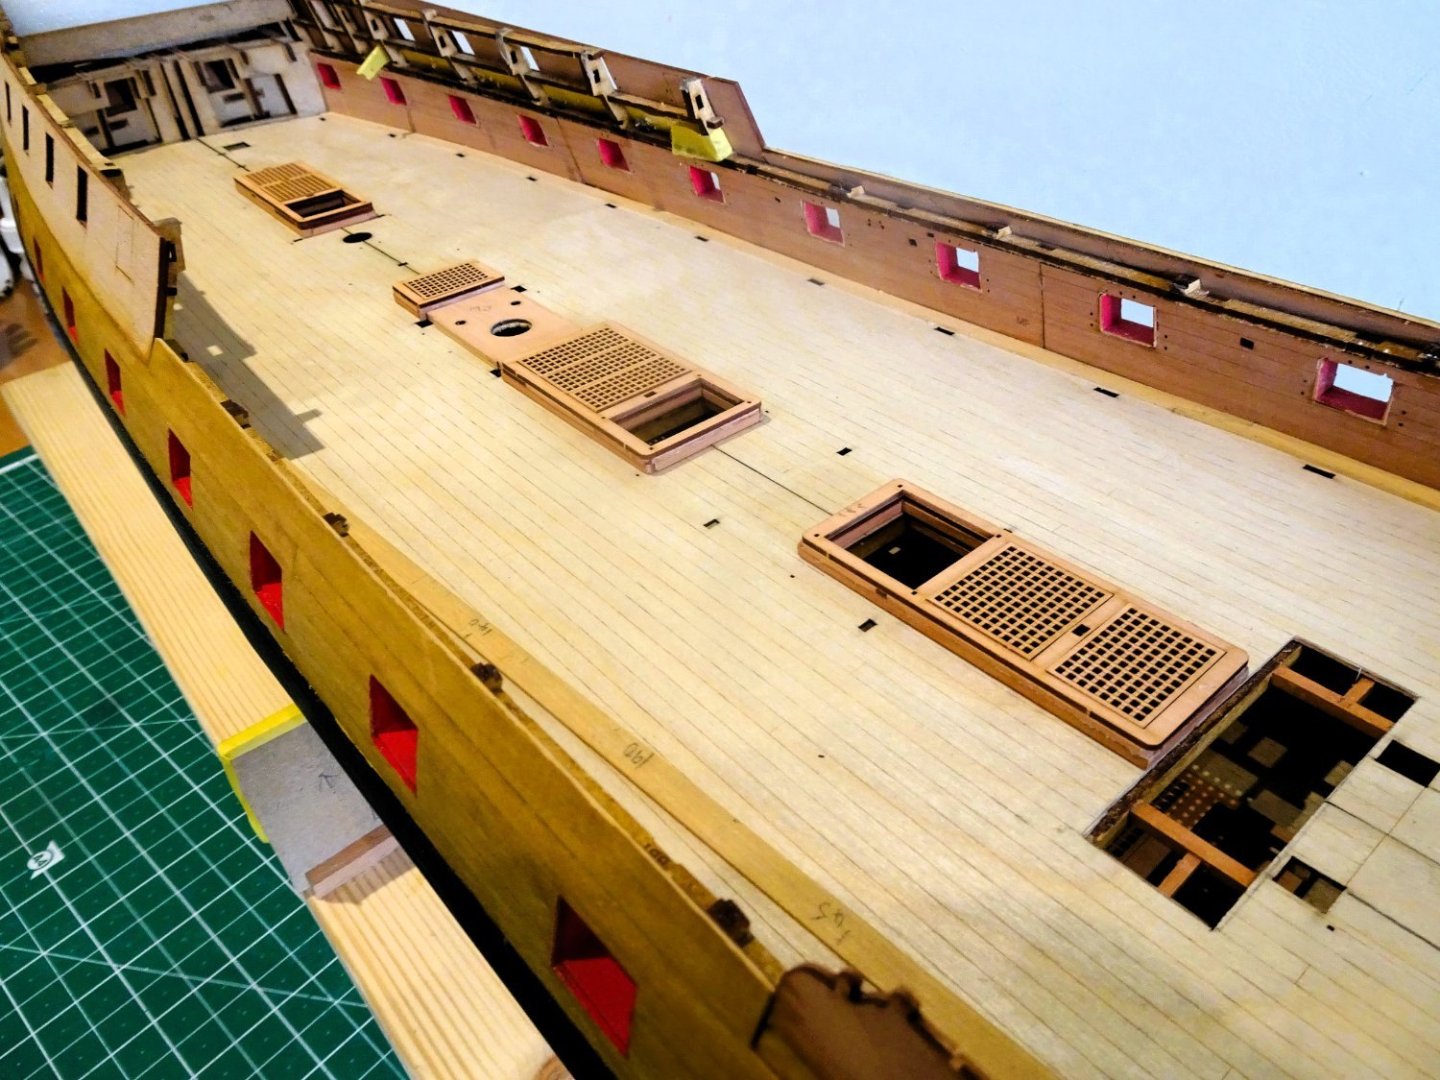
Post Fifty-five Hatches and gratings – Part Two Modifying the hatches was fairly straightforward on Sphinx, not quite so on 'Indy.' On all three of the hatch/ladderway sets there are support pillars central to the head ledges; adding a round-up complicates the fitting. Apart from any other consideration, I think a slight round-up and camber to the gratings provides a much more pleasing aspect. Whether the coamings are high or low, a camber appeared to apply. 1478 To create the camber, I attach strips of Boxwood atop the ledges. This is then shaped down to a feather edge where it meets the coamings. 1480 Cleaning up still required but you get the idea. 1468 The gratings camber was formed around a large diameter cardboard tube (4¼”) 1469 Bit of a leap of faith this, you never know until the job is done whether the grating will fall apart having been given the water and heat treatment. 1484 The Main hatch was supplied with three sections of gratings. I’m pleased Chris provided this arrangement, I had to do it myself on Sphinx, and tricky little beggars they were to make. 1486 1487 1472 In my version the coamings rise 4.4mm (11”) above the deck with the Head ledges higher by 1mm. Once fully cleaned up the coamings will be painted black and the gratings left bright. B.E. 20/07/2023


- 648 replies
-
- 25
-
-
-
- Indefatigable
- Vanguard Models
- (and 1 more)
-
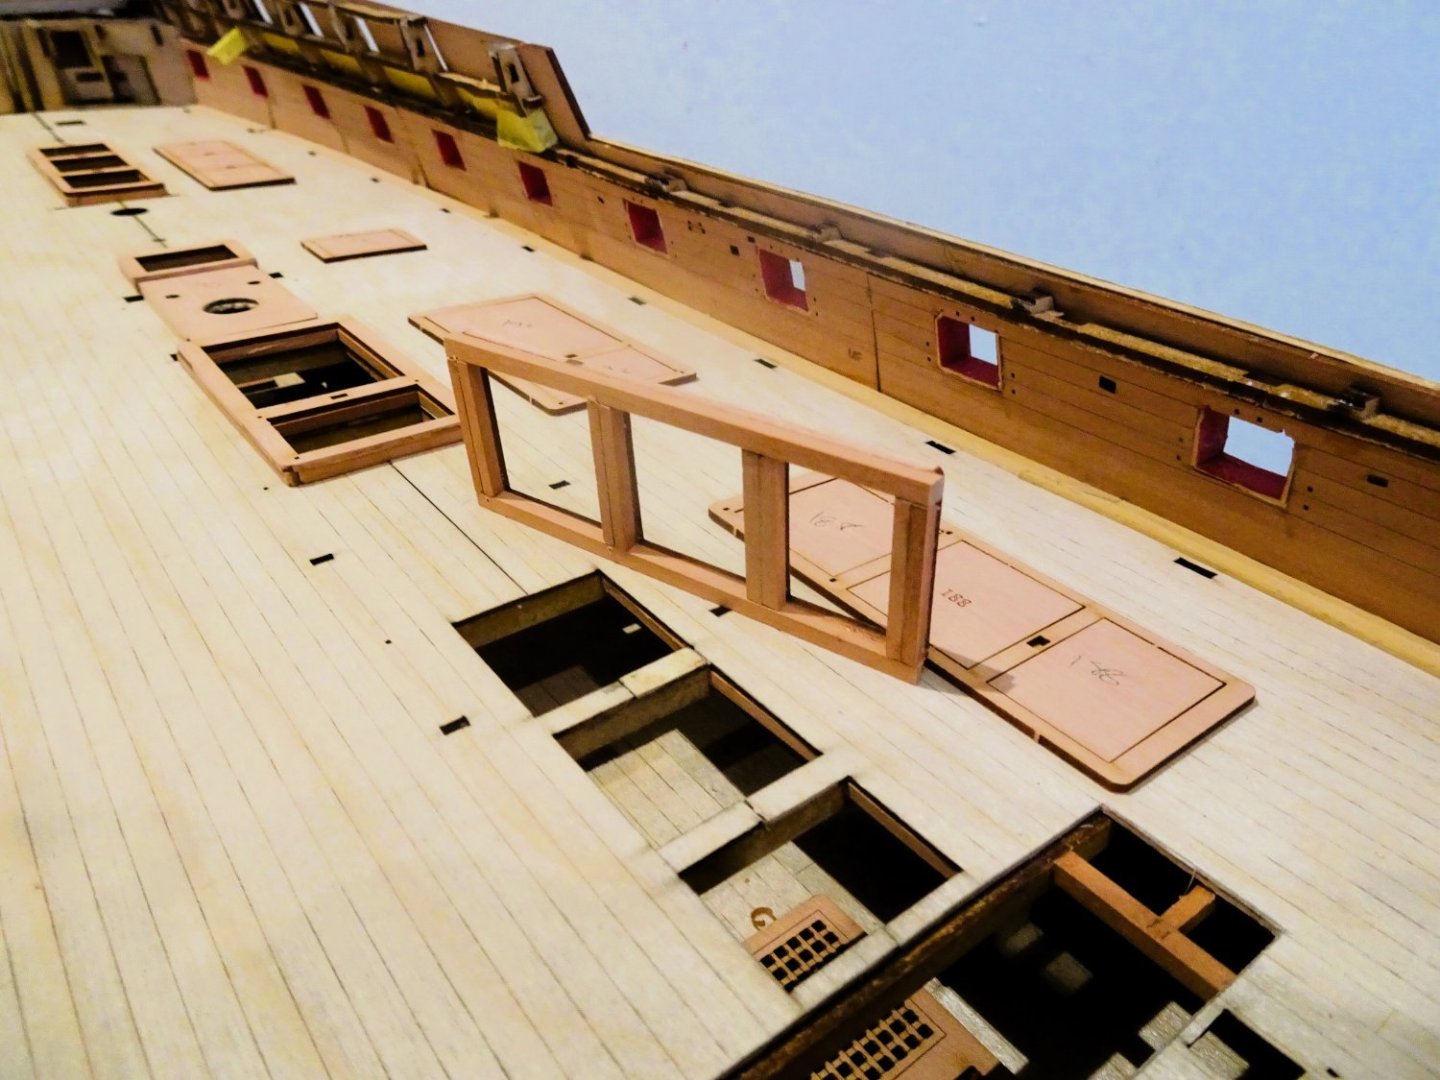
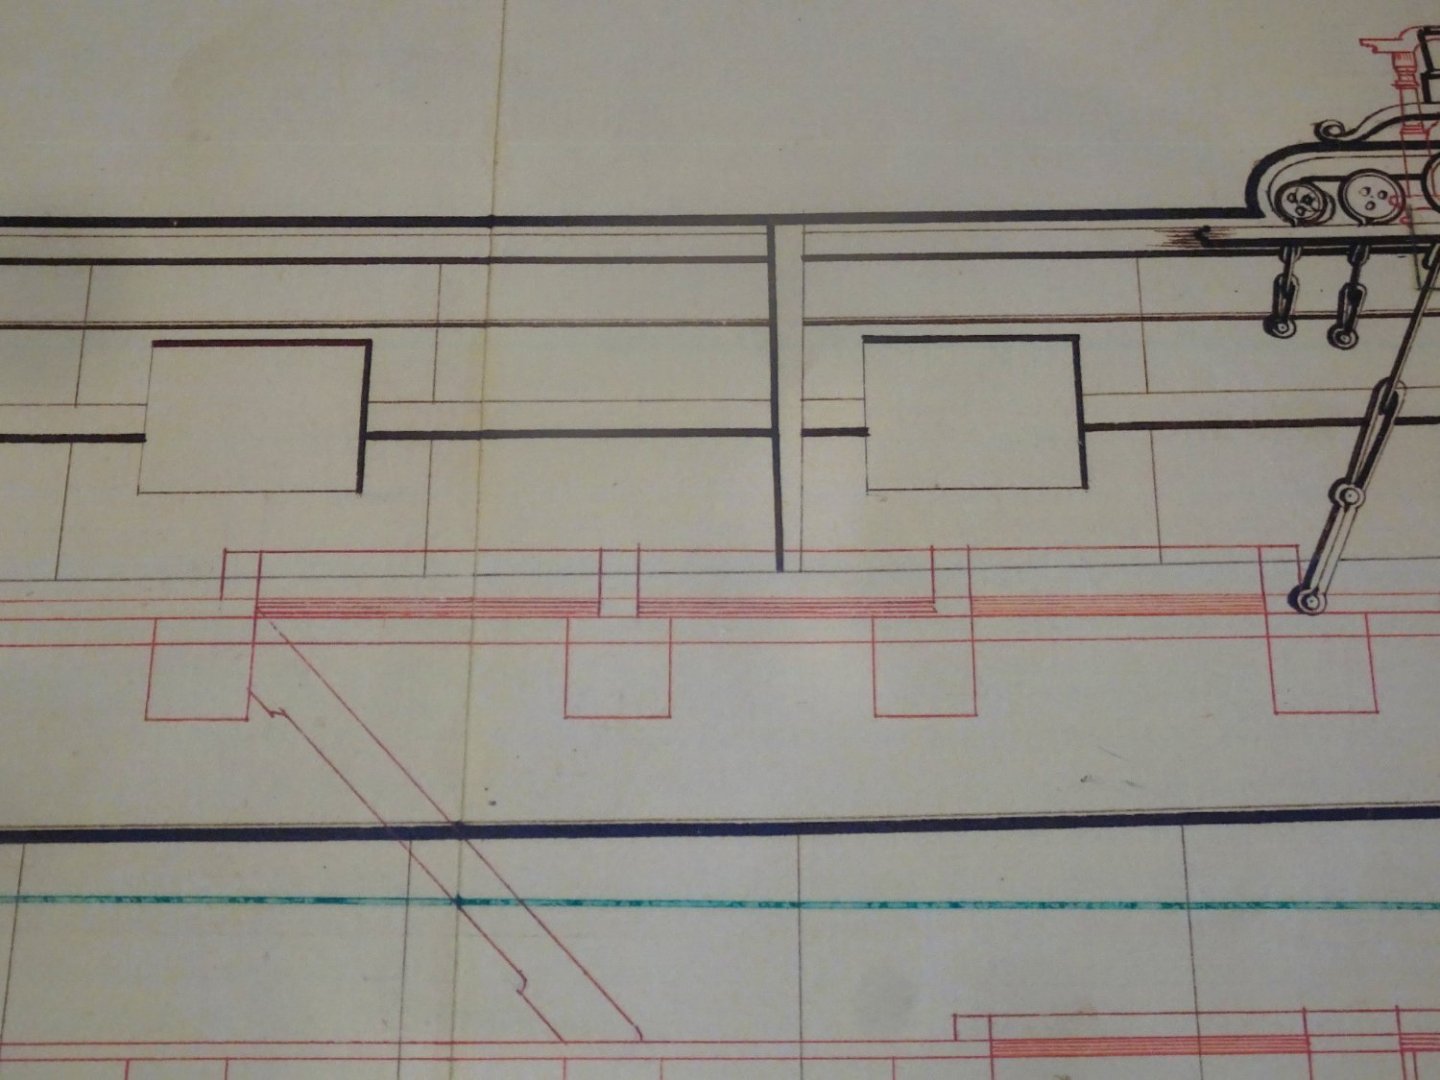
Post Fifty-four Centre line fittings. (Part One) These consist of the hatchways and ladderways. They are provided in the kit complete with grating sets and attached shot garlands in pearwood. The kit grating sets go together very nicely, and the gratings fit neatly into place with minimum effort. The depth of the coamings (2.8mm) equates to a height above deck of 7” which looks a tad low to my eye for a ship of this size. 1465 Looking at the Adm plan of Indy, the coamings, assuming a 1:48 scale, equate to a height of 9½” above deck. * At 1:64 scale this equates to 3.77mm The Lower deck coamings are much lower, as are those of the Qtr deck. *By Navy Order 1795 coaming were to be built well clear of the deck, approx. 15-18” (5mm – 7mm at scale) Goodwin (Construction and Fitting of the English Man of War) Indy went into service around the same time as the Navy Board issued the new order. Lavery (Arming and fitting of English ships of war) notes; Coamings and ledges varied considerably in height, according to the size of ship and their position. They could be as high as 12” on a large ship and as small as 3” on a sloop or Brig. By the late Eighteenth century much higher coamings were fitted on the gundeck than other decks, as water was much more likely to come in thro’ the ports of that deck. With all this in mind; 1460 I have beefed up the underside of the coaming frames using a combination of 3mm x 2.5mm and 2mm x 2.5mm strips. 1458 The finished height will be tweaked once I have decided about the round-up to the head ledges. 1464 The main problem with getting into this sort of detail is that Indy is a late age frigate conversion of which there seems to be a dearth of detailed information. Most of the contemporary large frigate models from which a visual appreciation may be gained, date from the 1770’s and earlier. 1463 The beefed-up hatches on the vast expanse of the Indy gundeck don’t look out of proportion, to my eye at least. 1466 I next need to look at the round-up to the head ledges. B.E. 19/07/2023

- 648 replies
-
- 17
-
-
-
- Indefatigable
- Vanguard Models
- (and 1 more)
-
I can see the issue Kevin, are you fitting the mouldings in individual pieces or long strips? The aftermost piece looks out of kilter which would throw the line off. It needs a graceful curve to meet the Qtr gallery; I would remove the last piece and run a length across the ports, and fit it as it conforms to the sheer line, without paying too much attention to the manual photos. From the bow to the midships it looks just fine. B.E.
- 443 replies
-
- 8
-
-
- Indefatigable
- Vanguard Models
- (and 1 more)
-
Creating such wonderful models from scratch, I’m amazed how far you get in such a short time, Nils, interesting stuff.👍 B.E.
-
Post Fifty-three Planking the gundeck For this I am using mainly 1mm x 4mm Boxwood strip provided by Hobbymill eu. Broader strips will also be required in certain areas. 0492 I have already prepped the deck by the addition of carlings beneath the hatch openings and have opened up the deck area above the Lower deck ladderway down to the Orlop. The gundeck will otherwise be fully planked. The first job is to fit the margin planks. 1439 These are not too difficult on Indy; the forward section requires cutting out from 1mm Box sheet but for the greater part 6mm strip can be used with gentle edge bending. 1440 1442 I added a couple of scarph joints just for interest and with the open and clear decks on this minimalist build, they should be visible. 1452 1450 The part that will represent the waterway and contain the scuppers will be fitted once the Spirketting is in place. Before I can get stuck into the main planking, I need to consider the centre line fittings. These are intended to be simply glued atop the finished deck planking but I prefer to fit these in place first and plank up to them. This will involve beefing up the depth of the coamings etc by 1mm to compensate. I also like to see a round-up to the head ledges so these will also be modified. B.E. 17/07/2023


- 648 replies
-
- 23
-
-
- Indefatigable
- Vanguard Models
- (and 1 more)
-
A lot I would say Glenn, if I could produce planking such as on your 'Winnie' the thought would never have entered my mind.😁 B.E.
- 648 replies
-
- 3
-
-
- Indefatigable
- Vanguard Models
- (and 1 more)
-
Thanks Alistair, It did cross my mind to partially plate it, and I seem to recall a contemporary model displayed that way. Can't find it for the life of me now, but I was reminded seeing the early stages of kevin's 'Indy' plating job with the plates partly running up the stem and keel posts, but left low in the centre. Just a thought, but I've got a while now before the question faces me again. Cheers, B.E.
- 648 replies
-
- 3
-
-
- Indefatigable
- Vanguard Models
- (and 1 more)
-
Valid point James, and the waterline cutting factor has great appeal. 👍 Thanks for the clarification Chris, no criticism inferred. I like the look of both of them, and for me either would do an effective job on Indy. Were I to opt for plates, as cost isn't a factor, I would use the Vanguard set. Regards, B.E.
- 648 replies
-
- 6
-
-
- Indefatigable
- Vanguard Models
- (and 1 more)
-
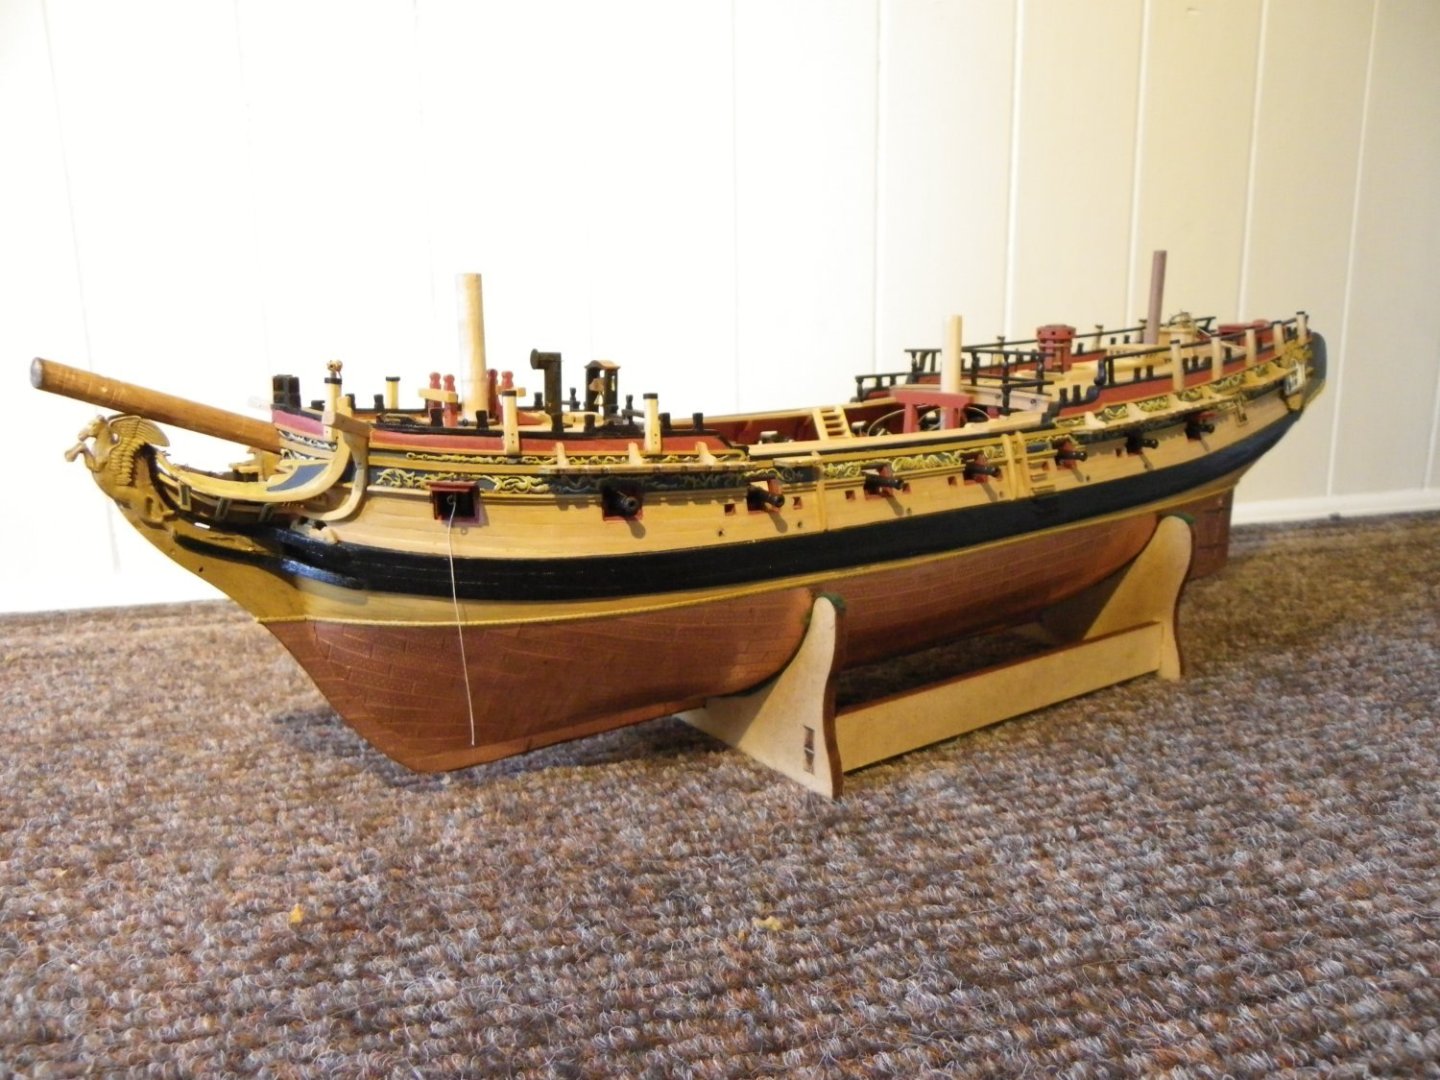
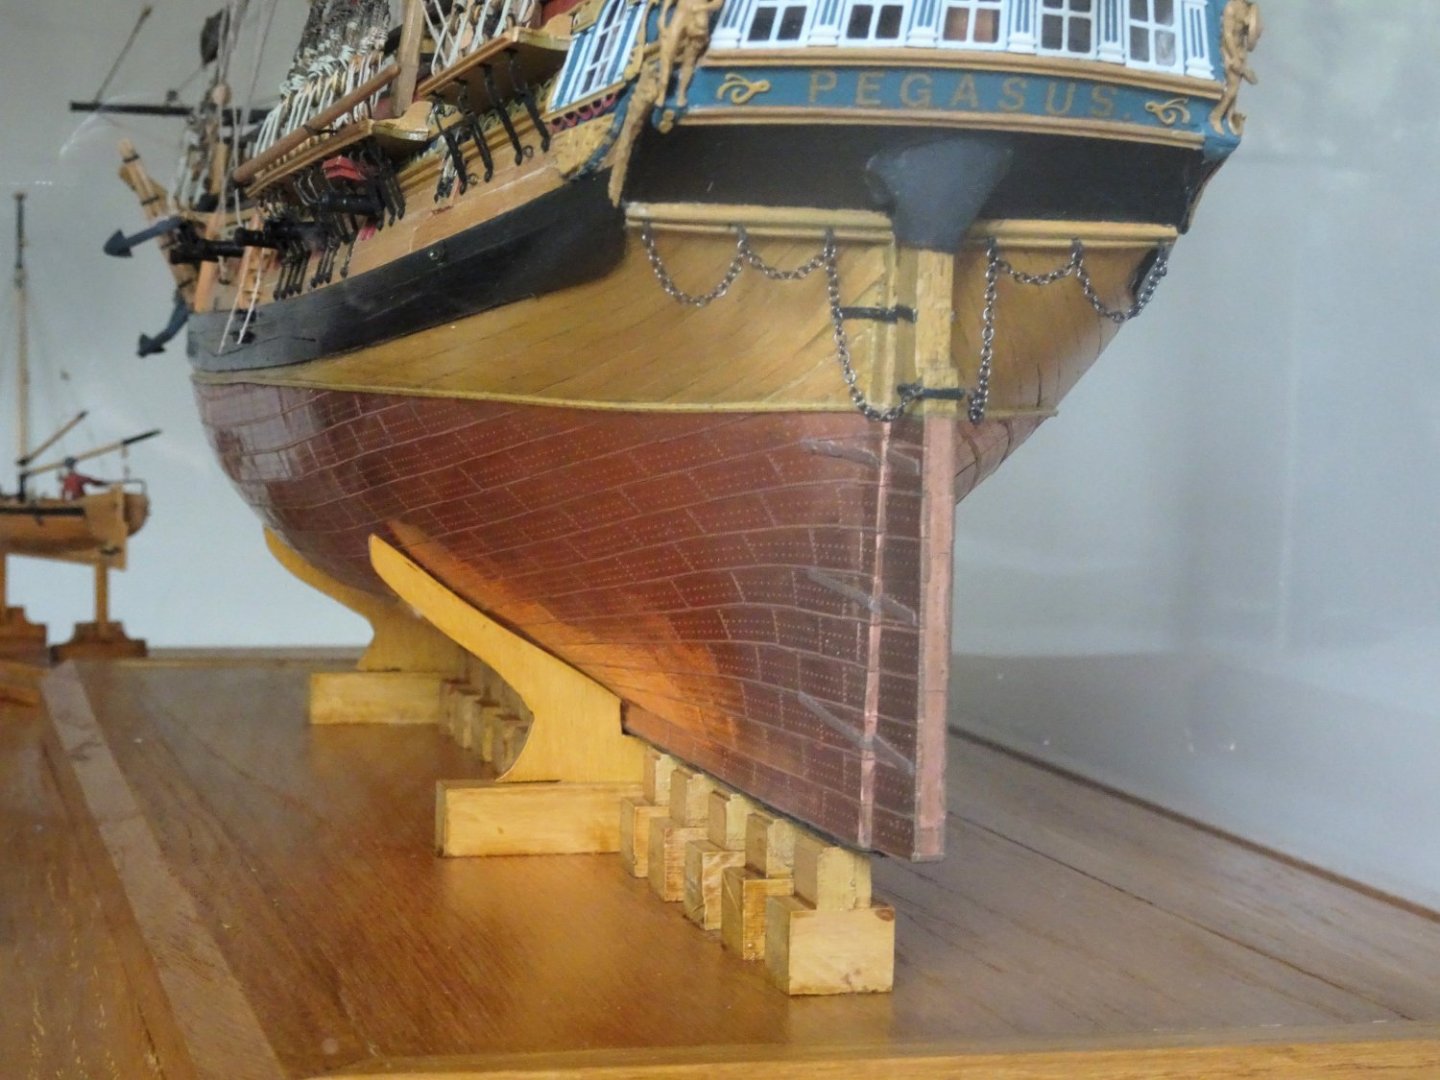
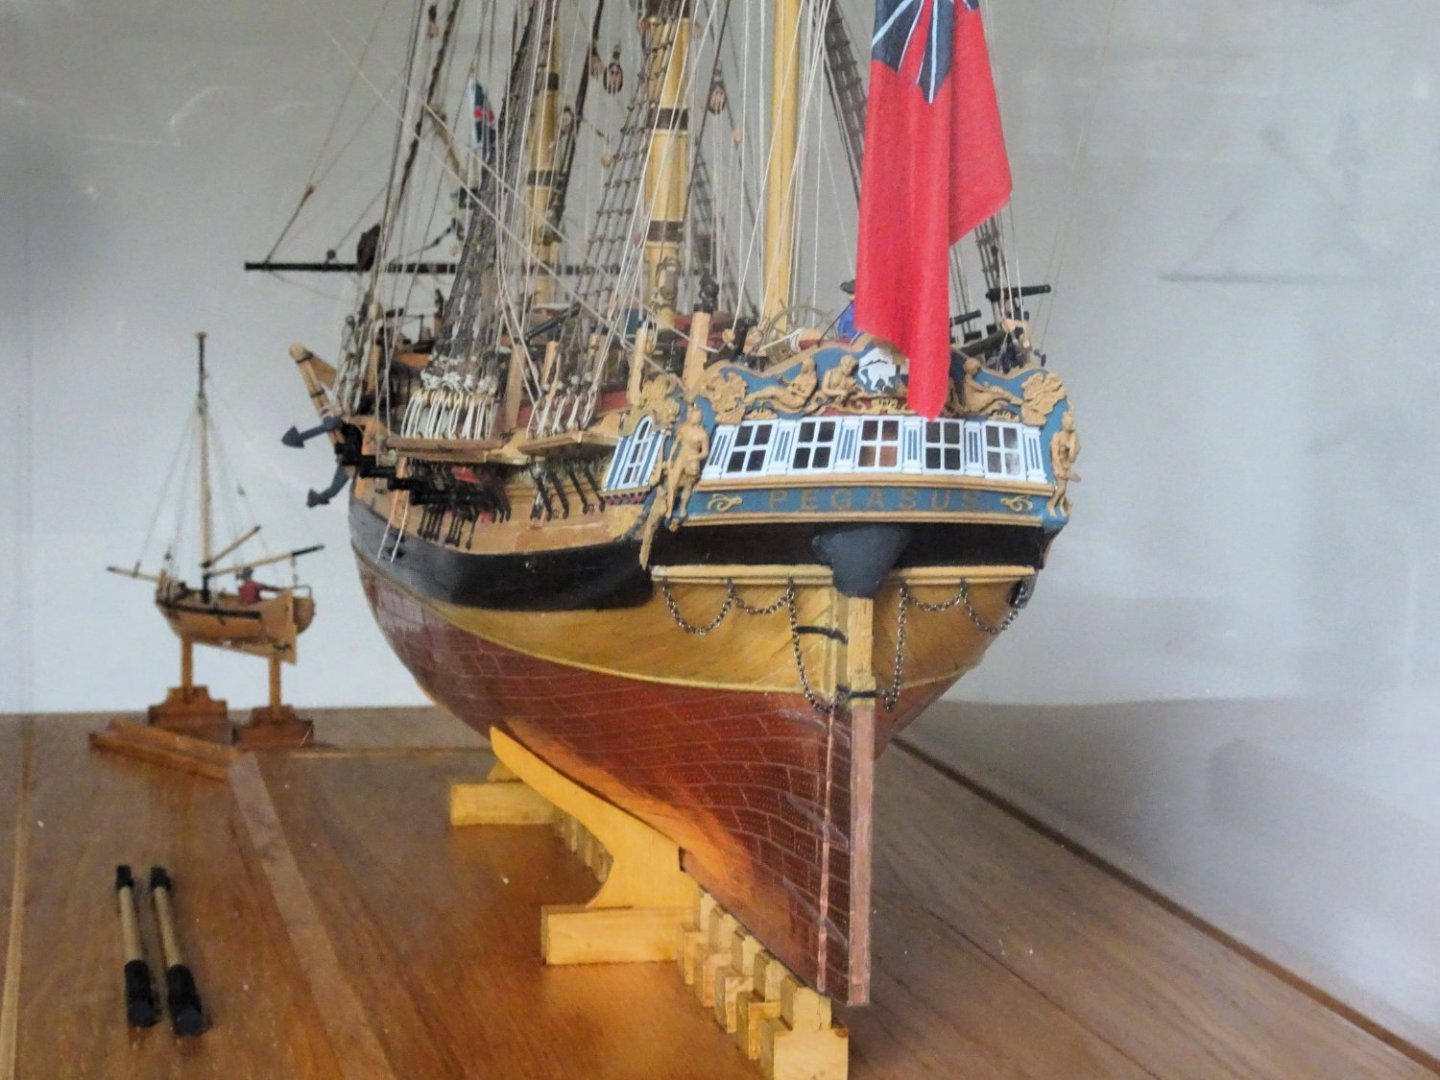
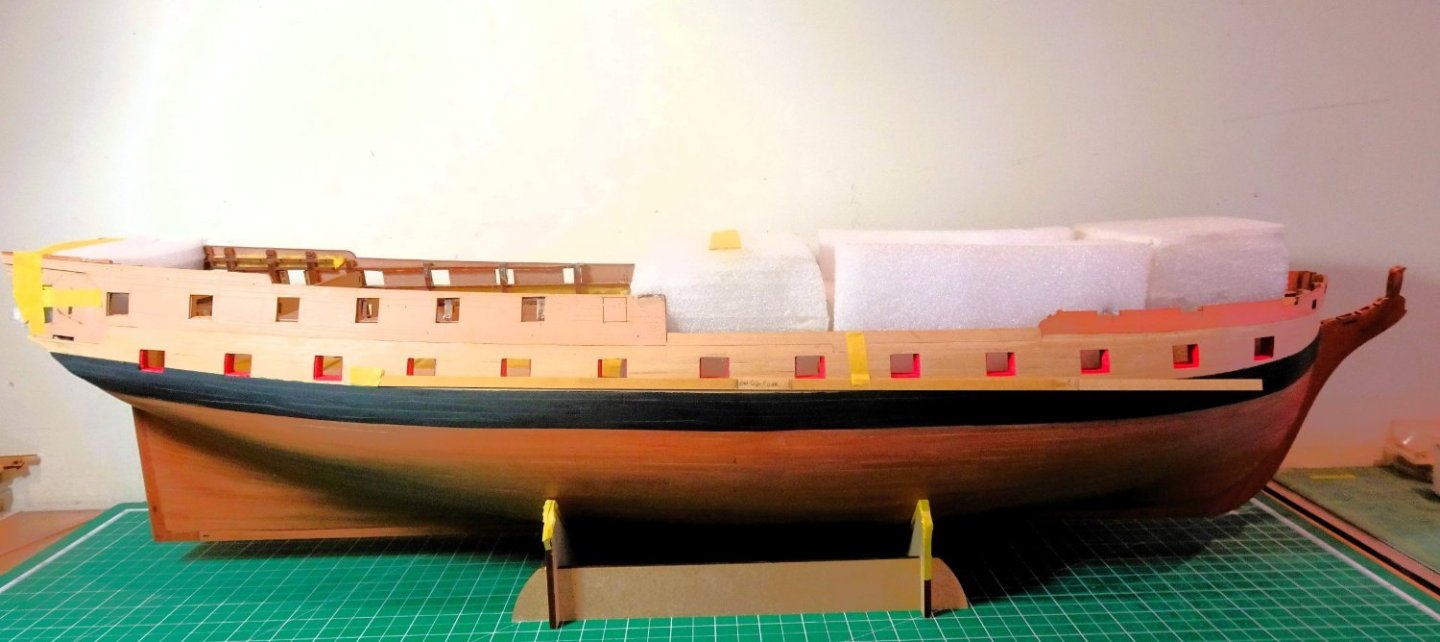
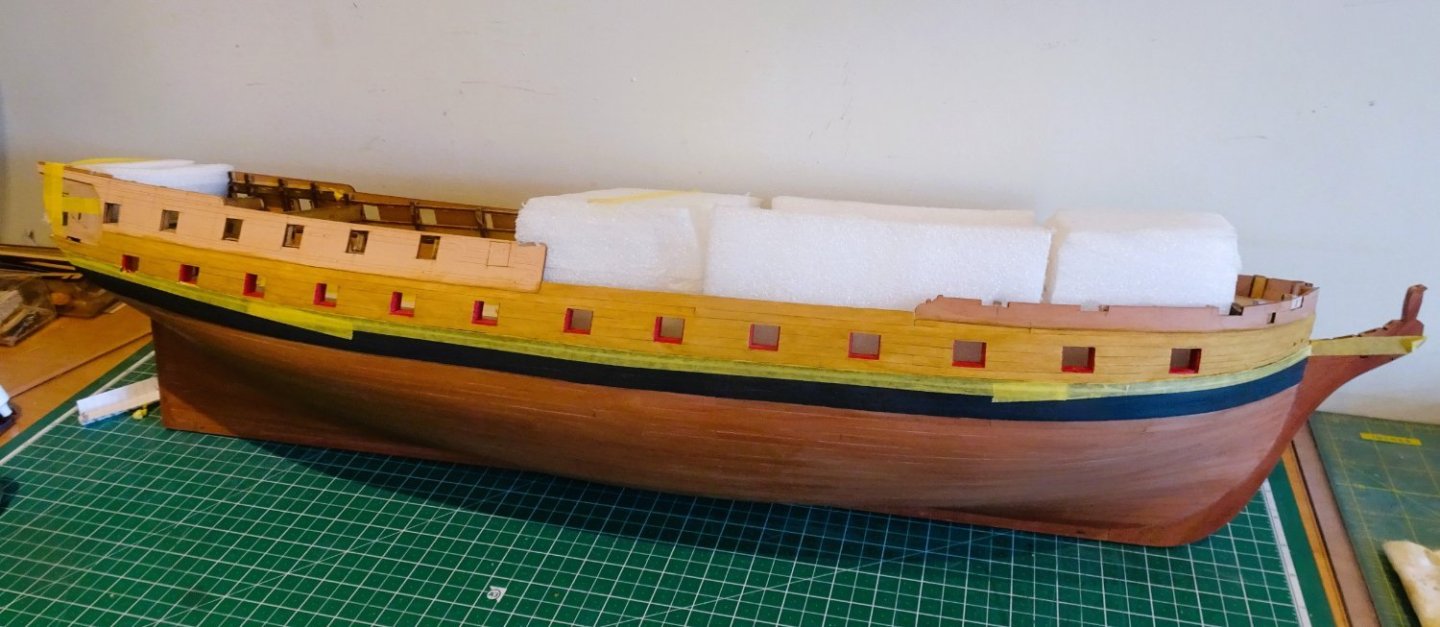
Post Fifty-two Copper To copper or not to copper that is the question. If to copper, is poncing around with copper tape to produce around 2500 indented plates worth saving the £150 cost of pre-formed plates or is it a worthy expense to preserve what remains of my sanity. Is it even worth bothering with nail indents at this scale? 023 (2011) I last coppered a ship back in 2011 with my Pegasus build. Once the plates were cleaned they were left to patinate naturally. I was pleased with the indented Amati plates which don’t look overscale to my eye. The Amati plates were also handed, and accommodated the overlap, without having to overlap, by having the indented perimeter nail heads on only two sides. These are not to be confused with the much pimpled copper plates supplied by Caldercraft, as used on their Pickle kit and others. I’m amazed they continue to issue this less than convincing version. I suspect that the specific plate sets from Vanguard originate from Amati, but these sets have the nail indentations around all sides of the individual plates. For those who don’t wish to bother with tape, there is a saving to be had by using the Amati versions. Seven sets of handed plates (2548 in total) will cost around £95 (£13.63 per set from CMB) The rub is getting them, they seem to be hard to find in stock at present. 1410 (2023) 1411 (2023) Difficult to photograph thro’ her case cover but this is the natural oxidation effect after 12 years, not that much different over the years but pleasing enough. As usual I am racked with indecision; the ‘Indy’ hull is I think good enough to leave bare, but then I quite like the look of a coppered hull, and coppering adds hours of fun to the build time, increasing the time frame before I am tempted by the next wonderment to issue forth from the Forest of Dean. When in doubt do nowt; Having pondered overnight I have decided to plank the gun deck which won’t preclude me from inverting the hull for plating at a later stage, should I ever make my mind up.🙄 B.E. 16/07/2023
- 648 replies
-
- 16
-
-
- Indefatigable
- Vanguard Models
- (and 1 more)
-
Thanks Ron, I usually do a preliminary check and sort of wood strips. The Pear I got from Hobbymill EU was very consistent for colour, and I just used it as it came, it worked out fine. Staining always has a risk, and in some areas on the port side Boxwood it came out patchy. A re-scrape, and re-application sorted the problem. B.E
- 648 replies
-
- 3
-
-
- Indefatigable
- Vanguard Models
- (and 1 more)
-
I do have some Vallejo Acrylic Varnish. I am interested to know why this is applied before the scraping. Read the post again Glenn. B.E.
- 587 replies
-
- 2
-
-
- Indefatigable
- Vanguard Models
- (and 1 more)
-
Glad you enjoyed your hols Glenn, and that your back is improving. A good scraping will make a world of difference to the deck, but I would be very cautious about applying wood stain, you may find it results in patchiness, beyond the natural colour tones of the wood. With Boxwood (which I always use for decks) I use a water based matt varnish following scraping. Admiralty paints used to do a flat matt varnish, but on Sphinx I used Vallejo Matt Acrylic Varnish. ps nice job on relocating those gun securing slots around the margin. B.E.
- 587 replies
-
- 3
-
-
-
- Indefatigable
- Vanguard Models
- (and 1 more)
-
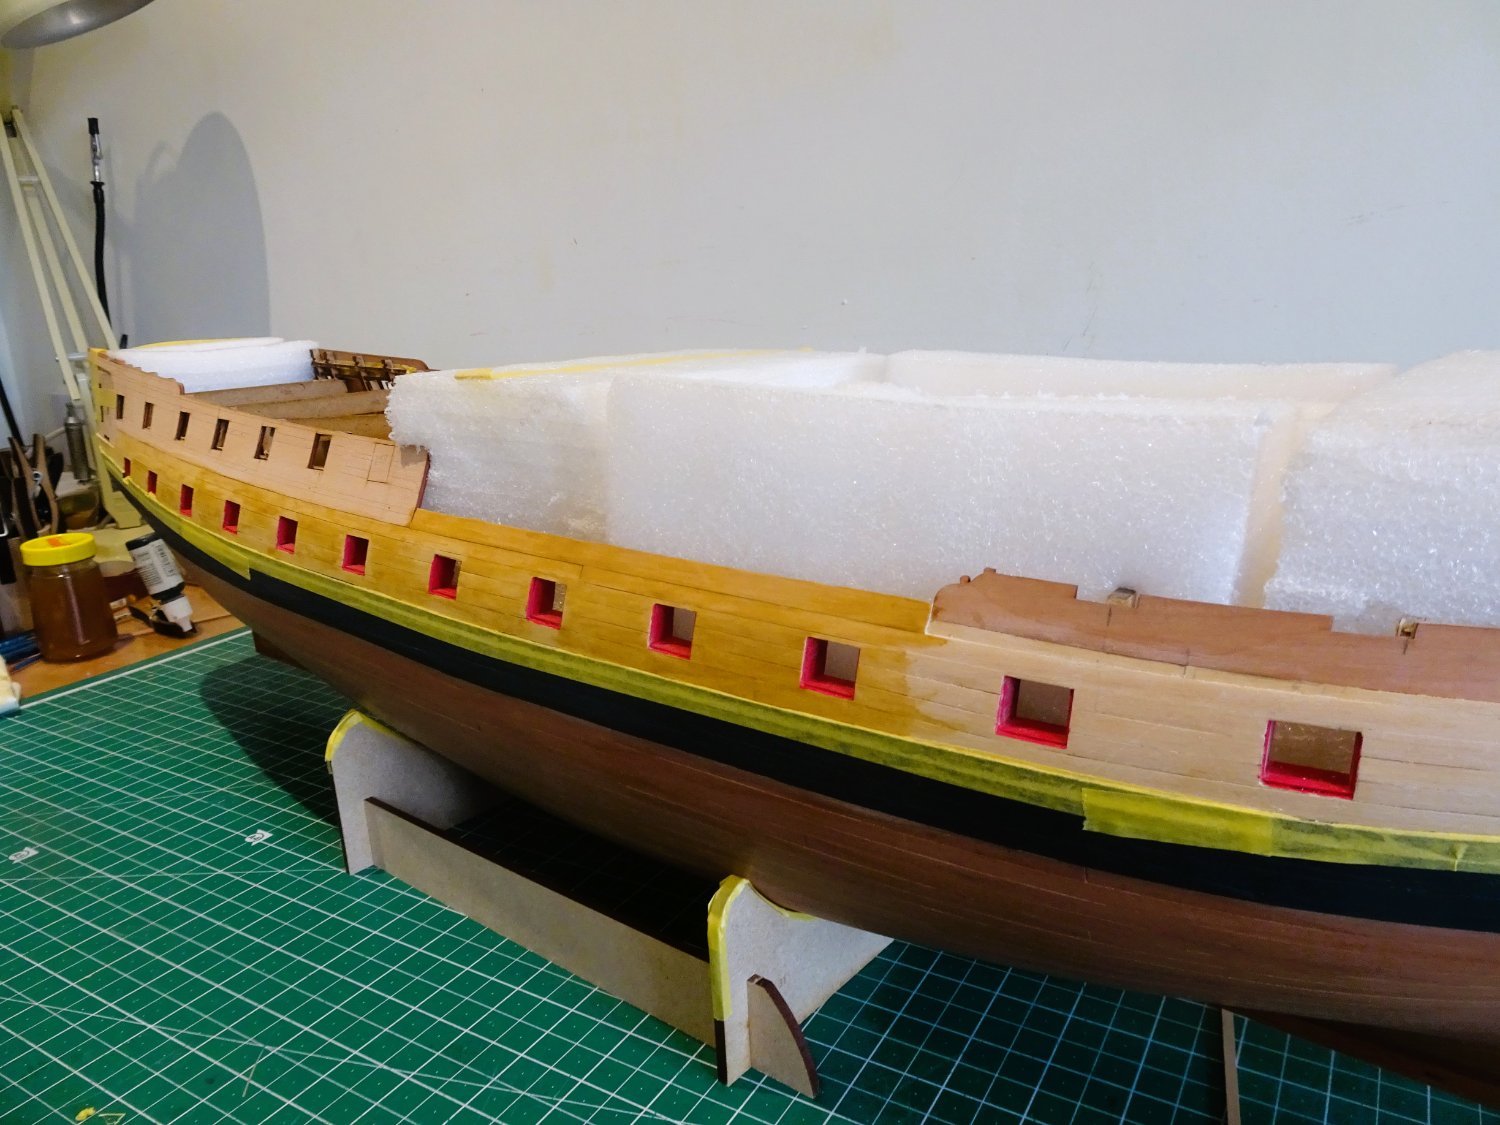
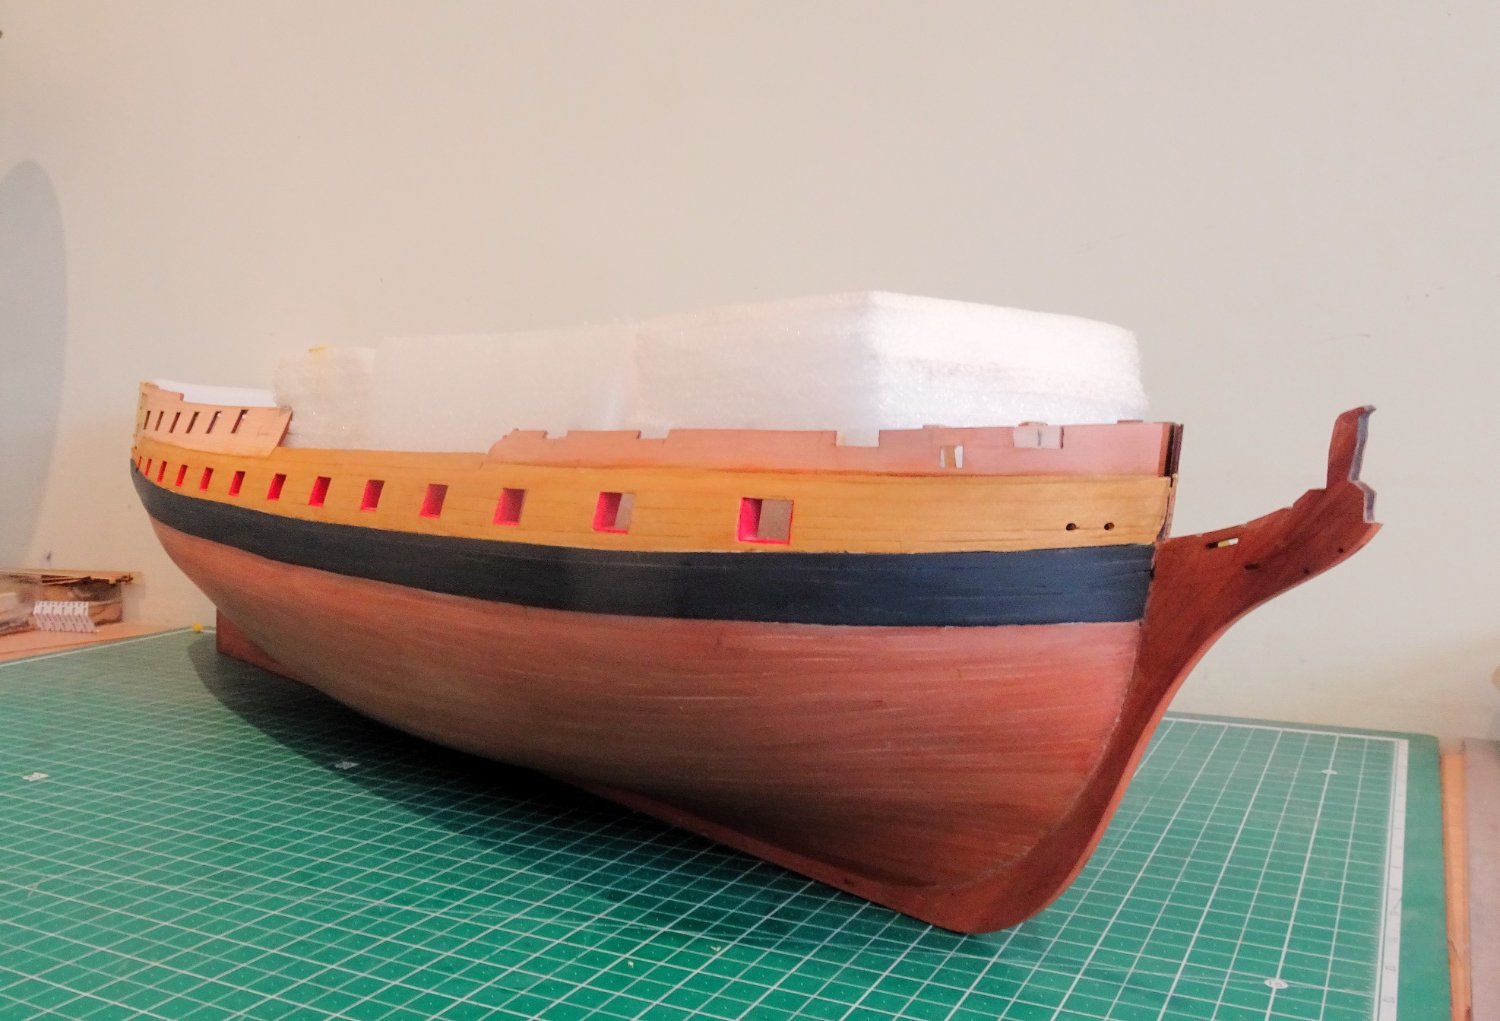
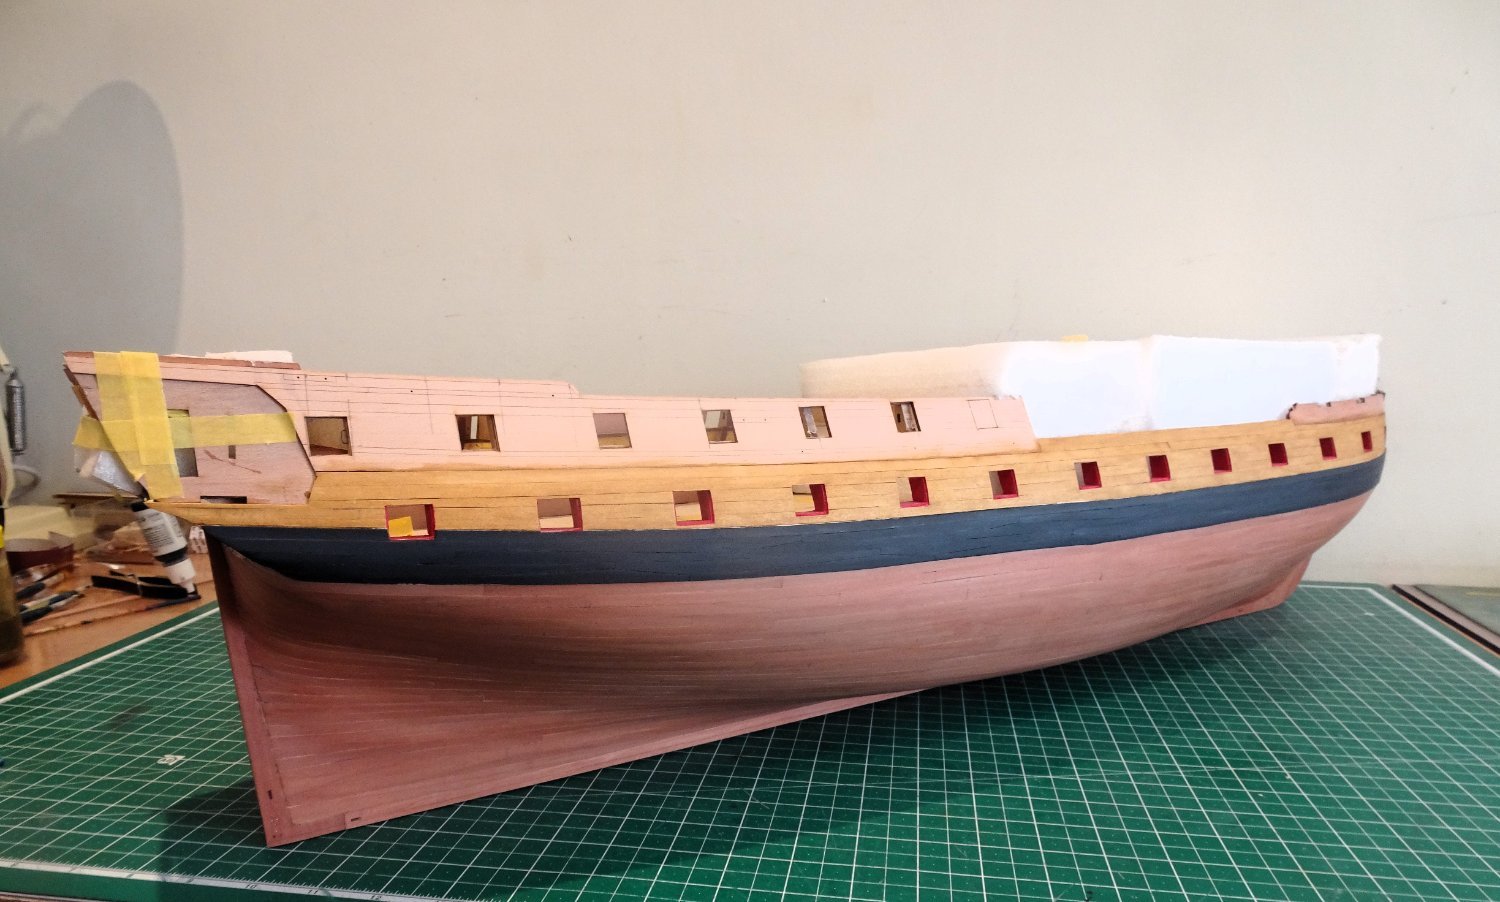
Post Fifty-one Boxwood hull planking I had in mind from the outset that the Boxwood above the wale planking would echo the ‘yellow paint generally applied to these vessels. Not that I will be following the realistic painting scheme of the era. As a Navy Board style model I will apply a degree of artistic licence, and follow the tradition of contemporary models in using minimal paint. This also means that I will allow the natural boxwood planking to follow the sheer rather than the deck line paint job which was the fashion of the time. The Topsides consist of pre-cut Pearwood sheets of plain wood with added mouldings and rails. At the lower edge a rail below the channel line will cover the join between pear and Box. 1424 In its bare form the Boxwood is too pale for my liking, so I have been looking at methods to enrich it somewhat. Application of w-o-p darkens the tone but not quite to the degree I have in mind. 1427 Having tested various combinations on Box strip I decided on using Colron English light oak Wood dye. 1428 Three coats have been applied by brush, immediately wiping off with a soft cloth. A coat of w-o-p was then applied to seal the effect. 1432 1433 At this point the aftermost gunports have been fully cut into the wales which were then repainted. Onwards….. B.E. 15/07/2023


- 648 replies
-
- 19
-
-
- Indefatigable
- Vanguard Models
- (and 1 more)
-
Hi Chris, What’s the difference with these to the kit supplied version? B.E.