Supplies of the Ship Modeler's Handbook are running out. Get your copy NOW before they are gone! Click on photo to order.
×
.JPG.ca33079f5815b861e67b9c2cccd37982.JPG)

Blue Ensign
-
Posts
4,550 -
Joined
-
Last visited
Content Type
Profiles
Forums
Gallery
Events
Everything posted by Blue Ensign
-
 Always a good result when the Qtr galleries line up with the stern gallery, well done Kevin.👍 Fills me with dread whenever I approach that area of work, it's such an important feature of the hull. B.E.
- 443 replies
-
- 6
-

-
- Indefatigable
- Vanguard Models
- (and 1 more)
-
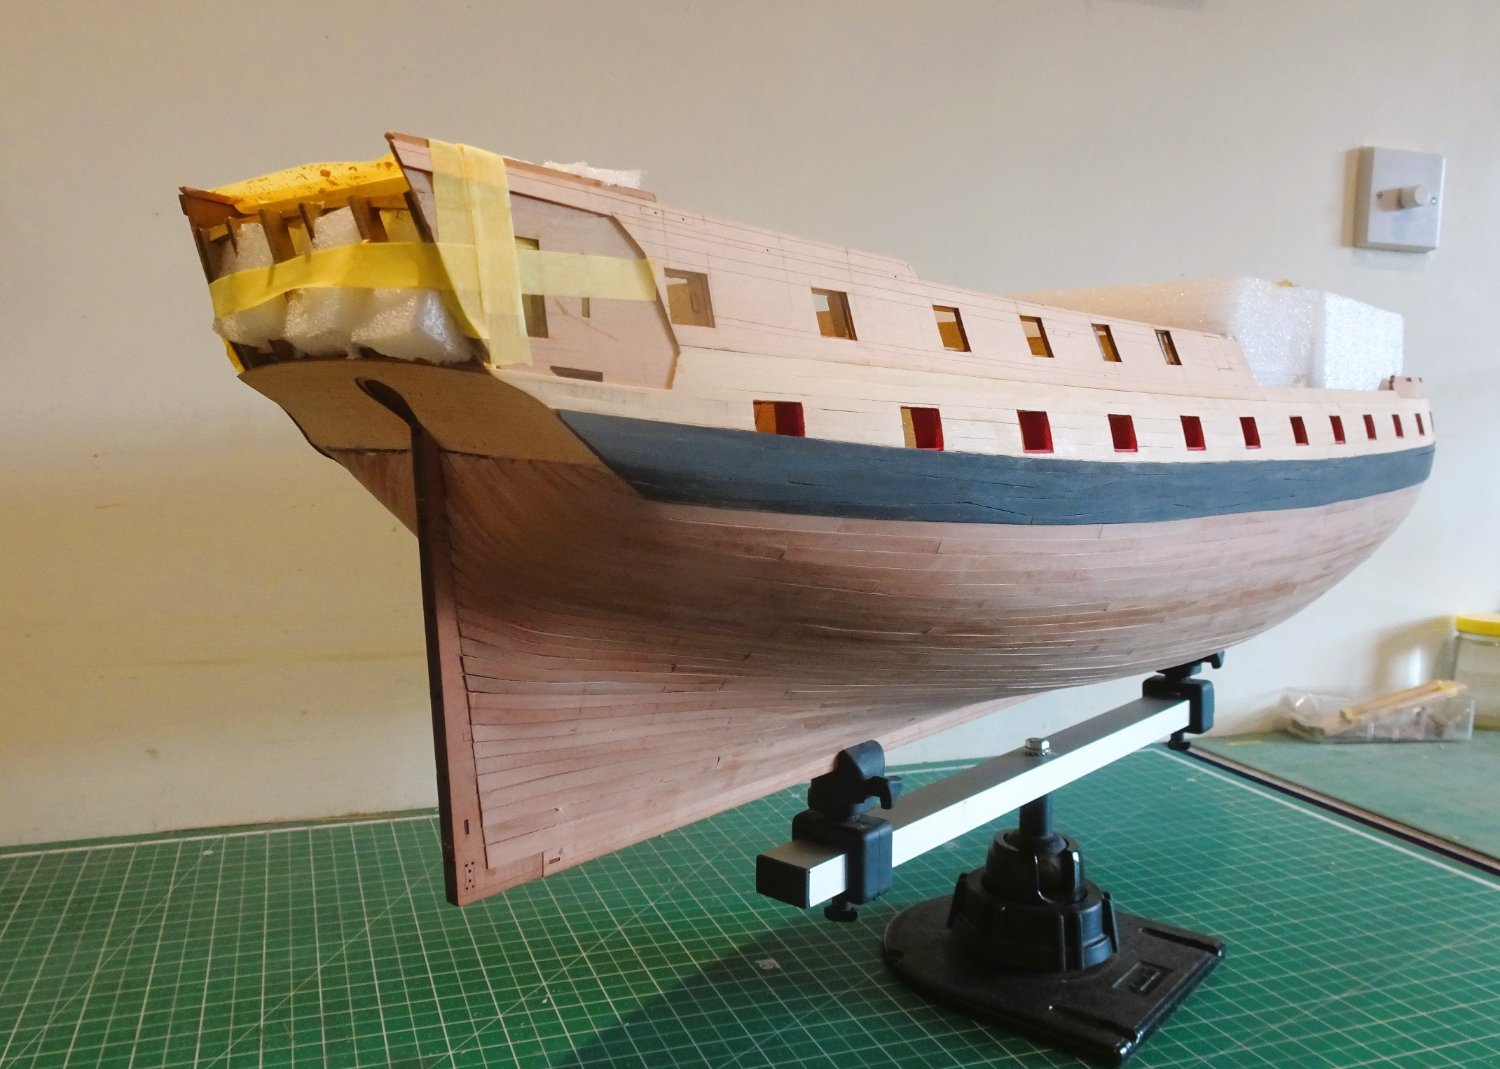
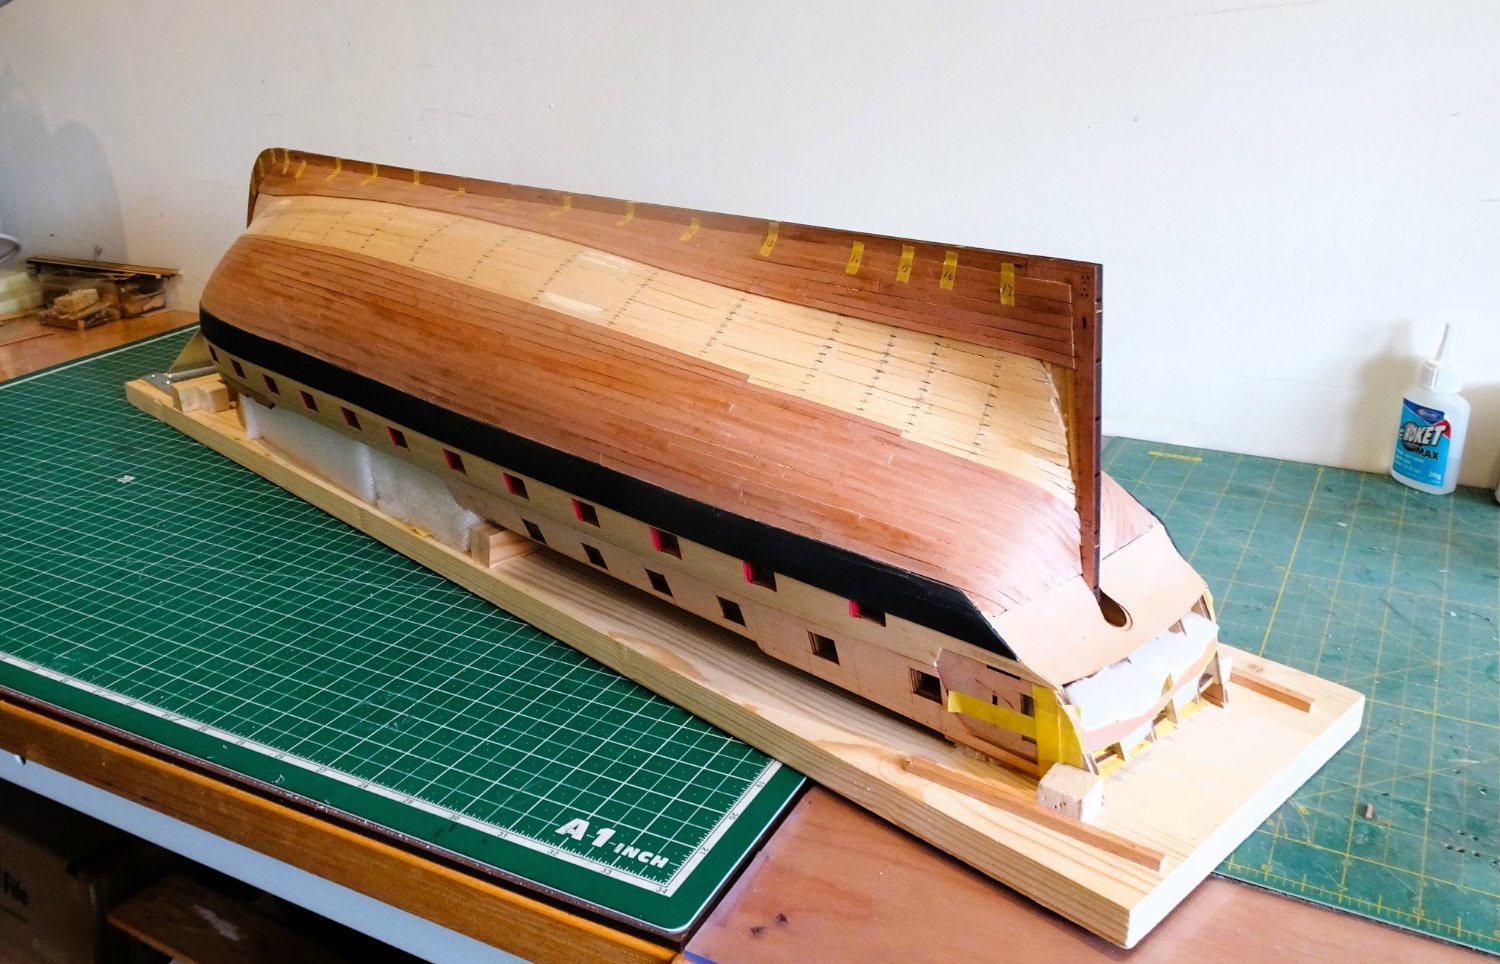
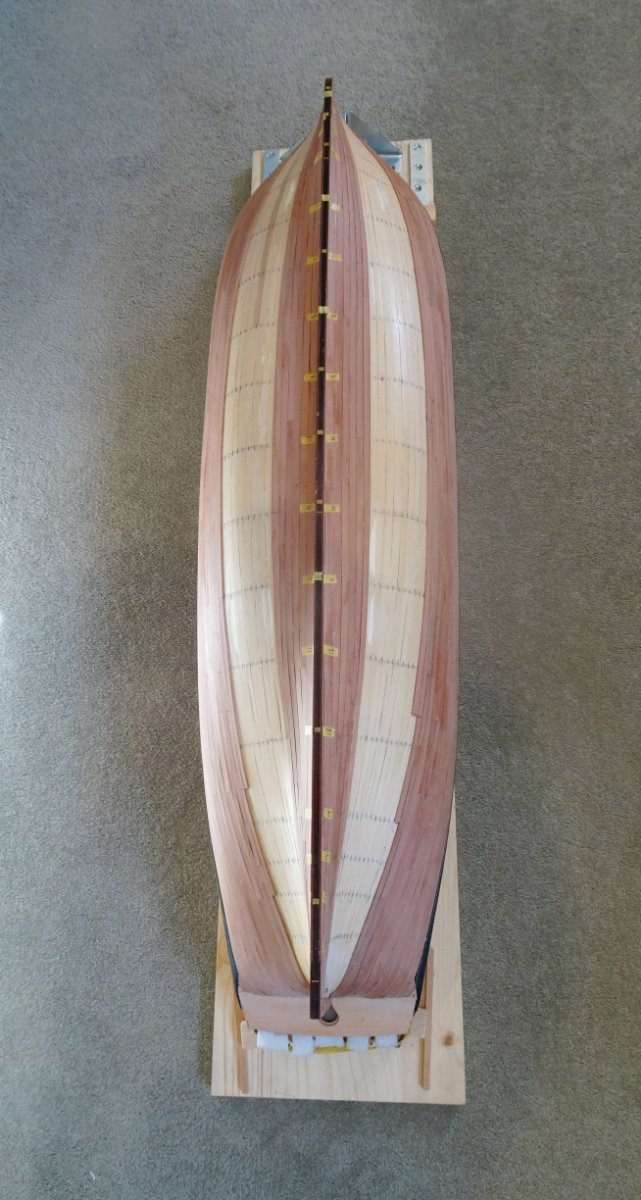
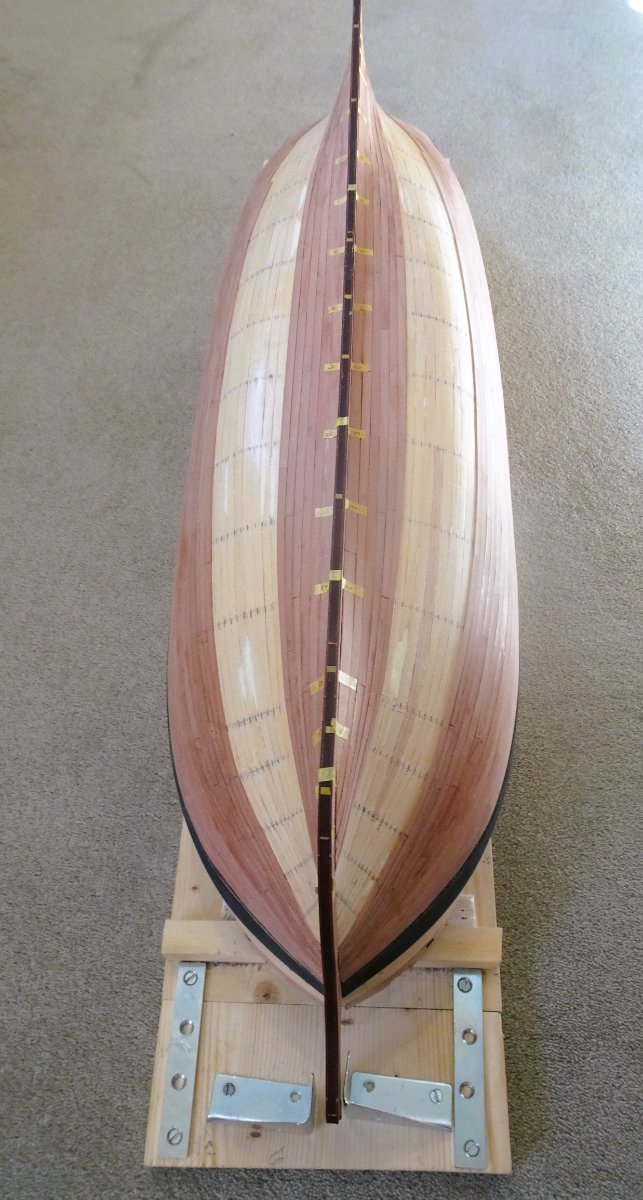
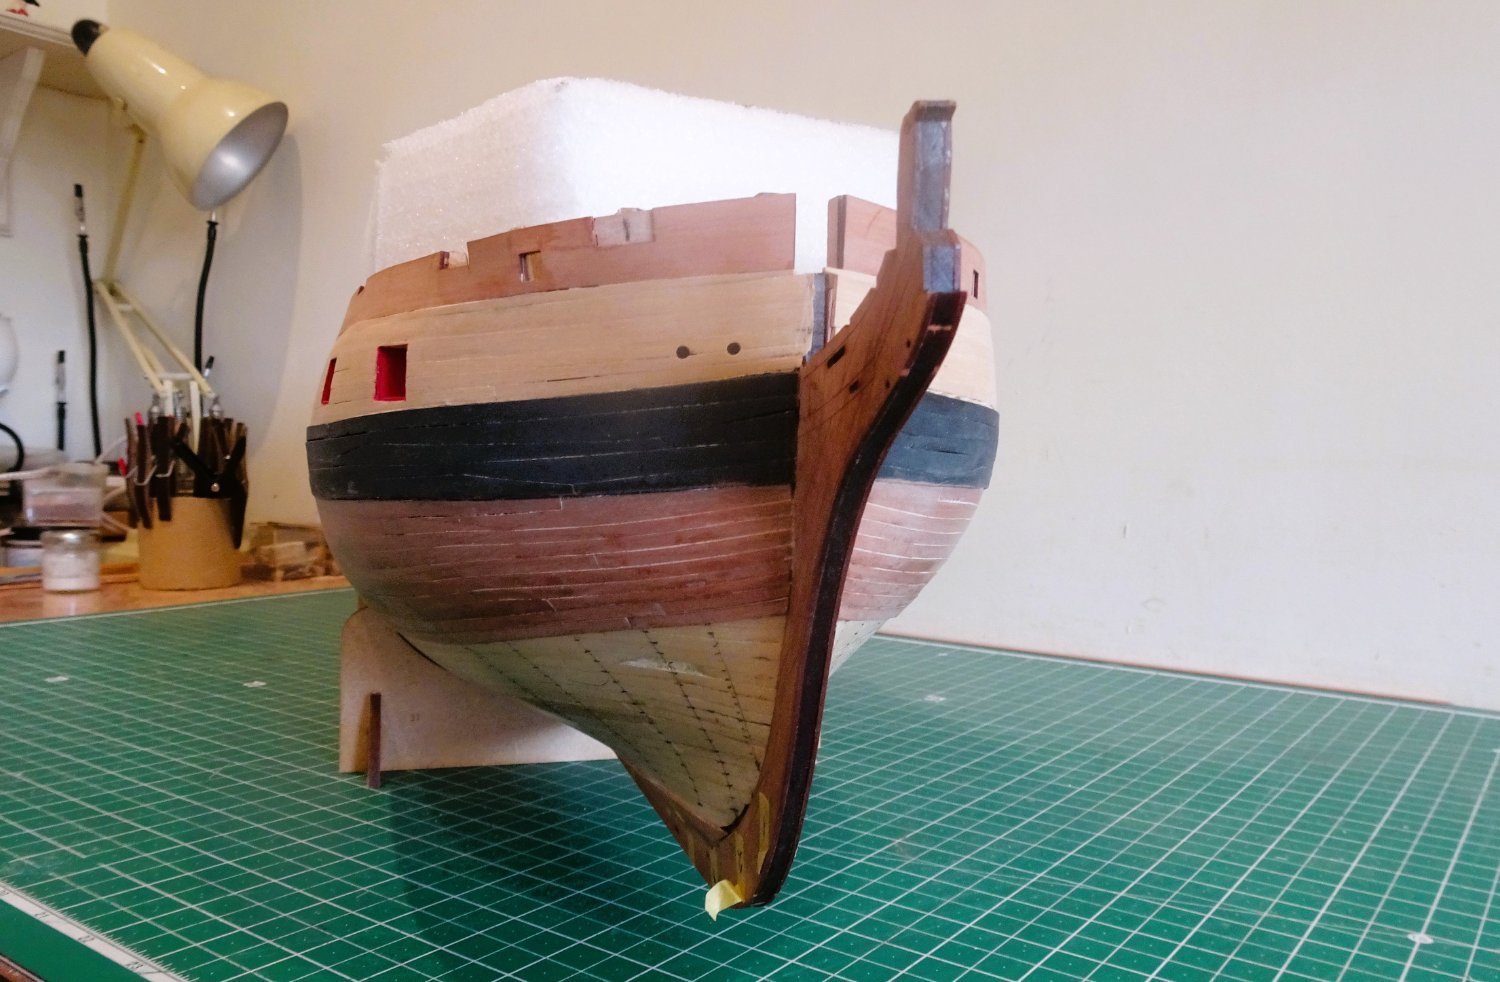
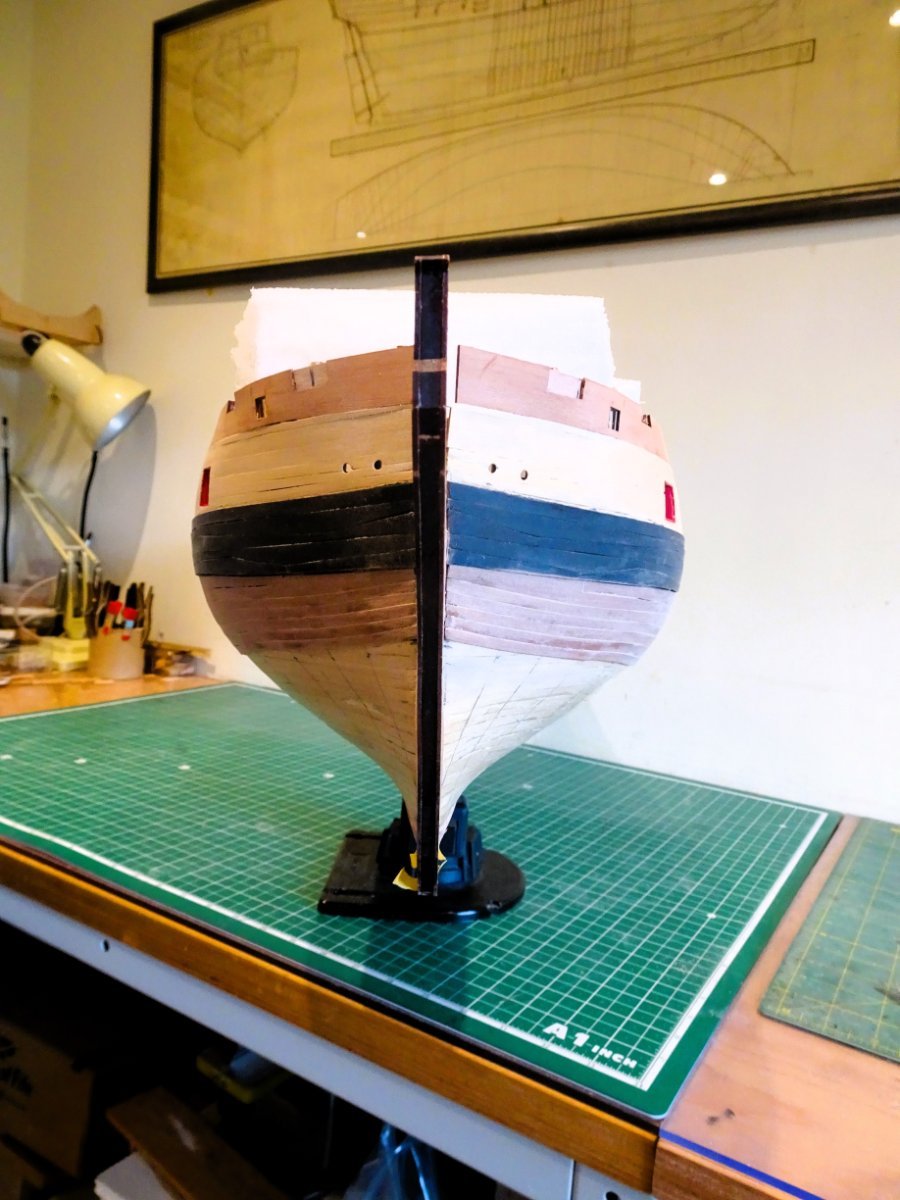
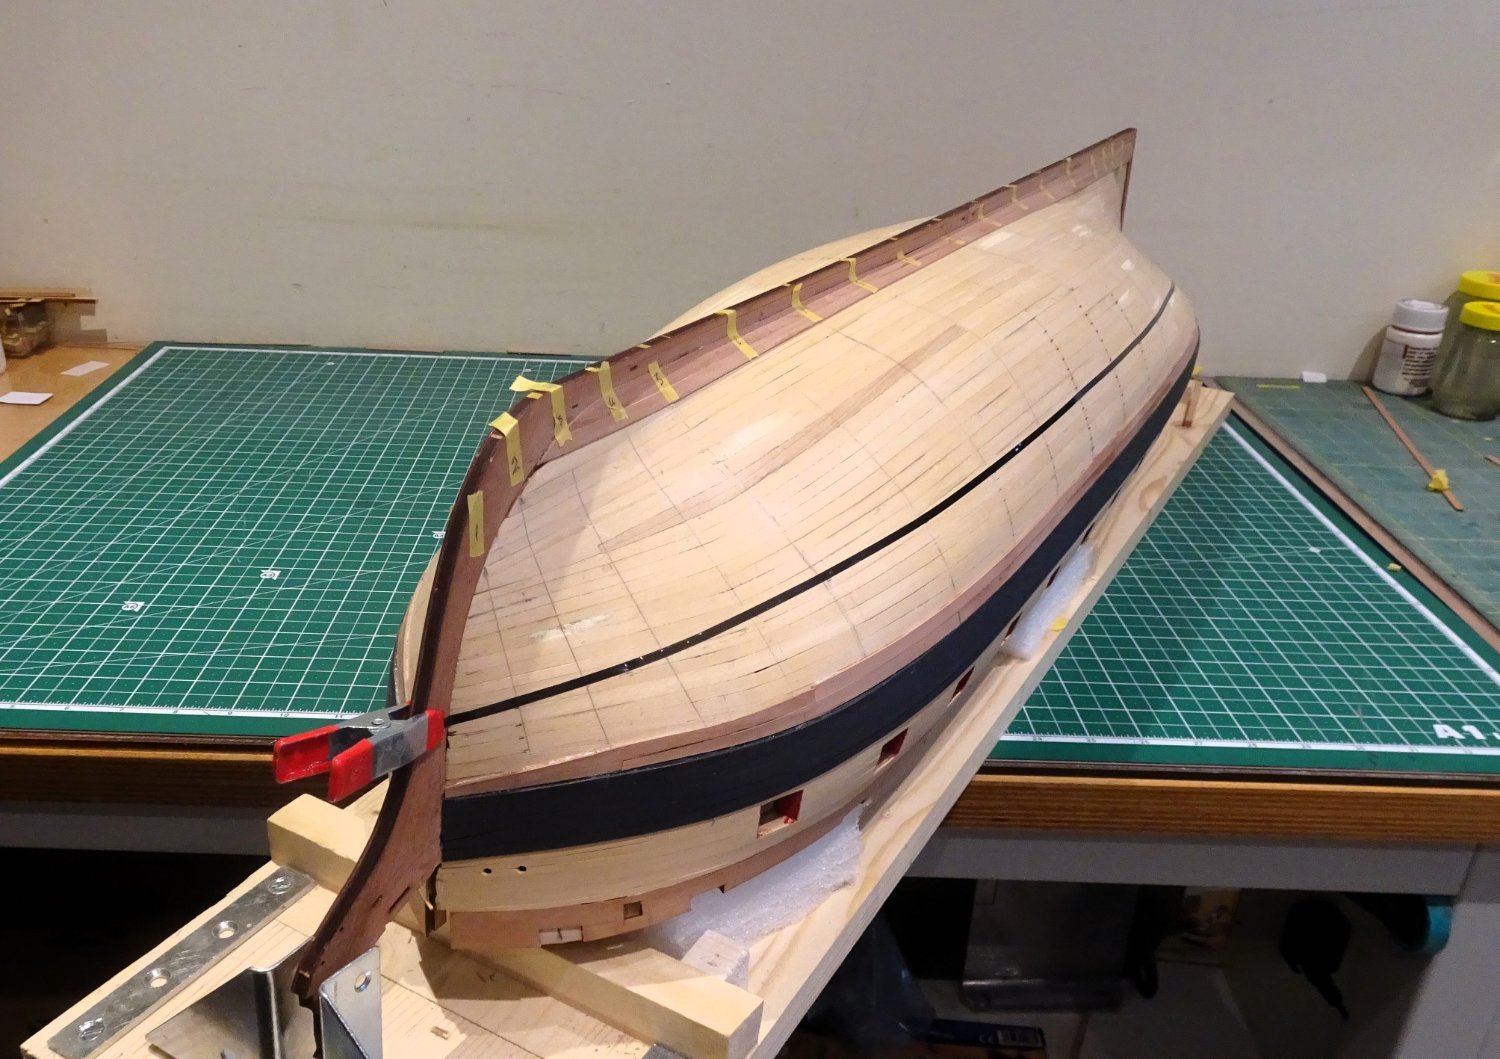
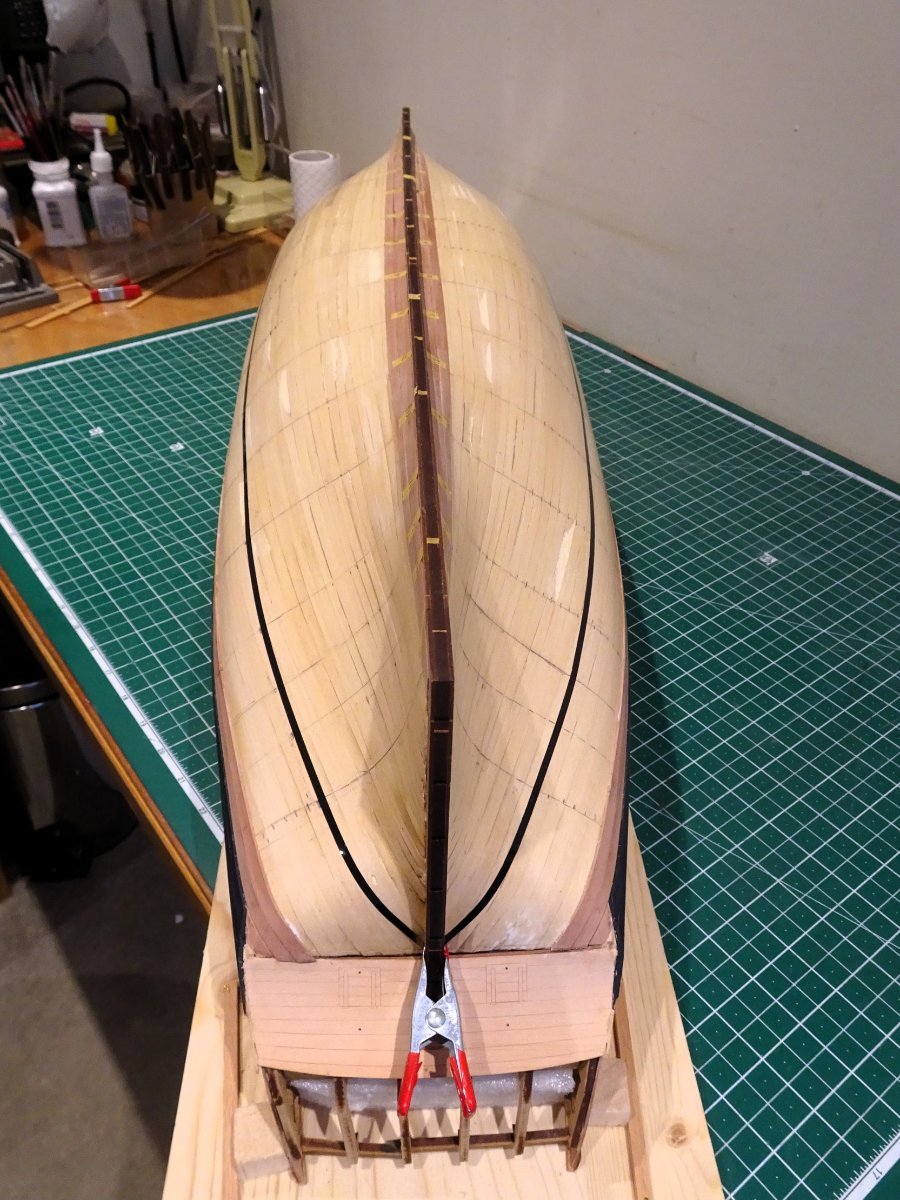
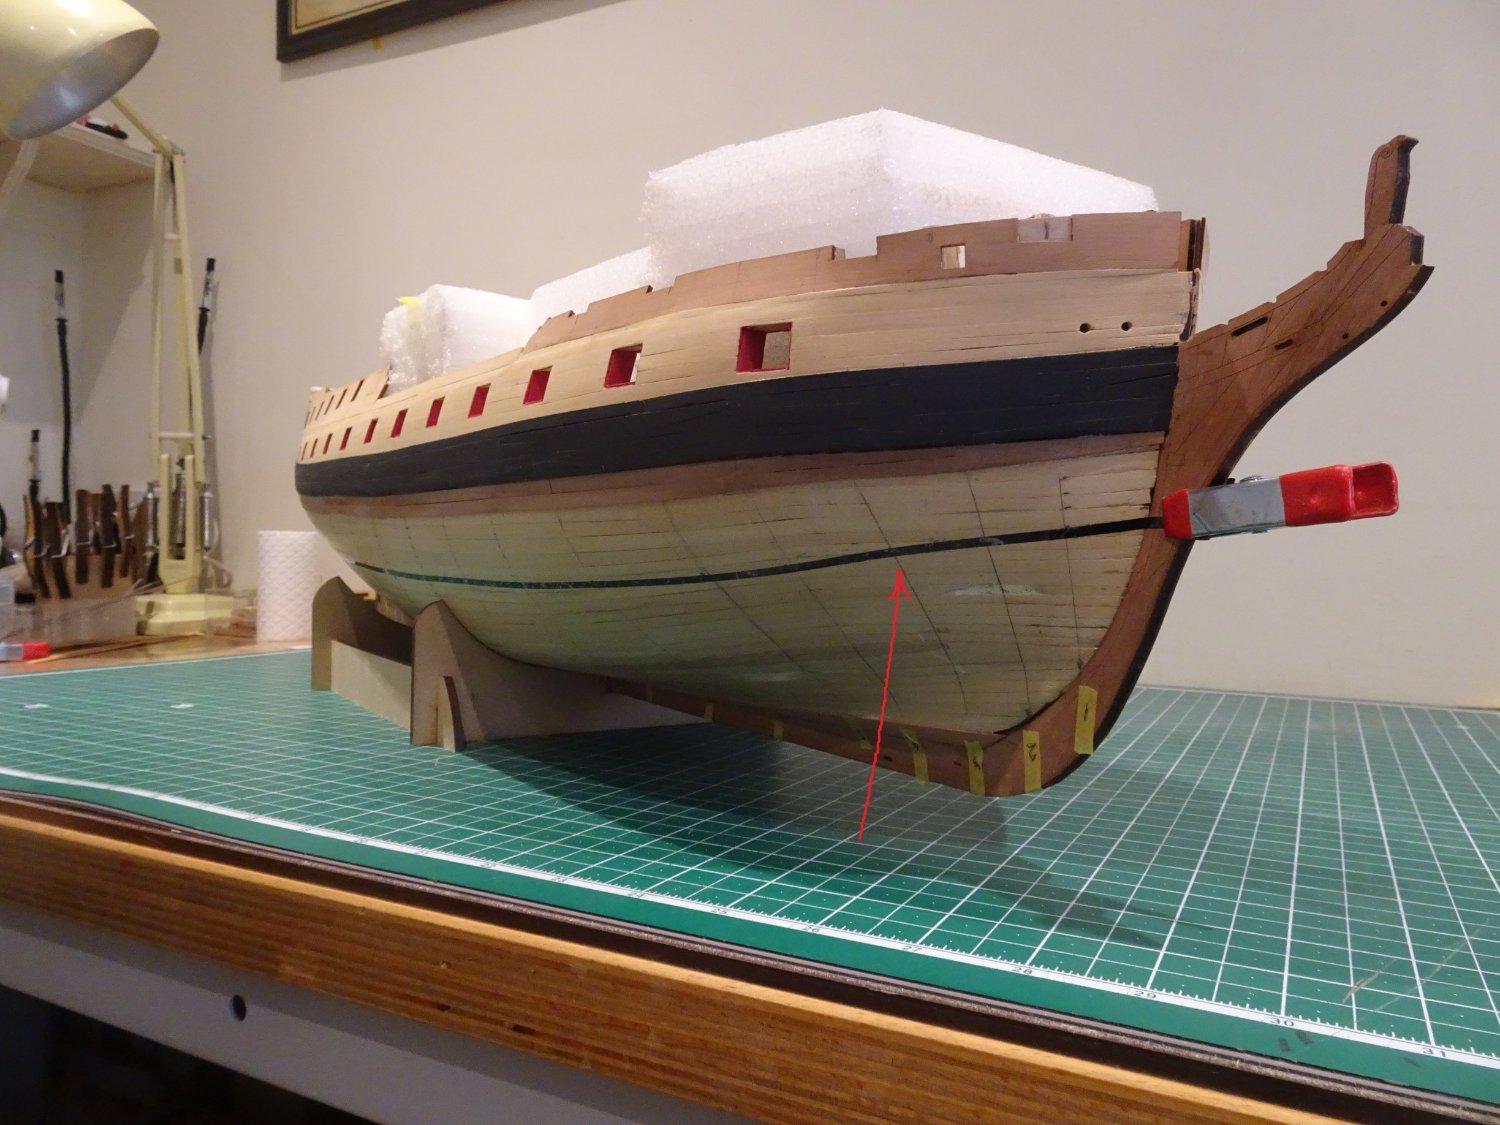
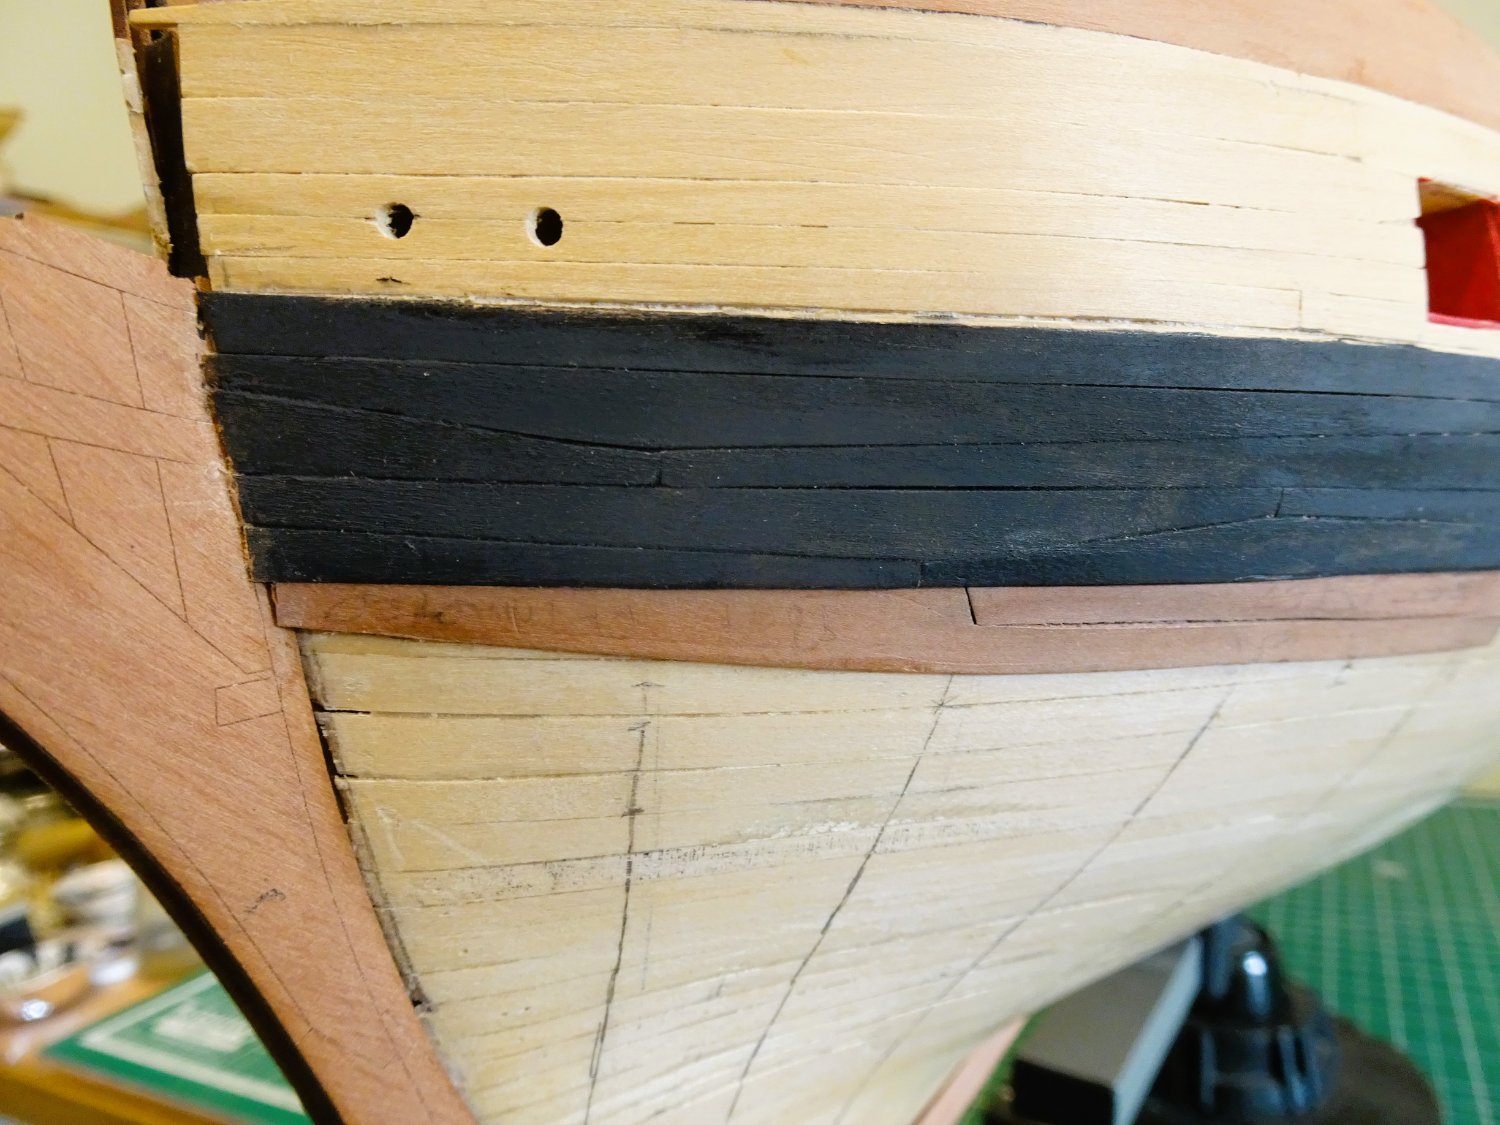
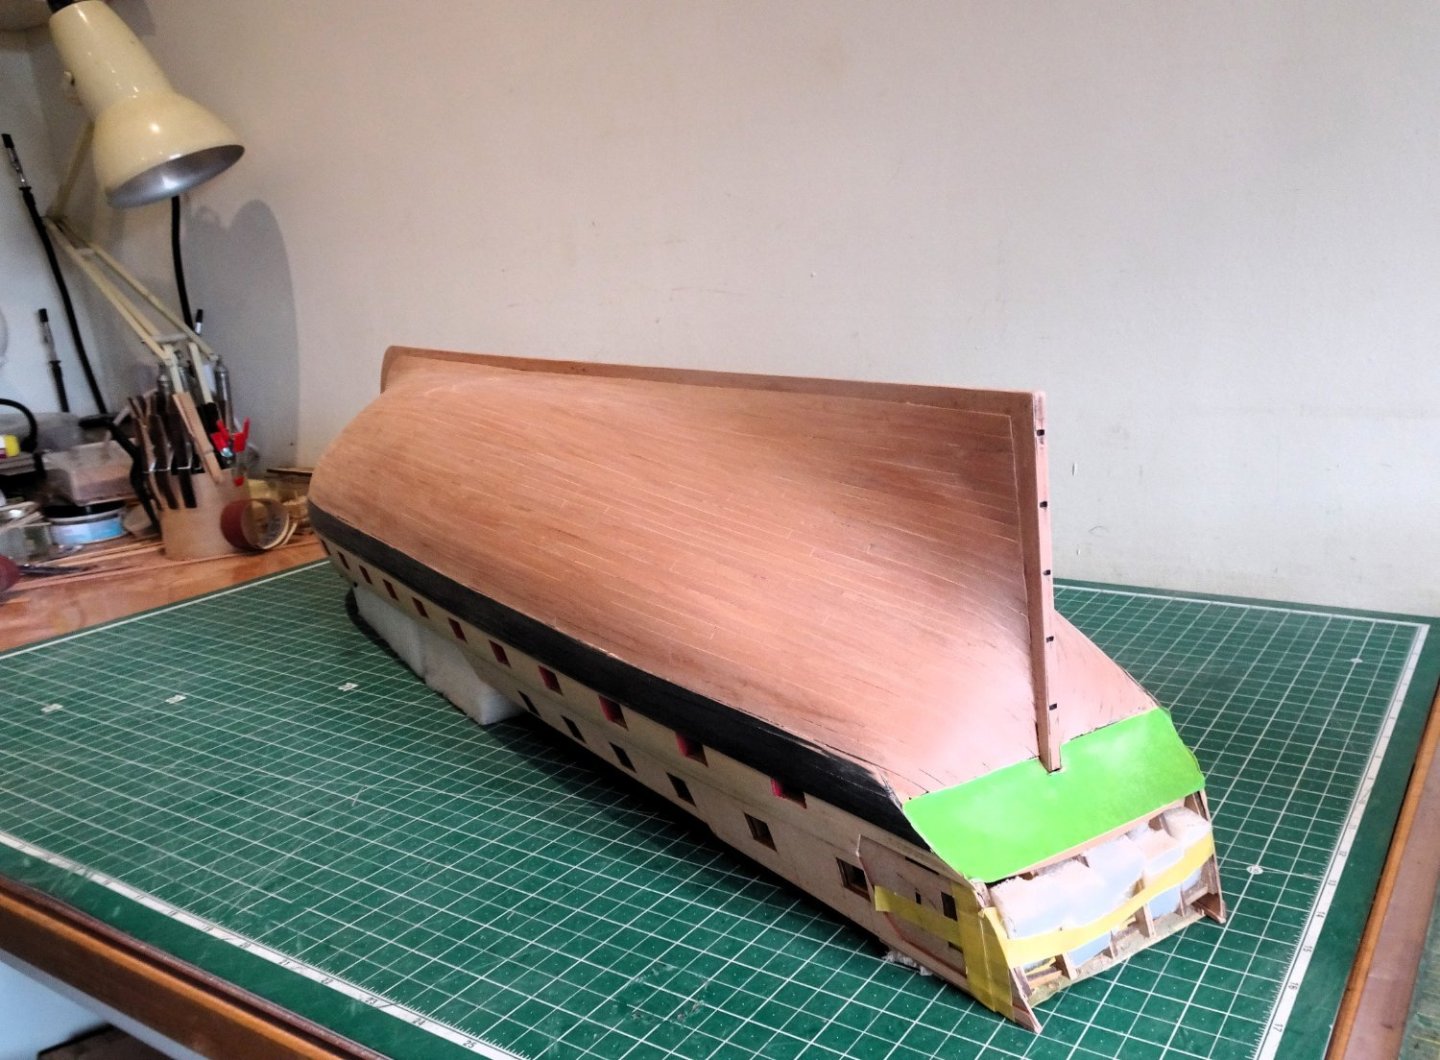
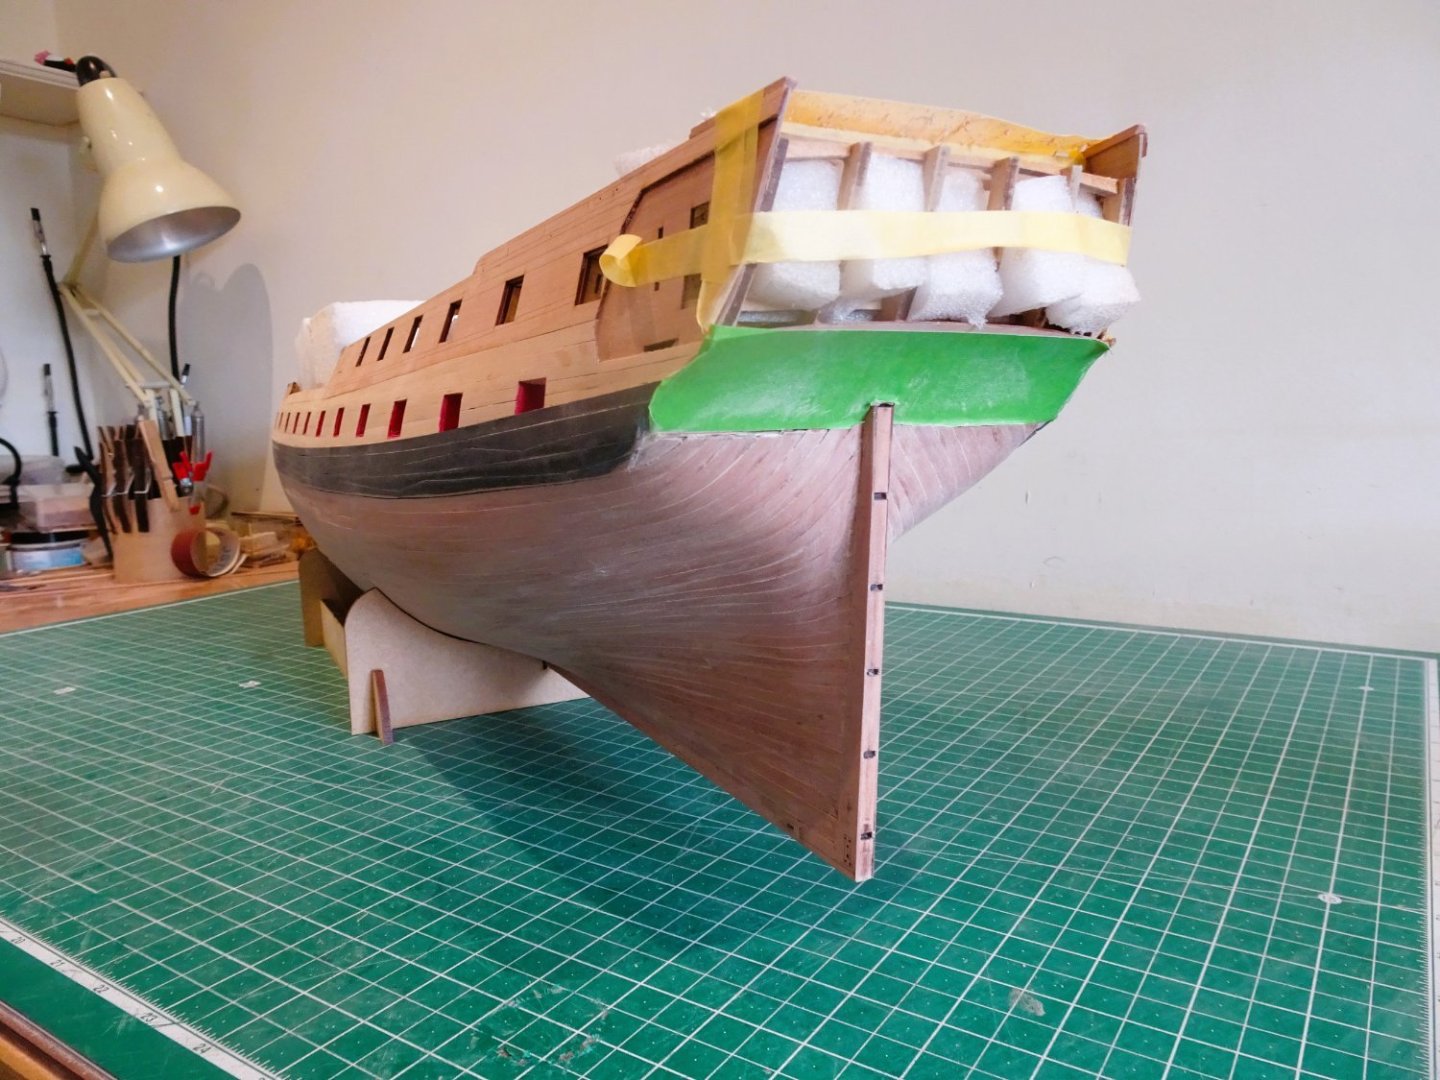
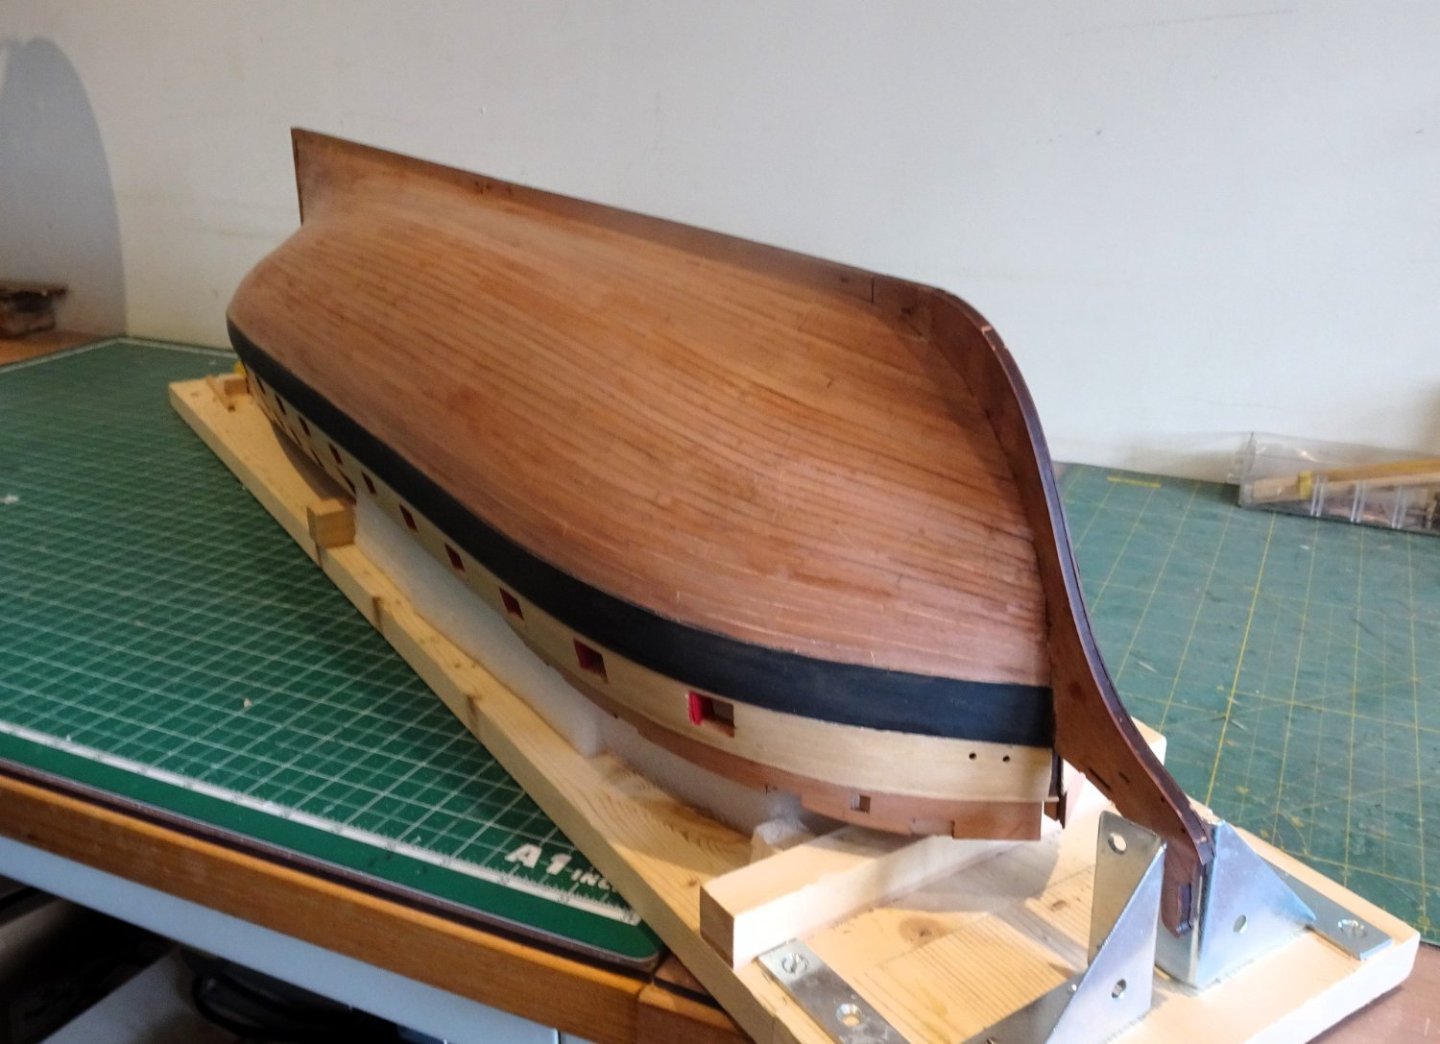
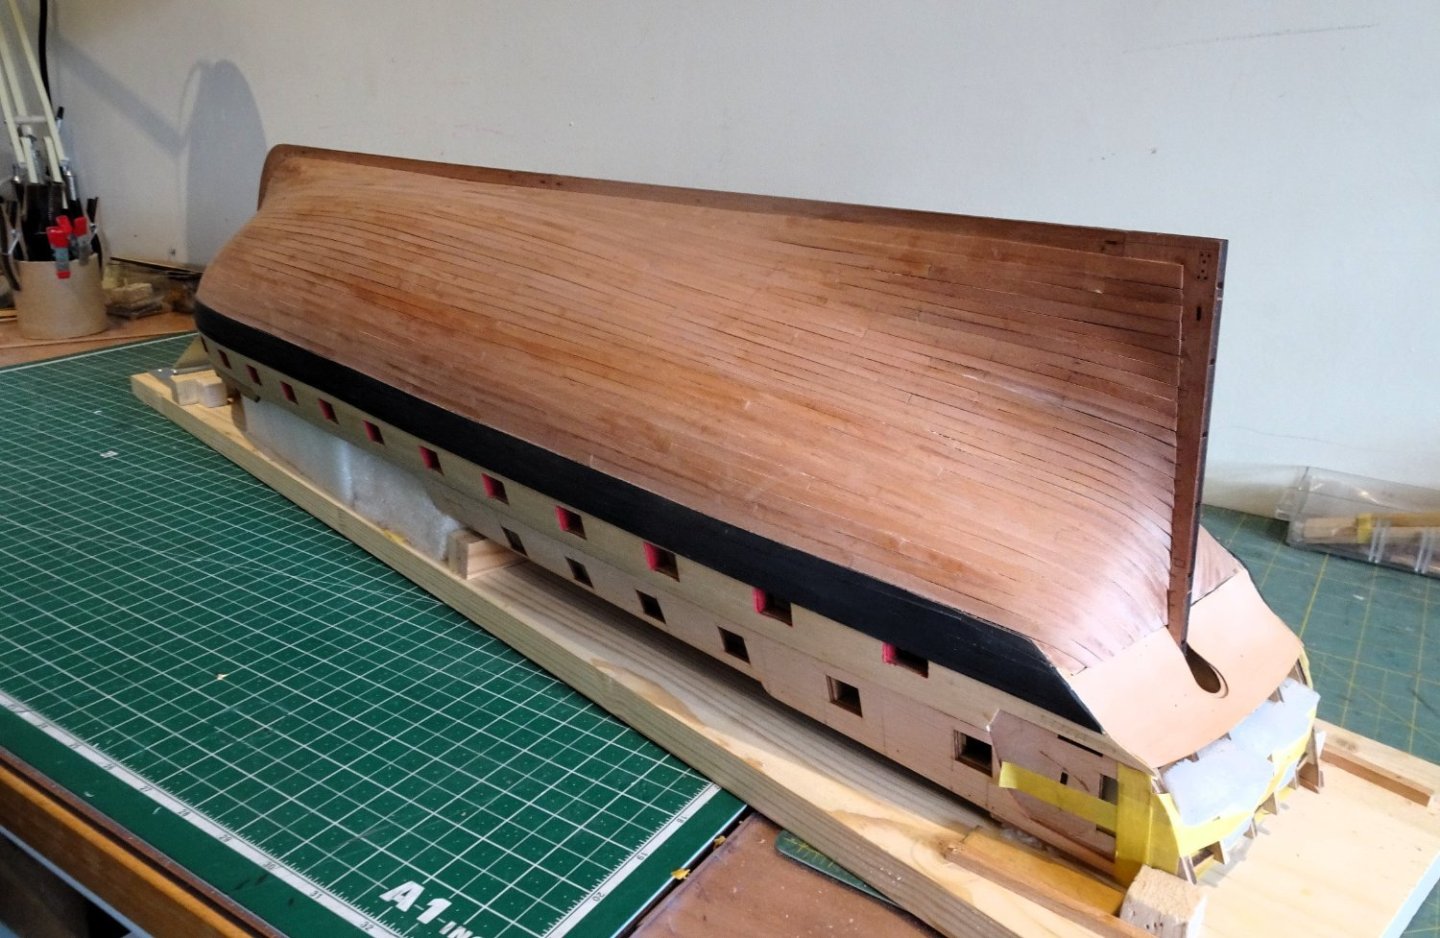
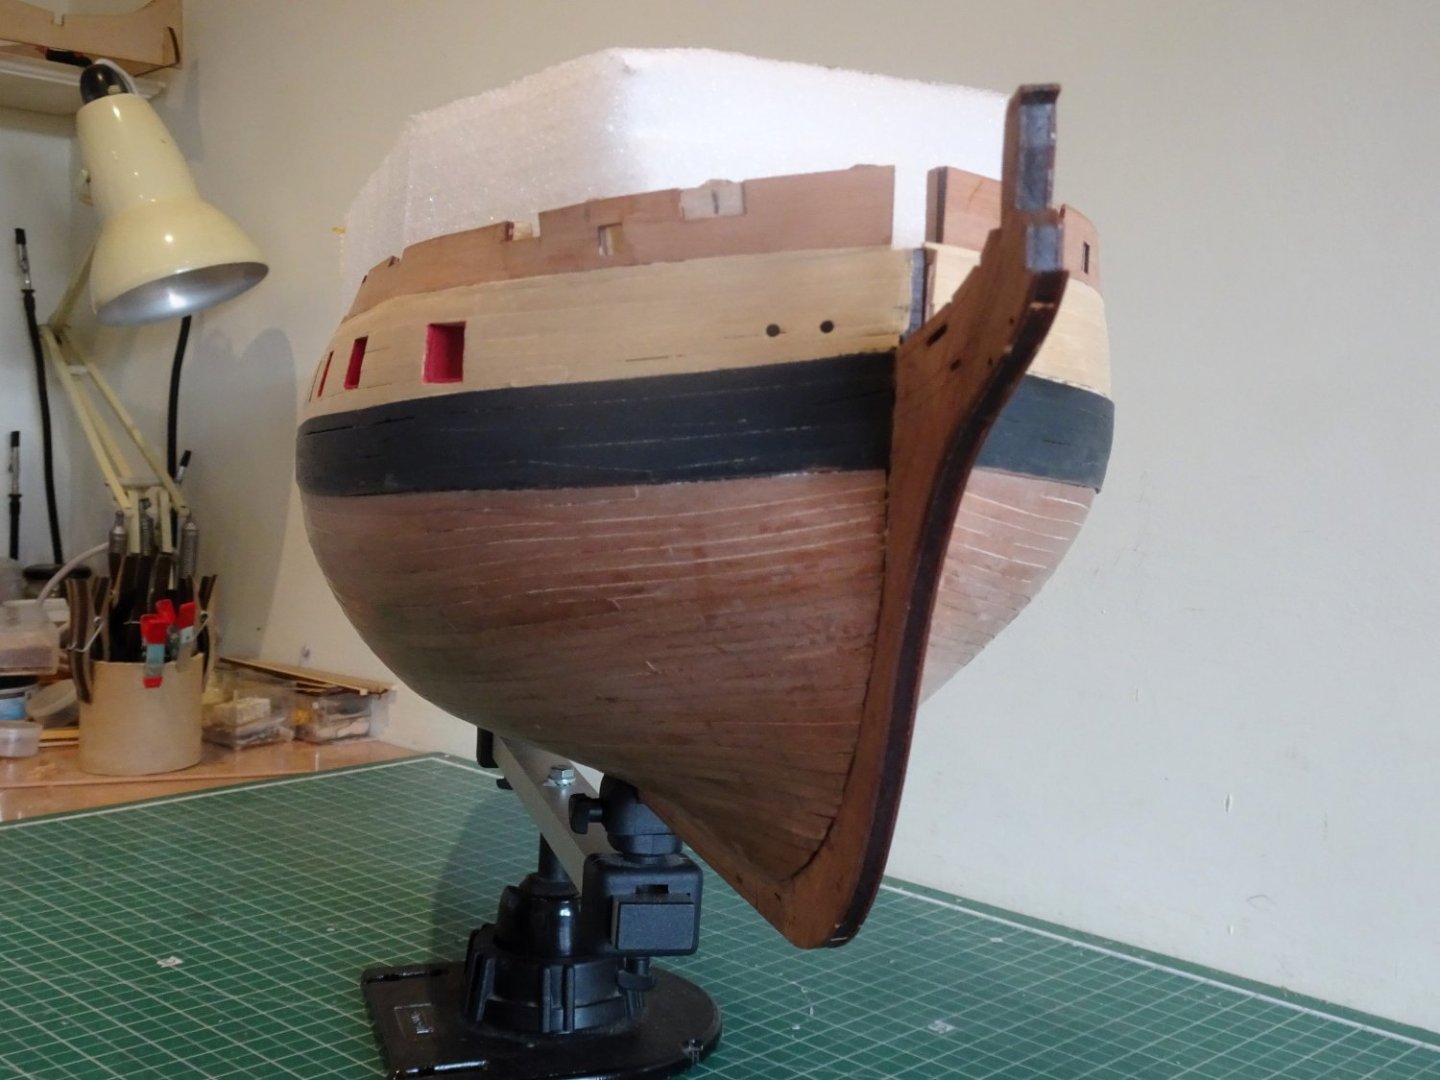
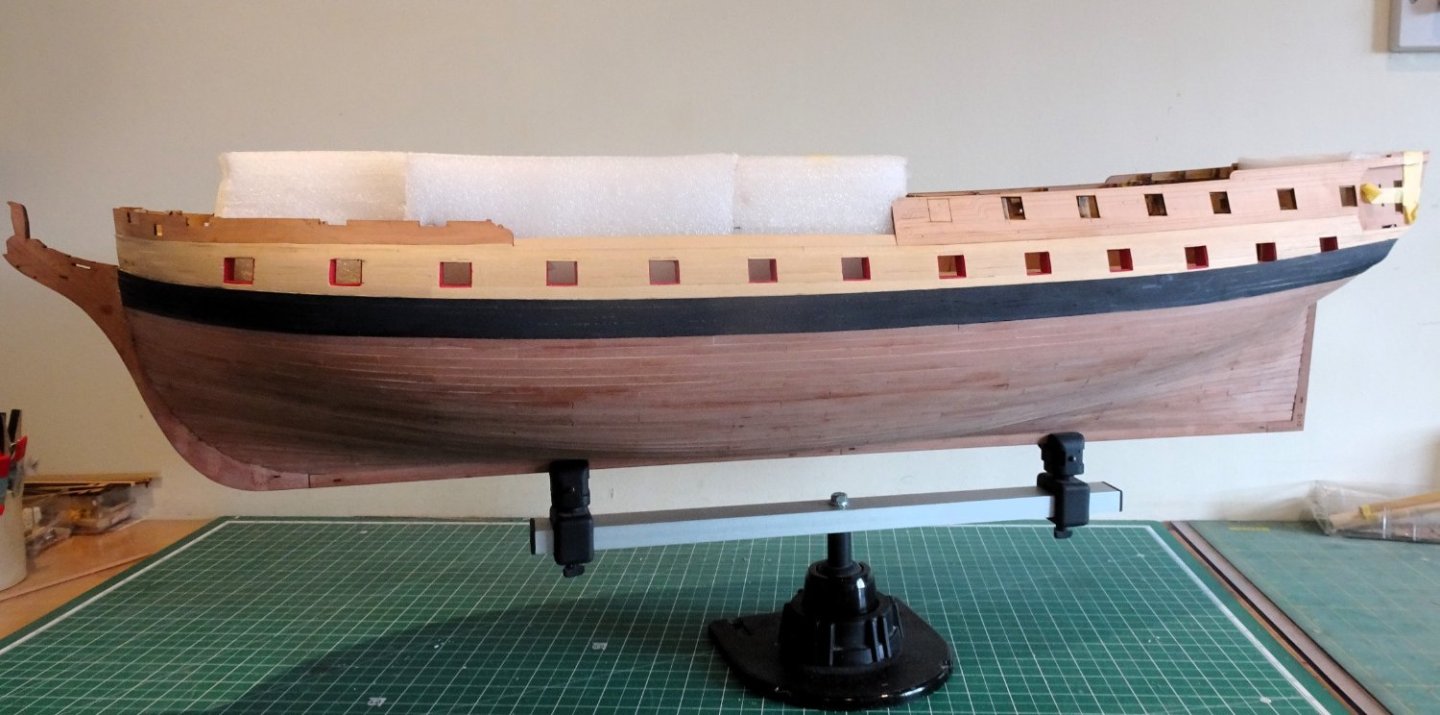
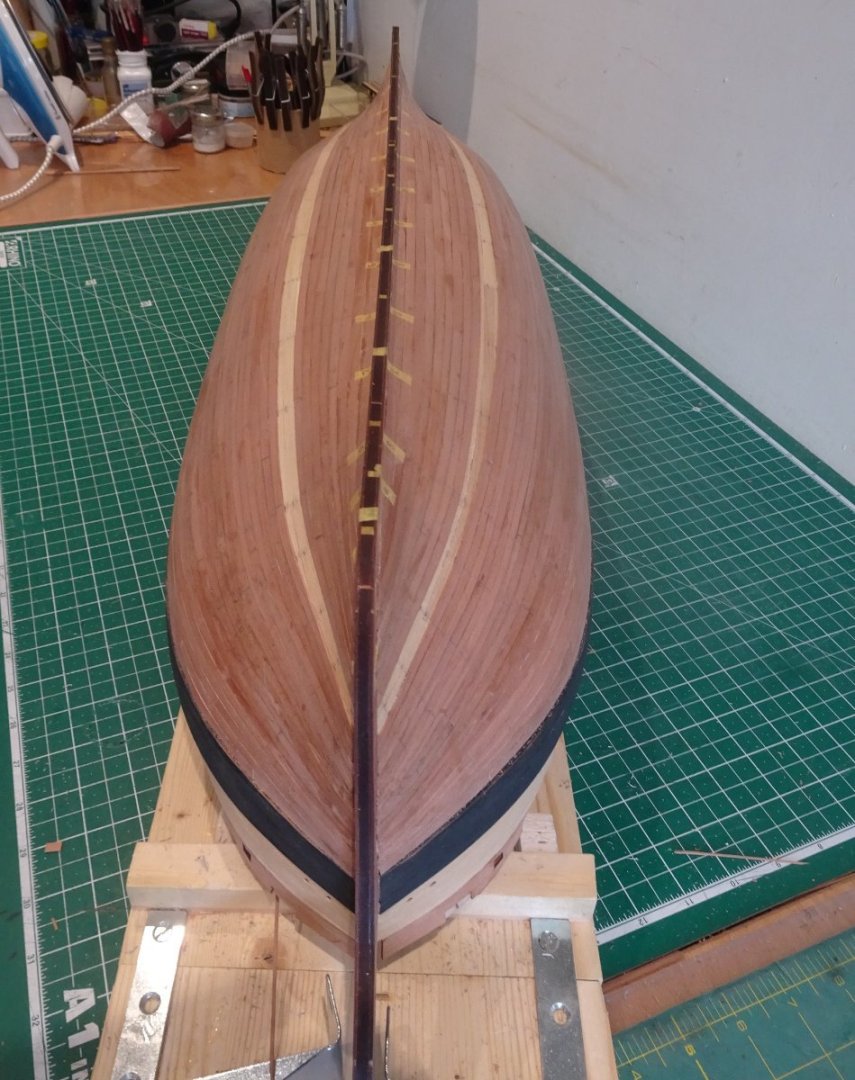
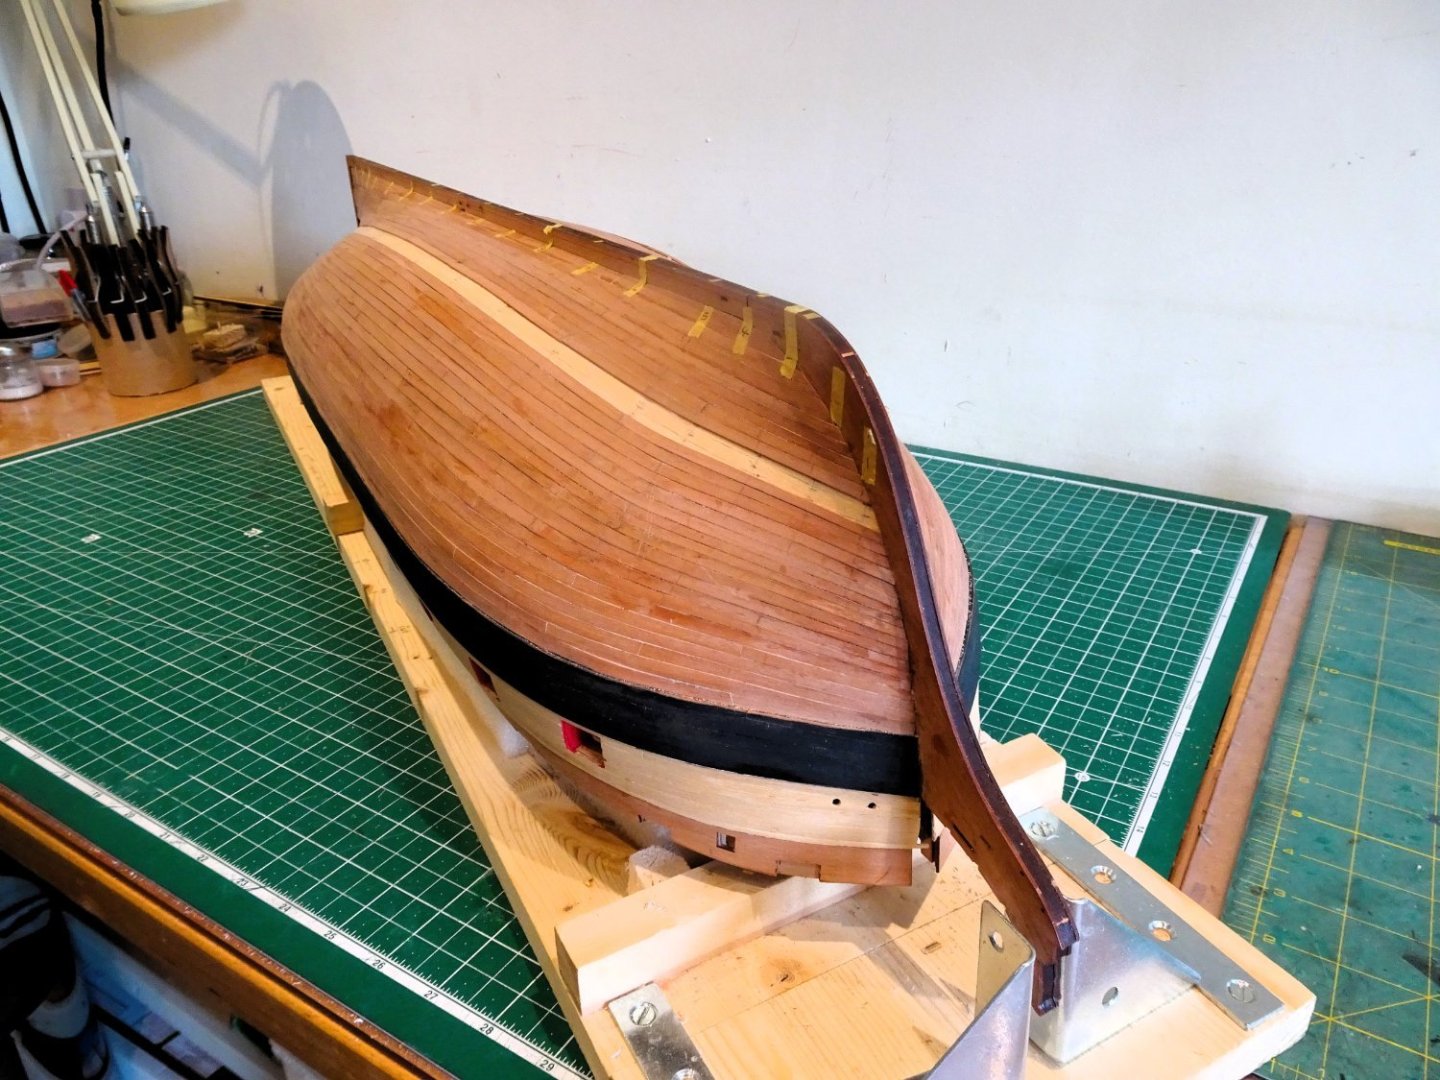
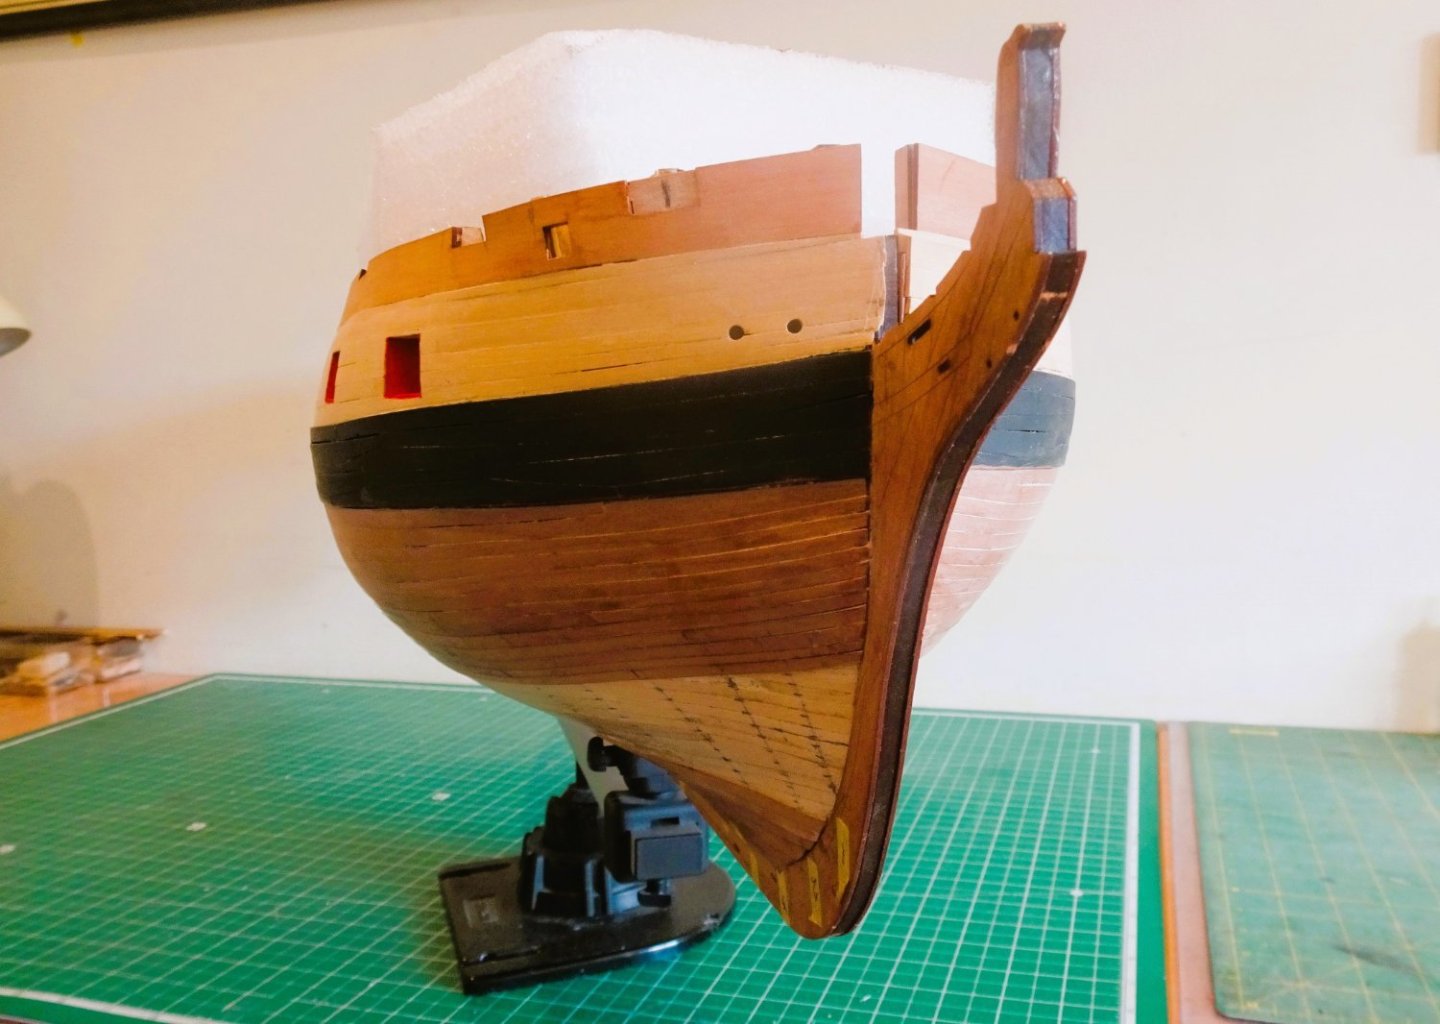
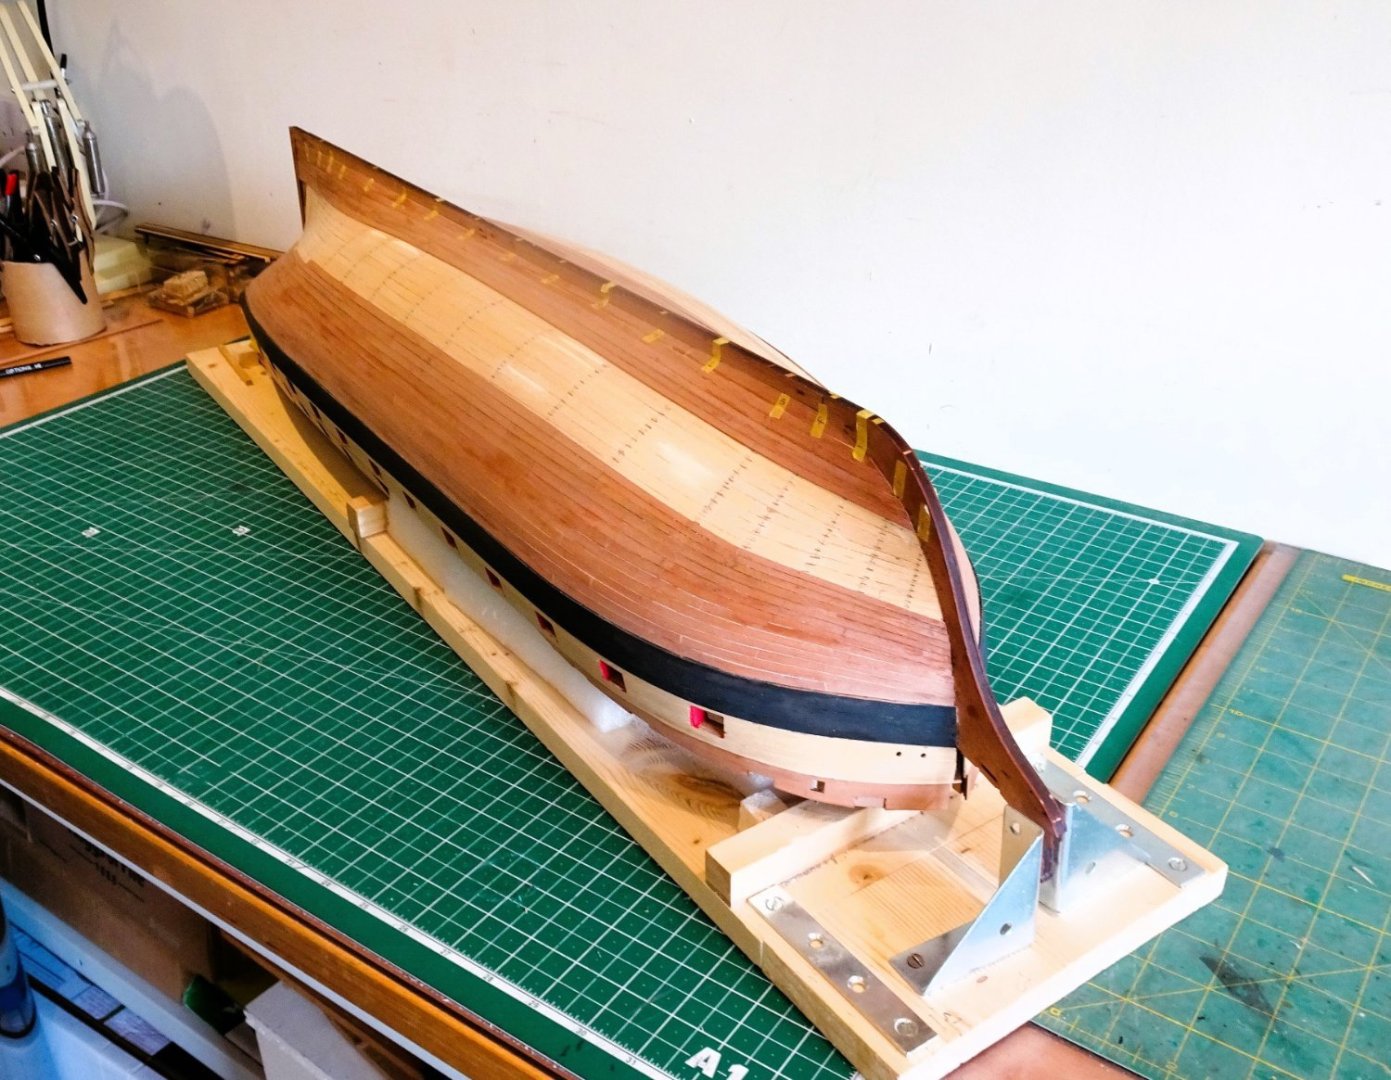
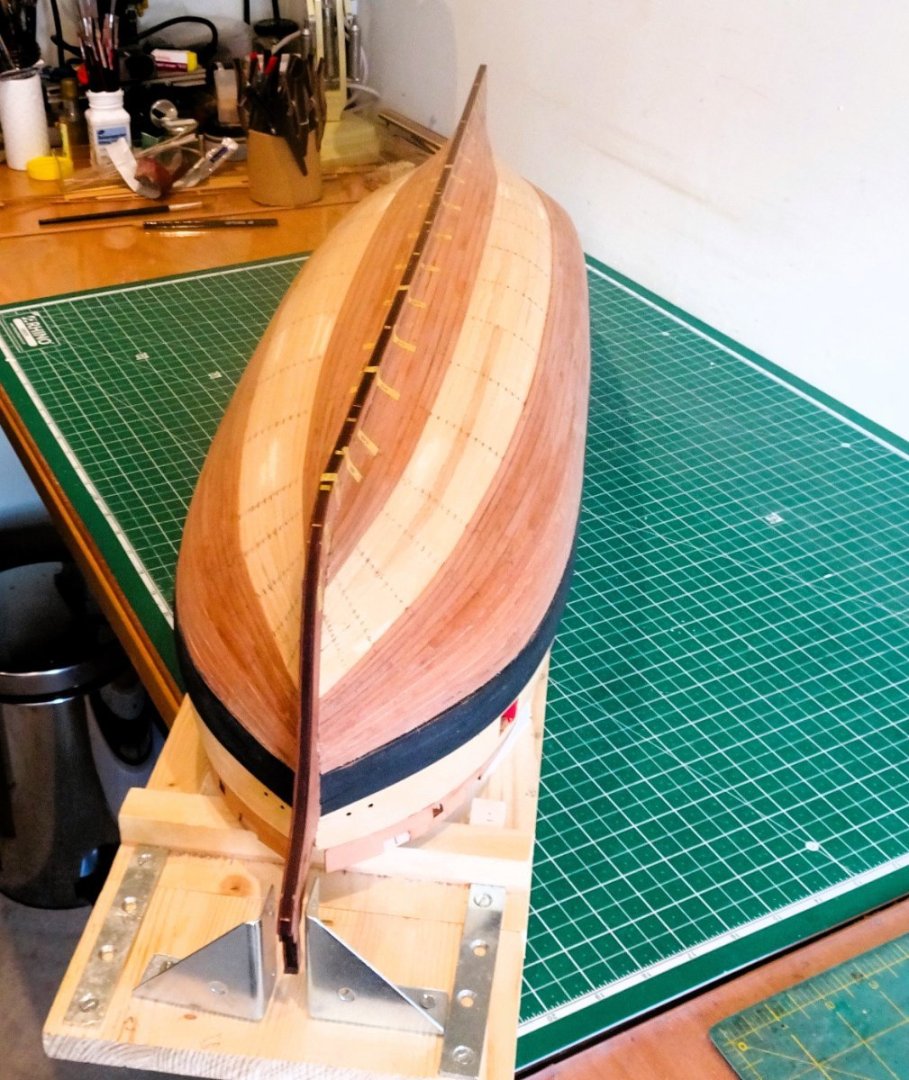
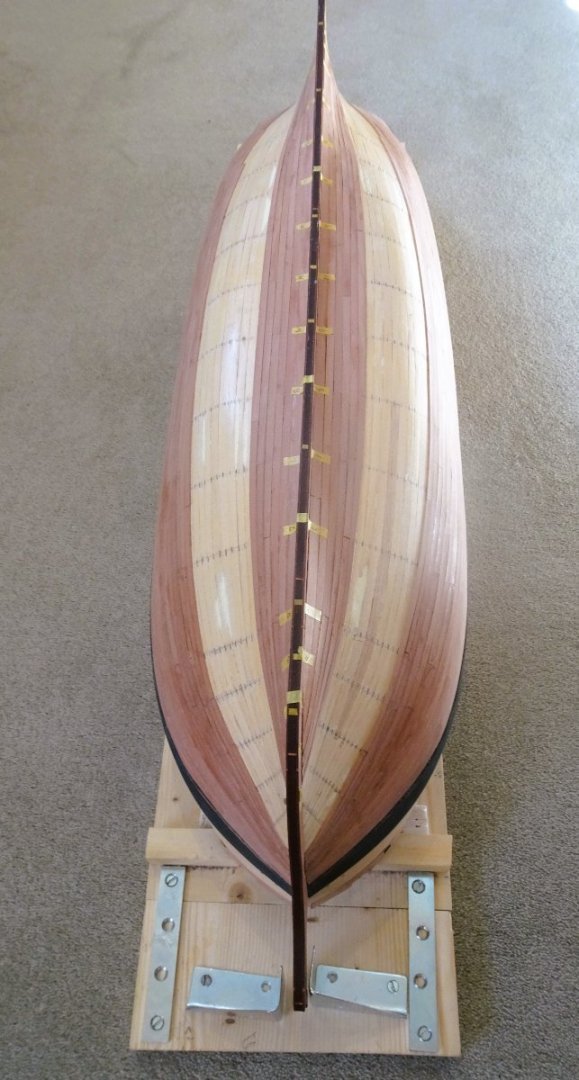
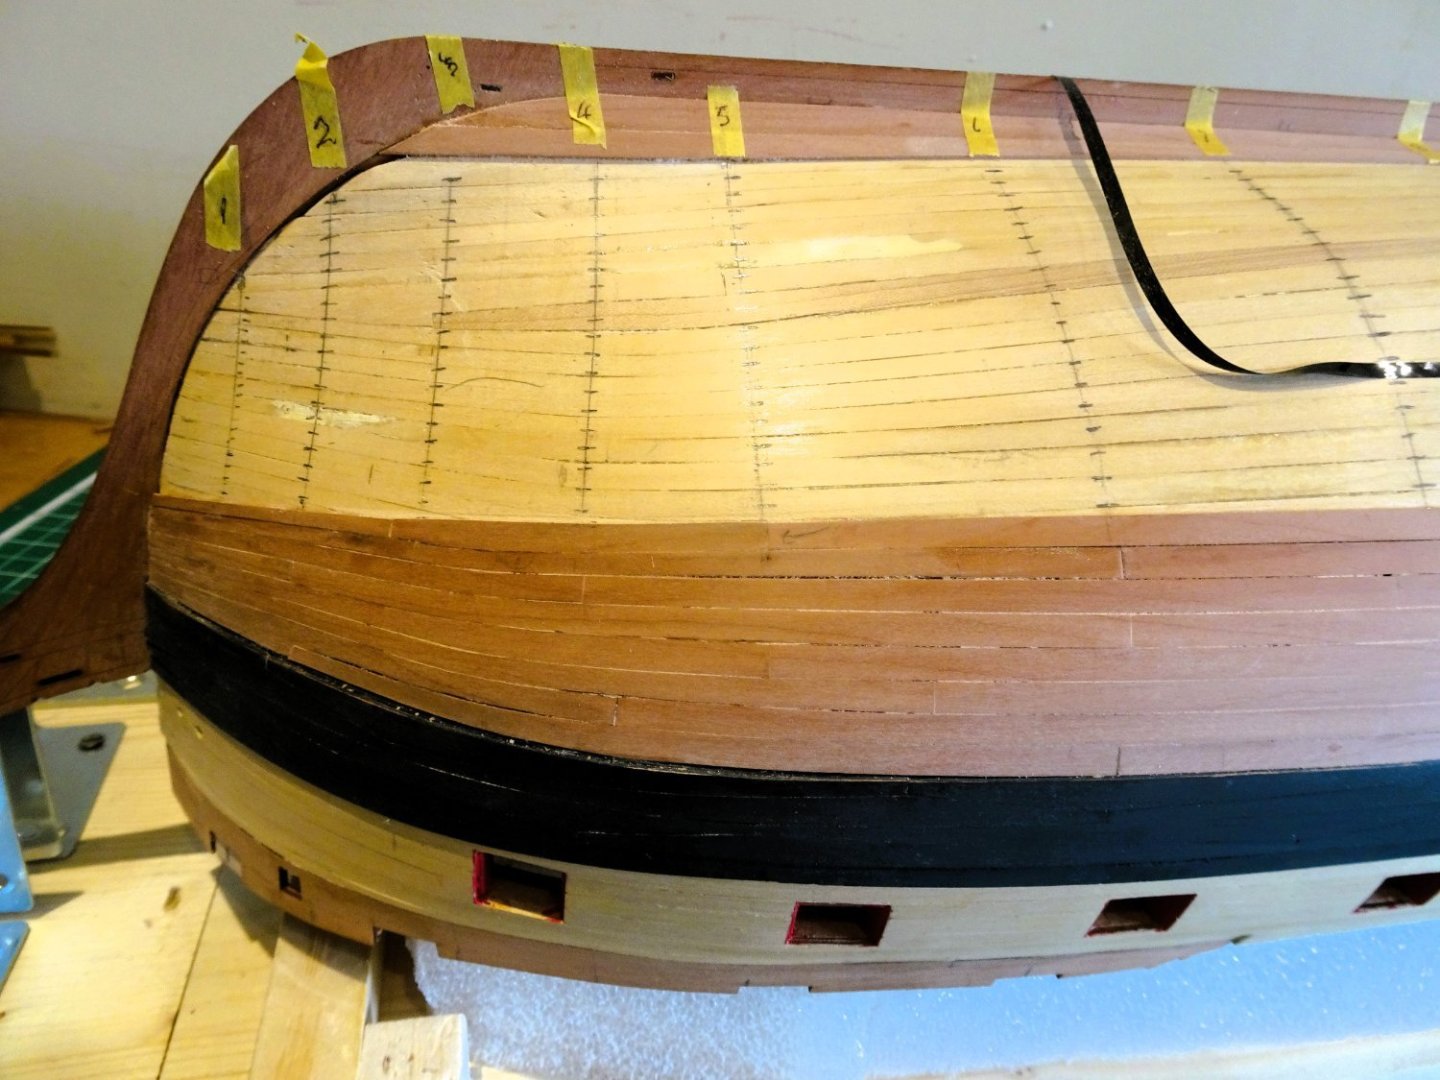
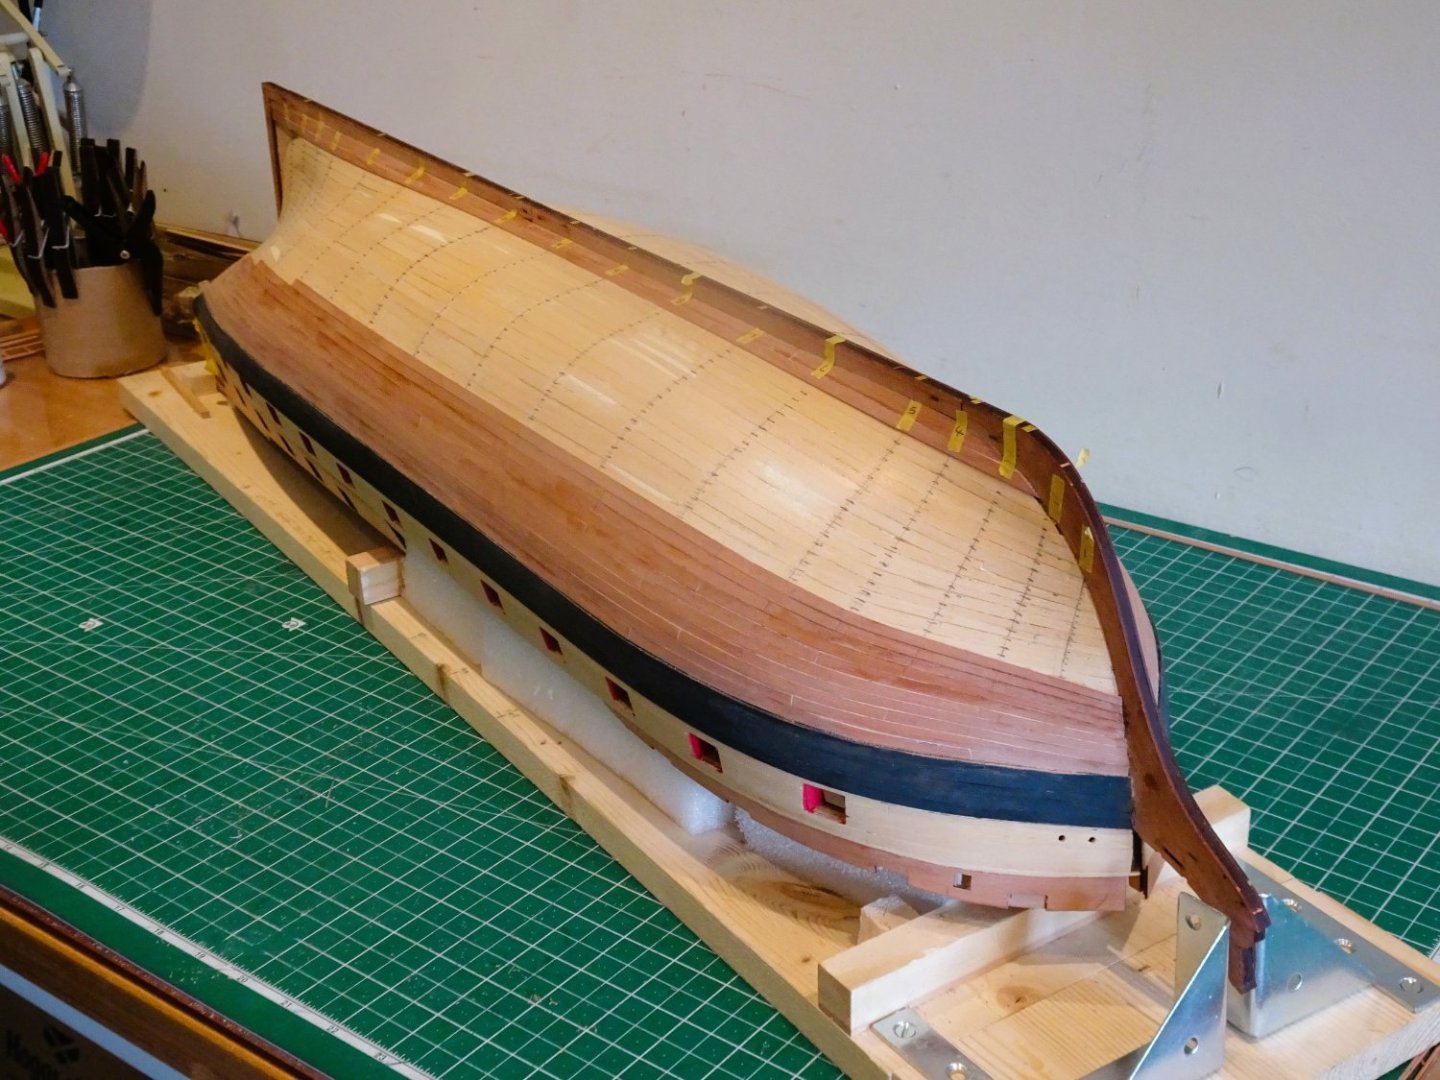
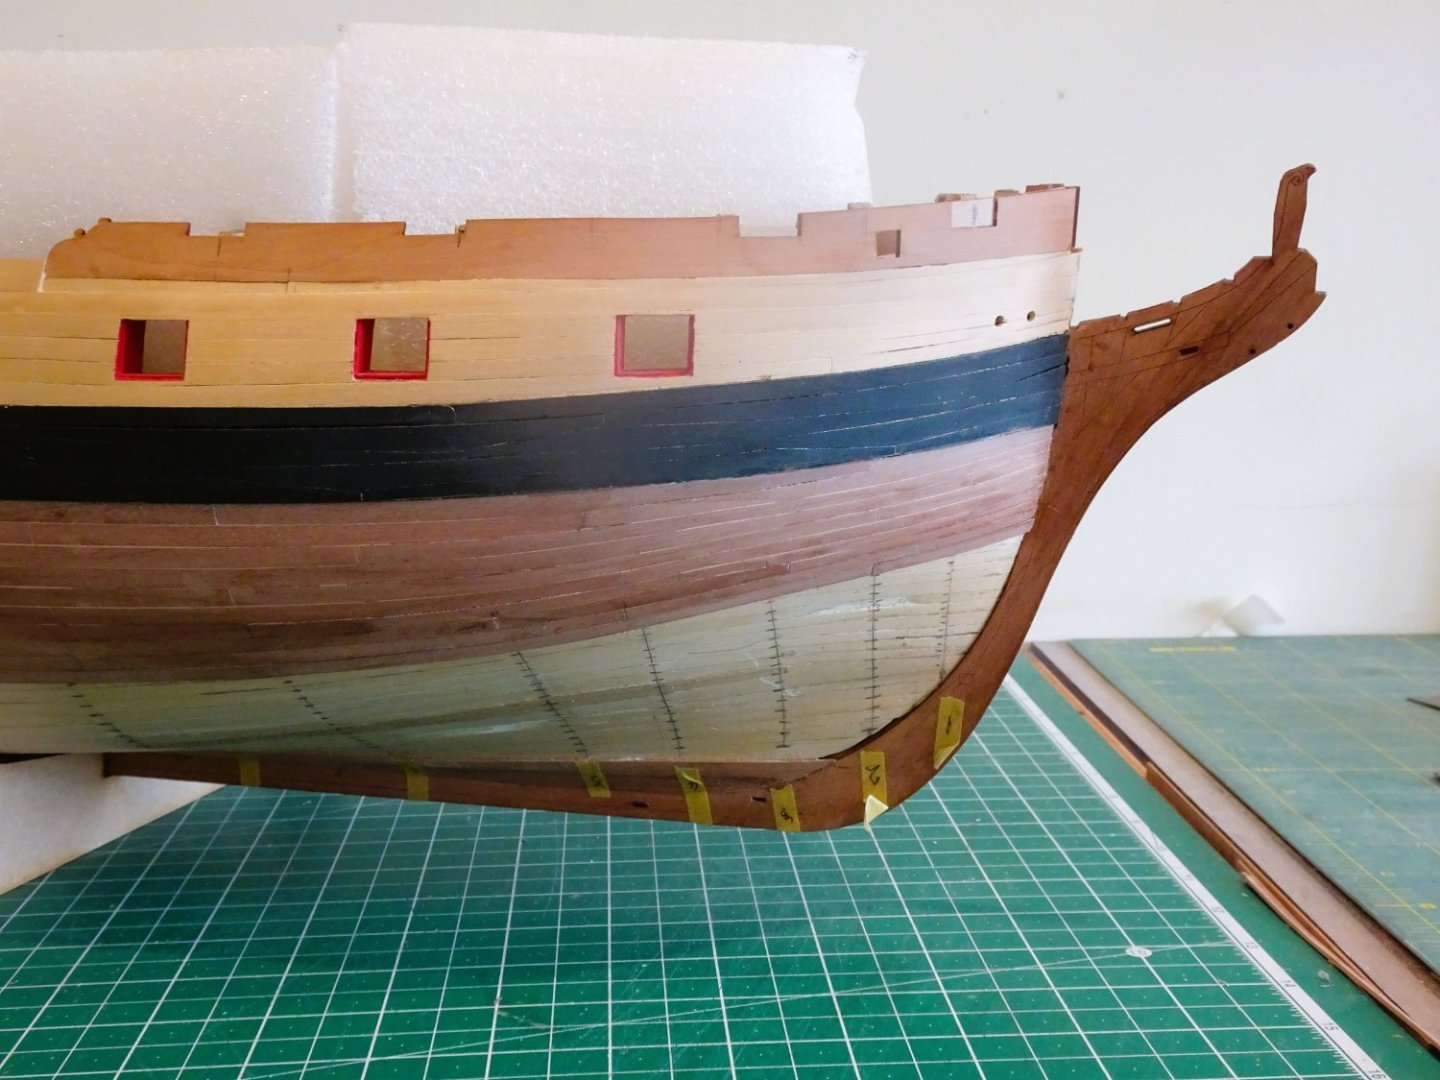
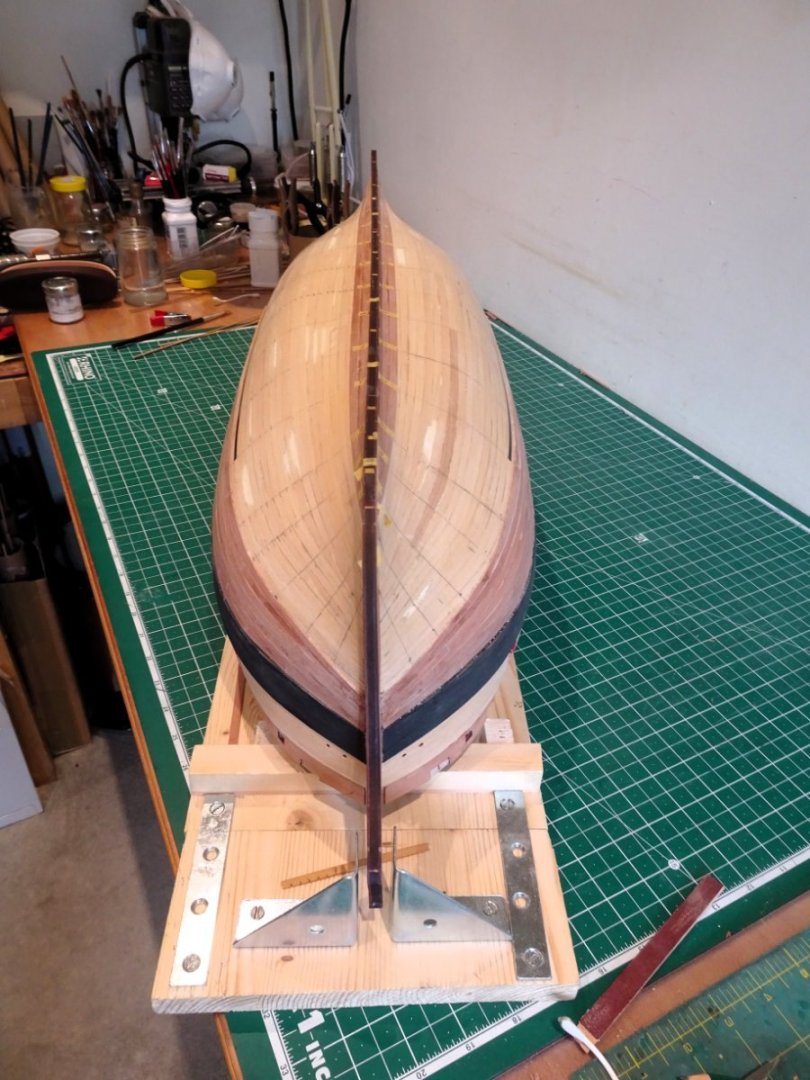
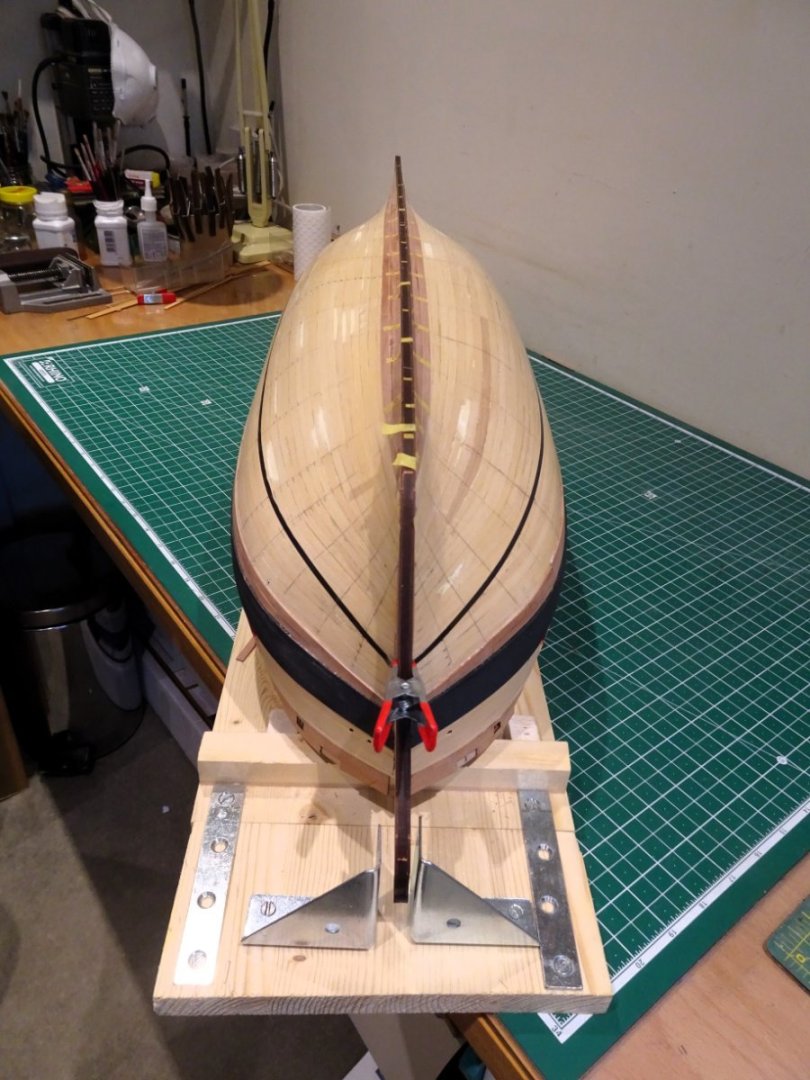
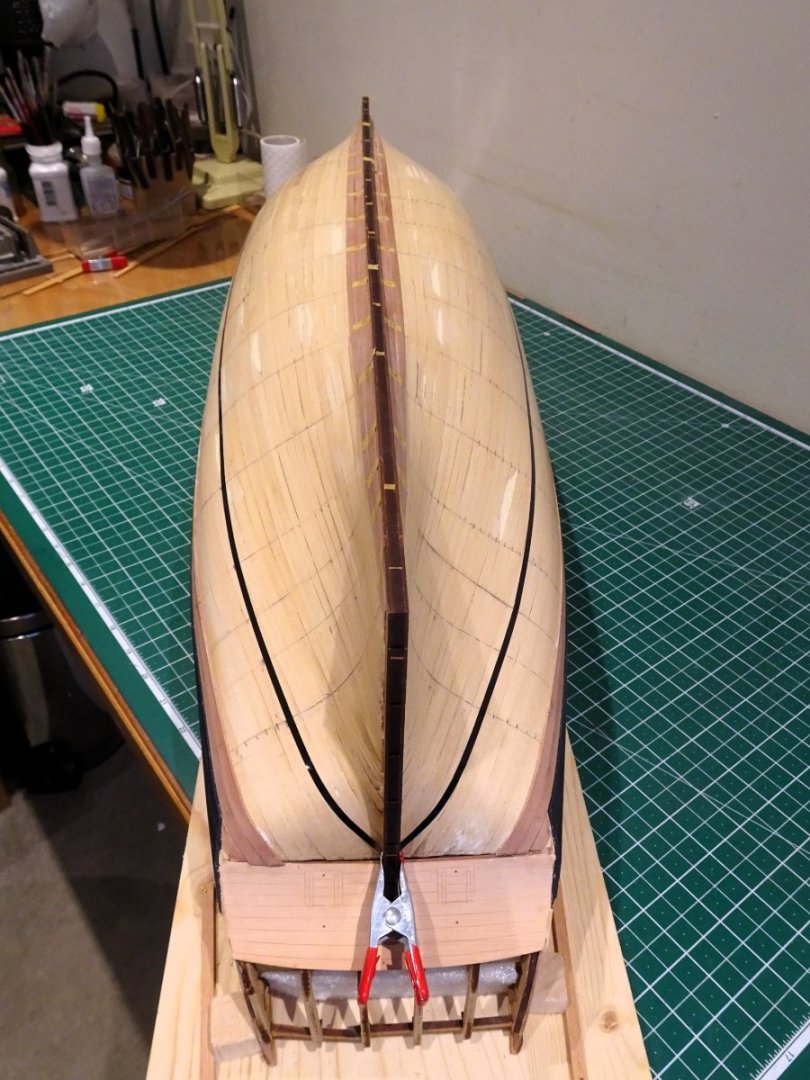
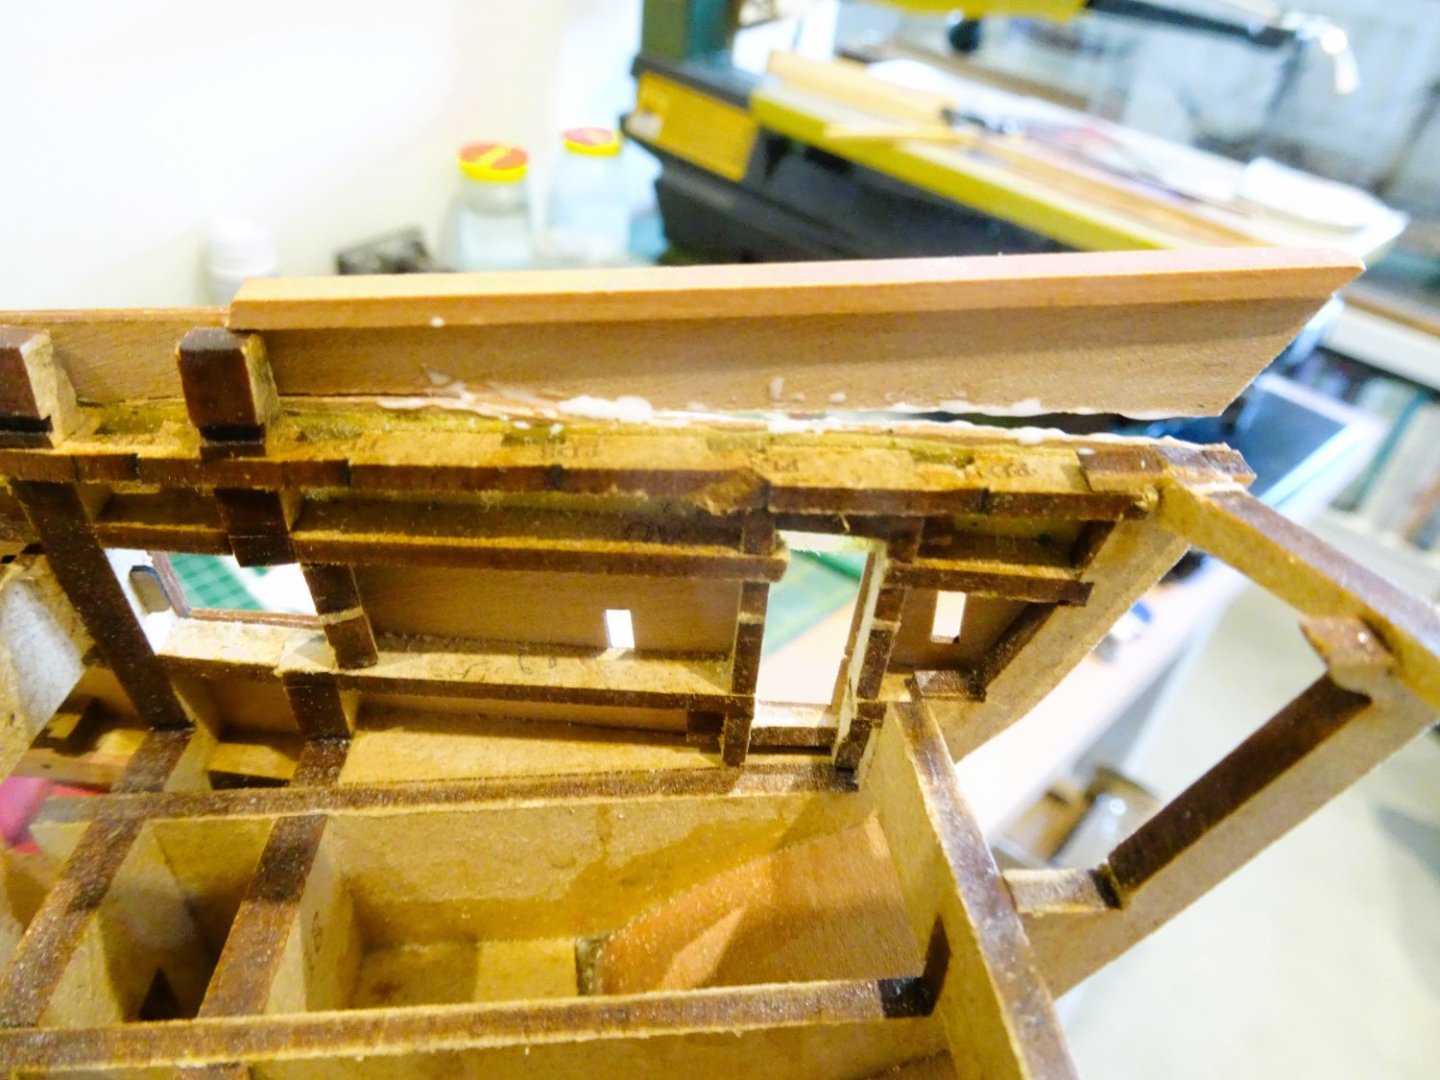
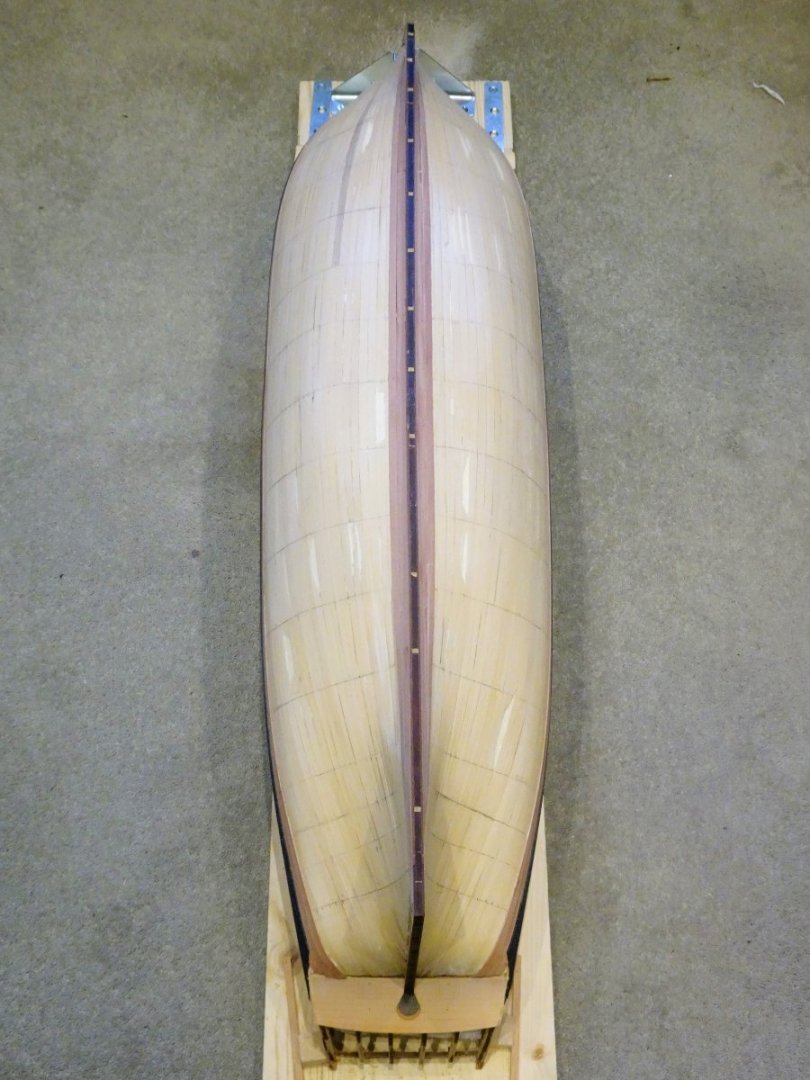
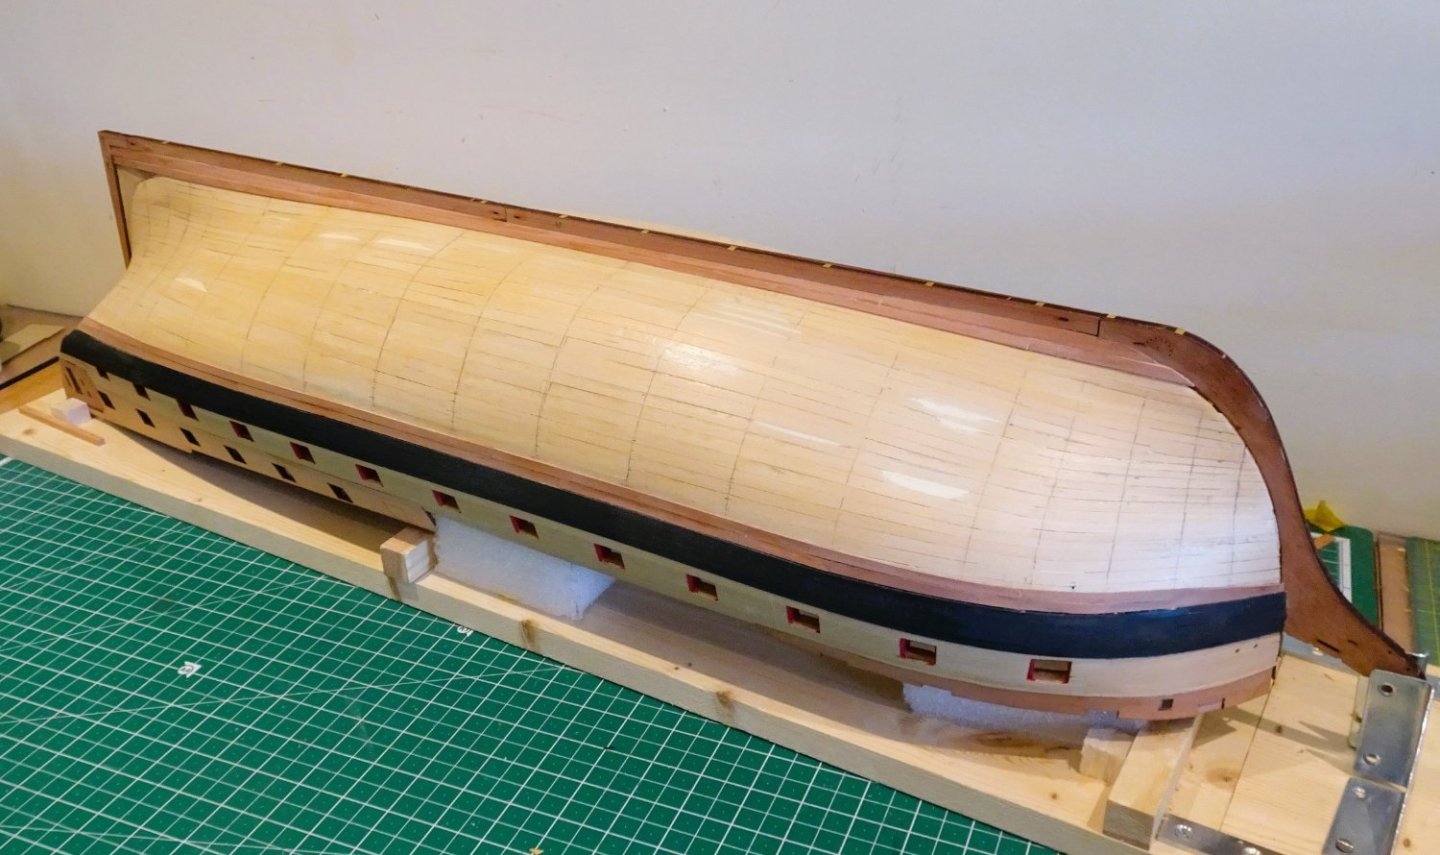
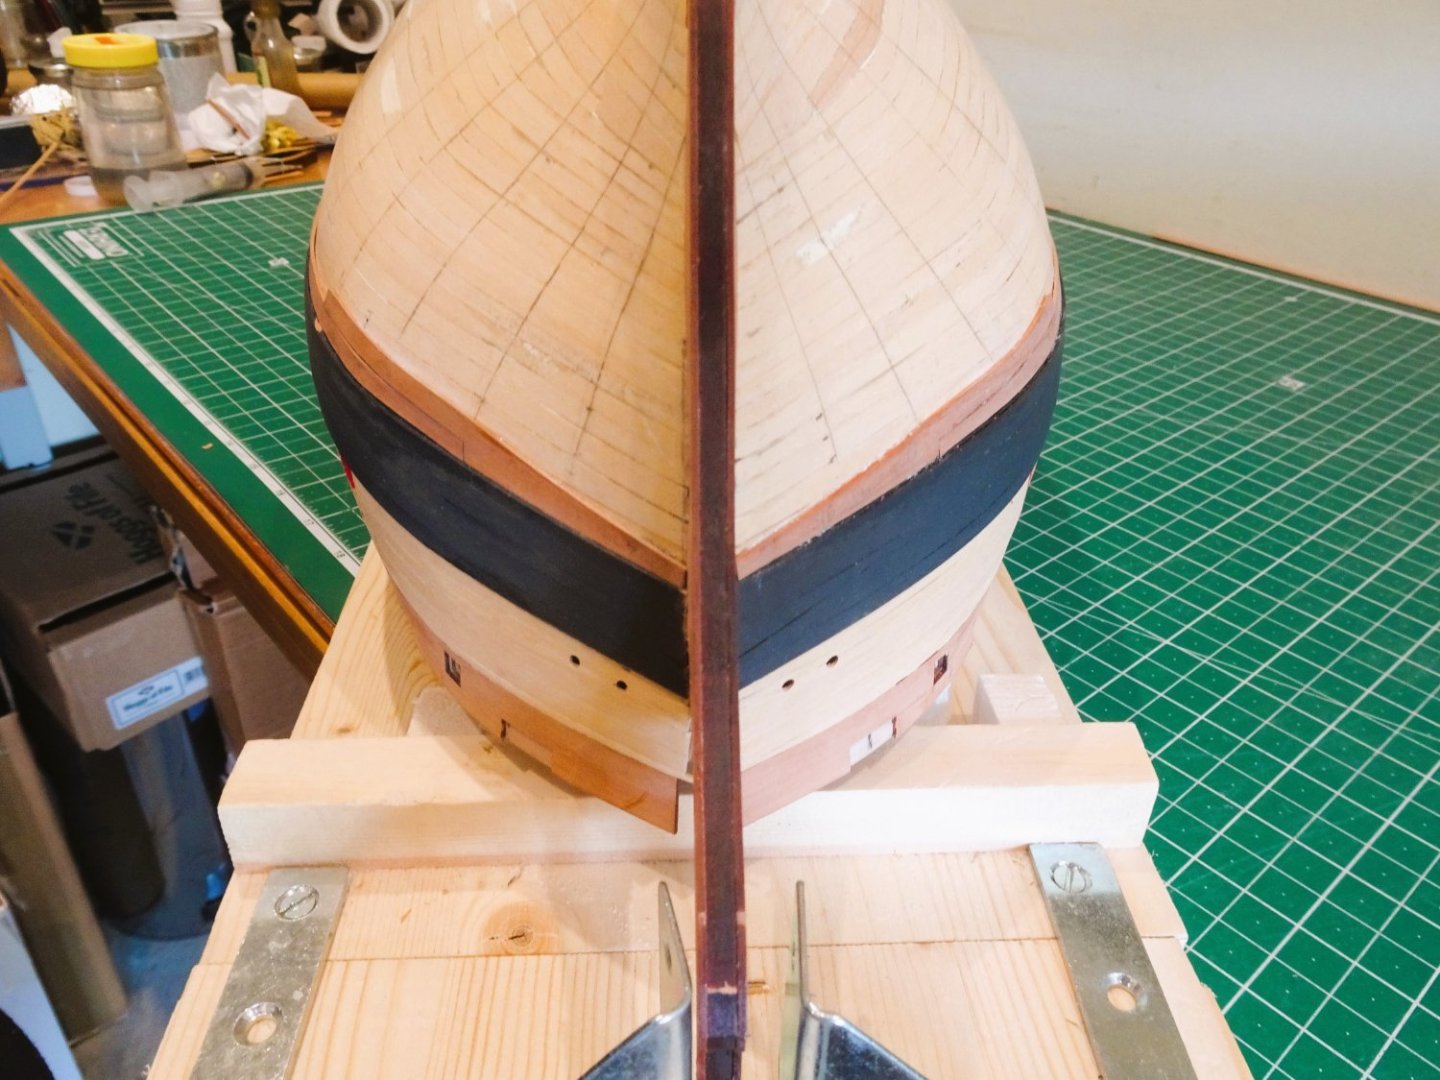
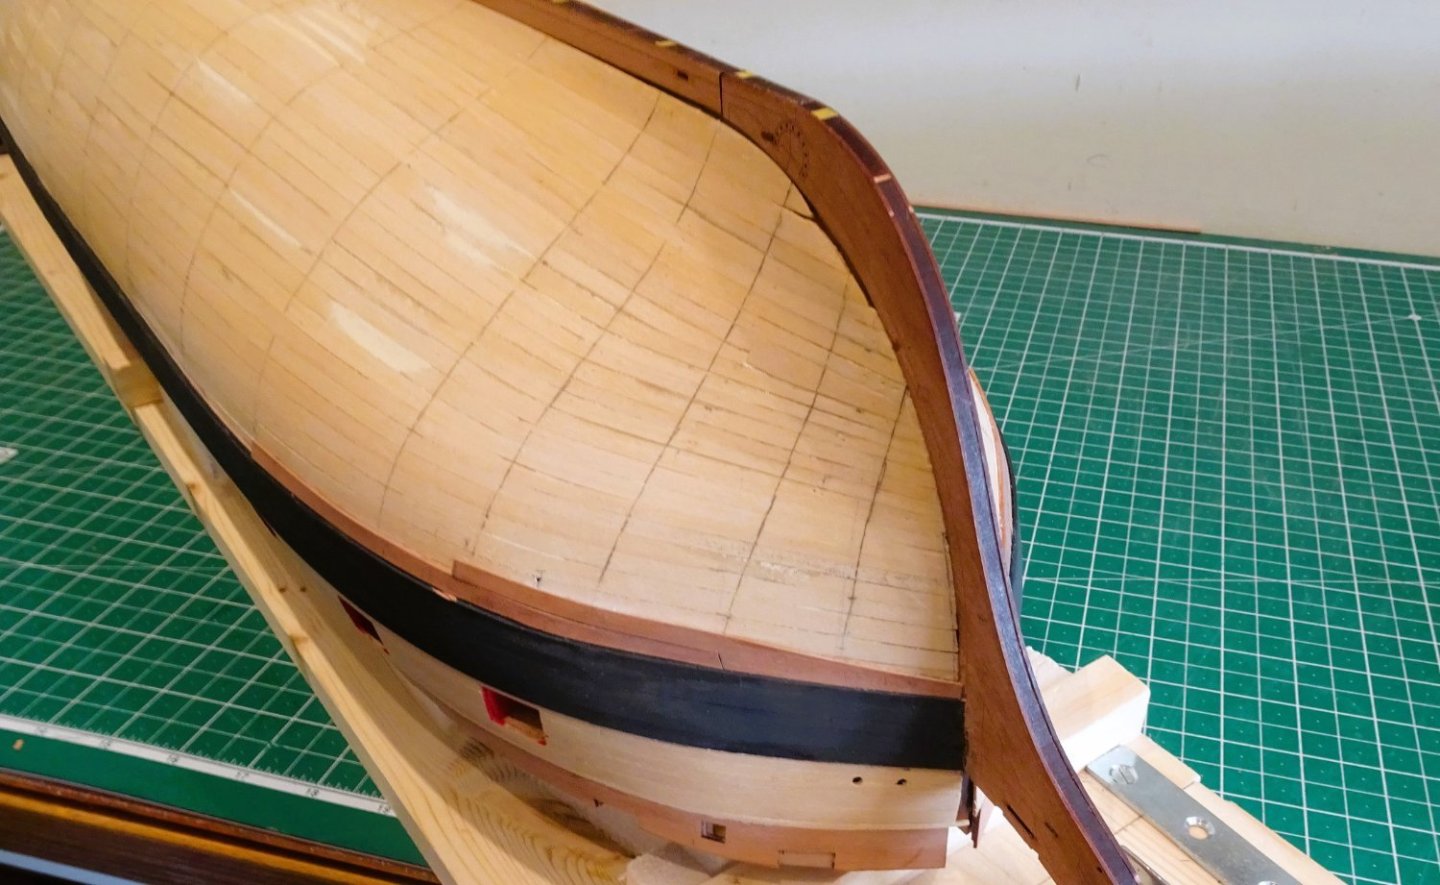
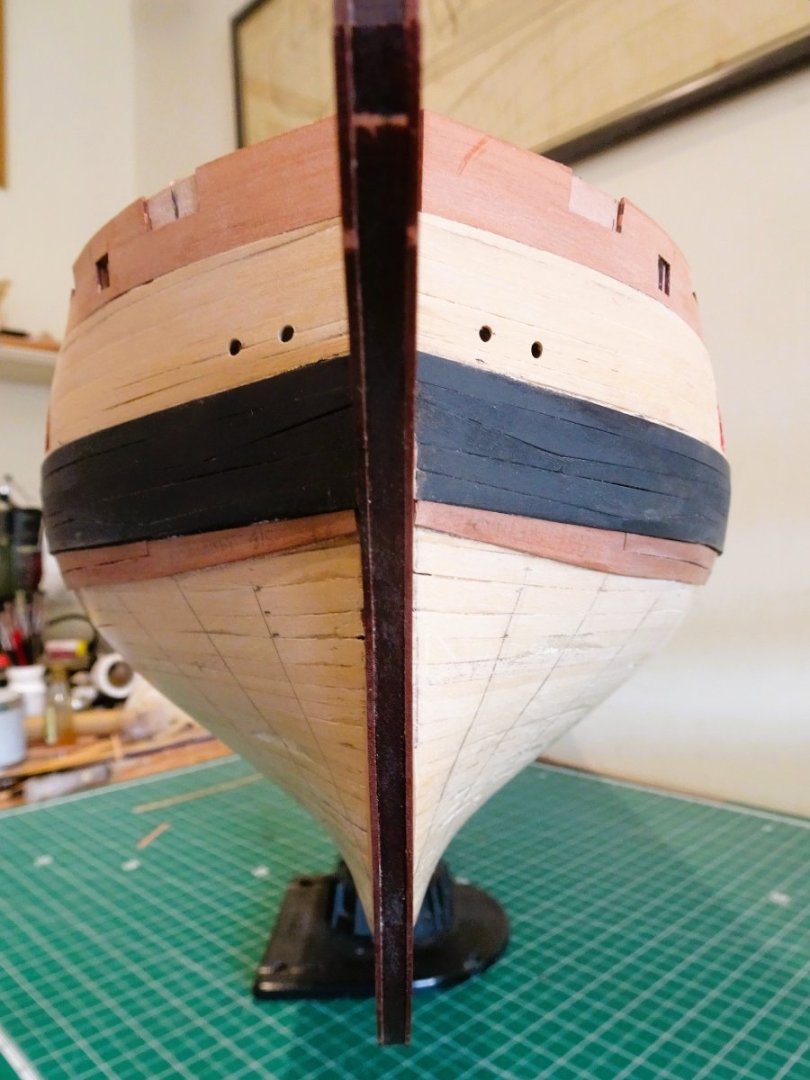
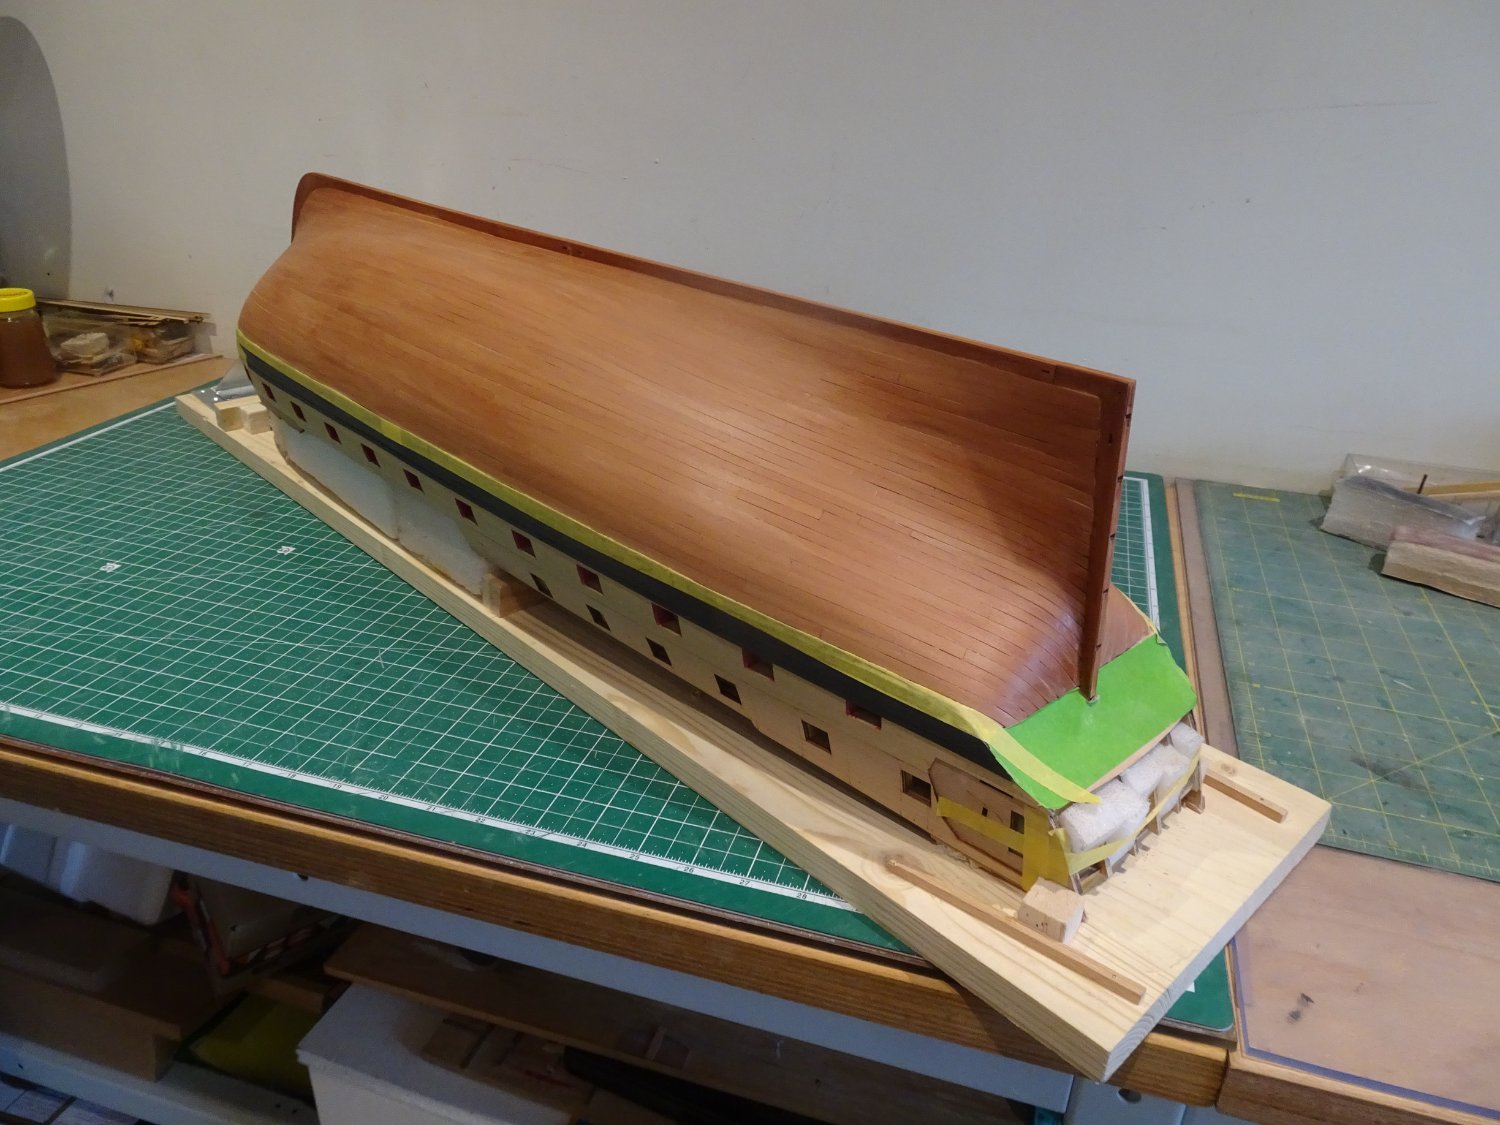
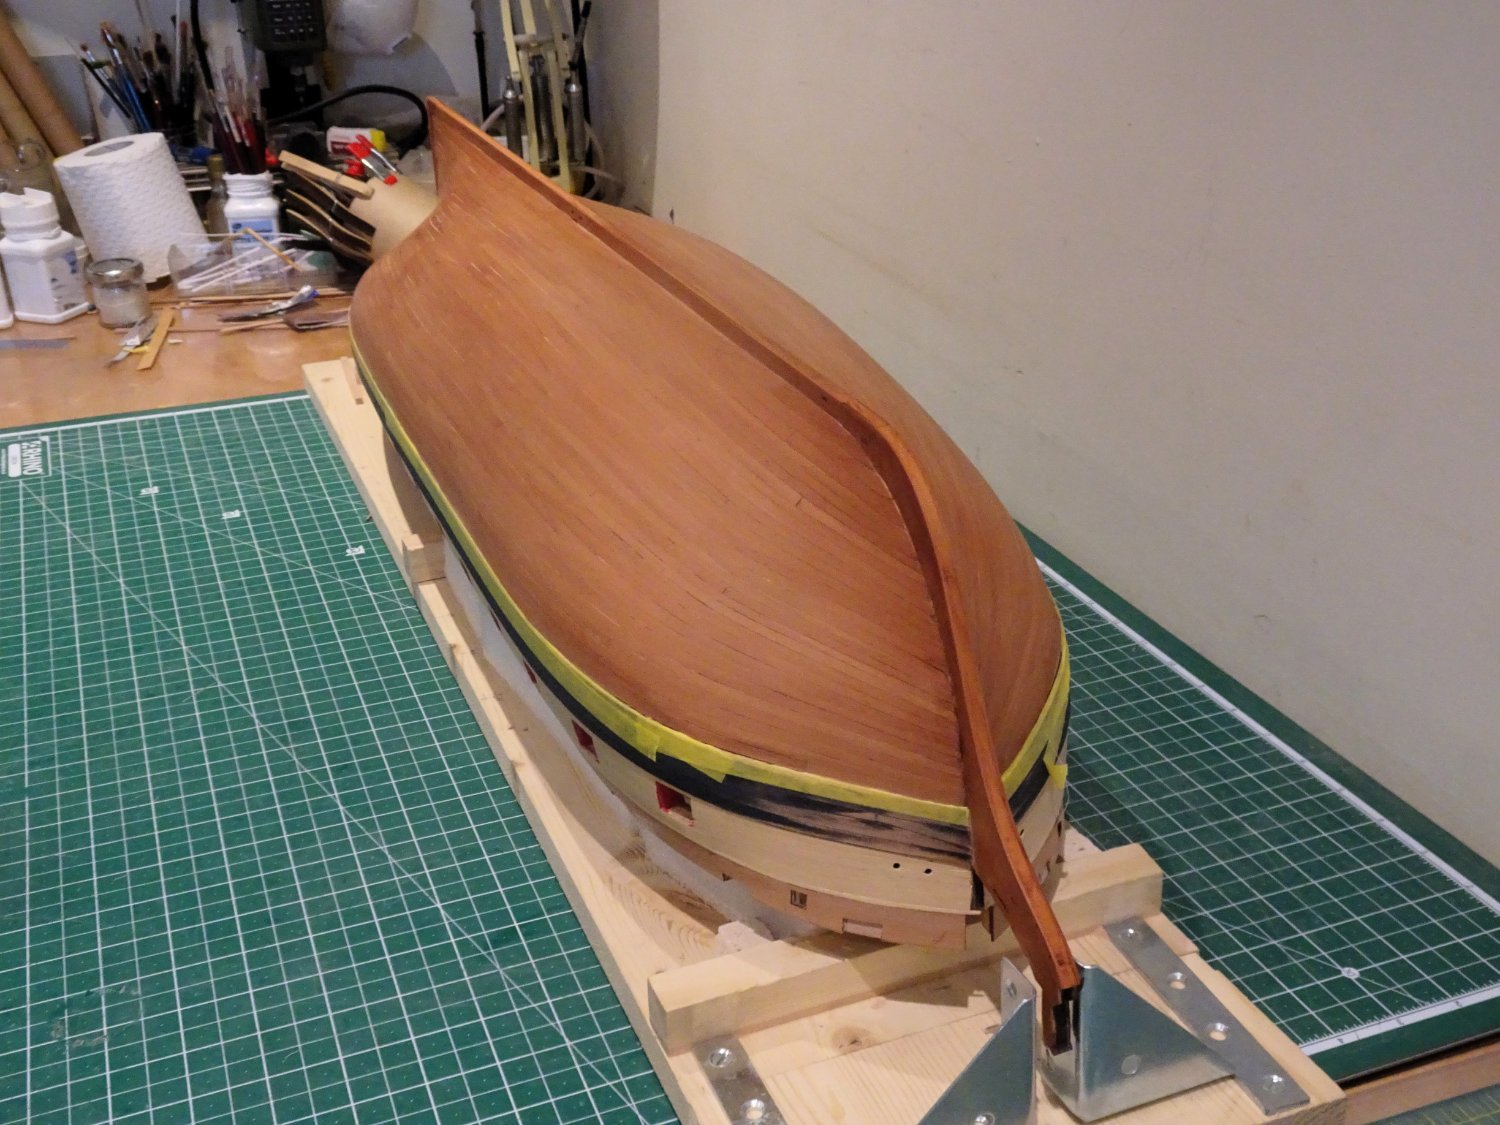
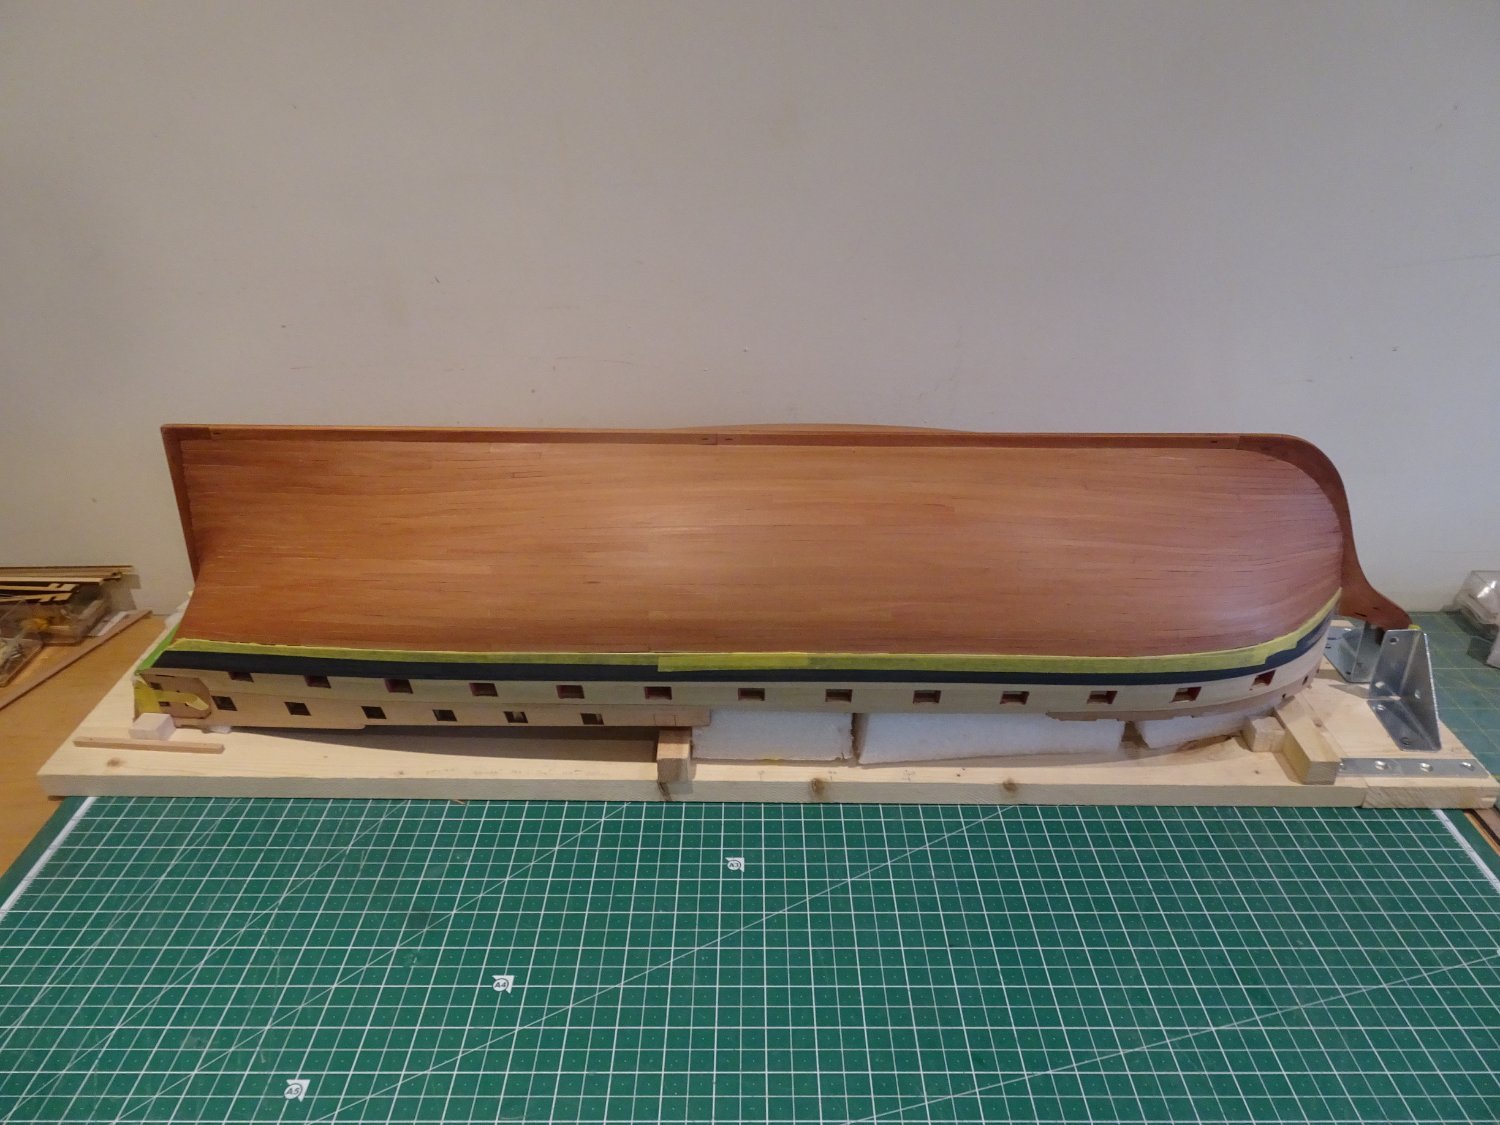
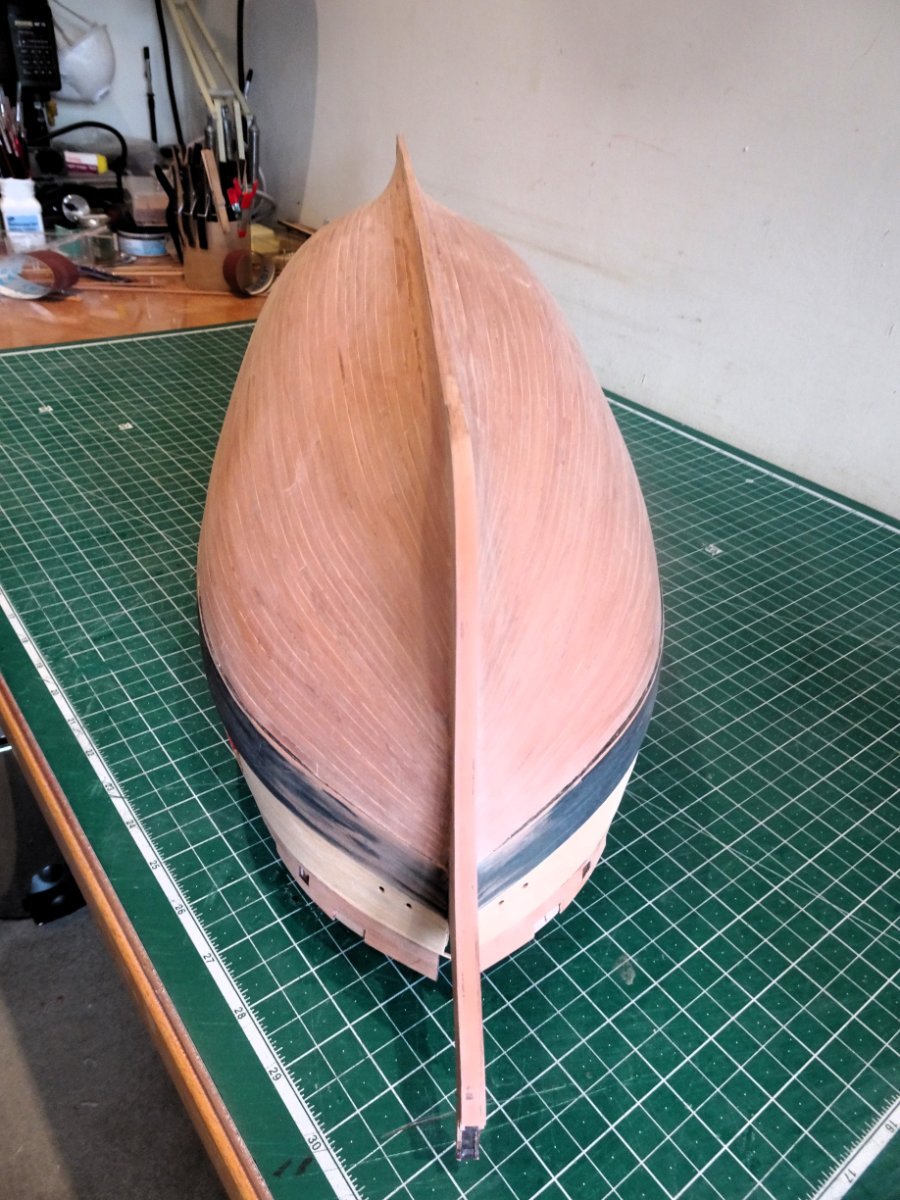
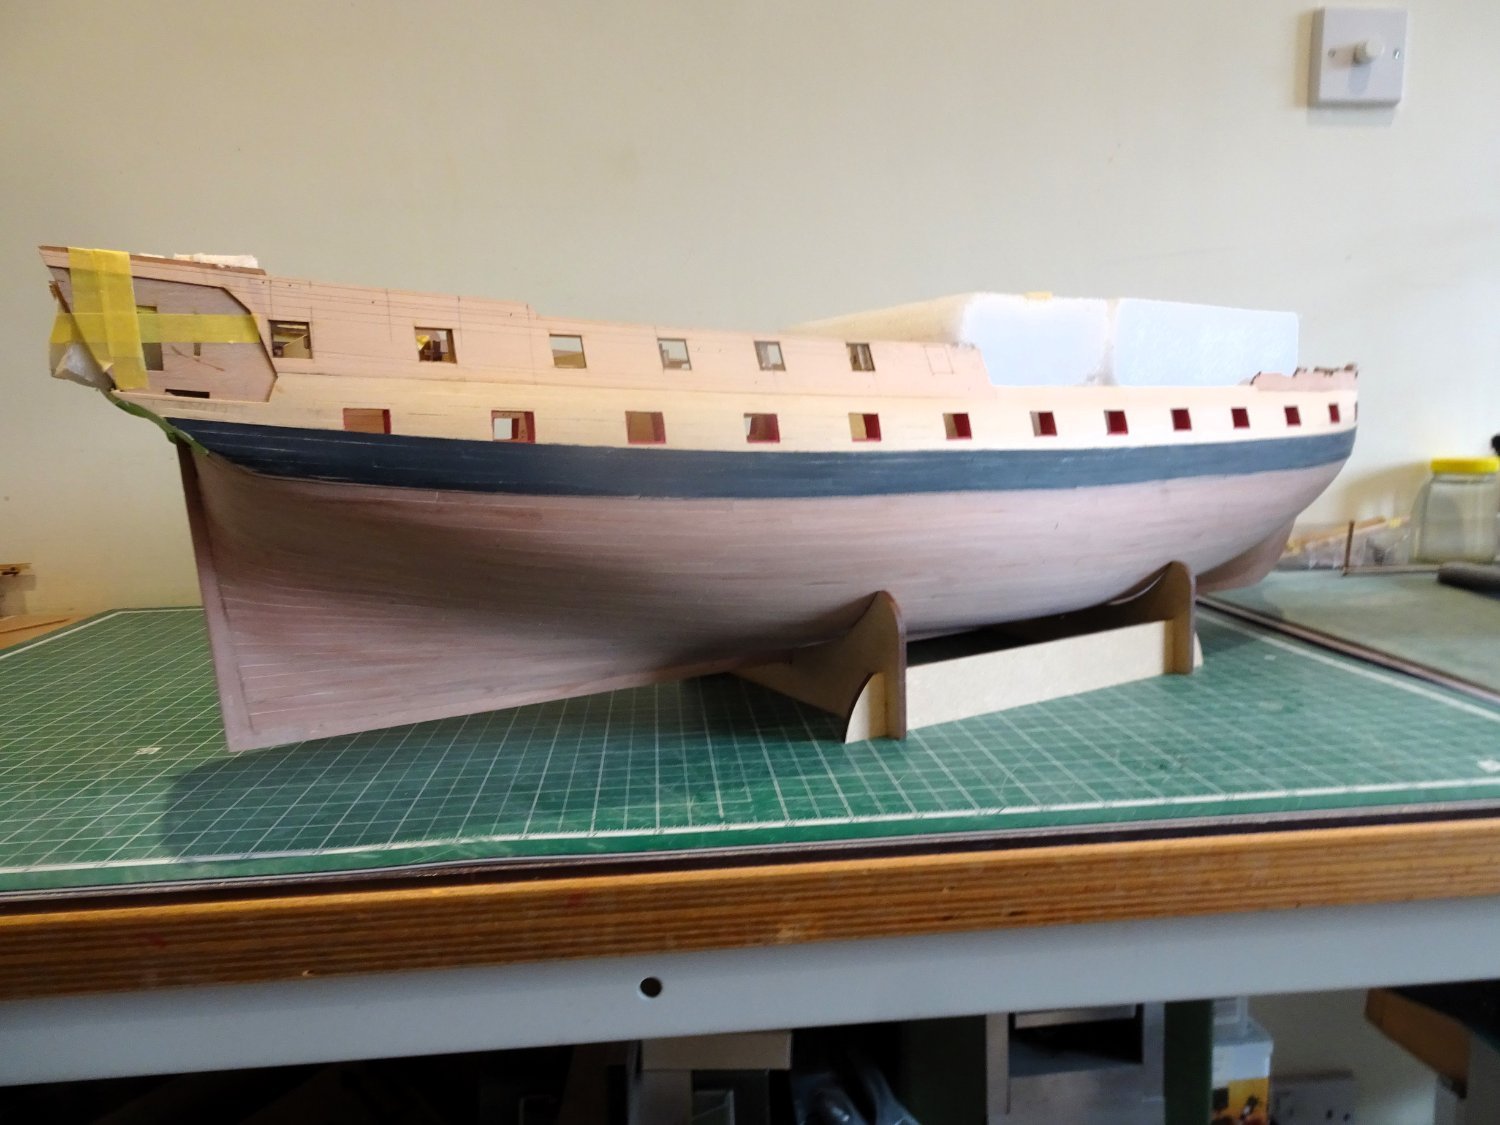
Post Fifty. Time to add a coat of w-o-p. I make my own up using spirit based Black friar clear satin Poly varnish diluted 50% using white spirit. Applied sparingly with a soft cloth the first application will reveal those areas that may need more attention. Application of w-o-p darkens the pearwood, and brings out the richness, but of more importance the overall tone of the wood is uniform and consistent. 1419 1418 1416 1414 1420 The colour tone is close to what I had hoped for to contrast with the Boxwood and is not far off the patination I would aspire to achieve were I to copper the hull. That’s a story for another time. B.E. 14/07/2023


- 648 replies
-
- 22
-

-
-
- Indefatigable
- Vanguard Models
- (and 1 more)
-
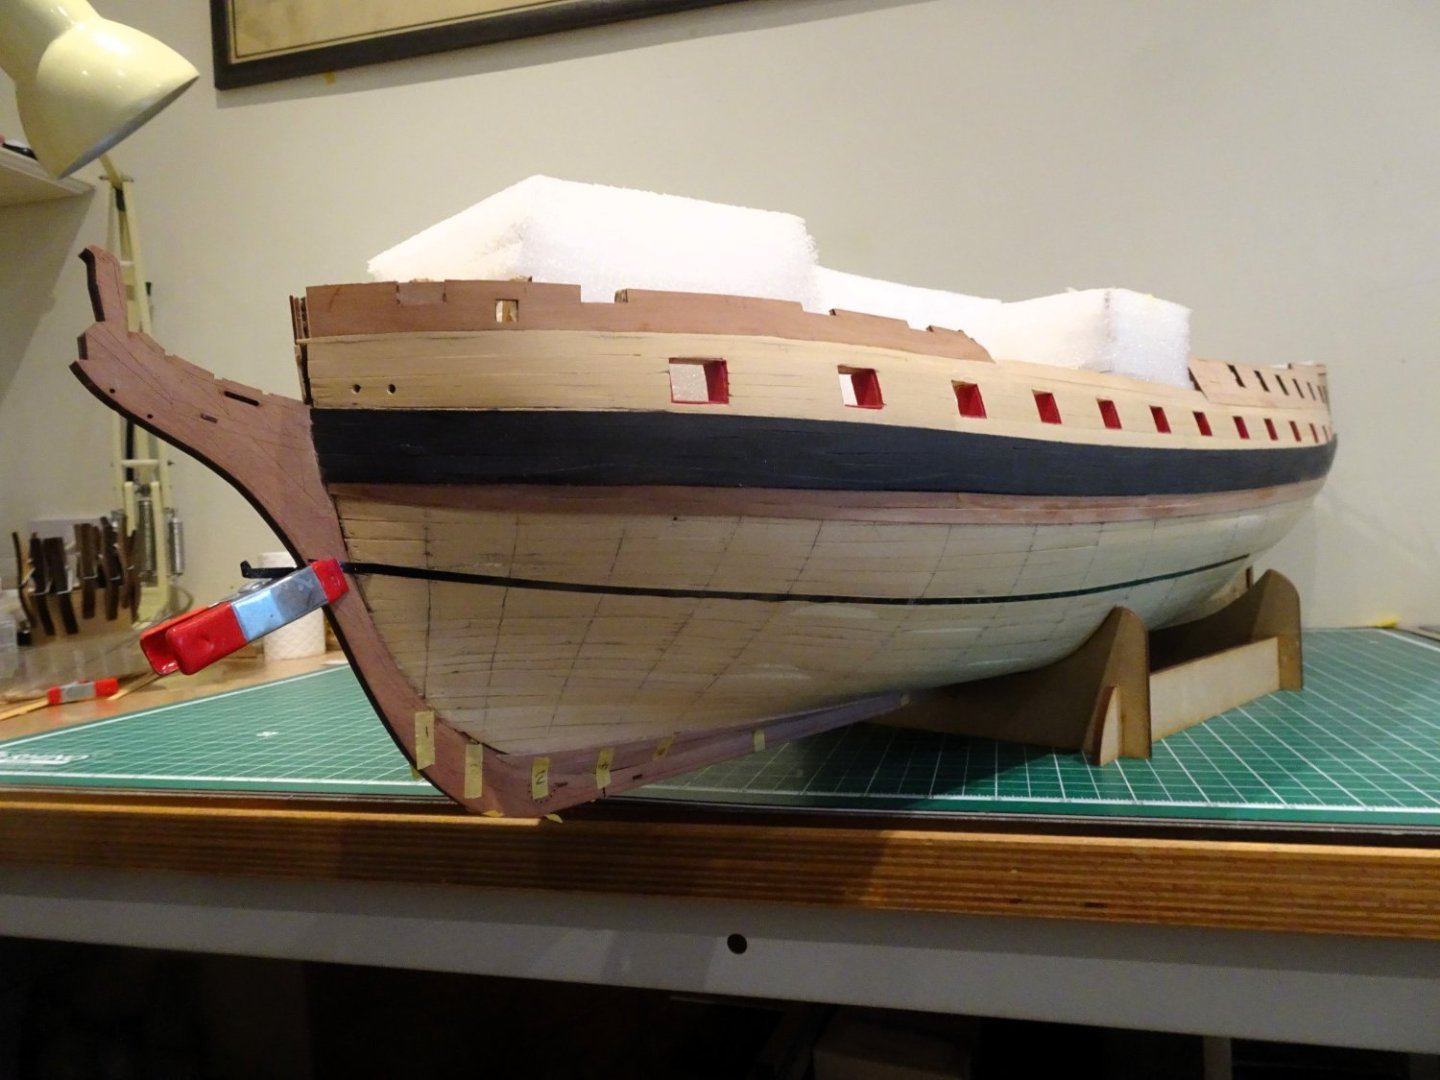
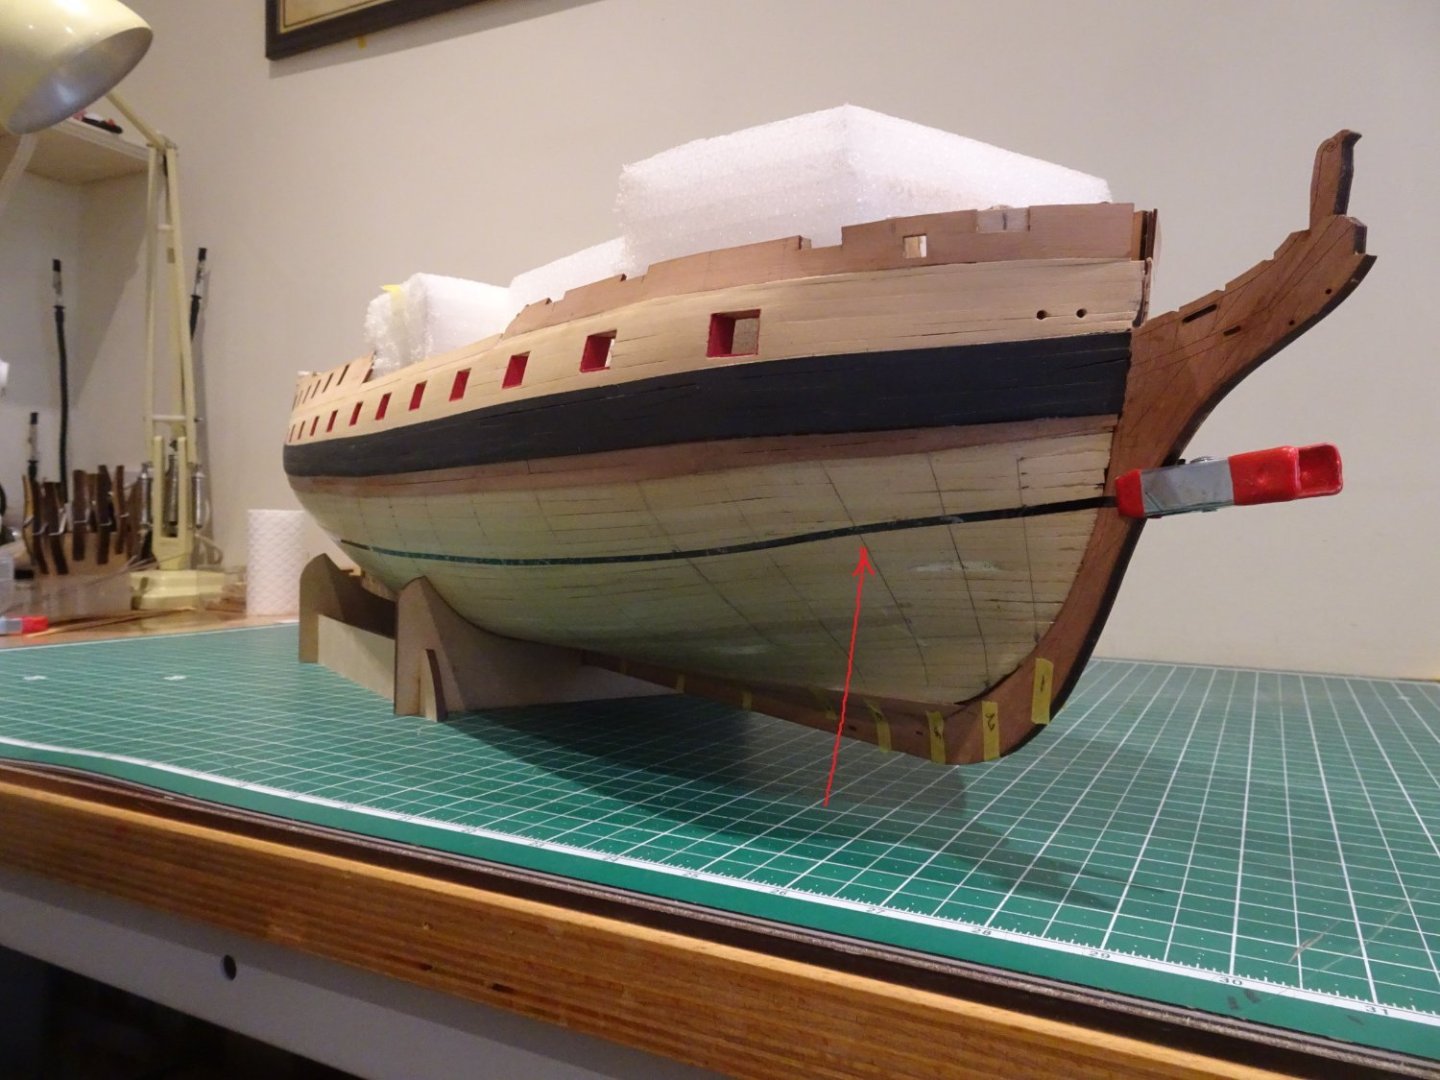
Cheers Guy's, thanks for looking in. @ Ron - An especially good job on conforming the one-piece wale. Unlike Sphinx, Chris opted not to provide a laser etched wale, and indicated use of three 5mm strips for the purpose. On my 'Indy' the wales are made up of four strakes of Top and Butt planking which I felt provided a more authentic look. Regards, B.E.
- 648 replies
-
- 3
-
-
- Indefatigable
- Vanguard Models
- (and 1 more)
-
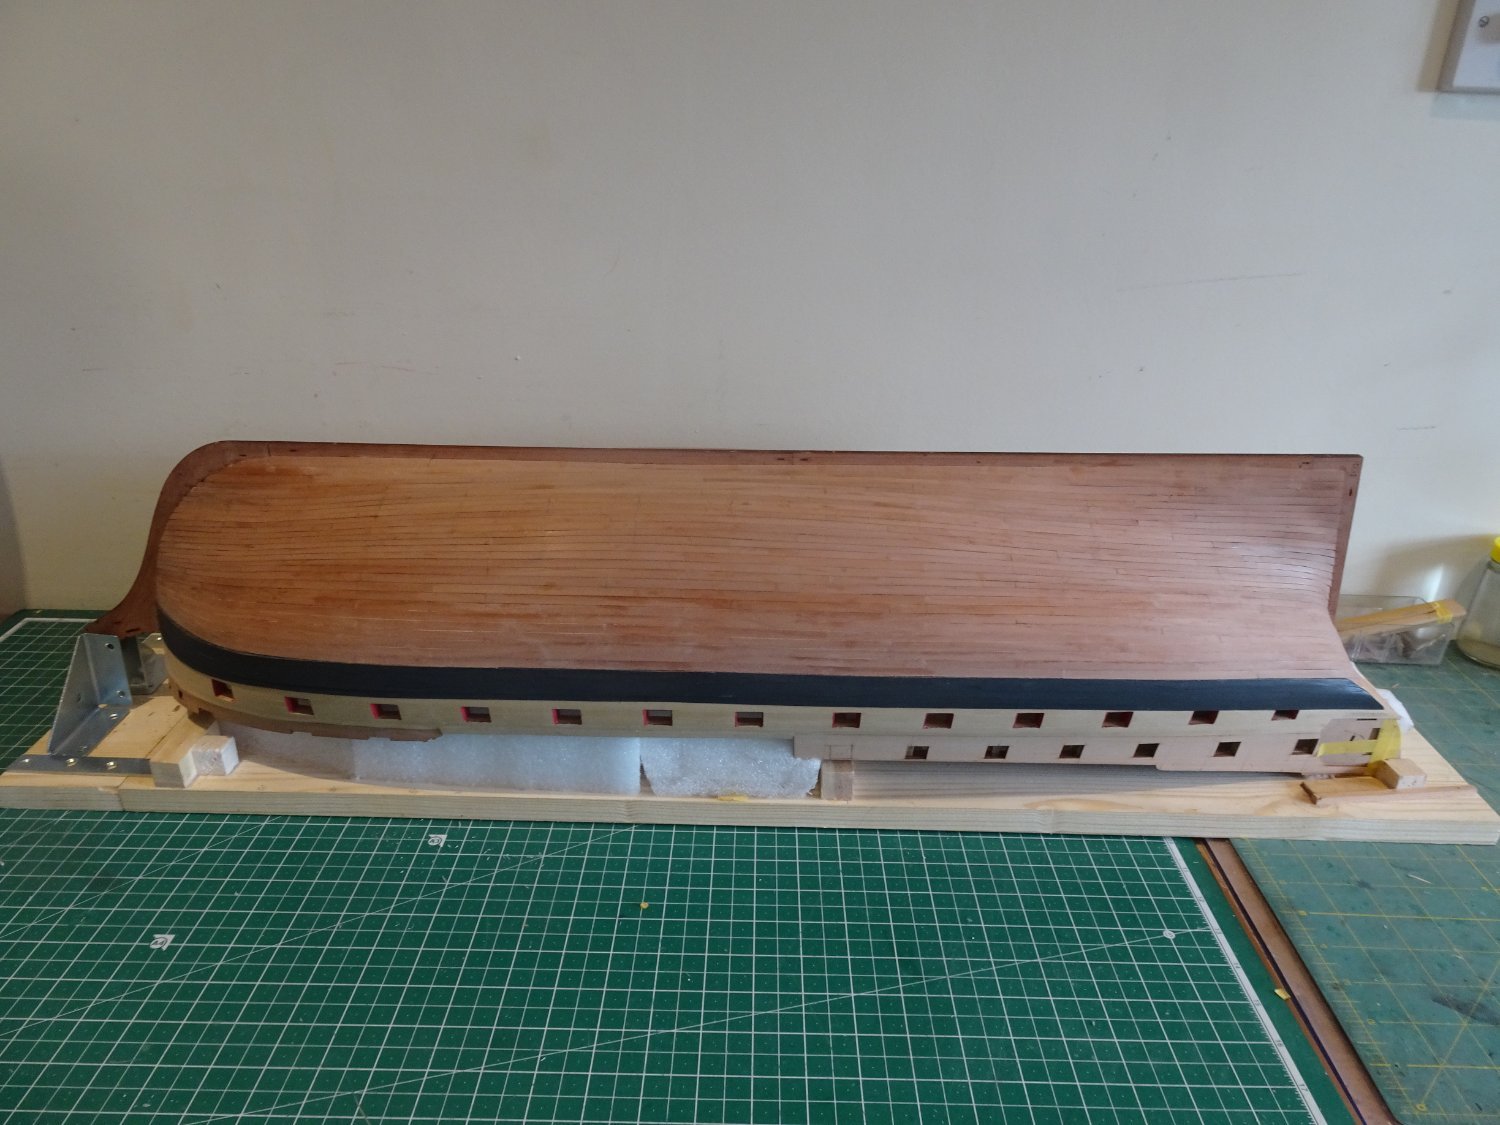
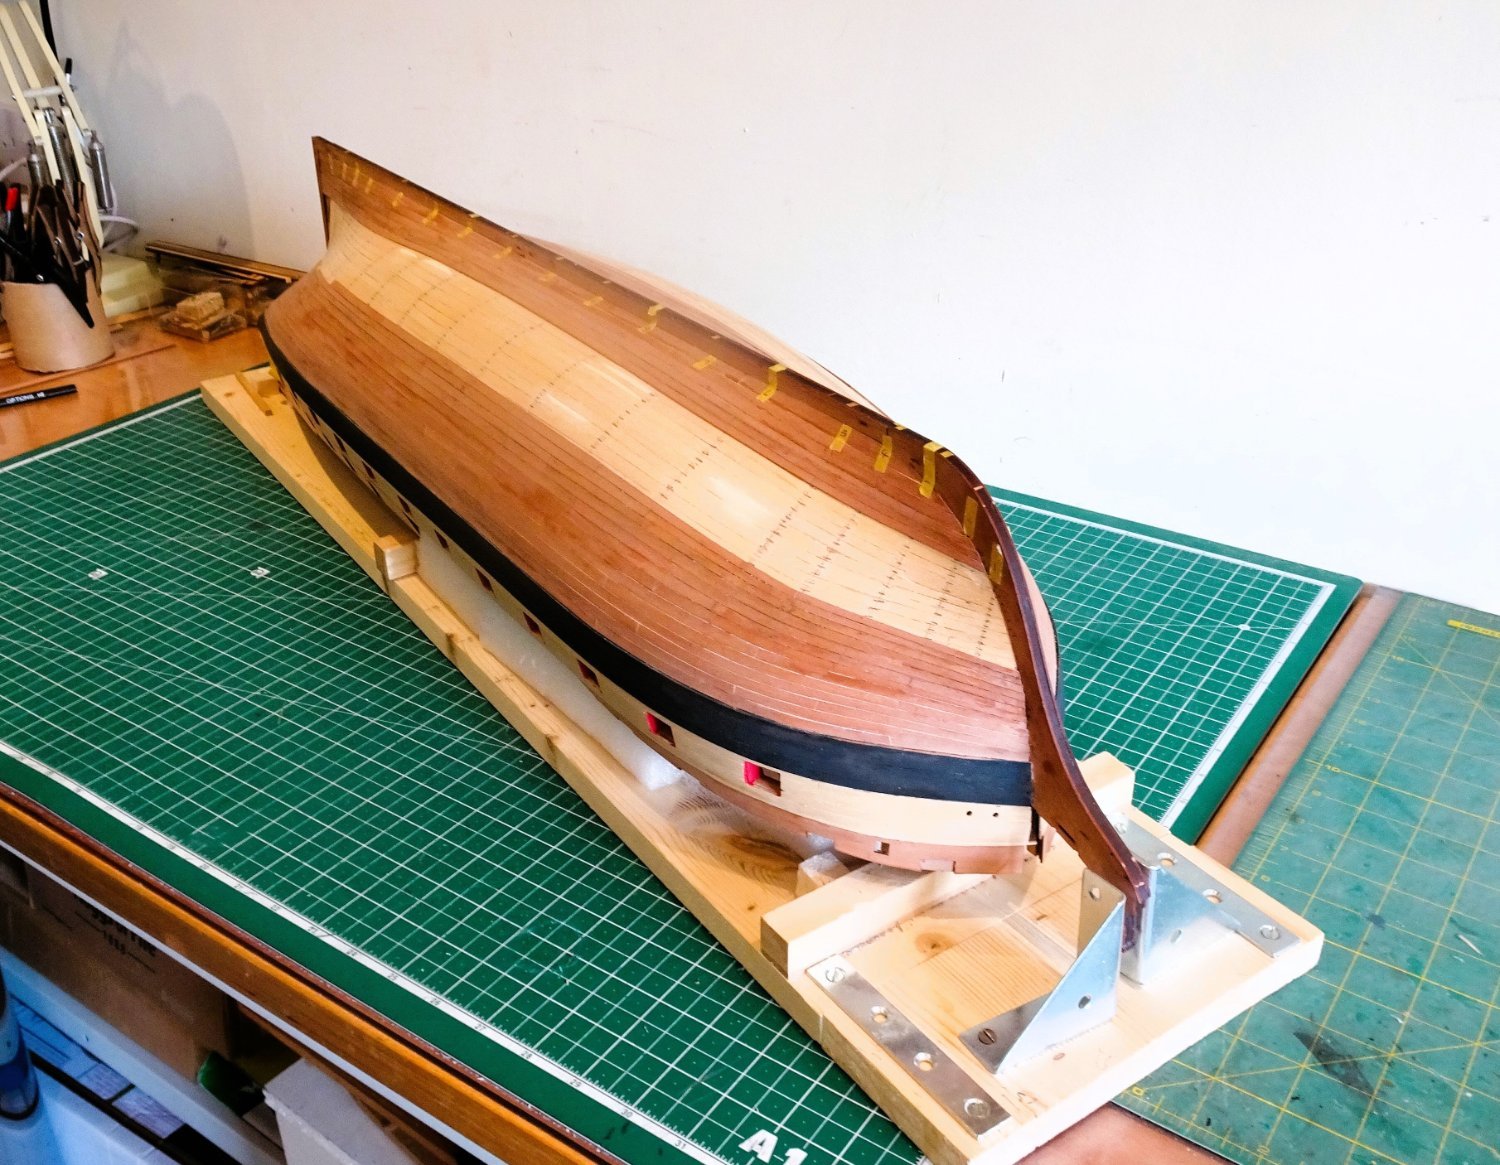
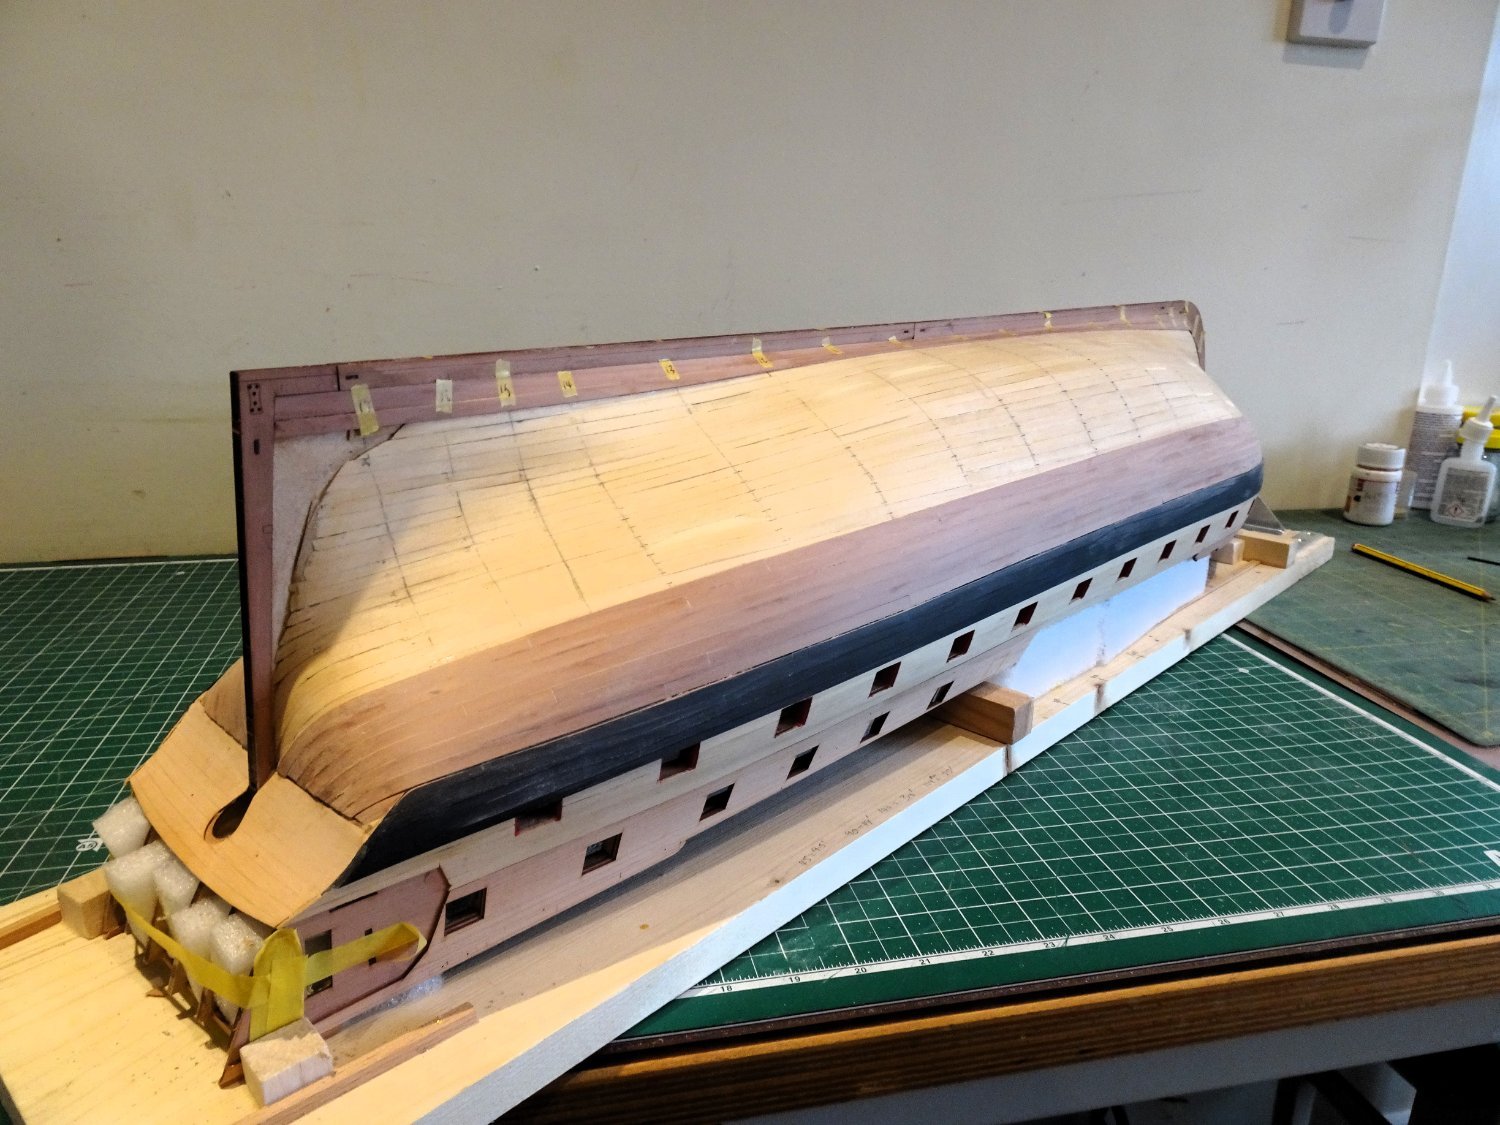
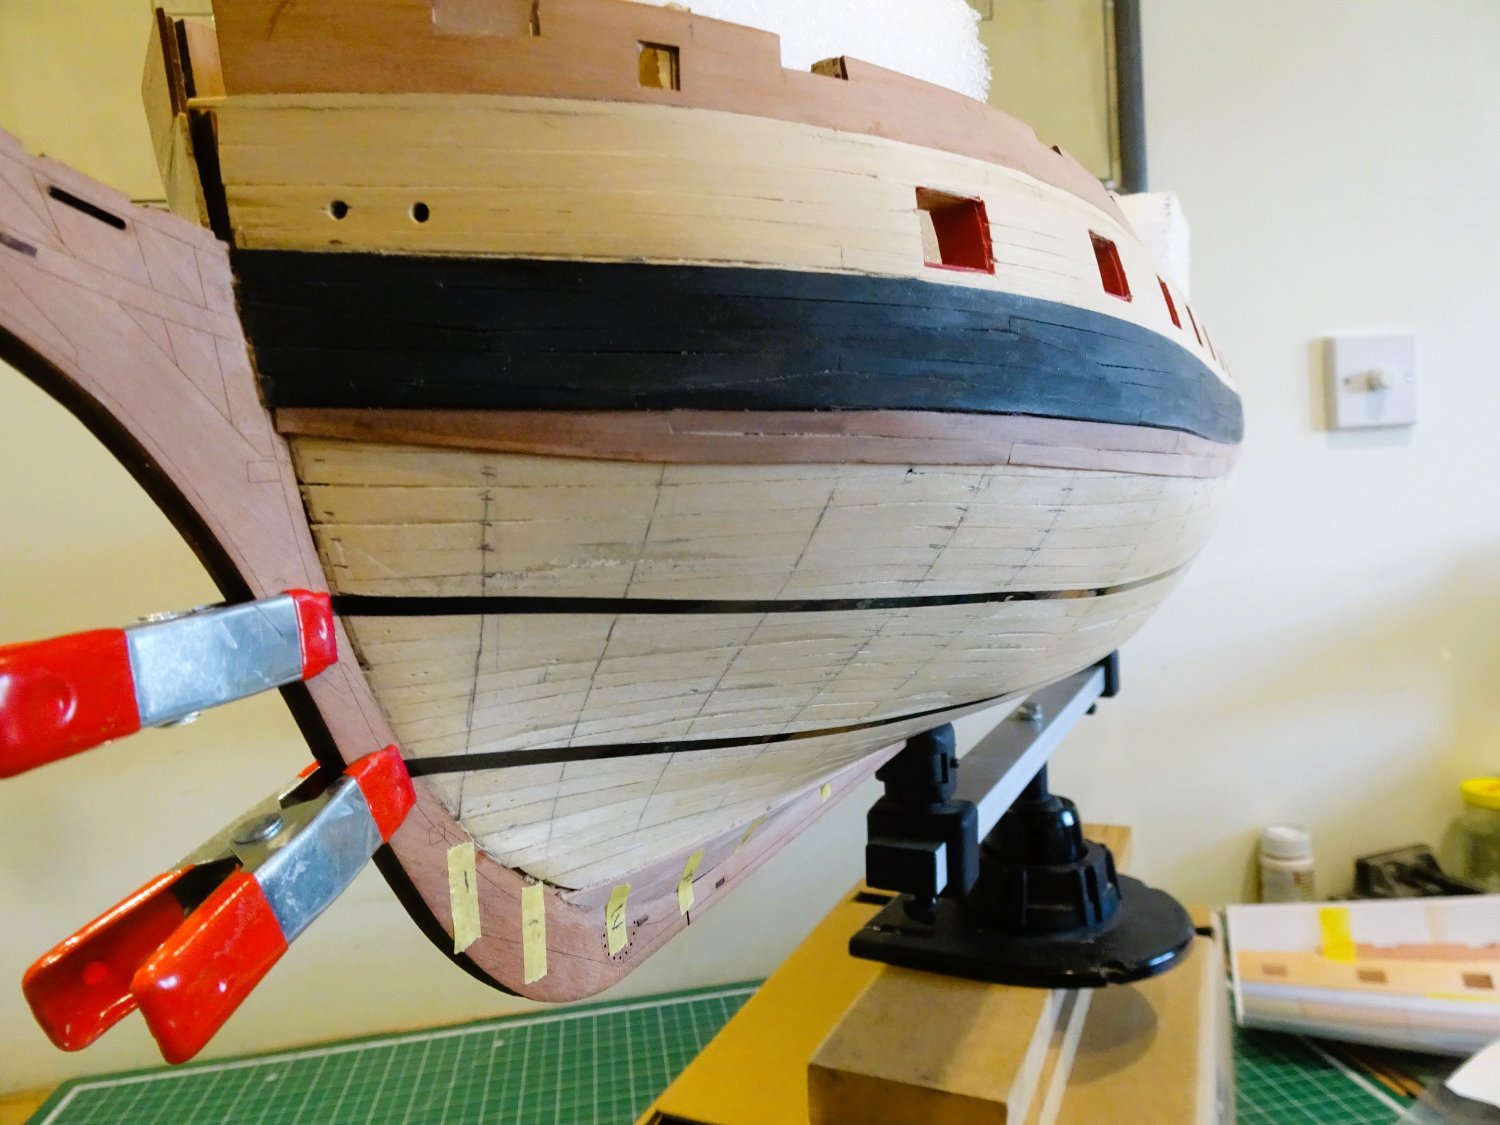
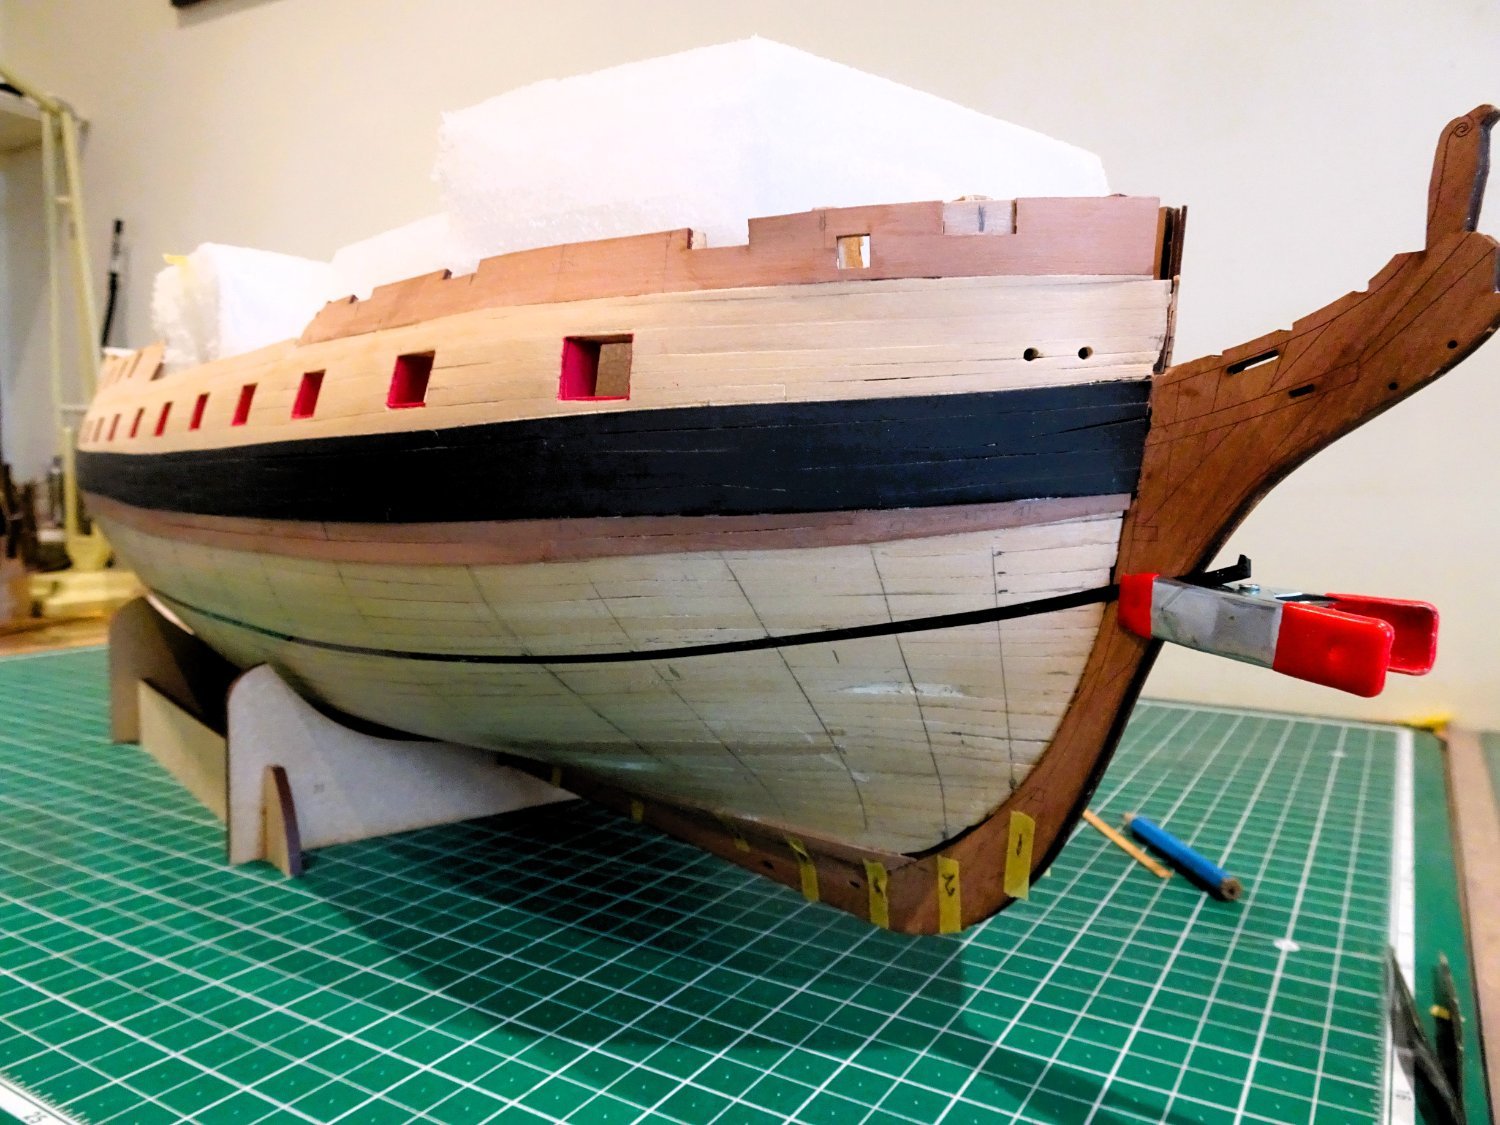
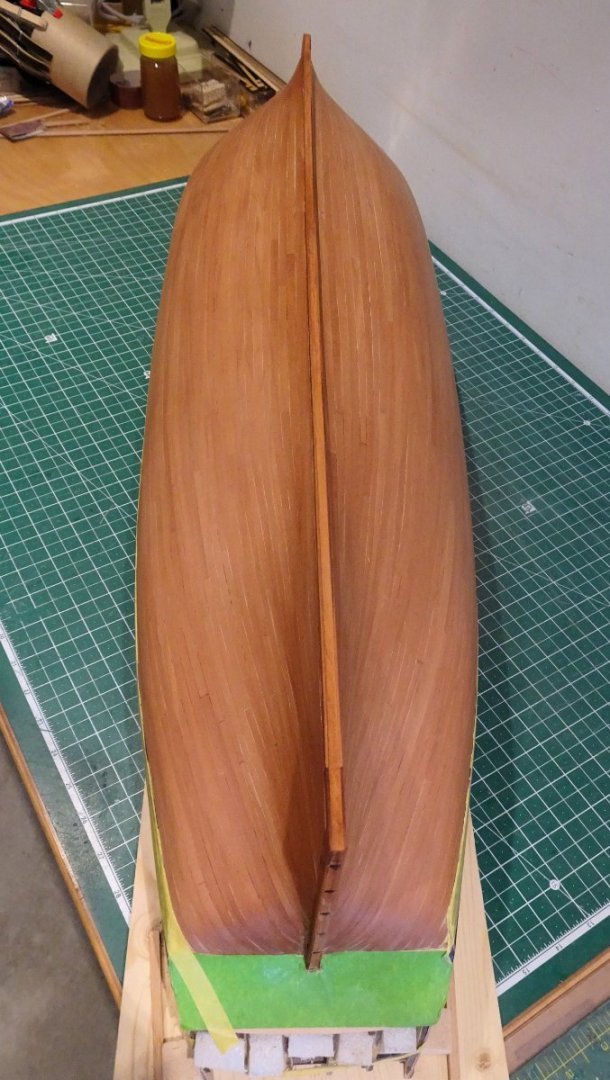
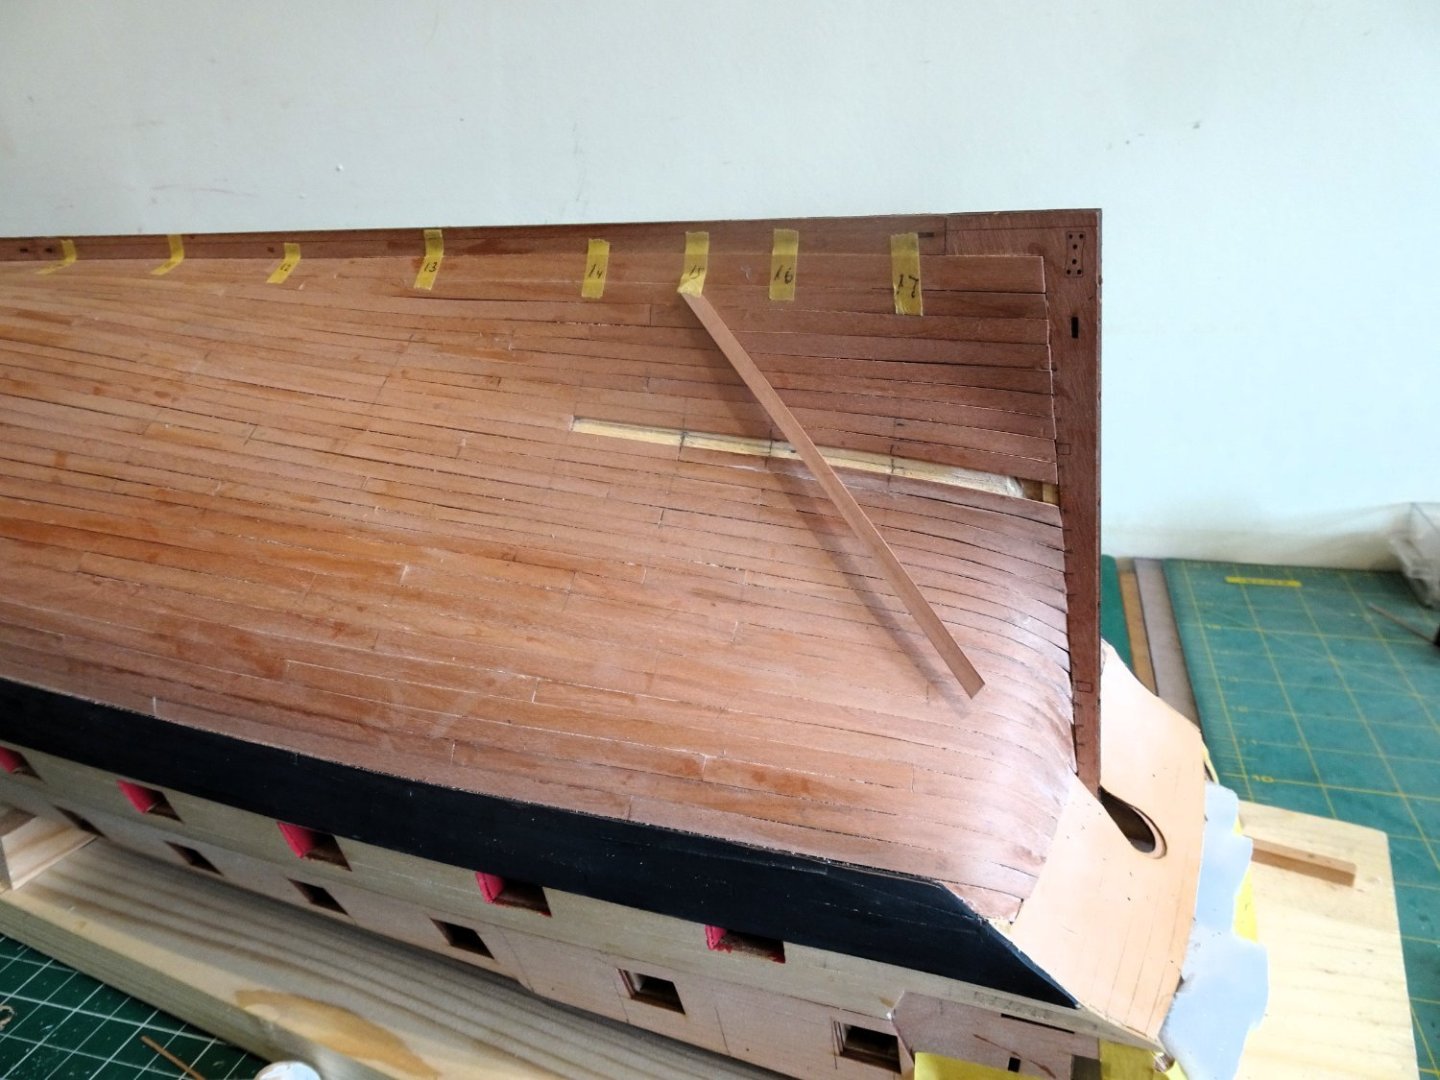
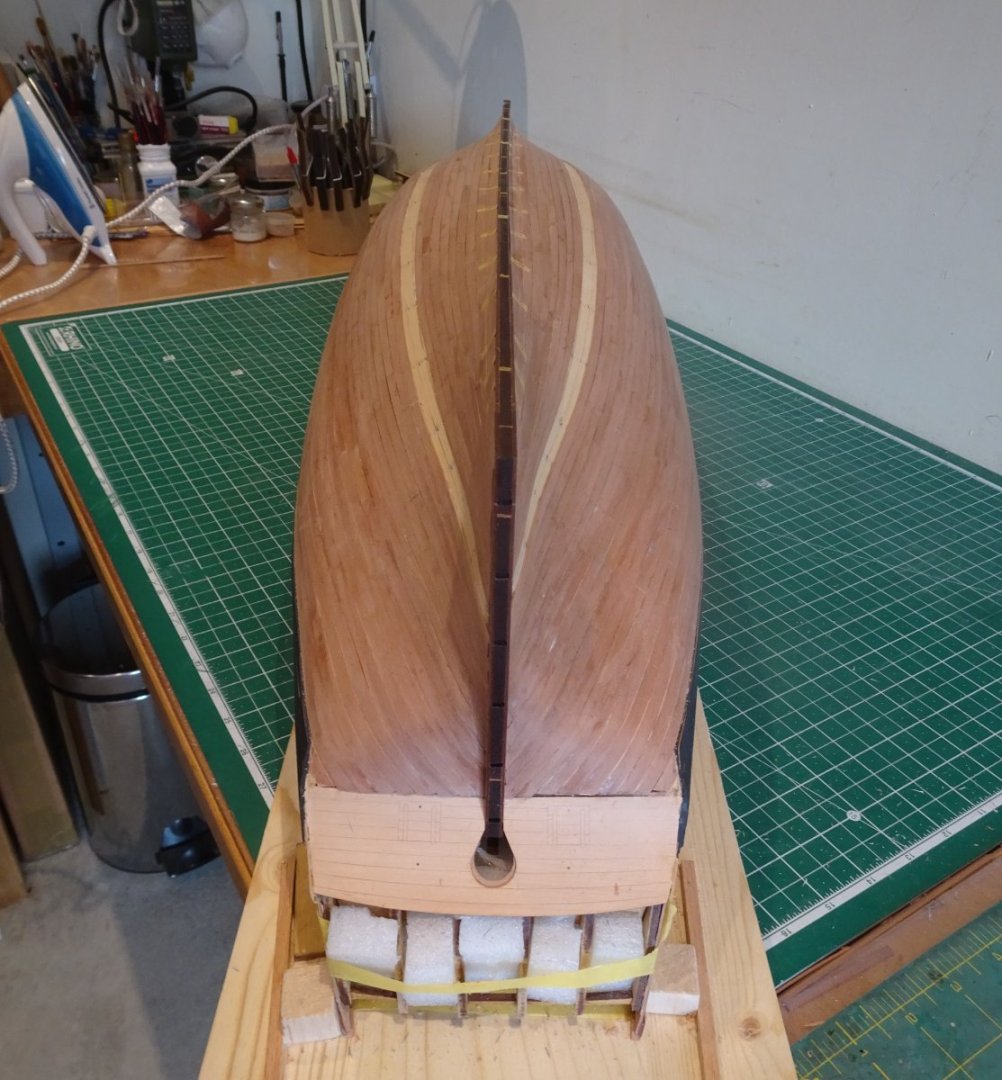
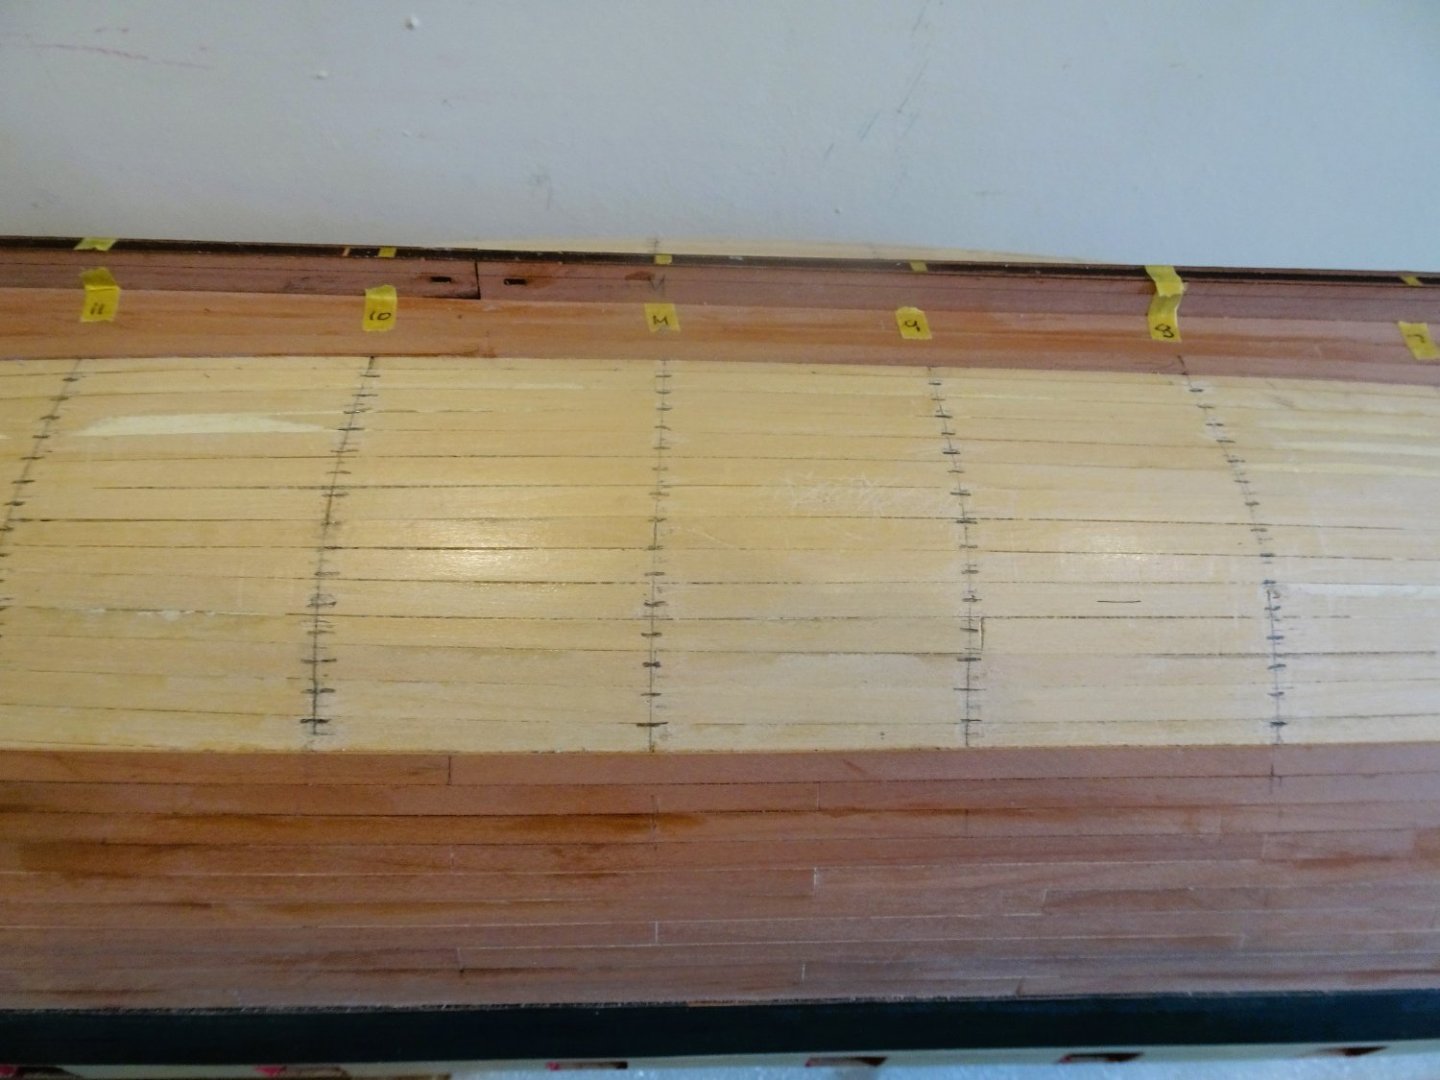
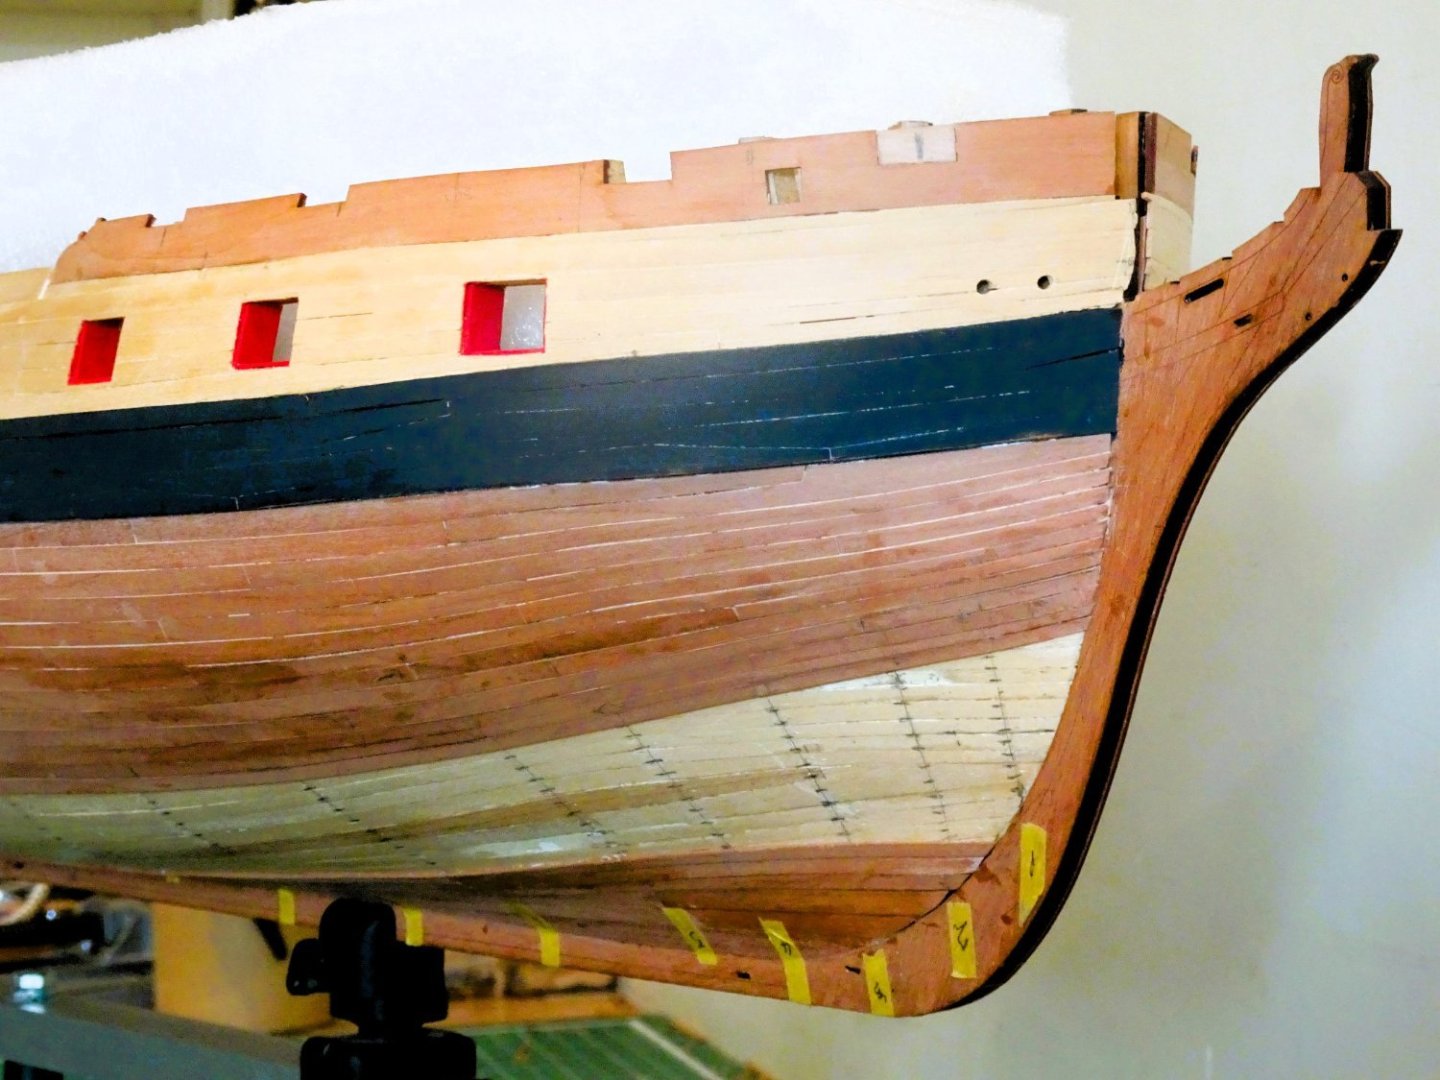
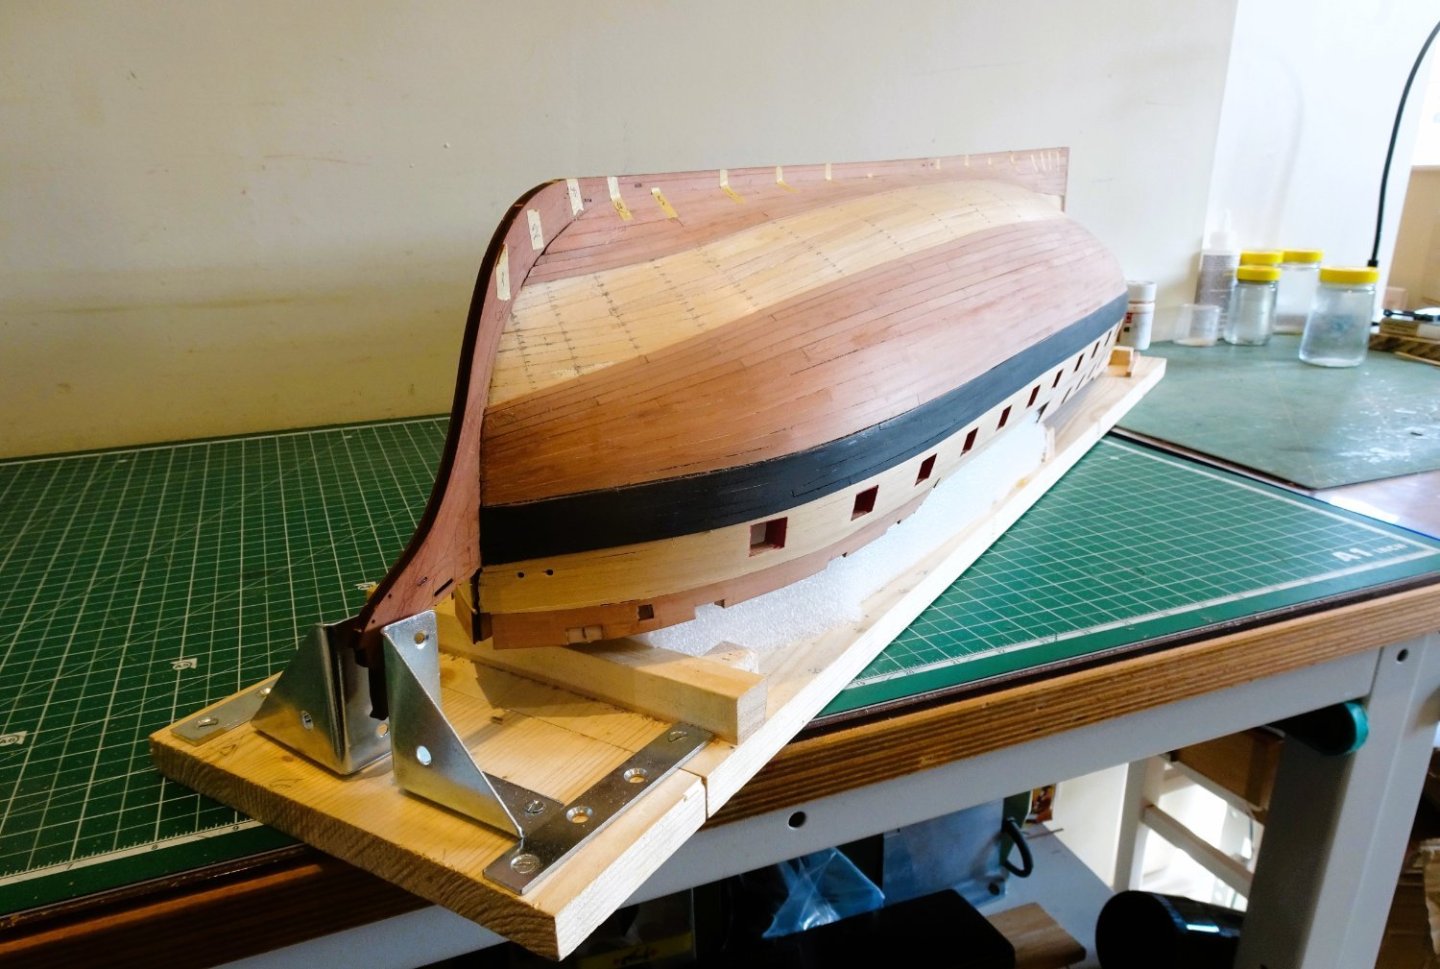
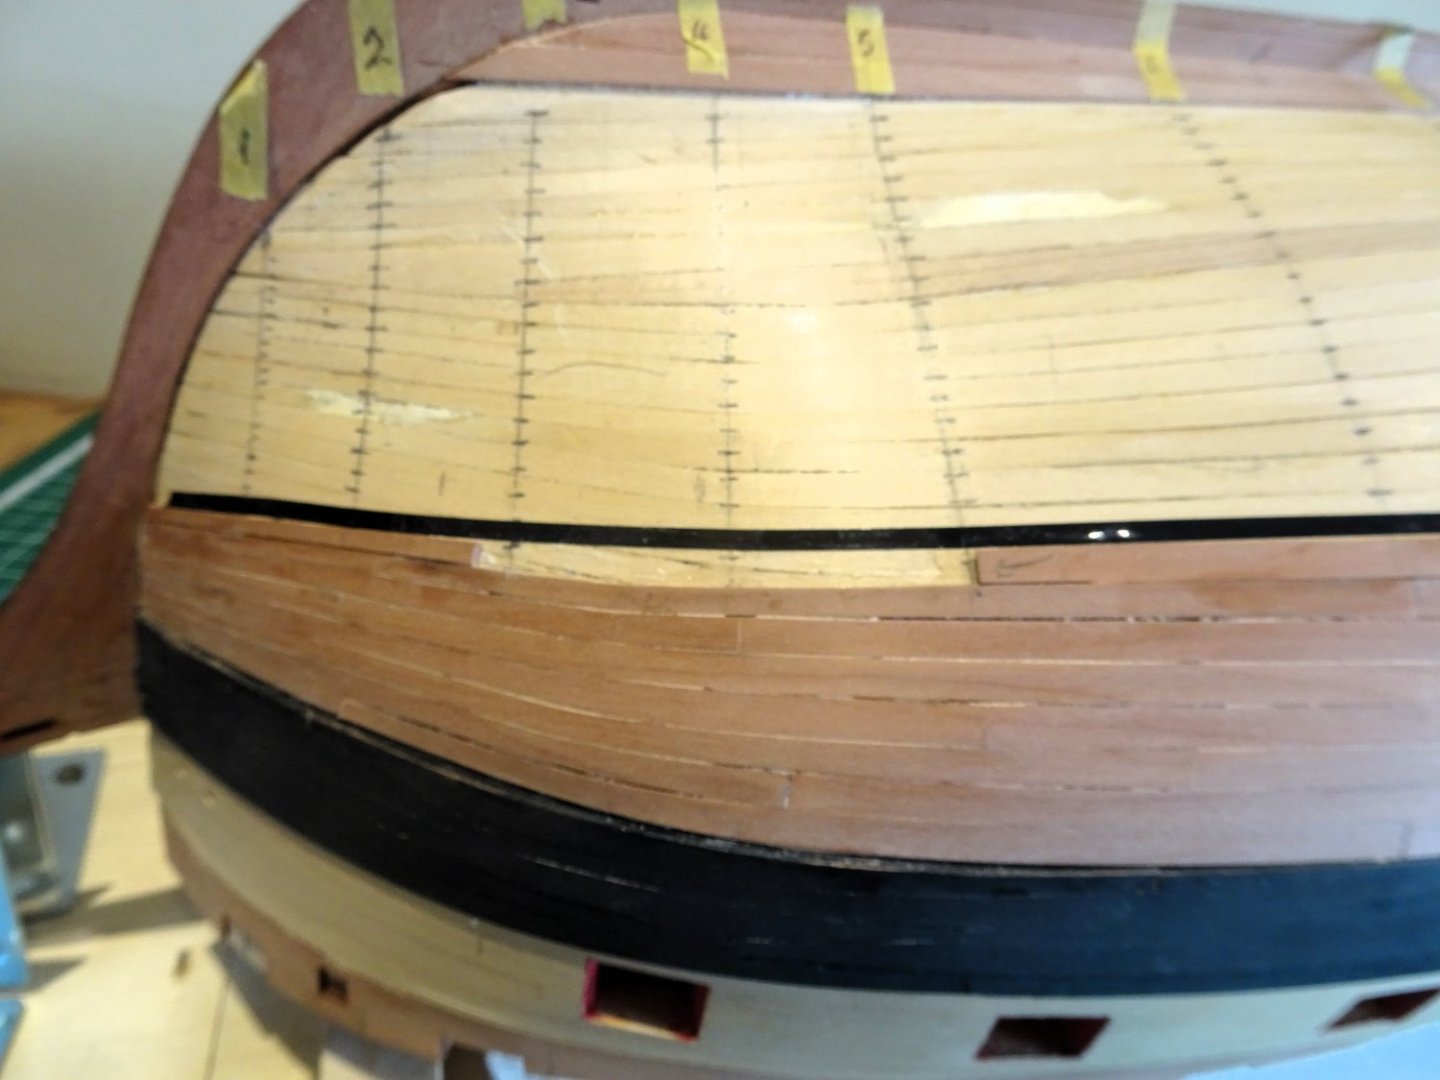
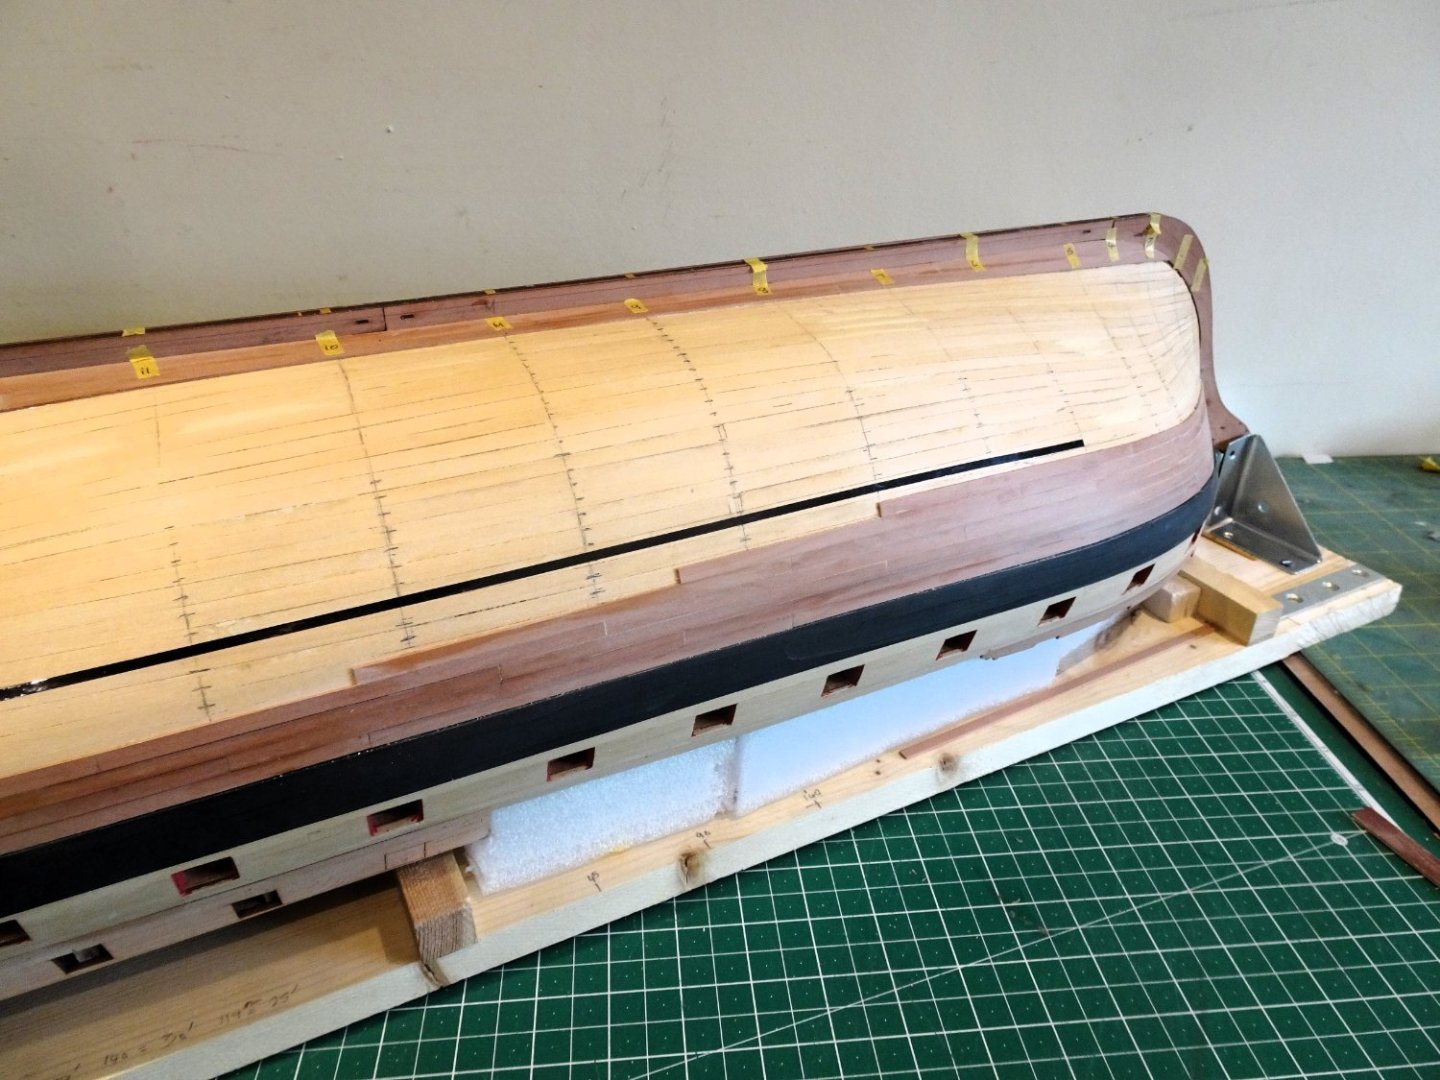
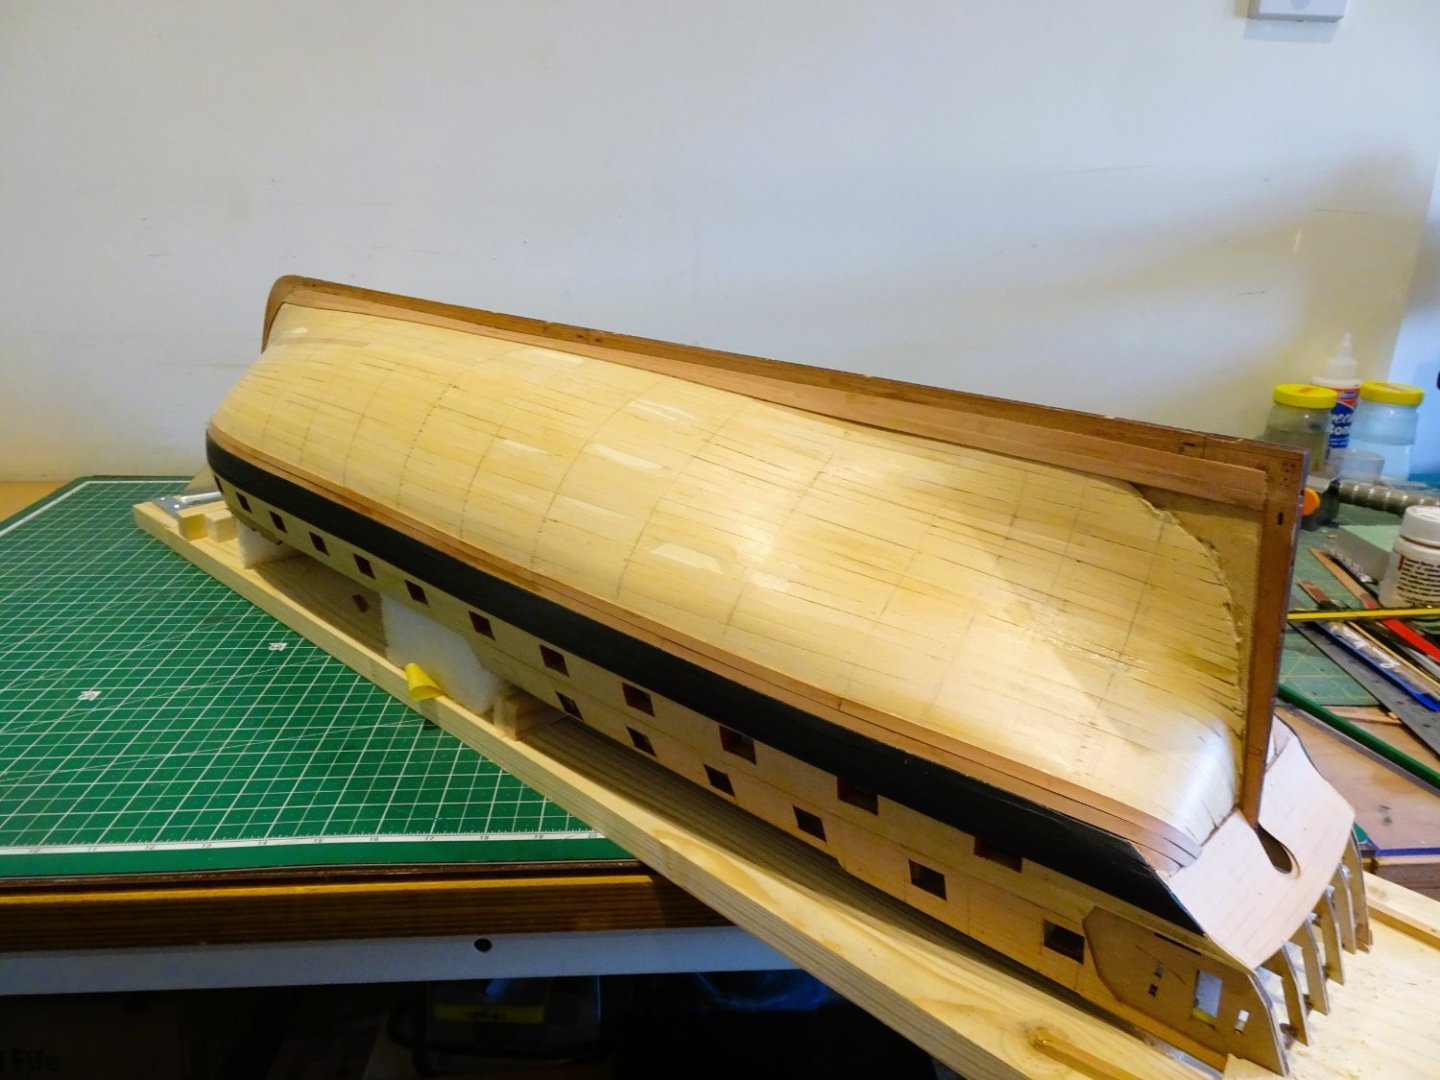
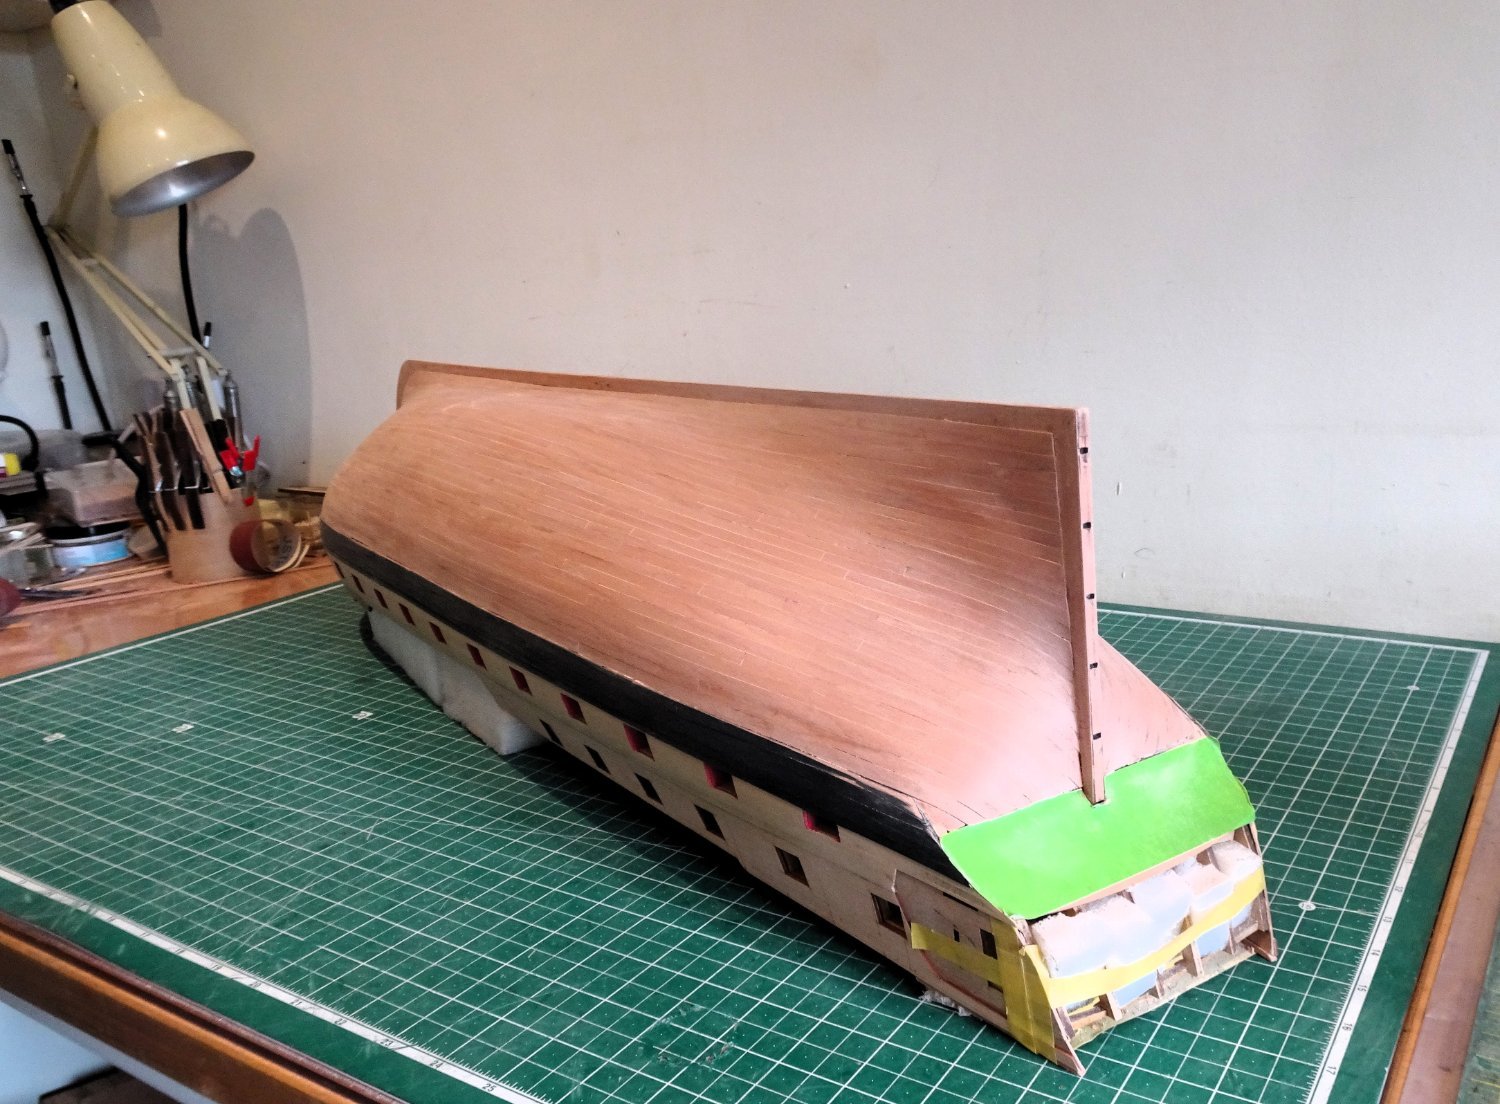
Post Forty-nine Sanding the hull For this I’m using a combination of 120 and 320 grit papers for the initial clean up. 1391 As I go, I collect the pear dust for use in any minor gaps between the planking. After a full day of sanding and stiffening fingers, I think I’m nearly there. 1395 1400 1402 1403 1404 1407 I’ll review it in the morning, and once I've had a general tidy up in my office, perhaps wop a coat of wop on it. B.E. 13/07/2023


- 648 replies
-
- 24
-
-
- Indefatigable
- Vanguard Models
- (and 1 more)
-
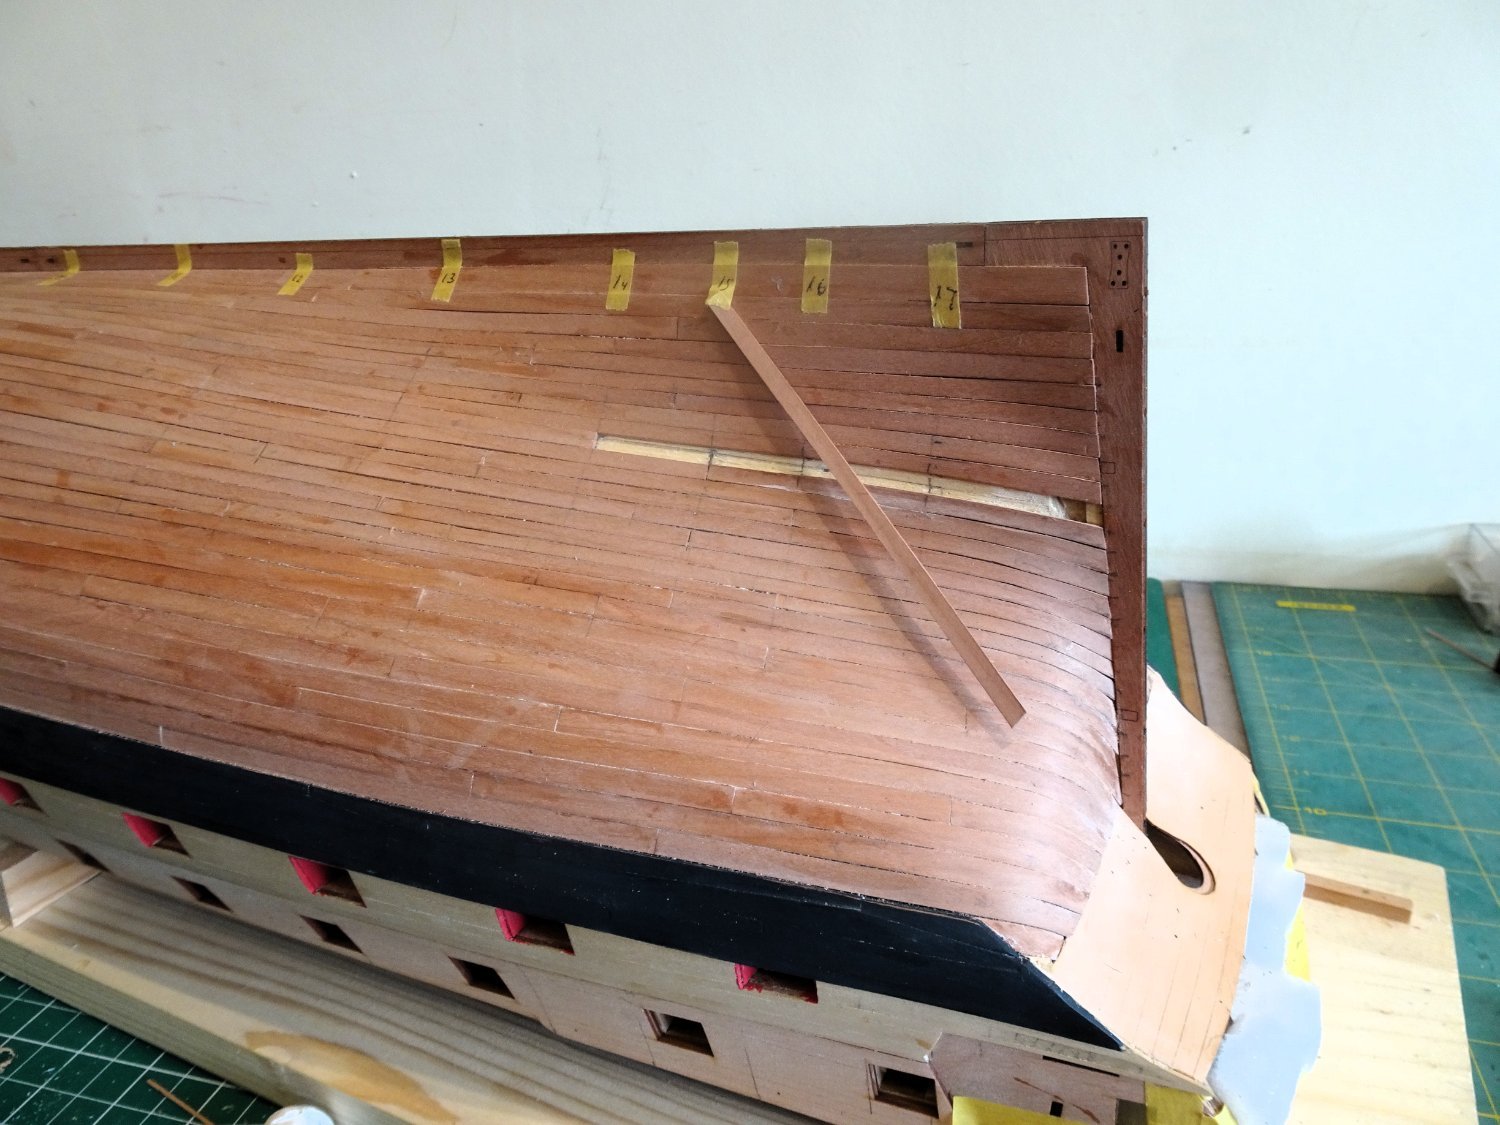
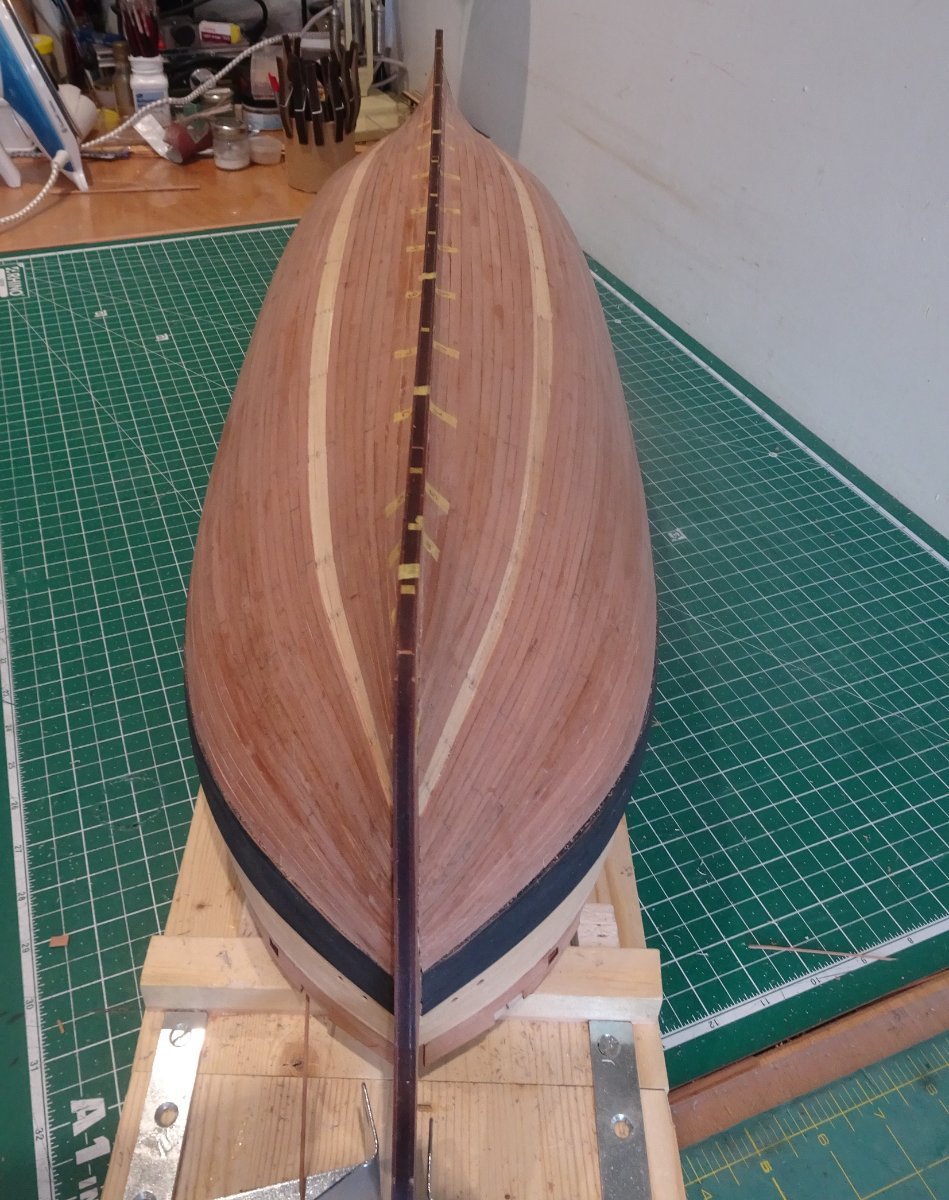
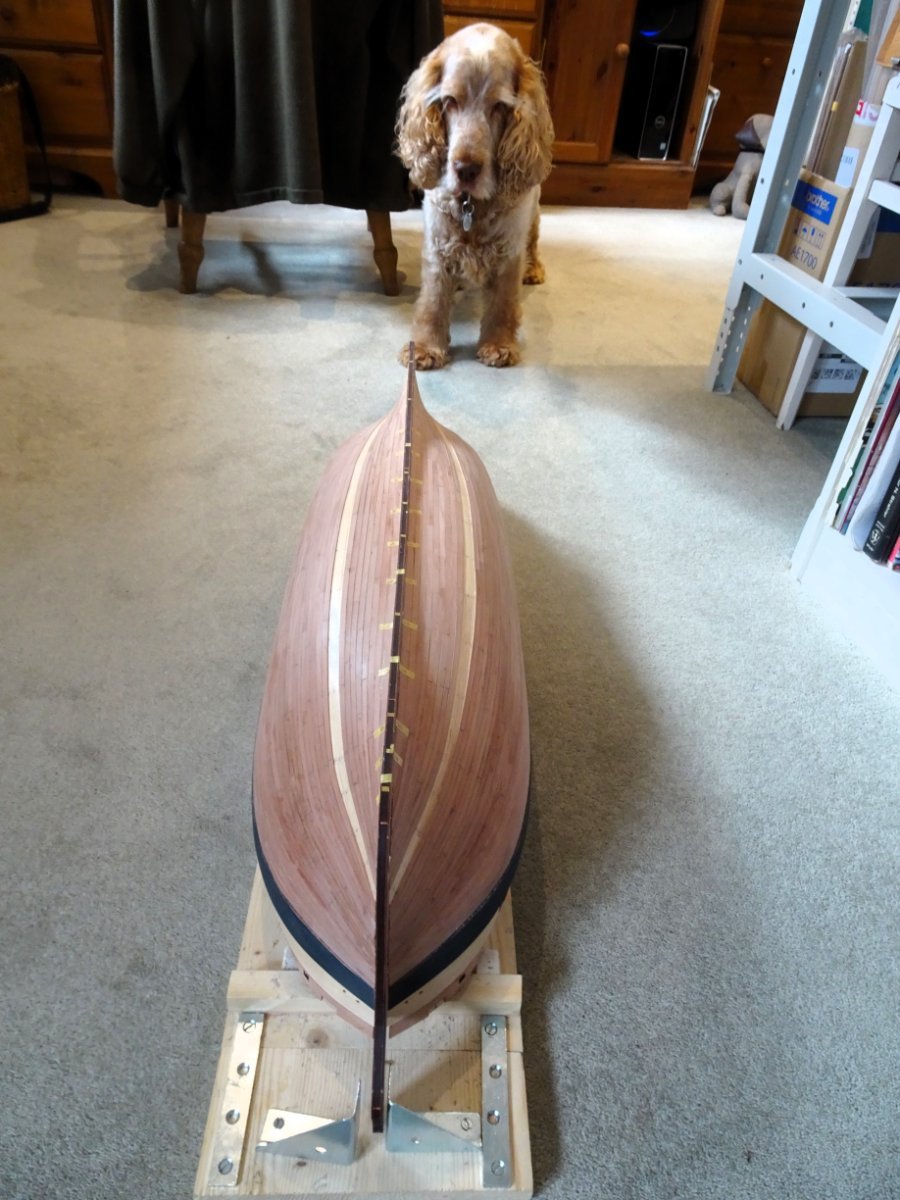
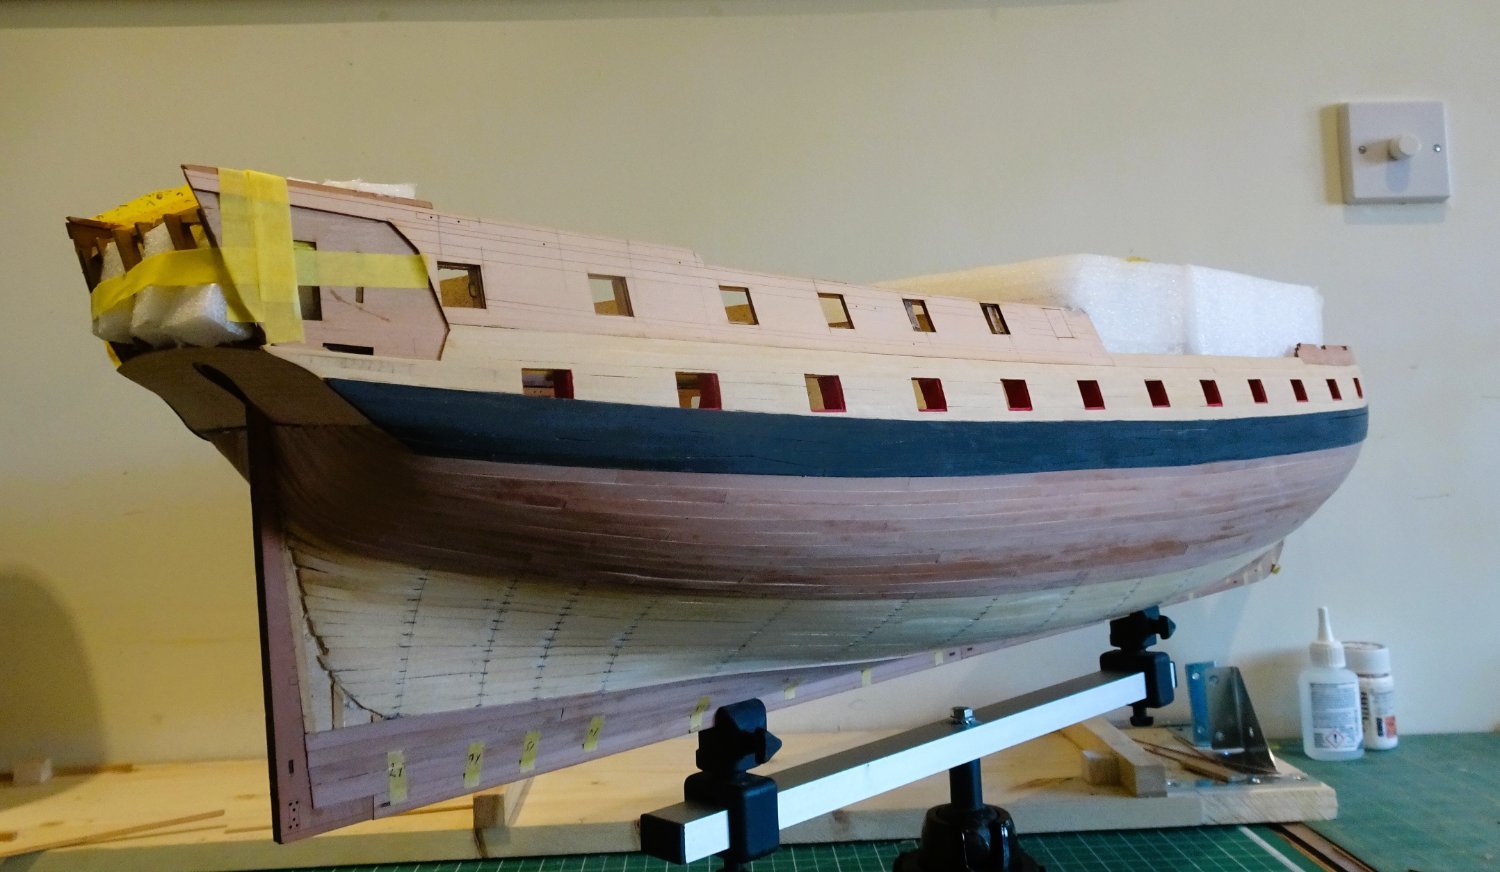
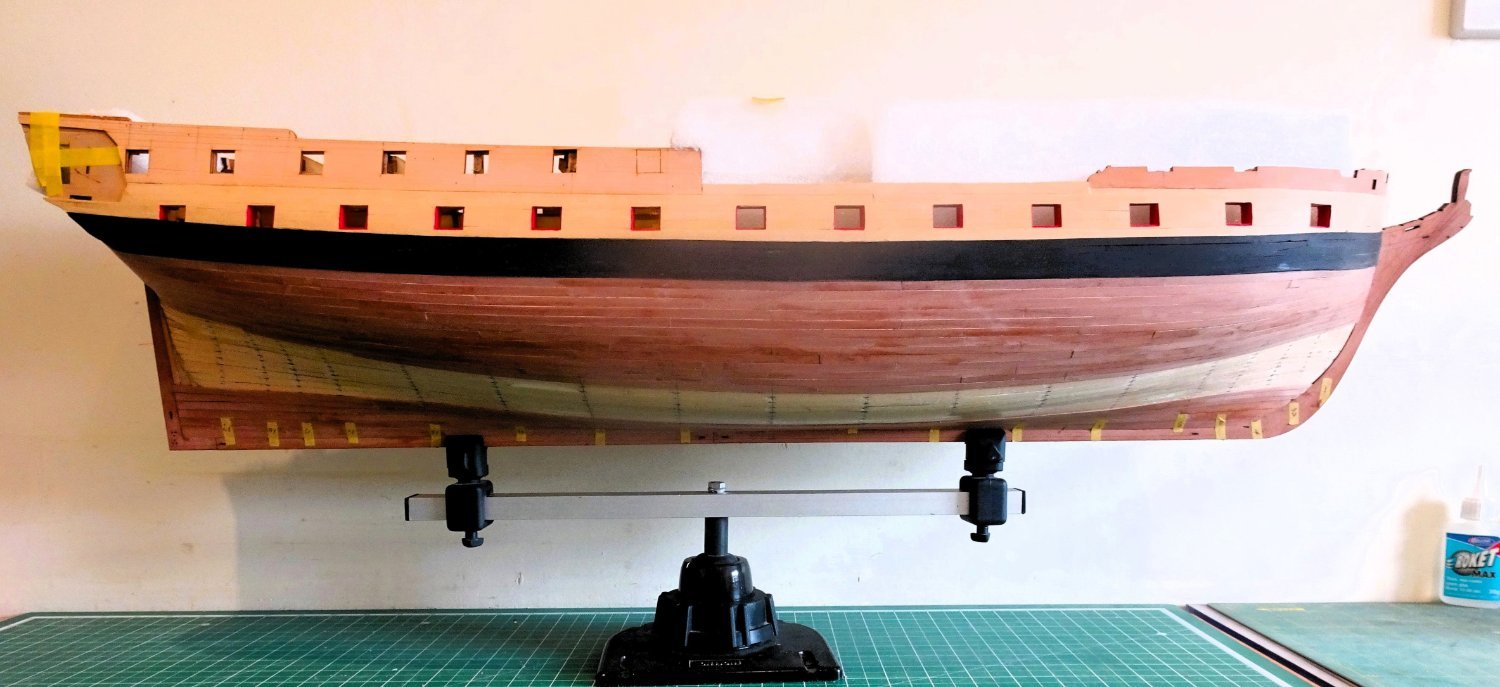
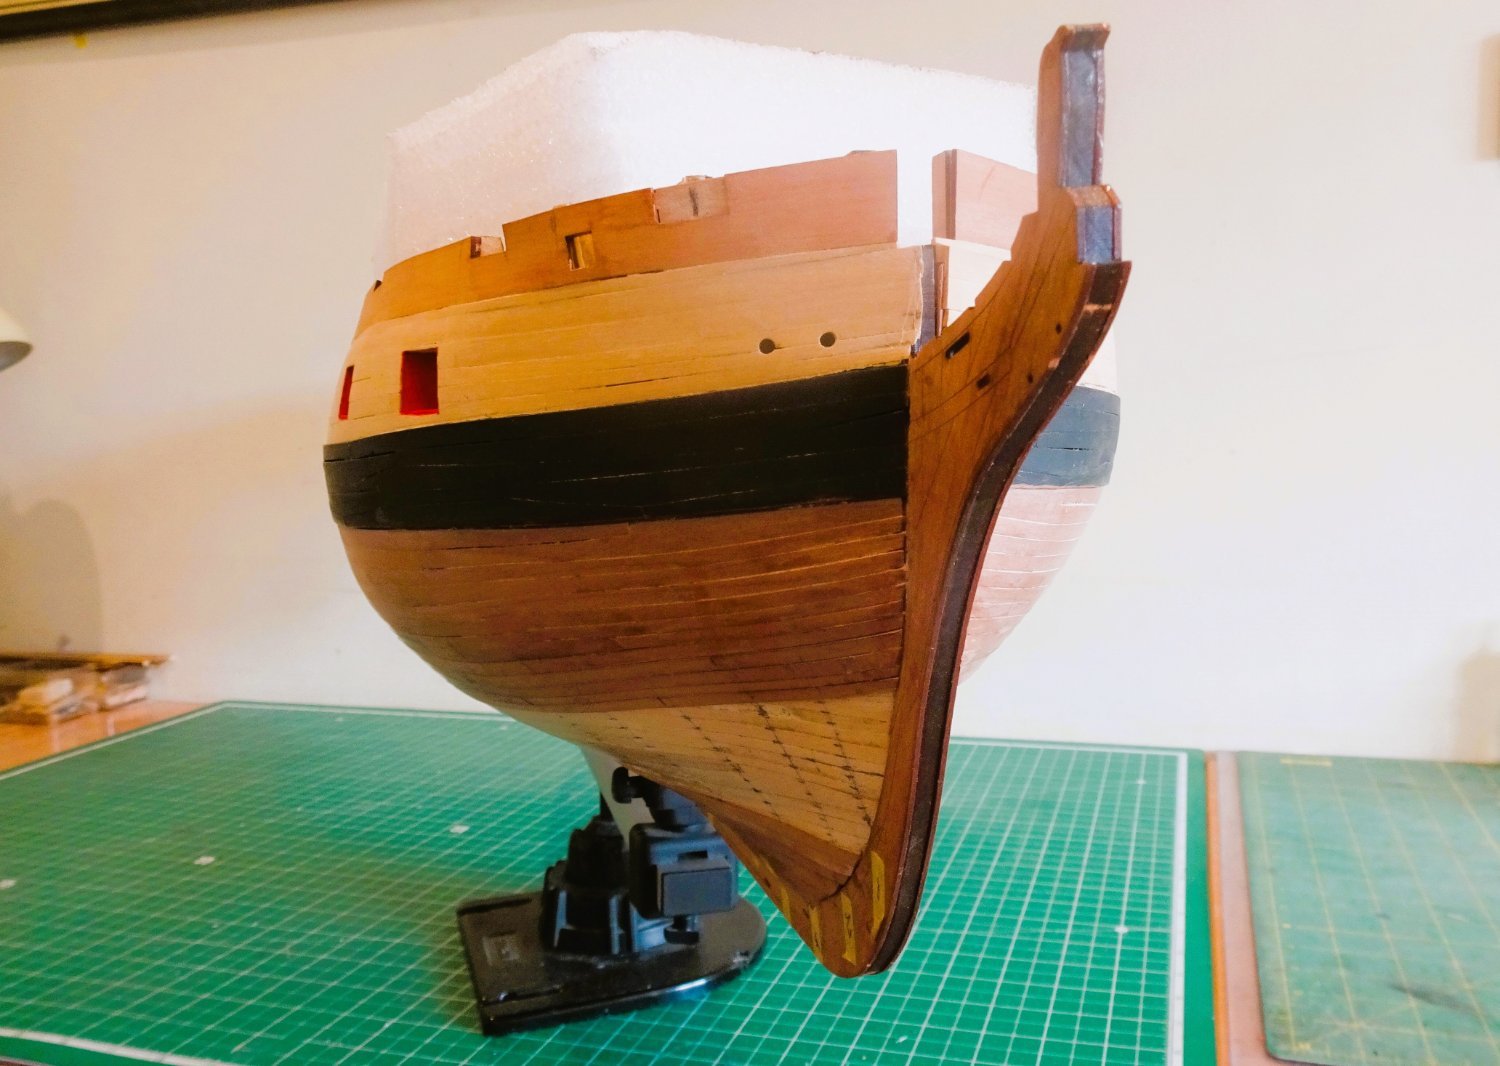
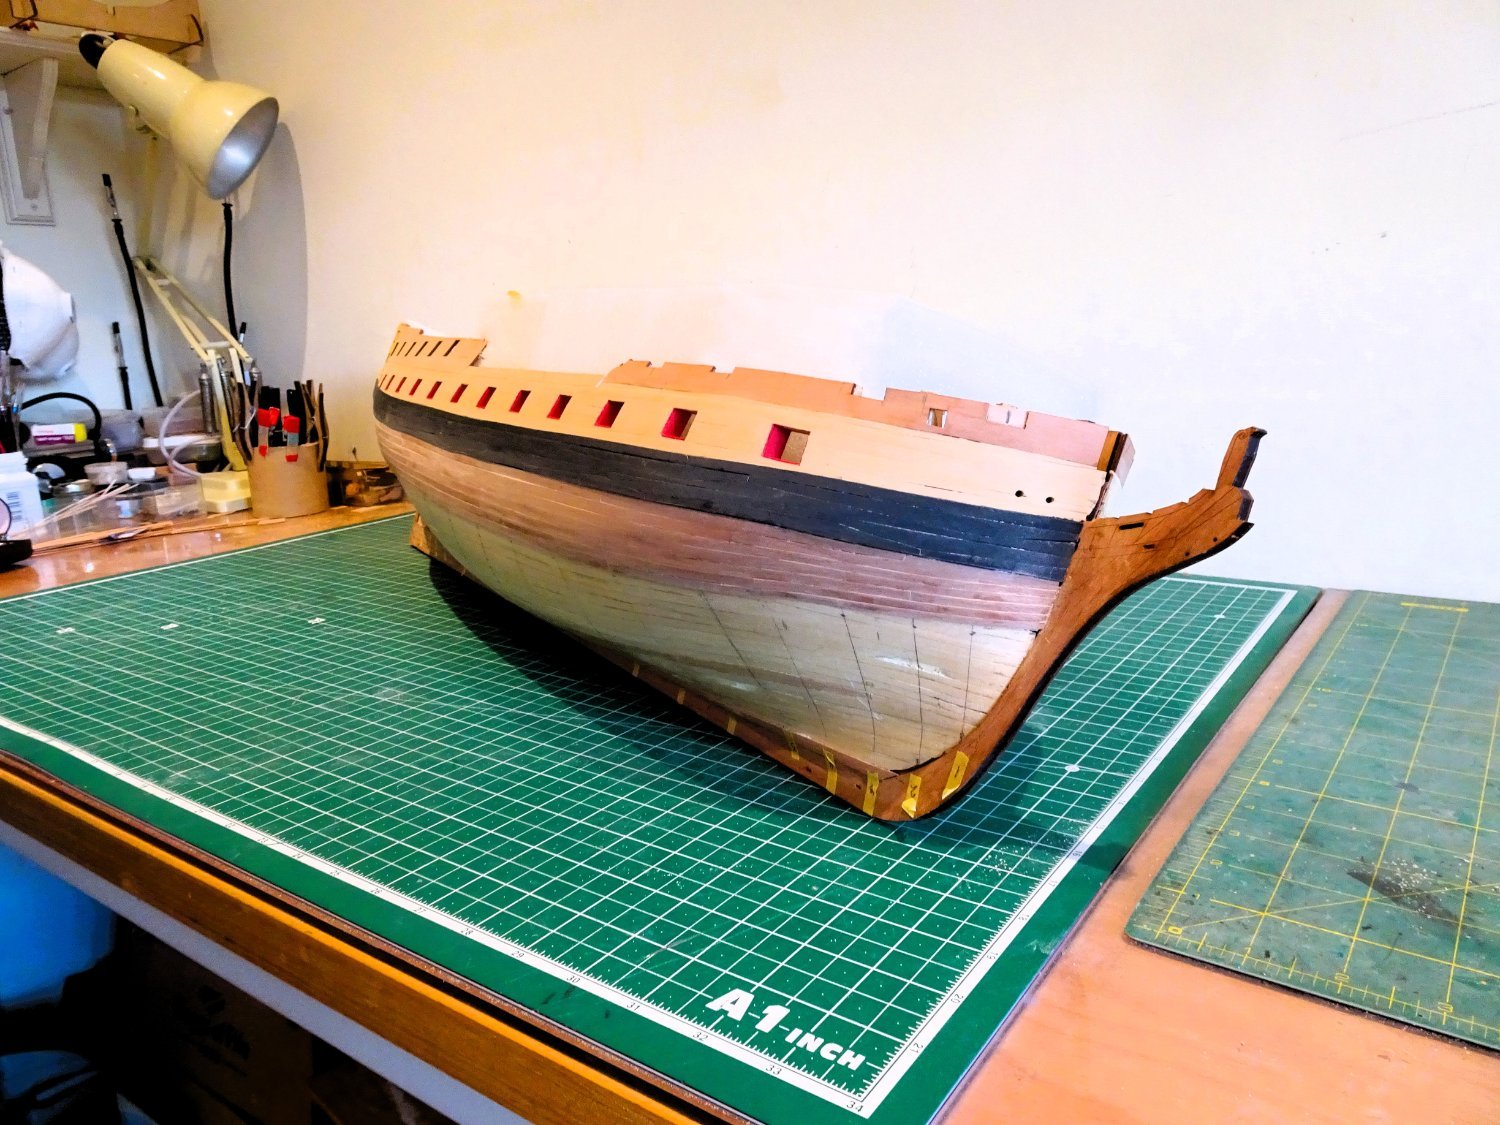
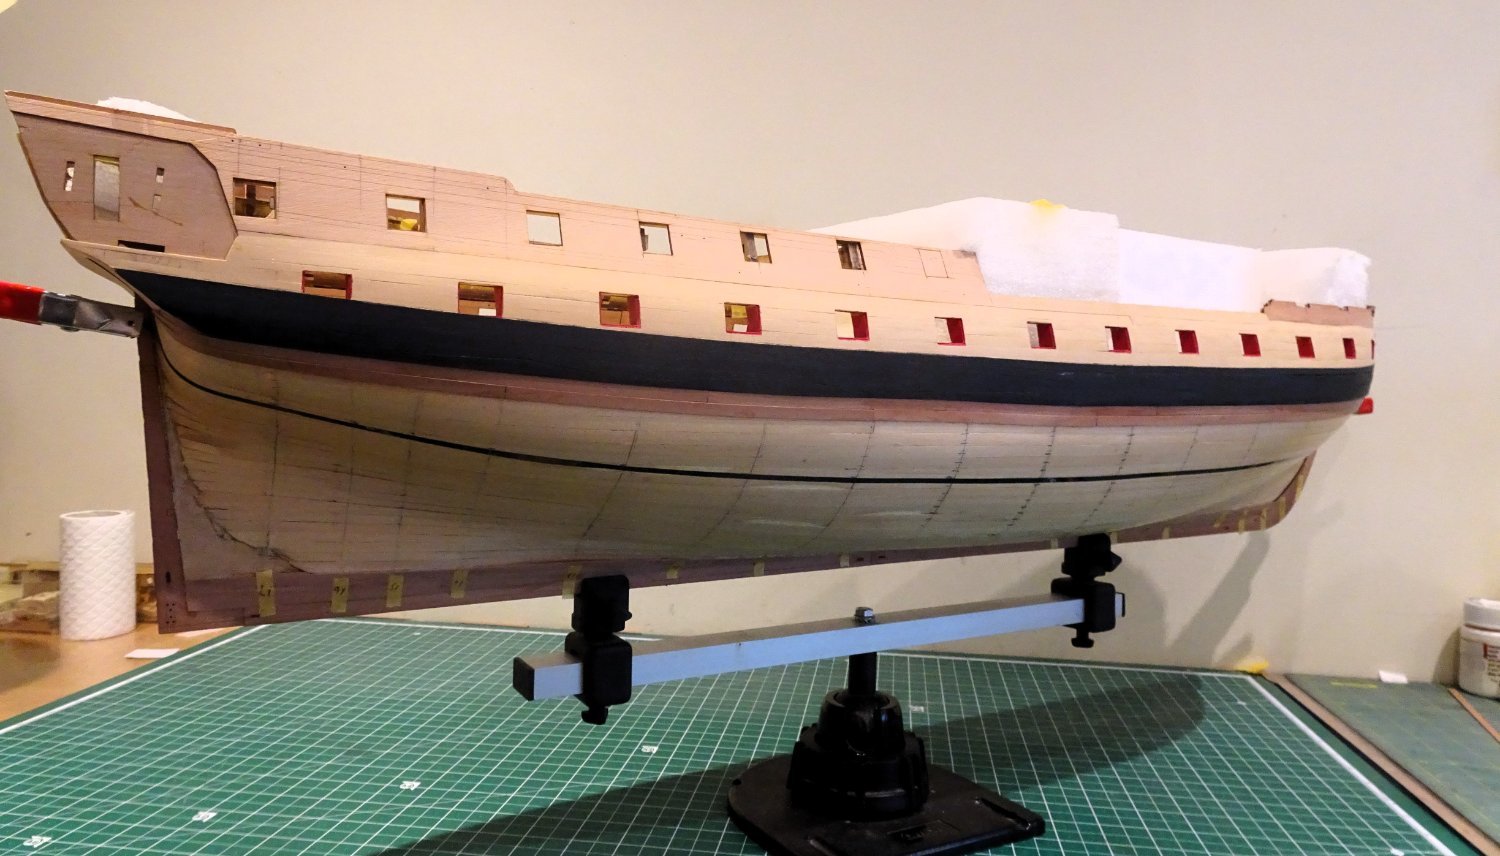
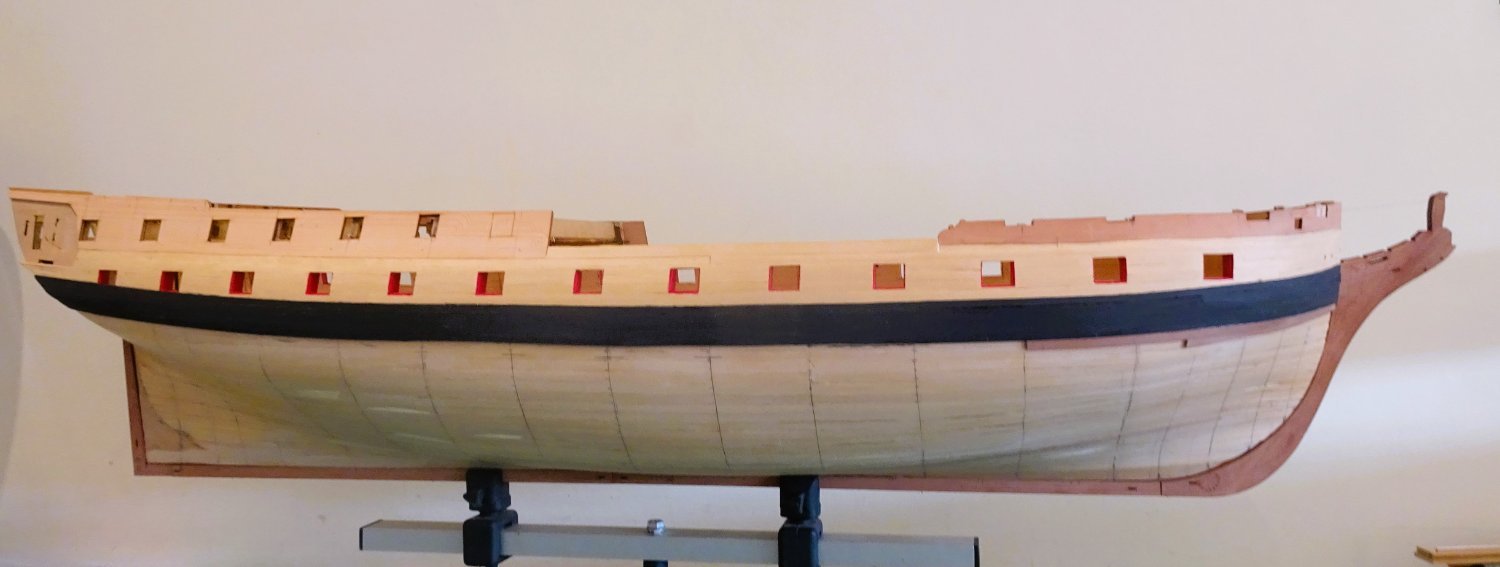
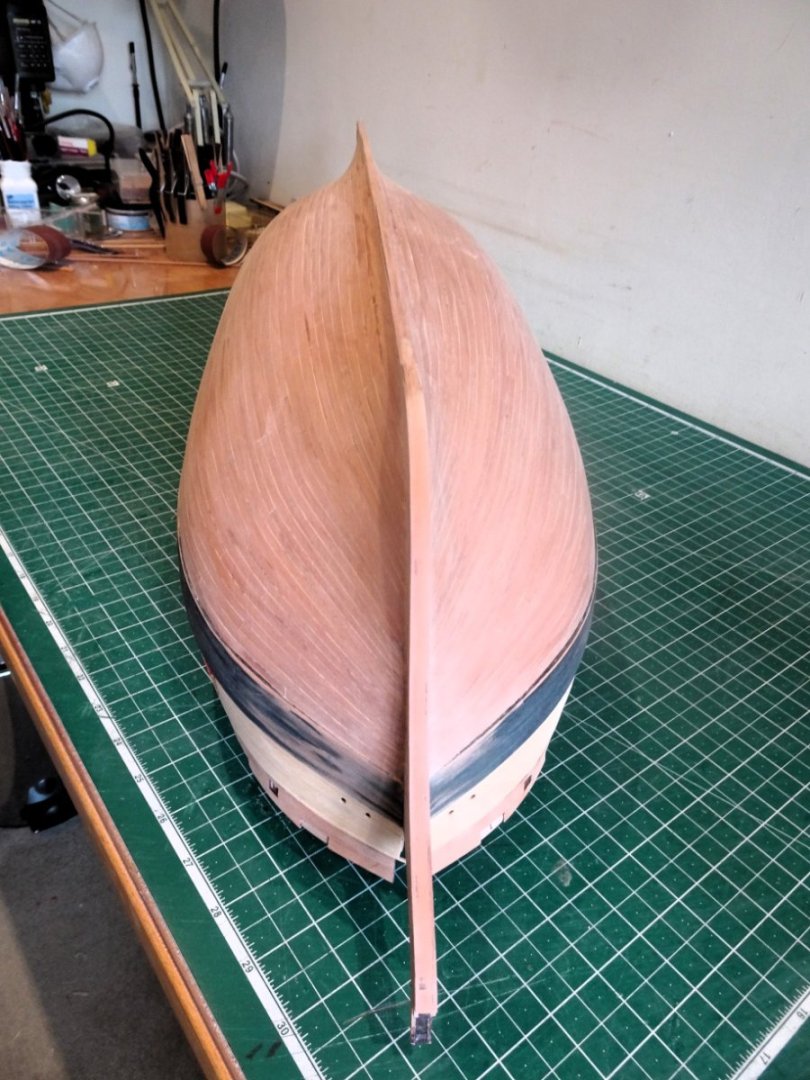
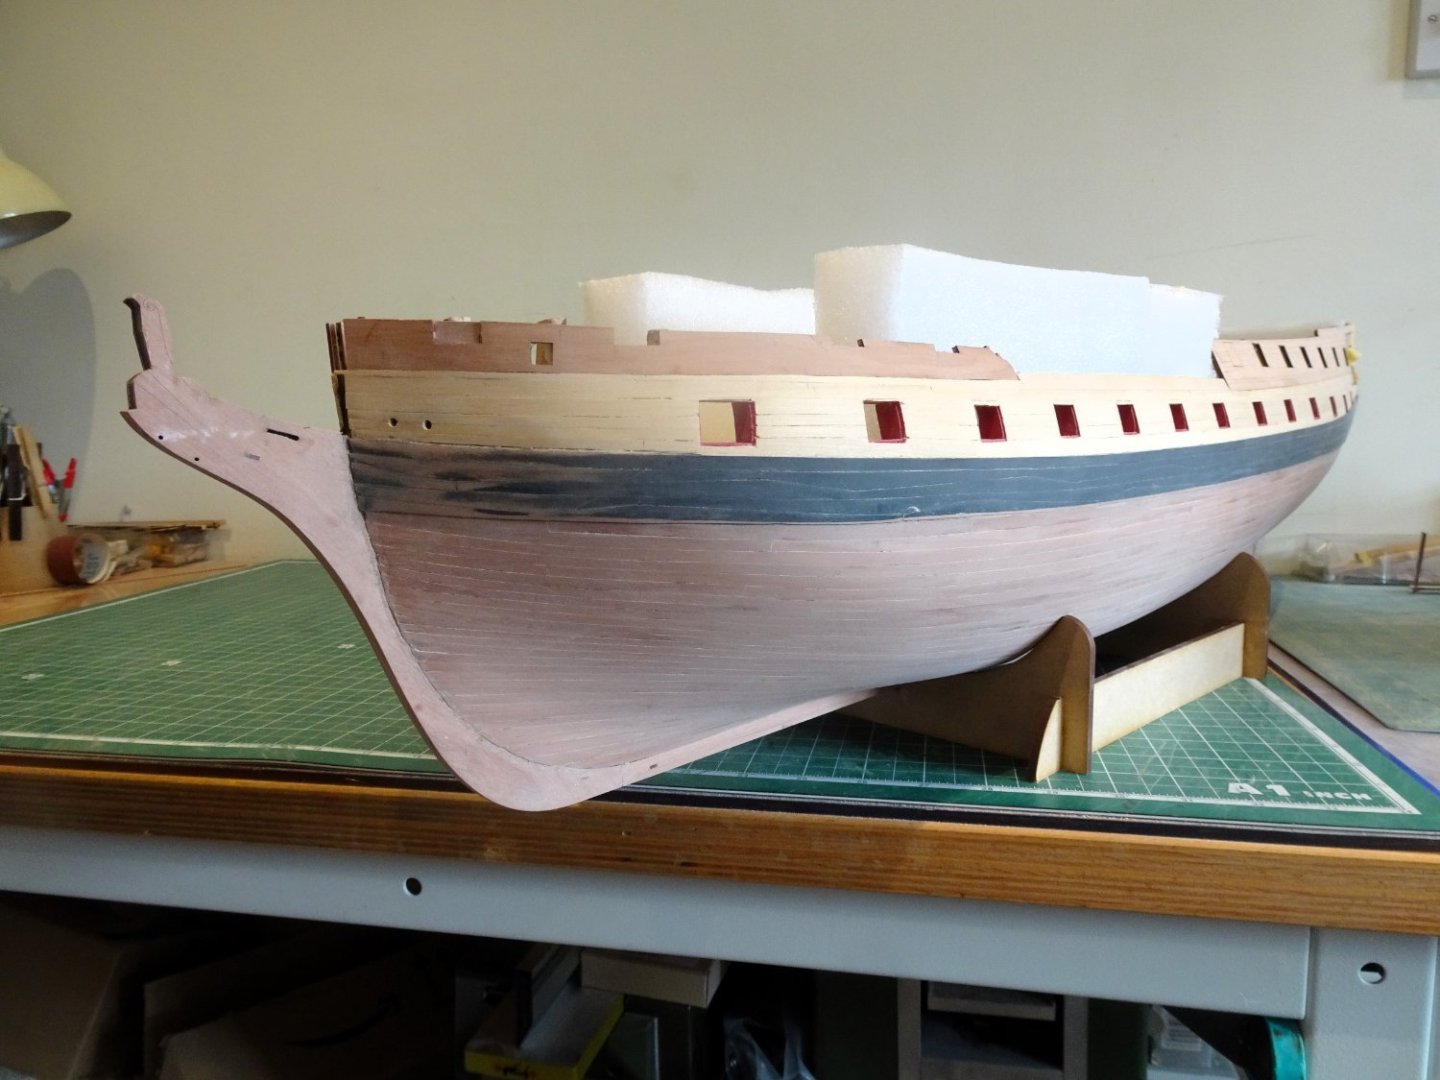
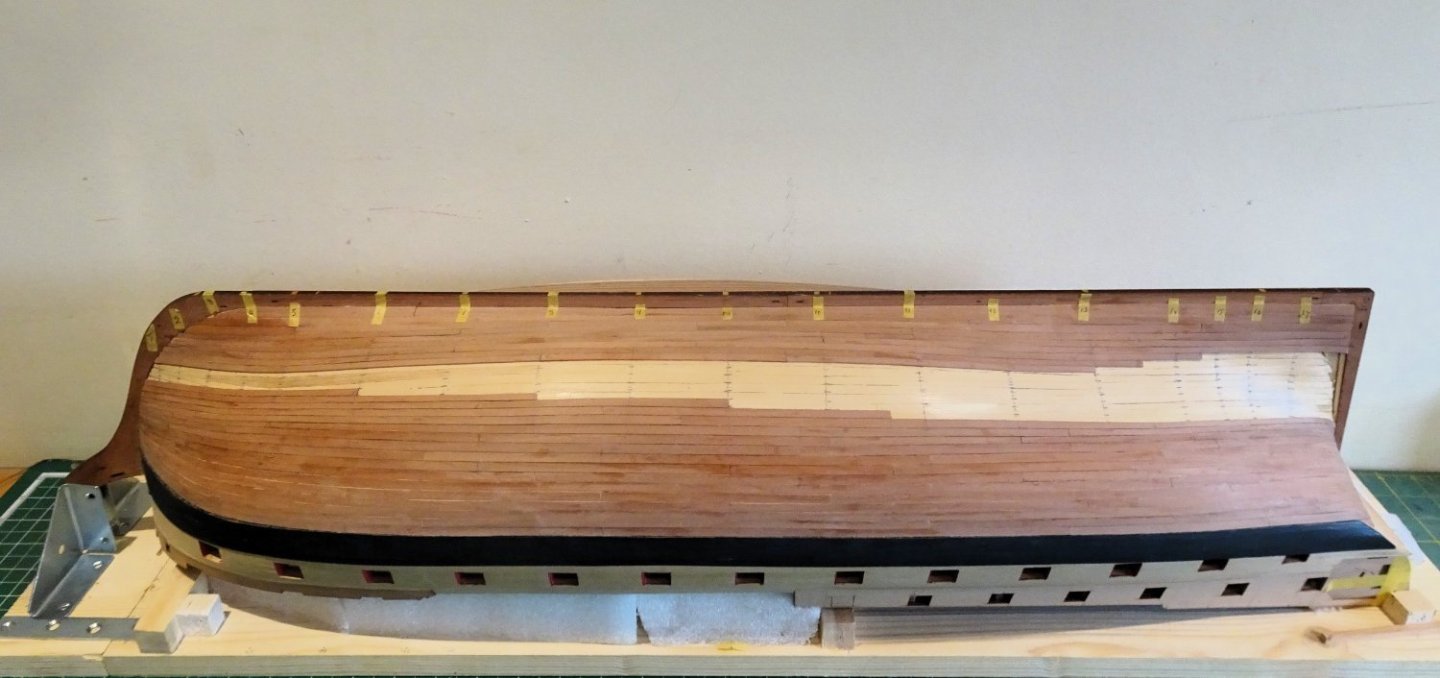
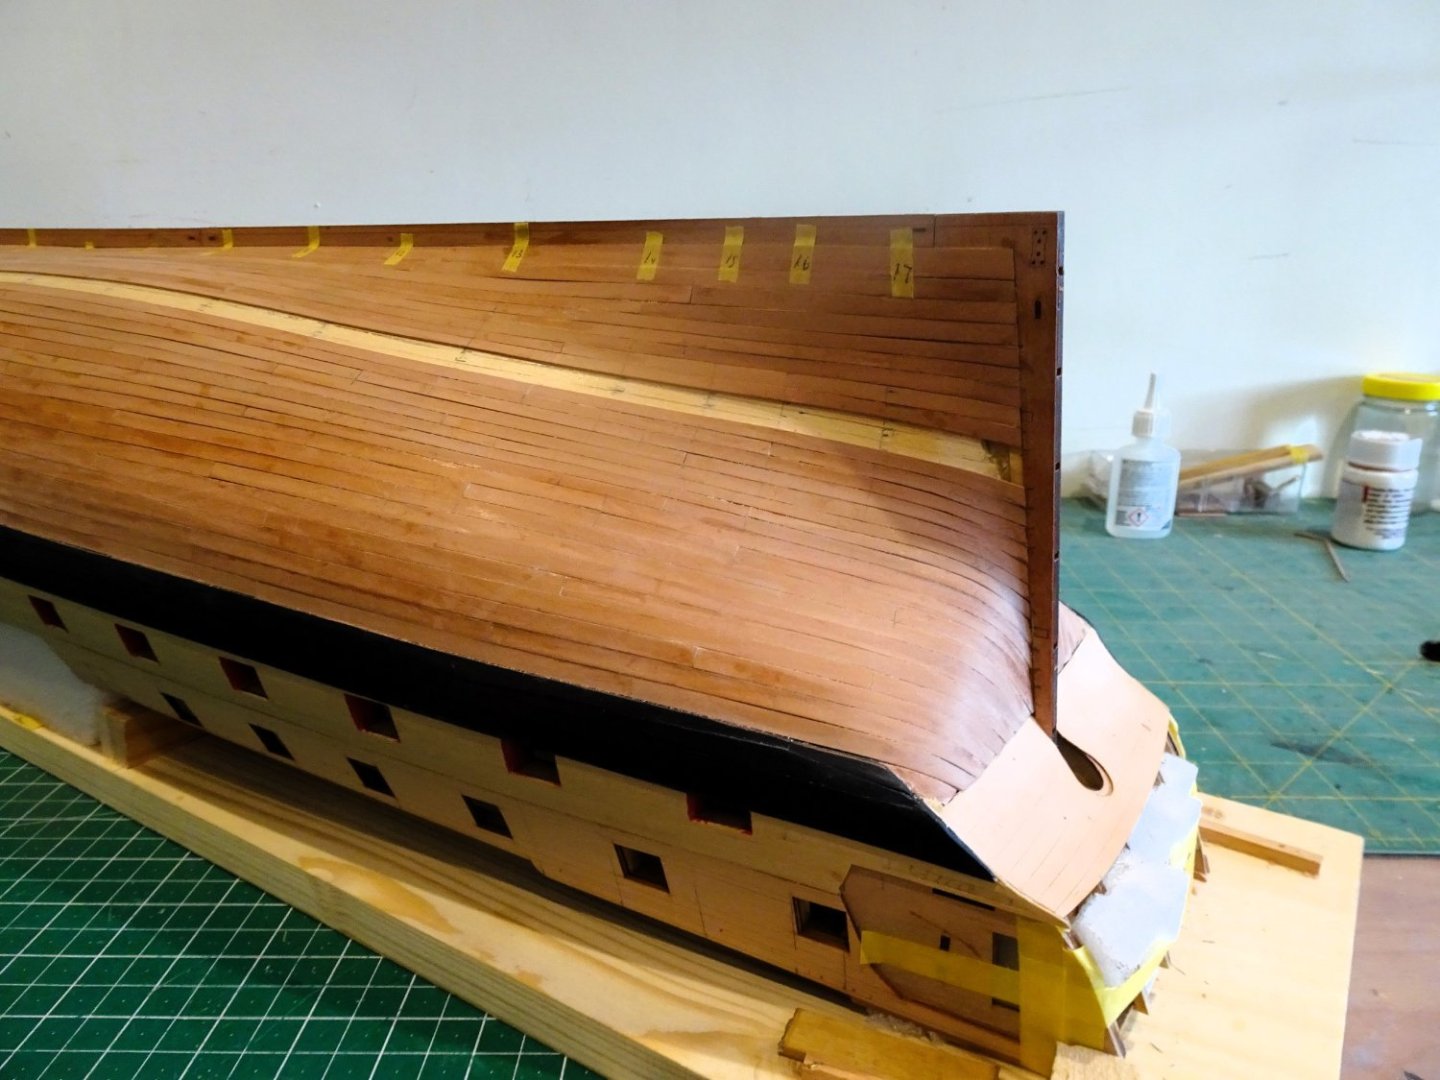
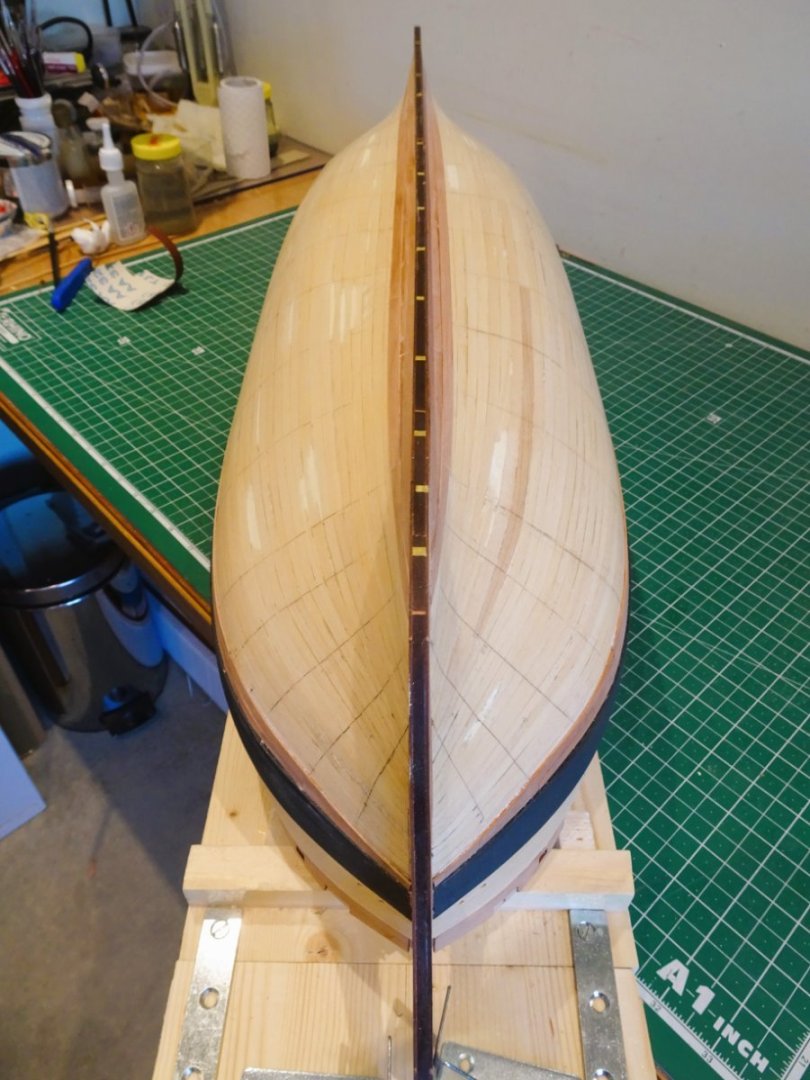
Thanks Kevin, Andy, and Alistair, and for the 'likes' - much appreciated. @ Andy - the jury is still out on the coppering question. @ Alistair - don't know about a masterpiece, but I'm fairly satisfied that the planking will be good enough to give me the 'unadorned' option. Post Forty-eight Planking completion. 1364 Two strakes to go and the hull is re-marked for the last time to shape the planks. 1365 The final strake. 1372 Last plank and completion. 1374 1375 1376 Complete. 🍾 Altho’ it feels I’ve spent a long time doing the second planking it has only been 25 active working days including the drop planks and Top and butt wale planking. Not very long in overall terms for a build of this magnitude. The work does involve several re-markings of the strake lines on the hull to keep things on track, the transfer of each reference point on the planks cut to scale, and the necessary tapering and spiling to get the fit. There were failures along the way but the incidence of scrapping planks was thankfully low. 1380 1381 1382 1390 Onto the sanding and cleaning up the hull. B.E. 12/07/2023


- 648 replies
-
- 31
-
-
-

-
- Indefatigable
- Vanguard Models
- (and 1 more)
-
Post Forty-seven Nearly there! With ten strakes to go the trickiest part is the sharp bends and twists where the planks abut the stern post. 1292 In this example the plank is wider at the end than the otherwise tapered run. 1340 The planks sometimes take on a serpentine shape. Over the weekend I made a concerted effort to push ahead with the planking and I put in two longish days at the workbench. 1327 The serpentine shape of the planking runs is evident here but I am now happy that there will be no crowding of the planks at the stem. 1333 I have concentrated on the bow planking as this is the most critical area, and I am pleased that there is no excessive sny as the planks follow the round of the bow. Two days later…….. 1363 1361 Two strakes left and they will be of pretty uniform shape - I’m relieved to see. 1351 1360 A small satisfaction to be had when both sides match. 1355 My shipyard assistant casts a critical eye over my efforts, is he impressed, hard to tell, but I'm satisfied. 🙂 Cheers, B.E. 11/07/2023.

- 648 replies
-
- 24
-
-
-
- Indefatigable
- Vanguard Models
- (and 1 more)
-
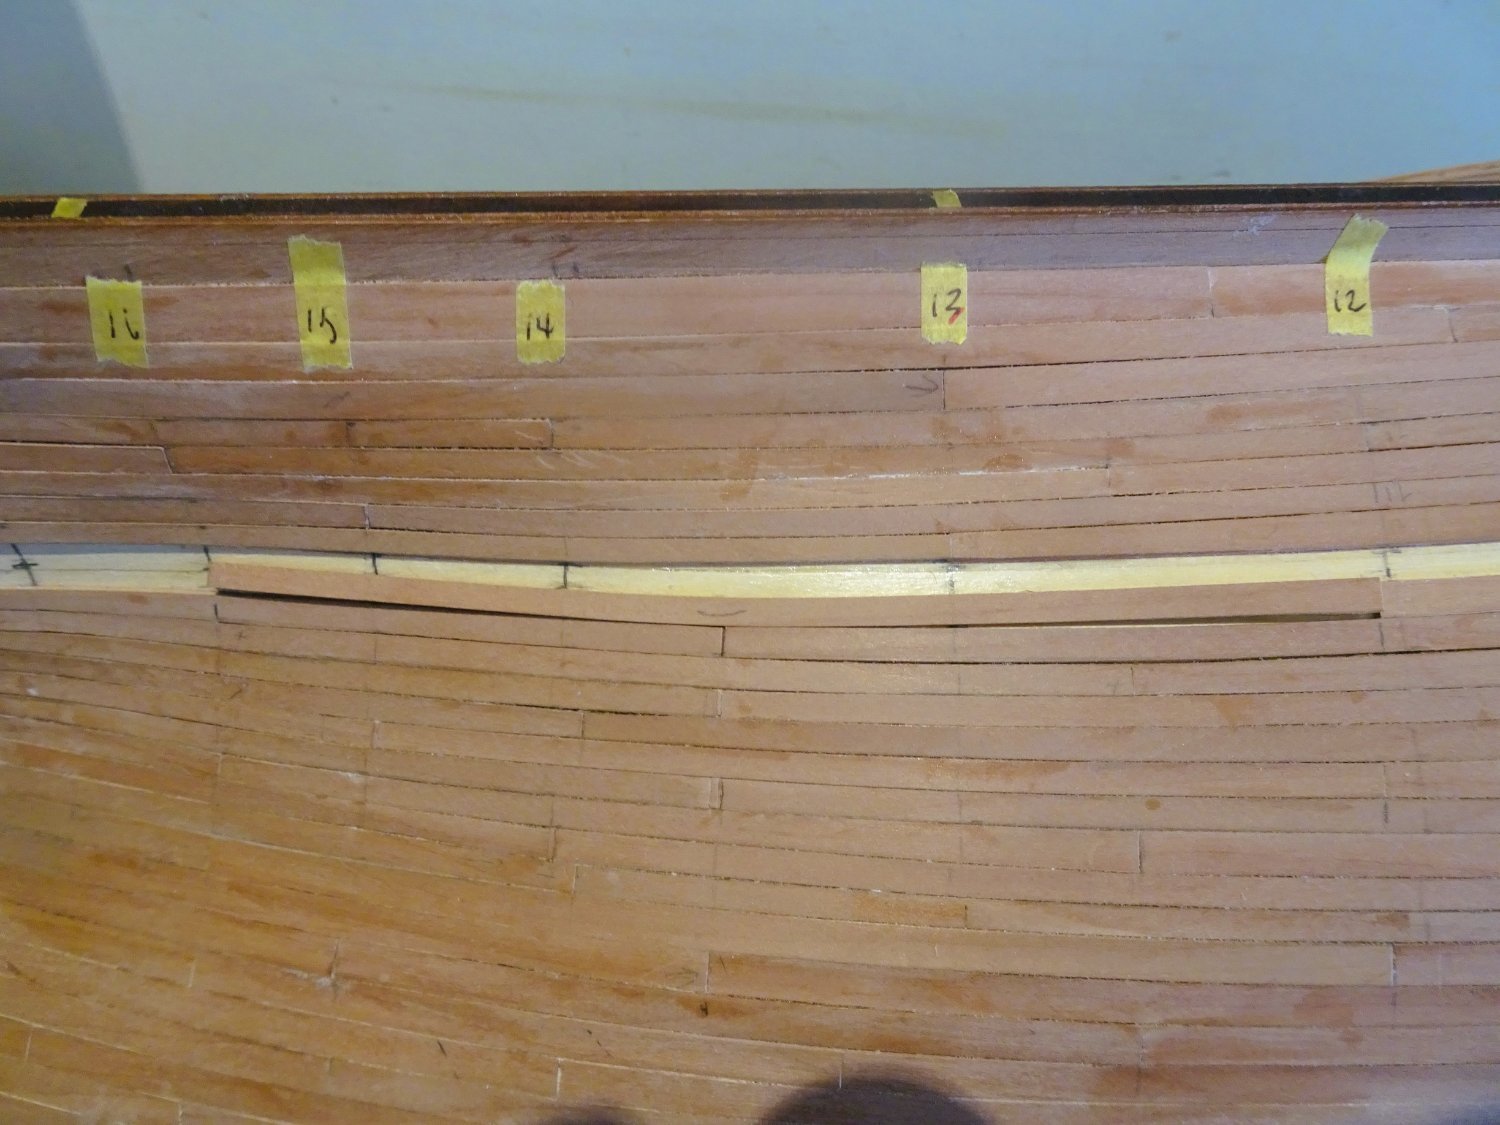
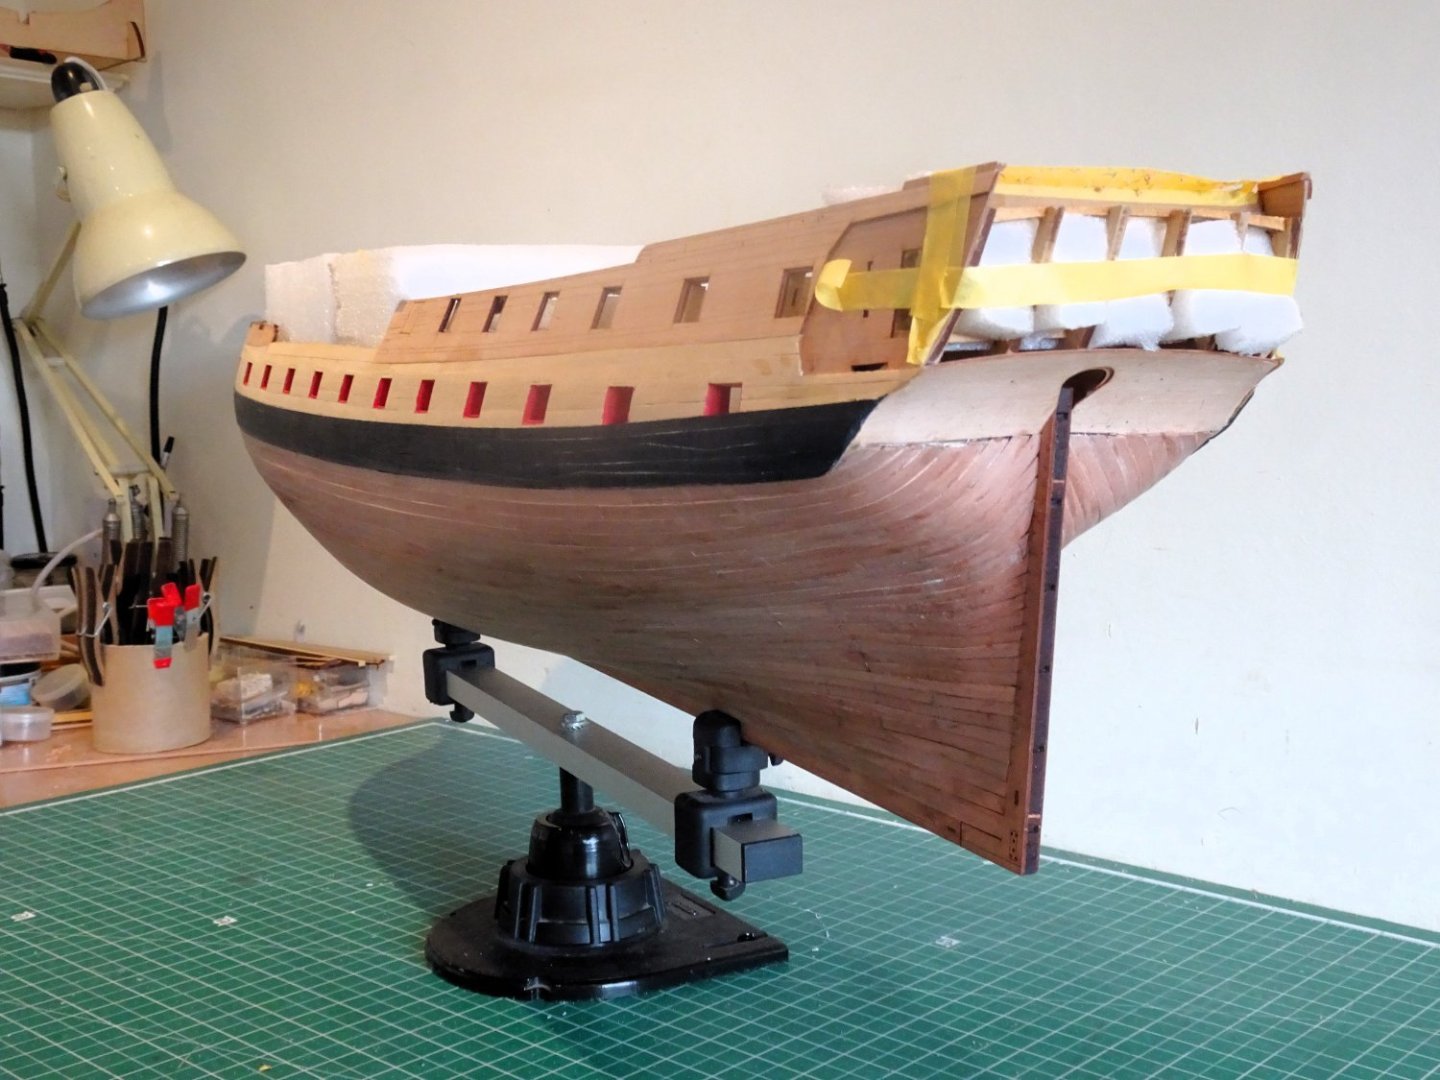
Post Forty-six Planking continues. One of the downsides of the ‘Indy’ hull is the sheer size and weight which becomes very wearing given the constant need to turn it about and shift it from inverted to upright and back again to check the run of the planking. I’ve obviously spent too much time on small hulls in recent times, I think back fondly to those fine little fishing boats and even Sphinx, which at the time I also thought was a big beast, but seems quite small now. Not moaning, just musing, - on with the show. 1290 I have now re-marked the hull with the plank widths at each reference point. Sixteen 5mm planks are now required at the two central bulkheads ‘M’ and ‘9’. Another week and this is the state of play, now four months into the build. 1305 1304 I am now planking alternatively from wale down and keel up, it is a slow business and I’m achieving around two strakes a day. 1306 1308 1316 1318 1317 1319 I am closely watching the run of planks at the bow, and at this point I will re-mark the runs, hopefully for the last time. 1320 Tapering is now a feature from around Bulkhead 11 to the stern, but towards the keel the boards also broaden out a little. 1323 1324 Little by little the gap is closing, and the finish line is in sight. Ten strakes are now required, and another week should see the second planking completed. B.E 08/07/2023


- 648 replies
-
- 23
-
-
-
- Indefatigable
- Vanguard Models
- (and 1 more)
-
Cheers Guys for your ongoing interest. @ Glenn - wise words, it is the same on Indy, it is between 3 and five that the sny can get excessive. @ Allan - Already in hand, I fined the wale down following fitting, and it will be done slightly more when I get around to final finishing. Regards, B.E.
- 648 replies
-
- 4
-
-
- Indefatigable
- Vanguard Models
- (and 1 more)
-
A fine job Kevin, I imagine you're a lot happier with the build now than you were a few weeks ago. The copper against the black hull looks very striking.👍 B.E.
- 443 replies
-
- 5
-
-
- Indefatigable
- Vanguard Models
- (and 1 more)
-
Looking good Kevin, should be completed by the weekend.👍 Are you intending to keep it bright or weather it a little? B.E.
- 443 replies
-
- 3
-
-
- Indefatigable
- Vanguard Models
- (and 1 more)
-
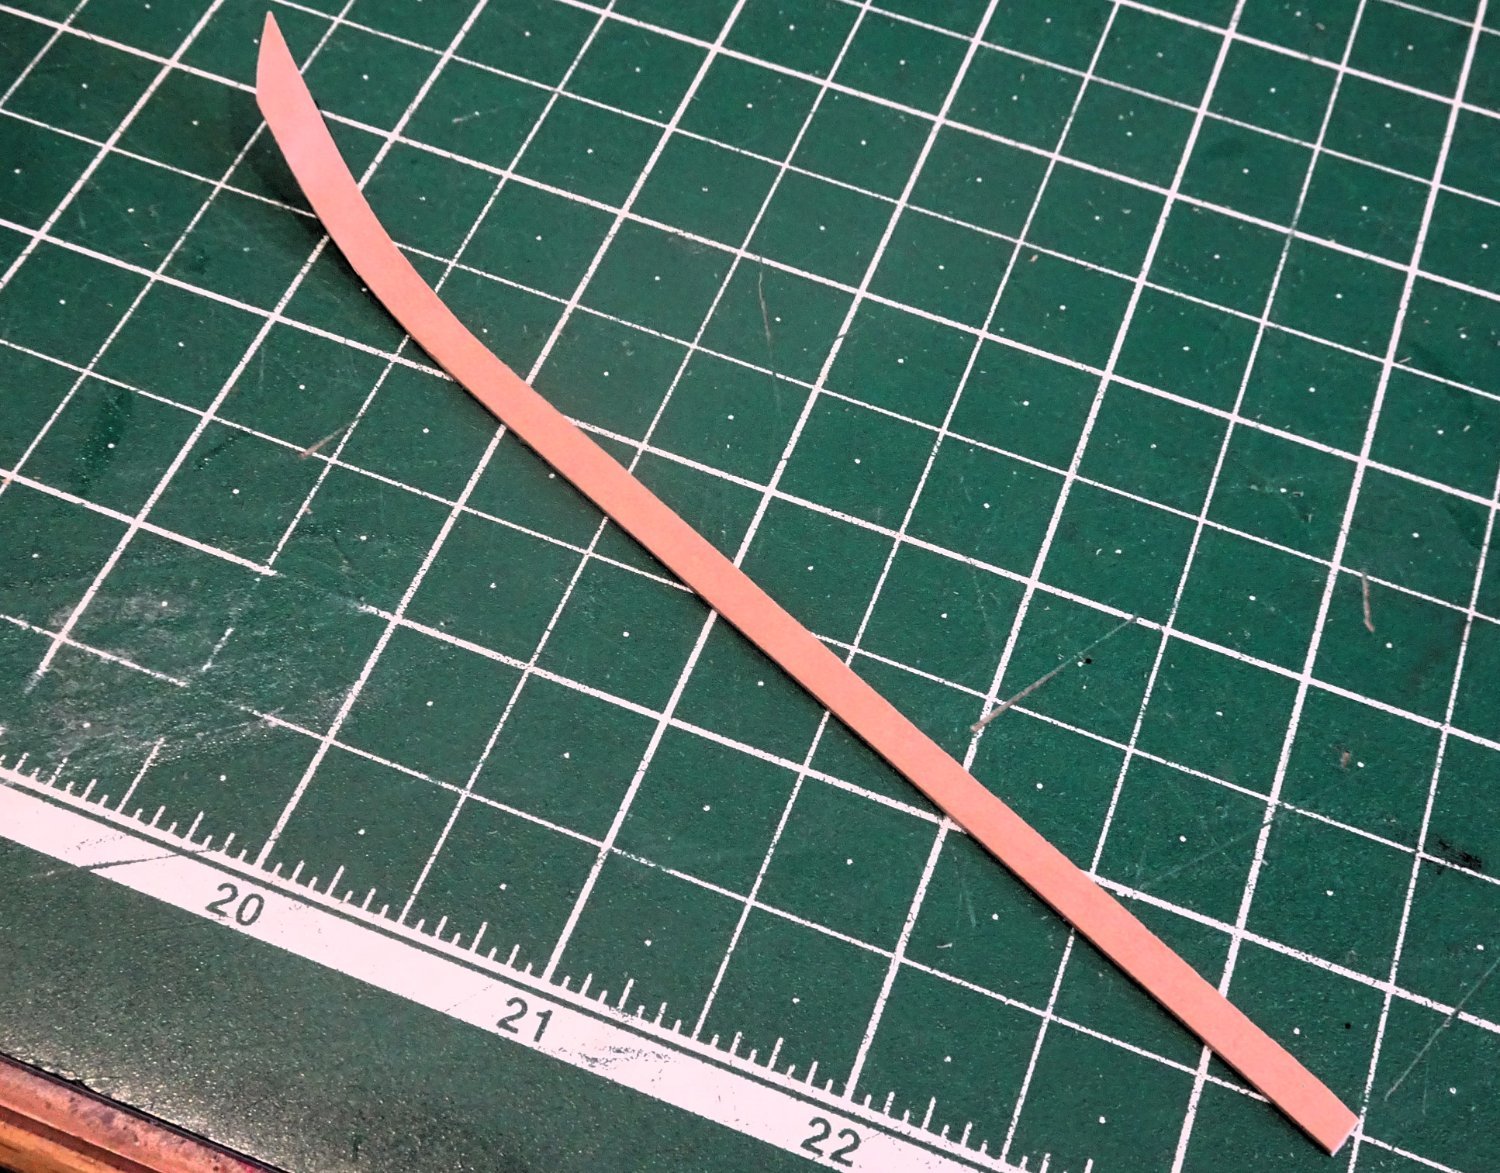
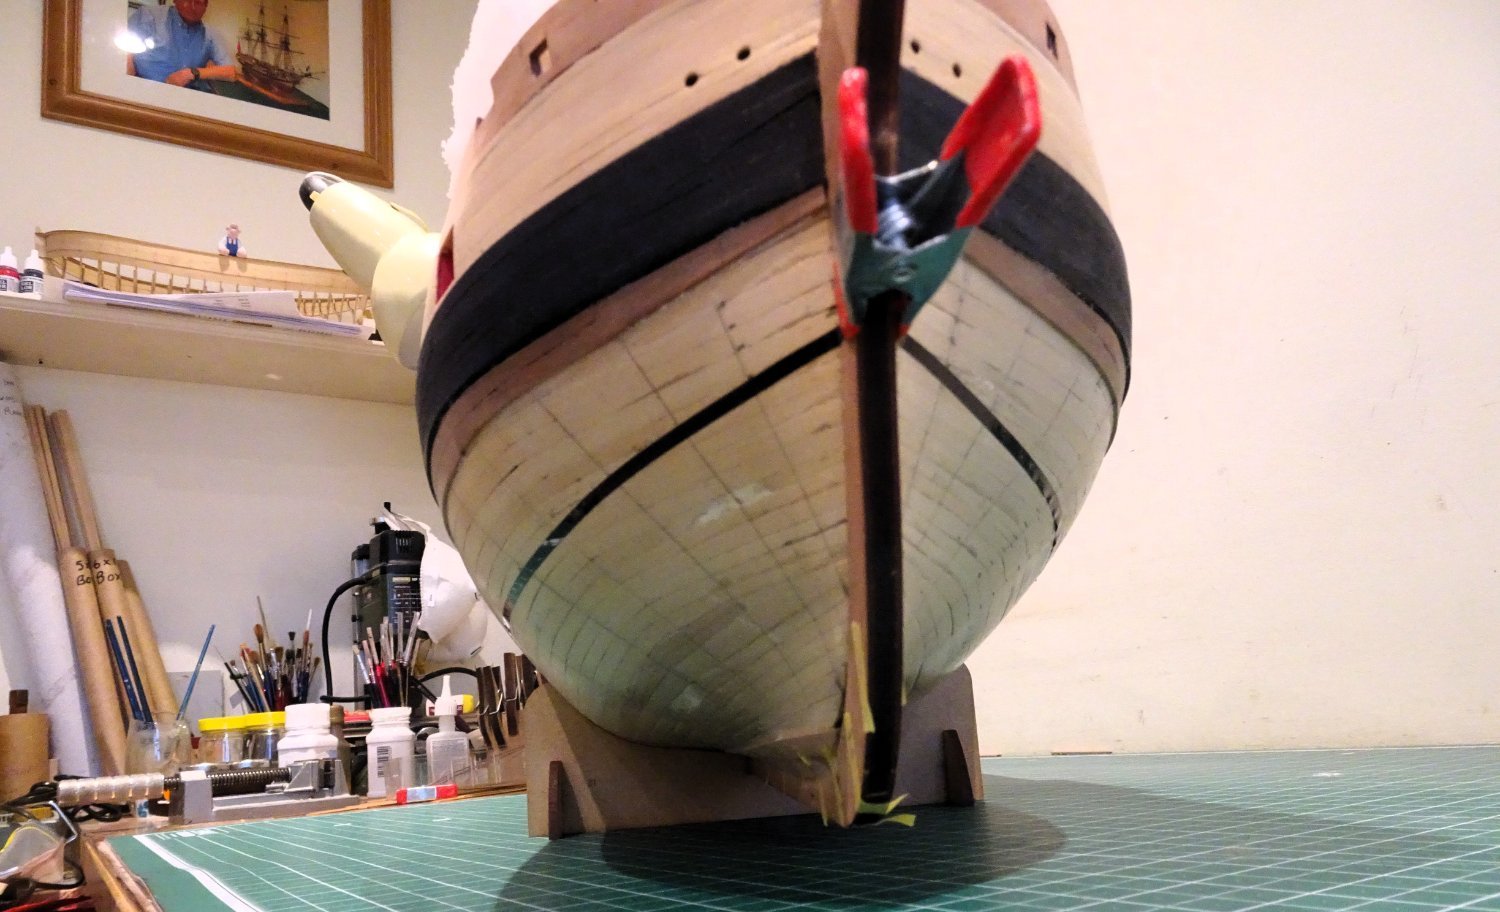
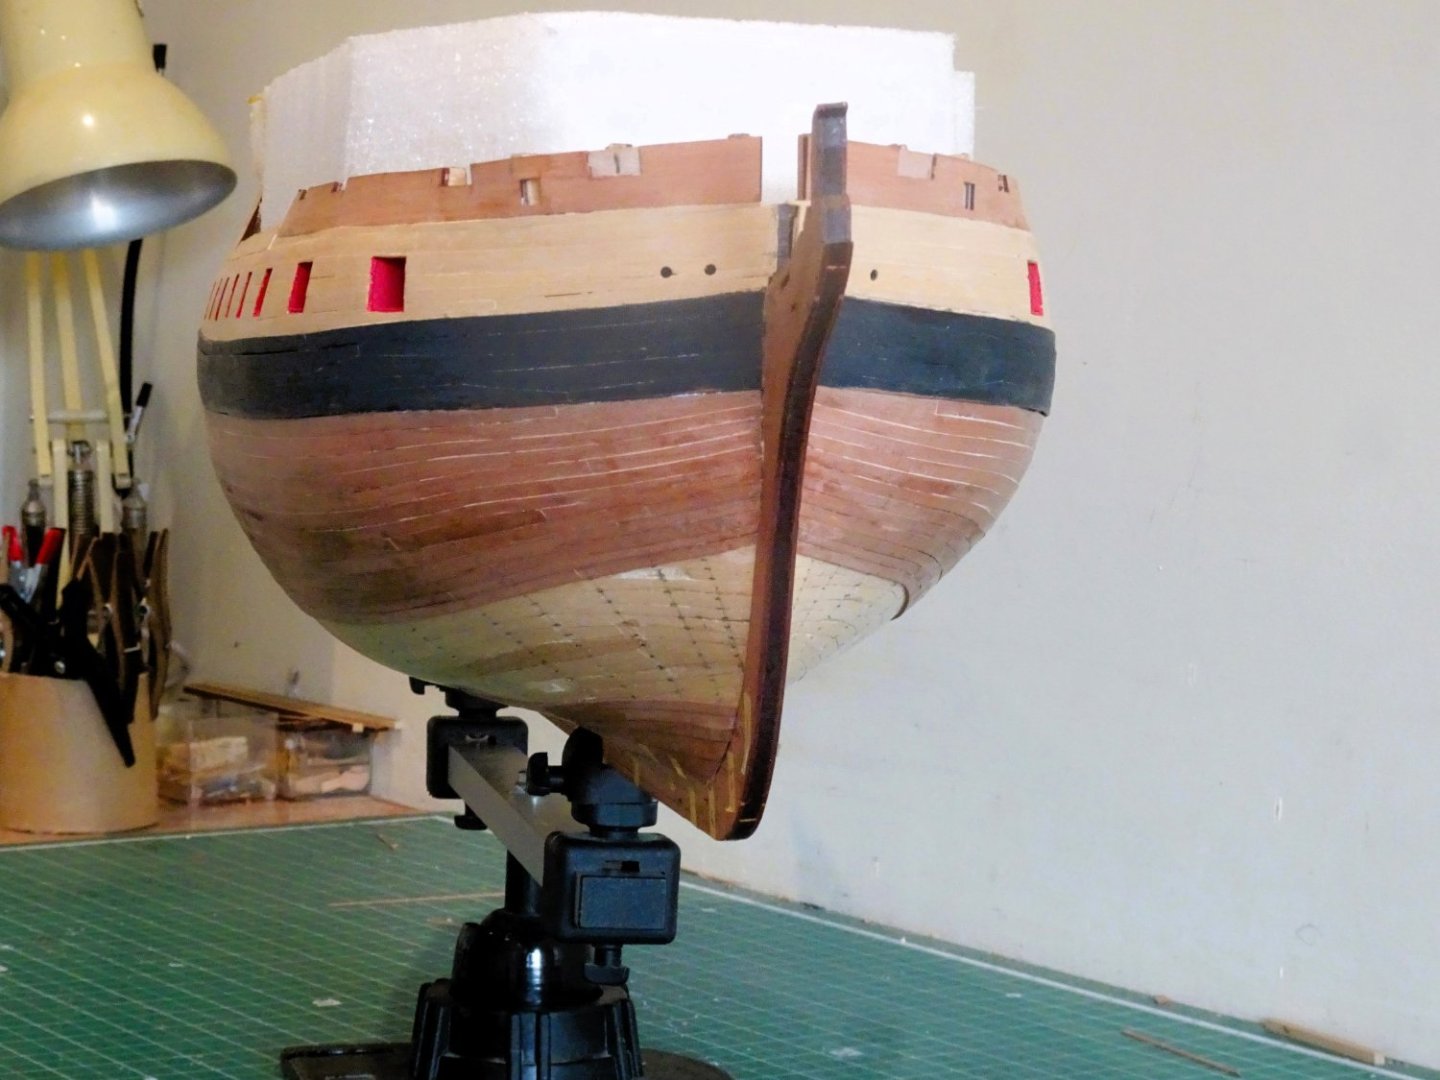
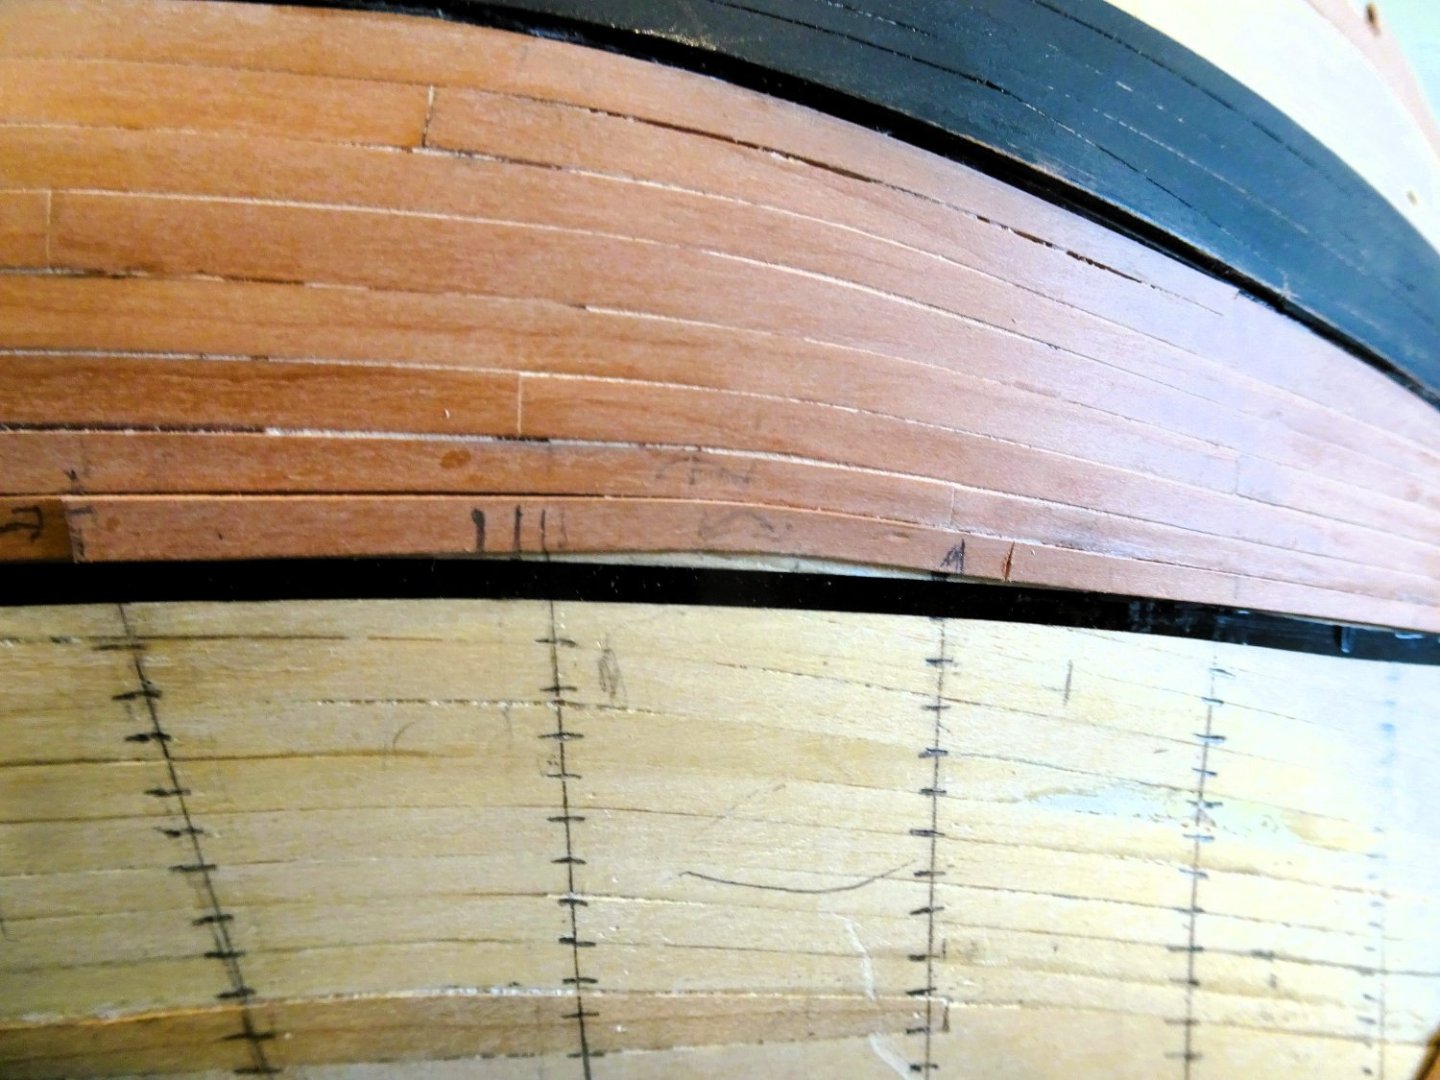
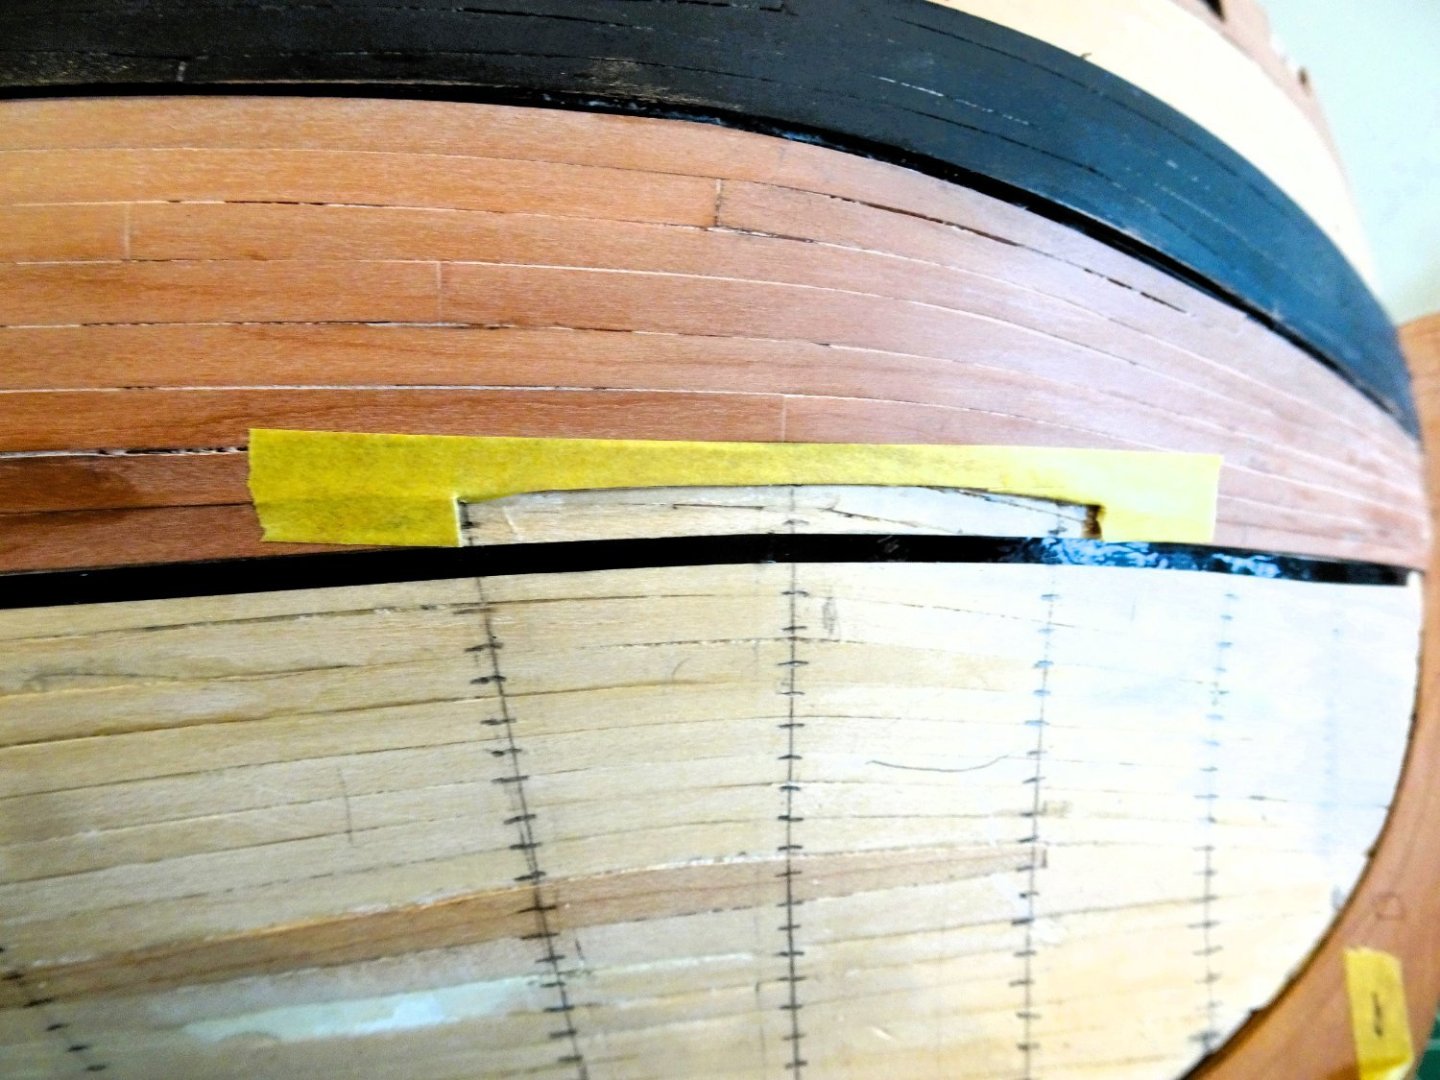
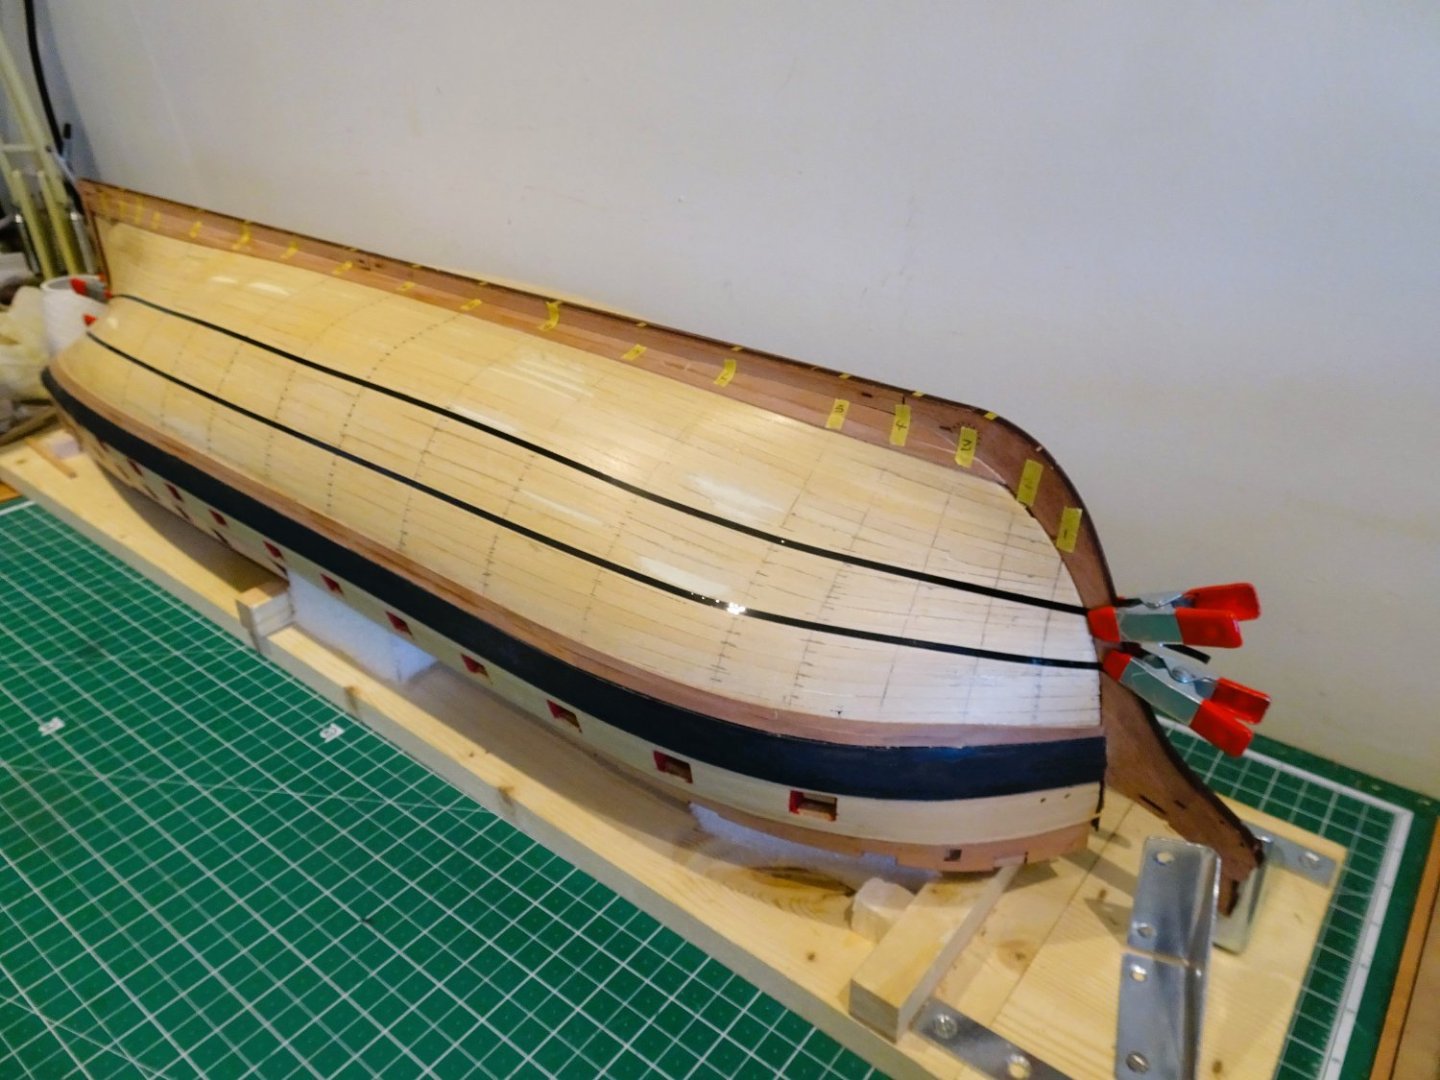
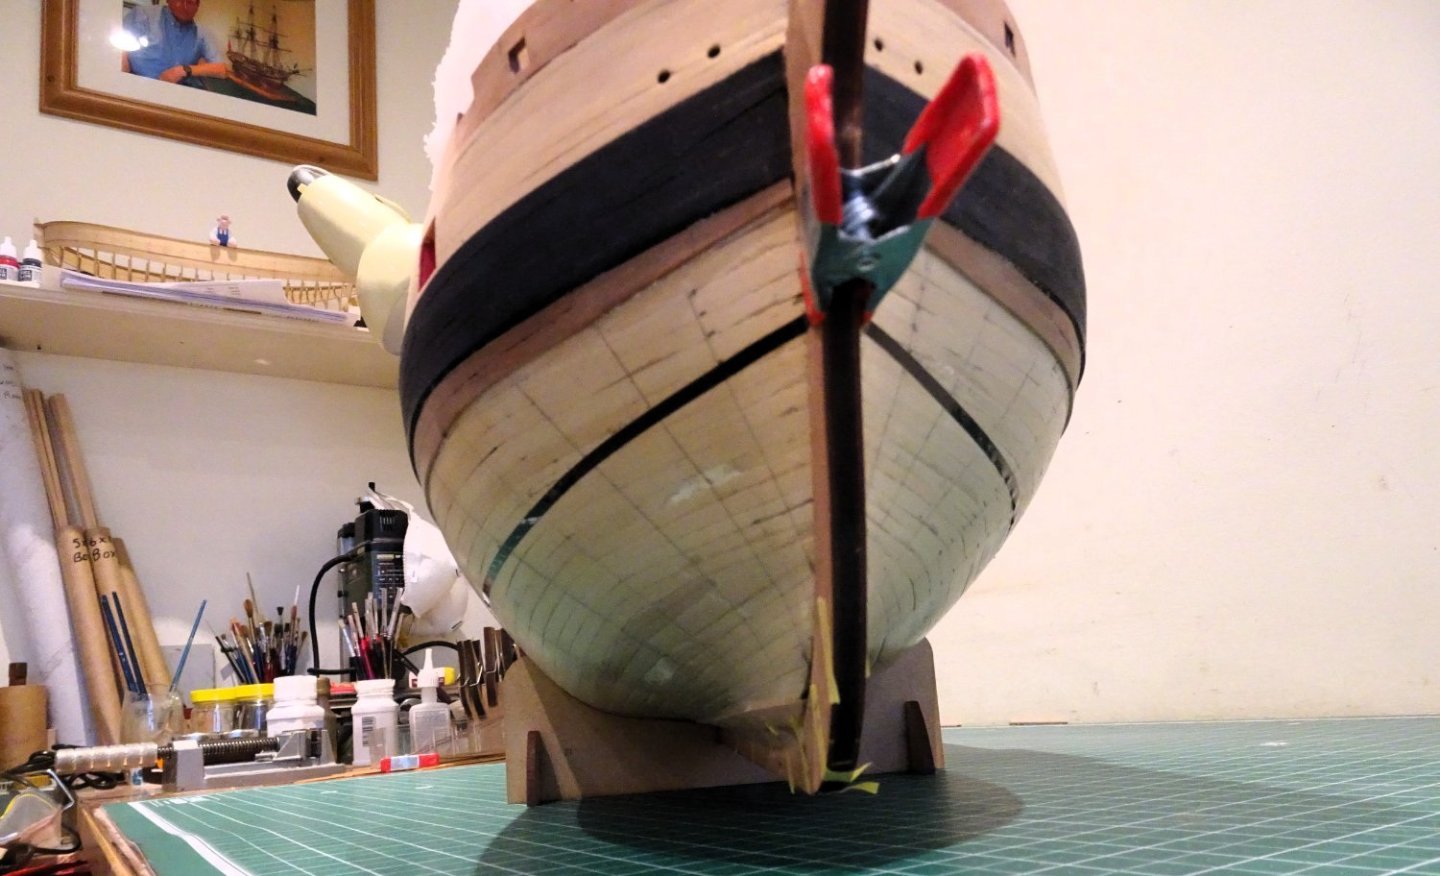
POST Forty-five As planking continues, I become aware of an undesirable feature developing. The word is snying. In this context it relates to the excessive upward curve of a plank where the centre is higher than the extremities. 1258 This is a common problem in the bow area and I note on my hull there are slight indications of it developing eight strakes down from the wale. Probably due to deficiencies in my lining off/and or incorrect tapering, it occurs where the planks are edge bent as they round the bow, and strake upon strake, the effect is magnified. 1260 My solution is to remove a section of the last fixed bow plank, and spile in a new section to reduce the extremity of the curve for the next plank to lie against. 1261 Fortunately, the section came away cleanly without too much effort. 1262 The spiled insert is not easy to spot and is a better option than carrying on regardless with the result of visible excessive snying. 1263 With ten strakes now completed each side I am now below the waterline, and the planking runs looks better to my eye. 1268 1277 I’m about a third of the way down the hull, I will now add a further strake above the Garboard, re-check the strake arrangement, and carry on......... B.E. 03.07/2023

- 648 replies
-
- 28
-
-
- Indefatigable
- Vanguard Models
- (and 1 more)
-
Post Forty-four The first Band. I am using fairly scale lengths with a 140mm maximum and around 45mm minimum lengths. 1219 I am not going for a set sequence of repeat patterns, but I am giving mind to the positions of butts on adjacent strakes. For deck planking I will take a more structured approach. 1224 I plank side and side about, and Ca is used throughout, with a pot of Acetone handy for wiping excess from plank faces as I go along. 1251 The required shape for the bow timbers is transferred to the planks, which are dampened, tapered, edge bent, bevelled, and generally fettled to fit. I found this necessary from around Bulkhead five to the stem. 1231 1253 One of the advantages of the Indy hull is that apart from the bow area there are long sections of using full width planks which proceeds quite quickly. 1247 Looking a bit rough at this stage, but I now need to re-mark the hull for the next band of planking. Onwards…. B.E. 01/07/2023


- 648 replies
-
- 25
-
-
- Indefatigable
- Vanguard Models
- (and 1 more)
-
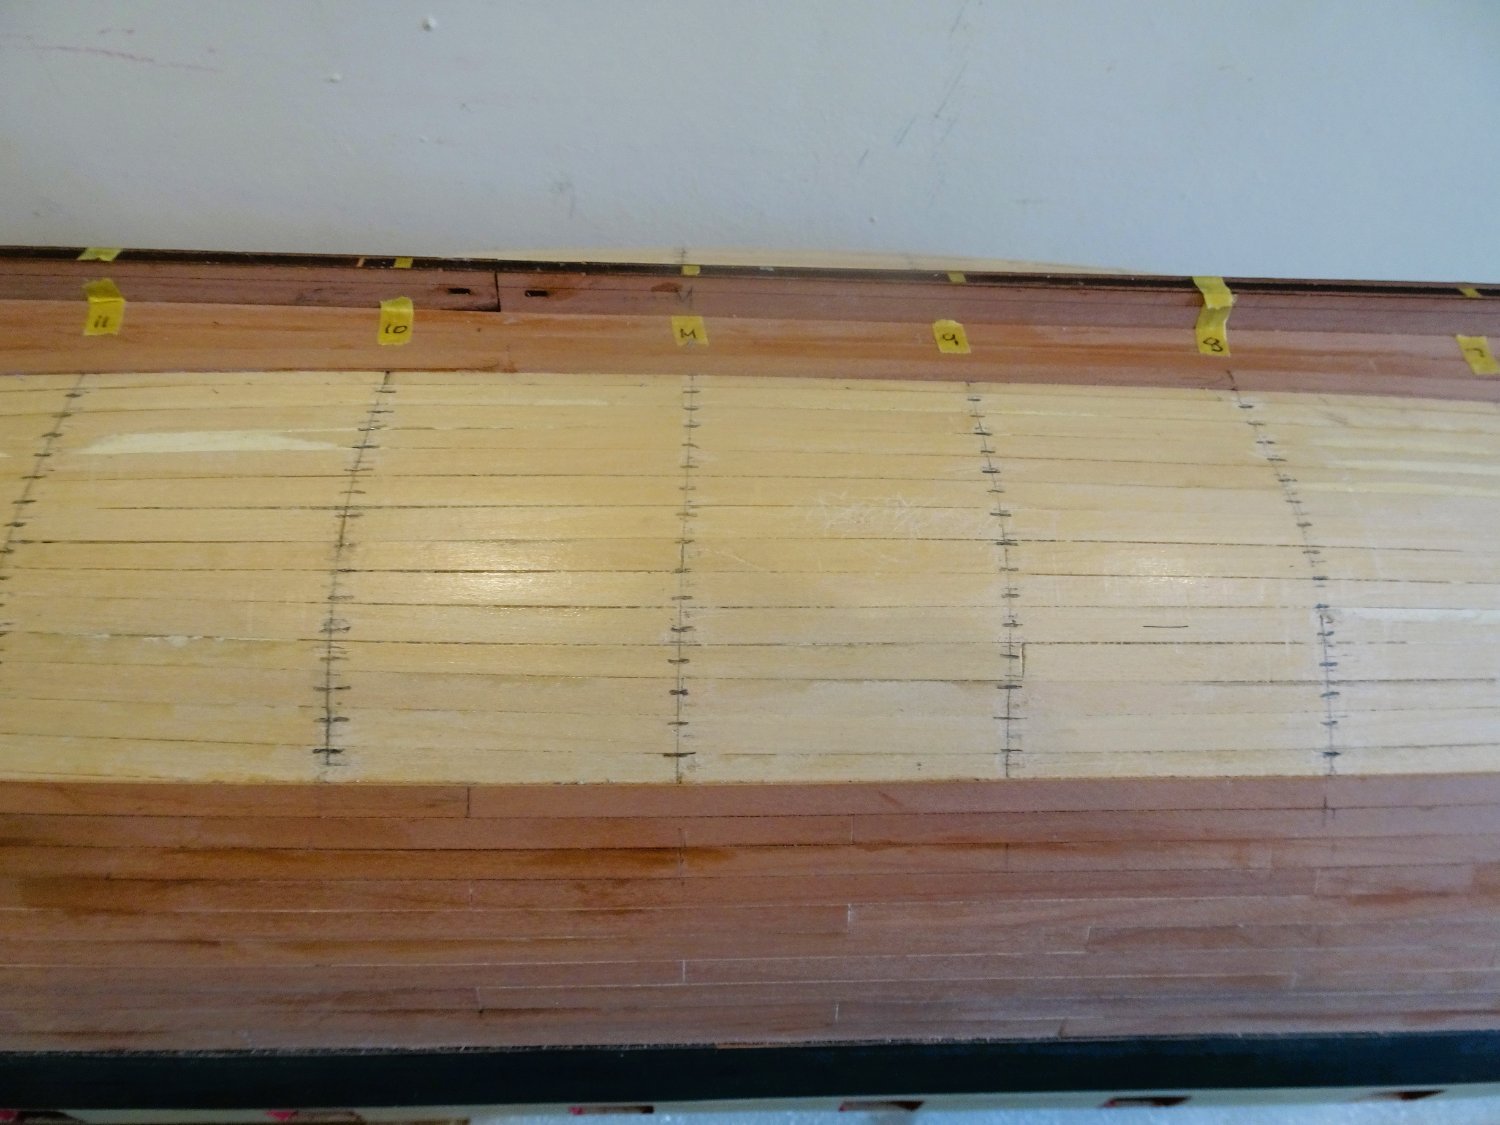
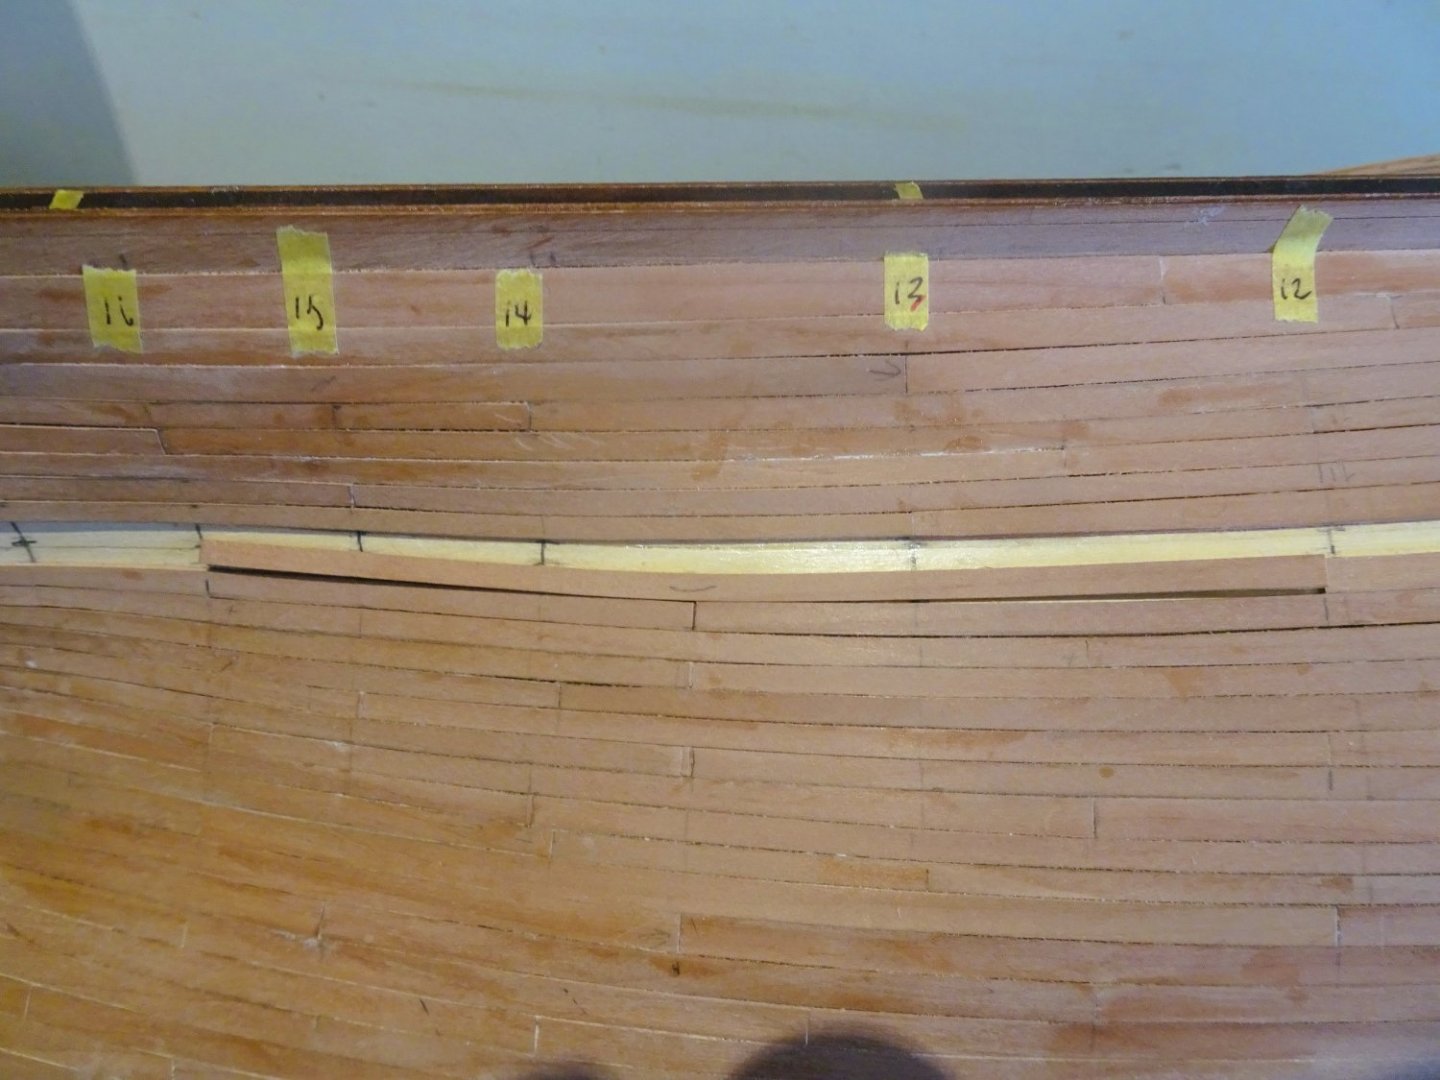
Post Forty-three The Preparation I have (26) 5mm planks at midships which are marked off on the hull using a tick strip. I intend to work a first band of six strakes below the existing planking, and I’m looking to have the plank ends at the stem not less than 3mm in width. With this in mind, I apply the lining tape. 1173 1179 The first application of the tape, now the tweaking begins. In these shots the upper tape marks the line of the first section. I am aiming to get a smooth sweep up to the stem using edge bent and tapered strips only. I hope to avoid the need for spiling except perhaps when I reach the under belly of the hull. The trouble with lining off is deciding when it is at its optimum line. This process is more art than arithmetic and I find myself in an agony of indecision wondering whether I have reached that point. Using strip wood there is inevitably error creep strake upon strake, so I will fit the first section and then recalculate. The following photos show the point where I think I am getting close to an acceptable run. 1191 1193 1195 1199 1212 1205 1207 1203a I think it needs a slight tweak as indicated. 1216 This looks better to my eye. I can now proceed to mark off the strake widths at each bulkhead point and begin planking. B.E. 27/06/2023.


- 648 replies
-
- 19
-
-
-
- Indefatigable
- Vanguard Models
- (and 1 more)
-
So, you could be up for another 30hrs work to complete both sides, a testing exercise Kevin, and that's without any consideration of copper nail heads.🫤 She will look good tho' with the copper against the black.👍 B.E.
- 443 replies
-
- 5
-
-
- Indefatigable
- Vanguard Models
- (and 1 more)
-
Looks to be going on ok Kevin,👍 Are you cutting individual plates, or applying longer strips, and marking the vertical plate joins post fitting? B.E.
- 443 replies
-
- 5
-
-
- Indefatigable
- Vanguard Models
- (and 1 more)
-
Mrs Kevin looks a natural for coppering, a good job to sub-contract me thinks. B.E.
- 443 replies
-
- 6
-
-

-
- Indefatigable
- Vanguard Models
- (and 1 more)
-
Congratulations Mark, on completing your Sphinx despite the physical challenges you have had to endure. No easy task, these things are hard enough as it is. I admire your perseverance, well done.👍 B.E.
- 505 replies
-
- 8
-
-
-
- vanguard models
- Sphinx
- (and 1 more)
-
Cheers Guys, The repair seems to have held, but work is now suspended for a week whilst I enjoy a week in Dorset. An opportune time for a break, in the better sense of the word, I think. B.E.
- 648 replies
-
- 5
-
-
- Indefatigable
- Vanguard Models
- (and 1 more)
-
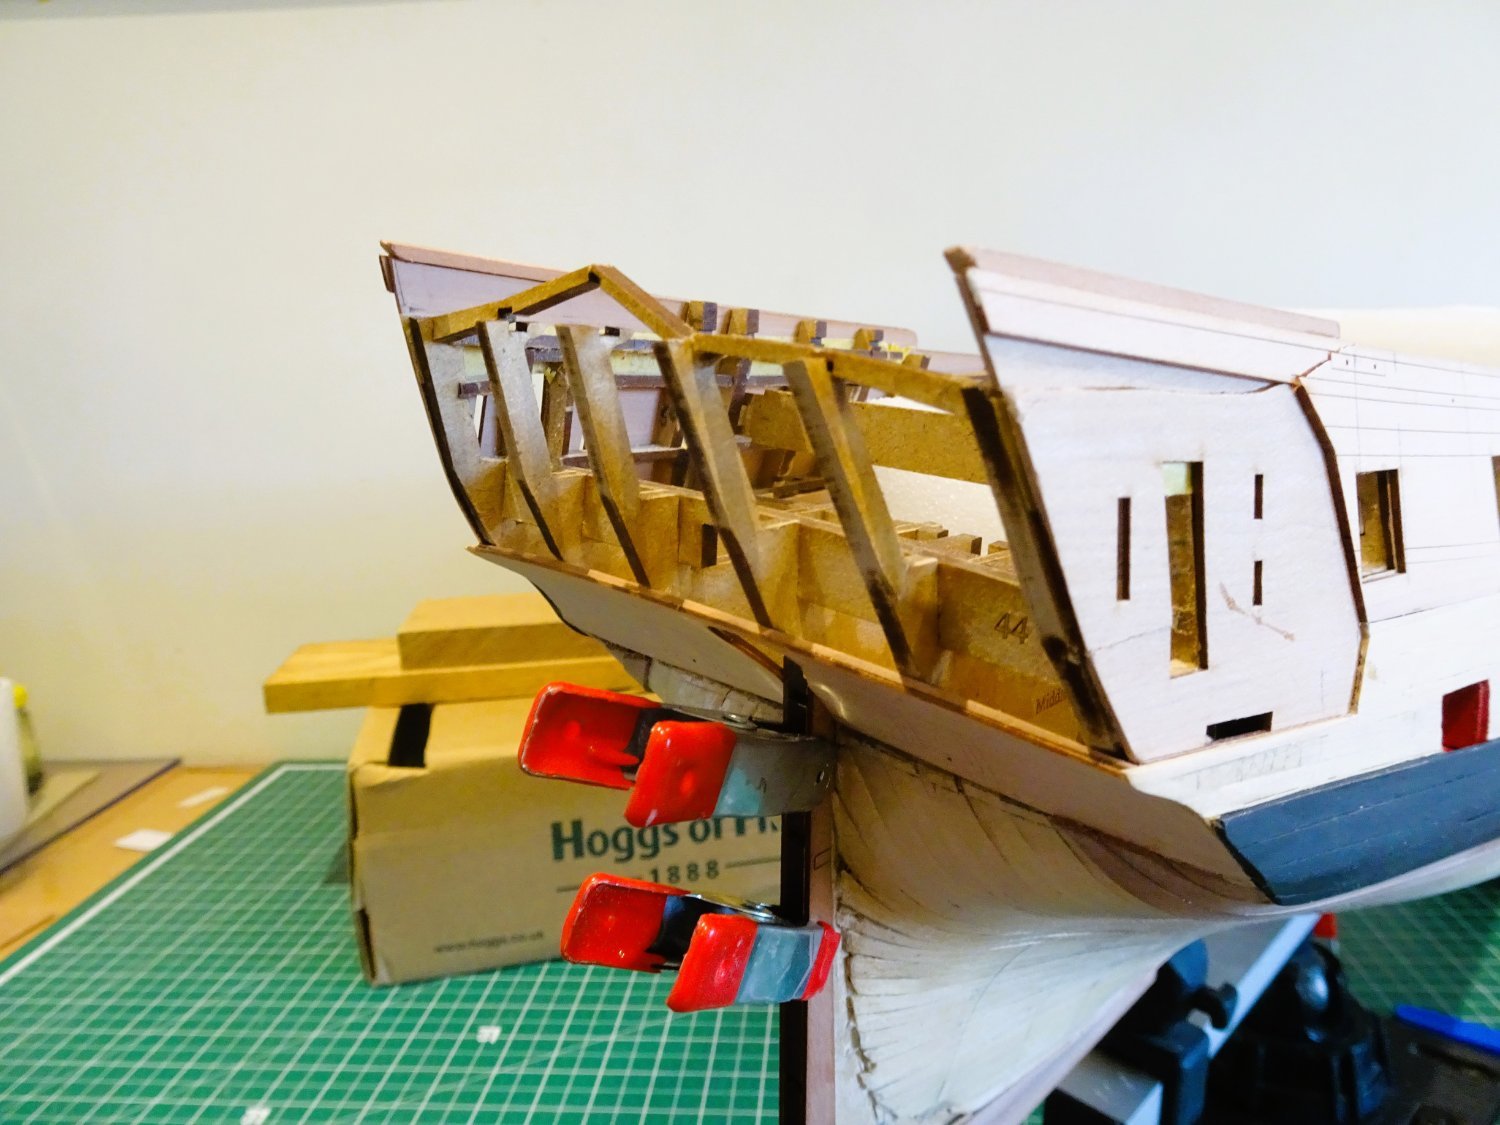
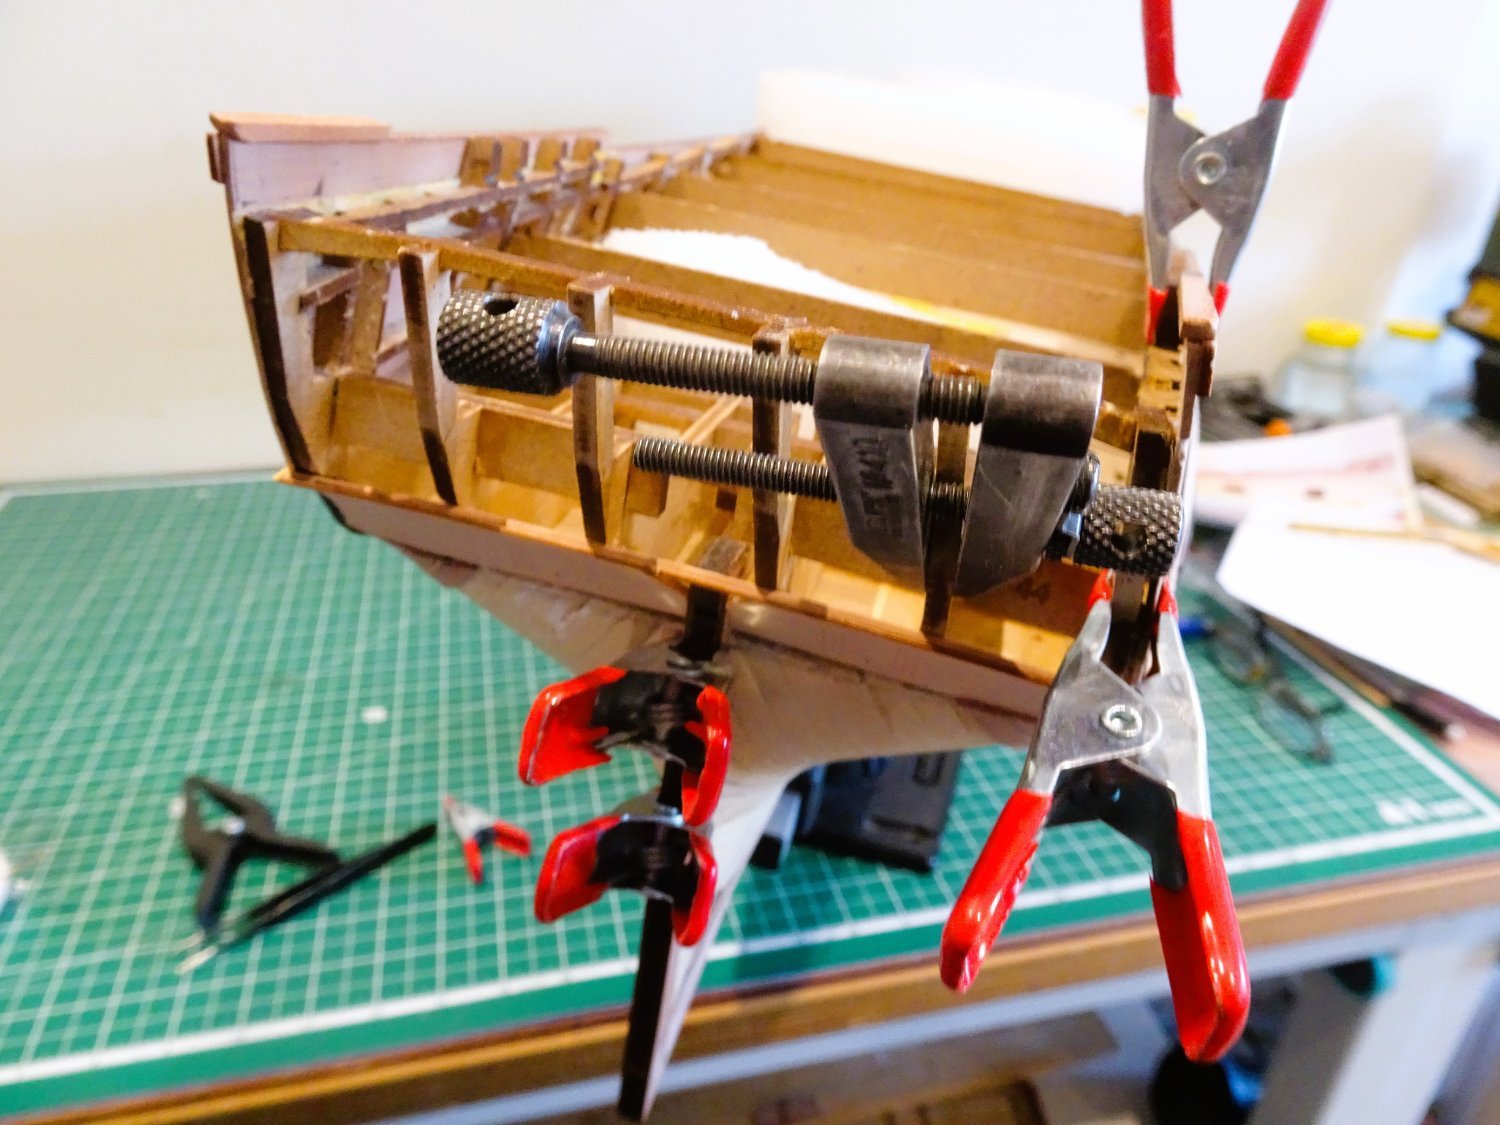
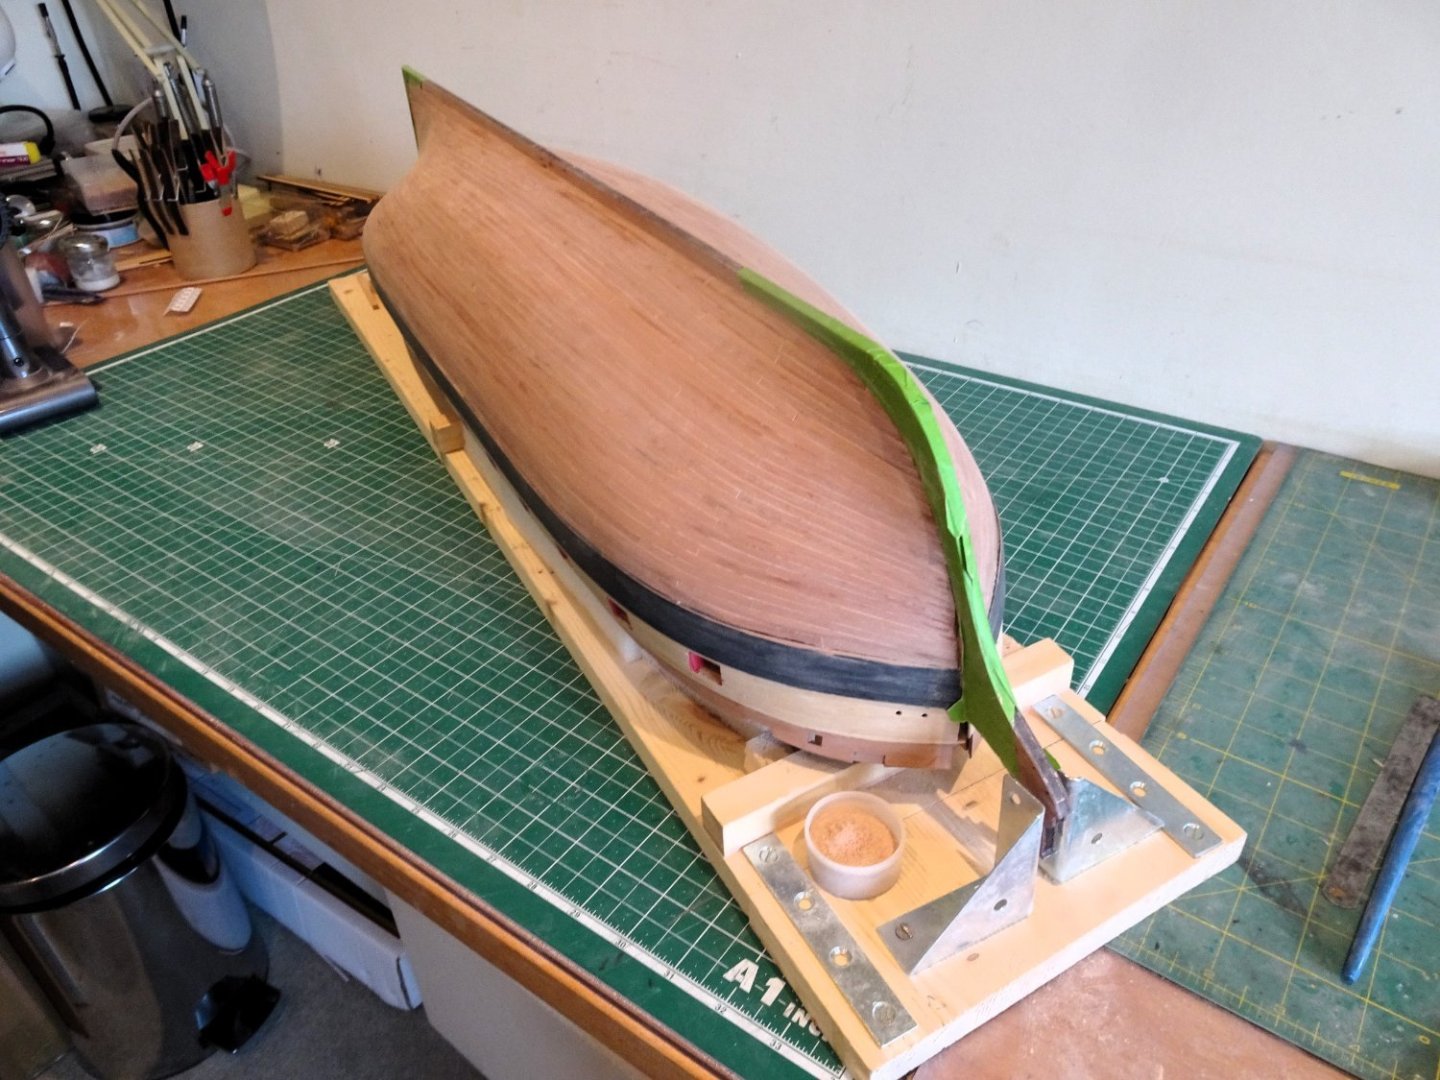
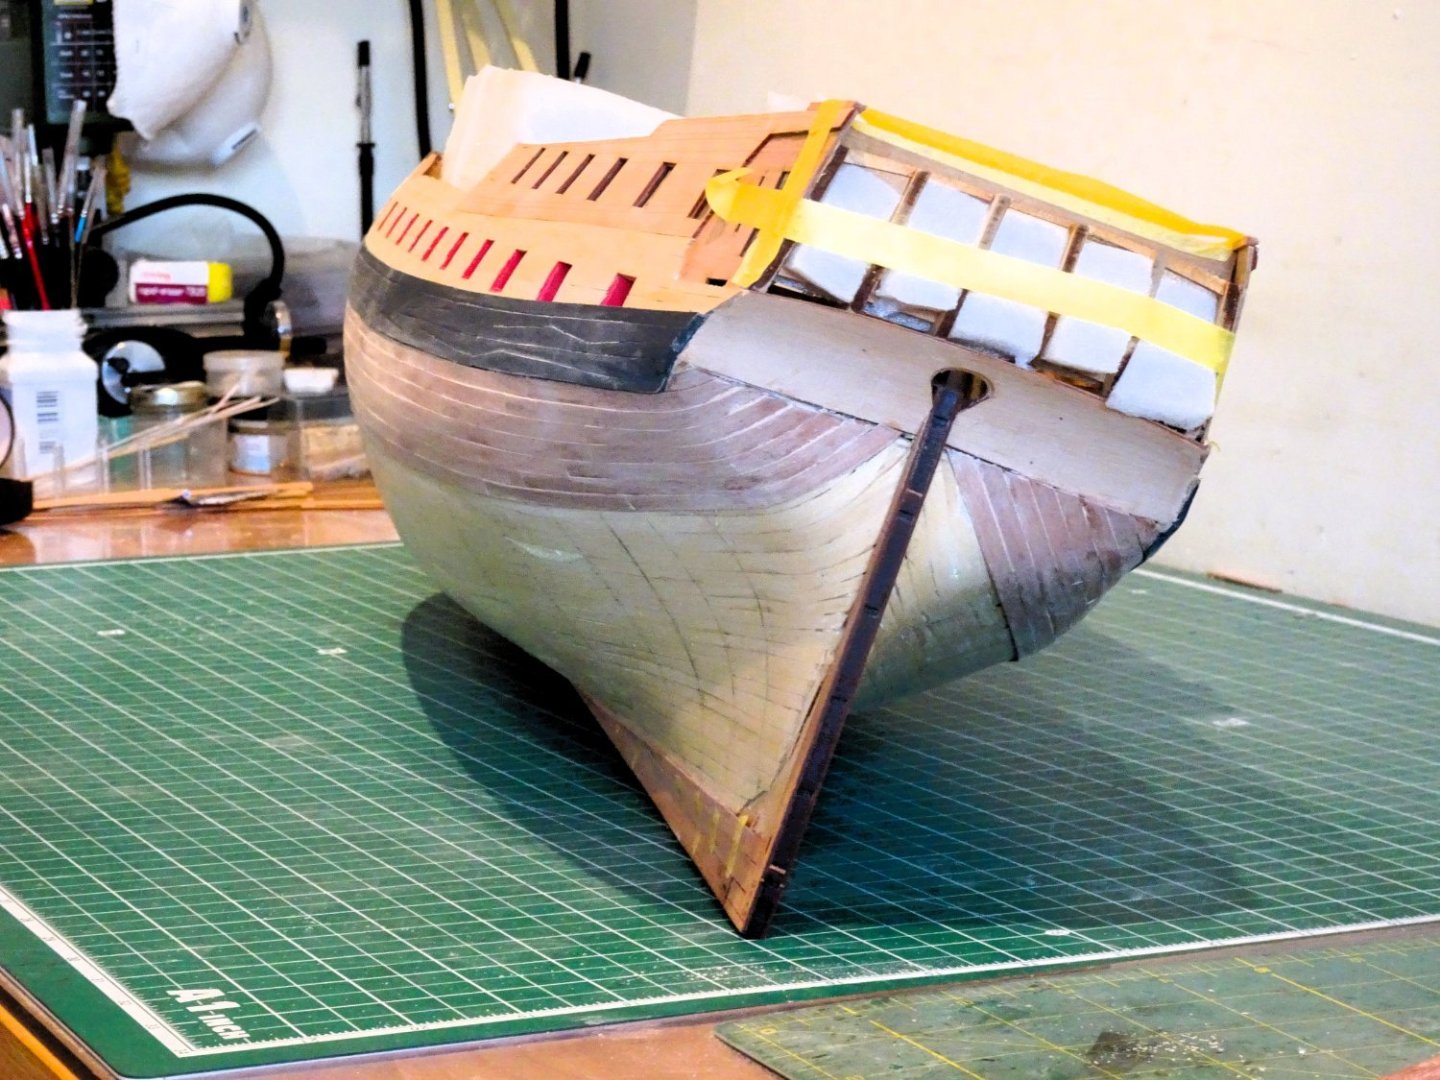
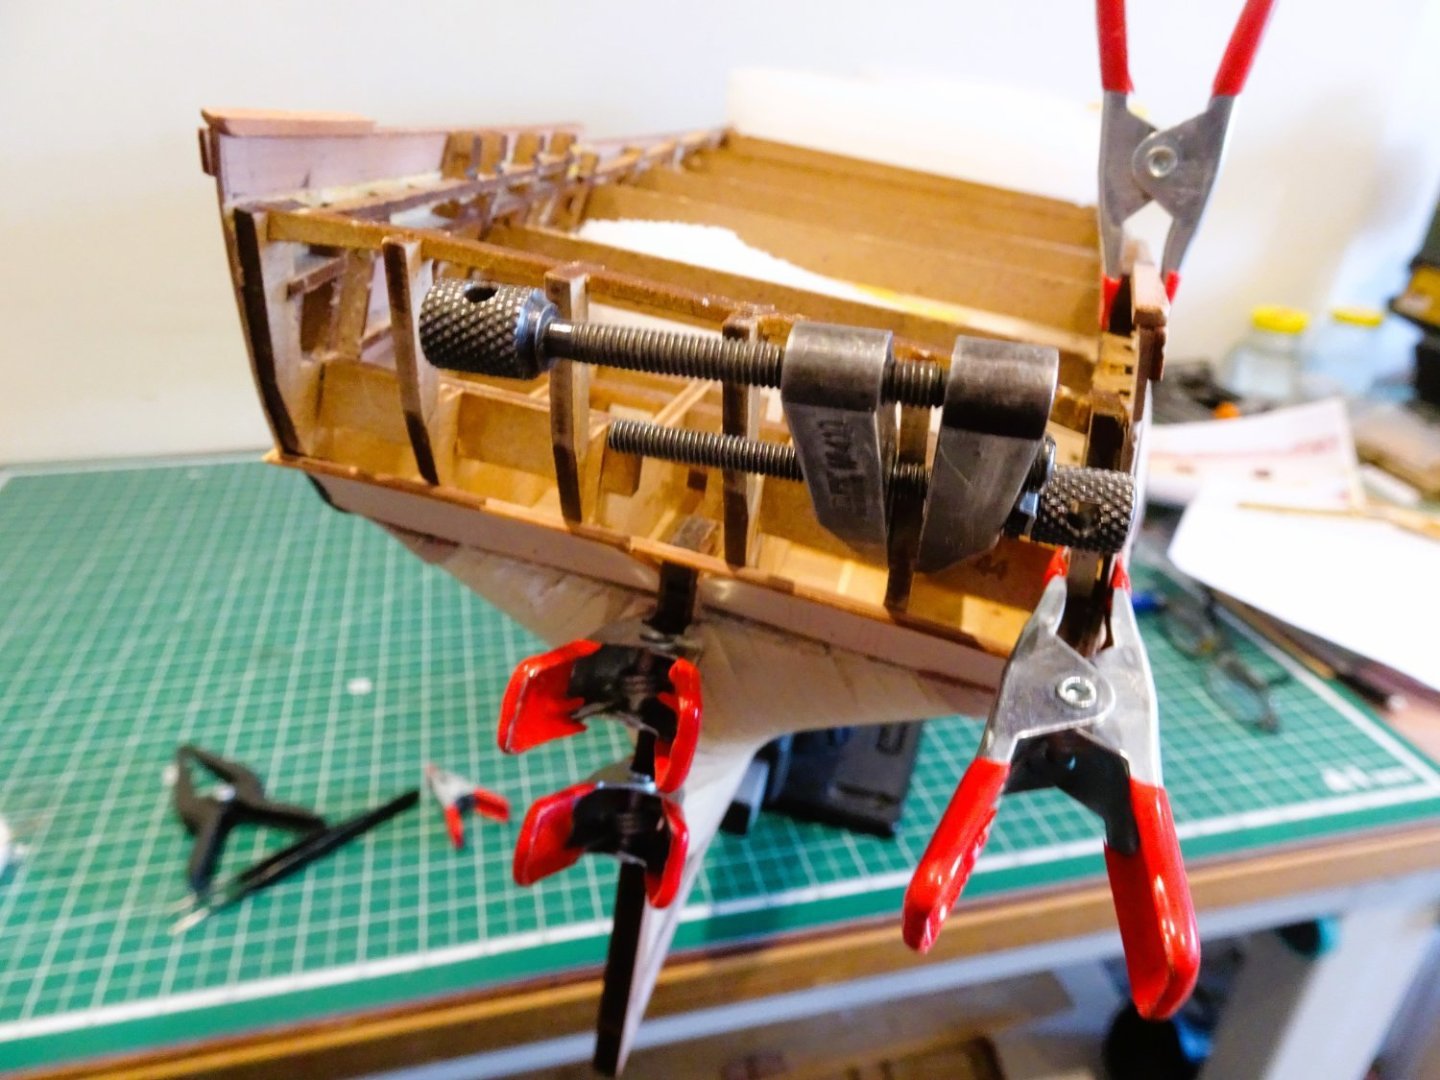
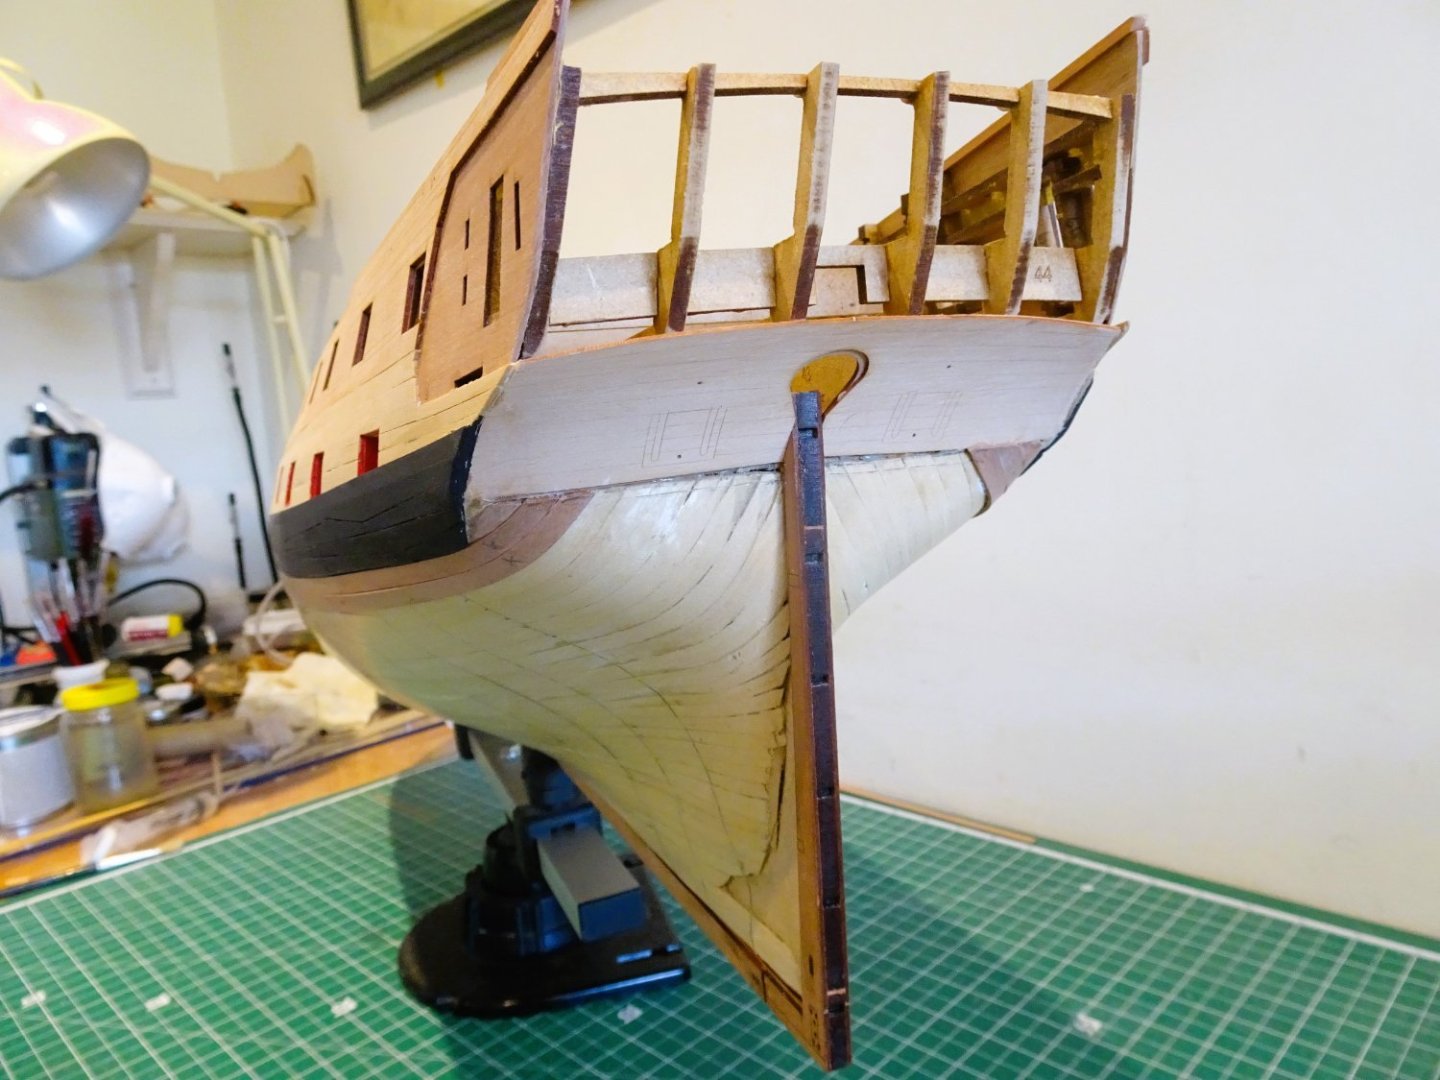
Post Forty-two A bit of a set back What I feared may happen with a hull this size has happened. Manoeuvring to check the lining off resulted in the hull toppling off its support with the stern crashing against the wall. 1185 The stern frame bracing has buckled, and one of the mdf stern frames split. 1186 The Upper stern pattern above the gallery has been split. 1187 1188 I’m bloody annoyed with myself letting this happen, but pva and clamps should sort the issue. Not a good start to the day.☹️ B.E. 16/06/2023


- 648 replies
-
- 22
-

-
-
-
- Indefatigable
- Vanguard Models
- (and 1 more)
-
Nicely planked Derek, that'll do very nicely. 👍 ps I like your idea of using pipe insulation for inverted hull support, an effective and lightweight solution. Regards, B.E.
-
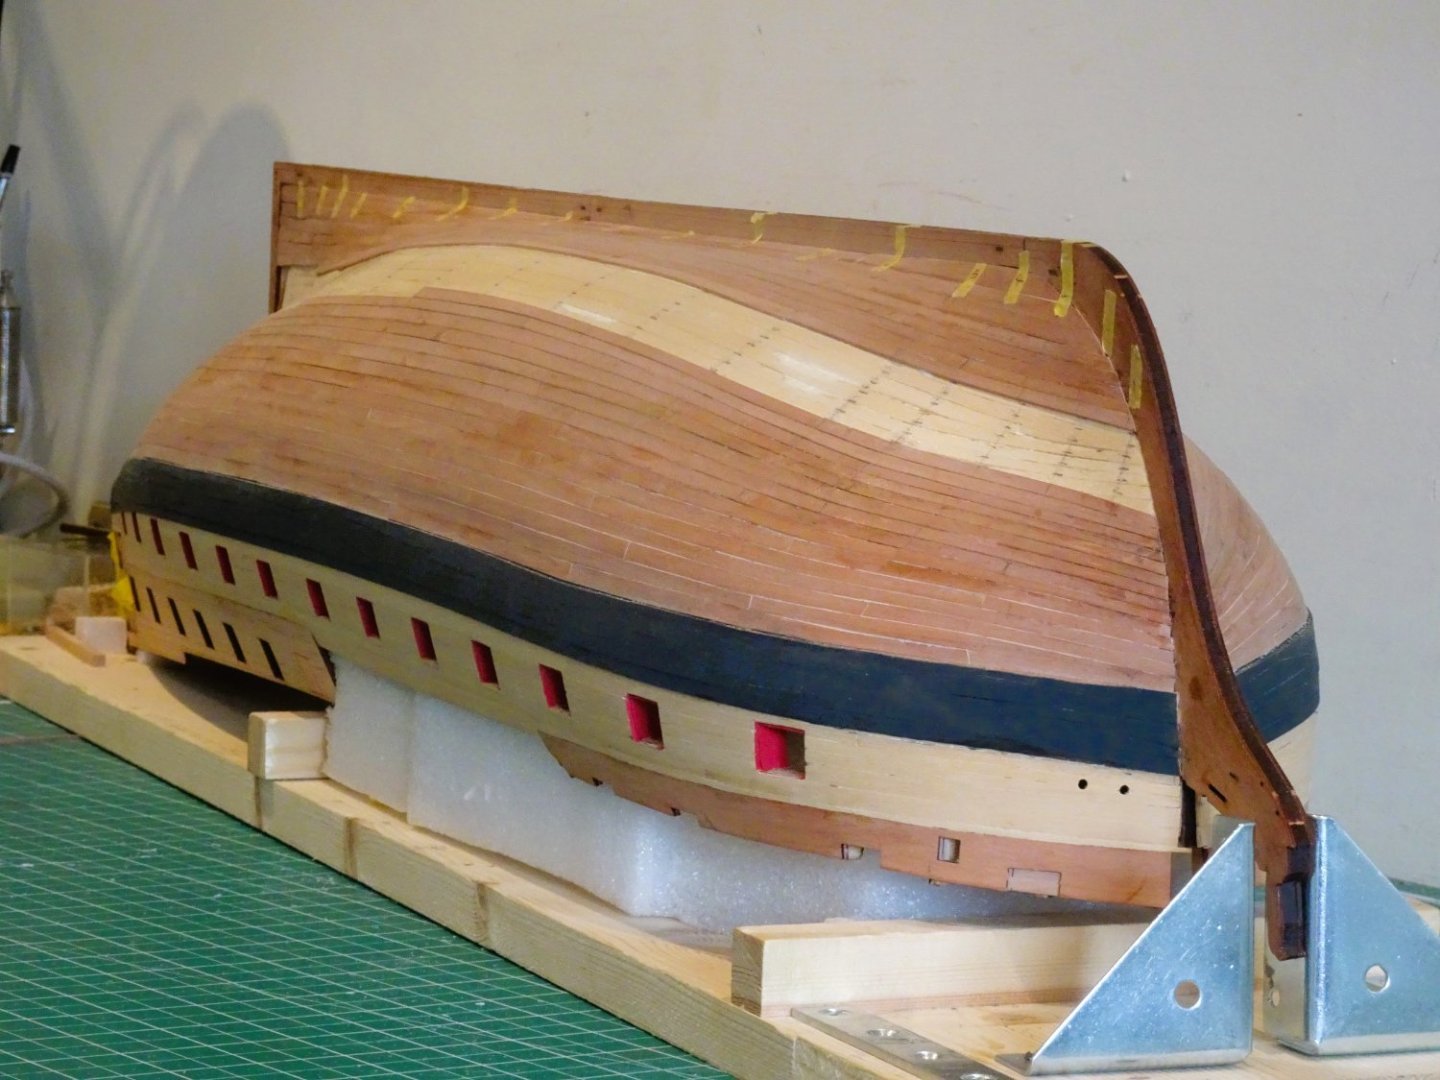
Post Forty-one Garboard Planks The two strakes below the wale are completed before I move onto the Garboard. 1152 These were fitted as individual planks, and attached using ca. According to the Construction and Fitting of the English Man of War (Peter Goodwin) the width of the Garboard Strake is 2/3 the moulded depth of the keel which would be 6.5mm at scale. At midships the depth from drop plank strake to keel is 141mm On paper this represents 28.2 number of 5mm planks. 1168 I have opted to round up to 7mm wide strips for the Garboard planks which I think better shows the difference to the usual hull planking. 1166 I next added the strake above the Garboard. 1161 1157 1165 At last, I can now move onto prepare for the remainder of the hull planking. B.E. 15/06/2023

- 648 replies
-
- 19
-
-
- Indefatigable
- Vanguard Models
- (and 1 more)
-
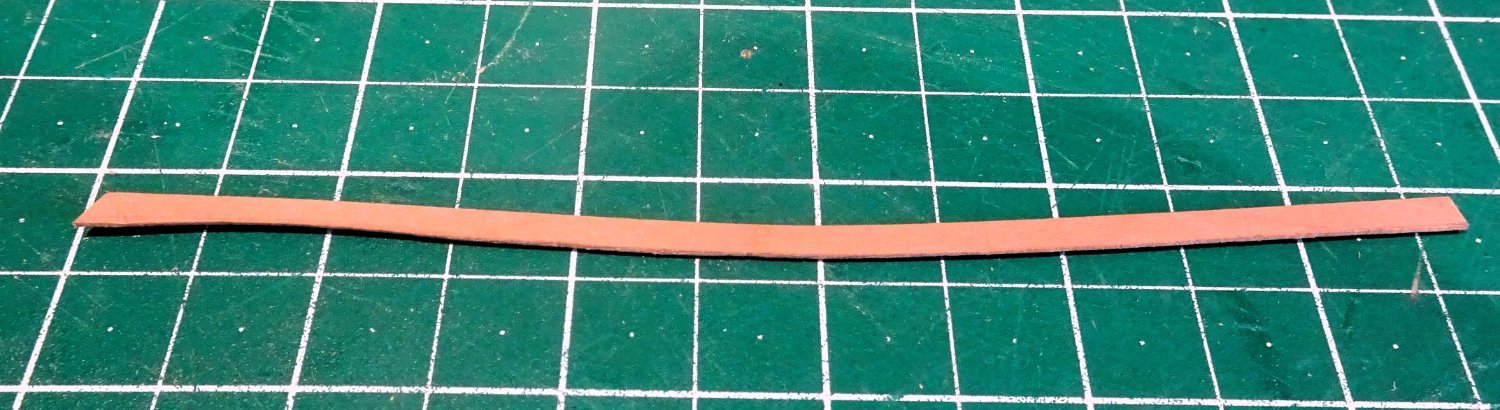
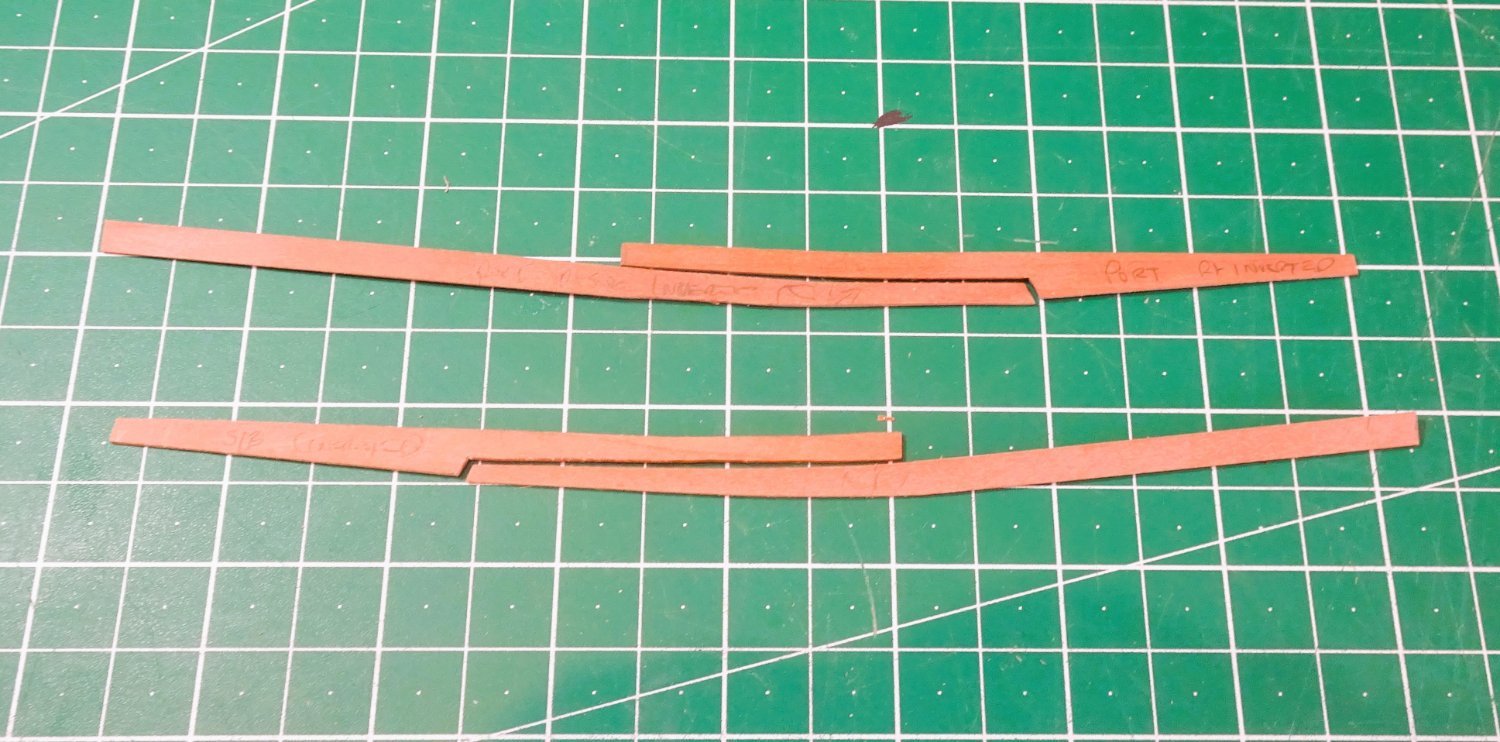
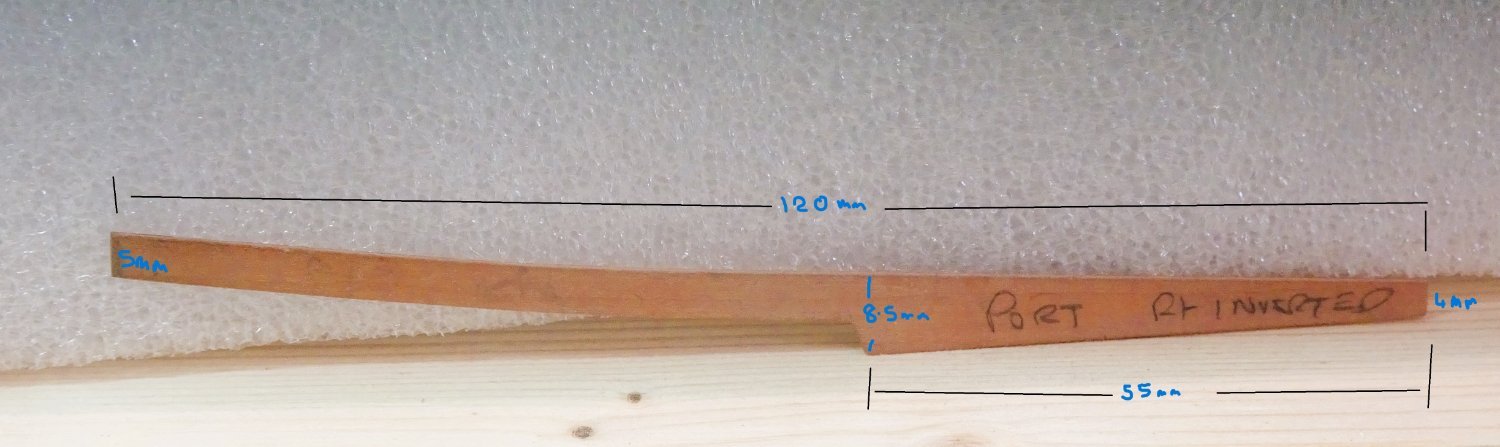
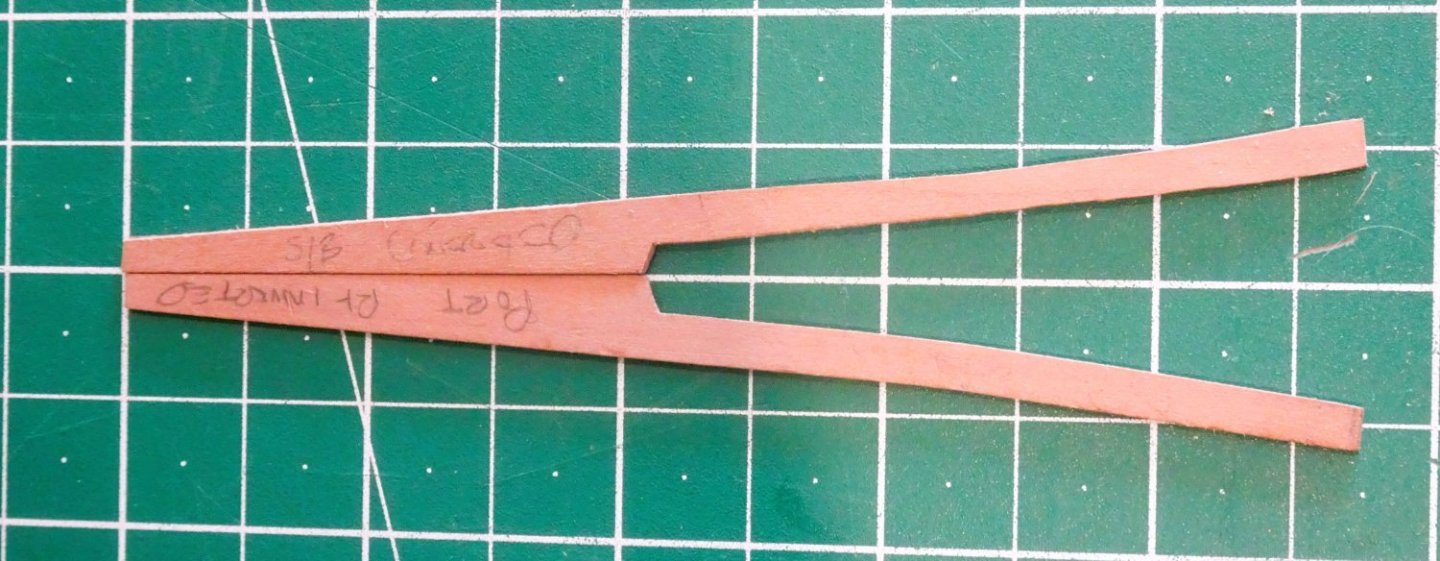
Post Forty Drop planks at the Bow. These are a feature of ships of the period and generally appear immediately below the wale. They are a nice feature on a model, and installing a drop plank should help prevent overcrowding of the strakes at the bow as planking proceeds. 1131 Where it meets the stem I have tapered to 4mm, which is 1mm less than the full single plank width. The taper was determined in the usual way using a single 5mm plank which was then use as a template on a 10mm plank. 1127 The body of the plank must be broad enough at the aft end to take account of a tapered plank that butts against it and runs beneath the wale. The tail of the Drop plank also must run to meet a full width plank of 5mm, following on and running towards the stern. Together they form the first two strakes beneath the wale. I couldn’t find any specifics about the proportions of drop planks between the body and the tail, so this is my best guestimate. 1128A These are the dimensions I used. The drop plank width is 4mm at the stem, 8.5mm at the aft end of the body, which is 55mm long, and with an overall length of 120mm. 1132 1133 1140 1148 1142 B.E. 14/06/2023


- 648 replies
-
- 18
-
-
- Indefatigable
- Vanguard Models
- (and 1 more)
-
I would agree with you Allan, the thinness of the davit struck me immediately when I built the launch for my Sphinx build. I doubled up on the kit measurements to allow for the inclusion of the roller, a fairly simple mod if the look offends the eye. PS. Alistair - I went for the Pinnace on the spare topmasts, I think the more elegant lines suit the Swan better. B.E.


-Copy.JPG.1d96afca46e27de623efb17ad4635bf0.JPG)