HOLIDAY DONATION DRIVE - SUPPORT MSW - DO YOUR PART TO KEEP THIS GREAT FORUM GOING!
×
.JPG.ca33079f5815b861e67b9c2cccd37982.JPG)

Blue Ensign
-
Posts
4,564 -
Joined
-
Last visited
Content Type
Profiles
Forums
Gallery
Events
Everything posted by Blue Ensign
-
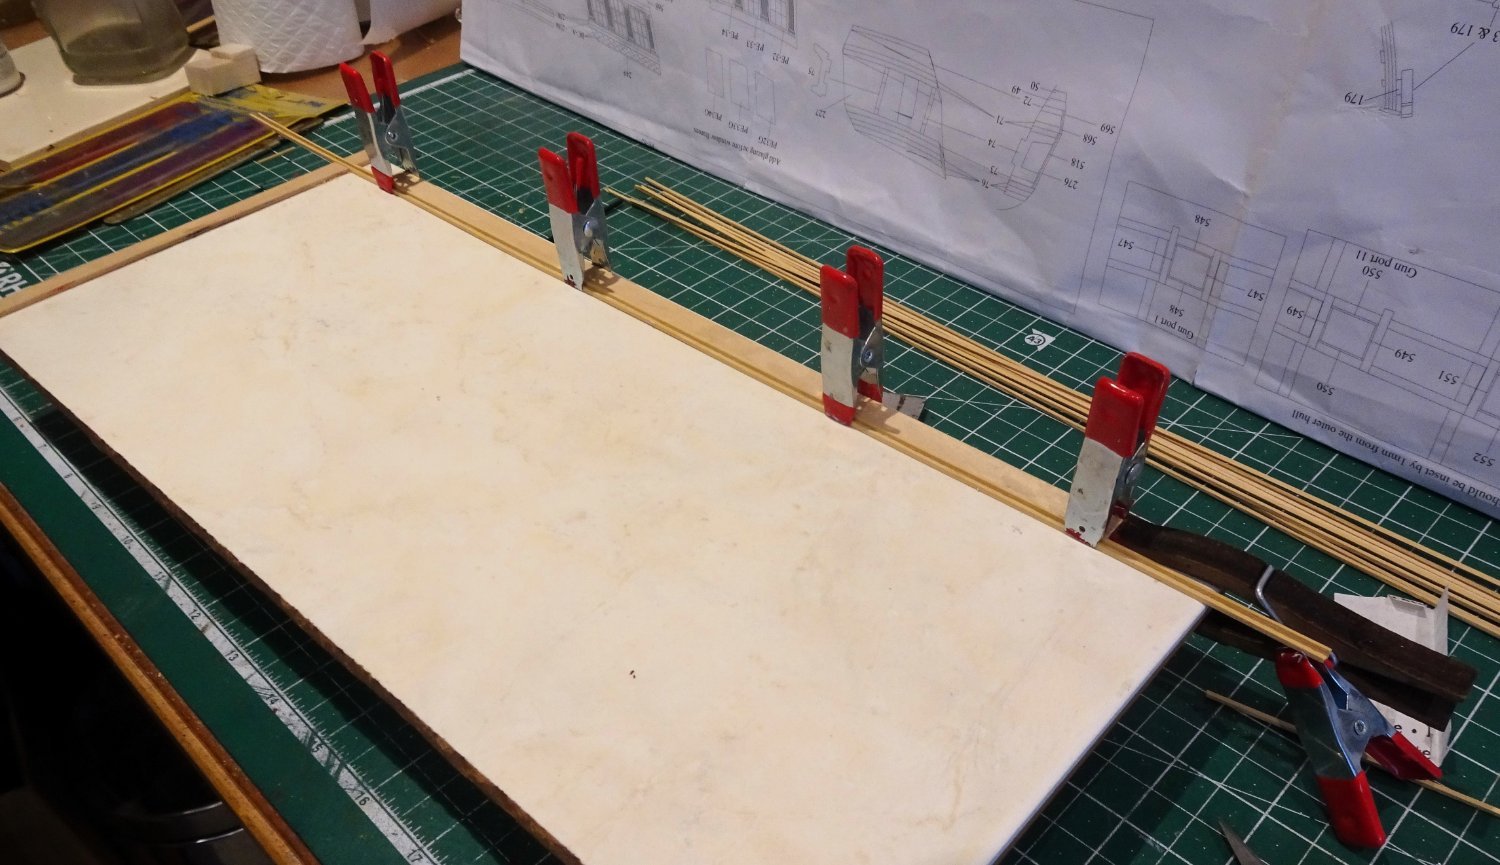
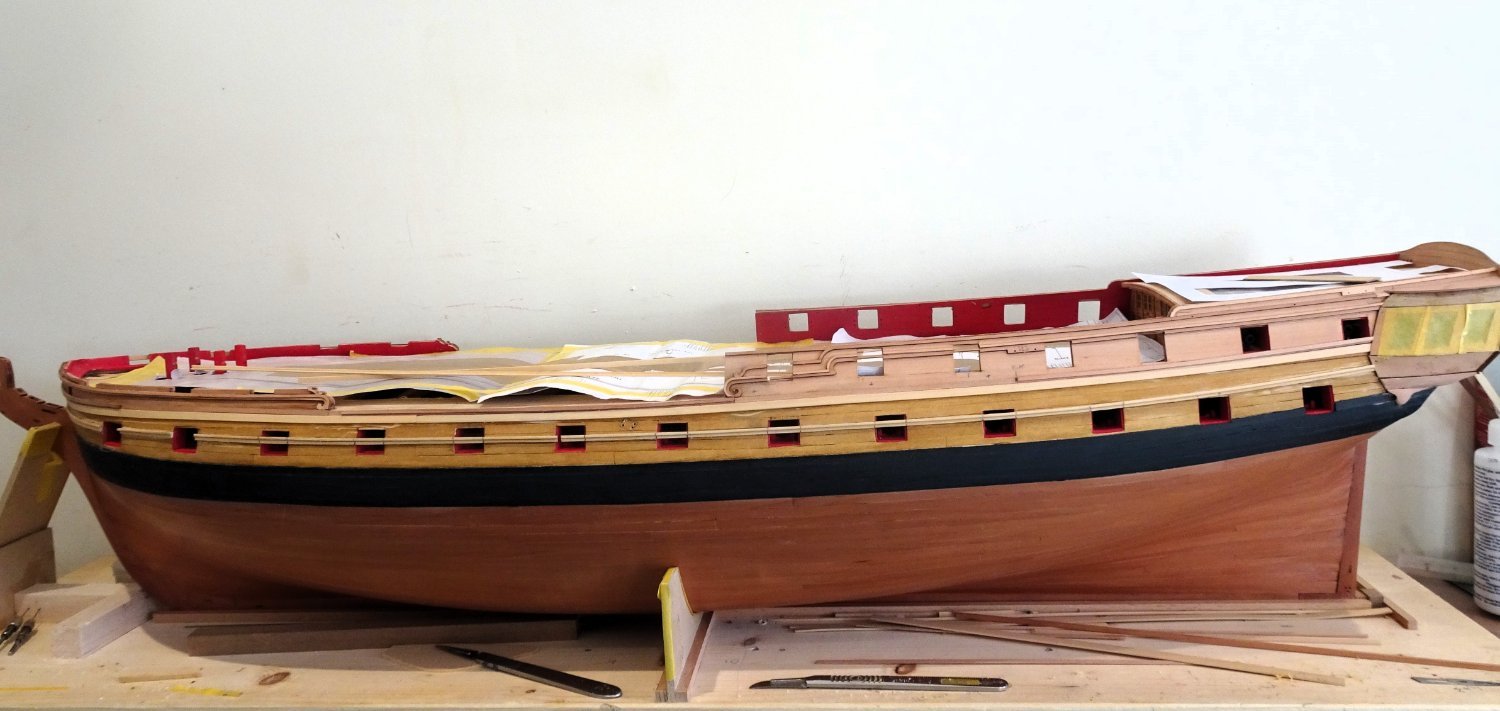
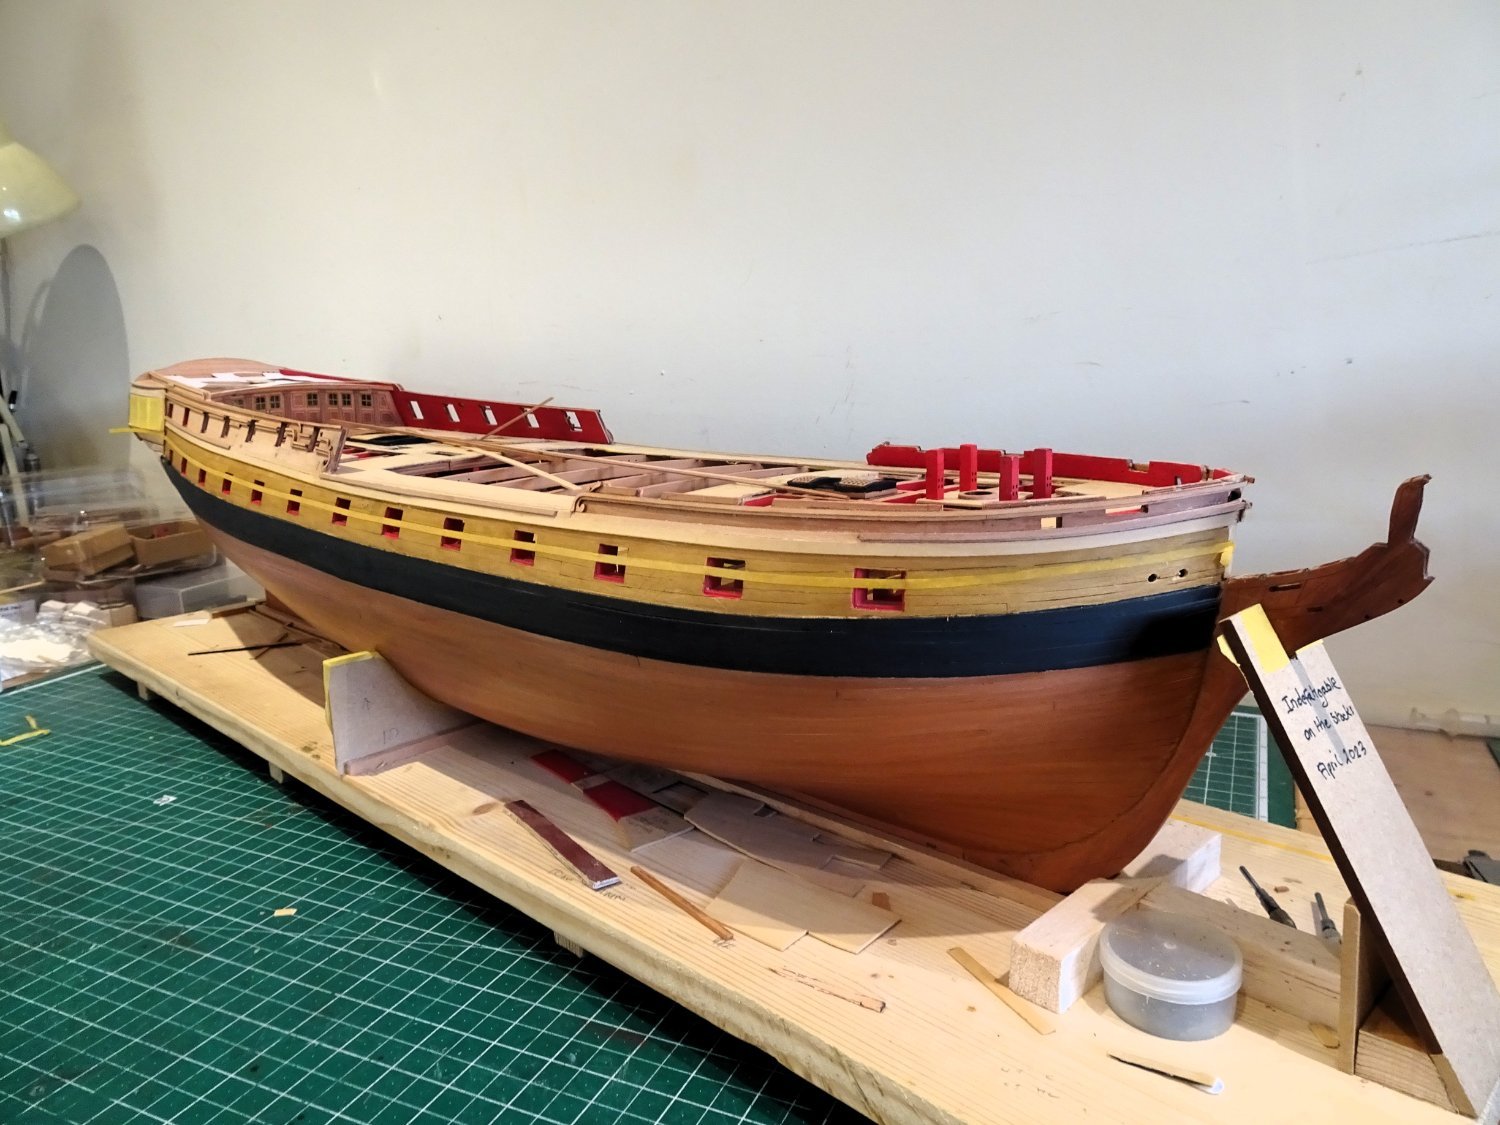
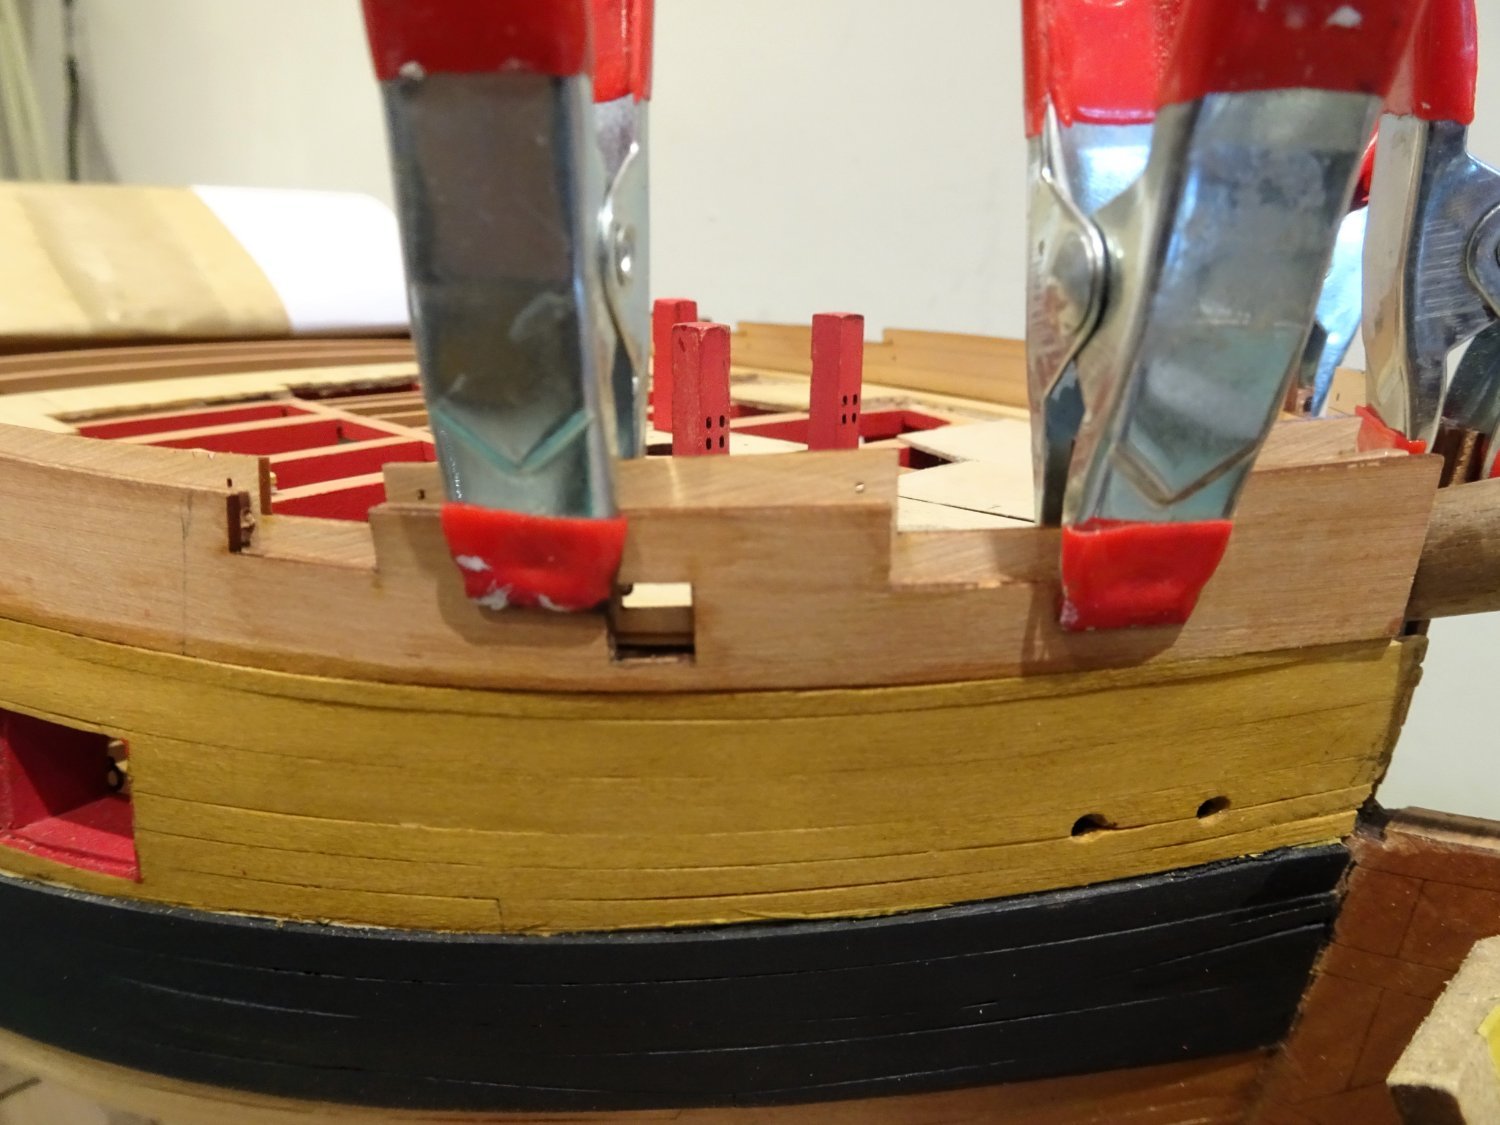
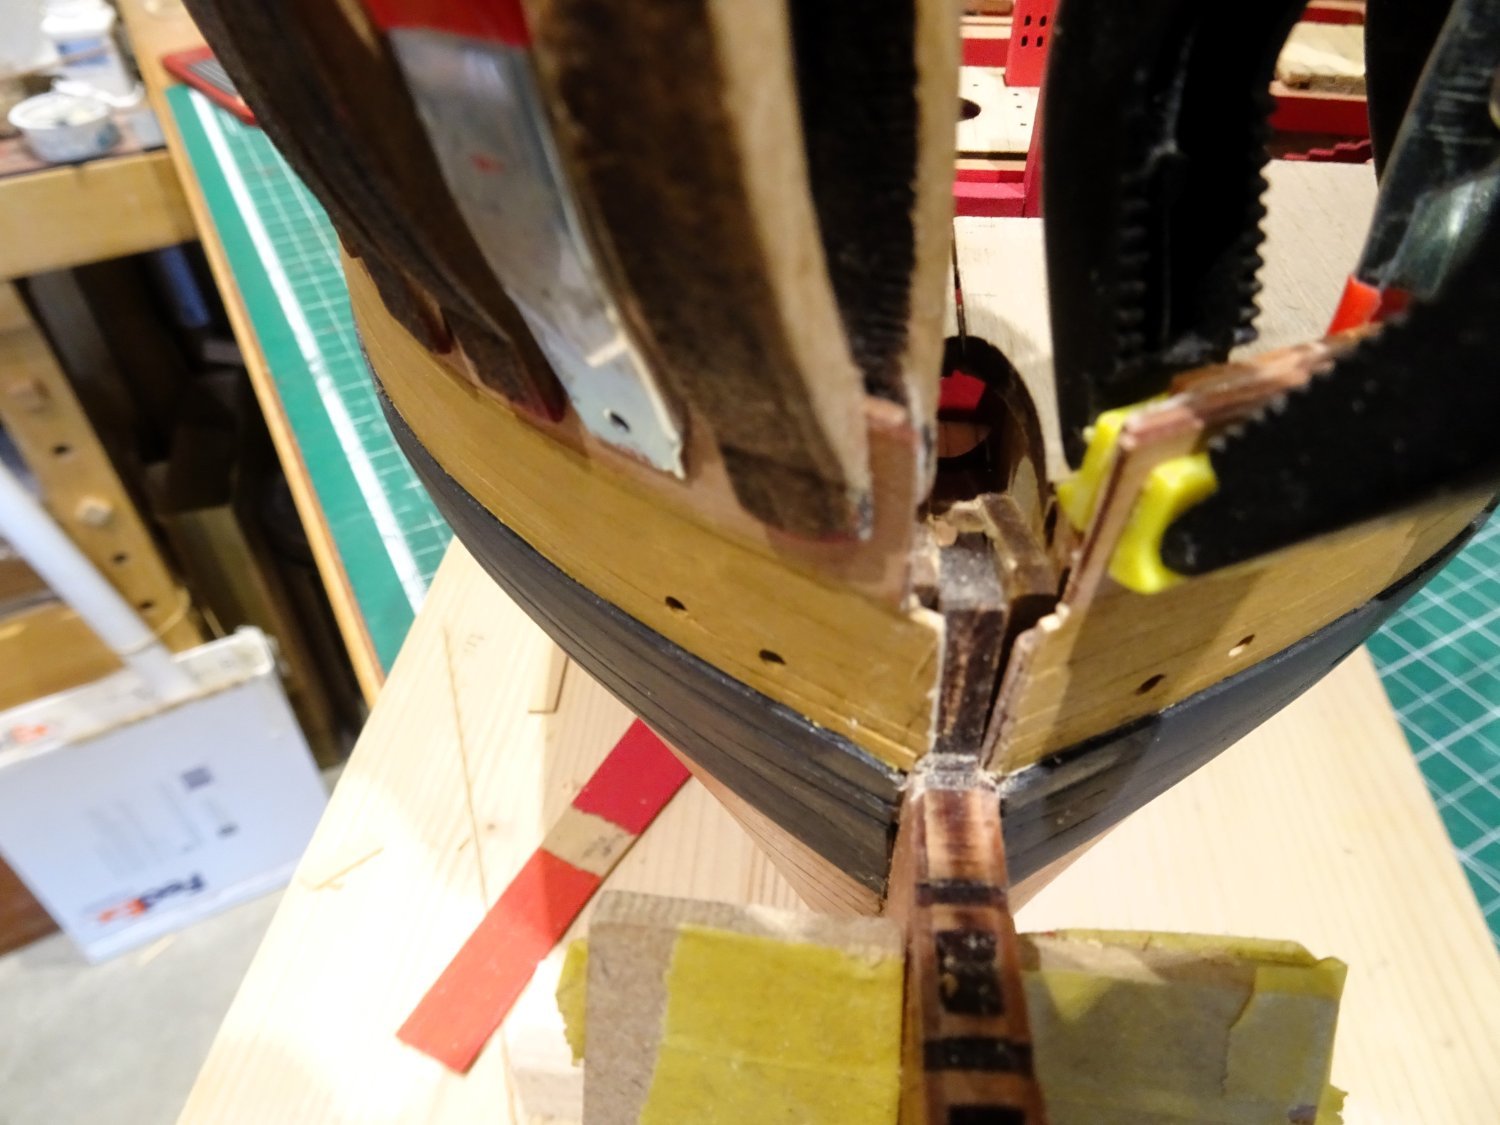
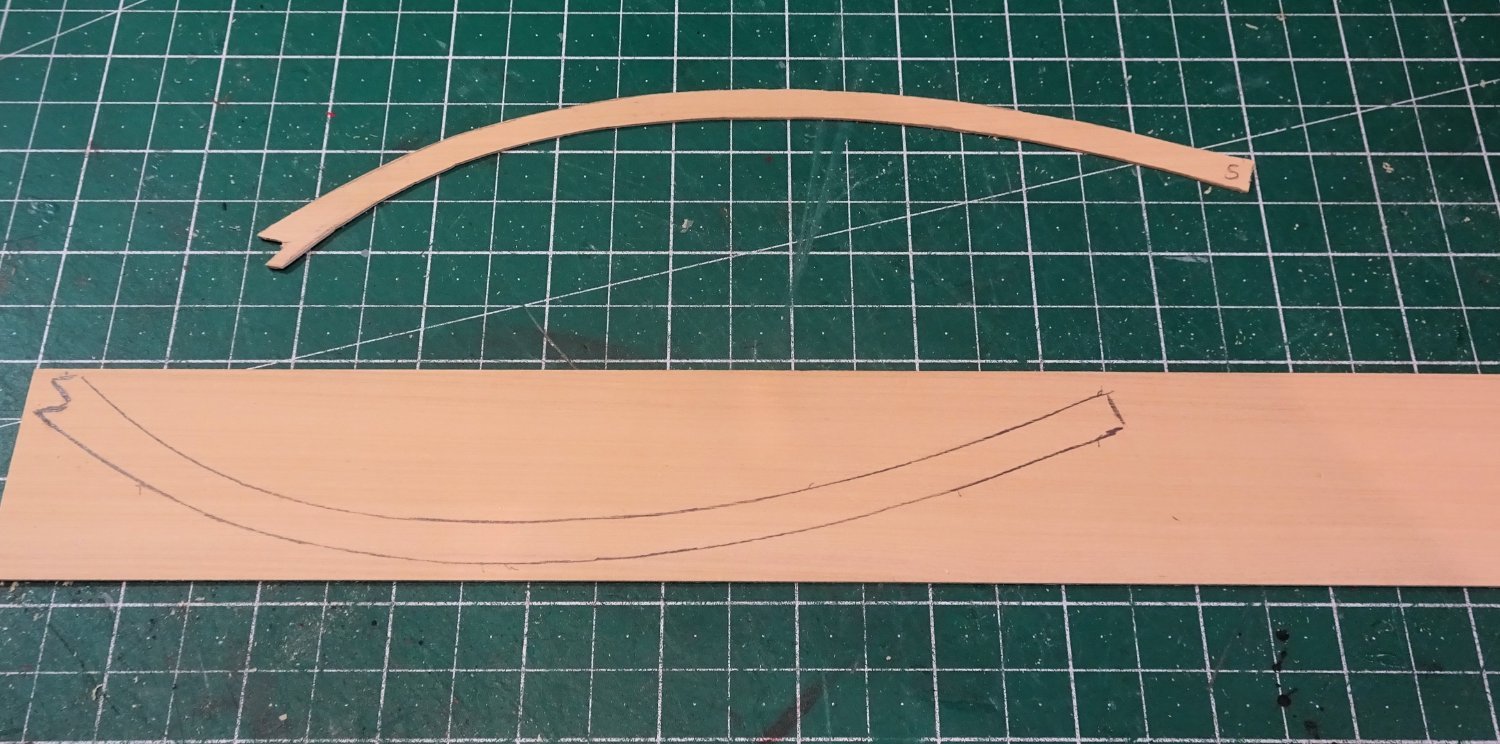
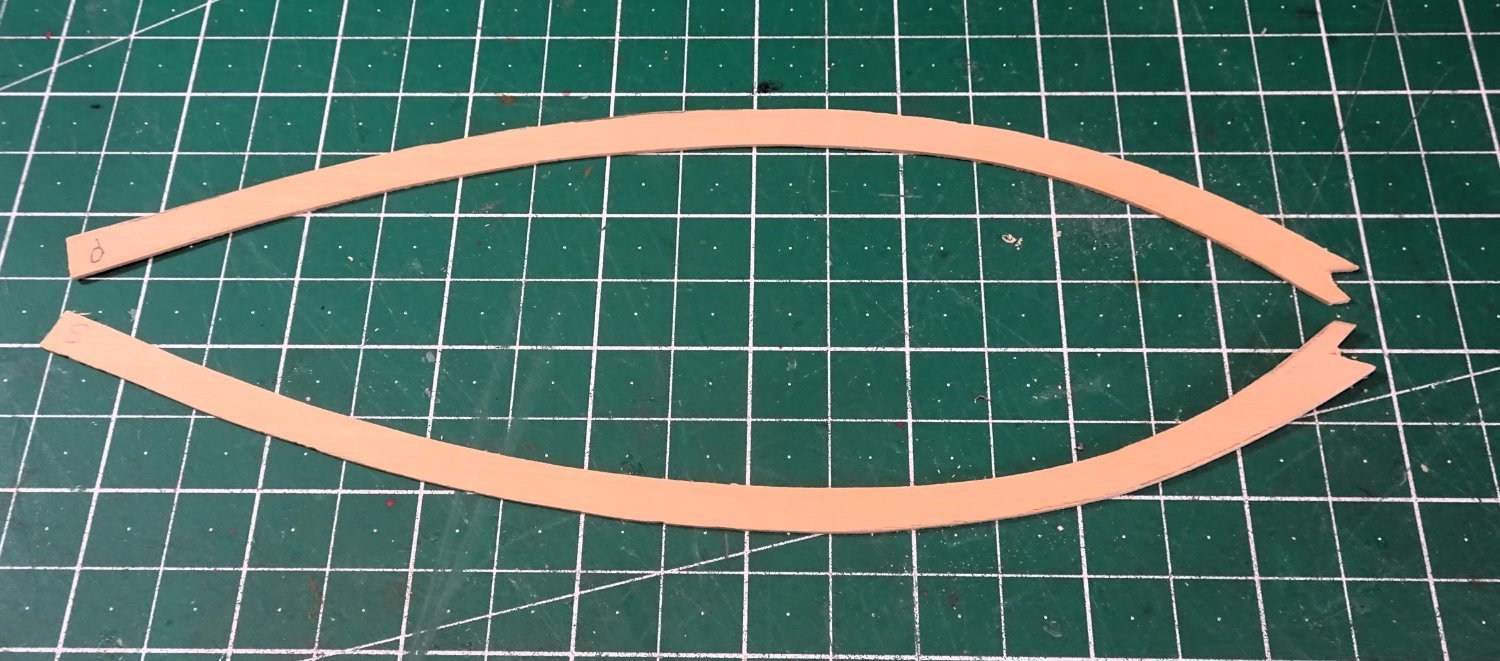
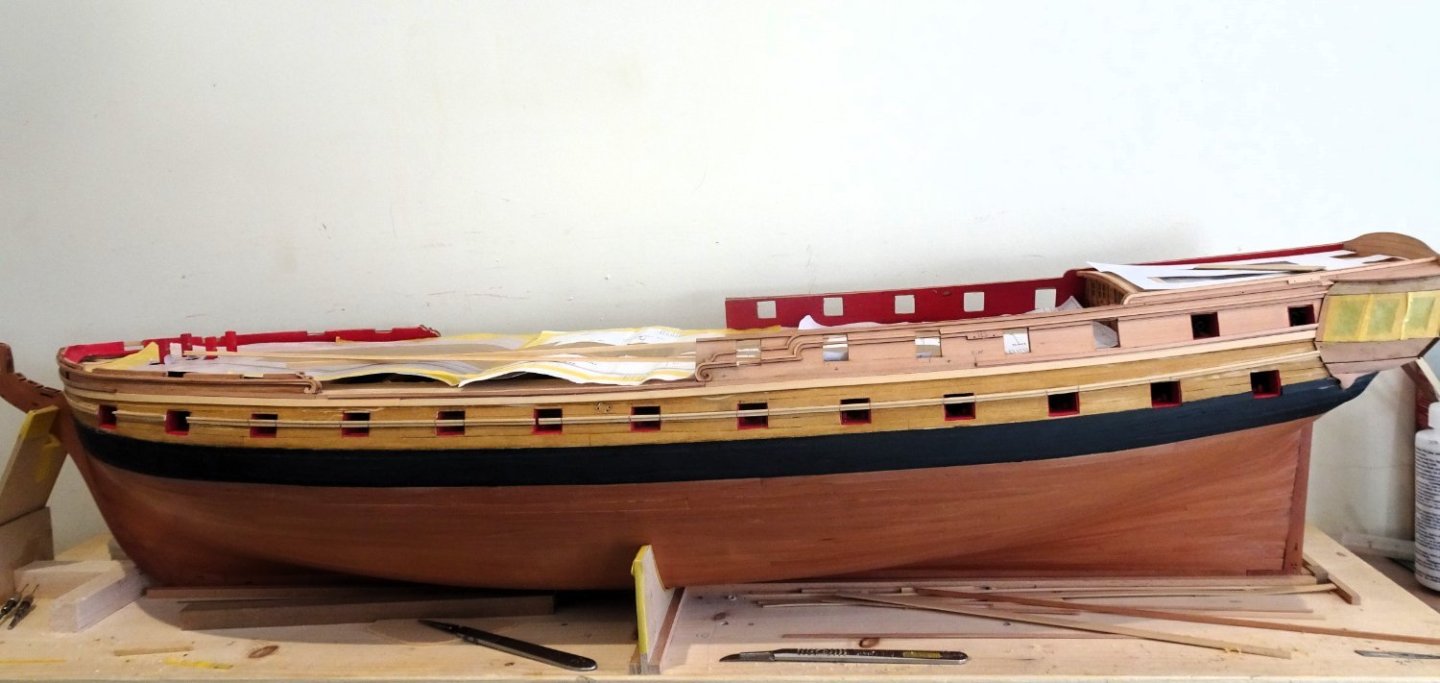
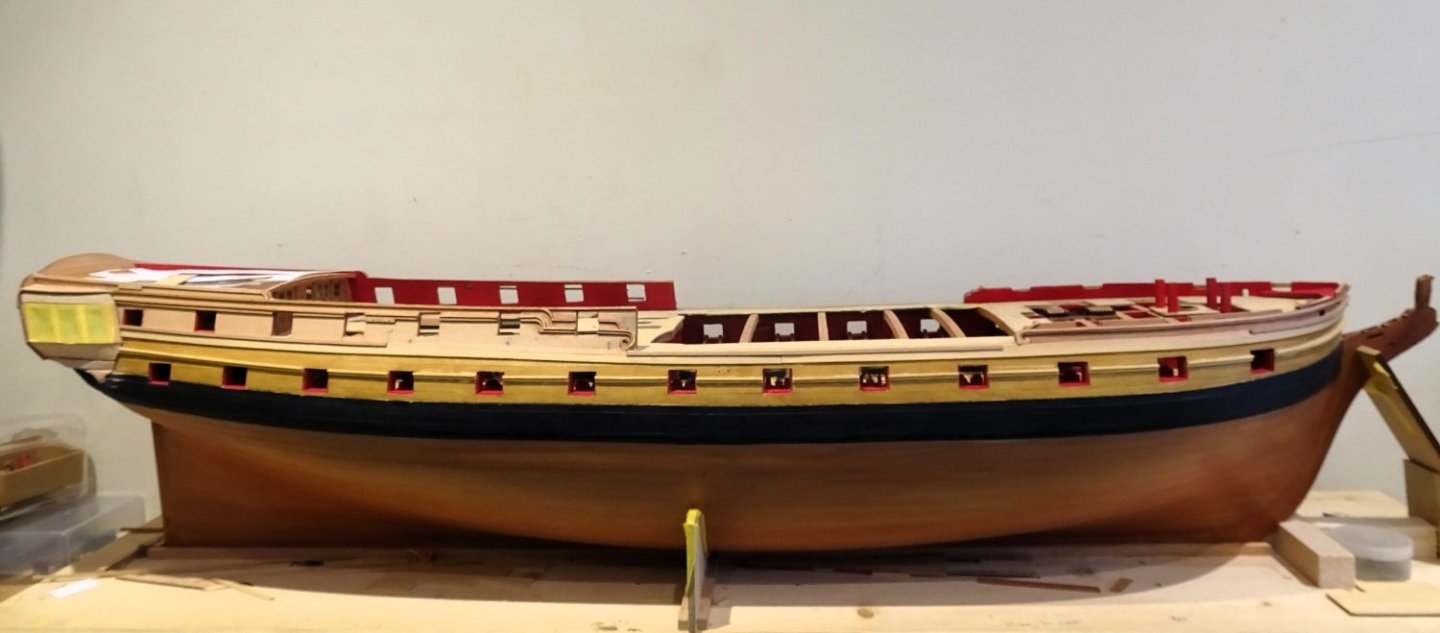
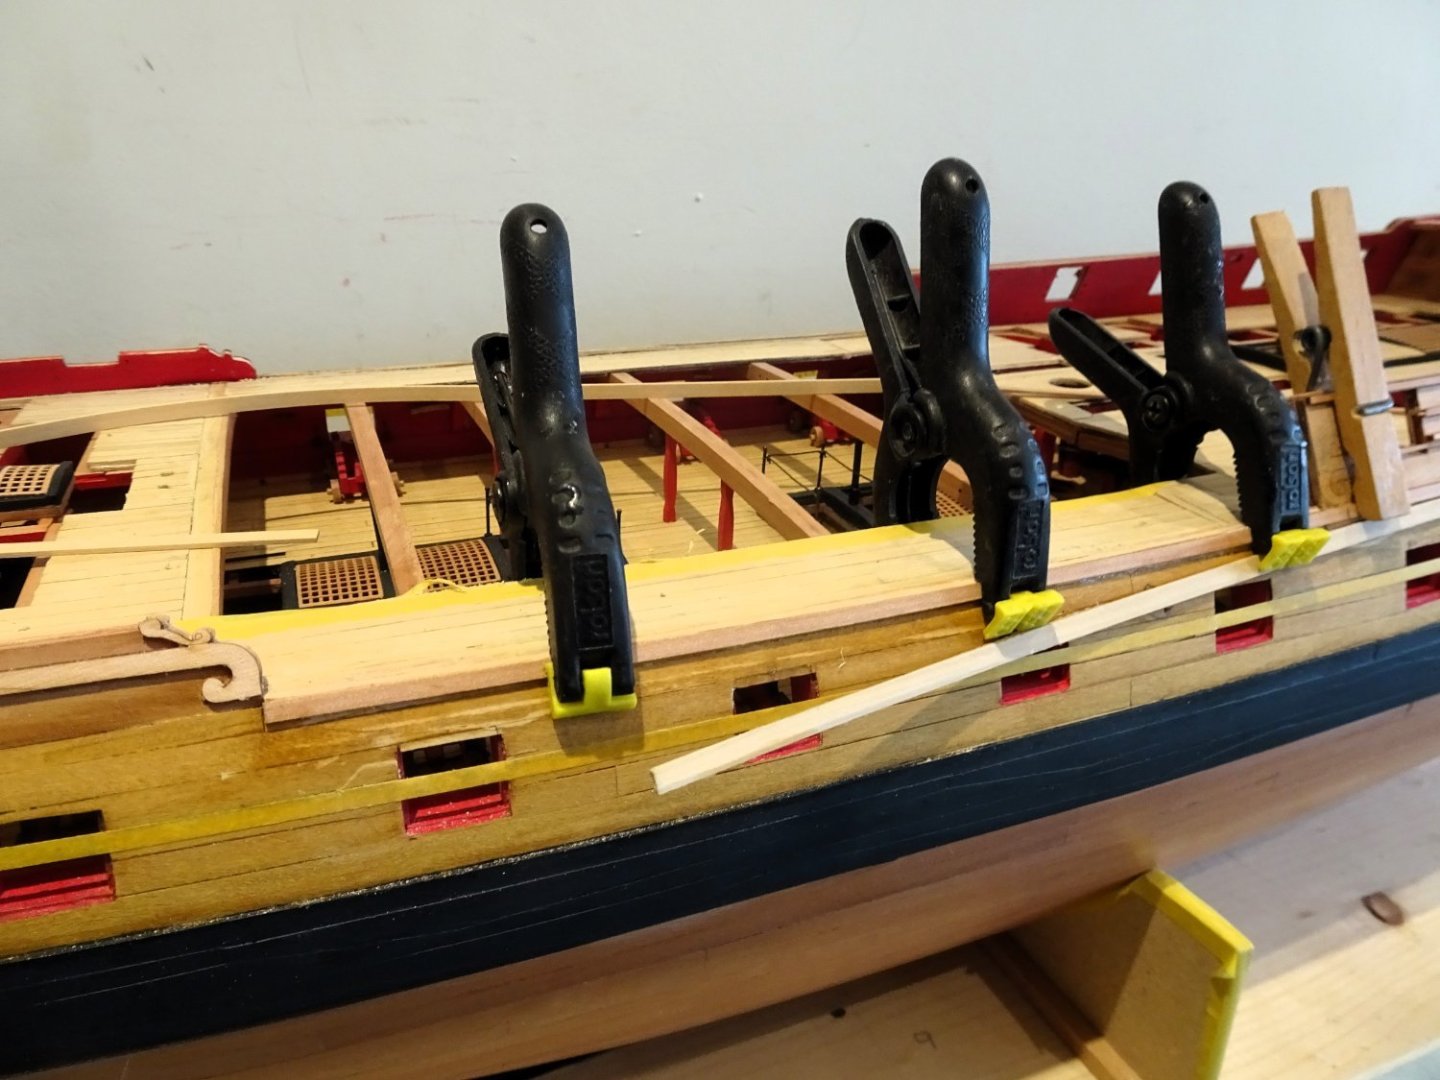
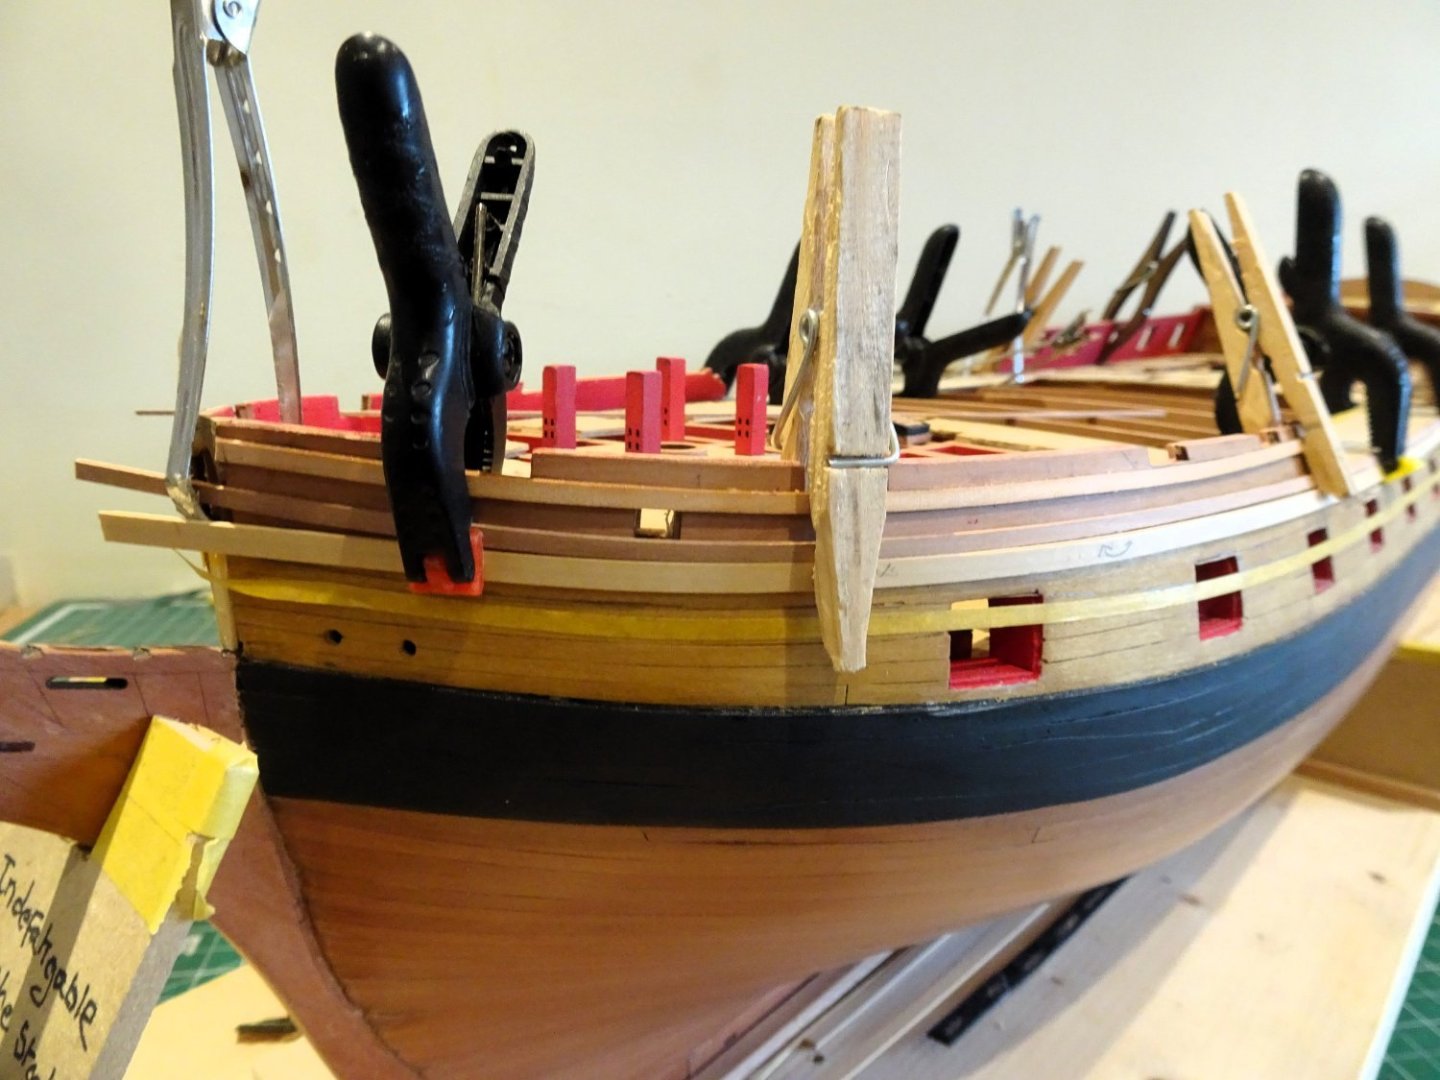
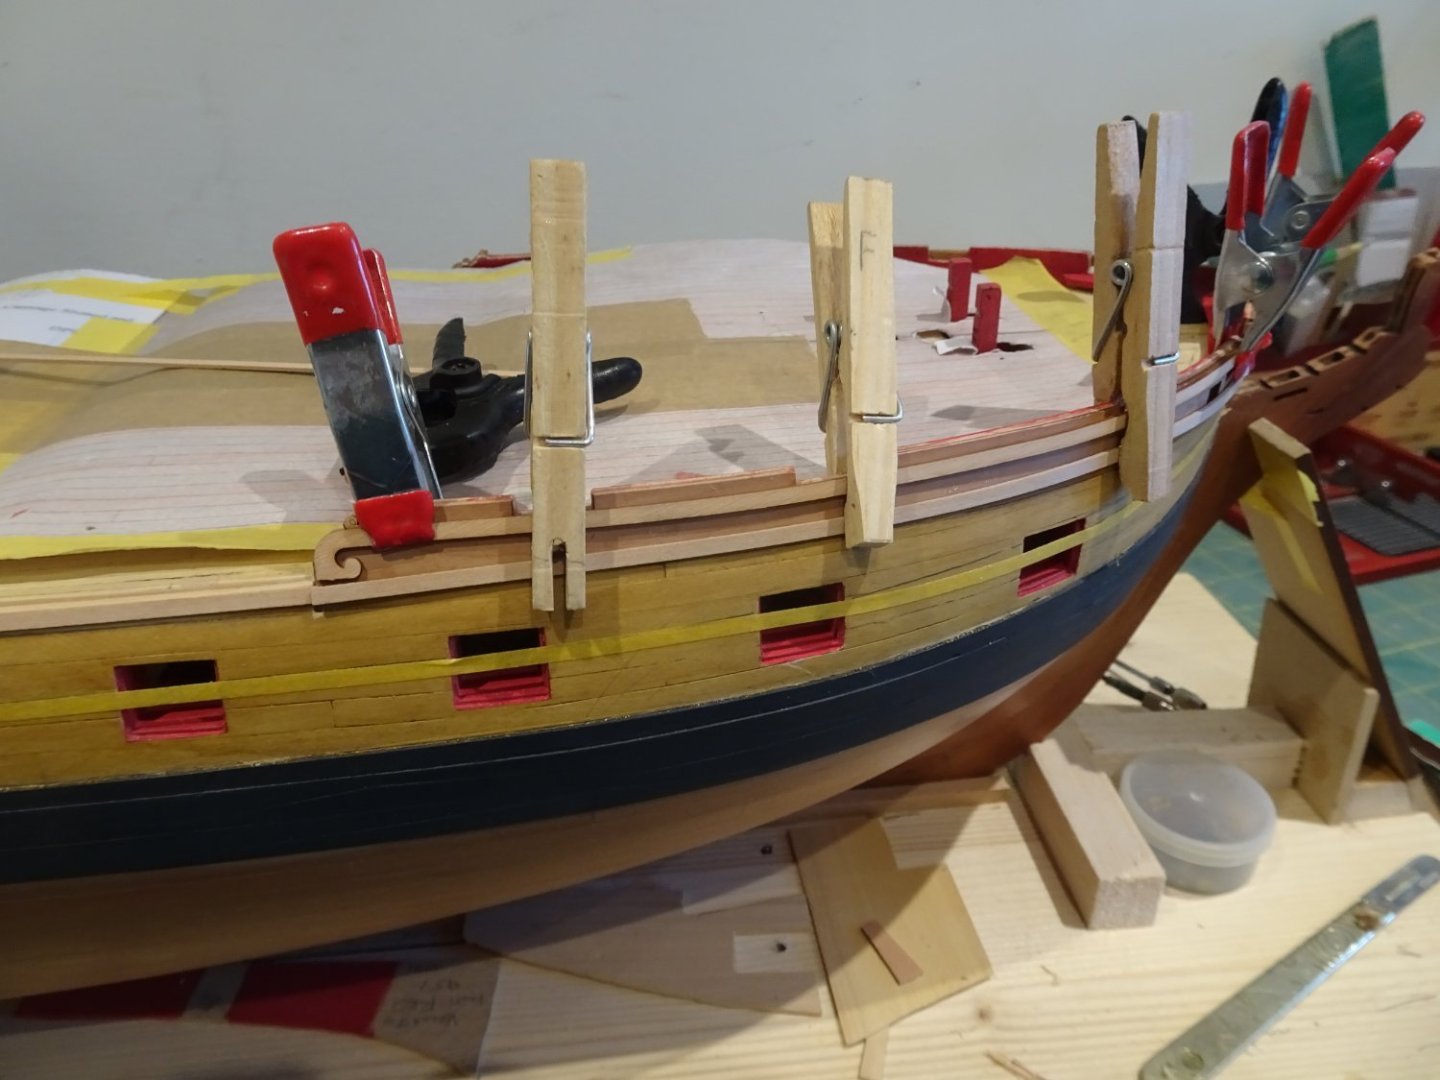
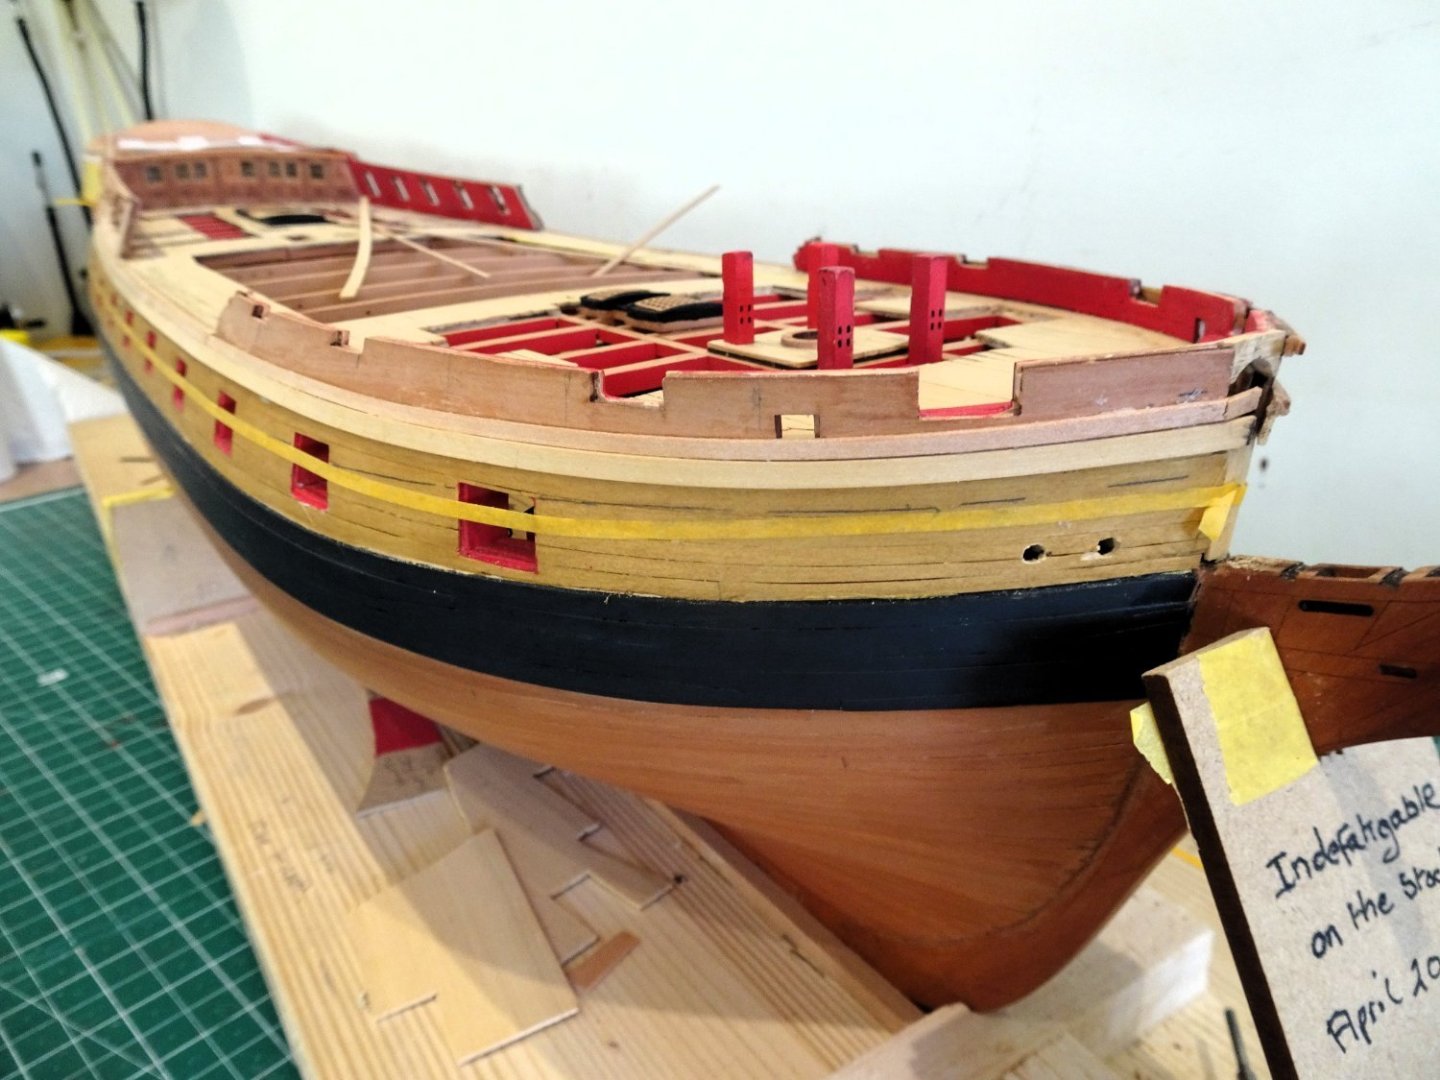
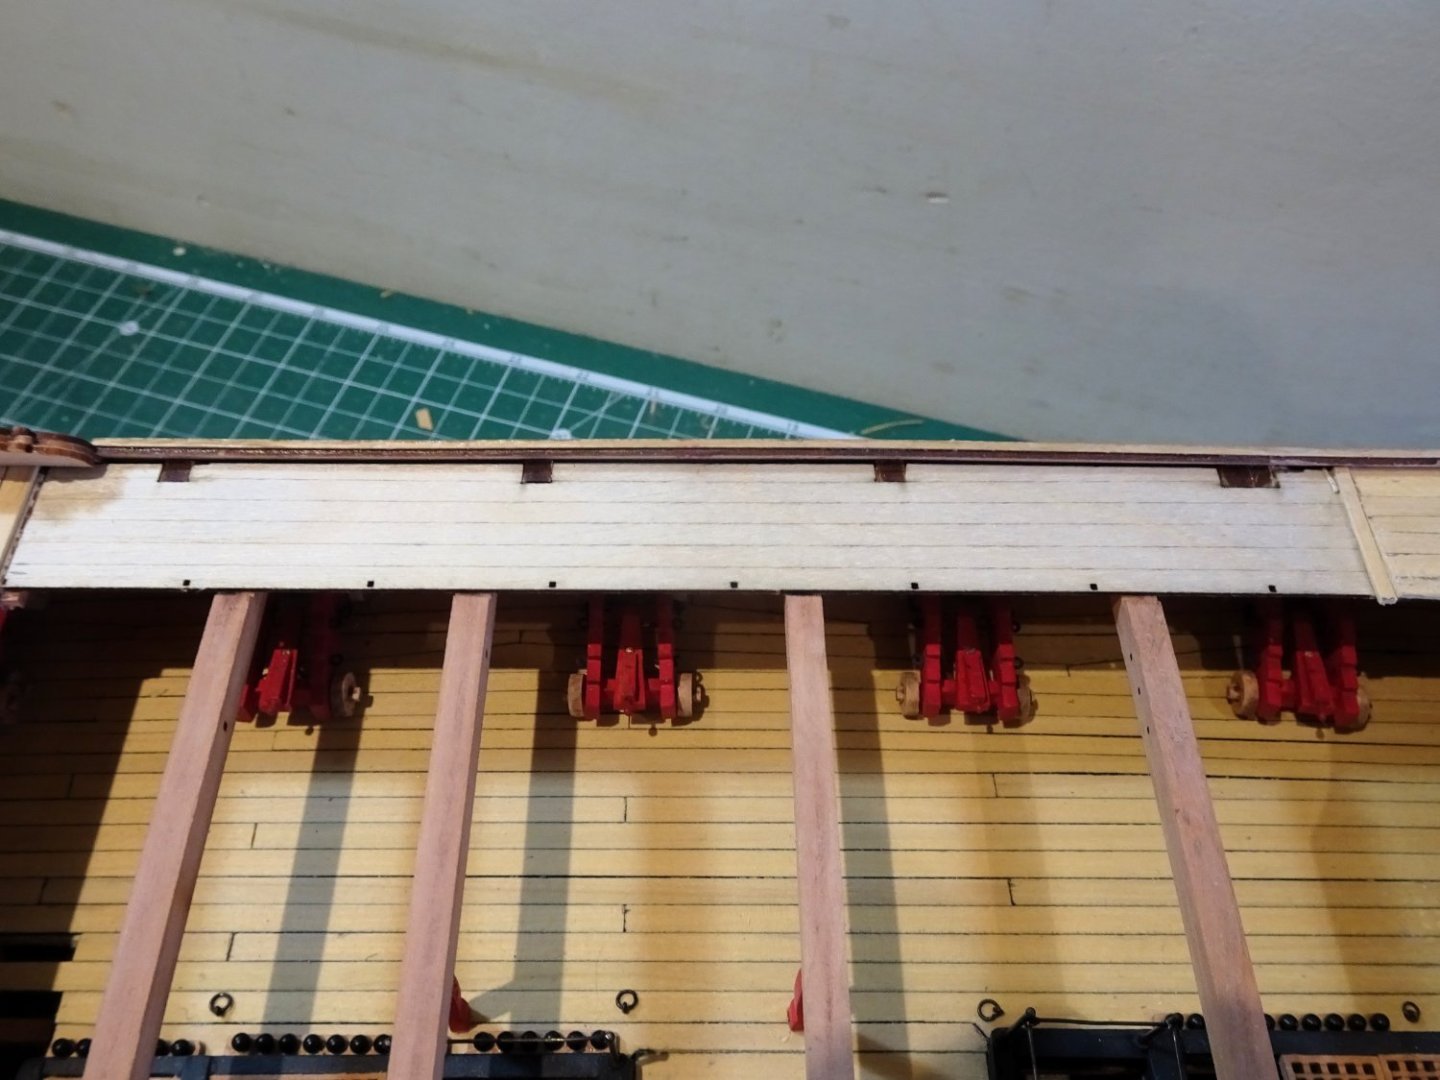
 Post One Hundred and seven Gunport mouldings The kit provides 3mm and 1mm Pearwood strip to make up the profile. A simple affair with the 1mm strip providing the relief profile. I had considered scribing my own profile, but long lengths are involved, which could prove tricky, and I thought that the kit ‘simple’ arrangement would probably look ok with the edges softened to remove the ‘blocky’ look. The prime objective is to get a smooth even curve from gallery to stem following the sheer. On my build I have used Boxwood strip for the makings, to match the Boxwood planking. 2718 A simple jig is used to assemble the two parts before sanding and shaping. 2722 The mouldings are in two sections each side, running from stern to port eight, at which point the sheer has levelled out, and then onto the bow. Between the upper rails and the Main wale I am now able to tweak the line particularly at the bow and stern, to satisfy the eye. As it turned out there wasn’t much of a ‘tweak’ required. The upper line was then taped and the moulding glued below. It is better to fit long sections to achieve a smooth curve, rather than fit short sections between the ports. 2725 I did further divide the forward strip into two sections for ease of fitting around the bow. Ca was used to fix the moulding. 2729 2732 2733 2734 2737 2741 2748 Trimming around port openings is a time-consuming business, three days work to reach this point with more time required to clean up the surfaces. The process also mars the surrounding areas, which I expected and will be rectified later. B.E. 14/11/2023
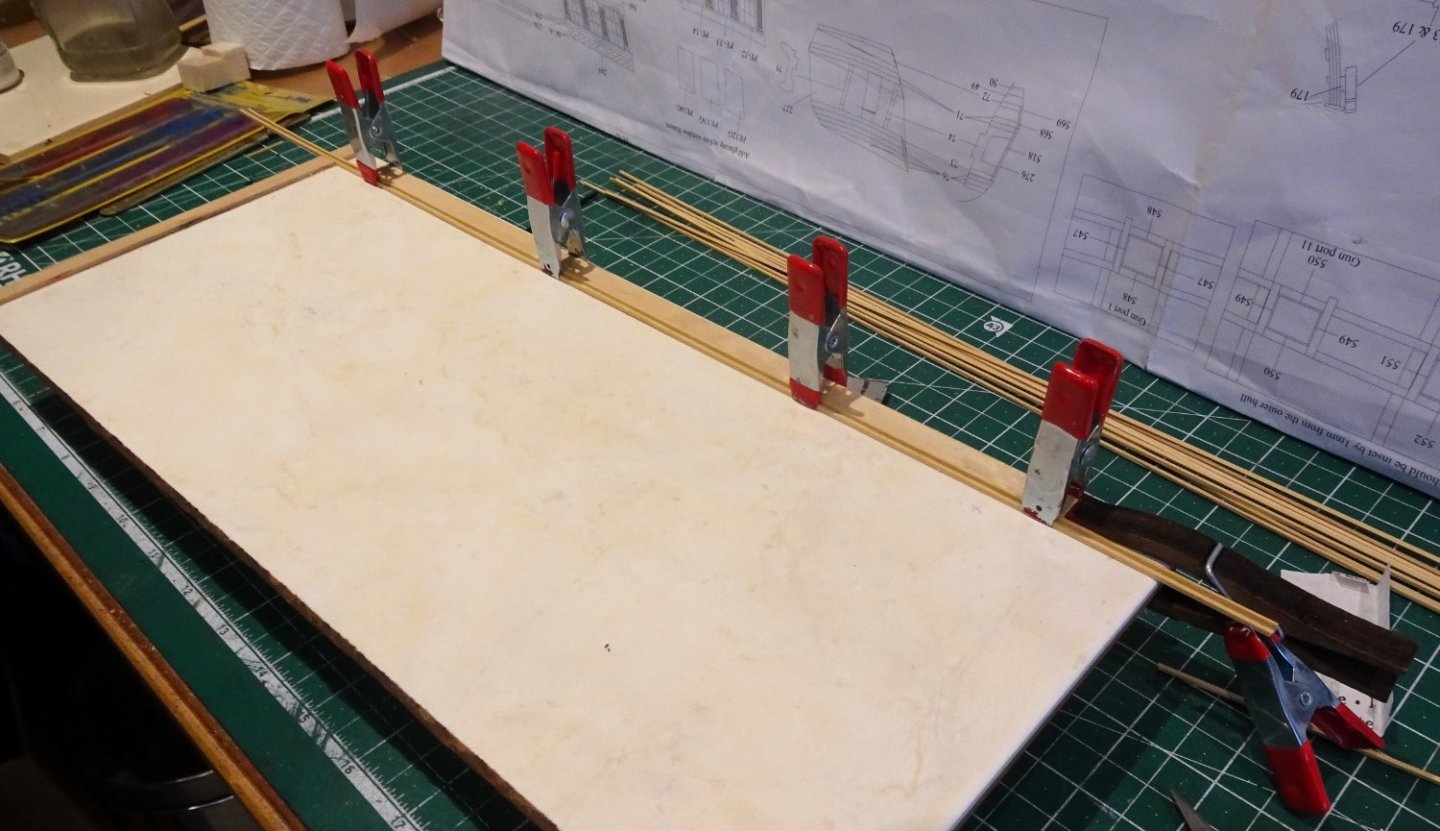


- 648 replies
-
- 23
-

-
- Indefatigable
- Vanguard Models
- (and 1 more)
-
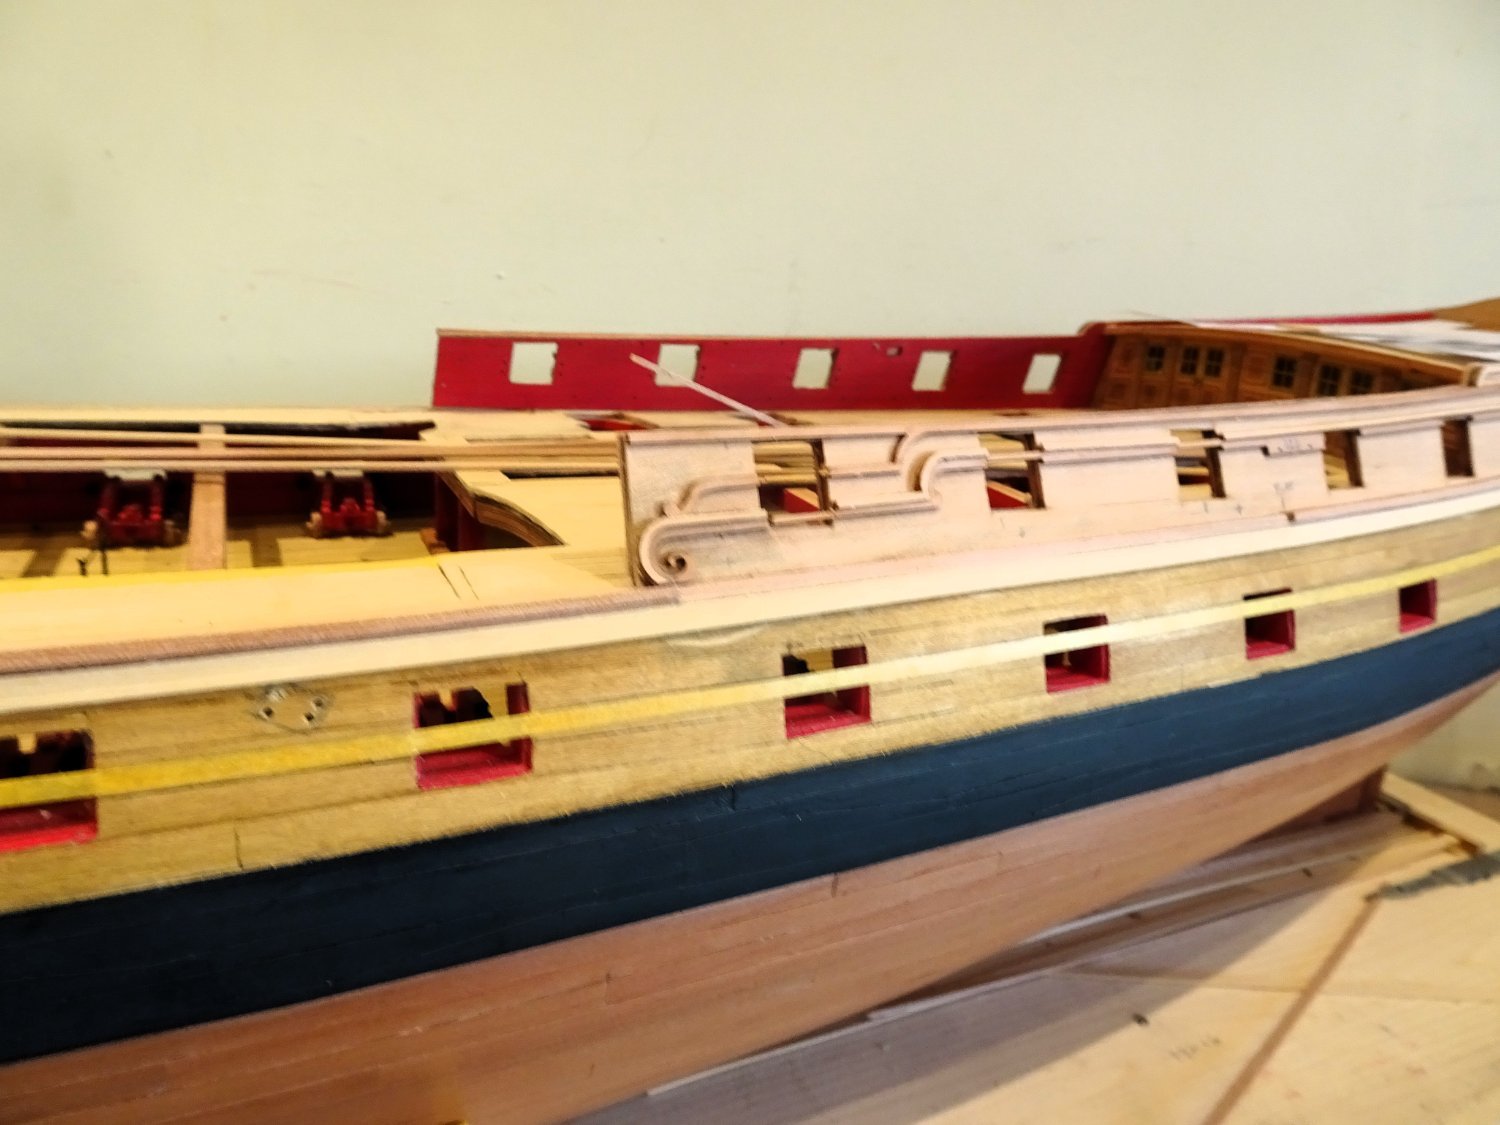
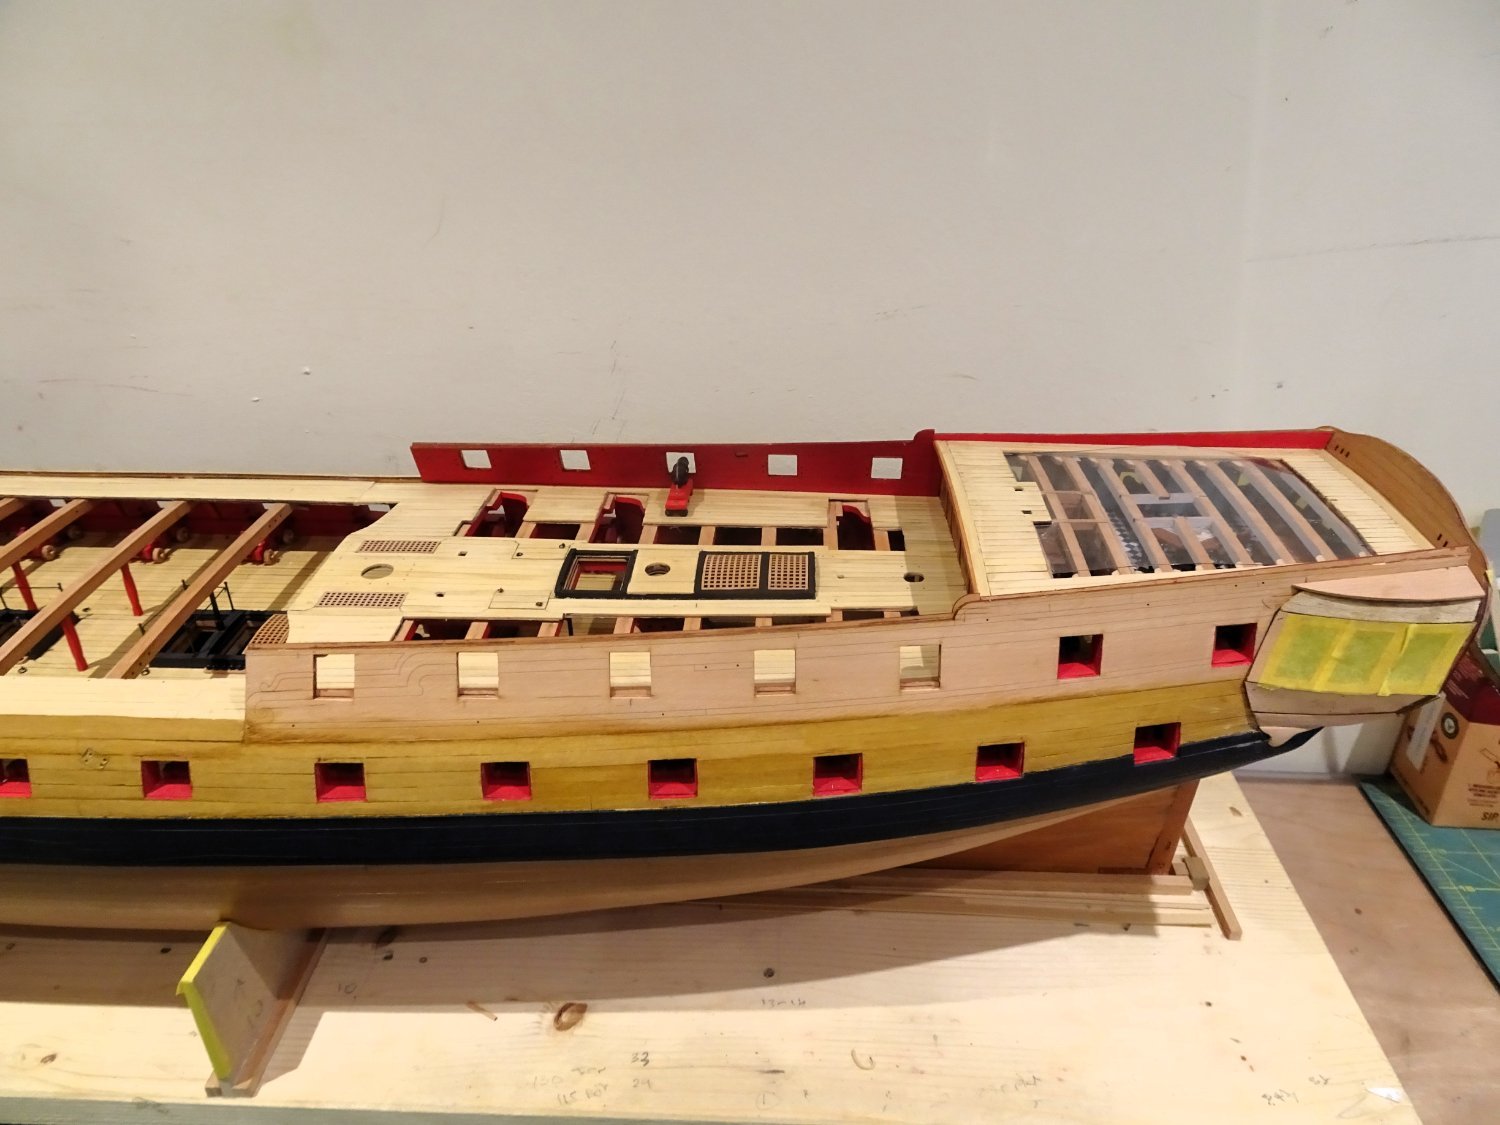
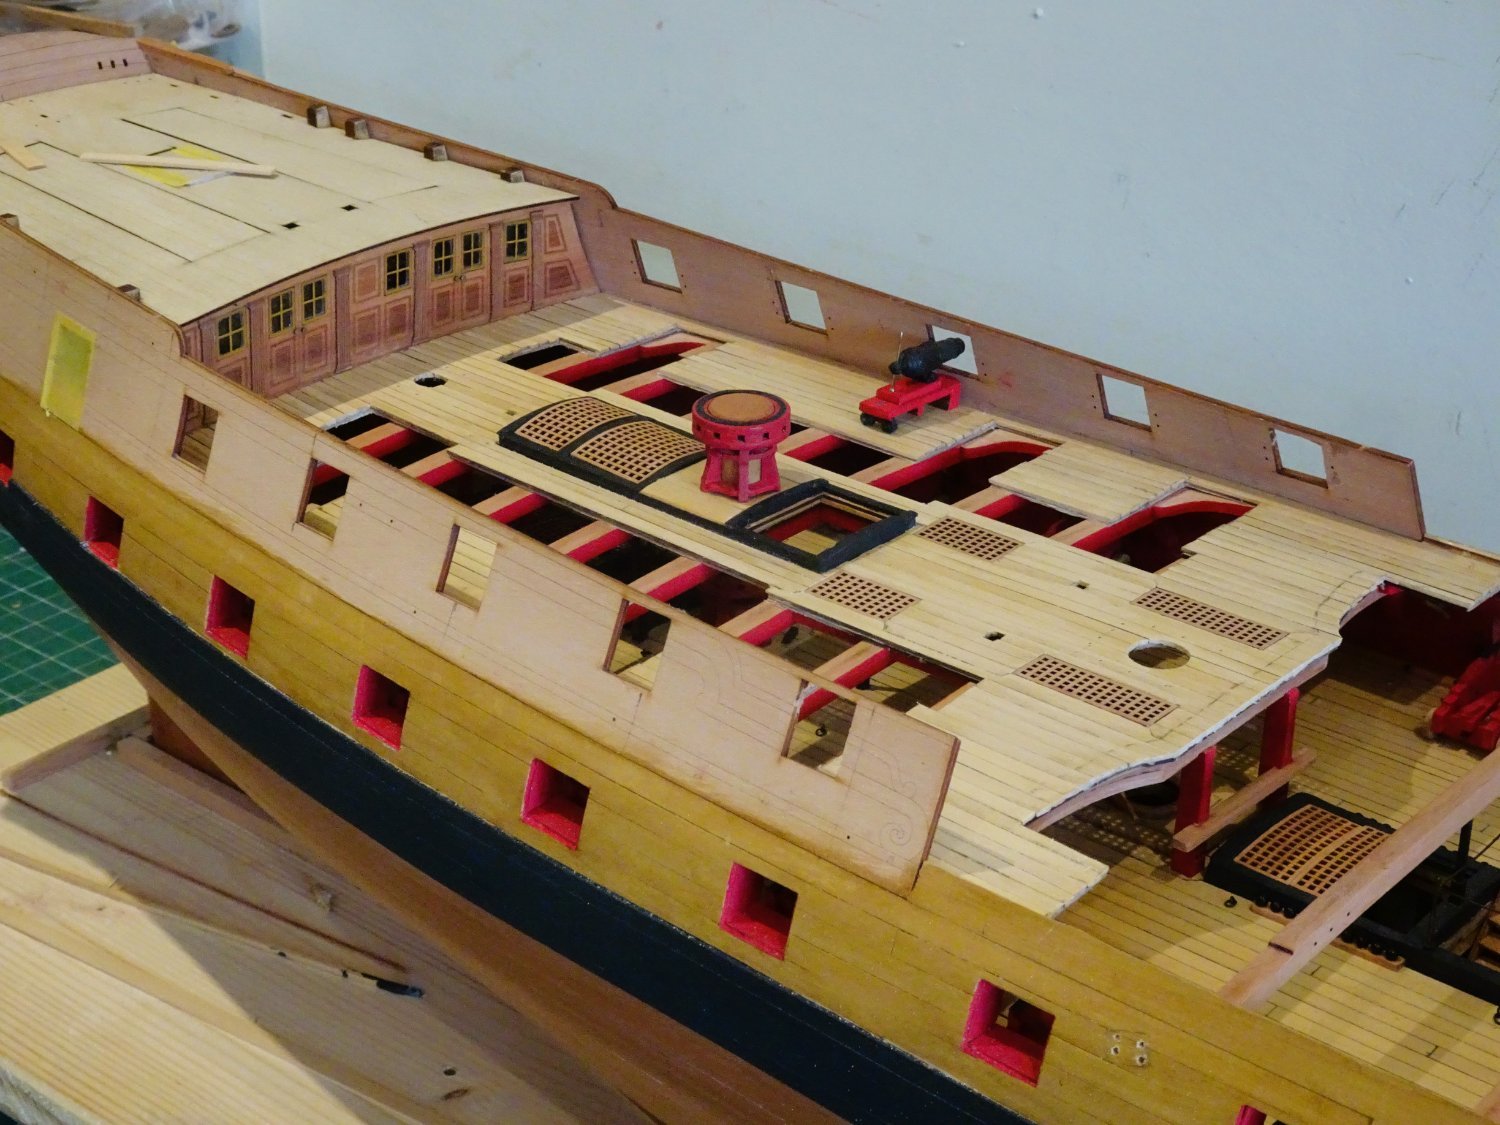
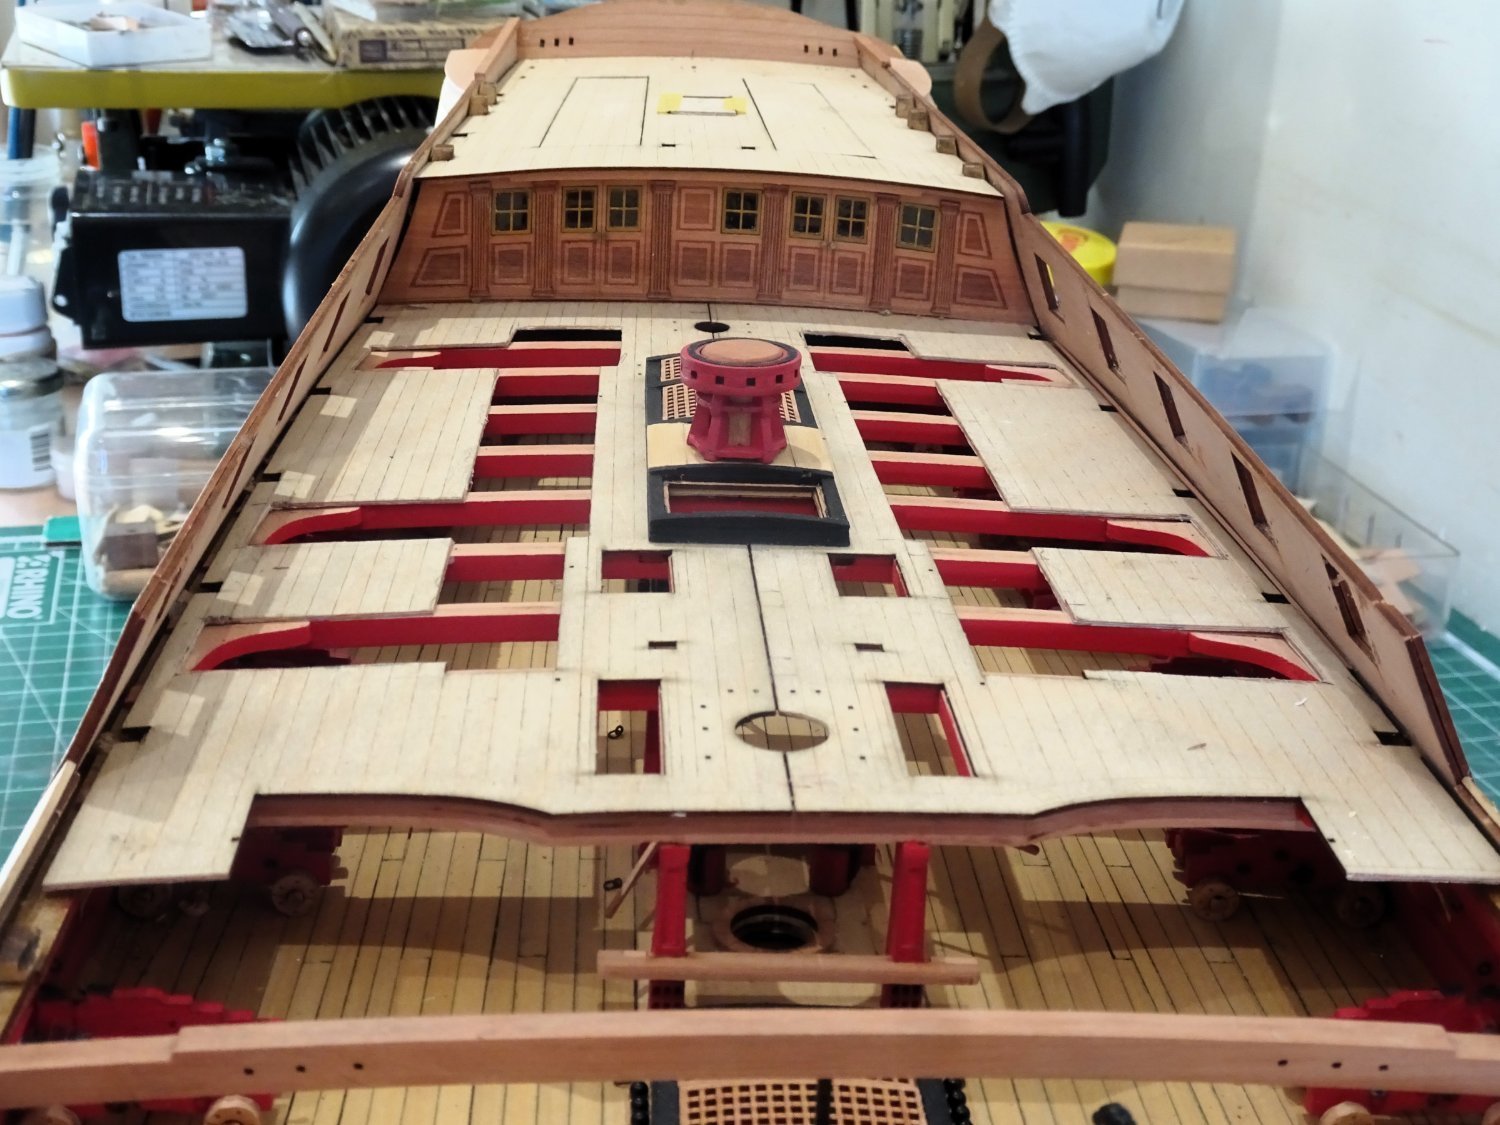
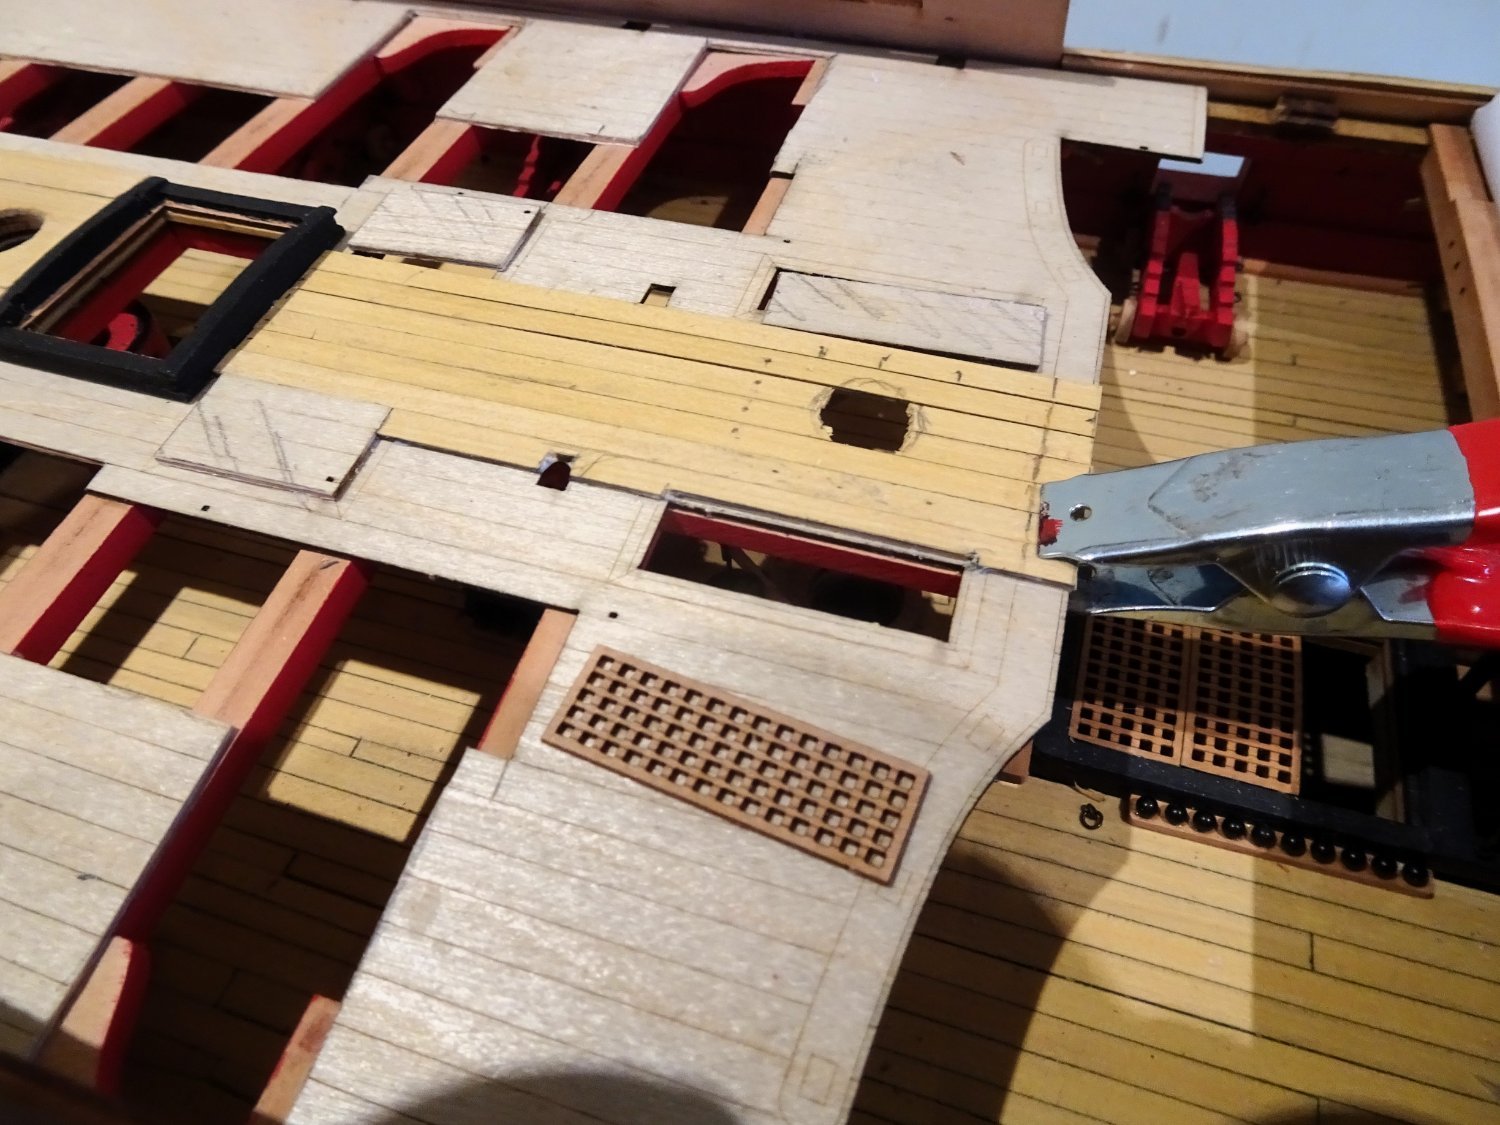
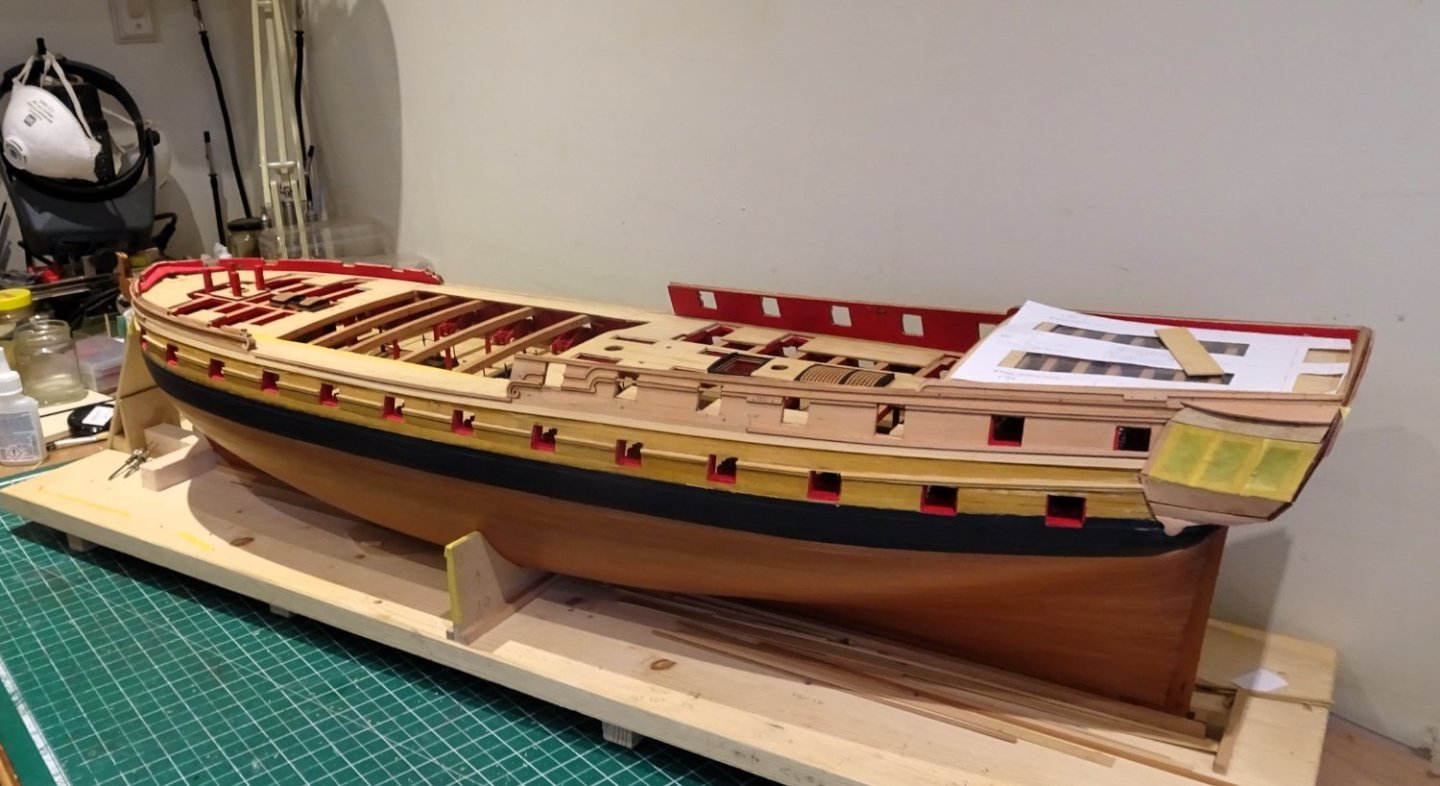
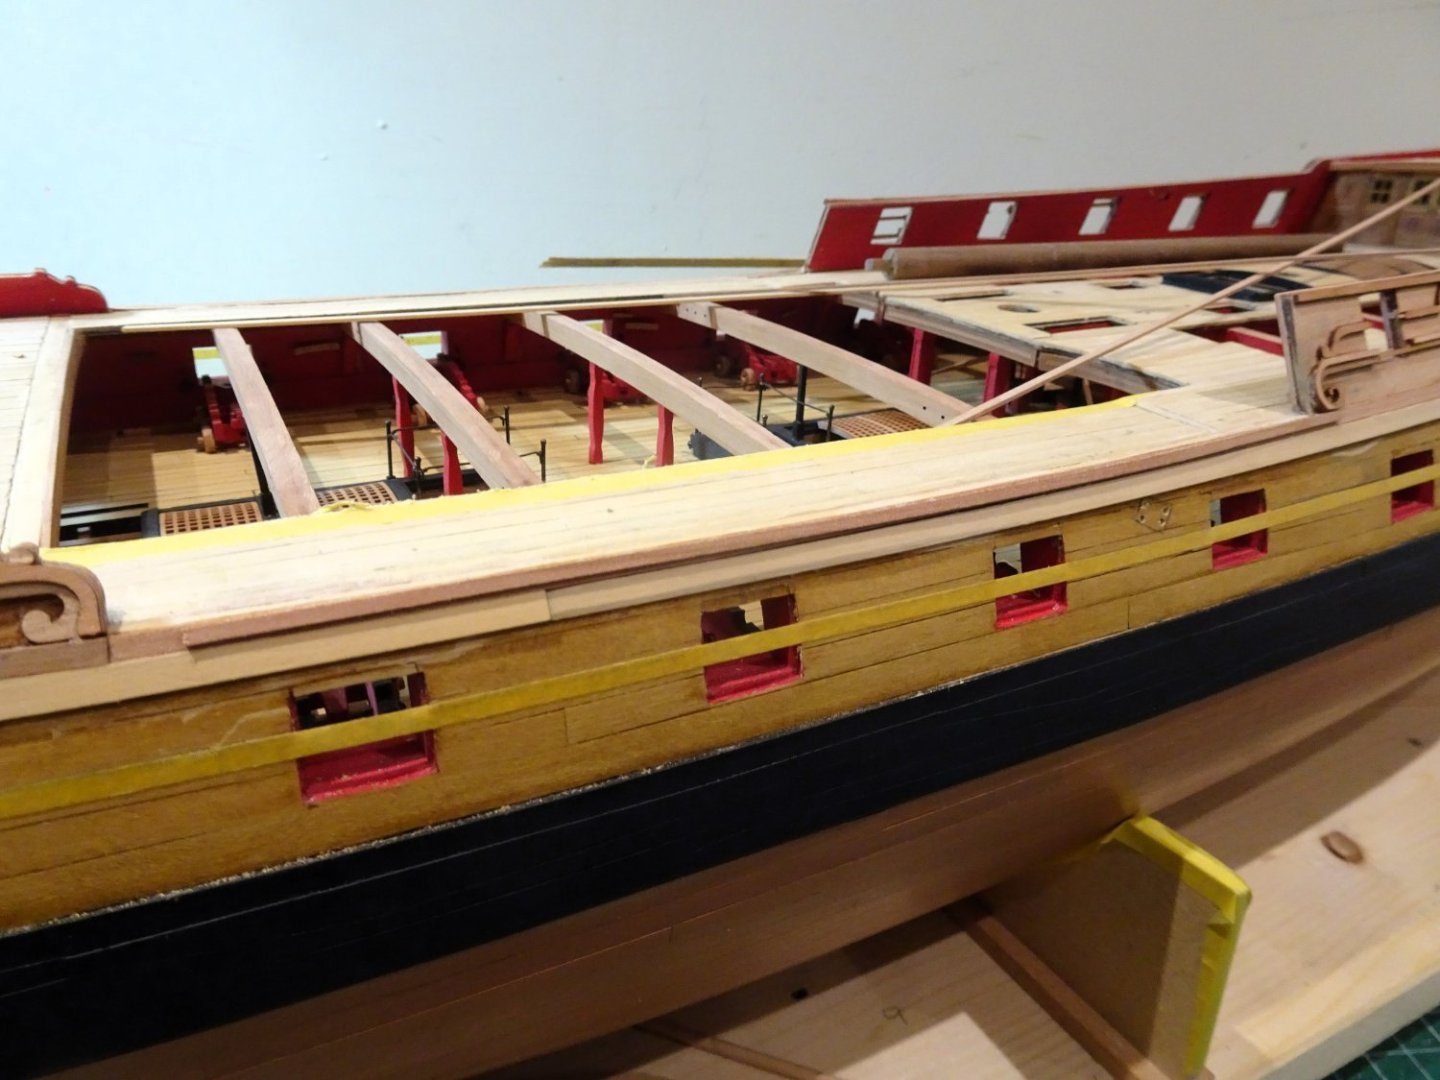
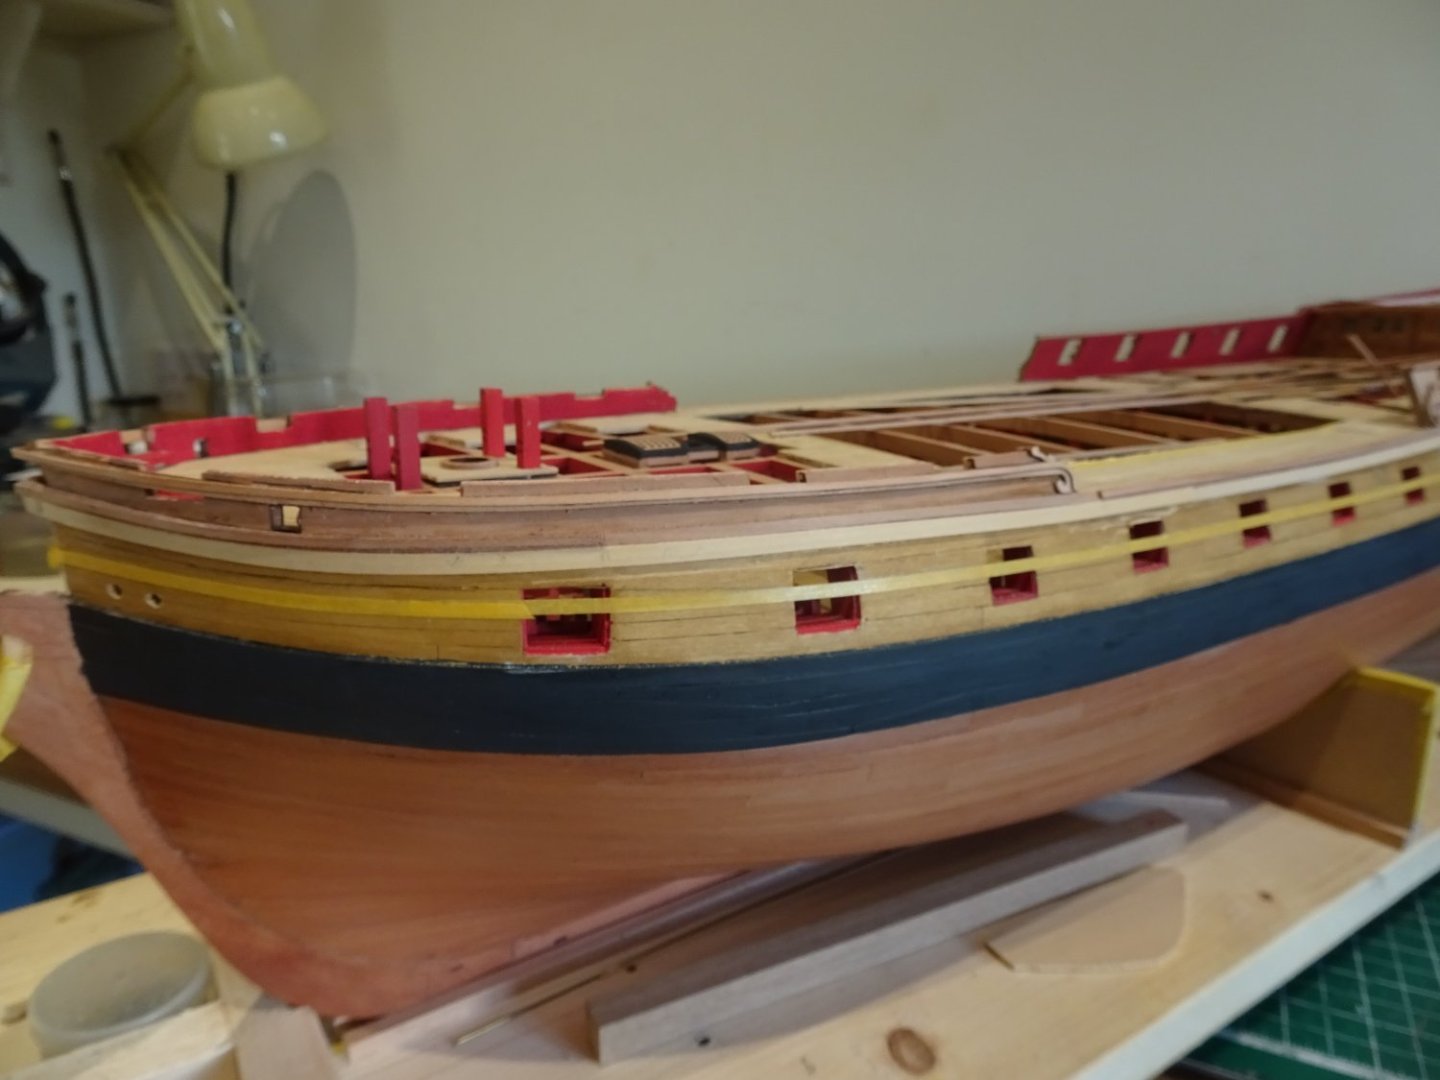
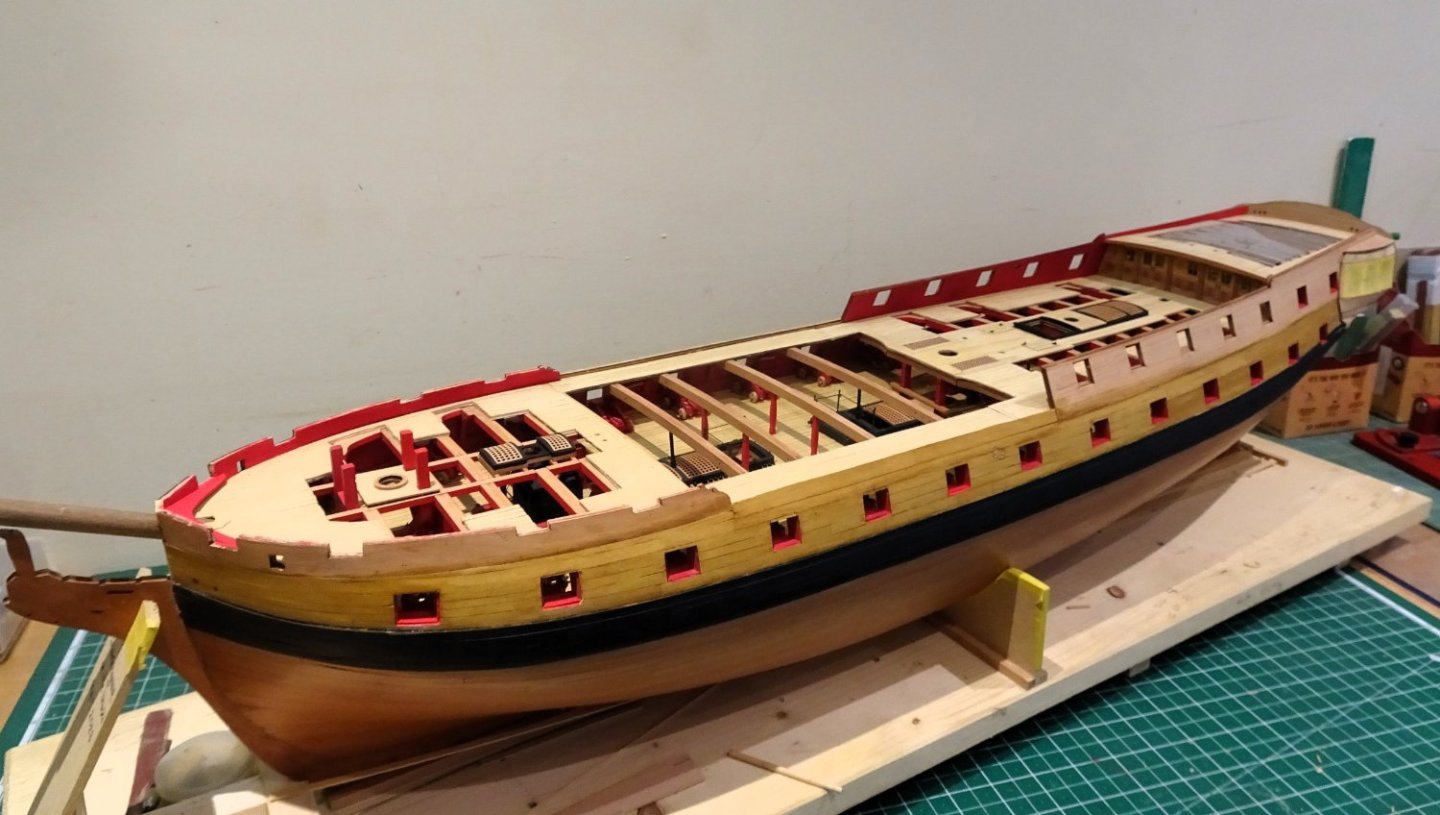
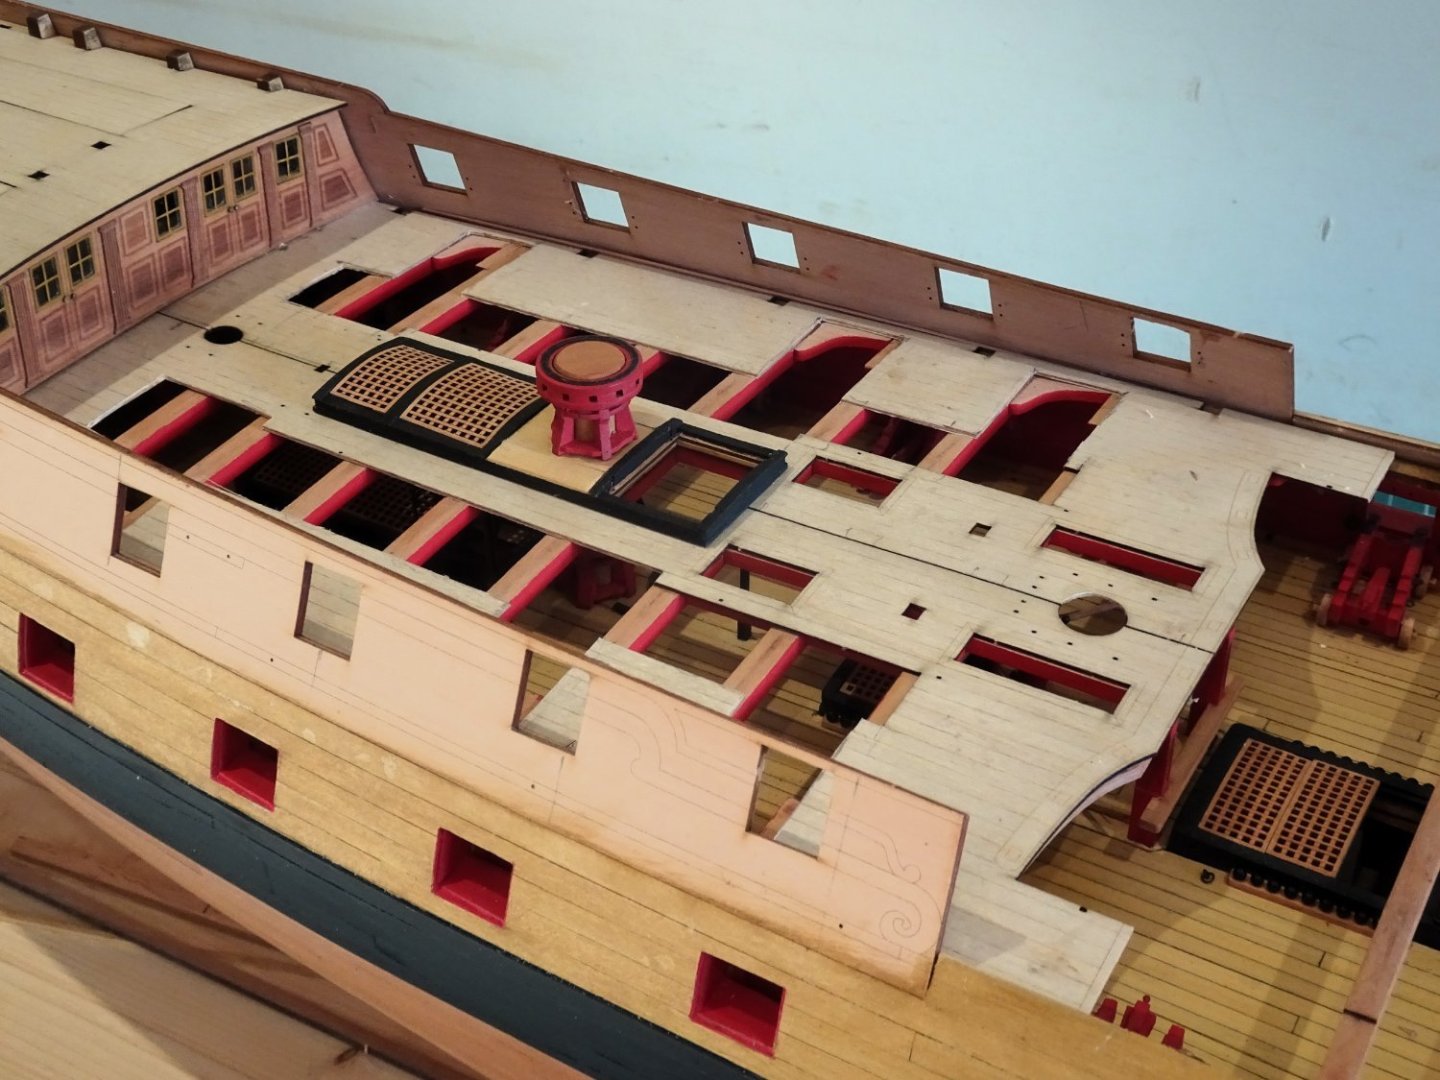
Post One Hundred and Six I have now reached a part of the build where there is a lot of bits and pieces. Bulwarks to sand level, gunports to clean up, and mouldings and cappings to fit. There is also a lot more dust. Getting the rails to run correctly and look acceptable to the eye has proven the most difficult part of the build for me thus far. It took several constructions/de-constructions, to arrive at a sequence I found acceptable, without the urge to instantly rip it all off again. This is what I found by trial and error worked best for me. The most critical rail is that running between the gun-deck ports following the sheer of the hull. I opted not to fix this first, as indicated, but I marked the line of the rail using Tape. 2714 Before I commit to glue I want to see how it will eventually relate to the rails above it. Before adding the capping rail along the waist (section515) I think it is better to add the continuation of the 3mm strip to the forward end of the waist, following the sheer. 2688 I also added these before adding the topside decoration along the Qtr deck and Foc’sle. Below this the 4mm strip can be added.( I am using Boxwood strip) I stop the strake short of the forward end of the waist. This strip is referred to as the ‘second wale’ left over from Indy’s time as a Sixty-four. The forward sections of the 3mm and 4mm strips are then added to terminate at the bow stem. 2689 I am keeping an eye on the line of the main gundeck rail still marked by tape. 2700 Before fixing I use the upper rail with the scroll work to check how that will eventually relate to the intended fixing line. 2702 The lower 4mm (second wale) is then added. 2710 Once fitted the decorative rail is fitted above it, ensuring an even curve, and that the scroll work at the aft end meets the rail below it. 2712 2mm strips are then added to the 3mm rail, this completes the Wale for the Fore channels. 2715 The decorative scroll work at the break of the Qtr deck is now fitted ensuring the scroll meets the rail below it. The Topsides are instantly improved by the addition of the mouldings. 2695 To complete the rails a 2mm strip which defines the Channel areas is applied atop the 3mm rail. 2711 The rails line up at the bow but need a fair bit of cleaning up at this point. 2716 This is not the end of the story, the gunport rails and waist capping rails are now to be added, and the decorative rails and scroll work need some fettlin’ to address the rather ‘blocky’ look of them. I am relieved that this part of the project has been completed without ending up with any mismatches or ugly rail angles at the bow. I found it quite a testy part of the build. Onwards…. B.E. 11/11/2023


- 648 replies
-
- 22
-
-
- Indefatigable
- Vanguard Models
- (and 1 more)
-
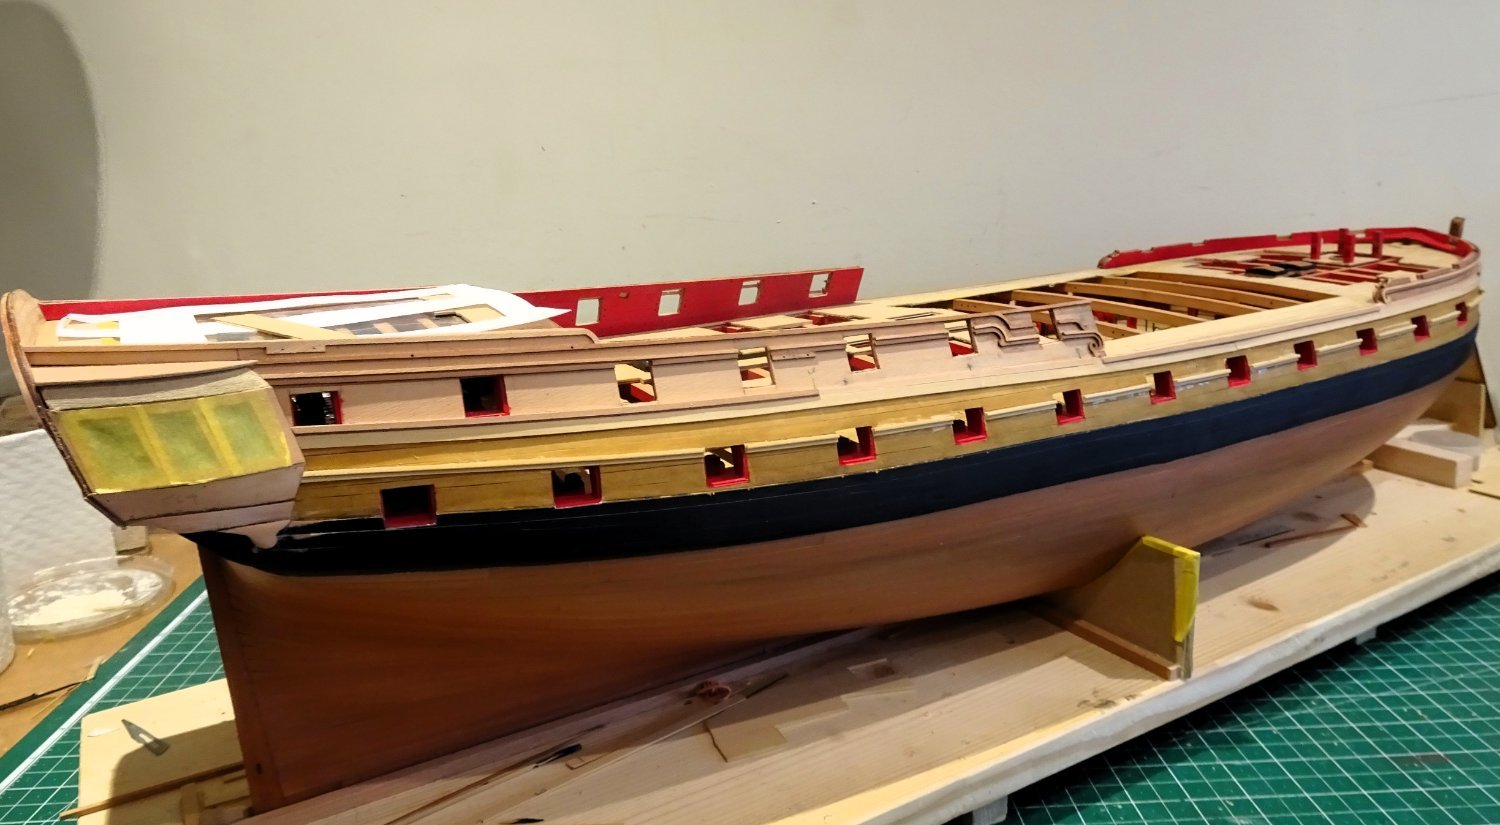
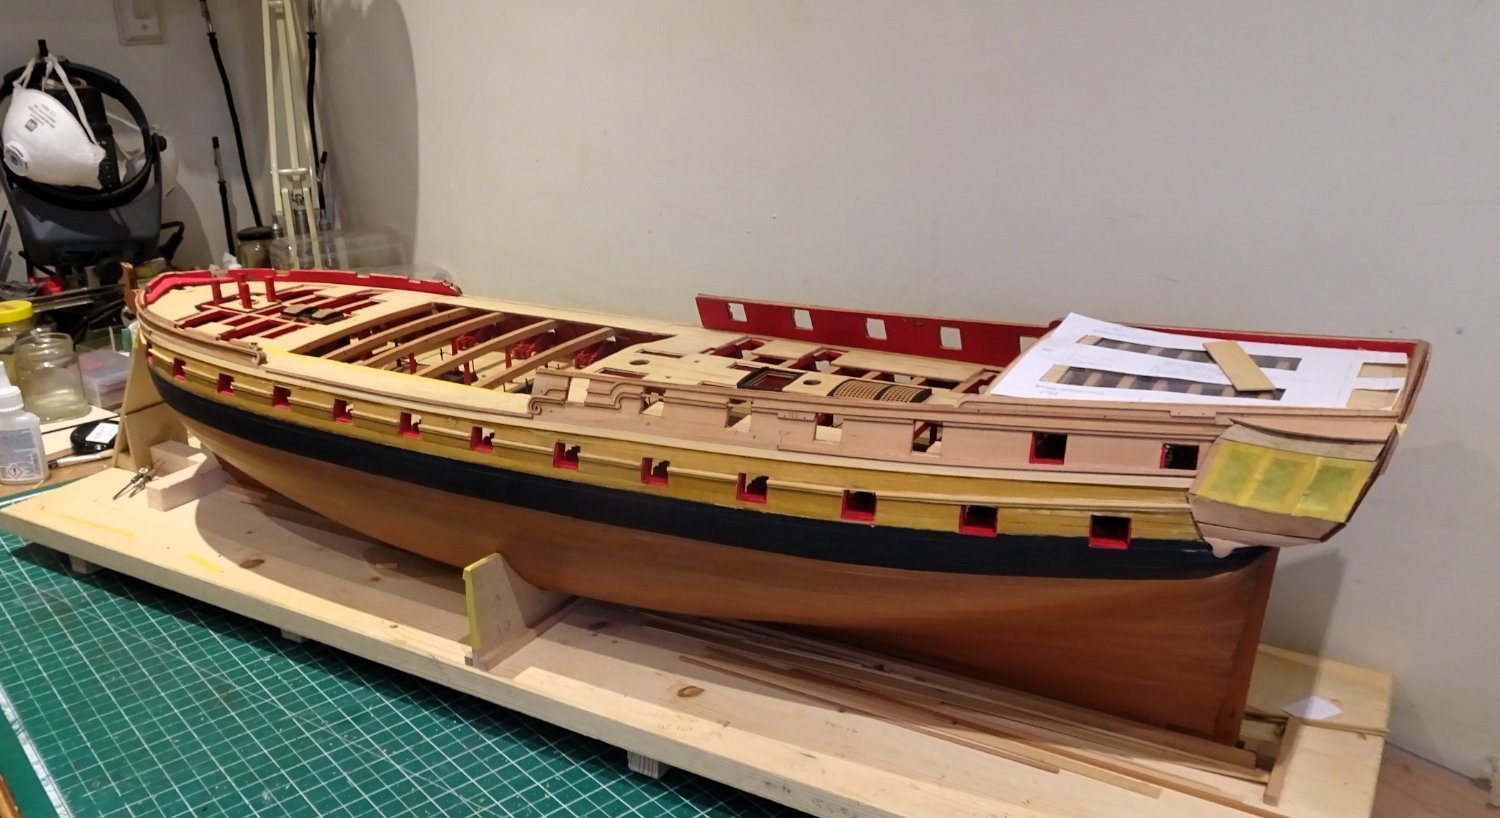
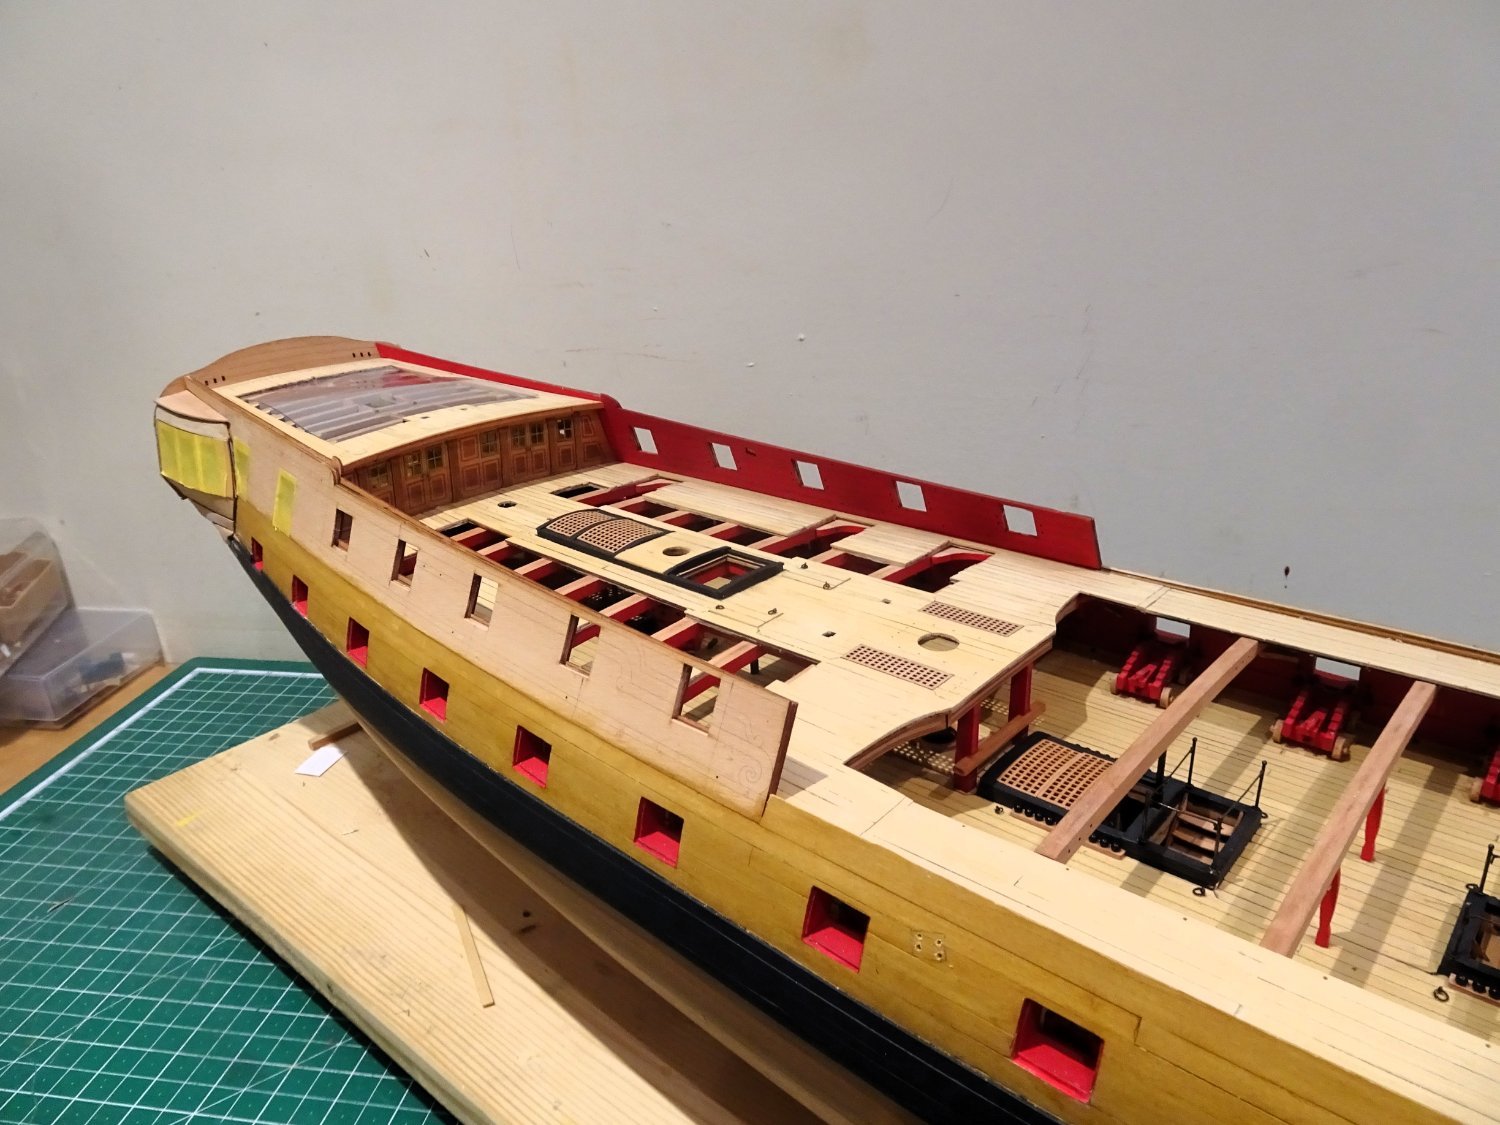
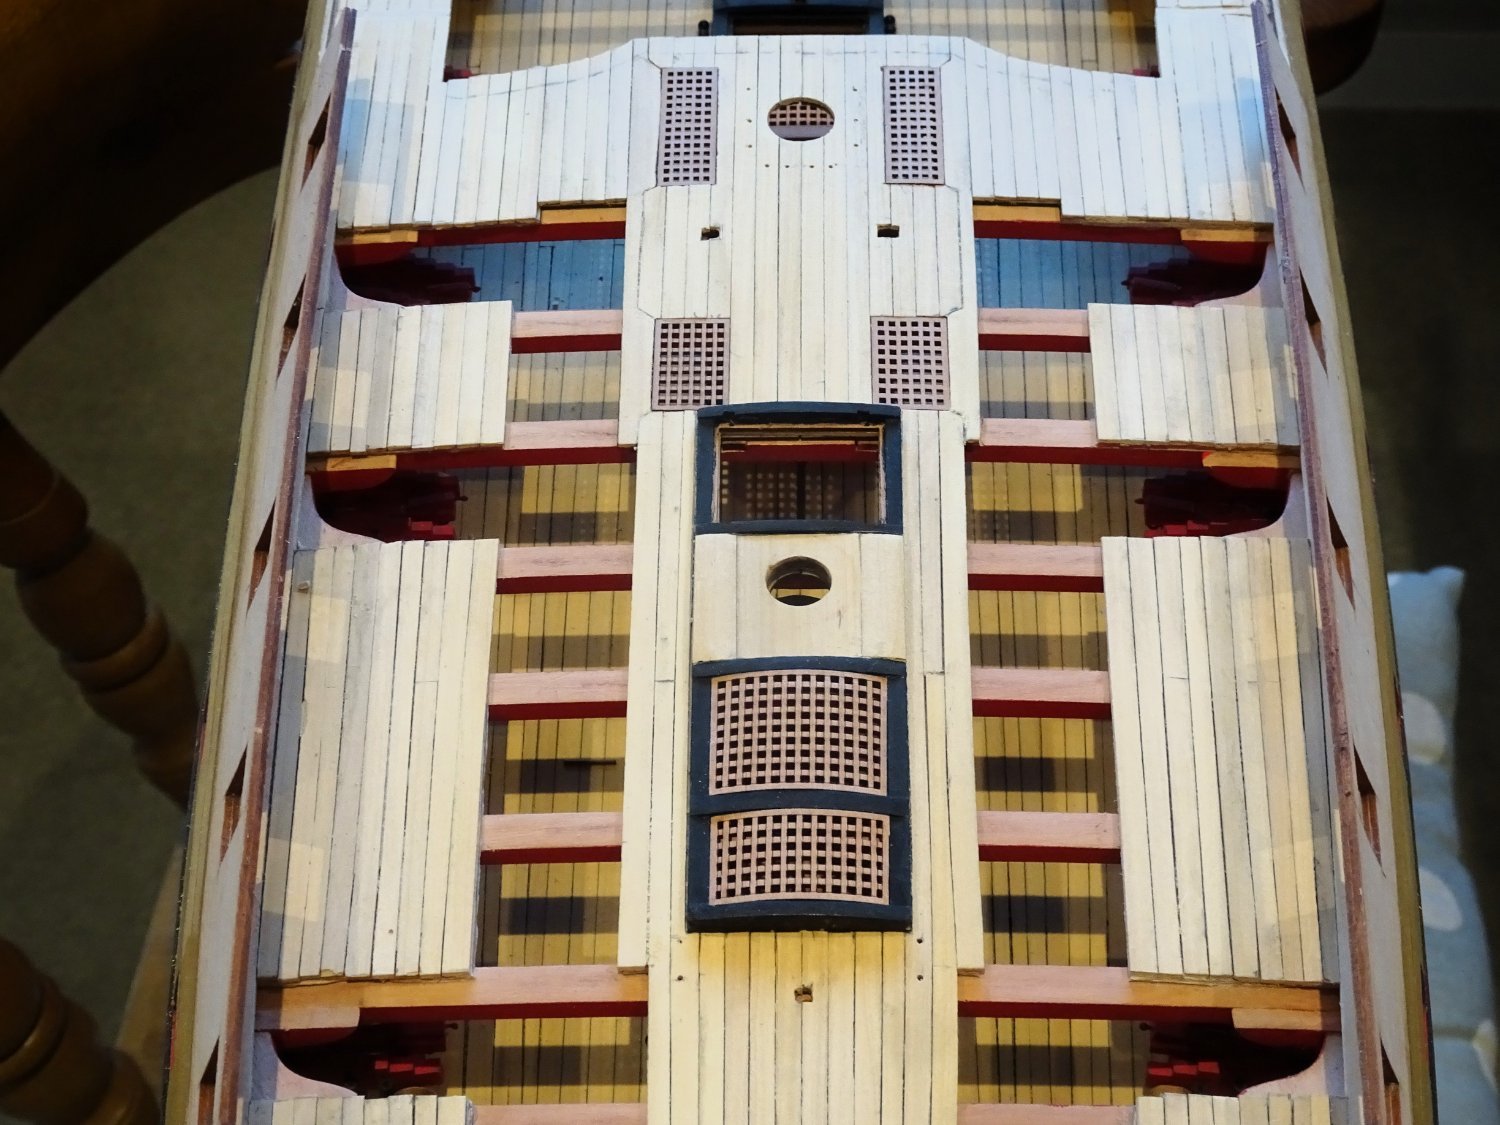
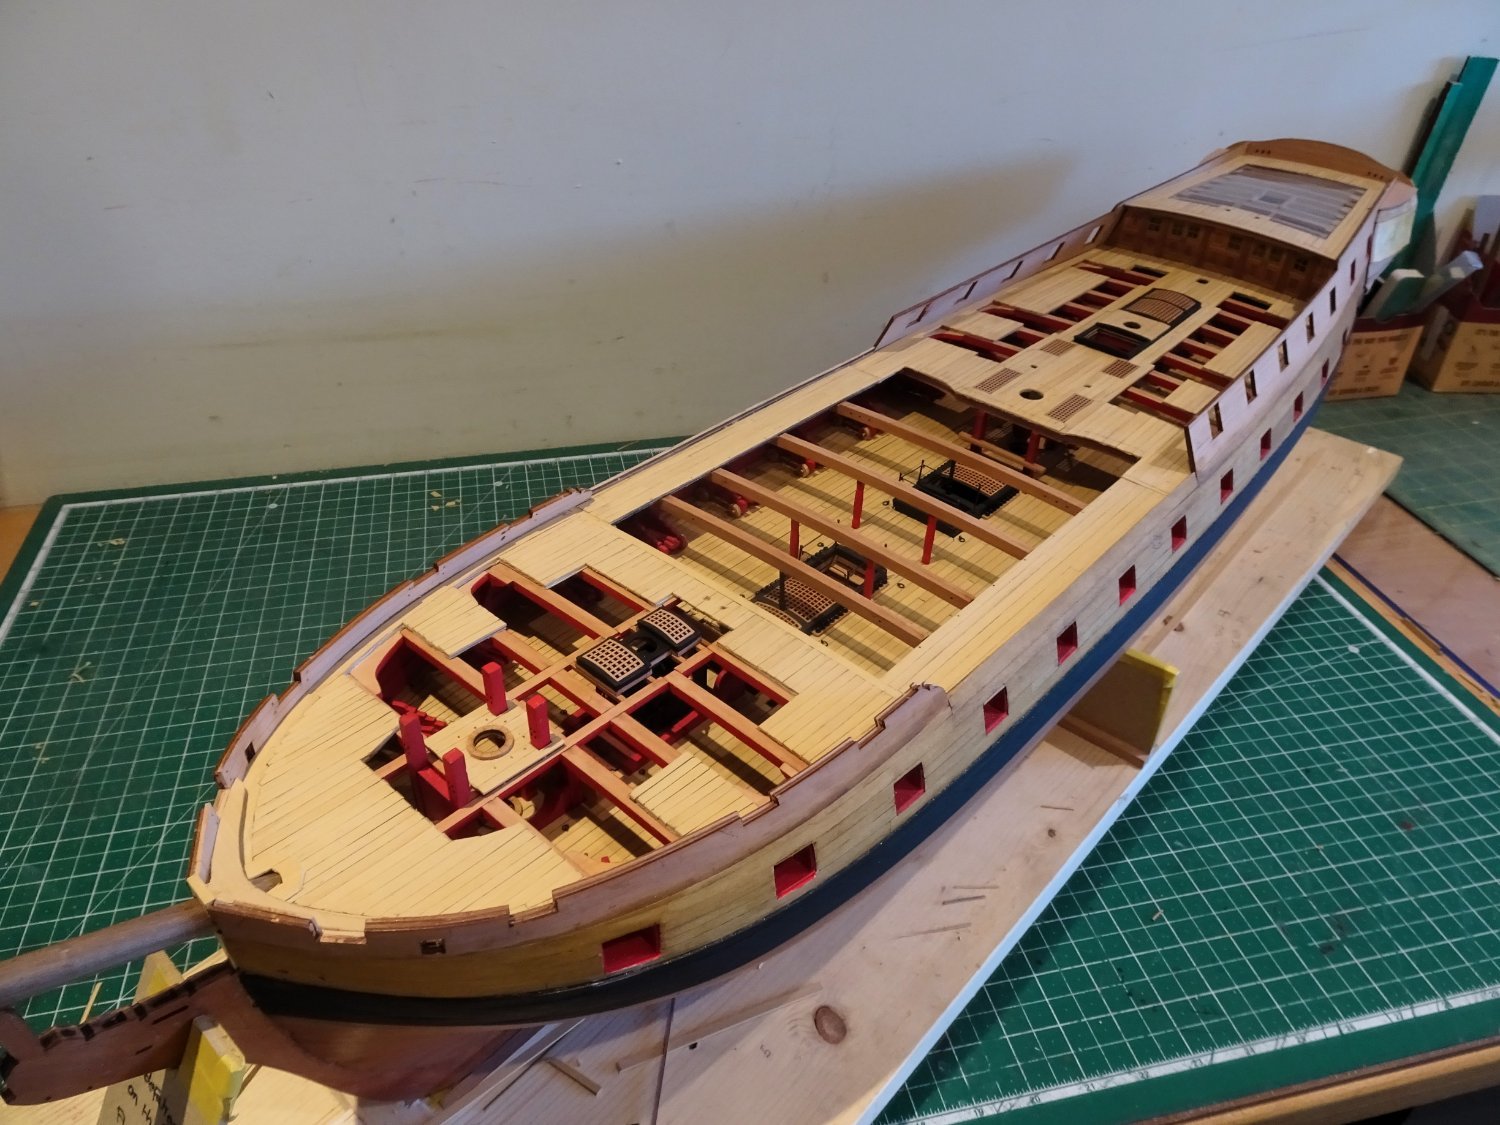
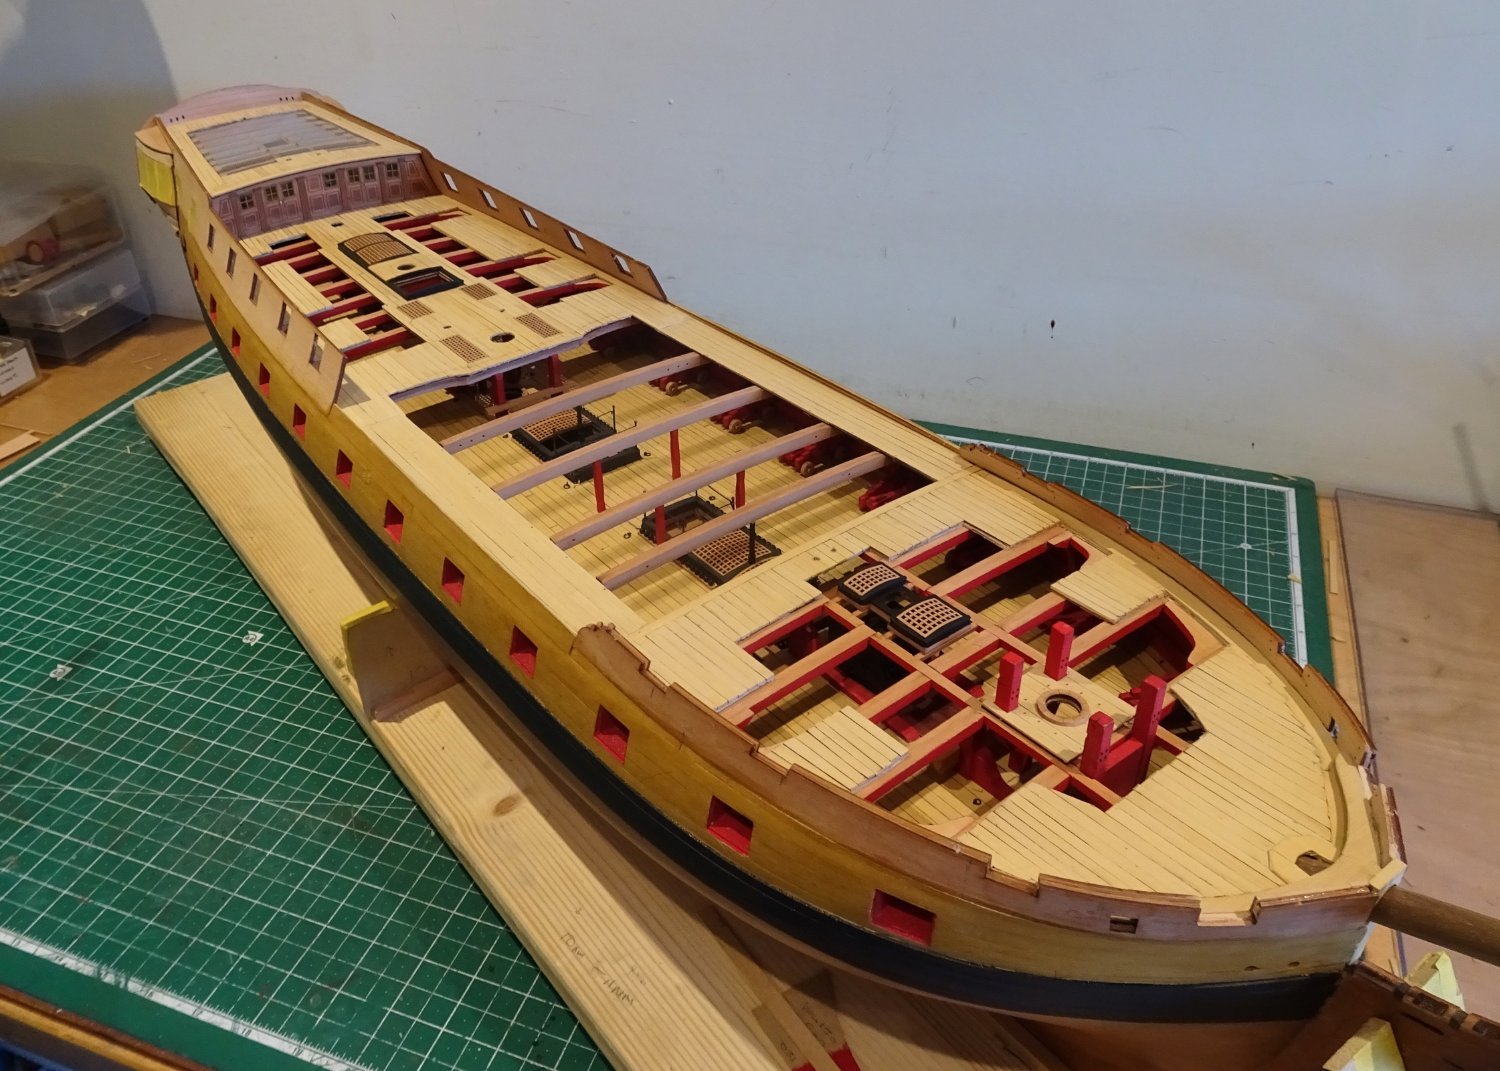
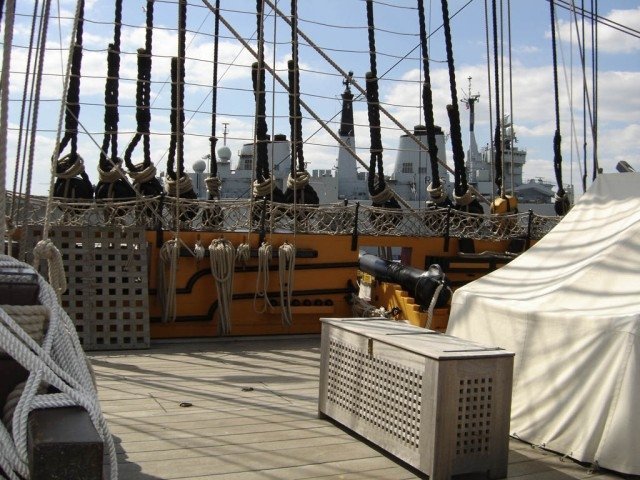
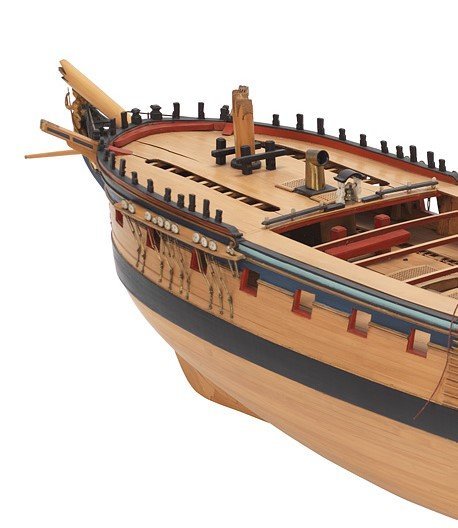
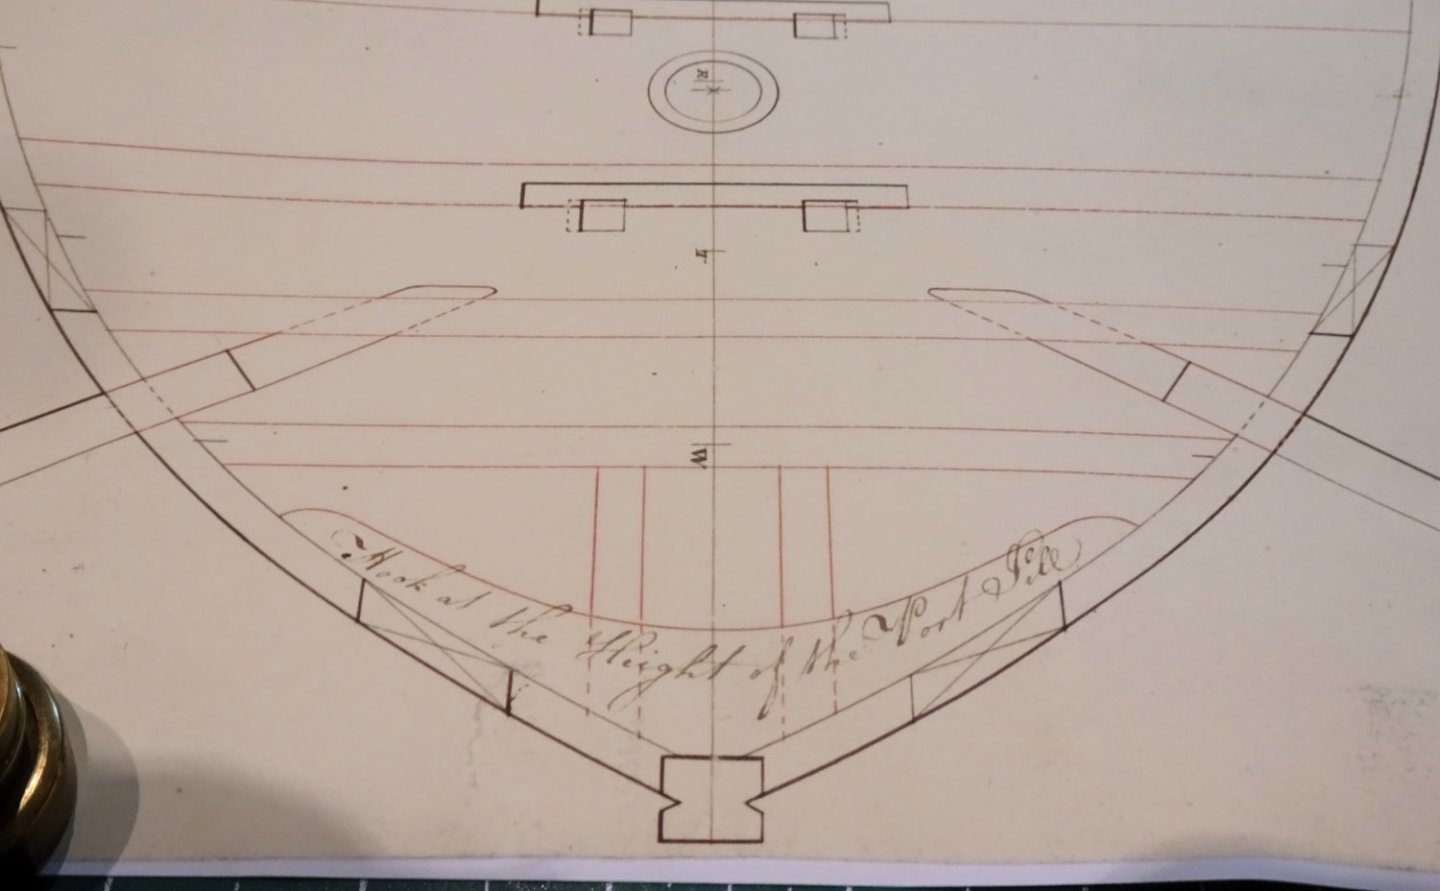
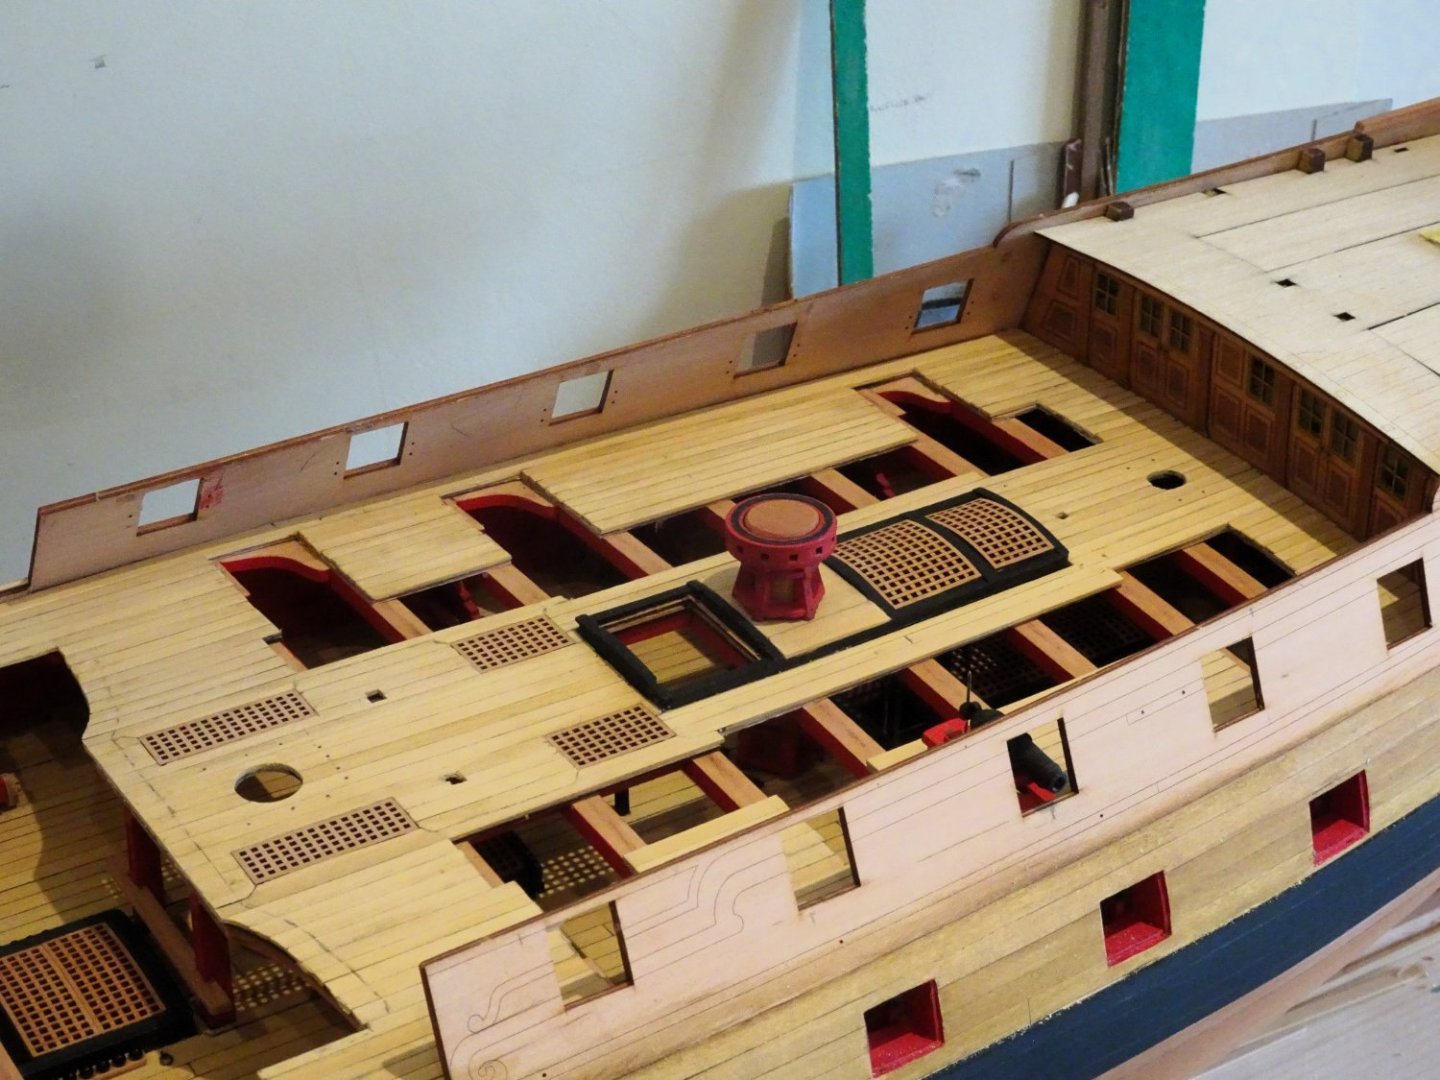
Post One Hundred and five. Bulwark Spirketting This is now added to the Quarterdeck and Poop decks, pre-painted before gluing into place. 2661 Painting on the model is made more difficult due to the tumblehome of the Topsides along the Qtr deck. 2668 2669 Quite a change to the look of the model once this is done, but with gunport fettlin’ and other work, some restoration will be inevitable as the build progresses. 2673 The decorative facia panels at the break of the decks are also added at this time. These remain unpainted and are treated with w-o-p. Toprope scuttles Back in Post 99 I said that I have some reservations about the Top rope scuttles being represented by gratings. 0050 They are generally shown as closed boards, without framing, and with lifting rings attached, as on Victory (Above) 2664 2667 This seemed a good point to knock up a couple of closed scuttles to see how they look. 2670 Altho’ more historically correct, I’m not sure I prefer them to the supplied gratings from a purely aesthetical viewpoint. 2675 B.E. 08/11/2023


- 648 replies
-
- 27
-
-

-
- Indefatigable
- Vanguard Models
- (and 1 more)
-
Nice one, I think Chantelle is going to need some extra help packing all those extra orders you will hopefully receive.👍 B.E.
-
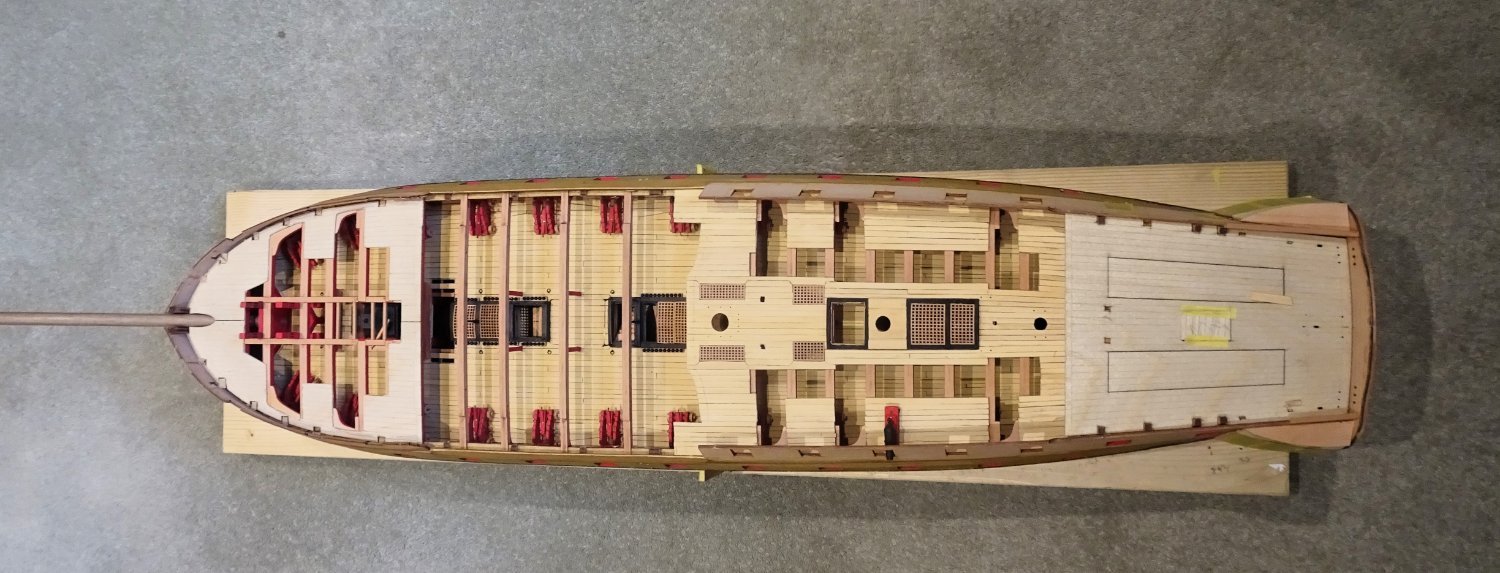
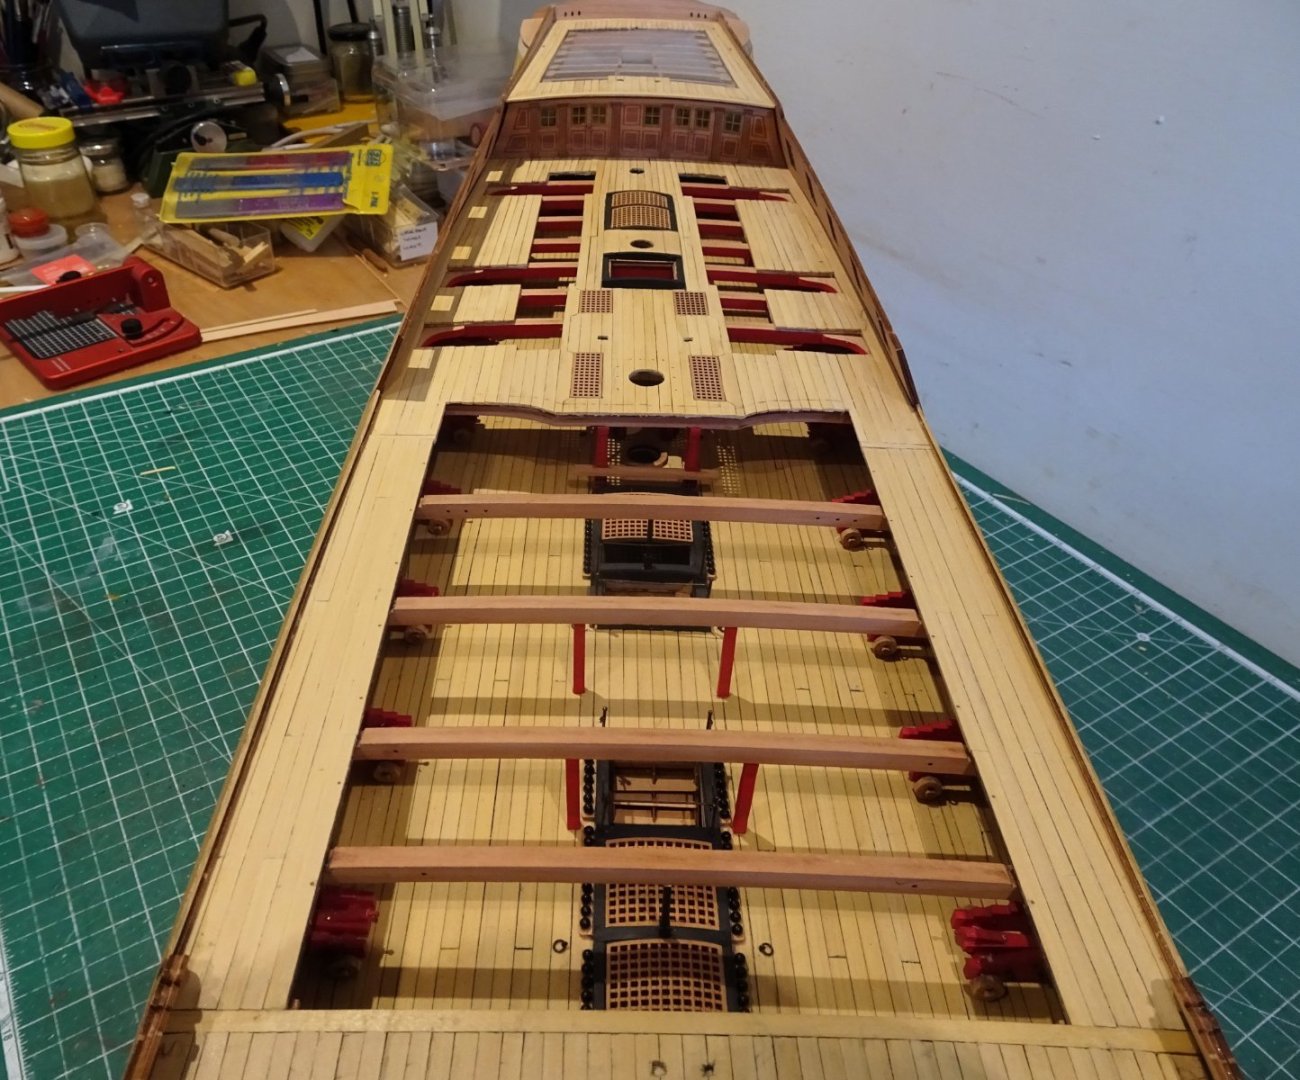
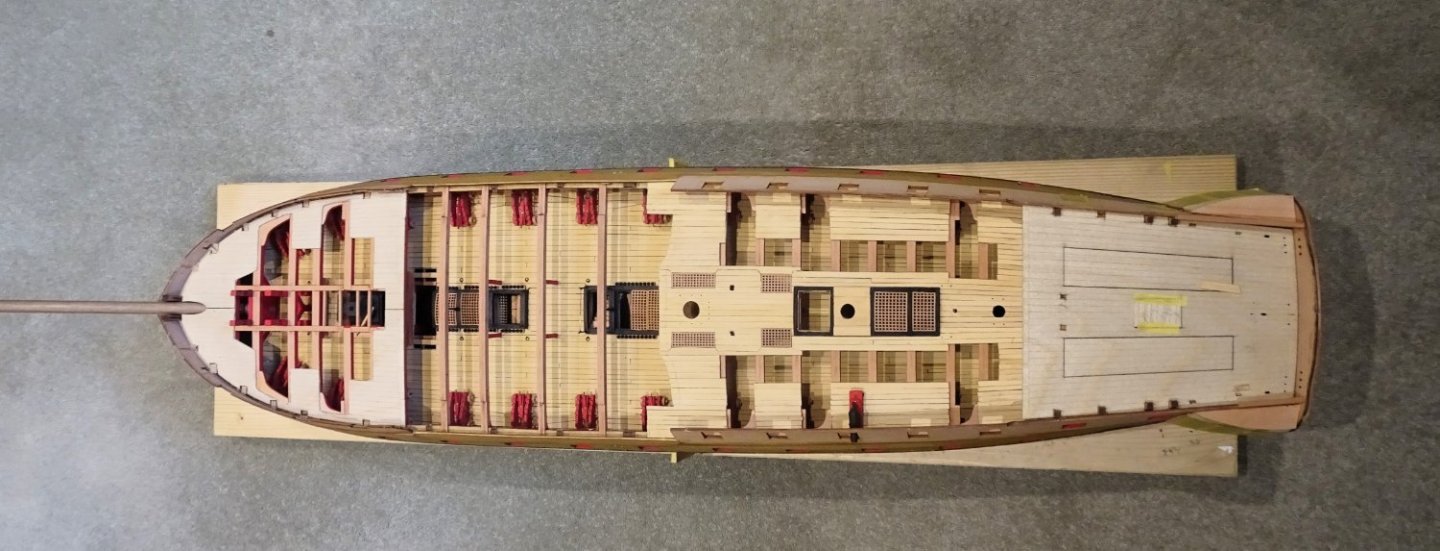
Post One hundred and Four Gangways The sub-deck pieces slot neatly atop the skid beams held in position by the bulwark lugs. 2646 Separating the deck sections made it necessary for me to add a support beam at the forward end to support the joint against the Foc’sle breast beam. It struck me that on the plans there are no butt joints to the planking. The length of the Gangway is some 41’ which would suggest that some butt ends would be required. The planks would be fixed to the beams which are unevenly spaced across the waist with spaces of: 2@50mm 2@30mm, and 2@ 35mm. which makes it a little more difficult to work out a repeat pattern, but there are only six strakes. With an open sided gangway it is obvious if a butt join has nothing to support it beneath. 2649 I worked a system using scale planks of around 28’ maximum to utilise the available fixing points. I started with the innermost strake and worked towards outboard with a final spiled plank at the bulwark. This completes the Indy planking on my version. 2652 2660 2650 2651 2659 2656 2657 2653 I have to say that the Castello Boxwood supplied by Vahur at Hobbymill EU was a pleasure to use, excellent quality. Movin’ on. B.E. 06/11/2023


- 648 replies
-
- 27
-
-
-
- Indefatigable
- Vanguard Models
- (and 1 more)
-
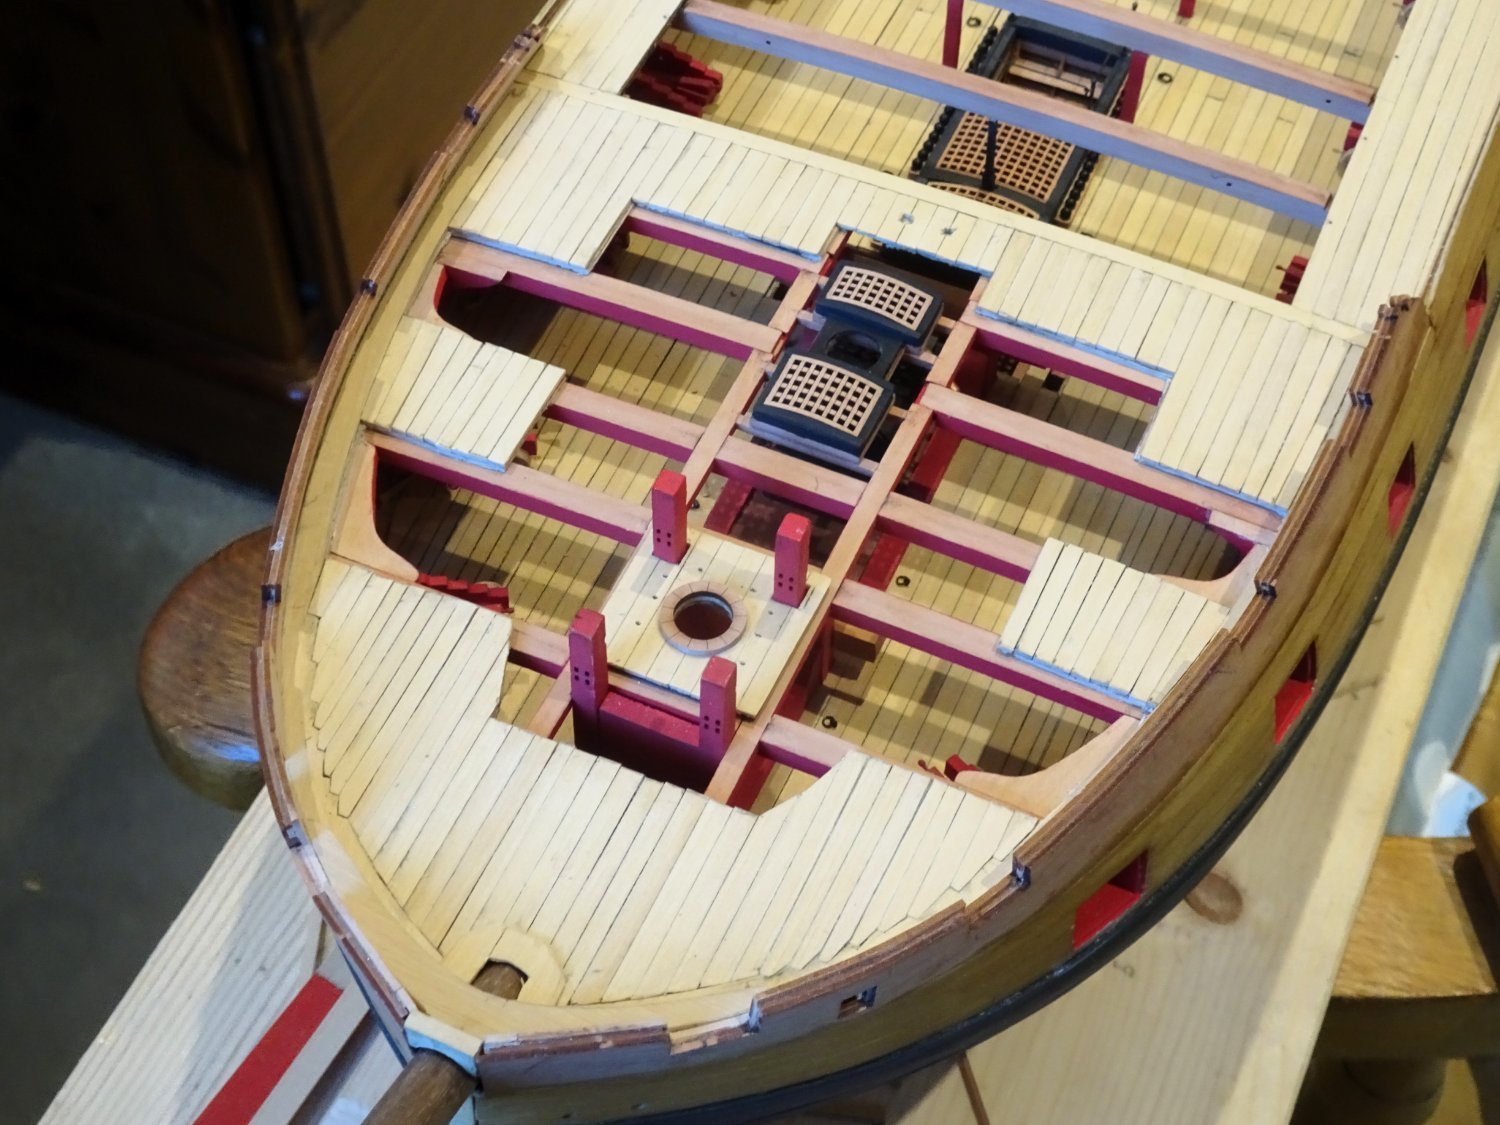
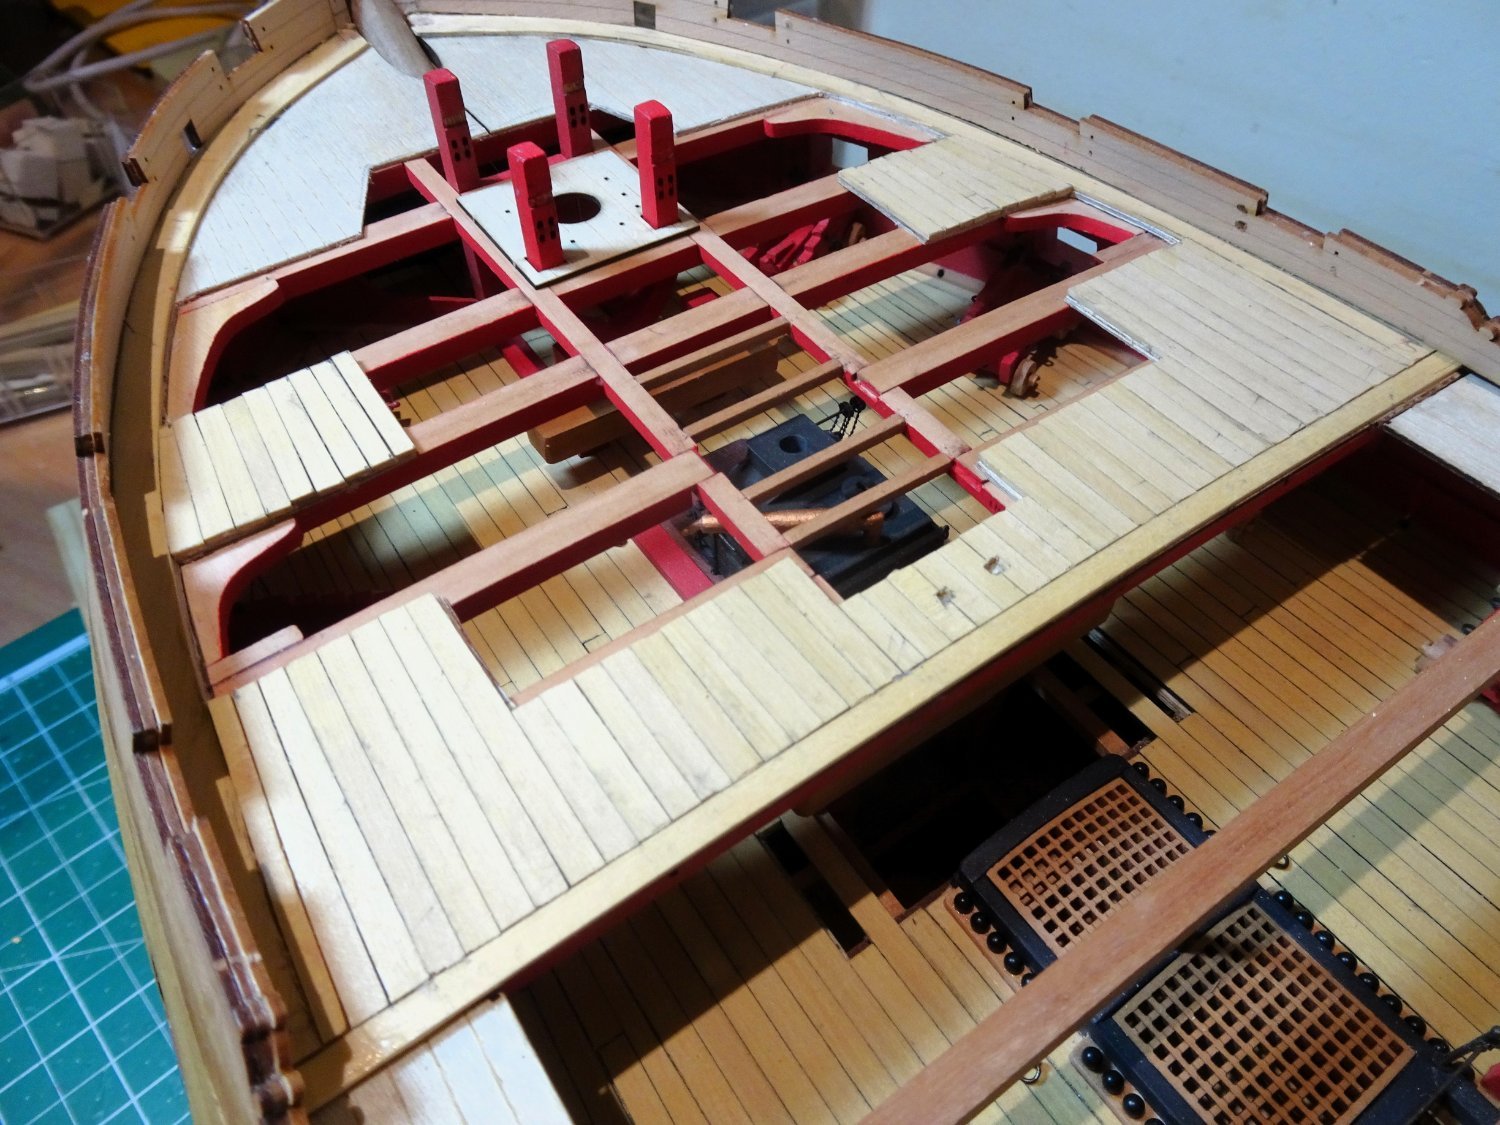
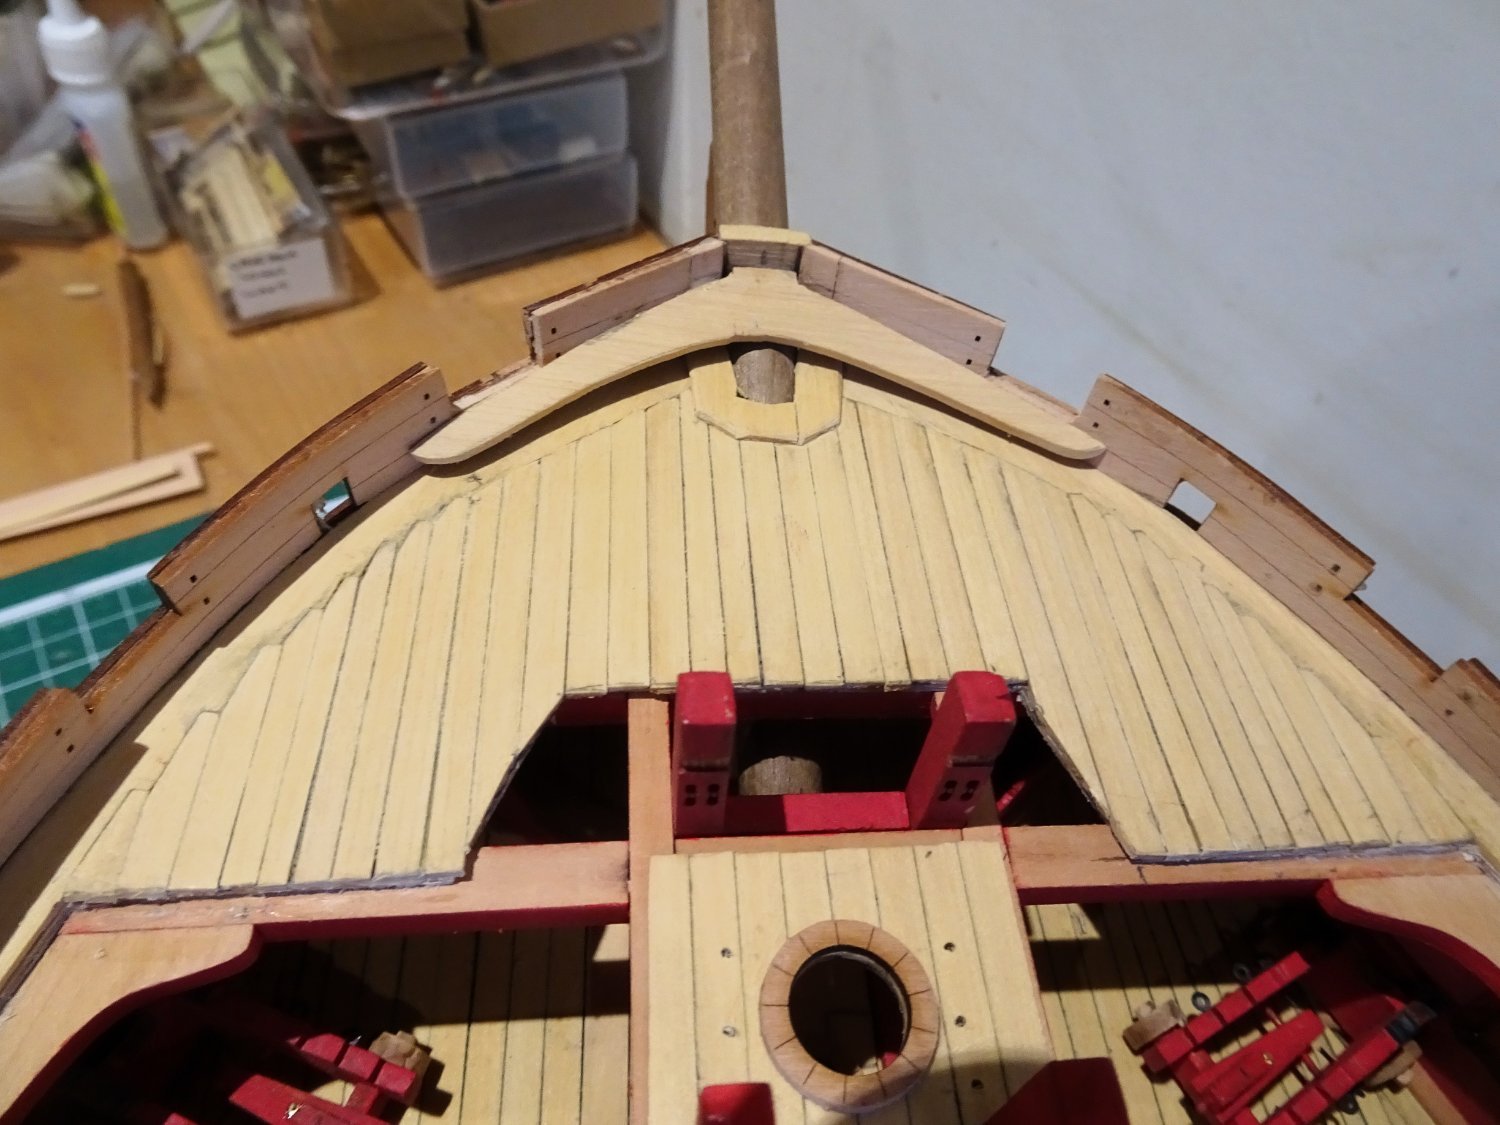
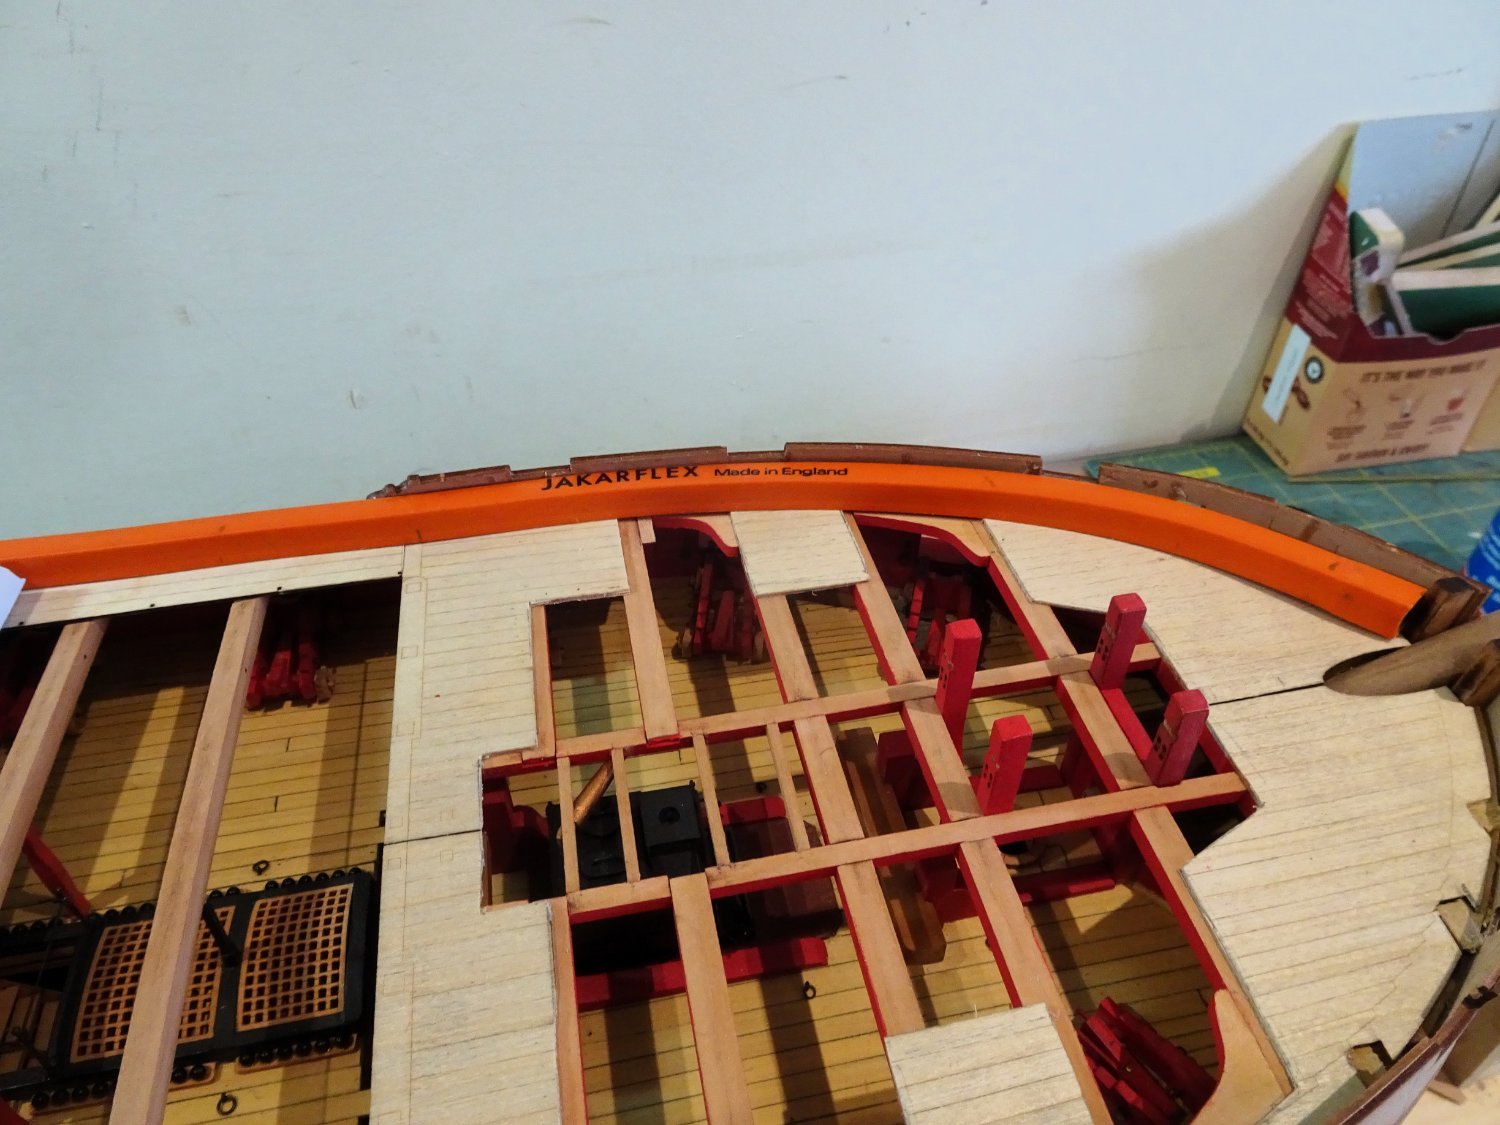
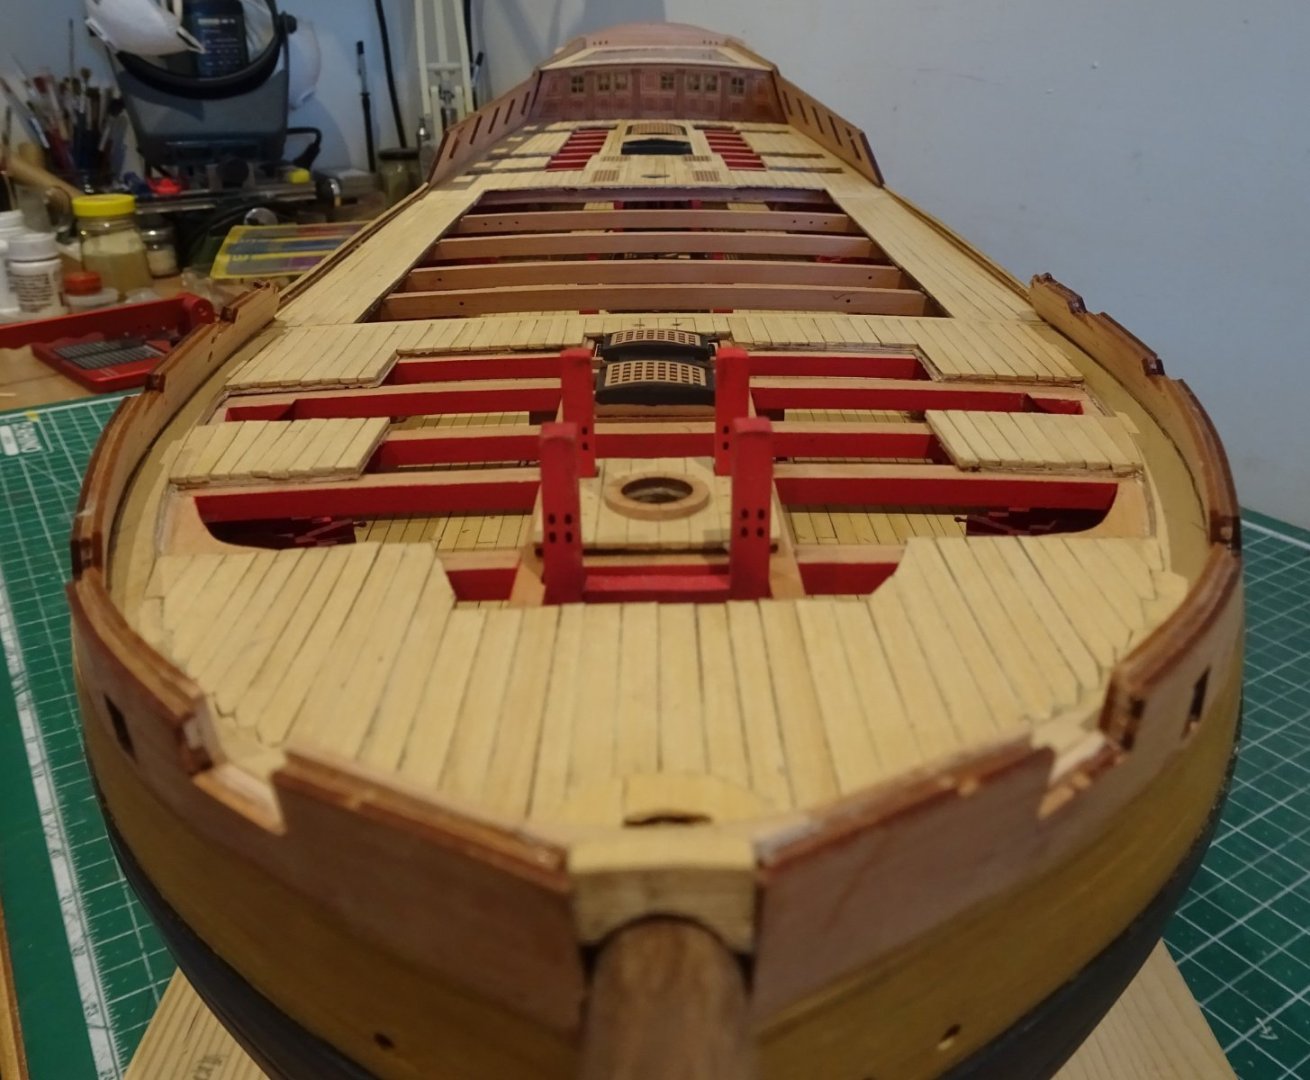
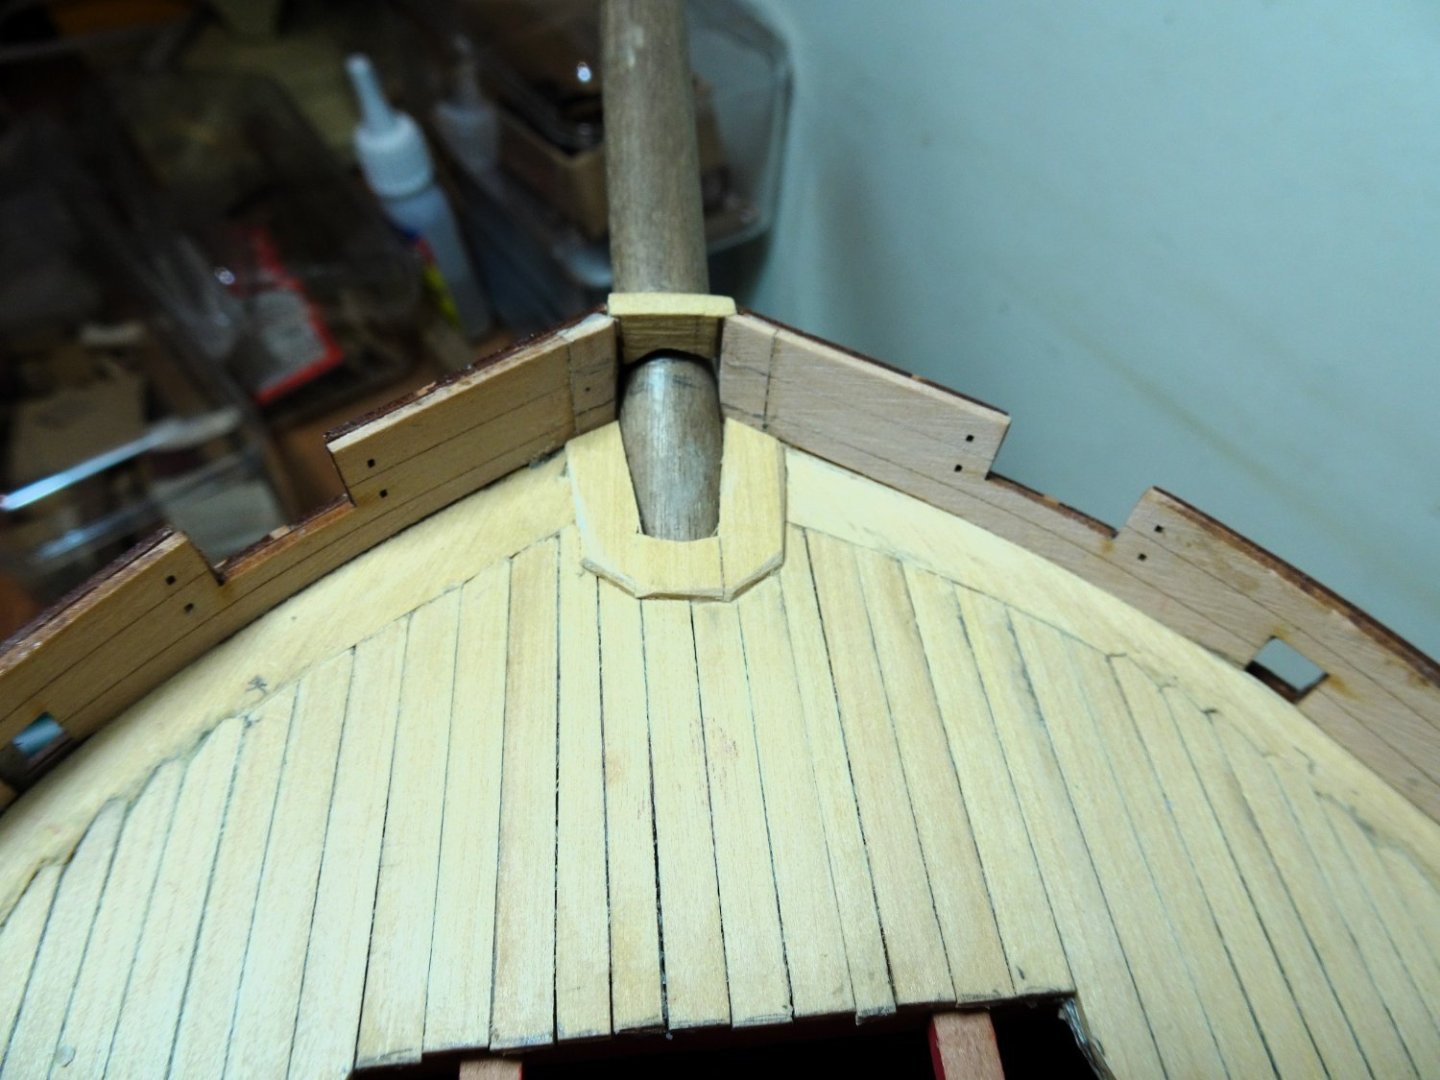
Post One Hundred and three Foc’sle completion. 2627 The planking begins at the centre working outwards, roughly following the layout on Plan sheet C1. 2630 There are eight strakes of Joggled planks, to do each side, Fairly straightforward, it’s getting a clean cut that’s the tricky bit. 2629 Use of a scalpel and micro chisels simplify the procedure. Bowsprit partners These were fitted to ships, but one is not shown on the Indy plan. However, it struck me that the area of the deck around the Bowsprit looked unfinished. 2632 Based on my own preference I added one. It also had the advantage of covering the scars of the now removed posts. Hook 2633 Version four at last fitted. The dimensions were taken from the Adm Plan and scaled to 1:64. 2640 2635 2637 2644 2642 Just the gangways left to do, then a clean-up of the planking and a coat of flat varnish. B.E. 04/11/2023


- 648 replies
-
- 22
-
-
- Indefatigable
- Vanguard Models
- (and 1 more)
-
Obviously someone not up to speed in the latest developments in ship modelling, or who read any of the blurb before buying. I imagine that those fine craftsmen of the 18th century would have been highly delighted with plastic and resin had it been available at the time, at least for some of their requirements, they used what was available. B.E.
-
I had a look back on my log and looking at the photos I took there doesn't seem to be that much difference at that stage. If you look at the manual p33 you can see the first planking finishes around the same point, and even shorter lower down. (deliberately) Remember this has to be fined down sufficiently to allow the second planking to fit the stern post. Carry on Mugje, you're doing a fine job. B.E.
-
I wasn't quite expecting to find the spirketting so high above the topsides, no doubt due to some unrecognised error on my part way back in the build.🙄 You are correct tho' Ron, I do enjoy 'enhancing' kits where I can, doubles the pleasure of a build for me.😁 B.E.
- 648 replies
-
- 6
-
-
- Indefatigable
- Vanguard Models
- (and 1 more)
-
Good to hear that sales are going well Chris, and why wouldn't they, you have great products.👍 Interesting times ahead, eh. B.E.
-
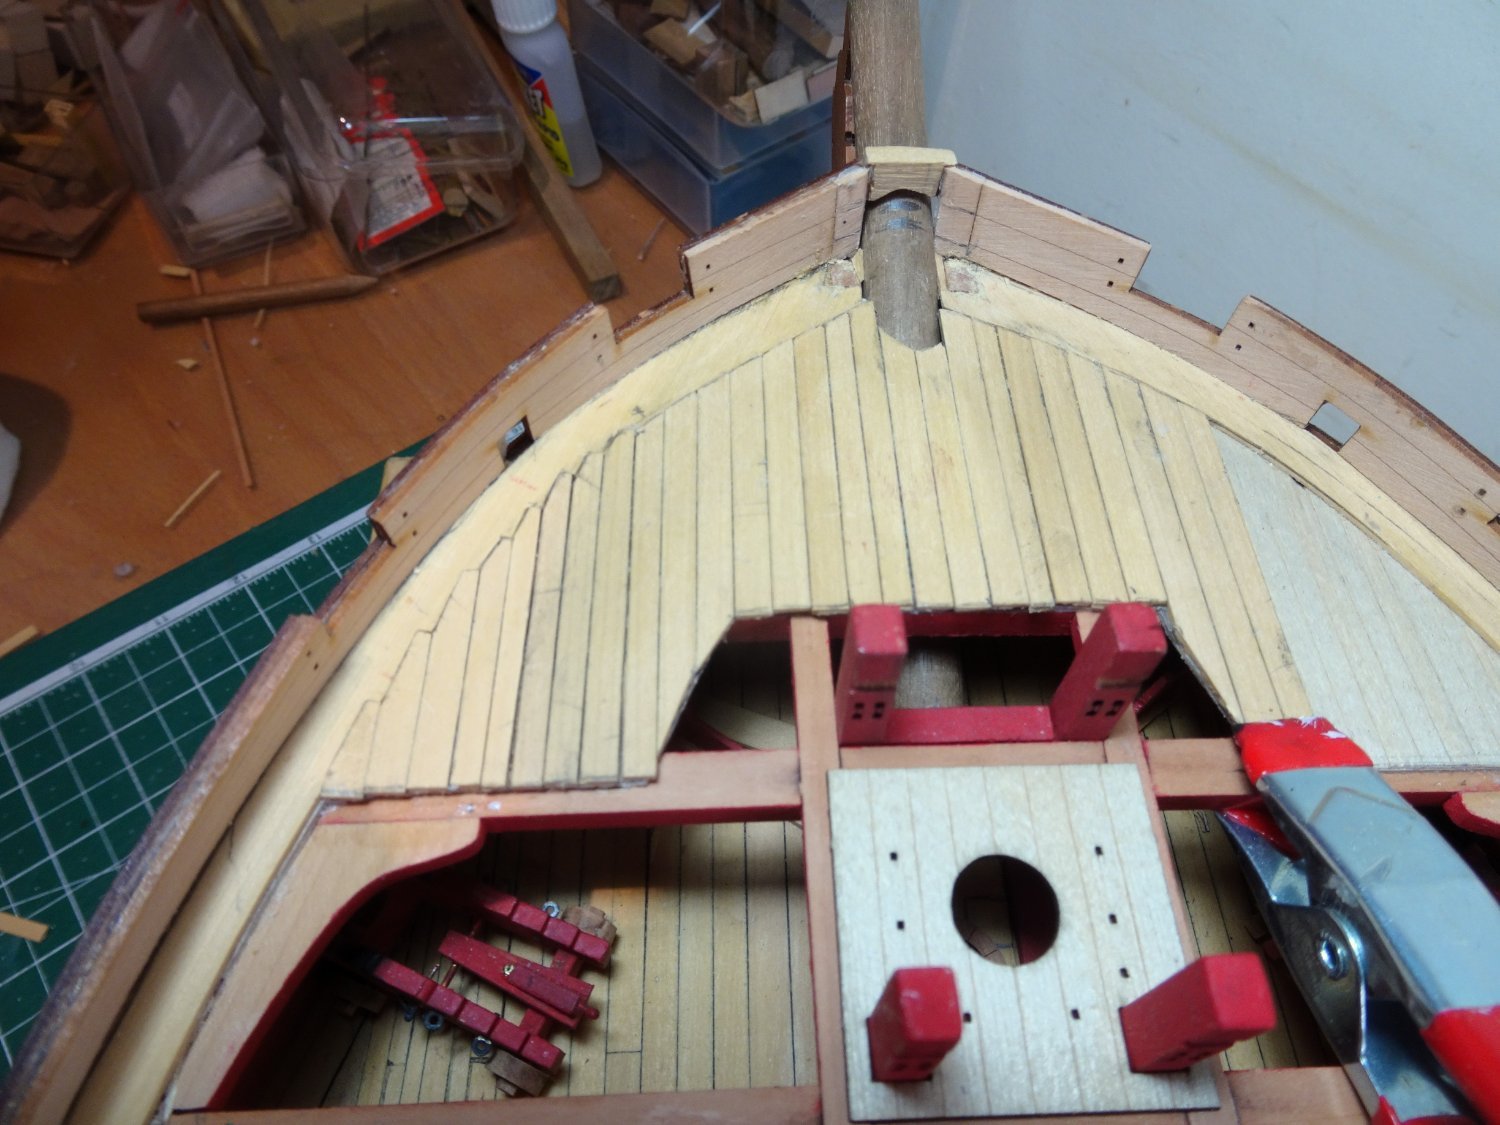
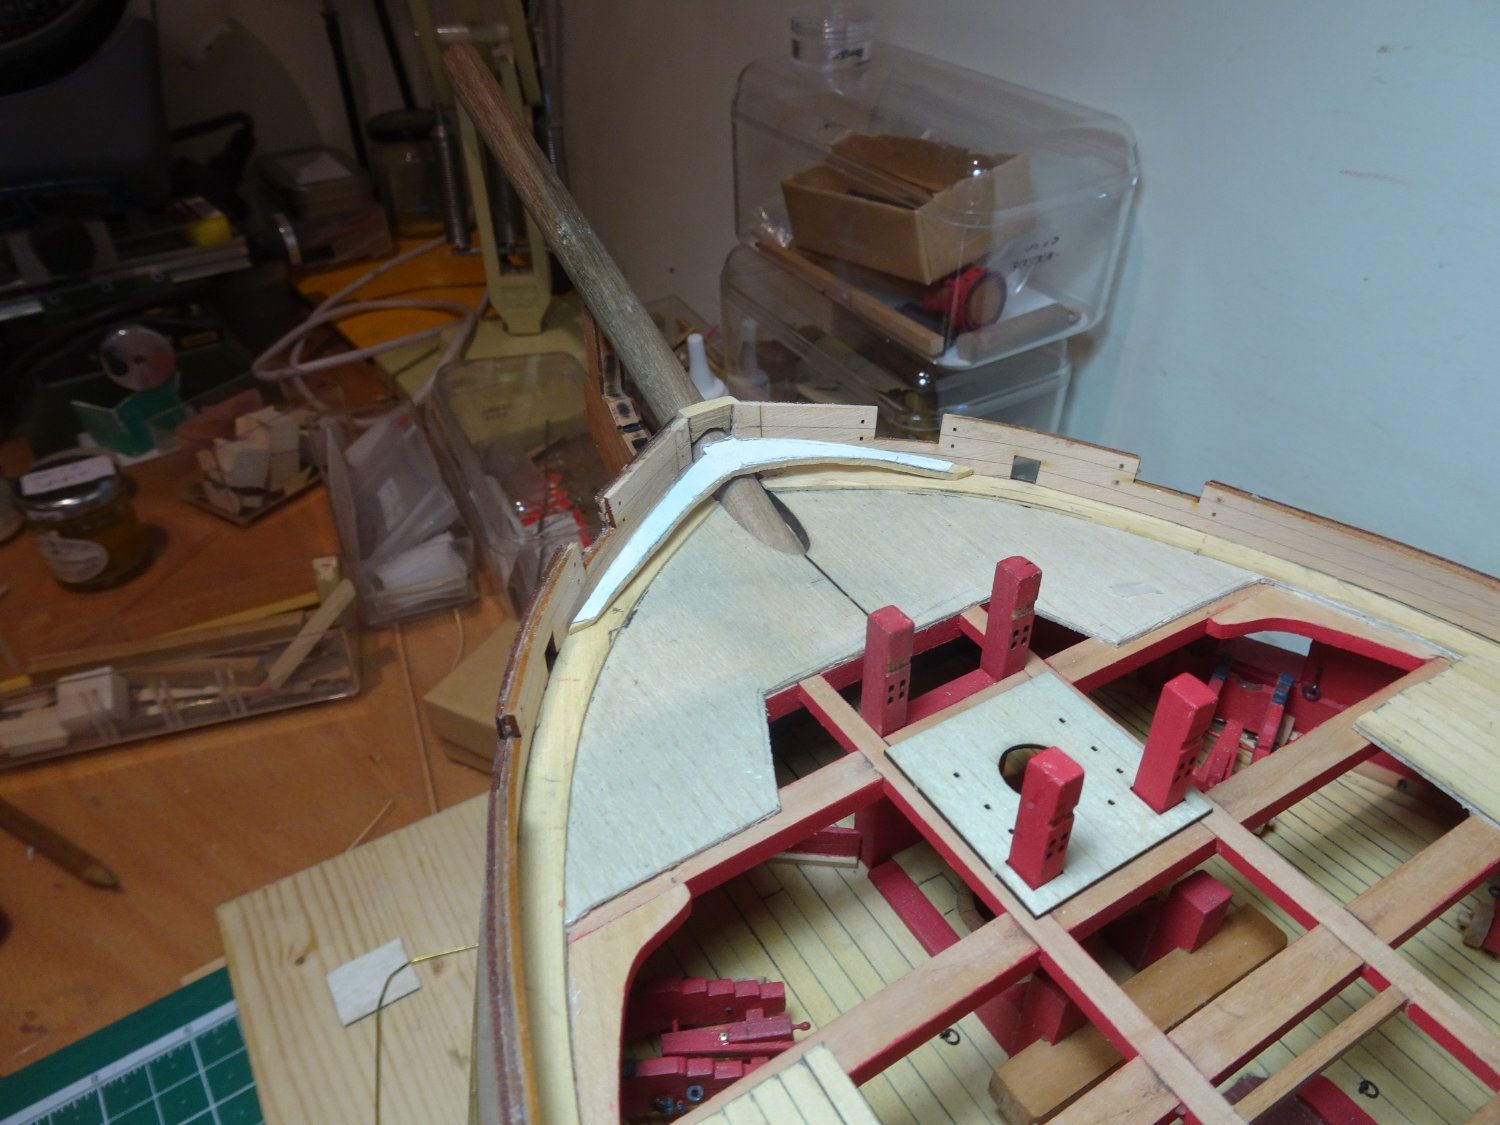
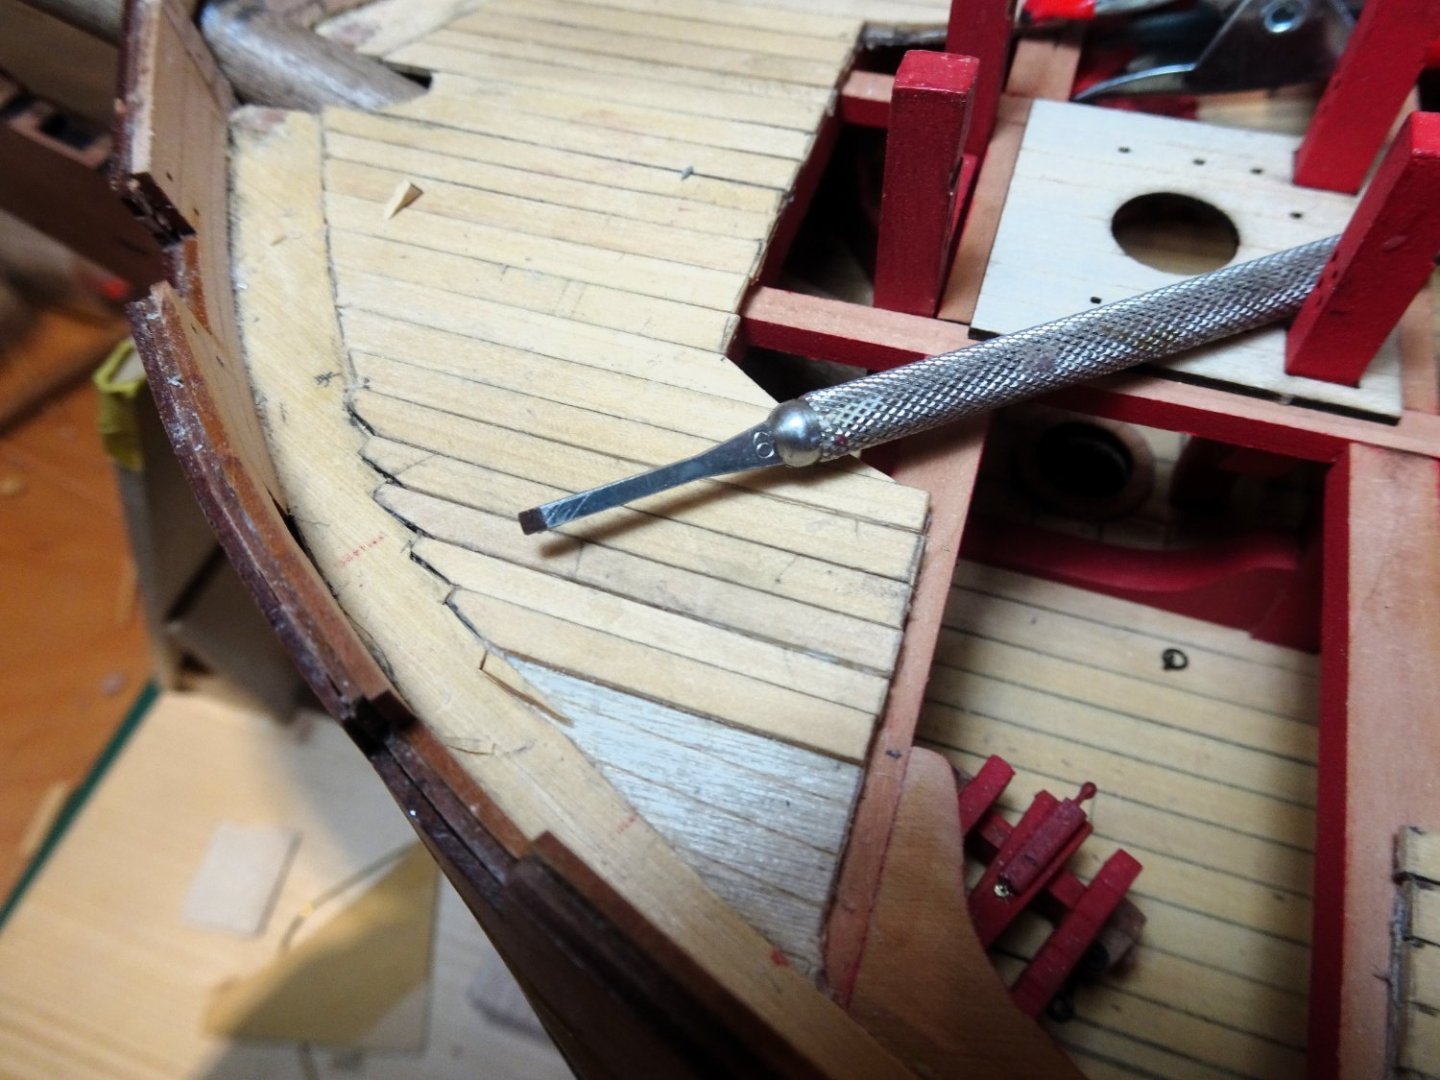
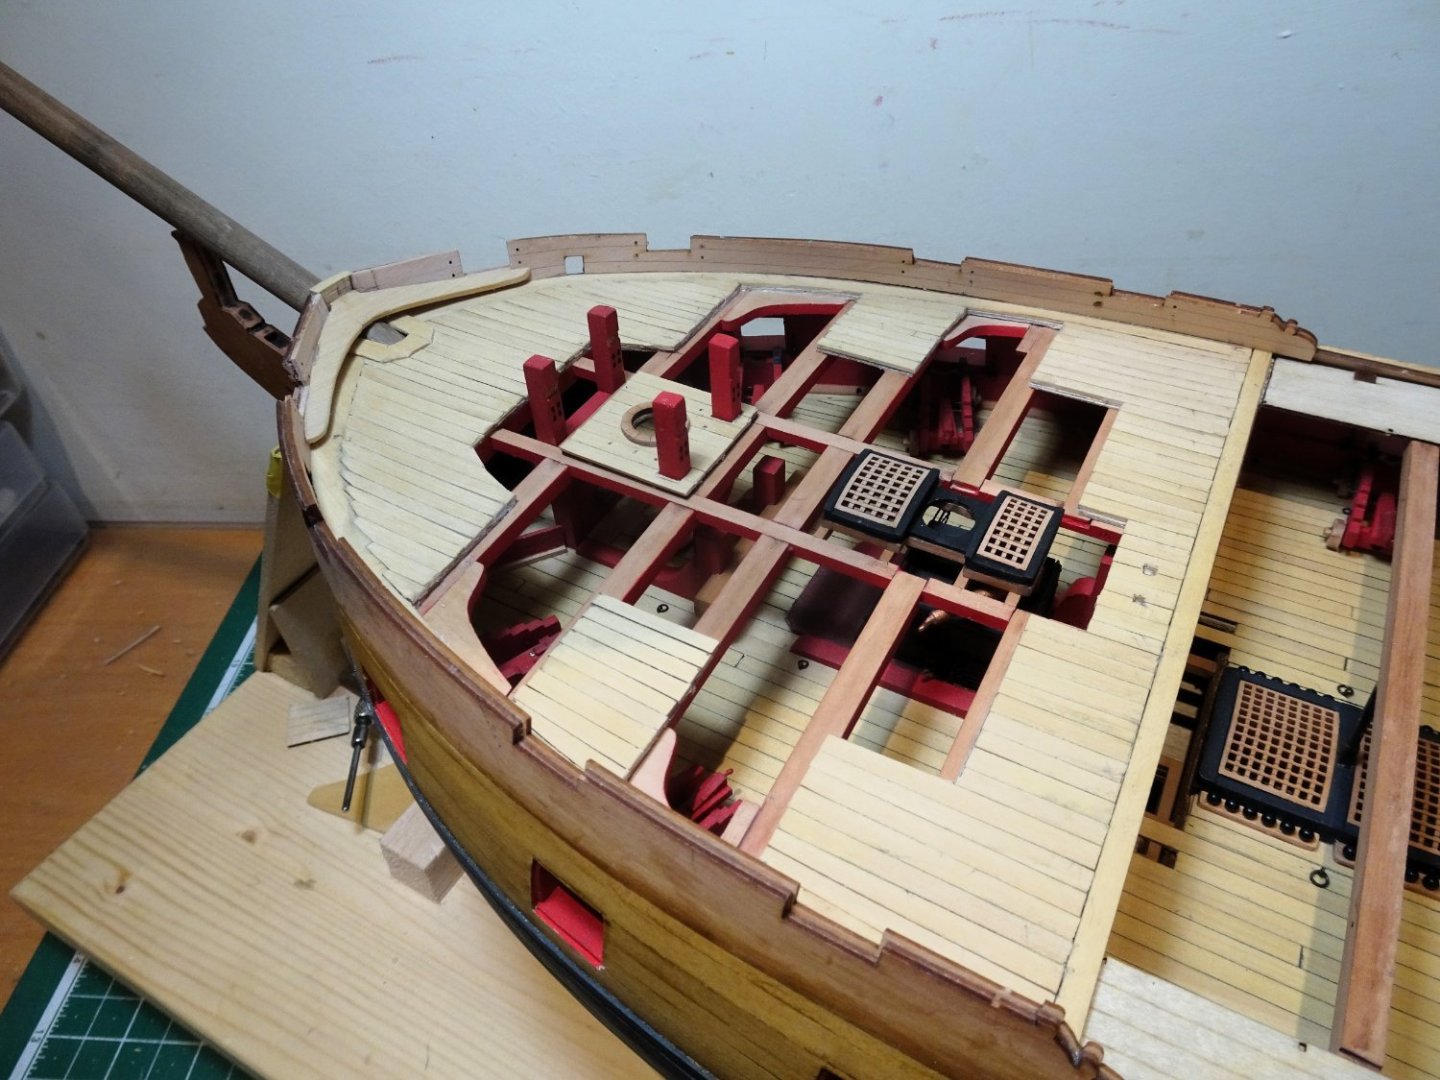
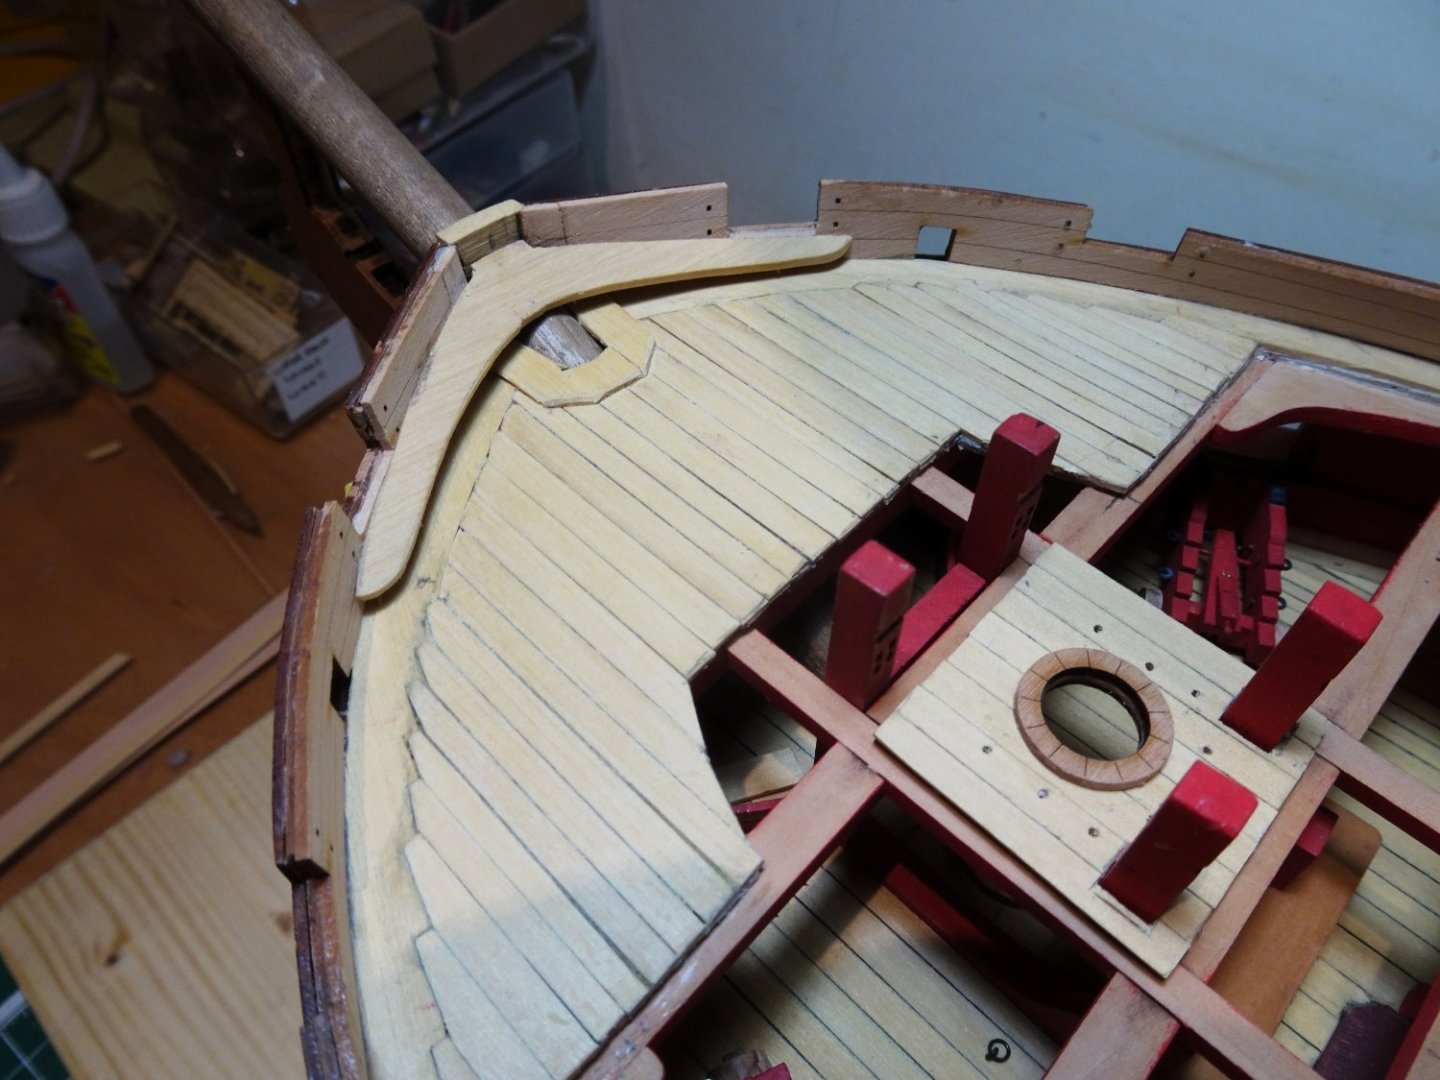
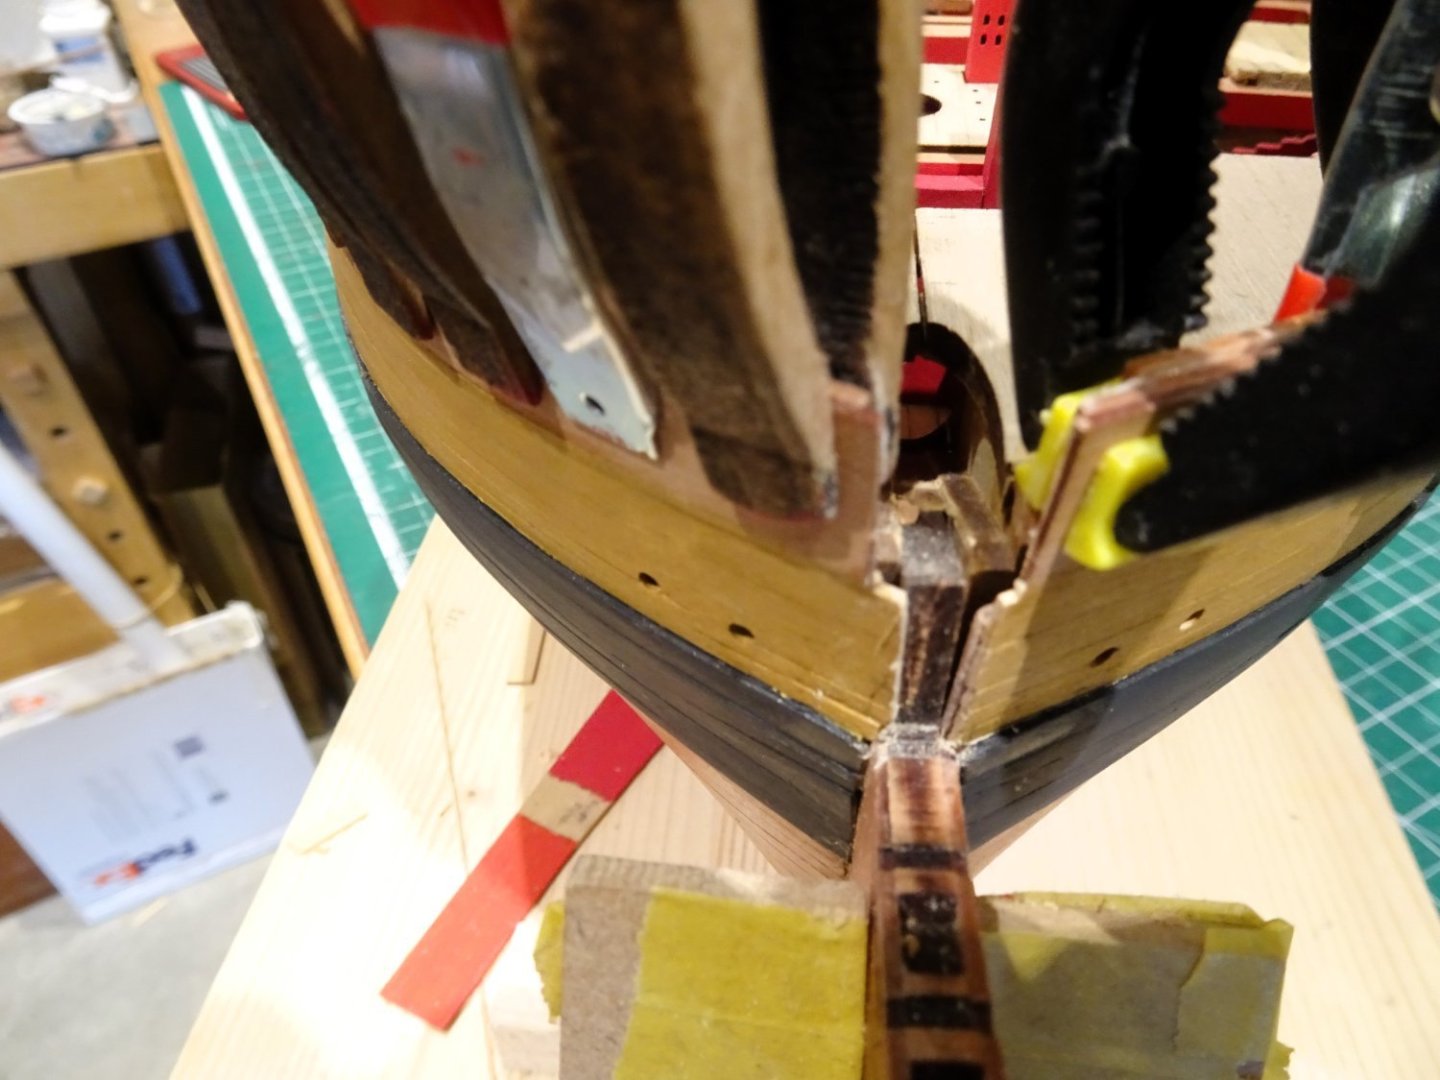
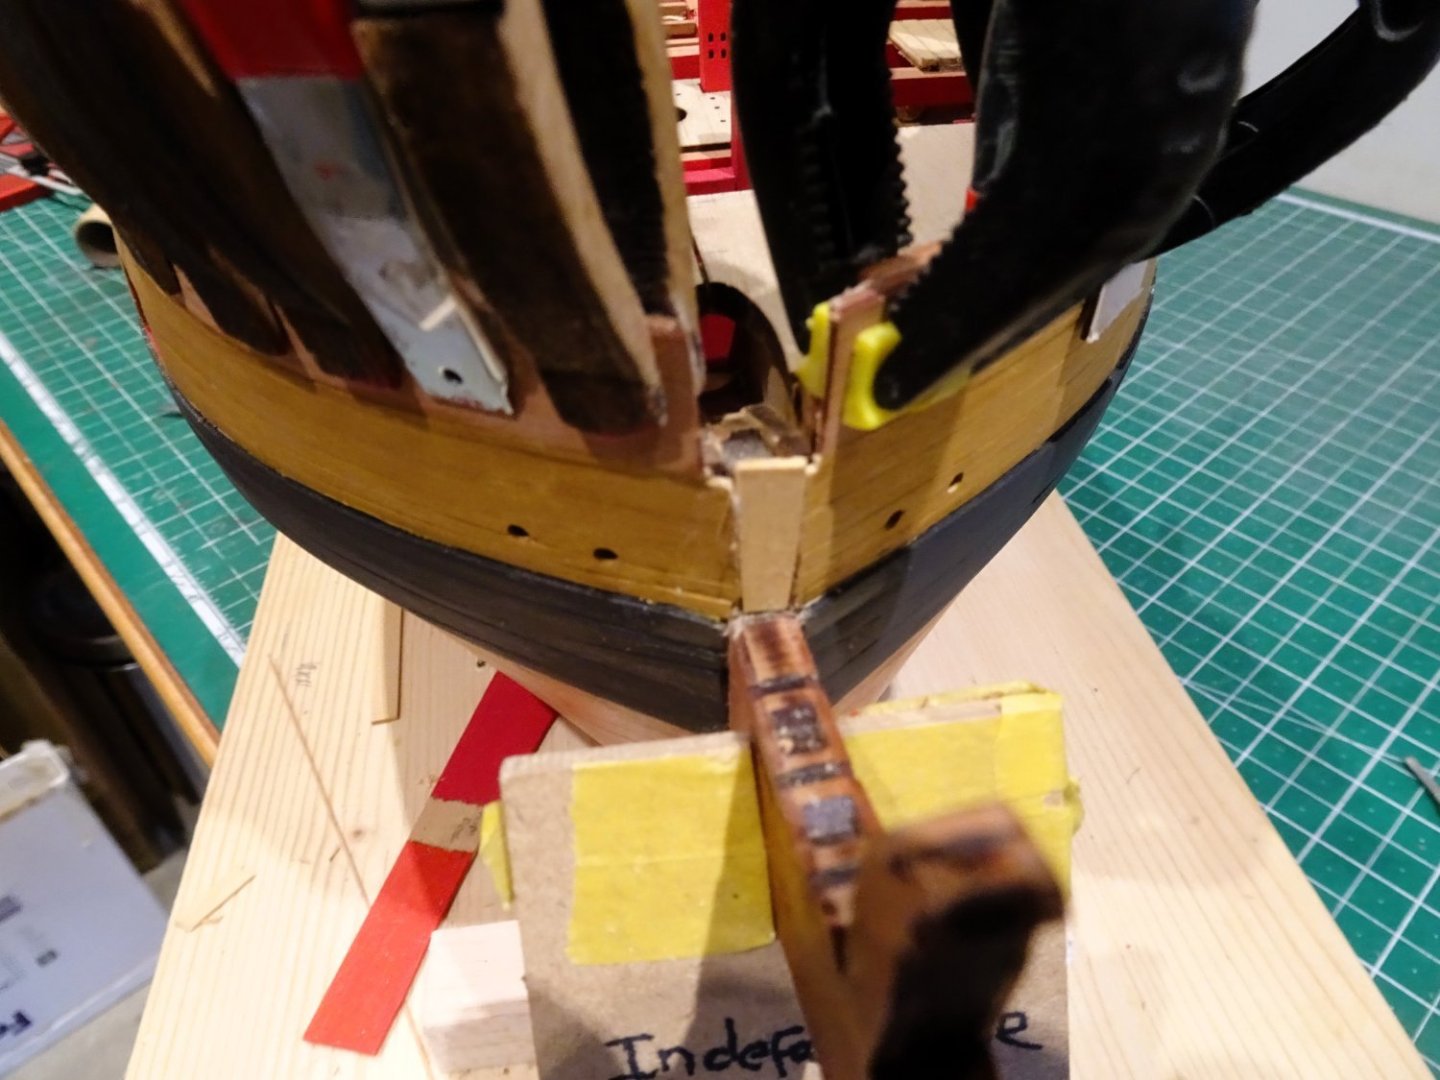
Post One Hundred and two Foc’sle stuff cont’d. A day spent fitting small sections of planking to suit the cut-away plan. Each one requires tapering to suit. Not difficult but time consuming. 2627 The tricky part is the eight or so strakes that will require joggling into the margin planks As an update from my previous post I have found a contemporary model of a large Frigate (Diana) 1794 which indeed does show a hook at the Foc’sle. As the razeed Indy plan also details this feature albeit at a slightly higher level, I grasped the nettle and removed those two uprights either side of the bowsprit. Necessary to fit a hook. The bulwark spirketting was clamped into place and given the heat treatment. I didn’t find it necessary to wet the wood. 2615 One potential issue is that the spirketting sits some 3mm above the outer bulwarks towards the fore end, including the top hole for the ring bolts. I can’t imagine how this has come about, all the other reference points seem to be correct. I resolved the issue by carefully shaving the bottom edge of the spirketting to bring things into line. 2623 With the spirketting glued into place, small additional pieces were required to be added, cut from matching fret. 2617 There is an untidy area where the topside planking meets the stem at the bow that could use a little fettlin’. It is mostly hidden once the Bowsprit is in place, but that’s no reason not to sort it. 2618 A simple job to tidy up the plank ends and slot in a filler piece. 2621 A bridging piece is now fitted over the top of the Bowsprit opening. The capping rails will eventually cover this. Still a lot of cleaning up to do but getting there. I can now work the hook and finish off around the bowsprit area. 2625 This is the second hook I am working on, tricky little beggar to get a good fit, and I may well end up with a third. B.E. 02/11/2023


- 648 replies
-
- 23
-
-
- Indefatigable
- Vanguard Models
- (and 1 more)
-
Thank you, Allan I’m not sure, my main concern is to improve authenticity where I can, given the kit limitations. The fore end of the kit is solid to provide a strong block to build the hull, which is perfectly ok as Chris designed the model to be fully planked which would hide all this raw stuff. 2106 As you can see on the photo the carlings end in mid air, and the Bowsprit step was originally fixed further forward, I moved it back to its proper position between the Bitt posts. The way I’ve designed my planking layout is to hide this stuff, a sort of smoke and mirrors job, but I can’t hide those posts fully open to view. Before I started to look in depth at this issue those two bulkhead extensions either side of the bowsprit looked odd to my eye, and I couldn’t find anything similar on contemporary models of large frigates of the time. The problem is that these Razees are anomalies, and you won’t find a hook on the foc’sle of specifically built frigates- as far as I know. An interesting little exercise ahead. B.E.
- 648 replies
-
- 21
-
-
- Indefatigable
- Vanguard Models
- (and 1 more)
-
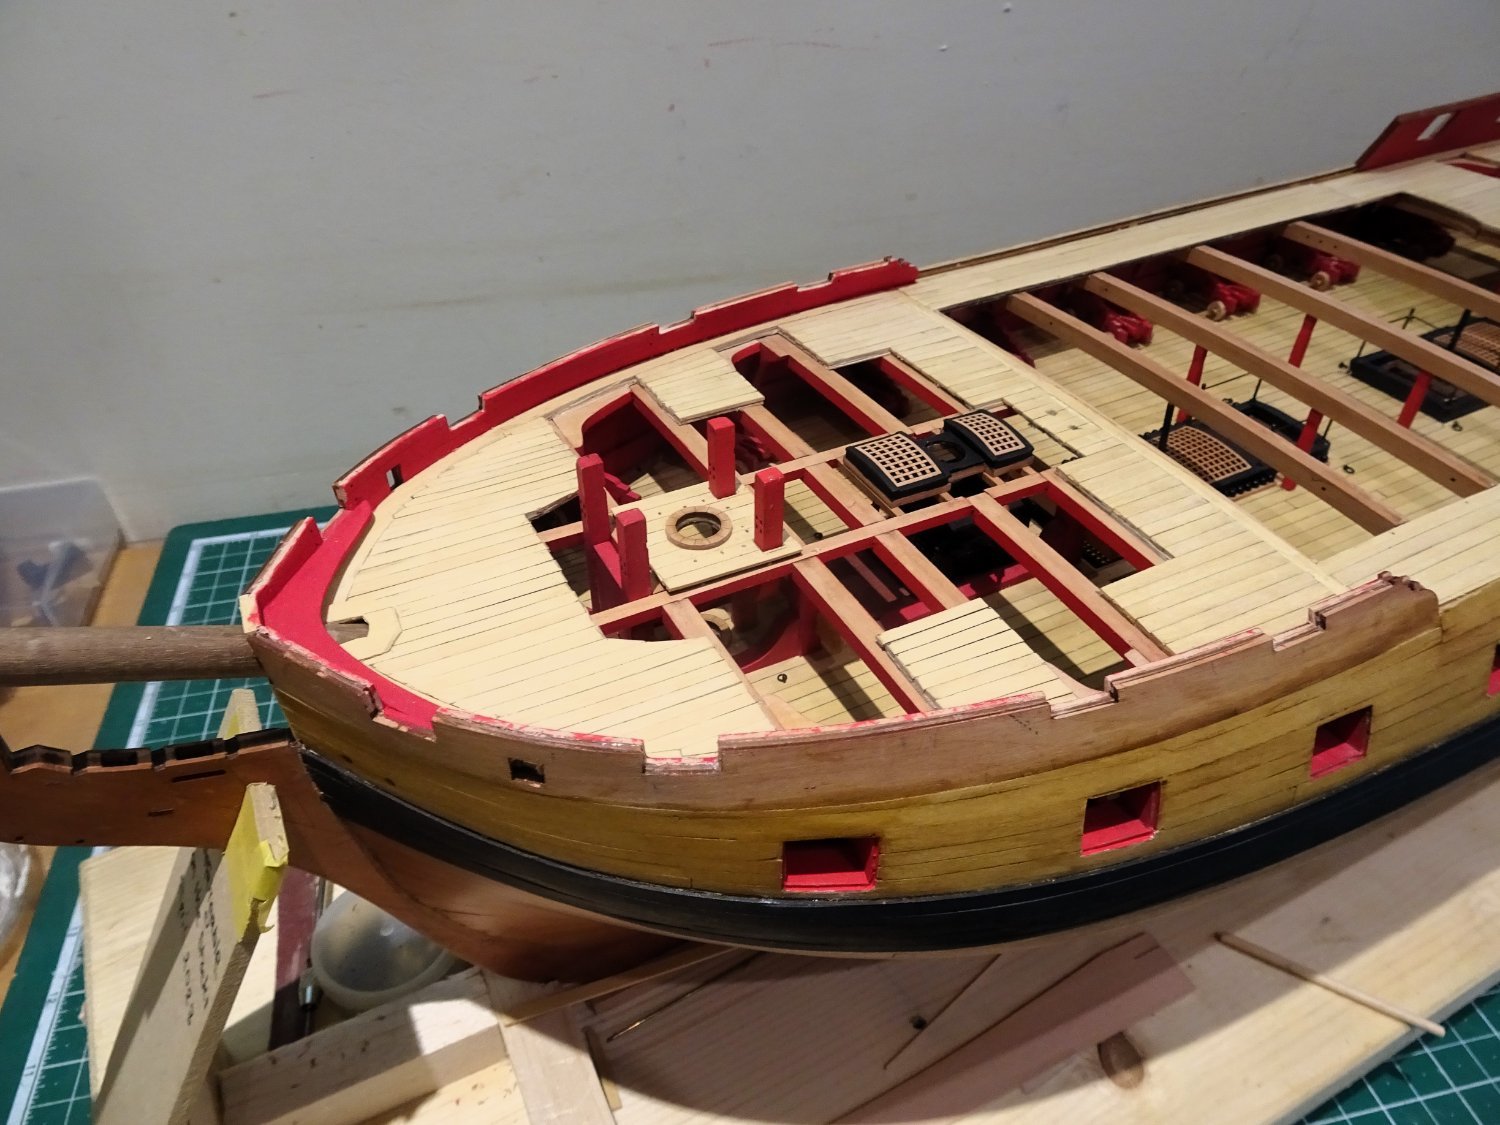
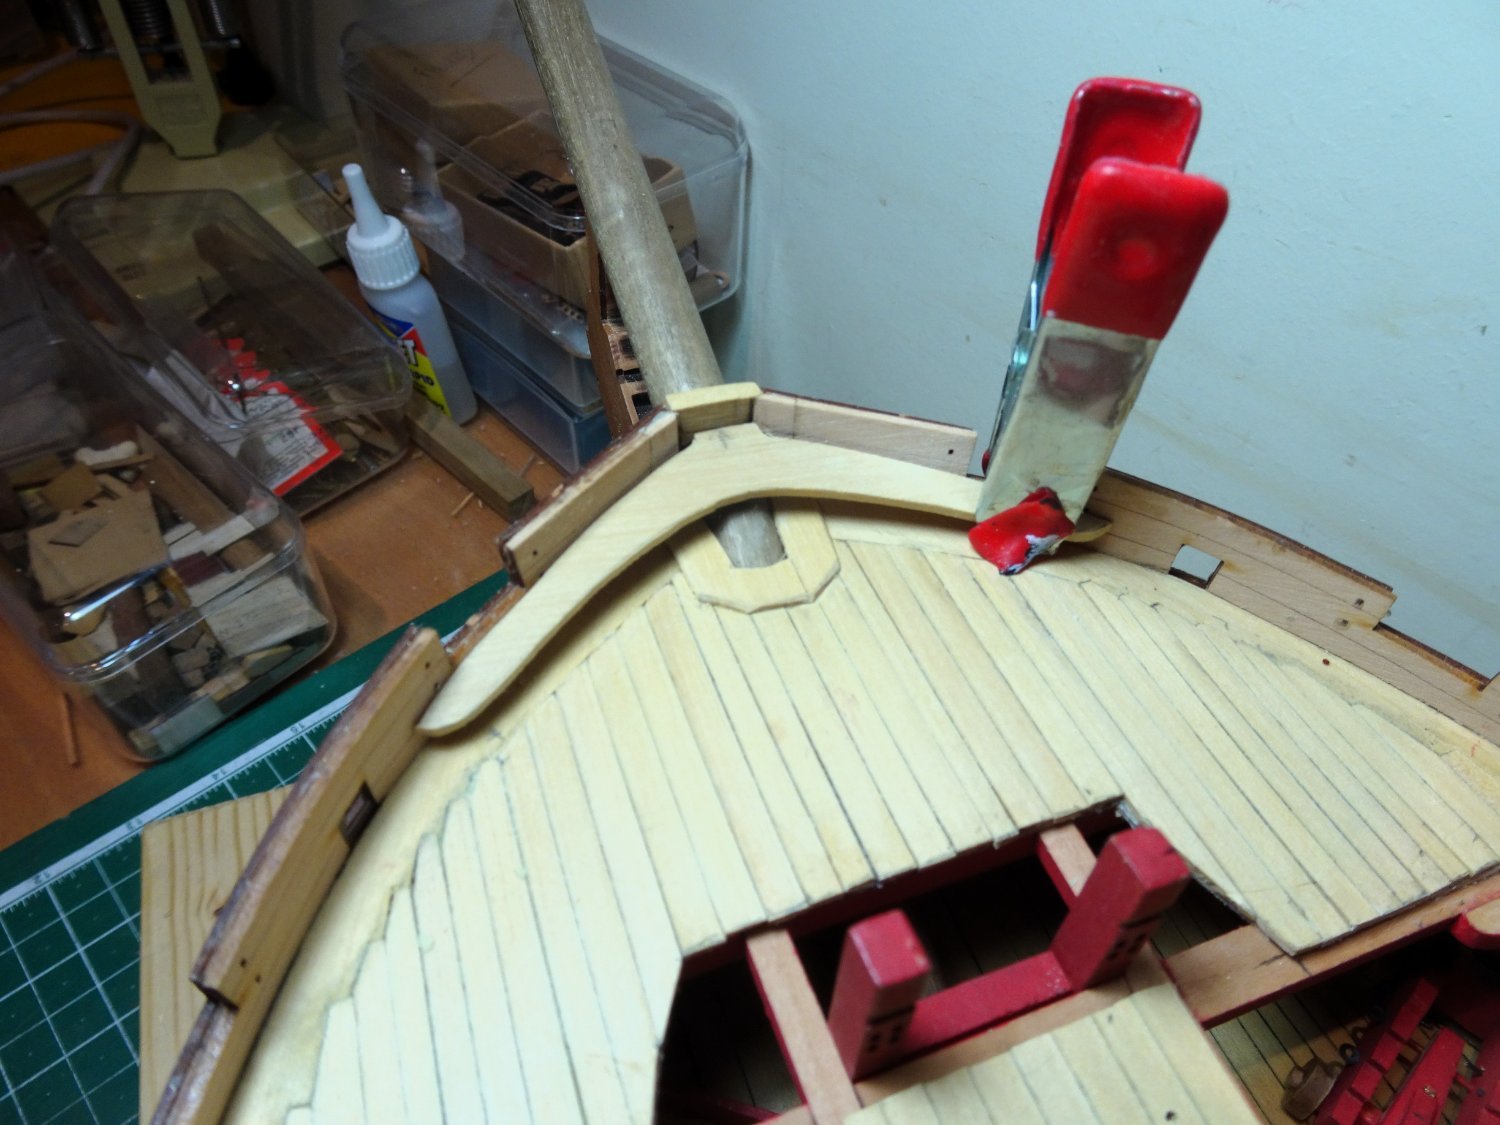
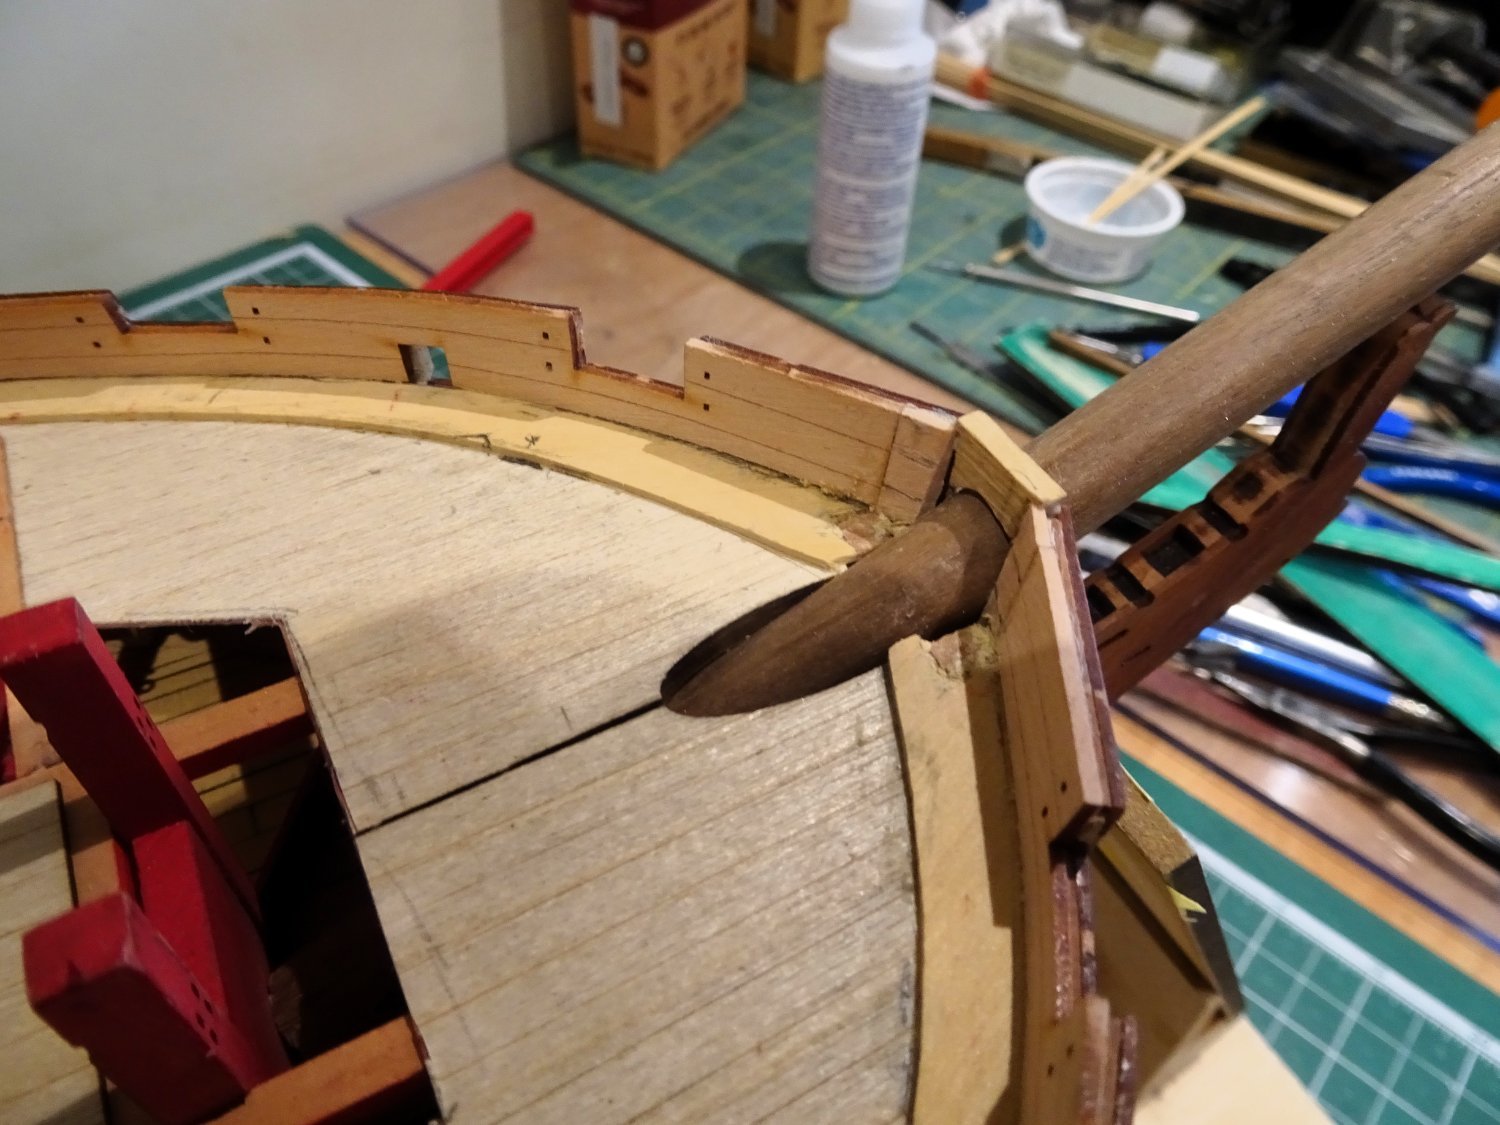
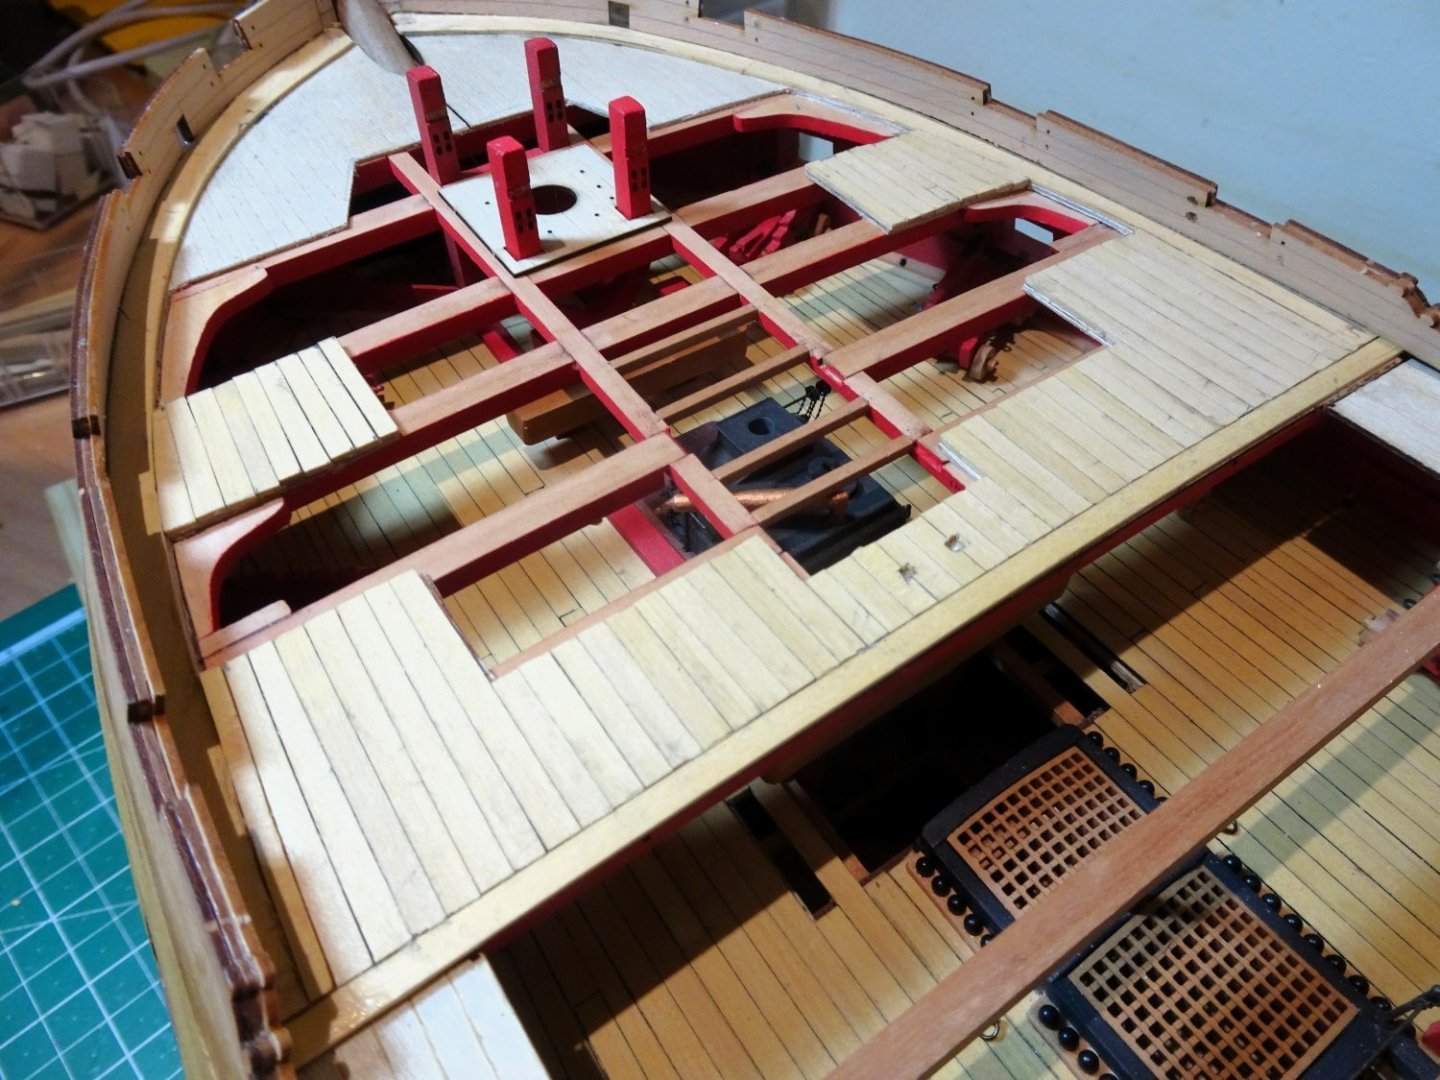
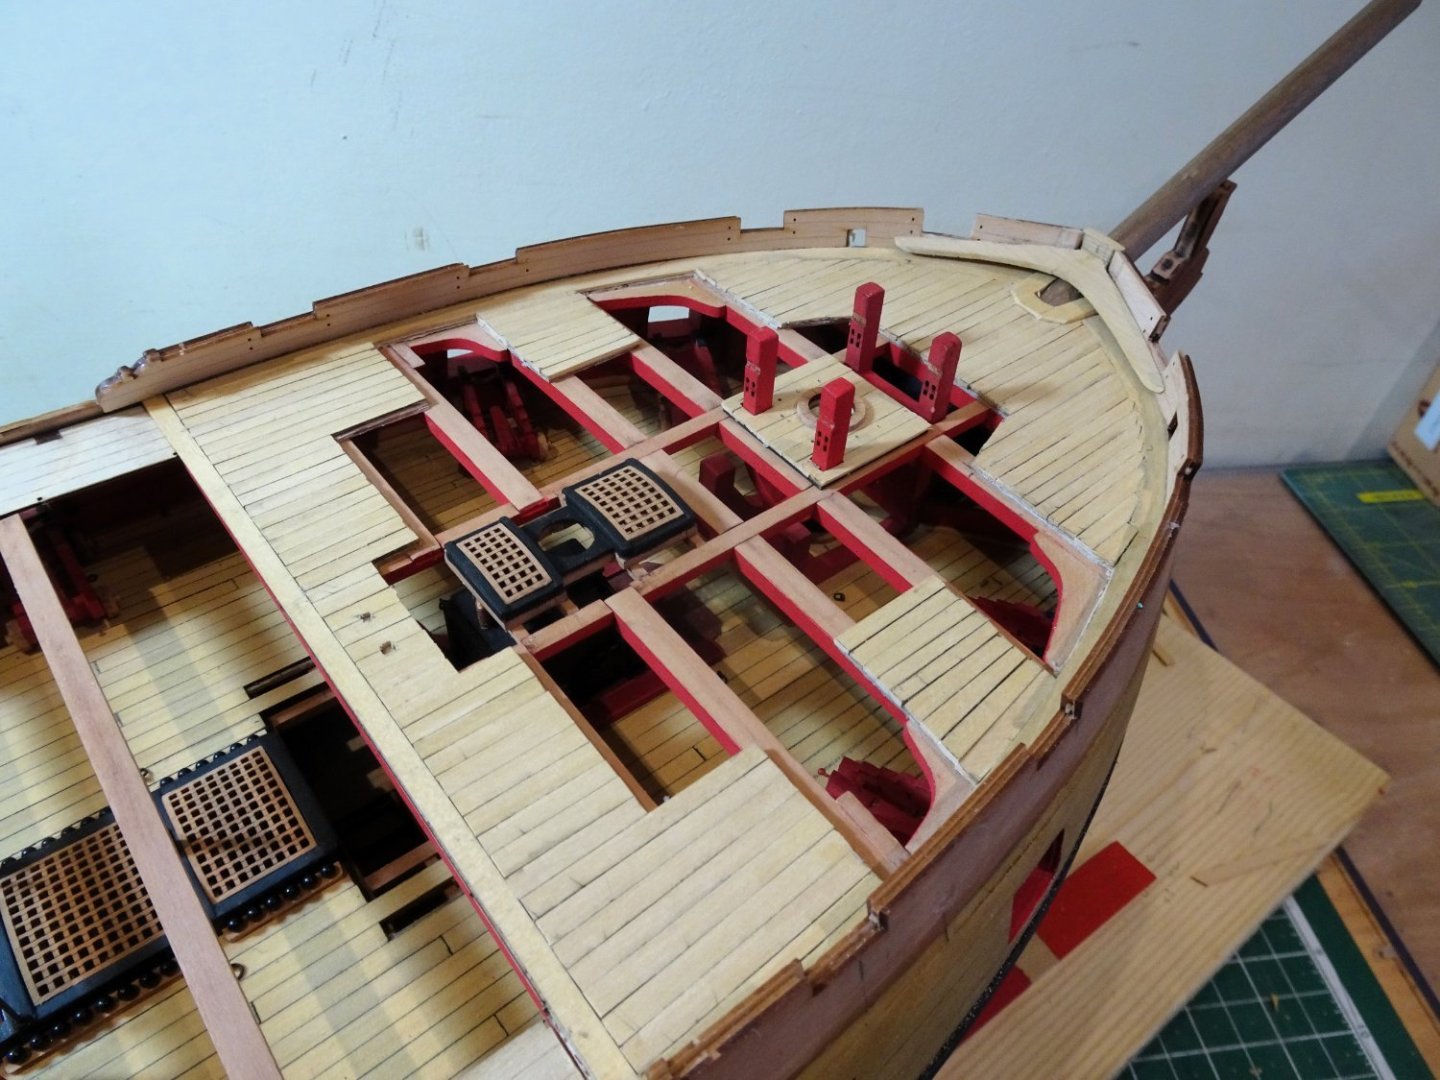
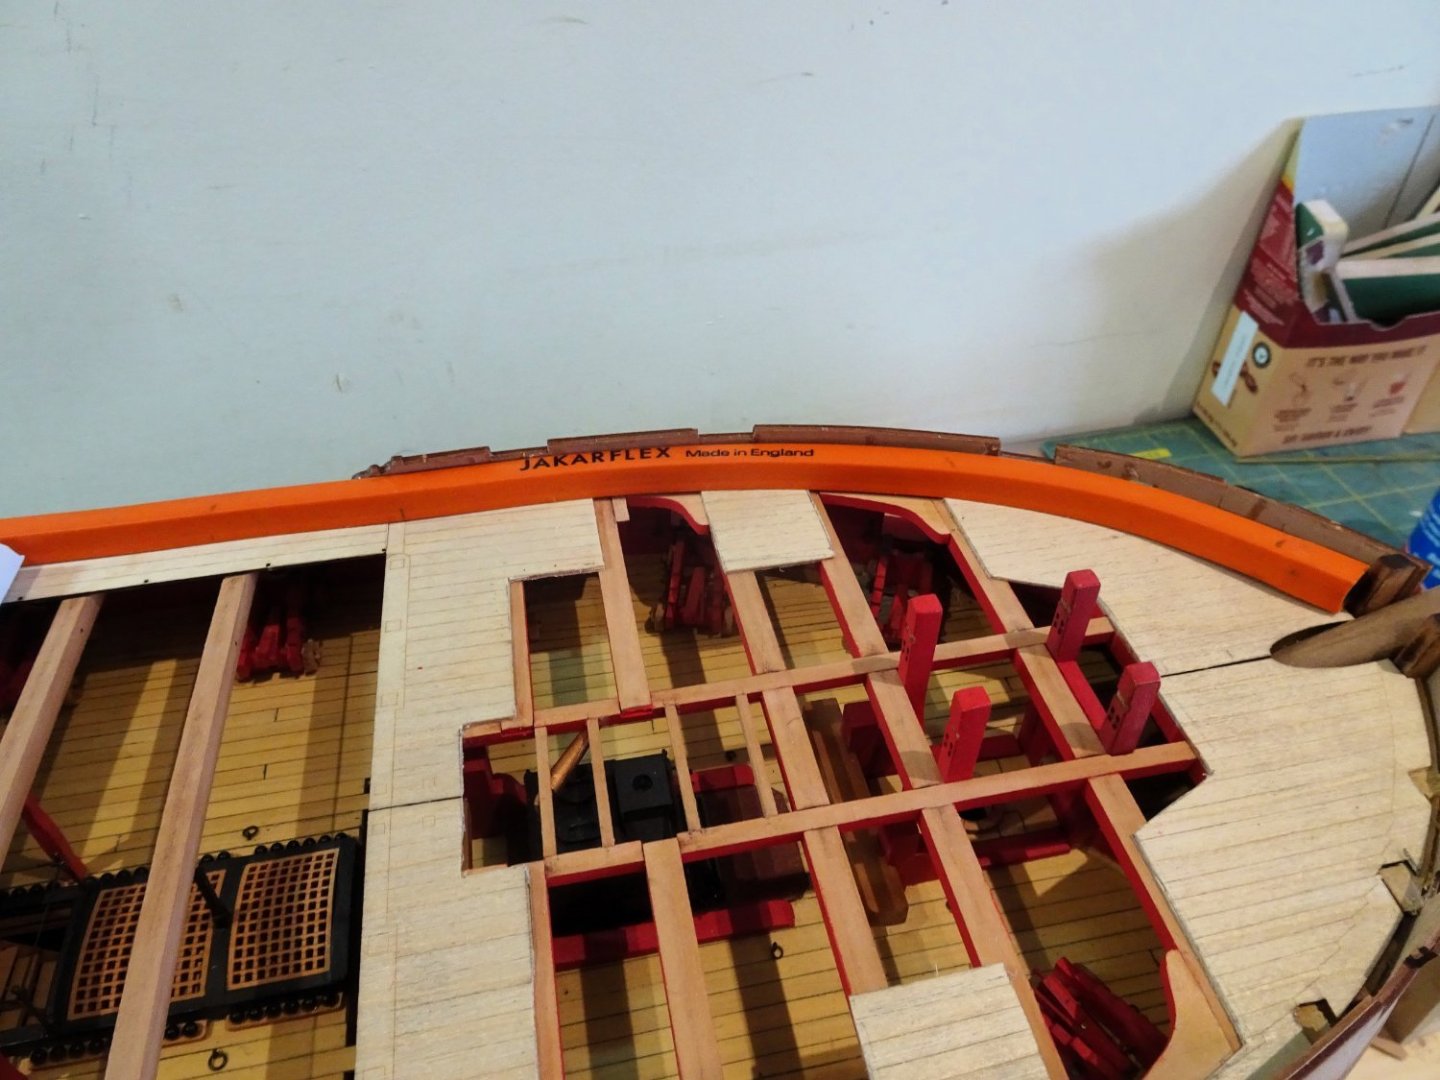
Thank you Mugjie, Ron, and Allan, much appreciated, and thanks for all those 'Likes' Post One Hundred and Two Planking the Foc’sle This is the most difficult deck to plank by reason of the sharp curves to the bow. 2607 The Margin plank will need to be 7mm in width to cover the rough edges and bulkhead tops, and the severity of the curve rules out using strip. 2609 2610 It is simpler to cut out the margins from 1mm Box sheet on the scroll saw, and then tweak to shape. 2612 The main advantage of cutting out the margins is that there is no stress in conformation against the bulwark. In thinking about the Foc’sle, questions come to mind. Should there be a Bowsprit step over the deck area where it passes through? Those two posts either side of the Bowsprit look awkward, what are they for? They don’t seem to align with the knighthead tops that are fitted separately on the capping rails. They may of course just be a simplification of the kit design and construction for practical purposes rather than any actual feature, and there’s no indication to remove them as with the other bulkhead tops. The Adm Plan of the Foc’sle indicates a ‘hook at the height of the foremost Port cills. The kit has a couple of pin racks in this area. 2614 Foc'sle of the Razeed Indefatigable This would have been the Upper gun deck before she was razeed and to fit a hook seems reasonable in this area, but those posts preclude such a fitting and would require at least reducing in height, becoming in effect supports for the hook. I’m not really convinced by the present arrangement, and I’m minded to fit a hook. There is no indication of an open space between the Foc’sle bulwarks above the bowsprit but I need to ponder on it before I do anything too drastic. In the meantime I can progress some of the deck planking B.E. 01/11/2023


- 648 replies
-
- 18
-
-
- Indefatigable
- Vanguard Models
- (and 1 more)
-
When I built Pegasus which was the last model I coppered, I coloured them a slightly darker bronze colour as a contrast. B.E.
-
You are correct Dave in your thoughts about copper and iron. The rudder straps, pintles and gudgeons were all made of a cuprous alloy, to avoid the chemical reaction of mixing iron and copper. B.E.
-
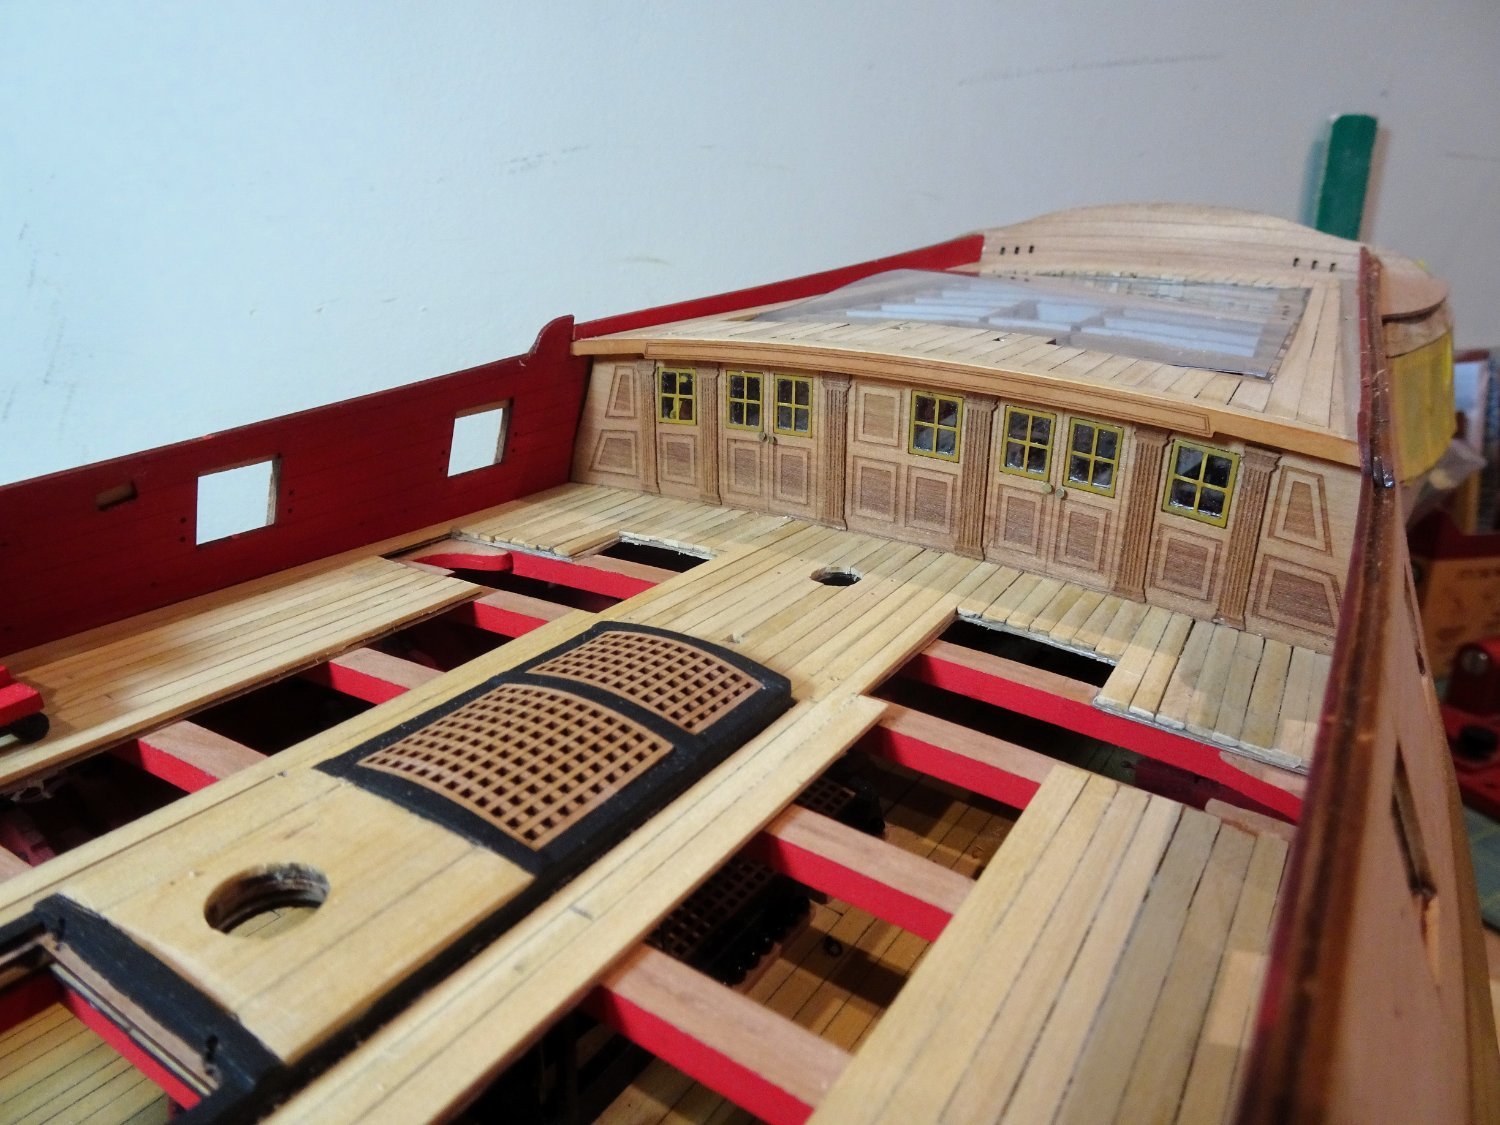
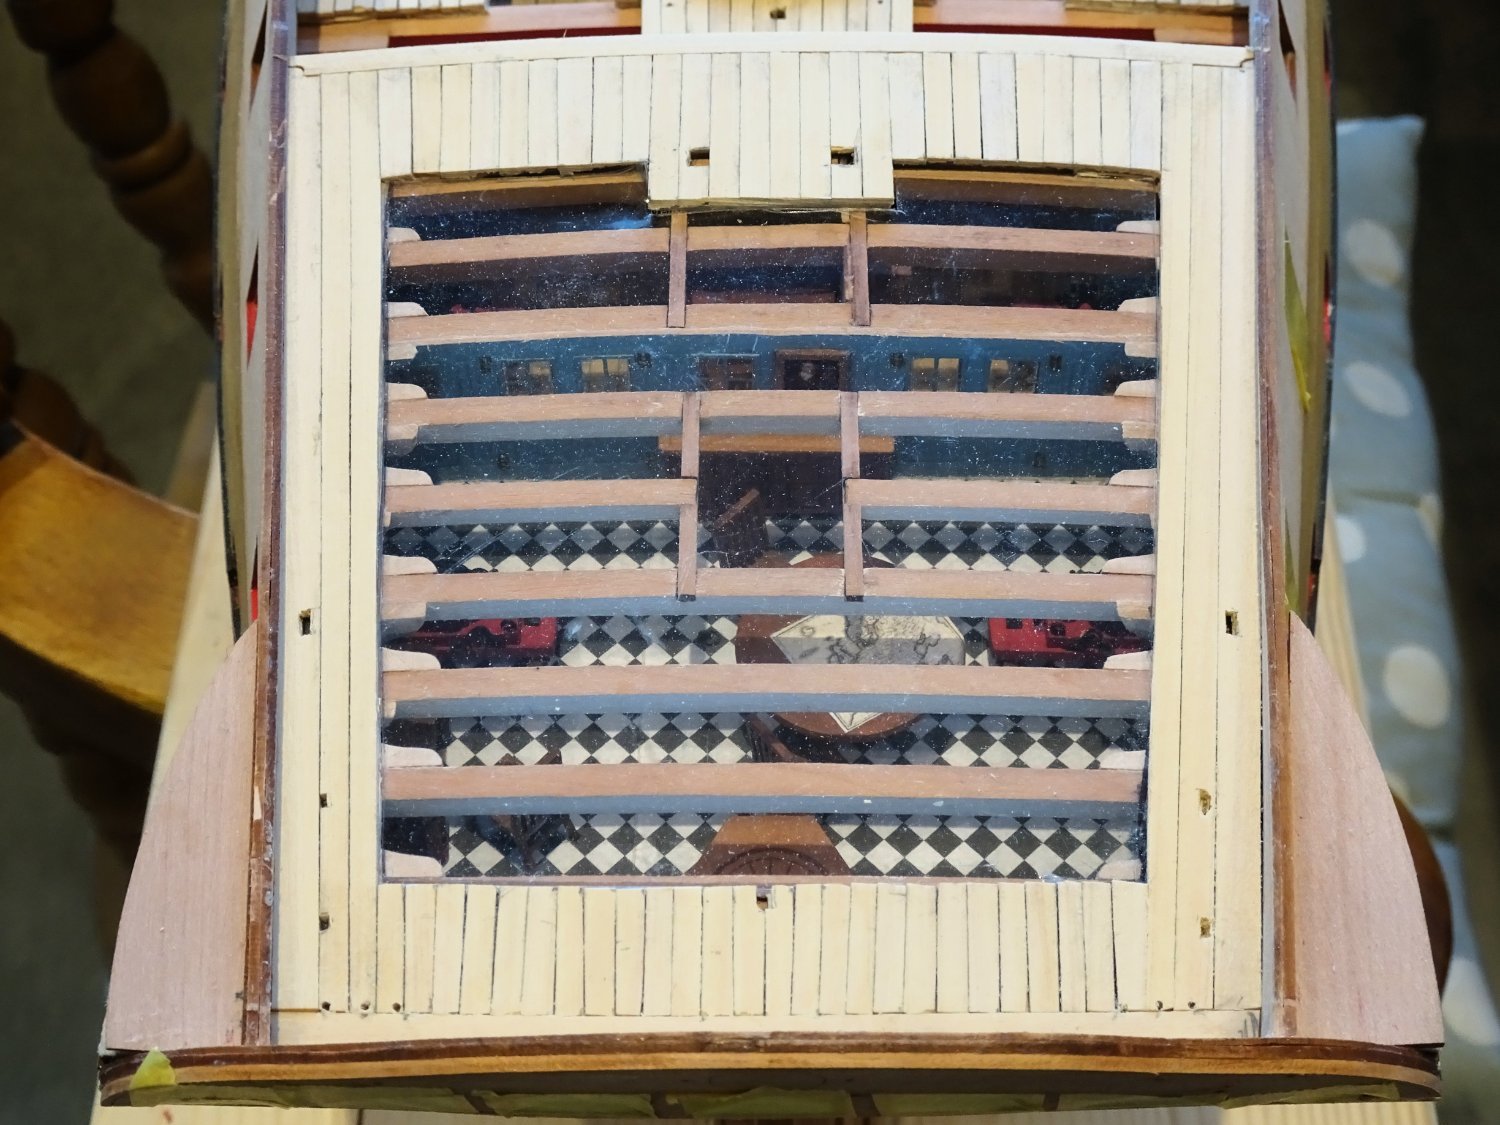
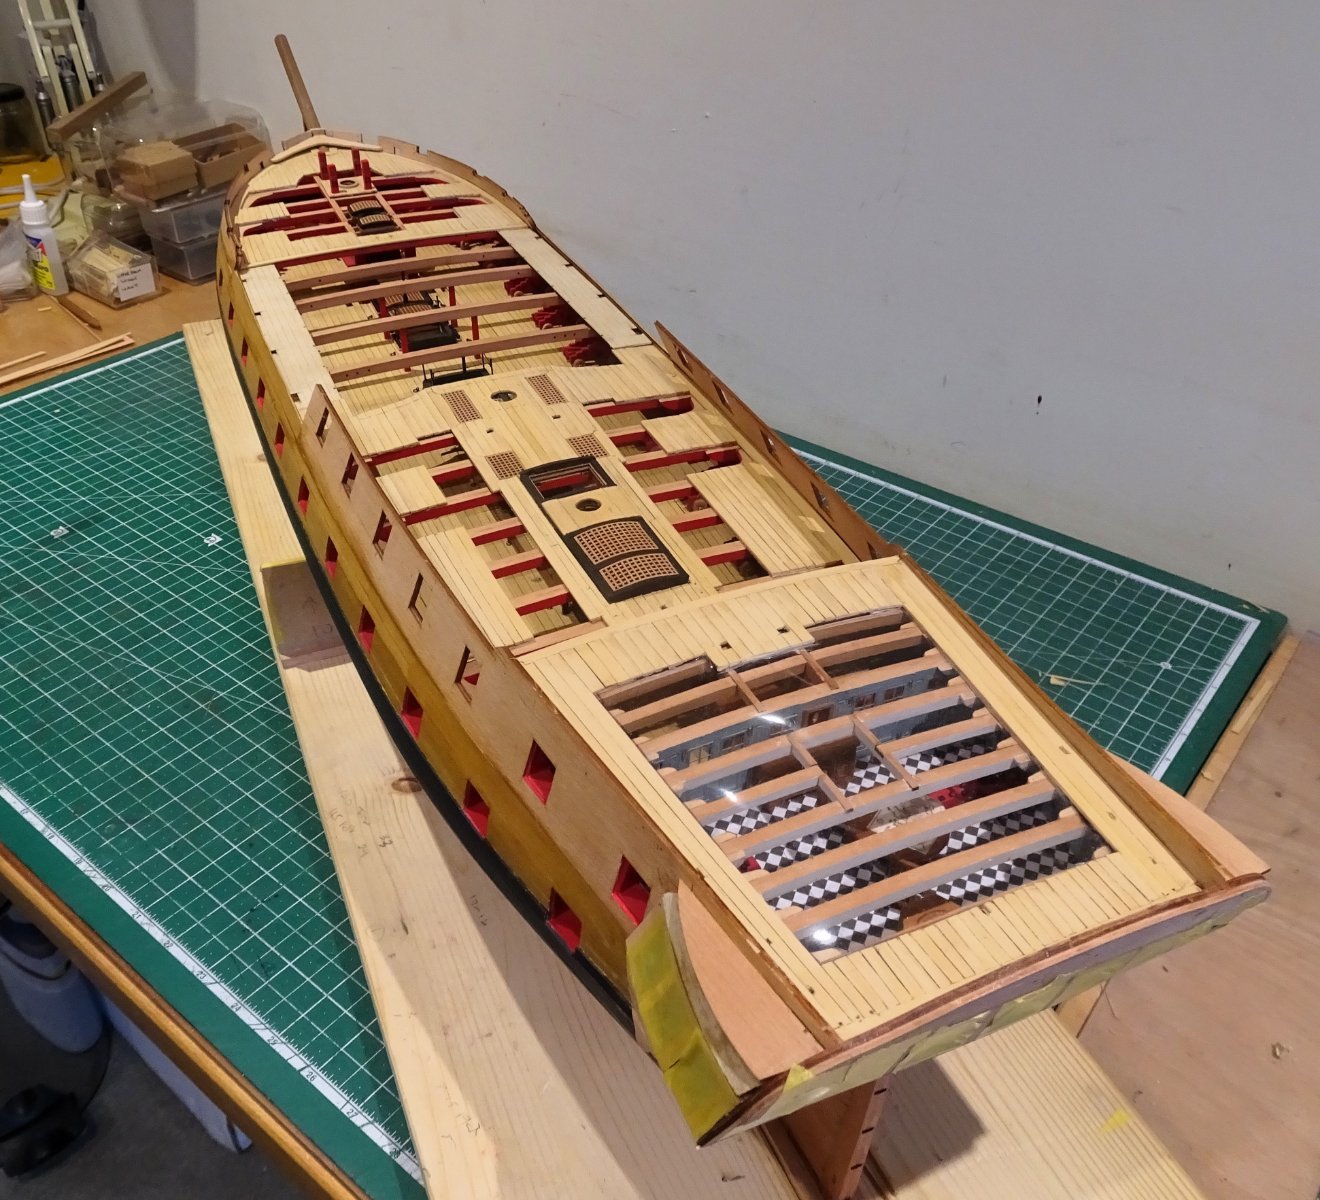
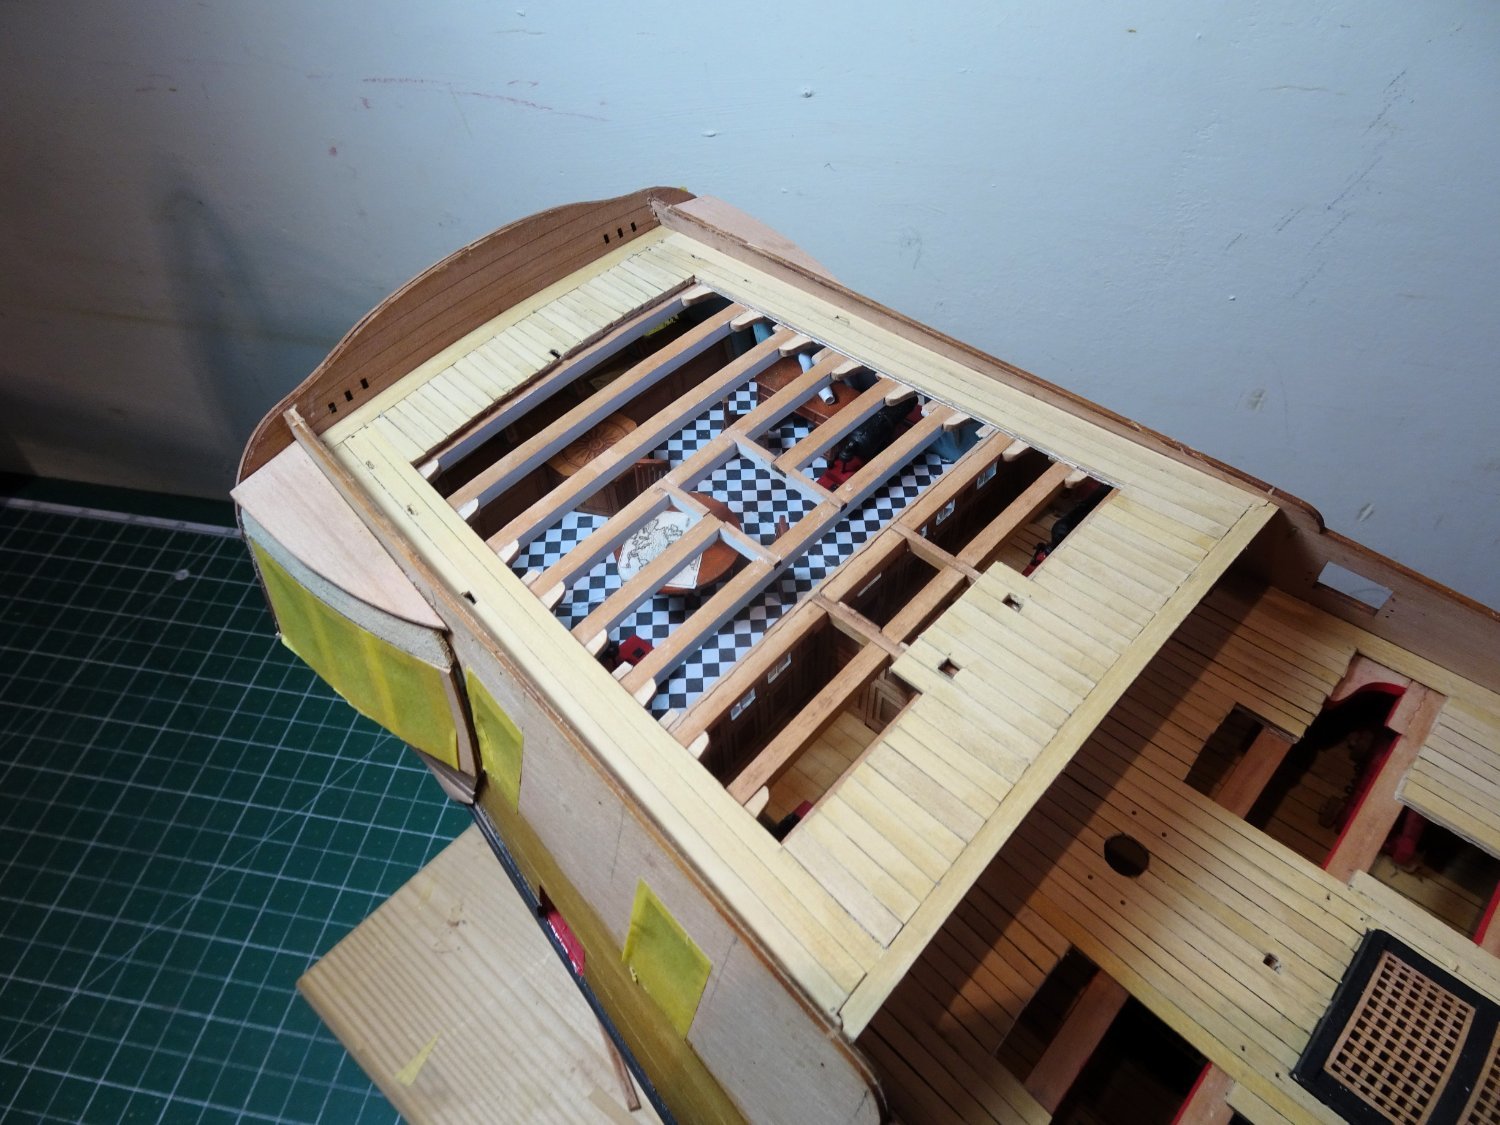
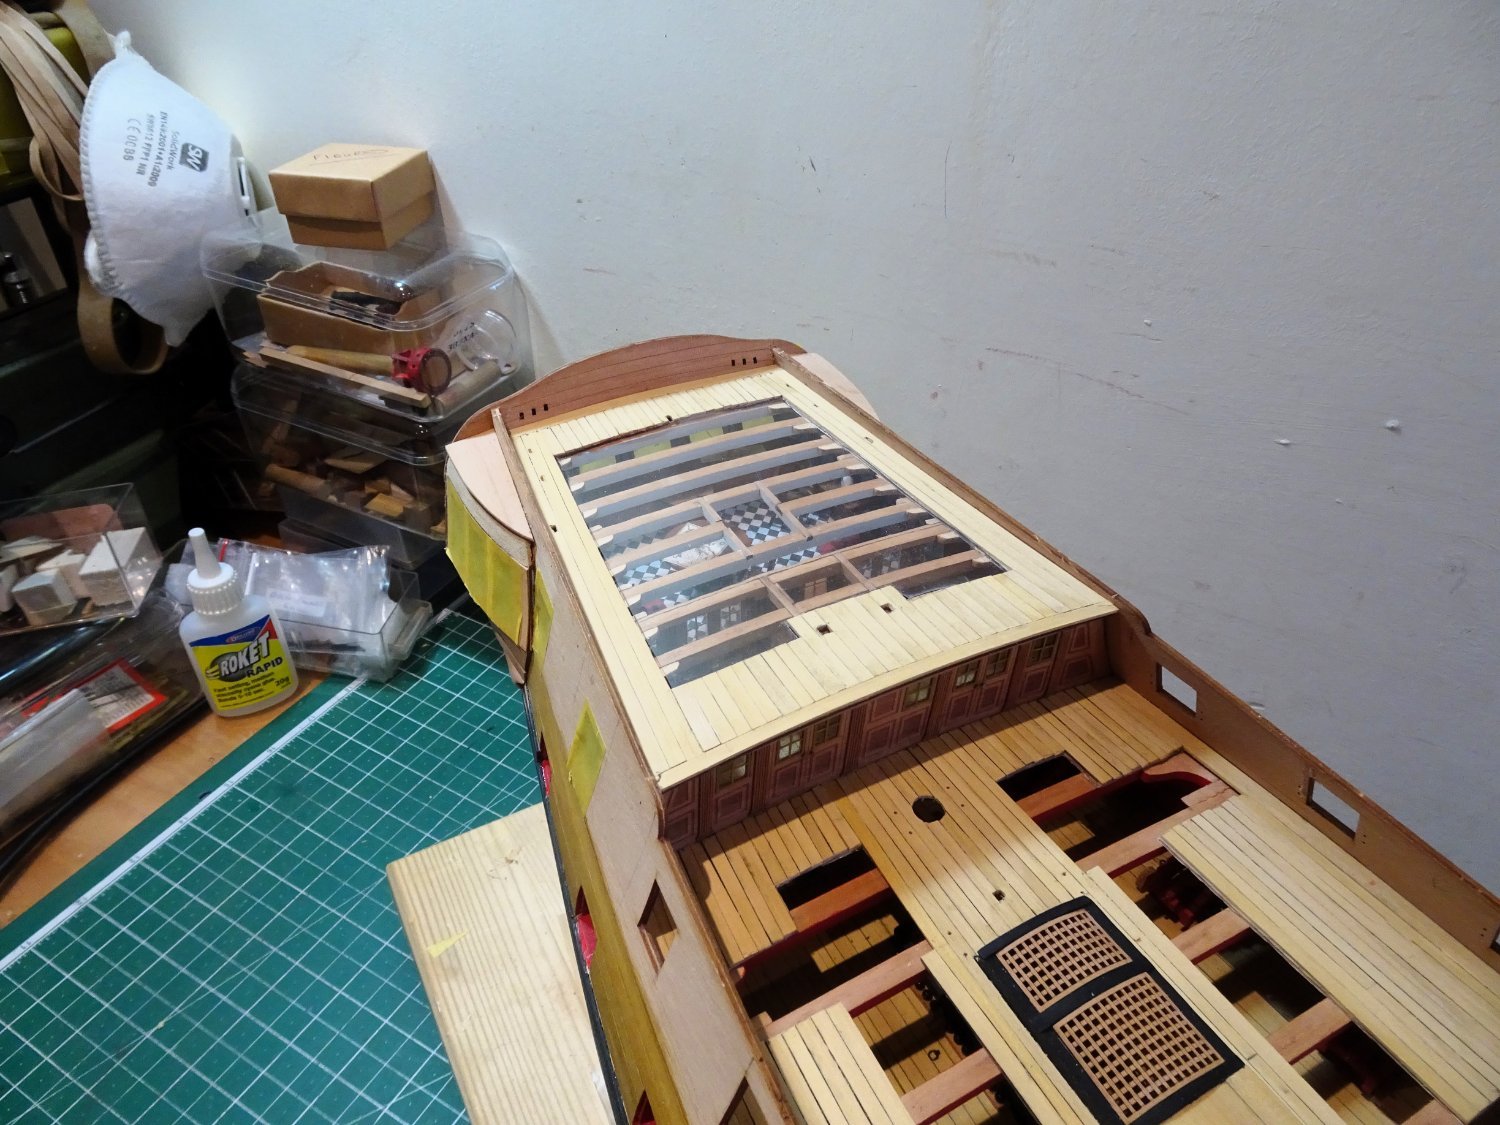
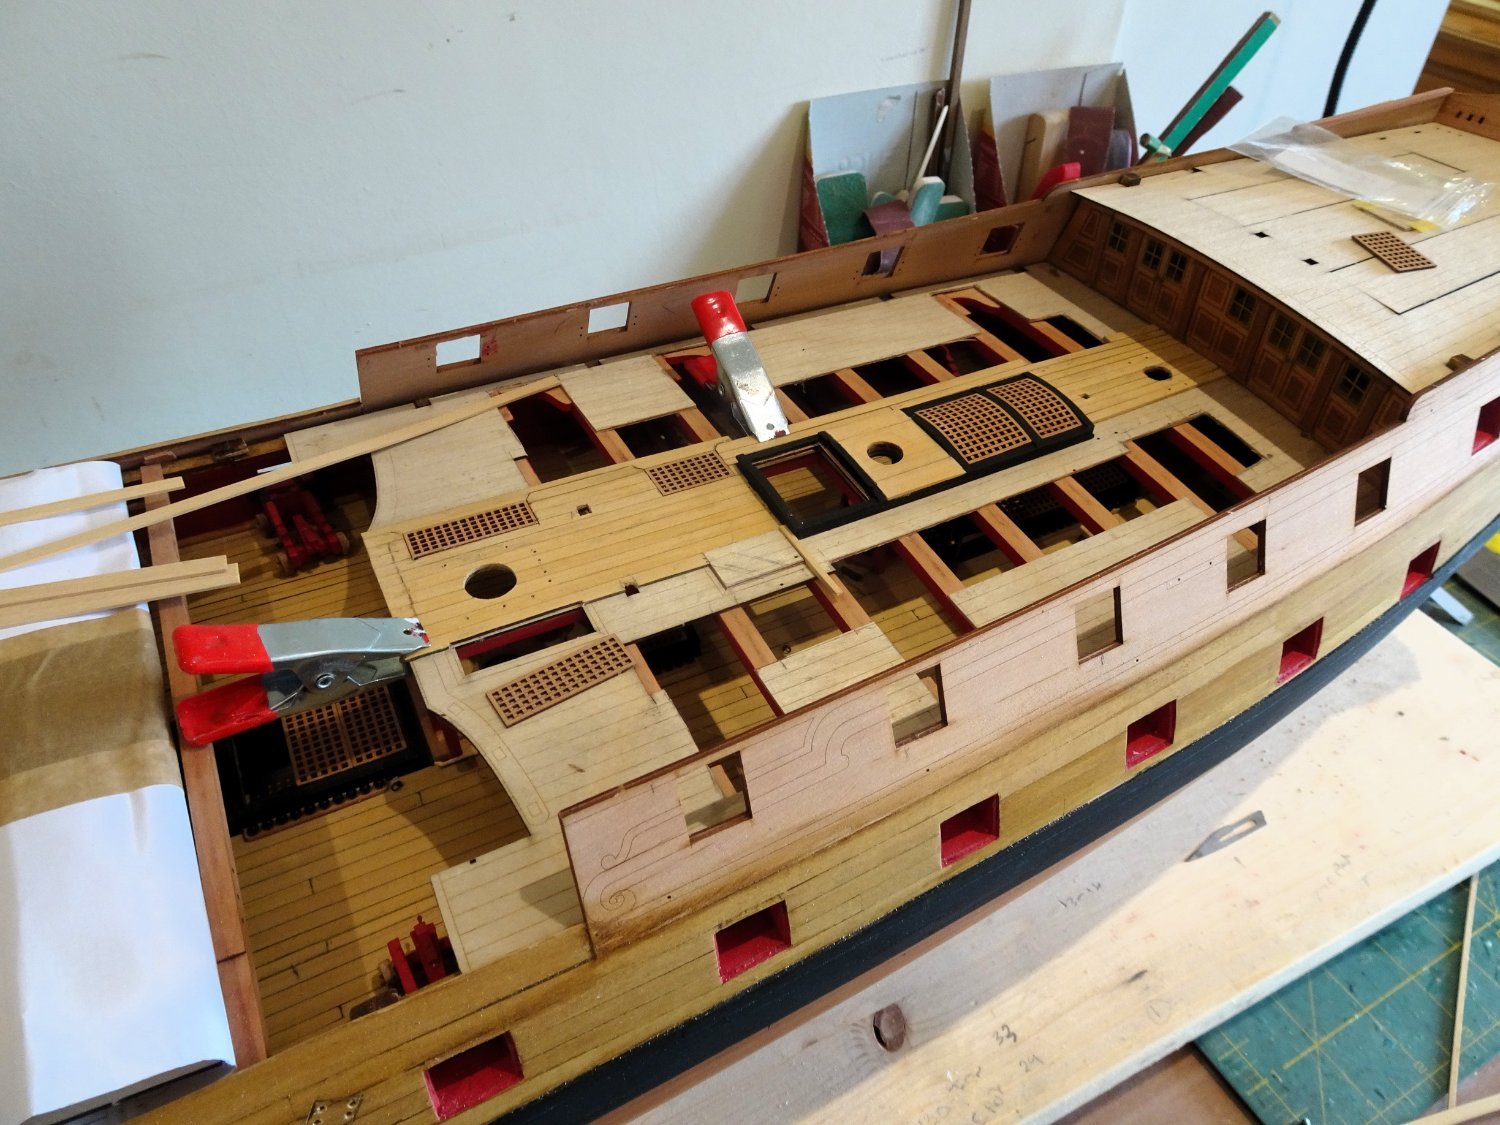
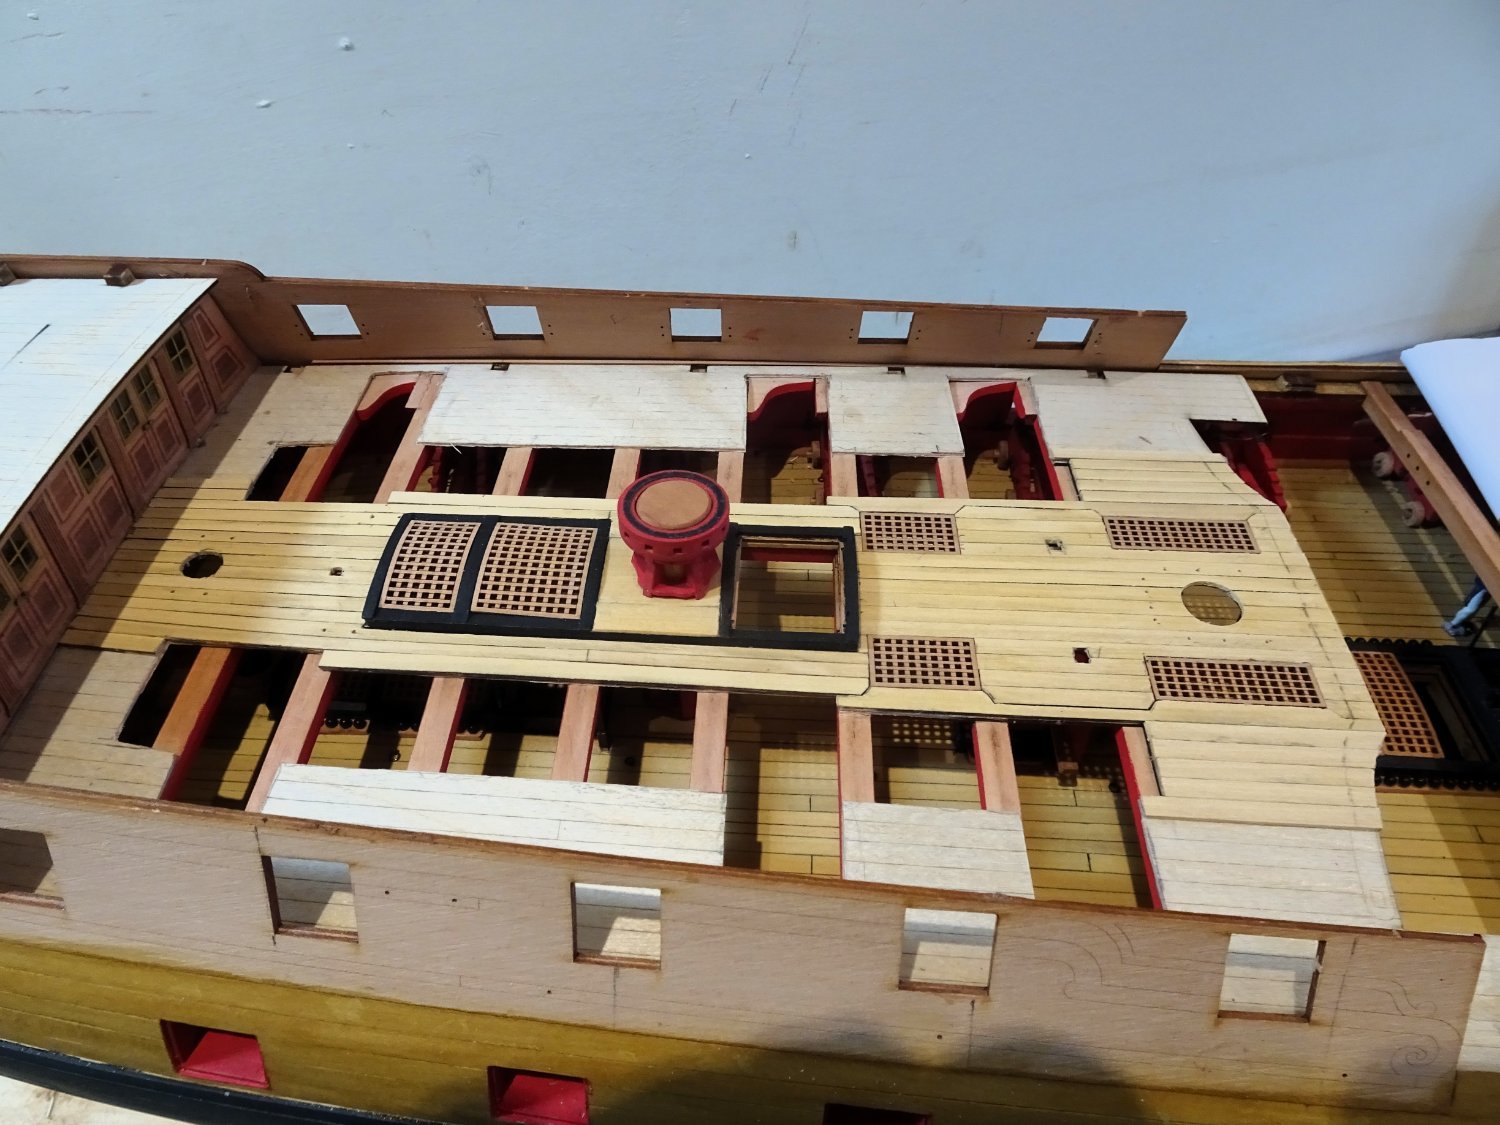
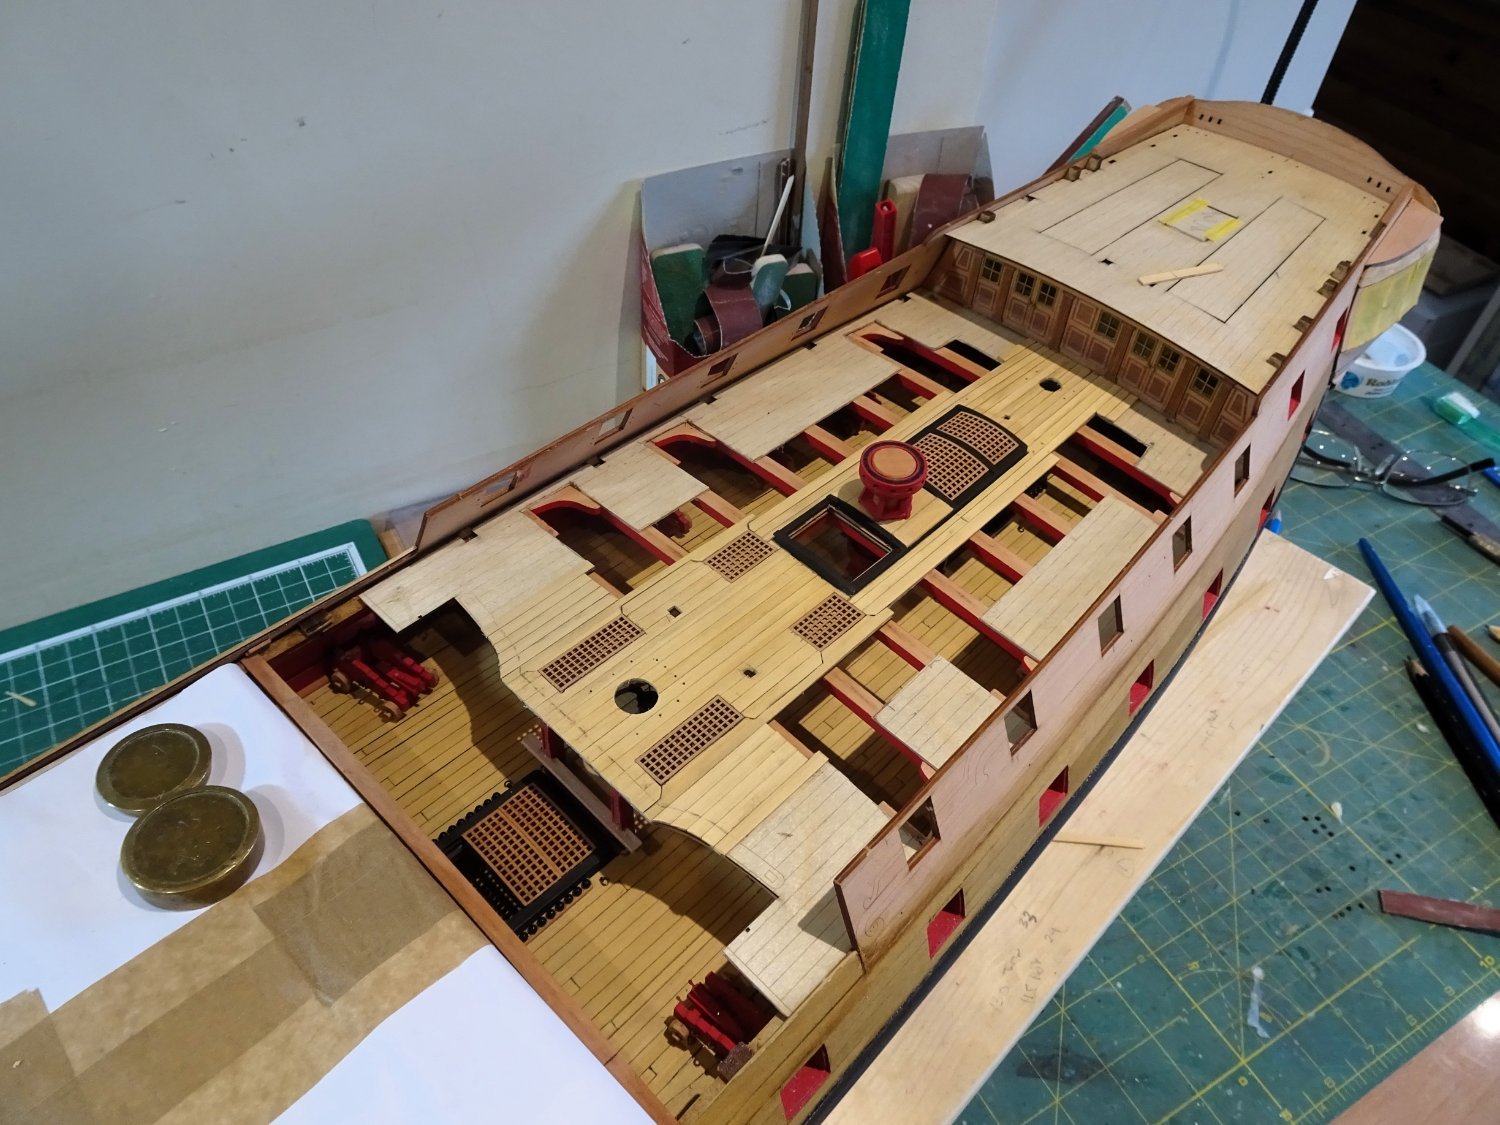
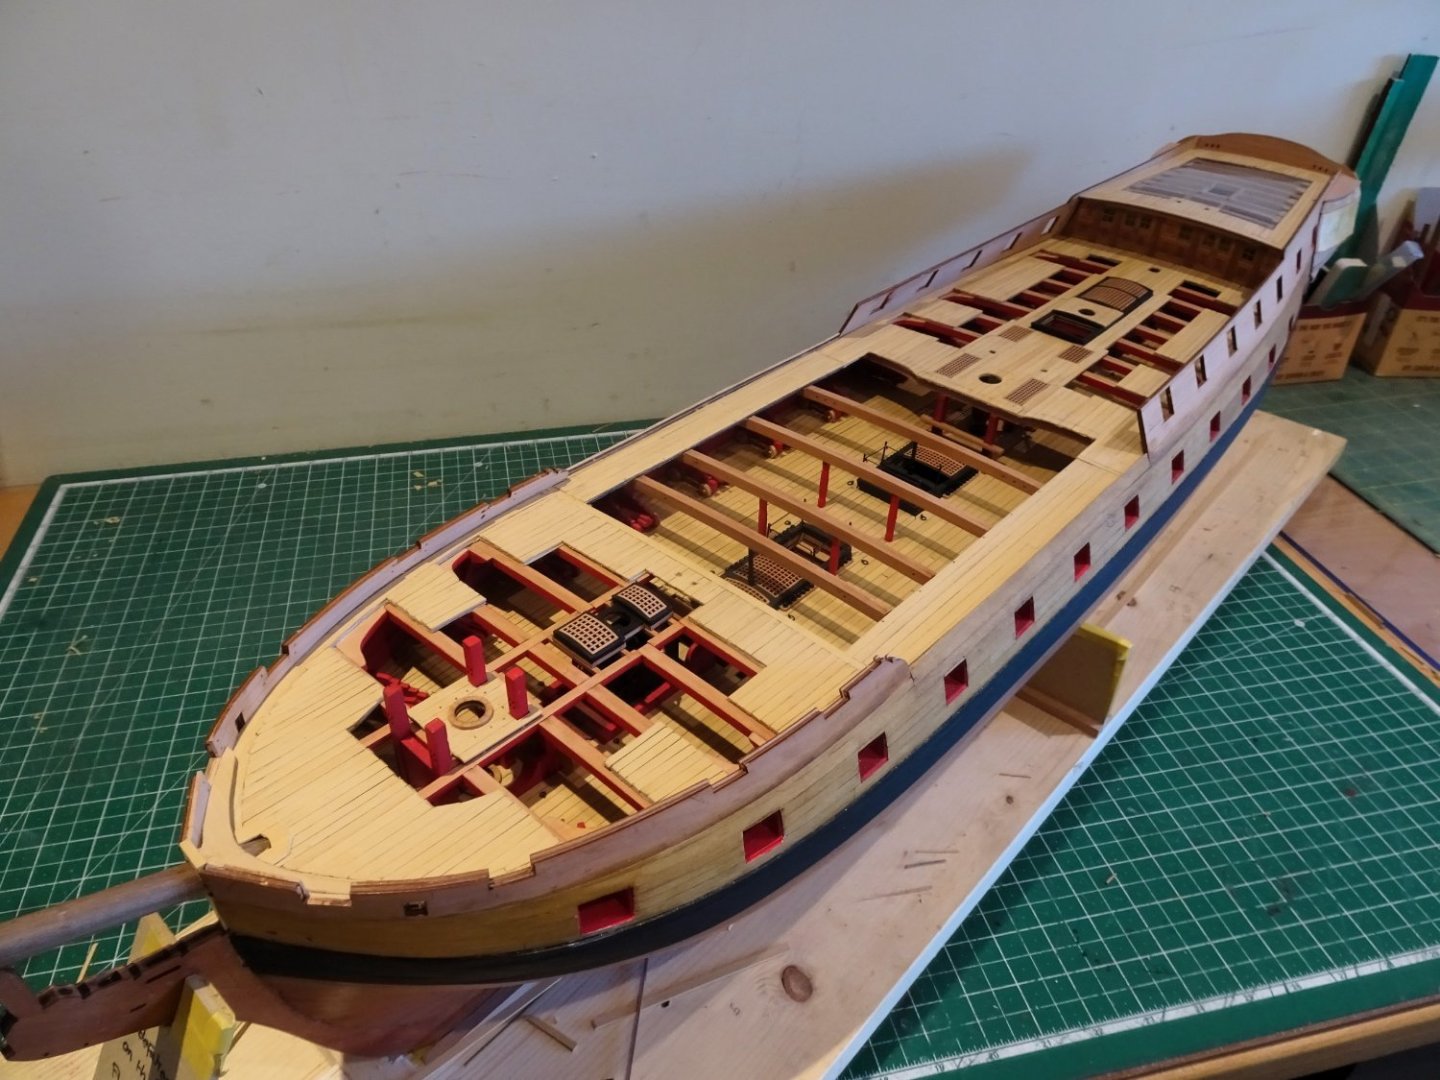
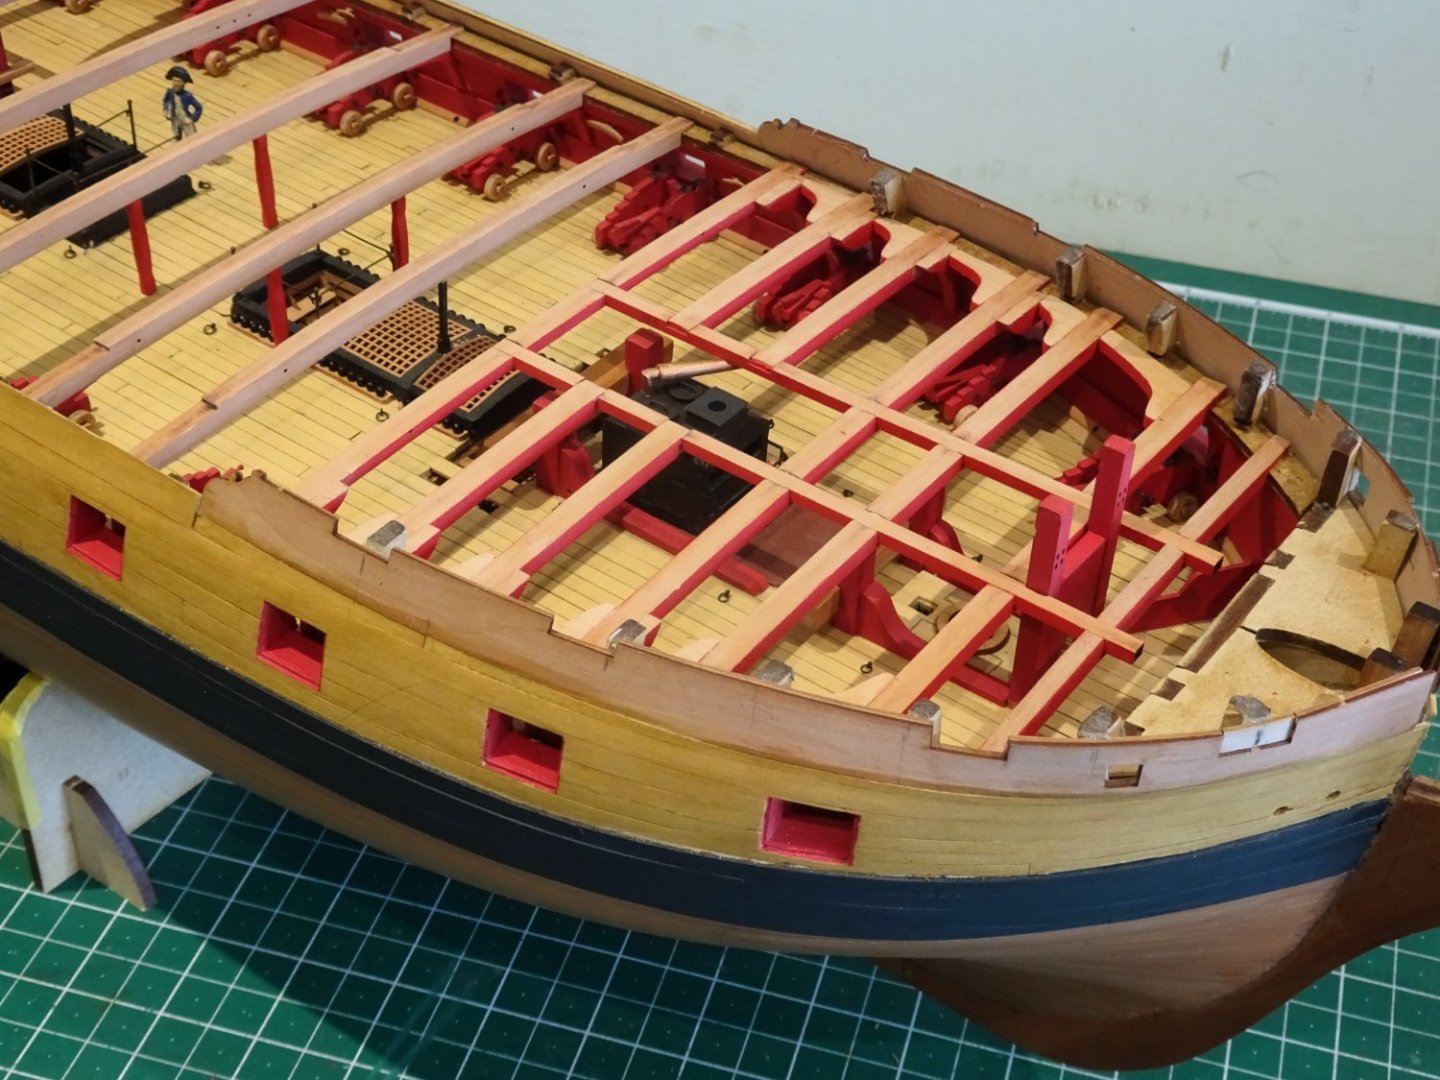
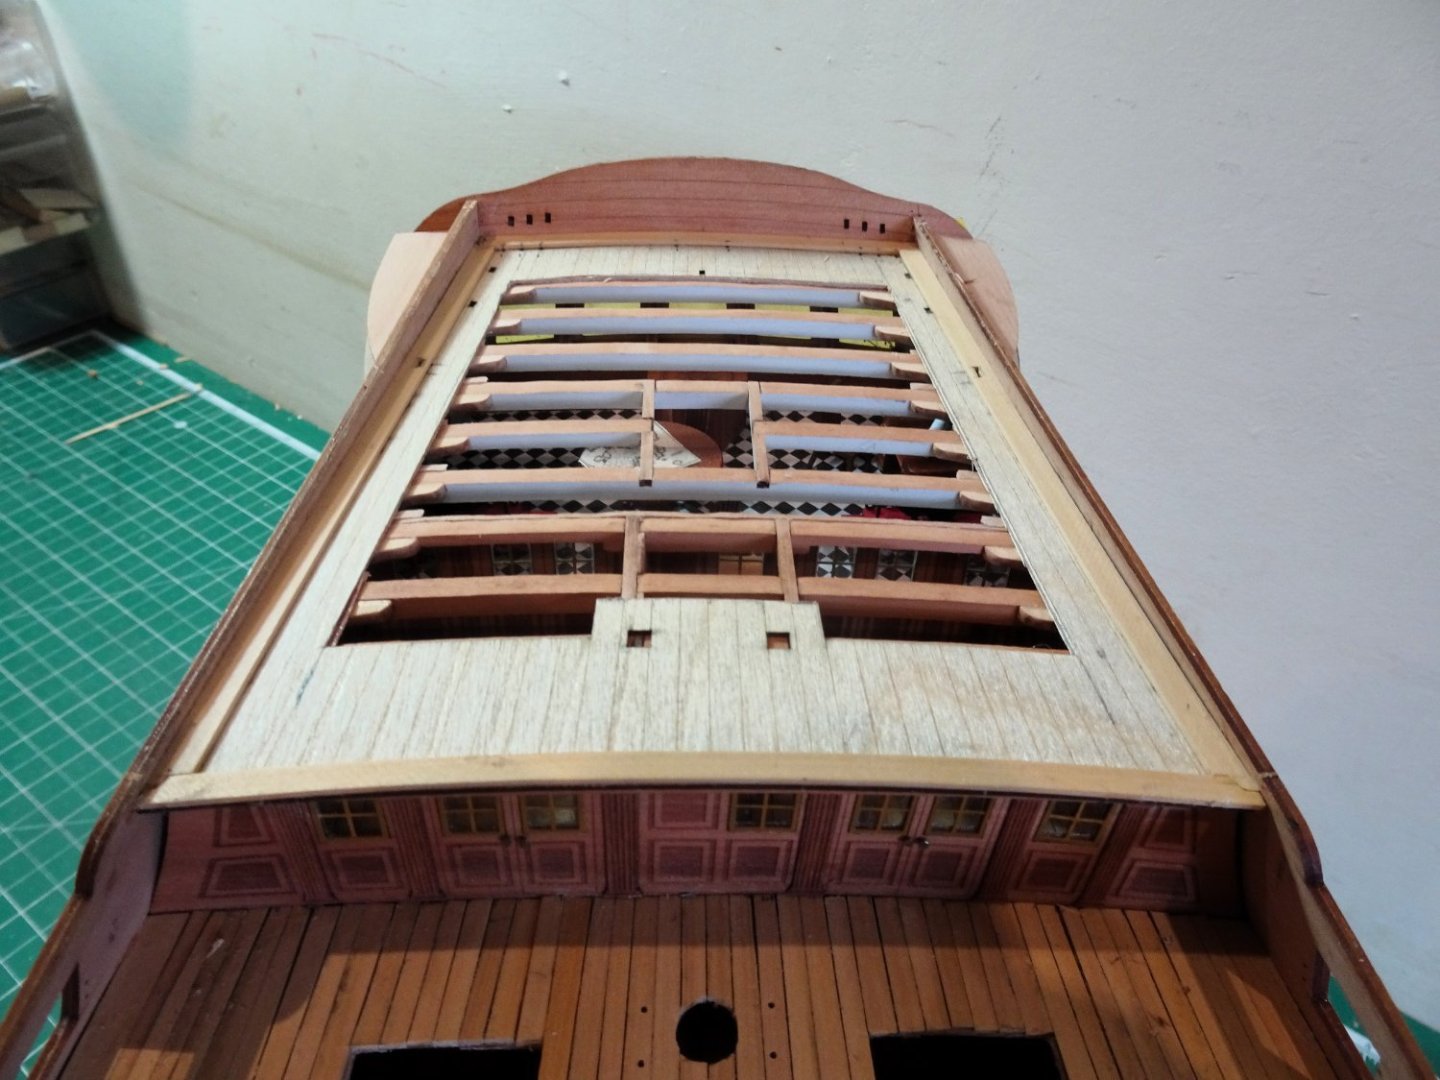
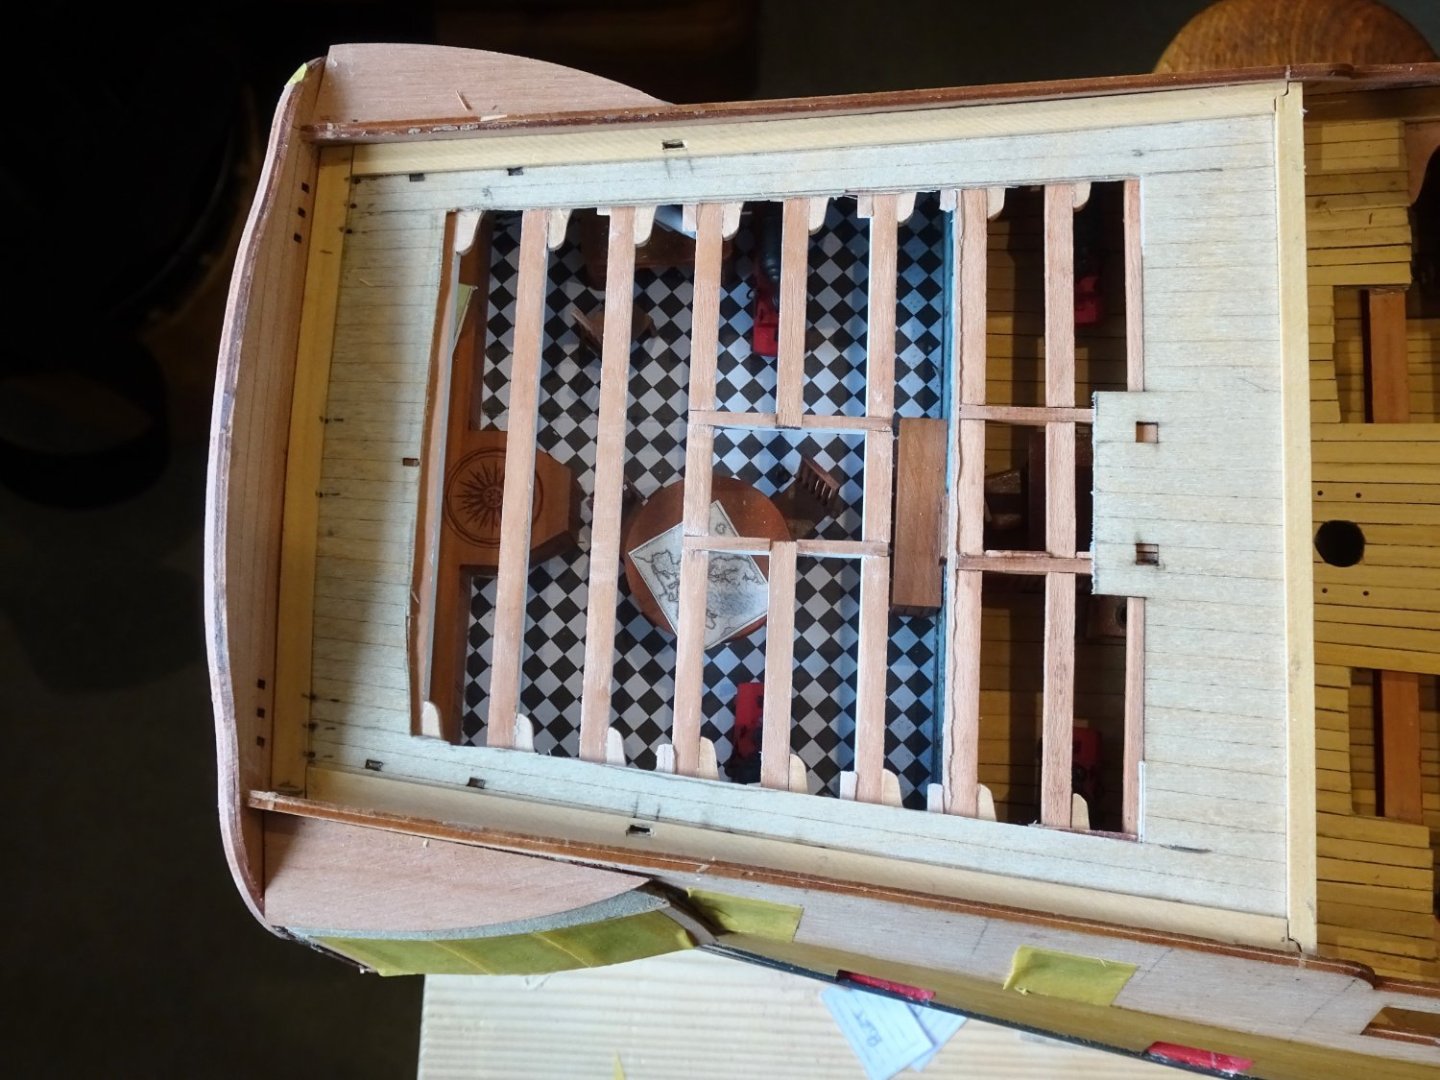
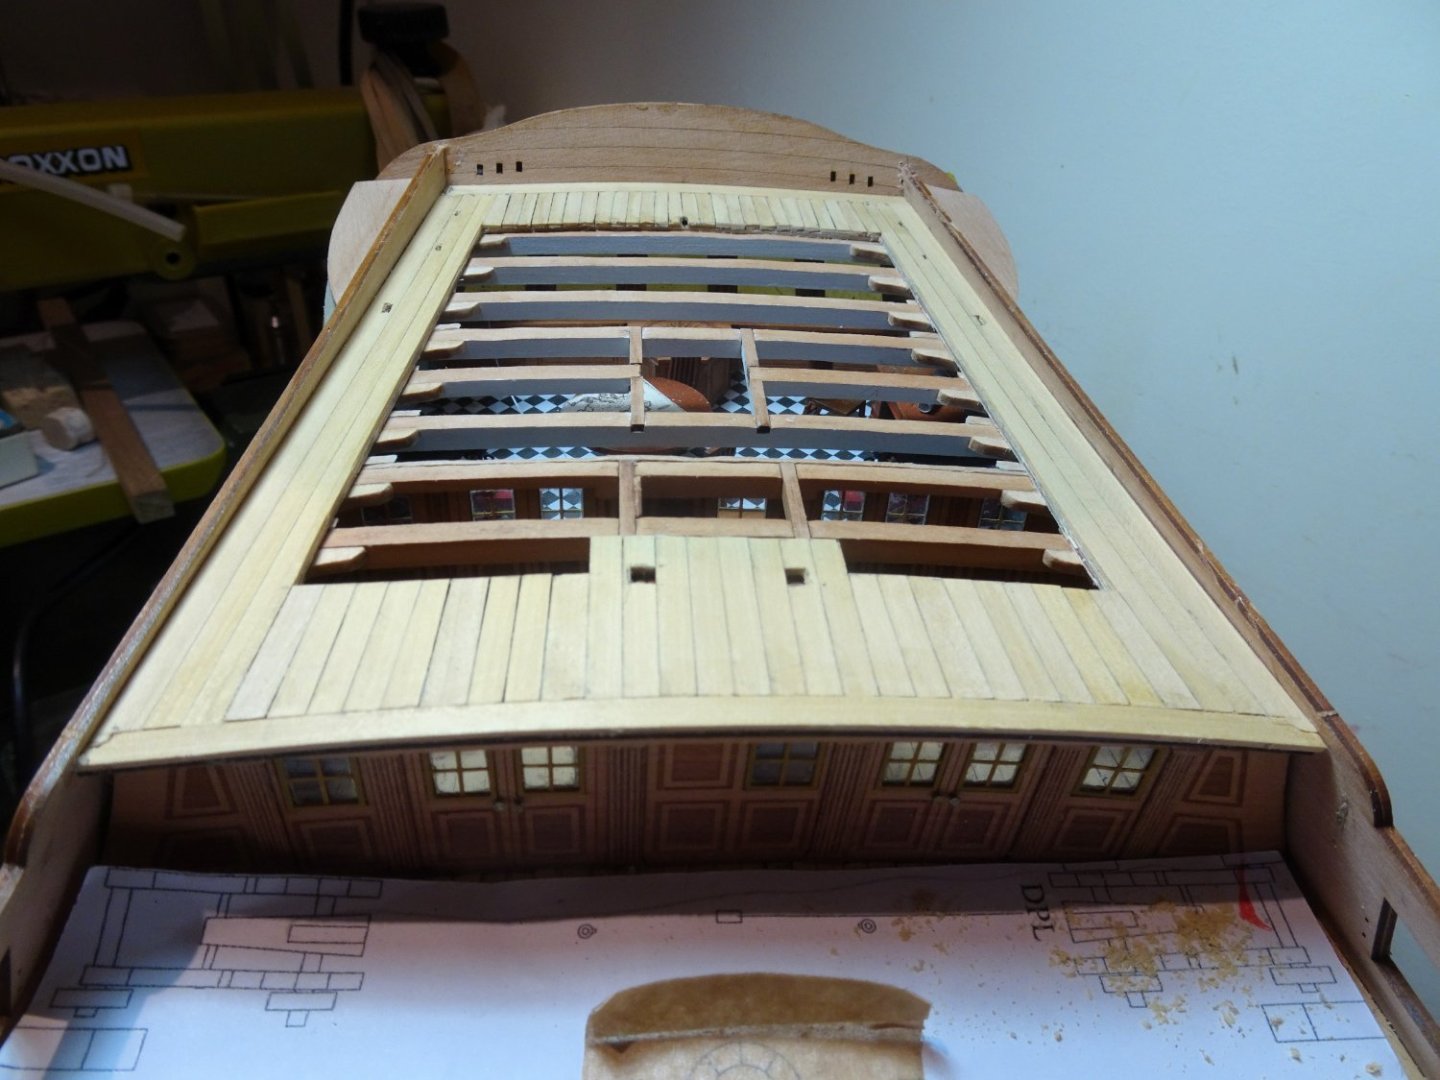
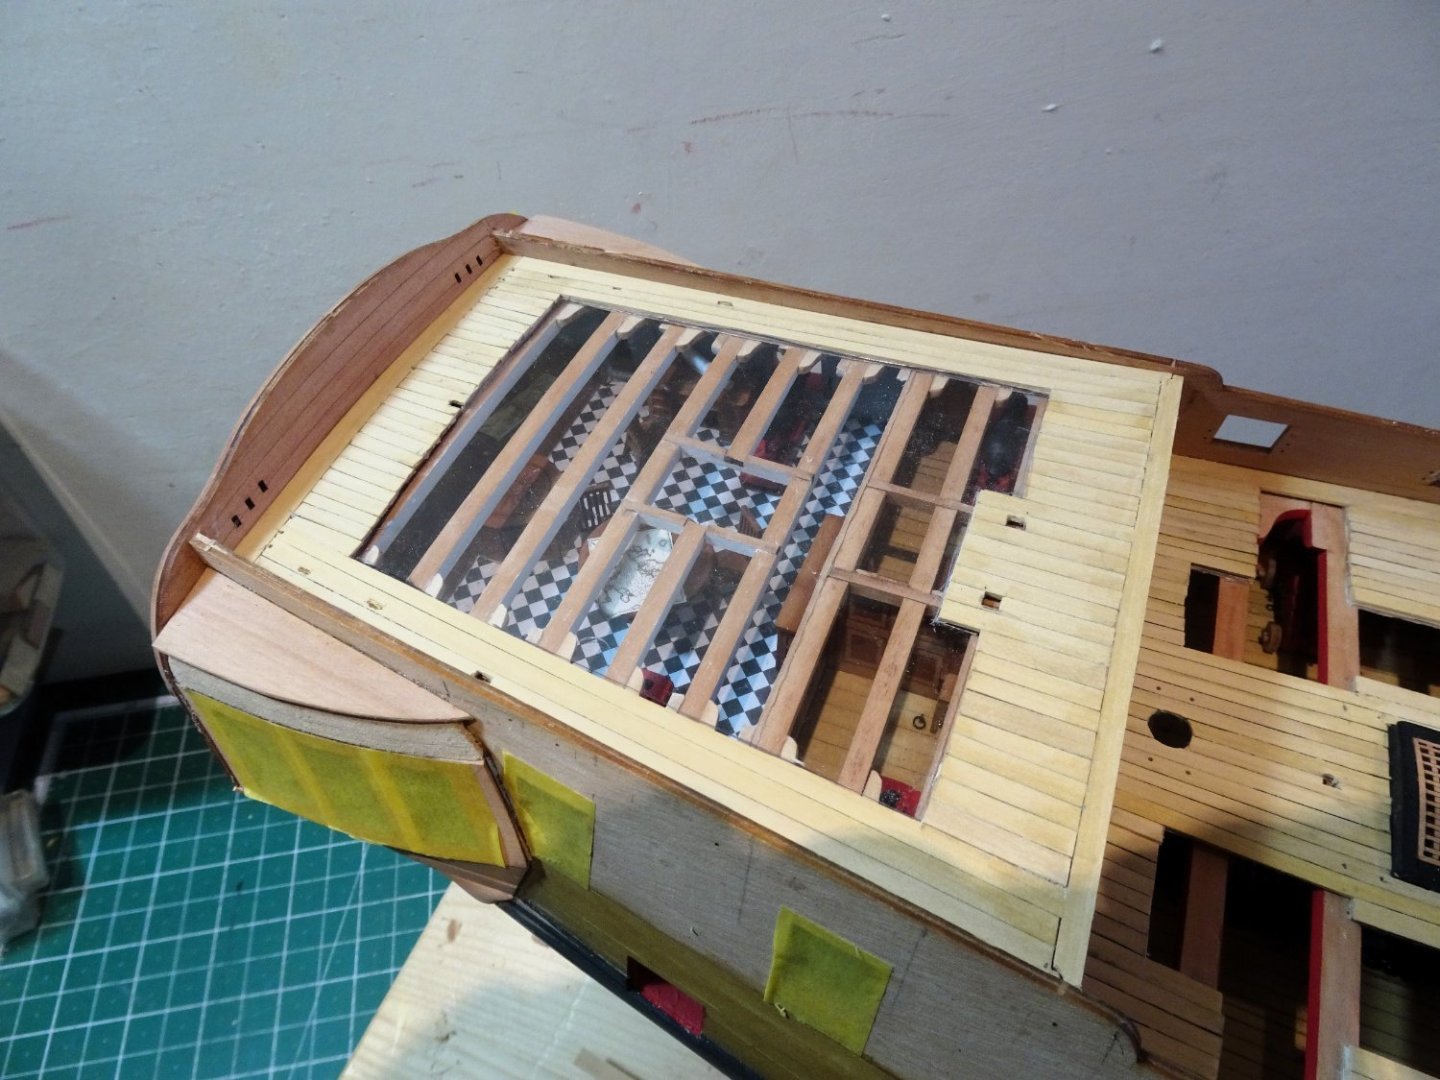
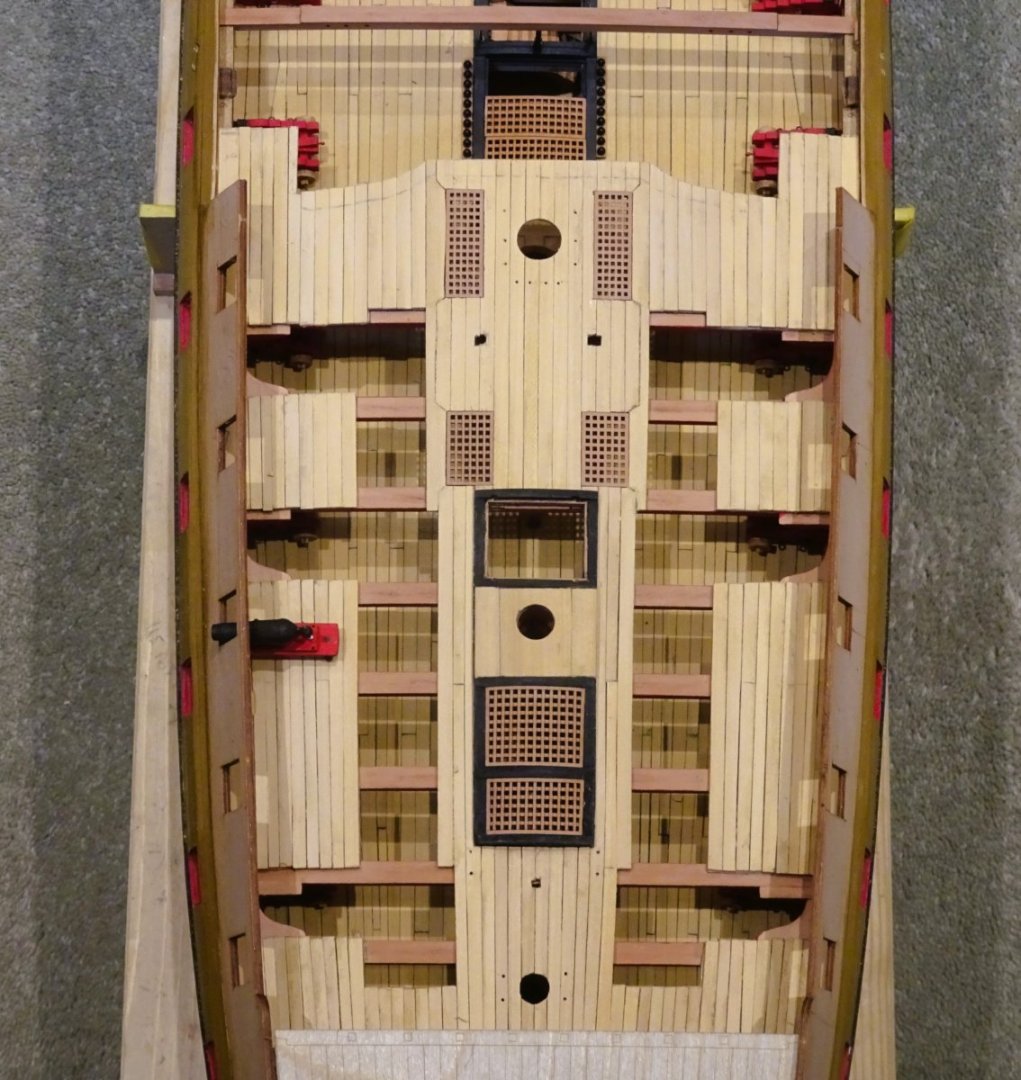
Post One Hundred and one Poop deck As with the other decks I have left very little planking to be done. My aim is to maximise the view of all that wonderful detail that Chris has provided in the cabins below. 2591 2592 With the sub-deck modified and secured, planking can begin. I start with the margins using 5mm strip. 2597 2599 The remaining planking is straightforward, the worst part fitting some (26) 15mm tapered lengths along the taffarel. 2604 2605 I have taken the pre-caution of fitting an acetate cover for the poop to keep the worst of the dust out whilst the build continues. 2601 Whilst I’m on a roll I think I will carry on and plank the Foc’sle and Gangways. B.E. 31/10/2023


- 648 replies
-
- 33
-
-
-
- Indefatigable
- Vanguard Models
- (and 1 more)
-
Nice work David, she's looking very smart.👍 I have a soft spot for cutters and may well end up buying this one myself, once I've done with the behemoth. The rudder coat looks good, tricky little beggars to make and fit. As for the tiller coat, so long as it covers the aperture, I don't think shape is that important, and yours looks quite stylish. B.E.
- 152 replies
-
- 5
-
-
- Vanguard Models
- Cutter
- (and 2 more)
-
Very nice work Richard, another sweet model to add to your paper Navy. Well done. B.E.
- 18 replies
-
- 2
-
-
- Pevensey
- World of Paperships
- (and 2 more)
-
Well done Cisco, a very neat fix, as I've said before I like your approach. ... and your Acanthus leaf carving looks excellent. 👍 Regards, B.E.
-
Enjoy the build, Sphinx is a great kit, but can be tricky in places. I think you need to move your log to the 1751-1800 section, it will get lost in the 1500 time period. Cheers, B.E.
-
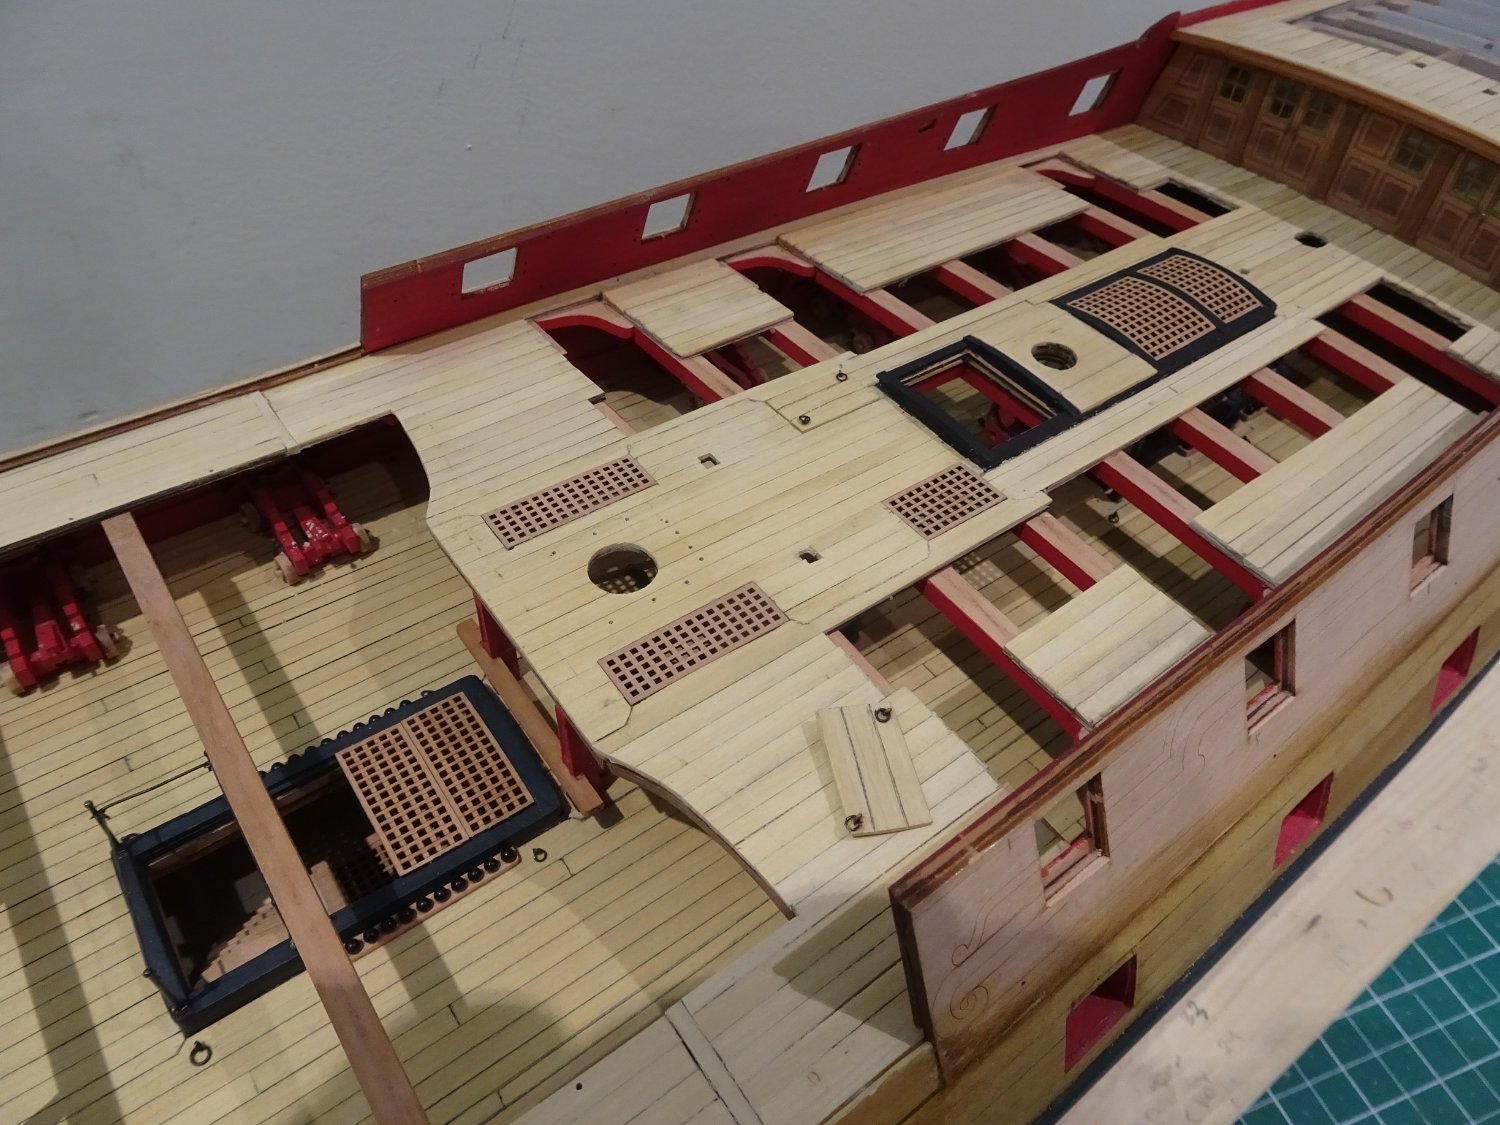
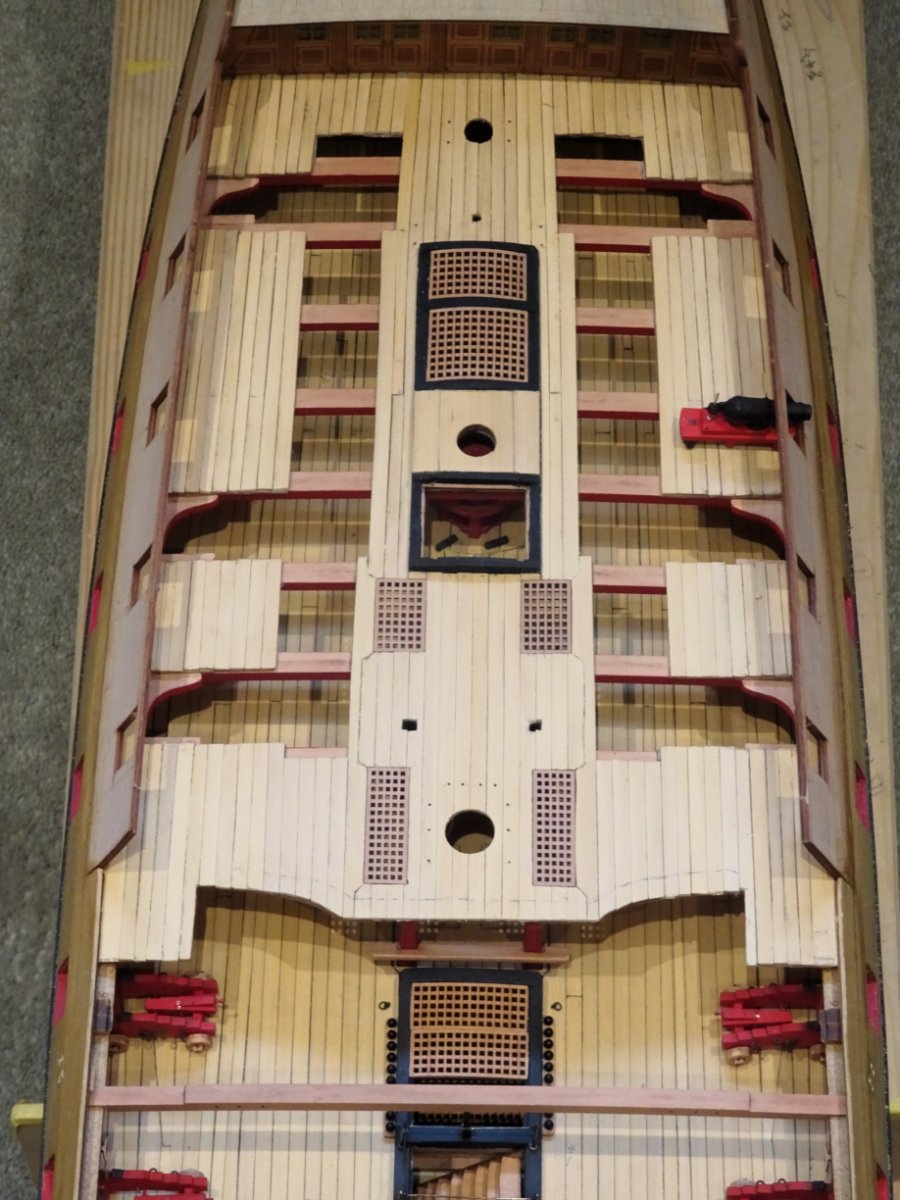
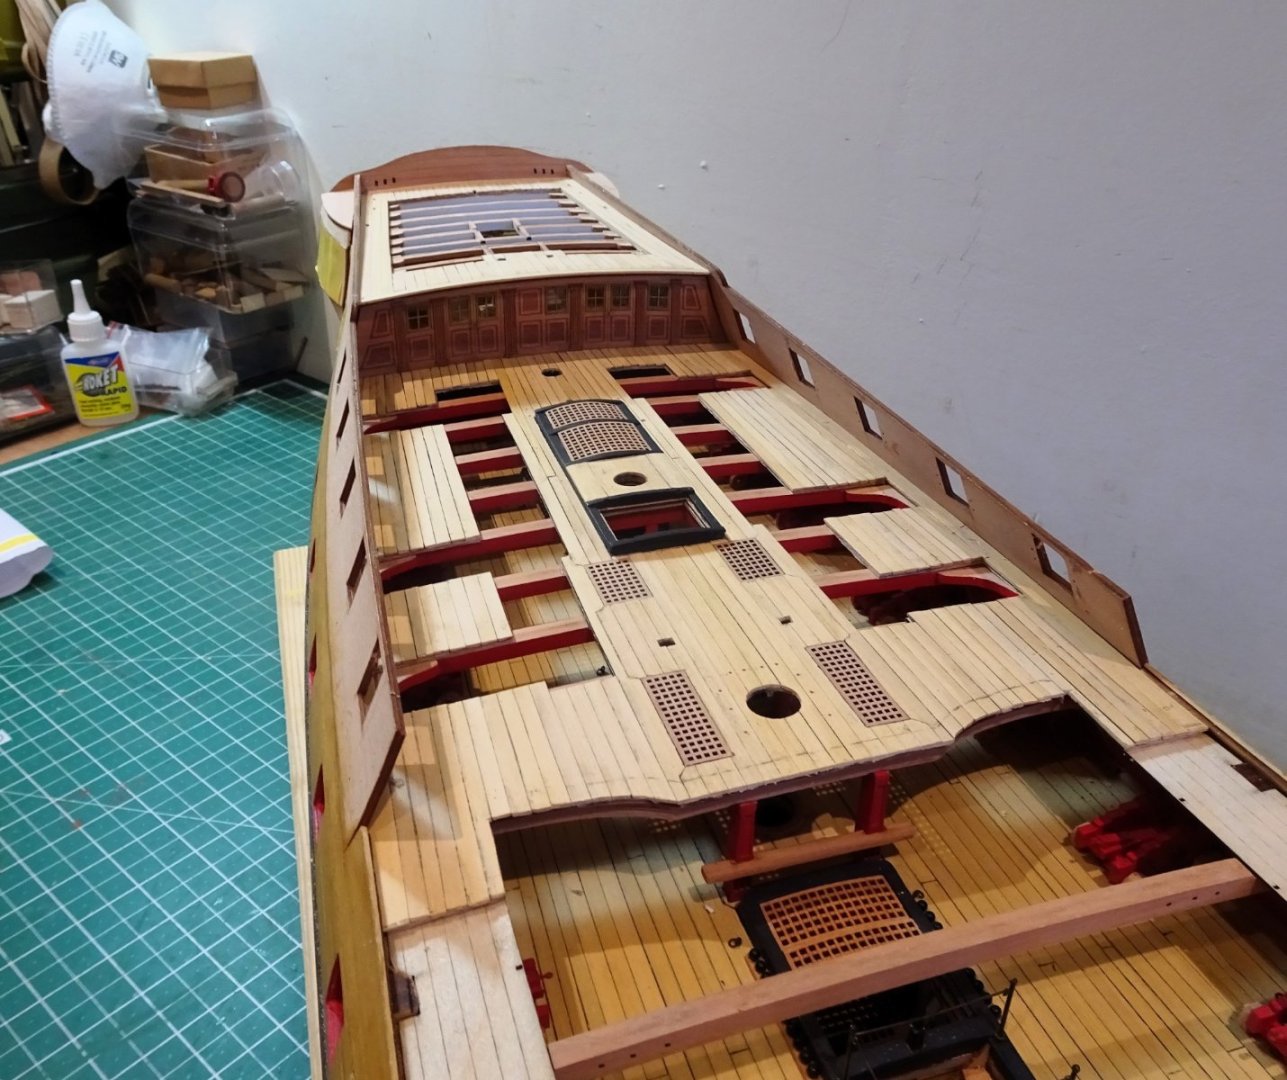
Post One Hundred QD planking cont’d I next fit the Margin planks using 6mm x 1mm Box. This covers the rough edges where the bulkhead tops still show. Fortunately, the curve is soft enough to allow an edge bend even with timber this broad. For the remaining planks I followed the etched design on the sub-deck as far as possible. This involves a degree of taper as the strakes run aft. Three days works sees the completion, and I’m fairly content with the result. 2575 2551 2554 2569 2580 2584 2585 Still work to do, deck scraping and tidying up before the inner bulwarks are fitted. At this stage clearing dust and debris from the Upper deck is a constant issue. At least with this amount of open space, I can get to remove it. B.E. 28/10/2023


- 648 replies
-
- 30
-
-
-
- Indefatigable
- Vanguard Models
- (and 1 more)
-
Compared to the kit provided Amati guns, these are the definitive article, and any difference to the Armstrong pattern guns at this scale is not worth the mention. I used them on my Pegasus build and they are pretty close to scale, and look good. These days we have the luxury of resin versions for choice. B.E.
- 49 replies
-
- 3
-
-
- Pegasus
- Victory Models
- (and 1 more)
-
Blimey Glenn, you make me blush, I don’t consider myself more worthy, whatever that means. Any worth in pursuing our interest is surely the satisfaction we derive, and the desire to get better, whatever our level of experience. If you’re enjoying it it’s worth it. Cheers, B.E.
- 648 replies
-
- 10
-
-
- Indefatigable
- Vanguard Models
- (and 1 more)
-
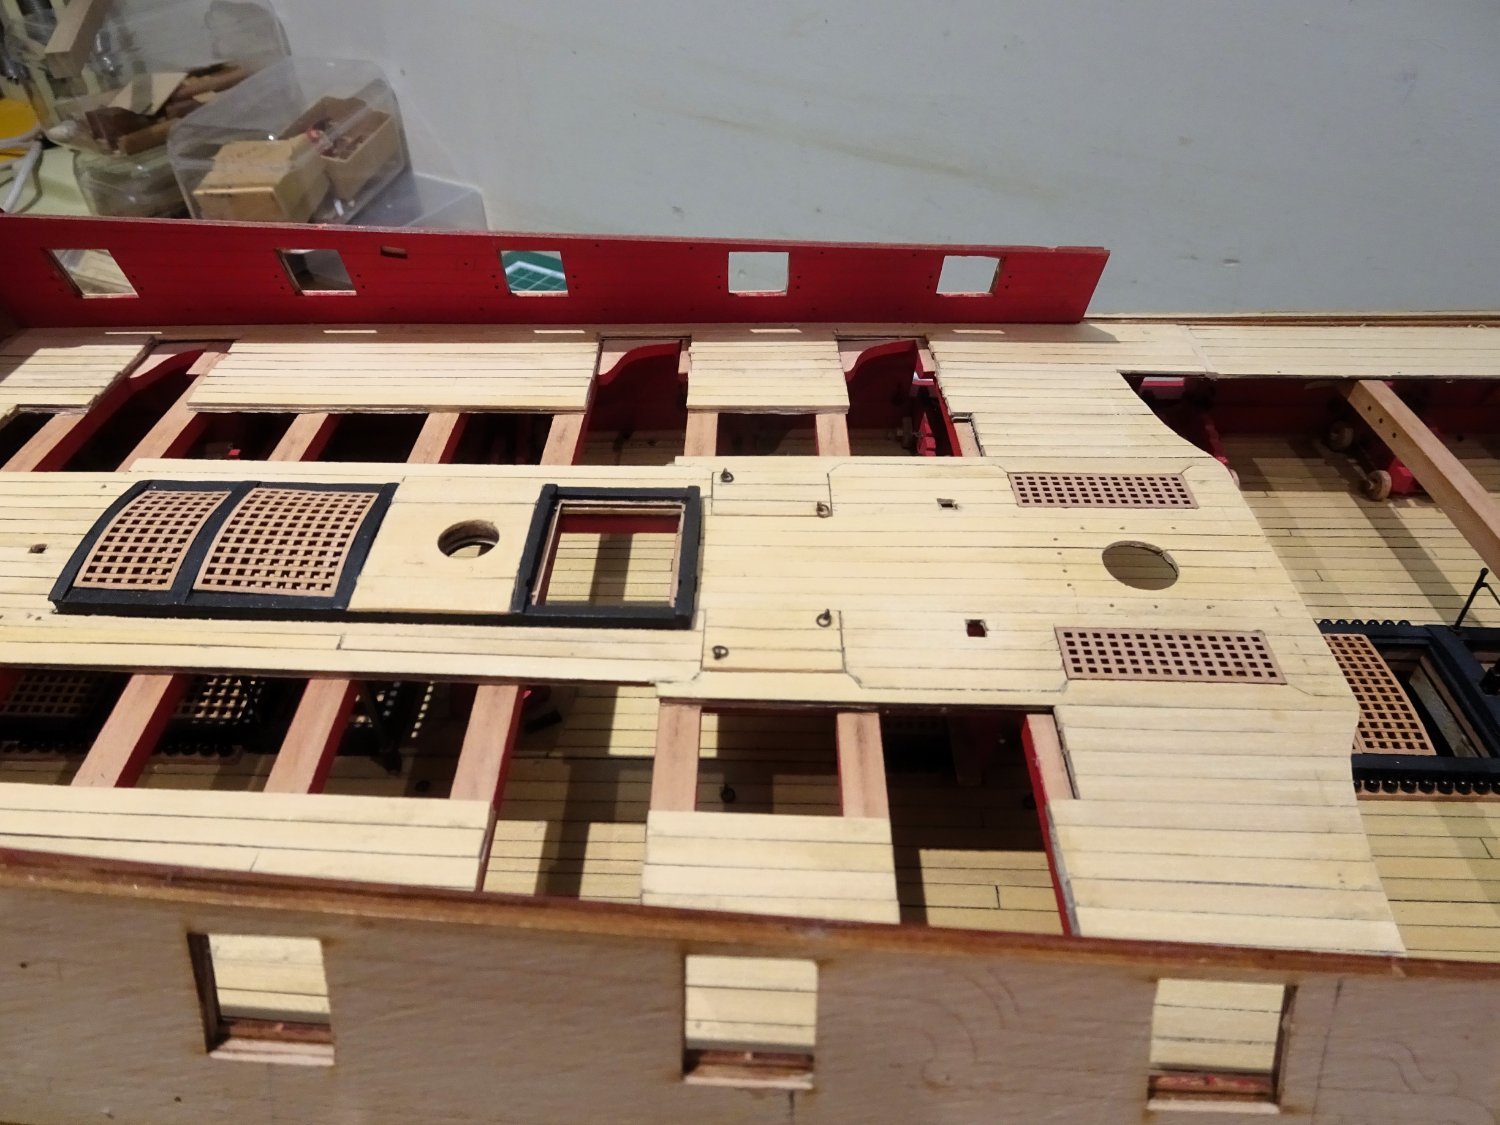
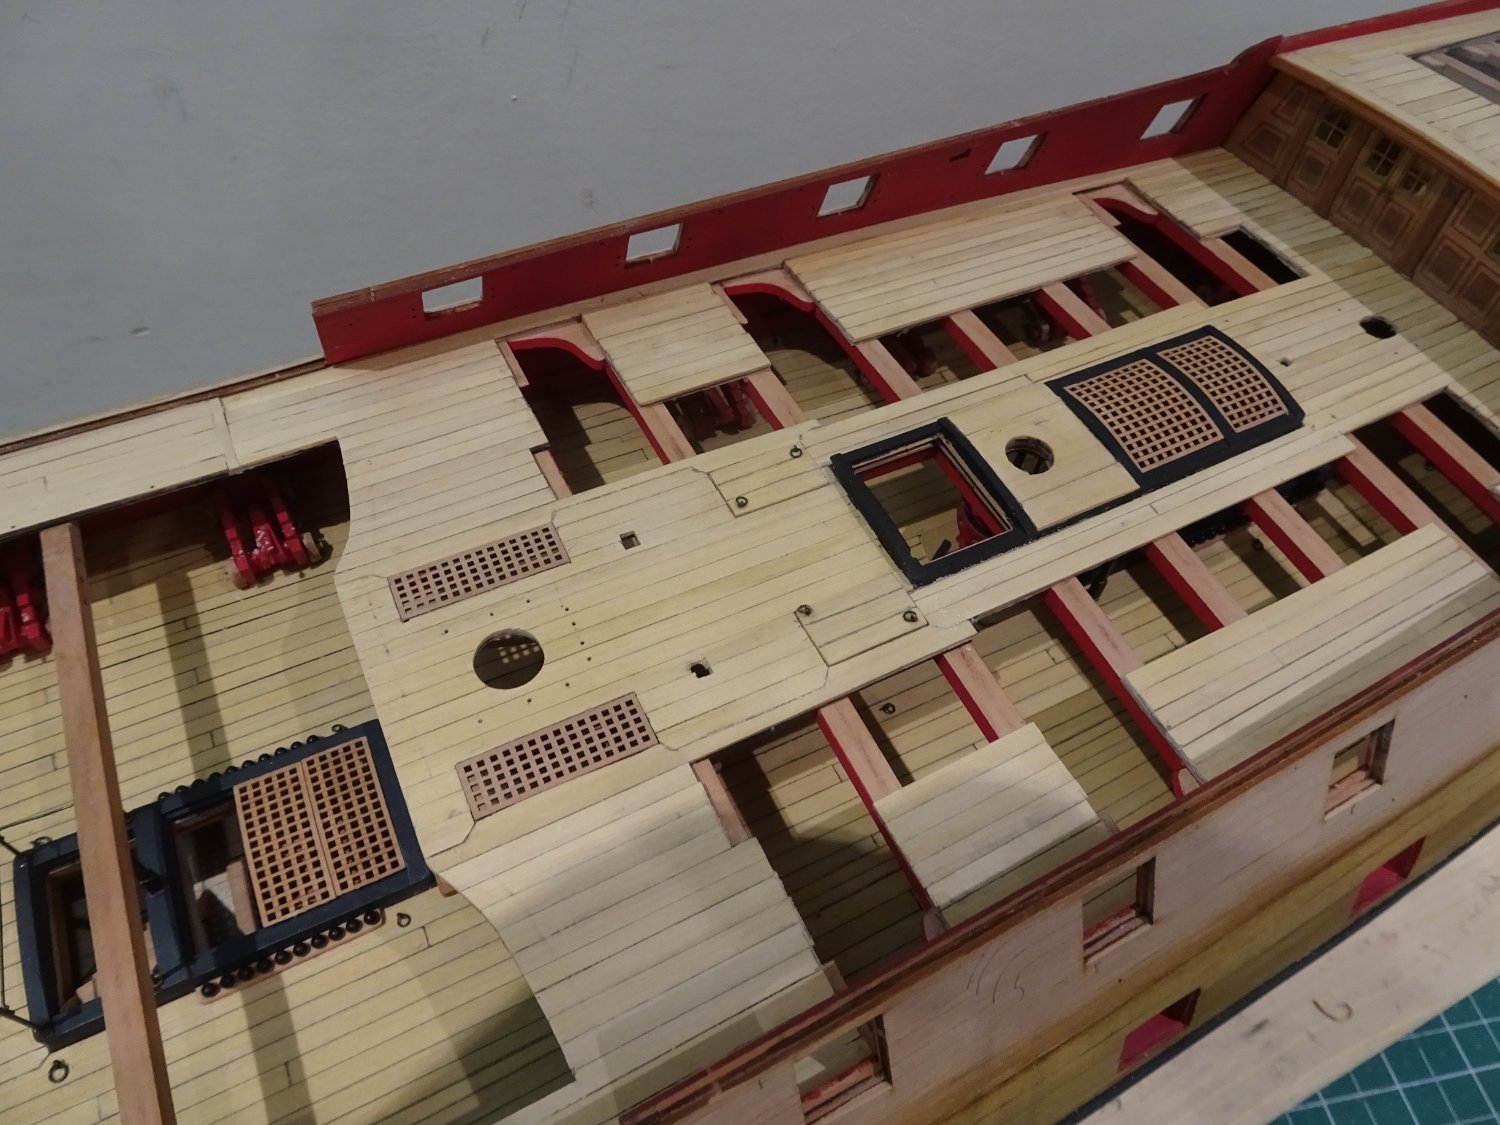
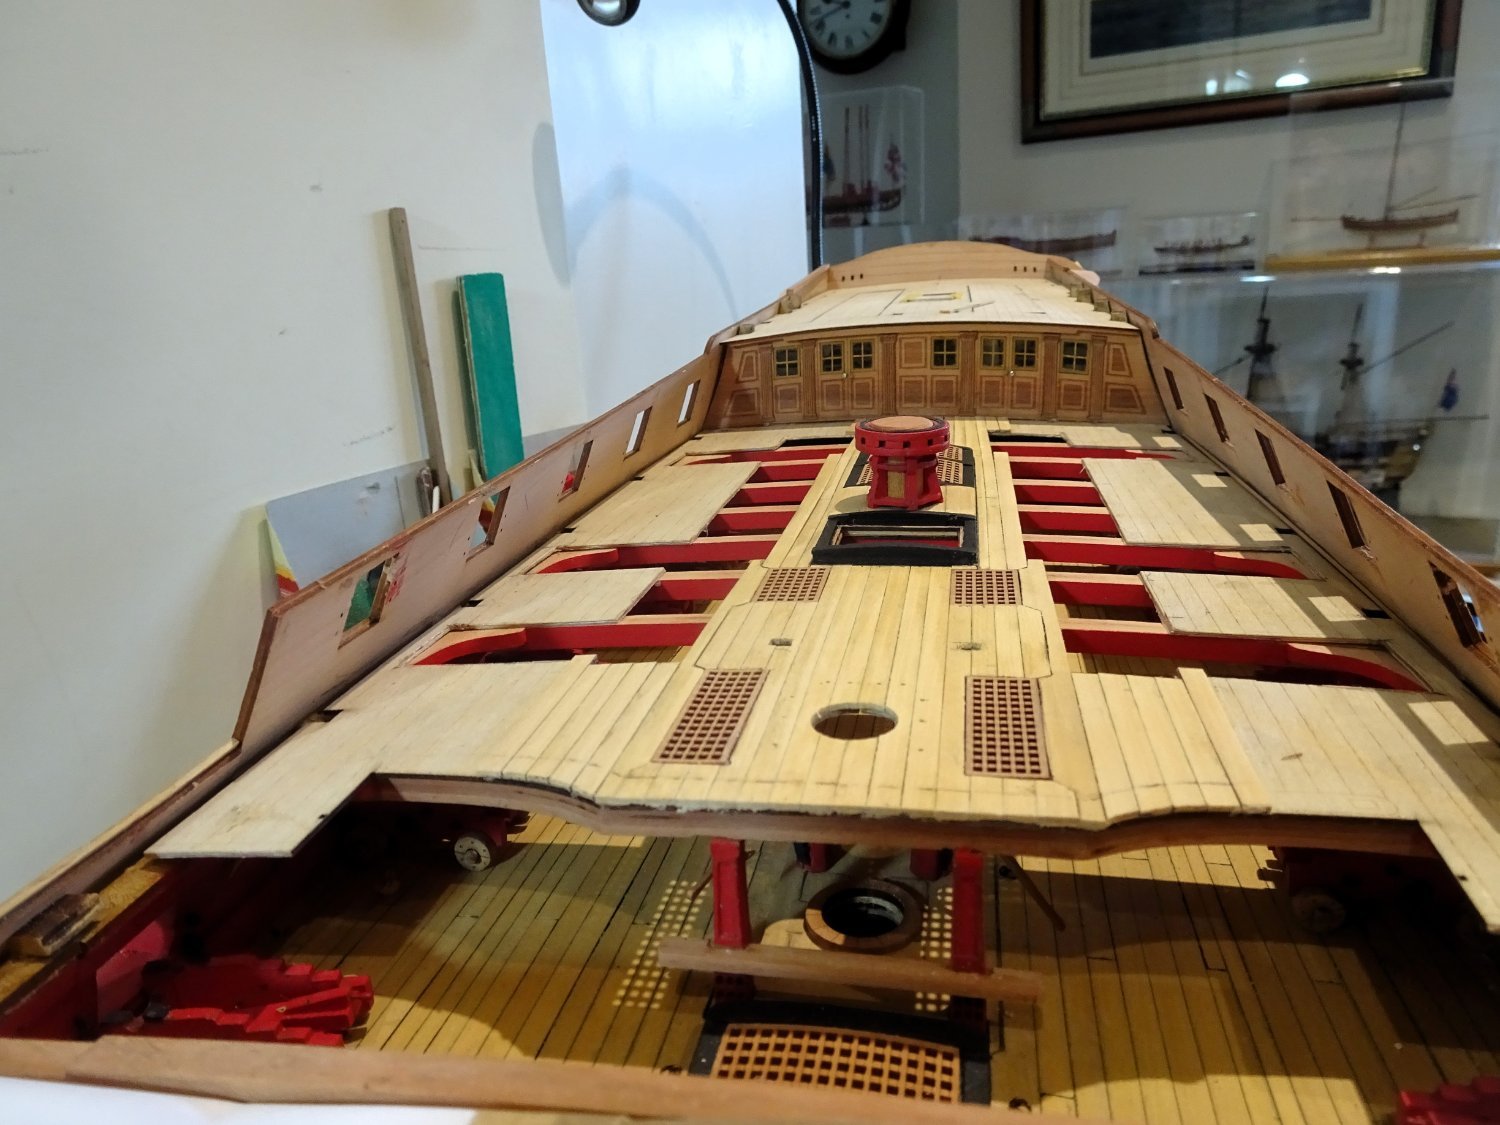
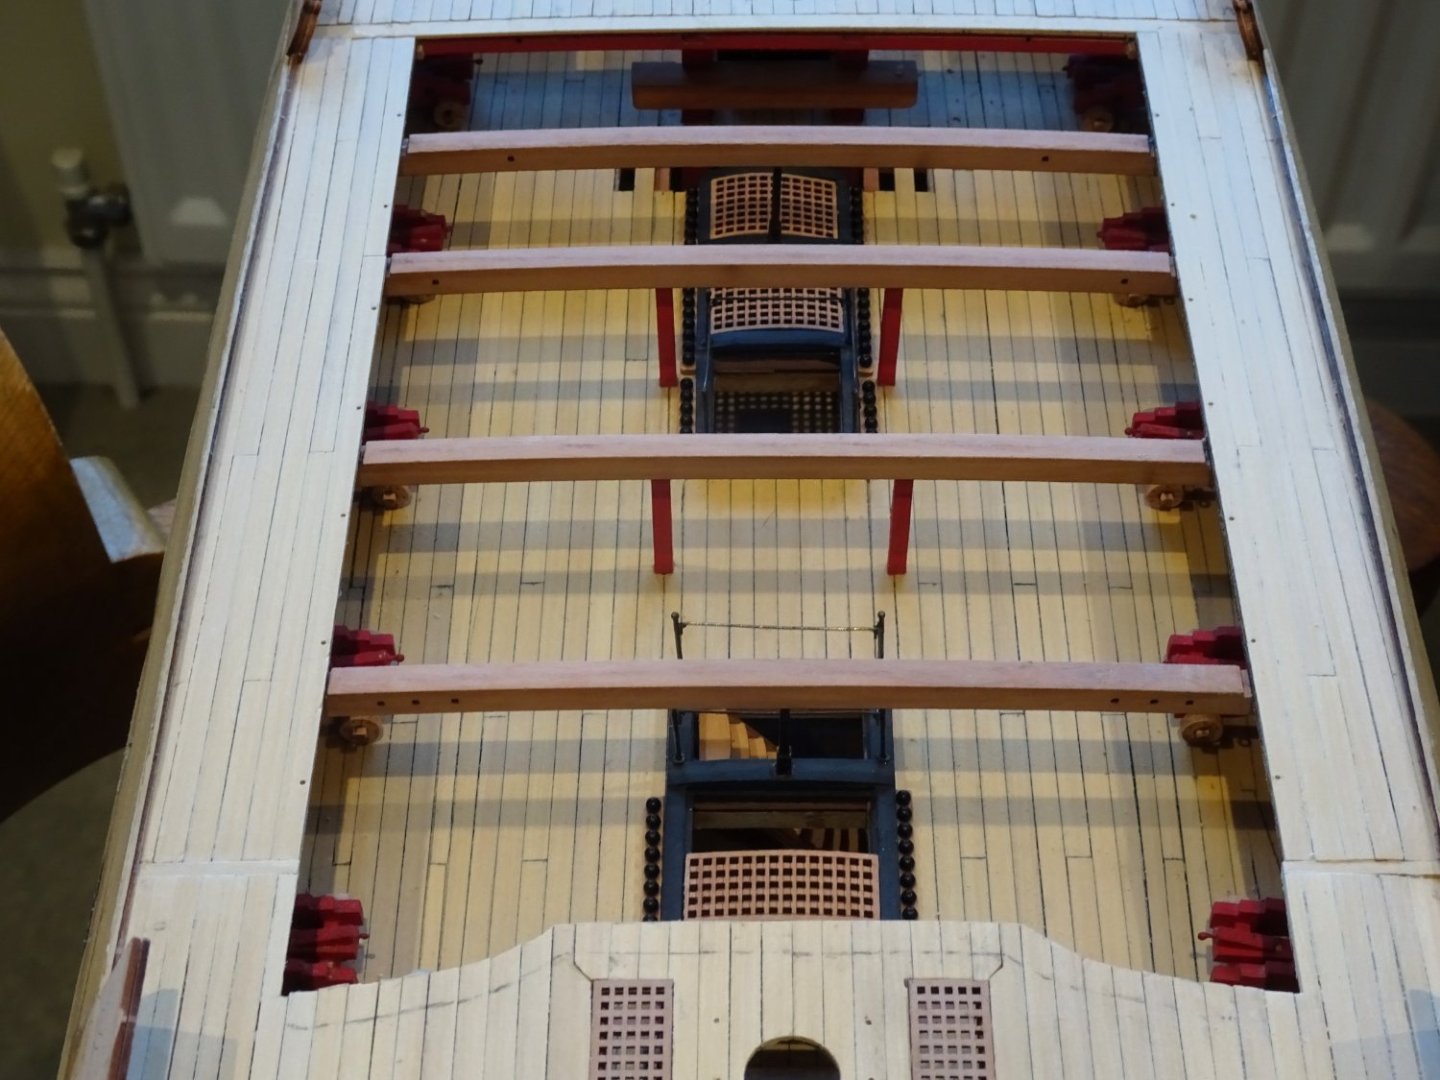
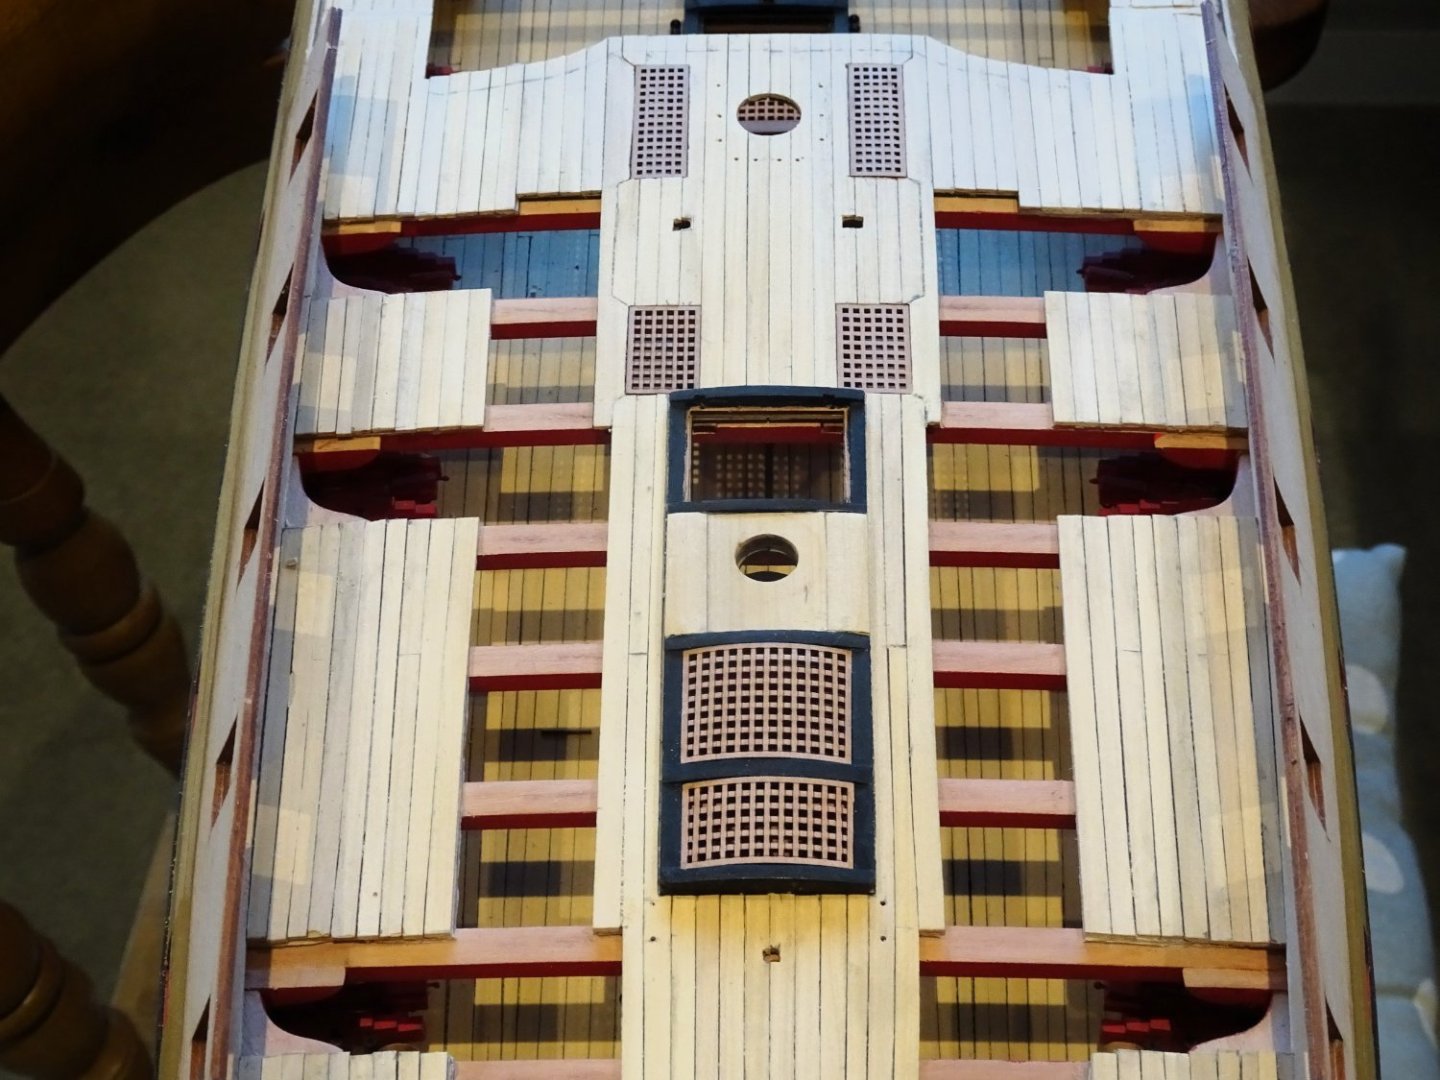
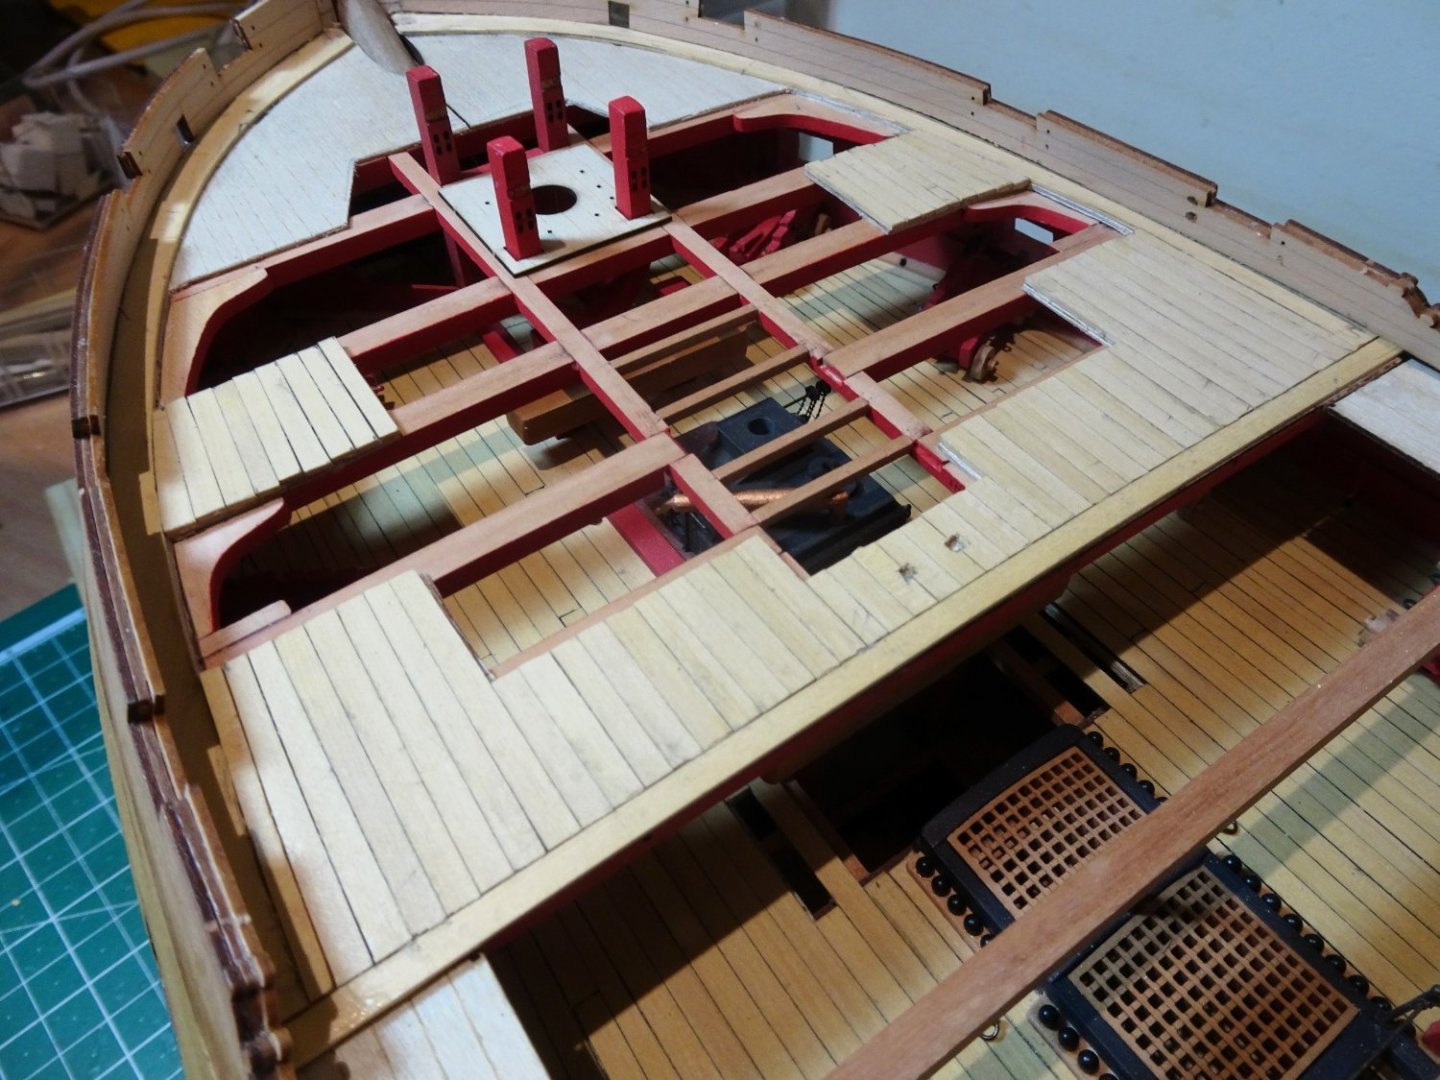
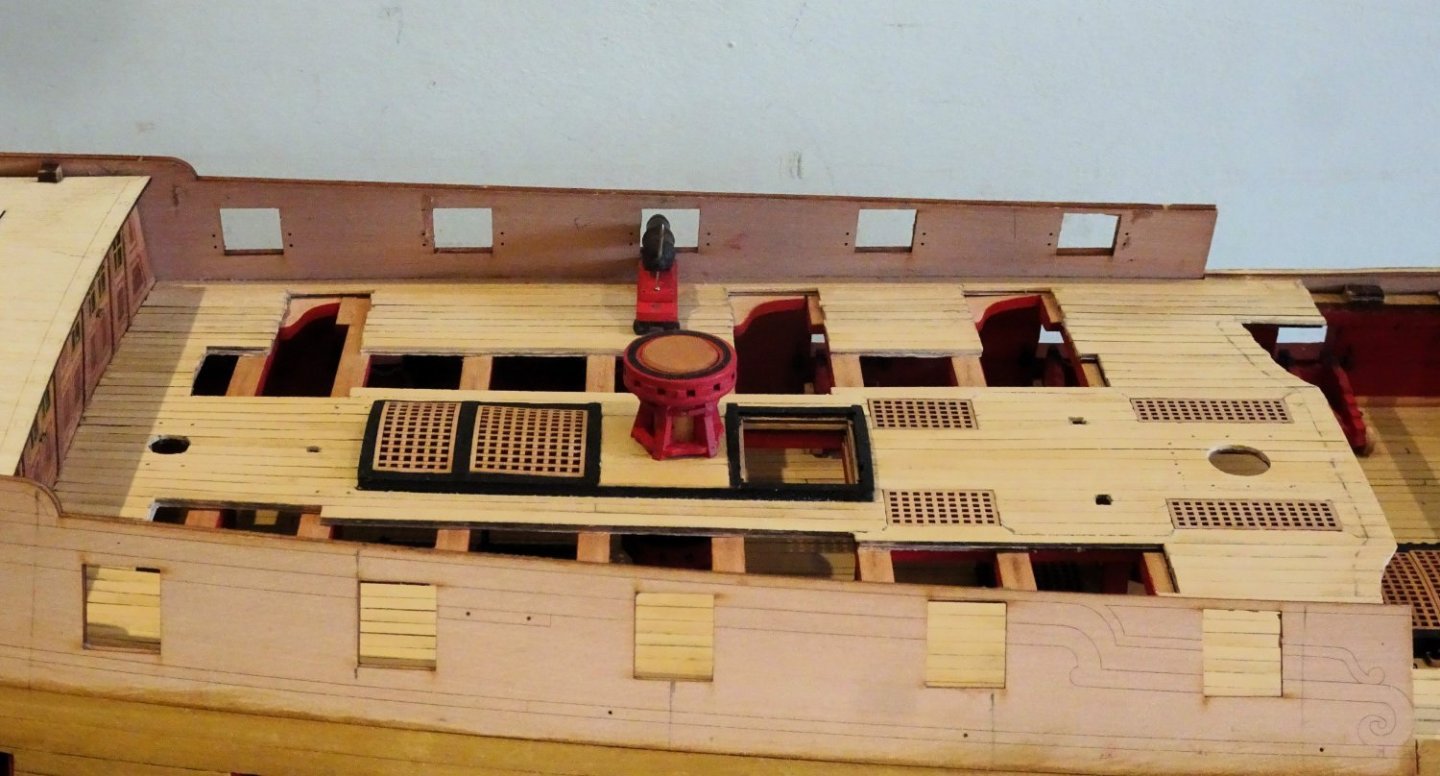
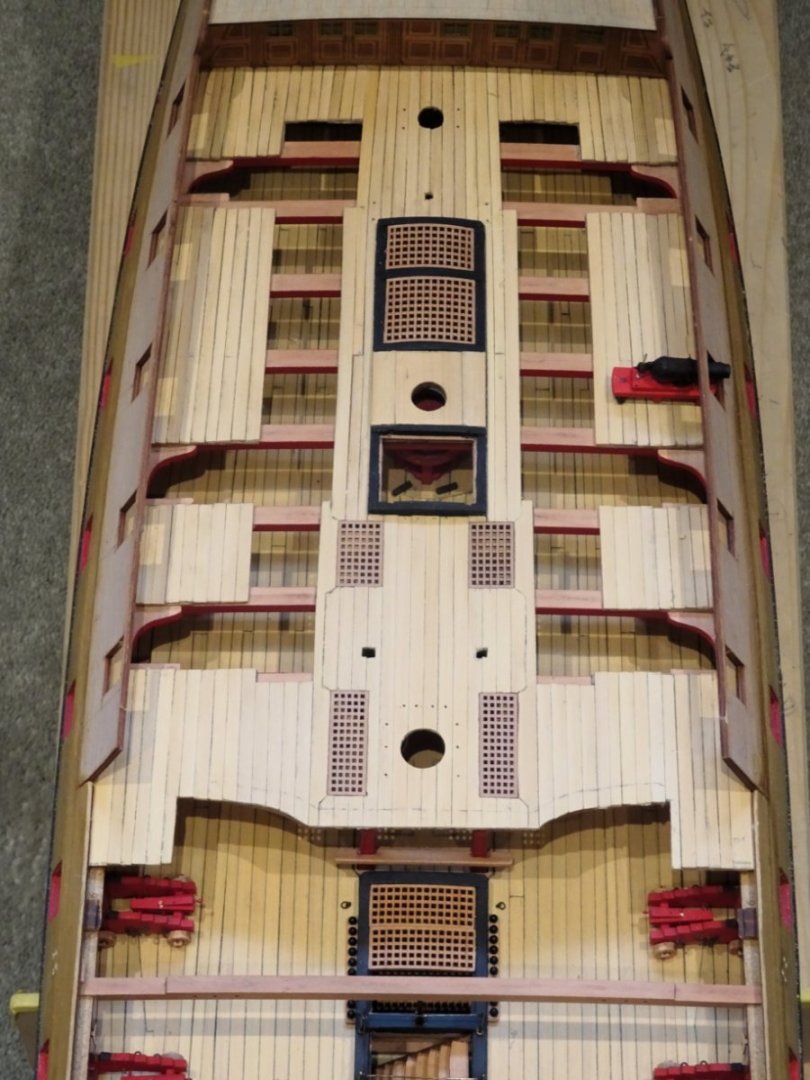
Post Ninety-nine Quarterdeck planking Back to deck planking, and an activity I quite enjoy. I am using mainly 4x1mm Boxwood, and some broader strips where the layout dictates. 2514 As with the Upper deck the centre line fittings of hatch/ladderways and Capstan step are fitted before planking. 2518 The fittings were designed to sit atop the planking so have been raised by the depth of the planking to compensate. In addition to the hatchways there are grating sets that represent the covers for the Top-rope and pump scuttles and sit flush to the deck. I have some reservations about the Top rope scuttles being represented by gratings, they are generally shown as closed boards, without framing, and with lifting rings attached. This is how I will display them. The deck planking layout requires some careful thought. 2519 2520 A tricky part is planking around the scuttles. To this end blank scuttle templates are temporarily fixed in place to run the planking to, and the specific parts used to check. 2524 2525 2526 The centre line section completed, I will now move onto the outer strakes and Margin planks. B.E. 26/10/2023


- 648 replies
-
- 25
-
-
-
- Indefatigable
- Vanguard Models
- (and 1 more)
-
I like it David, these small boats are testy, and she stands the test of macro very well. I'd be pleased to have her. B.E.