.JPG.ca33079f5815b861e67b9c2cccd37982.JPG)

Blue Ensign
-
Posts
4,572 -
Joined
-
Last visited
Content Type
Profiles
Forums
Gallery
Events
Everything posted by Blue Ensign
-
 Neat work, and nice joggling 👍 I tend to use a flat matt varnish for sealing the deck, but wop is only diluted varnish. Remember there are fittings to stick to the deck which are better fixed to a varnish free surface. Personally I don't apply wop to painted surfaces. B.E.
- 562 replies
-
- 3
-

-
- vanguard models
- alert
- (and 2 more)
-
I've just picked up on your log David, you have some great innovative ideas, and I like what you're doing with Diana. 👍 B.E.
-
I see you have The Cutty Sark book by Longridge in which he notes. The Cro’jack sheets were made fast to the Qtr Bumpkin, and the Tack to an eyebolt on the rail. Does this not resolve the issue? B.E.
-
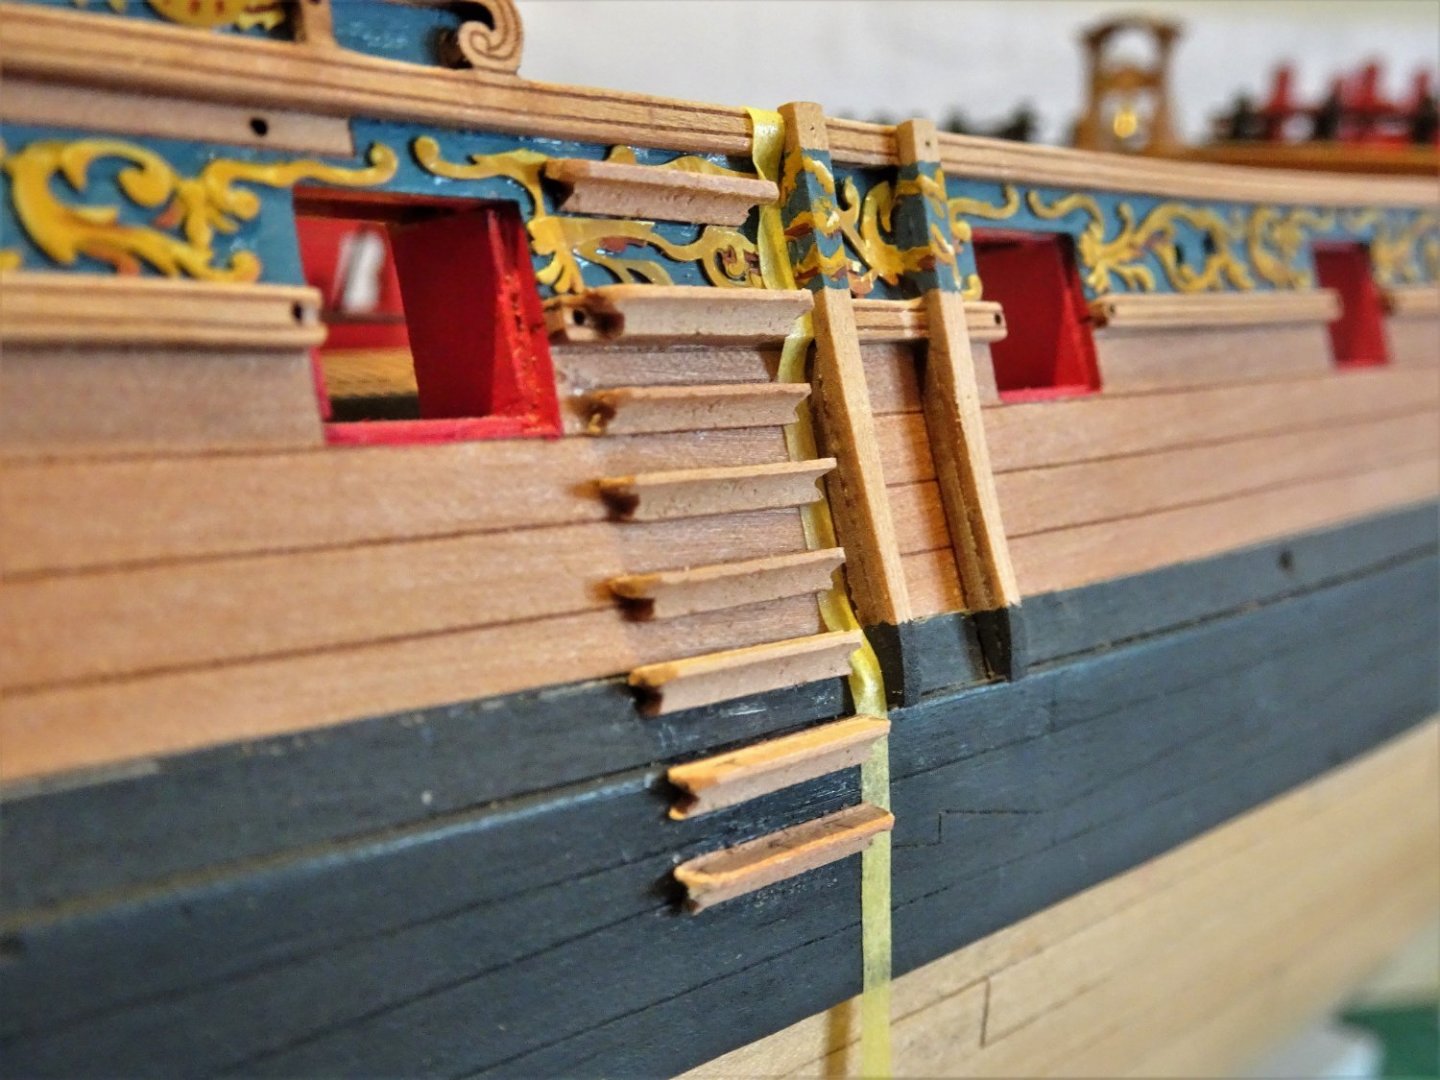
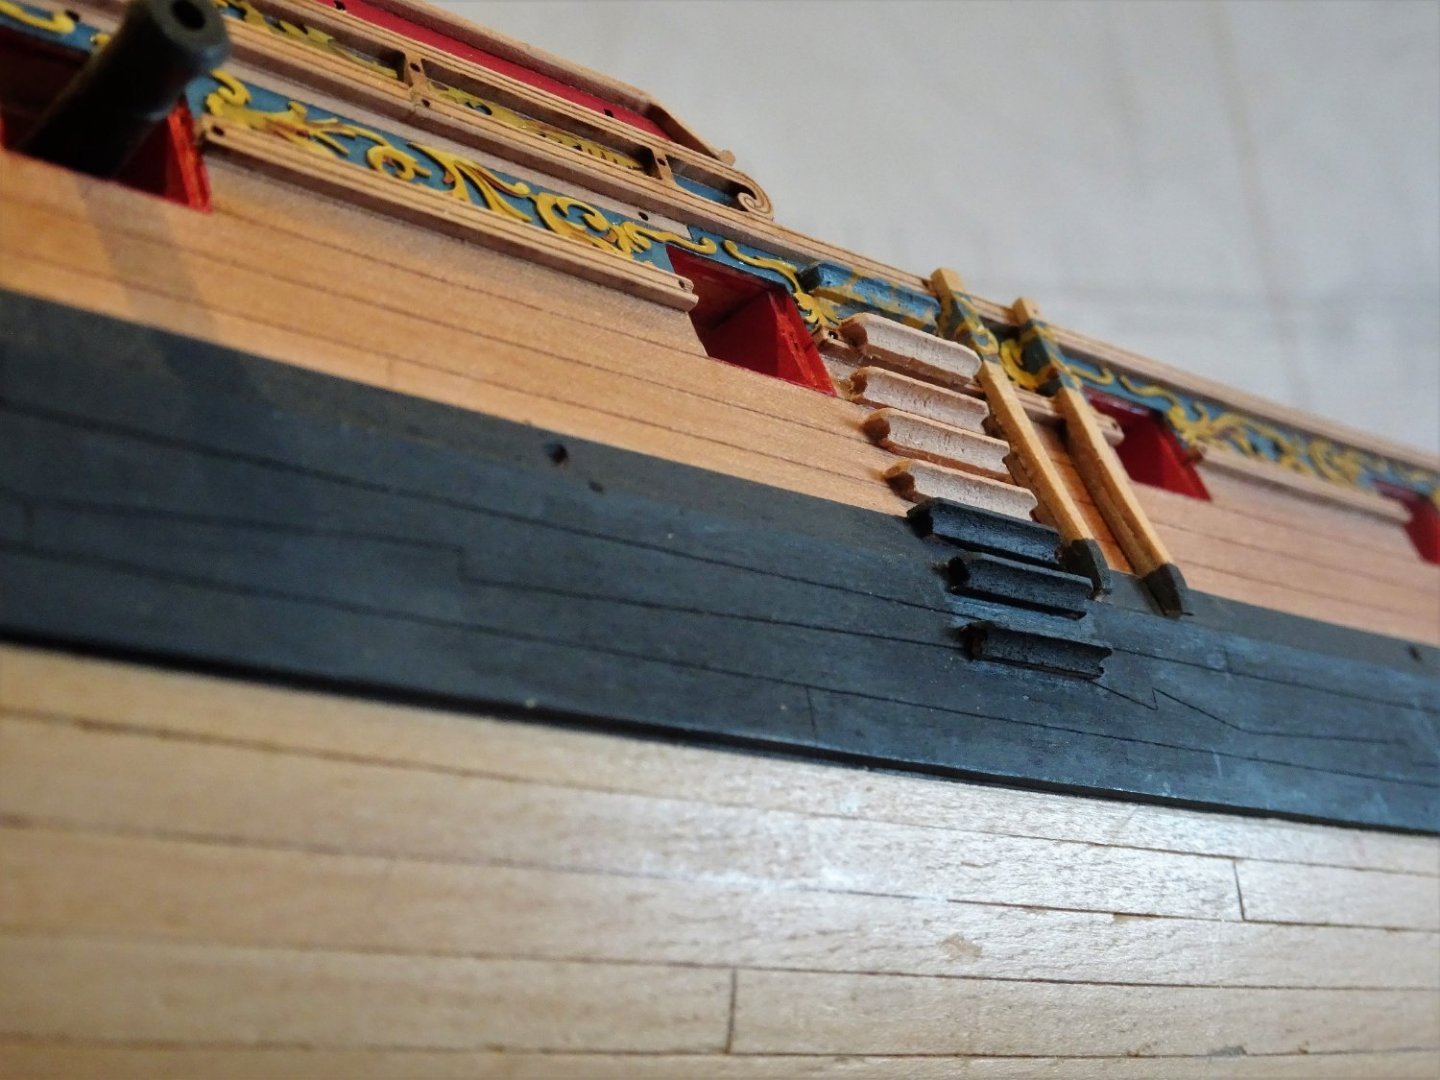
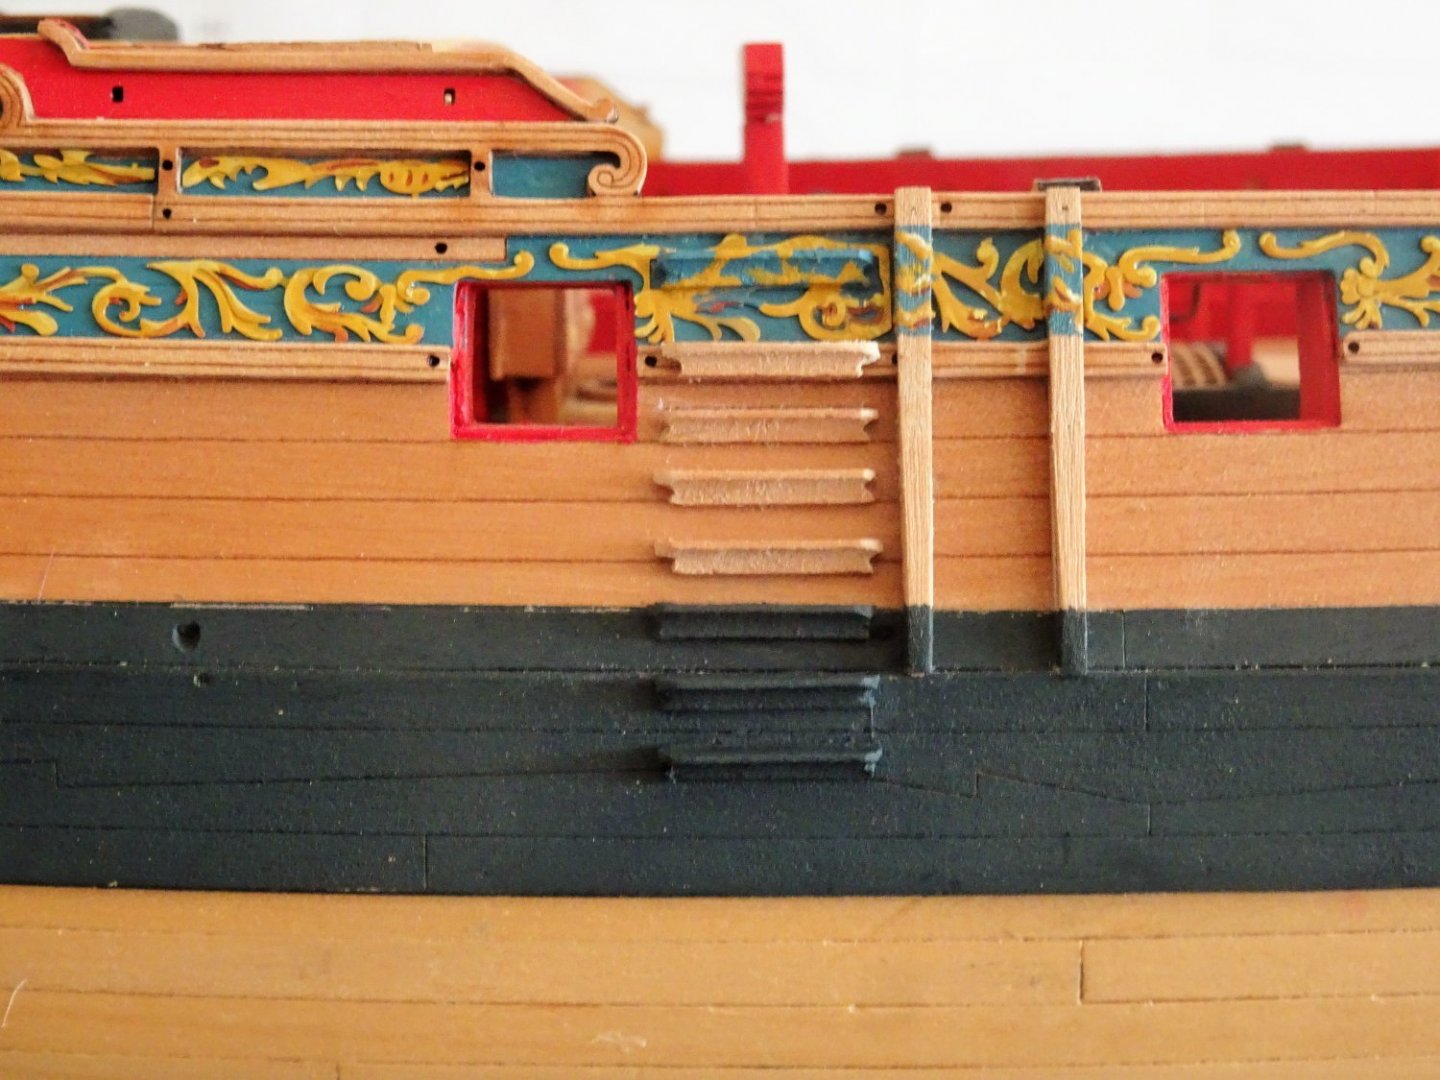
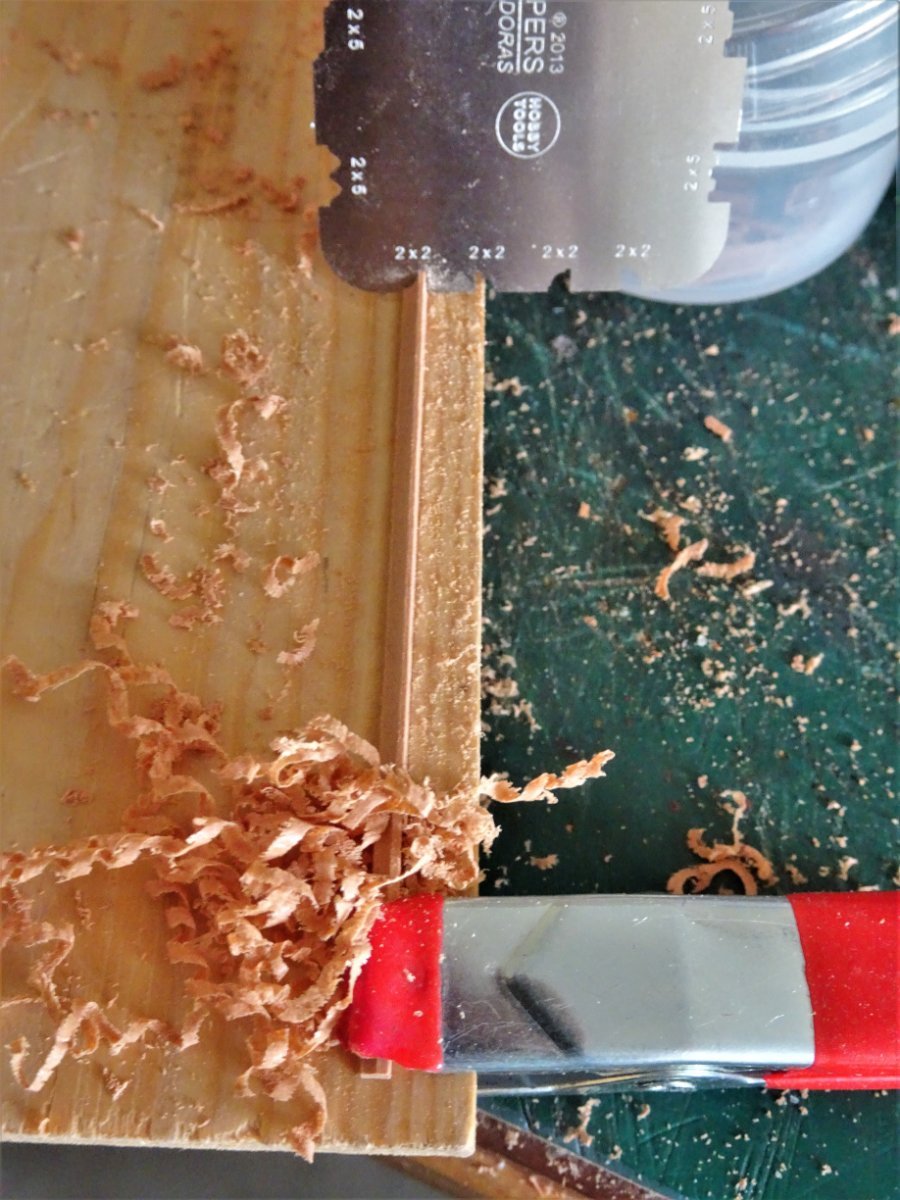
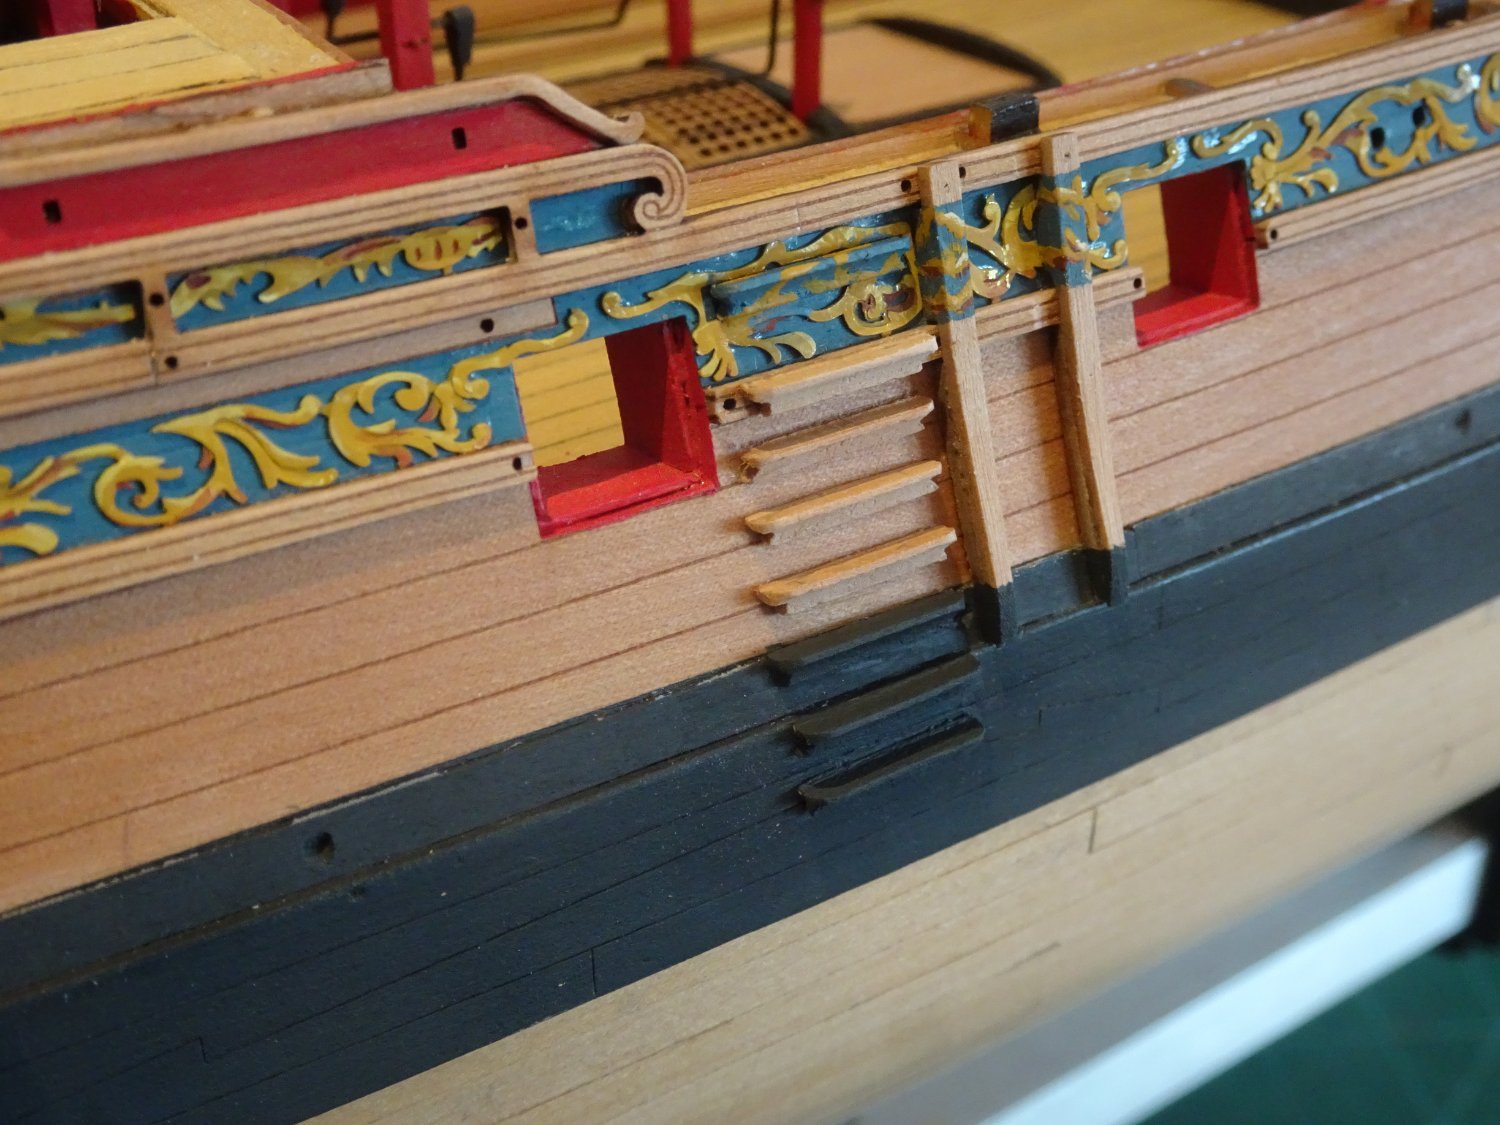
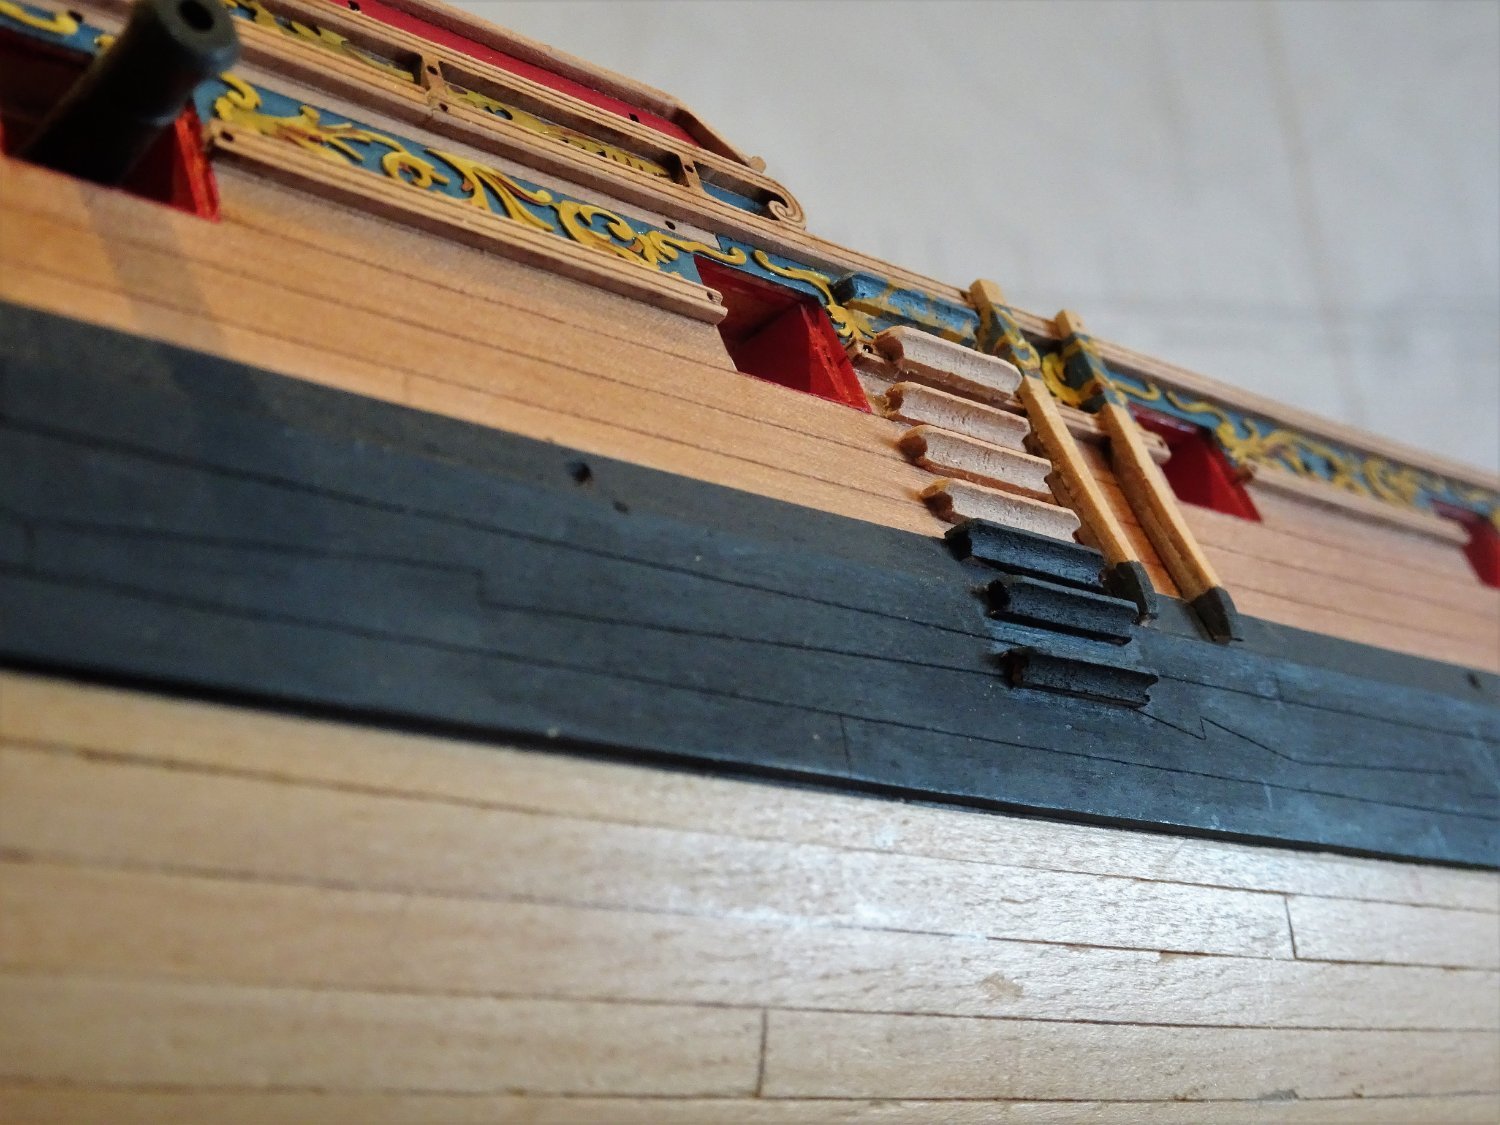
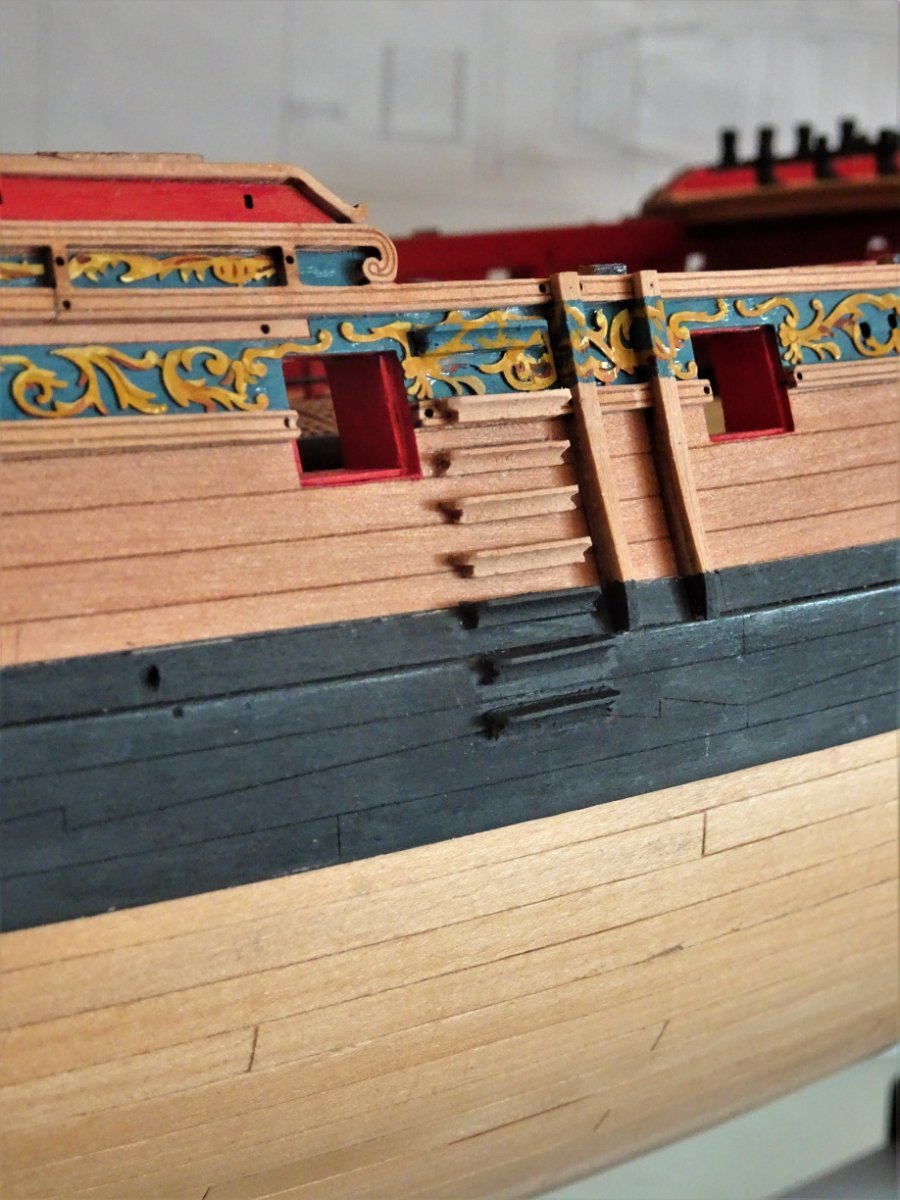
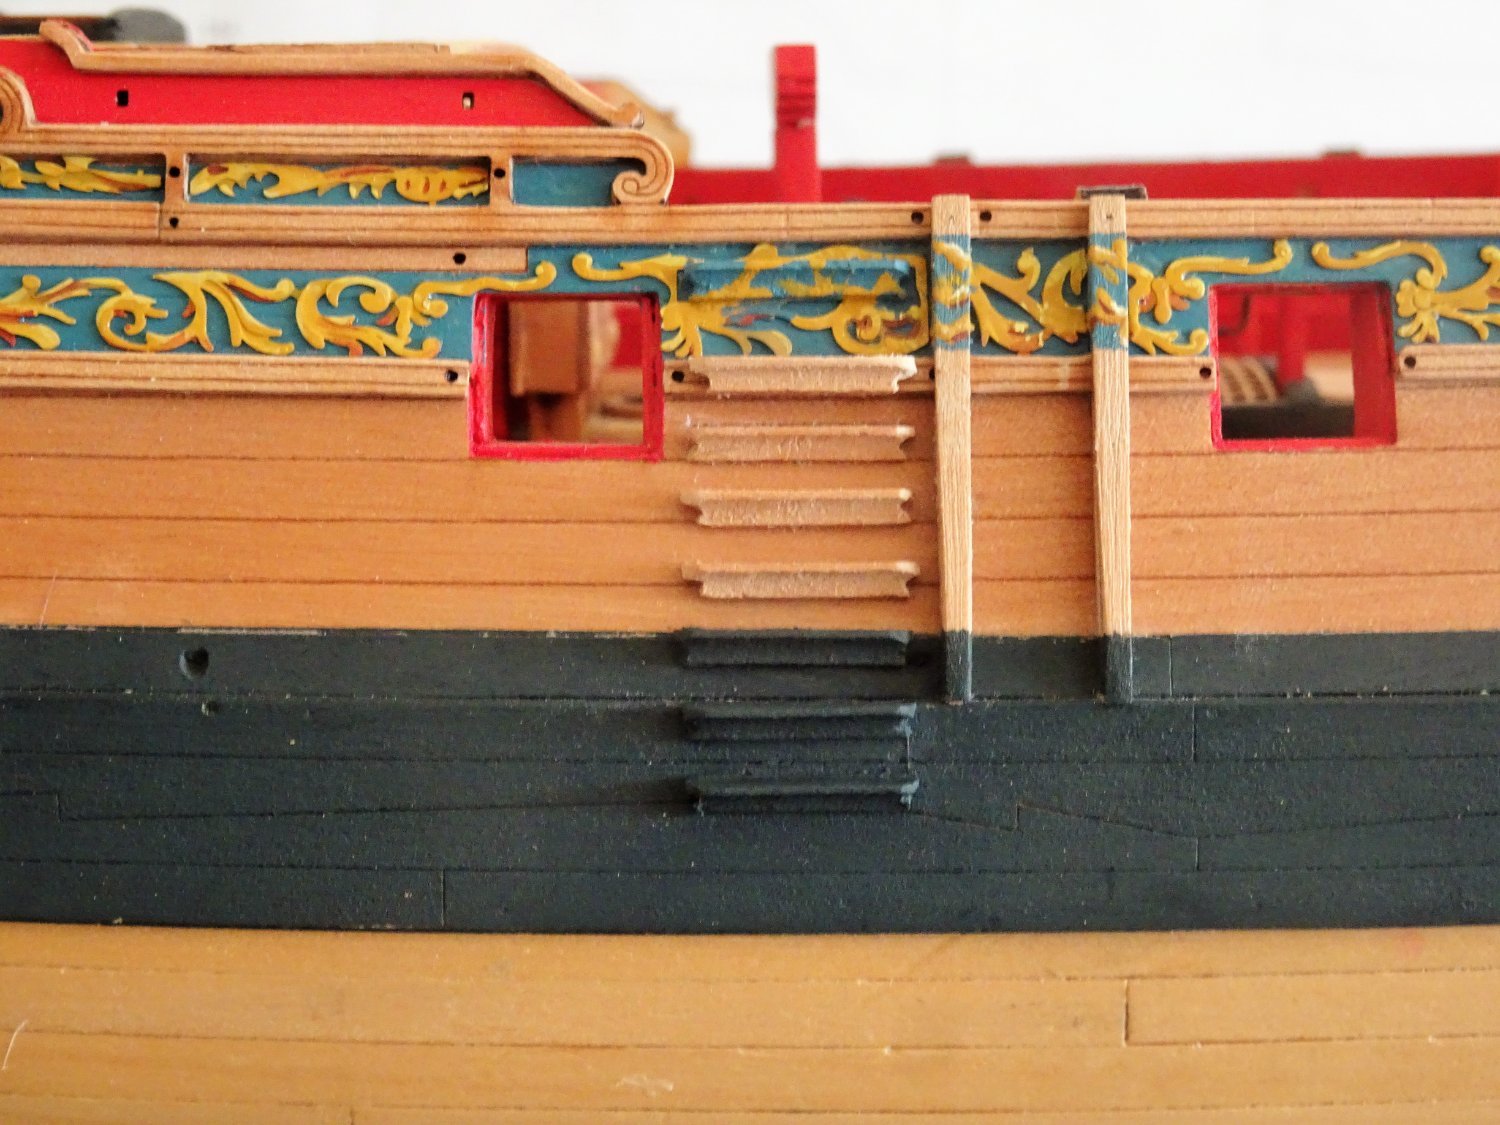
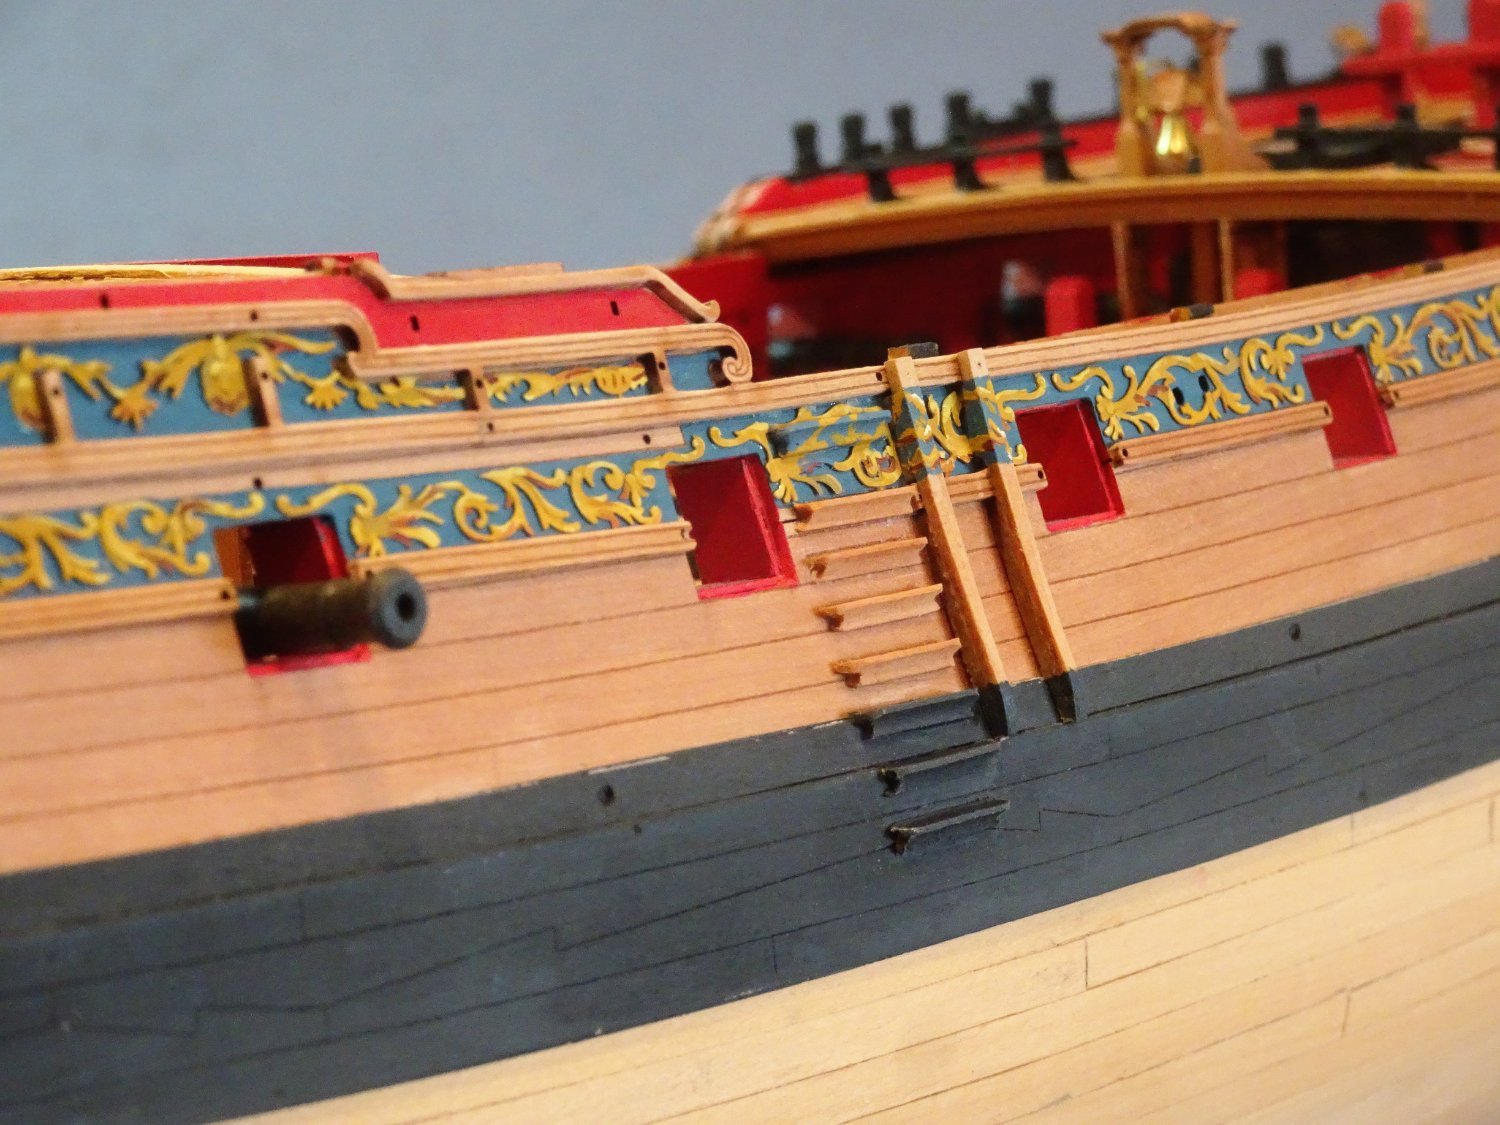
Thank you Guys for your comments and 'likes' Post One Hundred and Fifteen Looking at the side steps. These are very fragile requiring a two part assembly from 0.6mm laser cut Pear. Awkward little beggars to hold, glue, and char clean. The scale width of the steps look good at 2’ 9” ( 13mm) but the depth of the treads looks a little shallow to my eye at 1.88mm (4½”) and the support I thought lacked substance. Having assembled and messed about with these annoying little pieces I decided to make my own. 6675 Using a sufficient length of Pear 2x2mm Square stock and a Micro shaper from Artesania Latina, a nicer looking profile can be produced (quickly), which are chopped into 13mm lengths, and finished with files (Slowly) Generally the scraper profiles are too large for work at 1:64 scale but there is a scotia profile at 2x2mm that suits the purpose. Whichever version you use, these things are tricky to fit. If only for aesthetic reasons they need to be evenly spaced, and parallel to each other as they rise up the side. There is not an overly defined tumblehome on the hull but there are some that require a slight bevel on the back of the step to throw the tread level. The top step position is defined by the decorative frieze which has a cut-out for it. The next step is positioned on the moulded rail, level with the top. This raises the question whether to apply atop the rail or cut the rail to facilitate the step. Chuck has recently discussed this subject and a visit to his Winnie log always pays dividends. Chuck decided to cut the rail to allow placement of the step on the hull. The problem with Sphinx, if the rail is to be cut, is that there is only 1mm of rail left each side of the step between the fender and port. I decided to place the step on the rail to judge how it looks but it does rather stand out and catches the eye. There is also a greater space between top and second than between second and the remaining six. 6712 In practice this means there is a 5mm space tread to tread between the top and second step, and four mm for the rest to keep them evenly spaced. If 5mm is used the bottom (8th) step would be placed a little too low down the wale. I did a quick round robin of the current builds of Sphinx and there’s an eclectic mix of step positioning, some followed the plan but omitted the bottom step, others placed the second step above the rail. Only James followed the plan in his prototype build. (as he would) For me the Adm plan shows eight steps so eight steps it will be. 6720 With the top step coloured and decorated the distance difference between the top and second steps is not too obvious. I begin the job by fixing the top two steps, then the bottom three ( on the Black Strake and wale) I then mark the gap between the second and sixth tread top, this gives the remaining three steps a tread to tread distance of 4mm, pretty much in alignment with the position marks on the hull. 6716 6718 From this angle the difference with the step atop the moulding is quite obvious. I suppose the step could have been thinned a little using the moulding as part of the step. 6715 I prefer the slightly beefier profile of the scratched steps. I decided to remove the moulding and place the second step directly on the hull and infill a small piece of moulding to the sides. This is the modified look. 6725 6726 6734 I much prefer the look with the moulding removed. Whole hull shots to give the overall perspective. 6733 6738 6737 This has been a lot of words for a small but time consuming element of the build, but each part is important and contributes to the whole. I think I will attend to the waist capping rails next. B.E. 01/05/2022


- 857 replies
-
- 35
-
-

-
- Sphinx
- Vanguard Models
- (and 1 more)
-
Post One hundred and Fourteen Fore and aft along the hull This is a time of dealing with many small details yet to be completed or re-visited. Dressing the Head timbers. These are the covering boards that face up the head timbers. On kits it can be quite difficult the get these to look realistic with that nice concave shape to follow the head timbers. When I fitted the Lower rails, I had to do some filler work to reduce the oversize slots into which they fitted. 5543 I can understand why Chris allowed a generous measure of leeway to slot the Lower rails into place. I recognise the technical difficulty of creating slots that would closely follow the rise of the rail up the head timbers, given the vagaries of individual constructions. Even so I think the slots could be reduced a little in size from the upper ends of the head timbers. 6667 To maintain the curve, further filling is required post fitting. Looks horrible, but once sanded and repainted hopefully it will be worth the effort. A new set of mini sanding sticks were prepared. 6705(2) I think that looks better and no unsightly gaps. It took several goes to get a result that my non macro eye could accept. 6699(2) I spot a little paint overspill on the upper cheek rail, strange the stuff you see on photos that bypass normal vision, what did we do before macro photos. 6701 A small piece of moulding has been added to join the forward extension of the lower cheek to the foot of the figure which I think gives continuity and accords with contemporary models. 6678 6681 With the Headworks completed I think Chris’s design has achieved that elegant 18th look, the best I have encountered in the models I have made. Fettlin’ the Fenders In their raw state the side fenders and Chess trees are a little chunky. They benefit from a little further shaping, fining, and tapering towards the bottom, and a little rounding on their bottom ends. Where they cross the Blue topsides and black strake they are ideally painted to match. On the Topsides the frieze work should be continued around and across. 6694 The area is small enough to tempt me to paint the continuation of the Frieze work. 6692 6691(2) The w-o-p treatment hasn’t been applied at this point. 6668(2) Working my way aft I will next tackle the side steps. B.E. 28/04/22

.thumb.JPG.77f2cd135cdf0bb3bad9f9830d90f2cc.JPG)


.thumb.JPG.c3b27f400c0e76740589f1a43efd512e.JPG)

.thumb.JPG.d14c6d9857340bfbedc3aeb8ce9d1cb3.JPG)

.thumb.JPG.7f089958e47ee0f4097d54de5d47bf71.JPG)

- 857 replies
-
- 28
-
-

-
- Sphinx
- Vanguard Models
- (and 1 more)
-
Very kind of you to say so Nipper, much appreciated. B.E.
- 857 replies
-
- 3
-
-
- Sphinx
- Vanguard Models
- (and 1 more)
-
You’ve got it Ron, 👍 and 0.1mm line is about spot on for Crowsfeet, equates to 3/4” circ. line. B.E.
- 542 replies
-
- 5
-
-
- Sphinx
- Vanguard Models
- (and 3 more)
-
It's been a few weeks, but wow what progress you have made Glenn, your planking is a joy to behold, and the whole model so pristine. Beautiful work.👏 ps I'm feeling inadequate. B.E.
- 840 replies
-
- 3
-
-
- winchelsea
- Syren Ship Model Company
- (and 1 more)
-
Beautiful work Thomas, an excellent demonstration of how to do it. B.E.
-
I didn't use the lamination method myself as I managed to wing it with the solid, but I suspect the Cathead supporter on Diana is a little more beefy that that of Sphinx. Is the angle of Cathead on Diana based on a kit part? it doesn't look that steep on the AotS artwork and drawings., but you can always trial it with a piece of square stuff. The steeper the angle the further back along the Cathead the sheave slots will exit on the underside, in order to keep the run of the Catfalls vertical. Thank you David for your kind compliment, much appreciated. Regards, B.E.
- 857 replies
-
- 3
-
-
- Sphinx
- Vanguard Models
- (and 1 more)
-
Your Crowsfeet look nice and taut Ron, but can you clarify if the method of reeving is one of your simplifications? I don't think I recognise the double looping of the line through the rim top holes, effective, but not necessarily authentic as far as I know. Regards, B.E.
- 542 replies
-
- 3
-
-
- Sphinx
- Vanguard Models
- (and 3 more)
-
Cheers Guys, thank you very much. @ Glenn – I’ve picked up tips from many on MSW and the beauty of acrylics is that you can experiment a lot within a very short time. @ Chuck - your Winnie build is my constant reference for detail. I can’t replicate the top-notch standard of your work, but because of it Sphinx is much enhanced. @ Ron - I too will be adding the Billboard, bolster and lining, they appear on the Marshall painting. I intend to add stump lower masts and Bowsprit, but they won’t be glued into place. The gammoning will probably be the only rigging on the model. I am toying with the idea of leaving the masts as tall as the case cover will allow and maybe add the cheeks, front fish, and wooldings. I may also make up a full mast to include in the case as an example, but this all a long way ahead. @ Mark – I don’t know about gold standard, but I do hope my efforts are of some use to other builders. Regards, B.E.
- 857 replies
-
- 7
-
-
- Sphinx
- Vanguard Models
- (and 1 more)
-
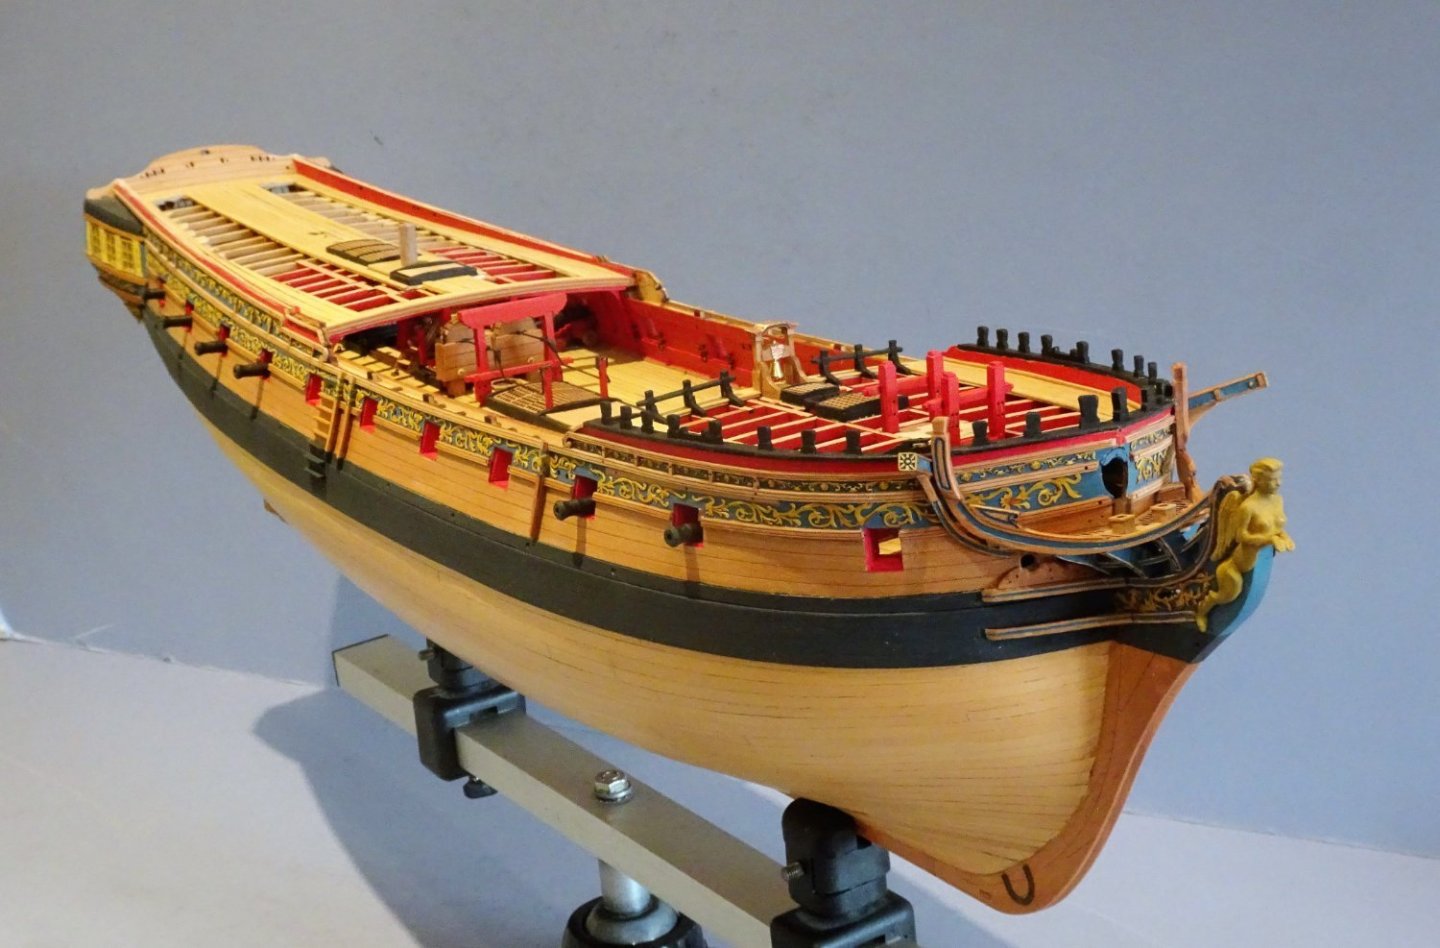
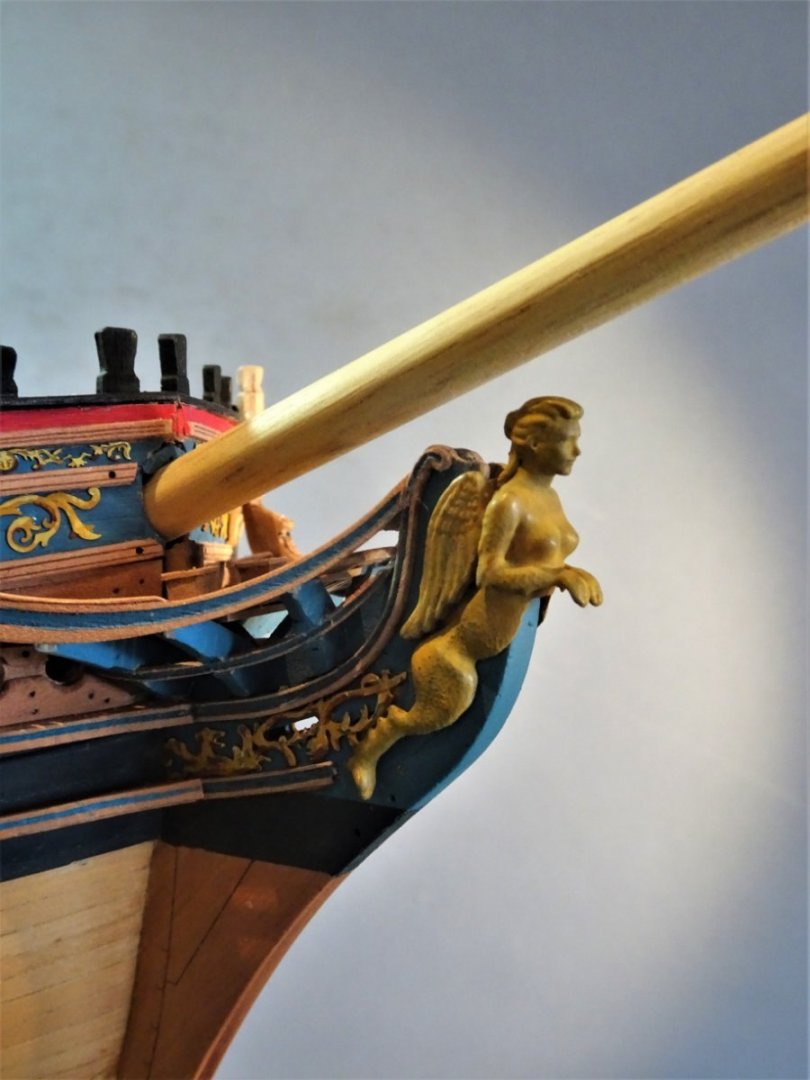
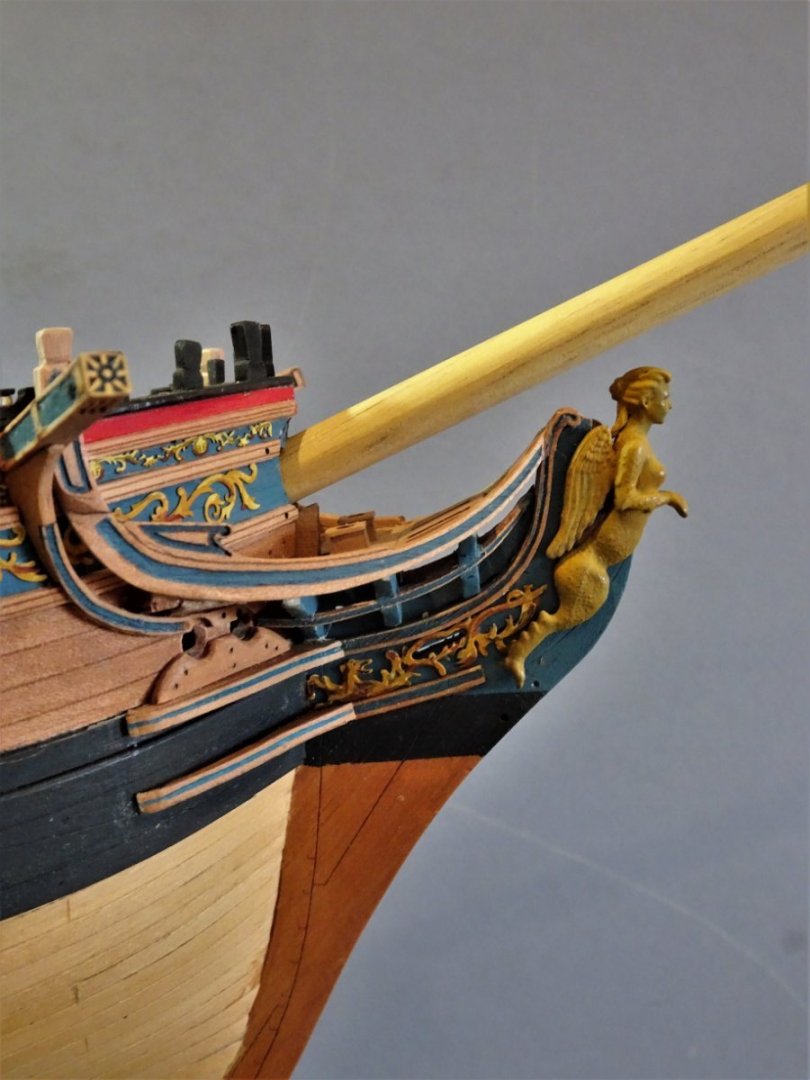
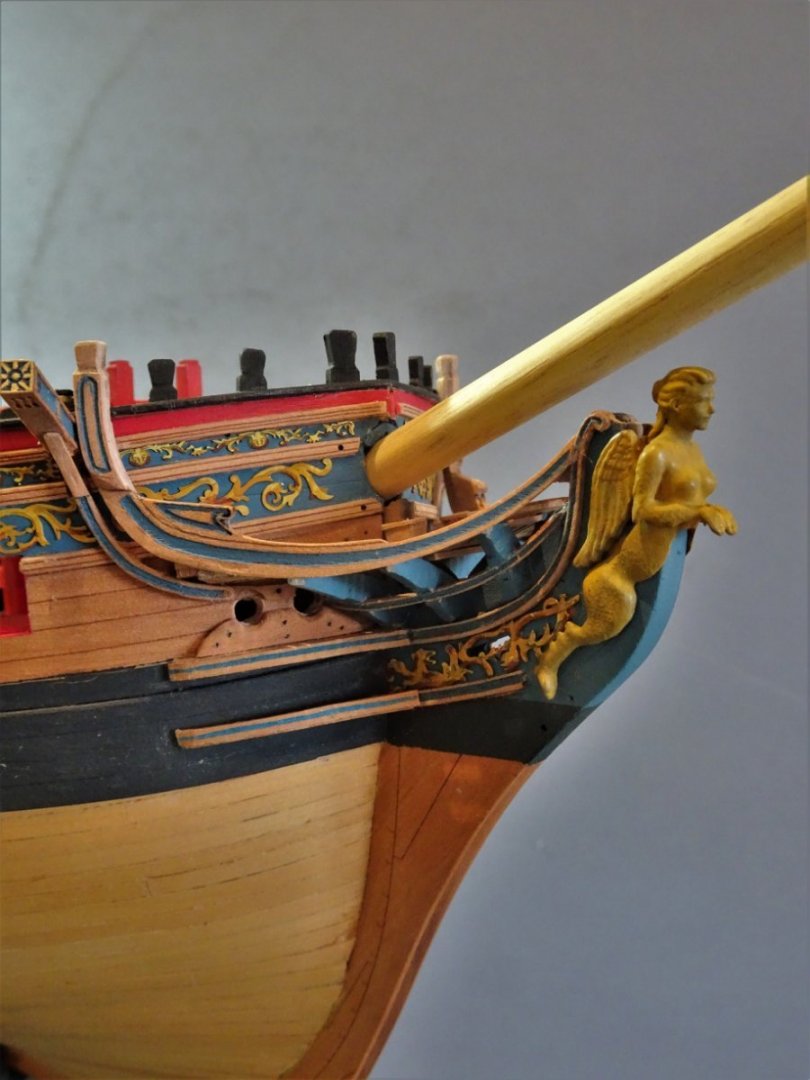
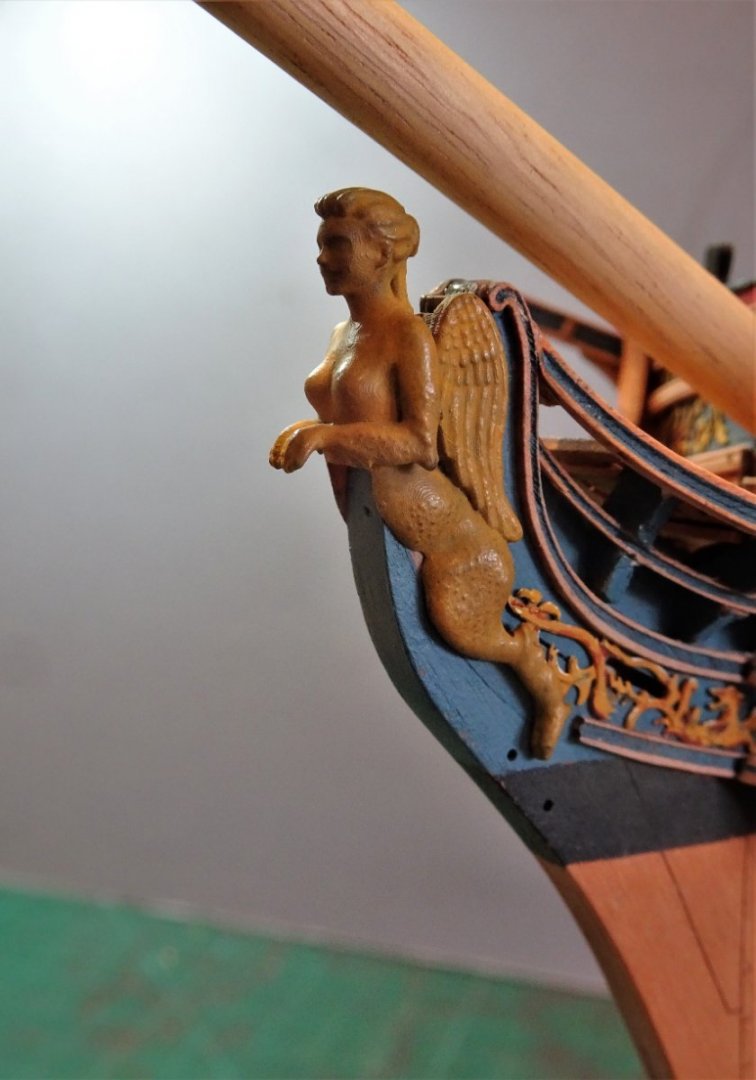
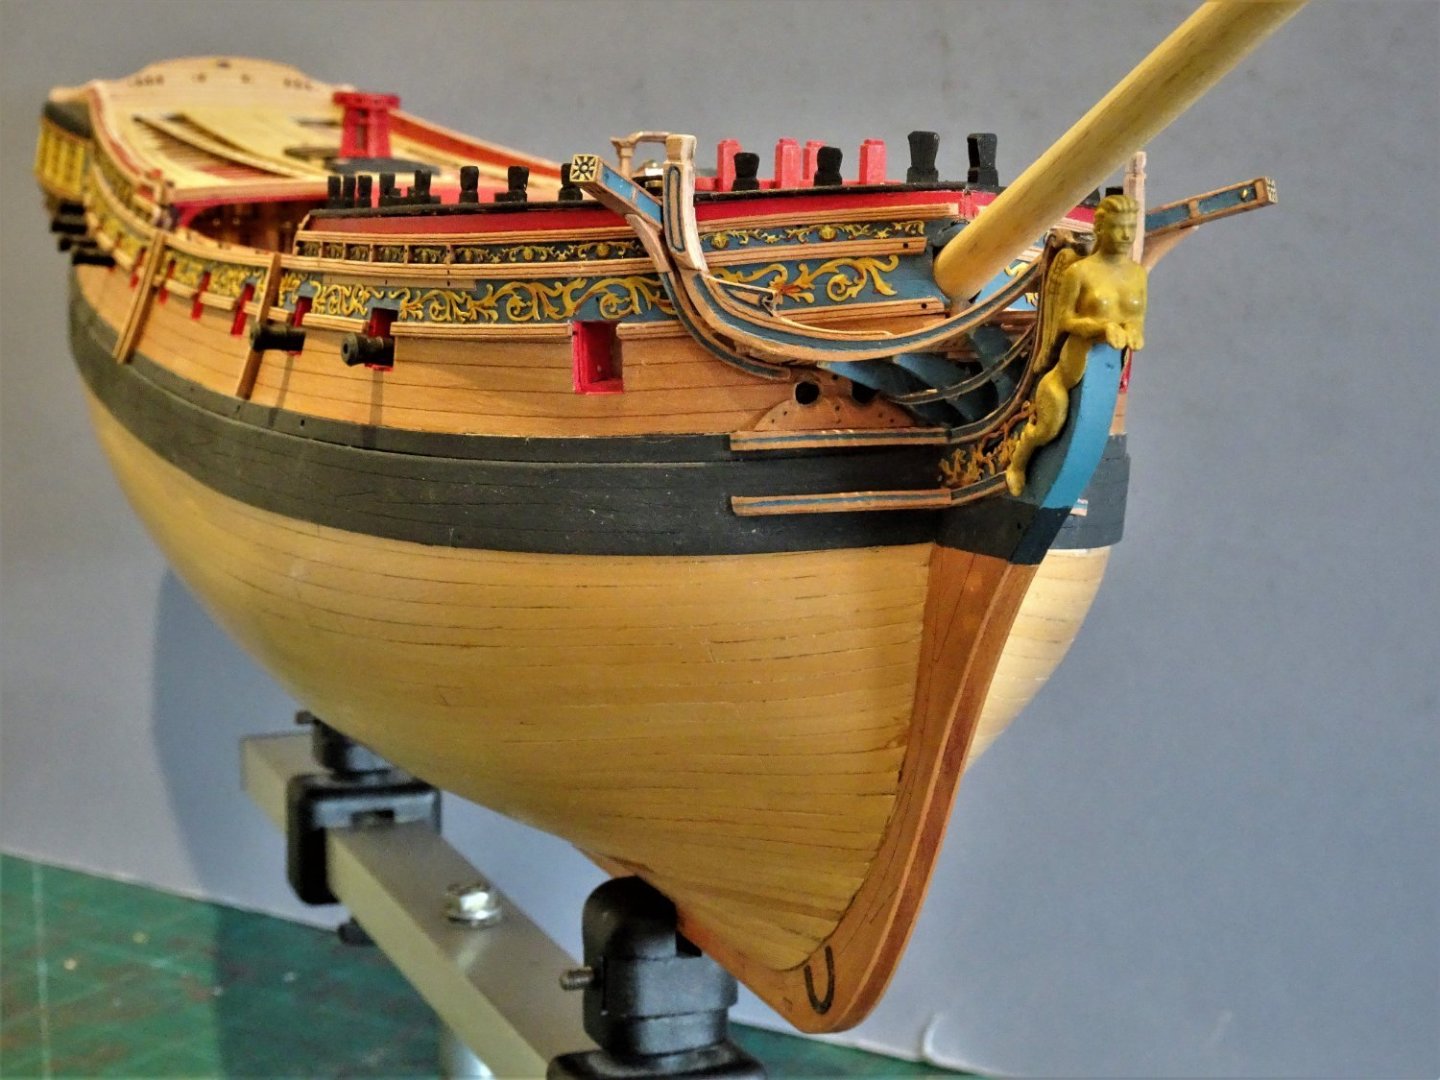
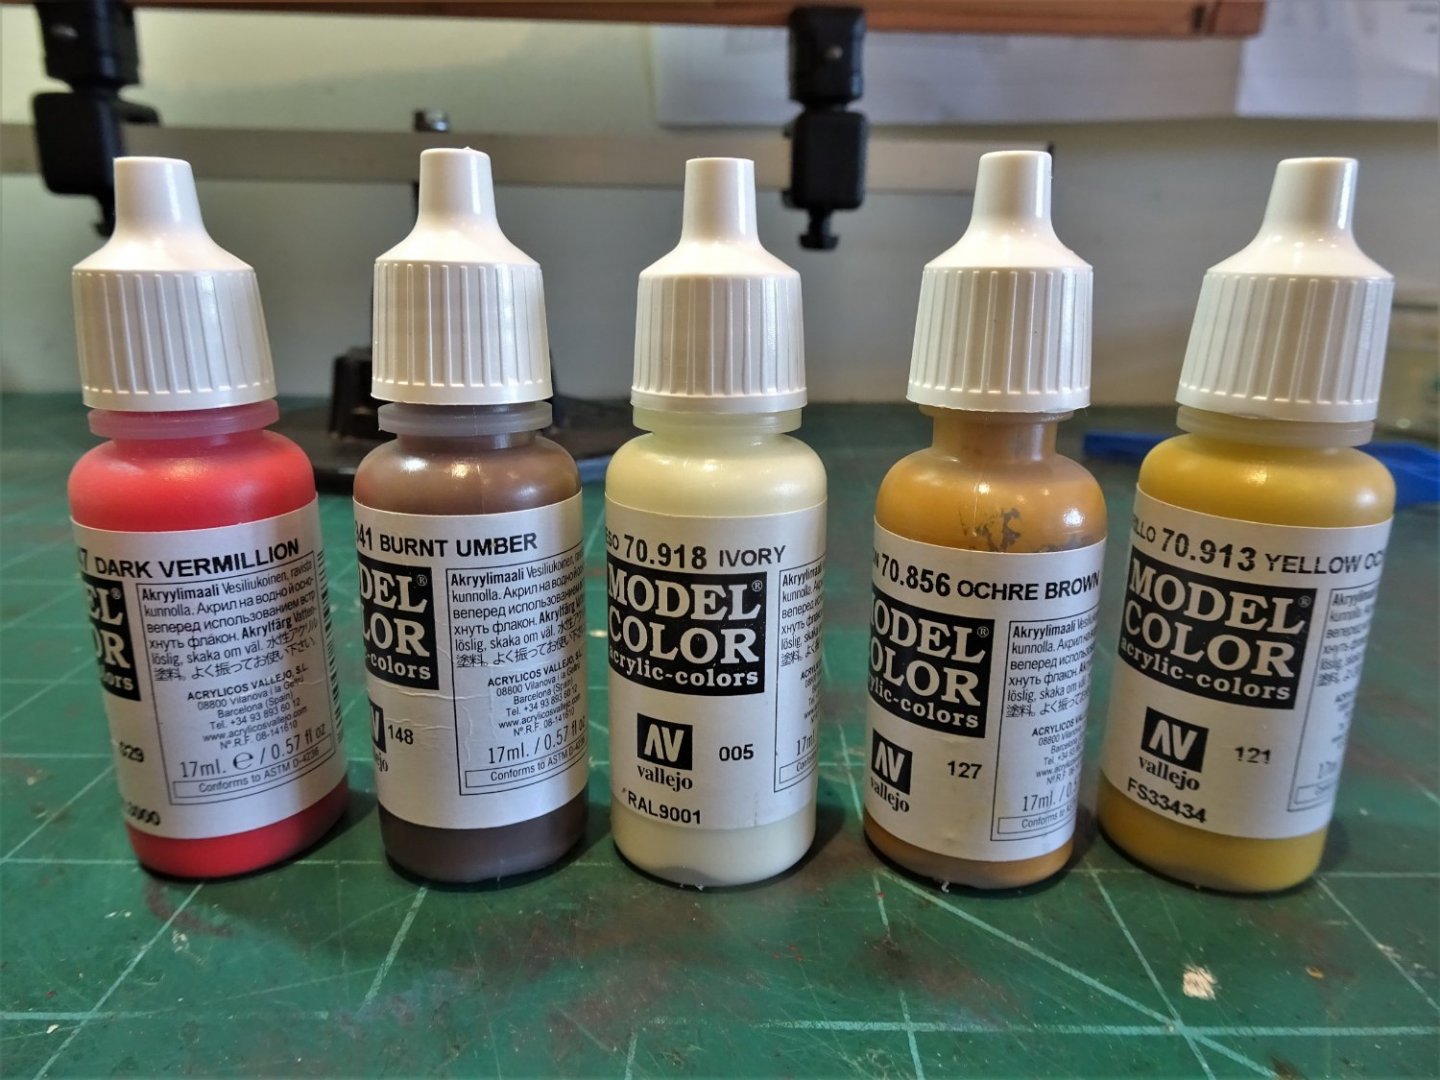
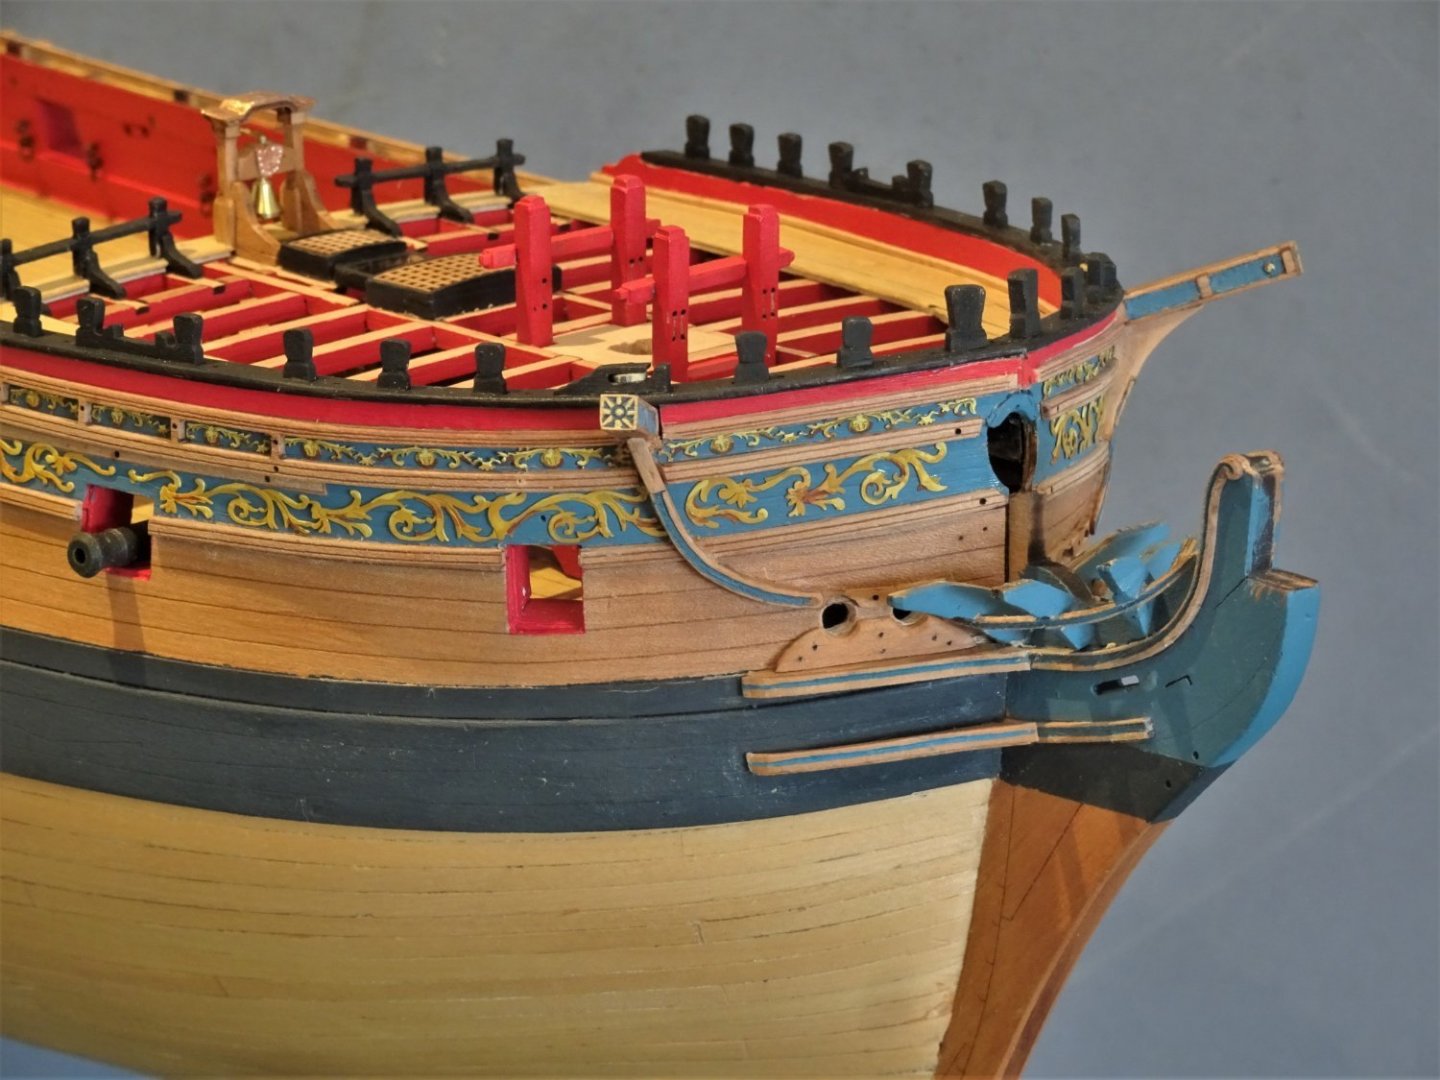
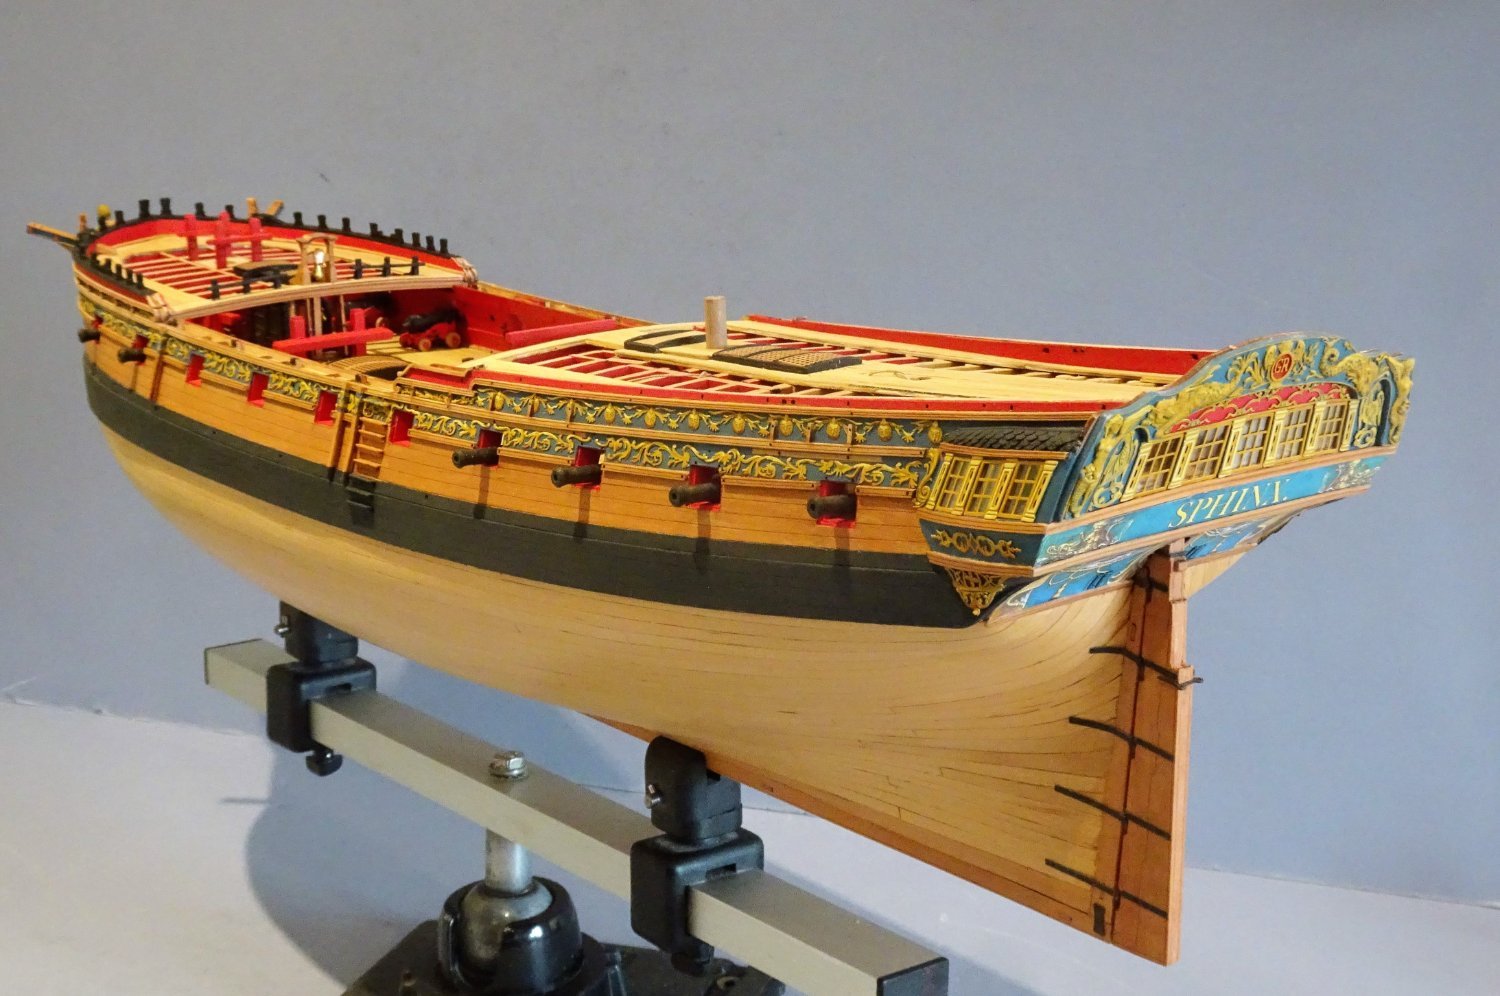
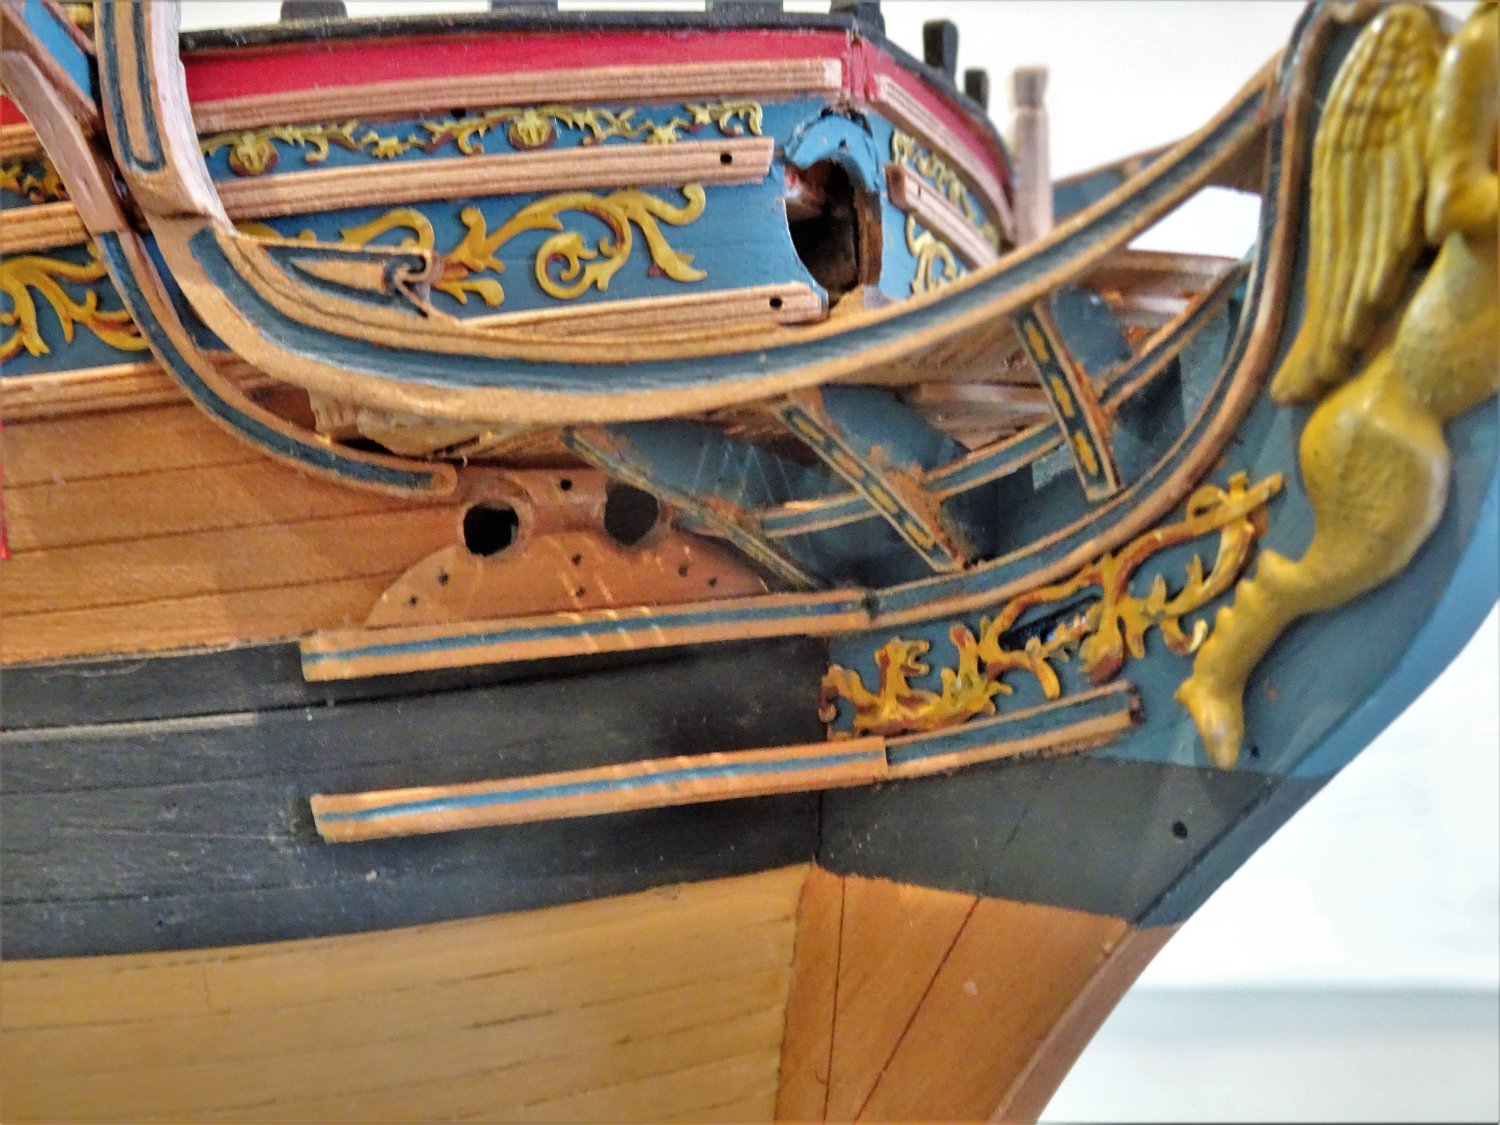
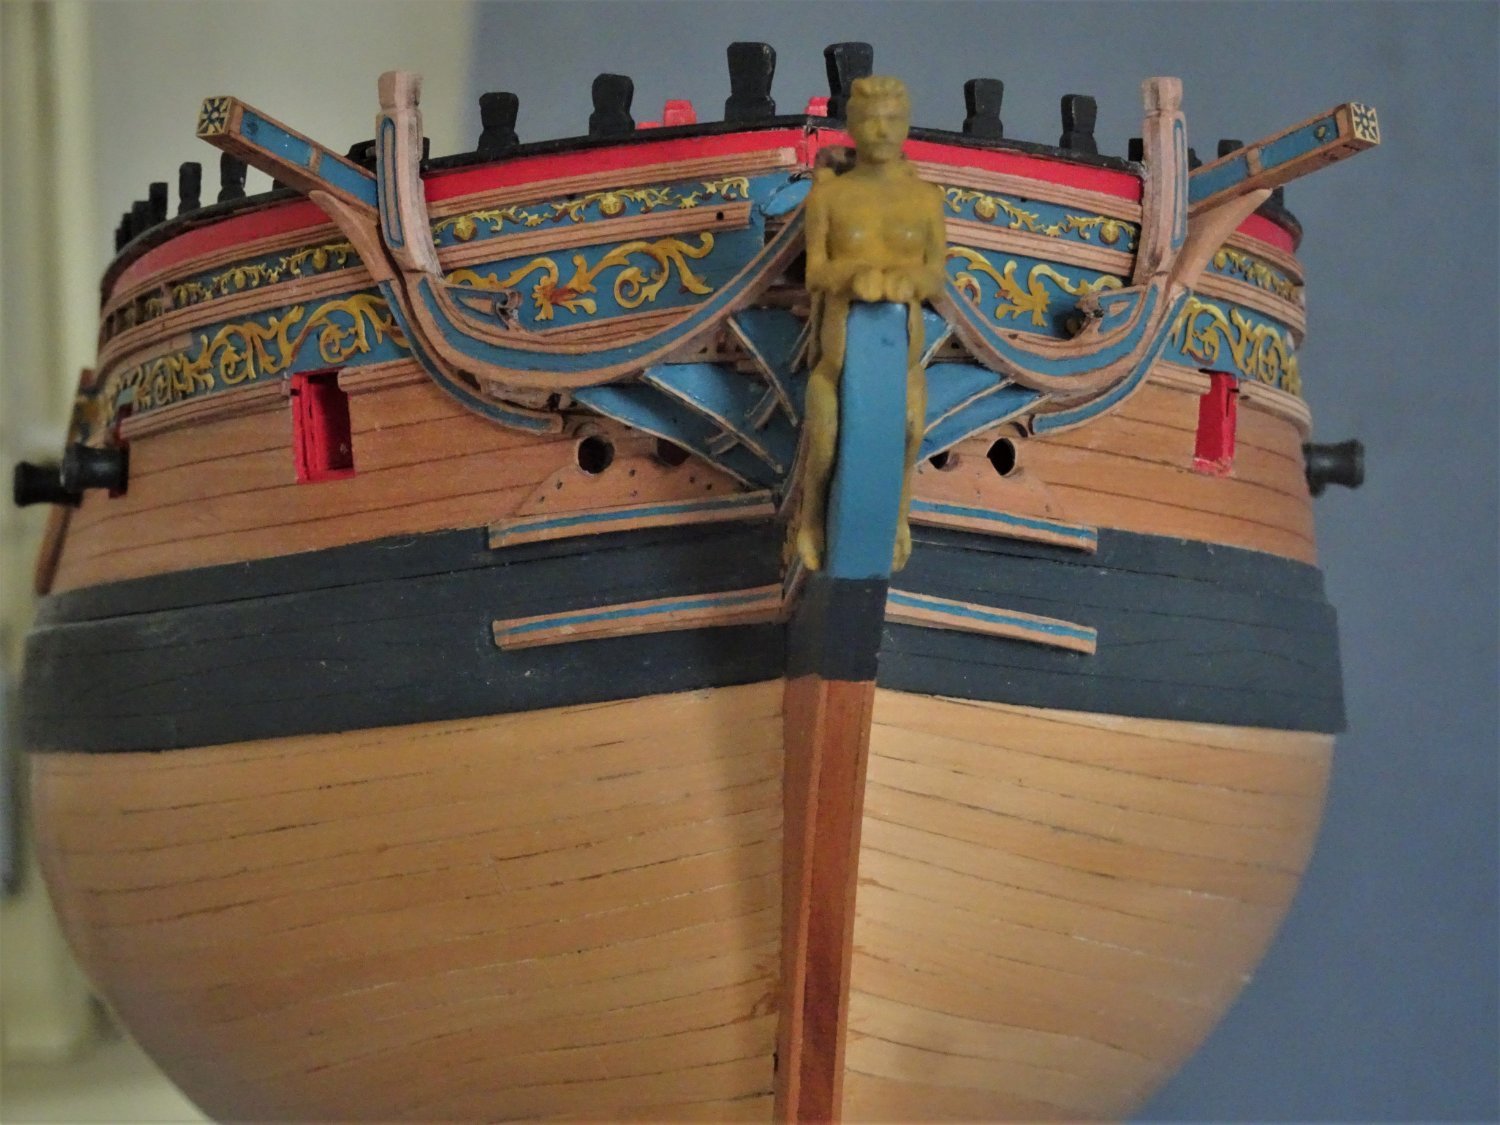
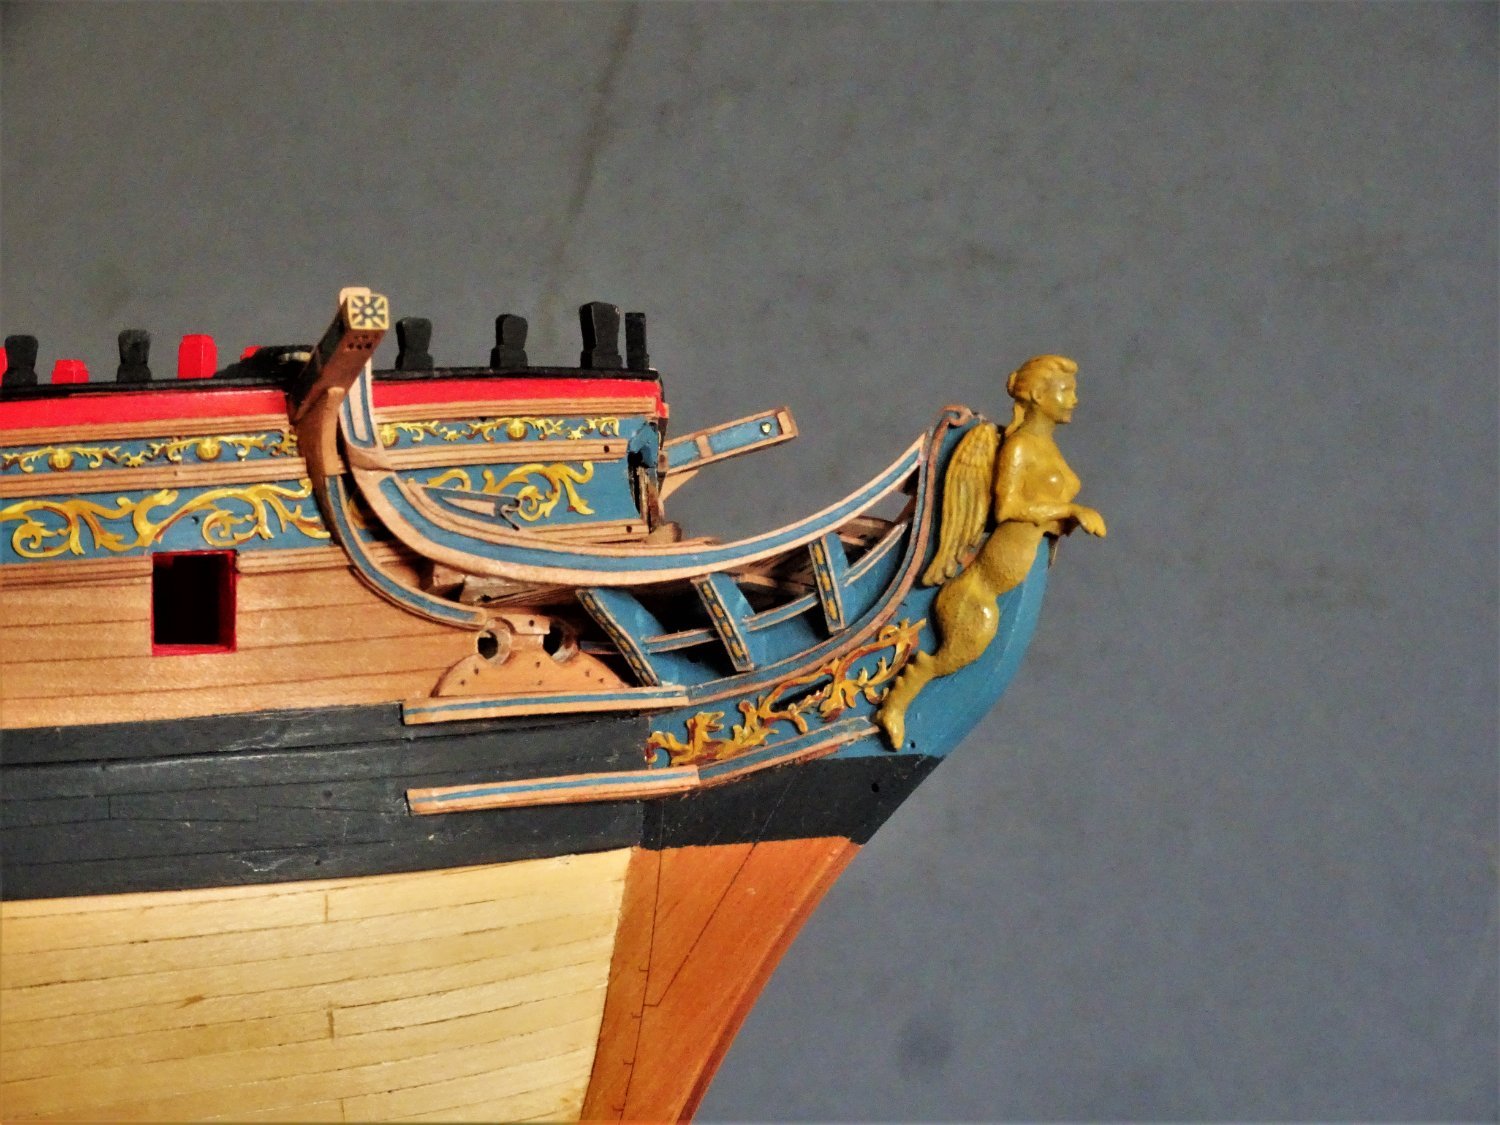
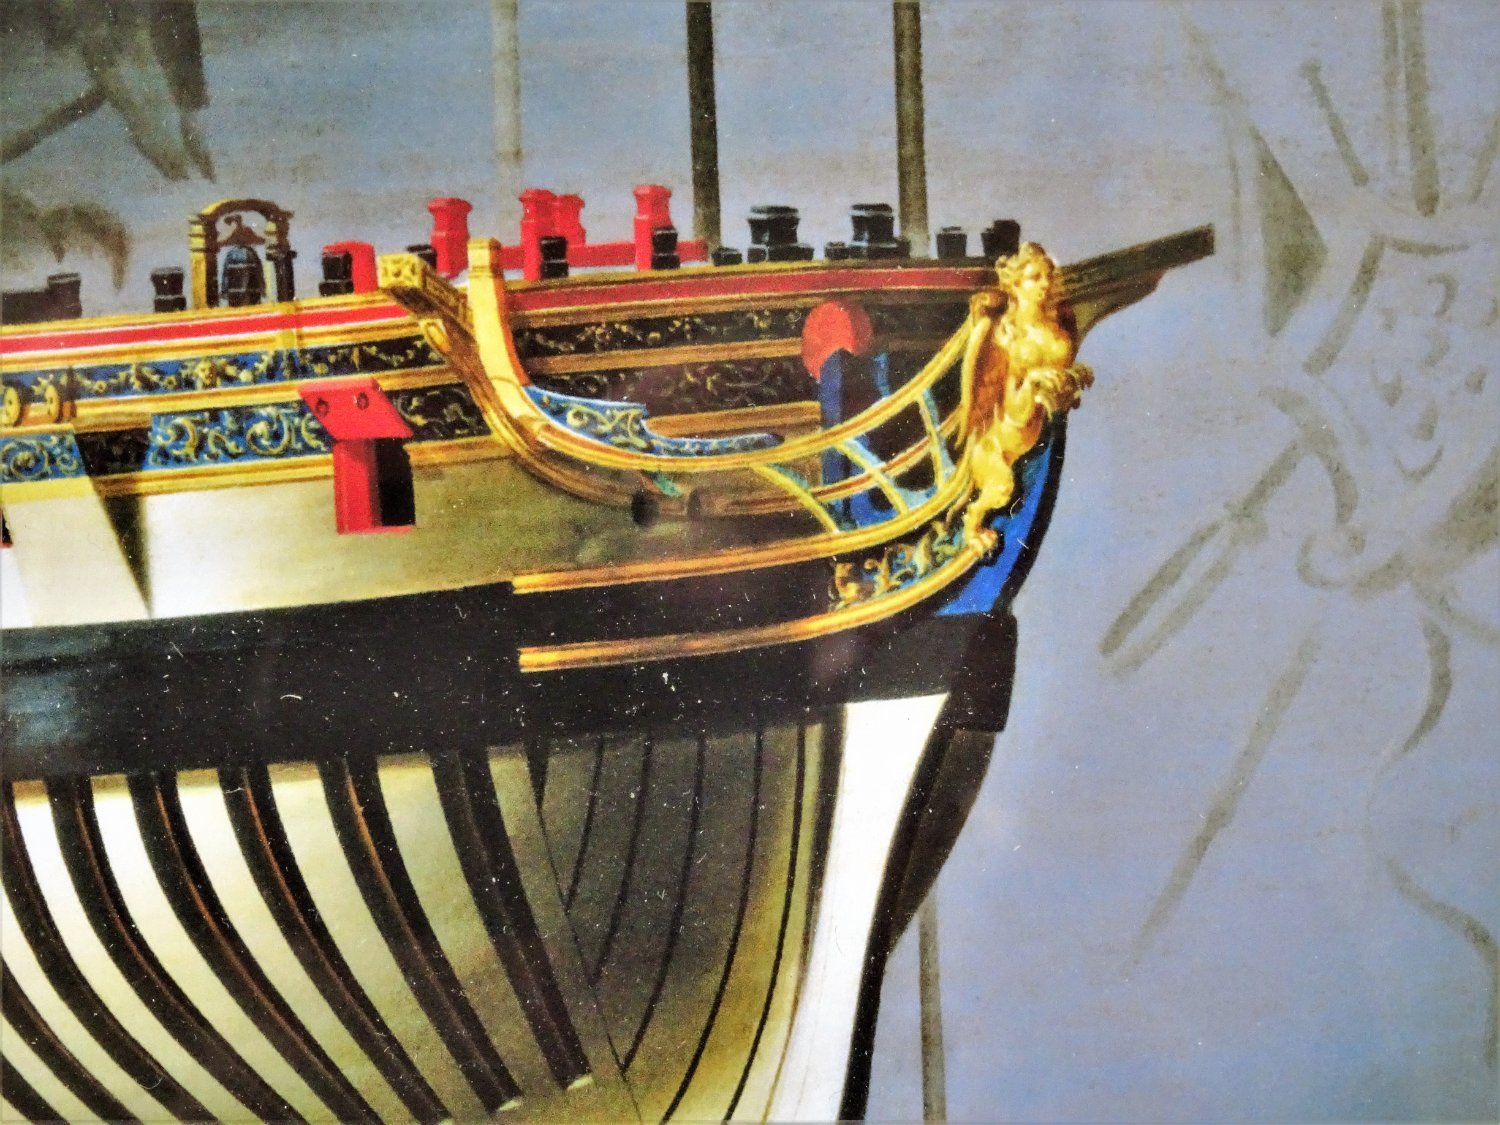
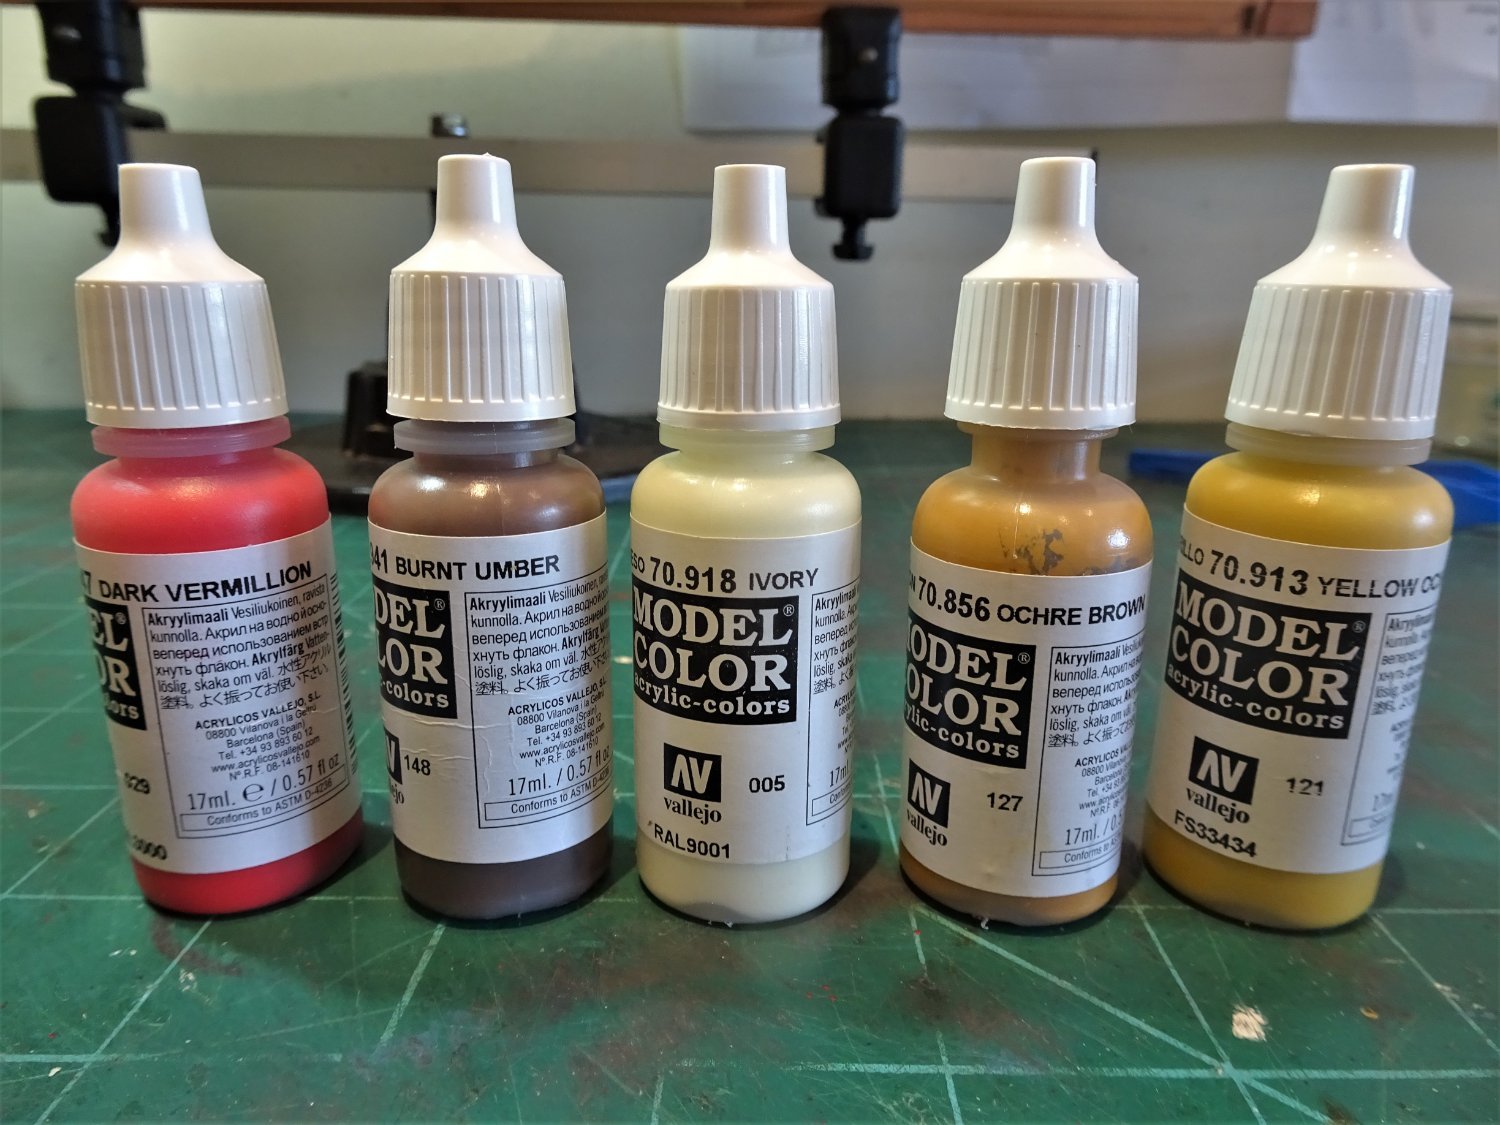
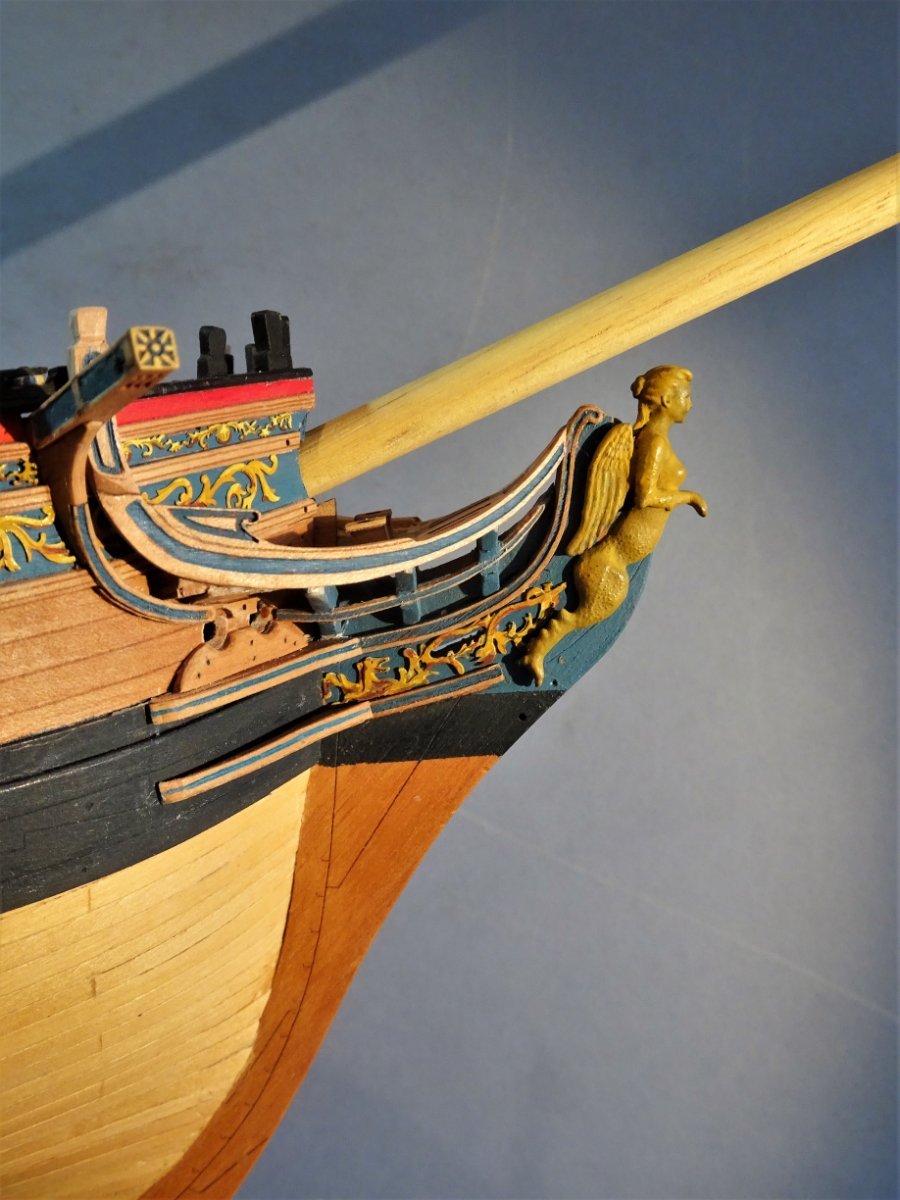
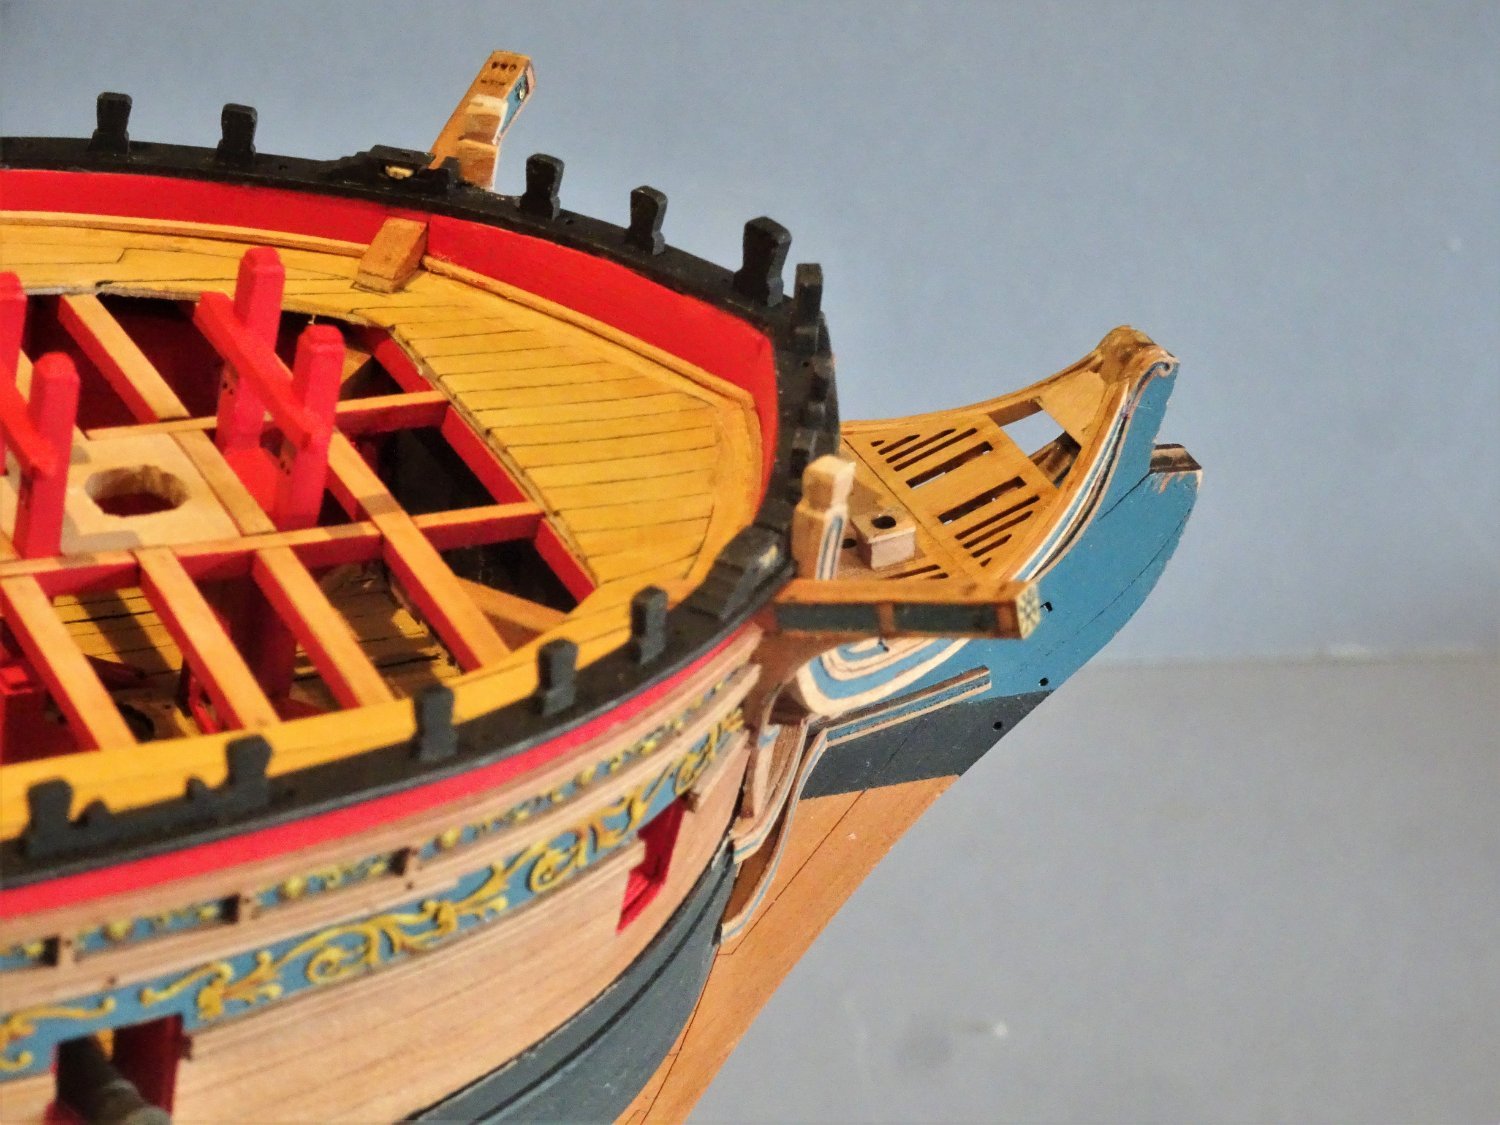
Post One hundred and Thirteen Adding the Figure. The provided resin Figure is nicely detailed, but not one of the most attractive figures evident on ships of the 18th c. For those interested in such minutiae it is likely that the figurehead was carved by Cuthbert Mattingly, Figurehead carver at Portsmouth Royal Dockyard 1760 – 1778 at which point he brought his son William into the business. Historical evidence may suggest that Figures were painted in colours, the unrestored model of Tartar of 1734 shows evidence of having been painted in colours, and there are other examples into the early 19thc. and beyond. I intend to leave the figure natural using only highlights and shadows to bring out the definition, it seems to suit the Navy Board style. This also accords with my natural inclination to avoid the garish. A base coat of Ochre Brown is applied, followed by a wash of Burnt Umber. Further highlighting (Yellow Ochre /Ivory mix) and shadowing(Dark Vermillion/ Burnt Umber mix) with a little darker wash for the crevices. 5957 I will be using Vallejo acrylics throughout. 6651 While I was trial fitting the Figure I noticed that the forward part of the Lower cheek seemed a little short. This looked unfinished to my eye. 6655 Generally where a full figure was involved the feet rested on or against the termination of the cheek moulding, as shown in the Marshall painting. 6646 I may be able to add a small piece of moulding to the rail. 6654 6652 6647 I quite like the look of the colour which varies given the light conditions but that is not to say that the urge to meddle won’t overcome me at some point. 6660(2) 6658 Still work left to do on the Headworks. B.E. 25/04/22

.thumb.JPG.e0cd658746e485c9b6831e64cea2dcfe.JPG)

- 857 replies
-
- 34
-
-
-
- Sphinx
- Vanguard Models
- (and 1 more)
-
Thank you David, It's worth a go but I would suggest you try laminating the supporter from three separate strips which will be easier to create the quite sharp curve required. I see there are some good drawings of the Diana Headworks in the AotS book. One advantage of lamination is that if three strips are used a profile can be created along the face of the supporter. The top of the supporter should be square with the underside of the Cathead which I didn't quite achieve, but given the size I just about got away with it. I await with interest to see the results of your endeavours. Regards, B.E.
- 857 replies
-
- 4
-
-
- Sphinx
- Vanguard Models
- (and 1 more)
-
Thanks Ron, I just hope my blue colour mix lasts the distance. It should do there's not a lot of painting left to do. I felt I had to put the extra effort into the Rails as there will be nothing to distract the eye, no Catfalls with large hook, anchors, or rigging. Regards, B.E.
- 857 replies
-
- 3
-
-
- Sphinx
- Vanguard Models
- (and 1 more)
-
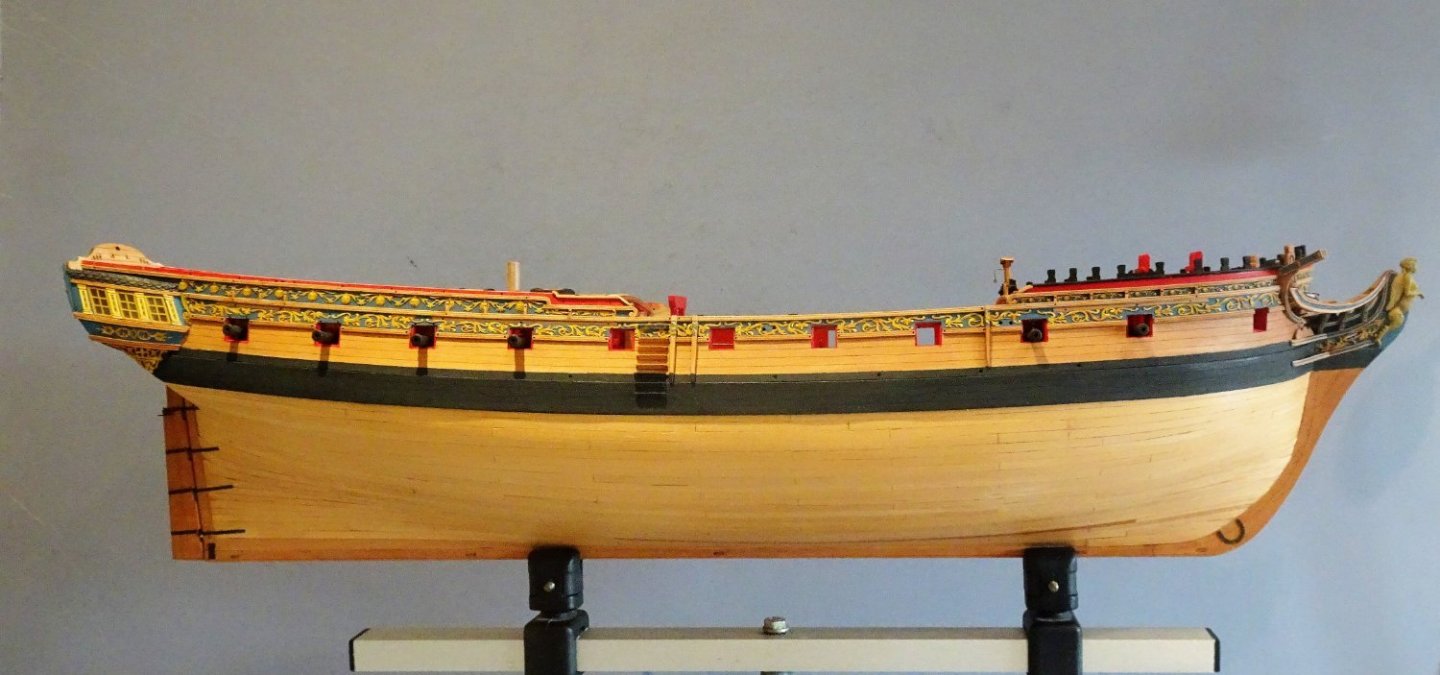
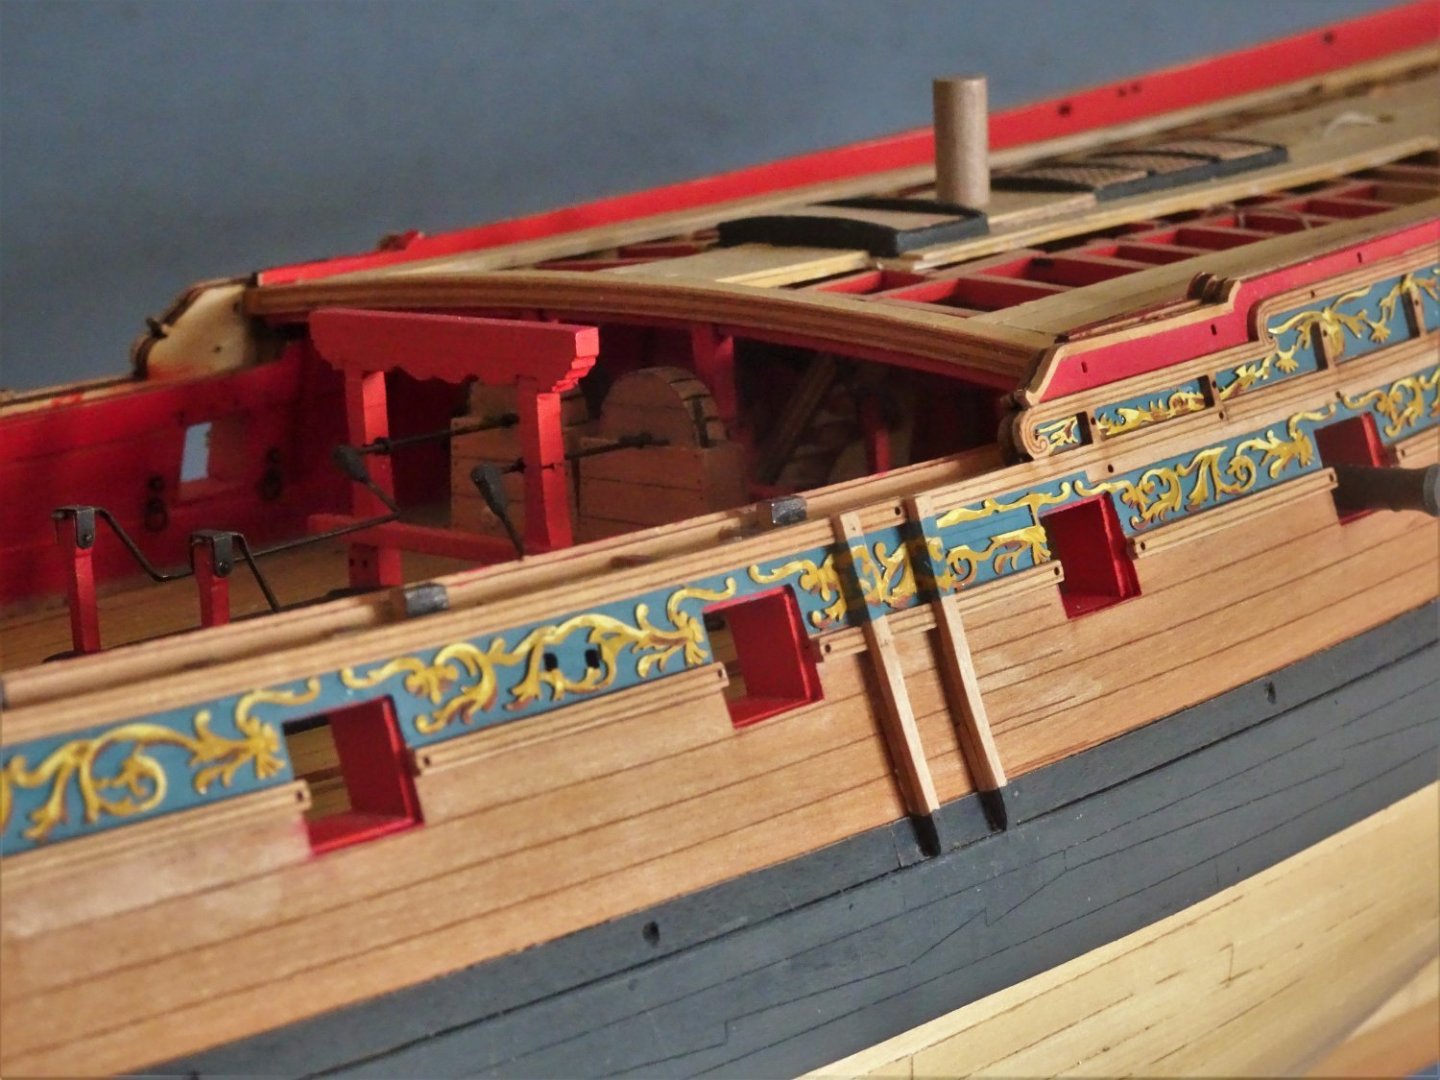
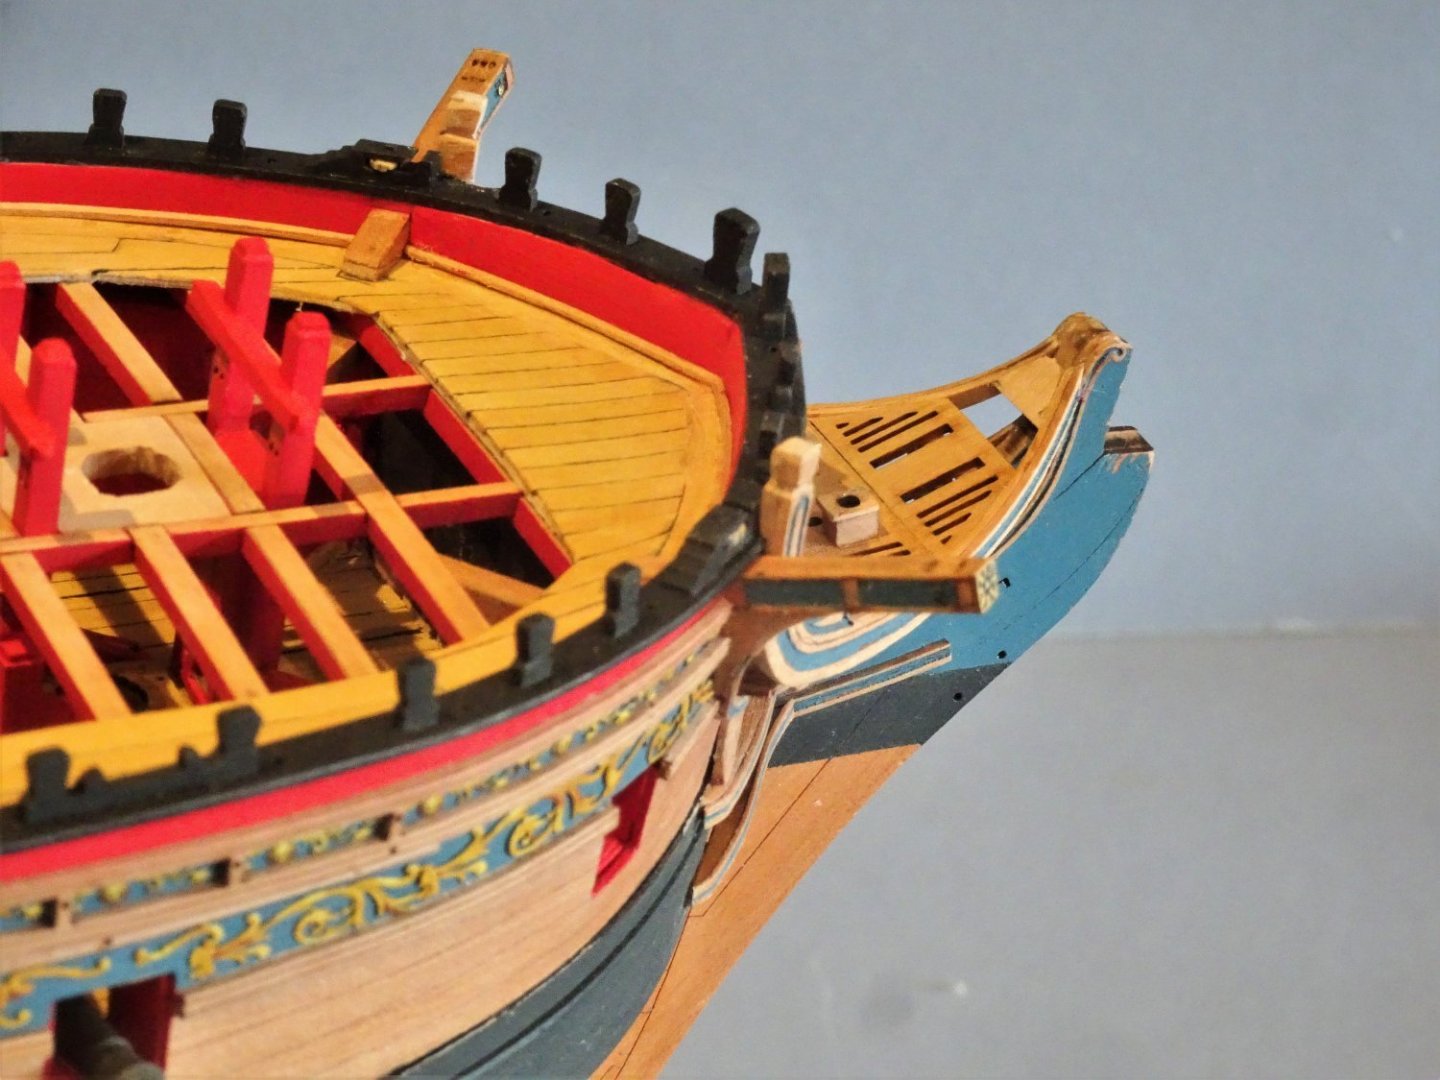
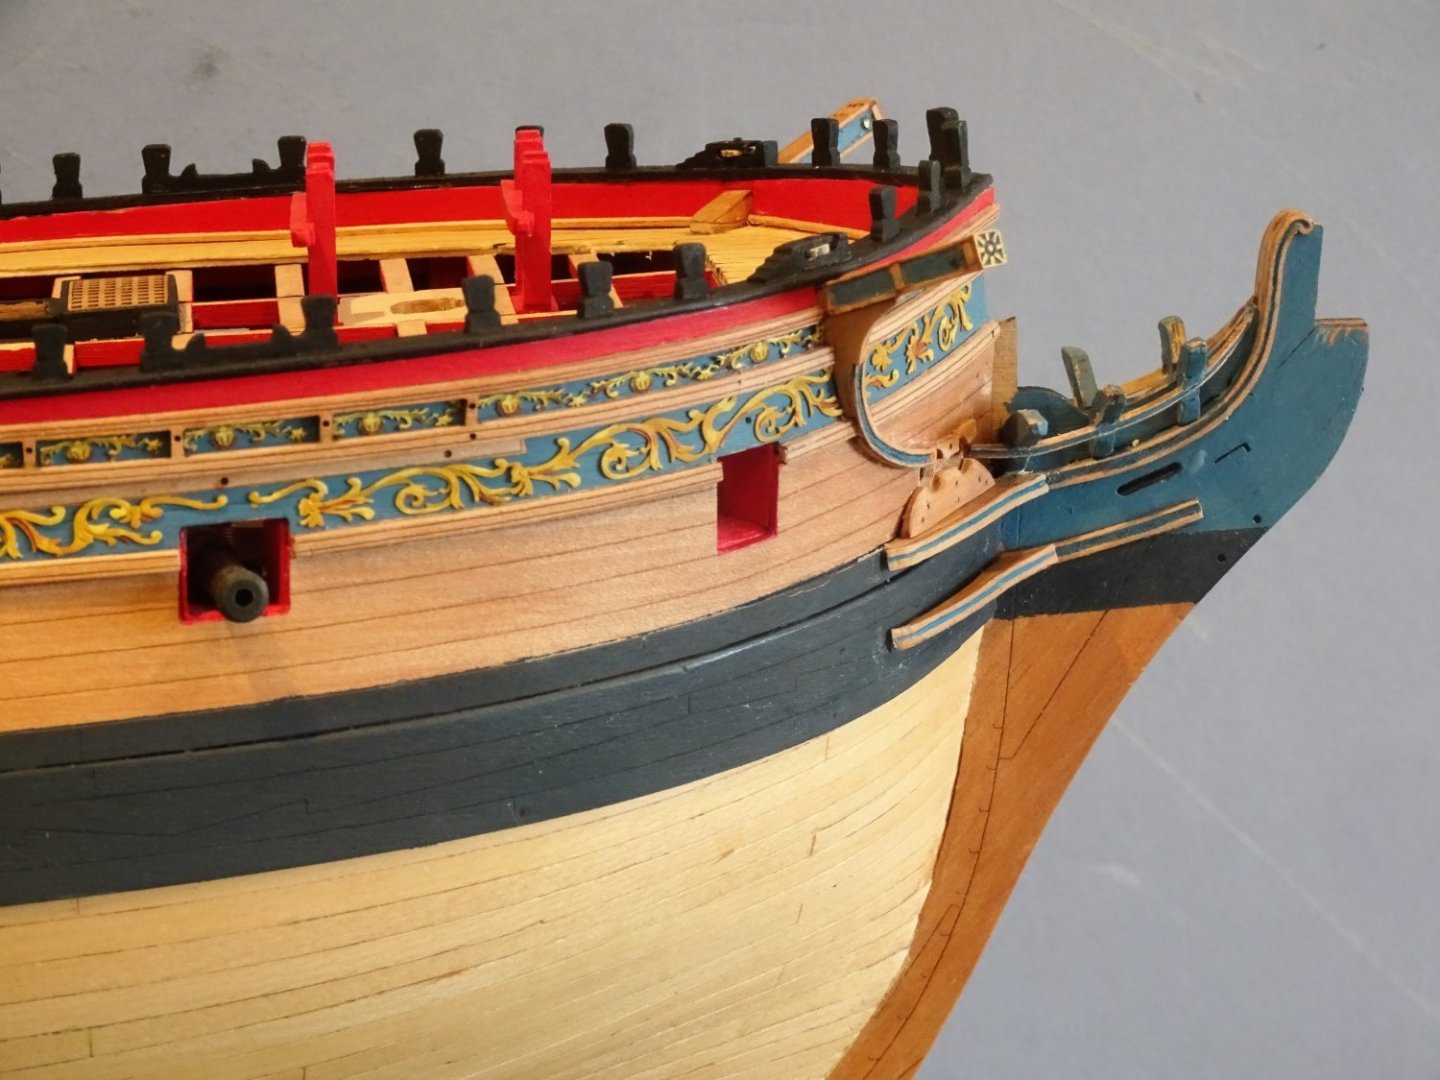
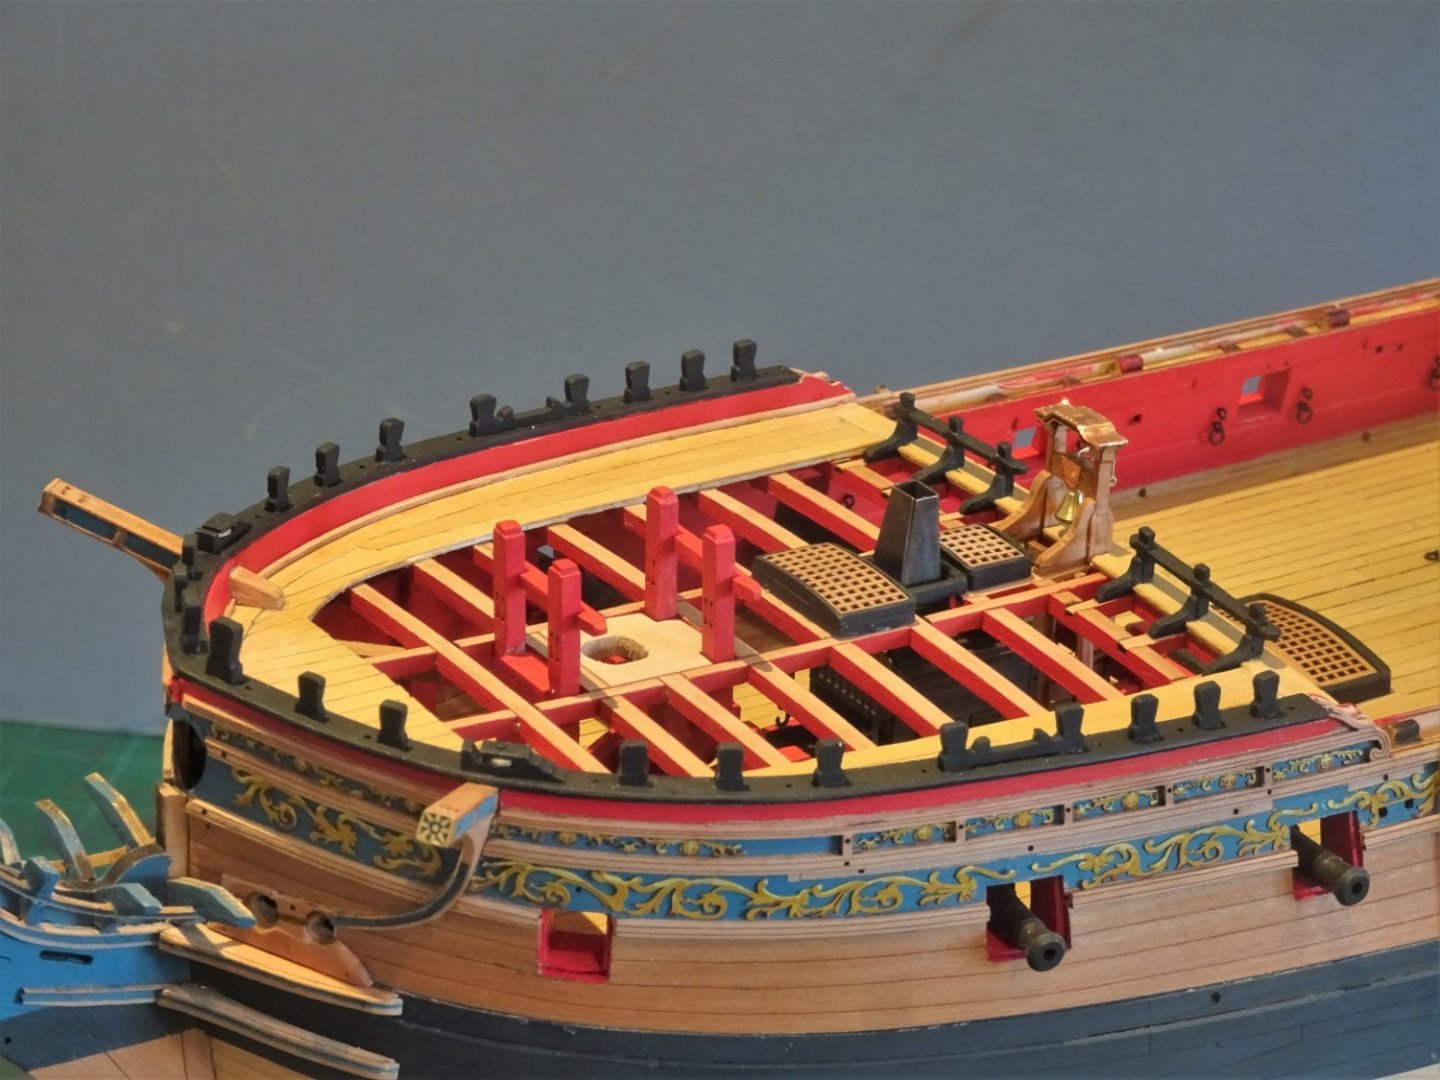
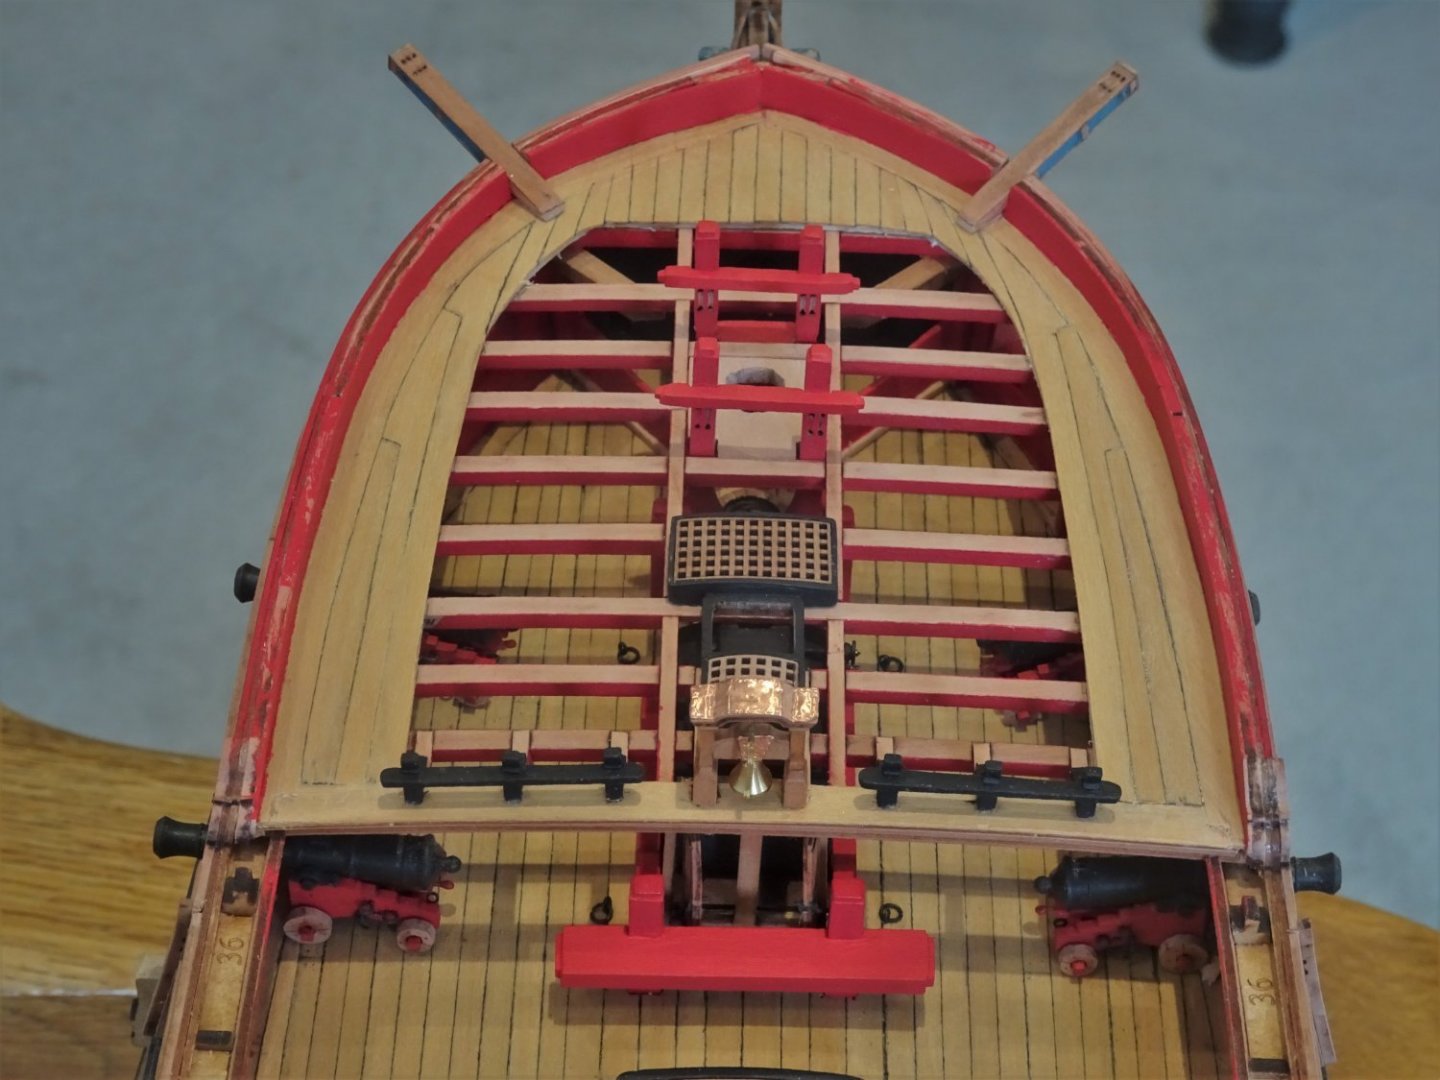
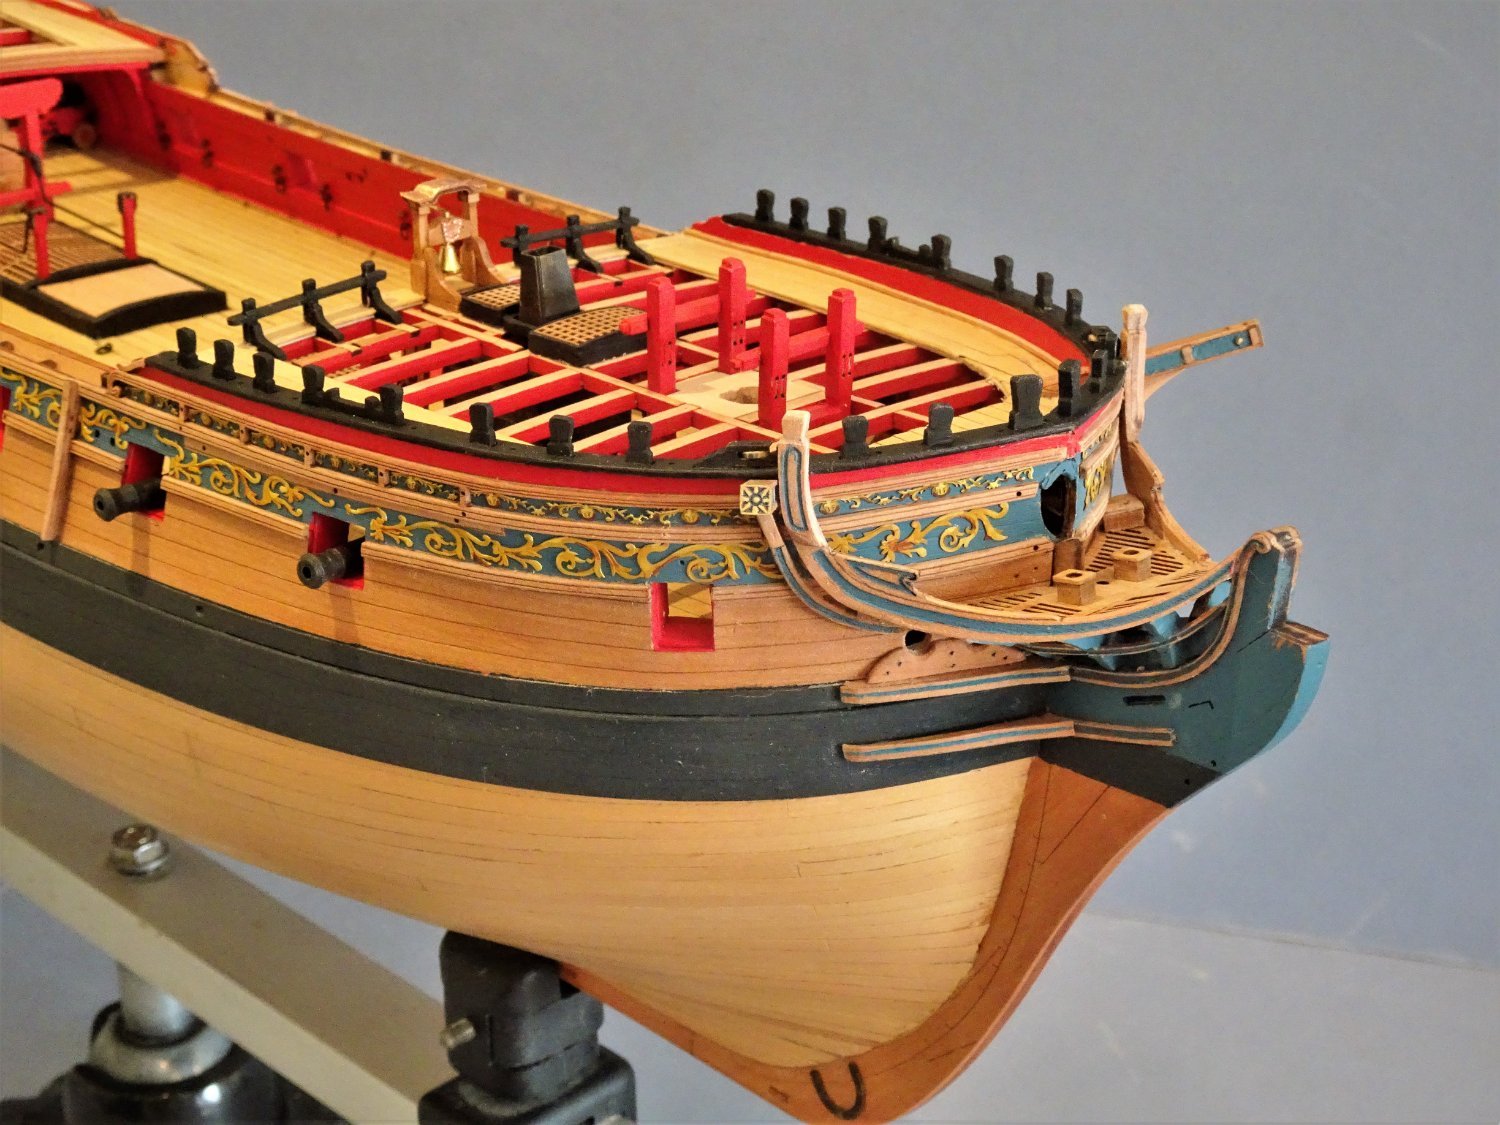
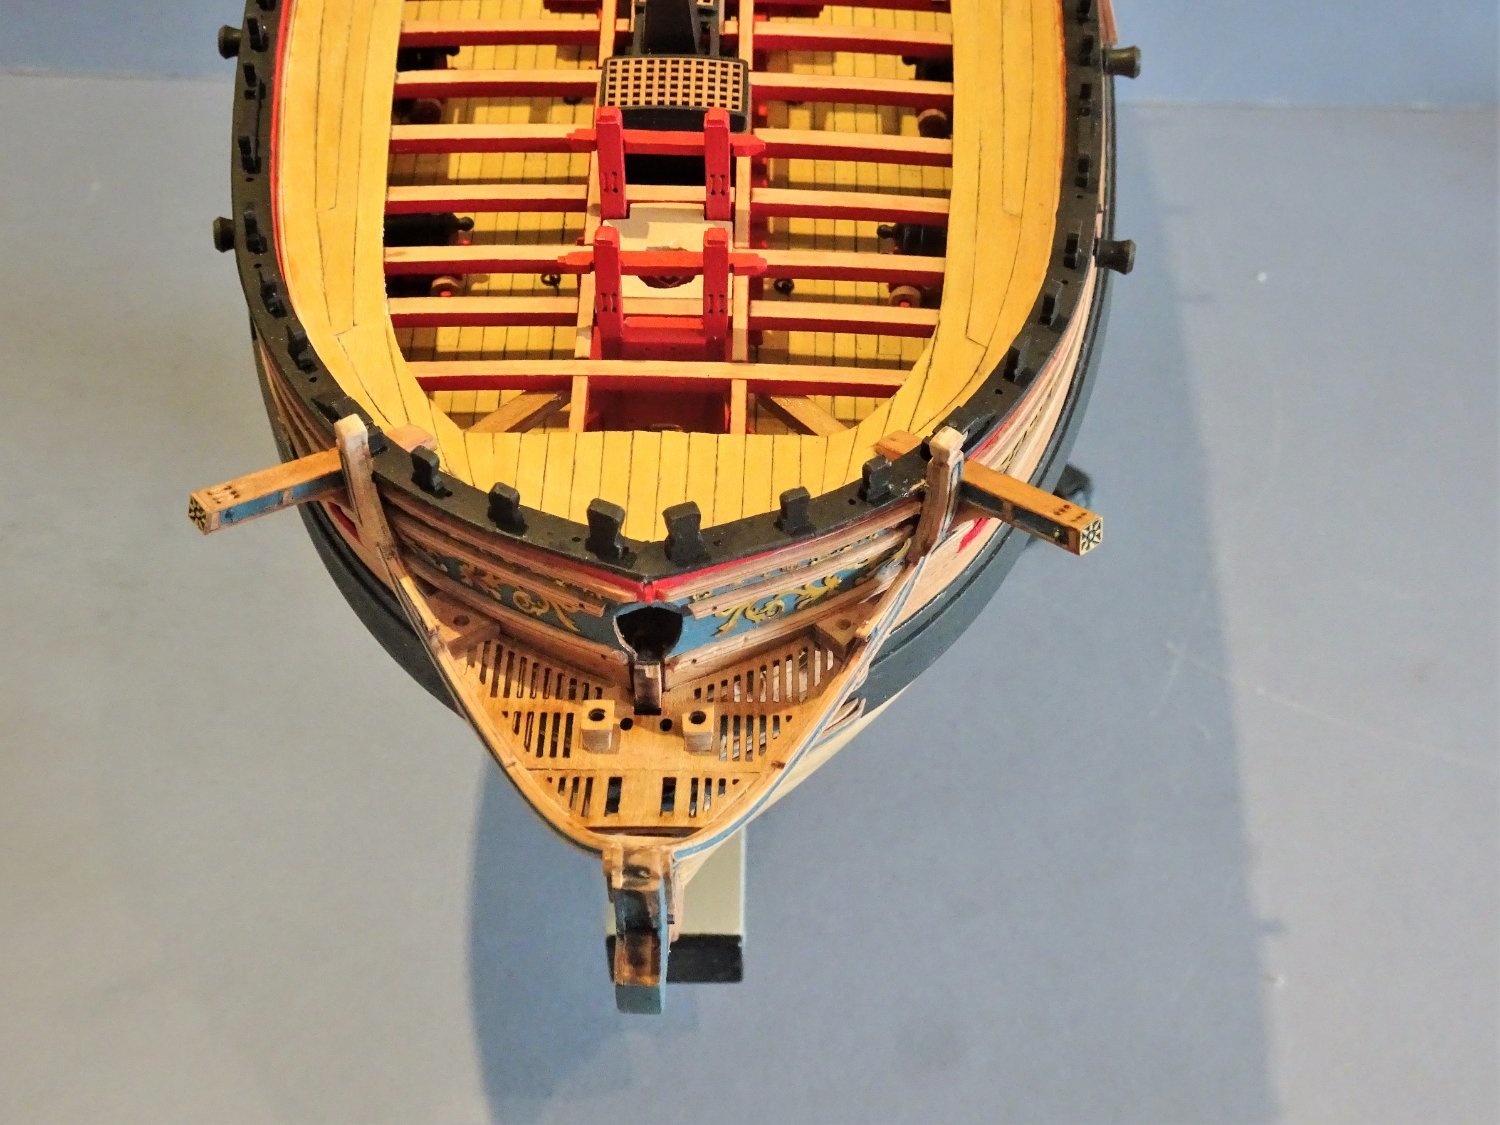
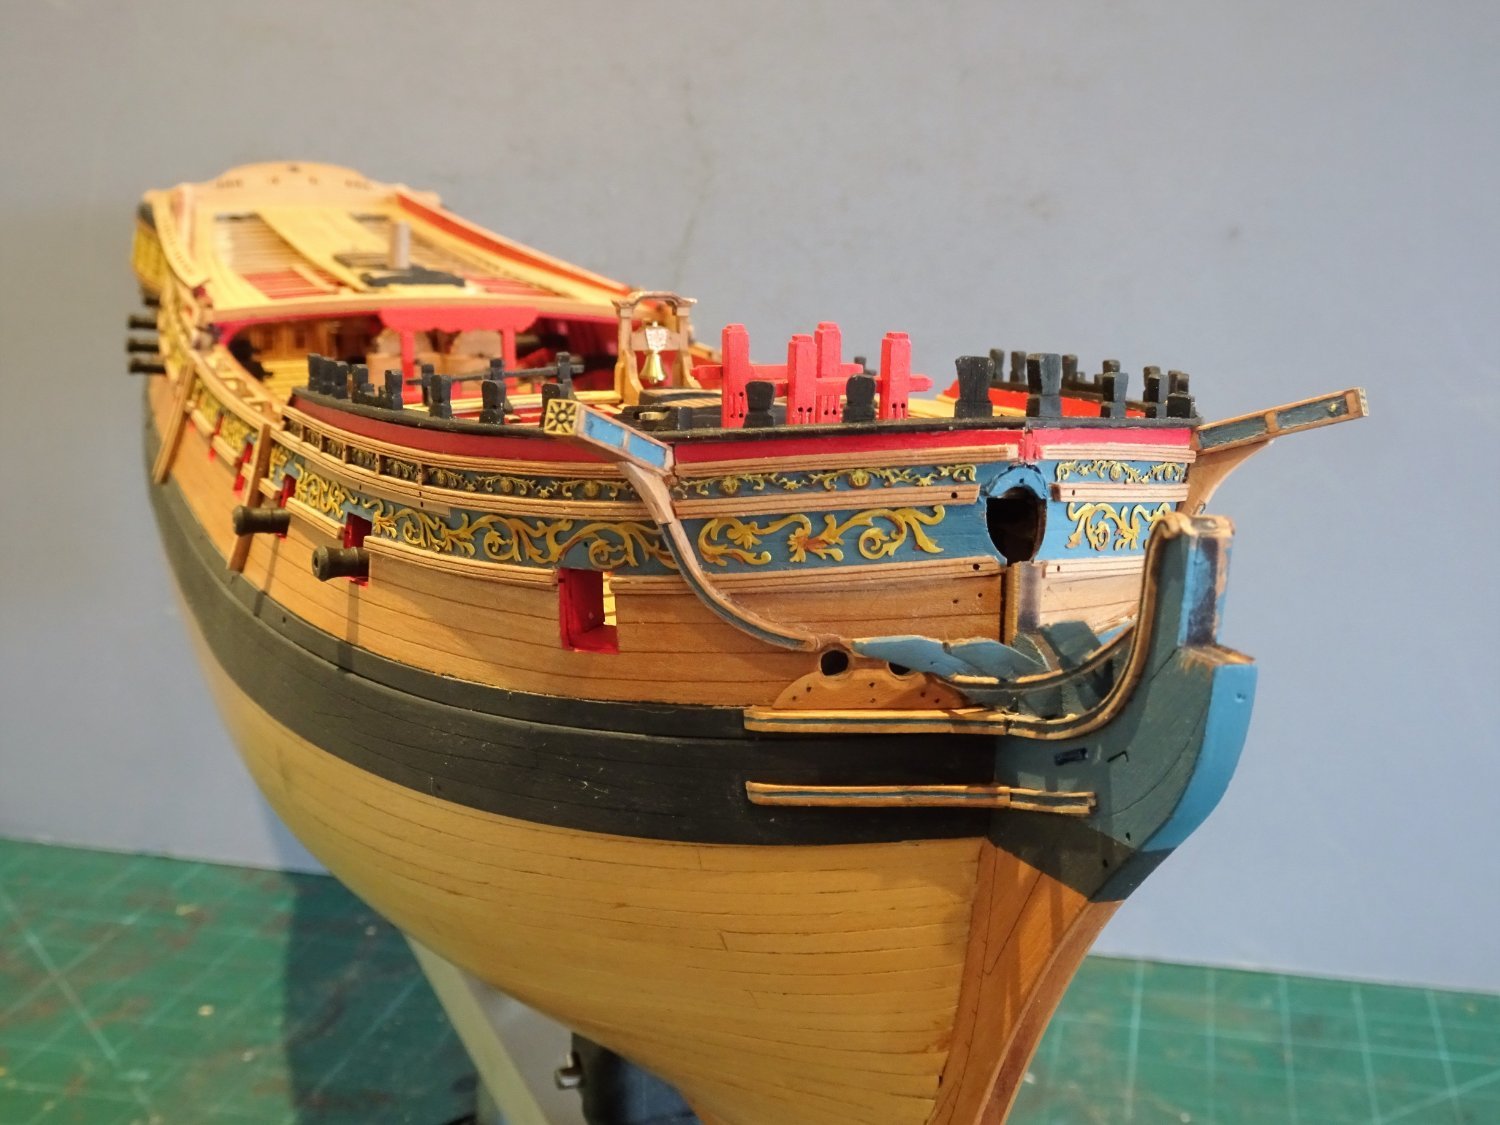
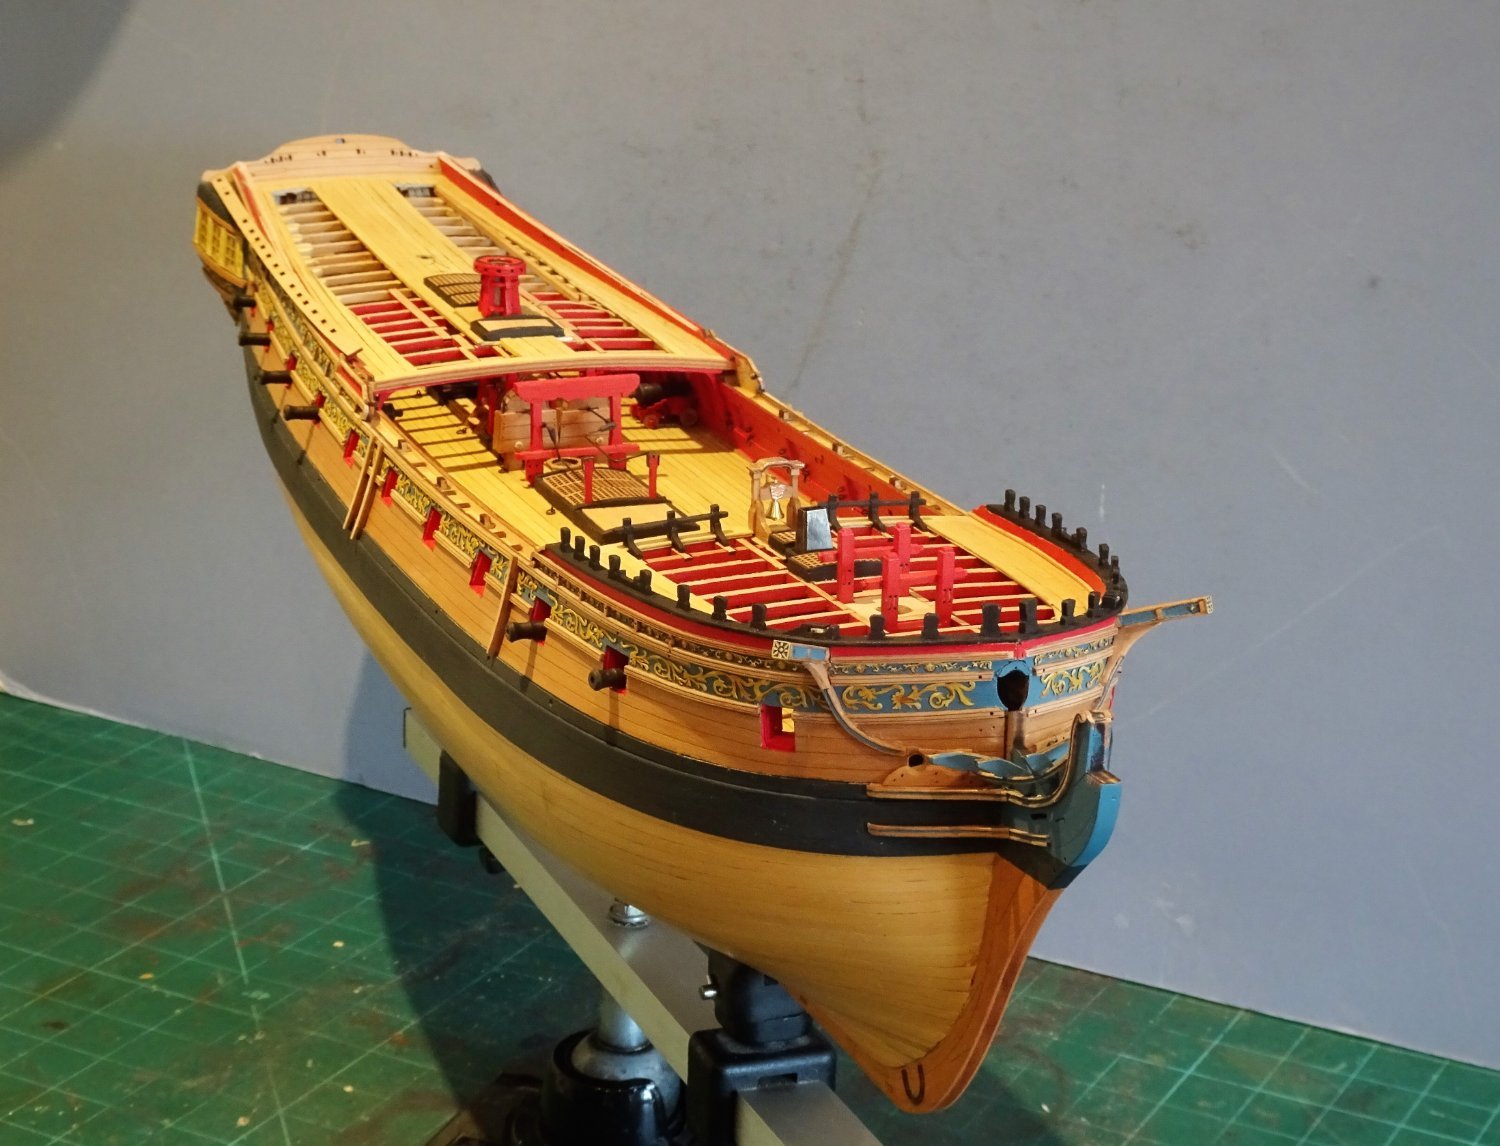
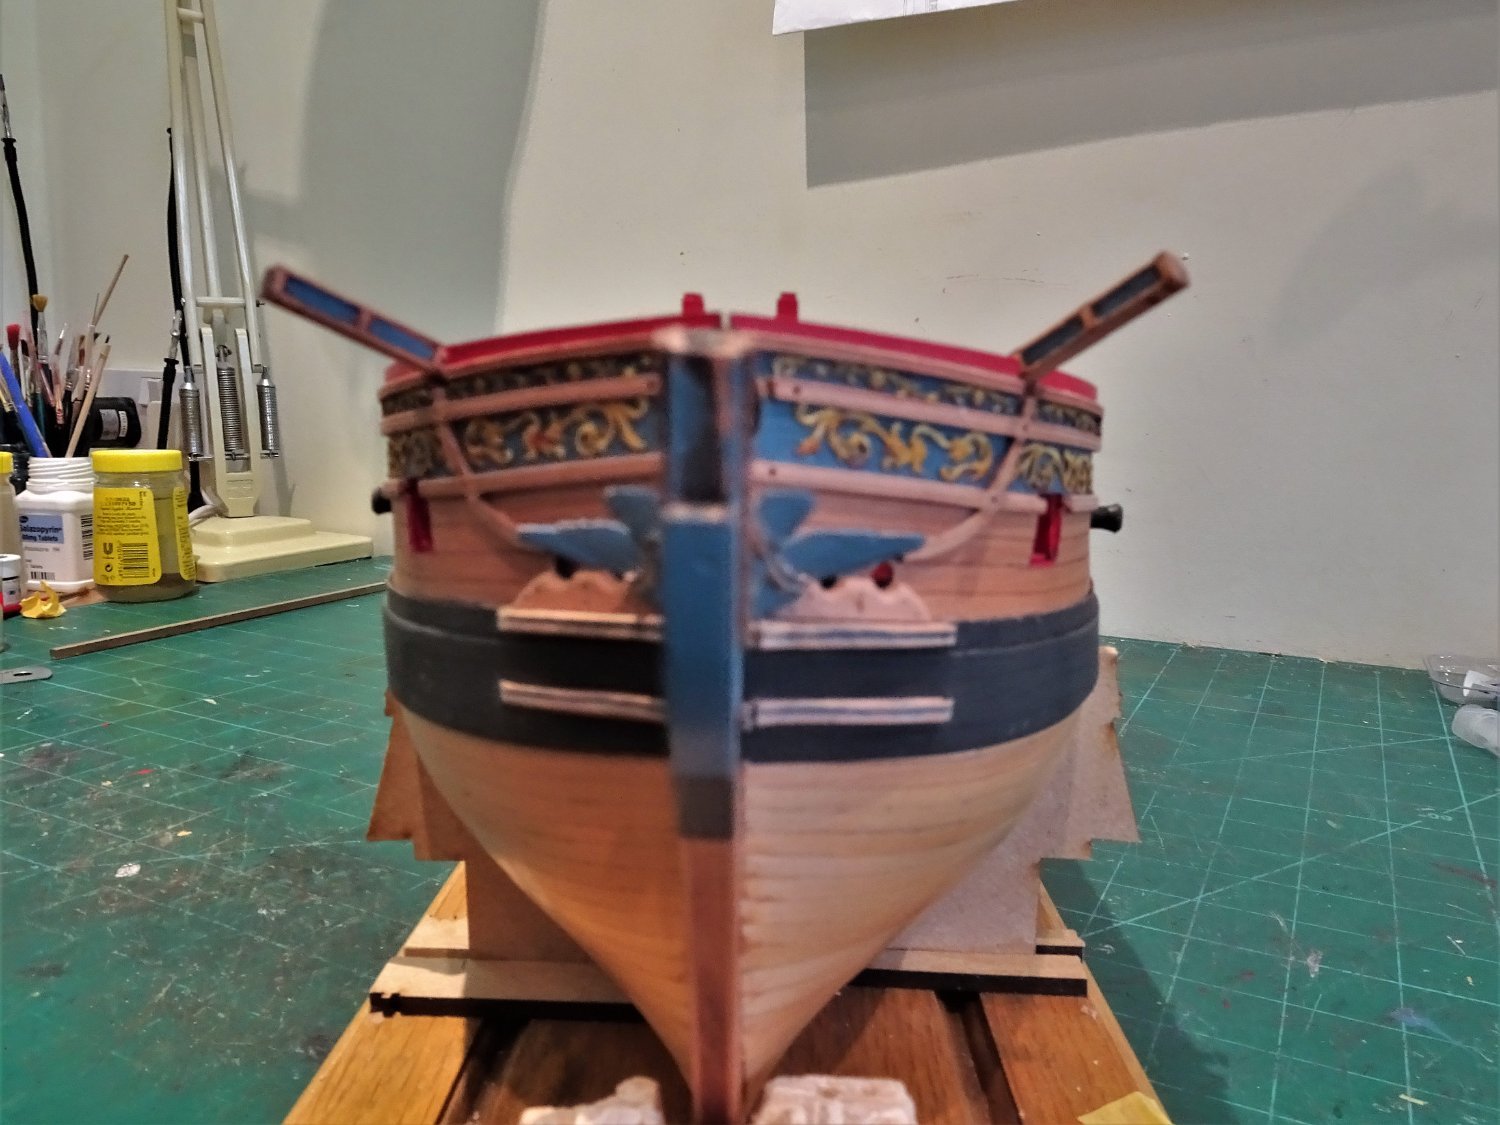
Post One Hundred and Twelve. The Headworks. This, together with the stern have a deal of visual impact and need to look good. Some of this work has already been completed, the Head timbers, Upper and Lower Cheeks, and their associated Eking Rail and Hair Brackets. I had not yet fitted the grating pattern in place as indicated much earlier in the build, but this is now the next step. The Main Rail There is no denying, Main Rails are tricky, but Chris has produced a version that replicates the elegant curve up to the head and is the first model I have made where I haven’t had to replace this element. It is a three-section assembly which gives a combined thickness of 3mm at the head tapering to 1.8mm at the bow. 6617(2) As a simplification the False rail has been made part of the overall laser cut part, but ideally it should be a little thinner than the Main rail to which it would have been bolted. There is an outer section that beefs up the timberhead and stands proud of the rail. This creates the Stepdown which is a feature of the Main Rail. This benefits from a little light paring down to meet the lower level. Fitting the Rails The blurb gives a two-line instruction The rails can now be fitted to the bow as seen here and on plan. If only it were that simple! Yes, it can be, but the fit will be less than desirable. The forward tip of the rail fits nicely over the inner side of the Hair Bracket, but it seems to me that for the upper part of the Rail to sit correctly the back edge needs to be notched to fit over the Capping rails overhang and the Upper Hull rails. I start by holding the forward end in place and mark on the inner end where the upright crosses the hull rails. An angled notch is cut in the upright from aft. 6621 None of this will be seen with the Main rail in place. I also found it necessary to shape the grating pattern a little at the Fore end for a tension free fit. Ideally it would be useful to pin the Fore end to the Hair bracket but it so fine that the smallest pin I have tended to split it. I used pva to glue the rails in place knowing that should I need to remove them I could do it without damage. The following are the macro shots taken purely to give myself pain, otherwise known as highlighting areas for improvement.🙄 6628 6626 I decided to add a second pair of easement seats fitted between the False Rail and the bow. I suspect that these seats were far more popular than the exposed pair, but maybe that's just an assumption by a 21st c. man. 6625 6624 6622 6635 I have added the Saddle where the two rails meet at the bow between the Hair brackets. 6634 6632(2) Still work to do on the bow but overall, I’m satisfied the way the Main rails turned out. B.E. On this St George’s Day.
.thumb.JPG.afe7e54afad094f915134d18650737b8.JPG)


.thumb.JPG.13852d40217aaf1c42cdc11b0d68a1ec.JPG)

- 857 replies
-
- 28
-
-
-
- Sphinx
- Vanguard Models
- (and 1 more)
-
Progressing well Glenn, One suggestion I would make is to paint diluted pva onto the footropes (Horses) and roll a paintbrush handle over them until they hang smoothly. Where stirrups are involved I also hang small weights off the end before trimming to keep them straight without curl. (I tend not to use brass etch stirrups) B.E.
- 476 replies
-
- 3
-
-
-
- sphinx
- vanguard models
- (and 1 more)
-
I’m sorry Chuck I don’t know the answer to your question, but it’s certainly available to those members of the Tffm club. B.E.
- 857 replies
-
- 2
-
-
- Sphinx
- Vanguard Models
- (and 1 more)
-
Thank you Mike, The etched frieze designs on Sphinx are a tad finer than that used on Pegasus, but I followed the same procedure with Pegasus, and was very happy with that result as well. I followed the method described in 7.26 of Vo 11 of Tffm. On Sphinx I used Vallejo acrylics, but I think I used oils on Pegasus. You could always try hand painting on a frieze wide strip of suitable paper and see which you like best. It's always nice to do hand painted stuff but painting the brass to make it look like paintwork satisfied my artistic needs. Regards, B.E.
- 857 replies
-
- 5
-
-
- Sphinx
- Vanguard Models
- (and 1 more)
-
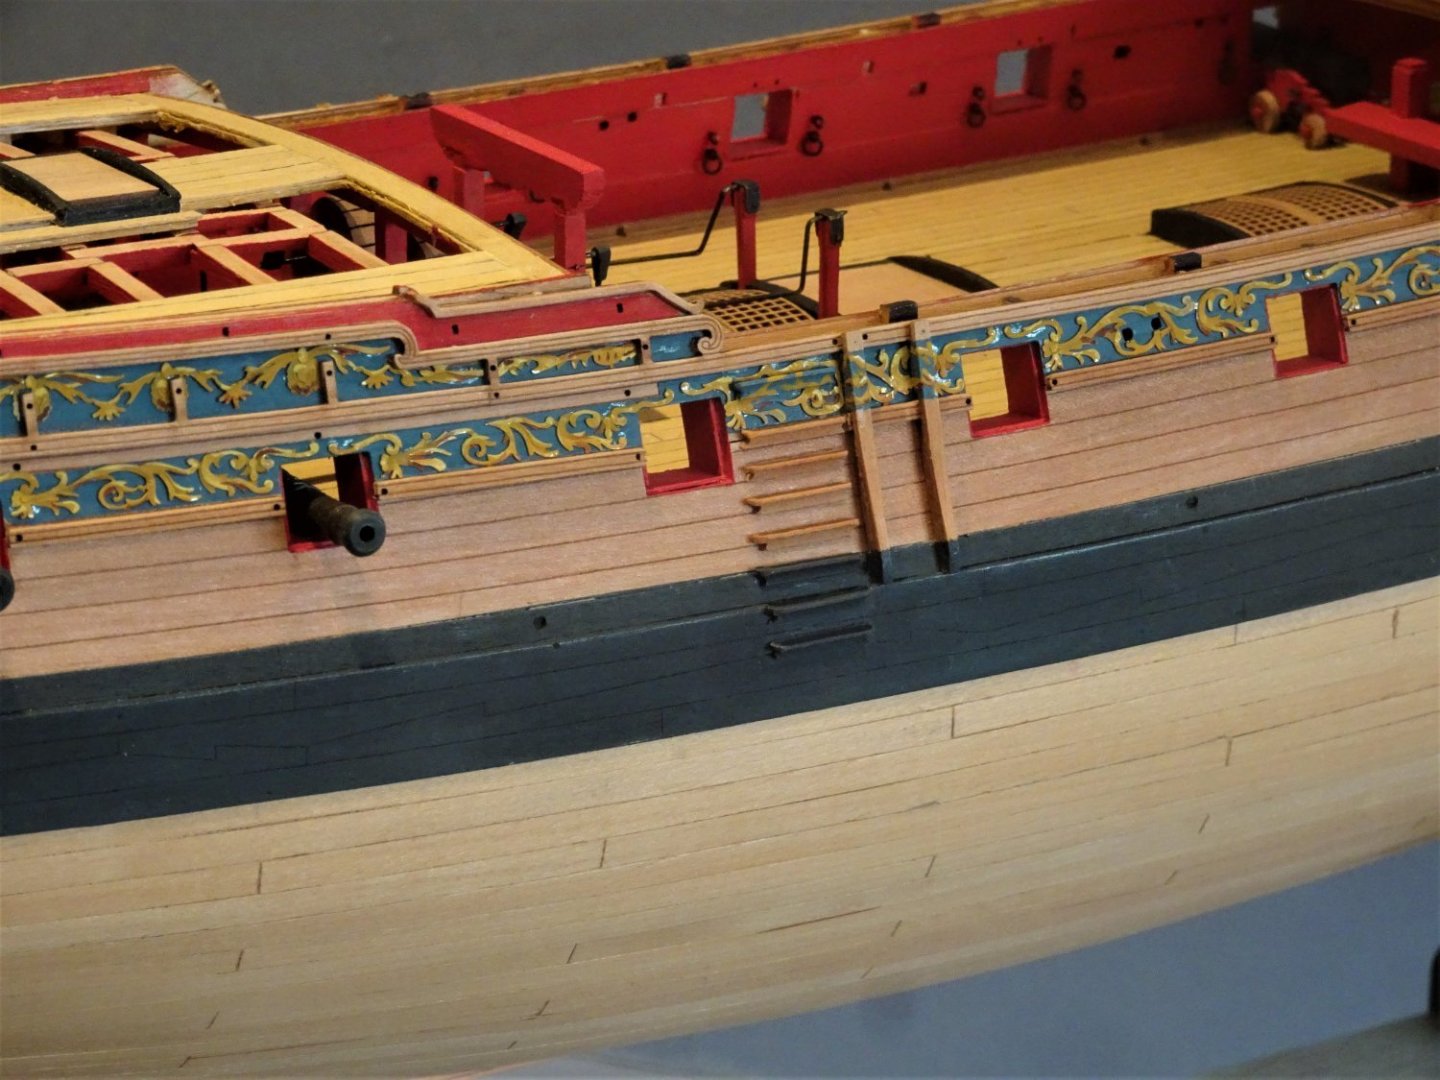
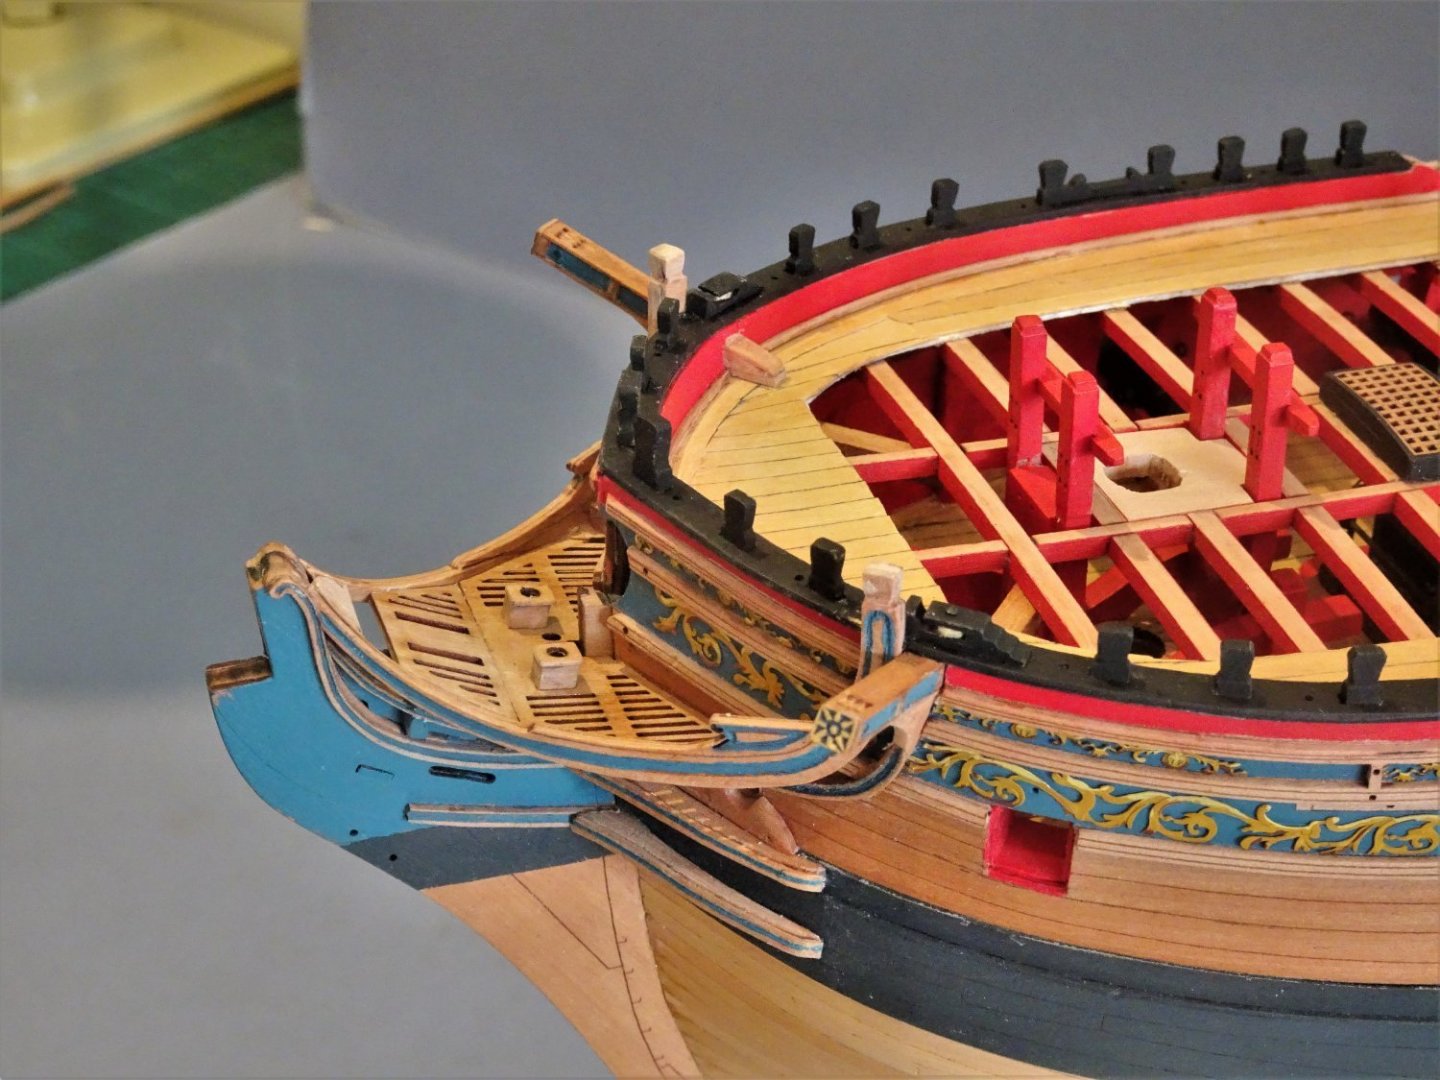
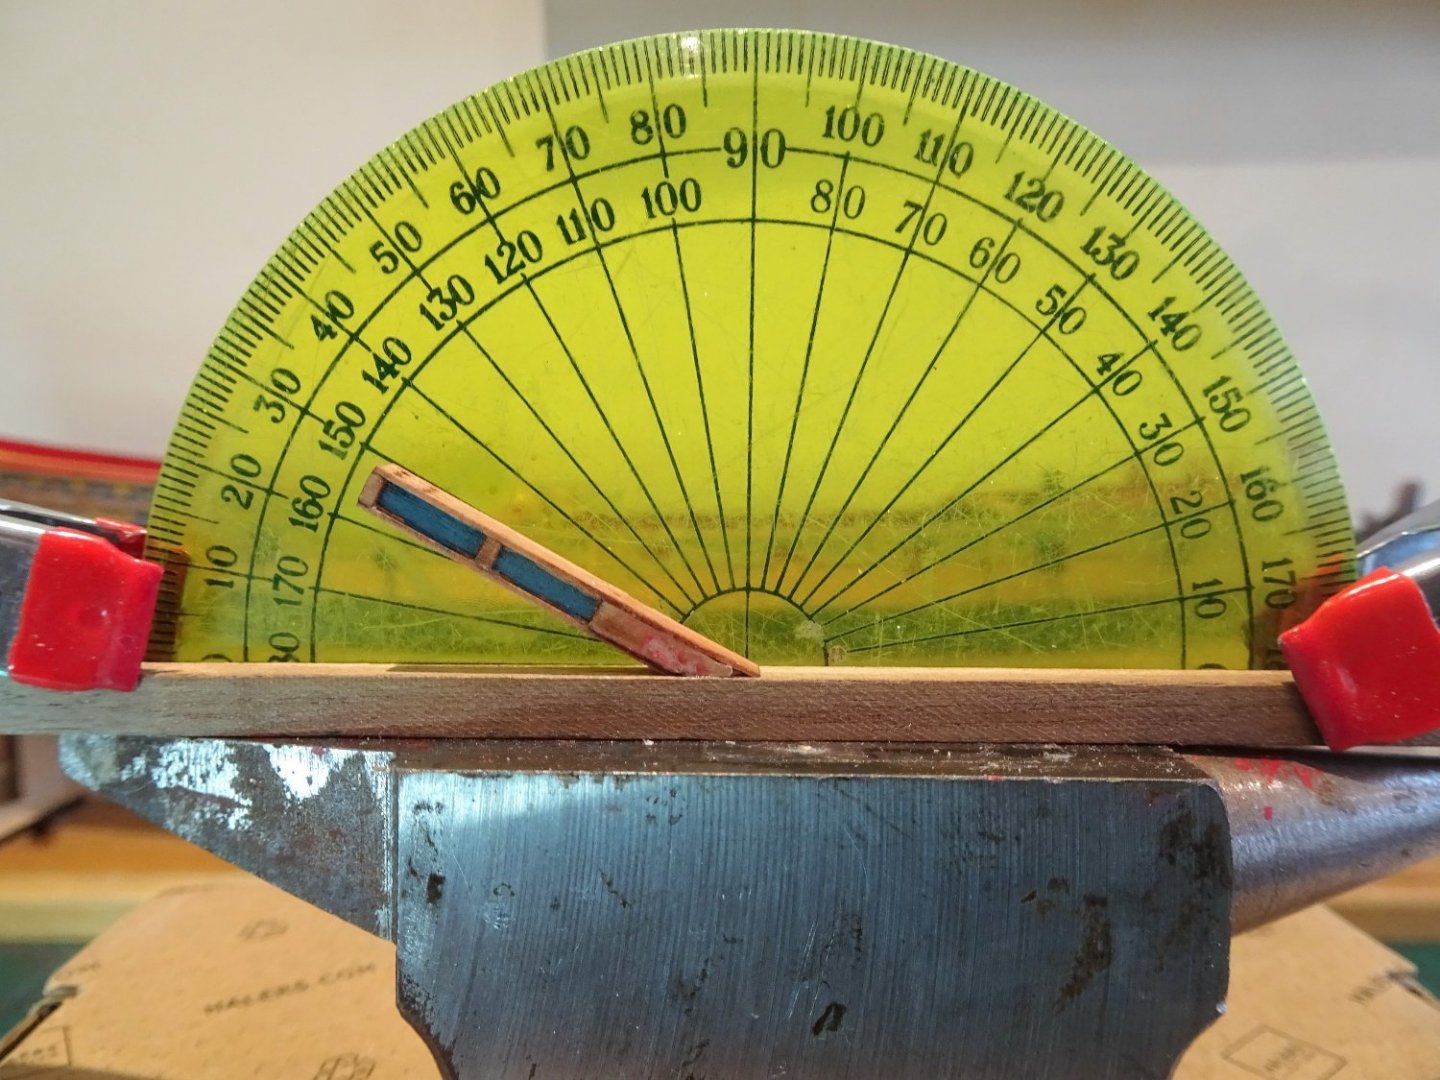
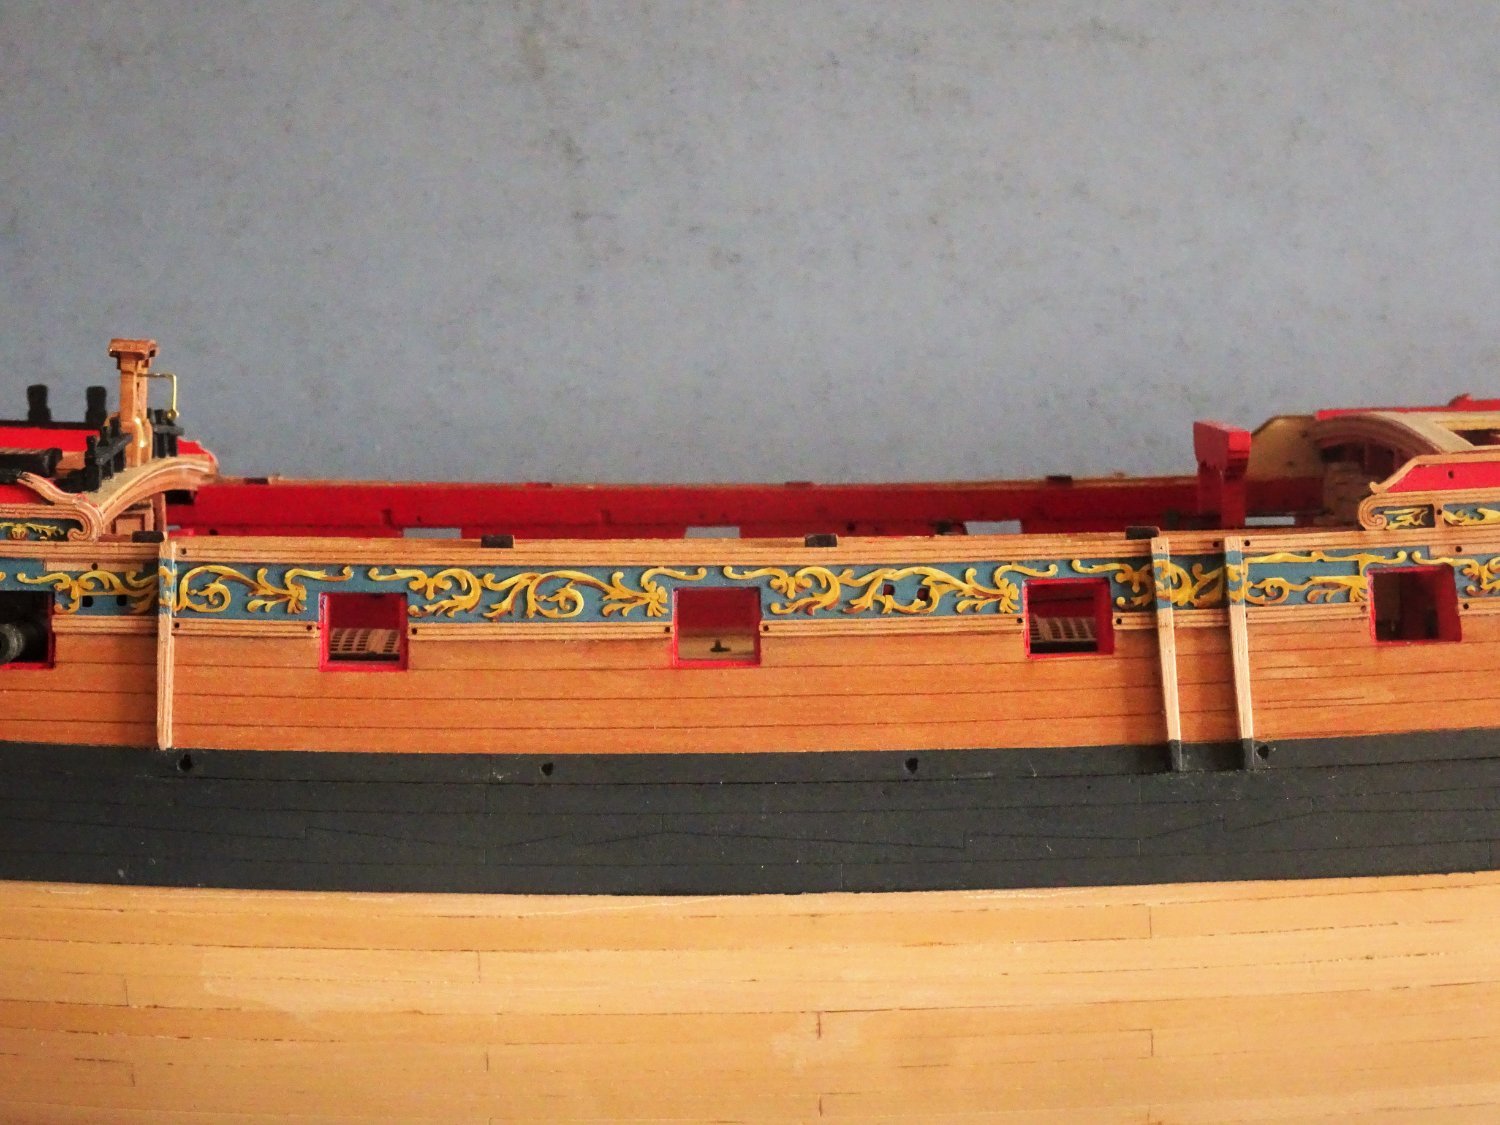
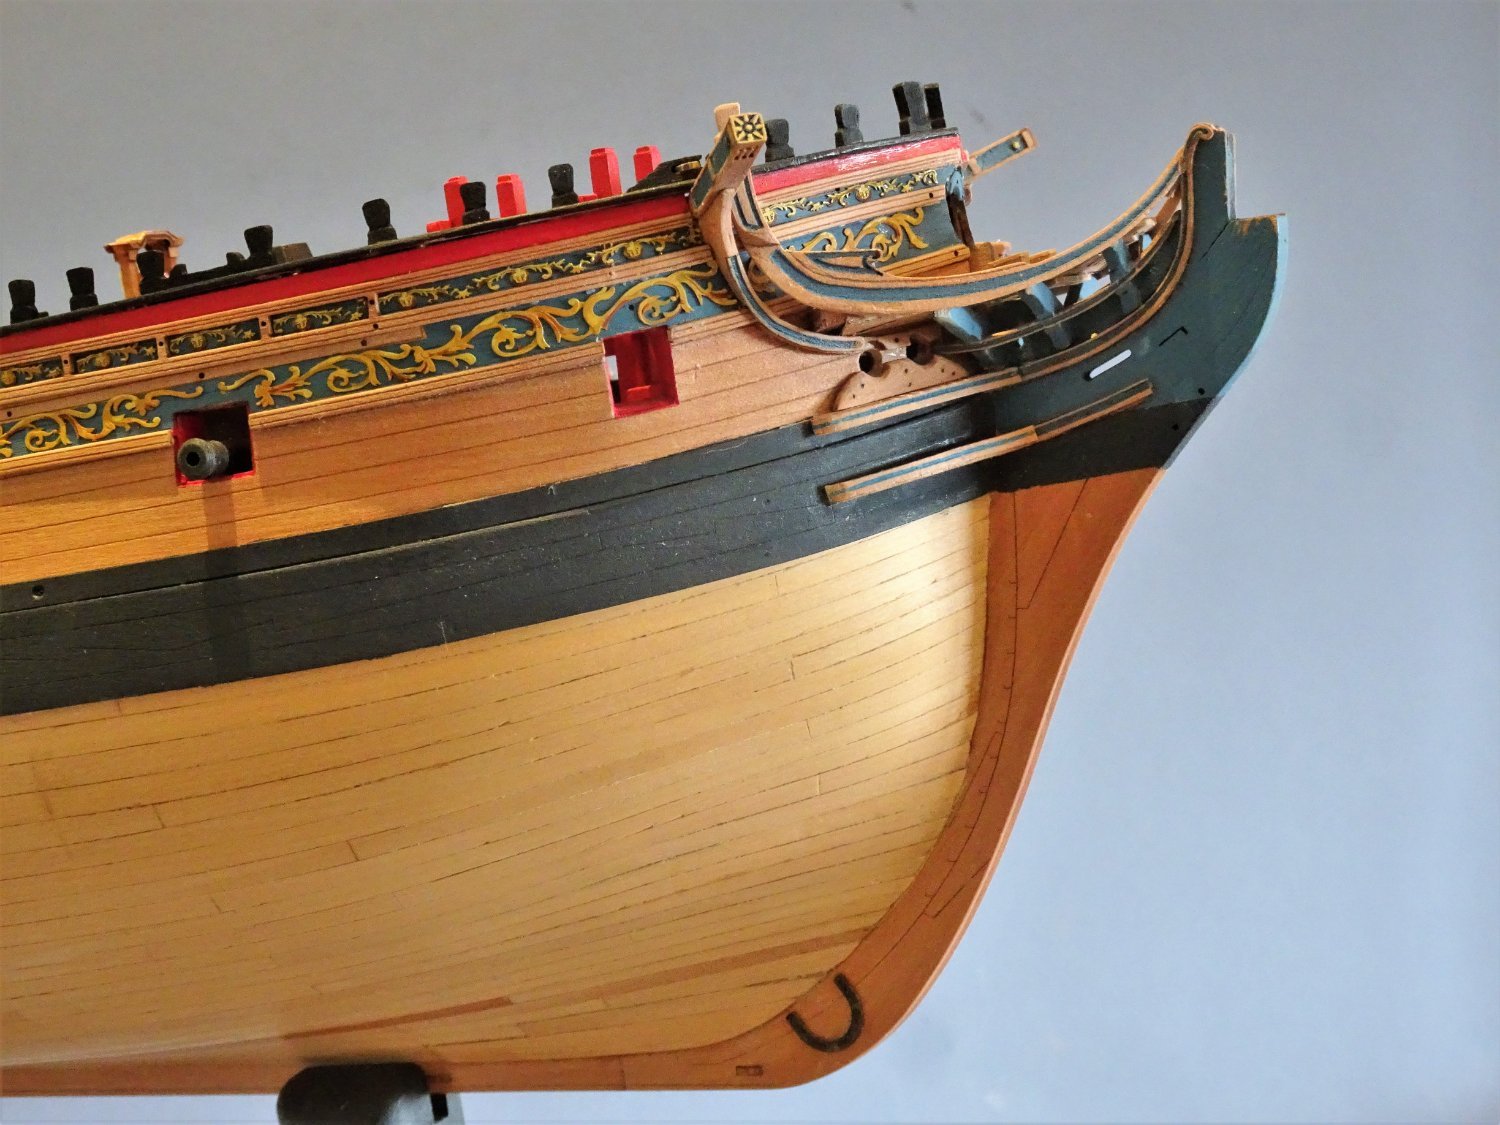
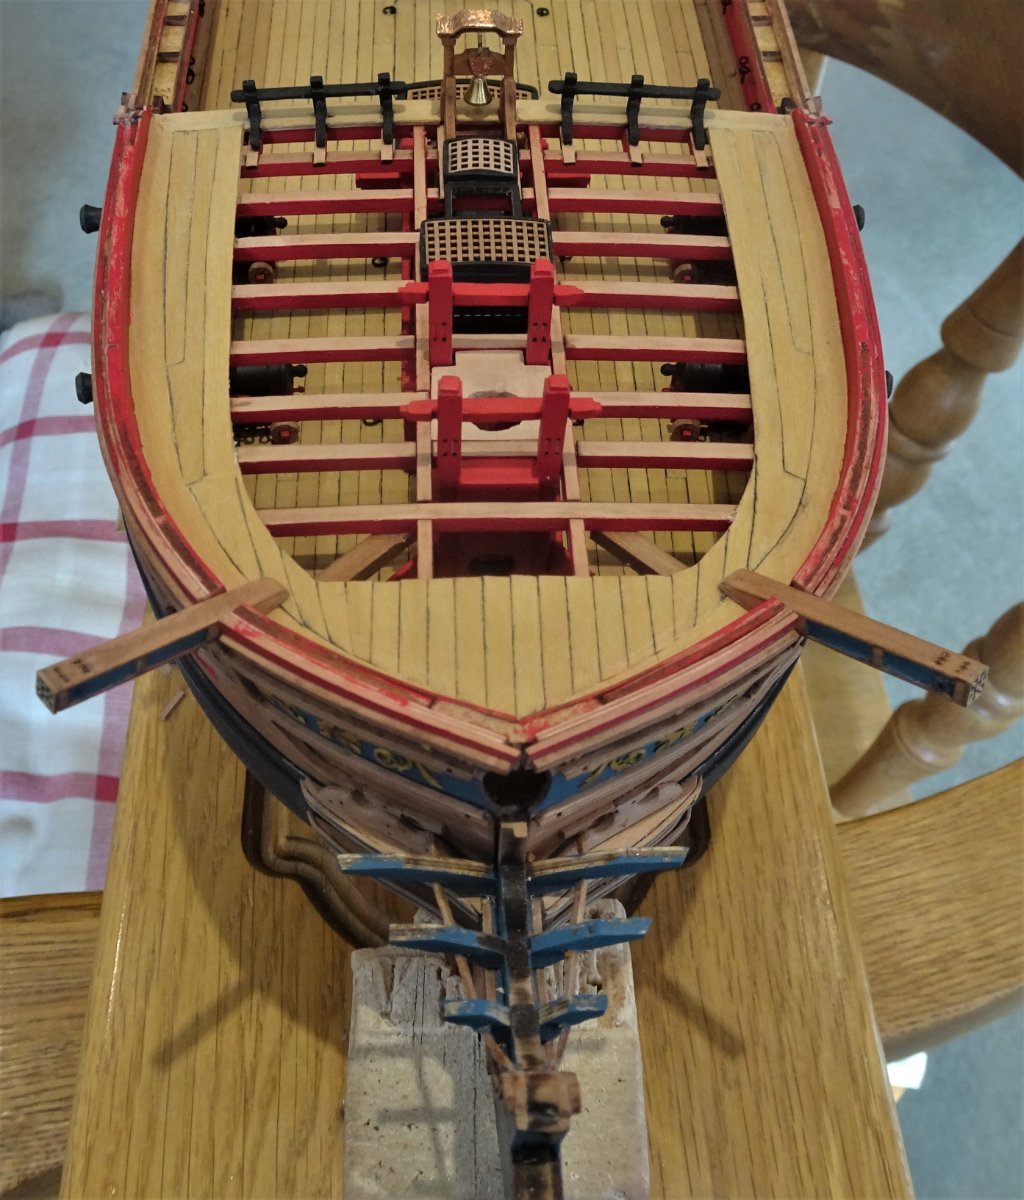
Post One Hundred and Eleven. Foc’sle Capping Boards and Timberheads The instruction is to have the inner edge of the rail flush with the inner bulwark. On my model at least there was a little lining-up mismatch in the curve around the bow area. This is most probably due to the way the round on the hull was faired all those months ago. 6564 The capping rails were on and off the model numerous times before eventually painting and gluing in place. The timberheads are individual and position specific. It took me some time to locate them on the parts sheet (sheet6) and the location plan (sheet14) and then find the actual timber sheet. 6608 The Timberheads are quite nicely shaped and only need cleaning up before painting. I was pleased that they slotted into the capping rail with a perfect fit. Note that the bottom edges are angled to suit the sheer line. The Fish davit supports and Snatch block at the Cathead are nicely detailed. Cathead supporters There should be a smooth curve to meet the Eking rail but at this scale it will be a tricky thing to carve the curve out of a solid block, so I tried the water/heat bend approach first. The kit item was used as a template to draw the shape with a much longer tail onto a piece of 2mm Pear wood. I use the spare fret from the kit as a donor piece. The shape is cut out on the scroll saw and left to soak for several hours. 6578(2) The bend is then induced to match the pattern of the eking rail. 6577(2) This took more than one soaking to get as close as I could without splitting the wood. An alternative approach would be to laminate three separate strips of thinner stuff which may be easier to curve. 6580 The top of the supporter where it meets the Cathead requires to be angled to sit right with the curve. This is a bit of a compromise but at least achieves a smooth curve. At the bottom end the Cathead needs to be fayed to meet the Eking rail. Part of the sheer rail pattern that sits beneath the Eking rail needs to be removed to allow the Cathead to sit flush with the hull. 6593 6595(2) 6598 6599 6609 Am I satisfied with the result, perhaps not 100%, but I will reserve further judgement until I come to fit the Main Rail of the Head works. B.E. 21/04/22

.thumb.JPG.bc5014b76a5f7875c505acc7034bef3c.JPG)
.thumb.JPG.29b9c703a3e86c26f5e8b1aeabaf23d2.JPG)

.thumb.JPG.e082dac907c6ec22b0ea4caf777aac73.JPG)


- 857 replies
-
- 19
-
-
-
- Sphinx
- Vanguard Models
- (and 1 more)
-
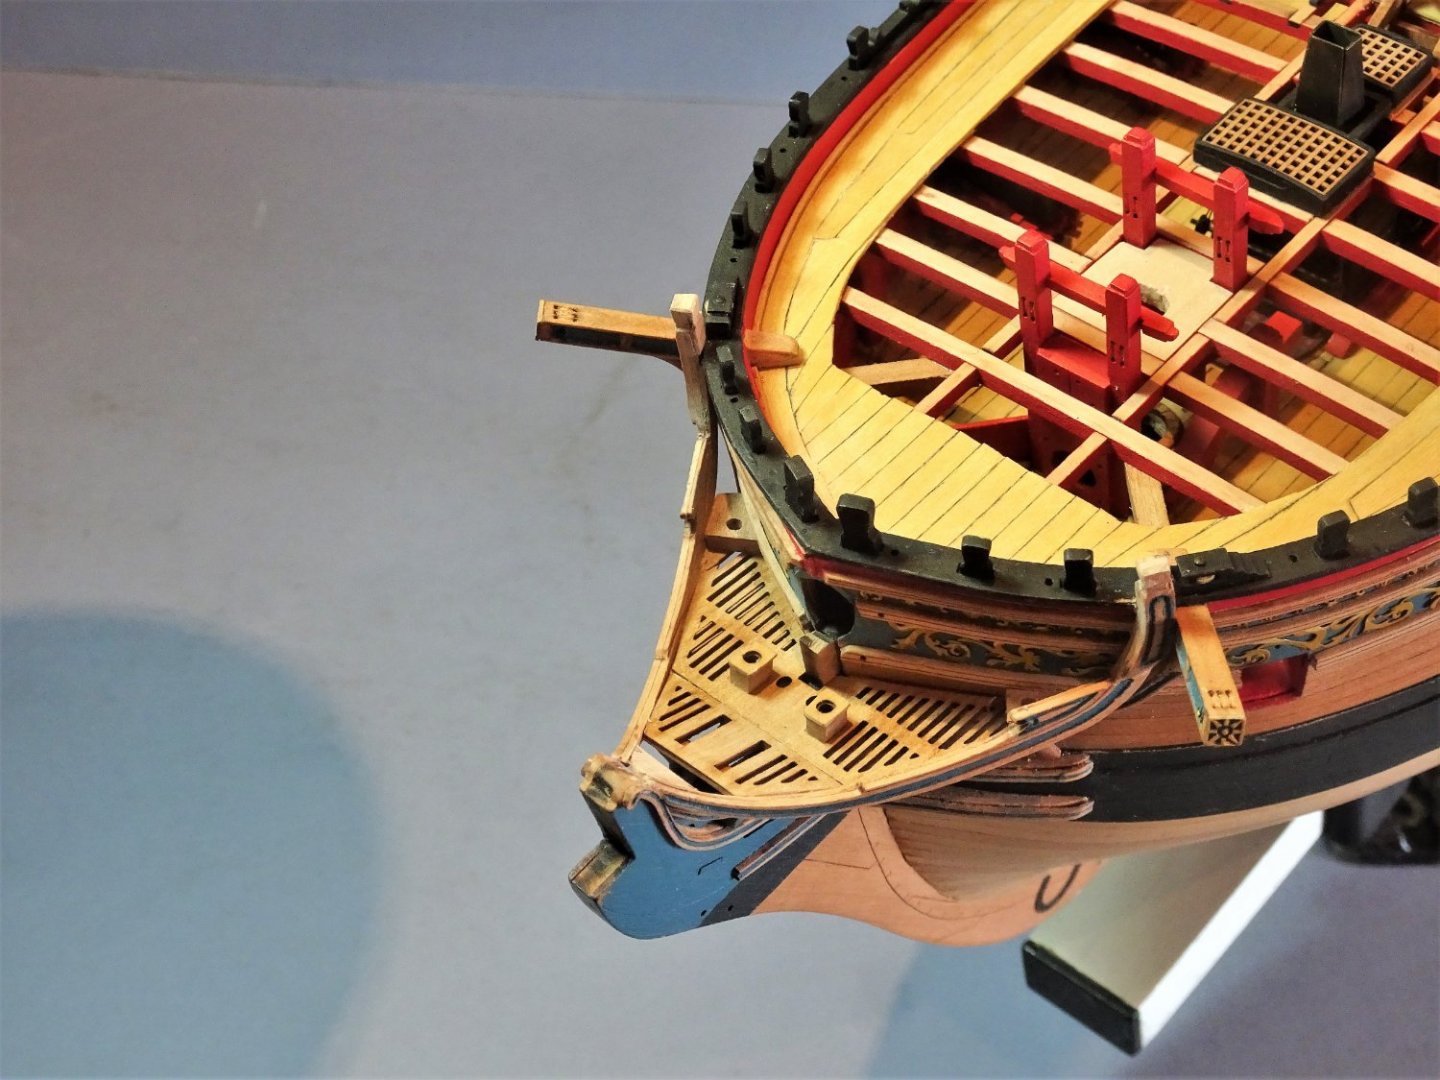
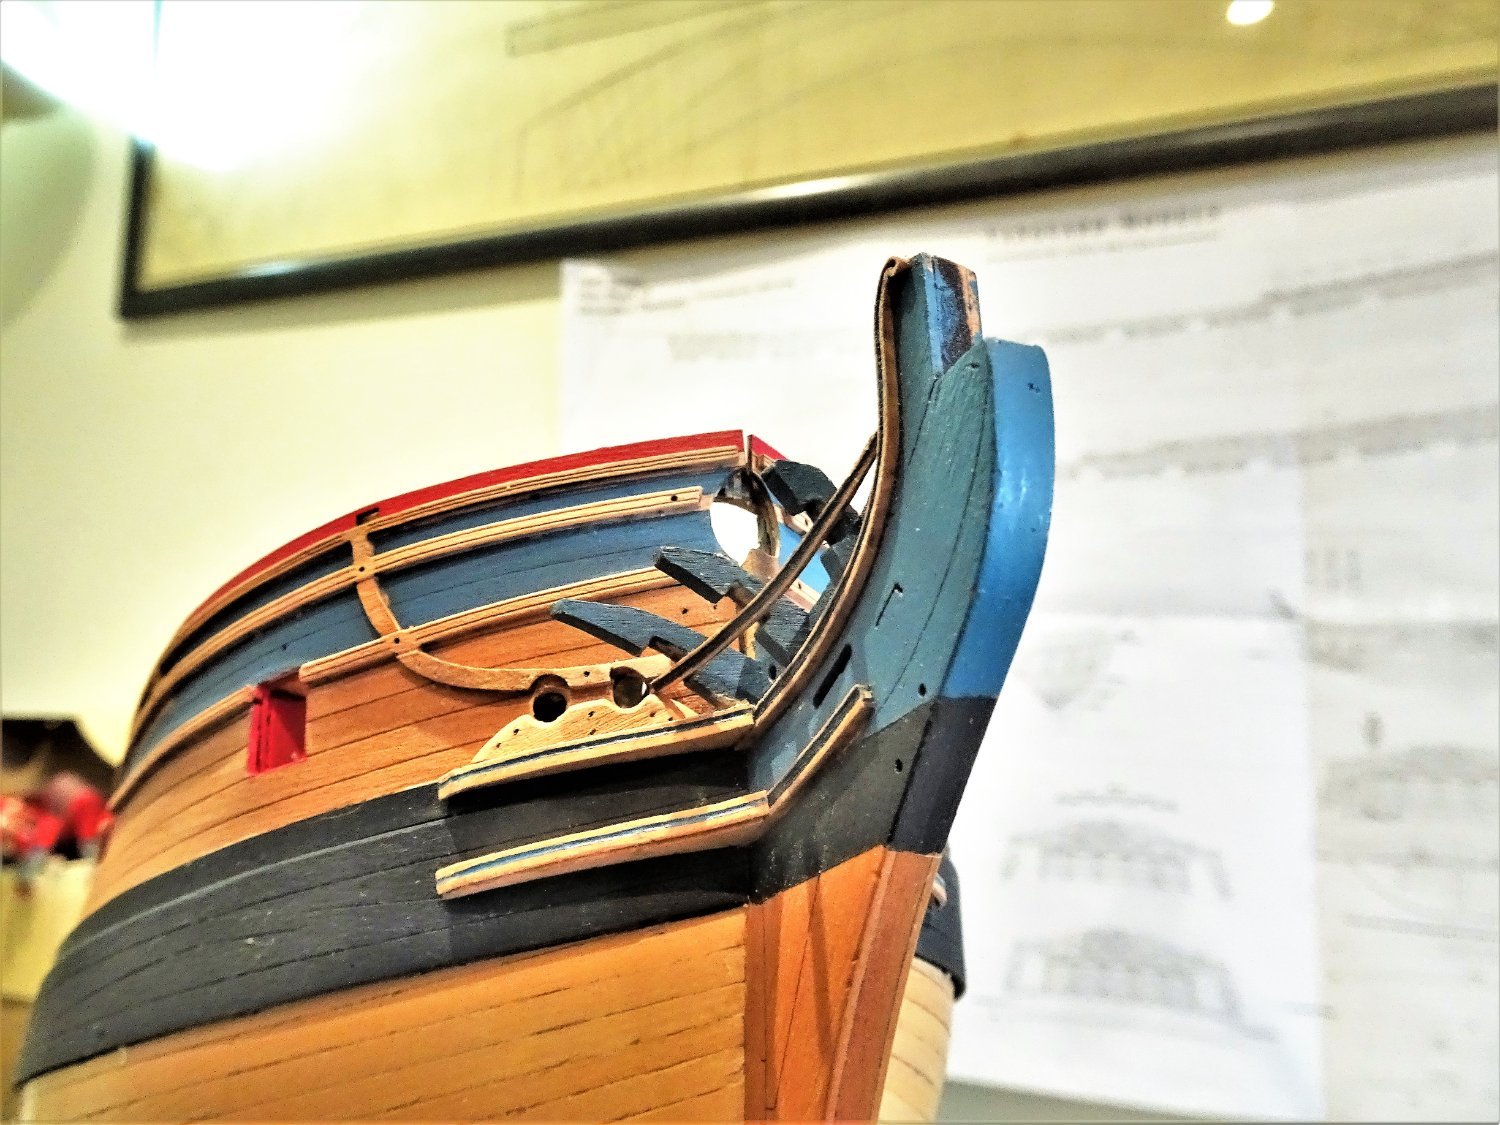
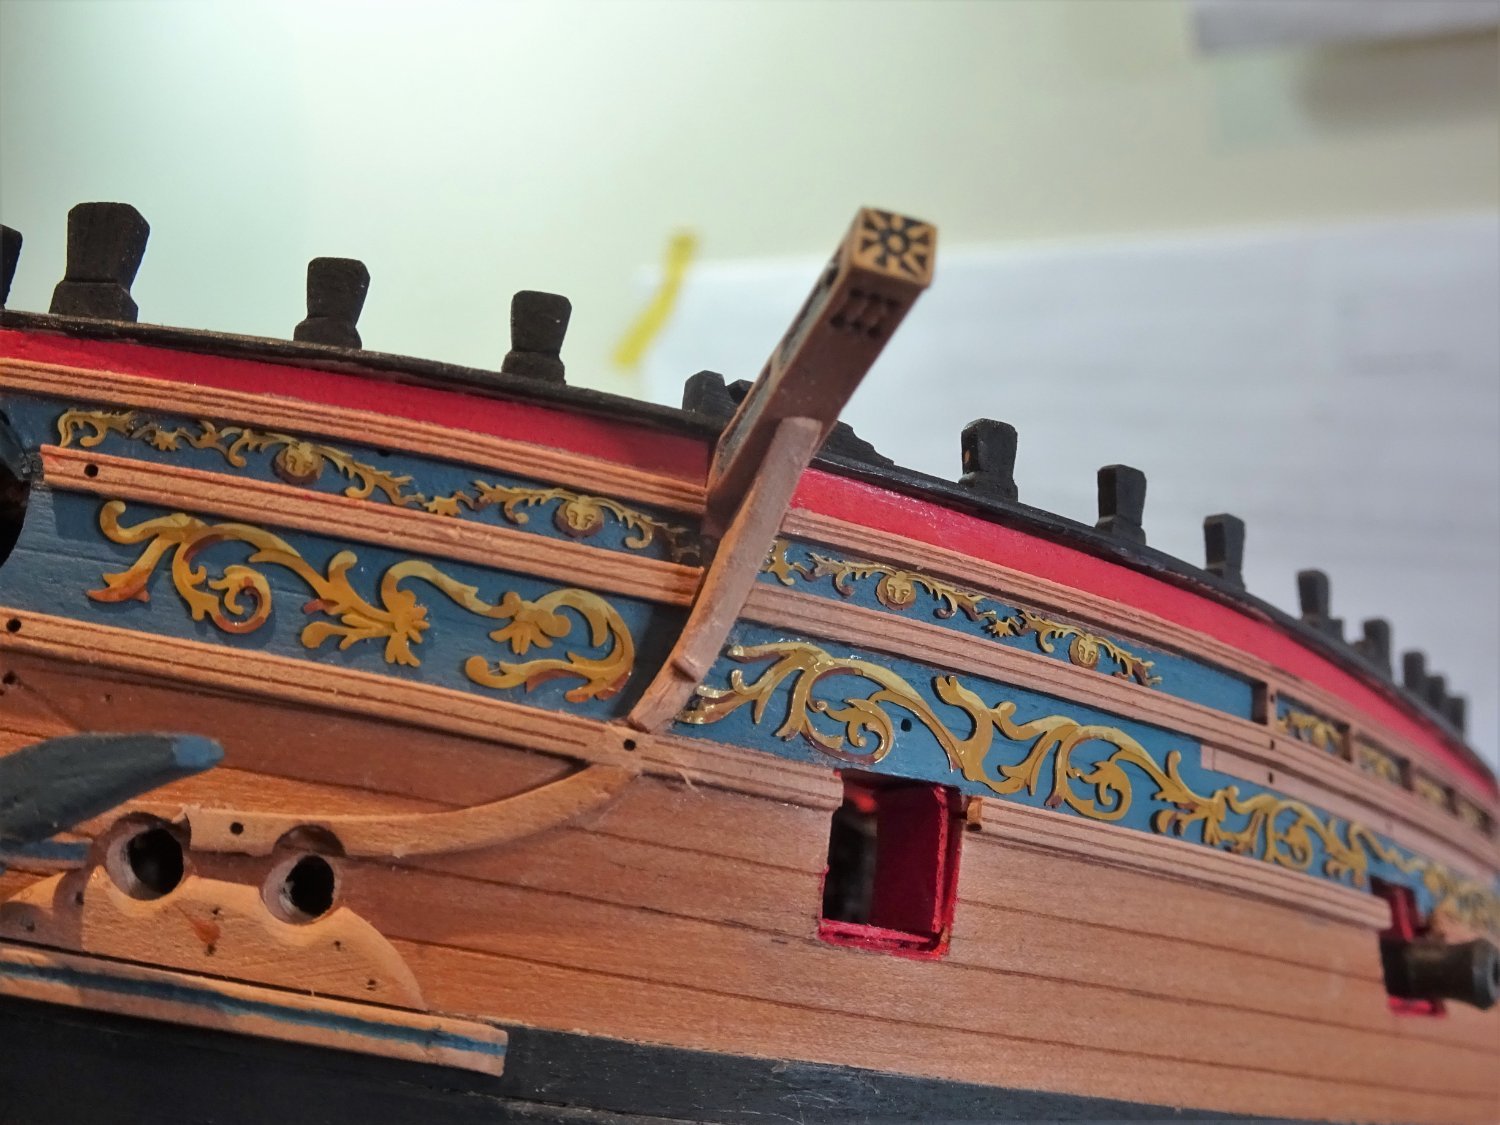
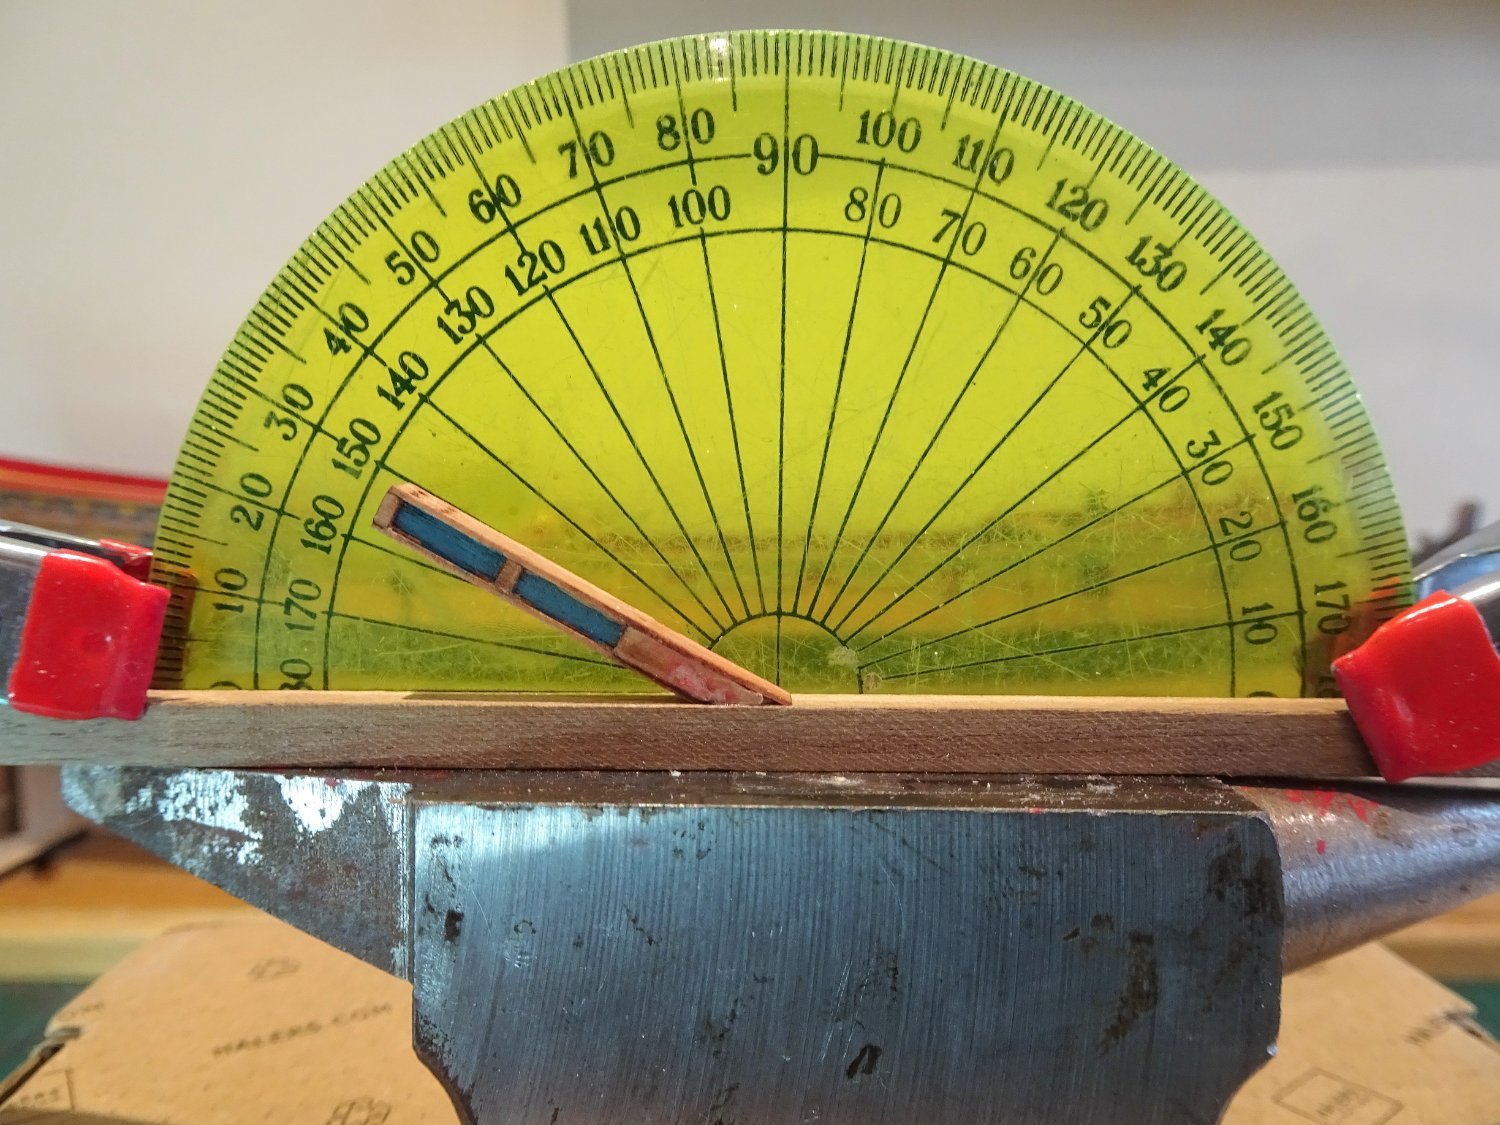
Post One Hundred and Eleven Catheads Tricky things Catheads. The good news, the Catheads align with the previously installed Cattails. The less good news the Catheads are proving a pain to install. From the blurb pics it looks like the Cathead only fits inboard to the extent of the angled base. Even with the slot cut down to deck level on the inner side and to the bottom of the top rail on the outer side, the cathead stubbornly refuses to allow the Gunwale to sit flush. 6481 The Cathead stive is 30° which looks a little steep to my eye, Goodwin (The Construction and Fitting of the English Man of War) gives the angles at between 15° - 20° 6482 In this shot the Starboard side Cathead is set at 20°, the Port side as per the kit arrangement at 30° 6483 20° suits my eye much better. Adjusting to a revised angle will entail fiddling with the deck fit but will resolve the fit issue below the Gunwale. Fettlin’ the Cathead. The Cathead is a constructed part with three sheave holes pre-drilled. A star emblem is lasered into the decorative cap that fits to the outer end, a nice touch. Greater realism can be given to the sheave holes by using a scalpel blade and micro file to give more form to the sheaves, and by inserting a pin thro’ the sides of the Cathead to represent the sheave pins. There is a simplification with the sheave holes, which are drilled vertical to the beam. The sheave slots should really be vertical in relation to the stive. Not an issue for me on this occasion as I am not rigging the Catfalls. I have decided to leave the Catheads bright with the panels painted blue and the cap decoration also coloured. This accords with the Marshall painting. 6535(2) I have set the angle at 20°, a simple jig is used to match the pair. 6534(2) 6551(2) 6540 6541 5639(3) 6556(2) 6554(2) I am trying not to think about the Cathead support bracket at present which I know should follow the curved line of and fay into the Eking rail. The manufacture of the kit provided Laser cut item precludes this feature. I will have a go at making a replacement but forming the compound curve is no easy task, unless because of the small size a curve can be induced in a length of 2mm thick Pear strip. Still I have the covering boards / capping rails/ Gunwales to consider before I need worry about that. B.E. 18/04/22


.thumb.JPG.fd238cdae8ca917333d97741d887007d.JPG)
.thumb.JPG.36d75a2312393642e41ae1d4af3a6321.JPG)
.thumb.JPG.7158e1199e788b1b4ded6b58e8a7fd08.JPG)

.thumb.JPG.3991f35de4cdca1fcbeb98b43d1b03fd.JPG)
.thumb.JPG.a5bf035b99a263b4171cd316068471bb.JPG)
.thumb.JPG.90a6601e731126456c3287e539b9ca17.JPG)
- 857 replies
-
- 20
-
-
-
- Sphinx
- Vanguard Models
- (and 1 more)
-
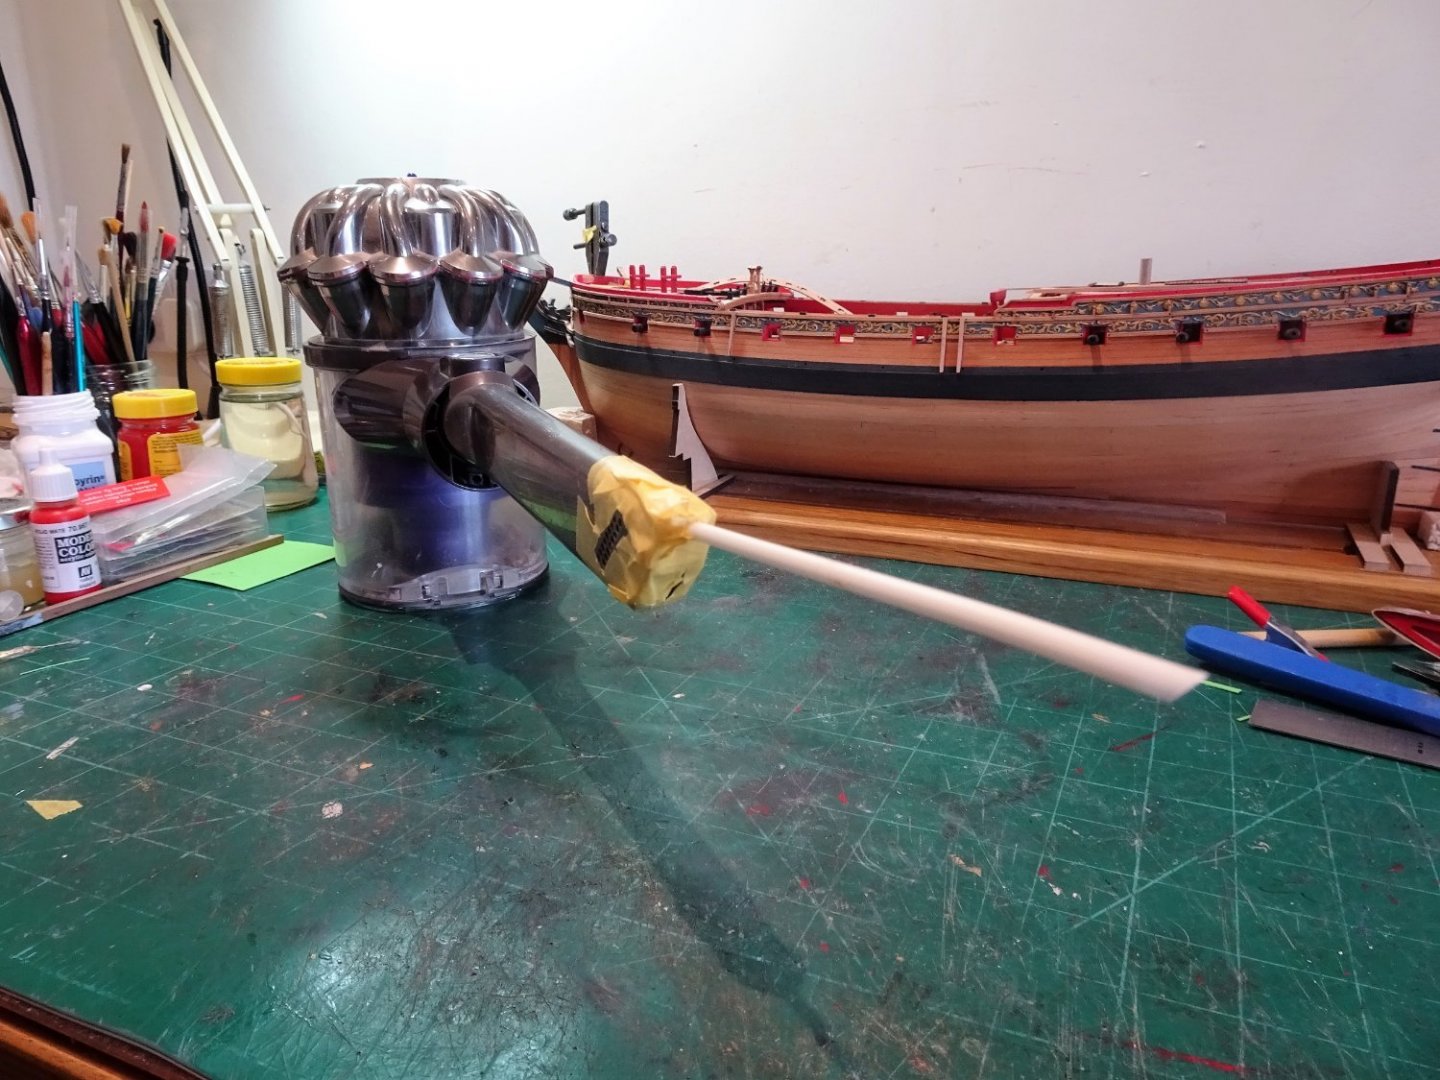
Thanks Bug, the major dust making aspects of the build have now been completed, but there is an ongoing need for sanding and re-painting here and there apart from the general dust that just appears. I have temporarily modified the Dyson hand cleaner (Mrs W hasn't noticed yet) by taping a length of flexible Evergreen Tubing over the nozzle. Crude but effective.😉 B.E.
- 857 replies
-
- 12
-
-
- Sphinx
- Vanguard Models
- (and 1 more)
-
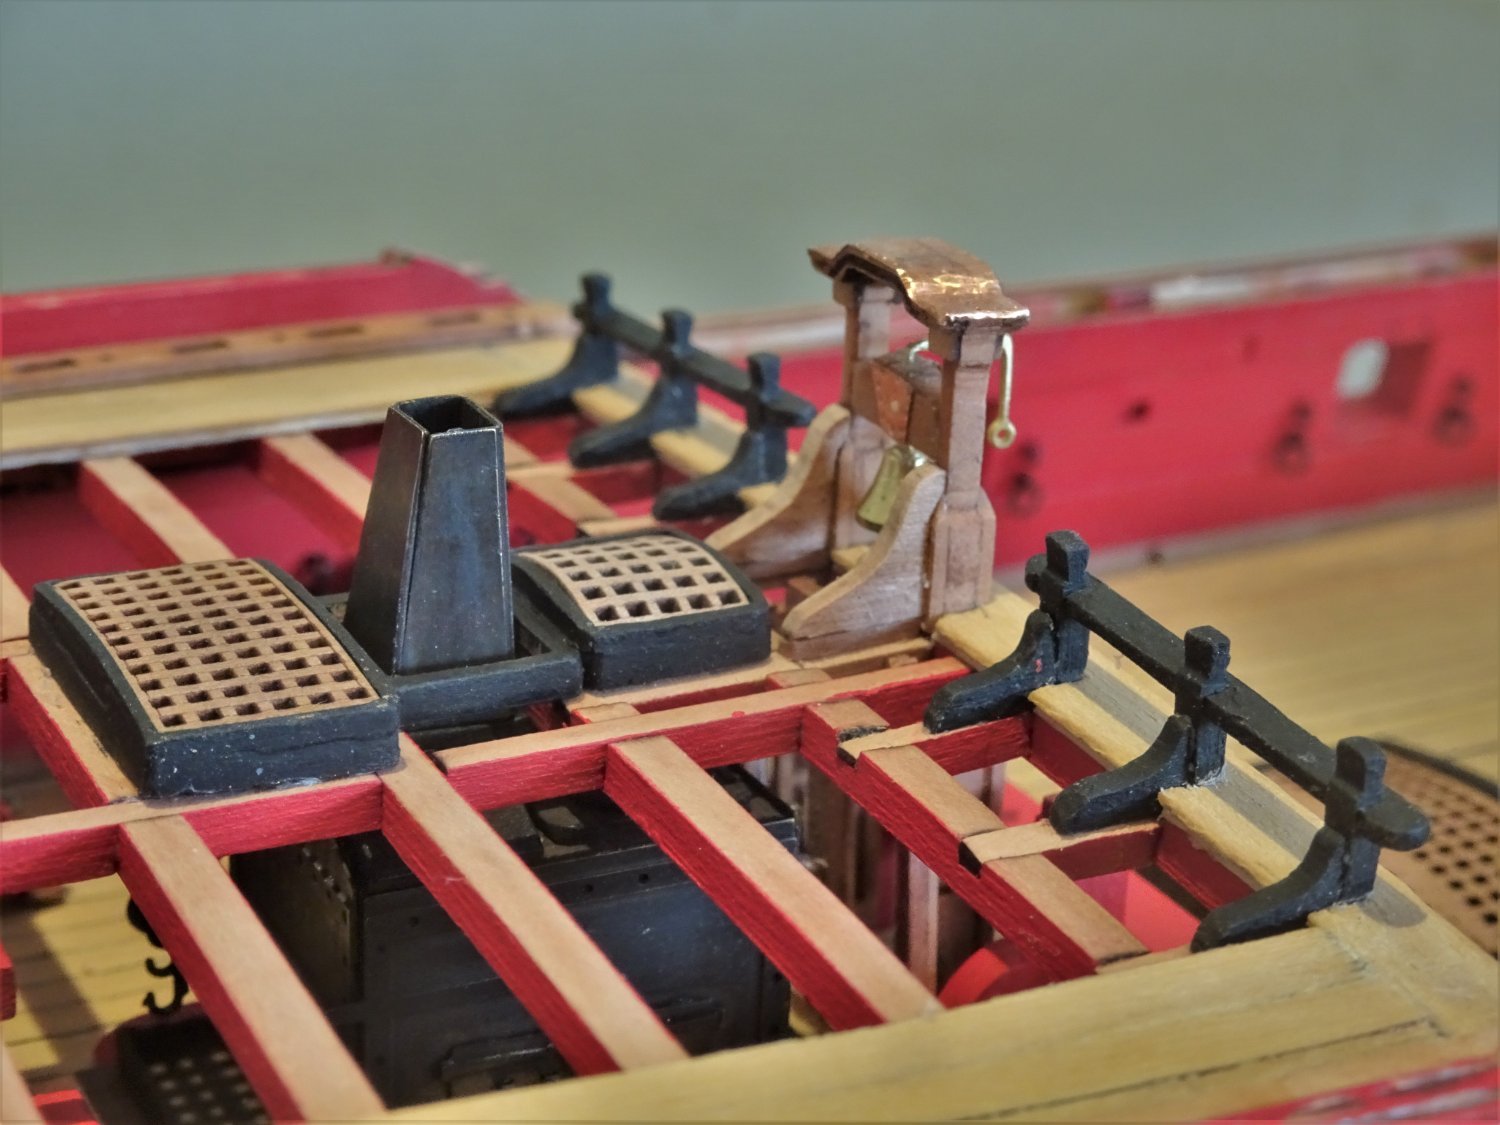
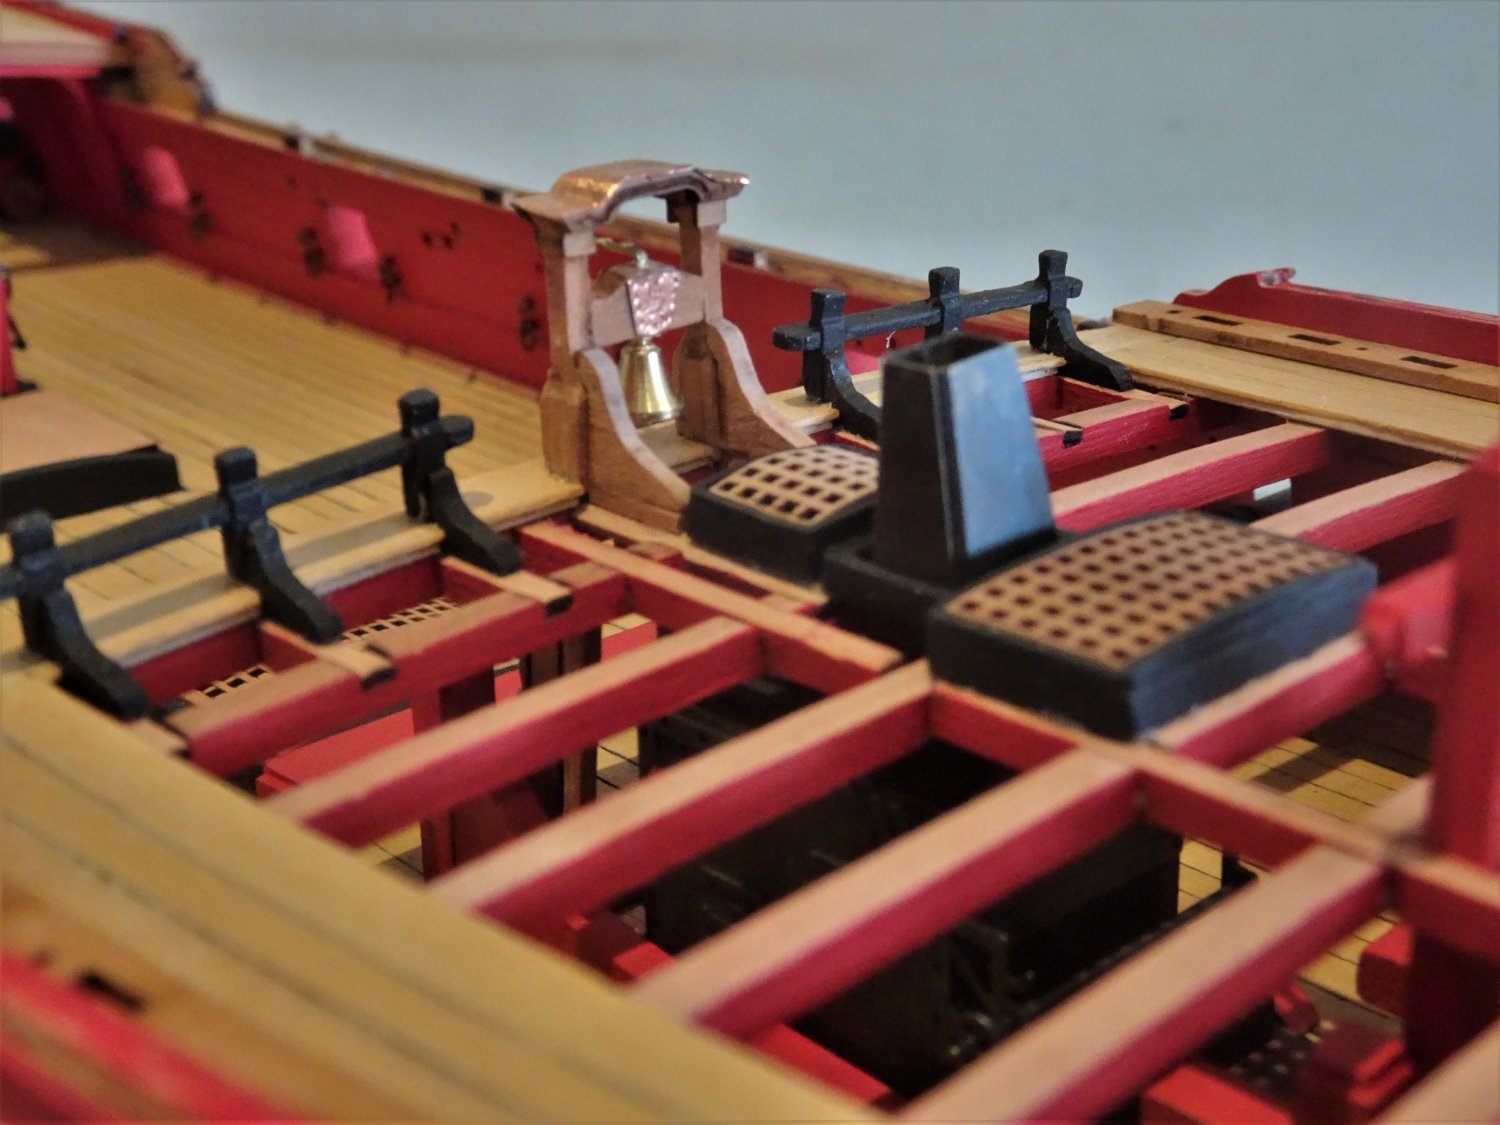
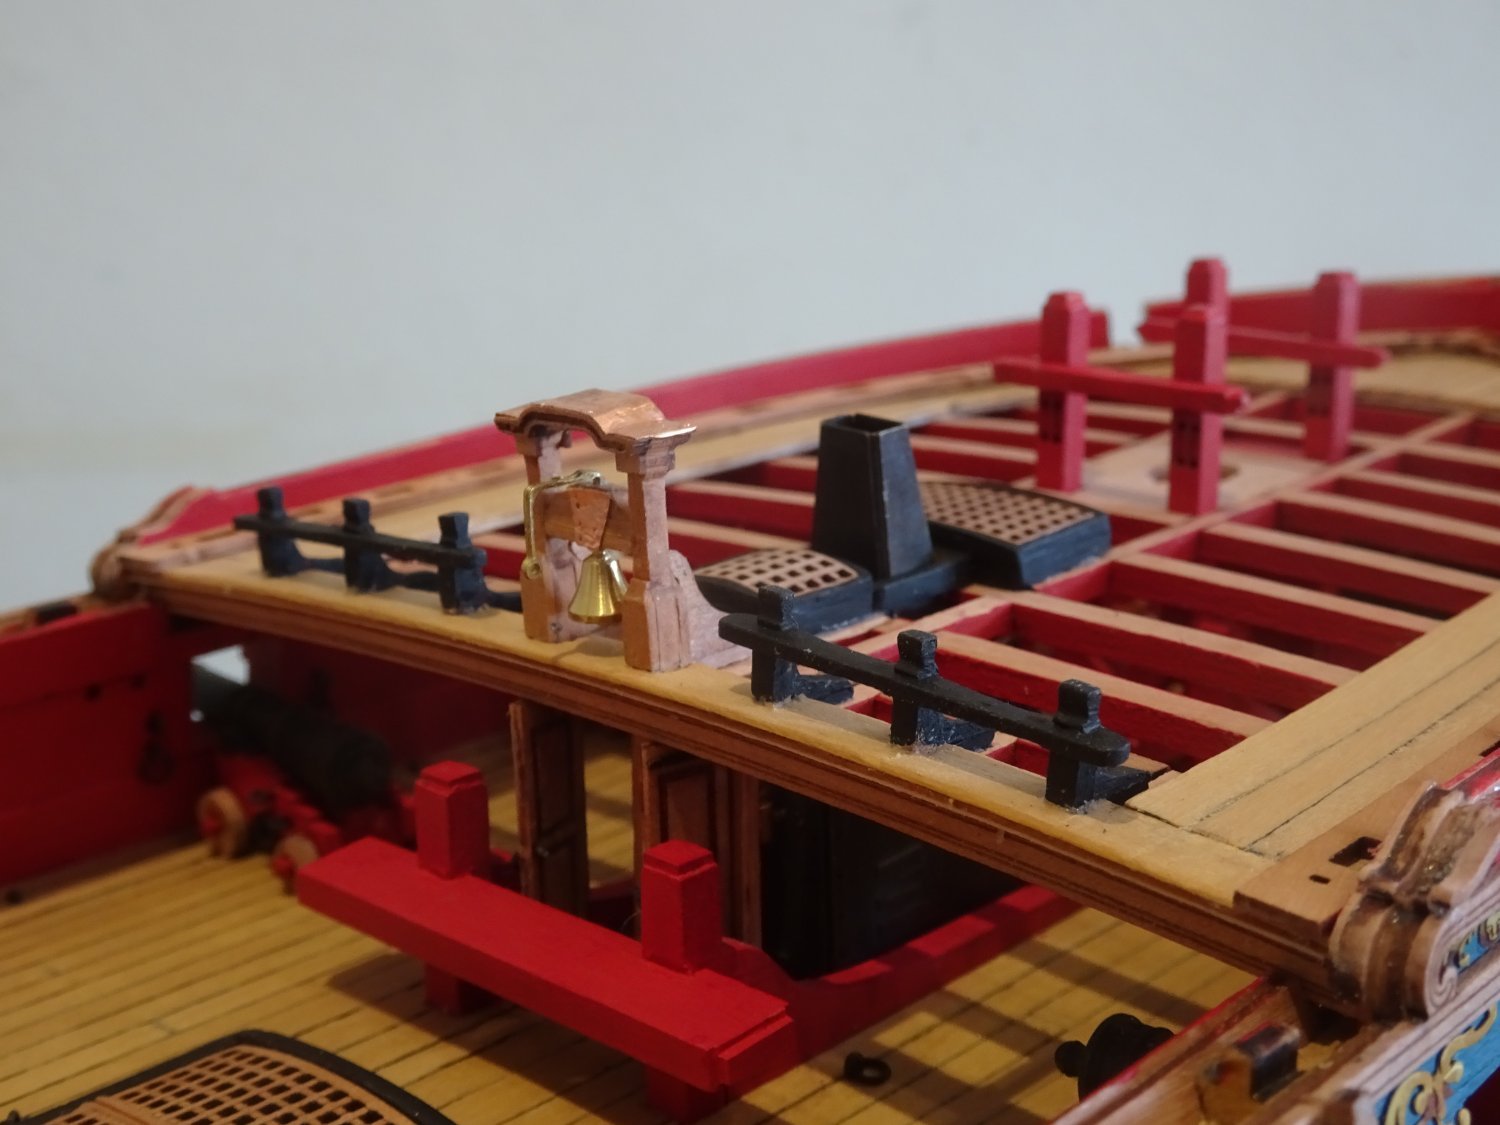
Post One Hundred and Ten Foc’sle Breast rail More tiny little pieces to assemble and fit. It’s these small fittings that soak up a lot of time, I have been fiddling with these for two days. 6518 Made more difficult by my deck modifications resulting in the need to tweak the support knees so that they sit on the carlings whilst retaining the above deck height. 6527 As with the Bitts the belay pin holes have been filled in. 6524(2) 6520 6528 The support knees for the Belfry are added. Constant soft brushing is now required to keep the dust down, must try and find a small nozzle cleaner to get between the beams. In the next post I return to the Cathead. B.E. 16/04/22


.thumb.JPG.b9115340ea1cc36ee1bf1266dbce8fba.JPG)


- 857 replies
-
- 20
-
-
-
- Sphinx
- Vanguard Models
- (and 1 more)
-
Can't quite recall what I used but around 3mm square is close enough. It needs to be flexible, and once I had cut the notches, the strip was heat bent to follow the sheer. B.E.
-
Nice Rudder Head cover Chris, 1 like the compass design on the top. 👍 These little details make all the difference, at least to me. B.E.


.JPG.f573193651ce2a8d14f5310b6c29fdde.JPG)

.JPG.ebd2879033c5b713926f425497cfc78a.JPG)

.JPG.7f5d6d9bc2d4ab98c7498a3d16cf8911.JPG)
.JPG.85c9e6b9143d67d832dbb54c53c34f2b.JPG)


.JPG.09785abdf677a200eda30cdc6557f98e.JPG)
.JPG.392ecc31083dafe0be50e35c36d871ce.JPG)


.JPG.94e3c59f2199ff35c4f8dd3cb88df4b4.JPG)
.JPG.d575d8d169f7edc82ae2568910e7ff2d.JPG)
.JPG.00ef240f1660c4dcfe0af6647bd3cf13.JPG)

.JPG.574eef9af194b0435735be1c53d9fdfb.JPG)


.JPG.89997070388fcc64e1e1d5de5cd36b5c.JPG)
.JPG.23adccf2846dffc6a28b280bf6cd8432.JPG)
.JPG.0d4e3adc12ff5108f6bec316df17be78.JPG)

.JPG.1331d17e58d36a2de4f475efd12b4767.JPG)
.JPG.e71b5fc8b8ce9a9f77284db962efe25a.JPG)
.JPG.a3704db55f3e642d0fd4d177f93c75ae.JPG)

.JPG.b87931861f1980f3a0675f24d5bcbd14.JPG)