
.JPG.ca33079f5815b861e67b9c2cccd37982.JPG)

Blue Ensign
-
Posts
4,567 -
Joined
-
Last visited
Content Type
Profiles
Forums
Gallery
Events
Everything posted by Blue Ensign
-
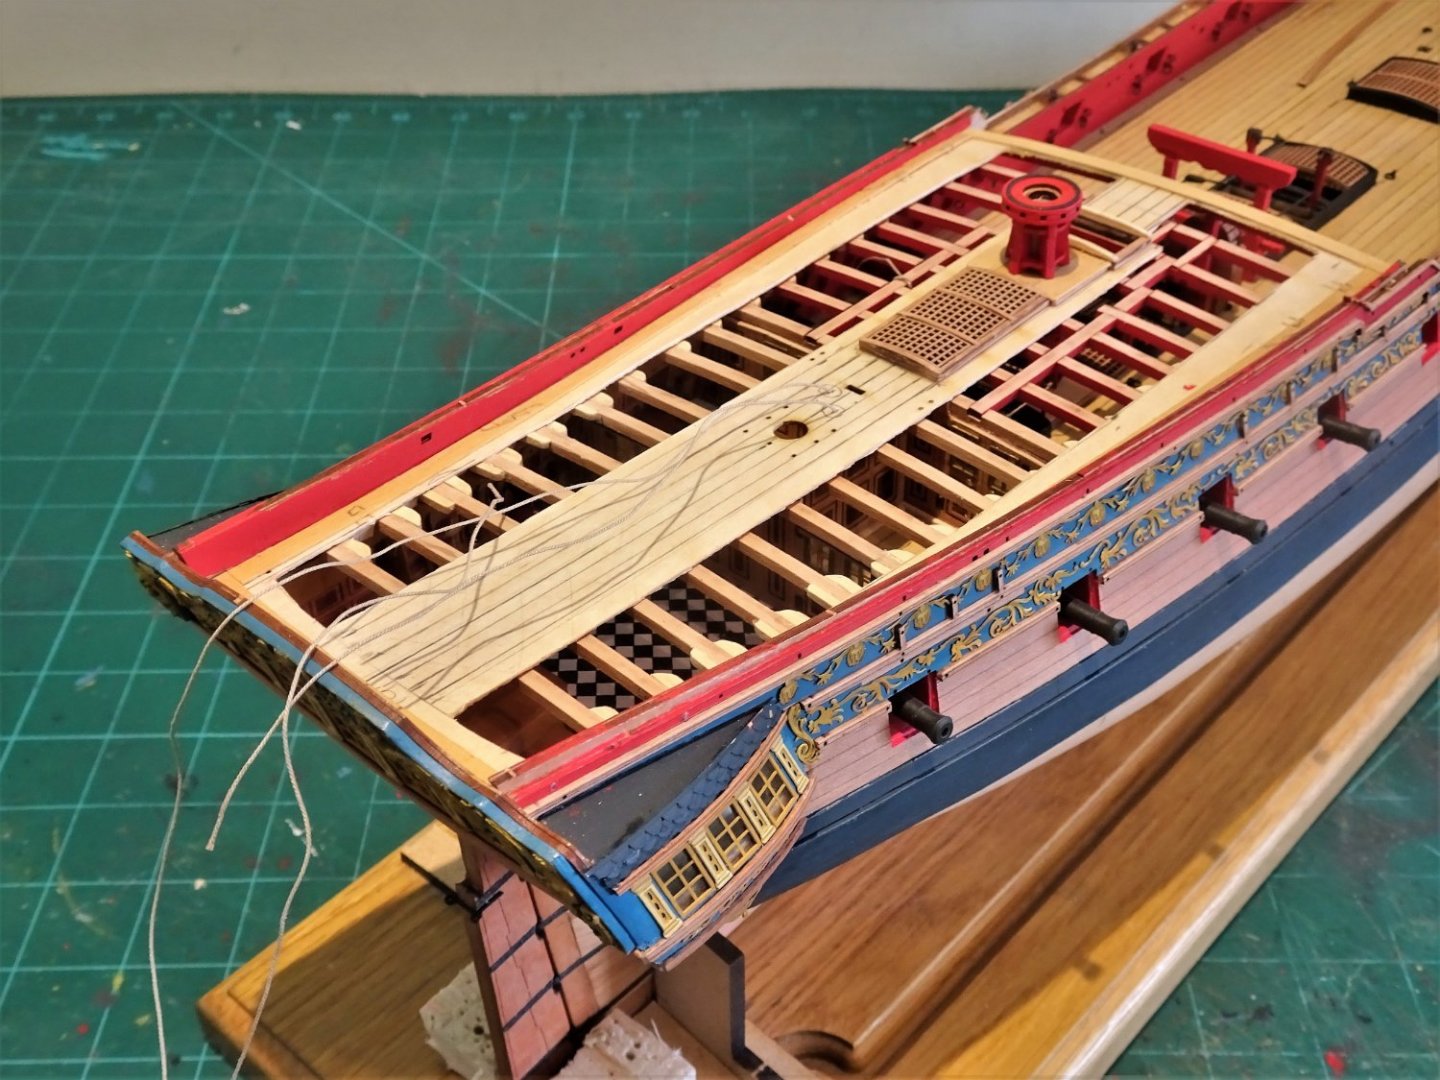
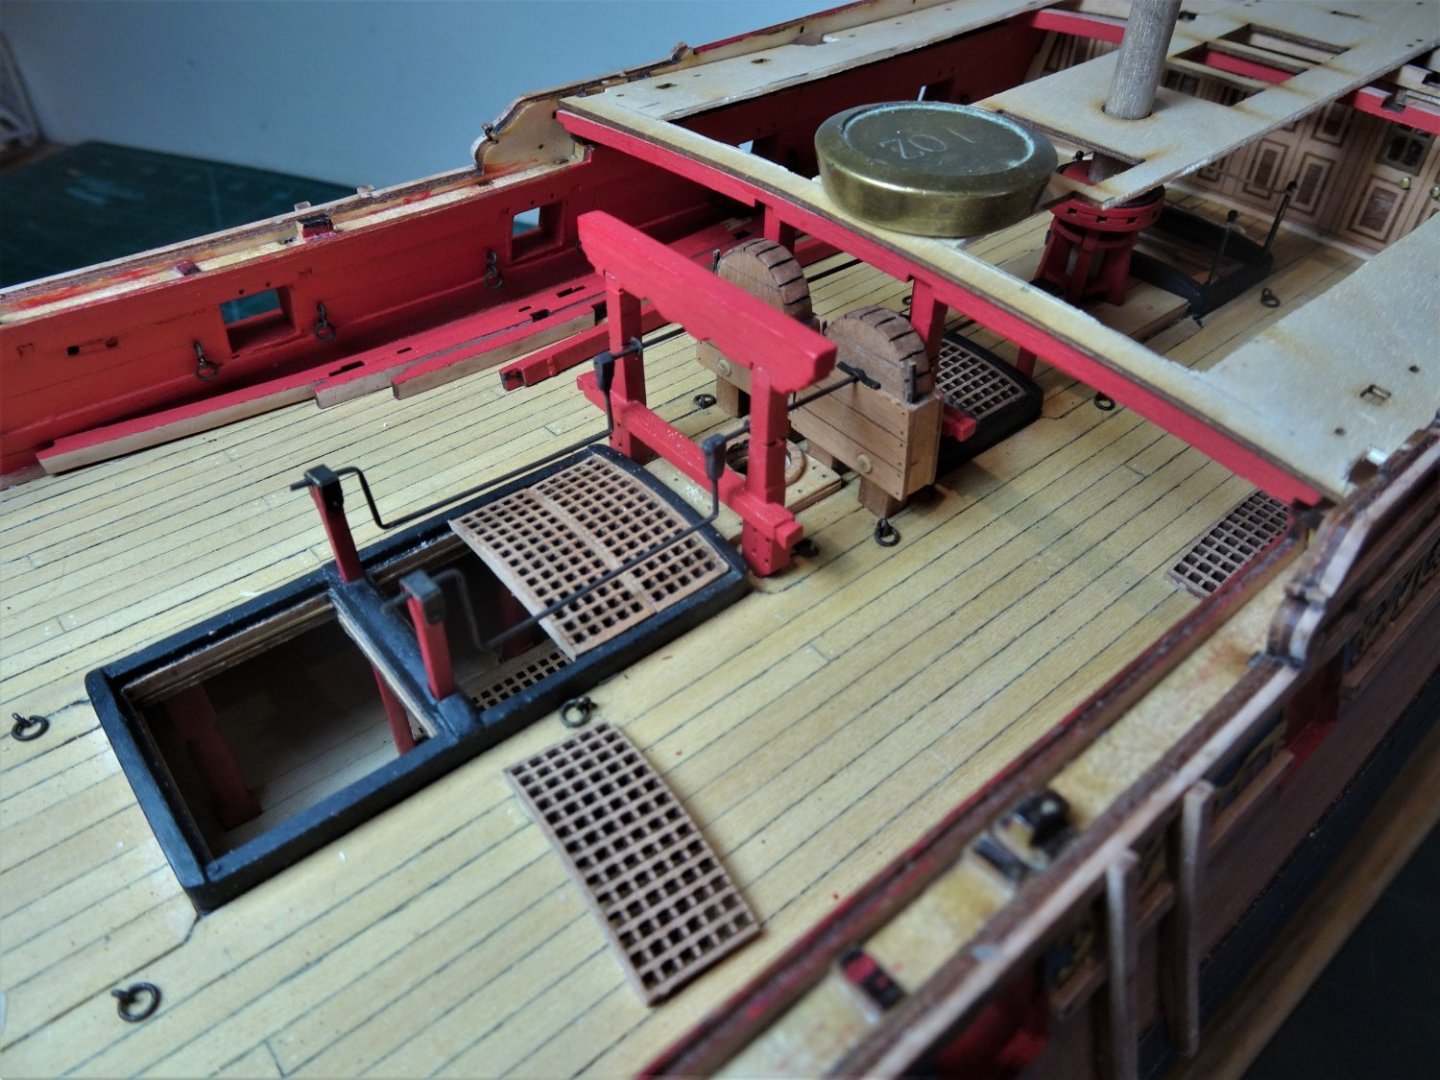
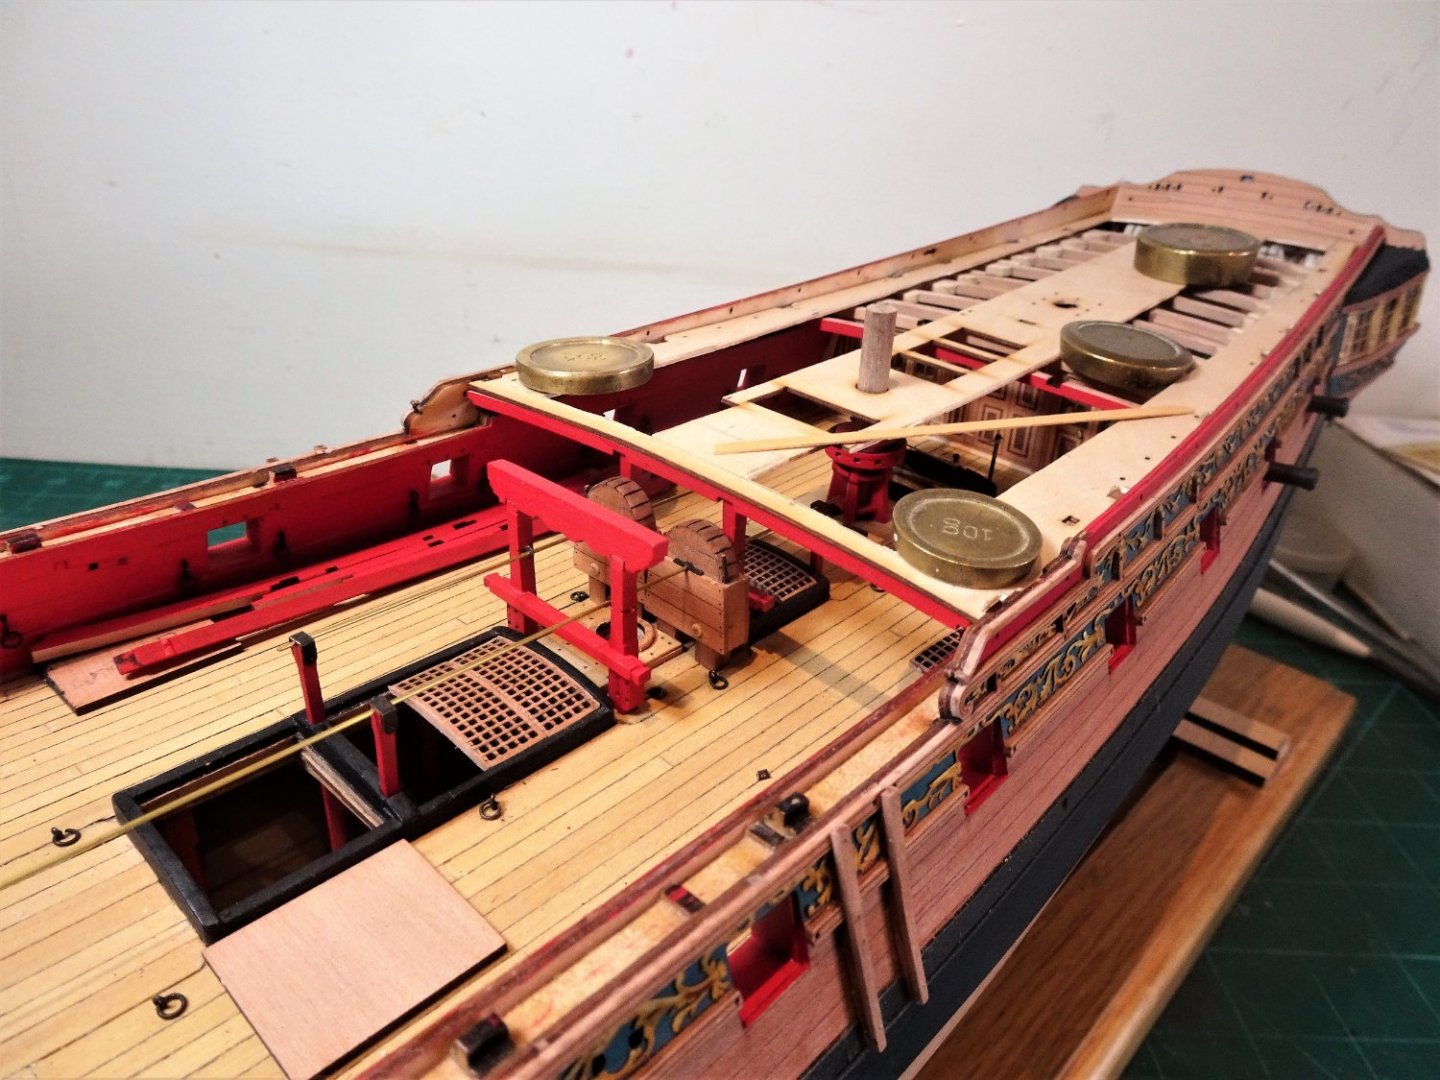
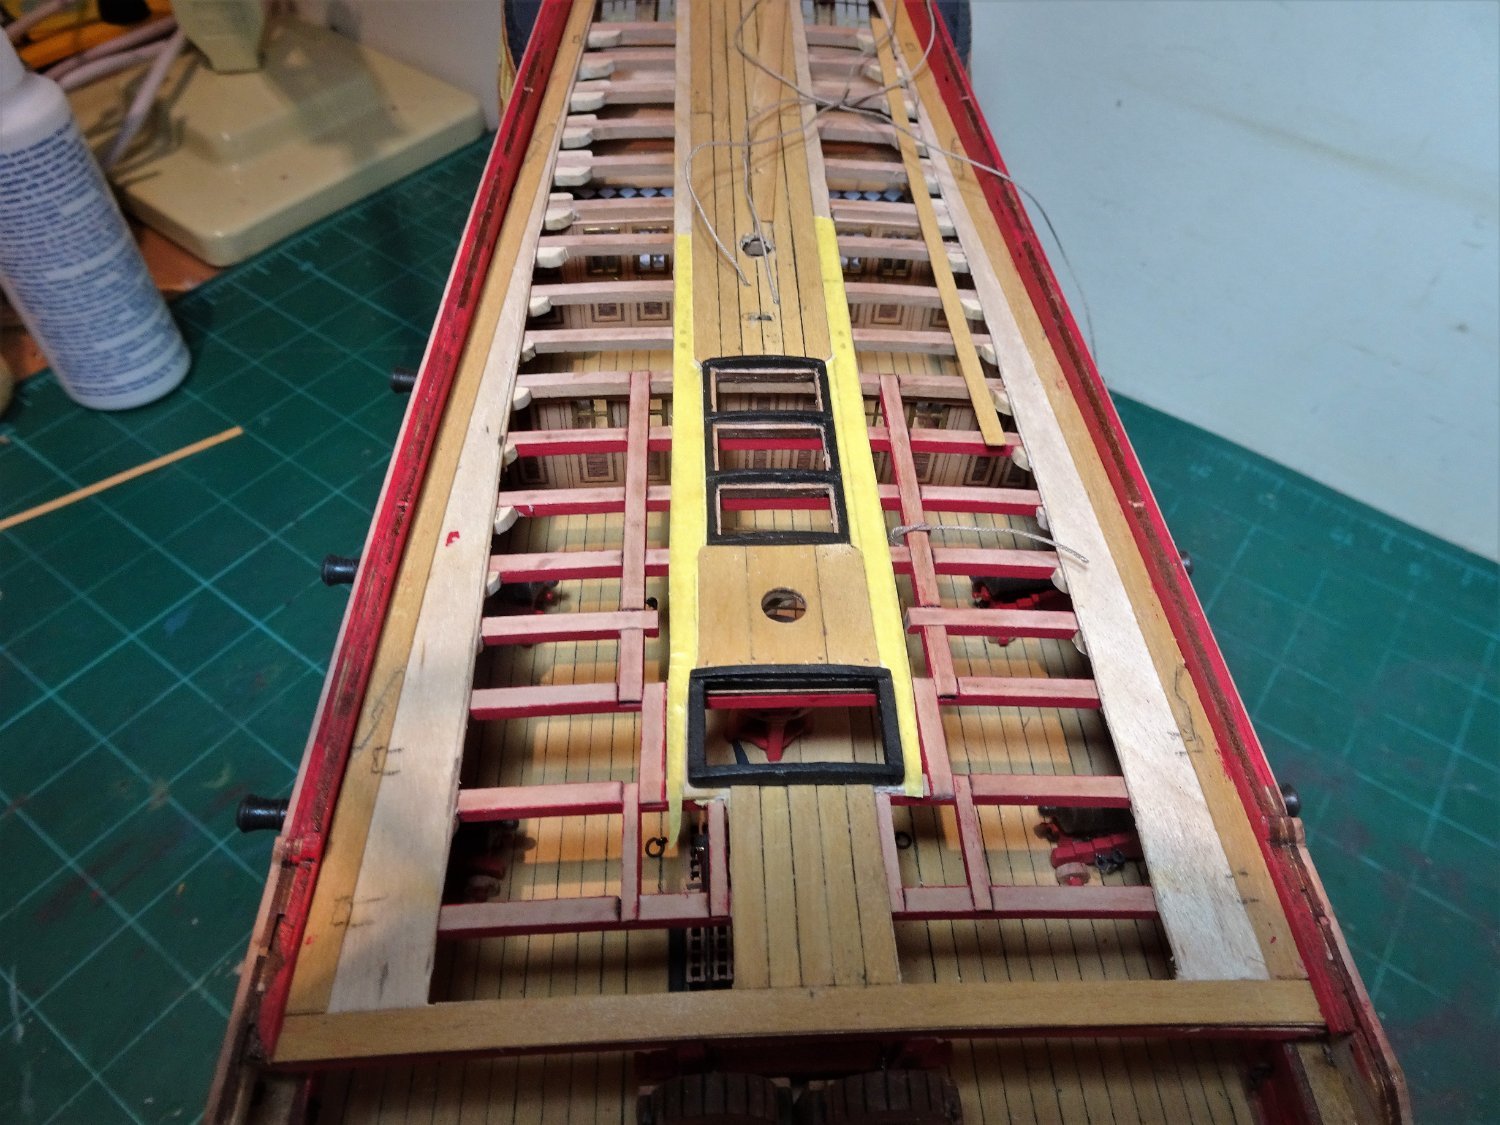
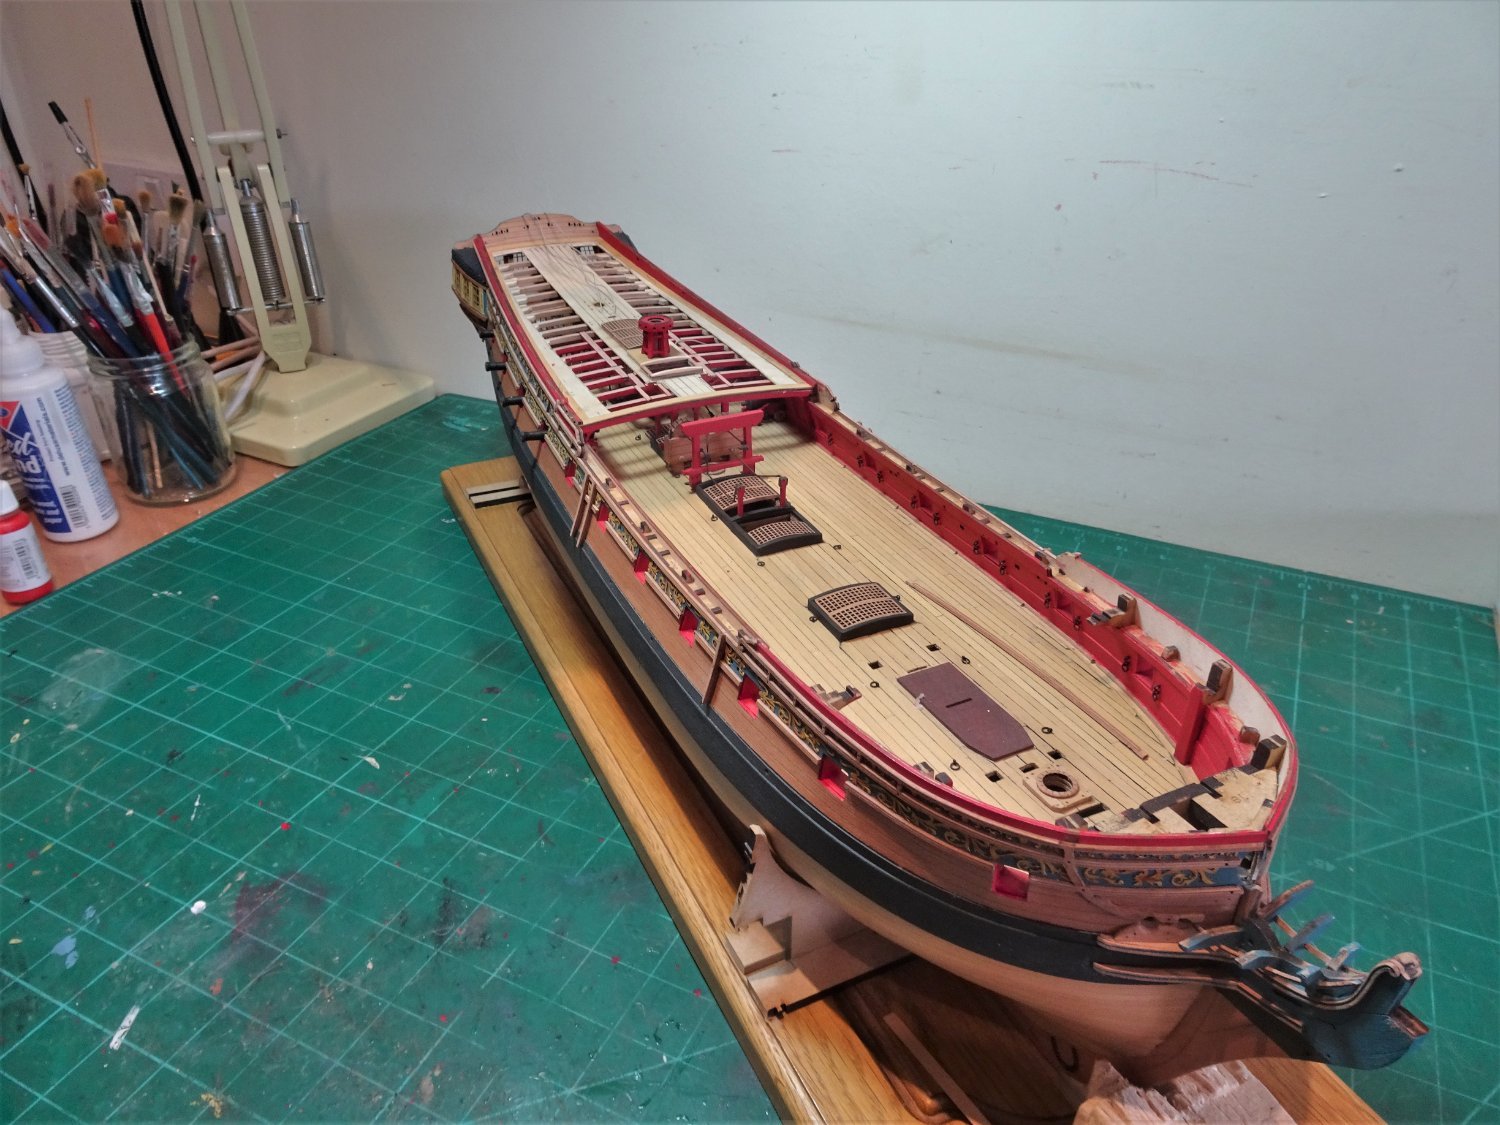
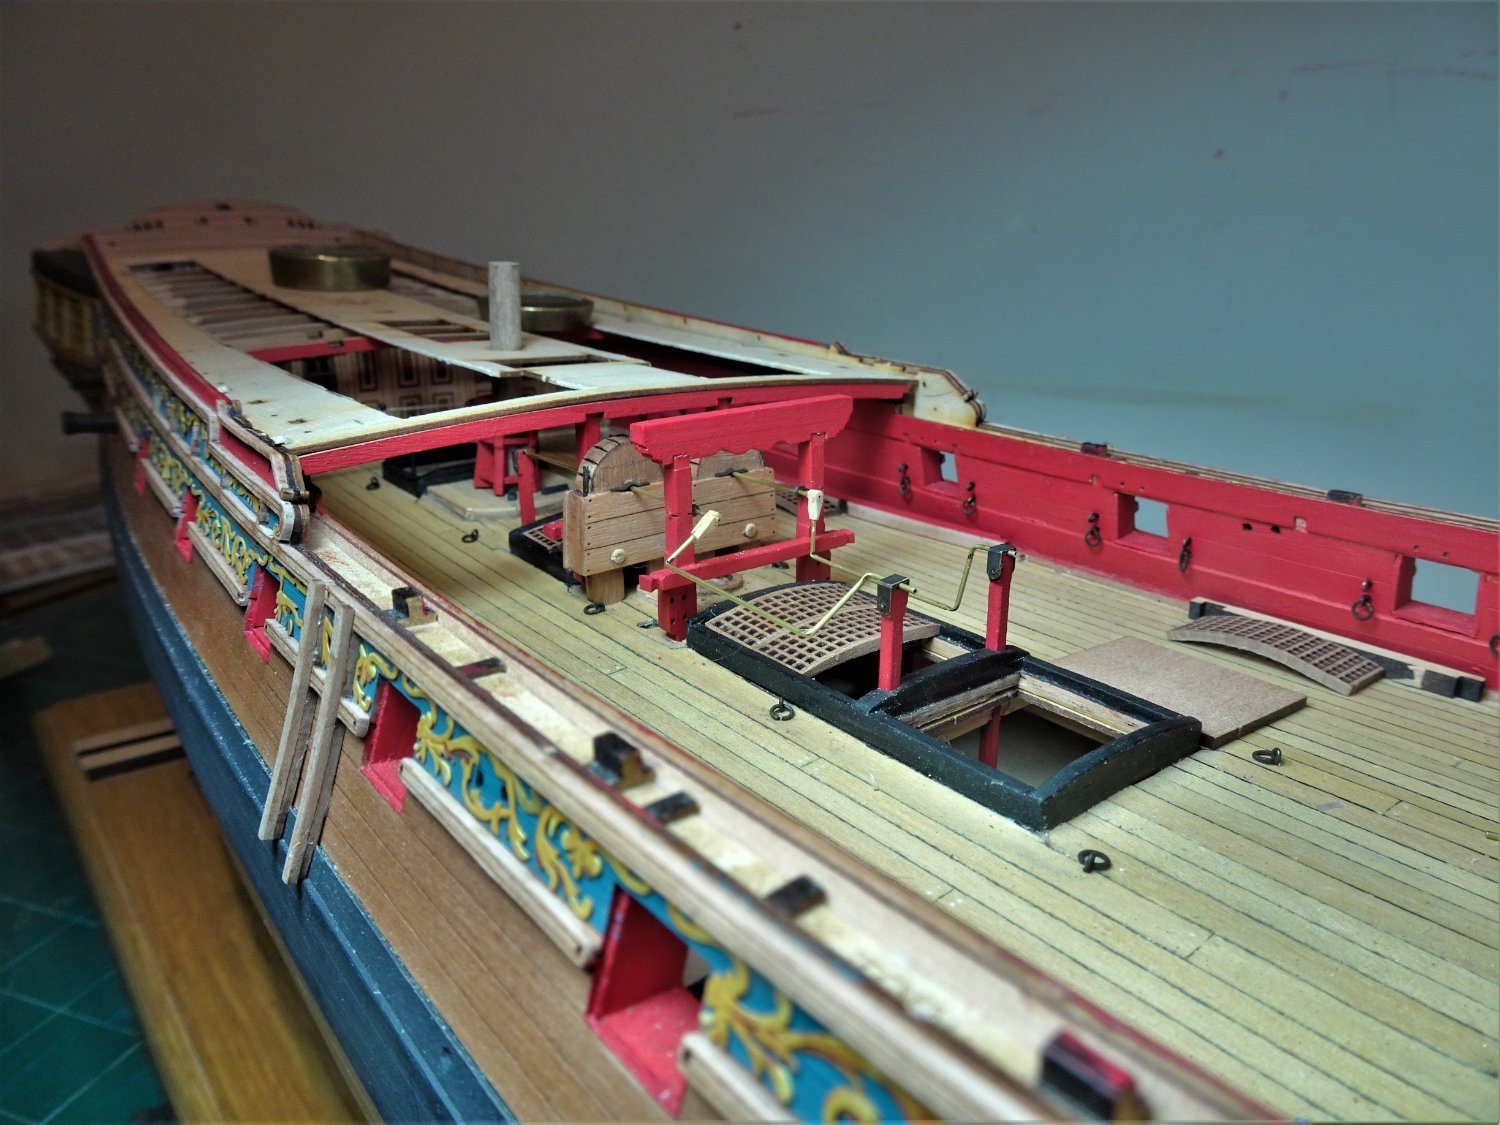
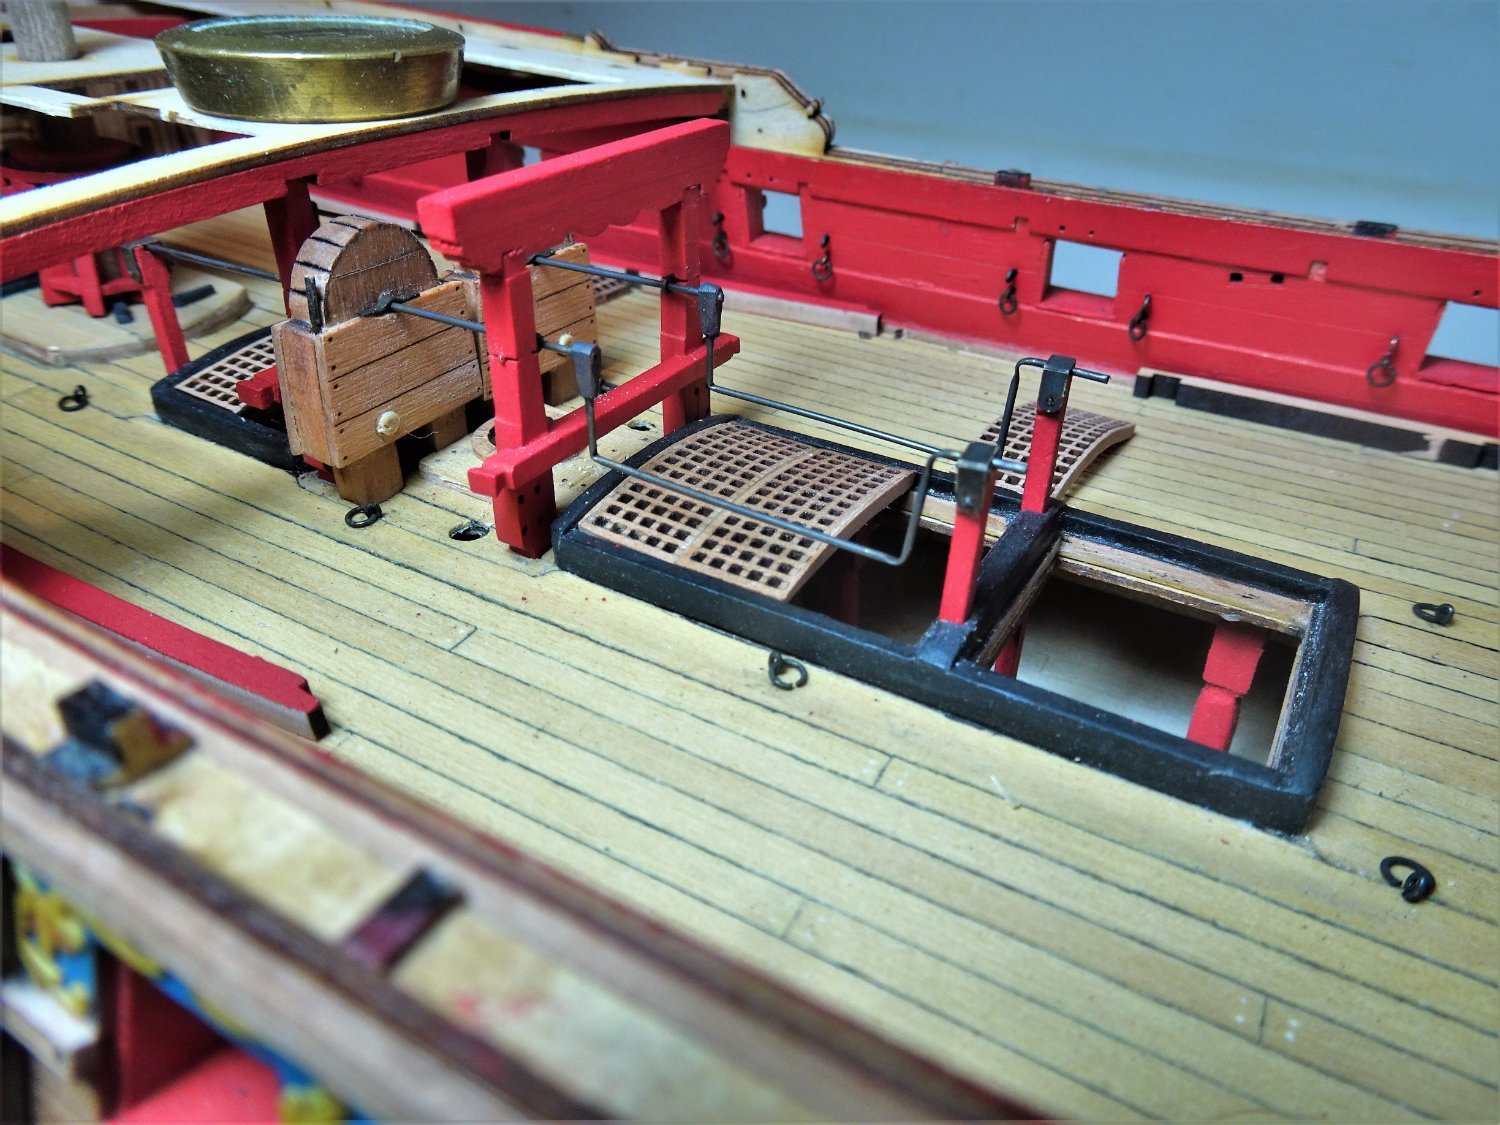
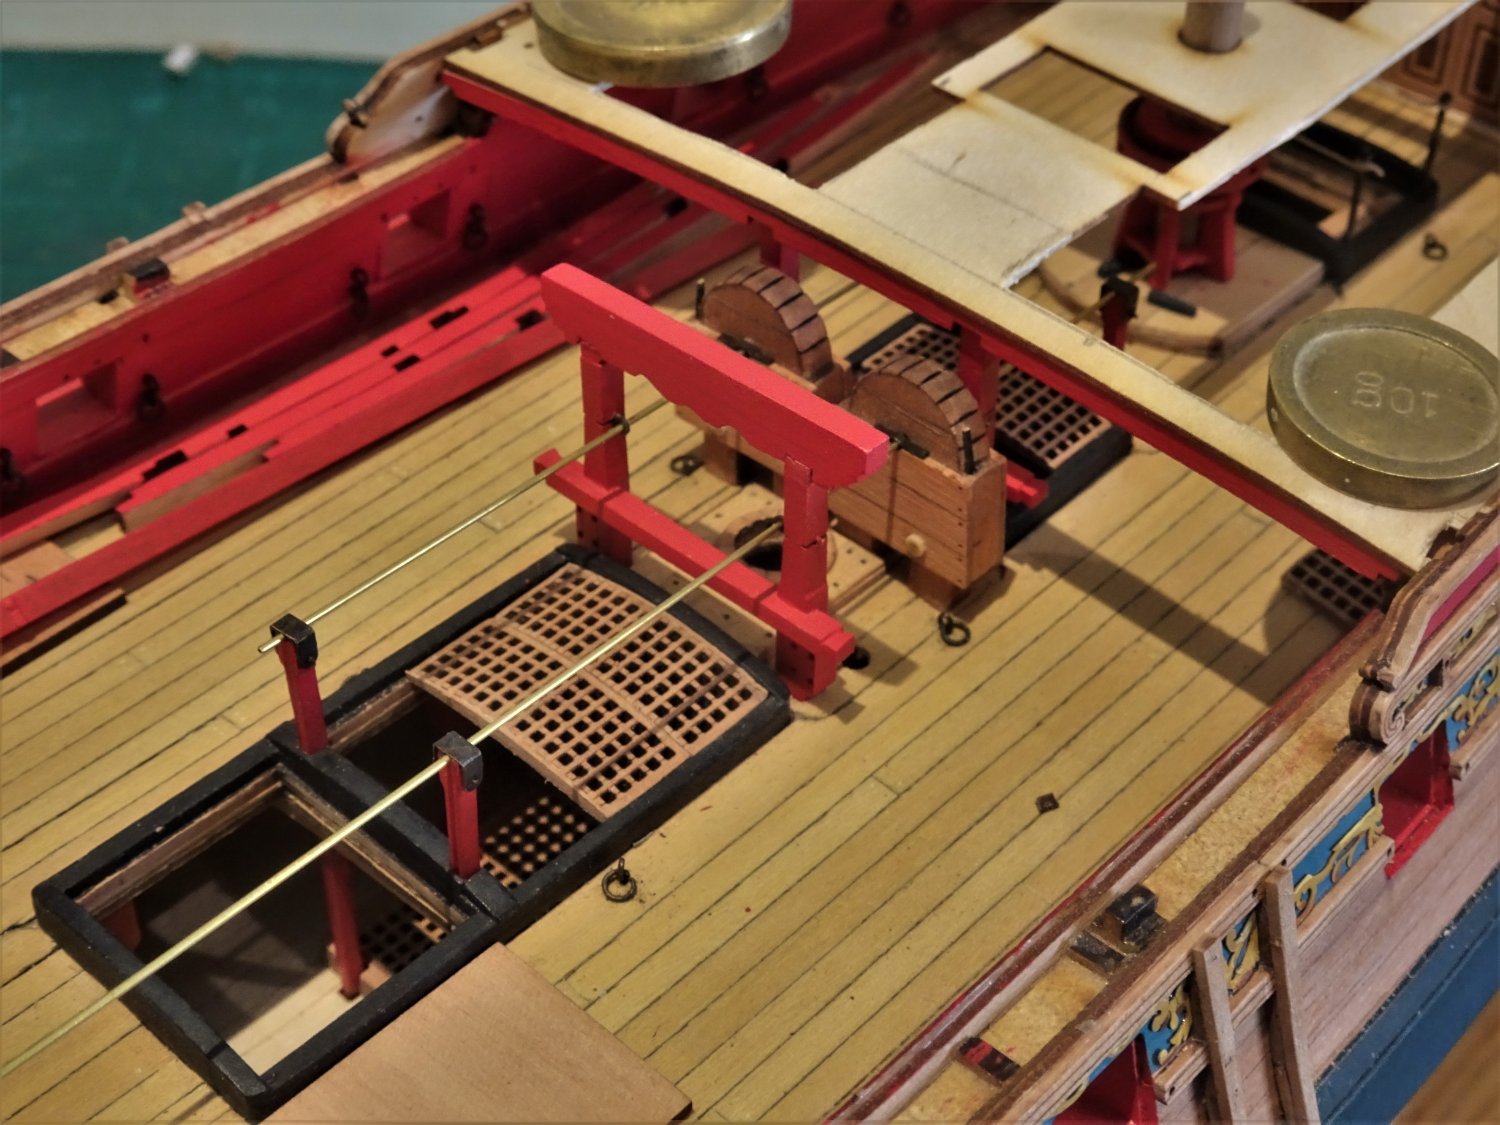
 Post Ninety-eight Quarter-deck planking continued. The completed ladderway/coaming set is glued to the false deck prior to planking. 6158 I start to planking down the centre line and for the shaped planks around the ladderway/gratings a pattern is made using 18mm Tamiya tape. 6160(2) The shaped deck plank. 6163 It took a couple of goes to get a pattern to correctly fit on the model. 6165 The completed centre line planking, but without any fettlin’. It will need scraping and a coat of flat varnish. 6170 6171 The coamings require re- painting, got a little marred during planking, but I think the ‘round-up’ modification gives a more authentic look. 6168 I now need to figure out the planking along the margins. B.E. 17/03/22
.thumb.JPG.94c3984f03ca2154f02f235d7801f5fd.JPG)


- 857 replies
-
- 19
-

-

-
- Sphinx
- Vanguard Models
- (and 1 more)
-
A sweet build James, very nicely done, love the finish you've achieved on the Windlass. B.E.
- 29 replies
-
- 3
-
-
- well smack
- Vanguard Models
- (and 2 more)
-
For continuity of planking material as used on the Upper deck, it is far too flimsy to stand alone. Cheers, B.E.
- 857 replies
-
- 2
-
-
- Sphinx
- Vanguard Models
- (and 1 more)
-
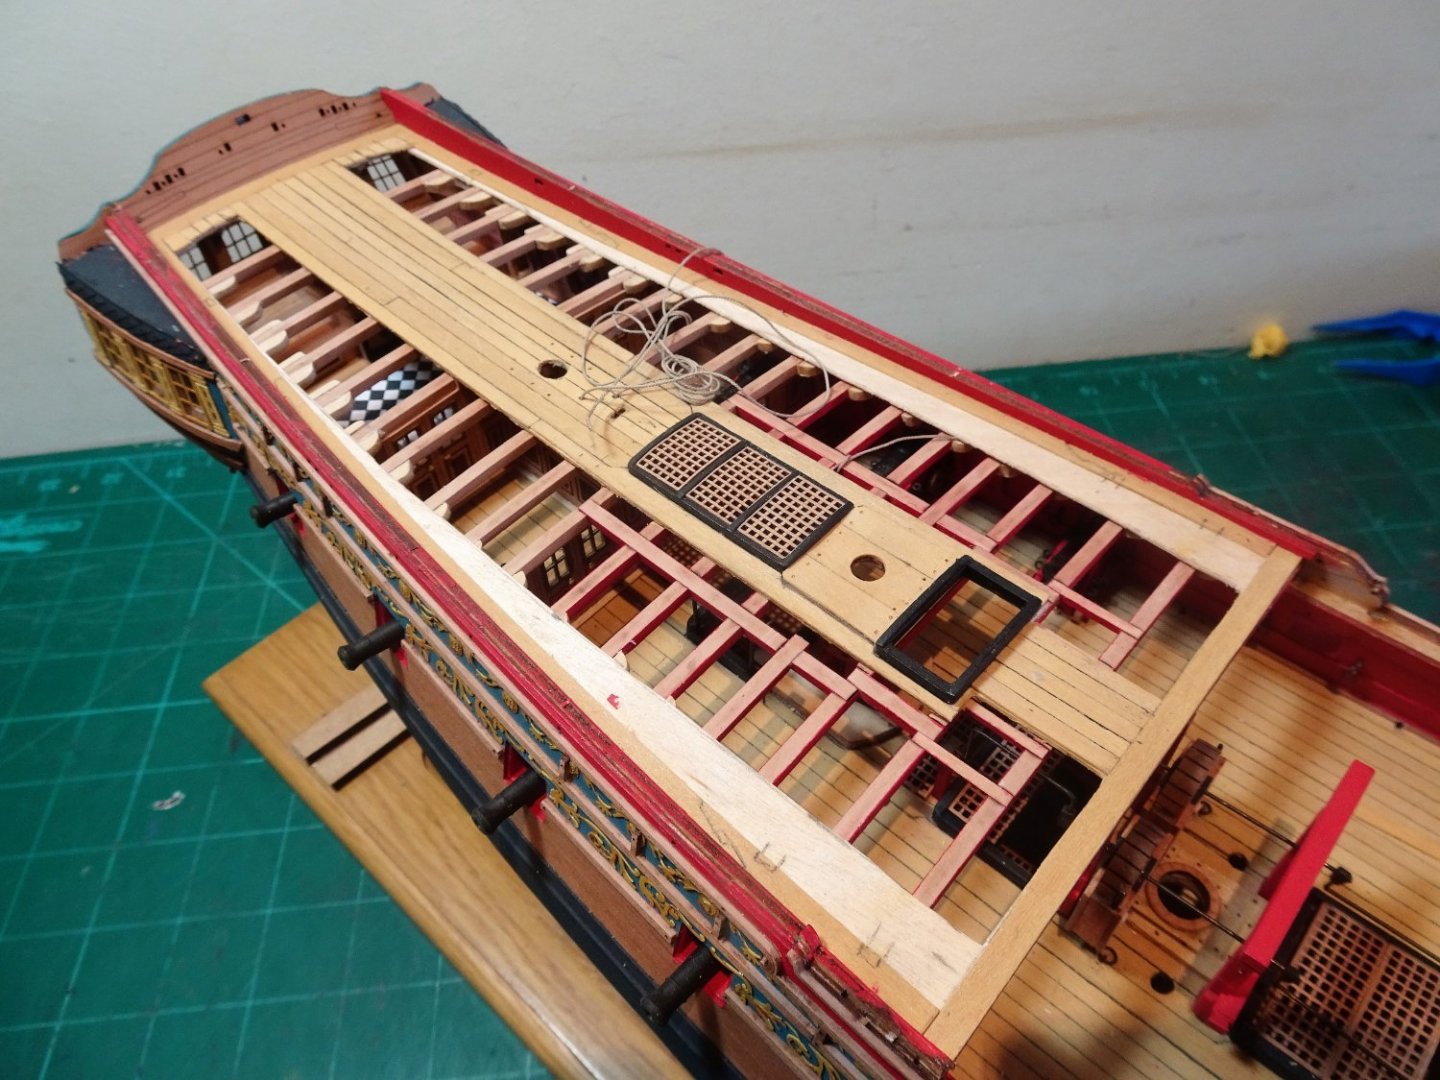
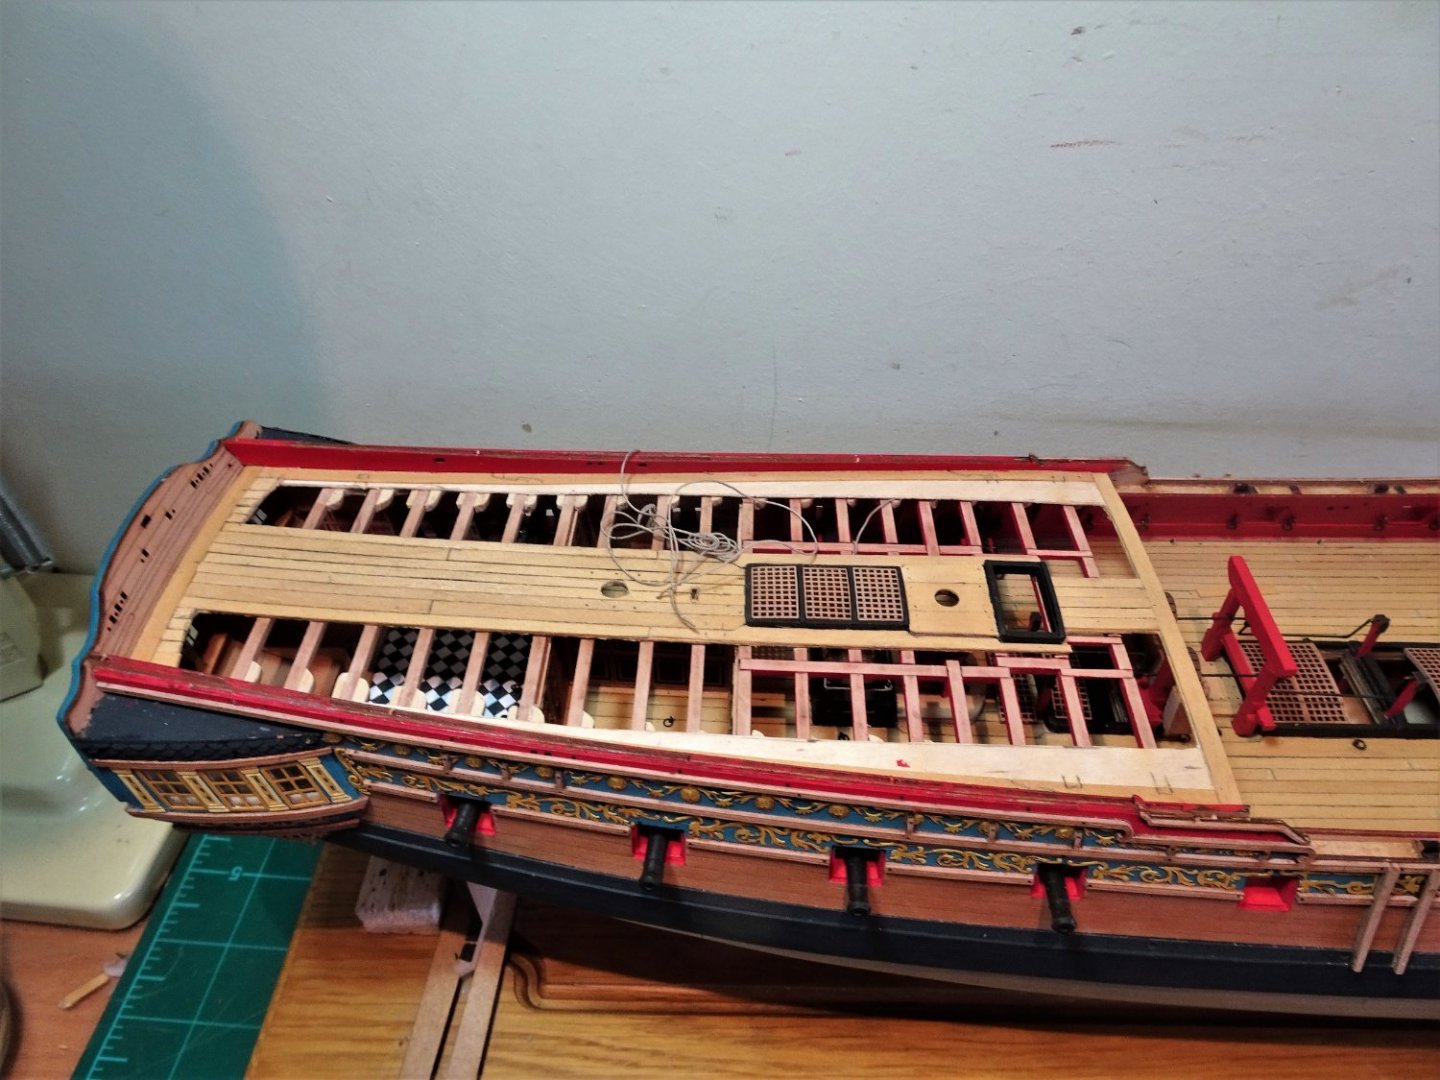
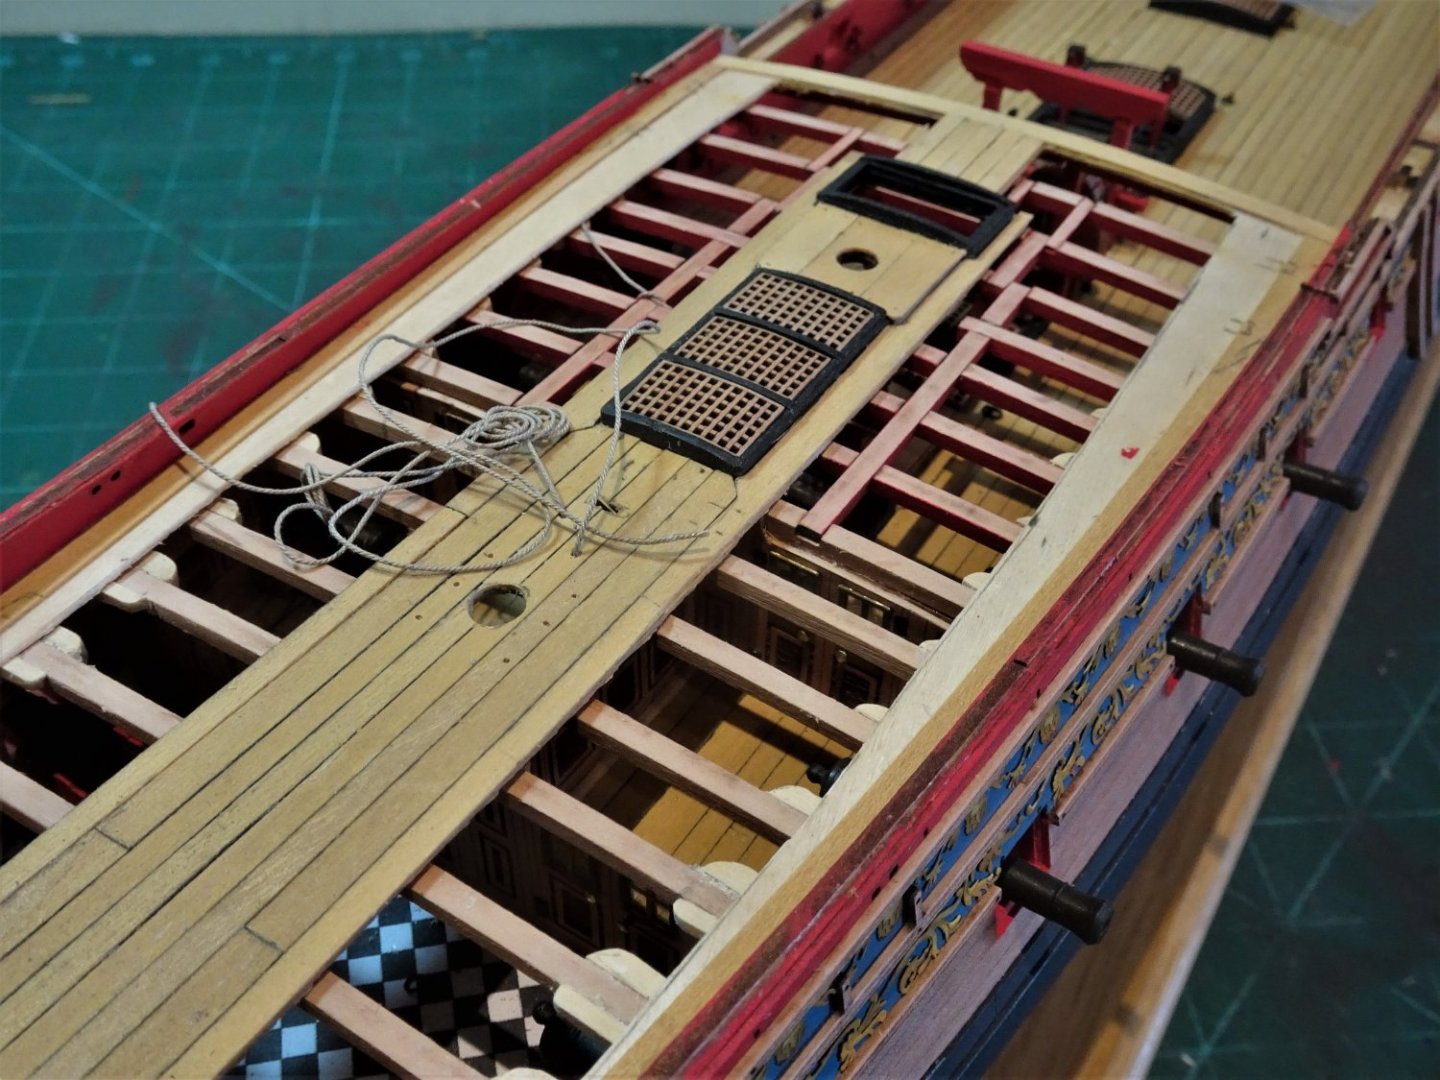
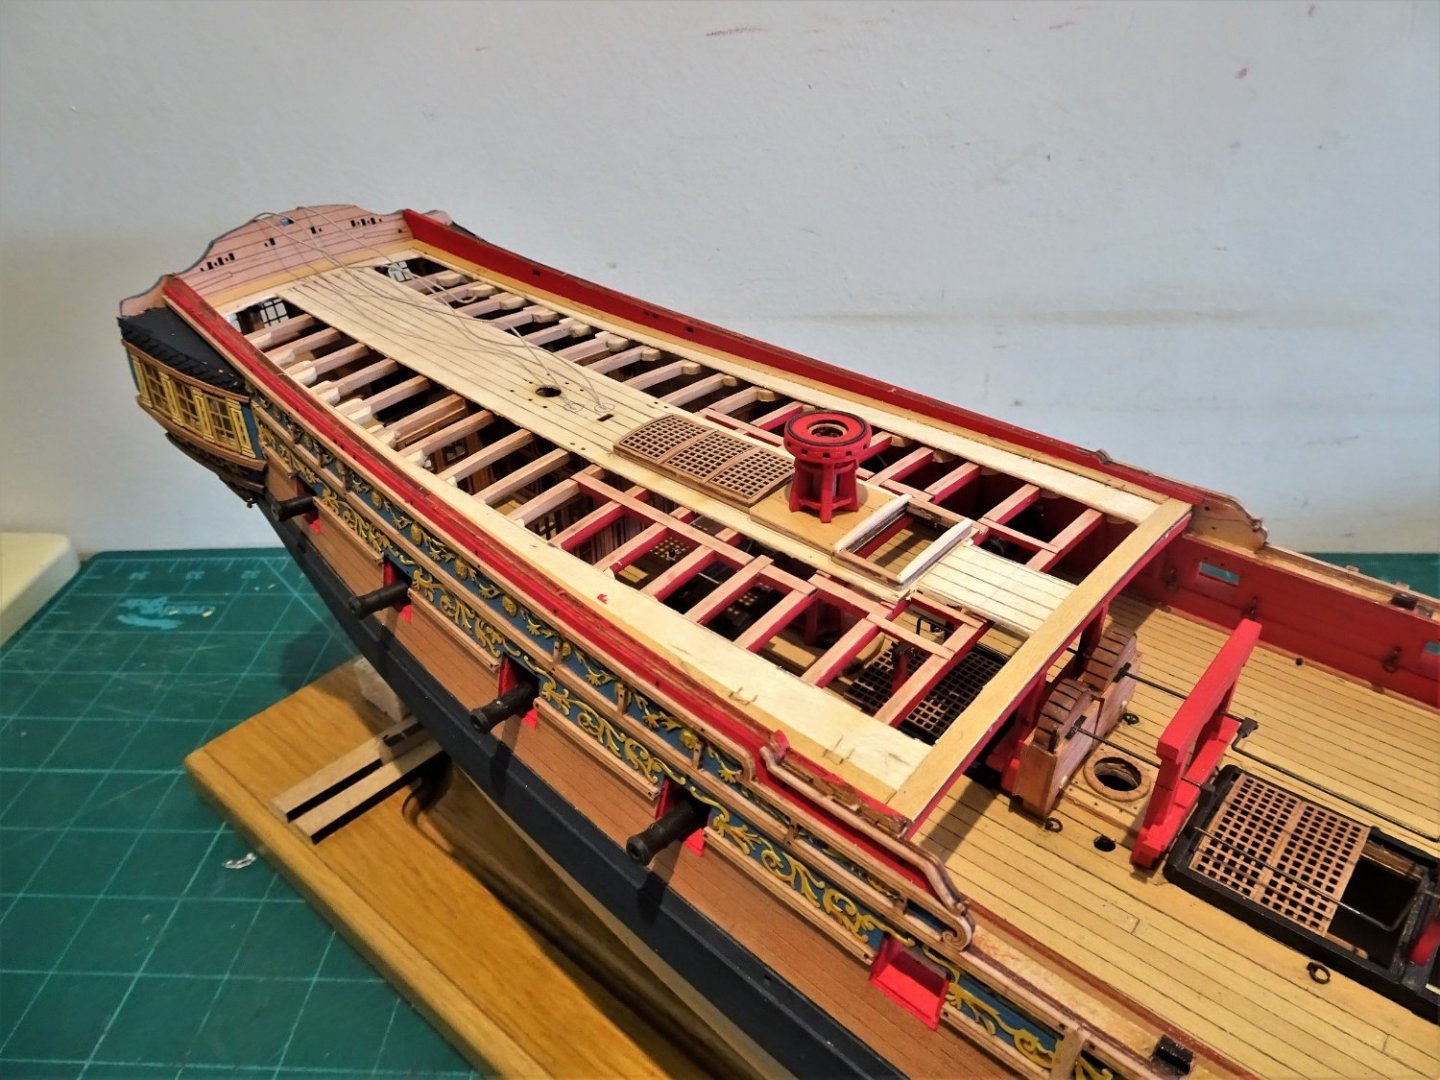
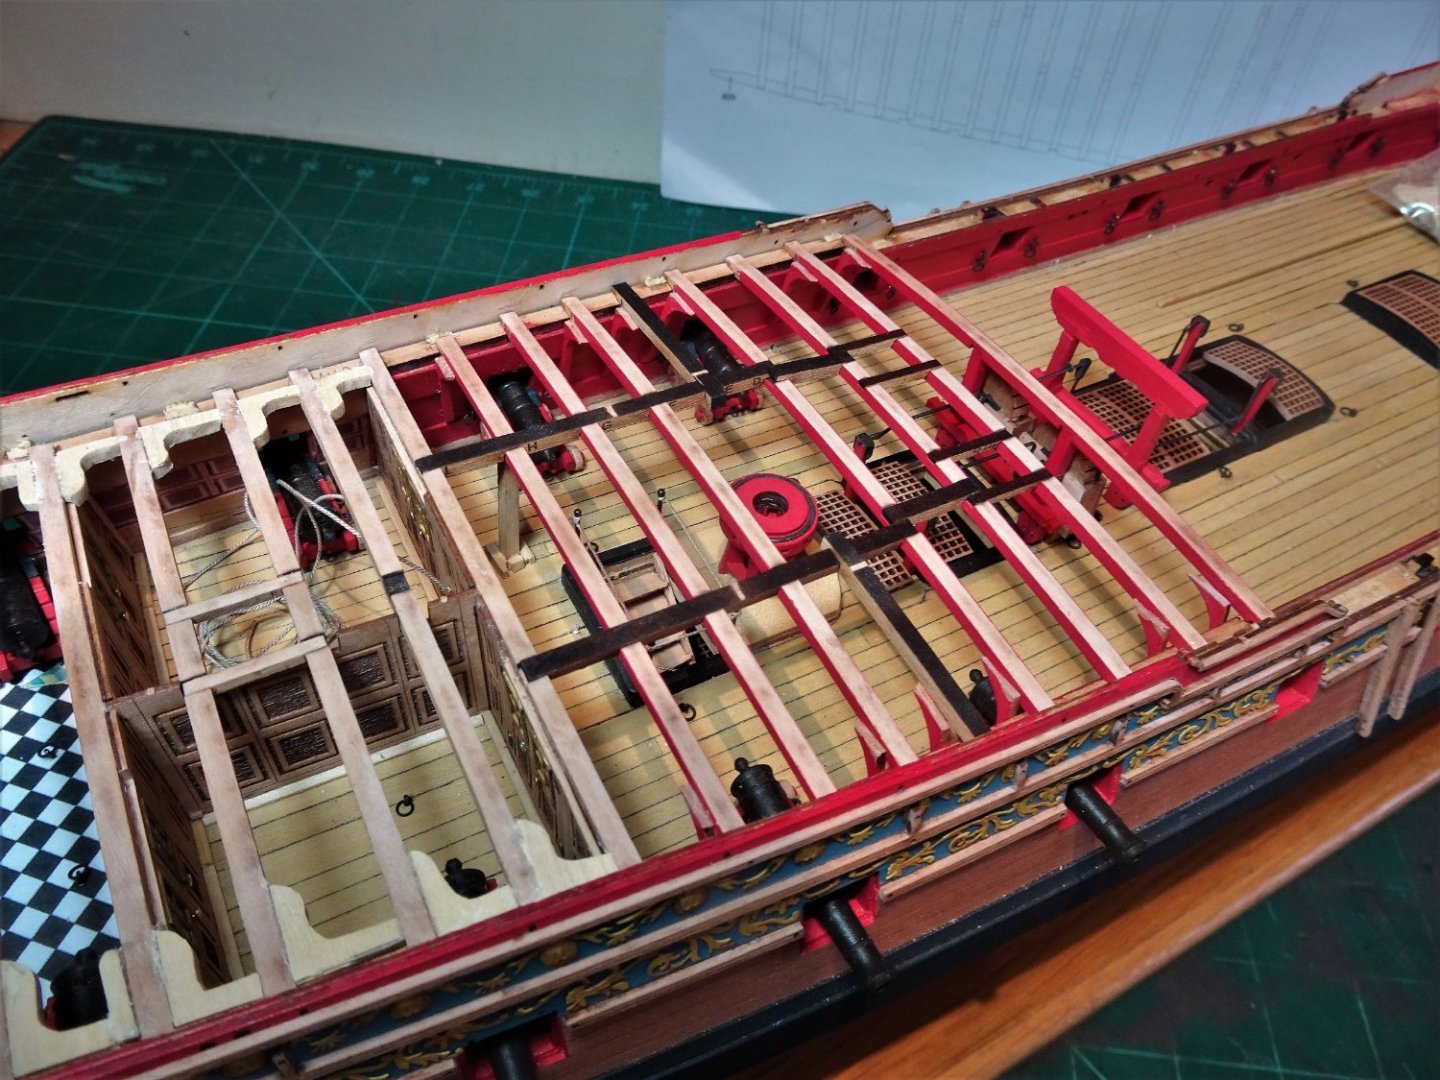
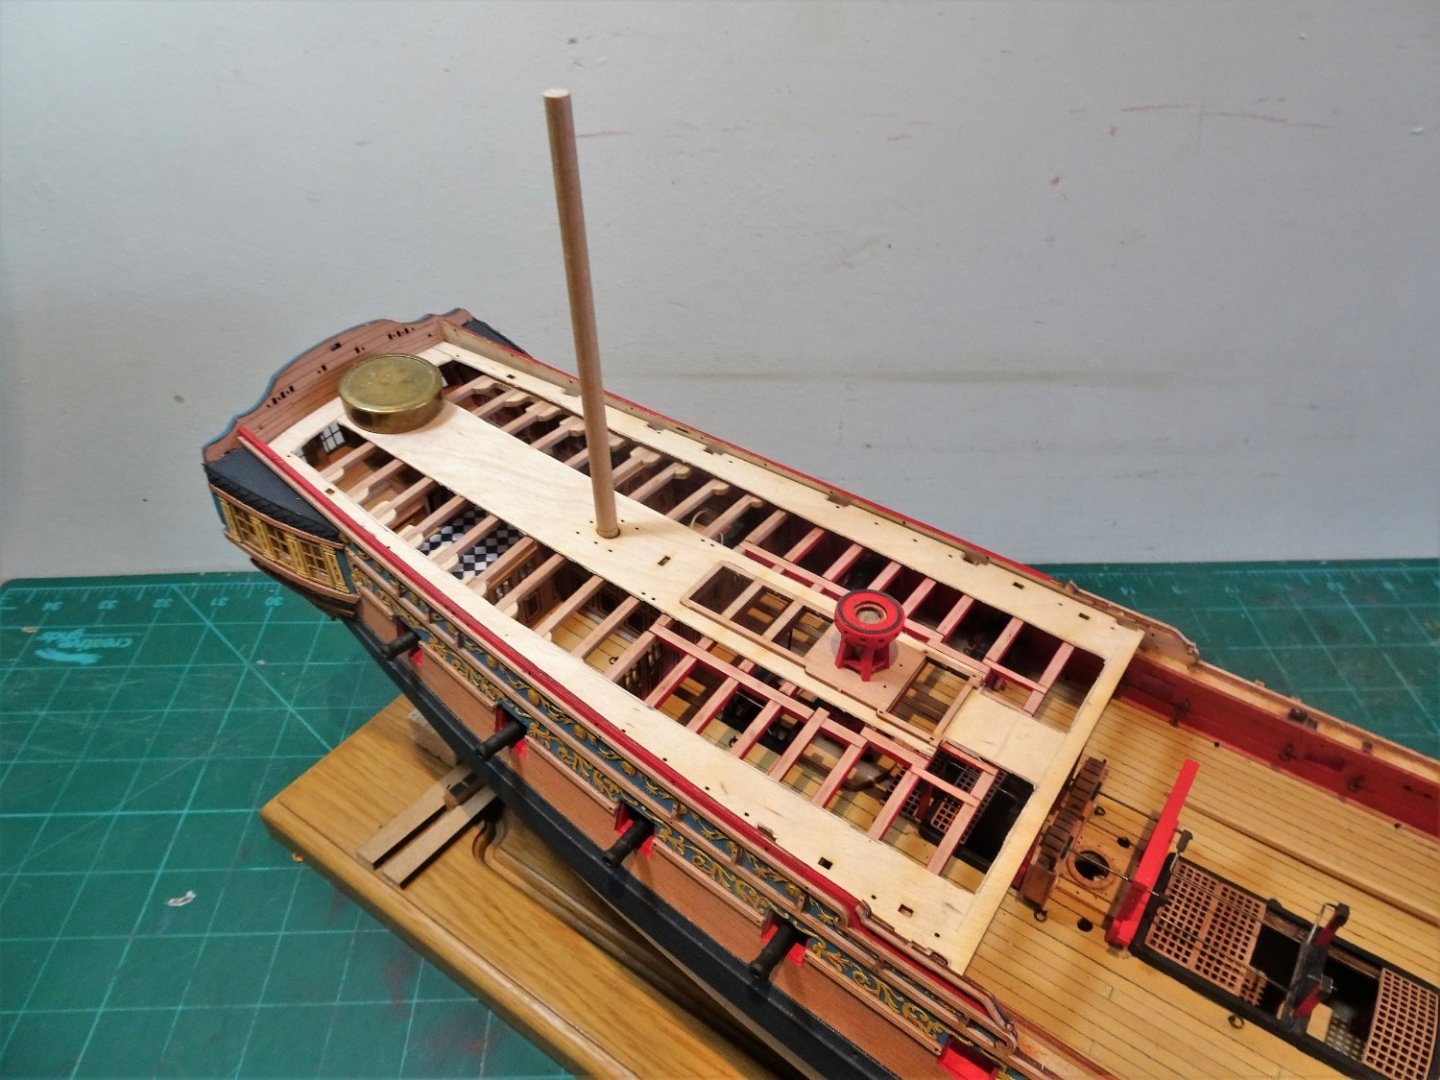
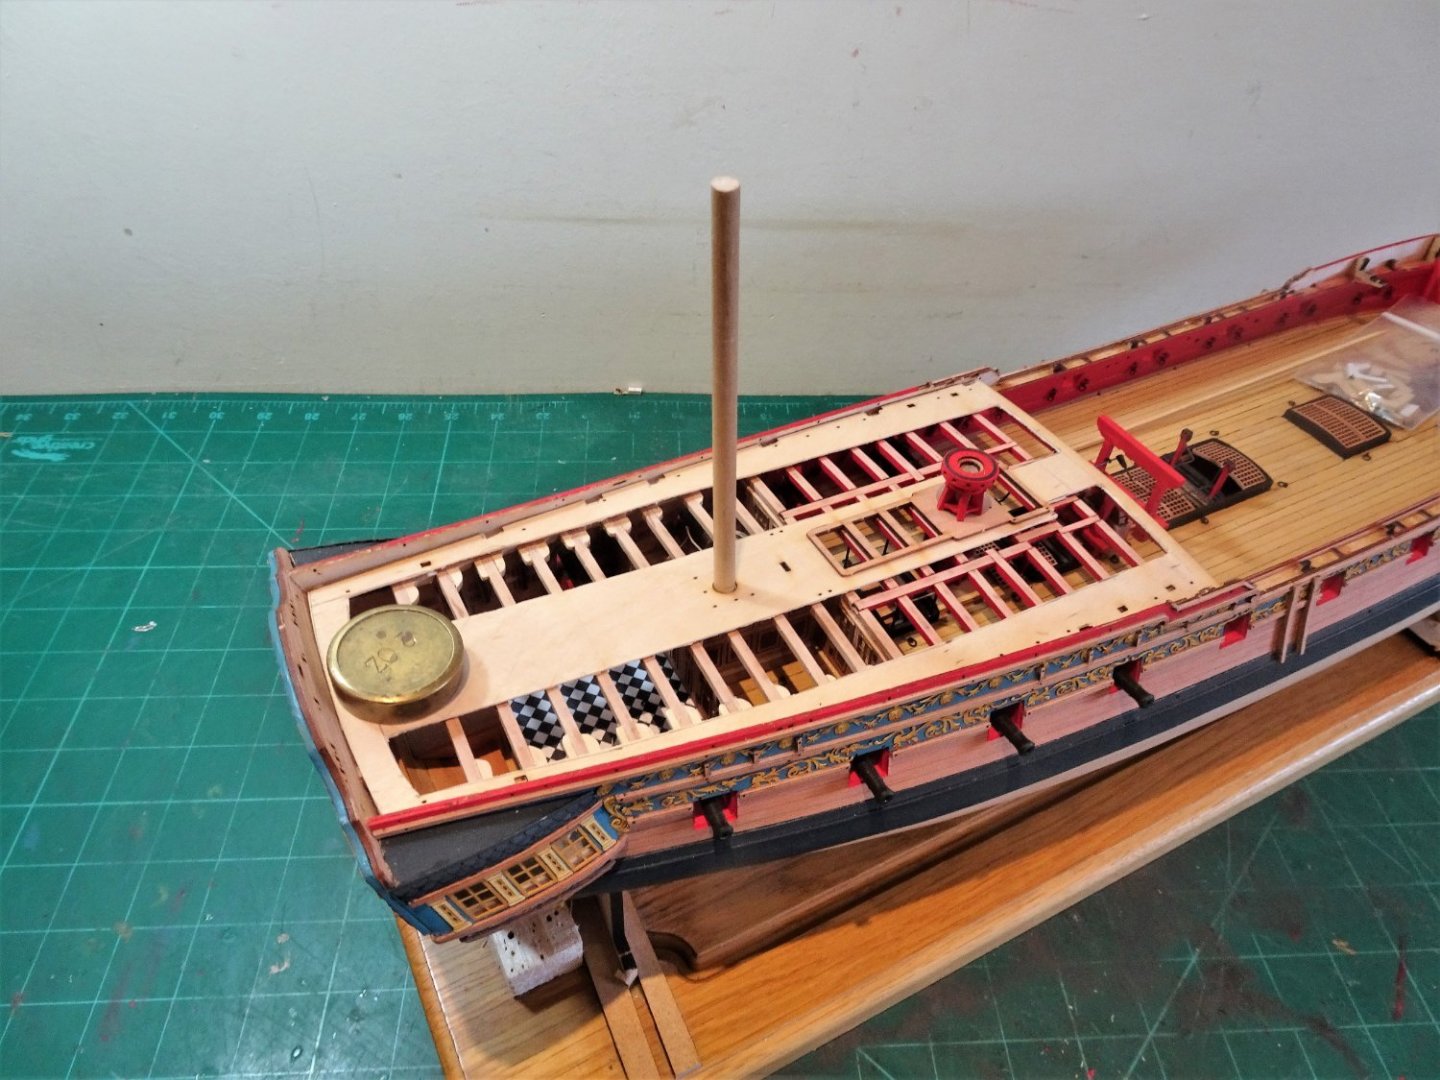
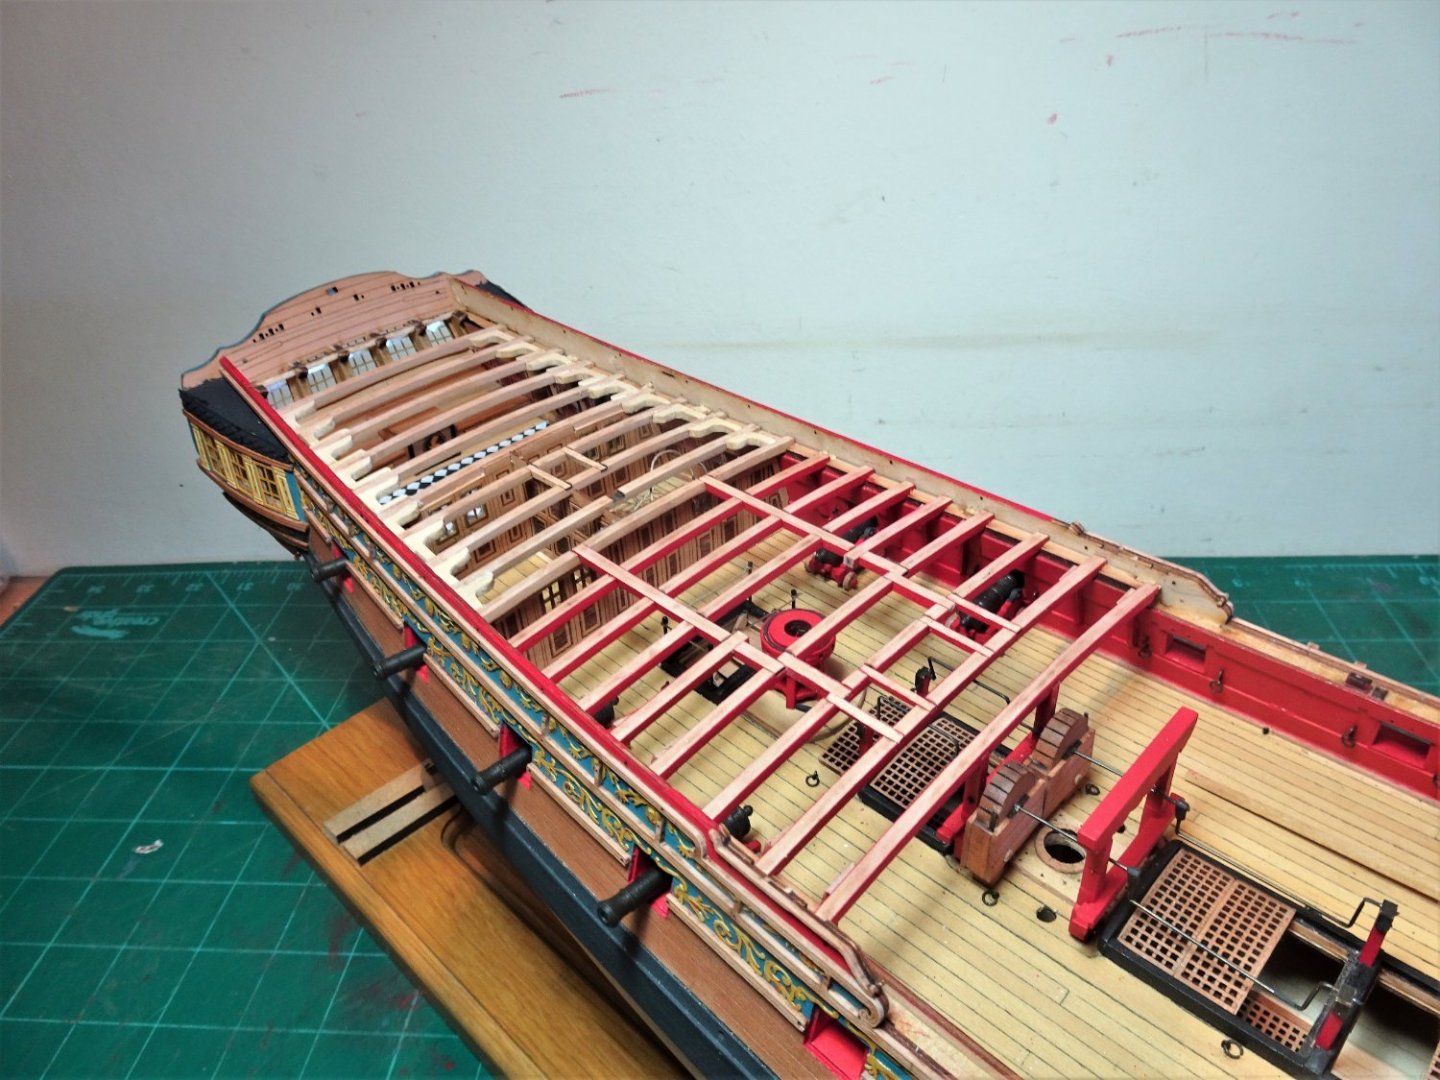
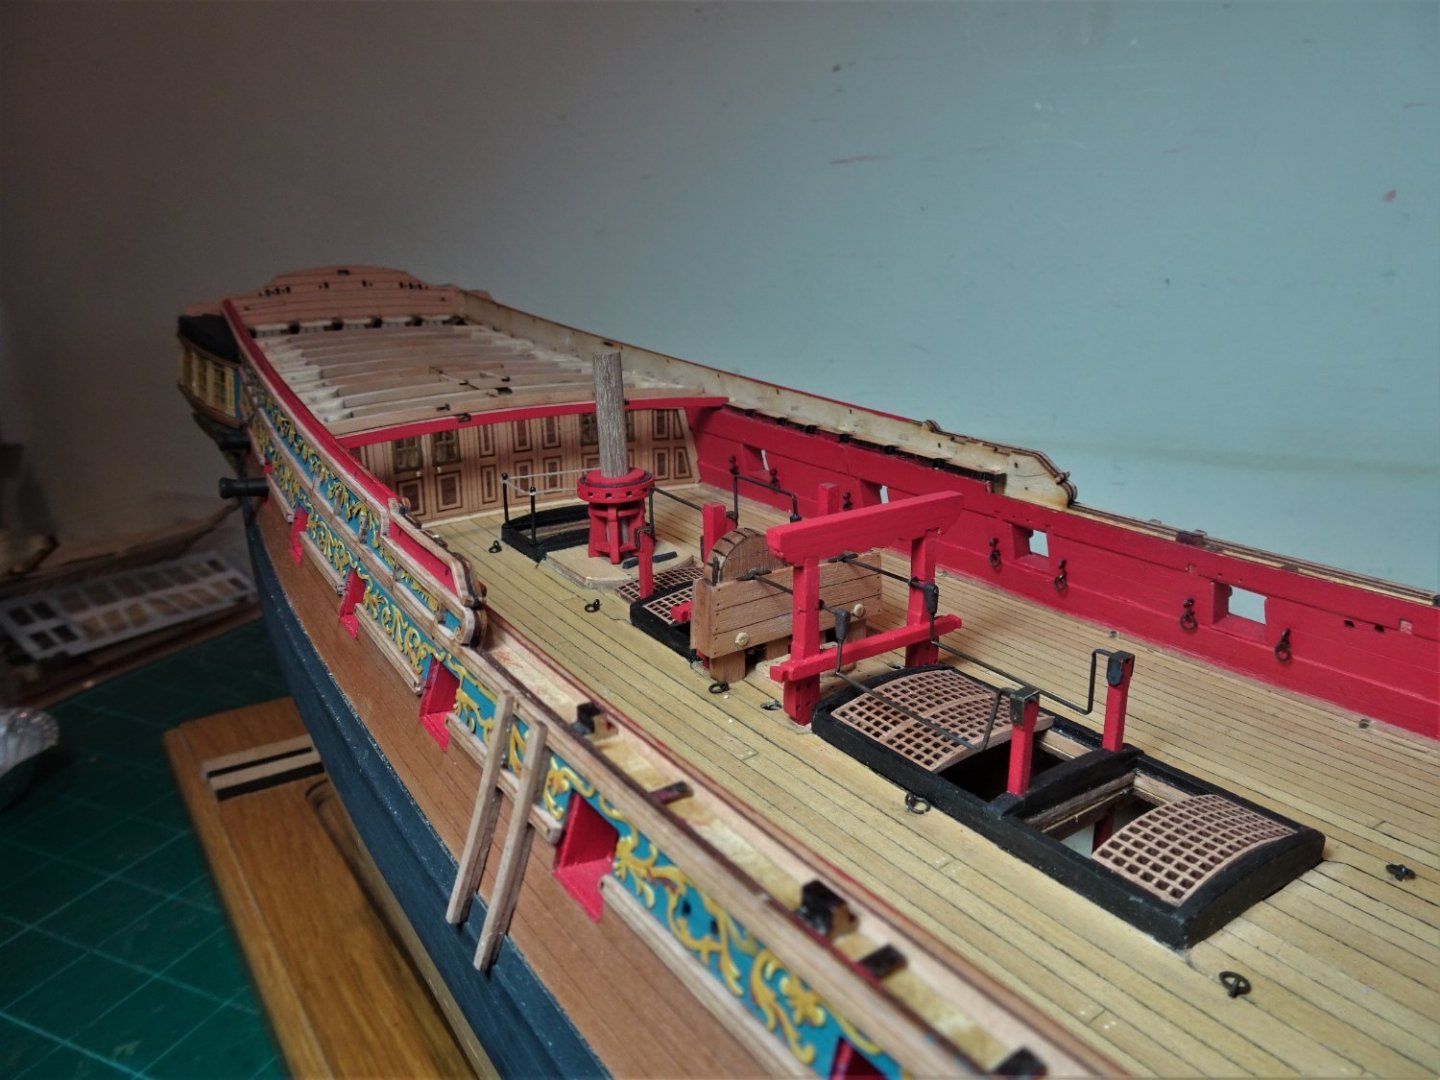
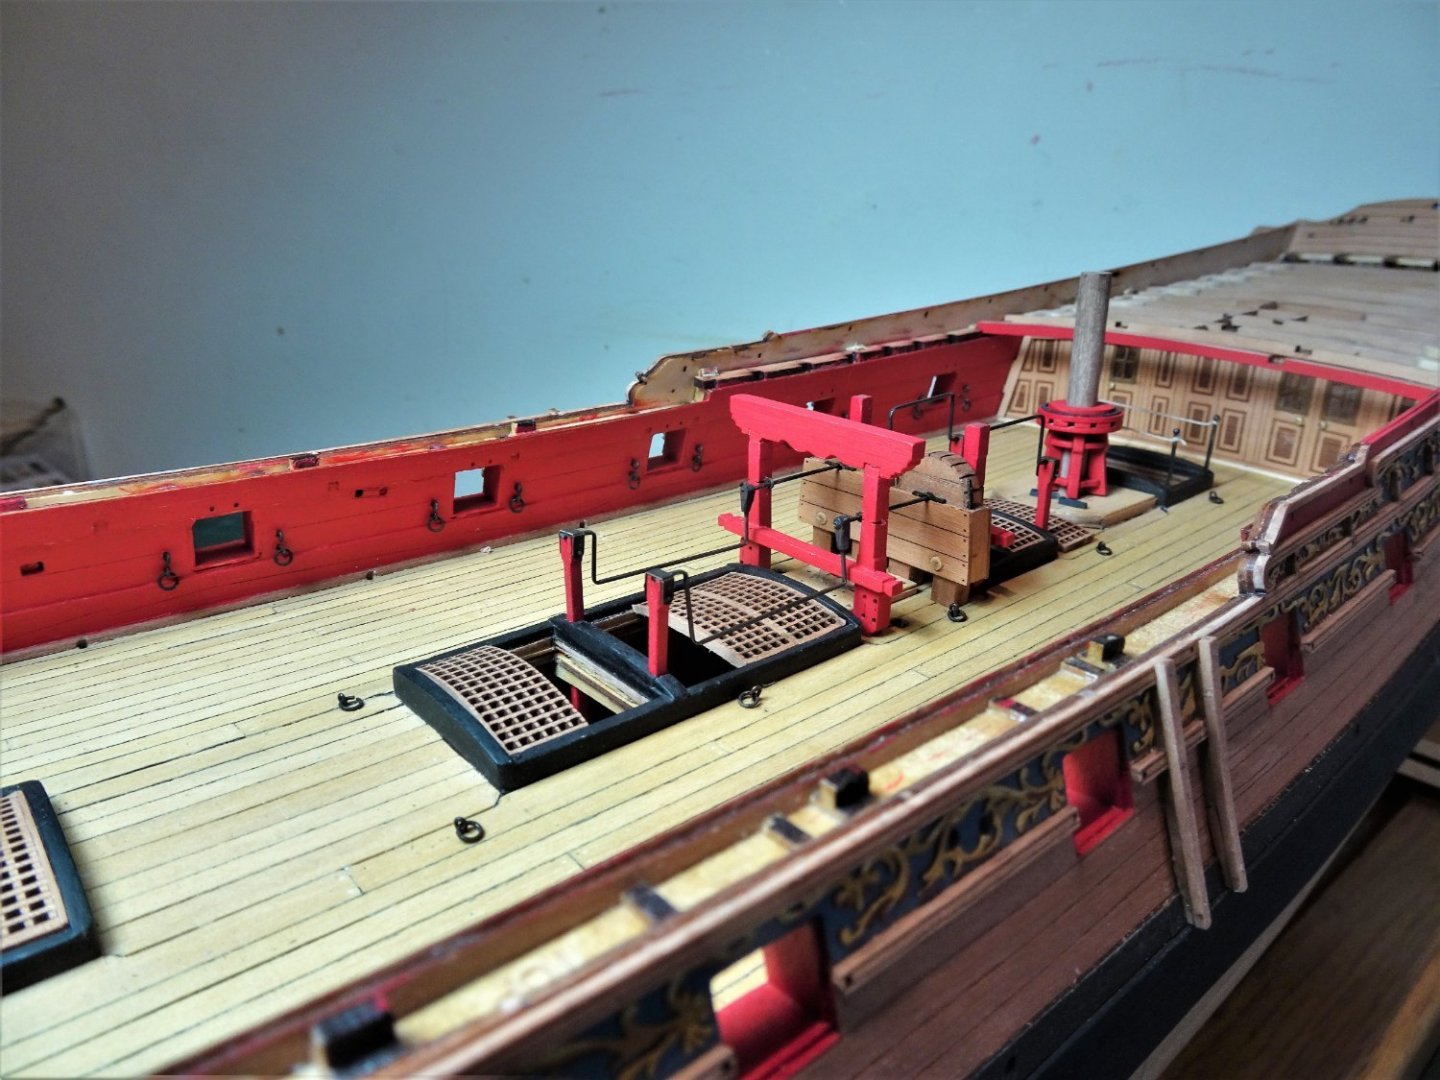
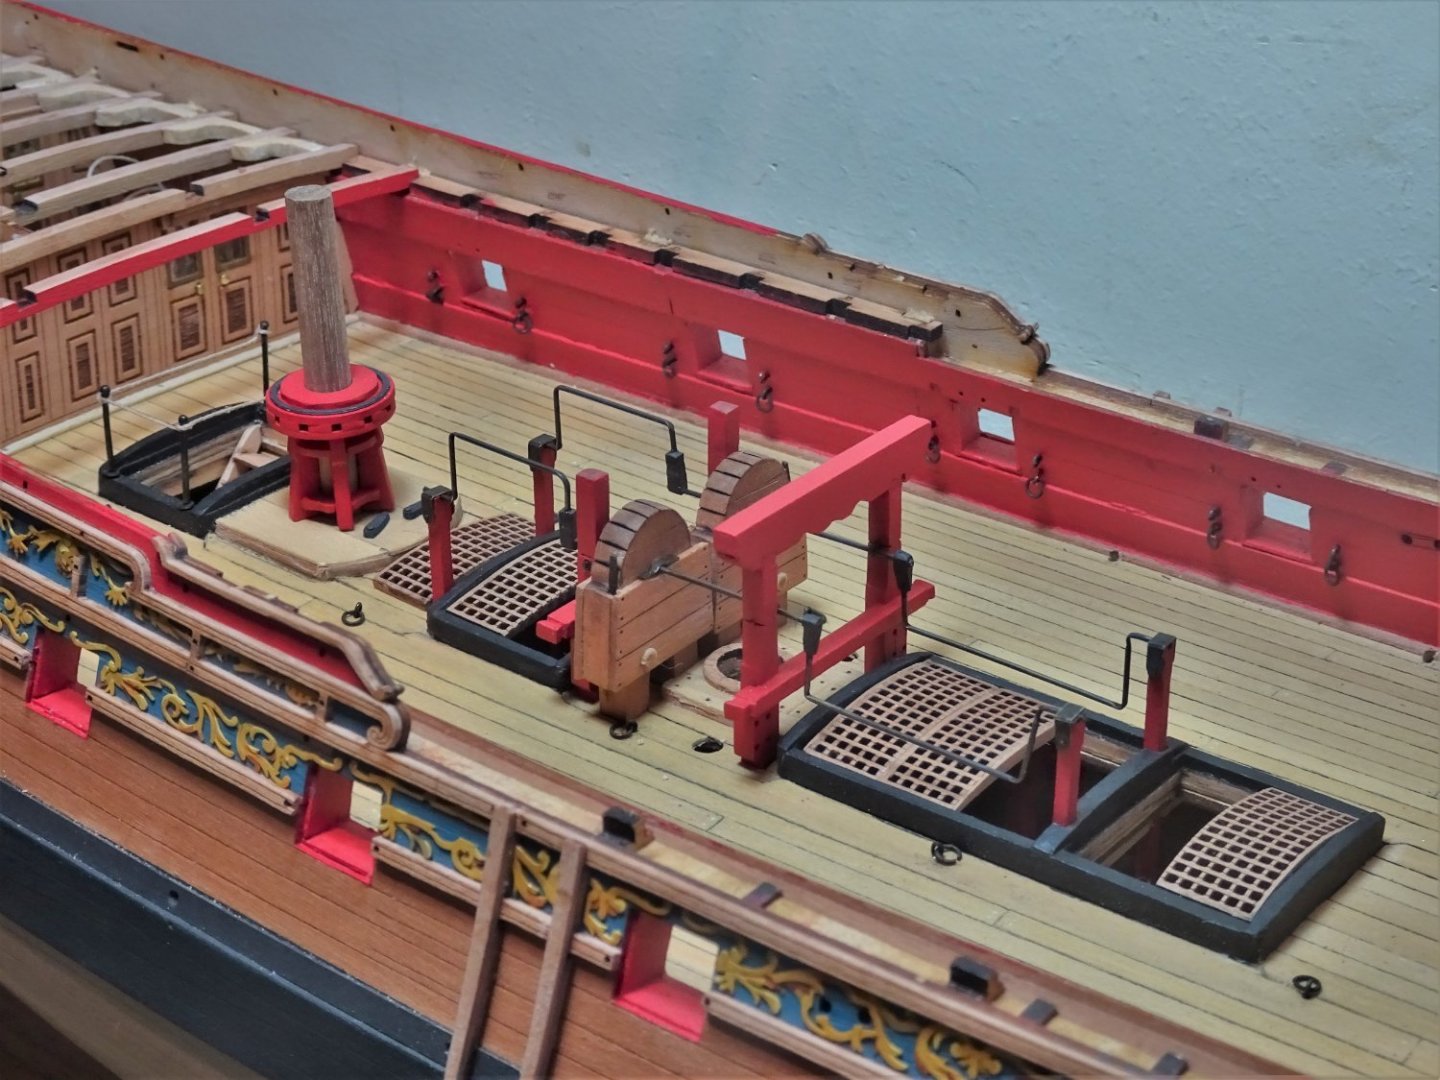
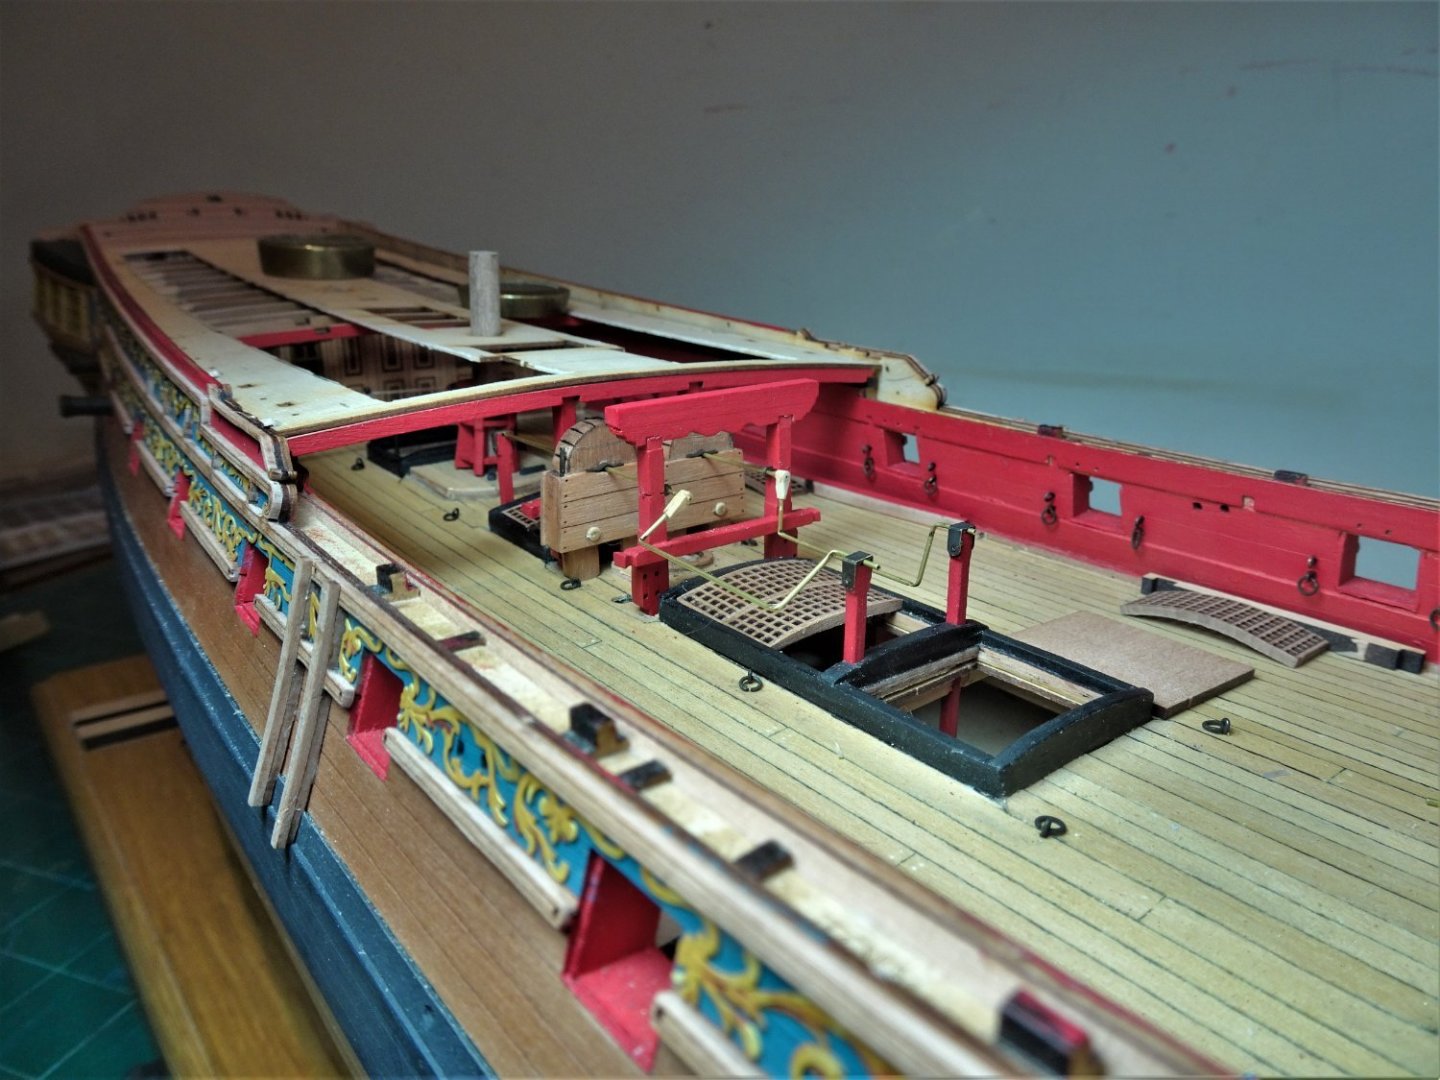
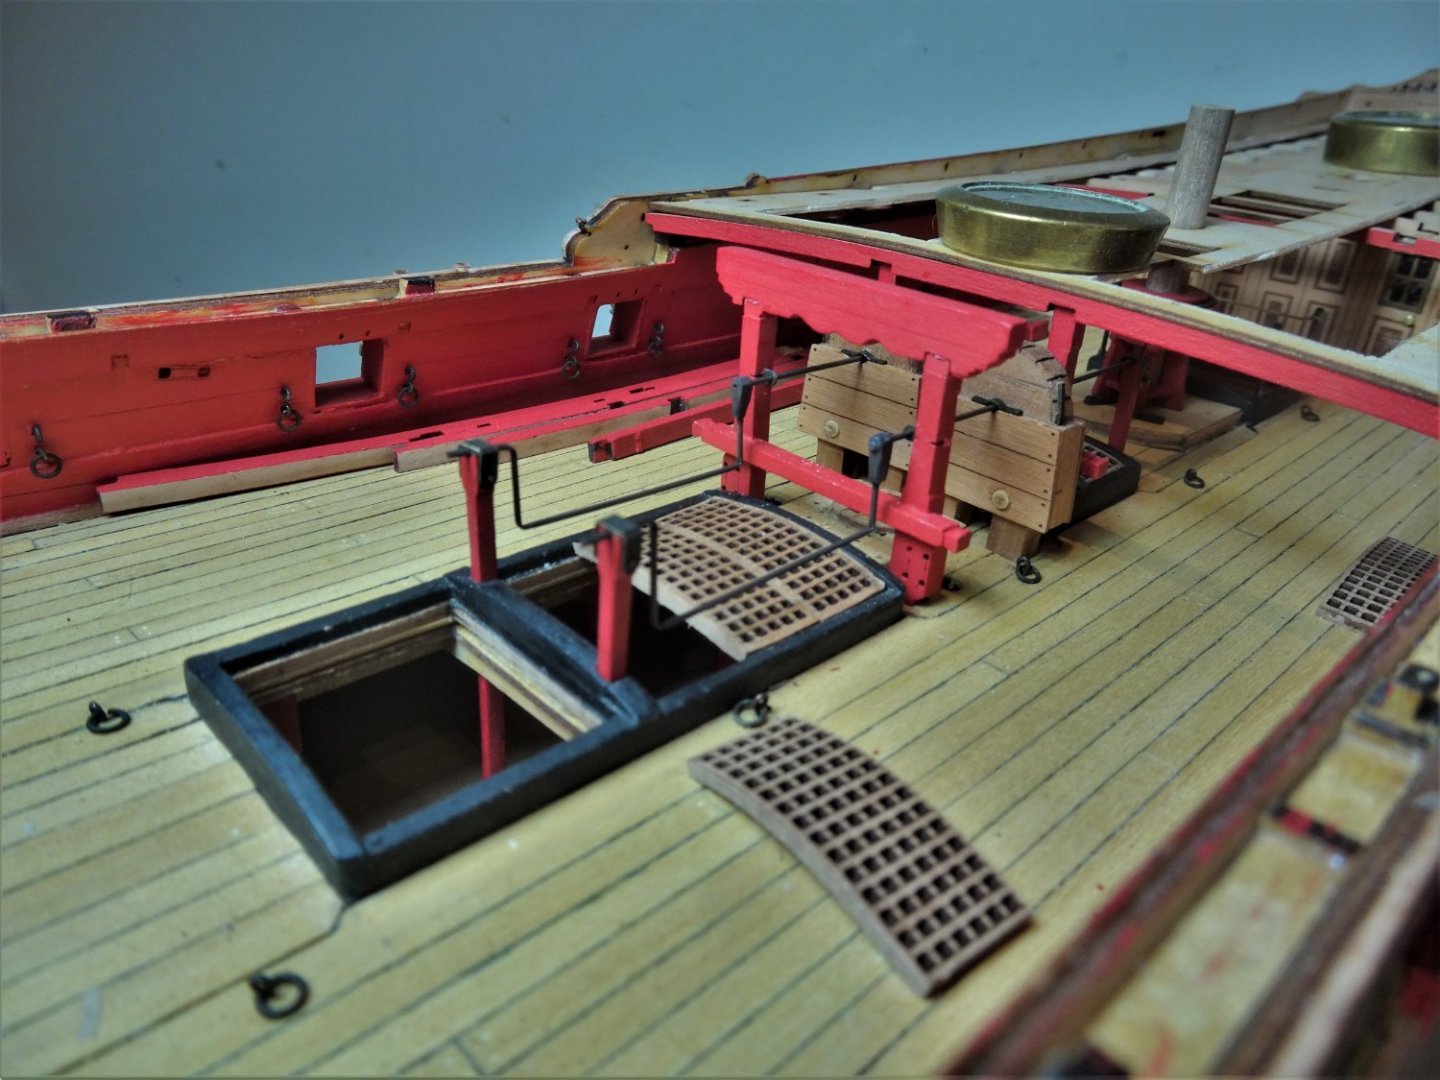
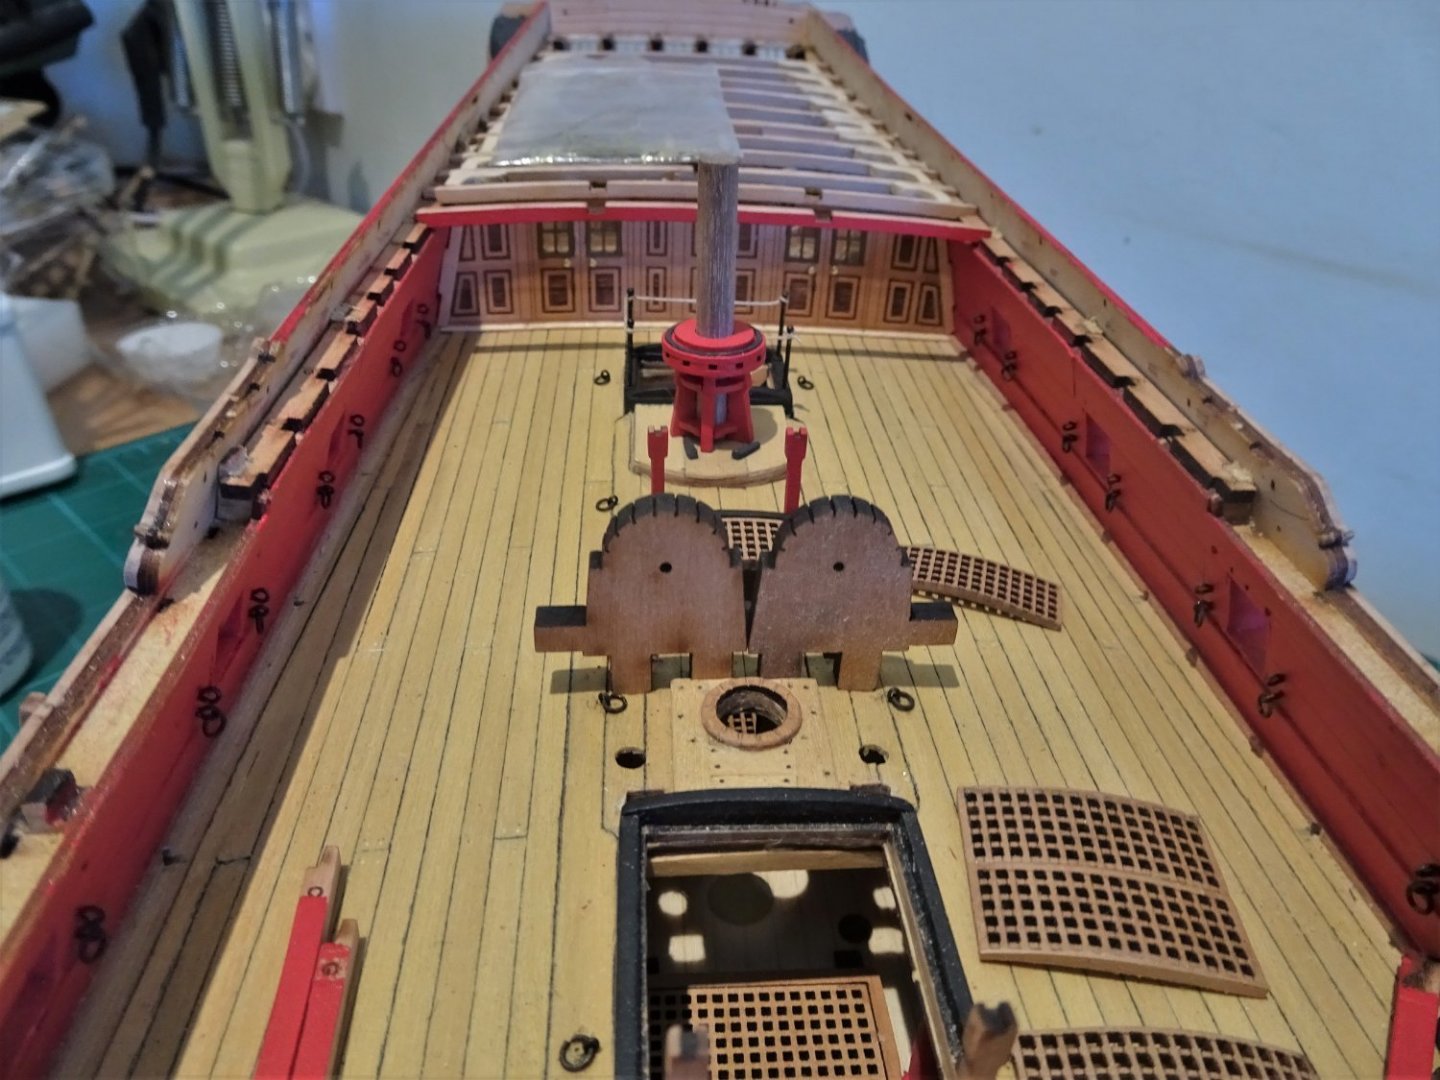
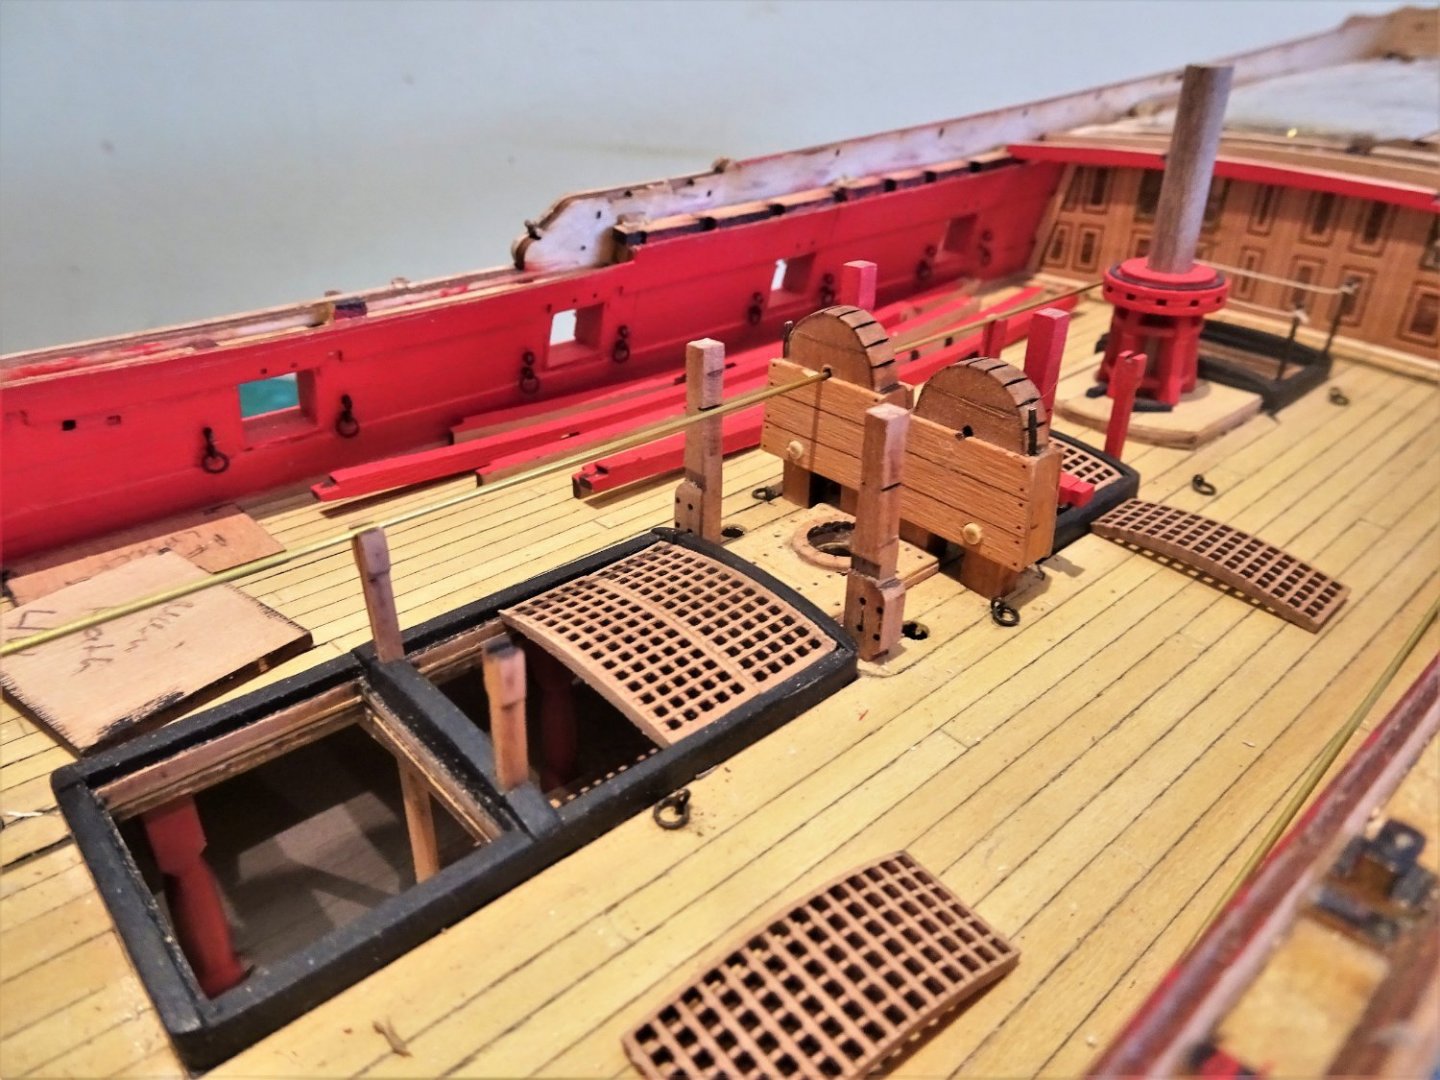
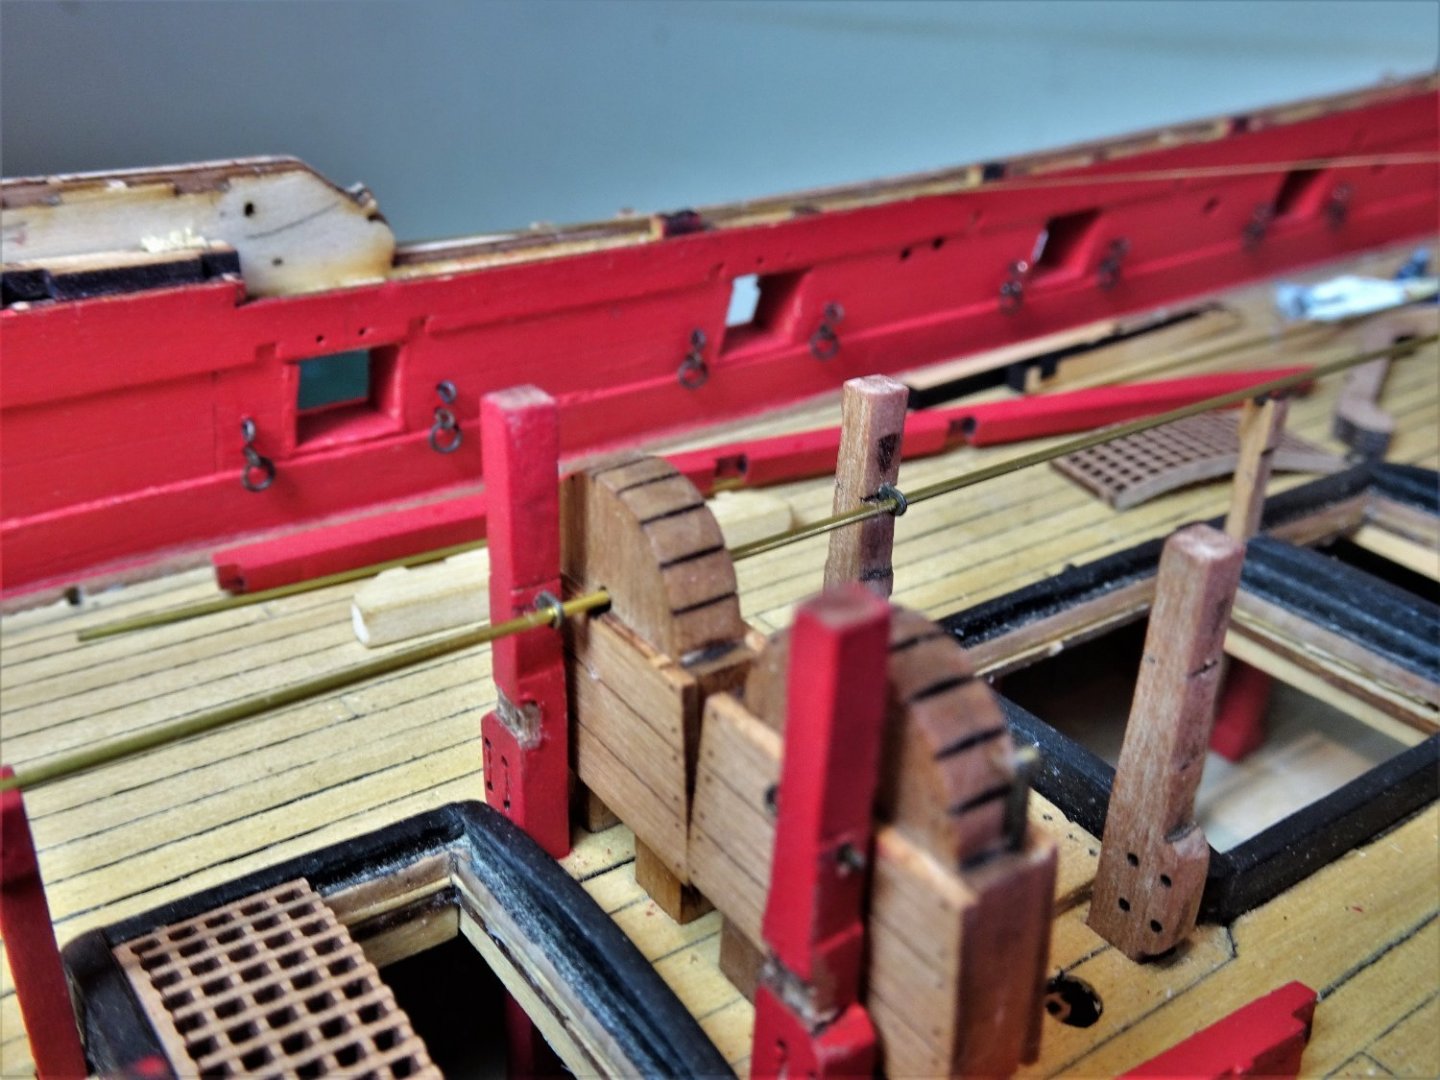
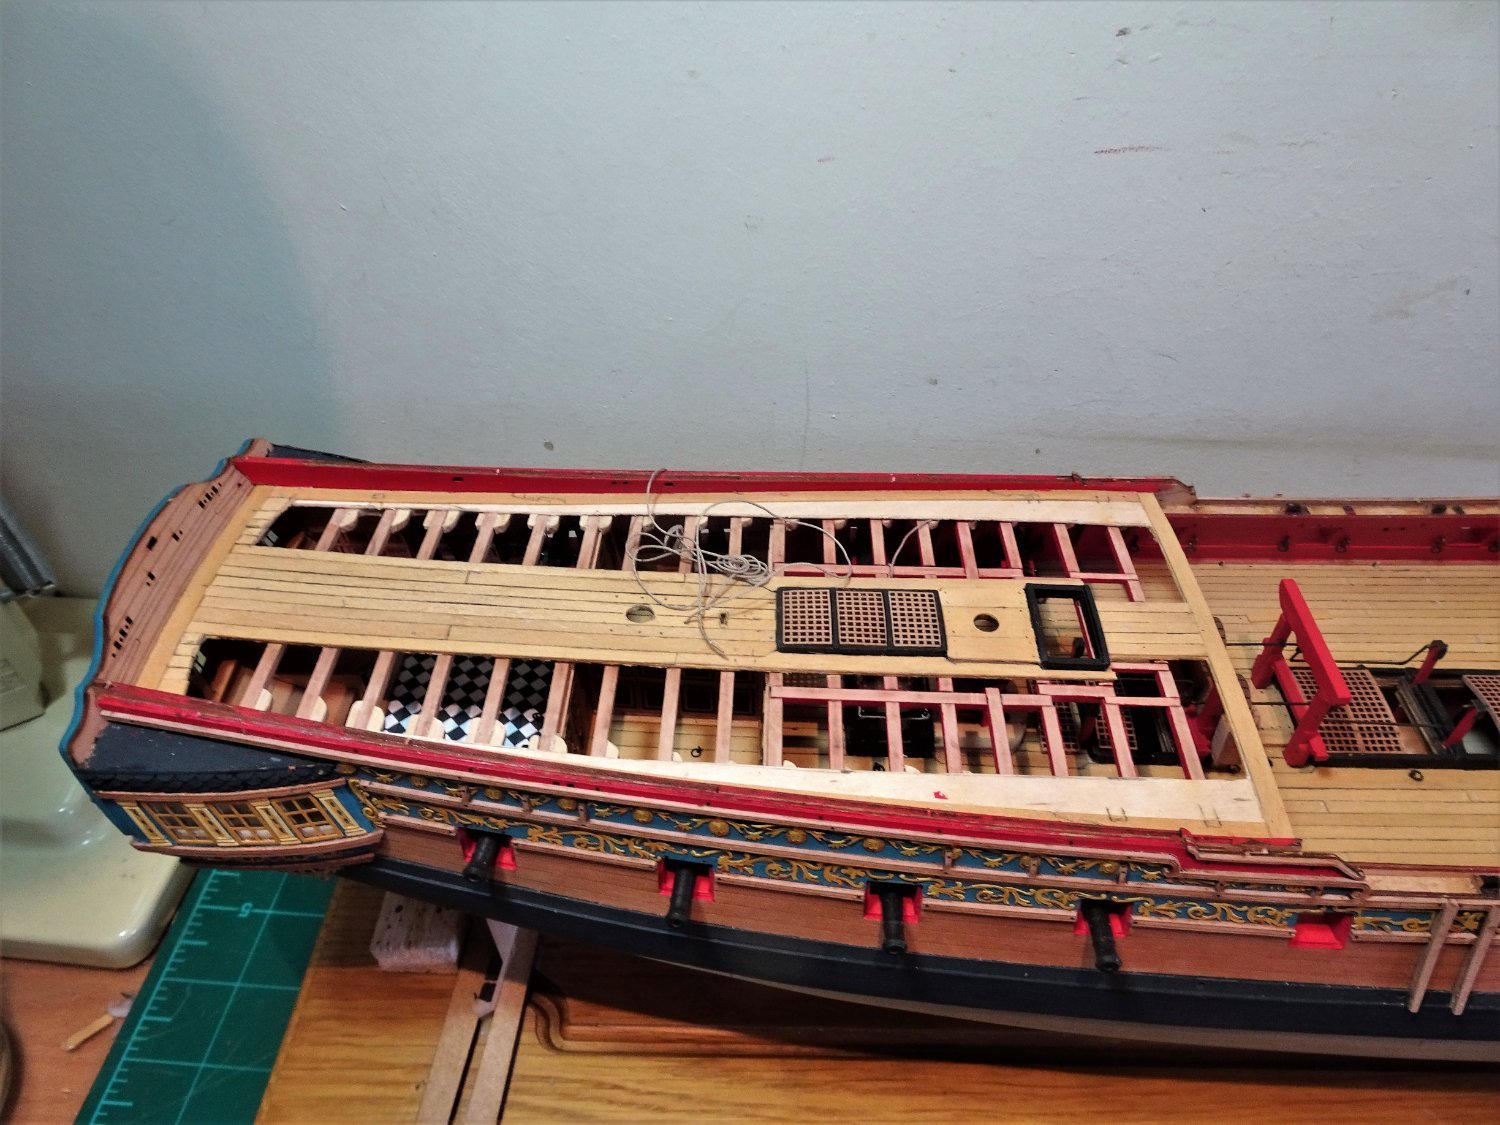
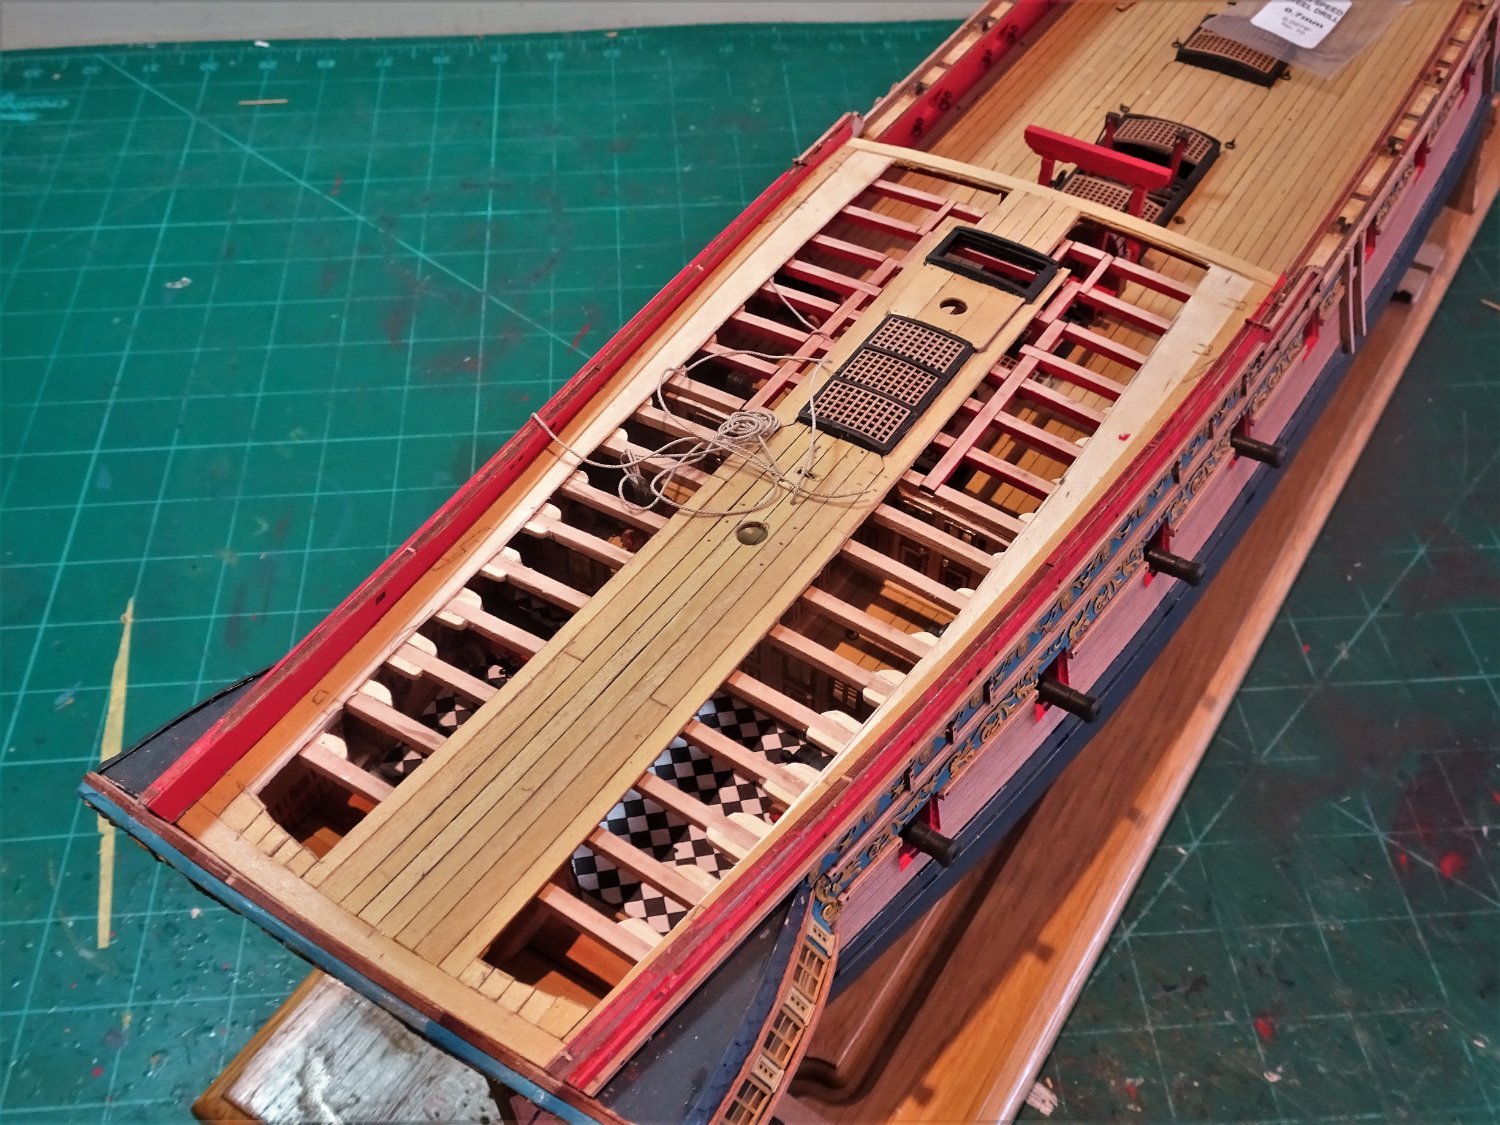
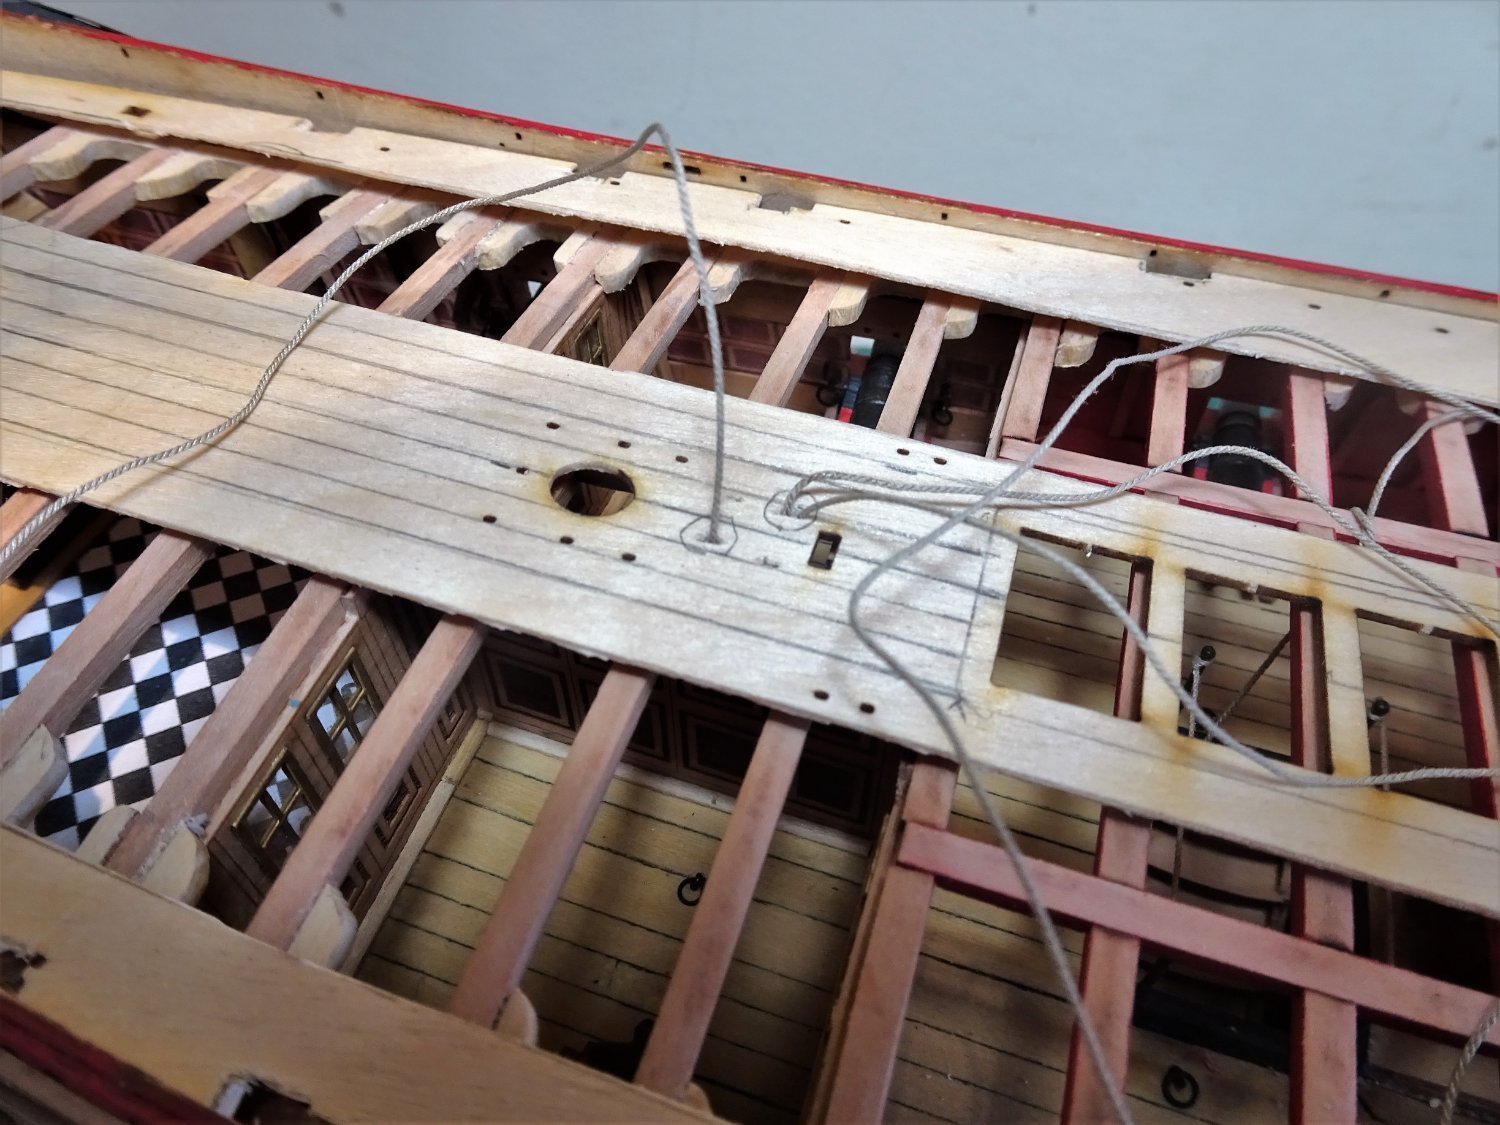
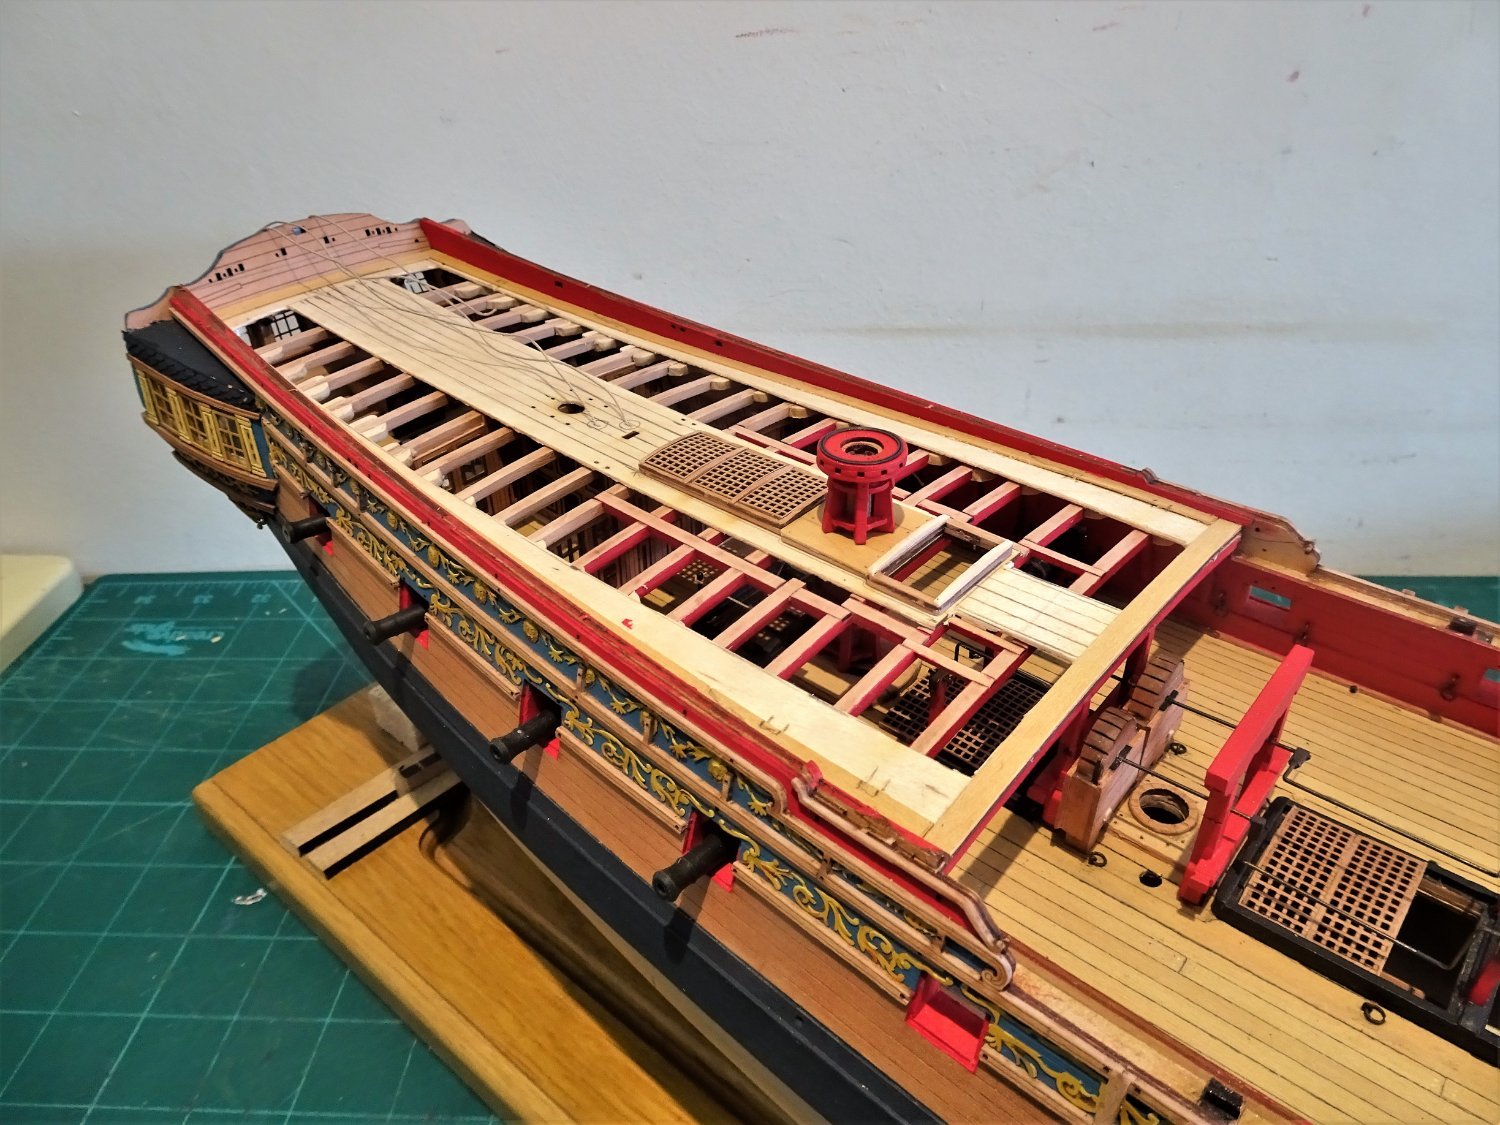
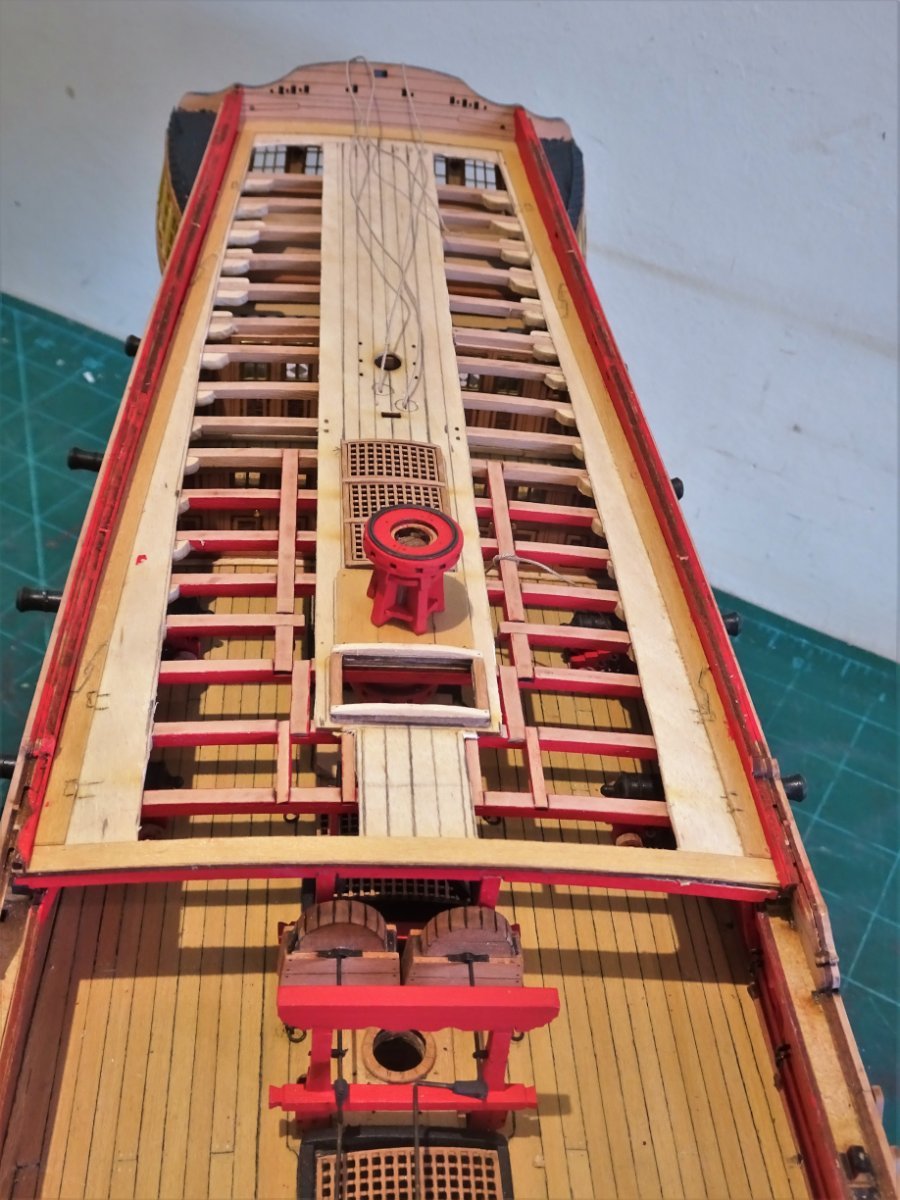
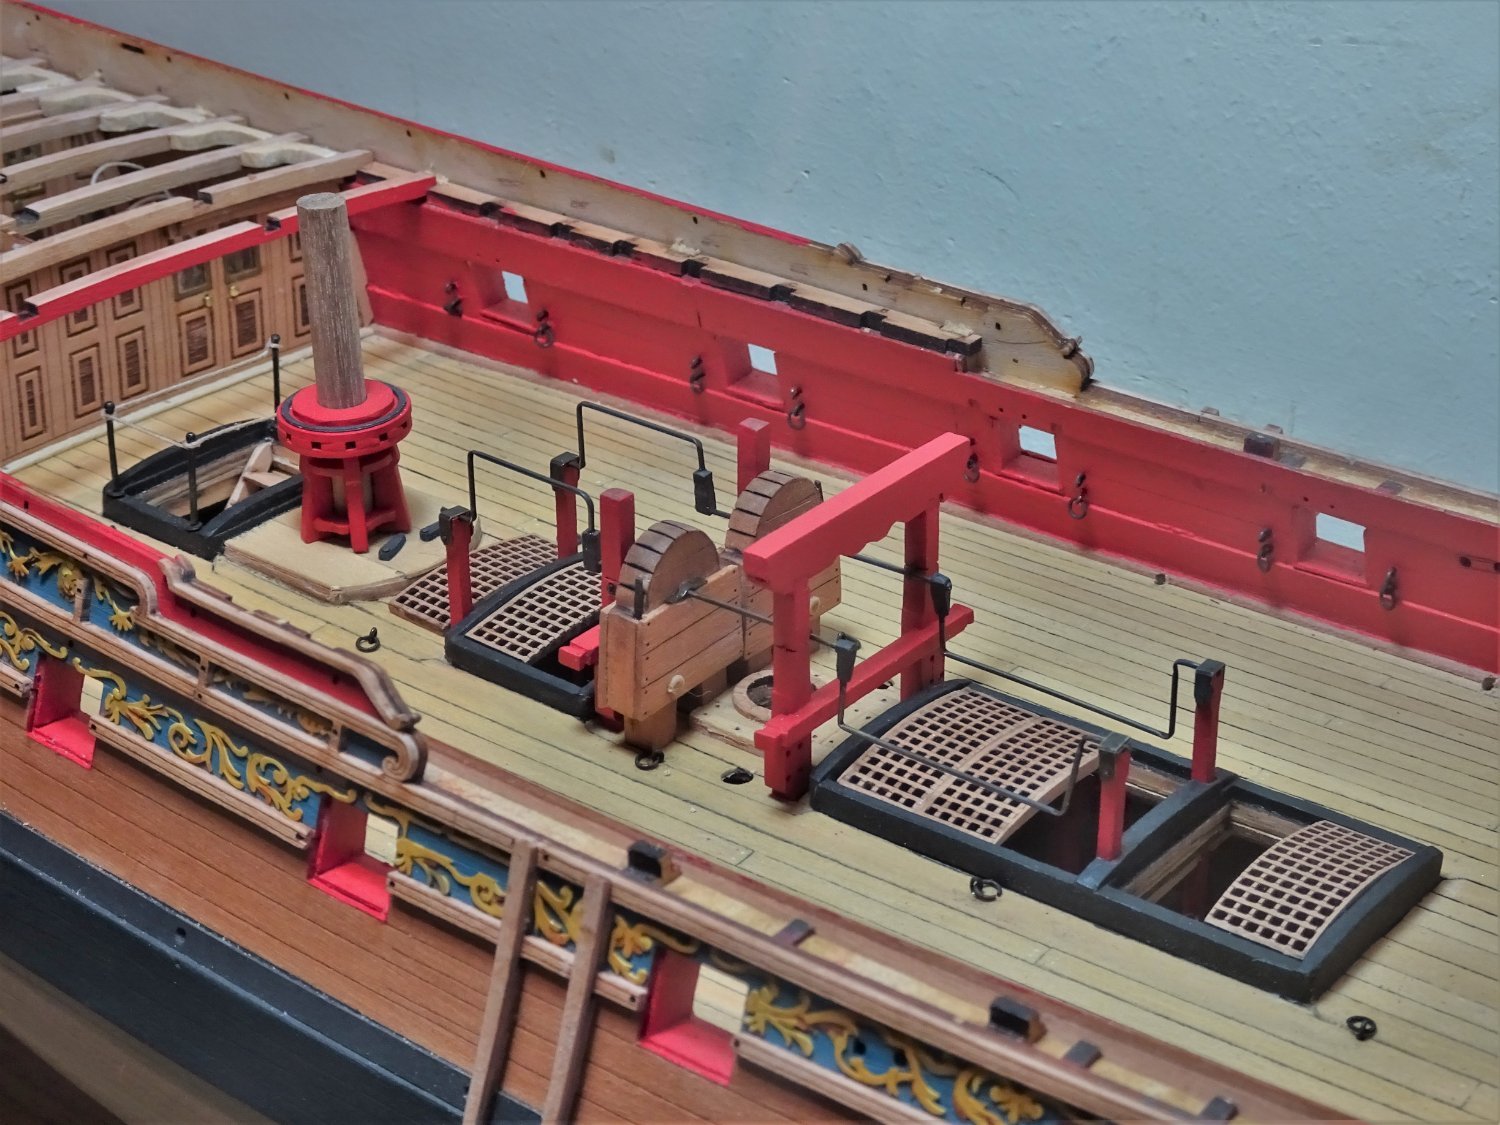
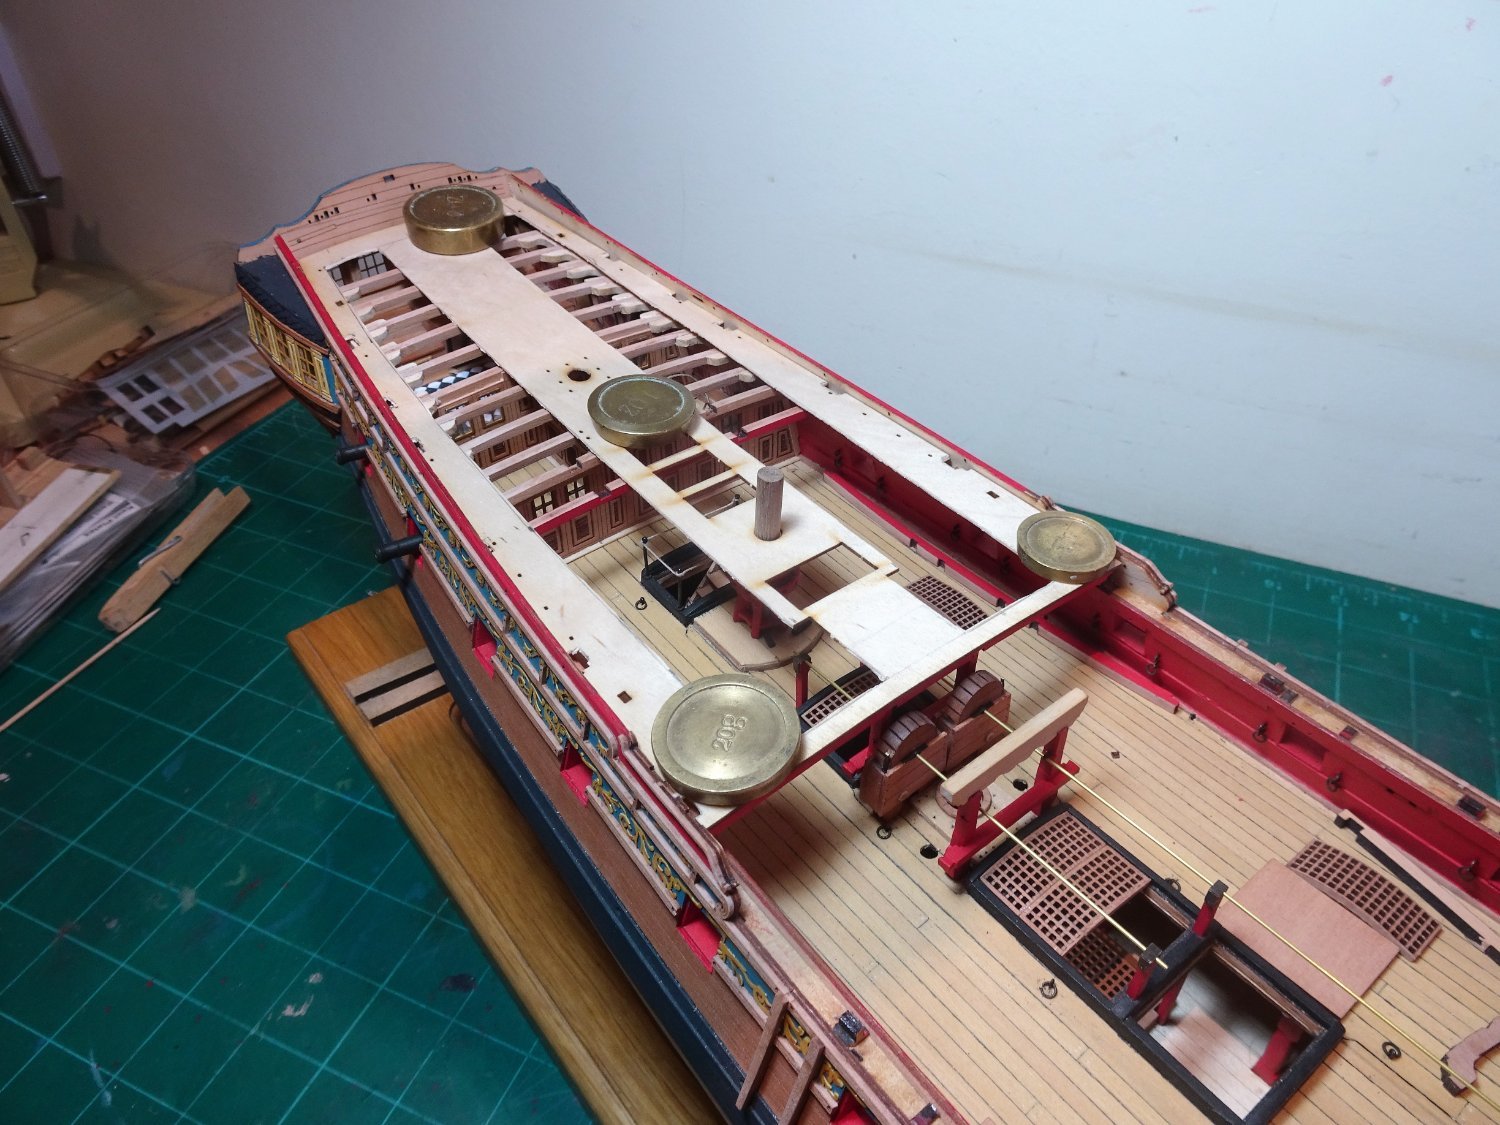
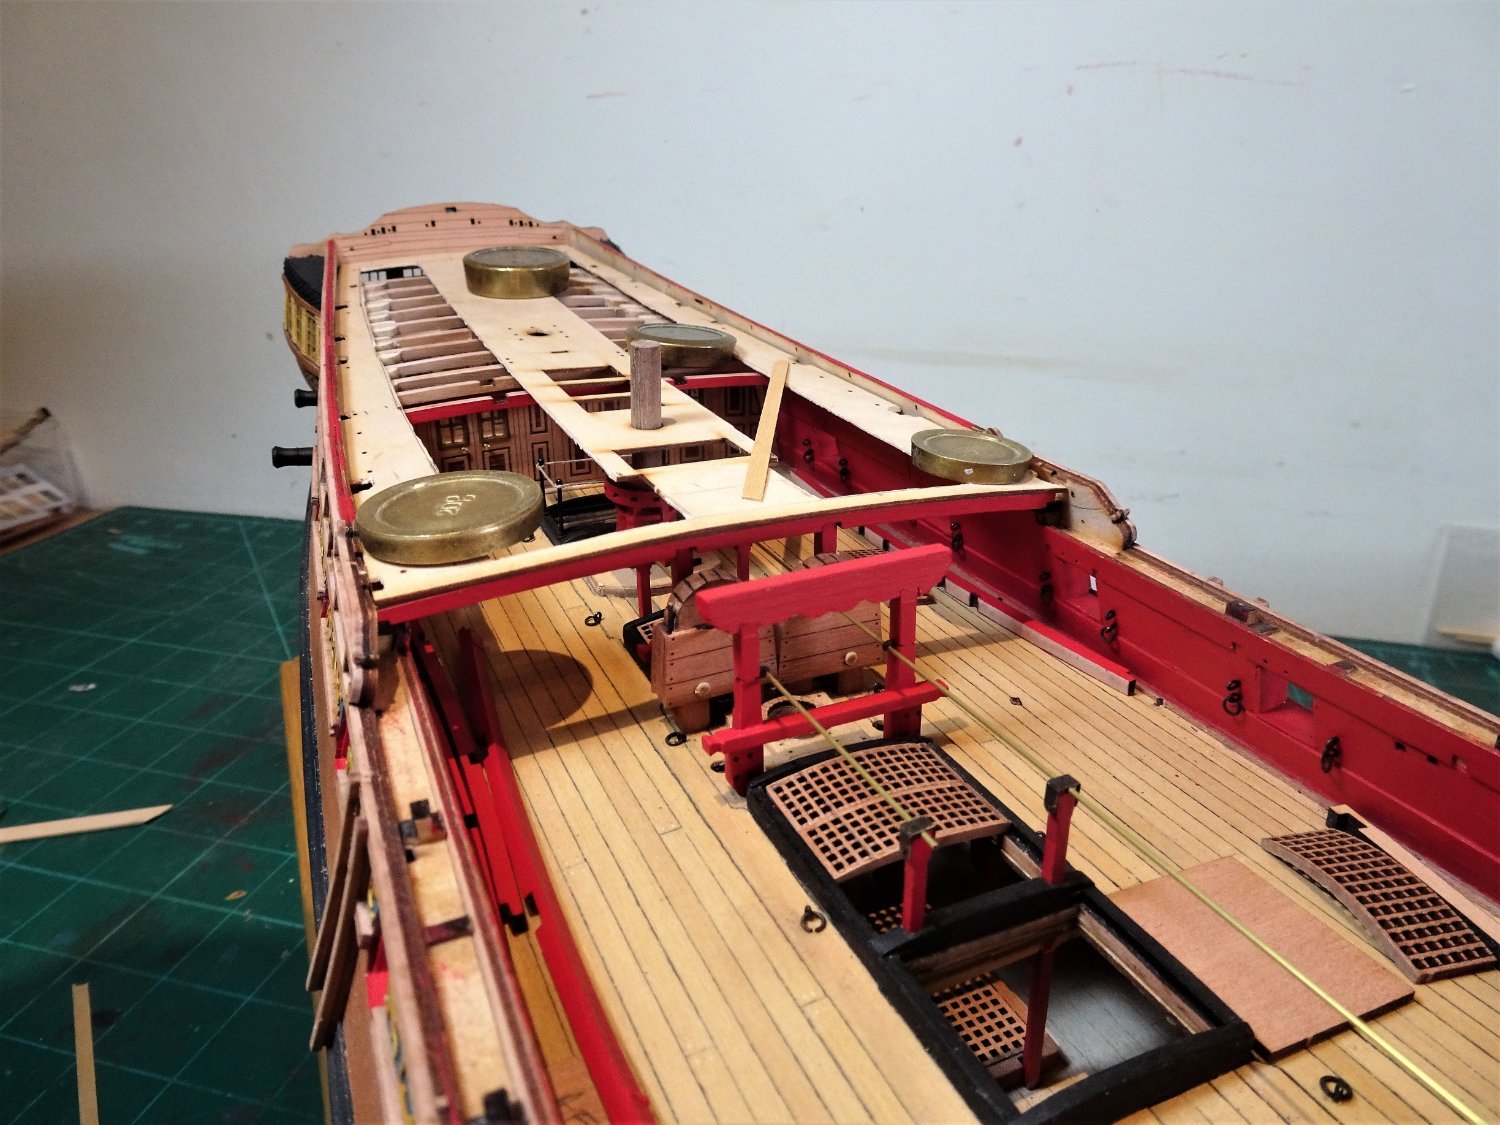
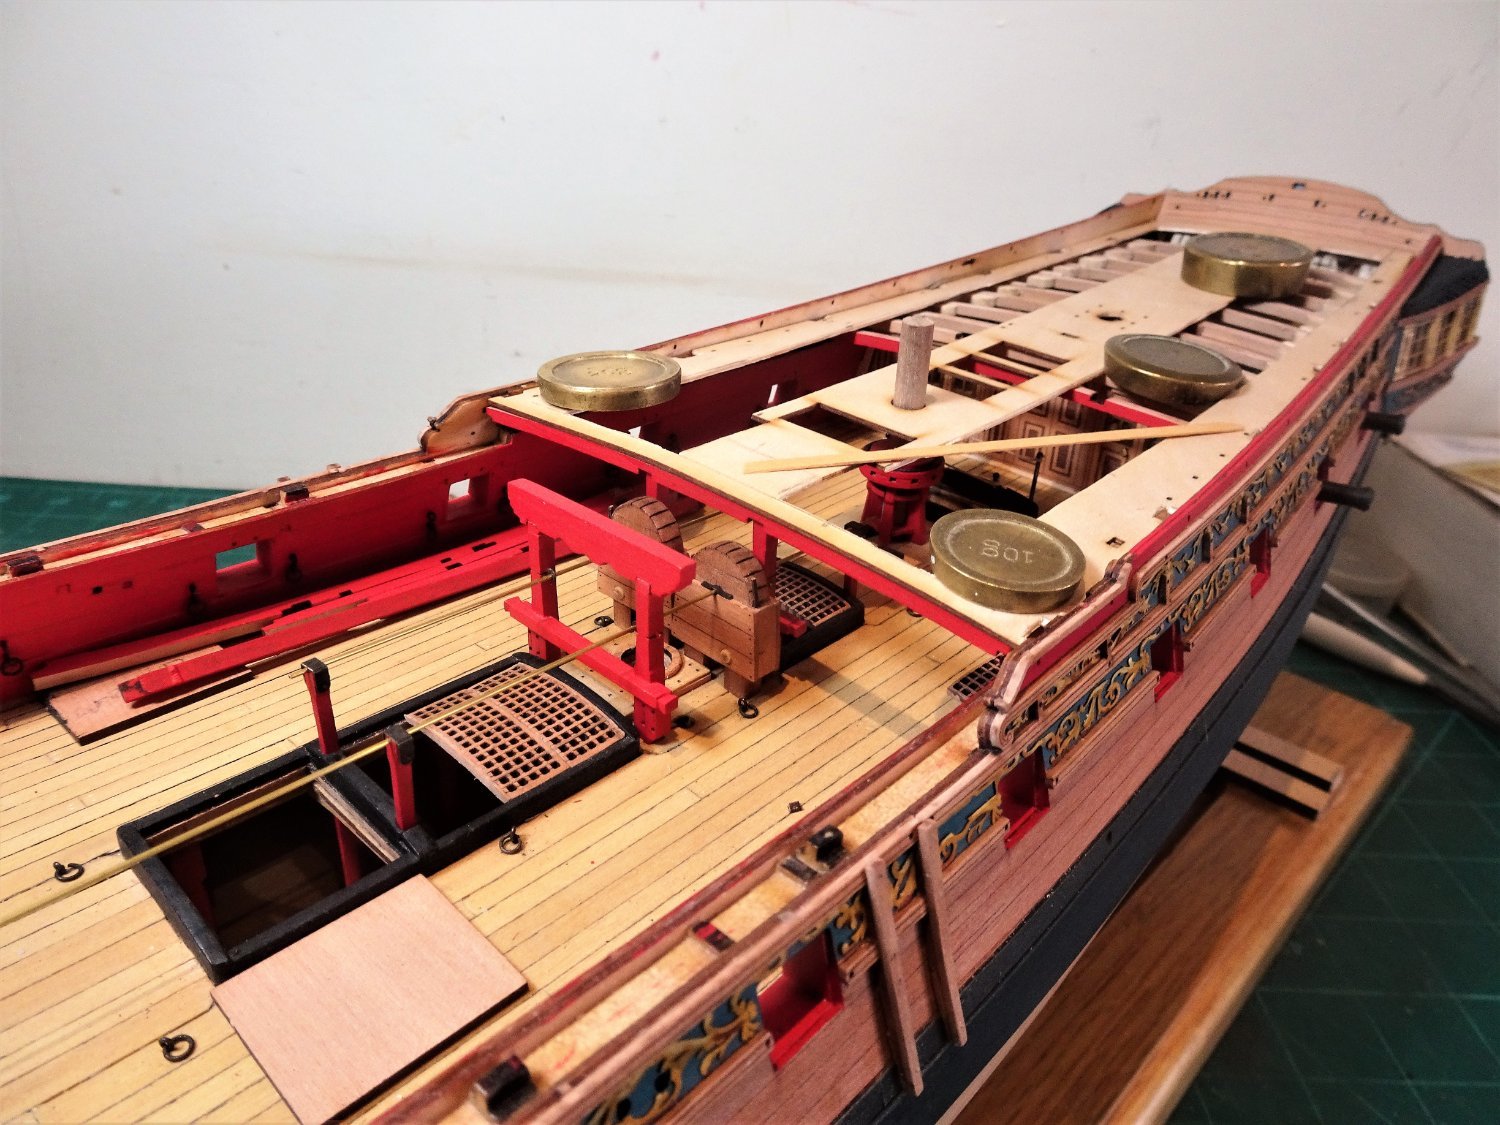
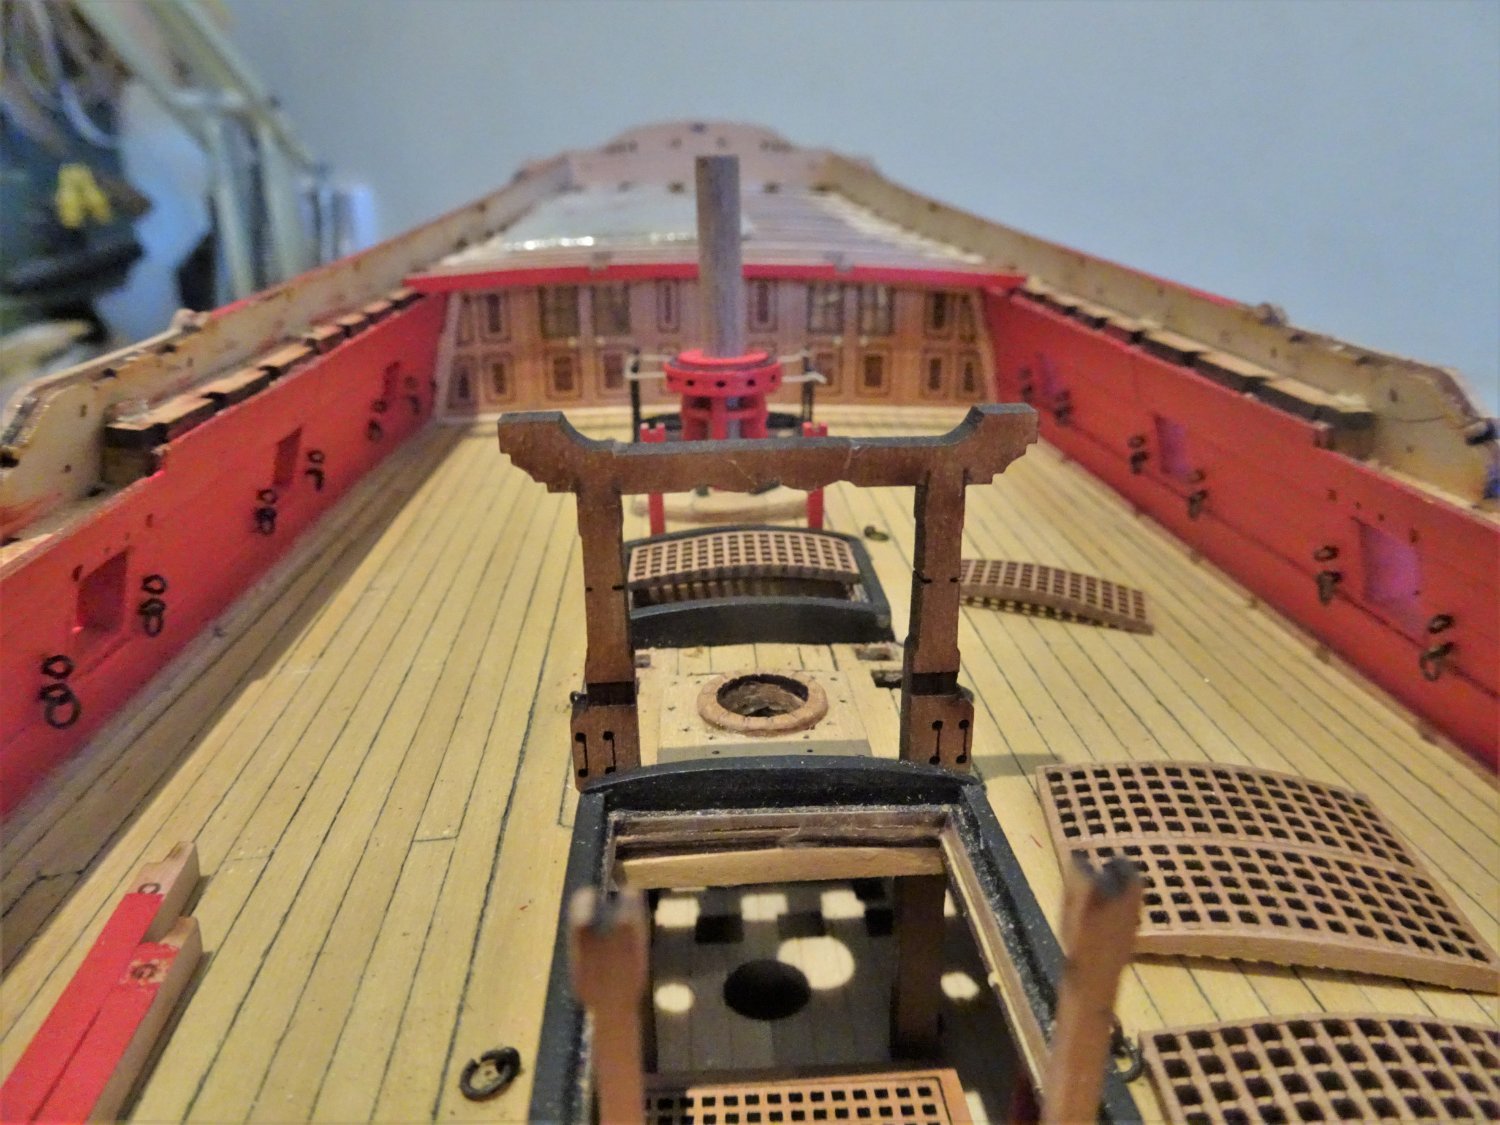
Post Ninety-seven Laying down the Quarter deck 6134 6133 The Lodging knees are completed but the forward ones will not be seen below the deck. It is time to cover up a lot of the work I have done and add the the ‘false’ Quarter deck ready for planking. 6138 I brushed slightly diluted pva on the underside of the deck; it took all of my available weights to clamp it down. Even so with such a large area to glue the deck failed to grab in one or two edge spots and additional glue had to be applied beneath the deck using a scalpel blade. I was a concerned not to get glue on the exposed beams. Tiller lines 6135 I had earlier in the build rigged the tiller lines below the upper deck and these are fed thro’ the QD at time of fitting. Not even sure at this point whether I will rig the lines, but I have given myself the option. If I do, I will probably splice the forward port line to the aft s/b line, and pull it taut with the splice below decks. Using the False deck option. There are implications beyond using your own planking with this option. Both the false deck and the printed deck are of the same 0.8mm thickness, so with the addition of, in my case 0.6mm thick planking, the bulwark patterns which are shown as fitting on top of the planking will be raised. I fitted the inner bulwark patterns, including the facing skins in advance of planking. 6142 These inner bulwarks stand some 4mm above the outer bulwarks at the transom which surprised me a little, as it is a fair bit to sand off level with the outer hull. Ladderway and Gratings I think these warrant a little fettlin’ to provide a slight round up both to the ladderway head ledges and the head ledges to the grating set. 6145(2) This was done by the addition of small section Pear and Box wood sanded to shape. The three gratings were soaked and given a matching round up. The Capstan partners were also planked. With the False deck secured I can begin to add the decking. As with the Upper deck I am using Boxwood strip of varying widths but all of 0.6mm thickness. For the Waterway/margin planks I use 4.5mm planking with scarph joints scribed in. It is also used to cover what would be the QD Transom beam, and QD breast beam. 6151 At this point the inner bulwarks have been painted red, prior to planking, and the perimeter planking glued into place. 6153 The grating set/Ladderway will be painted before gluing into place before planking. Toprope scuttles At the forward end of the deck either side of the Ladderway can be seen the carlings that form the Toprope scuttles. 6152 On my build they will be left as is, but for those wishing to add a degree of authenticity to their build, the raised coamings and gratings as shown in the kit are rather fanciful. The scuttle lids were more likely solid with small lifting rings, and were flush with the decking. The scuttles were used primarily as access for the tackle used in raising and lowering the Topmasts. I performed the same modification on my Pegasus build. 6149 I will now work to complete the minimal planking of the Quarter deck. B.E. 15/03/22

.thumb.JPG.2189c49c907c6ce860aac9597f05b686.JPG)

- 857 replies
-
- 20
-
-
-
- Sphinx
- Vanguard Models
- (and 1 more)
-
Nice job on the waterline Thuky, it clearly demonstrates the keel drag common to cutters. An interesting approach to the Topsides painting, I look forward to seeing the full and complete vision. With this sort of thing I suspect there is a fine line between subtle effect and perceptions of a poor paint job. Yours certainly achieves the former. B.E.
- 562 replies
-
- 3
-

-
-
- vanguard models
- alert
- (and 2 more)
-
Having a catch-up Jean-Paul, your beautiful Cheerful continues to delight. 👍 B.E.
-
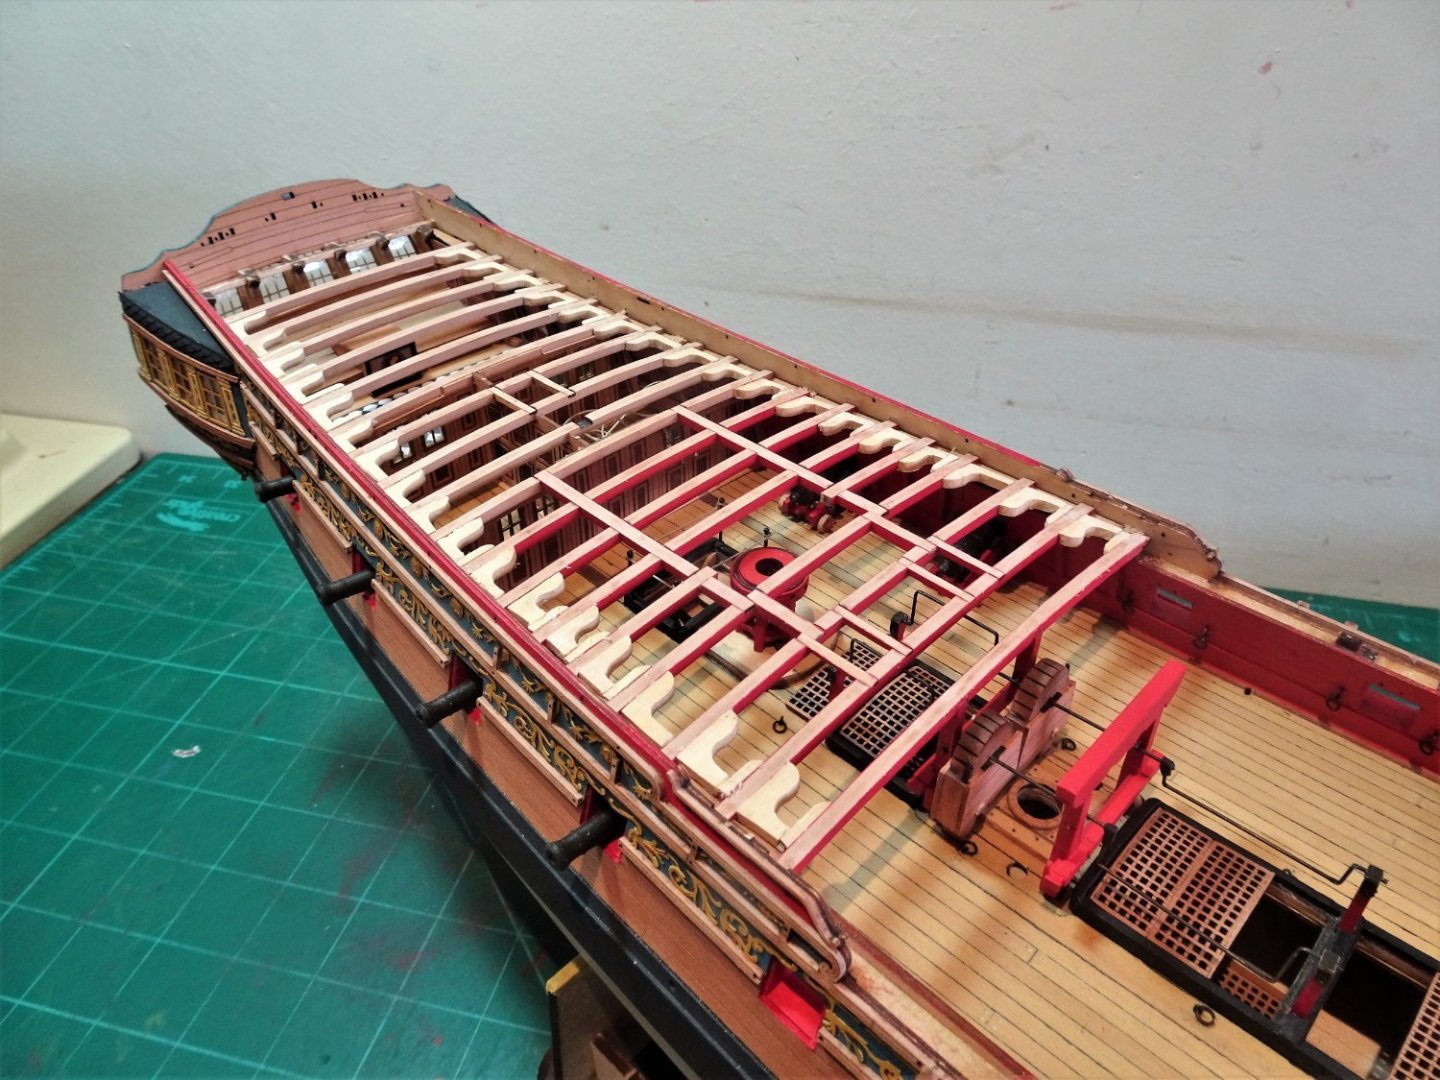
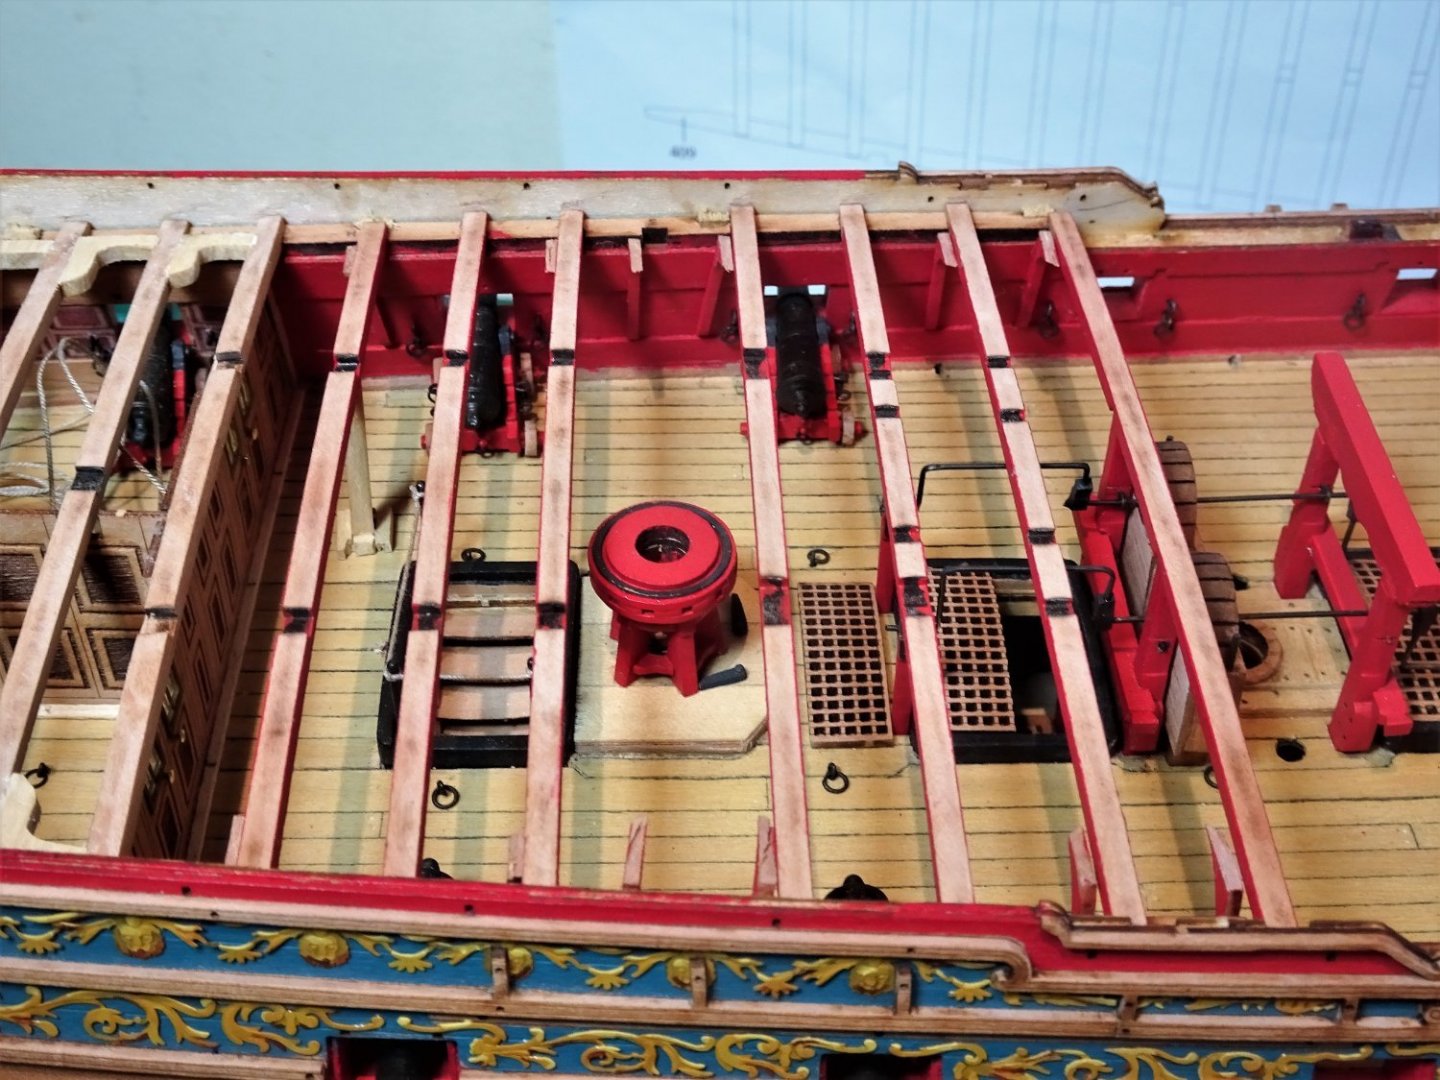
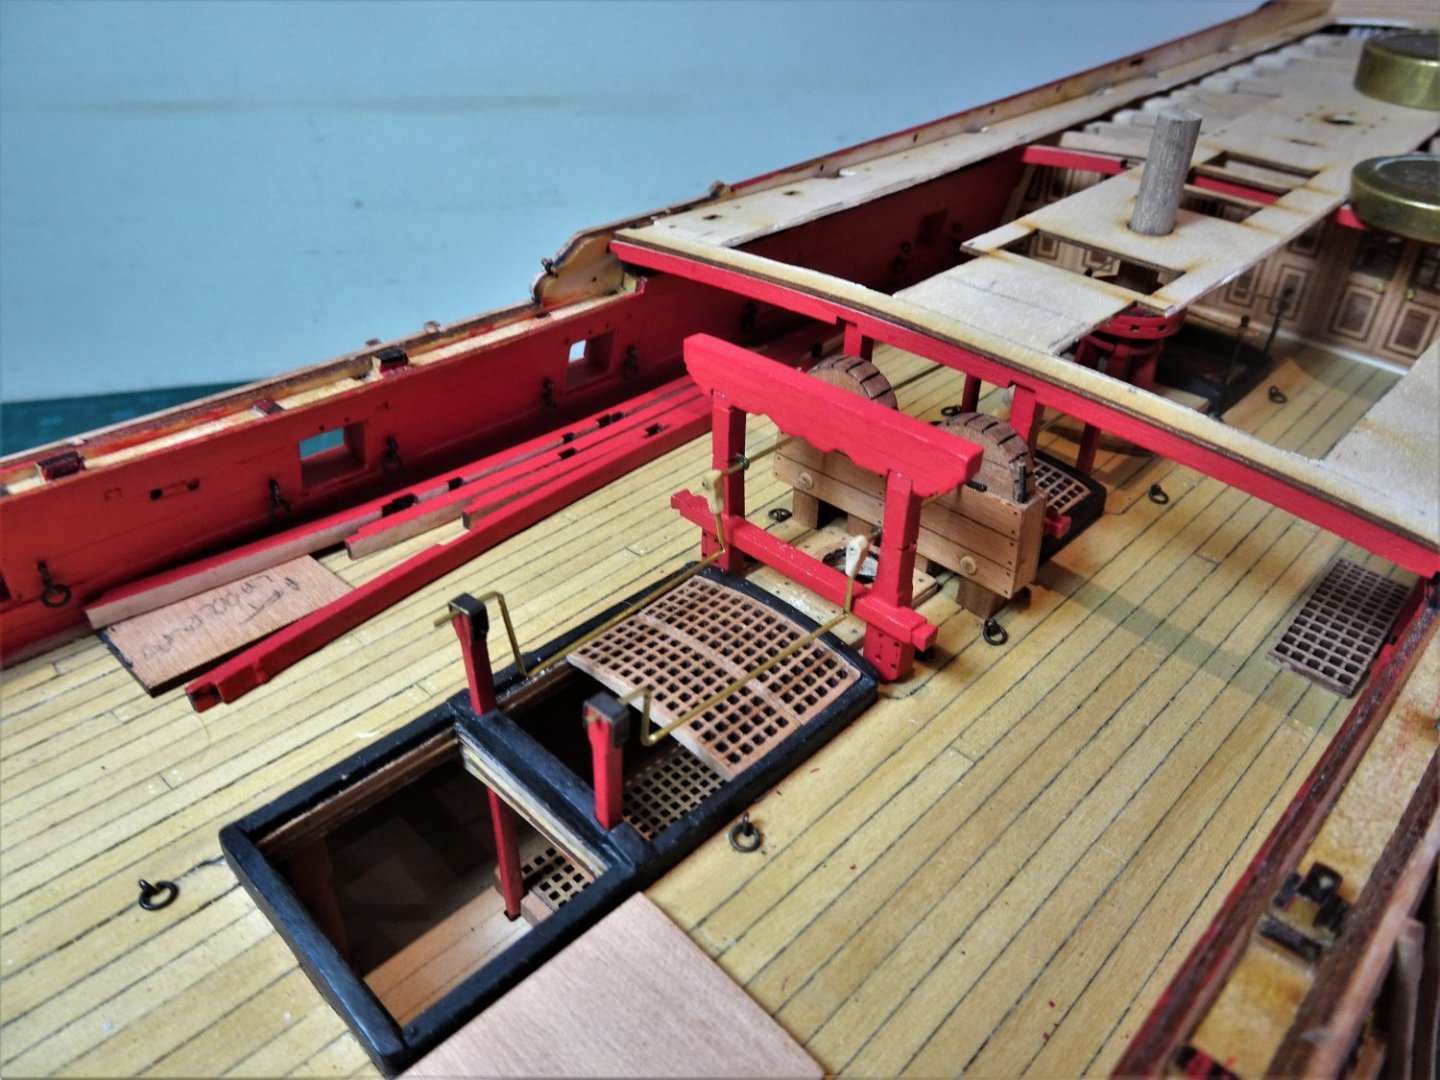
Post Ninety-six Completing the Quarterdeck beams Seven beams remain to be fitted to support the Quarter deck, plus their associated Hanging and Lodging knees . I start where I left off moving aft to fore. Before I fit the beam I add the hanging knees where required. In this area the knees are painted red. With the knees in place the beam is temporarily fitted to check the position, after which it is glued into place. As each knee is fitted any glue excess on the bulwarks is removed using a small brush dipped in water. 06112 The Hanging knees in place. 06117 With the beams in place the Carlings are trial fitted, these are heavy with char which will all need cleaning off. 06119 False tops will be added to the knees to run flush with the beam tops and meet the lodging knees. The Carlings all slot perfectly into place, a testimony to Chris’s design and production skills. 06128 The Carlings are cleaned up and painted red on their facings to match the beams. 06127 I really like the look it’s almost a shame to add planks. 06121 The false deck is tweaked a little to correlate with the beams and Carlings. 06122 Always a good idea to check the Mizen and Capstan slot properly into place. 06124 There are still the lodging knees to fit but less of these will be seen as the planked area broadens towards the break of the Quarter deck. B.E. 12/03/22


- 857 replies
-
- 24
-
-
-
-
- Sphinx
- Vanguard Models
- (and 1 more)
-
I too missed the narrower profile for the Bridle port and left it too late to do a modification. I took the view that to side hinge the normal port would only draw attention to this omission and it didn’t really sit right with my eye. I drew a small comfort that the Sphinx did have a normal sized and hung Bridle port. Lovin’ the Pegasus figure Bug, it is a great modelling mindset to think outside the (kit) box and inside the (Toy) box. Regards, B.E.
- 419 replies
-
- 3
-
-
- Victory Models
- Pegasus
- (and 2 more)
-
I think you may have the bulkhead screens the wrong way around Glenn. The hinges should be on the aft side which puts the Mizen mast in the Coach rather than the Bedspace. B.E.
- 476 replies
-
- 3
-
-
-
- sphinx
- vanguard models
- (and 1 more)
-
Thanks Glenn, so true, my only small regret is that I'm about forty years too late to take advantage of all the wonderful stuff that has come and is still yet to come out of the Syren and Vanguard stables. Outstanding designers indeed. B. E.
- 857 replies
-
- 5
-
-
- Sphinx
- Vanguard Models
- (and 1 more)
-
The modified waterline looks excellent, good decision Doug.👍 B.E.
- 102 replies
-
- 1
-
-
- Flirt
- Vanguard Models
- (and 1 more)
-
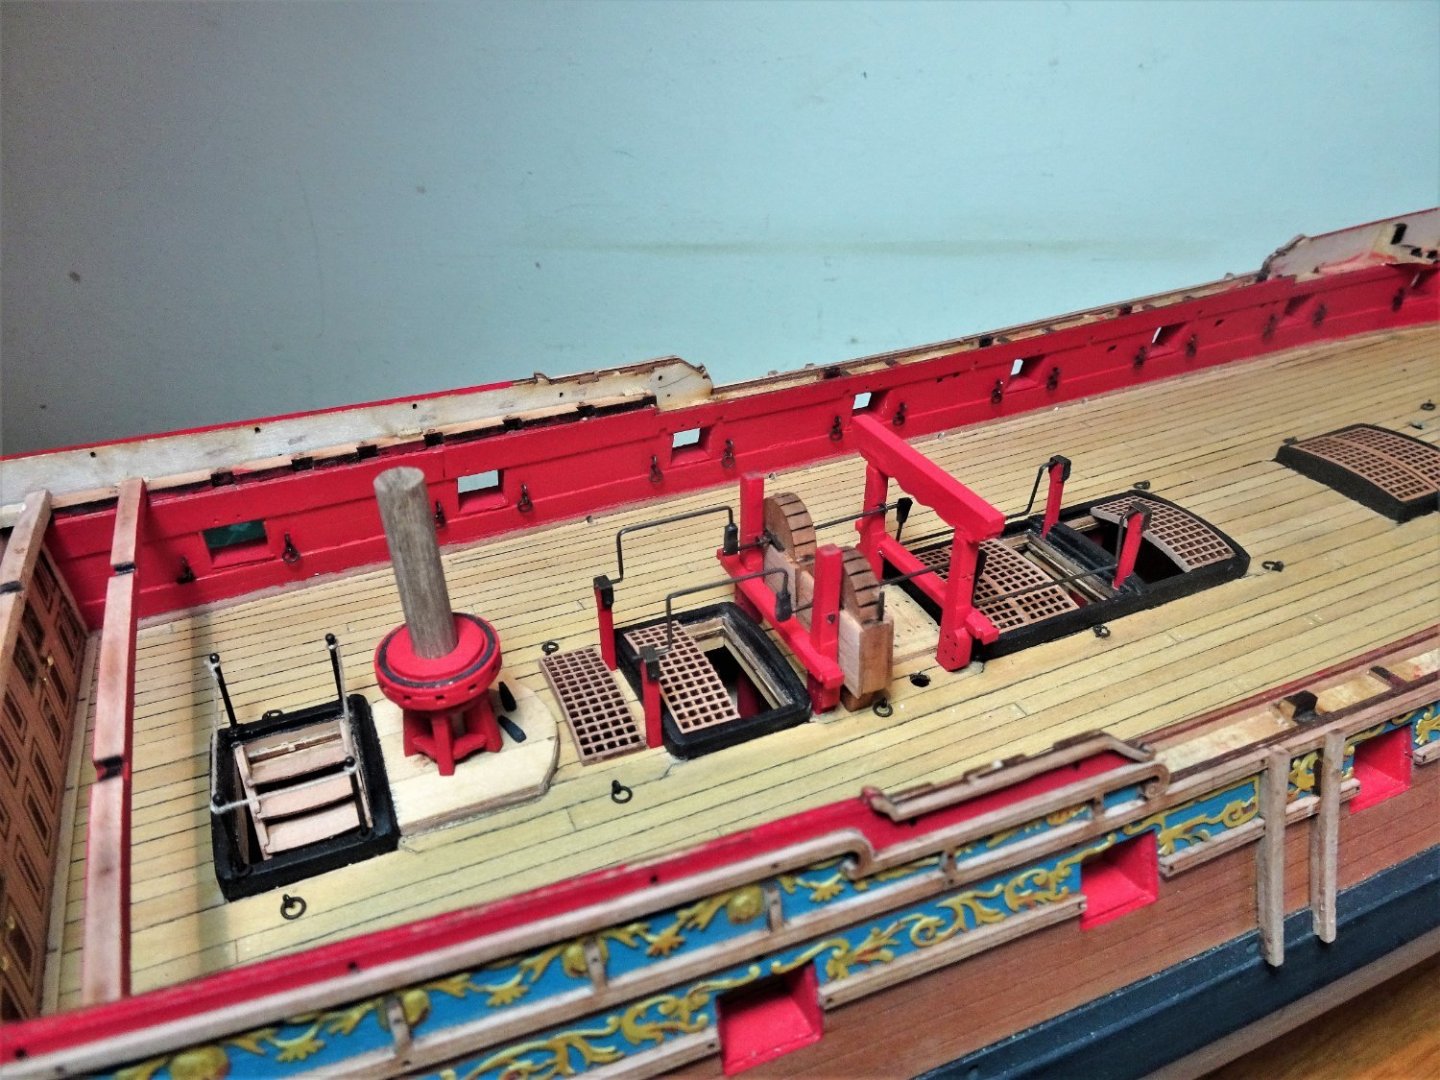
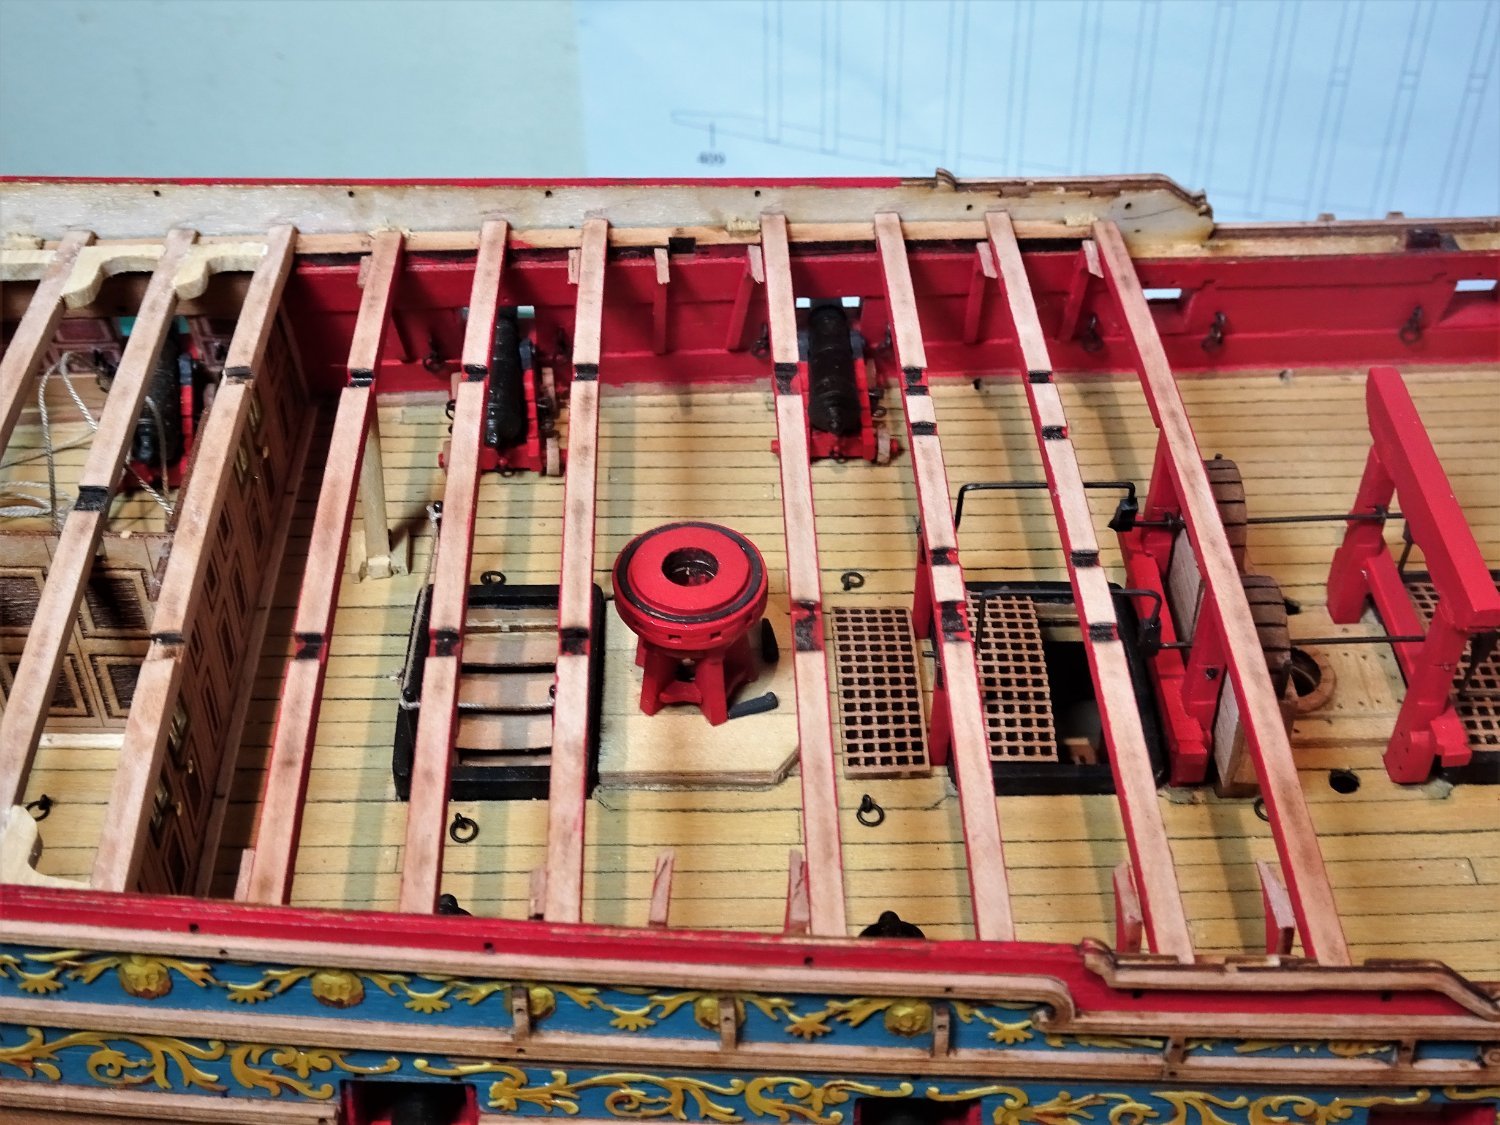
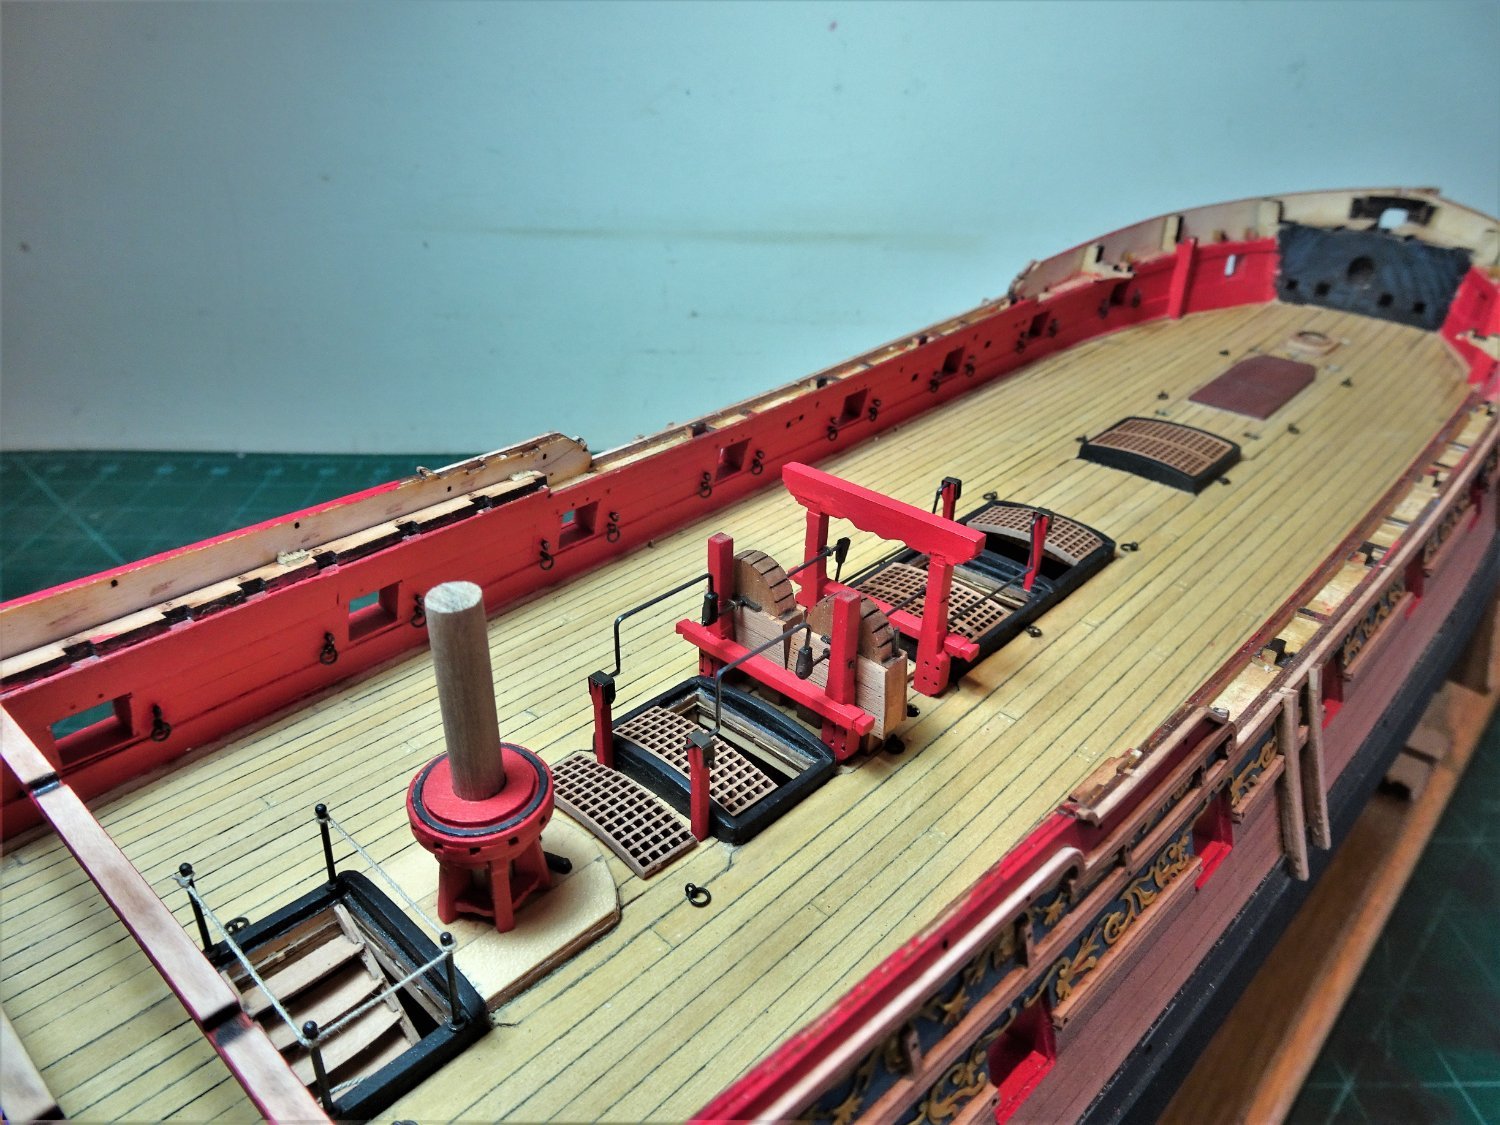
Post Ninety-five … and still more about Chain pumps Onto the rear winches behind the Pump cisterns. 6086 These winches are smaller than the fore and are displayed in the raised position. 6088 The Axletree and connector are glued into the cistern Rhodings to hold them in position. 6090 6091 The forward winches remain free to rotate. 6096 I was going to re-work these using brass rod and section, but at the scale involved I think they pass muster so I’ll stick with them. 6103(3) The remaining four guns beneath the QD are glued into place. I have cleaned up the deck out of guilt having seen Rusty’s pristine 'Winnie' deck yesterday. 6105(2) 6101(2) I can now think about completing the Quarter deck beams and the associated hanging knees and ledges. B.E. 10/03/22

.thumb.JPG.ac92f59a5561dbafd303a7a3697f4a06.JPG)
.thumb.JPG.3c7d294f16d7c8a13362b194ad7b3a7b.JPG)
.thumb.JPG.28d481e3d5006aa37d8bf48c1a8a2f4e.JPG)
- 857 replies
-
- 24
-
-
-
- Sphinx
- Vanguard Models
- (and 1 more)
-
Looking good along the QD topsides and Galleries Glenn, a vast improvement on V1. 👍 B.E.
- 476 replies
-
- 3
-
-
-
- sphinx
- vanguard models
- (and 1 more)
-
Beautiful work on those ledges and pumps Rusty, Chuck's method of creating the iron work on the chain pumps looks great, and I followed it on my Sphinx build, but, I hasten to add, without the pristine look of your Winnie deck. B.E.
- 642 replies
-
- 2
-
-
- winchelsea
- Syren Ship Model Company
- (and 1 more)
-
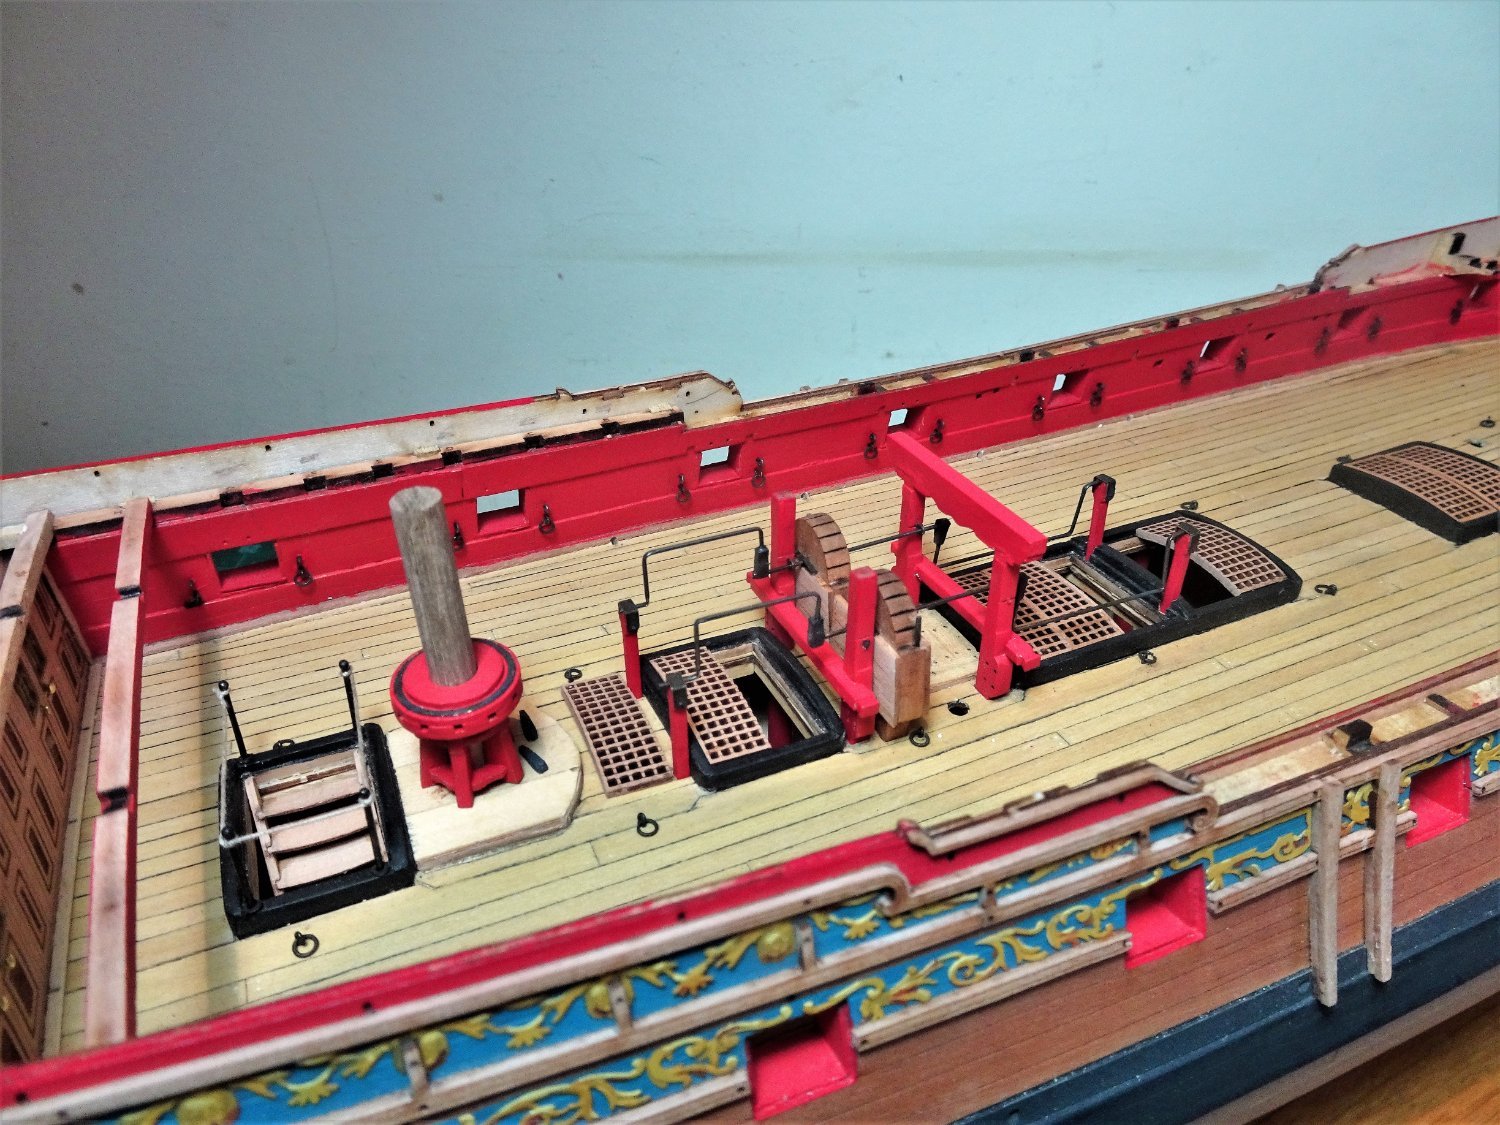
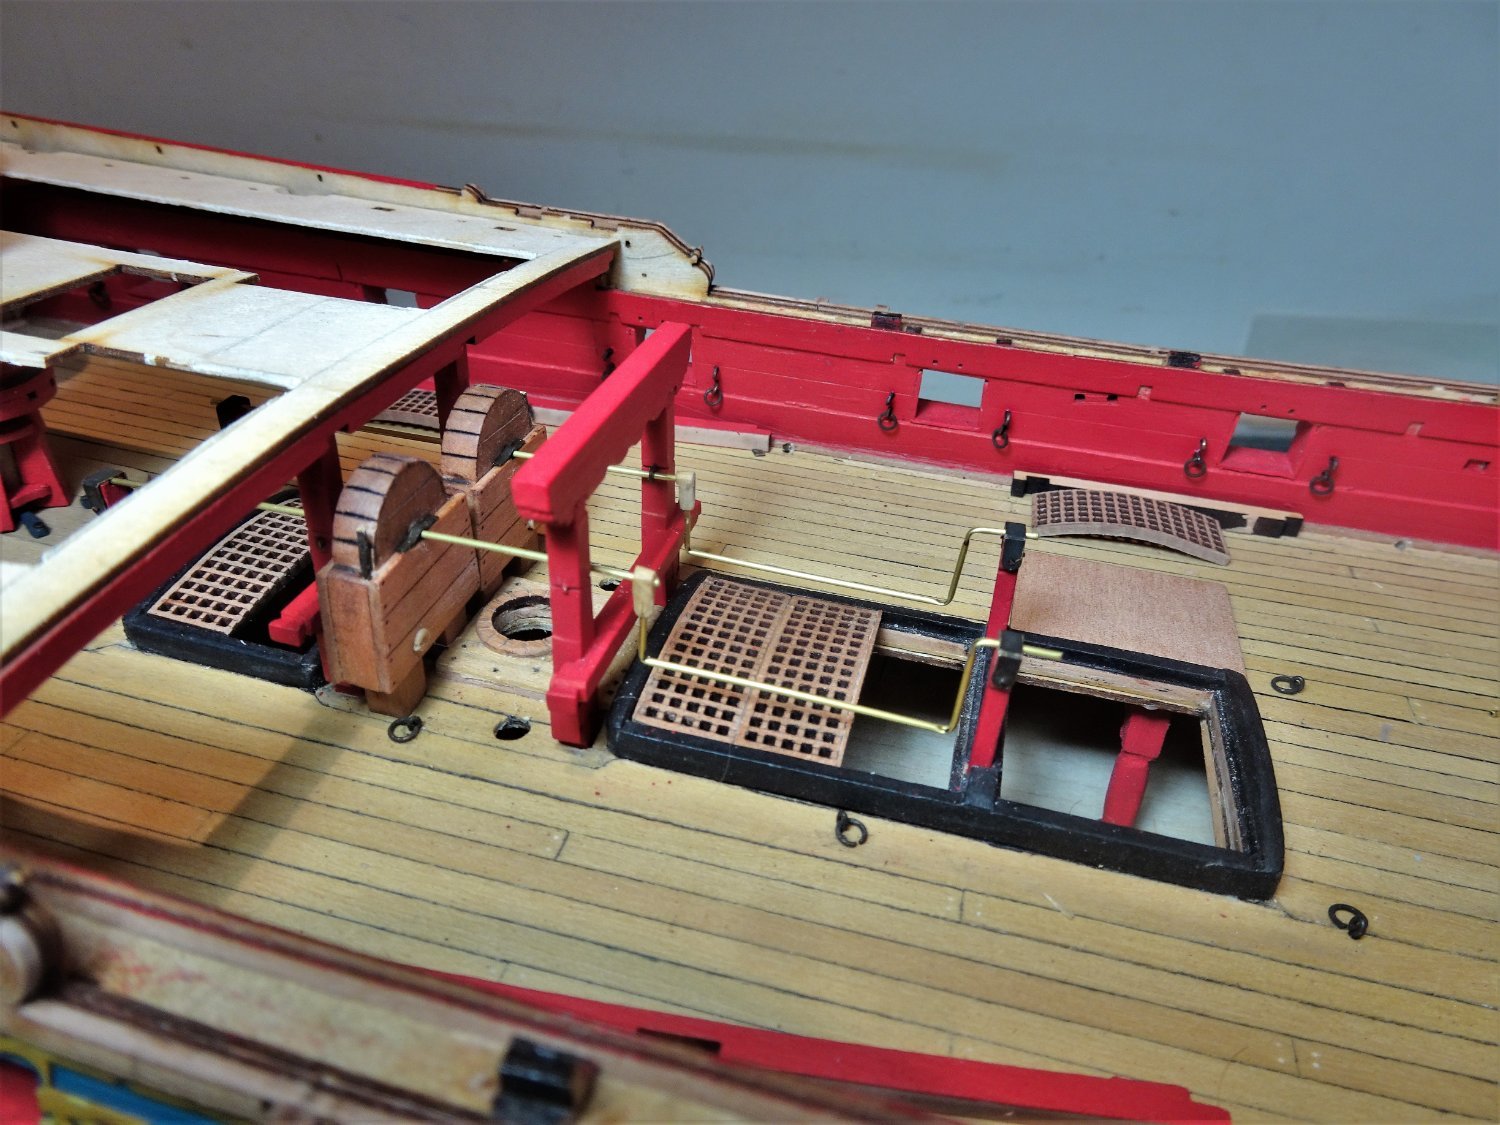
Post Ninety-four … and more about Chain Pumps Today I have mostly been playing around with the metal work for the chain pumps. It is useful time spent working out an approach to the job and trial fitting of the winches. 6046 I am using 0.7mm ø brass tubing and small Boxwood section for the connectors. 6053 The tricky bit is getting the winch shape across the Main Hatch and the fit into the forward stanchions. 6054 I scrapped three sections before I got a pair close to fit. 6062 The brass tubing was chemically blackened and the connectors painted Vallejo Black/grey followed by a dusting of weathering powder. 6068 All this is out of Chuck’s bumper book of ‘Winnie’ ‘how to’s’ but at a smaller scale, well worth a look if you fancy having a go. 6069 The aft winch handles will need to be made in the same fashion. I think I can improve on them but I’ll wait for the Brass rod and section to arrive. A satisfying day. B.E. 09/03/22


- 857 replies
-
- 14
-
-
- Sphinx
- Vanguard Models
- (and 1 more)
-
Thank you Yves, Chris has provided me with endless hours of enjoyment and interest, I am loving this kit. @ Chris - I agree you have to proceed on the basis of available evidence, the Adm plan being the most significant, and that does not show such fittings. The Marshall painting of 1775 does appear to show swivel posts, and they were a pretty standard fitting for ships of the period, so there are reasonable grounds for their inclusion, or not as your fancy takes you. I note that the John McKay drawings in the AoTS Pandora book show swivel posts, altho' Winfield does not mention them. This also applies to the Frigate Amazon 1773, where swivels are shown on the contemporary model. It is interesting to note that John McKay mentions in his book the disparity between various pieces of evidence. Contradiction of detail between official Admiralty documents, contemporary models, and the accounts of authorities has left us in a quandary in respect to certain details of Pandora's equipment. Amen to that. B.E.
- 857 replies
-
- 7
-
-
- Sphinx
- Vanguard Models
- (and 1 more)
-
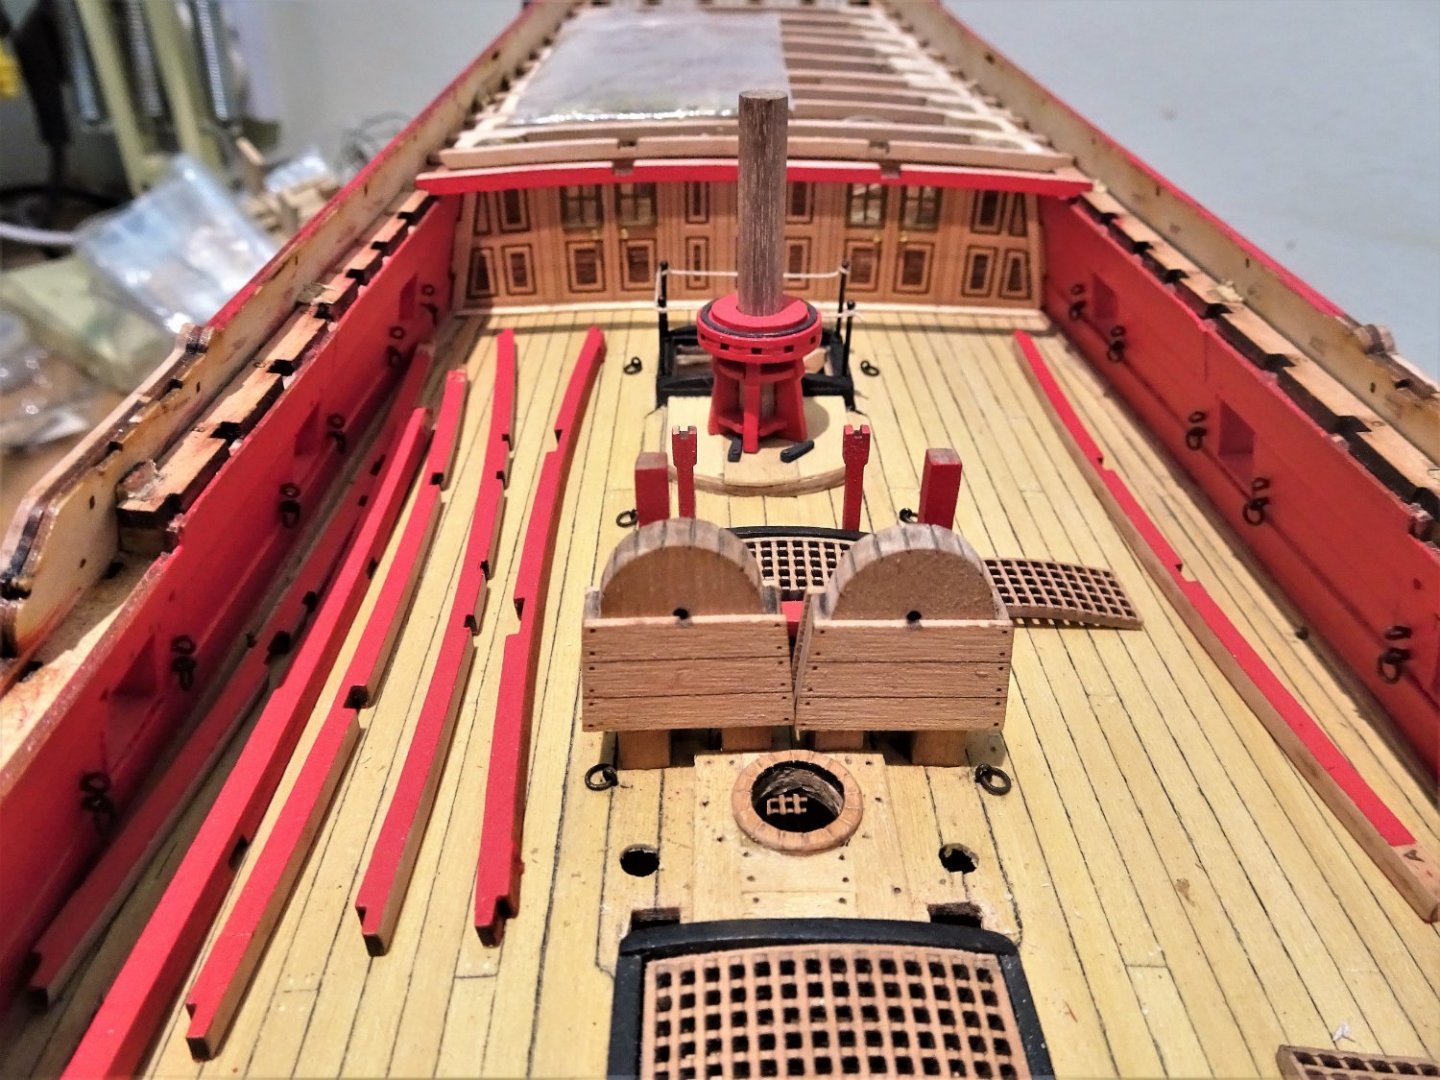
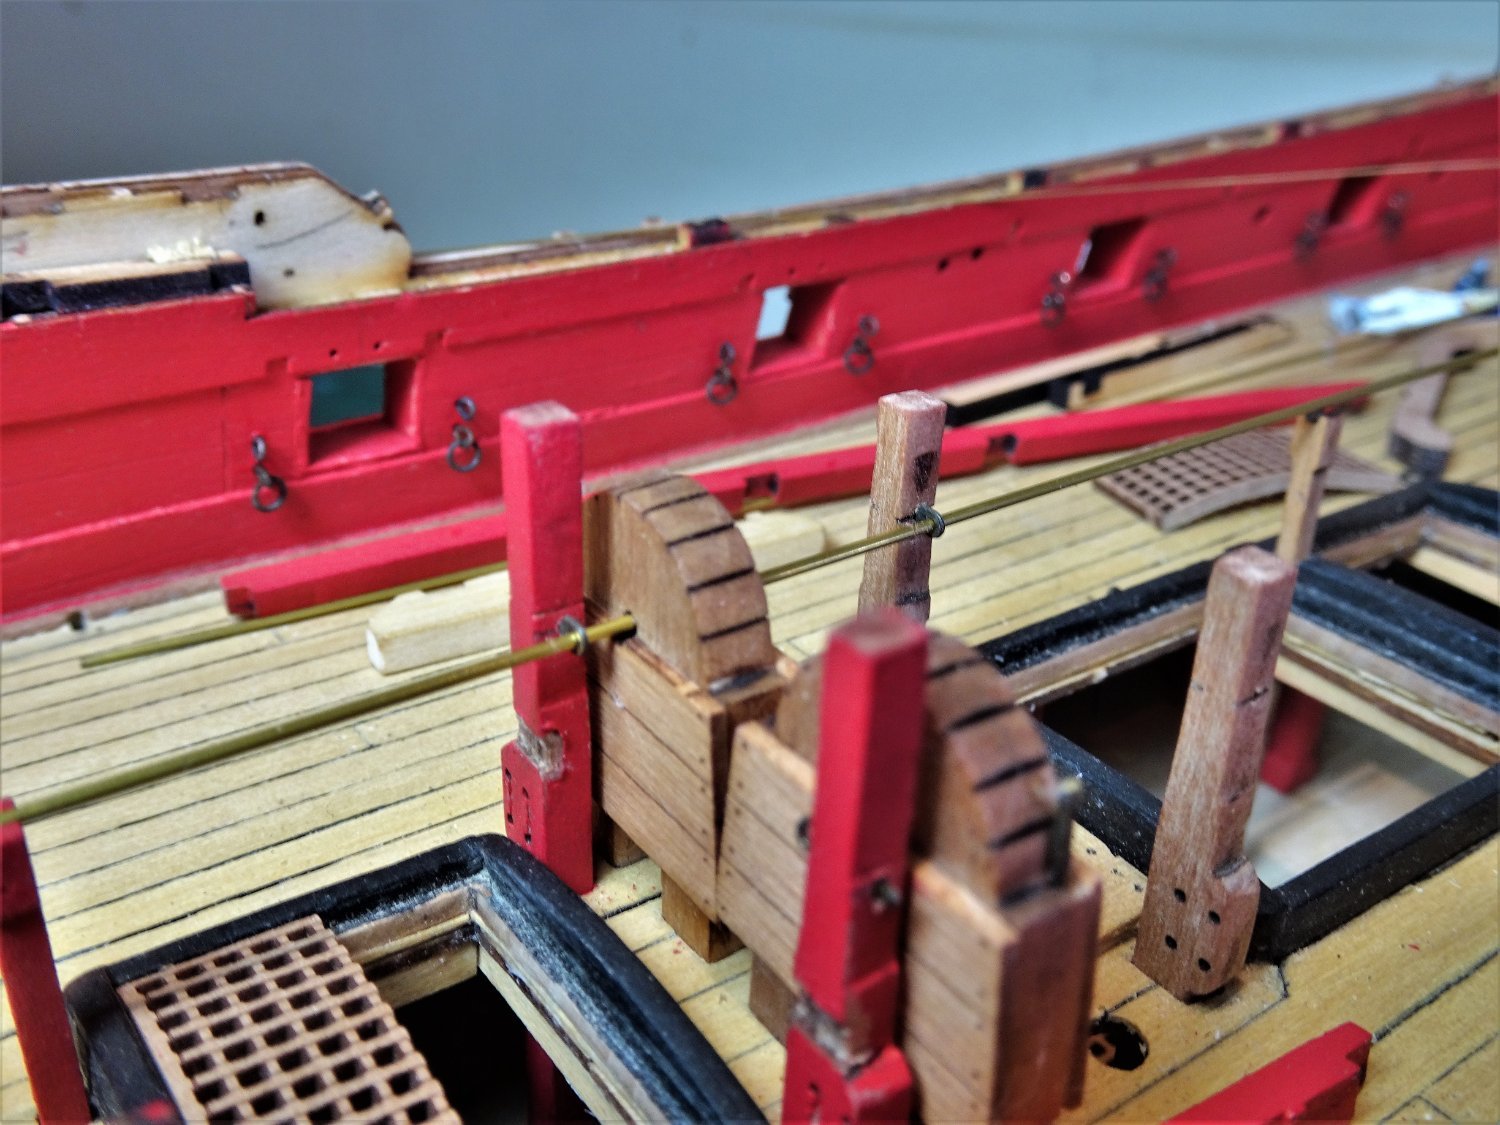
Thank you Bug, and Mike. Post Ninety-three Chain Pumps continued. Trial fit follows trial fit to ensure that everything slots into place. 6030 Sphinx is starting to resemble a building site. 6036 6038 6041 The caps to the pump stanchions are blackened and fitted, and the gallows top fixed into place. 6033 A fair bit of what lies beneath the Qtr Deck will be on show but before the beams are put into place I need to complete the chain pump workings. To this end I have some small square section brass rod on order to make the winch couplings. On thing that caught my eye is the rather awkward positioning of the Main ladderway leading directly onto the pump stanchions with the pump handles inhibiting clear access. The kit arrangement is correct and matches the Admiralty plan. Far be it from me to tell the 18th century naval architects their business, but I do wonder why the ladder wasn’t set on the forward side of the ladderway which is free of obstruction. I’ve pondered on two other questions; Why no sweep ports on Sphinx, they were pretty much de-rigueur on small ships of the era. Even Pandora, a larger frigate had them. Neither the Marshall painting nor the Adm Plans show these features. Not complaining, more than happy to omit these tricky little items. Why no posts for swivel guns, I’m sure she would have had them. They are not catered for on the kit, nor shown on the Adm plan, but the Marshall painting shows three posts extending above the Qtr deck rail, a key indicator that they are swivel posts. Always more questions than answers in this interest of ours.🤔 B.E. 08/03/22


- 857 replies
-
- 19
-
-
- Sphinx
- Vanguard Models
- (and 1 more)
-
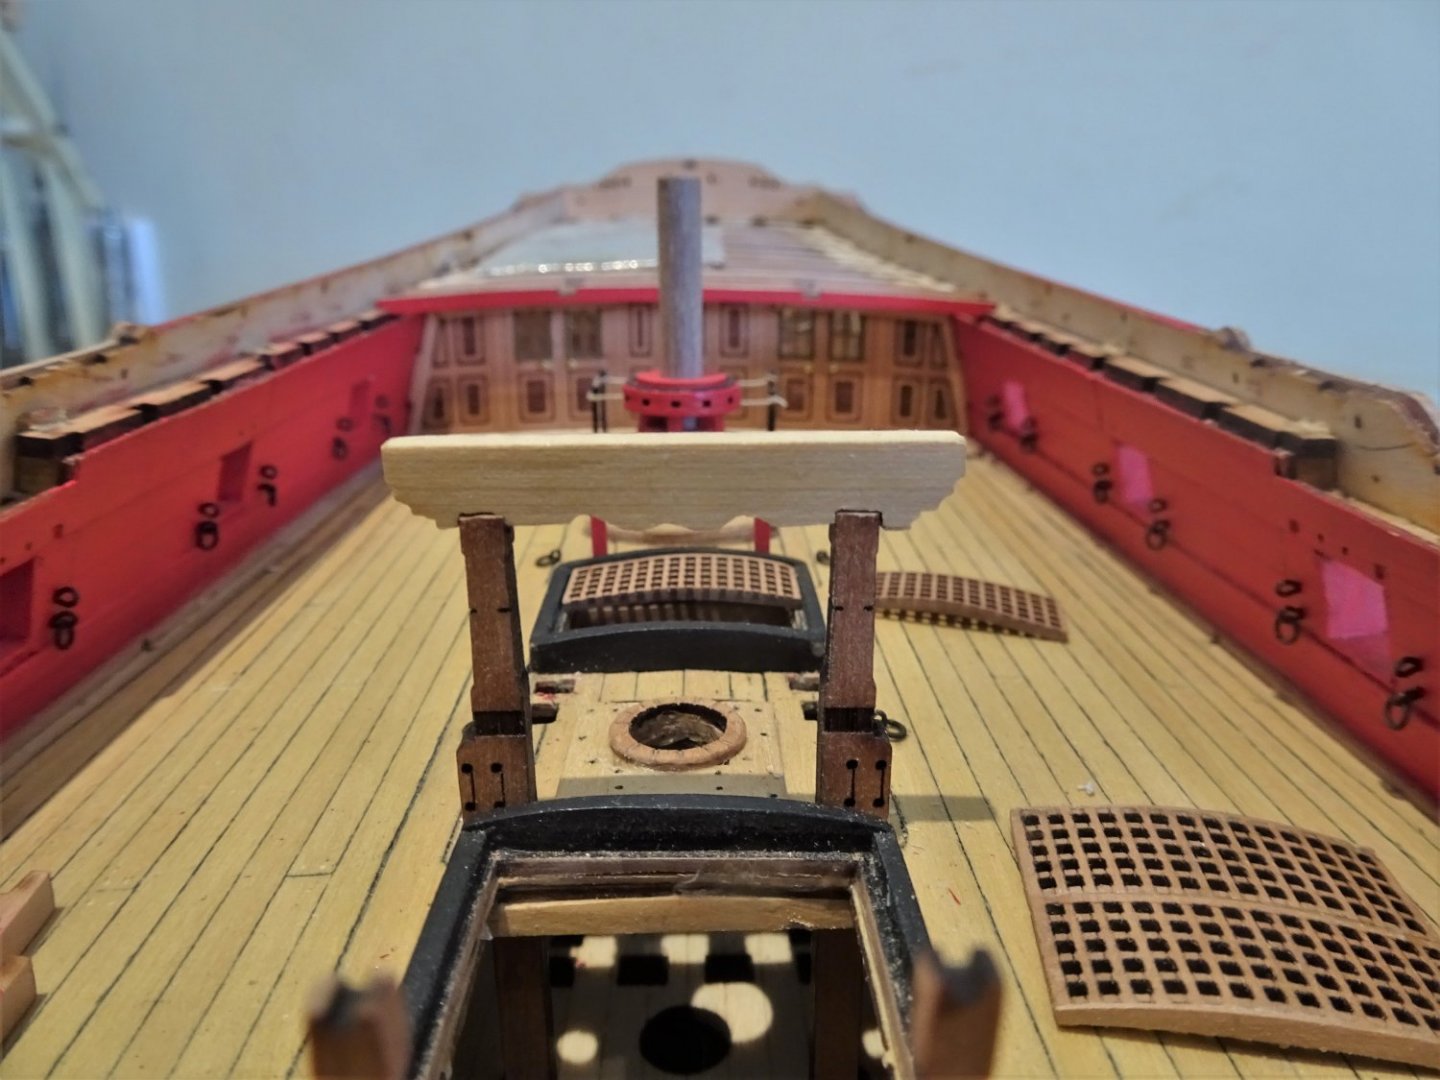
Post Ninety- two Back to the Quarter-deck and what lies beneath. There is a lot to check and test fit, all inter-related, plus a little fettlin’ to add detail to some of the fittings. The Gallows A touch of deja vue here, the gallows have a pagoda shape, the same as on the Amati Pegasus kit, and reflected in the AotS Pandora book. 05990 This is the only place I have seen such a configuration, and as with Pegasus I will replace the top with a flat surface, as per the Marshall painting, and represented on many contemporary models. 5995 The modified shape is transferred to a 3mm Boxwood sheet for cutting. 06000(2) The shape was cut out using the scroll saw. 06002 06003 Still needs fettlin’ but you get the idea. The chain Pumps These are quite nice with the planks marked on the hood, and planking represented on the faces of the cistern box. These can be further enhanced by the addition of the drain hole and plug on the forward face. 5993 On the outboard edge is a representation of the Pump dale connection, a rectangular section protruding from the cistern. I wasn’t sure about this; on the original, the dale fitted into a slot in the cistern, covered by a sliding board when the dale was not connected. 06009 I decided to remove these as I also thought they should be angled downwards slightly to meet the dale scupper. 017 Pegasus pumps and dales The Sphinx kit version of the chain pump cisterns and covers are far nicer, but times move on, I started my Pegasus build in 2010. I have said it before but Chris and Chuck have created a seismic shift in the development of ship model kits. I wish I were younger. I will leave the cisterns in their natural finish protected with w-o-p. 06022(2) In this shot the drain plugs have been fitted along with the Rhodings thro’ which the Axletrees pass. Winch handles and Rhodings I need to ensure that the winch handles run thro’ at the right height from aft to fore passing thro’ what would be the Rhodings on Bitts, Cisterns, and Gallows. The kit version is simplifed using flat section etch for the winches and eyebolts for the Rhodings. The couplings for the winches are absent in the kit version. I did manage to represent a more realistic representation on Pegasus, and will try again with Sphinx. For those who have an inclination to enhance the ‘metalwork’ elements of the chain pumps Chuck’s method in his ‘Winnie’ log provide an excellent example. 06013 Brass tubing is used for the axletrees and winch handles and the first action is to check a smooth run between stanchion supports and chain cover from both fore and aft. The position of the Rhodings can then be marked on the Main jeer Bitt posts and the Main Topsail Bitt posts. 06018 I have replaced the provided eyebolts that represent the Rhodings with smaller, better shaped equivalents. Once I am satisfied that the tubing will run freely through from fore to aft I can paint the bitts/gallows etc and glue the Rhodings into place. B.E. 07/03/22


.thumb.JPG.d1c06c42293c4ee75fff021853b27931.JPG)

.thumb.JPG.17f913d7a432c104d66717efc1994e46.JPG)
- 857 replies
-
- 18
-
-
- Sphinx
- Vanguard Models
- (and 1 more)
-
Cheers Guys, I think we all should add a little message hidden within our models. In Sphinx two of the scrolls contain miniature reproductions of the Marshall paintings of Sphinx, and a copy of the Admiralty plan. The third is a personal message from me. B.E.
- 857 replies
-
- 4
-
-
- Sphinx
- Vanguard Models
- (and 1 more)
-
Your hull looks very nice Doug. Looking at the Flirt blurb it looks like there is a drag at the stern, which means the waterline would be lower at the bow. The stand would have been designed to reflect this and bring the waterline level. However, your waterline doesn’t strike my eye as looking odd, and if mounted on level pedestals won’t attract the eye, Cutters in particular are noted for stern drag and on the Alert model the waterline at the bow is markedly lower than at the stern. B.E.
- 102 replies
-
- 1
-
-
- Flirt
- Vanguard Models
- (and 1 more)
-
Fine looking hull, I love the elegance of Viking Long ships, well done.👍 B.E.
-
Nice work on the head rails Bug, I like the curvature you have achieved.👍 B.E.
- 419 replies
-
- 3
-
-
- Victory Models
- Pegasus
- (and 2 more)
-
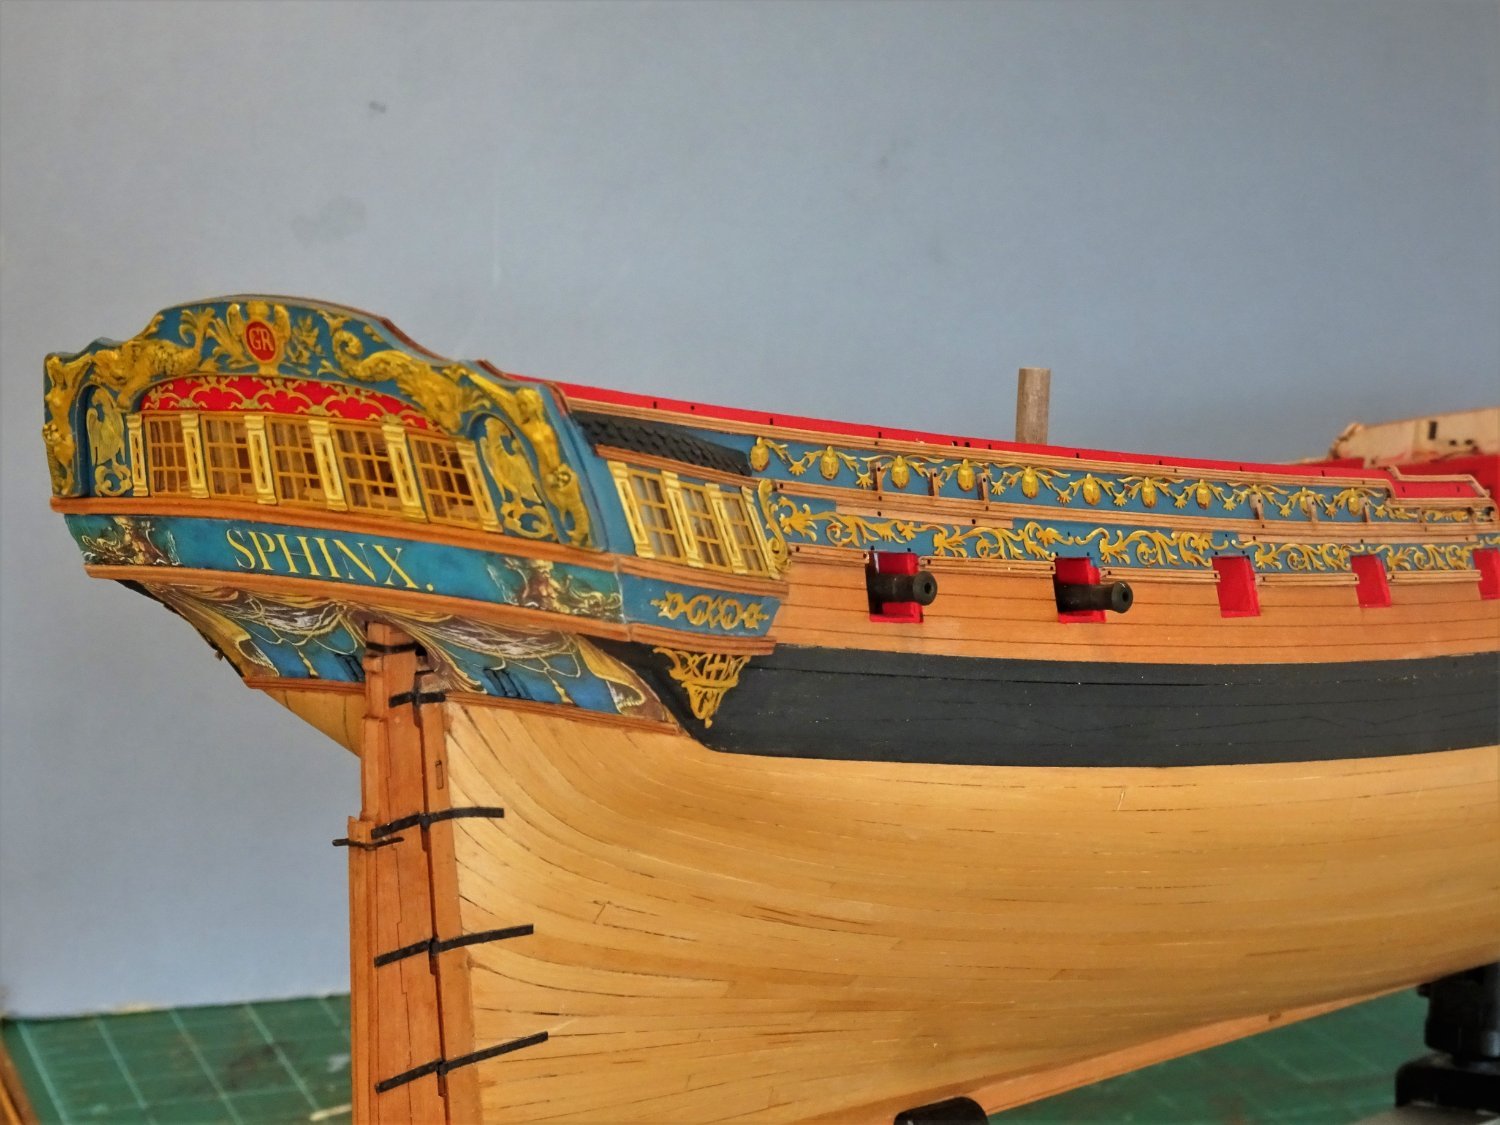
Thank you, Guys, your comments are much appreciated; I'm very pleased with the way the decoration has turned out and it's good to know that my fellow modellers like my work too. A little aside before I get back to the main event. I like to insert tiny hidden scrolls deep into the hull of models. 5672(2) Three now reside within Sphinx before access becomes more difficult. I don’t know what will happen to my models after I’m gone, I expect they will just end up in someone's attic, be binned, or sold for a fiver on e-bay, but I derive a small amusement from the thought that some years down the line those messages may somehow come to light. Cheers, B.E.
.thumb.JPG.5c29335323001ebafc07528ab9fb2843.JPG)
- 857 replies
-
- 12
-

-
-
- Sphinx
- Vanguard Models
- (and 1 more)
-
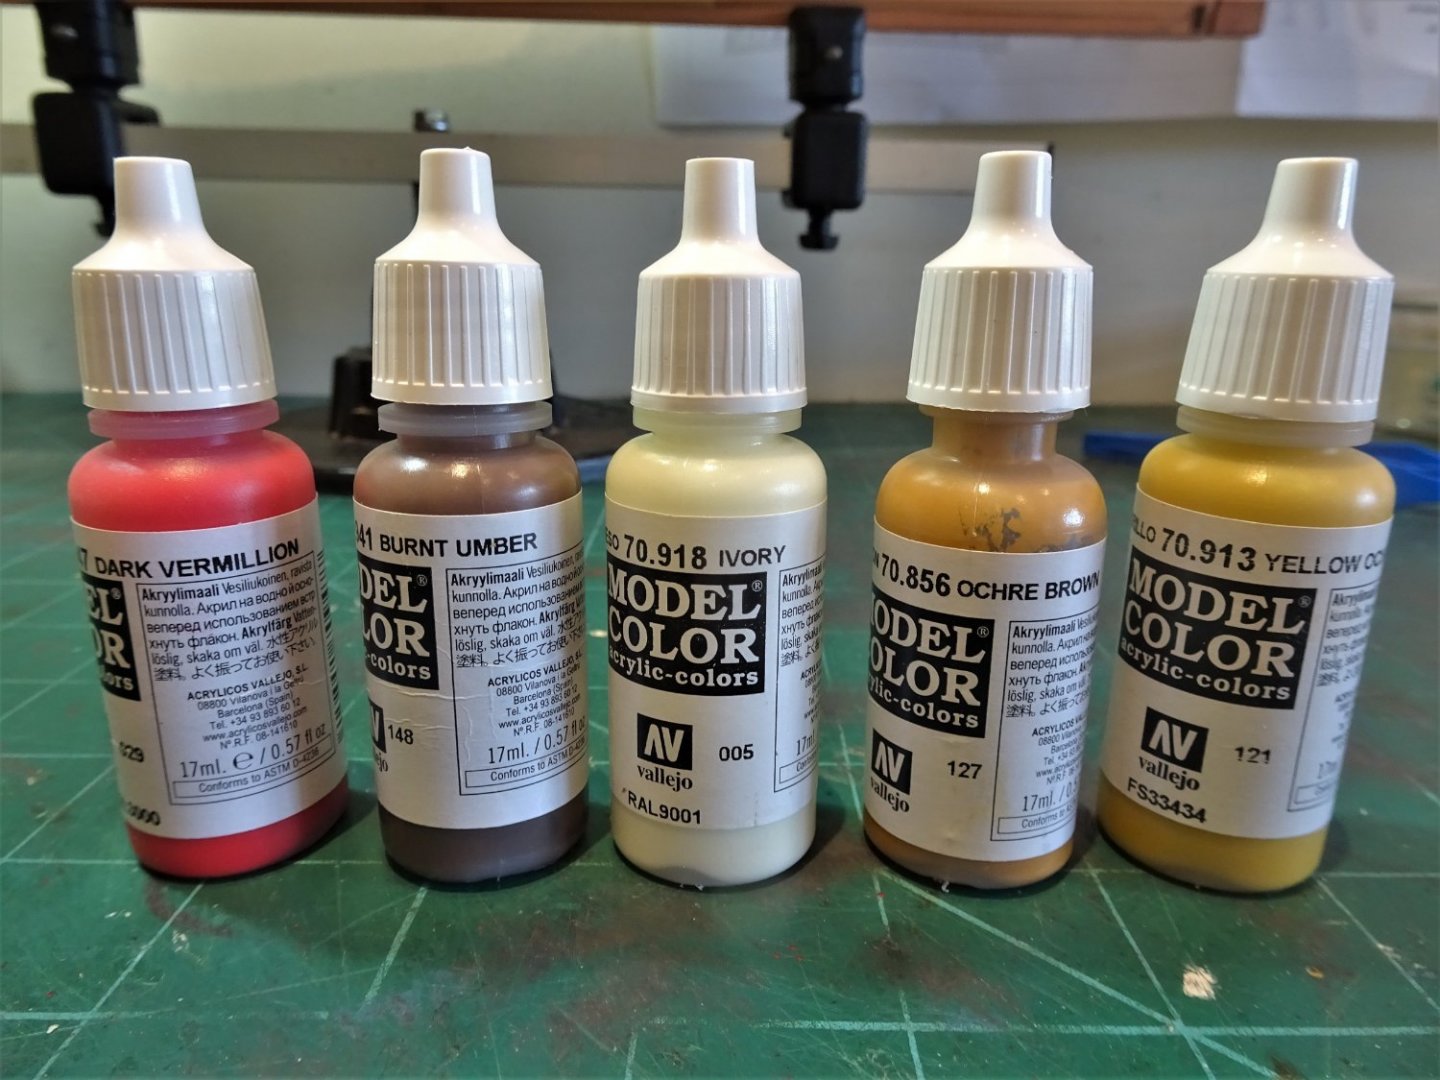
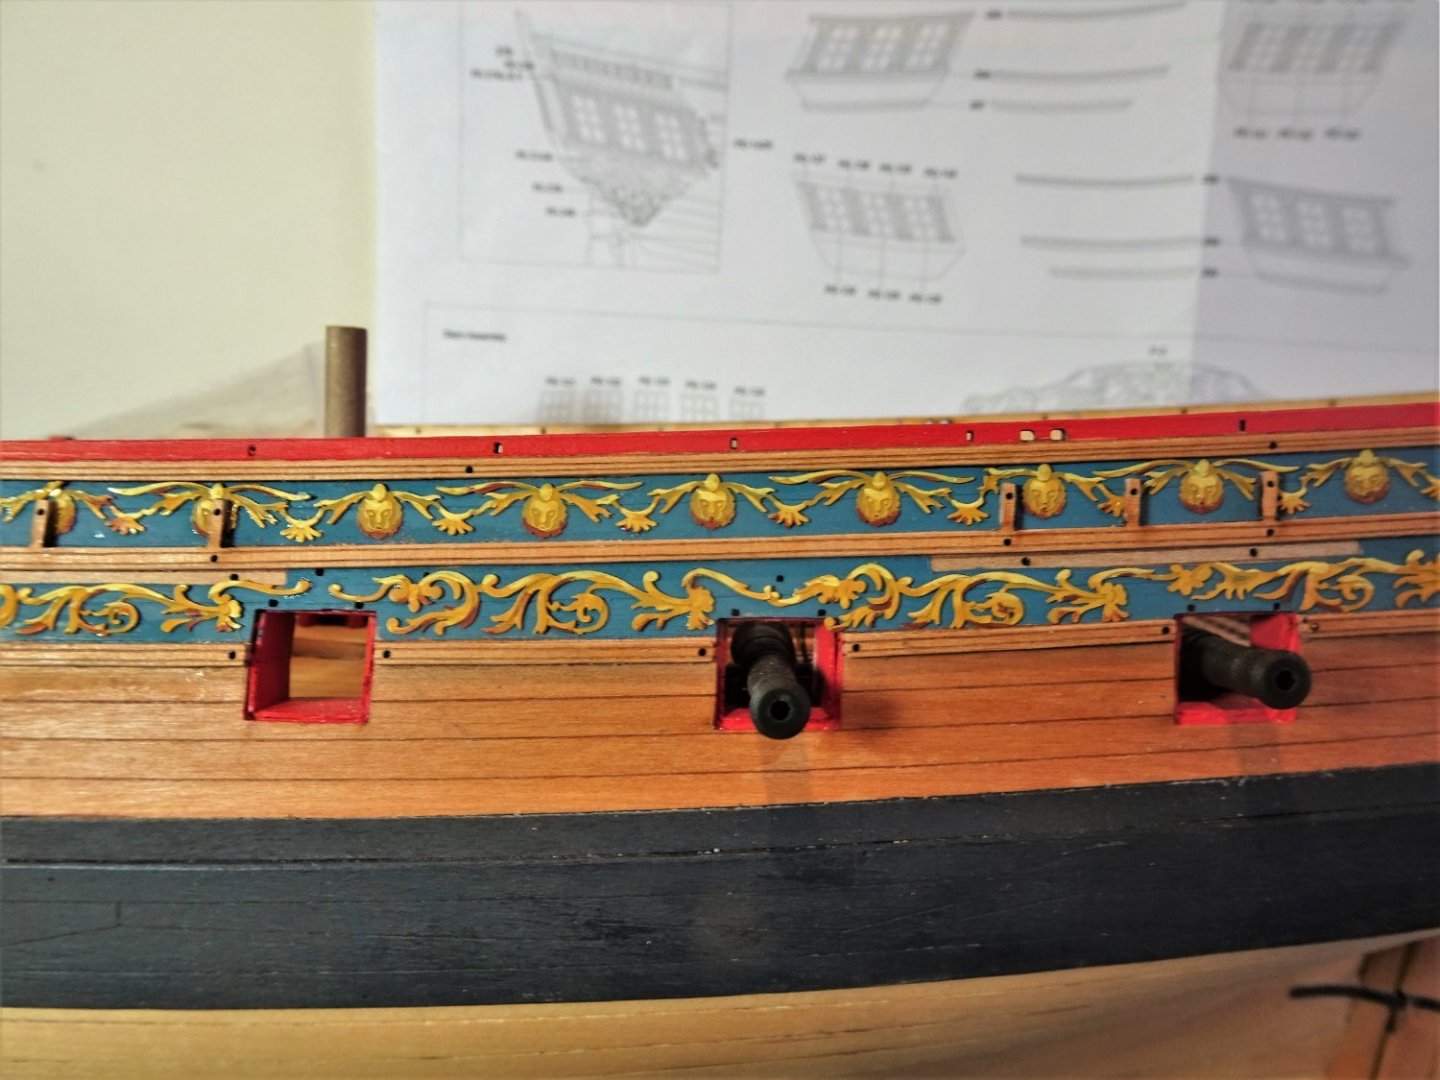
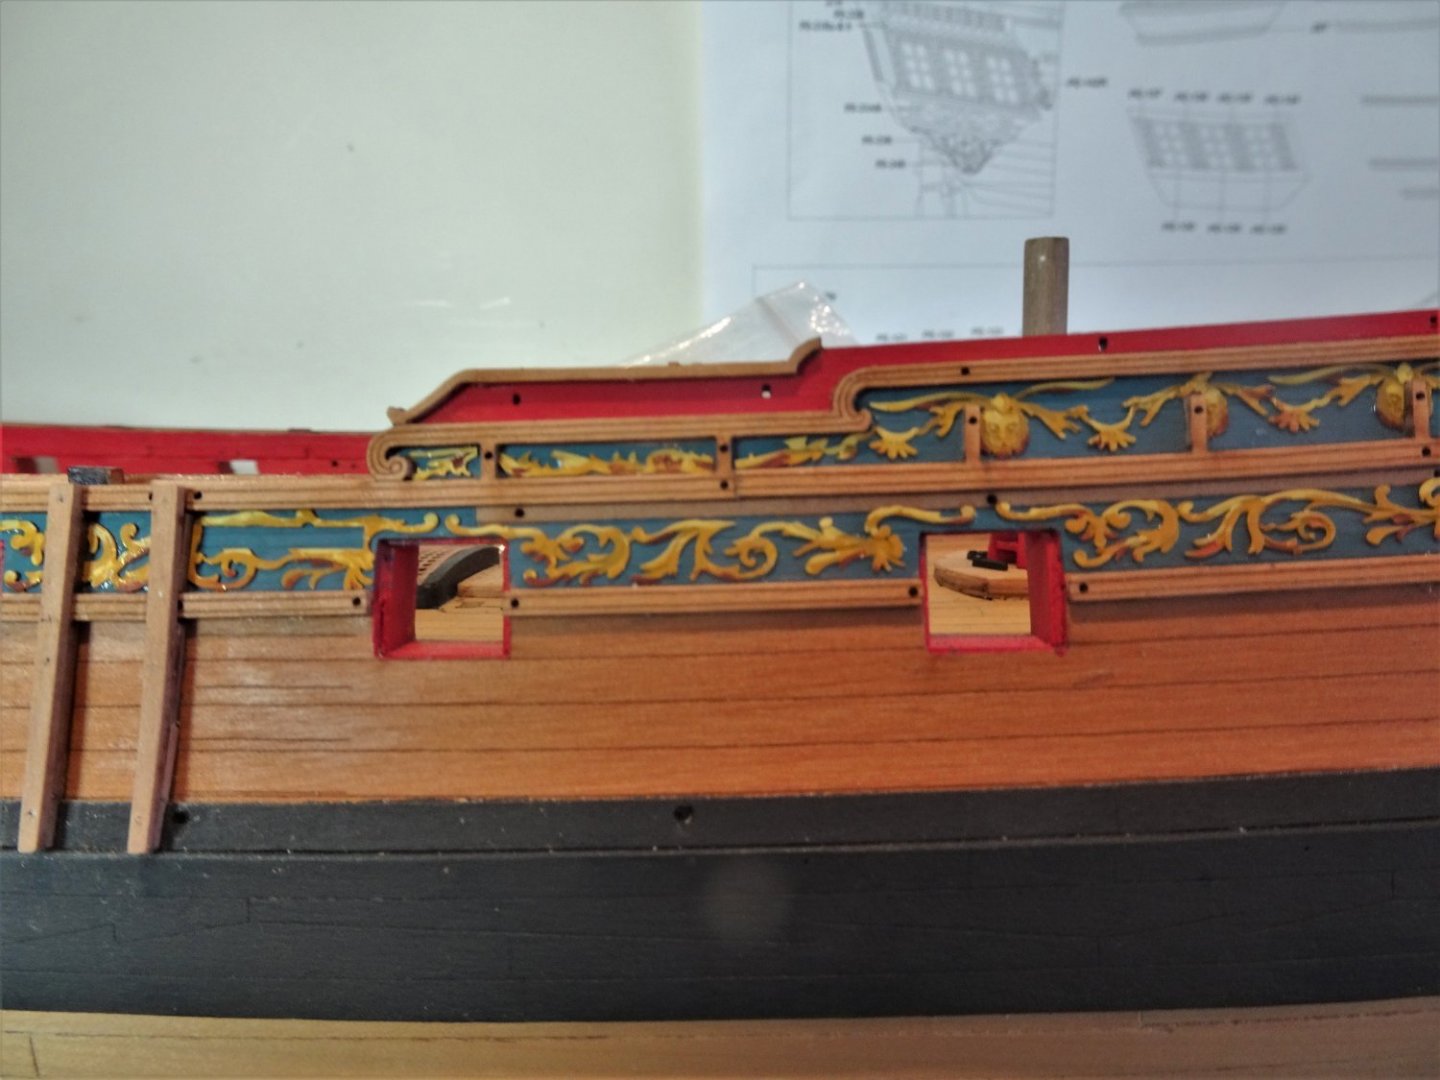
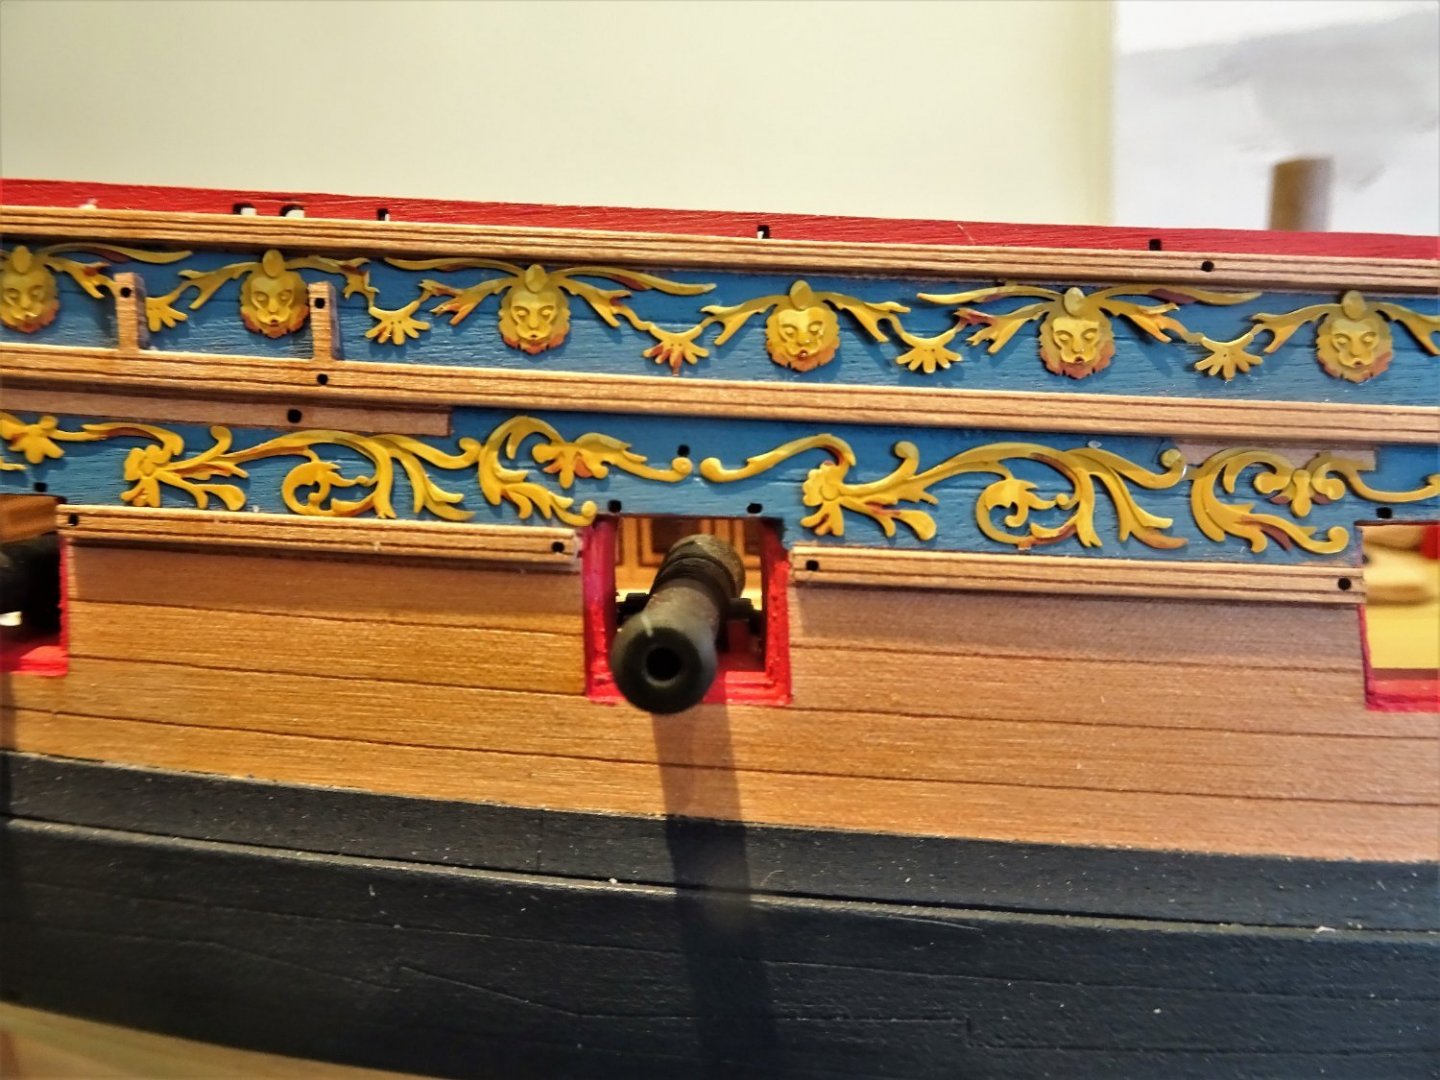
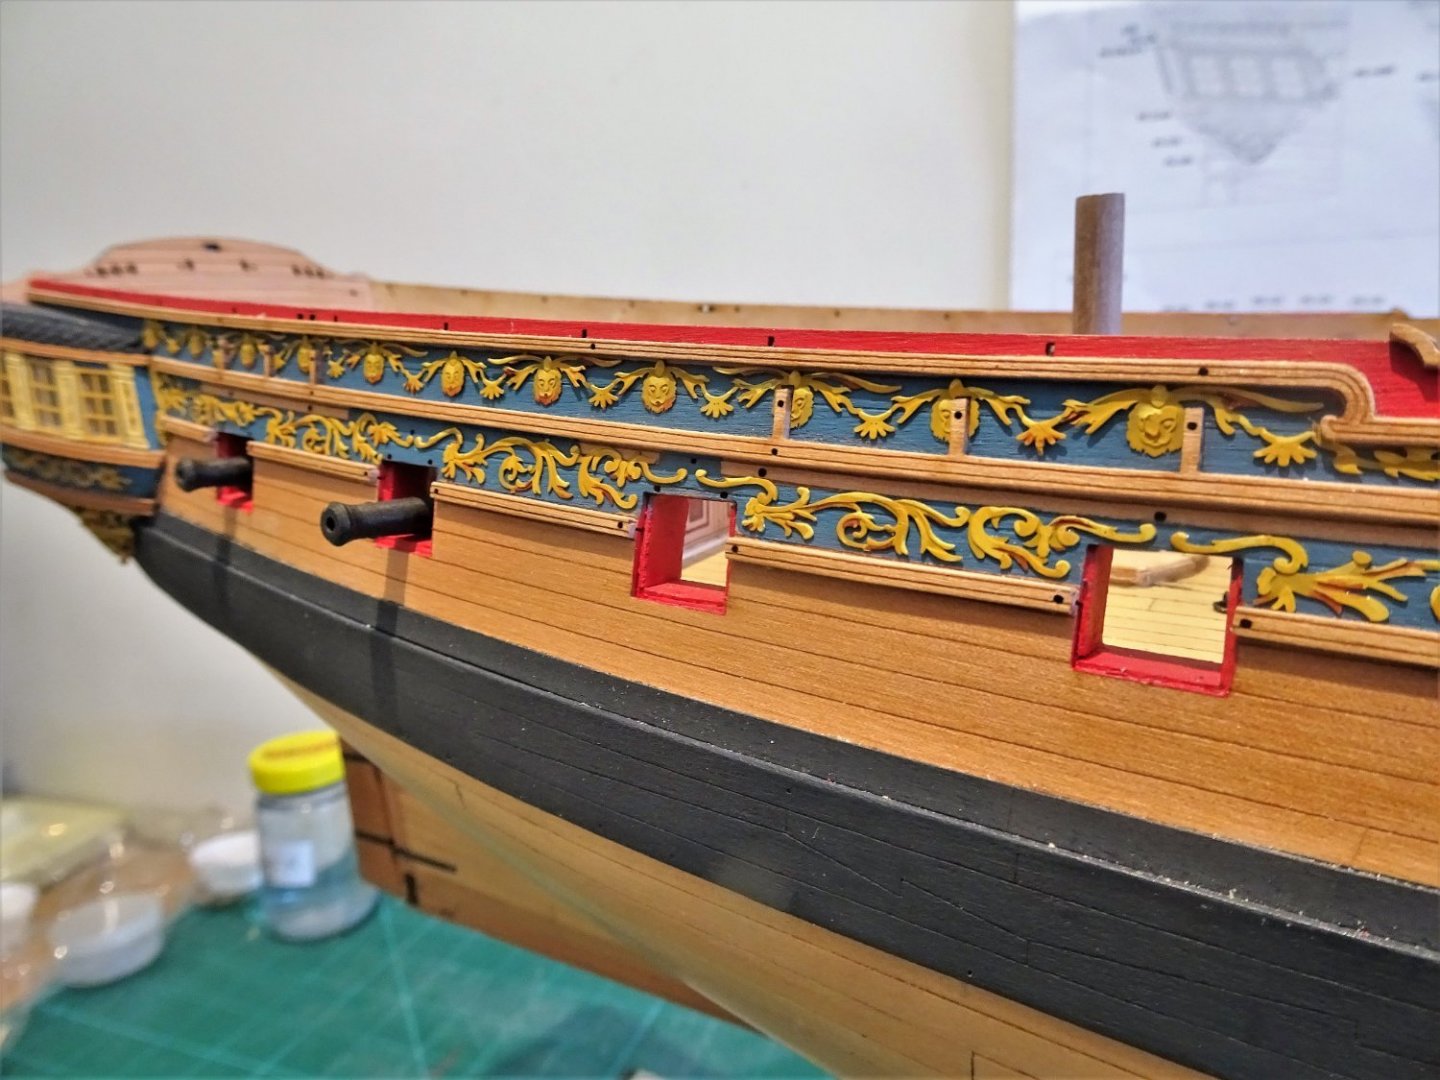
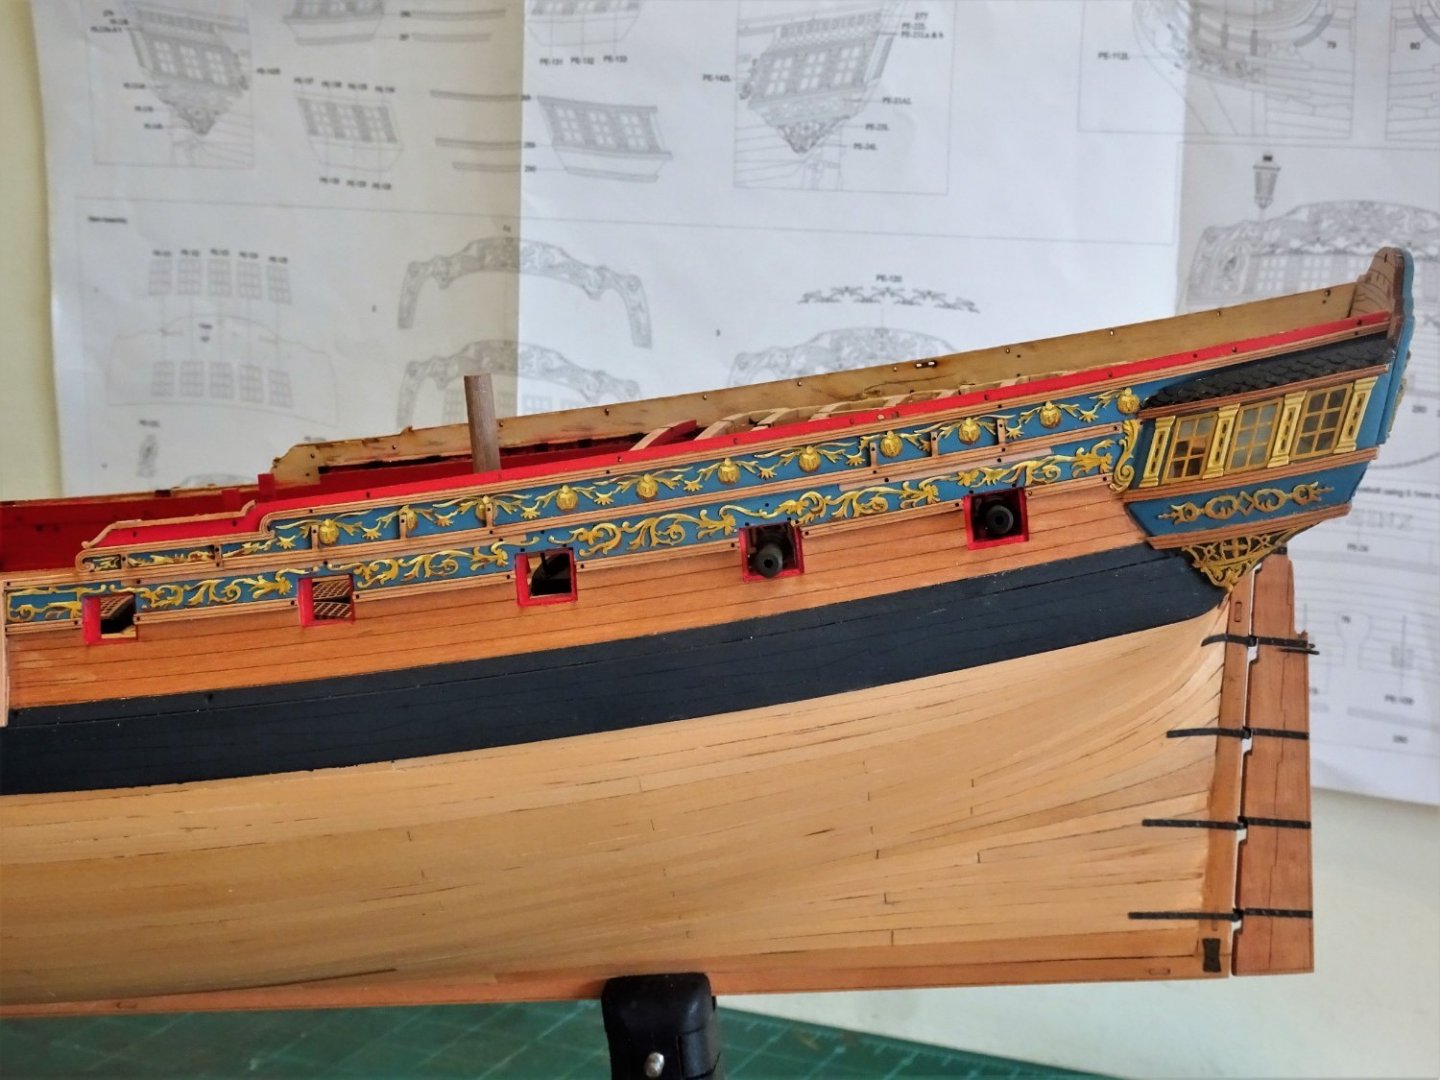
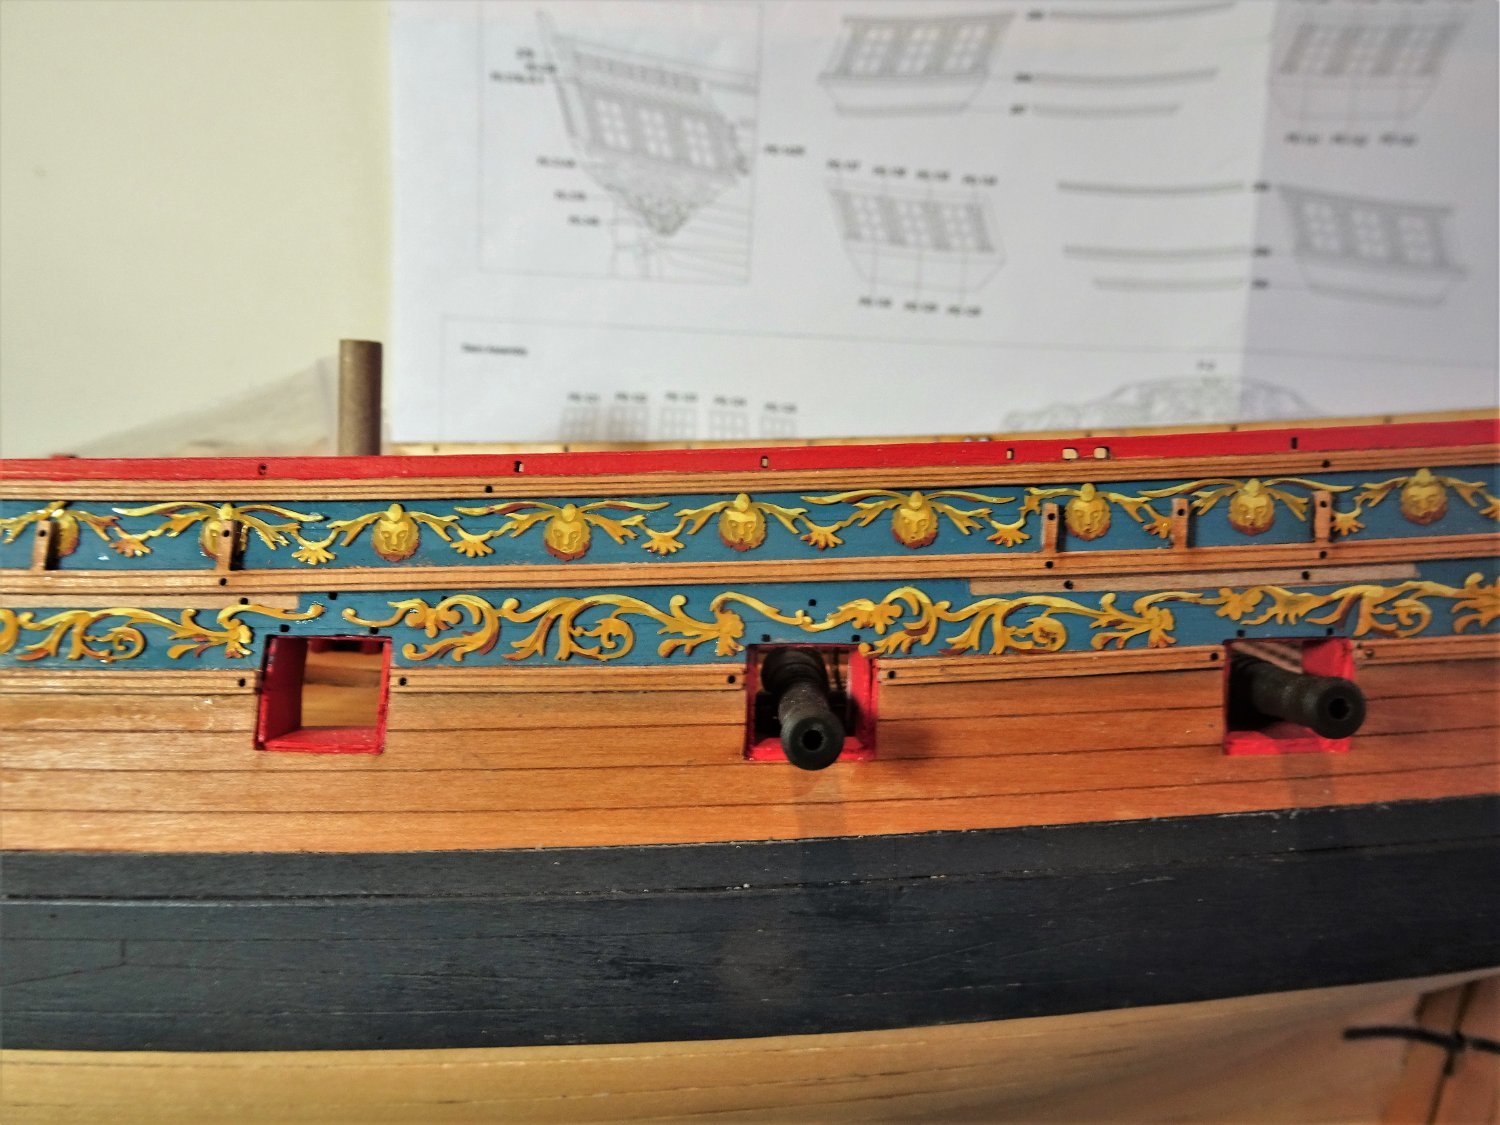
Thank you both, Glenn and Theo. 👍 Post Ninety- one Topsides decoration I have decided to attend to this now as it will probably be easier without having to negotiate guns sticking thro’ the ports. I had a look at using the ‘Winnie’ topside decoration but it proved more tricky to manipulate the design to fit between the rails. As etch decoration goes the kit version is very fine at 0.2mm, finer than the equivalent Pegasus decoration etch. So kit etch it is. My approach to preparation The preliminary preparation will be done on the fret. The etch is gently cleaned both sides with soapy water using an old toothbrush, then rinsed and dried. The design is painted with VMS Metal prep4k primer, followed by a base coat of Vallejo Ochre Brown. The painstaking job of applying highlight and shadow then begins. I will be using Vallejo acrylics throughout. 5957 I applied the highlights (Yellow Ochre /Ivory mix) and the shadows (Dark Vermillion/ Burnt Umber mix) but these will require more work once the design is attached to the hull. I used tiny dots of ca to attach the strips and I must commend Chris both for his design and accuracy in the fit of the strips. 5959 5960 5966 5967 5969 5976 5977 I am not disappointed to have gone with the etch for the Topsides, and am particularly pleased with the way the etch tones in with the ‘painted’ stern and counter decorations, courtesy of Chuck. 5981(2) 5980(2) I am pleased that from normal viewing distance of around 12” and from a broadside aspect, the fine etch does look like it is painted on, which was an unexpected bonus. 5978(2) I will continue to fettle the decoration using macro shots to reveal any flaws that require touching up, but overall it has been a satisfying couple of days. B.E. 04/03/22


.thumb.JPG.a651bdcdad654a3bef23fbbb8e028627.JPG)
.thumb.JPG.872927f3d10d6251da77253419d57a6c.JPG)
.thumb.JPG.e4732816067f78128d77f2be1a213556.JPG)
- 857 replies
-
- 39
-
-
-
-
- Sphinx
- Vanguard Models
- (and 1 more)
.JPG.caba237c5164bca96a4d226b36c729cf.JPG)


.JPG.145d4e6cec0d2c5f7c731ec8c39a0637.JPG)


.JPG.580cffe24eecf716ff61726251c6474e.JPG)
.JPG.ceffae42a0293619c49b4337d095e052.JPG)
.JPG.6c313acd3c45e96791af7ea9b823122b.JPG)


.JPG.94ef2bc5ad3e101cd67b52fc3a838d72.JPG)


.JPG.0760f254b5af202ed3b51c09cc73d9bb.JPG)
.JPG.9c7930872de165f56ddc57e8a1b2299a.JPG)


.JPG.2f781f65389b9045a2739f9a6b882eba.JPG)
.JPG.eb9da47182fbe7782b44e9ffe009a3fc.JPG)
.JPG.cd34517a910c07c98540c09b950f6cbc.JPG)