.JPG.ca33079f5815b861e67b9c2cccd37982.JPG)

Blue Ensign
-
Posts
4,572 -
Joined
-
Last visited
Content Type
Profiles
Forums
Gallery
Events
Everything posted by Blue Ensign
-
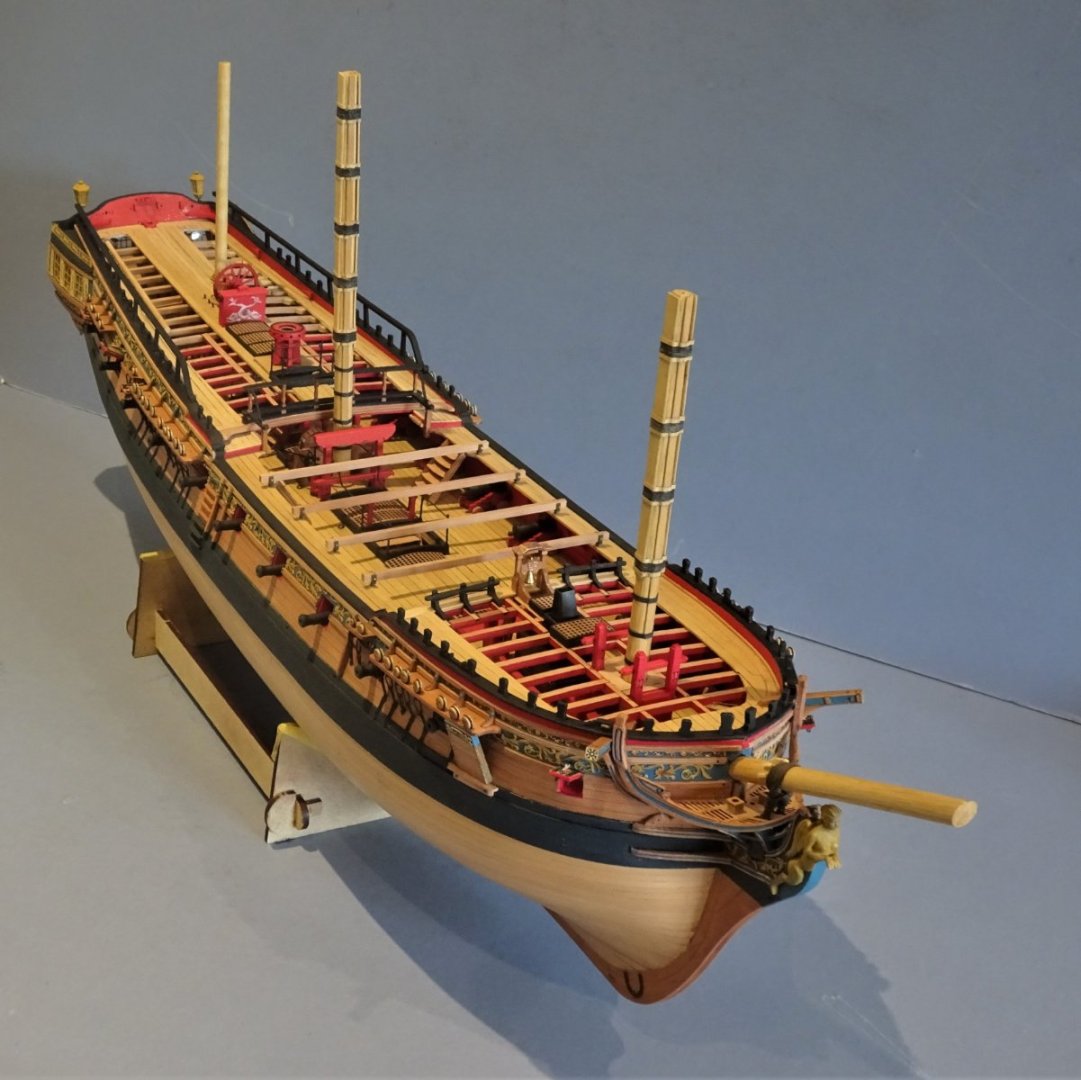
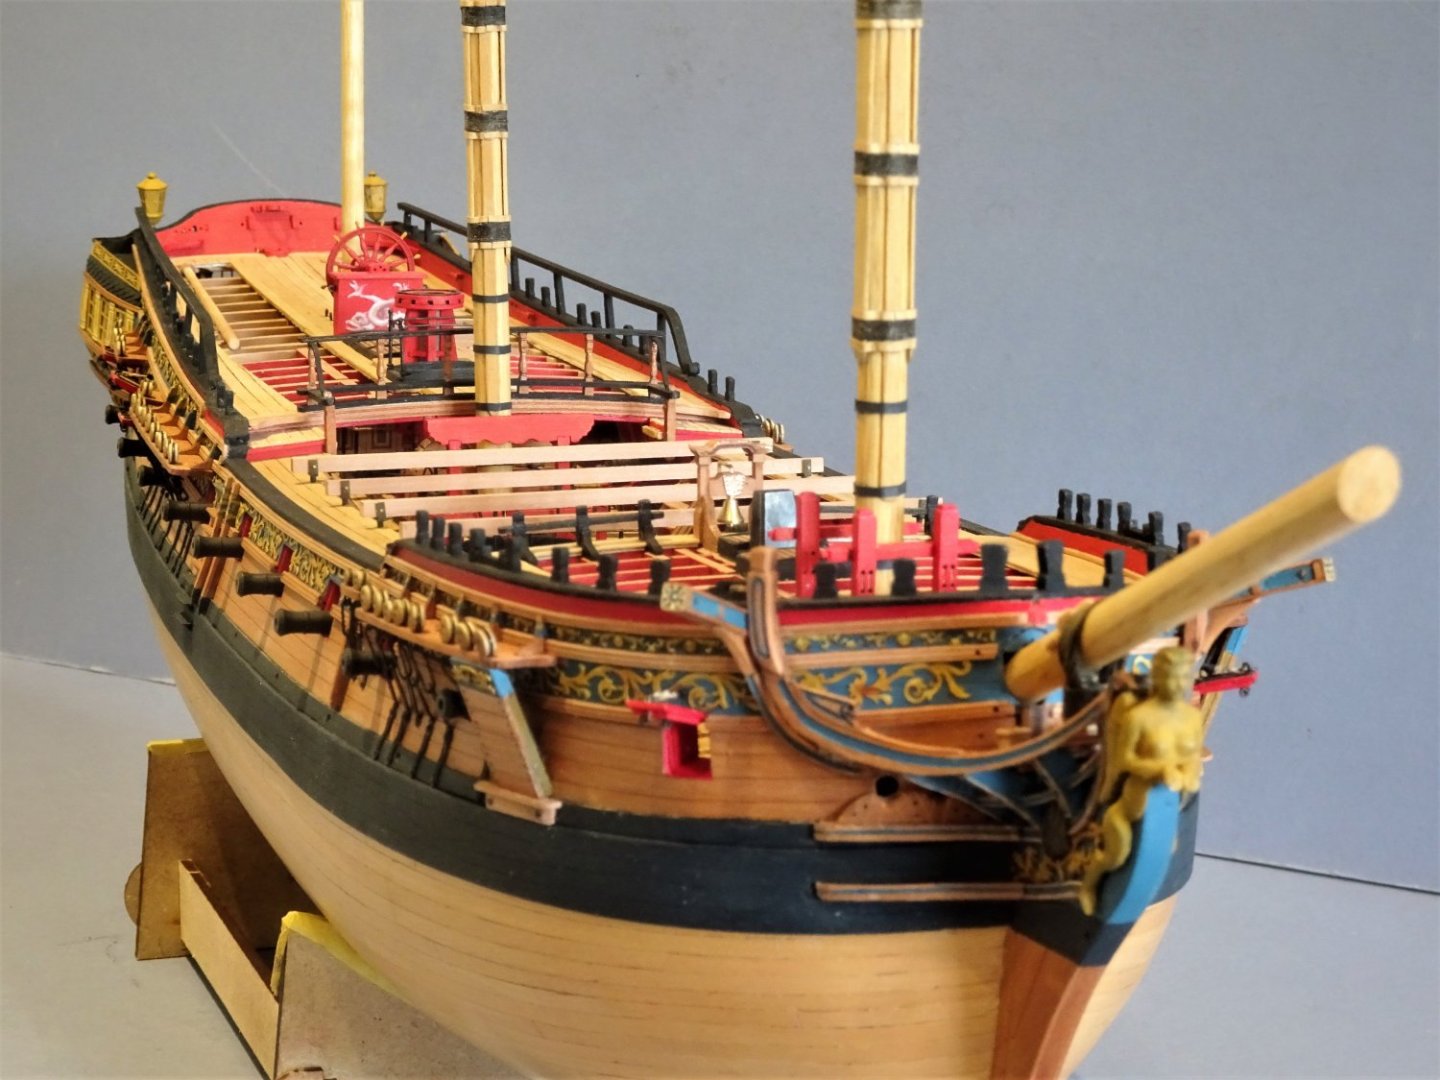
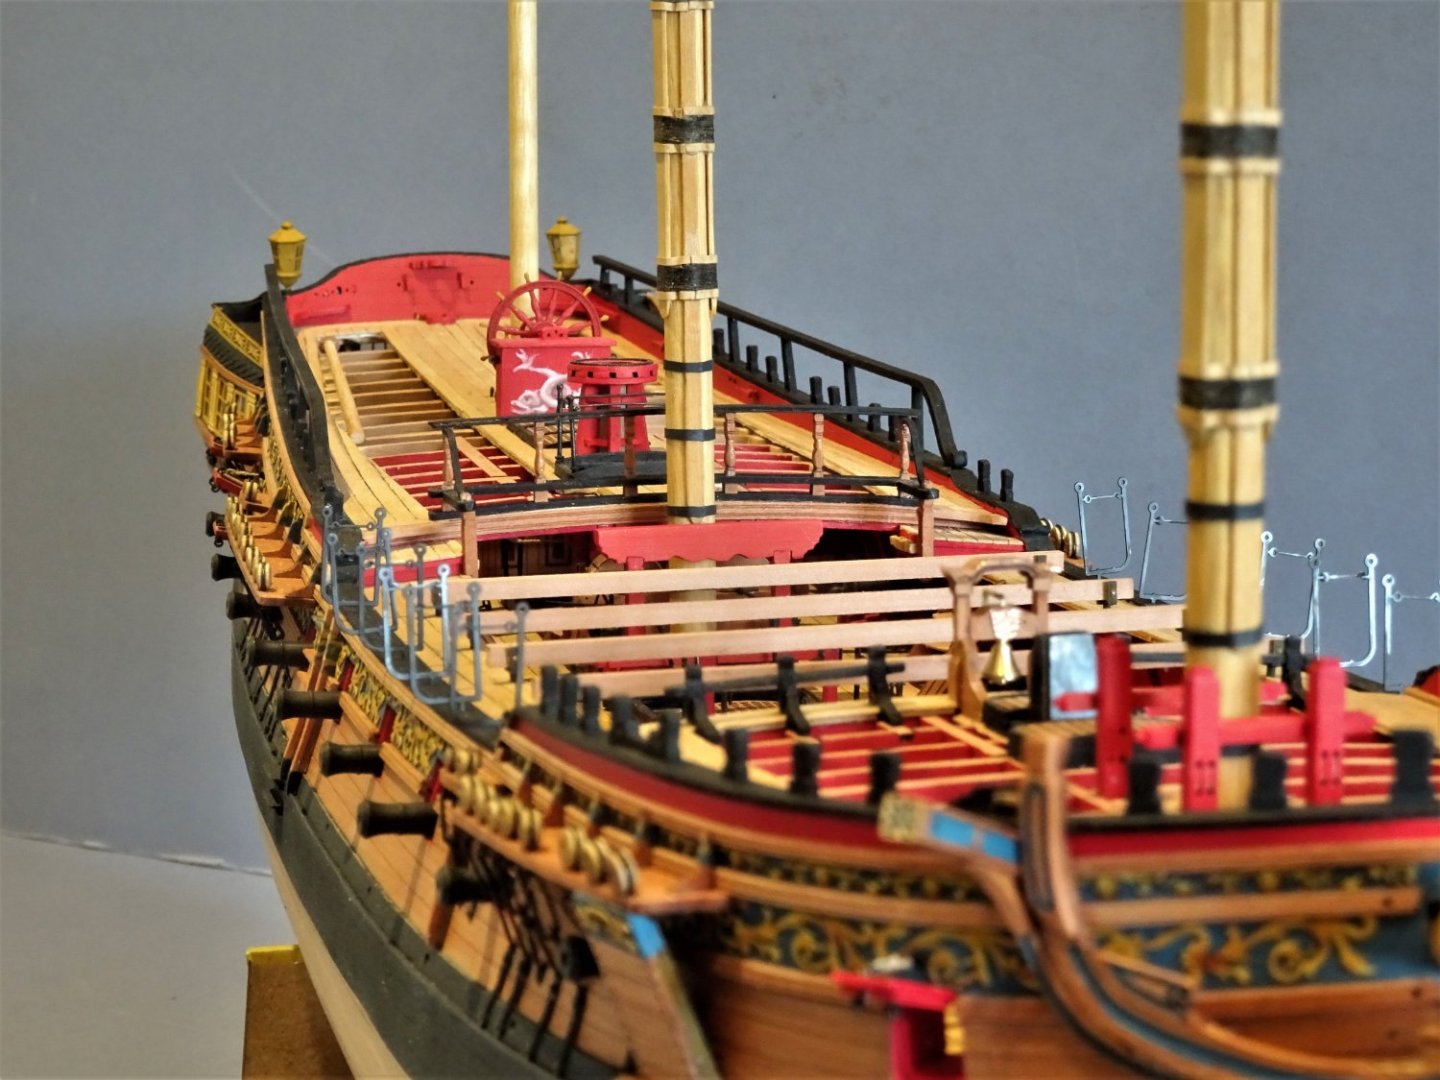
 Post One Hundred and Forty-five Twelve month review. The final completion of Sphinx will now be put on hold whilst I attend to the ships boats. A convenient point with the twelve month anniversary of the build start coming up. I have worked on Sphinx pretty much daily over this time, and it is a testament to Chris’s design that a model of this detail and appearance can be produced in such a relatively short time. I have tweaked the kit in quite a few areas to reflect my Navy Board Style version, but my Pegasus build which necessitated far more scratch adjustments, took over two years to reach this point. 01819(2) Pegasus at two year stage. As a change from my usual hand held cluttered work bench shots, a tidy up, and tri-pod photo shoot to mark the twelve month stage. 7646(2) 7631 7630(3) 7634(3) 7633 7639(2) 7635(2) 7629(2) 7644(2) 7652 7649(2) 7648 These last three shots show the Hammock Cranes temporarily in place to help me decide if I want to fit them. The contemporary Navy Board style model of the Amazon does show them, and the kit provided versions are very nicely detailed, but at this point I’m still undecided. Sphinx will now be put into her case while I make the Ships boats. Thank you to all who have shown interest in this build over the past year. B.E. 26/07/2022
.thumb.JPG.6c40666be5514ef63b4406cca34155e4.JPG)
.thumb.JPG.4f73f49eba83b085500f7fcf52e55ac8.JPG)
.thumb.JPG.c09162f797662dd3540ac9ae741e0333.JPG)
.thumb.JPG.18ff6ad8677c36258075b80863590ad1.JPG)
.thumb.JPG.d6da93dffaeb54d5251e2bec0ead32d7.JPG)
.thumb.JPG.4e72d8e02318c0cc61af2516e9e398ce.JPG)
.thumb.JPG.9dcd8d589145d0dd630e8a40abe3da49.JPG)

.thumb.JPG.2de9fb910e23d06df6cd49cde9ec3126.JPG)
.thumb.JPG.bb6845a610d29ec19cd69217908b2f37.JPG)
- 857 replies
-
- 37
-

-

-
- Sphinx
- Vanguard Models
- (and 1 more)
-
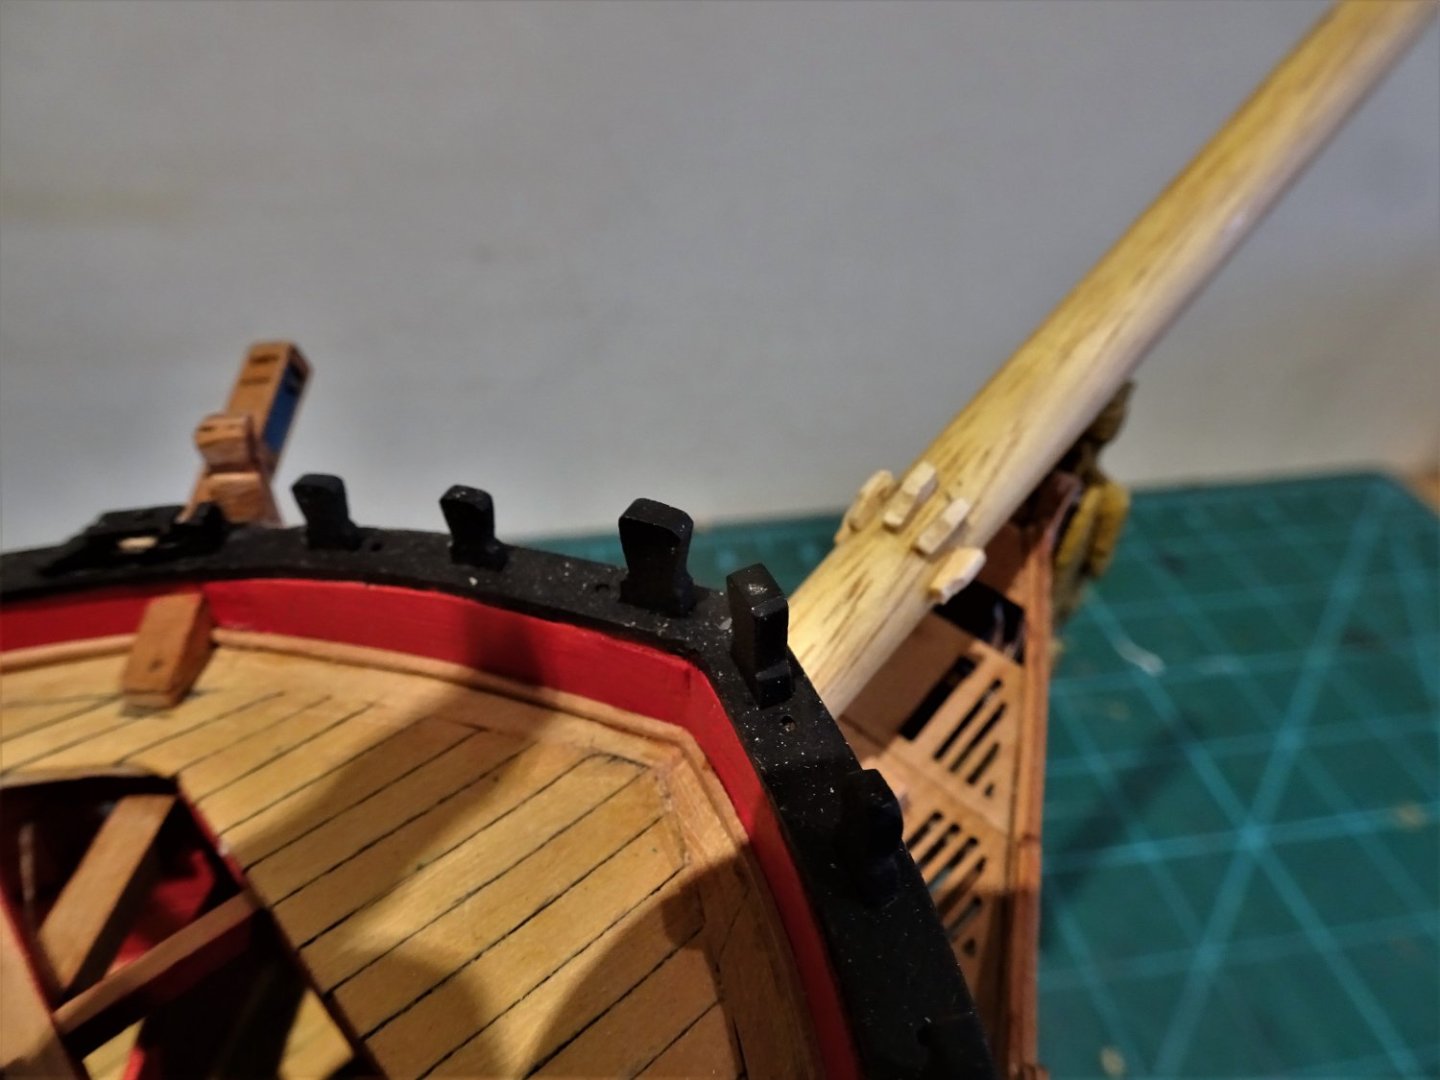
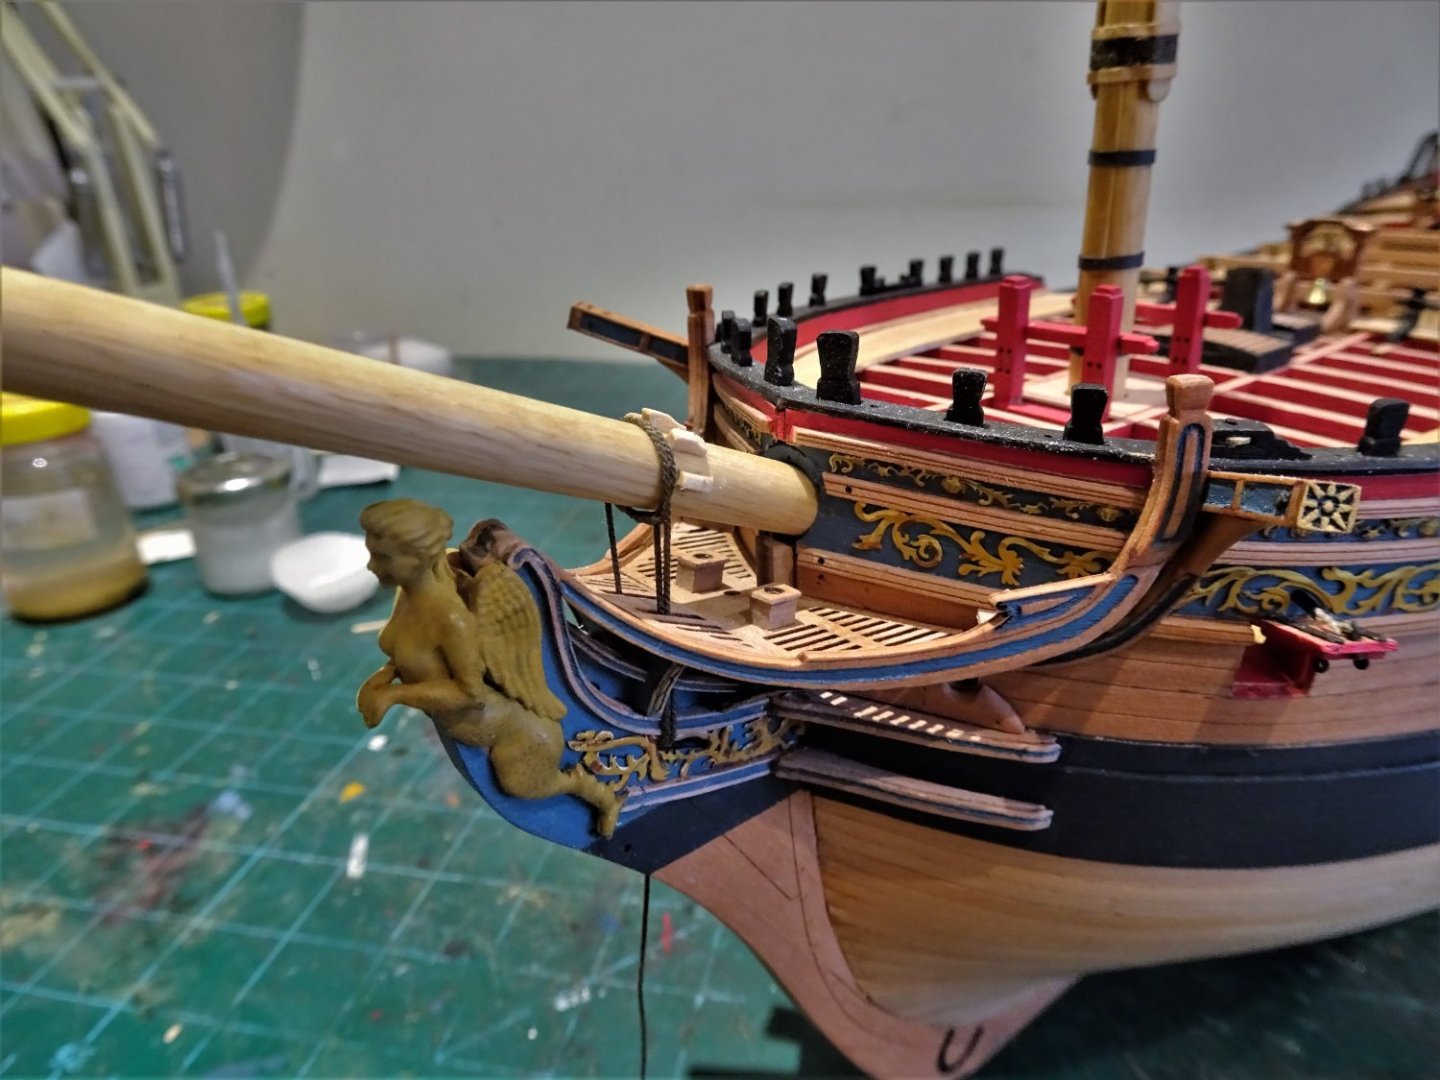
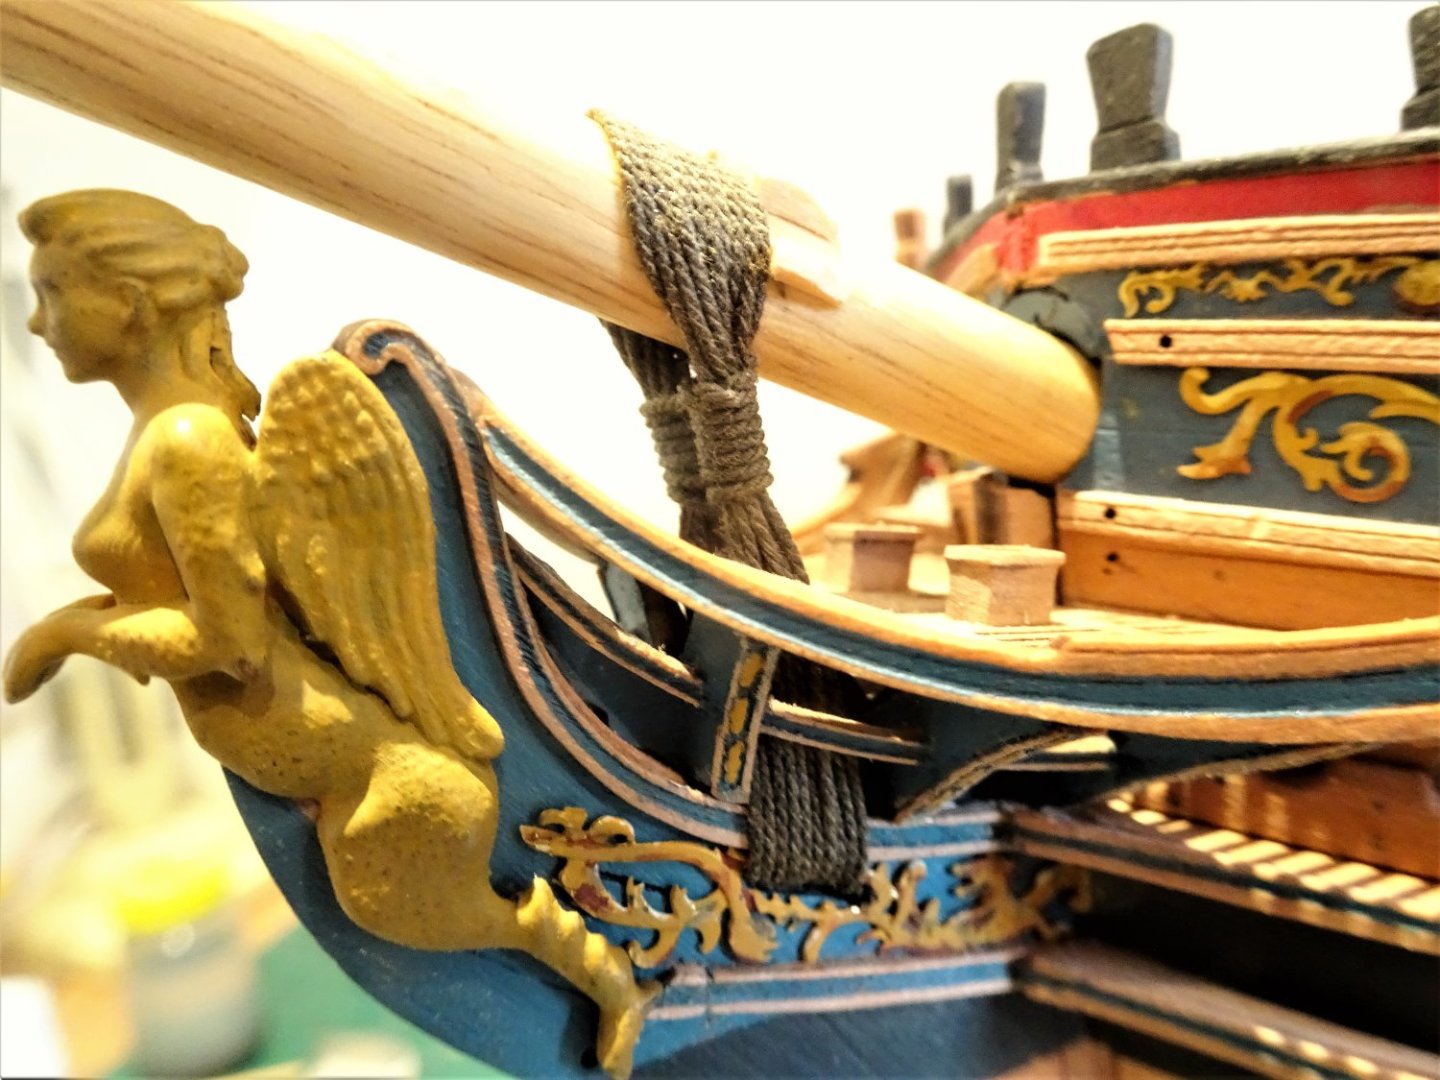
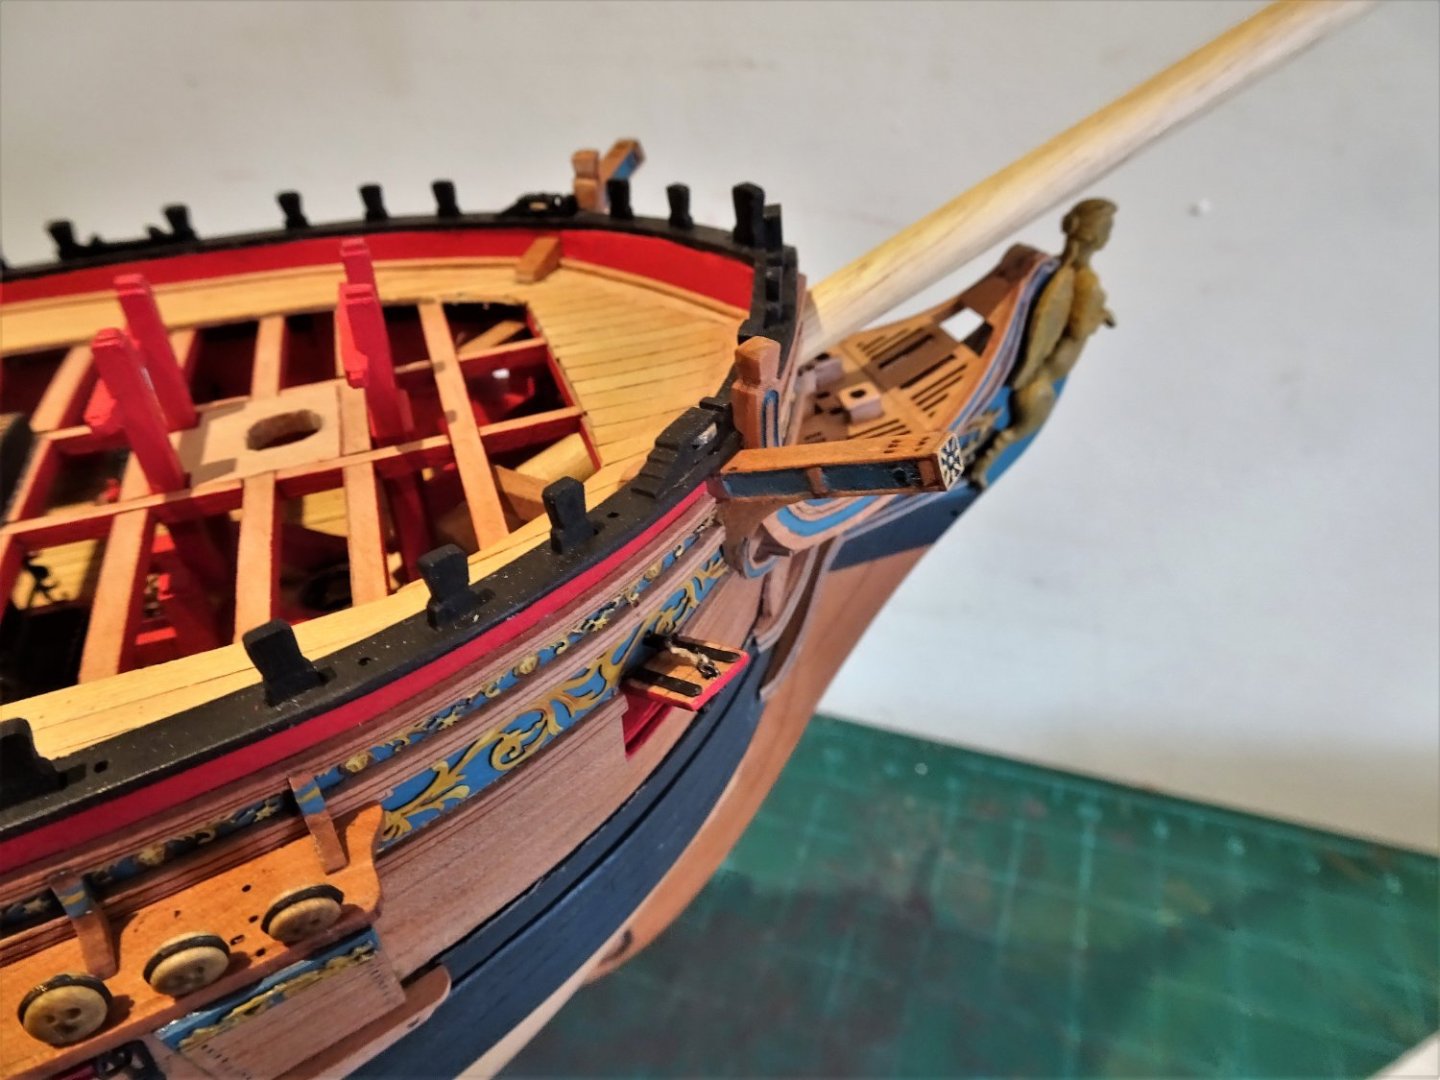
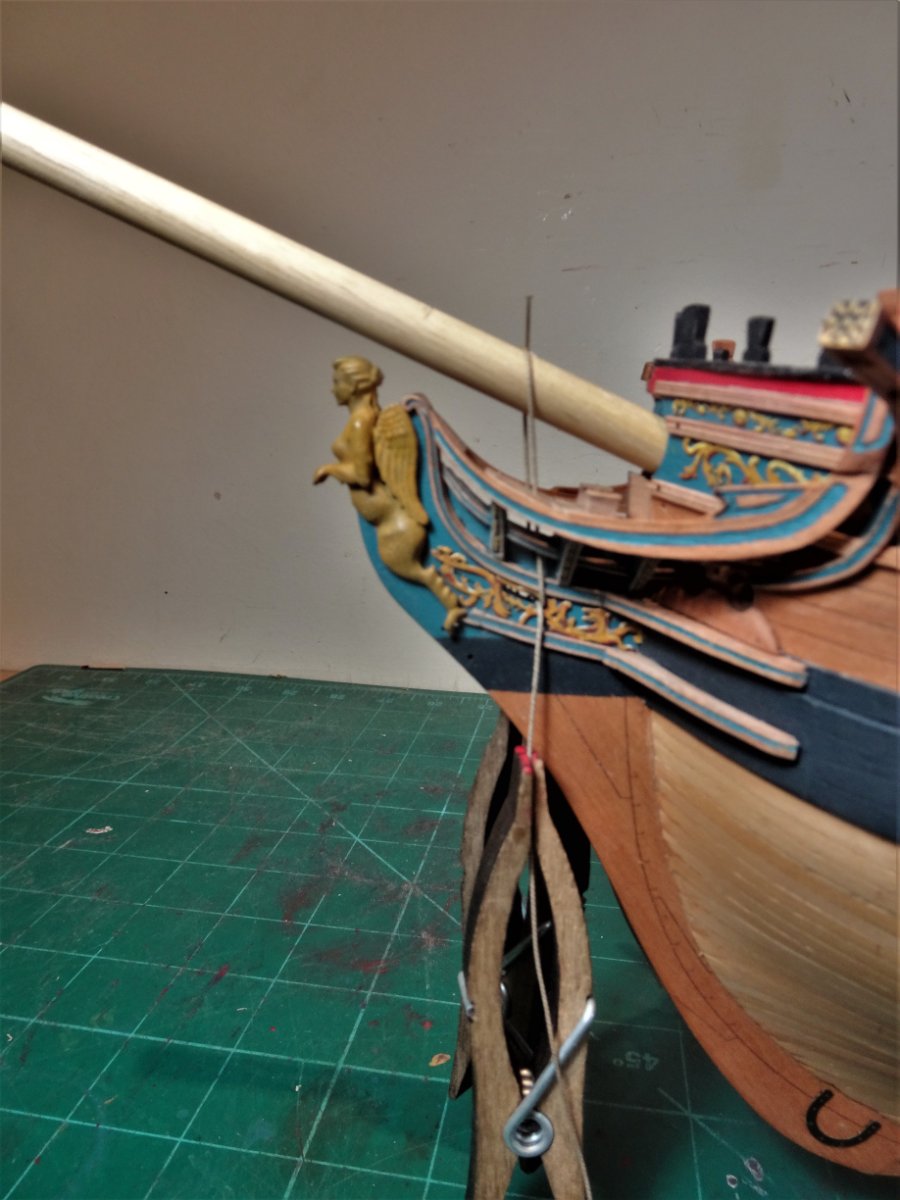
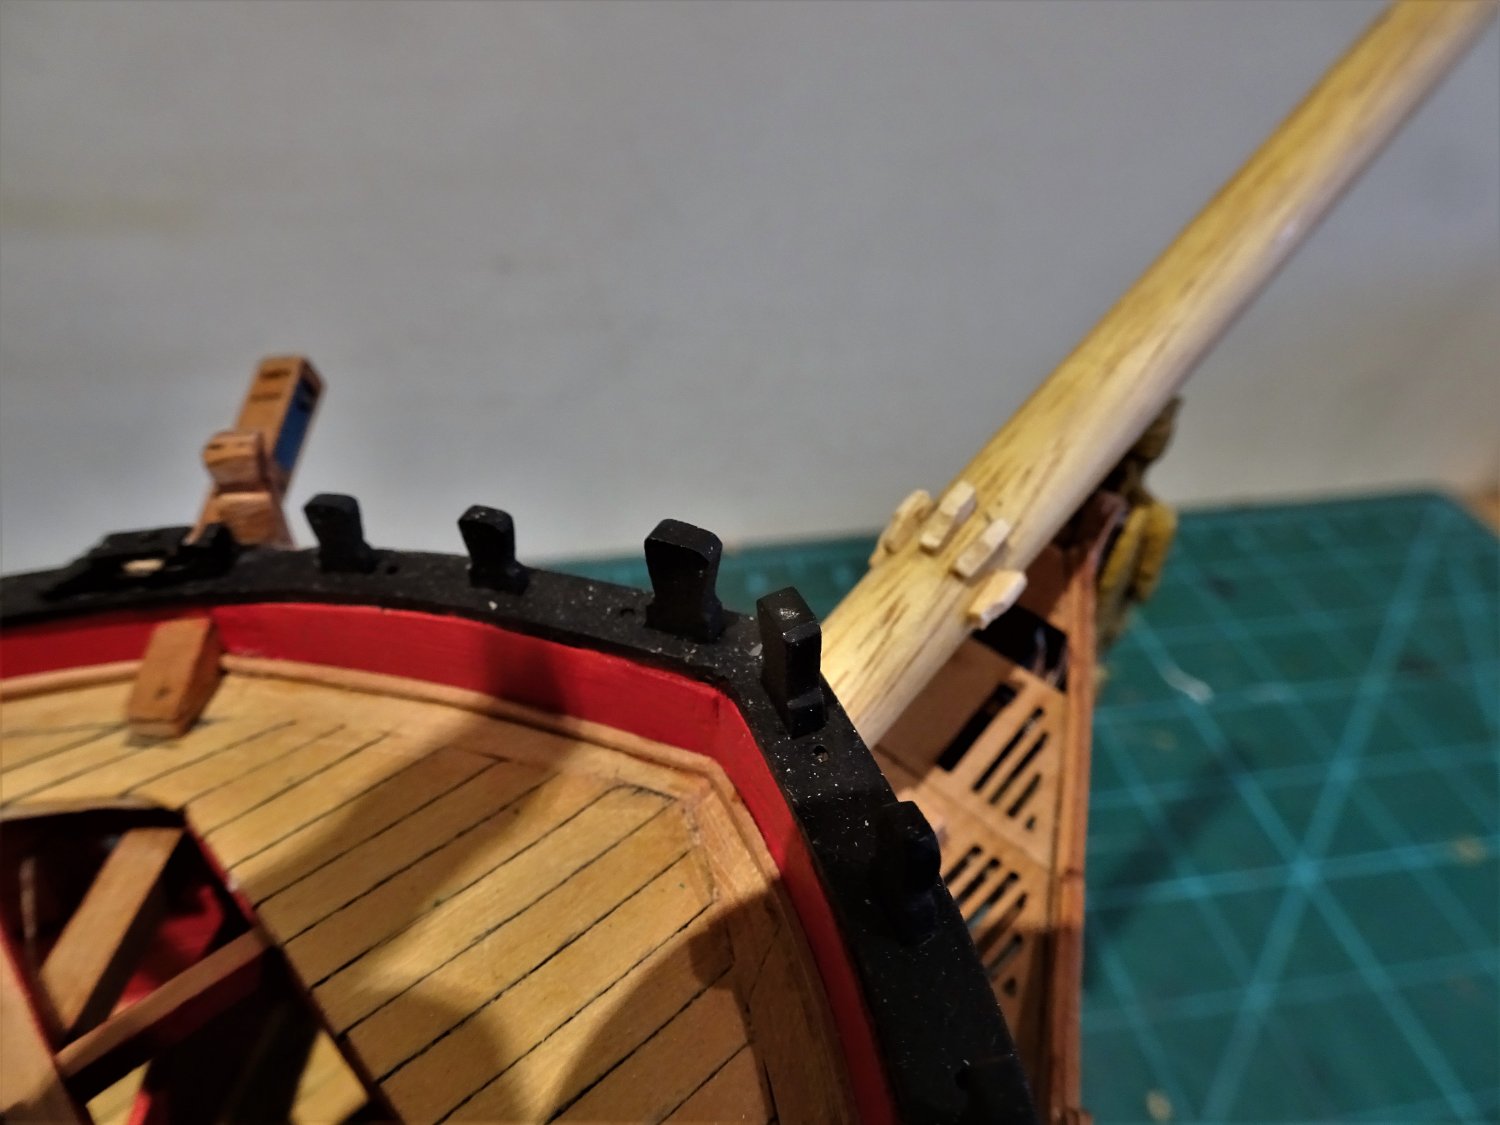
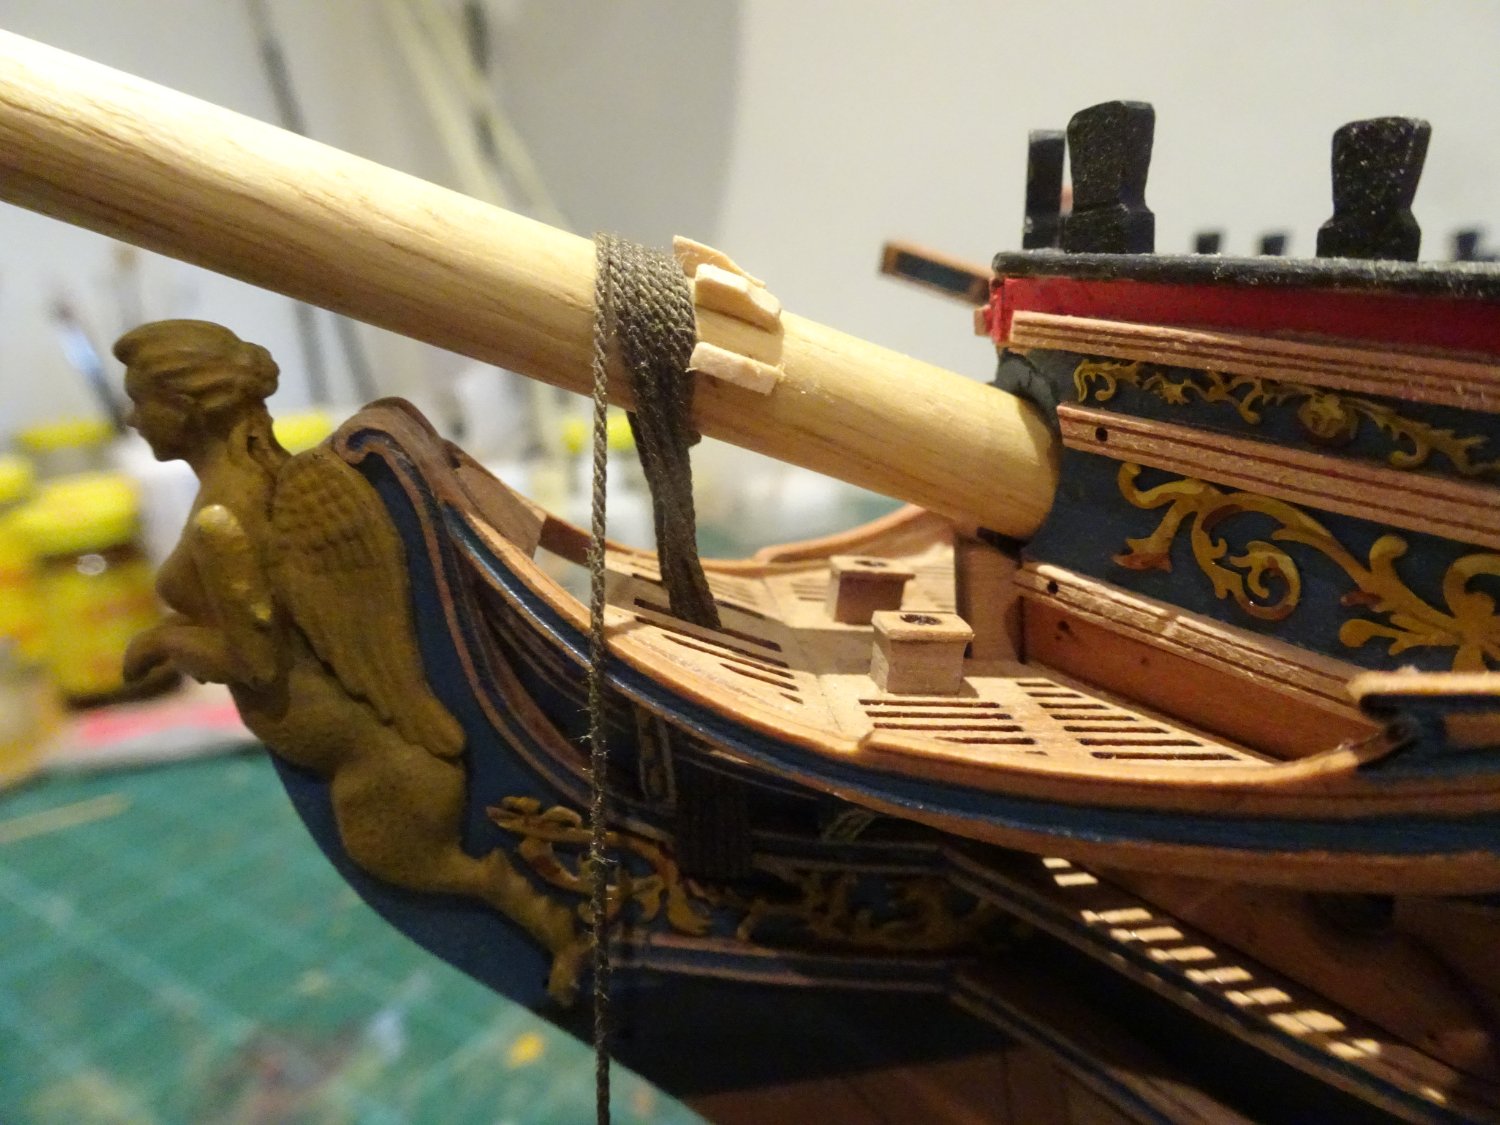
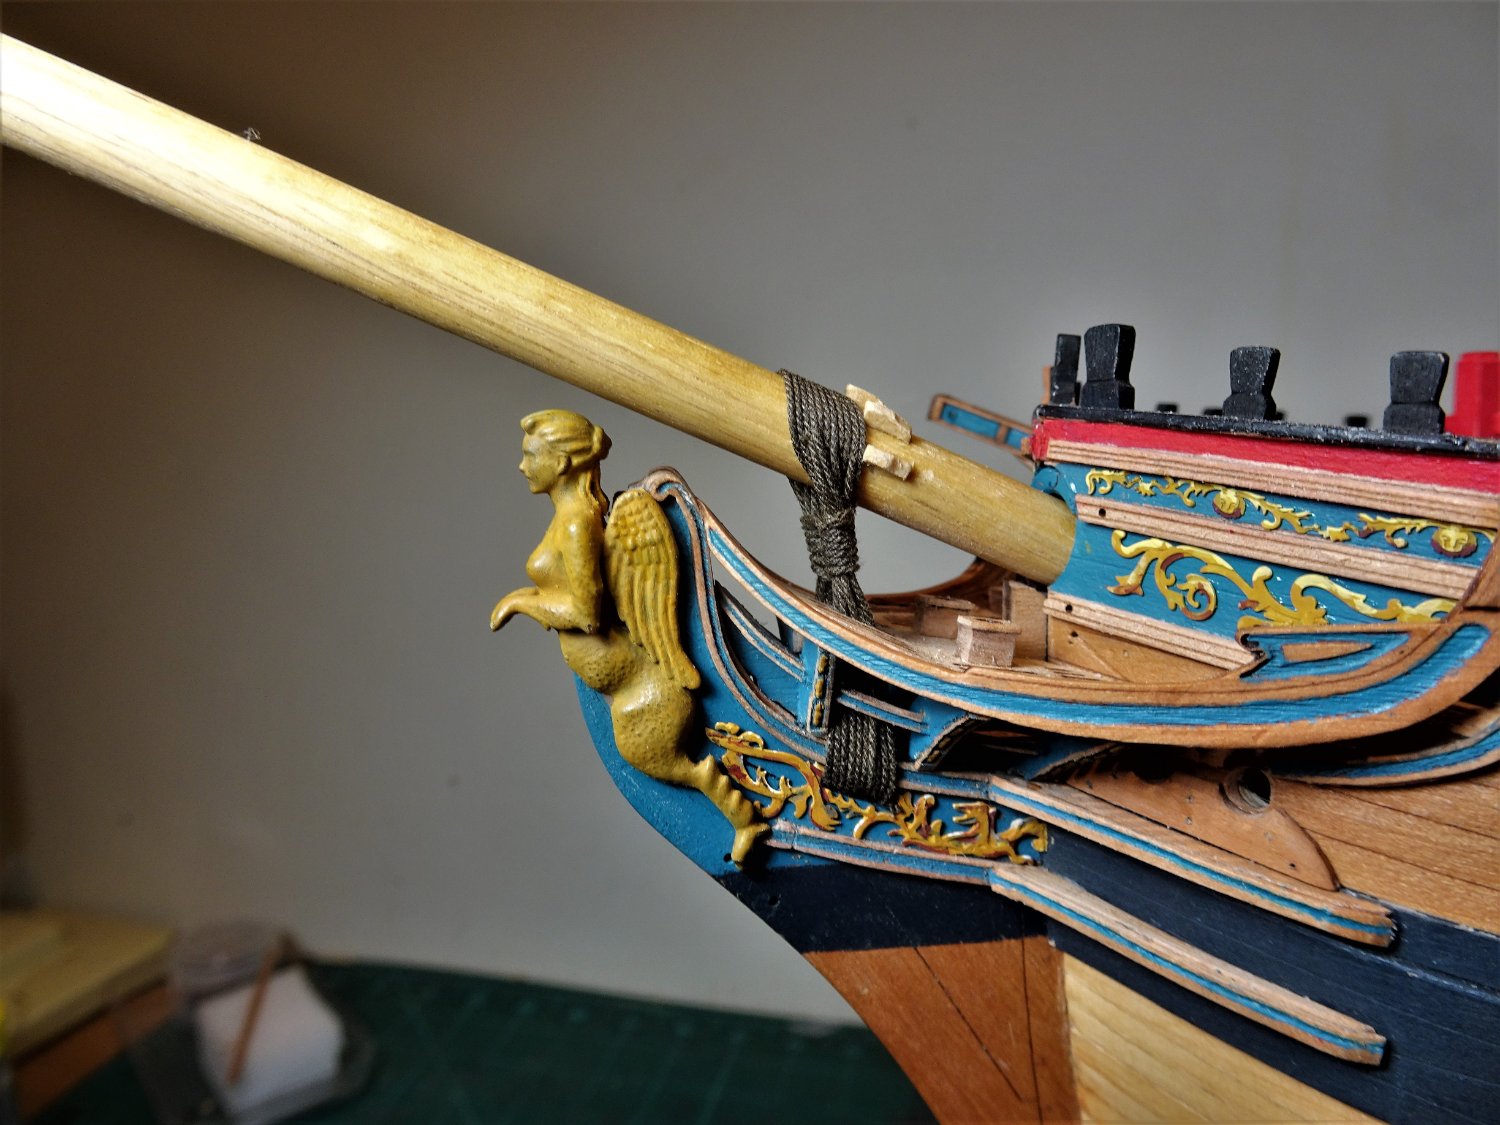
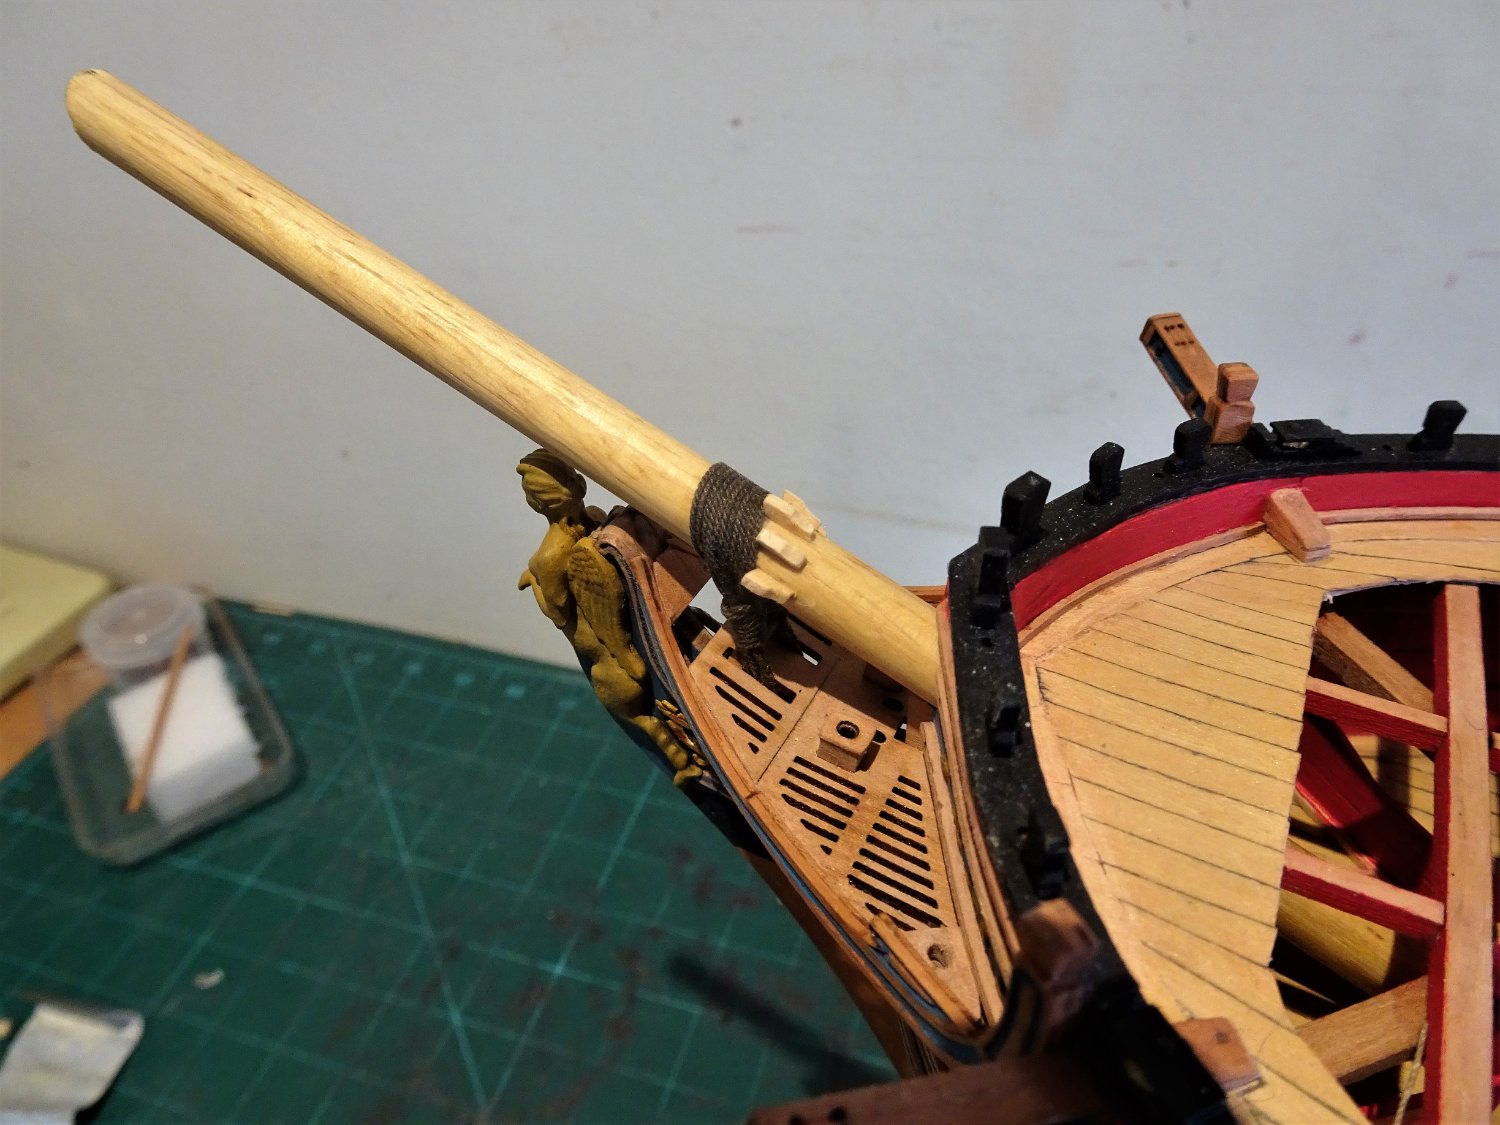
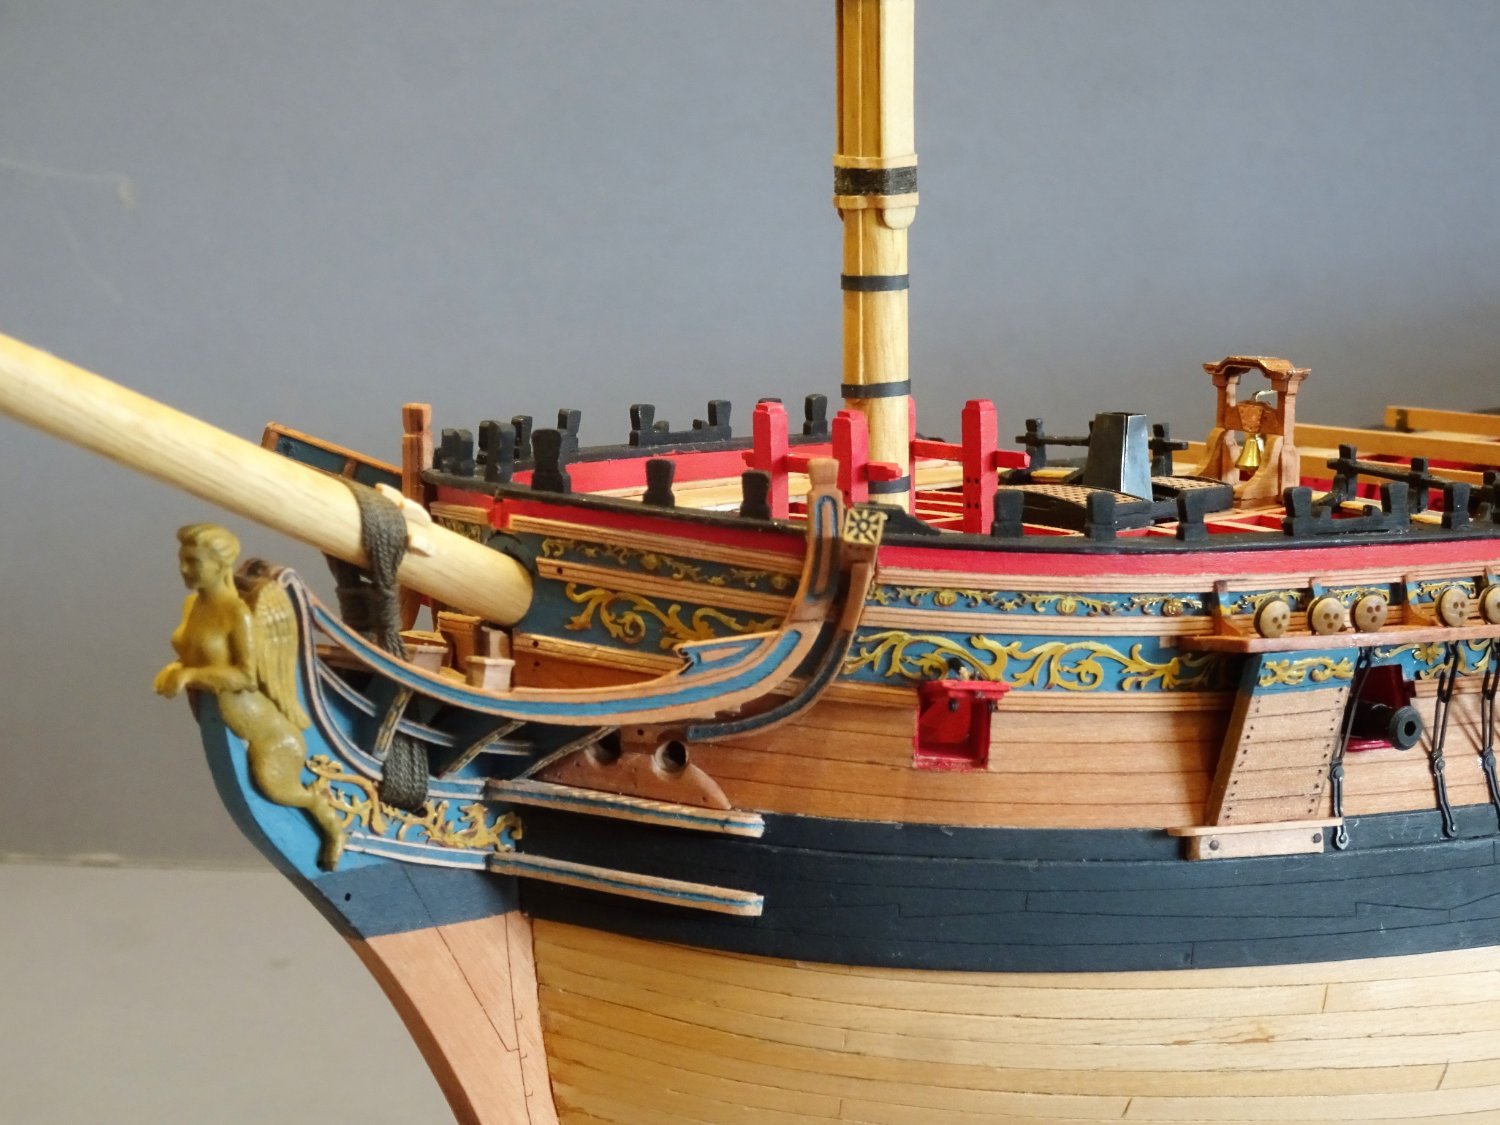
Thank you Thomas, much appreciated. Glad to see MSW is back online, been down all day, dark memories of the great crash came into my mind.😟 On with the show,.. Post One Hundred and forty-four Dressing the Bowsprit. The most prominent and only feature on my reduced length Bowsprit is the Gammoning. Steel indicates 5” circ line for ships of 20-22 guns which equates to 0.63mm ø at scale. I have used Syren 0.63mm rigging line. The kit plans indicate use of 0.75mm ø line and there is a diagram on Plan sheet 20 Rigging Plan 1. I would rig this before I add impediments such as the Boomkins to the head. To rig the gammoning the position of the gammoning cleats needs to be established. 7600 To mark their position a temporary line is fed thro’ the slot with the line restrained at the aft end of the slot. The line must be vertical to the keel. I found the kit provided cleats (393) impossibly small to handle for char removal and clean up. I found it easier to fashion the five required from some clean Boxwood section. 7611 The faces of the cleats are angled to meet the run of the line. Bowsprit Gammoning It is important to ensure that enough line is taken to complete the turns and frapping. I allowed 60” to complete the job, I had 12” left over, better too much than too little. Steel refers to cross turns of the frapping. When all the turns are passed, and hove tight, they are frapped together in the middle, by as many cross turns as are passed over the bowsprit, each turn hove tight: the end of the gammoning rope is then whipt, and seized to one of the turns. The frapping increases the tension; and adds to the security acquired by the purchase. 7612 Starting the gammoning thro’ an eye splice on the Port side. 7614 The gammoning progresses, note the twist as the line passes from fore to aft with each turn. 7626 7616 7627 7636 Well that’s the rigging done on my Sphinx, but the build is not over. B.E. 25/07/2022


- 857 replies
-
- 17
-
-
-
- Sphinx
- Vanguard Models
- (and 1 more)
-
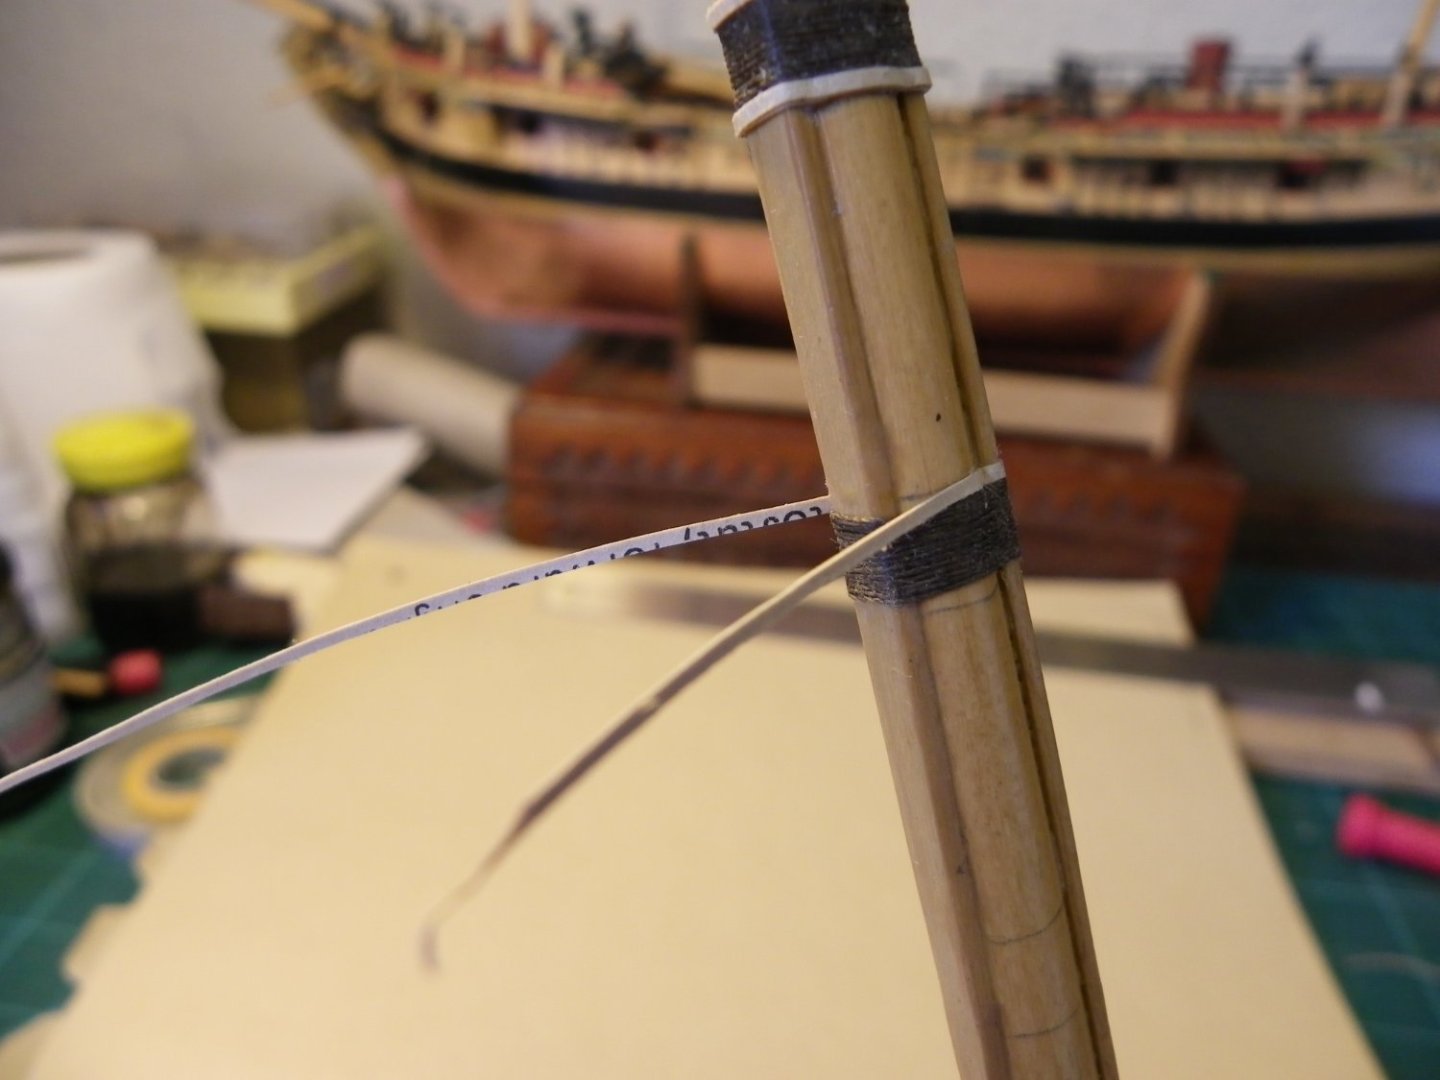
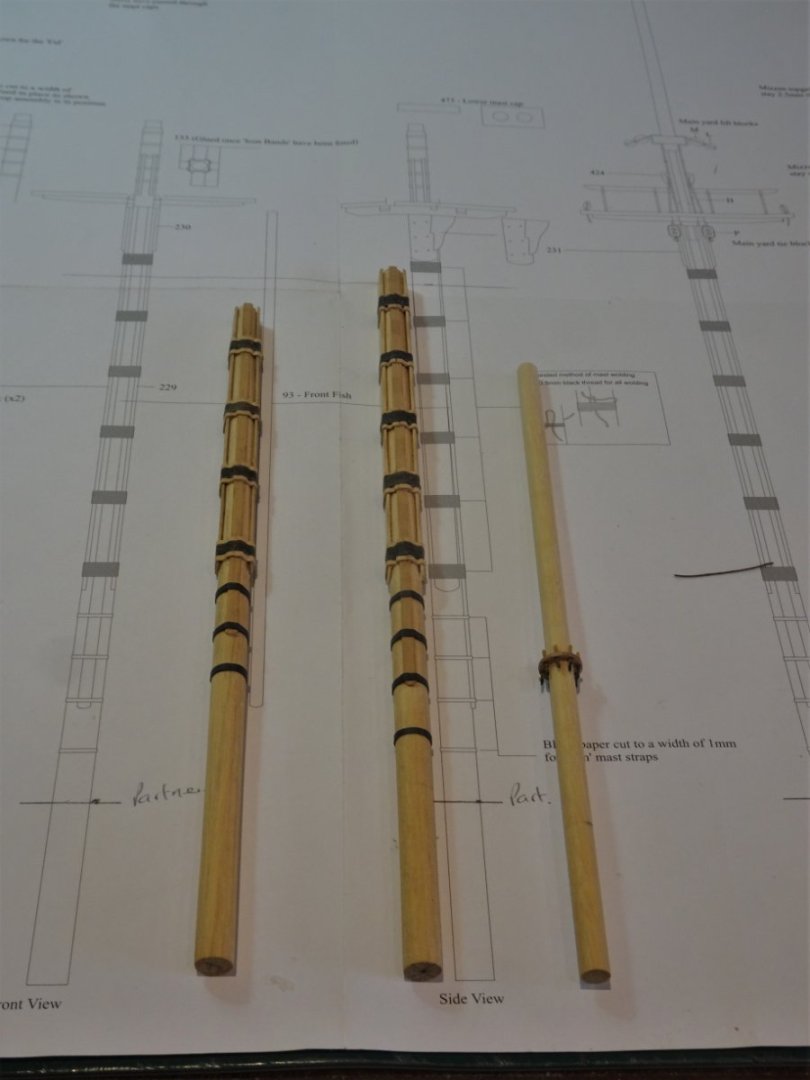
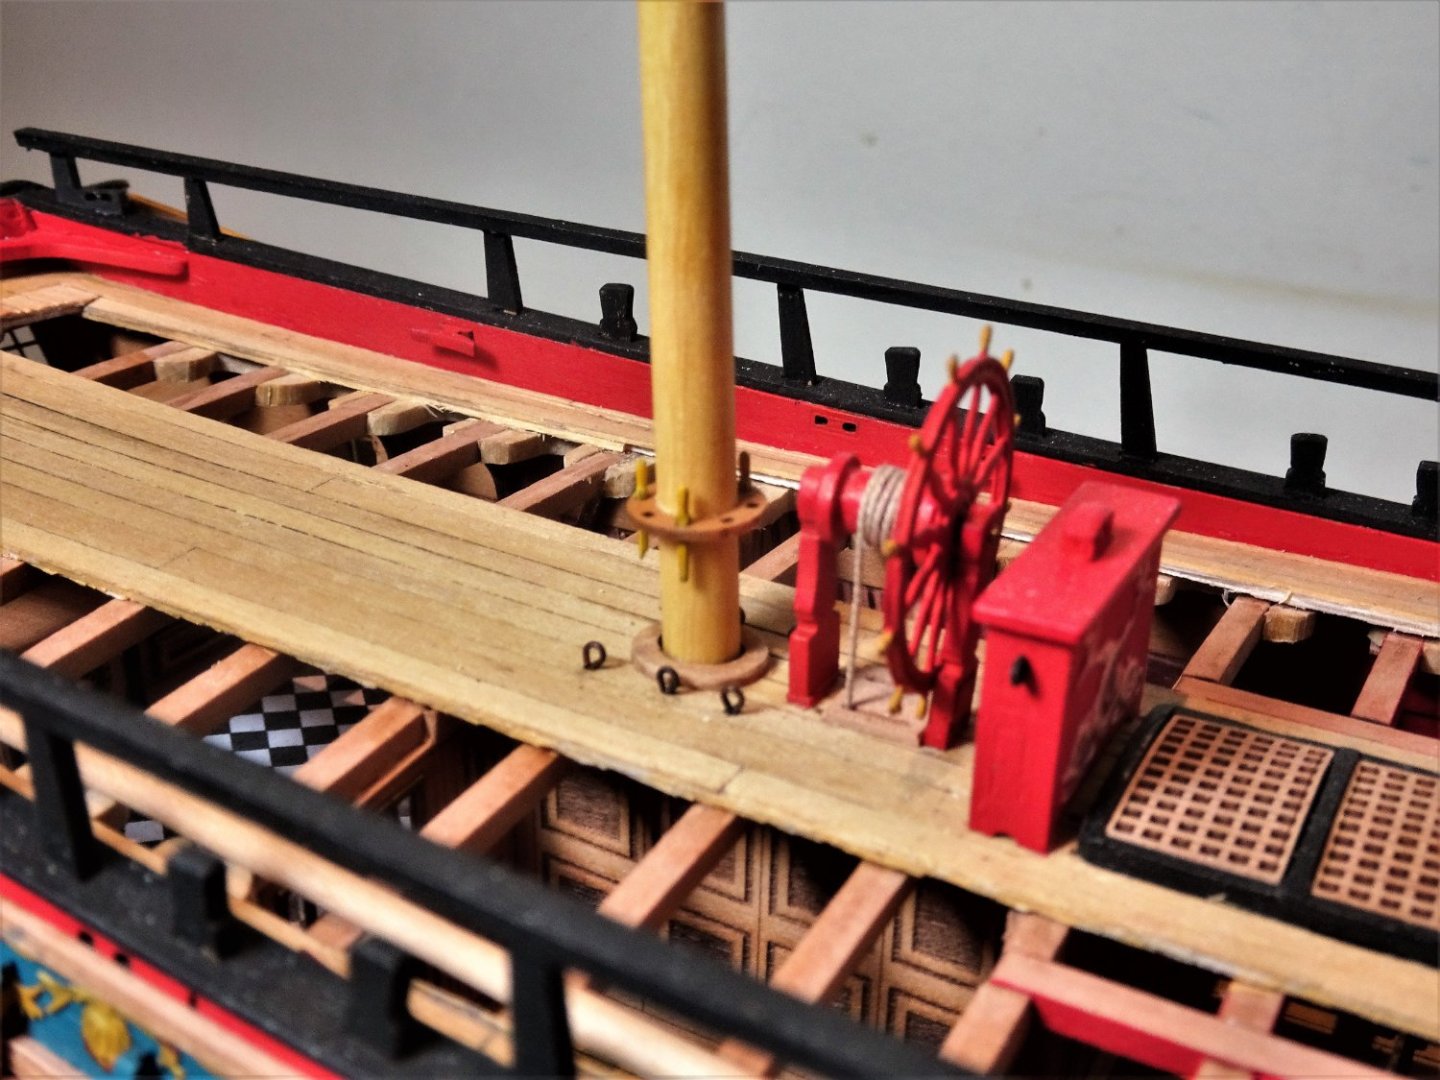
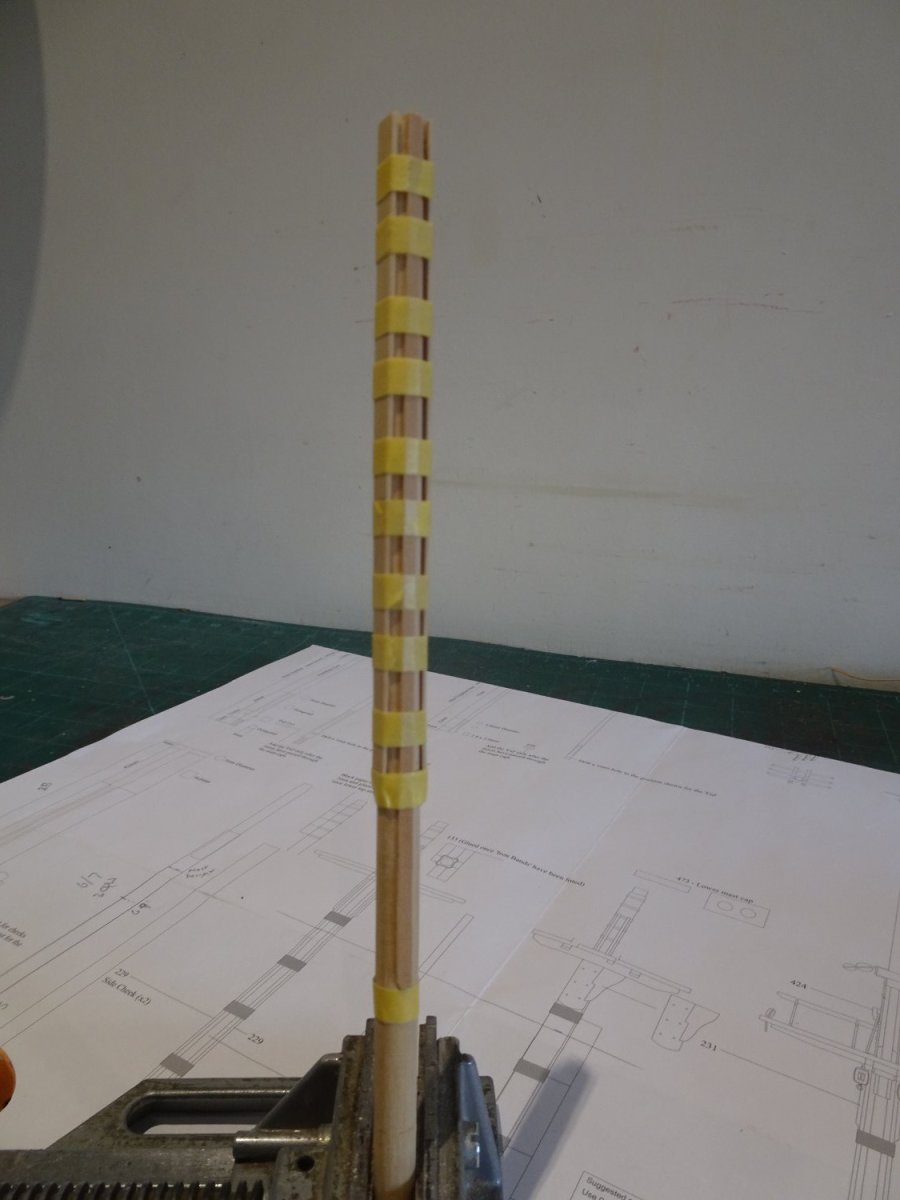
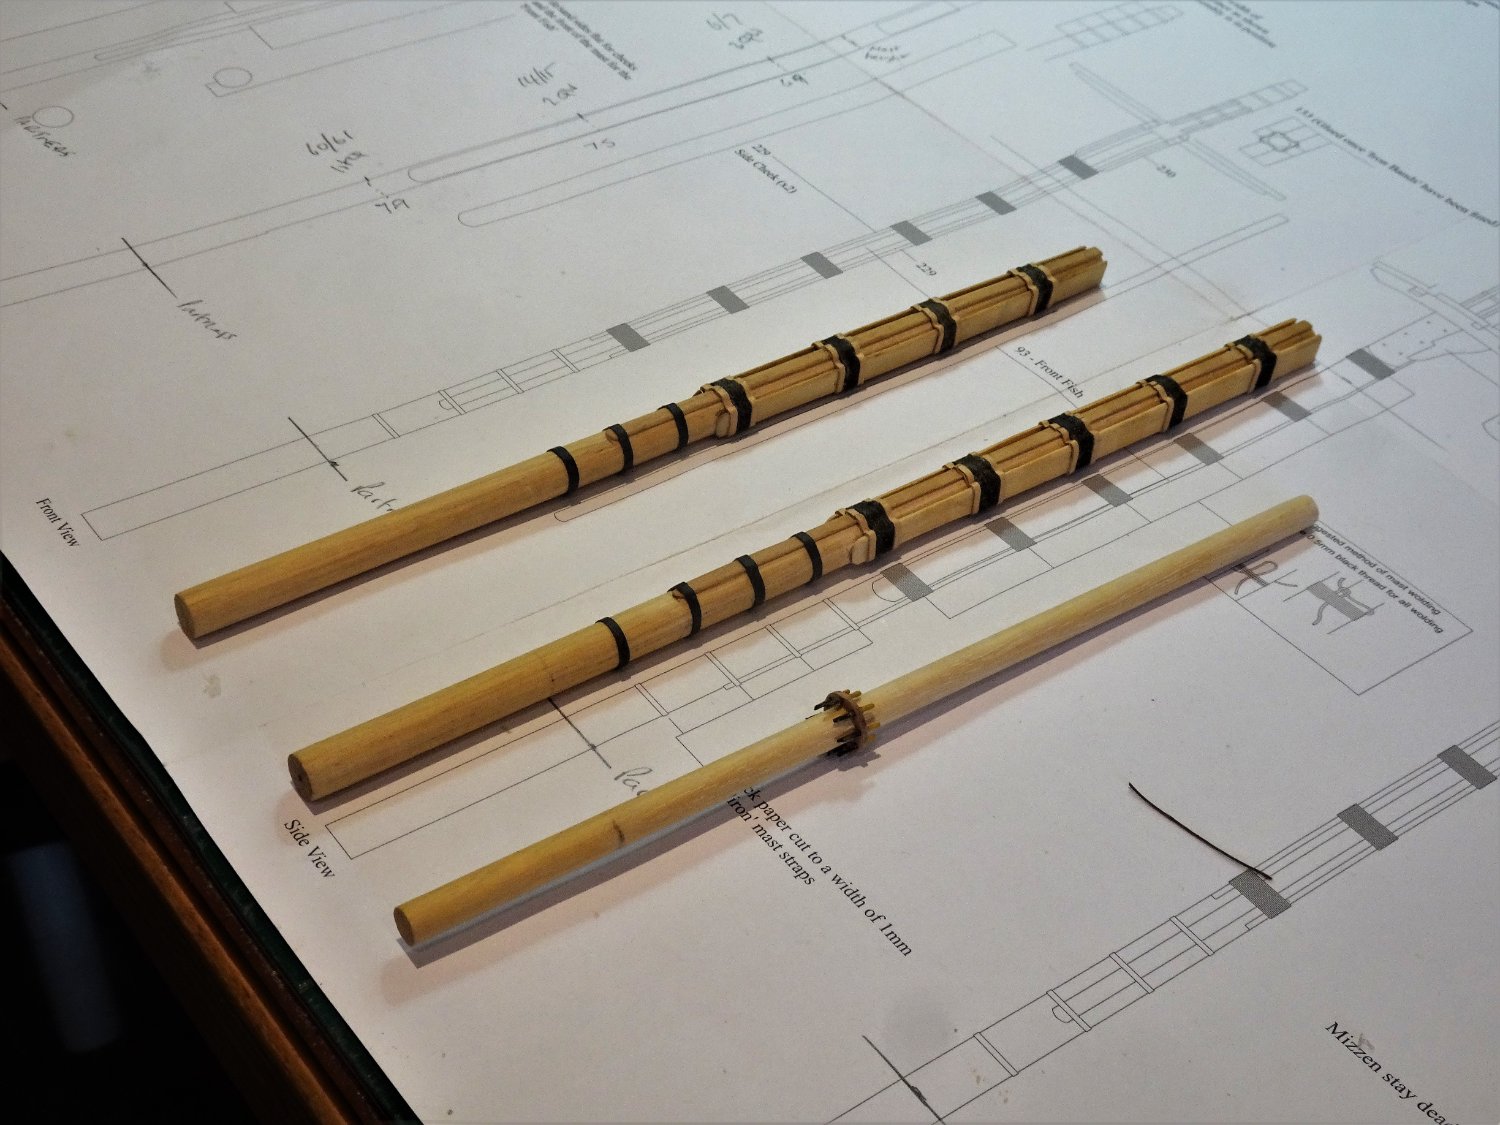
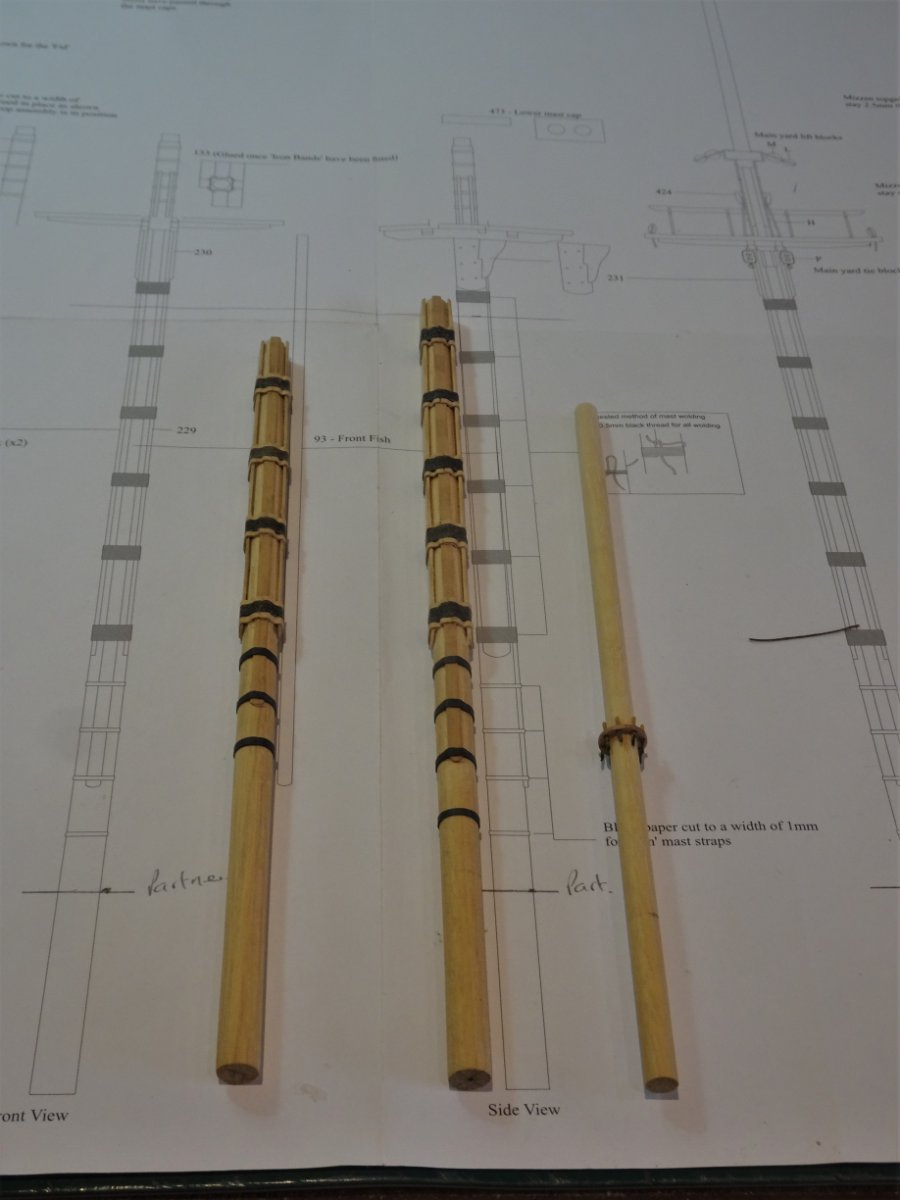
Post One Hundred and Forty-three Dressing the masts – Wooldings and straps The limited mast height still allows for five wooldings, and four iron mast straps to be applied to the Main mast, and four wooldings and three straps on the Fore mast. For the wooldings 2½” circ line was used to a depth of 12”. This equates to 0.31mm ø line to a depth of 5mm. I am using Syren 0.3mm ø line for the purpose. 7575 The masts are taped up to define the woolding area. Not included on the kit plans are the wooden hoops top and bottom of the wooldings that secure them in place. 004 I used narrow strips of thin card taken from a Manilla folder to make the hoops. This was a method I successfully used on my Pegasus build way back in 2013, my previous involvement with wooldings. 7579 It is easy to apply, conforms to the required shape, and sticks easily using pva. It is also a near colour match to the masts. 7578 Slices of heat shrink tubing are used for the iron bands. Mizen Mast The kit includes a spider band which I added to provide a little interest to an otherwise plain stick. 7592 I’m not sure it is period appropriate, and I still may remove it. Were I rigging the ship my leaning would be towards cleats at this point in history. 7598(2) Trial fit of the masts. I quite like the look, I think I’ll keep them. Moving onto the Bowsprit. B.E. 24/07/2022


.thumb.JPG.972a6e102b7c43959f2b4d537fc0bb01.JPG)
- 857 replies
-
- 18
-
-
- Sphinx
- Vanguard Models
- (and 1 more)
-
The view in that first photo is absolutely stunning, looks like it belongs in the Rogers, or Kreigstein collections. Beautiful work Chuck. B.E.
- 1,784 replies
-
- 2
-
-
- winchelsea
- Syren Ship Model Company
- (and 1 more)
-
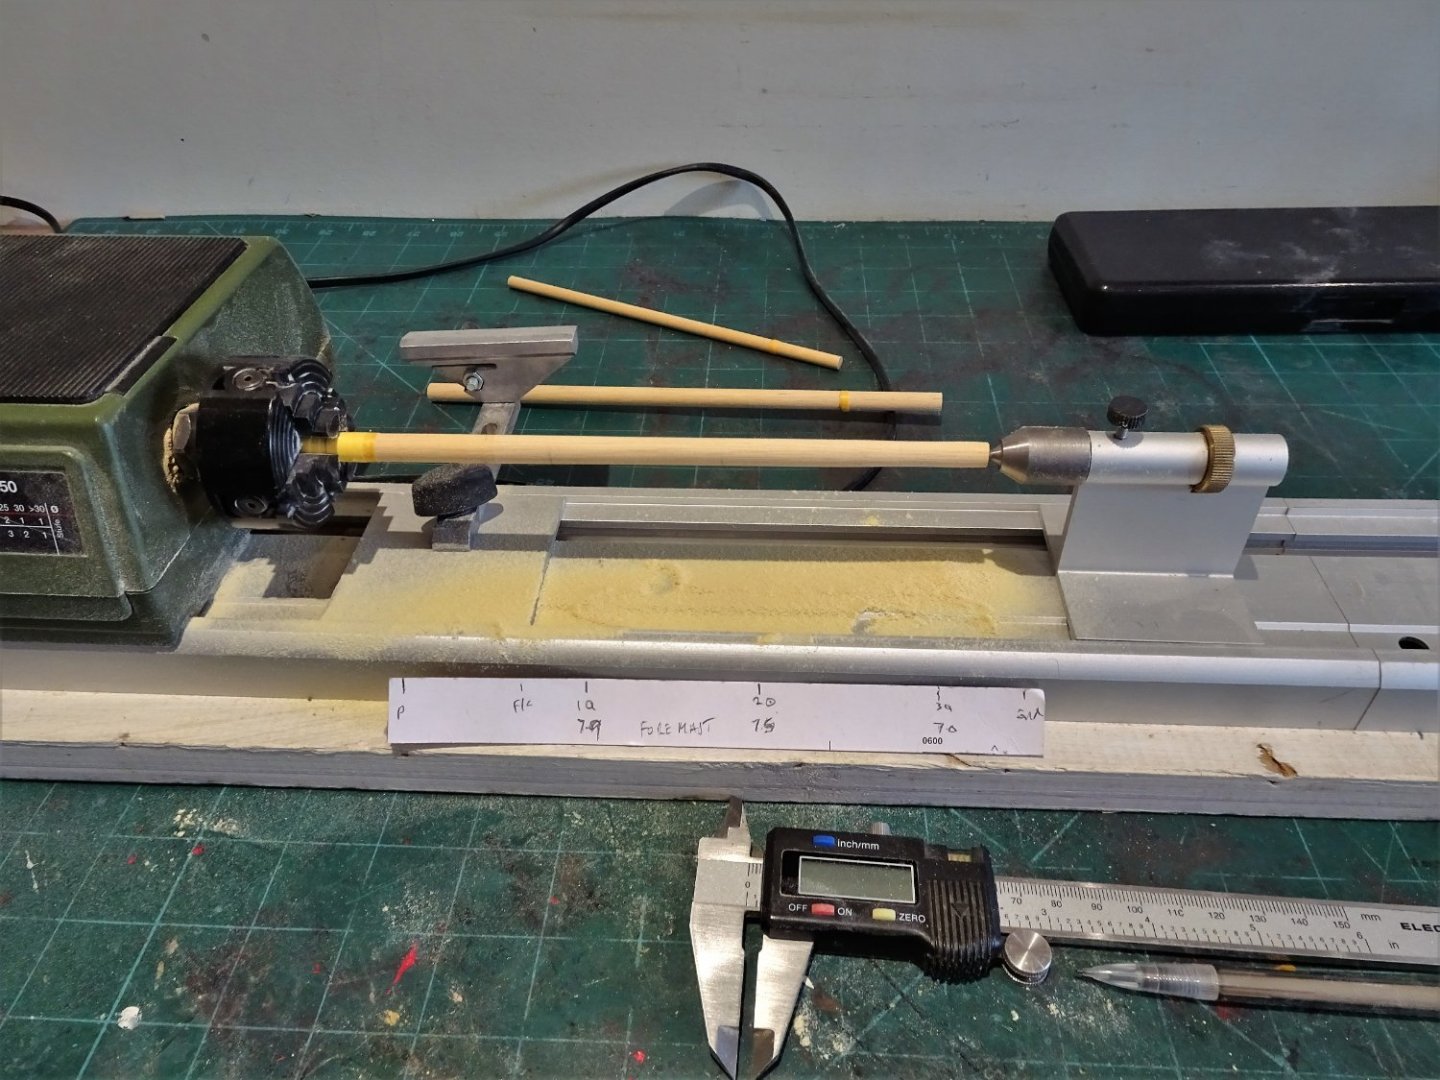
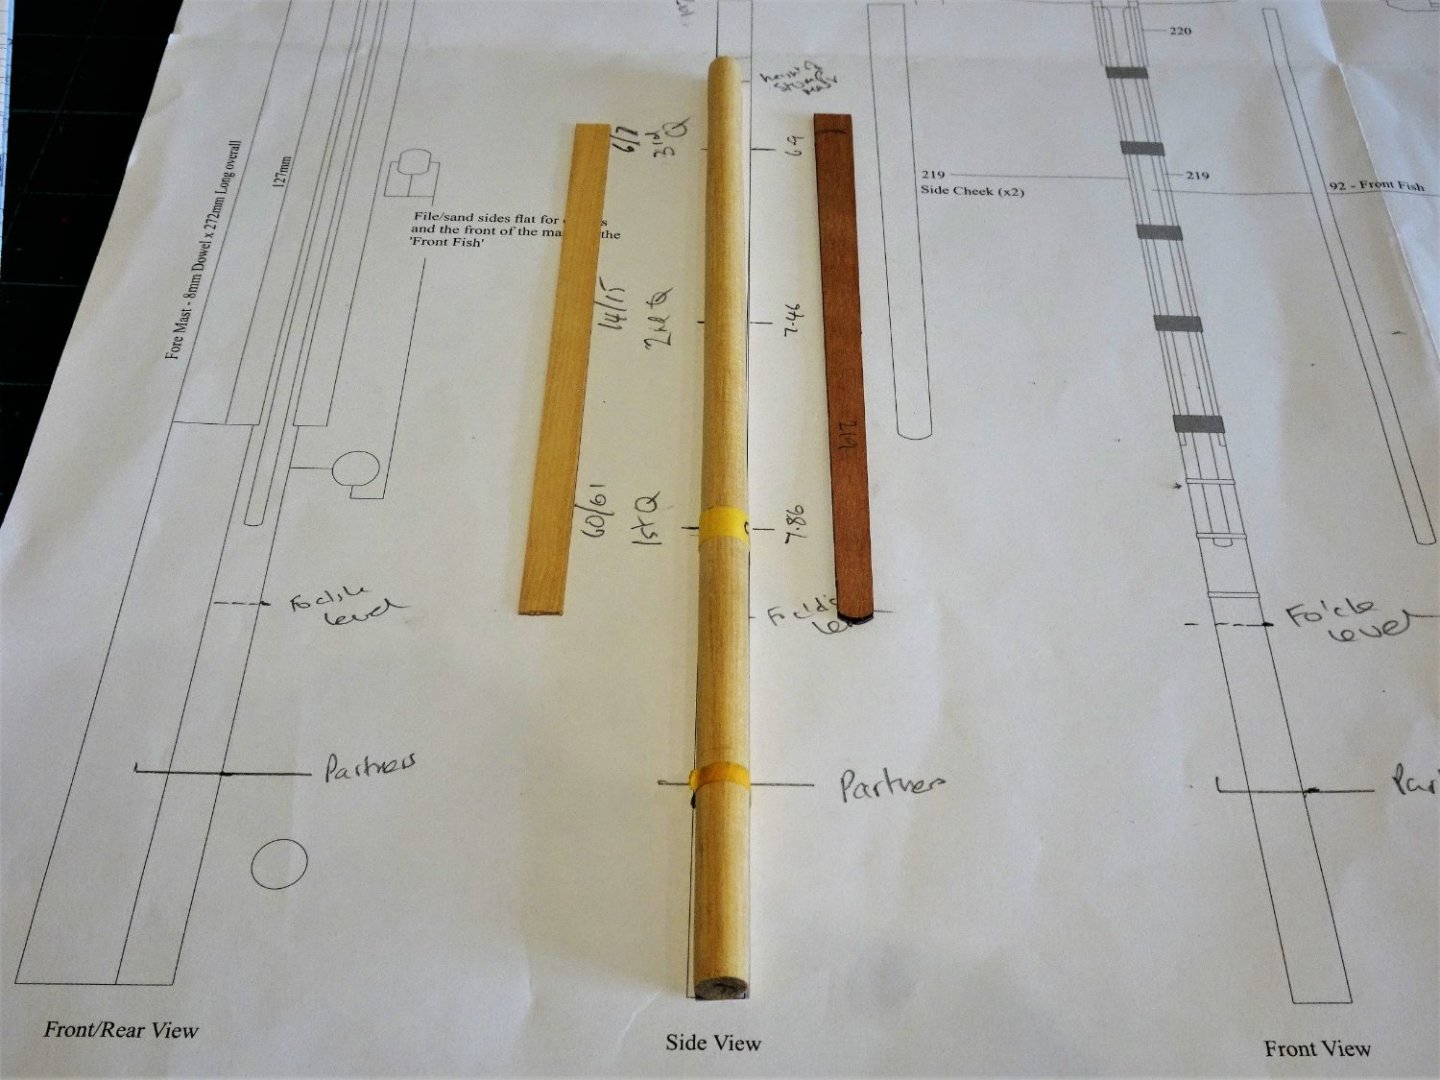
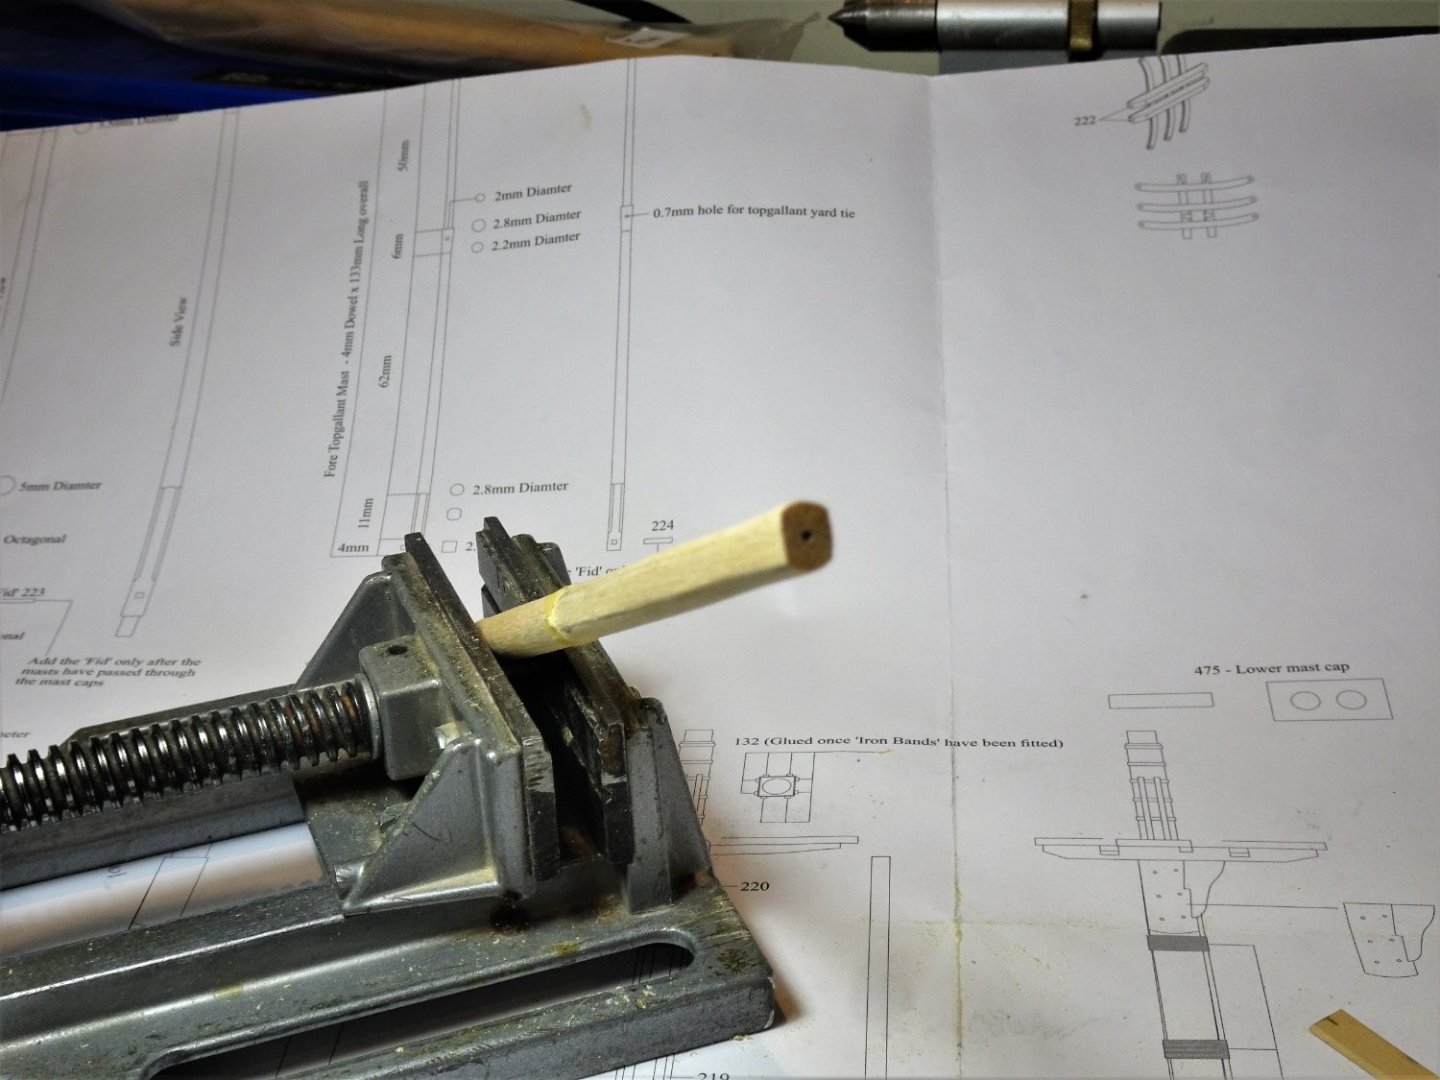
Post One Hundred and Forty-two Creating the Masts. With the masts cut to length the level at the partners is marked. For those who may not know the partners for the Foremast and Mizen are at the level of the Upper deck, not at Foc’sle and Qtr deck levels. This is only important if the mast is to be properly Quartered and tapered and the proportional fractions applied. Ie 1st Qtr 60/61, 2nd Qtr 14/15, 3rd Qtr 6/7. The mast is also properly tapered below the deck but that need not concern us with this model. Because my masts terminate just short of the hounds I have tapered close to the dimension at that point. (7mm) This also accords with the taper at the masthead base 7mm as shown on the plan. All the relevant points were marked on the kit plans, and transferred to the masts. 7562 The tapering was done on the lathe using only stiff sandpaper, with regular checking of the diameters at the quarters. 7565 I decided to replace the Pearwood kit cheeks with Boxwood versions that suited the Ramin mast spindles better. The bottom end of the Cheeks is marked on the mast spindle by reference to the plans. Creating the flats on the mast sides to take the cheeks is probably the trickiest element. 7570 I did this by marking the cheek outline on the spindle, and masking outside of this to form the area for flattening off. I used a combination of sanding board, scraping, and eye, to form the flat. 7566 7574 The Front Fish was also replaced with a Boxwood version. In the next post the mast will be completed with Wooldings and iron straps. B.E. 22/07/2022

- 857 replies
-
- 14
-
-
- Sphinx
- Vanguard Models
- (and 1 more)
-
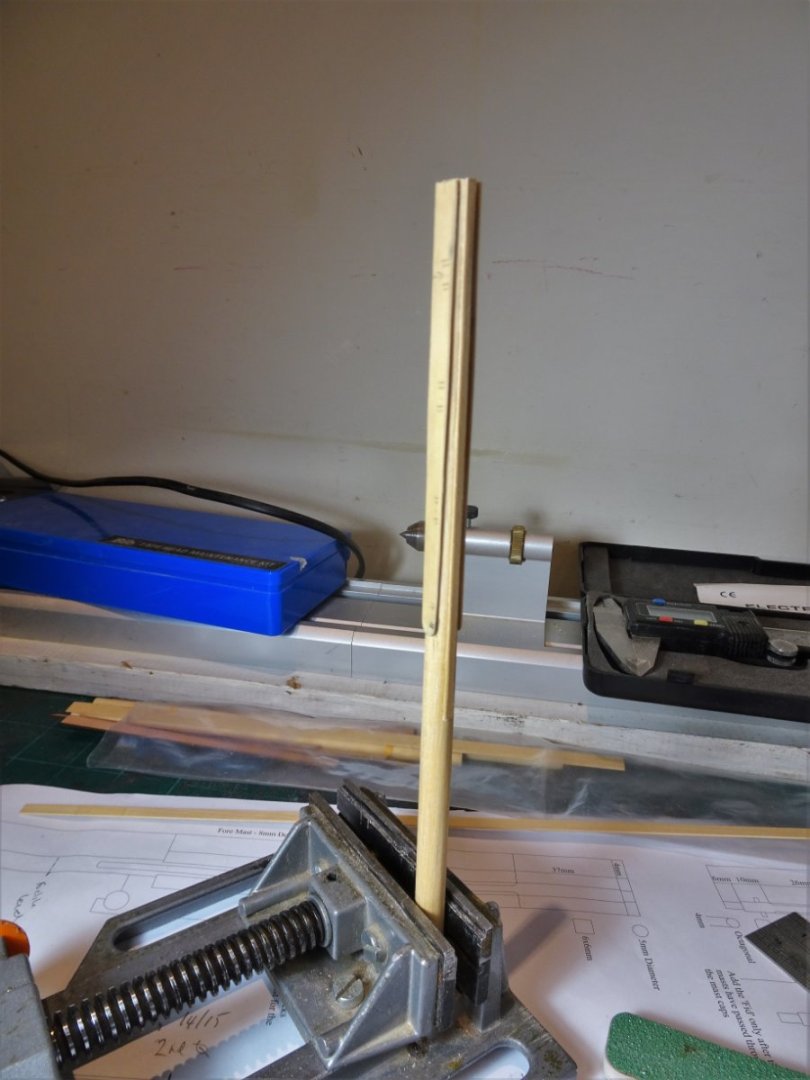
Thank you Rusty, Thomas, and Chuck, the appreciation of builders whose work I admire is much appreciated. Post One Hundred and Forty-one. To mast or not to mast The majority of Navy board style models don’t include masts, altho’ some do have short stump representations. My inclination is to install the lower masts and Bowsprit of lengths that will fit within the case. The case was pre-made for another project that my case maker had in stock but one that suited the Sphinx hull dimensions. The Bowsprit will be left in place complete with gammoning, but the masts will not be glued so there will always be the with/without option. These more than ‘stump’ masts will be dressed with the fittings that would appear on the given lengths. Details such as wooldings, mast bands, cheeks and Front fish, and Gammoning on the Bowsprit will be included. Wood Choice I generally prefer not to use Walnut dowel for lower masts, it may be smooth and straight, but the only way to get that pale colour of the lower masts of British warships of the 18th century is to paint it, and I prefer not to paint masts. I reserve walnut dowel for stuff like yards, altho’ even there I prefer Boxwood Square stock for the octagonally centred lower yards, and Topmasts. I avoid Lime wood dowel like the plague, longer lengths are sure to warp, and it’s hard to get a decent finish using wood stain/and or varnish. My wood of choice for lower masts is Ramin, a nice pale colour and straight. 7459(2) 8mm and 6mm diameter Ramin dowel. 7461(2) Ramin can be quite difficult to source, I get mine from Mantua Models UK based in Windsor. There is a minimum order of 3x 1000mm lengths of whichever diameter is chosen. 7558(2) 7561(2) 7555(2) Having established the optimum lengths I can now work on the relevant attachments. 7551(2) 7552(2) A few minor considerations still to be thought about such as whether to fit Hammock Cranes, but for all practical purposes the hull is now complete as regards Navy Board style display. B.E. 18/07/2022
.thumb.JPG.a33e8cfdff5314102425559a26d62fee.JPG)
.thumb.JPG.7ed51d3ee8215691c9e7dc32dc54a448.JPG)
.thumb.JPG.afa8a0df79478d1535c34c8a2eb49571.JPG)
.thumb.JPG.d06e6781f6fba42b87f37666062765b0.JPG)
.thumb.JPG.c898055ea93cc2b62a398e7b0bb1d676.JPG)
.thumb.JPG.b1db53cc4fe14ea93fa86bc0a1a18955.JPG)
.thumb.JPG.cbdeb0ff311bab7e438f04e9577a0ba4.JPG)
- 857 replies
-
- 23
-
-
- Sphinx
- Vanguard Models
- (and 1 more)
-
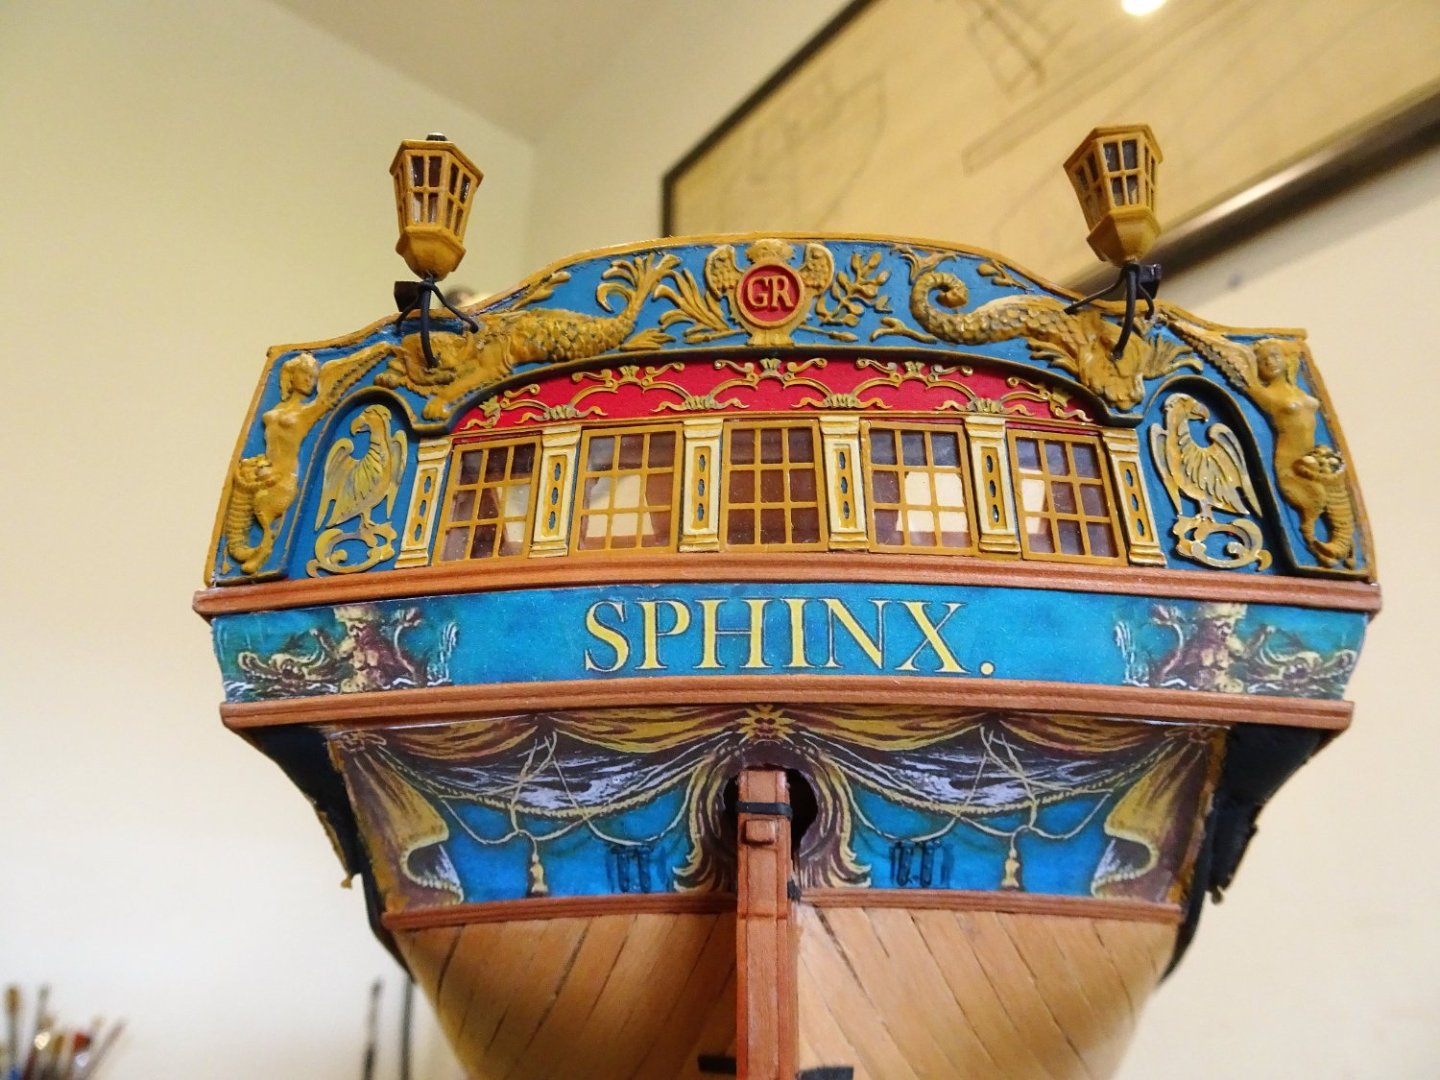
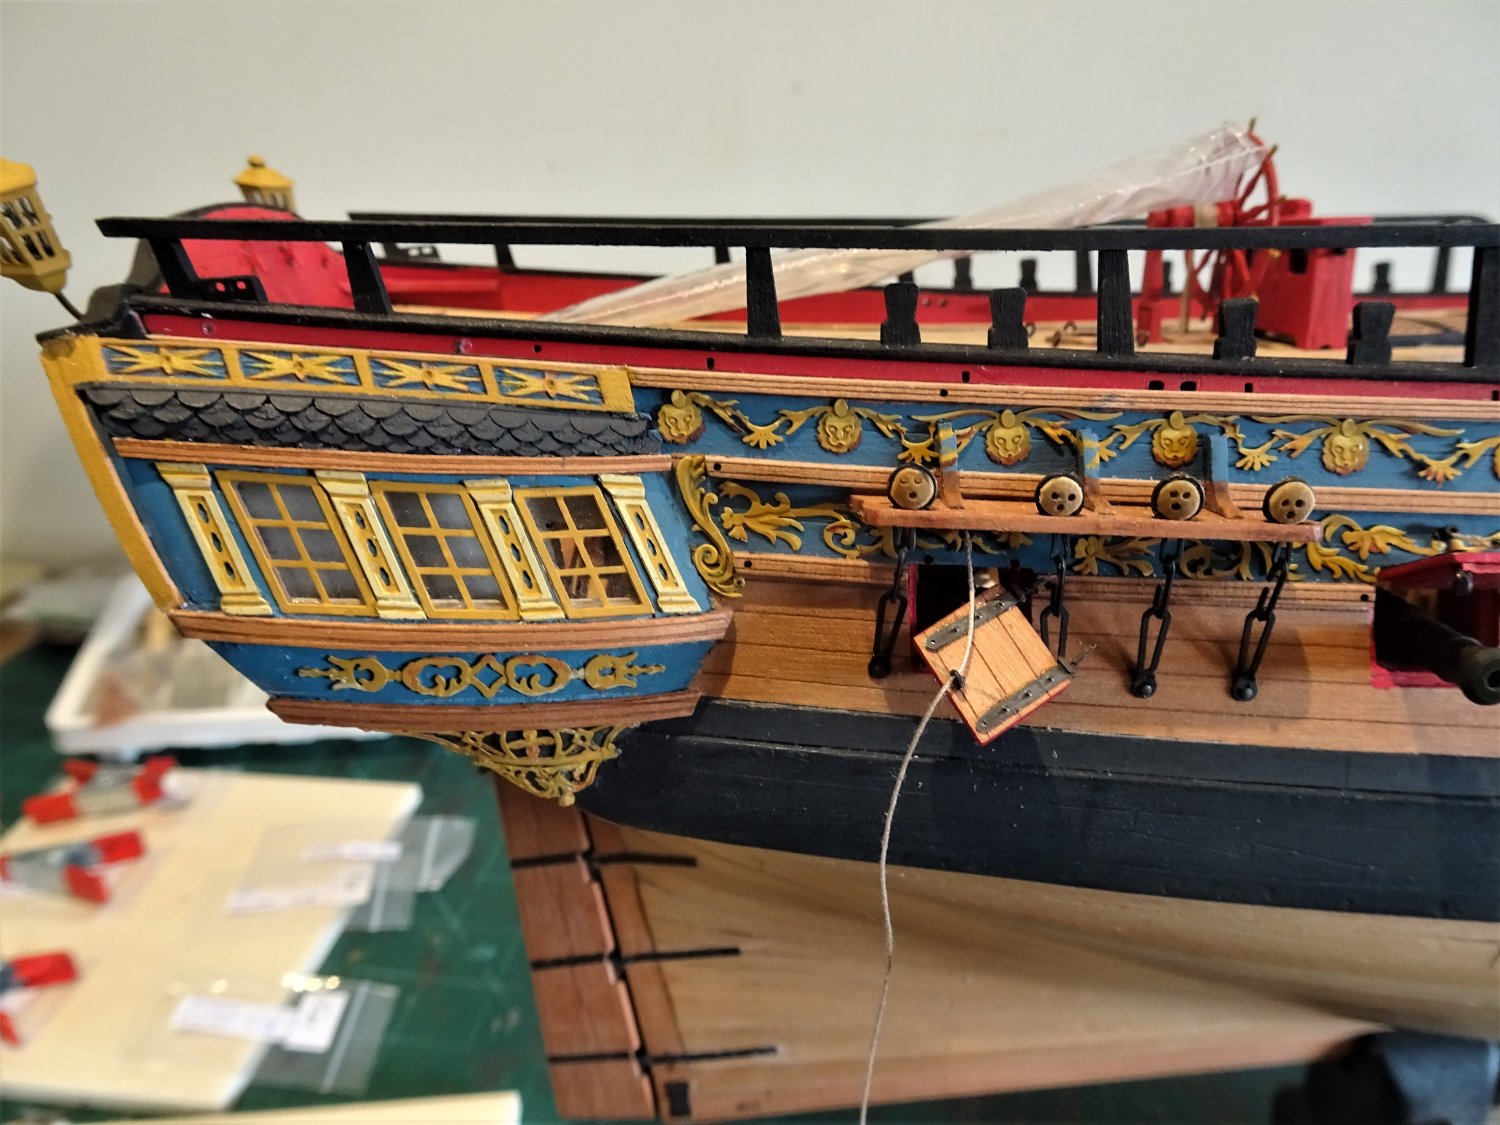
Post One Hundred and Forty. Bridle Ports At this stage of the build there are lots of little tasks to attend to, bridle Port lids and lantern brackets being two of them. 7537(2) The lids were modified to display them open as per the Marshall painting. 7535 The Bridle ports are now complete, these lids are top hinged rather than side hinged as often shown. Lantern brackets 7529(2) Apart from the central main support bracket there should be two side brackets running from below the lantern case to the stern facia. 7549(2) It is a matter of trial and error fitting these using brass wire of 0.5mm ø . They did prove awkward little beggars to fit. 7530 I didn’t really like messing with the stern at this late stage, particularly drilling holes into the relief mouldings, and the repeat handling of lanterns and facia did require some post fit restoration. I’ll now give some thought to masts. B.E. 17/07/2022
.thumb.JPG.07276252033e448bc8e102e918f6d2d1.JPG)
.thumb.JPG.480cb4a744c03beea4dc7e22db0358c2.JPG)
.thumb.JPG.f8e9ae89dee7681ea41b2ed48558602e.JPG)
- 857 replies
-
- 24
-
-
-
- Sphinx
- Vanguard Models
- (and 1 more)
-
Looking very smart, nicely done.👍 Your boy is a lucky lad. Cheers, B.E.
-
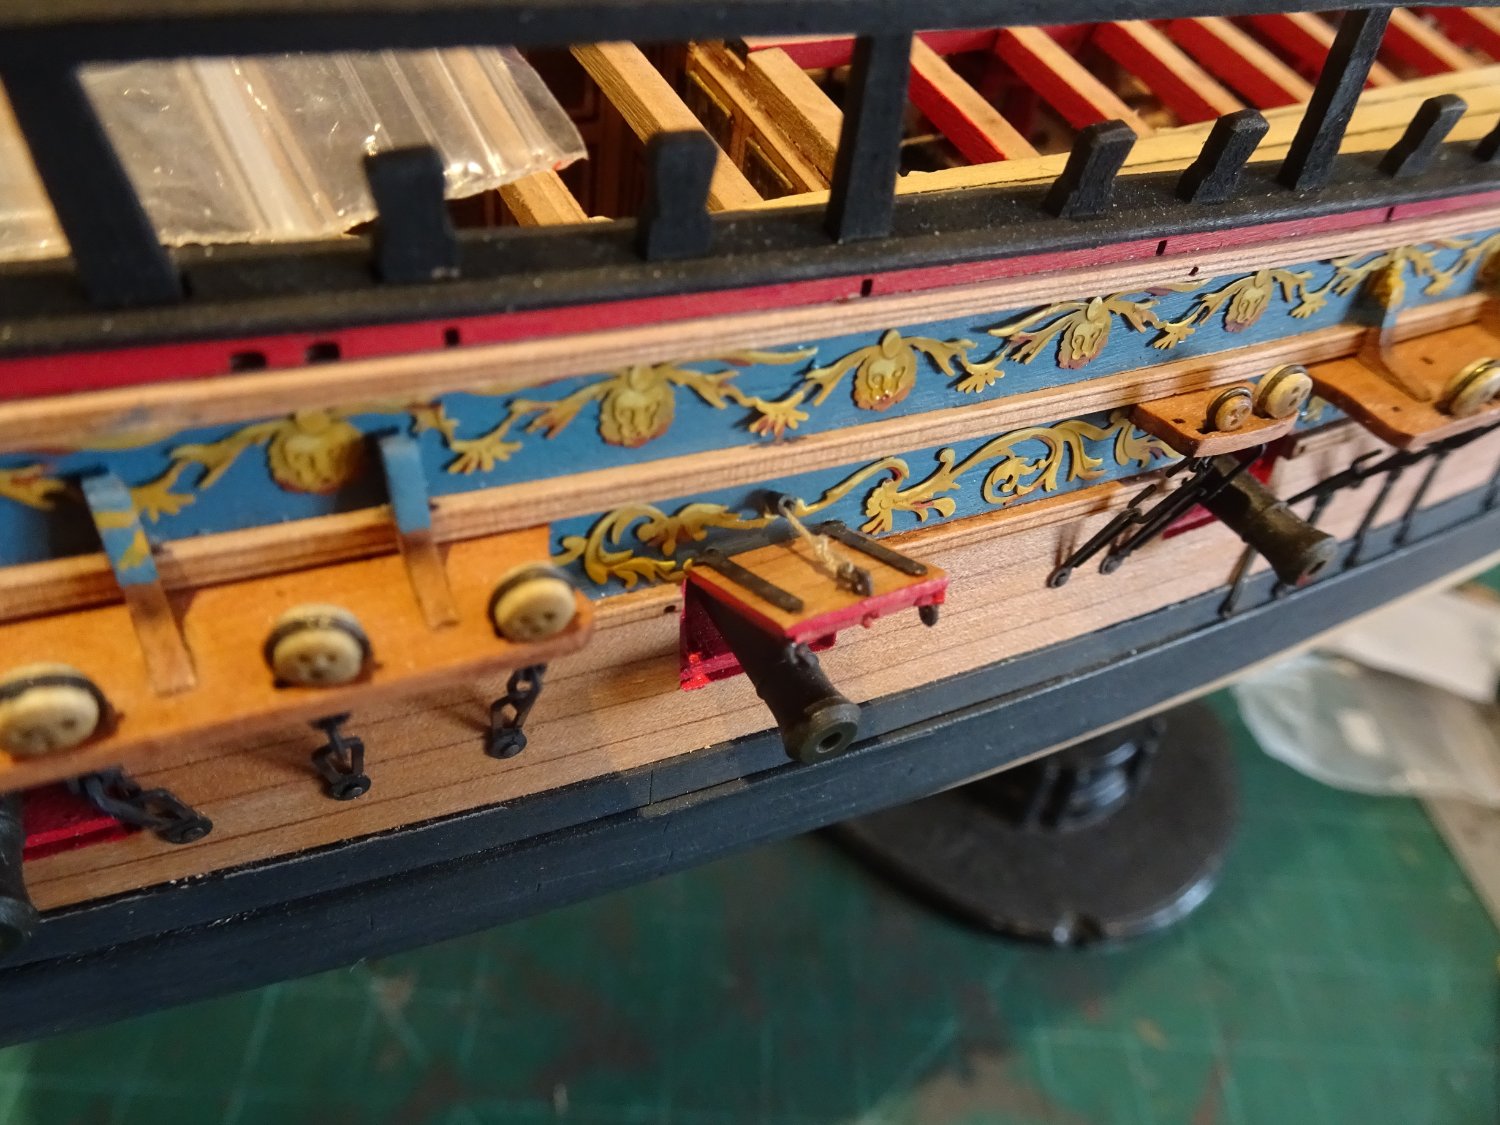
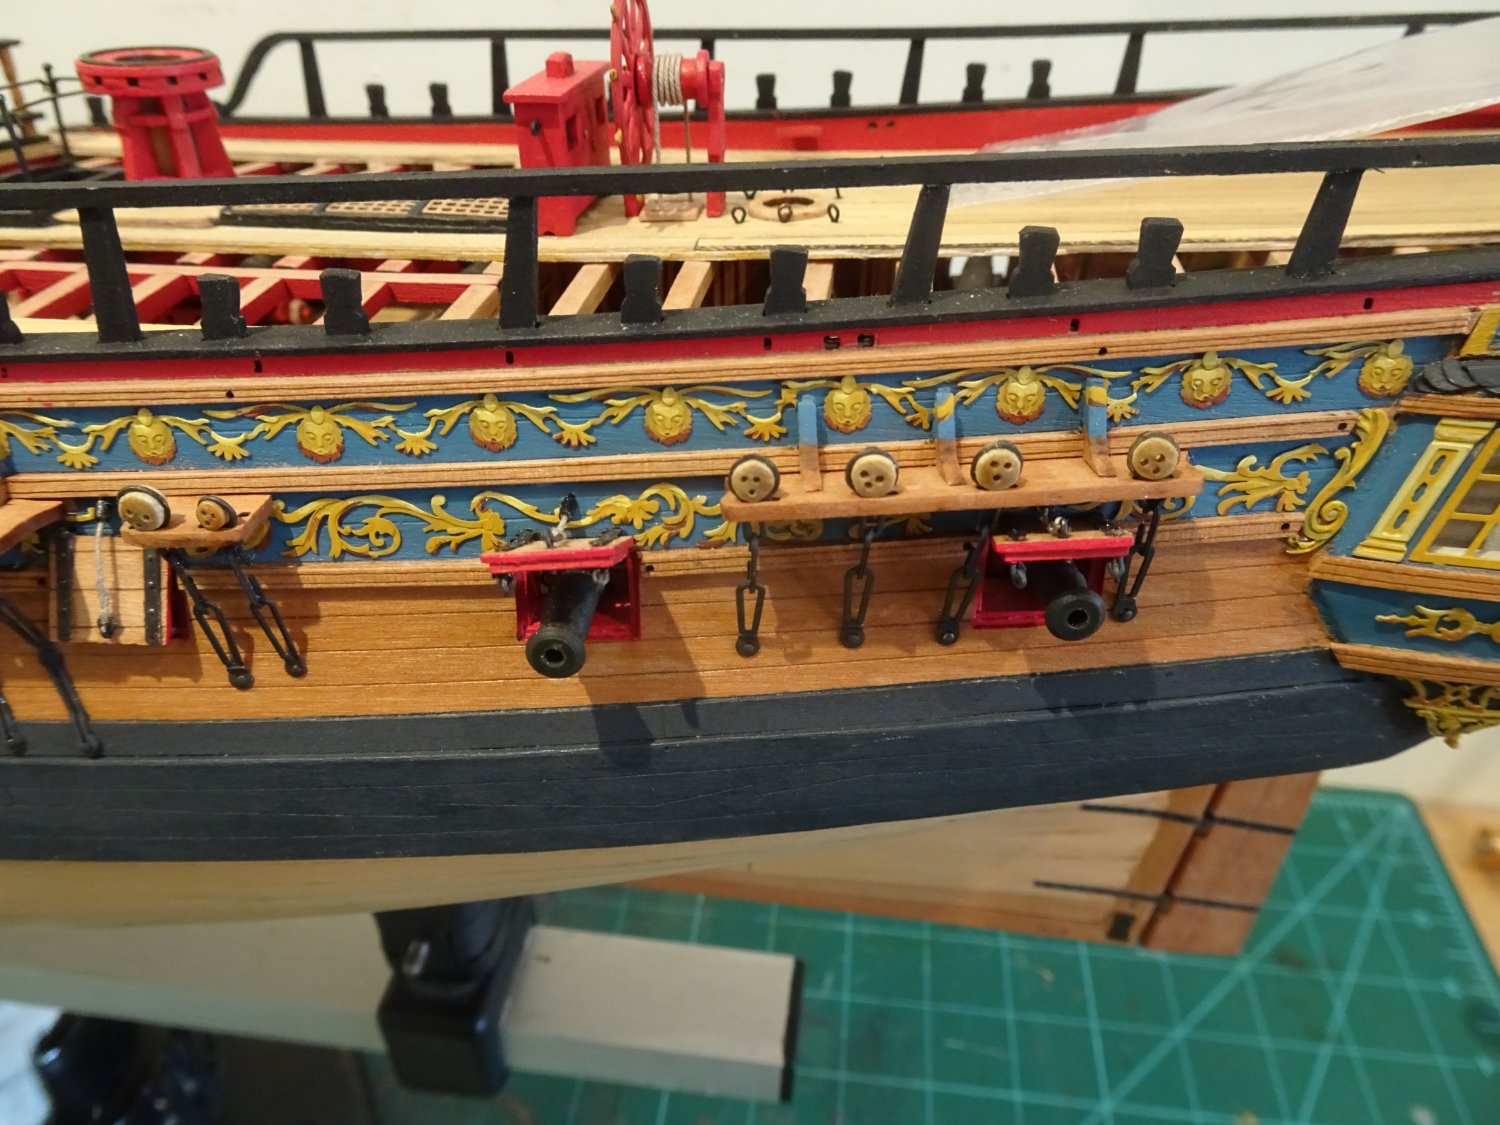
Post One Hundred and Thirty nine Port lids Thankfully only three per side to prep plus the Bridle port lids. The Bridle port was originally moulded shut into the topsides pattern, but I opened it up early in the build, so the cut-away piece will require some fettlin’ Care needs to be taken in fitting the three lids to the correct port. They are handed Port and Starboard, and the best way is to check that the scribed lines match up with the adjoining planks. In retrospect I think it would have been better to fit the lids, if only temporarily, before the guns were put into place. I assembled the two parts of the lids before painting. 7473 The provided eyelets to represent the port lid ring bolts are 1.9mm outside ø but are rather too broad with a flat profile which is inevitable with photo etch. These are tiny fittings but I find them unconvincing, looking like what they are, bent over eyelets. The rings properly scale to 0.4mm ø wire, 0.7mm in the clear, pretty tiny stuff to scratch make. My compromise is to drill out the provided rings using a 1mm drill and dispense with the stems. 7477(2) The rings are secured to a fine bolt which allows the internal lid rings to hang naturally. The kit provided port lid hinges are finely made, these are chemically blackened before use. I used carefully applied ca to fix the hinges. The port lanyards are of 2” circ line (0.25mm ø line). Seizing the lanyard to the lid ring bolt is tricky at this scale without making it look oversize. 7487 7490 I use the ‘false’ splice method feeding the line thro’ and back the line before sealing with a spot of diluted pva and trimming. 7496 The forward port lid only opens to the horizontal level as it falls between the aft end of the Main Channel and stool. 7494 Rigging the aft port lid; the lanyard is threaded thro’ the ring before fixing. The lid is simply pushed into place in the pre- cut holes. 7509 7502 On the port side I left the forward port lid loosely closed. The lanyard tubes can also be seen, a fitting the detail devil in me couldn’t resist adding. Telephone wire sleeving is used to represent the leather port tubes. 7515(2) 7512 Just the Bridle Ports to sort now. B.E. 13/07/2022
.thumb.JPG.6a6d8f559a3255f6dedbc12f94e7668c.JPG)


.thumb.JPG.0fd0bfacd0206928edb75370f102fb31.JPG)
- 857 replies
-
- 22
-
-
- Sphinx
- Vanguard Models
- (and 1 more)
-
Your planking is a thing of beauty Glenn, wonderful work. B.E.
- 840 replies
-
- 6
-
-
- winchelsea
- Syren Ship Model Company
- (and 1 more)
-
Sorry Ron, I thought the yards were only temporarily in place and that you could just turn it around. As you say with the Topsail set it won't really be noticeable. B.E.
- 542 replies
-
- 2
-
-
- Sphinx
- Vanguard Models
- (and 3 more)
-
Very nice work on those yards Ron, I fully concur with your approach to the footrope stirrups I'm not a fan of the etched versions. Once in position I hang small weights from the footropes to tension the stirrups and apply diluted pva or similar to deter curl. Re the Main Topsail yard, the stirrups should hang down the back of the yard when you finally fix, but of course you know that. B.E.
- 542 replies
-
- 3
-
-
- Sphinx
- Vanguard Models
- (and 3 more)
-
Building that stern is an exacting business Yves, and you’re doing a fine job. She looks splendid with the ‘painted’ stern, well done👍 B.E.
-
I always love the look of your models Nils, and Elbe is no exception. Beautifully drawn sails, and a great idea for the printing. B.E.
- 180 replies
-
- 2
-
-
- pilot boat
- Elbe 5
- (and 3 more)
-
I'm seeing it Ron, a very fine stern indeed. The open sash windows option is a nice touch, I did the same on my Victory build back in 2006, having seen them open during a visit to the Dockyard. The 'Indy' is going to make a great model, Chris does keep raising the bar. B.E.
- 488 replies
-
- 8
-
-
- Indefatigable
- Vanguard Models
- (and 1 more)
-
Thank you, Ron, Glenn, and Mark, for your support, I am happy to follow your sound advice. Regards, B.E.
- 857 replies
-
- 2
-
-
- Sphinx
- Vanguard Models
- (and 1 more)
-
Cheers Guys, you have confirmed what I really knew. 👍 it sometimes helps when others put it in black and white. I will leave the skid beams insitu for the present and display the boats on their cradles as a separate display within the case, when the time comes. Regards, B.E.
- 857 replies
-
- 7
-
-
- Sphinx
- Vanguard Models
- (and 1 more)
-
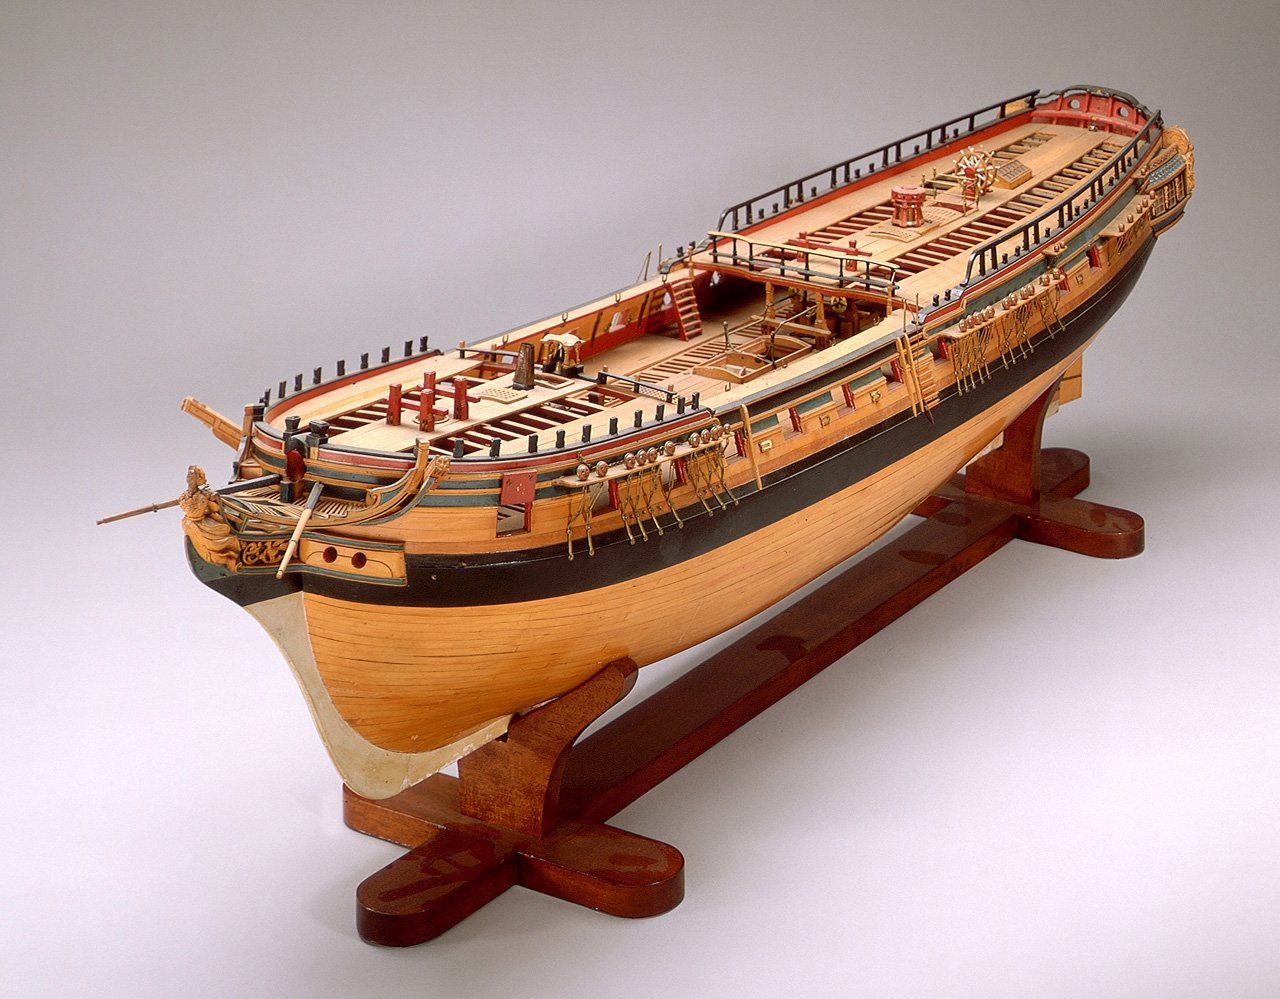
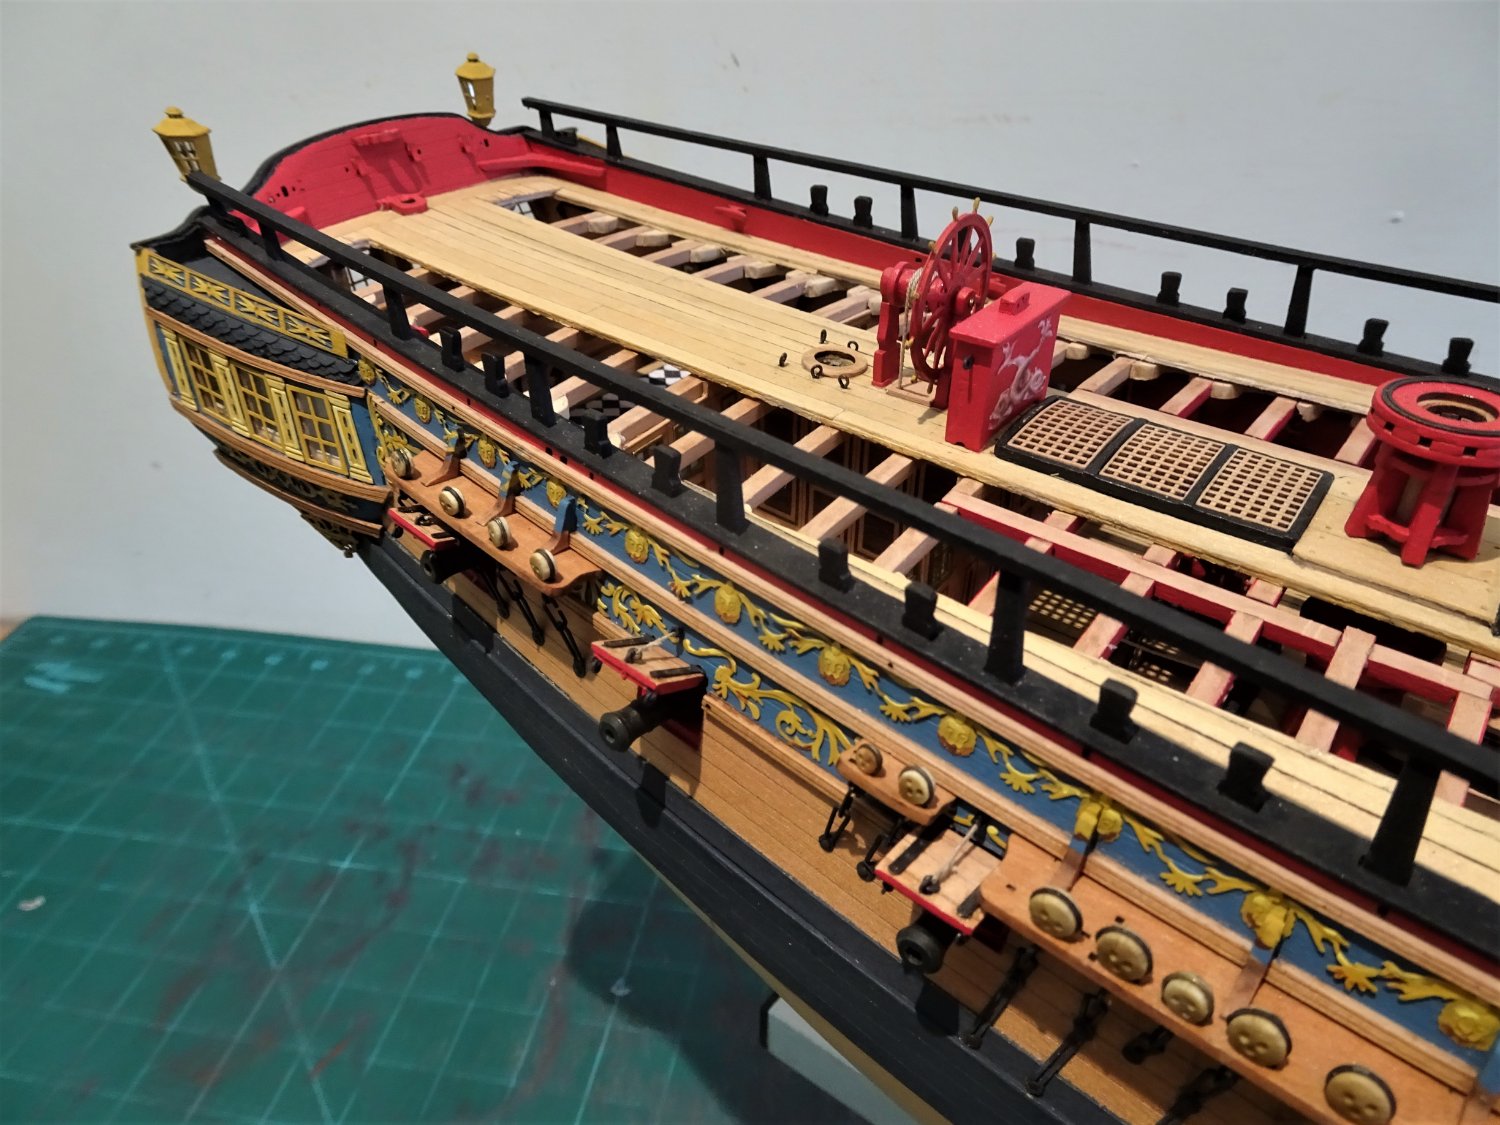
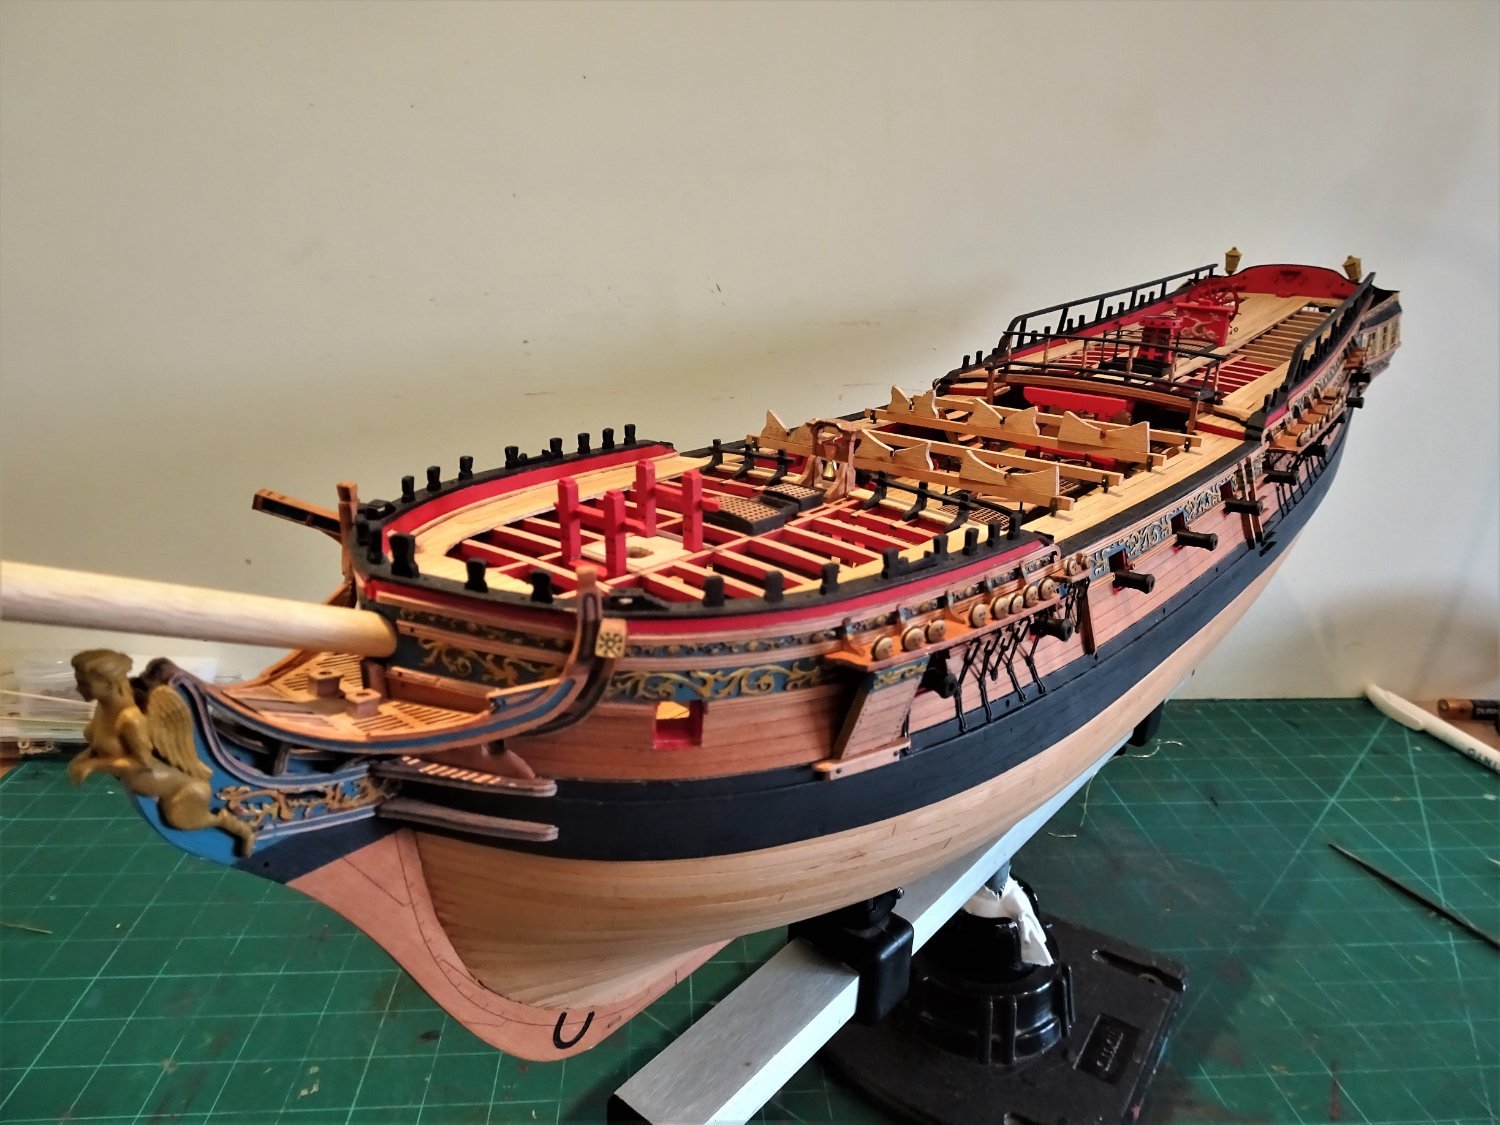
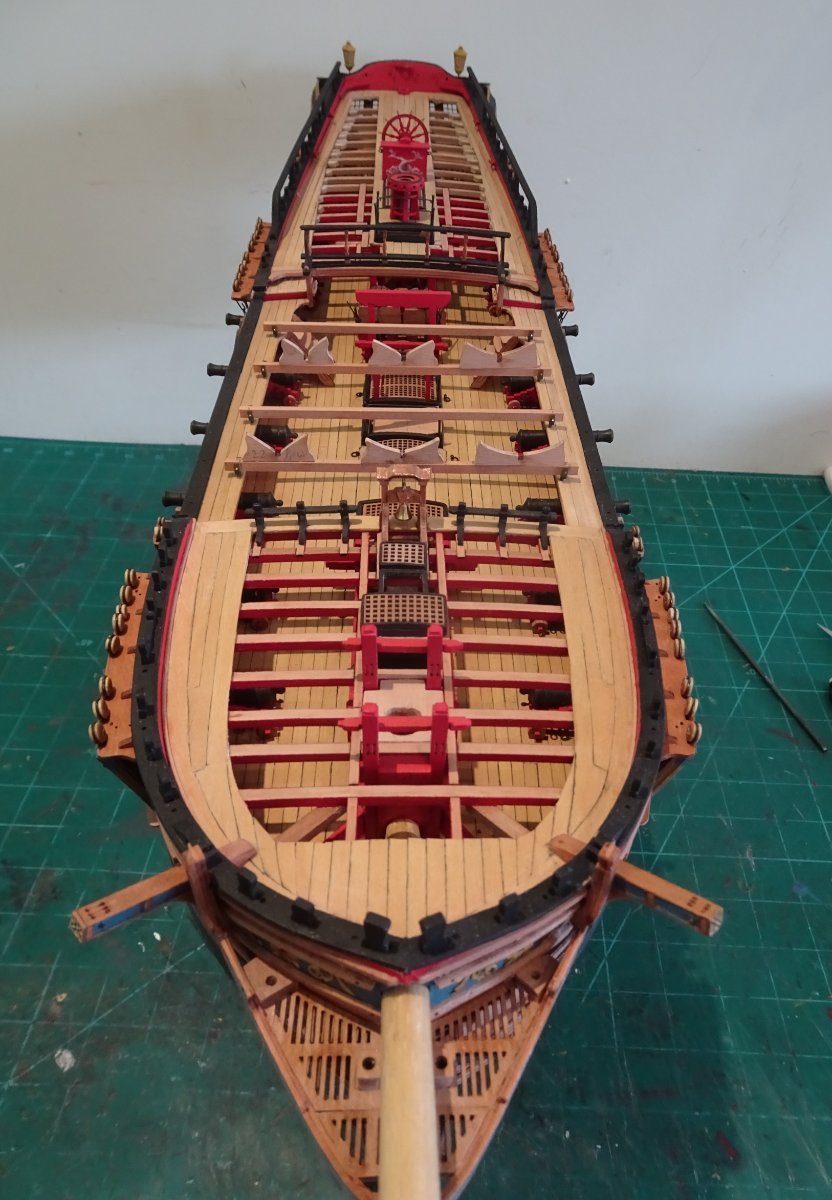
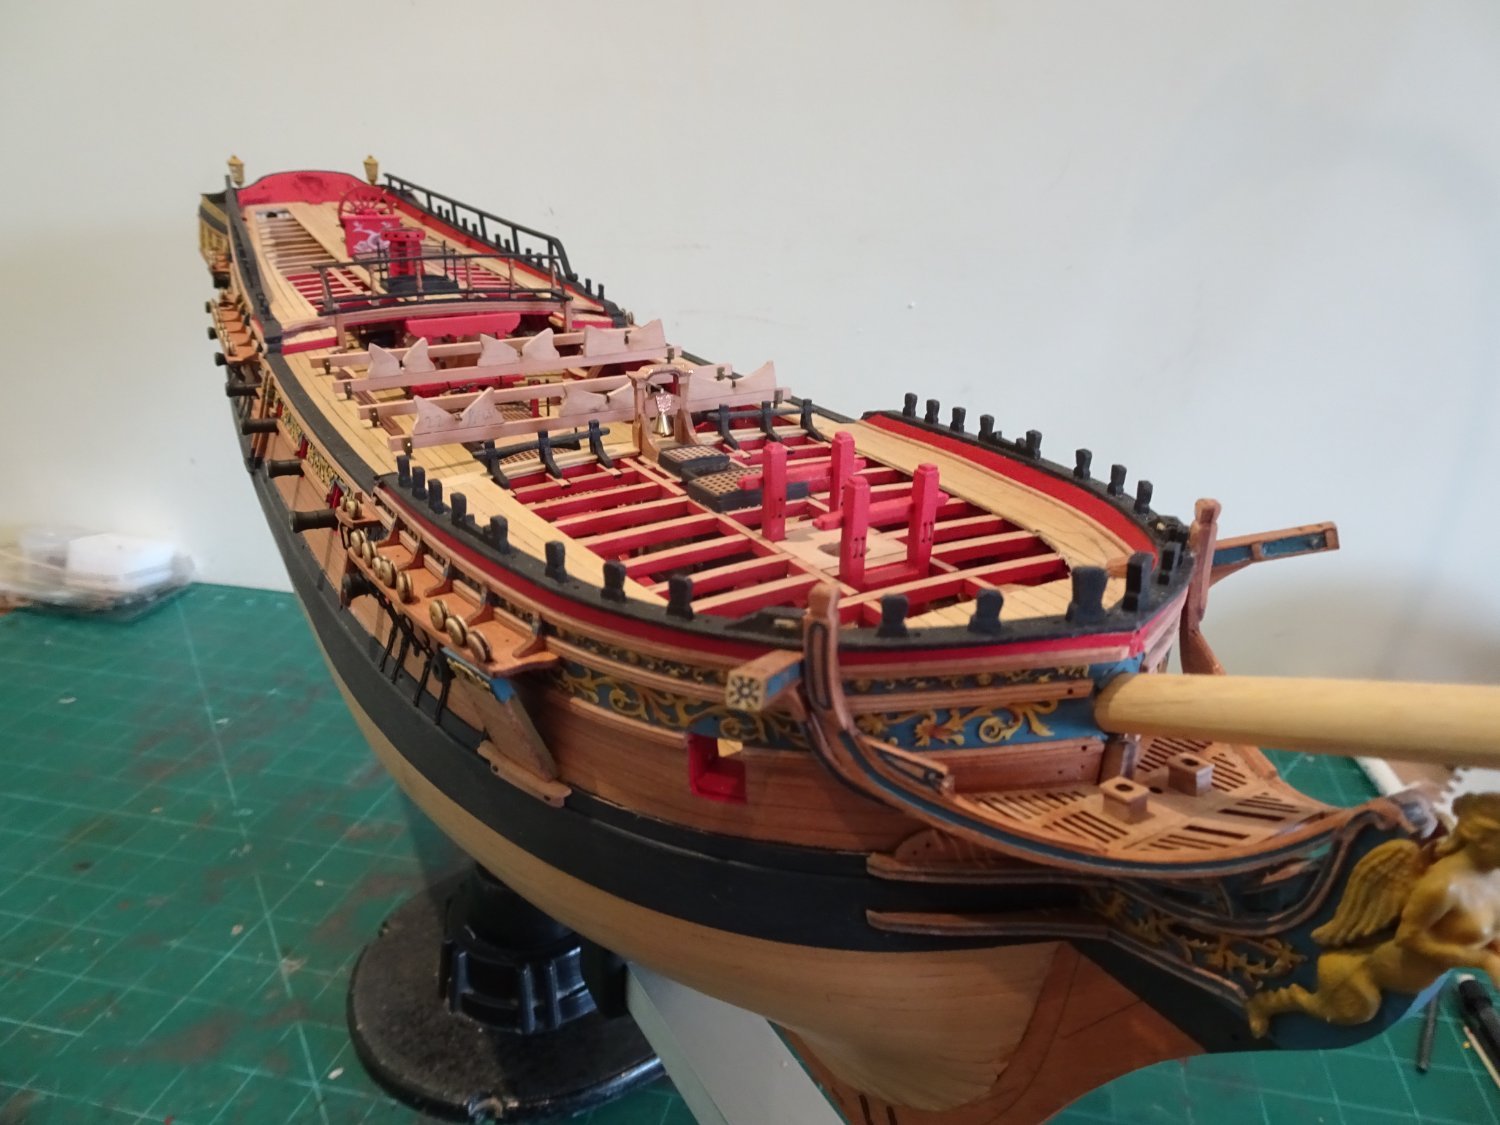
Post One Hundred and Thirty Eight The Skid beams At this point in history these beams were temporary, held in position by brackets along the Gangway between Qtr deck and Fo’csle. On the Marshall painting they are not shown, and I have doubts about fitting them. I can see that the number of four beams in the kit has probably been taken from the Pandora AotS book. Minerva 1780 Four is the number indicated on several contemporary models, but these tend to be larger Frigates, the Minerva (38) of 1780 being one example. On this beautiful model, as with several others, only the crutches are shown, and I’m of two minds whether adding the skid beams will enhance or detract from the overall look of this style of model. I certainly don’t want to obscure the Upper deck details. 7438 The beams have been replaced by some pristine 2.5mm x 3.00mm Pearwood stock (Hobbymill EU) 7434(2) As I’m not big on permanent fixing, if an alternative is available, I drilled and pinned the skid beams to the brackets. If you look closely the bracket parts do have bolt holes in the side. 7435(2) I also considered whether to fit any or perhaps only one of the boats on the model, or have them set as separate displays within the main model case. If I am to display a boat on the skids it will be the Pinnace as the most elegant of the three. The artist in me is drawn to the clean uncluttered look of the Navy board style model, the detail demon in me says if its there and applicable – fit it. 7442 7443 7444 7446 I’m not convinced that I like the look of the bare cradles on the beams. Were I building a fully rigged version I would not have these concerns but Navy Board style models are of a different order, and often less is more in relation to this type. I will ponder the matter further while I attend to the Port lids. B.E. 06/07/2022
.thumb.JPG.c686b9158e6969db42304370758f198b.JPG)
.thumb.JPG.7d0e188be7b9033ef34cf4b295b50681.JPG)


- 857 replies
-
- 22
-
-
- Sphinx
- Vanguard Models
- (and 1 more)
-
Thank you Yves, not sure about pushing perfection, but your kind words are very much appreciated. B.E.
- 857 replies
-
- 3
-
-
- Sphinx
- Vanguard Models
- (and 1 more)
-
They are very nice Nils, but all down to Chris who is providing an excellent service to ship modellers. It is also good that he is supplying them at different scales. This 3d printing malarkey is having a major impact on the quality of fittings available for which I am truly thankful. B.E.
- 857 replies
-
- 6
-
-
- Sphinx
- Vanguard Models
- (and 1 more)
-
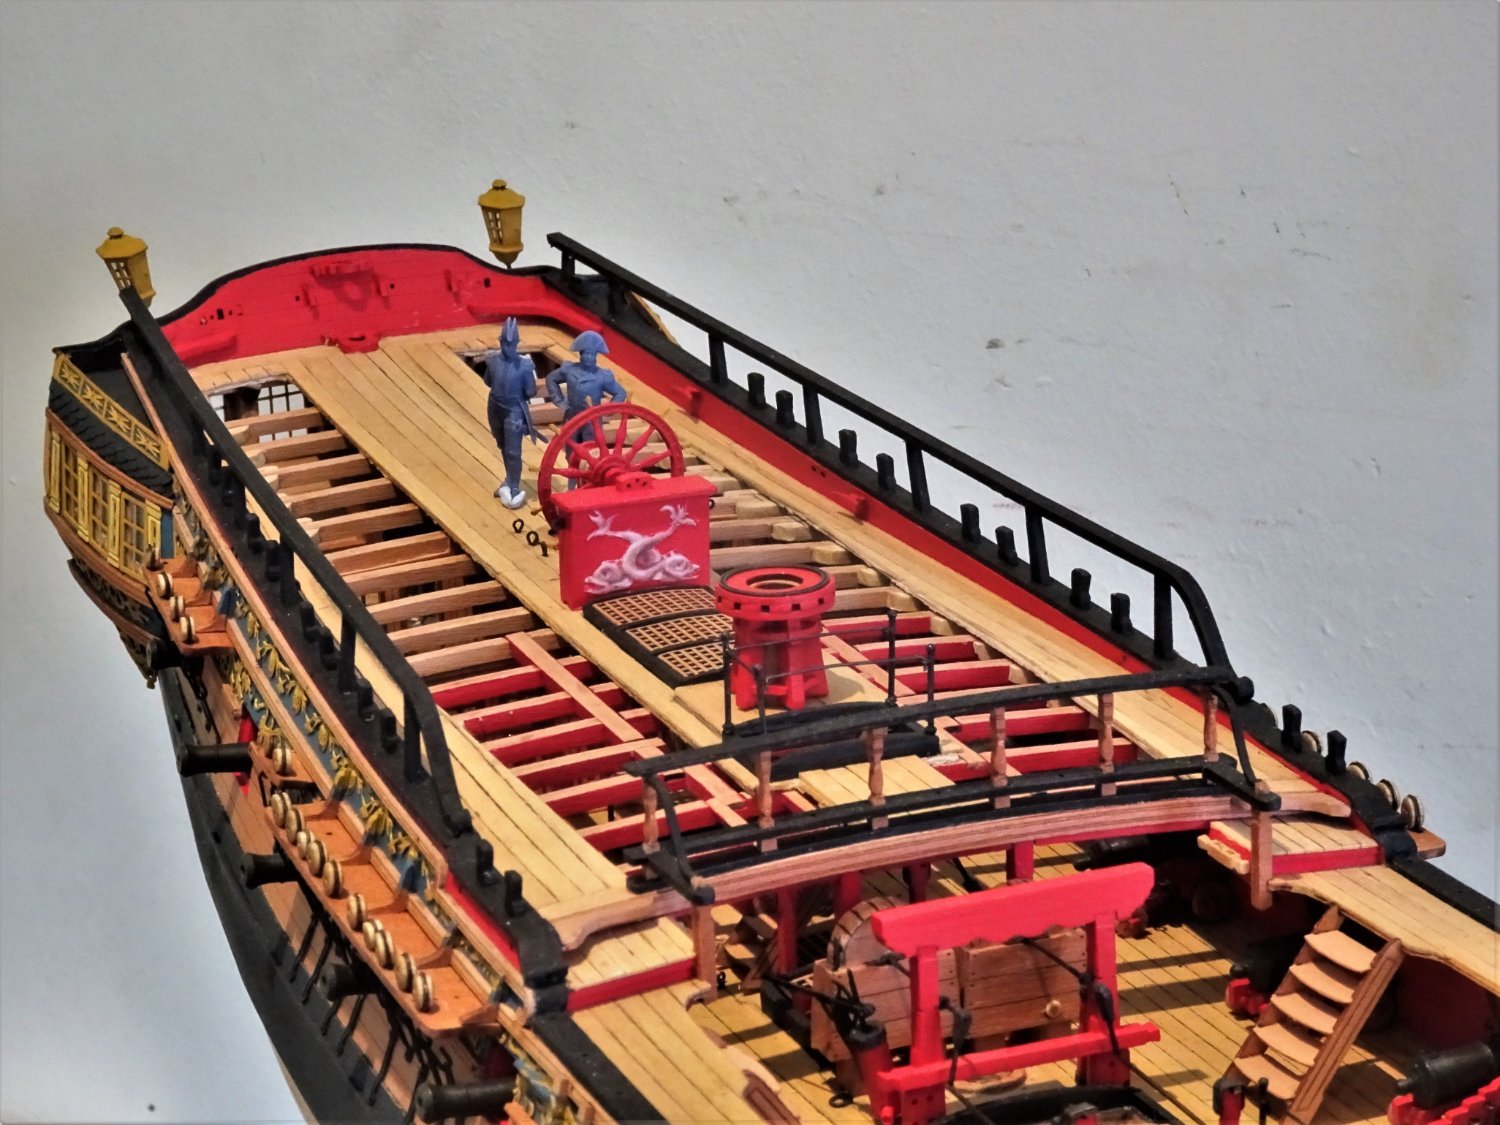
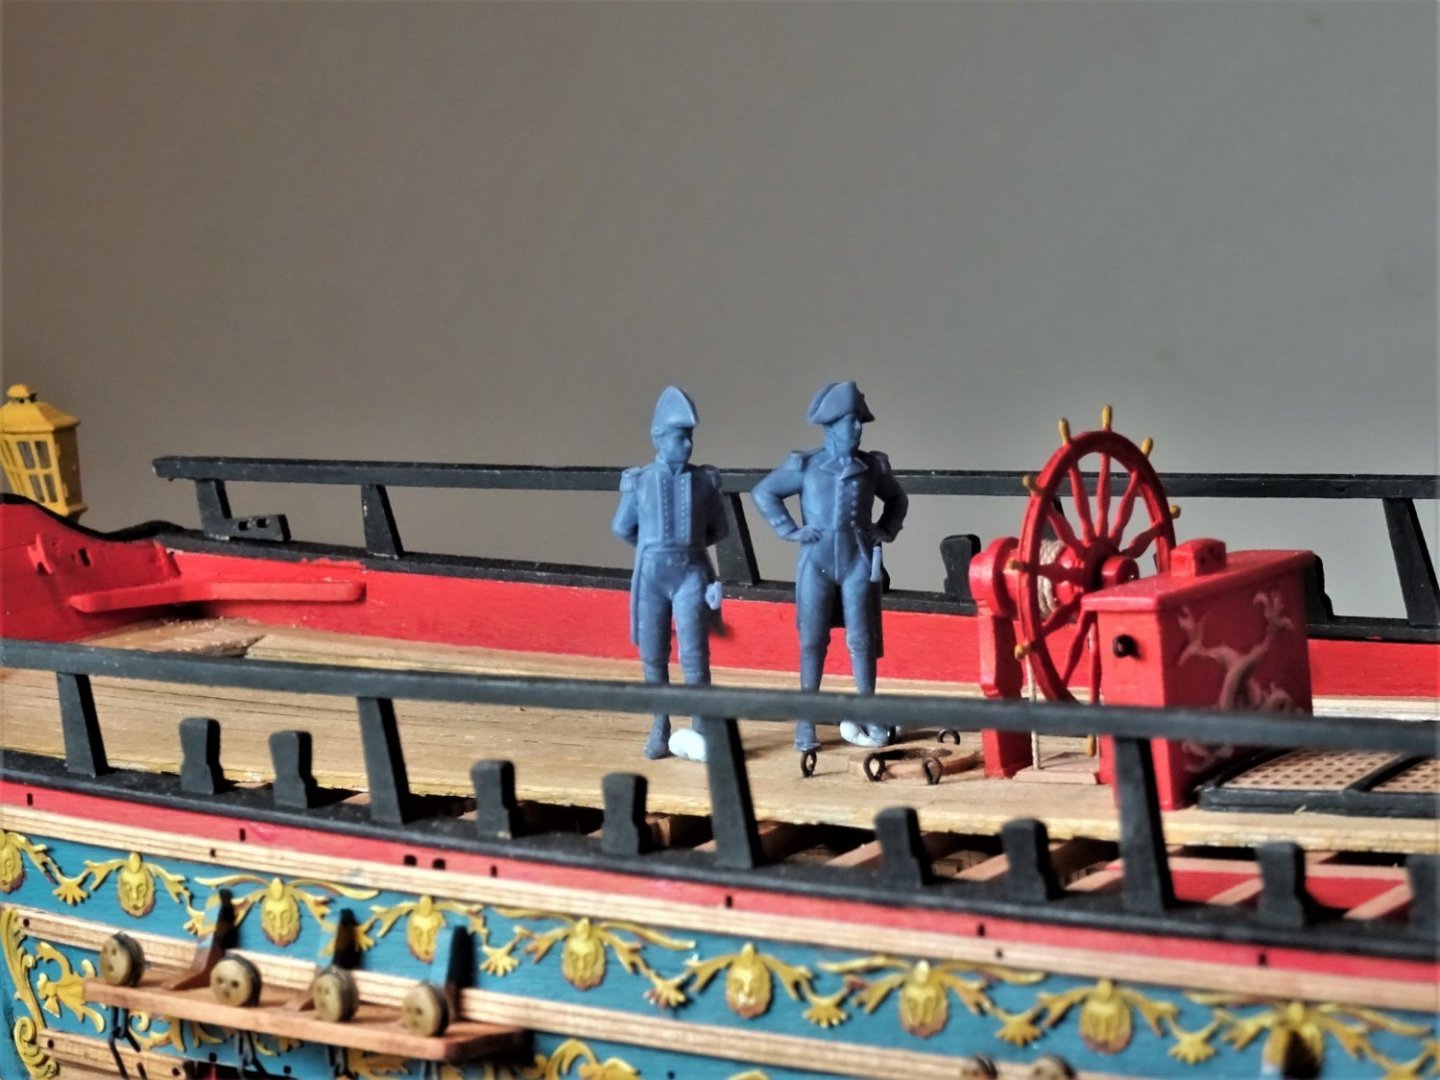
Post One Hundred and Thirty Seven Command candidates. When I first saw Chris’s latest figures of Pellew and Hornblower I was pretty impressed, enough so to buy the 1:64 scale versions to satisfy my curiosity. They are indeed finely sculpted and detailed and altho’ not period dressed for Sphinx at least in her early years, they do look very fine on her deck as scale comparison figures. Both figures stand over six feet in scale height (sole of foot to Bi-corn hats) which is tall for the era, but Pellew was known to have been a tall man. I am not a fan of the bases which as a trial I have removed. 7410 I used side snippers to firstly reduce the base size by degrees, cut thro’ the centre between the legs using an etch razor saw, and snip away the remaining base. 7413(2) Beneath the soles of the feet, I supported the legs and then snipped away but not down to the feet, and then carefully sanded to the sole. Sir Edward did lose his foot during the surgery due to heavy handiness on my part, but it was quickly re-attached using ca. 7414(3) From aft the macro reveals a crack running down Hornblower's shoulder, this was not visible to the naked eye – well mine anyway. With the Hornblower figure, be careful in handling as the sword extension beyond his frock coat is very vulnerable to breaking. (Don’t ask me how I know) 7415(2) A fine pair of Quarterdeck officers. 7416(2) Hornblower would certainly have to duck beneath the beams. He is standing next to Capt. Grimm who stands at a scale 5’ 8” 7421 They do look good, particularly standing on their own feet and not on a pedestal. One or other could be re-identified as Captain Richard Lucas who commanded Sphinx in 1794. 7424 Back to the main event… B.E. 04/07/2022

.thumb.JPG.7e84936ec65a93d79bfd9f4d22bd36ac.JPG)
.thumb.JPG.1fe3666725412343929ca5468314b741.JPG)
.thumb.JPG.a90a5b48b553e6e286a2c91b07078c0a.JPG)
.thumb.JPG.3328325f0fc6eb5c519e187f8aceea51.JPG)

- 857 replies
-
- 25
-
-
-
- Sphinx
- Vanguard Models
- (and 1 more)
-
That should prove an interesting exercise in self torture, I look forward to seeing the event. I hope you photo the process Grant, or is that a secret of ship bottlers, a bit like magicians not revealing their tricks.😉 B.E.
-
That is tiny work Grant, does it have the system whereby the mast and rigging are inserted flat into the bottle and pulled upright with a string, or does it fit fully erected thro' the base? B.E.
-
Love the Mermaid figure Thomas, and that port quarter stern shot is stunning. B.E.
.JPG.0a9777e62ef2595709c01dde9eac849b.JPG)
.JPG.f43905a9f373d8daf06a6d5aa628e53b.JPG)


.JPG.82b6976b844e22fc9b0fa3210b09c5f2.JPG)
.JPG.ddde798902c2785092d18c3ed43b778c.JPG)
.JPG.2a82e7061e06c091978843adb275c1ed.JPG)
.JPG.c77168dc096ad297c6256ff5bd83cacd.JPG)
.JPG.61491af489d7c4a32a4db6698de9d920.JPG)
.JPG.4d3e6fdf3016a692a7286ffcf58eed3c.JPG)

.JPG.995e6777c585cb989521df1cf77c65cb.JPG)


.JPG.5a529663d6b421472d4ae16bc0e8ebf2.JPG)


.JPG.8a8947789098c4e329e8b8bacaa088e1.JPG)
.JPG.bee0c90f317593aaa8b834fcc248fdbe.JPG)
.JPG.b68516a2cbf4776d62adb3016bda5922.JPG)
.JPG.0196ae2e132699052e3910e0e015bec0.JPG)
.JPG.41edb507abd6b65fded8fd227bd8d715.JPG)
.JPG.89f51b792d3e5d8c2ca2556053c2e38f.JPG)
.JPG.4dc6bdb678e22b7750c402fd6d43659a.JPG)
.JPG.4a2cb525f11865027924458908d1f651.JPG)


.JPG.b5d716b3a596ae3371821f83dffe3449.JPG)
.JPG.7ee5b0bc8794de6930446fafa7404530.JPG)

.JPG.8437b8013d979cdb61a74a181b0a1f34.JPG)


.JPG.f5ca13442f048d83627d7dab7de0717f.JPG)
.JPG.69ef83954fcd119f375be21e22a929bb.JPG)
.JPG.095b50f9f607447c0ee5a138c20a50ef.JPG)


.JPG.f8c3e86bd9b1783c2afc43a3622cdd01.JPG)
.JPG.565dbca761f1f1a6881797c2026c7b6e.JPG)
.JPG.8d72a9d657c35a5c96da7060b360bbba.JPG)
.JPG.f5a619fce9a64d79377014d2ec4ef9c6.JPG)