


SawdustDave
-
Posts
1,770 -
Joined
-
Last visited
Content Type
Profiles
Forums
Gallery
Events
Posts posted by SawdustDave
-
-
-
Belaying pins....
Quick post, just to share this little innovation I think many of you may like to try.
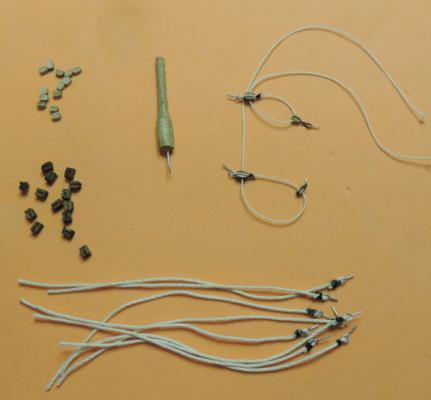
As I got into the rigging of this project, I took inventory of my bone yard of blocks, cleats, and belaying pins. I discovered that, although I have four different sizes of belaying pins, none of them actually fit the scale of this ship. What I needed was a 1.2mm pin length with a 1cm shank.
Remember the little plastic tooth picks with the bristles?
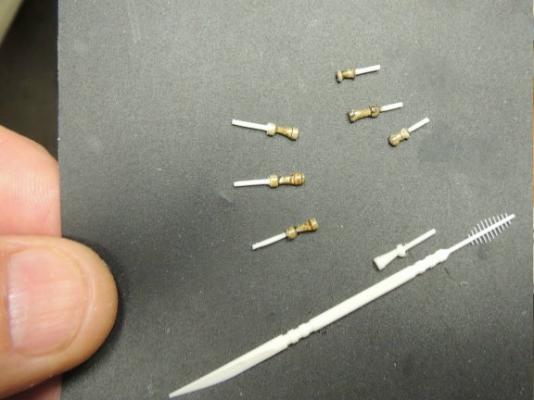
Stained the heads with a dark walnut.... perfect.
-
Thanks all for your regular visits and "likes" .... Like everyone else on MSW, I thoroughly enjoy your support, comments, and encouragement.
If all goes according to plan, we will capture the presentation on video and share it as the final posting of this build. I can hardly wait to see the look on his face.
-
Yves my friend. How are you?
"Fast".... I would say it is far more a matter of putting in lots of shop hours, than being "fast".
Mainly because I've decided to do the presentation to the good doctor on my next follow-up appointment, which will be December 4th.
Think I'll make it?
PS....Promised Chuck P today, I will come back and build the Cheerful a second time.... Much slower and according to his plans.
Guess I'll have to finish the SOS first.
-
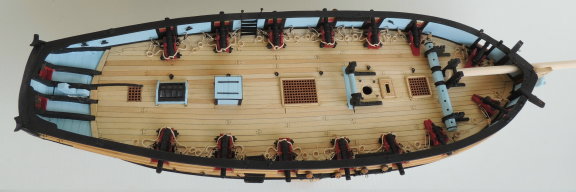
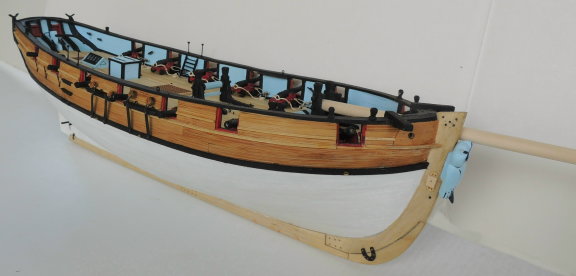
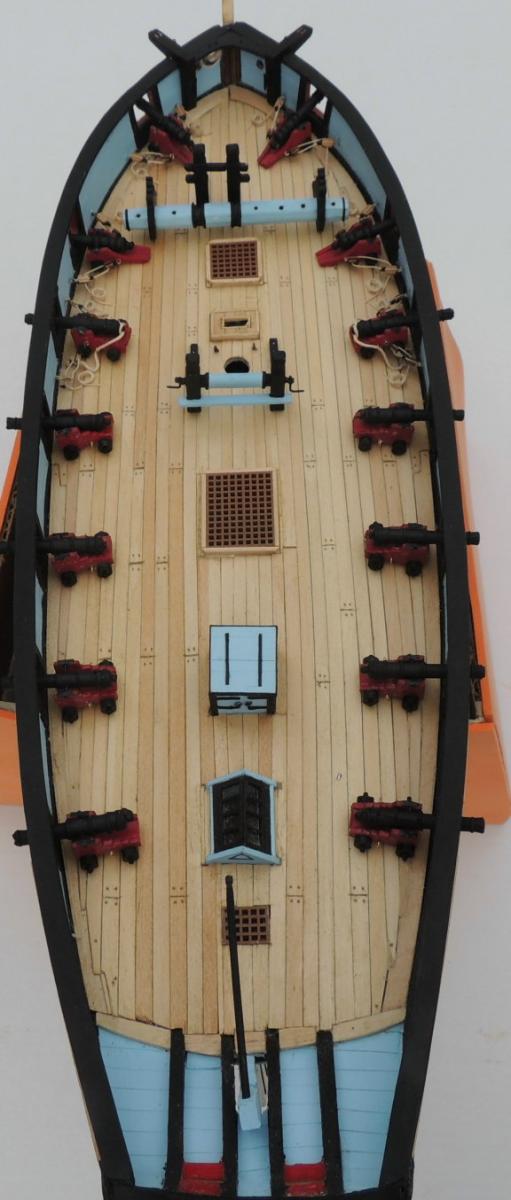
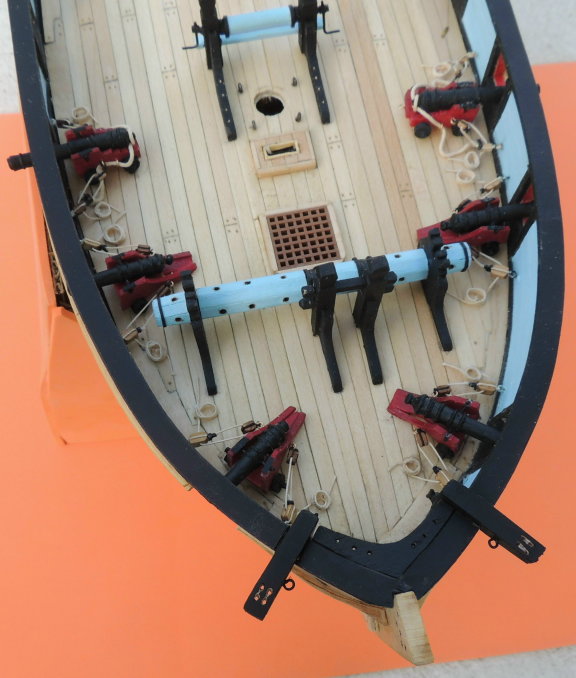
A couple of full view shots. She's really beginning to come together now.
Birdseye view....
I kinda like this low angle shot.... Thinking I might need to darken the keel and bow stem. Don't want to paint over the joinery and iron plates. Something closer to the bamboo hull planks might work more better. What think ye?
If all continues to go well, by my next posting .... she will be tall....already working on mast and booms.
-
Major progress update....
Four days of rain and gloomy weather, plus the Admiral's off visiting our kids in Louisiana.... adds up to major shop time for Dave.
After finishing up all those cannon riggings, turned my attention to a long list of small projects....
Over a dozen cleats and eyebolts, timberheads, belaying pin rails, boom crutches, inboard ladders, boarding steps, stern gun port lids, and several touch-ups.
Beginning with the gun port lids.... I tried blue and black first....settled on natural.

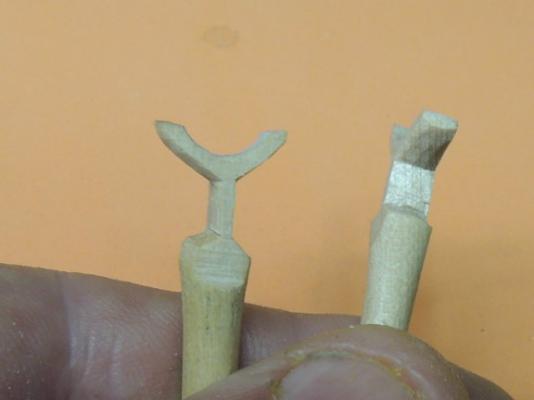
One little note on those tricky little boom crutches.... carved them out of two golf tees!
Created the keel iron reinforcements.... with brass bolts.

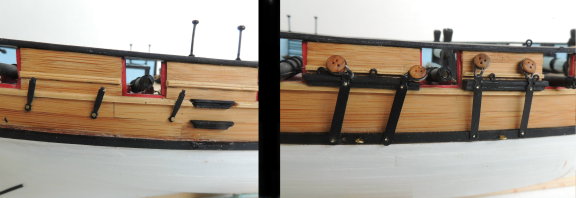
The channels and chain plates with deadeyes....also note the boarding steps.
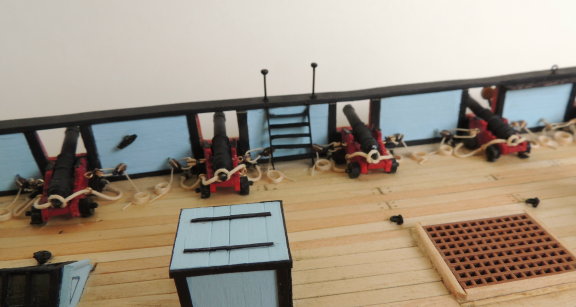
Inboard ladders....
-
Of all my shop equipment, (3 table saws of different sizes, 2 laths of different sizes, band saw, drill press, chop saw, grinders, table sanders, thickness plainer, etc) it is the router that still makes me a little nervous. Loud and powerful, and moves a lot of material.
Hand held is safer than table mounted, but you can't always use hand held on small parts....a real bad *** piece of equipment.
-
What concerns me most with the setup is that you are pushing the material through the bottom of the blade.... with all the hazard of that spinning blade going on above the material. I trust Ed is very intensely aware of the potential danger and will be keenly focused when using.
Careful mate.... We don't wish to see any of your blood on all that magnificent workmanship.
-
SOS just sitting there..... Every day, saying "What the hell?" Can't you see I'm not nearly finished?!!!"
Sorry Charlie. I'm very busy right now. Just be patient....Your time will come.

- dgbot, CaptainSteve, Omega1234 and 3 others
-
 6
6
-
-
Interesting addition to the ship....
A staff member asked me if I knew about the silver owl pin Dr. P always wears on his lapel. I had noticed it but never inquired about it. Turns out, there is a unique story behind it.
This lapel pin was given to Dr. Pillsbury by a few years ago by another patient who is a jeweler.
We all recognize the owl as an iconic symbol of wisdom and knowledge....right?
So when he began wearing it every day, his staff, and then dozens of fellow UNC physicians wanted one of the owl pins as well. Last count, there are over 500 owl pins being worn every day by UNC physicians and nurses.
Understandably, he considers that little owl pin very special.
So, his admin. assistant gave me one of the pins while at my appointment yesterday.
I used it to create a mold and cast this piece, which I painted blue w/black trim.... now mounted as a headfigure on his ship.
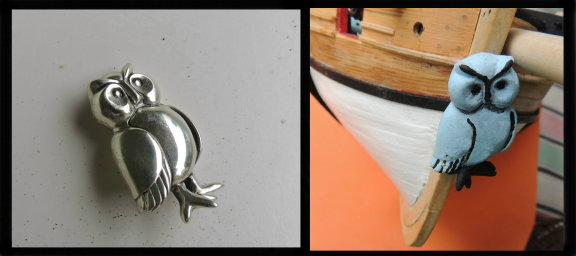
I realize these small vessels did not usually, if ever, have carvings on their bow.
This one does.
-
-
That's what I thought Augie. Thanks for confirming.
After all these years, I must admit, the proper nomenclature of ship parts is definitely not my strong suit.
Thanks to a lot of help from you guys here at MSW, and Google, I manage to get by most of the time.
- Omega1234, Piet, CaptainSteve and 2 others
-
5
-
More cannons....
Another three days of working on the eight remaining 6 pounder cannons.
Assembled and painted the trucks and wheels .... or do you call them carriages and trucks?
Cast the cannons and painted them and mounted them onto the carriages.

Now working on the pre-rigging of the blocks and tackle.
Using 3cm and 5cm blocks. Note, at this scale, I am leaving out the hooks and serving the tackle directly onto the rings.
Think I'll take a break from the guns this evening and carve the six cap rail timberheads.
-
-
Here's an interesting link to a video I think all of you will enjoy as I did.
https://www.facebook.com/stefano.simeoni.1/posts/766719033457113
Can you imagine building an entire ship with these tools? And the men swinging those mallets and axes with such skill is mind boggling to me.
We really have become soft over the years, by comparison, huh?
- captain.jerry, Ryland Craze, Piet and 5 others
-
8
-
Good solid shop day....
Lot's of cannon rigging, but a few other items to break the repetition cycle.
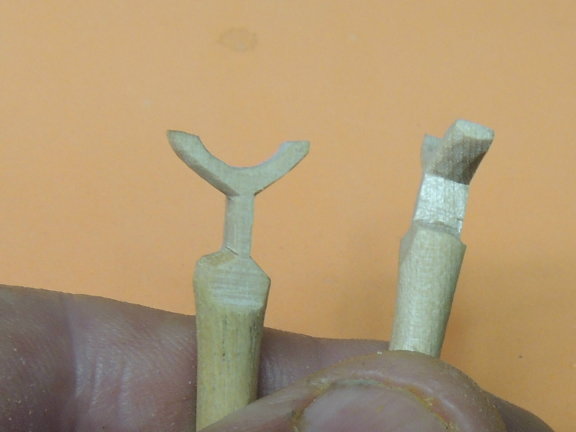
First, this little plate which will eventually carry the jib outhaul line from the tip of the bowsprit....

Then I cut and fitted the catheads and bow rail pin holder....

Finally, mounted all four of the small 3 pounder guns and two of the 6 pounders.

Real nice to see the foredeck beginning to fill in. And the colors seem to all be working pretty well overall.
Began shaping a couple of anchors this evening. They are always fun to build and rig.
-
Molding and Casting cannons....
I took a few quick shots of the process for those who might not be familiar with molding and casting.
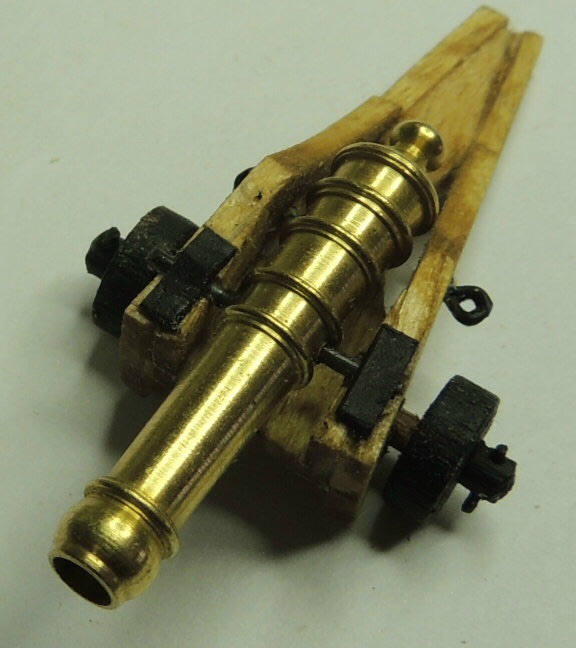
With over a dozen cannons needed, the options are.... Order manufactured cannons, turn each one individually, or use a master to create a mold and produce an unlimited number of identical units with castings.
Personally, I enjoy the molding and casting process.
For molding, I use "Smooth-On" urethane mold compound (2 parts).... cures in about 16 hours.
For casting, I use Alumilite liquid casting plastic (2 parts).... cures in about 20 minutes
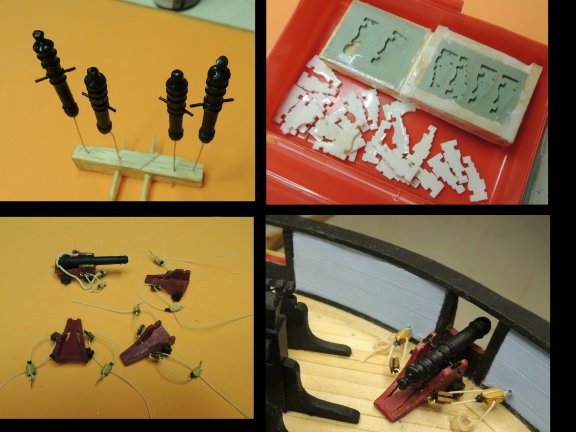
The top left mold was created three years ago using the turned cannon seen in the pic.
The top right mold was poured at about noon yesterday and removed early this morning. I used the brass cannons purchased for my SOS build to create a DOUBLE mold.
The castings turned out great.
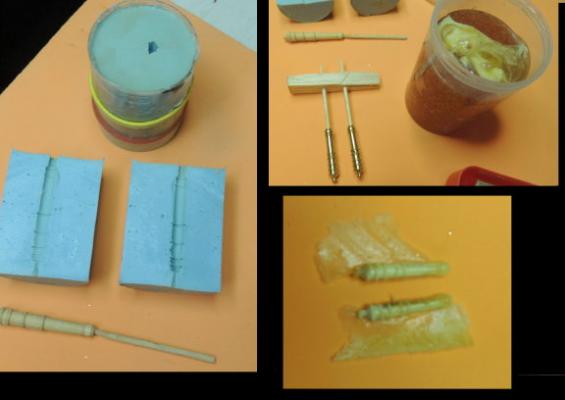
In this next set of pics....
Top left, the cannon castings are painted black.
Top right, I'm using a mold created years ago to produce the truck sides.
Bottom left, the trucks are assembled and pre-rigged. Also note the comparison of the 4-wheeled truck that will be used for the 10 gun ports aft of the windless.
Bottom right, is the smaller cannon installed in that first gun port position.
Note the much improved footprint in that very confined space.

- Canute, Ryland Craze, Jack12477 and 12 others
-
15
-
-
-
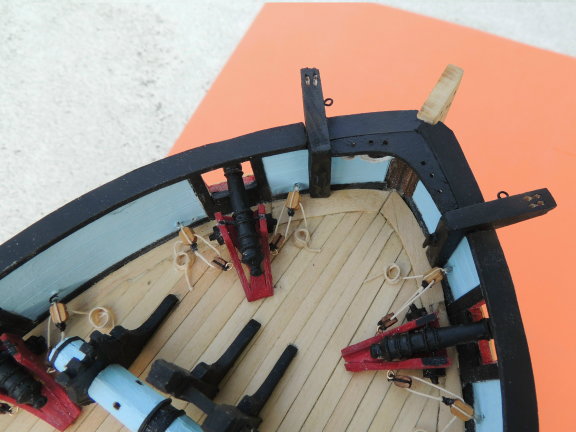
Sorry guys.... I just couldn't abide the "space issue" with that first cannon.
So I will pull that one out and replace it with one of these smaller rigs I had developed for my SOS build.
Smaller cannon and the footprint of the truck is better suited for the tight quarters.

I am creating a casting mold from this cannon in order to make four of these units.

-
-
Right Ken. Don't want the good Dr. to be taking any heat over the color of the gun trucks.
One down, 13 to go.
This first one took me six hours, but that included a lot of experimenting.....plus, the fact that I haven't rigged a cannon in over three years.
Really enjoyed this one....the other thirteen will seem more like work.
-
OK.... Burgandy they shall be.
This pic appears more red than it really is. The color is pretty much a perfect wine color. Definitely not the red of NC State Wolfpack.
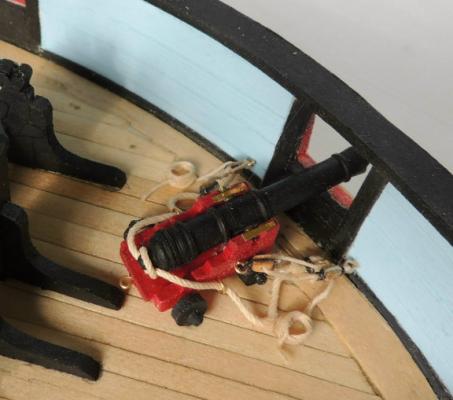
Looks like this first gun port (on the port side) would be a pretty tough place to operate from. Keep in mind that the bowsprit runs directly to the middle of the two knight heads right behind the gun. That knee also comes into play with the recoil of each firing.
I am not going to rip out and move a thing at this point. That is the gun crew's problem. They will either live with it or walk the plank.


Cutty Sark by NenadM
in - Build logs for subjects built 1851 - 1900
Posted
Very nice work Nenad. "Patience".... You asked? That little deck house required an awful lot of patience my friend.
Cheers