


Landlubber Mike
-
Posts
4,543 -
Joined
-
Last visited
Content Type
Profiles
Forums
Gallery
Events
Everything posted by Landlubber Mike
-
 When I was researching this a few weeks ago when the GB topic was being considered, I think I found a picture of the particular plane I will be modeling: The caption for the photo I believe said something to the effect of US soldiers inspecting a captured Hs 129 in Tunisia in May 1943.
- 51 replies
-
- 14
-

-
For the "Sandbox" group build on the LSM sister site, I'll be building (and hopefully finishing) the Hobby 2000 Hs 129B-2. I've got probably every piece of aftermarket for this kit so I'm planning on showing this bird fully opened up. I hadn't heard of Omask before, but when researching, I found they offered a lot of great AM for this kit, including a 3D printed Mk 101 cannon (which I couldn't find elsewhere in this scale) and stencil masks for the two color schemes offered in the kit. I'm planning on building the one on the cover: I also managed to find some scale camels to add to the diorama. Should be a fun ride!
- 51 replies
-
- 12
-
-

-
Thanks OC!
-
Thanks guys!
-
I found a 1/72 scale Navy WW2 pilot from CMK and a picked up a resin concrete tarmac off of eBay the other day, so decided to use them for a simple diorama with the JRS-1. I like adding figures to help better show scale. Here, the figure shows how big this plane was.
- 112 replies
-
- 22
-
-
-
Finally finished! This thing has been fun, but a bit nerve wracking. There are so many PE and other fragile detail pieces, that I kept breaking things off. I figured out a way to hold the model, but one time I accidentally held it a little too firm a popped one of the windows into the fuselage - let's just say, I said a few not so nice words 🤬 Somehow, after shaking the fuselage for a few minutes, the window popped back down into the slot. It took a while, but I managed to get it glued back in. It's not perfect, but better than terminating the build. Thanks to everyone for your support and help!
- 112 replies
-
- 19
-
-
-

-
Thanks EG! I agree - the colors really make for a beautiful color scheme. You can build later war schemes but I knew from the beginning that I wanted to do one of the yellow wings.
-
Finish line is in sight. Finished adding the decals, did a little shading/weathering, and just sprayed a final semi-gloss coat. Just need to rig, add the props and canopy antennae, and maybe add some last bits of weathering for things like the wheels. Thanks for looking in!
- 112 replies
-
- 15
-
-
-
Thanks Alan!
-
Great work Craig! I really like that brown simulated leather for the interior. Is that Ascot Brown? Can I ask what paint manufacturer? It really looks good.
-
Productive [late] night yesterday. Got the decals on the underside of the wing, fully assembled the plane minus the antennae on the top of the canopy (which is too fragile to really install at this stage), and sprayed the fuselage and top of the wing with a gloss coat. Almost to the end finally! Just need to add decals, a little weathering/shading/highlighting, and then the rigging. Fingers crossed the tape comes off the windows ok. This kit fights you all the way, but it's looking like a nice model in the end. The struts in particular where a pain the posterior to try and fit and glue. Thanks for looking in!
- 112 replies
-
- 15
-
-
-
Thanks Ken and Brad! I found the key to reds and yellows is to put down a primer coat of white (or even pink) for an even tone. It's a pain though when you have to do touchups, as you really need to re-prime and then paint. I've learned the hard way from my earlier yellow wing builds 🙄
- 112 replies
-
- 10
-
-
Thanks Glen and Gary, really appreciate it!
-
Thanks Andrew!
-
Thanks Craig! I totally agree with what you said. Masking is definitely not something you want to skimp out on. Good to know. I like buying paints from Spraygunner too. Otherwise, in a pinch or on a whim I'll order paints off of Amazon or even eBay if I'm having trouble finding something.
-
Thanks Alan! I did my F3Fs using Vallejo Metal Colors - they came out ok. Paints were really easy to use, but another time or two I got what looks like pooling spots where the paint doesn't seem to adhere very well (looked almost like a smear). It could have been I was spraying too much/too close/too much pressure in that particular spot, but I didn't seem to have problems with the rest of what I painted. It sucked having to strip the paint and try again. The Mr. Color paint had none of those issues whatsoever. Not as easy to use as Vallejo, but when you have to paint a big area in metal, because the metal paints already magnify any imperfections, I'd rather avoid compounding issues.
- 112 replies
-
- 11
-
-
-
-
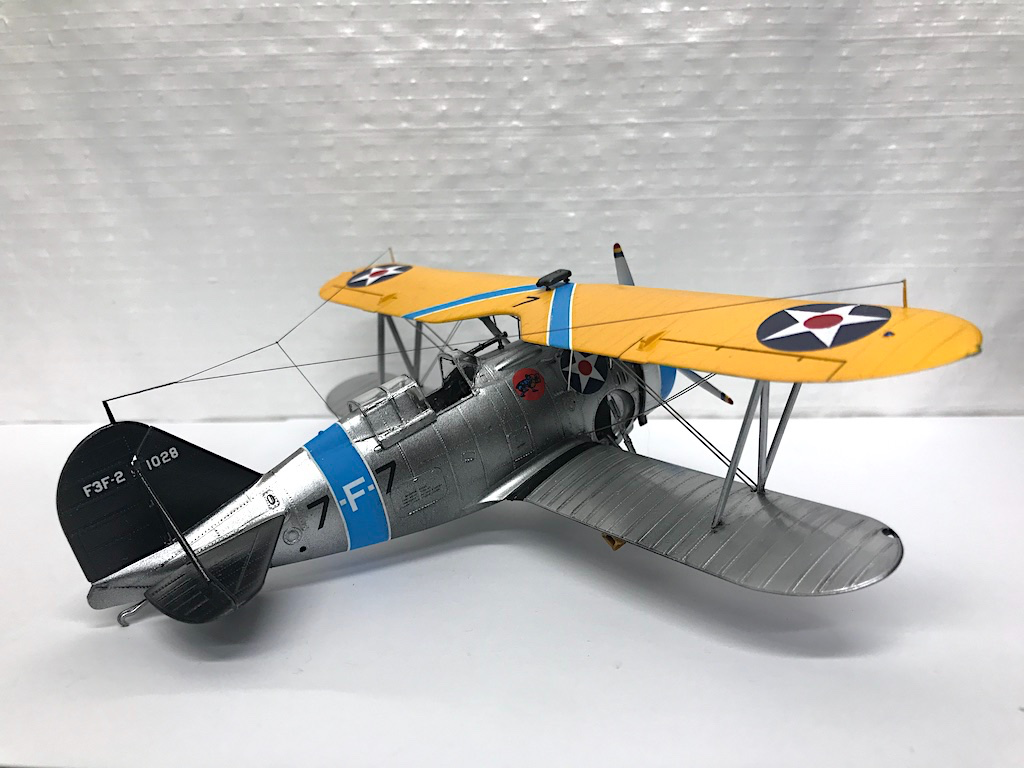
I've made some good progress the past couple of days. I managed to finish painting all the parts, including touch ups just a bit ago, and have started adding a gloss coat for decals and weathering. Lots of Tamiya masking tape was used! The kit gives you decals for the upper black stripes and anti-glare at the nose, but I decided to paint them instead since the underside of the fuselage and the floats is also in black, and I wanted to avoid potential color mismatches. Paints used: Primer: Mr. Surfacer 1200 Red: Tamiya Flat Red XF7 with a bit of brown mixed in to tone down the bright red look. Yellow: Decanted Tamiya Camel Yellow TS 34 Green: Vallejo Game Air Sick Green with some Vallejo Model Air Green mixed in. The kit shows a very emerald looking green, but I wanted mine toned down a bit (similar to how I used a more toned down red color). Aluminum: Mr. Color Super Metallic 2 (SM 201) - Super Fine Silver 2 (for undercoat, I used Mr. Color GX 2 Ueno Black gloss). I really loved how this paint sprayed! I like Vallejo's Metal Color range, but I've had issues at times with getting a smooth coat and sometimes it doesn't adhere very well. I'll probably keep using Vallejo for smaller items like engines and details (and I used it for touch ups on this model), but this Mr. Color line might be my new go-to. Black: Tamiya Nato Black XF 69 Thanks for looking in!
- 112 replies
-
- 12
-
-
Thanks Alan, it's been a learning experience for sure. I might try for a better fitting kit like from Tamiya or Hasegawa next as this one has burned me out.
-
Thanks Kevin, I think so too Was a bit worried with the Frankenstein mix of materials and other components. Cleaned up nicely though.
-
Looking really good Craig. The kit looks like it goes together really nicely, and those PE enhancements really make the model pop.
-
Really cool subject Alan - looking good! I feel your pain on putting in a lot of time without feeling like you made much progress. My JRS-1 has been soul-crushing that way.
-
Really sharp looking Craig, nice job! One of my favorite cars.
-
Really nice job! I leave for a while, come back and you've already started and finished a model - and a beauty at that. Great work!
-
Hey Craig, just catching up after being away for a while. The Ferrari came out fantastic! Really well done my friend. The yellow is really sharp and for a color that's not always easy to execute, you knocked it out of the park.