Landlubber Mike
-
Posts
4,544 -
Joined
-
Last visited
Content Type
Profiles
Forums
Gallery
Events
Everything posted by Landlubber Mike
-
 Hi Joe, The gunport patterns for my Badger were a source of aggravation for me as well. I eventually got them to fit, but I have a foggy recollection of running into a kink near the 3rd bulkhead as well. Like you said, the patterns are great for getting the run of the lines right, but I think they really fight the laws of geometry in force fitting them along the curves of the hull. I didn't try this, but would maybe cutting or removing part of the pattern near the top where the kink is relieve the issue? Not sure that I would cut the pattern completely as you lose the straight run, but I wonder if the kink can be alleviated by cutting or removing some of the material on the pattern. Then again, cutting or removing a piece of the pattern might also throw the straight line off, so maybe it's better to just work with the pattern in two sections? Sorry to hem and haw on this. For what it's worth, I think for my Badger, the slight kink issue went away after some sanding, installing the first planking, and then sanding some more down to almost the pattern at the kink area.
- 302 replies
-
- 2
-

-
- granado
- caldercraft
- (and 1 more)
-
Yes, that's the conclusion I'm coming to as well I think dropping bulkhead 17 is the way to go. You're right that extending and adding a curve to the transom will help me pick up a couple of more millimeters which should set things up nicely. To make the curve, I probably need to modify the keel to fit stern extensions on a modified bulkhead 16 like I had on the Badger and I've seen with other kits. The transom will sit on the extensions, where the inner pair of extensions is longer than the outer pair to help set up the curve. The kit just has you slap the transom onto bulkhead 17, leading to a flat transom. Since I'm planning on adding clear windows and dropping the flag lockers, this might help me add an element of depth if one looked into the windows. I have a feeling that the stern modifications are going to take at least a month and plenty of practice tries to get right.
-
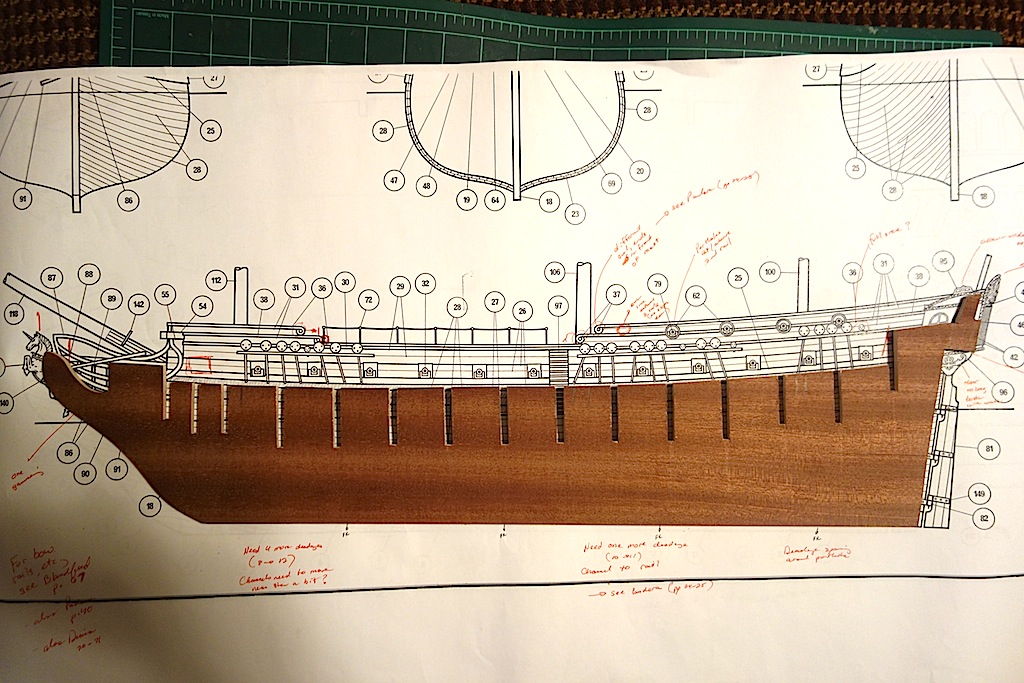
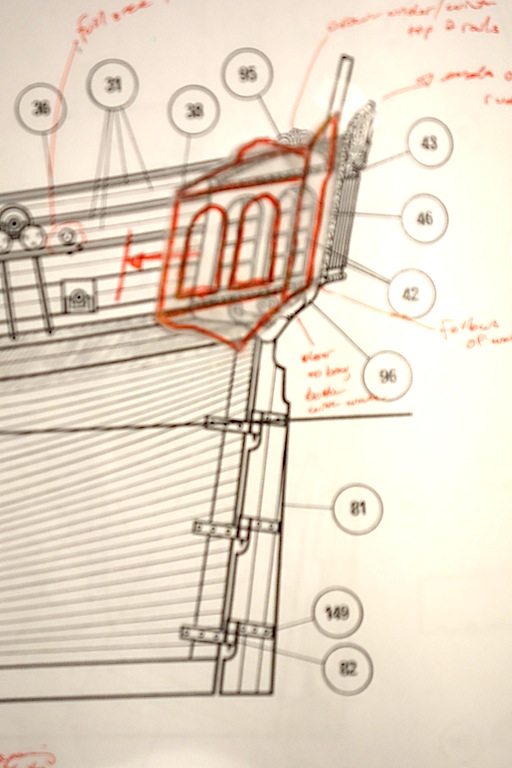
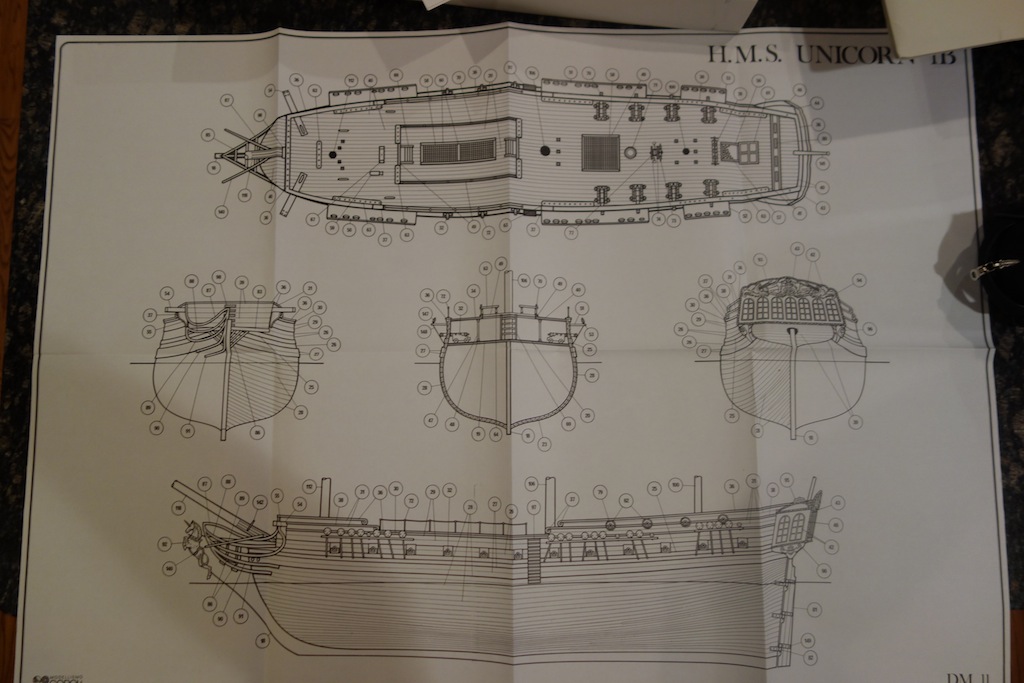
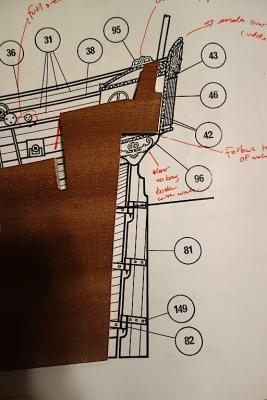
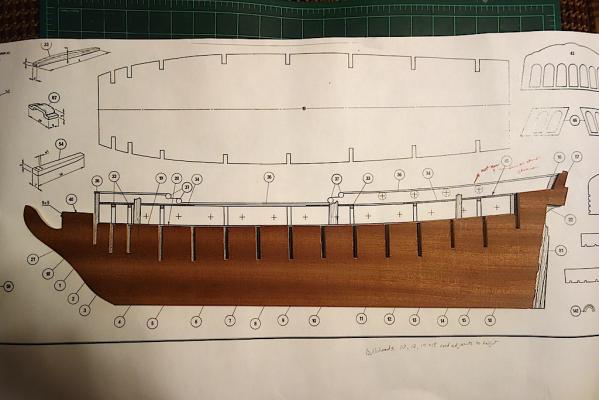
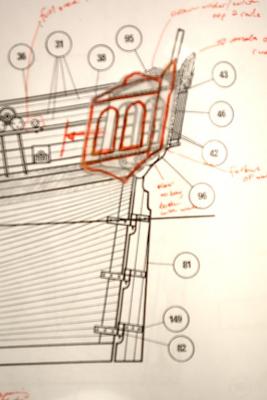
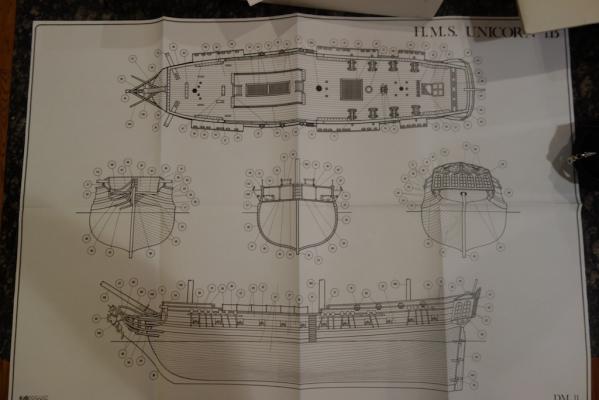
Here are a few pictures of plans DM1 and DM2. I made five photocopies of each to mark up and use as templates. To get to Chapman's plans regarding the stern galleries, they need to be moved forward so that they forward of the stern post, rather than sit over the rudder. I took a tracing of the stern gallery from the plans, and moving it forward 10mm, it looks much more in conformity with Chapman. Chapman, however, shows the stern gallery almost butting up against the last gunport (indicated by the arrow in the picture below). So, not only would I need to move the stern galleries forward relative to the stern post and rudder, but I would have to actually reduce the keel length by probably another 15mm or so to move the full stern area closer to the last gunport. However, I have a slight problem in using the plans. The kit supplied keel does not match either plan DM1 or plan DM2, and it's not due to creases in the plans. In DM1, the keel is too short at the stern post (almost like it contemplates the addition of a stern post), but the keel matches the plans at the transom area: In DM 2, the keel is too long relative to the plans: What to do? If I go with the keel as is, looking at DM1, the stern and stern galleries will hang even further out from the stern post and rudder than is shown in the plans. That's the opposite result from Chapman where the stern galleries sit forward of the stern post and not over the rudder. At this point, I'm thinking that the stern area of the keel is going to need a complete makeover. It will need to be shortened a bit so that the stern gallery sits closer to the last gunport. I will also have to shorten the extension on which the transom will fit so that the galleries sit further forward. Furthermore, since I'm not including the flag lockers on the quarterdeck I will need to modify the top area of the keel at stern and remove material from the last bulkhead just above the quarterdeck line so that the plywood is not visible. Too late in the evening to make any final decisions. I'll sleep on it and come back to it tomorrow. A bit frustrating that I haven't started building yet, but hopefully all this advance preparation will have been well worth it.

-
Ian, thanks so much for sharing the results of your research. This is all very helpful! I think you're smart in not making that modification as I think the renovation would have been a nightmare Last night I was all good and ready to cut out the new keel, when I noticed the stern gallery issue. I spent much of the evening last night agonizing about how to address it. It looks like the newer kits have the stern galleries in a similar position, if not even slightly further back as shown with the bottom decorative piece: I ended up using tracing paper to trace out the stern gallery, and used it to move the stern gallery forward until it matched up more closely with Chapman. Interestingly, I got to a very similar re-design as in your last picture - I'm very glad that I wasn't too far off The two things so far that I haven't accounted for are the rake of the transom and its width - thanks so much for sharing that with me. When I moved the stern galleries forward, I came to the conclusion that Corel and Chapman differ probably by about the width of the flag lockers. By moving the last bulkhead to just behind where the second to last bulkhead sits, the result seems to be a little more consistent with Chapman. I'll post a picture later this evening of my markup of the plans to account for the modified keel. Along with the stern, I've been plotting out the thicker wale and modification to the bow area with respect to the figurehead placement, headrail orientation and configuration, etc.
-
For a quick update, I finally got my workshop set up and new plywood in. Thankfully I was able to find a plywood sheet that was flat I've been working through the plans for the Unicorn and using other reference material I have (e.g., AOTS books for Pandora, Blandford and Diana) to figure out what, if any, other modifications I should make to the keel now, so that I can build the model closer to the Chapman plans. One thing I noticed was that the stern galleries on the Corel plans seem to fit fairly far back on the ship, whereas on Chapman's plans, they sit fairly close to the last gunport. So, I'm thinking of shortening the keel a bit to move the last bulkhead closer in (probably, up to where the second to last bulkhead sits). That should not only make it more consistent with Chapman, but other similar ships of that period as well. One issue in looking at the plans is that the keel part is longer at the stern area on one of the plans and shorter on the other Since the deck templates seem to fit the keel piece as is now, I'm going to work with the outline of the keel piece and just modify it a bit. I'm realizing that I'll also have to modify some of the bulkheads a bit to change the angle of the quarterdeck so that the portholes gradually open up as you proceed toward the bow. That's going to be fairly tricky I think, especially as other builders have had trouble lining up the quarterdeck portholes with the guns. Wish me luck
-
Hi Joe, nice kit for your next build. Caldercraft makes great kits, I'm looking forward to following along. The only issue with at least the Badger kit was that the walnut was prone to splintering, and the walnut laser cut pieces were on walnut sheets that were not solid walnut, but more like plywood. Otherwise, the plans, instructions, guns and photo-etch parts are top notch. I think there is an AOTS book for the Granado. Are you going to enhance the kit in any way? On the stern extensions, if I remember correctly, my Badger was set up similarly, so that the stern transom would have a slight curve to it. You obviously need to get the stern extension pairs even in order to have a nice smooth curve on the transom. I don't recall it being too difficult when all was said and done. Enjoy the kit!
- 302 replies
-
- 1
-
-
- granado
- caldercraft
- (and 1 more)
-
Yeah, those look like cross-eyed cannons The cannons in my kit seem to be very nice (haven't open the bag holding them yet as I tend to lose things). On the extra port, Chapman shows one port pretty much up against the stern gallery. I haven't closely compared them, but they could be spaced and located a bit differently than how Corel does it.
-
On the Badger, I generally followed the order of construction in the instructions. For some reason, the instructions have you add on some of the rails, but not all, then add deck details like the cannons, and then go back and add the remaining rails, drill hawse holes, etc. I probably ended up popping off each cannon two or three times adding the rails and other external hull items. The blame is mostly mine though, as I tended to work on the model on my coffee table, and many times, on my lap. For the quarterdeck guns, I bought 4-pounder Caldercraft cannon kits from Cornwall Model Boats, which are 26mm in length (Model C85040AK) to see how they look. The guns are marketed as 1:64 scale guns circa 1790, so probably somewhat close to the 4-pounders for the Unicorn's period. I also bought the Corel 25mm cannon barrels (Model CC21) which are blackened like the kit guns and in the same style - at first glance, they seem like they would fit on the Caldercraft carriages. Interestingly, the Caldercraft 4-pounder carriages are almost the same size as the Corel carriages. The sources I've read differ when it comes to the number of guns on the Unicorn: -- Corel: total of 32 guns, with 24 on the upper deck and 8 on the quarterdeck. -- Chapman: his notes show the ship as having a total of 34 guns -- 24 nine-pounders on the upper deck and 10 four-pounders on the quarterdeck (no swivel guns). -- Gardiner: his Frigate book says that when the Unicorn and Lyme were launched in 1748, they only carried 24 nine-pounders on the upper deck, then notes when talking about successor ships to the Lyme-class like the Guadeloupe, that from 1756 these ships were allocated 4 three-pounders on the quarterdeck to introduce the new rating of 28-gun ship. -- Wikipedia: lists the ship as having 24 nine-pounders on the upper deck, 4 three-pounders on the quarterdeck (after September 22, 1756), and 12 half-pounder swivel guns (after November 11, 1756). Gardiner is listed as one of the Wikipedia references, so that's probably why Wikipedia and Gardiner are very close. I'm a little unclear as to why Chapman listed the Unicorn as having 10 four-pounders on the quarterdeck - my best guess is that the Chapman plans show five pairs of portholes on the quarterdeck (versus Corel having four pairs). Interestingly, Chapman also show 13 pairs of gunports on the upper deck, whereas Corel only has 12 pairs. I haven't made a final decision yet, but I'm thinking of going with the Gardiner approach of either as launched with no guns on the quarterdeck, or adding 4 three-pounders on the quarterdeck as a post-1756 version. The Caldercraft four-pounders at 1:64 scale could probably work as three-pounders at 1:75 scale. I highly doubt that I'll add swivel guns, as they may make the model look too busy and from a practical perspective, I don't know where I would mount 12 of them. More to research I suppose
-
Really nice work Ian. The cranks are perfect. Have you thought about the cannons yet? The nice thing is that the carriages are already put together I would make sure that you have done everything you want to the exterior of the hull, as I can't tell you how many times I popped cannons on my Badger because the barrel was sticking just outside the gun ports. Are you planning on using the same cannons for the main deck and the quarterdeck? If I remember correctly, Chapman's book notes that the ship had 24 nine-pounders, and 4 three-pounders on the quarterdeck (or something like that). The kit of course gives 32 guns.
-
Very cool, thanks Vince for sharing!
-
Like Ulises recommends, I would start with a kit that has a practicum for it (preferably one that is free). I did the Caldercraft Badger, which is rated as a beginner's kit, as my first kit, but I fumbled around quite a bit as I got myself up the learning curve. If I had to do it over, I probably would have started with a kit that had a detailed practicum available for it like the Phantom.
-
Vince, thanks for taking the time to repost the pics. This has been a great log to follow, and we all appreciate you sharing your work. Just out of curiosity, how did you weather the staircase? It came out very well.
- 593 replies
-
- 1
-
-
- royal william
- euromodels
- (and 1 more)
-
Nice work ZyXuz, you're moving right along on the build. You'll be done by the end of the year at this rate
-
How to sand longer stock?
Landlubber Mike replied to Landlubber Mike's topic in Modeling tools and Workshop Equipment
Thanks Ian that makes a lot of sense and explains why my pieces never get sanded flat -
How to sand longer stock?
Landlubber Mike replied to Landlubber Mike's topic in Modeling tools and Workshop Equipment
I was wondering about this - can you use the thickness sander where the piece is fed through the machine on its thinner end? Or do you build some sort of sled so that the piece stays perpendicular to the table? I did invest in a Byrnes thickness sander, but unfortunately it was damaged during shipping last week. Jim has been very helpful in working with the shipping company. -
How to sand longer stock?
Landlubber Mike replied to Landlubber Mike's topic in Modeling tools and Workshop Equipment
Thank you guys! -
Hi everyone, I've decided on my next build to replace the kit would with better wood from Jeff at Hobbymill. I'm thinking ahead about how to create and finish the keel and stem post. I have the Byrnes table saw and disc sander at the moment, but was wondering, for the longer pieces, how do you sand them to have a perfectly straight line? On the disc sander, I think you're only supposed to sand on one side of the disc. So for longer pieces that exceed the radius, can you use the disc sander? Or is there some other way to ensure that long lines are straight? Thanks!
-
Yes definitely some nice ideas. I agree about the davits and the dolphin striker. Not sure about the doors under the forecastle either - will need to research that. The tiller is a nice touch My new plywood arrived yesterday, and it looks very good. I should be able to start actually working on the model now, rather than just thinking about it
-
Not yet, still have a long way to go I blame all the skilled modelers like yourself for making me feel very much the novice
- 431 replies
-
- 1
-
-
- pegasus
- victory models
- (and 1 more)
-
Hi Denis, I'm a newly proud owner of Jim's table saw (and disc sander) as well. Amazing quality, isn't it? I just got an email from Donna that my thickness sander is coming today - woohoo! Enjoy!
-
While looking up figurehead pictures, I just so happened to come across this 1:48 scratch build of a Unicorn. The builder carved the figurehead himself, which looks incredible. He also made some modifications to the rest of the ship, including a completely different stern, an open waist, open portholes on the quarterdeck (connected by rails rather than a wall), and a crane-type setup off the stern off which a small boat is hung. Very nice build. http://shipmodeling.net/photopost/showgallery.php?cat=1318

-
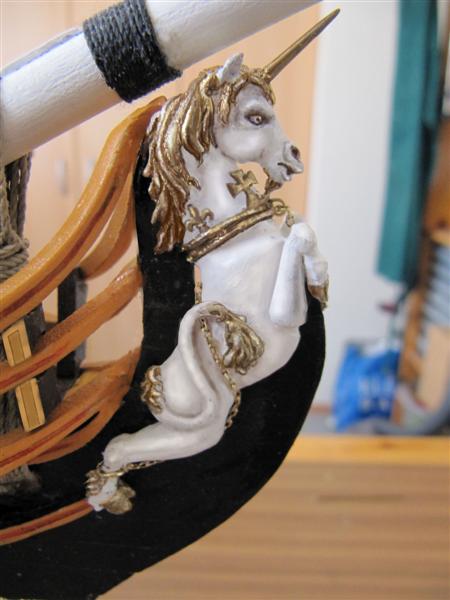
Hi Ian, For all the issues with the Corel kit, your stem and figurehead came out very nice. I agree though that any modifications to this section would be very ambitious and quite in a different league from the scope of your other modifications I took a look at the Pegasus practicum, and the way Amati does it, the stem for the kit is shaped like a seat (an "L" shape) where a slot in the back of the figurehead sits neatly onto the seat and the legs straddle the stem. Then, you backfill the open area between the back of the seat and the back of the figurehead with wood so that there is no gap between the stem and the figurehead. It is a bit hard to tell on the Chapman plans whether there is an open area or not (probably not), but regardless, it looks like the figurehead area of the stem should maybe extend upward and more forward a bit so that the figurehead sits higher and further back onto the stem. That's going to be a really complicated modification, as from what I recall, you are right that the figurehead in some areas is actually narrower than the stem. I bought a spare figurehead from Cornwall Model Boats as I thought that I might paint one white and other colors and the other in "wood" to see which I liked better. But, I might use the spare to figure out whether it's feasible to cut the figure in half, or cut a slot out in the back. I guess if that doesn't work I can always try carving or sculpting my own The Corel figurehead is actually a nice model to work from for the general design, though it did strike me as being perhaps a tad small for the ship. I could make it a bit larger and wider, and cut a slot in the back into which the stem could sit. It was ambitious to think about carving the stern figures, but carving the figurehead would be a whole other ball game
-
Excellent work Peter - your sails are coming out very nicely. Well done!
- 431 replies
-
- 1
-
-
- pegasus
- victory models
- (and 1 more)
-
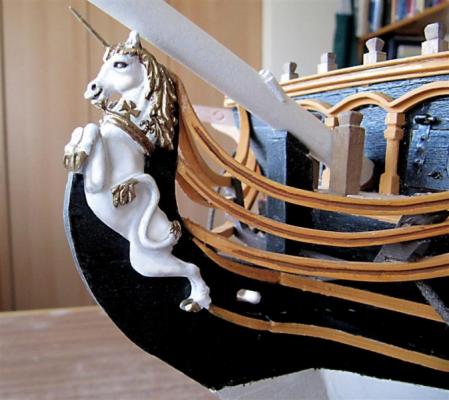
Hi Ian, Yes, I think a ship like the Unicorn would only have one lot of gammoning. My guess is that it would be more appropriate to keep the aft one. I spent a few hours tonight drawing out how the various parts of the stem would be constructed. In doing so, I noticed that the Corel plans differ from Chapman in not only the gammoning, but also in how the headrails (I think that is what they are called) are constructed. In Chapman for example, the lowest headrail runs under the gammoning slot and into the figurehead's rear feet (Corel shows the lowest headrail running above the gammoning slot and curving upward. The upper headrails seem to have a different run to them as well. Another thing I noticed was that the figurehead on the Corel plans fits lower, and more forward, than the Chapman plans and the figureheads generally on other ships. It seems like the figurehead should sit just under the bowspirit, but the Corel plans have quite a bit of space between the figurehead and the bowspirit. Ian, just out of curiosity, how did you fit the figurehead to the stem? Did you shape the stem to fit the figurehead, or did you cut a slot into the back of the figurehead to accommodate the stem? I was a bit surprised that the figurehead is a solid piece. If I remember correctly from the Pegasus kit, the figurehead has grooved slots in the back and bottom so that the figurehead could sit right on the stem. I am thinking that it might be better to make any adjustments, cuts, holes, etc. to parts before they are on the model. Too many times on the Badger I did the modifications once parts were fixed to the model, which led to logistical problems, or worse, other parts that were broken off.
-
Thanks Nigel! Learned something new tonight