Landlubber Mike
-
Posts
4,544 -
Joined
-
Last visited
Content Type
Profiles
Forums
Gallery
Events
Everything posted by Landlubber Mike
-
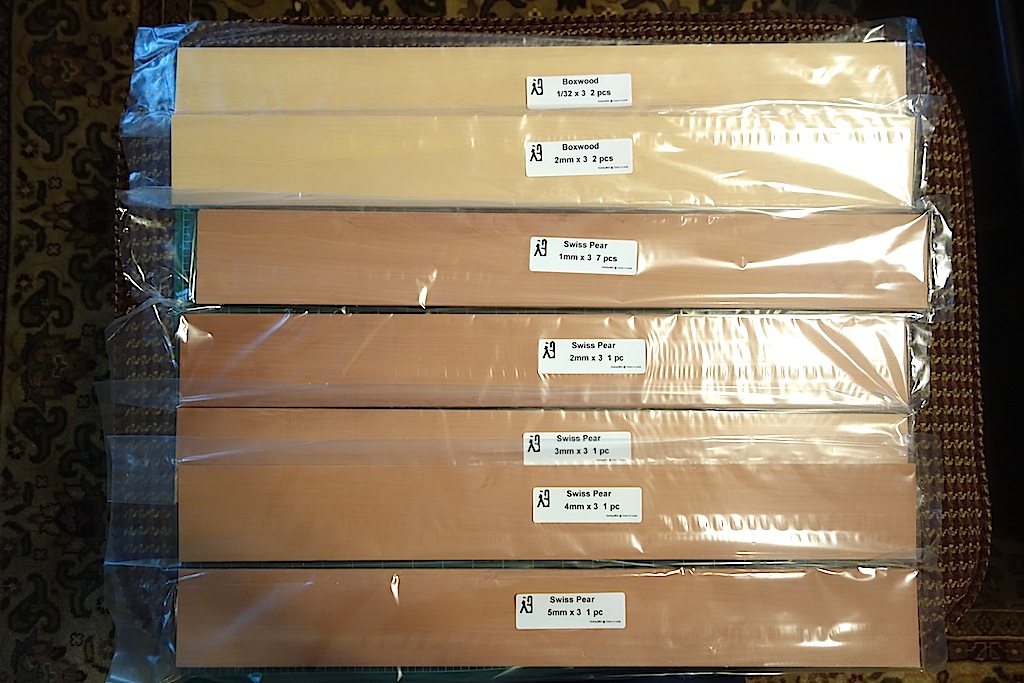
 A little present from Jeff at Hobbymill arrived at my doorstep this morning Gorgeous wood and impeccable customer service from Jeff - thank you! Now I just have to learn how to use my new power tools - safely of course! The pear will be used for the hull planking, including the areas to be dyed black near the gunports and stern. Boxwood will be for the deck planking and accents on the hull (rails, headrails, etc.). I'm also thinking about trying to carve some of the decorations on the stern in boxwood. I've been setting up my workshop, and studying plans to figure out how to modify the keel piece. I am going to try building the stem and keel in parts, so I've been drawing things out on the plans (and made copies at my local Fedex Office). Also have been comparing the Corel plans with the Chapman plans and plans for other similar vessels. One discrepancy is that Corel's plans have you add two gammonings to the stem, whereas the Chapman plans and other vessels of that size from my research seem to only have one. Guess one more thing to add to the list of changes. I can't really start much building until my new order of plywood arrives. I ordered two sheets from Micromark, which arrived even more warped than the Corel keel To Micromark's credit, they refunded me the purchase price, and I ordered a stack of 6 pieces of plywood from Hobbylinc that should arrive on Friday. Hopefully one of the six is flat. So, I'll probably practice with my scroll saw and new table saw in the meantime so that I'm a little more skilled when I have everything I need to start the build.
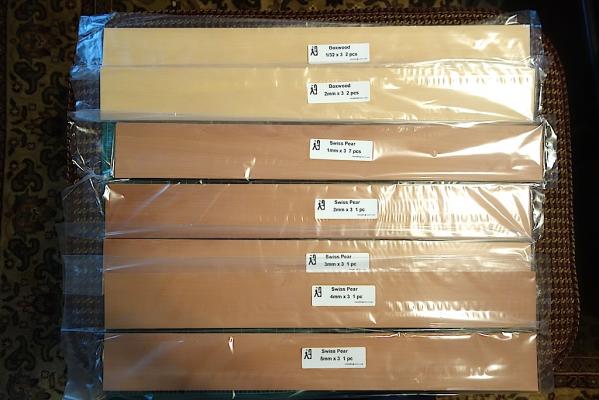
-
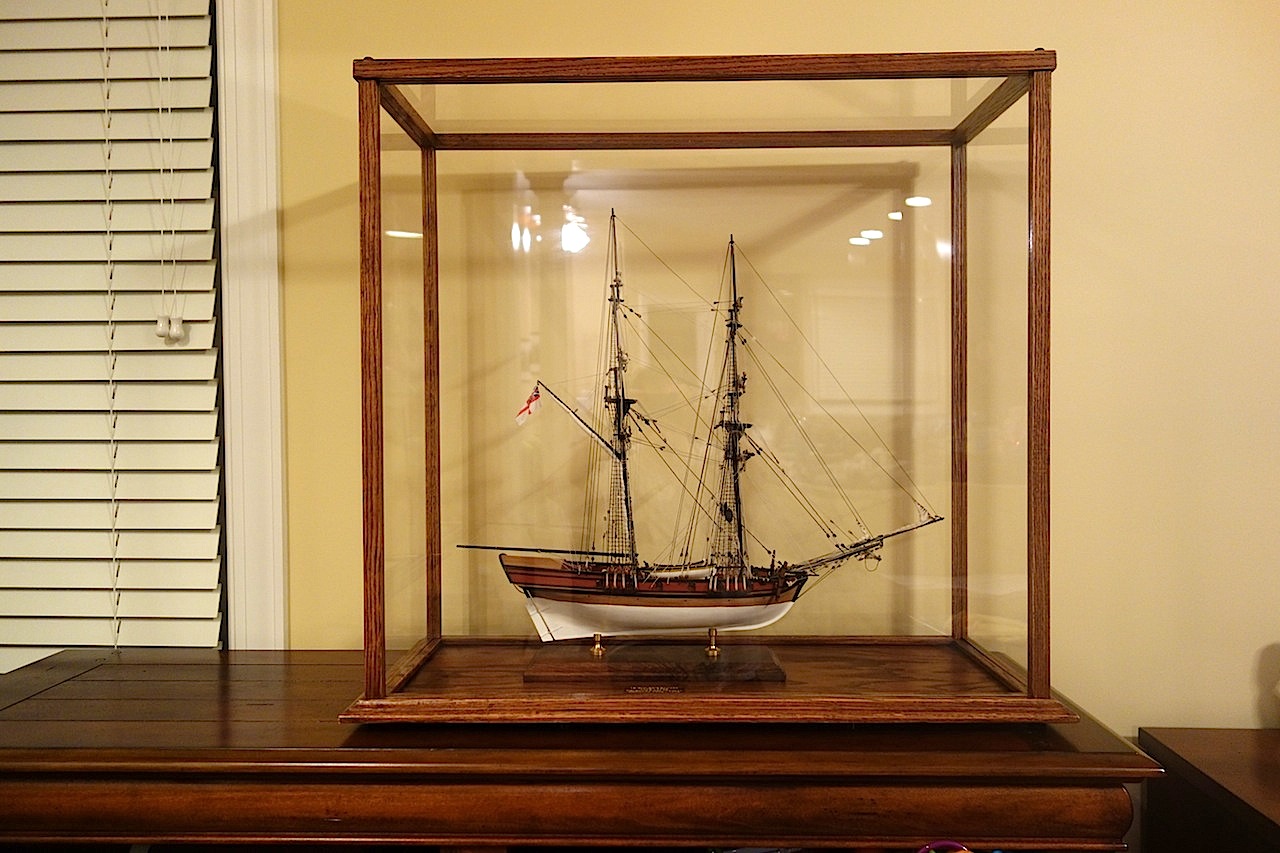
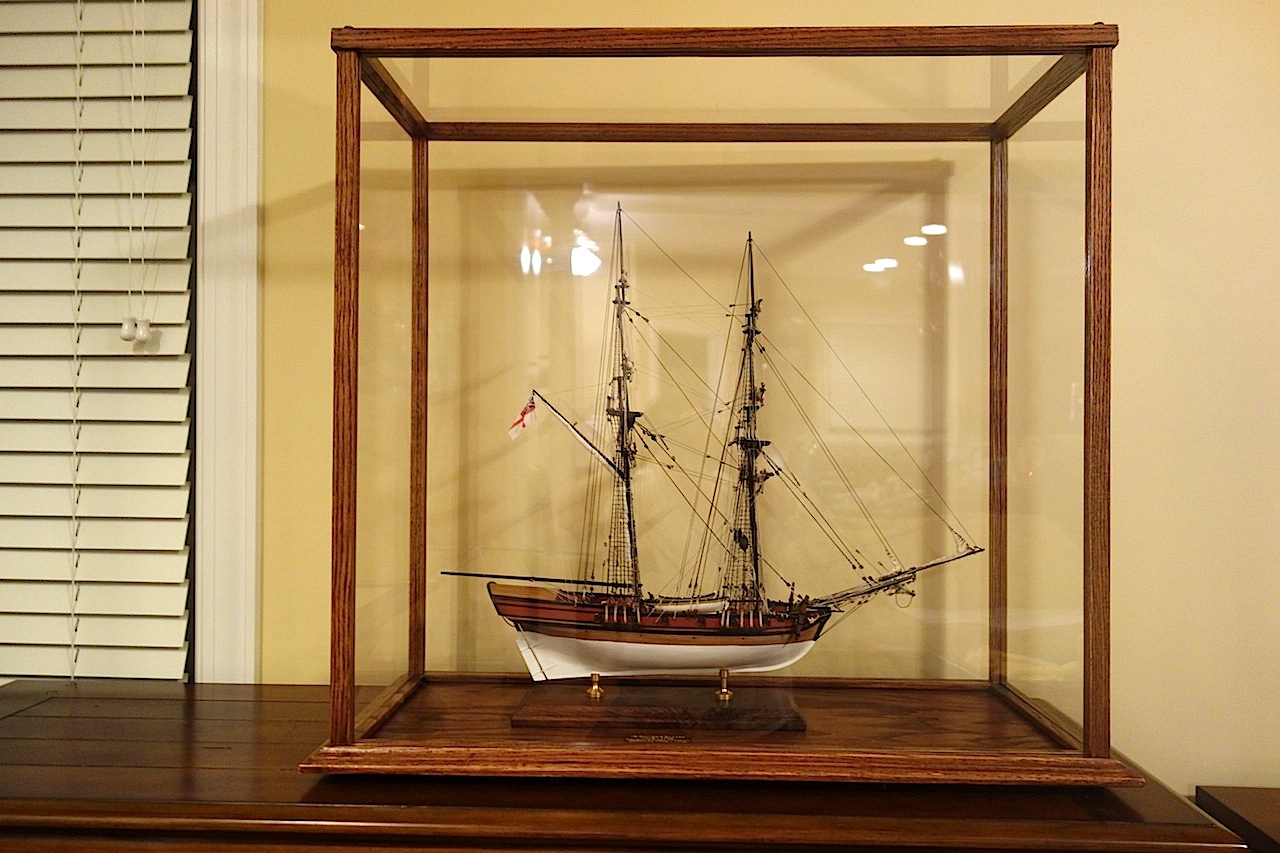
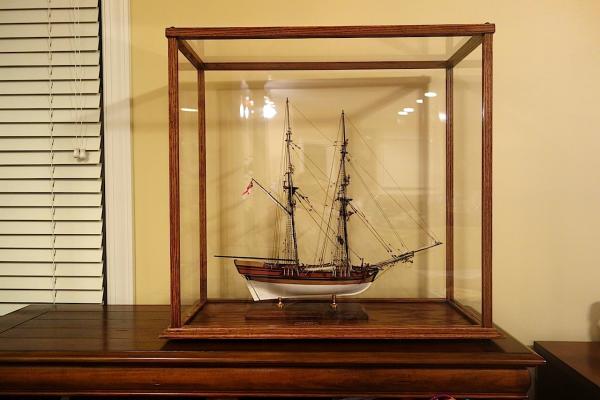
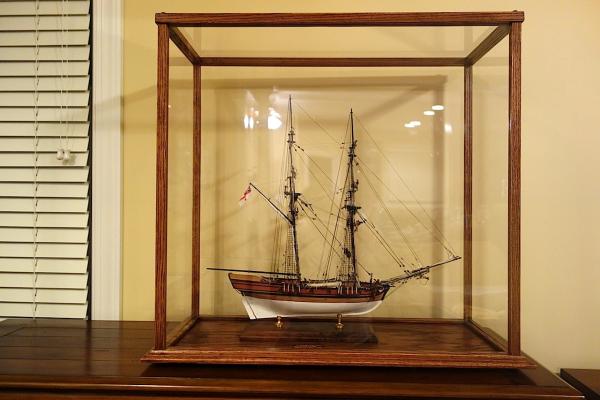
Thanks very much guys, I appreciate the kind words! Frank, the case is 30" x 27.5" x 12" (width/height/depth). The posts can be cut down to size, but I was a bit nervous doing so. I'm actually glad I left them as is as I like the extra space on top. The width barely fit the model, with less than 1" clearance on both sides of the studdingsail booms. It was a bit nerve-wracking because you need to lower the case (without the base) onto the base, and then use clips underneath to lock the base into the case. Of course I kept finding specs of dust and other blemishes, and had to pull the case off three or four times. Thankfully the ship modeling gods were with me, as I figured that with my luck, I would hit a studdingsail boom and pop off a bunch of lines of rigging Alistair, I'm going to do the Corel Unicorn as my next build. The Unicorn is a bit simpler, but I'm planning to do a number of modifications in order to come up with a more accurate build. The Pegasus is probably much more amenable to building straight from the box, but I figured I could use another kit under my belt in order to do that kit justice -- especially with all the gorgeous Pegasus, Fly and other Swan-class builds going on at the moment. I'm strongly considering a second build alongside the Unicorn for those much needed breaks and to avoid burn-out. I probably will do the Charles Morgan, mostly because the Pegasus would be very similar to the Unicorn. But, it seems like the Morgan requires lots of scratching (in large part because the wood and fittings are not very good), so I'm still thinking about which to pursue. Kester, thanks for well wishes. The cut healed fine, and I now have a nice memento in the form of a scar on my palm. The Admiral just shook her head when she saw me bleeding like a stuck pig, but thankfully I didn't need to ask her to take me to the hospital to get stitches
-
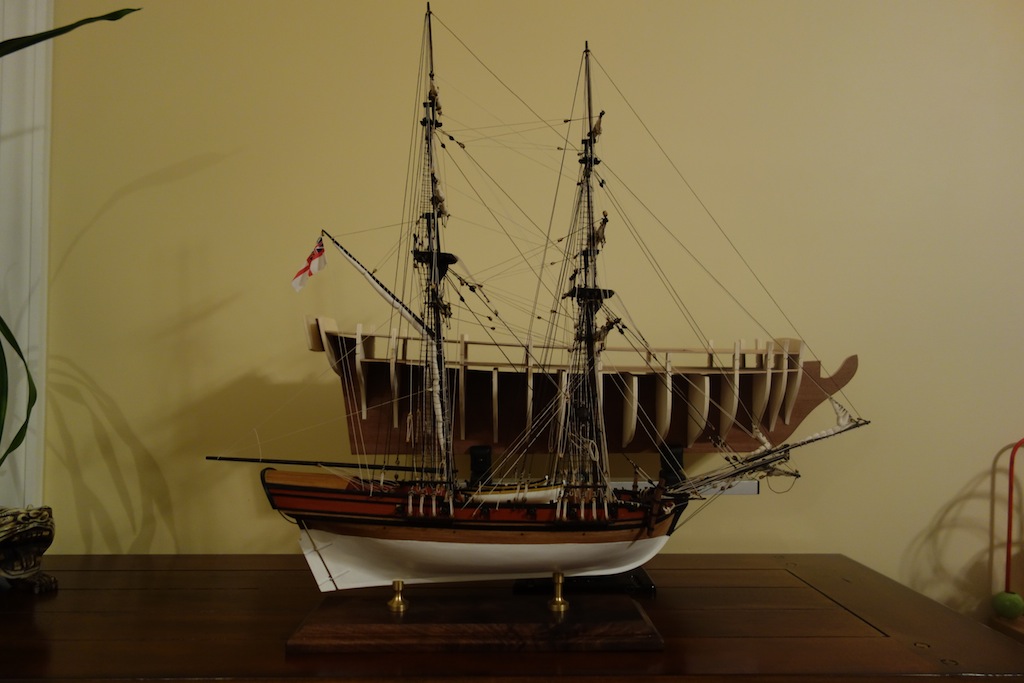
Well it's official -- finally got the Badger in a case. It's interesting how having a model in a case really gives the model more of an aura. Either that, or maybe the glass just helps obscure all the imperfections? The display case is from Model Expo (wait for them to go on sale). The glass is acrylic/plexiglass. I tried to save some money and cut the plexiglass panels myself, but I had problems with the plexiglass breaking cleanly, and the last straw was when a piece broke and gave me a nasty cut on my hand. So, I decided to find someone else to cut the panels for me, and ended up going with Dulles Glass and Mirror (www.dullesglassandmirror.com). Their website was very easy to use to place an online order for custom cut glass, and the package was sent quickly and was well packaged. I highly recommend them. A bit sad that the book is finally closed on this model, but it was a fun journey, in particular since I met a lot of friends through MSW, and now I'm looking forward to starting my next build(s). Thanks again for all the help and advice and support over the years.
- 153 replies
-
- 11
-

-
- badger
- caldercraft
- (and 1 more)
-
Hi Nick, very nice work on your Le Mirage I am about to start the Corel Unicorn, and actually spent last evening mapping out how to modify the one-piece keel piece to add the stern post, keel, false keel, and various components of the stem. Your approach is exactly what I'm planning to do and it's nice to see it executed in a beautiful way One thing I'd note - in my limited research, it looks like the scarph joints for the keel run a bit differently - essentially run vertically, so you don't really see the long joint. I could be wrong though. I'm subscribing to your log and look forward to your progress!
-
Looking really great Eamonn. Time to go enjoy your drink of choice in celebration before on to the next step of the build
- 1,039 replies
-
- 1
-
-
- ballahoo
- caldercraft
- (and 2 more)
-
Great choice of a next model, I am looking forward to following your build. Your Vasa came out great, so I have high expectations for this build (no pressure!)
- 786 replies
-
- 2
-
-
- Royal Louis
- Finished
- (and 1 more)
-
Hi Keith, that's what I was wondering as well. In addition to paints, I wonder if weathering powders would work? For example, I saw that Humbrol has a "chrome oxide green" that could be mixed with other colors to potentially get the color you need. https://www.humbrol.com/shop/weathering-powders/weathering-powders/av0005-weathering-powder-chrome-oxide-green-28ml/
-
Really nice work guys. For me, it's going to be a close toss-up between the green and brown effects. Just out of curiosity, once you get the effect you want, do you seal the plates with something to help stop any further oxidation? To avoid getting finger prints/oils on the hull, does anyone wear gloves? I wonder though if CA would eat through latex or other thin plastic gloves.
-
Model Machines 4" Table Saw
Landlubber Mike replied to dewalt57's topic in Modeling tools and Workshop Equipment
Well I managed to find a coupling of two adapters that provide a really good seal without using duct tape. I have a Fein shop vac, which is in metric and has a 35mm hose. The Byrnes machines' dust port is in inches (I believe 1.75" outer diameter, 1.5" inner diameter). I ended up buying the following two items: Shop-Vac 906-87-19 Universal Tool Adapter: http://www.amazon.com/gp/product/B00004RHKU/ref=oh_details_o01_s00_i02?ie=UTF8&psc=1 Bosch VAC003 35mm hose-to-1-1/4" port adapter: http://www.amazon.com/gp/product/B0000AV77S/ref=oh_details_o01_s00_i01?ie=UTF8&psc=1 I first cut off the largest section (including that square section) and the two smallest sections of the Shop-Vac adapter. Then I slipped the smaller end of the modified adapter into the machine's dust port. The Bosch adapter fits onto the vacuum's hose, and then is inserted into the larger end of the modified adapter. The Shop-Vac adapter is rubber, and the Bosch adapter is plastic, so as you slide the Bosch adapter into the Shop-Vac adapter, you not only are ensuring a tight seal between the two adapters, but also between the Shop-Vac adaptor and the machine's dust port. The fit is very snug when all is said and done, without needing duct tape or other solution. Anyway, just thought I'd share as I spent hours trying to find a solution. Hopefully this helps out others with Byrnes machines that might be using a shop-vac that is in metric size. -
Dust collecting on Byrnes Machines
Landlubber Mike replied to stantona's topic in Modeling tools and Workshop Equipment
Well I managed to find a coupling of two adapters that provide a really good seal without using duct tape. I have a Fein shop vac, which is in metric and has a 35mm hose. The Byrnes machines' dust port is in inches (I believe 1.75" outer diameter, 1.5" inner diameter). I ended up buying the following two items: Shop-Vac 906-87-19 Universal Tool Adapter: http://www.amazon.com/gp/product/B00004RHKU/ref=oh_details_o01_s00_i02?ie=UTF8&psc=1 Bosch VAC003 35mm hose-to-1-1/4" port adapter: http://www.amazon.com/gp/product/B0000AV77S/ref=oh_details_o01_s00_i01?ie=UTF8&psc=1 I first cut off the largest section (including that square section) and the two smallest sections of the Shop-Vac adapter. Then I slipped the smaller end of the modified adapter into the machine's dust port. The Bosch adapter fits onto the vacuum's hose, and then is inserted into the larger end of the modified adapter. The Shop-Vac adapter is rubber, and the Bosch adapter is plastic, so as you slide the Bosch adapter into the Shop-Vac adapter, you not only are ensuring a tight seal between the two adapters, but also between the Shop-Vac adaptor and the machine's dust port. The fit is very snug when all is said and done, without needing duct tape or other solution. Anyway, just thought I'd share as I spent hours trying to find a solution. Hopefully this helps out others with Byrnes machines that might be using a shop-vac that is in metric size. -
Amazing work Chris. After seeing your results, I'm taking that approach with my next build, the Corel Unicorn, that I would end up kit bashing anyway. The three primary colors on your Confederacy work so well - I just hope I can execute it half as well as you do.
-
Model Machines 4" Table Saw
Landlubber Mike replied to dewalt57's topic in Modeling tools and Workshop Equipment
I did, but maybe I need to look again. I need something that goes from 1.25" to 1.5" or 1.75". Didn't seem like there was anything in that ballpark. -
Model Machines 4" Table Saw
Landlubber Mike replied to dewalt57's topic in Modeling tools and Workshop Equipment
Thanks Al. I went to Home Depot on Friday to find the right size couplers, and couldn't find any that fit what I needed. I might have to look online if the adaptors I bought don't work. Ideally I was looking for something that fit both the Byrnes machines and my shop vac, as I see myself moving the shop vac around from tool to tool, and I wonder if the duct tape would unravel as you move the shop vac in and out of the outlets. Maybe I'm just overthinking things -
Nice start Frank, looking great. Should be a really fun model. Good luck with the plywood
-
Model Machines 4" Table Saw
Landlubber Mike replied to dewalt57's topic in Modeling tools and Workshop Equipment
Hey Al, Haven't used it yet, as I'm waiting for wood for my next build. It's very compact, runs very quiet, and like I said before, is built like a tank It's going to be nice to not have to hand sand everything Did you figure out the dust port and how to hook it up to a shop vac? I ordered a bunch of adaptors yesterday so hopefully one of them works. The Fein shop vac I got has a 1.25" (more like 35mm) hose, and the Byrnes dust port I think is 1.5" inner diameter, 1.75" outer diameter. It's been harder to find an adapter than I thought. Just out of curiosity, does that big knob to the left of the on-off switch adjust the speed of the saw blade? I haven't turned on the table saw, just fiddled with all the components. -
Model Machines 4" Table Saw
Landlubber Mike replied to dewalt57's topic in Modeling tools and Workshop Equipment
I got mine a couple of days ago, along with the disc sander. These things are built like tanks, very heavy solid construction. The finish is also pristine on them - it's almost a shame that they will get full of sawdust as they look like they should be in a museum. After getting my orders, I decided to suck it up and get the thickness sander (shh, don't tell the Admiral). Thanks Jim and Donna! -
Beautiful work on the cisterns! I took a look at your charts last night and was also struck by how much they differ from Steel. Interestingly, the Corel pictures don't seem to show that the masts and yards are overly thick, but maybe it's just their pictures.
-
Dust collecting on Byrnes Machines
Landlubber Mike replied to stantona's topic in Modeling tools and Workshop Equipment
Hi everyone, Sorry to bump this thread, but I was wondering if there were any other solutions to the Byrnes dust port adapter issue. I ordered a few of the tools recently, and the disc sander arrived yesterday. I definitely need an adapter fix as my shop vac hose opening is smaller than the sander's dust collection port. The PVC adapter and shop vac telescoping adapter seem like good solutions. Since I'll have the table saw, thickness sander and disc sander, I've also been trying to figure out the most convenient way to set up the shop vac so that I'm not constantly taking off and putting on duct tape. Is it easy enough to install adaptors on each of the three machines, and then just plug the shop vac hose into whatever machine I'm using at the time? I also saw Floyd's interesting approach of building a centralized connection system where the machines are connected to a common PVC tube, and the shop vac is run into the PVC tube: http://modelshipworld.com/index.php?/topic/1423-design-a-modeling-workshop/?p=28268 Any thoughts on the adapter or how to conveniently centralize the vacuuming across multiple machines would be greatly appreciated! Thank you in advance! -
Harbor Freight Workbench
Landlubber Mike replied to Landlubber Mike's topic in Modeling tools and Workshop Equipment
I bought a second of these benches. The quality for the drawers (as well as the general finishing) was worse than the first one. The worst thing is that I drove 25 miles to the store because they had an in-store only big coupon, I brought the thing home, down into my basement, and found out that the box had two legs of the same side So, had to bring it back upstairs, pack it back into my minivan, and take it all the way back the next evening. The next one didn't have that problem, but two of the drawers are too tight to even use. Not a big deal for me as the drawers are very shallow, but it still is a bit annoying. I think the reason that there are two of the same benches with different serial numbers is that they have two different manufacturers. They originally tried swapping out a leg piece with another from an open box that they had, but when I compared it to what I had bought, the dimensions were slightly different. I also agree with Tim about wishing the benches were a little deeper. I think they are a little over 20" deep. Probably fine for some of the machining work and small detail piece builds that I will do, but I don't think I could work on the model itself on the bench. In any event, these benches are incredibly sturdy and heavy. I doubt that I could build one myself for the $130 or so I spent for them. -
Peter, it's been a while since I've visited your log (MSW isn't sending my updates to build logs that I subscribed to ), but you've made really nice progress. Your sail work is outstanding, and I'm taking notes for my next builds (which ultimately will include the Pegasus). Nice to see a Pegasus build in sails - I've always thought that she would look gorgeous all dressed up! Looking forward to your future updates. You're on the home stretch
- 431 replies
-
- 1
-
-
- pegasus
- victory models
- (and 1 more)
-
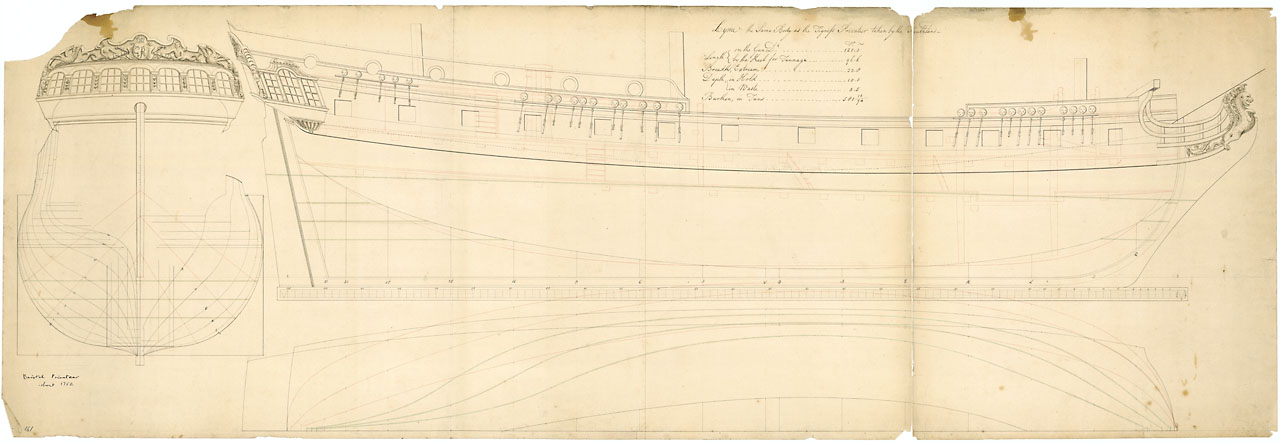
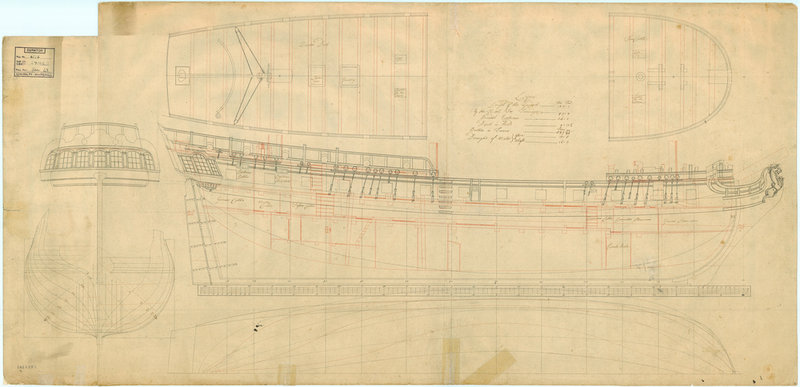
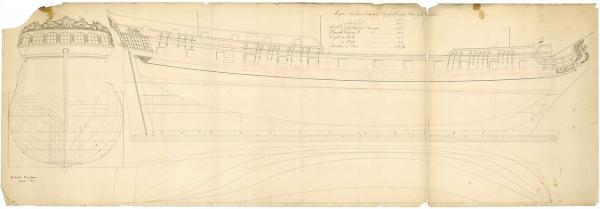
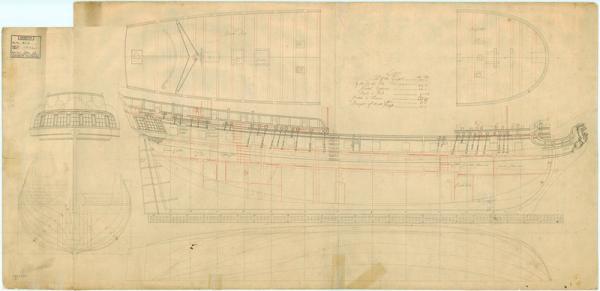
I'm fairly certain that the Pegasus has the tiller on the quarterdeck. Something to consider It's interesting - this morning, when I did a search on the Lyme at the NMM site, I came up with four plans. Now I only come up with two. The second picture in my last post might not be the 1748 Lyme - the stern looks pretty different from the Unicorn stern. This is probably the profile view for the 1748 Lyme: Like Chapman's plans of the Unicorn, the quarterdeck seems to slope upwards as you move toward the bow, although the portholes dont open up like on the Unicorn.
-
Very true Ian. Plus, you've shown that if I don't like something on the Unicorn, existing work can be readily removed and rebuilt to good effect.
-
Really gorgeous work Sherry. I can't really add much more to the other well-deserved accolades that MSW is giving you, but builds like these give me the inspiration to raise the level of my work Also, "Sherry Blue" is gorgeous - you should bottle it and market it
-
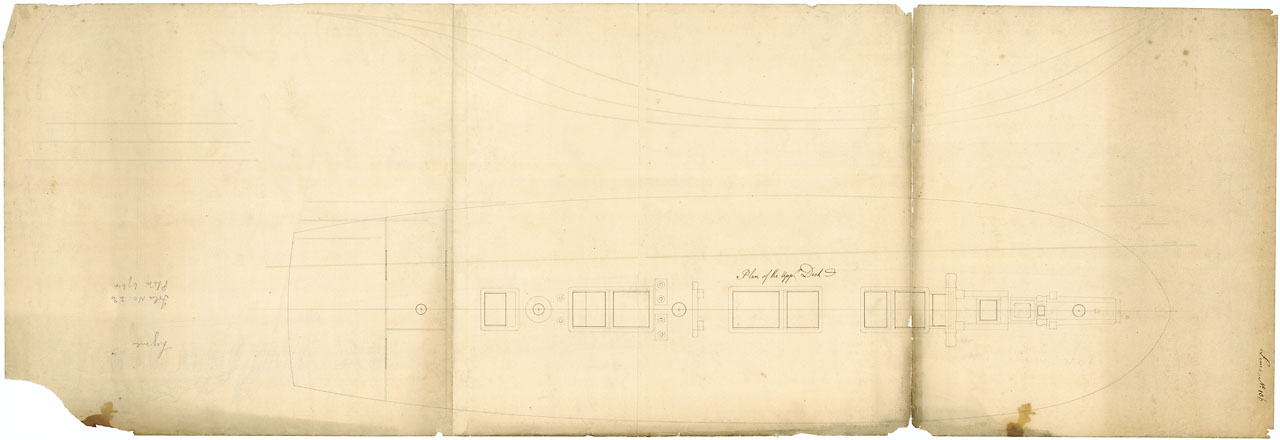
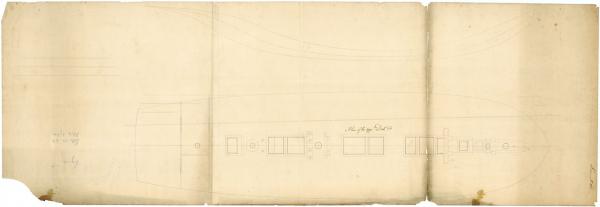
Thanks very much Ian and Joe, this is all very helpful. I'll go ahead and plan to cut the quarterdeck-forecastle template into two separate pieces. Since I'm planning on not including the flag lockers, I'll have to get rid of, or modify, the second to last bulkhead. That will leave a gap (I think) where the template should meet the stern, but I can just cut a new longer template if need be. The gap probably won't be all that big to give me a planking issue, but it might just be better to cut a new, longer one for added support. Thanks also for the tips on the forward upper bulwarks. I thought they seemed a bit odd, and I can only imagine how difficult that made the planking. Looking at the plans below of its sister ship, the Lyme, it doesn't look like Corel has the line correct. I'll plan on modifying it like you suggest. You've also given me a lot to think about when it comes to the masts. I feel like I should do something to help lock in the masts. Whether I build a cradle on the decks, or cut a slot into the keel, I think spending the time now will make life easier for me later on. Ouch, the list of modifications is growing longer by the day. I'm going to have to start writing all these down to keep them all straight. Yesterday, I started to wonder whether it makes more sense at this stage of my skill level to build the Unicorn next, which is a more basic kit but is going to require a lot of tweaking -- or go with the Pegasus, which I believe is a much better kit in terms of accuracy and components and can pretty much be built straight from the box (plus, I have Bob Hunt's practicum for that kit and the TFFM series). After coming across Ian's log and buying the Unicorn for $130 on one of Model Expo's eBay auctions, I figured that the Unicorn would be a good learning stepping stone before tackling the more complicated Pegasus -- especially given the high standards set by Blue Ensign and other Pegasus builders on here. So, hopefully it's just a matter of getting a few things on the Unicorn's hull "corrected" and then I should have a fairly smooth journey after.
-
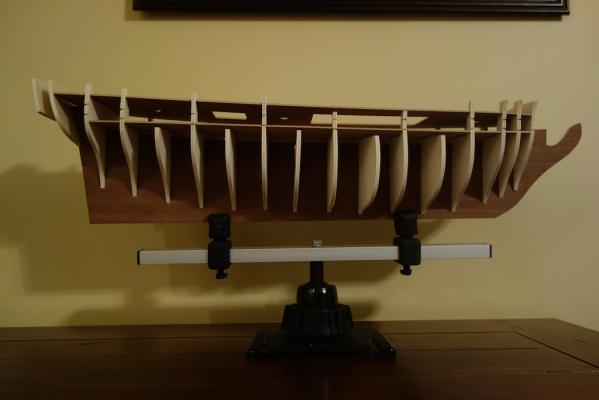
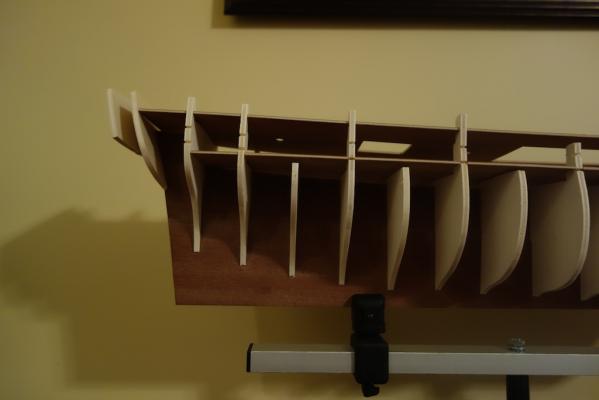
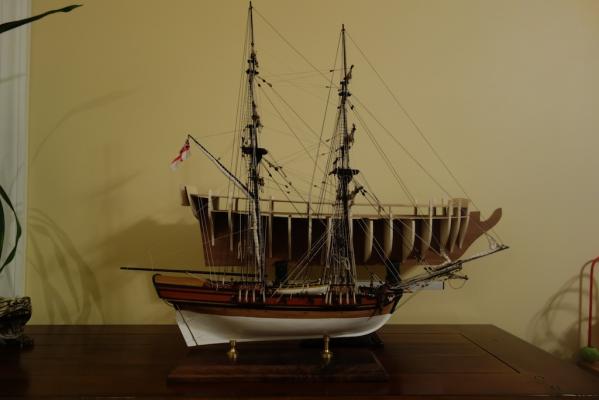
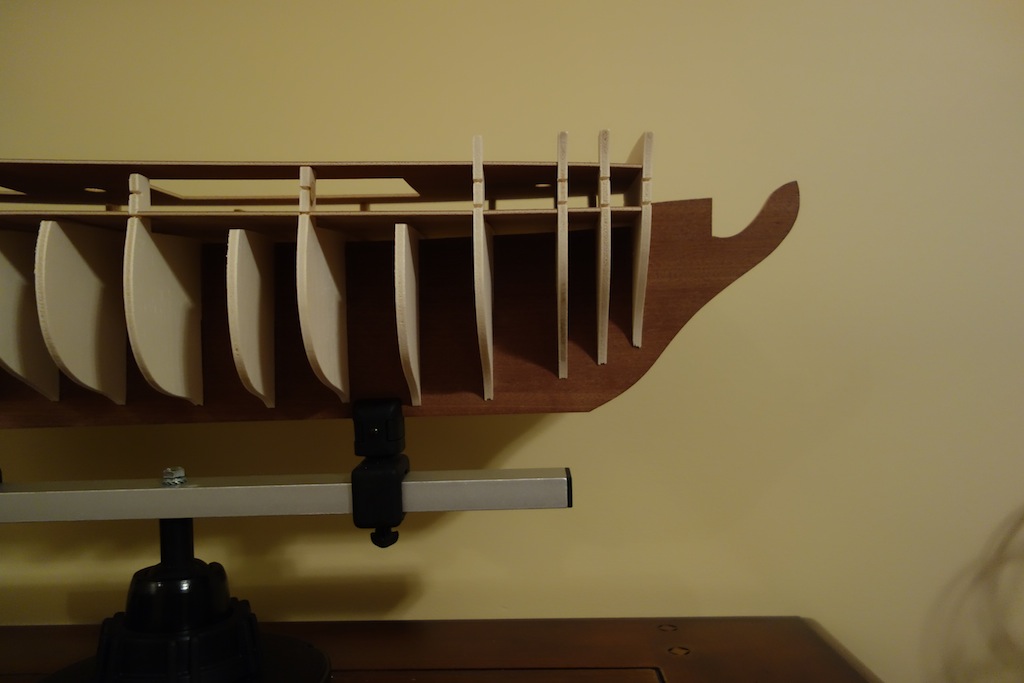
I spent a little time this evening and opened up the remaining bulkheads a bit to dry fit them on the keel. A couple of the bulkheads are a bit out of alignment and need to sit down a little lower. I'll check them against the plans and modify the keel a bit, then use the keel as a pattern to cut a new one out. The lower deck sat very nicely amongst the bulkheads. The upper deck was a bit tricky. Ian, I think I see what you are saying about how the upper deck pattern is supposed to lay - which is probably asking a bit too much to ask one piece to cover all three areas (quarterdeck, waist and forecastle). The quarterdeck area in particular is not sitting correctly, with a gap of a good few millimeters to where it should sit on the bulkheads the fore area of the quarterdeck. Since I'm thinking of changing the angle of the quarterdeck to open up the portholes, I'll need to make some modifications for the quarterdeck bulkheads anyway so I'm not too disturbed. Here are some pictures of the bulkheads and the deck patterns dry fitted to the keel. Also I took a picture against the Badger for the size differential. It's a bit hard to tell from the picture, but the Unicorn's hull is a good 50% longer and wider than the Badger's hull (even at 1:75 scale, versus 1:64 for the Badger).