Landlubber Mike
-
Posts
4,544 -
Joined
-
Last visited
Content Type
Profiles
Forums
Gallery
Events
Everything posted by Landlubber Mike
-
 Thanks Jay, this is very helpful. I forgot about looking to where the bottom of the buikheads lie - I'll have to take a look and figure things out. Thanks!
 -
Hi Jay, sorry I think I wasn't very clear. I was wondering if I should cut the false keel, stem and stern post right to where the hull planking should end (so that the rabbet would be cut into the plywood), or cut them bigger (and the false keel smaller) so that the hull planking would end up in the middle of the pear pieces, rather than butt up against the start of the pear (so the rabbet would be cut into the pear itself). If it helps, the keel is 5mm. I think the first approach would make cutting the rabbet much easier, but the plywood edge to which the pear pieces would be glued would be narrower -- and therefore, maybe less area for the glue bond -- for example, 3mm of the plywood matching up against the 5mm pear. The second approach would make it more difficult to cut the rabbet, but the plywood and the pear joint would be the full 5mm of both the plywood and the pear. Just curious as to what people generally do in these cases. Thanks!
-
Thanks very much guys, I'm going to go with cutting the new keel. A few hours of work will save me a lot of aggravation in the end. I'll probably also stick with plywood for the cost. One more follow up question. I plan for the stem, stern post and false keel to be in pear, and I also plan to cut a rabbet for the hull planking. When cutting out the modified keel in plywood, should I cut it such that the rabbet would be cut into the plywood (i.e., the hull planking would flow right into the start of the pear pieces), or should I make the stem/stern post/false keel a little wider so that the rabbet would be cut into the pear itself? I would think going with the latter might provide a little more strength to the glued area. On the other hand, cutting it into the plywood would be easier because I can more easily cut it since one side would be open. Thanks!
-
Looking really great Eamonn! Very clean, and I wouldn't have thought this was your "first proper" build I look forward to following your progress!
- 1,039 replies
-
- 1
-

-
- ballahoo
- caldercraft
- (and 2 more)
-
It's a bit hard to tell if it's merely a bend or has some twist to it. The keel definitely has an arch in the middle so that the middle is up a couple of millimeters off a flat surface. It looks like there might be a slight twist to it as well on one end, which has me a little nervous.
-
Thanks very much guys, I really appreciate it. I think I'll end up cutting out my own keel - now I'll need to see if Jeff at Hobbymill can give me a big enough sheet of pear to work with
-
Really nice build Patrick, congratulations! Looking forward to your Constitution log.
- 299 replies
-
- 1
-
-
- niagara
- model shipways
- (and 1 more)
-
Hi everyone, One of my next builds is going to be the Corel Unicorn. I plan to start it in a month or two, but was taking a look at the kit now to see if there are any issues that I might have to address. One is that the keel is slightly warped. The keel is made of either walnut or mahogany, and is a full piece that includes the bow and false keel - areas that will not be planked over. I'm planning on replacing most of the kit wood and going with swiss pear for the hull, which would include the bow and false keel. So, I'm trying to figure out what I should do. I was planning on cutting off the bow and false keel, and building new ones out of pear to attach to the kit's keel. But since the keel is warped, I'm wondering if I should just get myself new plywood since I'm going to be building the bow and false keel anyhow (rather than trying to straighten out the keel from the kit). My gut is telling me that I should just go ahead and reconstruct the keel so I don't have to worry about warpage. I have a scroll saw, so I think I should be able to cut a new one out without much problem. Does anyone think this is the better course? If I was to stick with the original keel, to un-warp it, do you soak it and clamp it between two straight boards for a few days? One more question - when constructing the bow and false keel, should I make them slightly larger so that the rabbet is cut into the pear, or should I construct them so the rabbet line ends at the plywood (i.e., the rabbet would be cut into the plywood)? My Caldercraft kit had walnut pieces for the bow and false keel and I believe took the latter approach which seems reasonable to me, but I thought I would see if anyone had a better suggestion. Alternatively, should I just reconstruct the keel out of a single piece of pear, so that I don't have to worry about cutting out separate pieces for the keel out of plywood, and the bow/false keel out of pear? I wasn't sure if pear is solid enough to serve as the keel when most kits I've seen use plywood. Thanks in advance!
-
Hi Ponto, Le Renommee is a gorgeous ship. Congratulations - would love to follow your progress on here as you build her
- 8 replies
-
- 1
-
-
- Euromodel
- Royal William
- (and 1 more)
-
Very nice work Kester as always. Thank you very much for the tutorials, I always learn so much reading your logs.
-
Hi John, thanks very much for the replies and for the pictures. Very cool stuff, gives me a lot to think about. On the kit wood and fittings, I noticed that they weren't of very good quality. Disappointing, but since I got the kit for a good deal and am planning to scratch a lot of the items anyway, I'm not too bothered I guess. Thanks again John - will start my build log in a few weeks
-
Hi John, thanks very much for the kind words. I should be starting the Morgan alongside the Unicorn probably in another 6-8 weeks or so. I'm taking my time right now to do a little research for the build, and wait for some upgraded lumber. I love all the details and improvements that you can add to the whaler (and ones that you are adding in particular), so am really looking forward to it. I'm thinking that I'll add full sails to the ship, and maybe move one of the whaleboats to the crane. I even have been toying with the idea of a diorama, with a couple of whaleboats in the water and one on the crane, but that might be a little too ambitious. My original goal was to avoid using paint at all on the build, and to stick with ebony/african blackwood for the black areas of the hull, holly for the masts and spars and detail pin striping, maple for the deck, and boxwood for the bulwark planking and deck houses and other items. Going with ebony or african blackwood was going to be prohibitively expensive though (along with the practical difficulties of those woods being toxic and difficult to work with), so now I've decided to go with dyed pear instead. I'm still trying to figure out if holly would work out for the white areas of the ship. I might have asked you this before, but when I look at pictures of the Morgan, it looks like the deck is a natural oak-ish color, and the bulwarks, deck houses, etc. seem to be painted a yellow ochre color. Was that your impression? I'm thinking that I could use maple for the deck, and use boxwood to represent the areas painted yellow ochre. Any thoughts on whether that would be roughly representative of the Morgan's color scheme? Thanks again!
-
Hi Ian, thanks very much! Your Unicorn was a big reason for why I decided to buy the kit for my next build, so please don't hide it I have been doing a lot of pre-planning for the build, both in terms of colors and modifications. For colors, I think I'm going to stick with three primary colors - pear for the hull, boxwood for the deck and accents, and black (stained/dyed pear and other woods) for the wales, mast tops, and spars. My goal is to not use paint to the extent at all possible, but that means replacing a lot of the strip wood which seems to be of relatively good quality. I'm also thinking about whether to color the bulwark planking, gun carriages, etc. a red color. I found a couple of stains that look promising, but I want to stay as close to a minimum number of colors as possible. This is the general approach taken by Bernard Frolich, echoed in Chris LeBren's build here which I think is absolutely beautiful: http://modelshipworld.com/index.php?/topic/2085-usf-confederacy-by-chris-b-316-scale-pob-scratch-build/page-2 I'm also thinking about doing a number of modifications. In addition to opening up the waist like you did, I'm probably going to scratch build the stern and stern galleries, add a thicker wale, and angle the quarterdeck so that it matches up a little better with the Chapman plans (where the portholes gradually open up as you move towards the bow). I might even be bold enough to put a mixture of full and furled sails on the build now that I have gone through the experience with the Badger. I don't think that I will attempt to add a stove like you did, because yours would surely put mine to shame
- 153 replies
-
- 2
-
-
- badger
- caldercraft
- (and 1 more)
-
Thanks very much Alistair I bought the Pegasus from a MSW member a couple of years ago and intended it to be my next build, but I thought that maybe starting with a kit that is a little more basic would help me build up my skills a bit more to do the kit justice. So, I ended up getting the Unicorn off of eBay for a very low amount ($130 or so) and figured I would start with that kit. Of course, now that I have been researching the Unicorn kit and seeing the great builds from Ian and ZyXuz, I am planning a lot of changes to the kit -- to the point that maybe I would just be better off going with the Pegasus which is more of a "complete" kit in my opinion All kidding aside, I have the TFFM series, and I think the Unicorn and Morgan will help me advance my skills to build a detailed Swan class per those books. I'm planning on doing the Charles Morgan alongside the Unicorn build. I found with the Badger that there were times I felt stuck or burned out and stepped away from the build for months at a time, so I think having a second build alongside the Unicorn might help me avoid that. The nice thing about the Morgan is that I won't have to rig cannons with 2mm blocks -- bad thing is that there are 7 whaleboats
- 153 replies
-
- 3
-
-
- badger
- caldercraft
- (and 1 more)
-
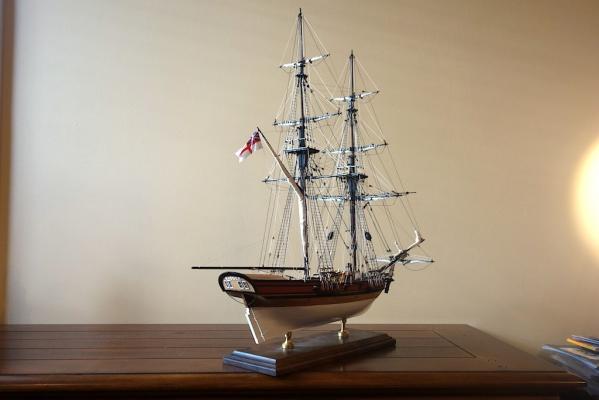
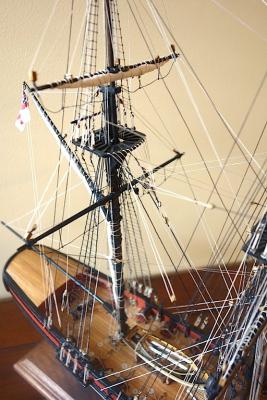
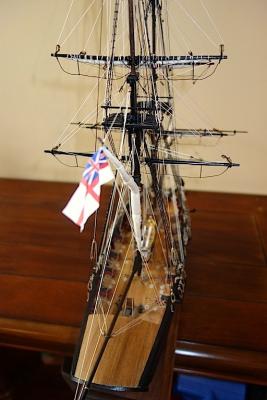
Hi Peter, thanks very much. I think I'm still very much a landlubber, but I appreciate the vote of confidence I am almost ashamed to say that I didn't actually fabricate the ensign, but these are from BECC Scale Model Miniature Flags, whose website is: http://www.modelflags.com/. They are cloth, and look pretty good in my opinion, or at least better than I could have hoped to make. Model Expo sells flags but they are on the small side and more of a vinyl type of material, unlike the cloth used by BECC which is very easy to work with and manipulate to add folds and creases. They have a very wide selection of flags and sizes, and I would highly recommend them. I happened to come across them when placing an order with Cornwall Model Boats. I think you can buy them directly from BECC, but I bought them from CMB.
- 153 replies
-
- 1
-
-
- badger
- caldercraft
- (and 1 more)
-
Thanks very much everyone, I really appreciate the kind words. It means a lot coming from you guys, as your builds have been a great inspiration to me. Kester, I have a case that I got from Model Expo a couple of years ago when I thought I was close to the finish line - that was before my twins arrived I need to stain and finish the wood framing, and locate a good source for glass or plexiglass (probably the latter). It's in a cabinet at the moment so it won't get too dusty in the meantime
- 153 replies
-
- 2
-
-
- badger
- caldercraft
- (and 1 more)
-
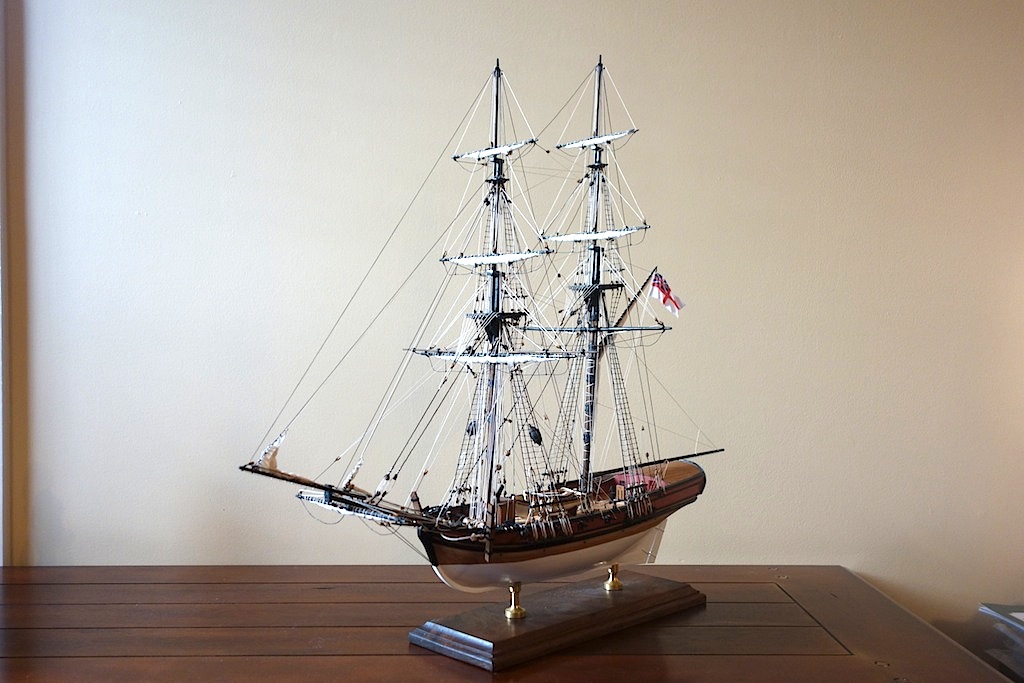
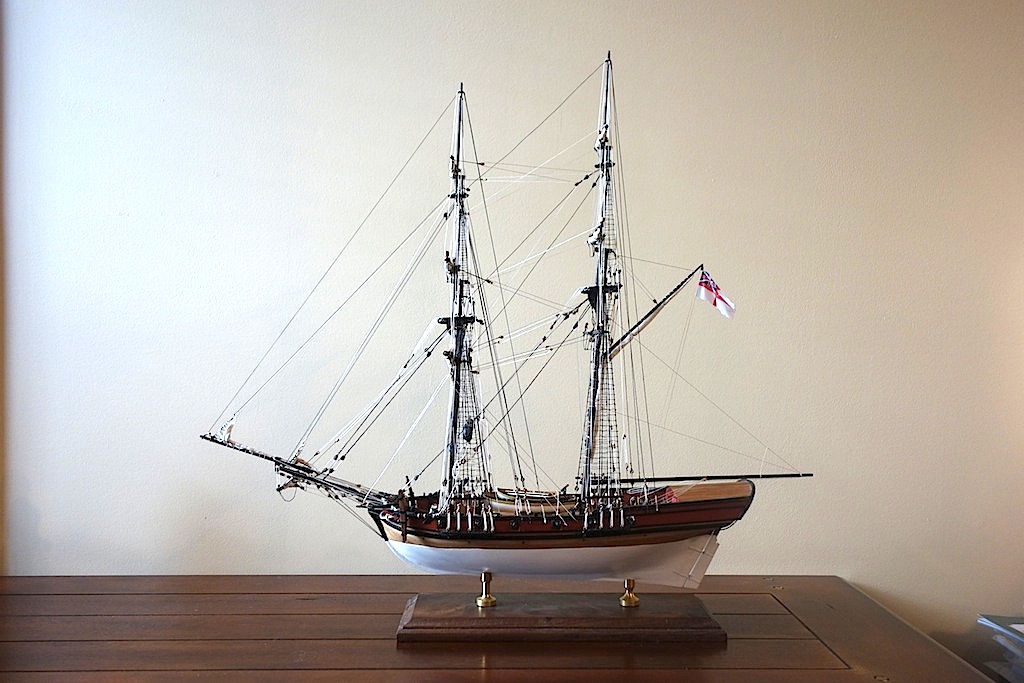
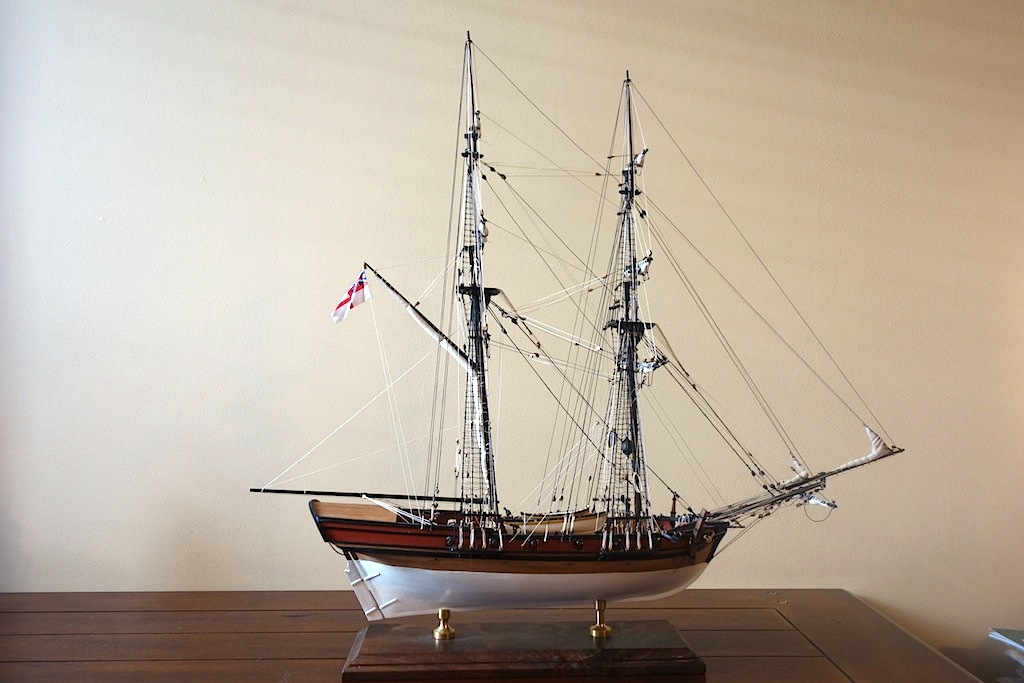
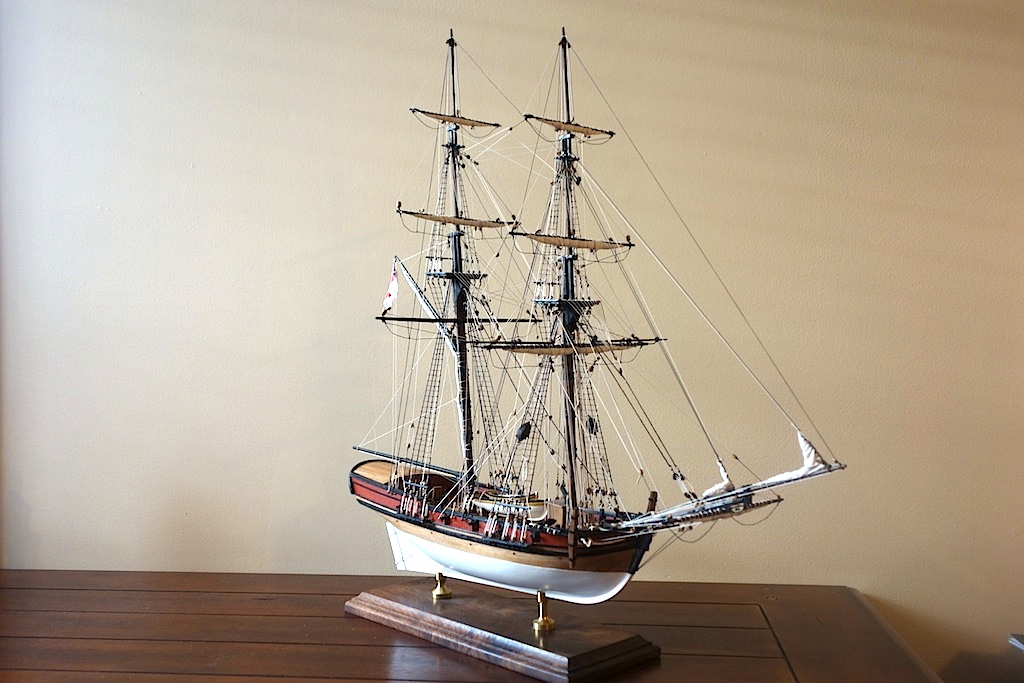
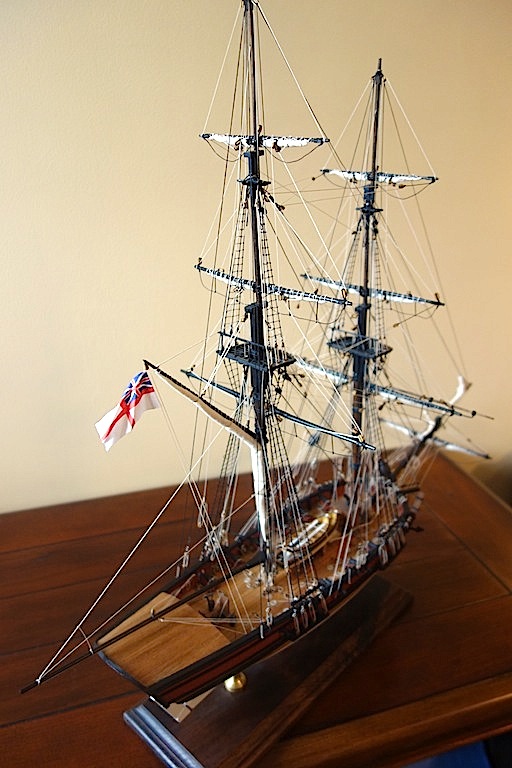
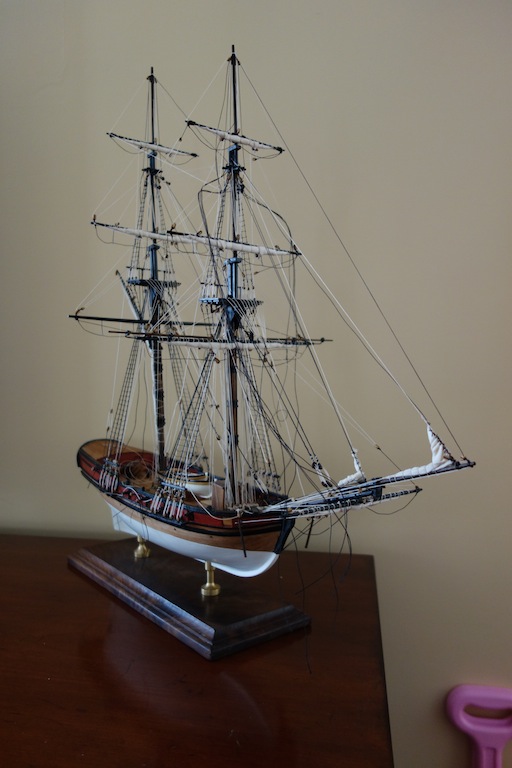
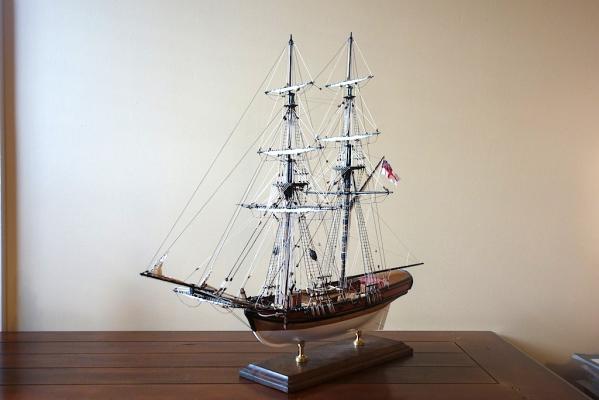
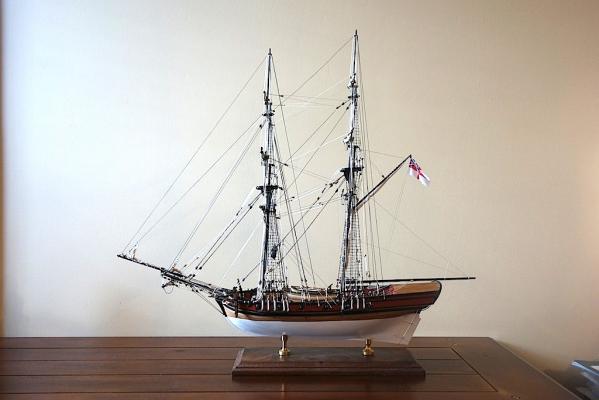
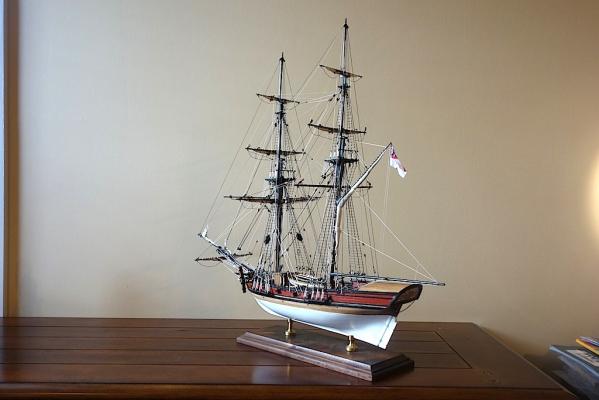
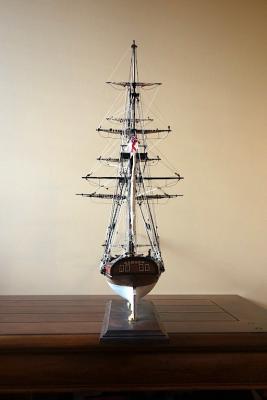
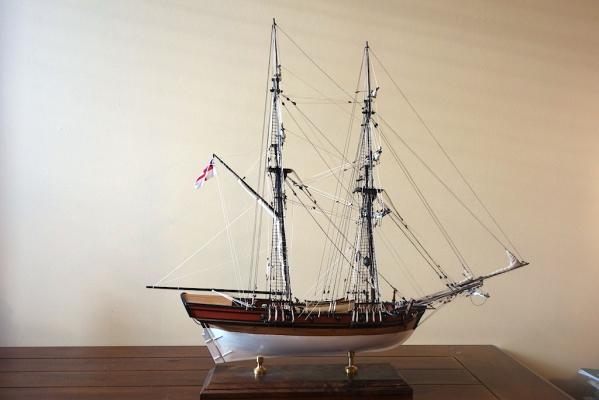
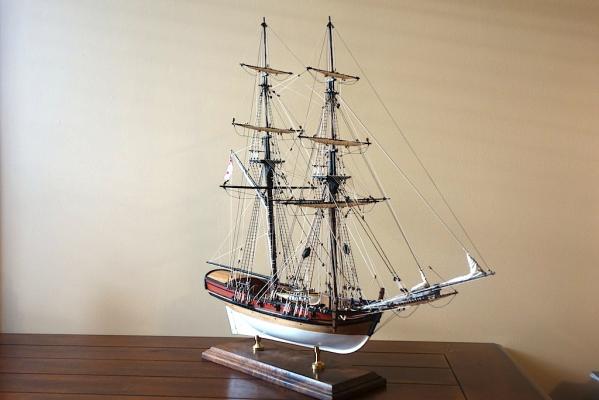
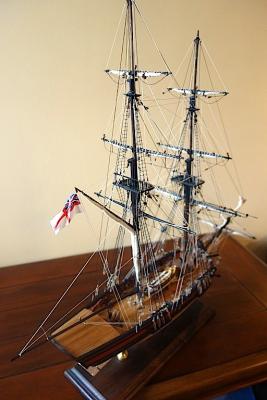
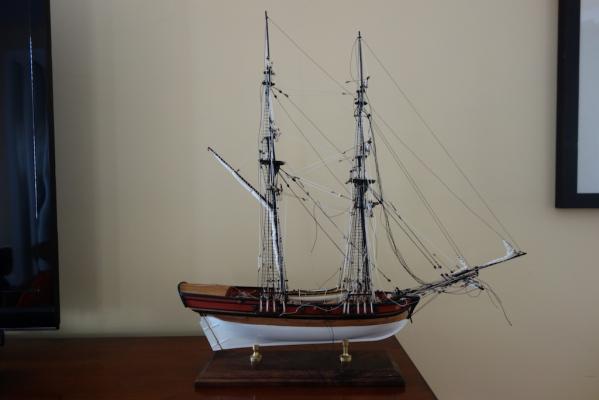
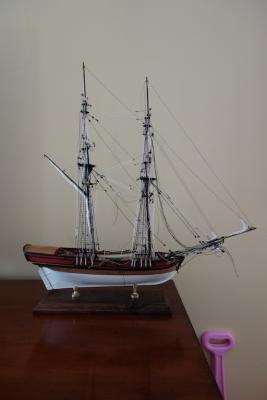
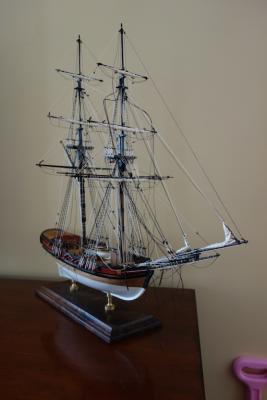
Here are the pictures - sorry they are a little dark, but the lighting in my living room (the only neutral background I could find) is not the best. Thanks!


- 153 replies
-
- 17
-
-
- badger
- caldercraft
- (and 1 more)
-
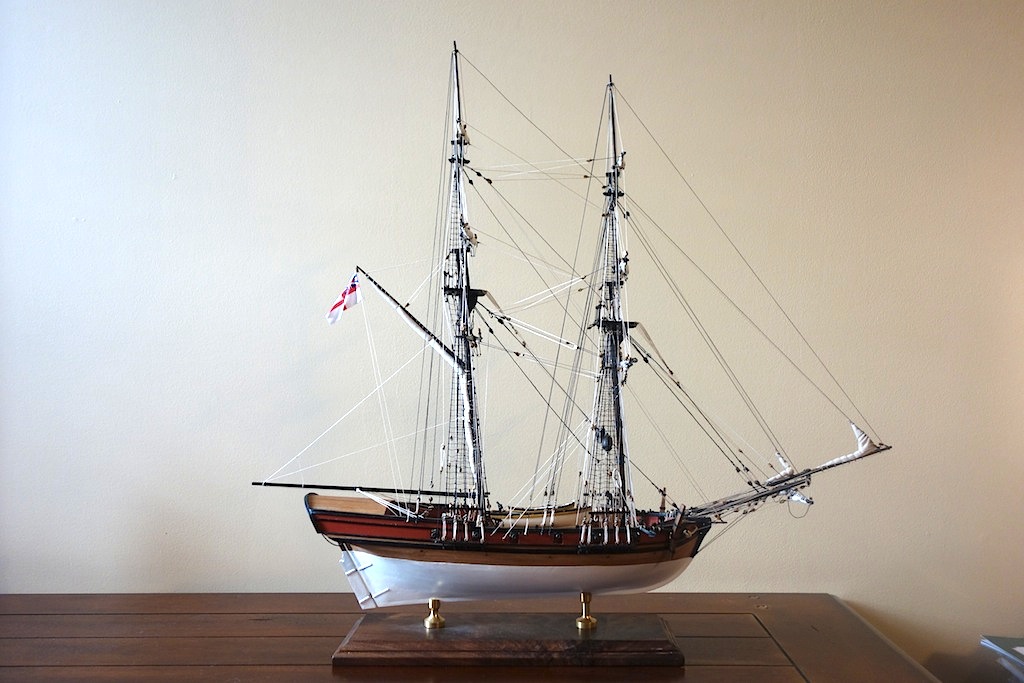
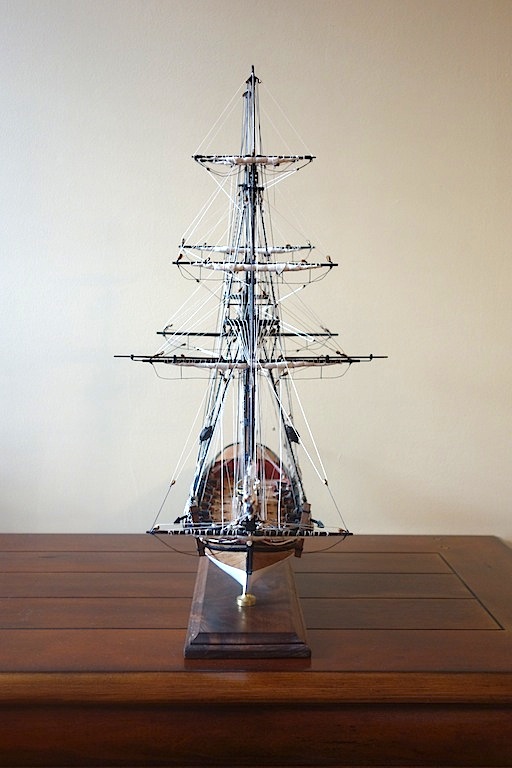
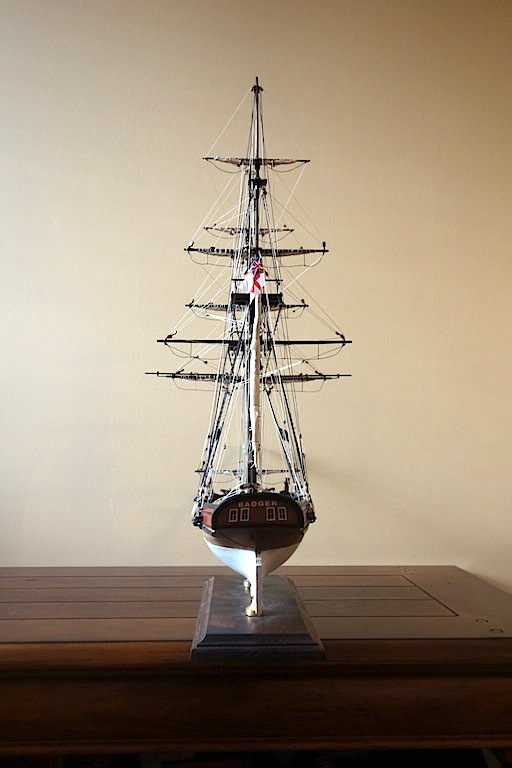
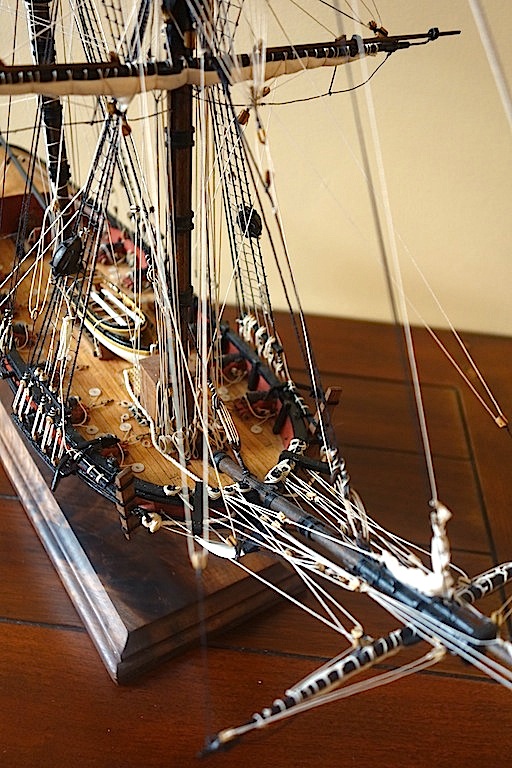
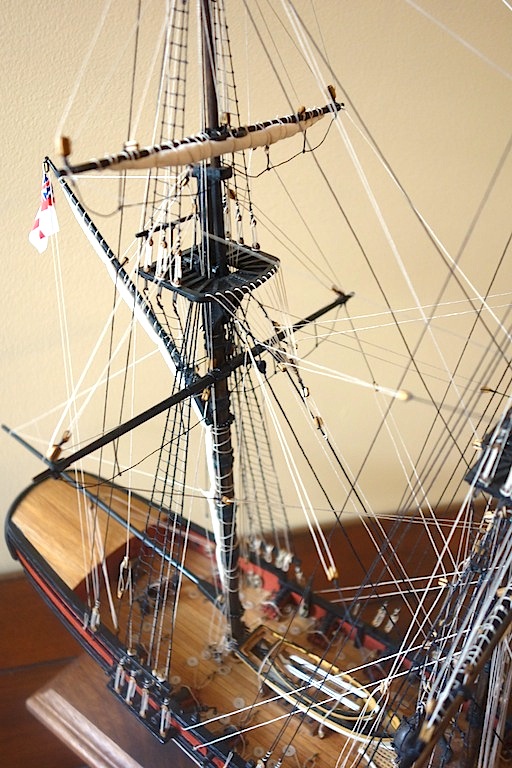
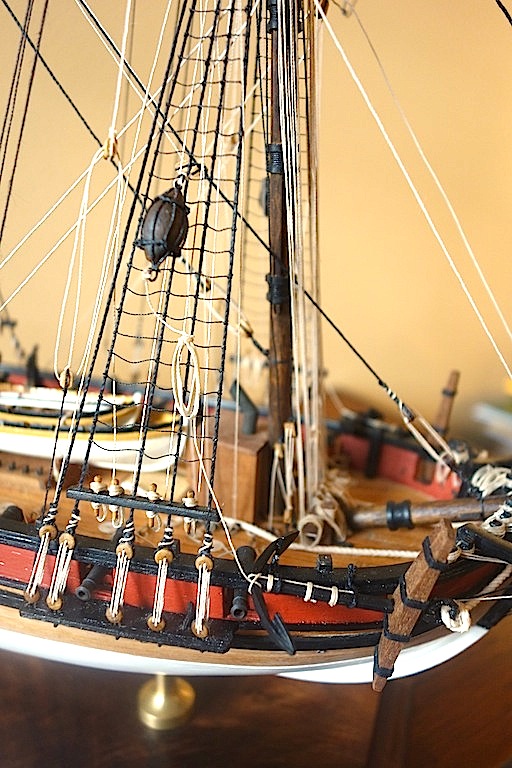
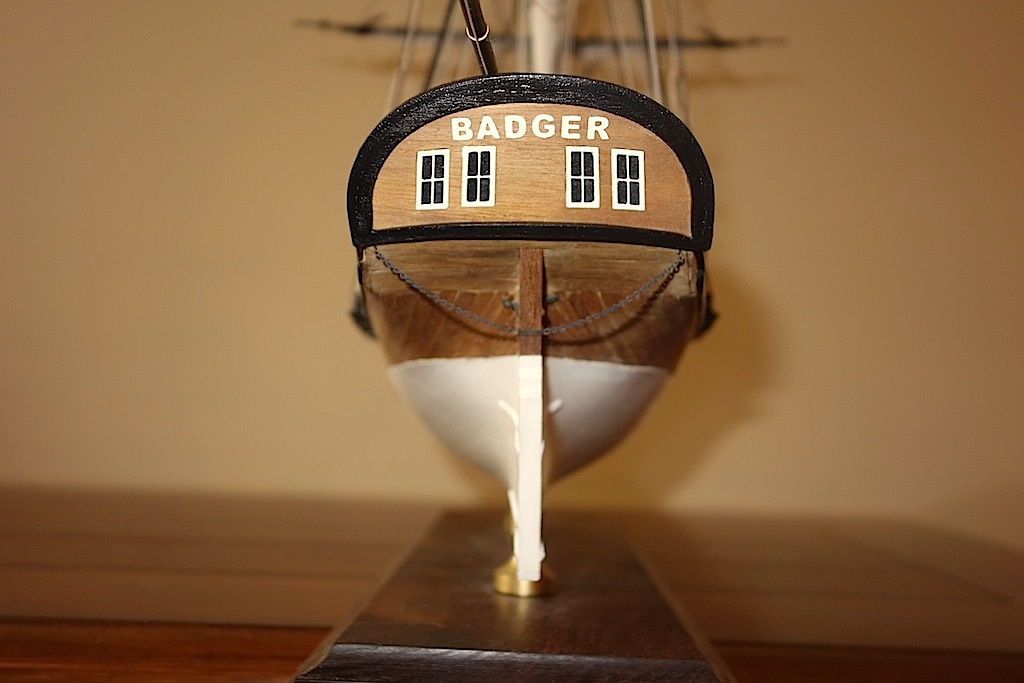
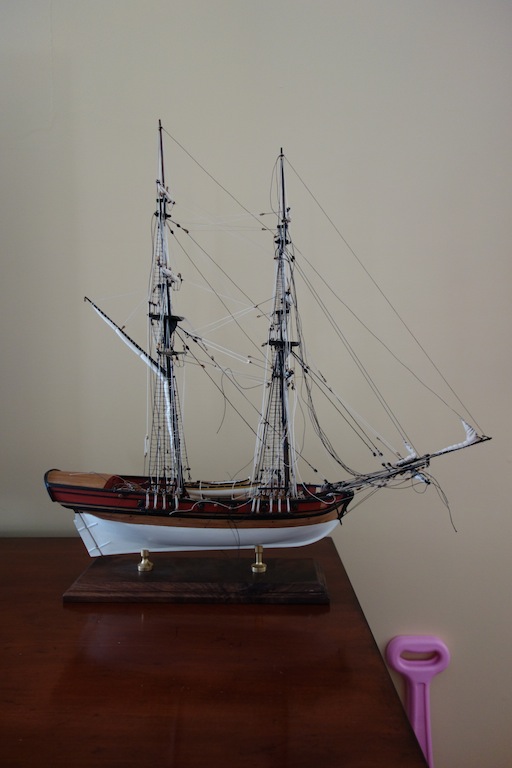
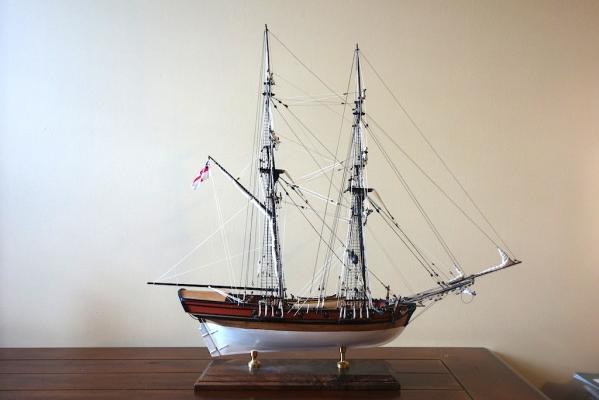
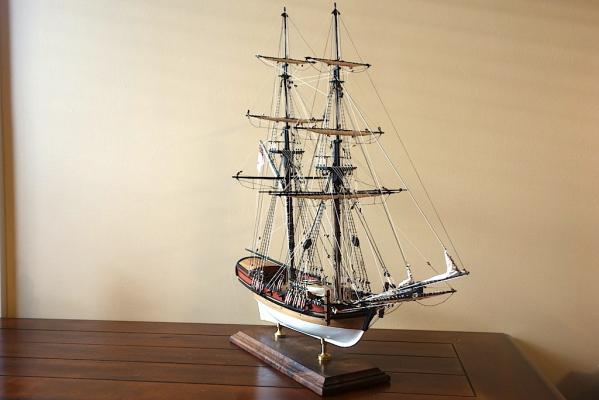
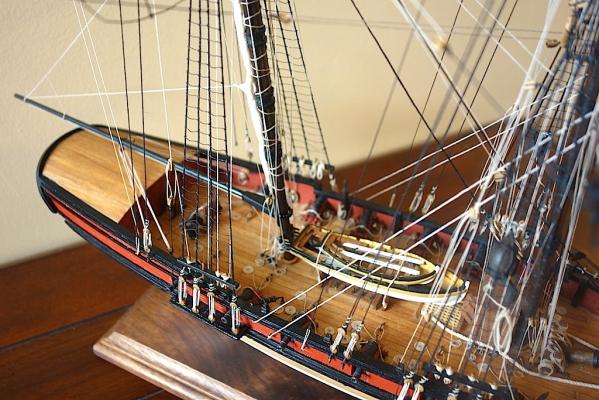
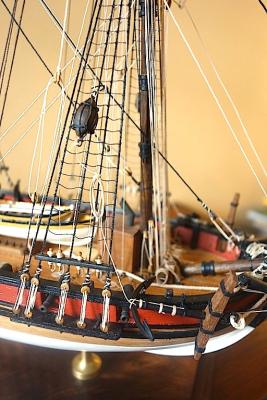
After 5 years, 3 months and 2 weeks, the Badger is finally finished! I just want to say thank you to all my MSW friends here for all the advice and patience with all my questions, and especially for all the inspiration that your build logs have given me to help push me to do a little better job than I might have otherwise done This has been a very rewarding hobby for me, but even more rewarding are the many friends across the globe that I have met and exchanged ideas with. So thank you all, and thank you MSW for providing such an amazing forum, without which I probably would be still on the hull planking A few words on the Caldercraft kit. I think it's a fantastic "beginners plus" kit that provides a lot of challenge, interesting detail, and options to add personal touches to. I would give it an A for the instructions, and an A+ for the detail parts. I give the pre-cut wood parts a B+, but the wood strips a B-. Unfortunately, the walnut strips were very prone to splintering, and the strips were not very straight in many cases. I have kits from other manufacturers that don't seem to have this problem, but this is of course a beginners kit so maybe I shouldn't expect very much. I actually added a lot of touches beyond just building the kit out of the box - deck was treenailed, and I added furled sails, anchor non-buoys, rudder pendants, and the ensign. The furled sails took a lot of research and delayed the build quite a bit, but I think they came out halfway decent, and so I'm glad I went that route. I have a great appreciation for people that do rigging very well - I feel like that's one aspect of my next builds that I in particular need to improve on. Speaking of my next builds, they will be the Corel Unicorn and the Model Shipways Charles Morgan. I have good friends in Ian and ZyXuz to help me along with the Unicorn, and John has a great Morgan build going that I will be borrowing a lot of ideas from. For these builds I'm going to try to avoid paint as much as possible, but build using pear, boxwood, holly, etc. and stains/dyes and scratching a lot of details (including, perhaps, full sails this go around). Should be a fun ride. So thanks again to all my friends here. If anyone building the Badger has any questions, please don't hesitate to ask. I'm going to take a couple of months away from the hobby to research my next builds and take a mental break. I'll be checking in on the build logs of course for inspiration and to learn ways to better improve my skills. Thanks again! I'll post pictures in the next post.
- 153 replies
-
- 1
-
-
- badger
- caldercraft
- (and 1 more)
-
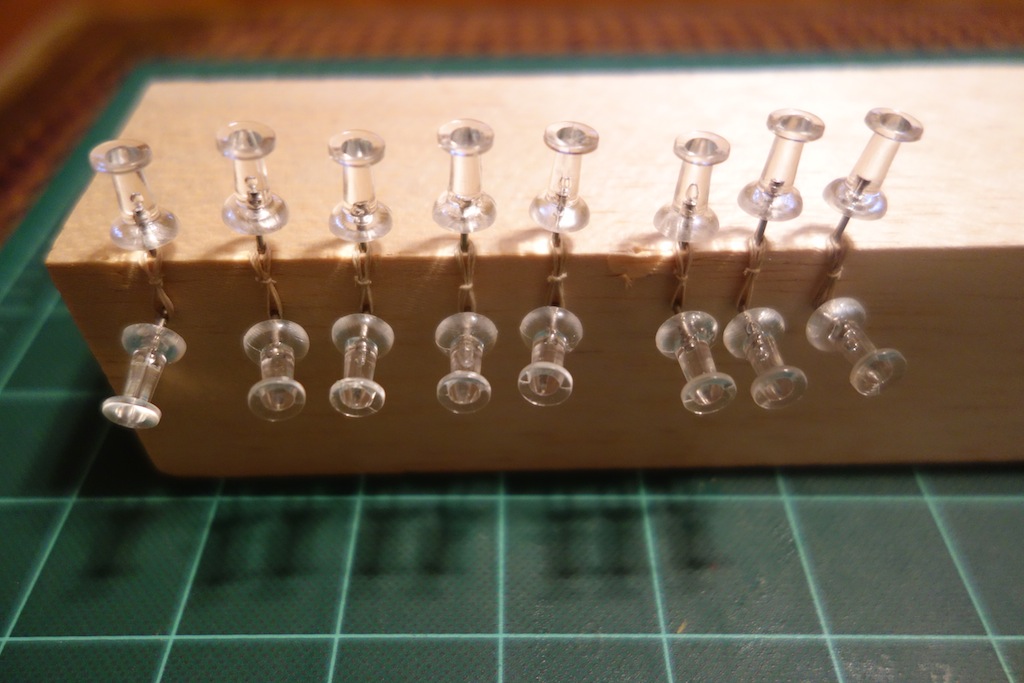
The blocks seemed a bit oversized, at least relative to the blocks on my Badger kit. I'll probably look into replacement blocks.
-
Hi ZyXuz, thanks for looking in on my log. I saw on your blog that you are now on the cannons. Have you decided on the number of guns that you will add to the ship overall, and whether you are going to use smaller caliber guns for the quarterdeck? I bought from CMB some smaller Caldercraft guns and carriages for the quarterdeck to see how they would look, but still thinking about what I want to do. Also, how do you like the cannon carriages? They actually don't seem all that bad, and it's nice that they are pre-constructed. It was a bit of a pain to assemble the carriages on my Badger, and there were only 12 guns
-
Thanks very much Kester - I'll have to remember that for next time. I think that makes sense on the coils. I forget where I saw this technique, as I'm not smart enough to have thought about it on my own For the furled sails, there is a little more bulk in the center of the yard, but perhaps I could have added a little more. Thanks for looking in and the advice, I really appreciate it!
- 153 replies
-
- 1
-
-
- badger
- caldercraft
- (and 1 more)
-
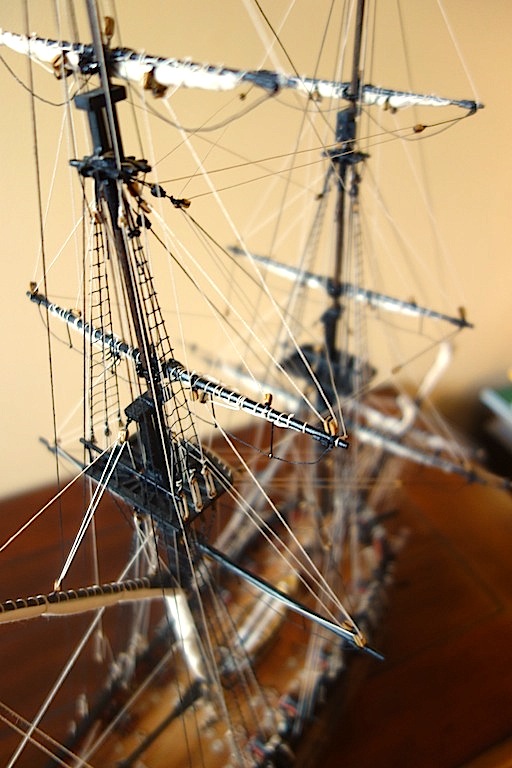
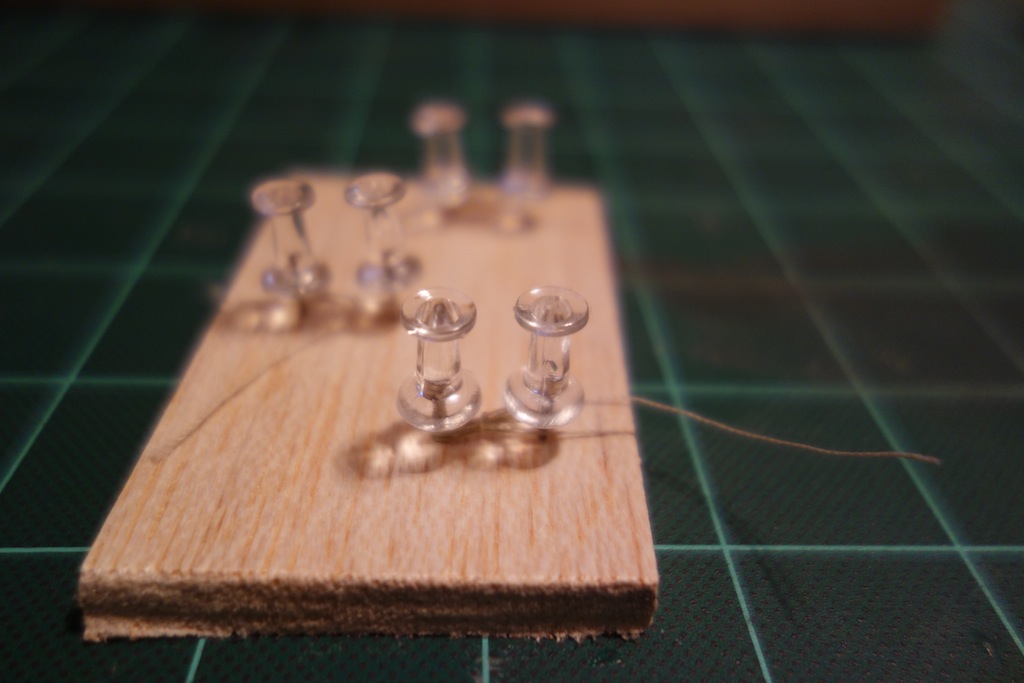
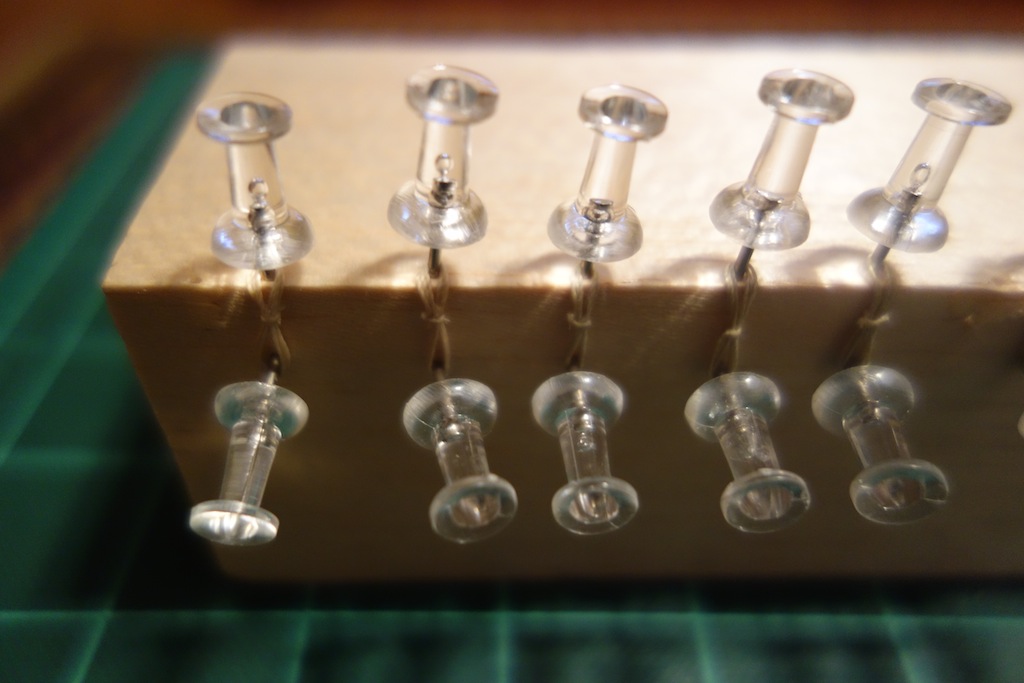
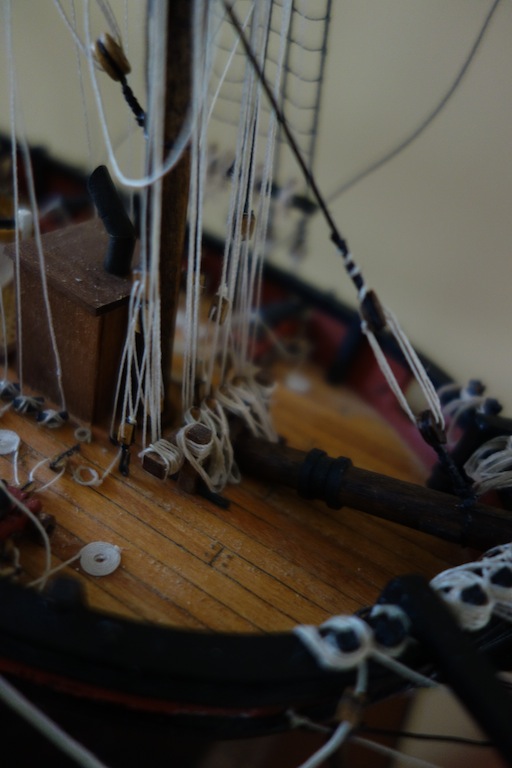
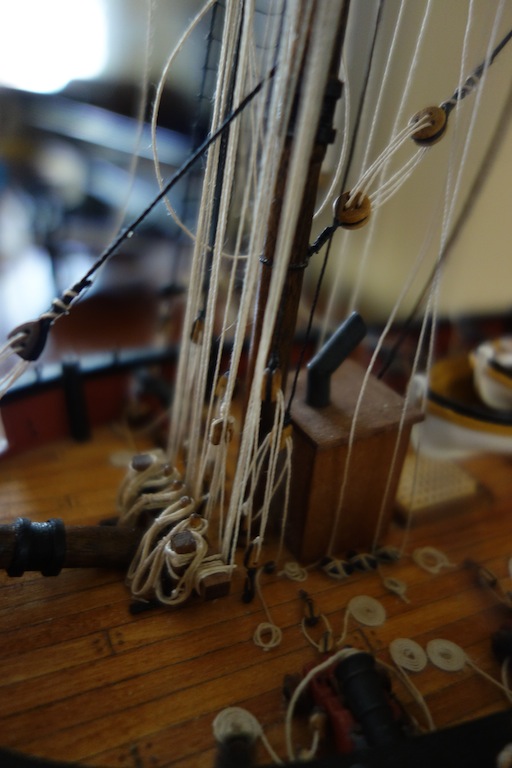
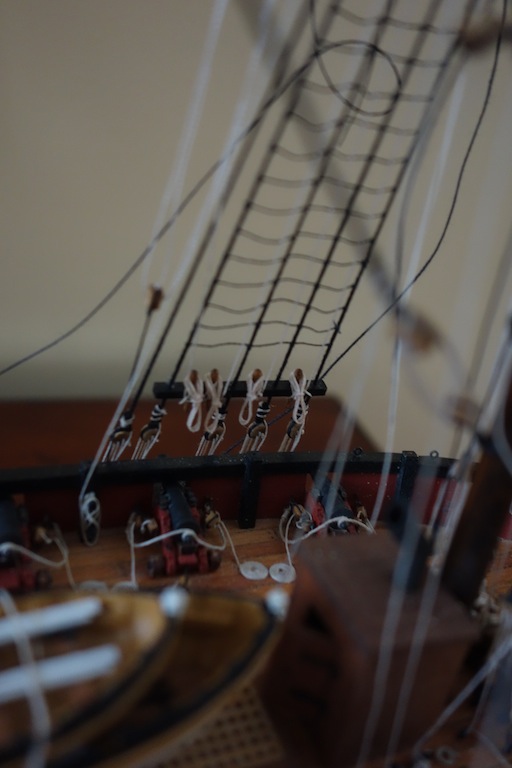
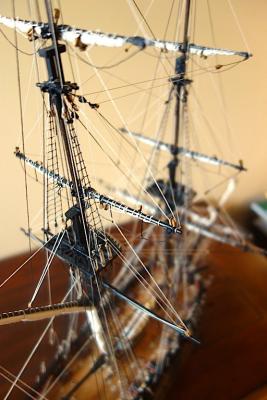
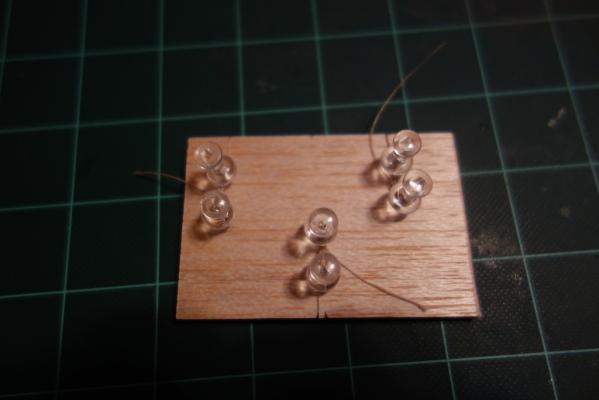
This is how I made the rope coils for the belaying pins. First few pictures show the simple jig from balsa which was set up to handle three coils at once. Slots are cut on one end to hold one end of the thread. I then looped it around the two push pins three or four times, then the line comes under and around the middle of the loop into a simple knot. I bit of diluted PVA was run over the knot and the loops to keep things relatively secure. Once dry, I used a block of balsa to try and get the coils to hang in a somewhat natural fashion. You can see in the next of pictures my high tech jig. By placing the top pin over the corner of the block, it helped get the coil into a better position I thought to hang naturally from the pin. Diluted PVA was added again to freeze them in place. Here are the final results. I think they came out somewhat ok, but if I had to do it over, I probably would have made them longer and probably a bit messier looking. Even pre-shaped, I found it was necessary to use a rigging hook to hold down the bottom of the coil to position it better after liberally applying another dose of diluted PVA.


- 153 replies
-
- 7
-
-
- badger
- caldercraft
- (and 1 more)
-
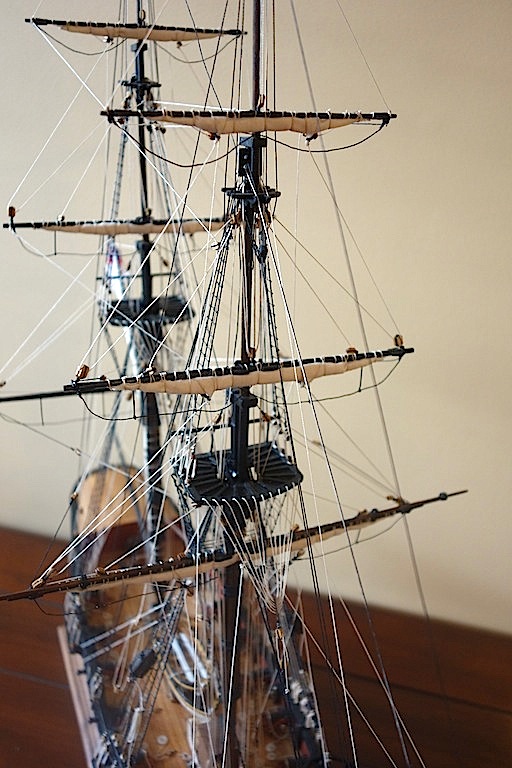
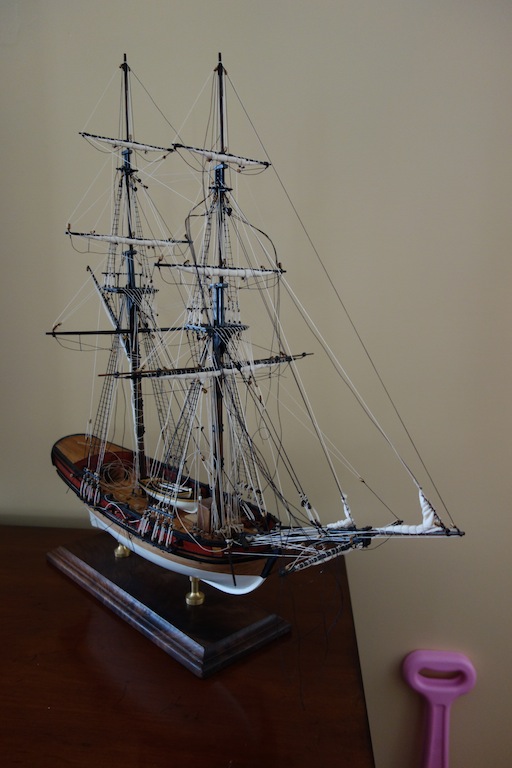
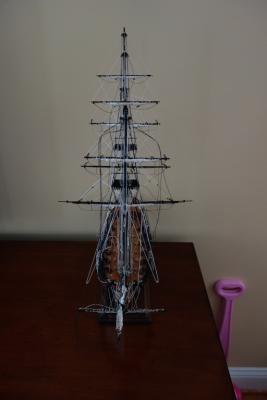
Hi everyone, here is a quick update of where I am now. The spars and braces are up, and at this stage, all that I have left is some rigging at the bow and stern, the backstays, jib stay, tighten up some other lines, and add the remaining detail items (driver boom, some more coils, the anchors and non buoys, rudder chain and flag). I was originally planning to have the ship completed by the end of last month, but came down with shingles of all things. Thankfully I'm better after about three weeks of excruciating pain, and making some good progress. I'm not in a rush at this point, as I'm not expecting the upgraded wood packages for my next two builds, the Corel Unicorn and MS Charles Morgan, until April or May. So, that gives me time to enjoy the home stretch and finish the display case. Enough rambling, here are some pictures. Again, sorry for the poor quality, but this is the most neutral background I can find in my house Thanks for looking in as always.


- 153 replies
-
- 6
-
-
- badger
- caldercraft
- (and 1 more)
-
Hi Mark, Good luck on version 2. I think this is a good call if you wouldn't be satisfied with version 1, and I'm sure version 2 will come out fantastic. Just think of version 1 as a learning experience Mike
-
Hi again ZyXuz, hope all is well. My package from CMB arrived, so now I should have enough thread to finish my Badger. I also got a few goodies for my upcoming Unicorn build, which I thought I would share with you (and Ian of course), if you don't mind. For the coat of arms, I ordered A5349, which was listed as 17mm (I think you had ordered A5350, the 27mm one). The 17mm is pretty close as you can see to the coat of arms on the original cast metal stern piece, but much sharper in definition. For the stern galleries, there is crown that sits on top of the cast metal piece. It all looks pretty mediocre, so I bought AMND166 (CD166), which is pretty close in size, but again, much better definition. I also bought a few other items to play around with. One was the stern decoration for another ship (A5338), which I could use the two ends for decoration around the coat of arms or along the sides of the stern. I also bought one of Corel's edging strip (CD110, or AMND110), which I might use as accents along the stern. I probably have more posts on the Unicorn, a ship I haven't even started building, than I do my Badger that I've been building for over five years