Landlubber Mike
-
Posts
4,551 -
Joined
-
Last visited
Content Type
Profiles
Forums
Gallery
Events
Everything posted by Landlubber Mike
-
 Peter, it's been a while since I've visited your log (MSW isn't sending my updates to build logs that I subscribed to ), but you've made really nice progress. Your sail work is outstanding, and I'm taking notes for my next builds (which ultimately will include the Pegasus). Nice to see a Pegasus build in sails - I've always thought that she would look gorgeous all dressed up! Looking forward to your future updates. You're on the home stretch
- 431 replies
-
- 1
-

-
- pegasus
- victory models
- (and 1 more)
-
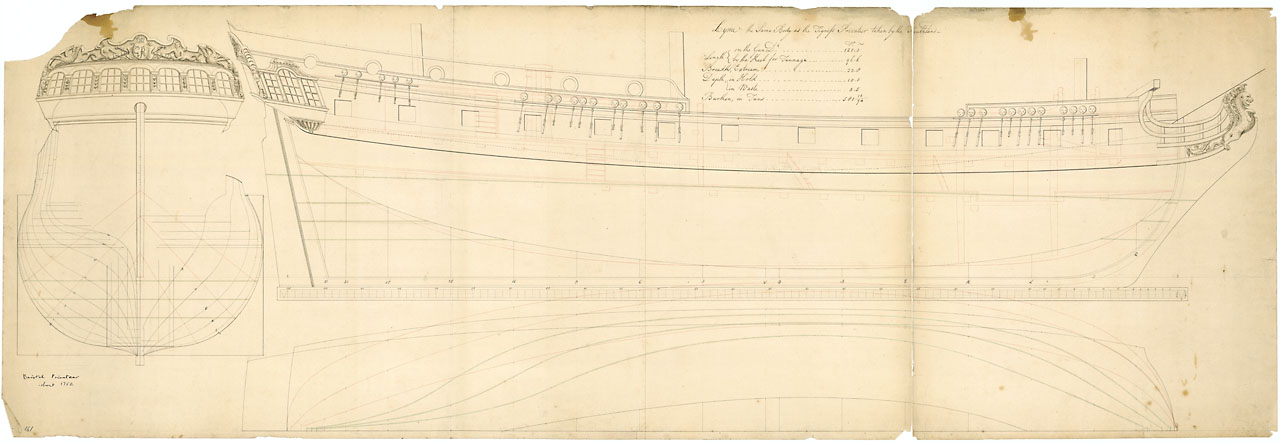
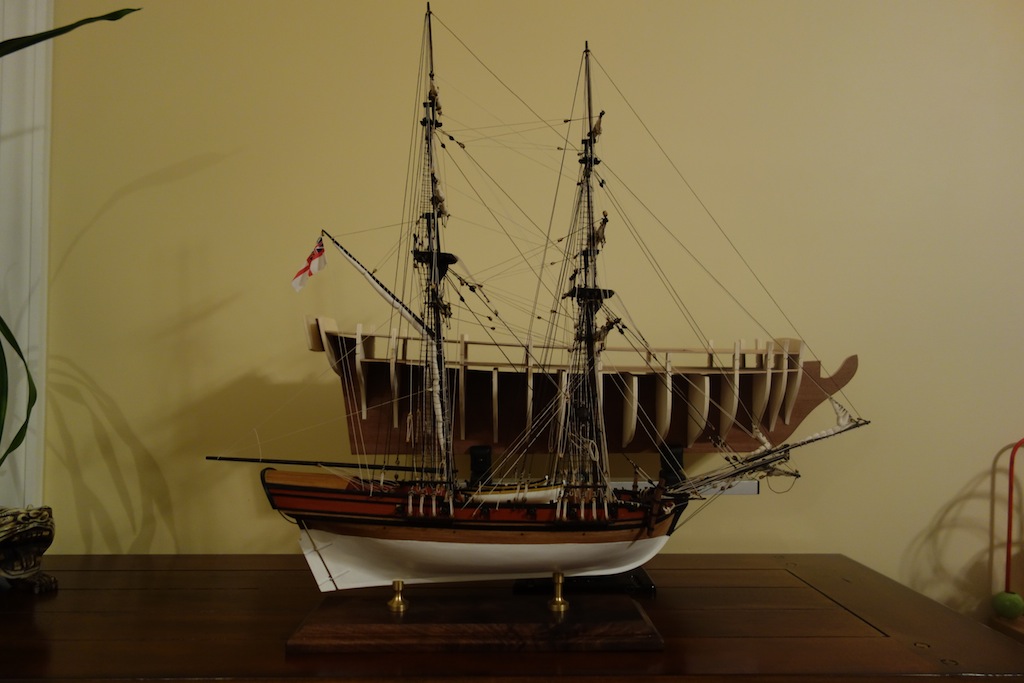
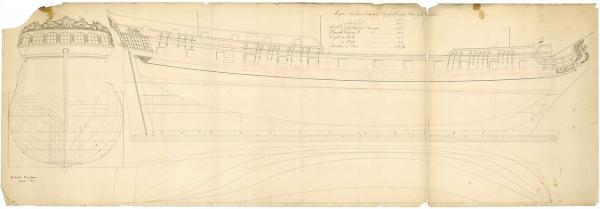
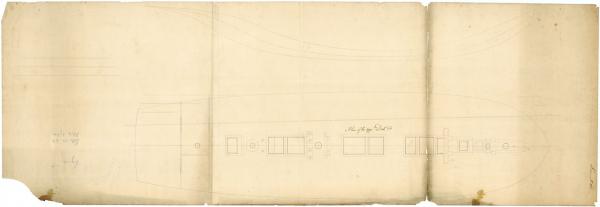
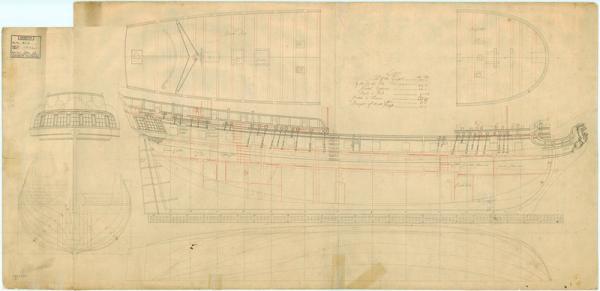
I'm fairly certain that the Pegasus has the tiller on the quarterdeck. Something to consider It's interesting - this morning, when I did a search on the Lyme at the NMM site, I came up with four plans. Now I only come up with two. The second picture in my last post might not be the 1748 Lyme - the stern looks pretty different from the Unicorn stern. This is probably the profile view for the 1748 Lyme: Like Chapman's plans of the Unicorn, the quarterdeck seems to slope upwards as you move toward the bow, although the portholes dont open up like on the Unicorn.
-
Very true Ian. Plus, you've shown that if I don't like something on the Unicorn, existing work can be readily removed and rebuilt to good effect.
-
Really gorgeous work Sherry. I can't really add much more to the other well-deserved accolades that MSW is giving you, but builds like these give me the inspiration to raise the level of my work Also, "Sherry Blue" is gorgeous - you should bottle it and market it
-
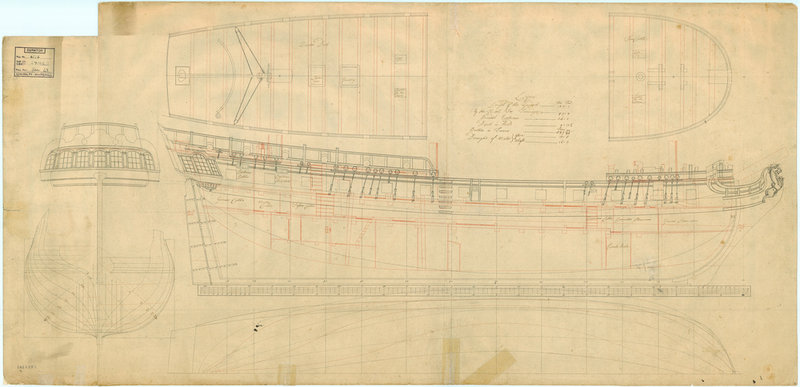
Thanks very much Ian and Joe, this is all very helpful. I'll go ahead and plan to cut the quarterdeck-forecastle template into two separate pieces. Since I'm planning on not including the flag lockers, I'll have to get rid of, or modify, the second to last bulkhead. That will leave a gap (I think) where the template should meet the stern, but I can just cut a new longer template if need be. The gap probably won't be all that big to give me a planking issue, but it might just be better to cut a new, longer one for added support. Thanks also for the tips on the forward upper bulwarks. I thought they seemed a bit odd, and I can only imagine how difficult that made the planking. Looking at the plans below of its sister ship, the Lyme, it doesn't look like Corel has the line correct. I'll plan on modifying it like you suggest. You've also given me a lot to think about when it comes to the masts. I feel like I should do something to help lock in the masts. Whether I build a cradle on the decks, or cut a slot into the keel, I think spending the time now will make life easier for me later on. Ouch, the list of modifications is growing longer by the day. I'm going to have to start writing all these down to keep them all straight. Yesterday, I started to wonder whether it makes more sense at this stage of my skill level to build the Unicorn next, which is a more basic kit but is going to require a lot of tweaking -- or go with the Pegasus, which I believe is a much better kit in terms of accuracy and components and can pretty much be built straight from the box (plus, I have Bob Hunt's practicum for that kit and the TFFM series). After coming across Ian's log and buying the Unicorn for $130 on one of Model Expo's eBay auctions, I figured that the Unicorn would be a good learning stepping stone before tackling the more complicated Pegasus -- especially given the high standards set by Blue Ensign and other Pegasus builders on here. So, hopefully it's just a matter of getting a few things on the Unicorn's hull "corrected" and then I should have a fairly smooth journey after.
-
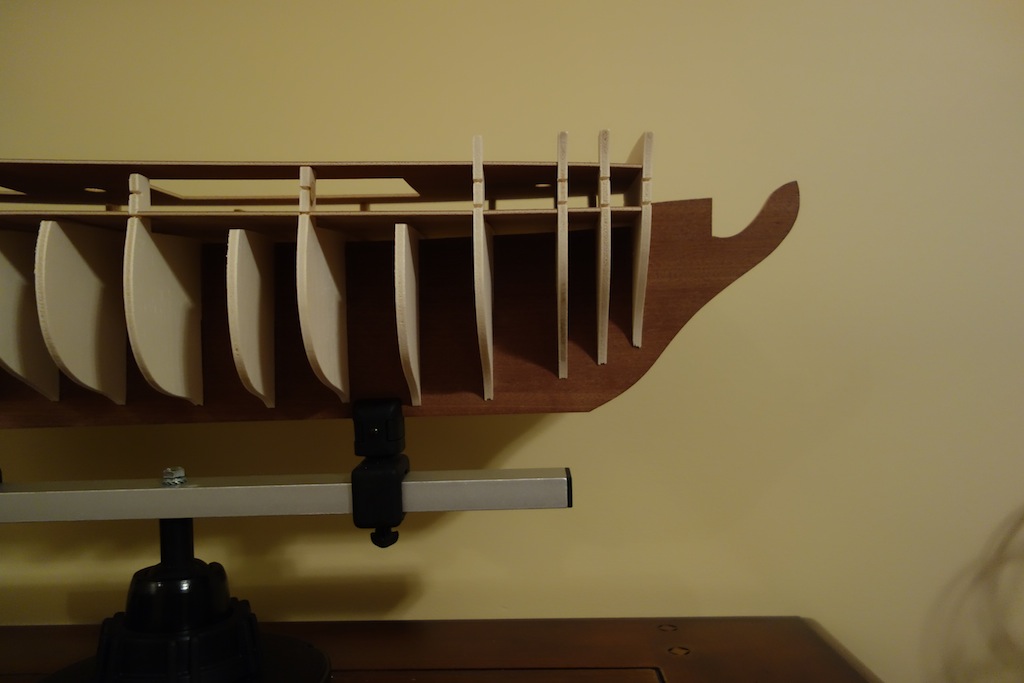
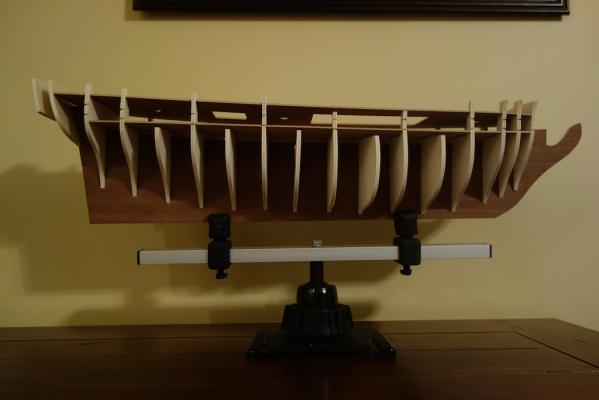
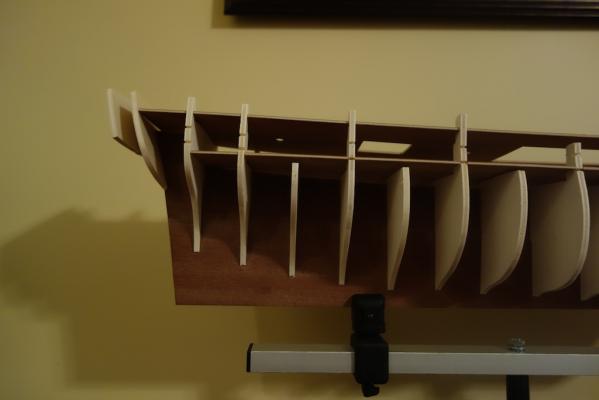
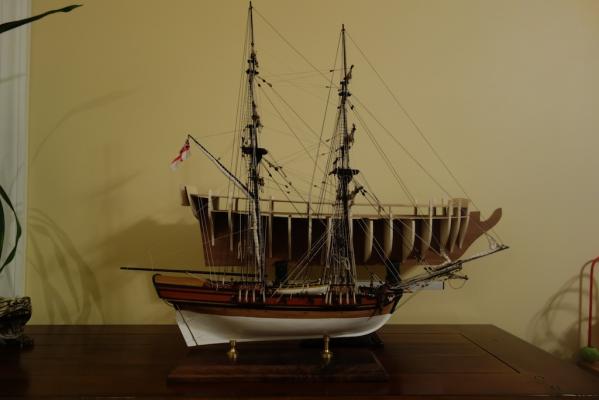
I spent a little time this evening and opened up the remaining bulkheads a bit to dry fit them on the keel. A couple of the bulkheads are a bit out of alignment and need to sit down a little lower. I'll check them against the plans and modify the keel a bit, then use the keel as a pattern to cut a new one out. The lower deck sat very nicely amongst the bulkheads. The upper deck was a bit tricky. Ian, I think I see what you are saying about how the upper deck pattern is supposed to lay - which is probably asking a bit too much to ask one piece to cover all three areas (quarterdeck, waist and forecastle). The quarterdeck area in particular is not sitting correctly, with a gap of a good few millimeters to where it should sit on the bulkheads the fore area of the quarterdeck. Since I'm thinking of changing the angle of the quarterdeck to open up the portholes, I'll need to make some modifications for the quarterdeck bulkheads anyway so I'm not too disturbed. Here are some pictures of the bulkheads and the deck patterns dry fitted to the keel. Also I took a picture against the Badger for the size differential. It's a bit hard to tell from the picture, but the Unicorn's hull is a good 50% longer and wider than the Badger's hull (even at 1:75 scale, versus 1:64 for the Badger).

-
Hi Ian, thank you very much. This is all very helpful and confirms a few things that I was thinking. Thank you so much for sharing the benefit of your experience with the kit. So far I've managed to open up bulkheads 1-10 and dry fitted them to the keel. I'm going to try and get the rest opened tonight, and will post a photo to show how the bulkheads fit. Hopefully they have remedied the problem from the older kits as to the bulkheads fitting too low. Do you know how the masts are installed? The Caldercraft Badger's keel had slots for the masts to fit through the deck and into the slots. That helped to lock the mast in position, at least front and back. It doesn't look like Corel has taken a similar approach.
-
Thanks Joe, that seems like the best approach to me as well. At this rate, it will take me another 2 months to figure out how I'll need to modify everything for the hull
-
Hi ZyXuz, Nice progress photos on your Unicorn. Even more importantly, I'm very happy to hear the good news about your father. Good luck to him!
-
Thanks a lot Jason. In a way, I'm wondering if I'm just causing myself more issues to work through by modifying the kit. On the other hand, it's been a very interesting journey so far learning about frigates during this time period, and it should be good practice before ultimately moving to the dark side I spent some time last night fitting the bulkheads to the keel. The bulkheads and keel took a bit of filing to get the bulkheads to slide into the pre-cut slots in the keel. Even though I'm planning on creating a new one, I wanted to get a sense of how the bulkheads lie, how the planking will proceed, and how the decks will be installed. My new keel will be of plywood, but I need to modify it so that I can have the bow/stem and false keel in pear. I also am thinking about reconfiguring the stern area (essentially scratching it to avoid the use of the cast metal parts, and getting rid of the flag locker) and angling the quarterdeck differently, so I'm trying to figure out now how all that will work going forward. Ian, ZyXuz and my other friends, I'm curious as to your thoughts on a couple of things: 1. Opening the waist and the upper gun deck template. The upper deck template is one piece covering the forecastle, waist and quarterdeck. With an open waist, there will be very little of the deck template that will survive at the waist for the waist gangways. One disadvantage of keeping the template in one piece is that you will see the bit of the template under the deck planking (I think). Since I'm going to use boxwood for the deck planking, the gangways might look like they have a dark line underneath. Is it worth it instead to cut the deck template into two pieces (one for the forecastle and one for the quarterdeck), and do away with the template for the waist gangways (somehow just use the deck planking for the gangways)? Hope that is clear 2. Stern post. In going through the plans last night and thinking about the planking, I noticed that the kit seems to suggest that the planking extend all the way to the stern/end of the keel piece, and not butt up against a stern post (the kit doesn't seem to include a stern post). I need to do a little more research, but my Caldercraft Badger had a stern post, and I'm wondering if the Unicorn would have had one as well. If so, that's another piece that I will need to cut from pear. Thanks for your thoughts!
-
Cristiano, thanks again for all your thoughts and help on this. I really appreciate it, and look forward to your Unicorn build
-
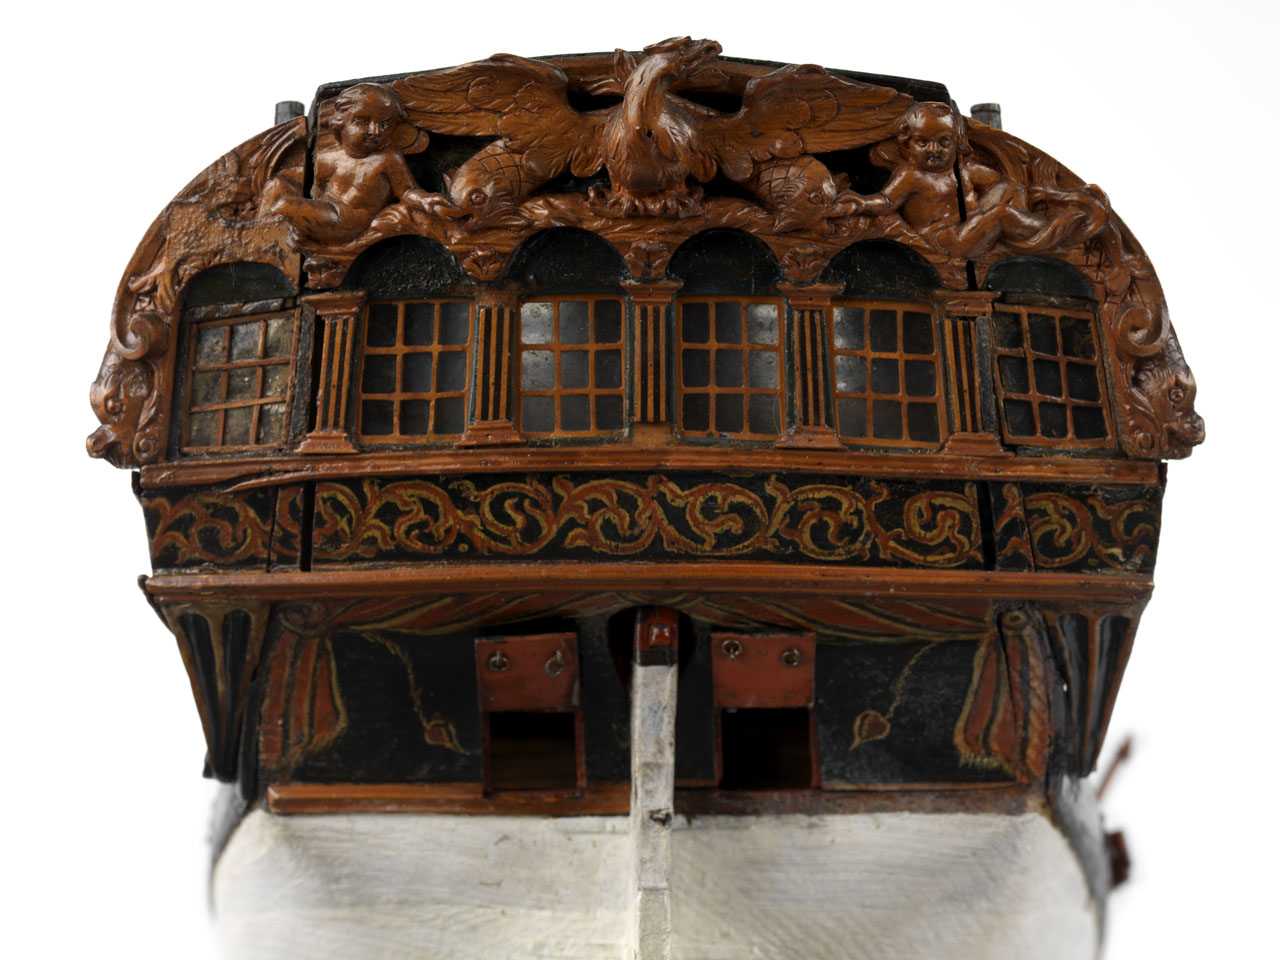
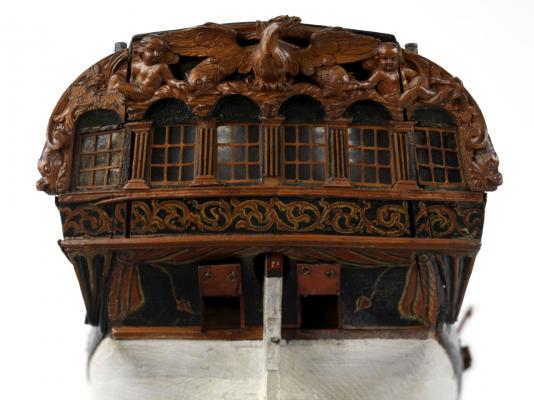
Cristiano, thanks so much! That's really amazing work you did there. I think you're exactly right about those figures. Are the two gods, in particular, Hera, resting on anything? That's one thing that seems a mystery, though it looks like they might be resting with one hand on the port hole, and one on the ground (or something else). Thanks again!
-
Hi Frank! Let me be the first to say that I am looking forward to your build - this looks like a really nice kit, and I'm sure you can add lots of interesting details given the scale. Should be a lot of fun!
-
Gorgeous work Jason, very crisp and clean! I'm sure that it will be a hit at the show! On the bowspirit, I can't tell you how many times I busted a line/block off of it by accidentally bumping into it. I'll probably move it to the latter stages of my next build.
- 800 replies
-
- 1
-
-
- snake
- caldercraft
- (and 1 more)
-
Hi Joe, thanks for that info. They came out really well. I'll have to investigate whether I can use resin shells as offered by Caldercraft to give me a good base as a shortcut.
-
Thanks Ian, this is all good to know. The Badger's resin boats took me forever to complete - I can't imagine how long these three boats are going to take me if I end up trying to scratch build them That's helpful info on the stove too. It sounds like things weren't too cozy for the Unicorn crew does it?
-
Cristiano, thanks so much for this - this makes it really clear for me! The pictures I was using really weren't helpful, but your modified picture really shows the four (or maybe five) figures! The peacock is now completely obvious. Funny how I saw a lion on the left and a unicorn on the right I can't thank you enough for taking the time to clear this up for me, I really appreciate it!
-
I think I posted on another thread, but I echo the very positive response from others on here. A lot of the techniques are relatively simple and intuitive, but you're left coming away with saying "how didn't I think of that?"
-
Joe, by all means please feel free to continue to post pictures on my build log. Your Unicorn/Fox is gorgeous, and the pictures are really helping me (and I imagine others) get a sense of what kind of improvements can be made to the kit. Please don't feel like you're hijacking my log in the slightest I love the touch of adding the small boats. Do you remember if you built them from scratch, or bought them elsewhere? I have the AOTS Pandora book, and I believe that the plans show 3-4 small boats nested in the waist similarly to yours.
-
Cristiano, thanks so much for your thoughts on this. It sounds like I was completely wrong on the far left and far right figures (except to the extent that they are all animals and not people!). I can kinda see the peacock on the right - I'm having trouble with the fishes on the left. You mentioned using Photoshop to clean up the picture of the stern. Did you use it on the picture in the link that I provided earlier? If so, and if it is not too much trouble, would you mind posting what the cleaned up picture looks like or send it to me via PM? I am not that good at this kind of thing, and when I tried through iPhoto, it didn't really make things clearer for me. Thanks again! This is very exciting, as I have been struggling with what the stern figures are for quite some time!
-
Good to know about the rigging Ian. I'll have to pay careful attention to all that. I like Joe's build adding the two small boats side by side - I'm thinking of doing something very similar as well. Glad to see that there is such a big Unicorn club No worries Eamonn, I don't have pics of my build yet since I'm waiting on tools and materials, so I certainly encourage lively discussion and pictures!
-
Thanks Ian, that's very helpful. I took a look at a bunch of models and most don't seem to have flag lockers along the stern area like that. So it seemed odd to me. Plus, taking a look at the Chapman plans, it looks like he drew a stern chaser port right where the Corel kit has the insignia (click link below, and then click the picture to get an extreme close-up view of the plan drawings): http://www.sjohistoriska.se/ImageVaultFiles/id_3085/cf_1803/55.JPG Not sure if I can pull it off, but maybe I'll think about adding redesigning the stern to use a stern chaser port in the center (with a crown right above the porthole), and then the figures on the sides. It looks like a lion to the far left, a man to the near left, a woman to the near right, and some other animal to the far right (possibly another lion, or perhaps a unicorn as per the UK coat of arms). I'll have to learn to either carve or use that sculpty clay stuff.
-
Oh wow, you're a pro then Hopefully someone else can guide you the right way. Have you taken a look at the Euromodel kits? The kits are probably the best I've seen, and give you plenty of options to add details to the build. I have the Friedrich Wilhelm zu Pferde, and it looks like an incredible kit with fantastic plans. I just need a few more models under my belt before I can attempt to do the kit justice.
-
Thanks Joe, looks great. I'm actually thinking of doing the same, and possibly adding arches above the windows like in this model.
-
Hi Joe, thanks for checking in and for the picture. Gorgeous model - feel free to post more pictures, as I can use all the help and inspiration that I can get I love your color scheme and change to a thicker black wale. I think that is how I'm going to proceed with my build, and so it's good to see how this might turn out. Did you end up scratching the stern area? Peter, thanks for chiming in. I have both those books, so I think they will come in very handy. I wonder how the rigging diagrams compared with your kit (which I think was a little older)? I'm probably going to add sails, so at first blush, it struck me that I might need to add some extra rigging points.