Landlubber Mike
-
Posts
4,544 -
Joined
-
Last visited
Content Type
Profiles
Forums
Gallery
Events
Everything posted by Landlubber Mike
-
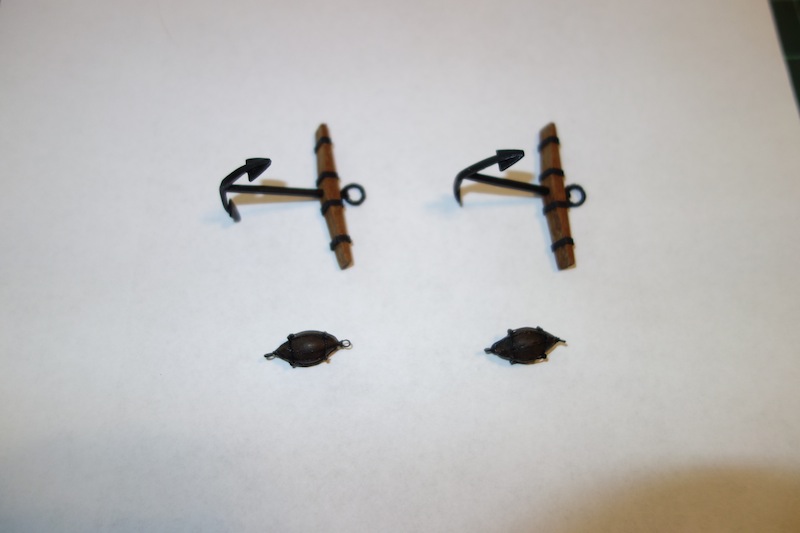
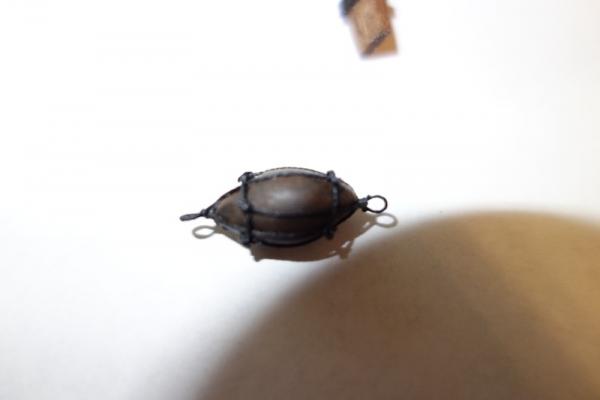
 Well I had a little time the last few days, so thought I would ease back into the build by building the anchor buoys. Let's just say they took me probably four or five times longer than I thought they would I have to clean them up a bit, but here they are. I was fairly pleased for the first attempt at making them. To build the buoy, most people I see use wooden dowels. I started down that road, but ended up switching the black sculpey clay. I used that clay earlier on the build for the mouse stays - it's easy to mold, quick to bake in your oven, and comes in various colors. I was able to make a bunch of different sizes until I got to the size that I thought worked best, and it was much quicker than working with dowels by hand or on my lathe. Once baked, I painted them with brown acrylic. The acrylic ended up acting more like a wash than a paint on the clay, which ended up giving it the look I was hoping for (not solid, but sorta worn and weathered) without using different shades of brown and black as I first thought I would end up having to do. The buoy harness (if that is what it is called) was probably the biggest pain for me. There are eight ropes running along the length, and two rope bands that go around the width. The bands only are knotted at the four ropes that start from the opposite end of the buoy, and lay over the other four that start at the end closest to the hoop (hope that makes sense) I started by first making a "spider" with two lengths of rope that crossed each other with one of them making the harness loop at the top. Glued the spider to the top, and the first half portion of the "legs" down the length of the buoy. Then I repeated with the other side. That was fairly easy, but figuring out the bands was tricky. I tried doing pre-made bands to slide onto the buoy, but they never looked right. I ended up taking the approach of cutting a length of thread, and tying each of the four knots one by one working around the diameter of the buoy. Once the knots were done and dabbed with diluted PVA, I cut the extra lengths, and glued the legs and the bands onto the buoy. That part took me a few hours to figure out how to do, but they came out ok I think. Next up - furled sails (finally).
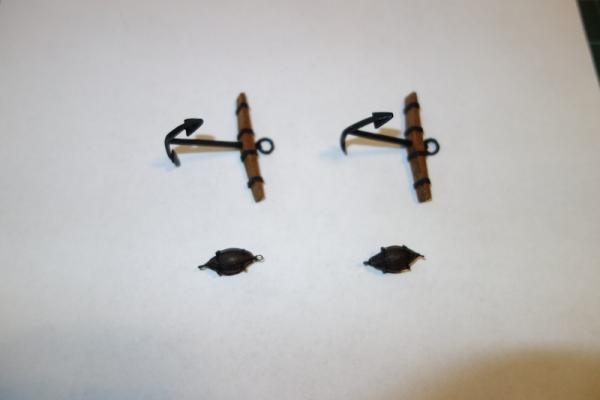

- 153 replies
-
- 7
-

-
- badger
- caldercraft
- (and 1 more)
-
Wow Ian, this is incredible work. Please tell me that this will be visible on your build If not, it deserves it's own special display case!
-
Really gorgeous work Rod! Very impressive! I love your case too. Just out of curiosity, did you cut the plexiglass yourself, or did you have it cut professionally? I'm trying to figure out what to do with my case, and weight is making me lean with plexiglass. I bought a case from Model Expo for my Badger, but I have to source the glass. Thanks!
-
Gorgeous work! I really like your display case - where did you get it? I plan to start my Unicorn at the end of the year. I need another couple of months to finish my Badger. Will be nice to work alongside you and Ian.
-
Hey Daniel, your Mercury is looking great. I'm just about done working on the Amati Hannah SIB, which is difficult given the scale but thankfully is mostly all photo-etched parts - the fact that you scratched built this ship is really impressive. Really nice work. Are you going to put it in a bottle with water? I'm using fake water from Vallejo, which has been even more difficult than I imagined given the shape of the bottle and narrow bottle opening.
-
Hey Chris, hope you and the twins are doing well Your build is looking fantastic as always. I bought the Le Gros Ventre book/plans off of eBay this summer for a good deal. Looks like a fun build. I probably need another couple of models under my belt before progressing to it, but that's on my list too.
-
Thanks very much for all the birthday wishes. Thanks also John, AVS and Bigcreekdad for the comments on the build. I'm about to turn back to and wrap up the Badger after a fairly long hiatus with the birth of my twin girls. They are starting to sleep the night (or at least most of it), so I should be able to get back to the shipyard. In the meantime, I've been finishing up the Amati Hannah ship in a bottle kit that I started alongside the Badger. Hoping to get that wrapped up this month, but adding the "sea" to the bottle has been tricky.
- 153 replies
-
- 1
-
-
- badger
- caldercraft
- (and 1 more)
-
Hi Ian, Most importantly, I wanted to extend my condolences for the loss of your faithful companion Tom. Your stove is magnificent. Really top notch work. Mike
-
Hi Mark, so sorry to hear about your dog. They are like any other close family member in my book. Nice job on the repair - I am really enjoying your build and learning a lot.
-
I fight my Admiral about that orientation all the time! Really nice work Mobbsie!
- 1,279 replies
-
- 2
-
-
- agamemnon
- caldercraft
- (and 1 more)
-
Thanks very much Jason!
-
Thanks for the painting tip Chris - it worked out incredibly well. Nice updates too - I don't know how you have the time with the twins to work in your shipyard. I haven't been so lucky
-
Thanks very much Kevin and Mobbsie! I don't know how much relaxing I can get in having three little girls under the age of 4, but life is good
-
Hi Mark, really incredible work - thanks for sharing. On the issue of ebony versus other means of blackening wood, has anyone used any of the ebony stains that are out there? I purchased a small can on Varathane ebony stain (which I believe is pre-mixed with pre-stain conditioner), but haven't had a chance to try it out yet. I believe Minwax offers ebony stain as well. I've been thinking about avoiding the use of black paint on my future builds as well. Can't argue with Chris' results using leather dye on pear though - wow!
-
Wow Ian, that's really incredible work! A masterpiece! Just out of curiosity, if you're using solder to join the pieces, will you be able to blacken the solder also? I prefer the look of blackened metal over painted, but always wondered whether the solder could itself be blackened.
-
Thanks for the techniques - I like how they turned out. Twins are doing very well, thanks for asking. They are four months now, and not waking up too many times during the middle of the night. Hopefully things get easier soon so that I can finish my Badger and move on to other builds.
-
Hi Frank, looking great! Did you use some kind of weathering solution for the wood? The anchor stocks came out very nice. For the anchor puddening, I used the technique in the attached article on anchors. Hope that helps. Anchors.pdf
-
Hi Bill, welcome to the Badger club. The kit does make for a nice model. There are a few of us here that are working on or have completed the Badger. I'm just about to the running rigging on mine, but my wife recently had twins, so I am a bit waylaid at the moment. If you have questions, please don't hesitate to ask!
-
Really nice job John - you're really cranking along!
-
I have the Proxxon mini lathe DB250. It came in very handy in building my masts and spars on my Badger.
-
Great! I'm a few months from starting my Unicorn, but it will be nice to work on this build alongside yours and Ian's
-
Sorry to keep asking you questions, but what kind of paint and color did you use to paint the ship's wheel? It looks fantastic, and well coordinated with the boxwood in your build