
Supplies of the Ship Modeler's Handbook are running out. Get your copy NOW before they are gone! Click on photo to order.
×


Landlubber Mike
-
Posts
4,447 -
Joined
-
Last visited
Reputation Activity
-

 Landlubber Mike reacted to DSiemens in Mercury by DSiemens - FINISHED - BOTTLE
Thanks every one for your comments. I was hoping to post more but being back in school and a trip to Utah I haven't found the time. Maybe this week end.
Jesse, I started the hard way and went back to the easy way. Solid hull really is the way to go with this scale. Trouble is it's harder to get to an exact scale. Then it is small enough the scale doesn't matter so much. Thank you for your comment.
Mike, I am putting her in a bottle with water which is why I haven't bothered fixing the rudder. Water can be tricky I've used a couple of techniques. So far I've found Plasticine to be the easiest but it takes some patience. I roll it up like a clay snake and put it through the bottle neck. I then put the bottle in the oven at about 200 degrees. The melting point is 150 but my oven doesn't get that low. Then it's a matter of watching for the clay to melt and shaping it with a metal wire being careful not to get any of the now runny clay on the sides of the bottle or in the neck. Also be careful not to burn yourself.
Another easy method is to roll up the clay and unroll it in the bottle. I explained that method on my blog. Siemensbottlingco.blogspot.com It's a little tricky but you can control the amount of clay easier and you don't burn yourself. Thank you for your compliments.
-
Landlubber Mike reacted to rvchima in US Brig Syren by rvchima - FINISHED - Model Shipways
Mike,
I bought 0.093 in. thick Optix brand acrylic sheet at Home Depot. The total cost was around $90 so glass might be cheaper. The acrylic sheets come in widths that are multiples of 12 in. My width was 12 3/4 in. so there was a lot of waste.
You can buy a tool to score and snap the plastic. If you score it many times perfectly along a straightedge and are very careful, it will snap right along the score. I screwed up my very first cut, so I gave up and used my table saw. I cleaned up the edge with sandpaper. The table saw turned out to be a good idea because I had to recut several pieces slightly undersized to make everything fit.
Rod
-
Landlubber Mike reacted to Alex M in HMS Sphynx 1775 by Alex M - Scale 1/48 - English 20-Gun Frigate
Thanks you Chris and Sinan!
Two days later...
The plastic sheets are not covered with varnish now, so they looks just like plastik
Alex
-
Landlubber Mike reacted to ZyXuz in HMS RaceHorse by ZyXuz - FINISHED - Sergal - Scale 1:47
Thanks Mike!
I ordered it from a local carpenter.. actually my dad's friend, a church member..
he's quite famous in our area, and provides reasonable price..
the only bad thing is it was too slow.. I've cleaned spider webs off my ship thrice waiting the case to arrive
Well, I plan to start it right next month since I'm still single and always free at home
Currently planning the color theme of my Unicorn, and some modification to be done.
Also, I've started buying better tools.. gonna make myself a DIY lathe and drill press stand to cut cost
Can't wait to START!!!
-
 Landlubber Mike got a reaction from ZyXuz in HMS RaceHorse by ZyXuz - FINISHED - Sergal - Scale 1:47
Gorgeous work! I really like your display case - where did you get it?
I plan to start my Unicorn at the end of the year. I need another couple of months to finish my Badger. Will be nice to work alongside you and Ian.
-
Landlubber Mike reacted to ianmajor in HMS Unicorn by ianmajor - Corel - Scale 1:75, 1748 to 1771
Now on to the rotisserie.
I made the top (smaller) pulley from a slice cut off some thick walled brass tubing. In this case the tubing has a 2.3mm outside diameter with a 0.7mm diameter bore. I have various sizes of this type of tube which is useful for making small pulleys and sheaves. Actually I used the lathe to part off the pulley to 0.3mm thickness, plus I included a 0.2mm thickness boss. I soldered the pulley on to a length of 0.7mm diameter N/S rod which fits in to a hole drilled in the stove's hood.
In the following photo this pulley and rod are temporarily fitted. The thick walled tube is lying alongside the stove.
Well - progress will stop on the stove for a week. I am heading off to deepest Herefordshire with my wife looking at houses - a retirement move. -
Landlubber Mike reacted to ianmajor in HMS Unicorn by ianmajor - Corel - Scale 1:75, 1748 to 1771
Progress on the stove...
The rail around the top of the boilers needs to be shaped and fitted carefully. There are several straight edges on the boiler which lie parallel to the rail, so if it is out of shape or wrongly fitted it will look awful.
To get the correct shape I milled a jig out of plywood. The rail was made from 0.5mm brass wire. The next photo shews the jig with the shaped rail - the wire curves down over the end of the jig to make the curved front ends.
The rail needs two supporting knobs at the rear of the boilers. For these I made two split pins out of 0.3mm N/S wire. To shape them I folded them around a 0.5mm drill bit, passed the two wire ends through a piece of scrap N/S. I pulled the ends with a pair of pliers to tighten the wire around the bit. To finish the knobs off I soldered the two ends of the wire together. The knobs were then threaded on to the rail and soldered in place. The rail was then offered up to the boilers and the knobs cut to length and bent to fit.
The next photo shews the method that I used to clamp the rail in position so that it could be soldered in place. There is a feeler gauge between the rail and the boiler back . This keeps the rail at the correct distance from and parallel to the boiler rear (horizontal alignment). I also used a small piece of 1mm thick N/S to check the gap all around between the boiler top edge (vertical alignment).
The knobs should have been fitted in to the corners of the rail but I couldn't get a decent anchor point for them so I compromised by moving them inwards. Having completed fitting the rail I realised that if I had left off the top nuts I could actually have fitted the knobs in the corners.
At this stage I added the centre legs. These are 1mm x 0.4mm strip. -
Landlubber Mike reacted to ianmajor in HMS Unicorn by ianmajor - Corel - Scale 1:75, 1748 to 1771
Three photos shewing the rail and centre legs in place.
-
Landlubber Mike reacted to DSiemens in Mercury by DSiemens - FINISHED - BOTTLE
The ship it's self is done! Now just got to get the dory and the launch and bottle her all up.
-
 Landlubber Mike got a reaction from rdsaplala in Badger by Landlubber Mike - FINISHED - Caldercraft - 1:64 - Brig
Thanks very much for all the birthday wishes. Thanks also John, AVS and Bigcreekdad for the comments on the build. I'm about to turn back to and wrap up the Badger after a fairly long hiatus with the birth of my twin girls. They are starting to sleep the night (or at least most of it), so I should be able to get back to the shipyard.
In the meantime, I've been finishing up the Amati Hannah ship in a bottle kit that I started alongside the Badger. Hoping to get that wrapped up this month, but adding the "sea" to the bottle has been tricky.
-
 Landlubber Mike got a reaction from riverboat in HMAT Supply by riverboat - FINISHED - Jotika/Caldercraft- 1/64th scale
Very nice Frank!
-
Landlubber Mike reacted to riverboat in HMAT Supply by riverboat - FINISHED - Jotika/Caldercraft- 1/64th scale
O.K. ...... now for a little update, at this time I'd like to introduce you all to the ......................
" HMAT SUPPLY CREW "
this is my first go at painting figures, so please excuse the flops here and there The Captain's name is Wesley R. Starboard. his first mate is Lowell L Port ( sound familiar? ), the gun crew are the Flint brothers, Manny , Mo, Jack and Clyde. The Bosun's name is
John Fixit........ last but not least are the rigging crew...... as of this time we have on-board the Shroud brothers ( this is a family oriented ship ), James,John and Joan( how did she get in here??) ... then we have three other guys, and I have no idea who they are!!! they must 've
picked them up at MSW 1 ...Any how . stop by and say hello to them and have a couple
Frank
Capt. Starboard
First Mate L.L Port
gun crew ... the Flint Brothers
Bosun's mate J. Fixit
the Shroud brothers ( and girl )
the three other guys ( I don't know who they are )
and........ two last group pictures!!!!
Hope you all enjoyed meeting the crew!!!! It's a motely looking crew....but then again, look at the ship they're on
-
 Landlubber Mike got a reaction from Mirabell61 in Badger by Landlubber Mike - FINISHED - Caldercraft - 1:64 - Brig
I've been missing in action the past few months as my wife had twins at the end of March. It's been a bit hectic to put it mildly, so I haven't had time to hit the shipyard recently. Thankfully the girls are almost three months now and sleeping better, so I'm gearing up to get back to work on the Badger.
Here are some pictures of where I left off earlier this year. Most of the standing rigging is done, and I'm about to start on adding furled sails. I'm hoping to finish it before the end of the year as I now have the Corel Unicorn and the Amati Pegasus on my shelf. Between kids and honey-do's, and of course being a complete novice, the build has taken me four and a half years.
-
 Landlubber Mike got a reaction from JayCub in Badger by Landlubber Mike - FINISHED - Caldercraft - 1:64 - Brig
Spars and bowspirit:
Launches:
Launches installed:
Masts installed:
-
Landlubber Mike got a reaction from JayCub in Badger by Landlubber Mike - FINISHED - Caldercraft - 1:64 - Brig
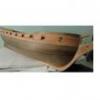
First planking:
Second planking:
Deck Planking:
Post-planking details:
Cannons Rigged:
Additional details on hull and deck:
-
 Landlubber Mike got a reaction from mobbsie in HMS Agamemnon by mobbsie - FINISHED - Caldercraft / Jotika - 1/64
I fight my Admiral about that orientation all the time!
Really nice work Mobbsie!
-
 Landlubber Mike got a reaction from mtaylor in Licorne by mtaylor - 3/16" scale - POF - TERMINATED LOG
Hi Mark, so sorry to hear about your dog. They are like any other close family member in my book.
Nice job on the repair - I am really enjoying your build and learning a lot.
-
Landlubber Mike reacted to Captain Slog in HMB Endeavour by Captain Slog - Caldercraft - 1:64
Hi,
A bit more progress on the deadeye strops and chains.
After soldering all the links from the post above, I tried my hand at brass blackening using Birchwood Caseys Brass Black from the local gunshop. They initially looked very good but as soon as I started handling them the black flaked and rubbed off. I knew this was down to insufficient cleaning of the links as at the time I just gave them a rub with a brass bristle brush.
I found it easier to just snip all the rings off the supplied photo etch chain plates (to keep and reuse) and bin the links and redo them all again. I didn't mind as I was enjoying the soldering and also used the opportunity to replace the large 0.7mm strops with 0.5mm as decided they looked better.
Once I re-soldered all 40 assemblies (again)and pre-bent to shape it was time to sort the blackening. I bought a small bottle of Hydrochloric acid (Please be careful using the acid if you try this) from Bunnings and soaked them all for a minimum of 10 minutes occasionally agitating them. After rinsing in water I dropped them into a 50:50 solution of blackening and water varying the times between 2 and 4 minutes (never noticed any difference).
After rinsing again and drying I used a soft bristle paint brush to rub them against a cloth. I inserted the deadeye and did a final squeeze to shape. The blackening seems to have worked but still get left with black fingers when handling but at least it doesn't all come off. I found the black was easily scratched though.
Picture shows all 40 assemblies. From the 80 solder joints I had 2 failures when I gave them the final squeeze. Not to bad really.
Picture shows the 3 different sizes used. Top is the mizzen mast shrouds, middle is the Fore and main mast back stays and bottom is the fore and main mast shrouds.
Also been working on other bits and pieces I did the binnacle tie downs which was an exercise in frustration. I used a thin Gutermann thread from the local Spotlight store to try seizing (thanks Shipaholic for pointing me there).
Also alternating between the chains and cannons. All the carriage parts are from a walnut ply sheet which after cutting free and tidying up they don’t look to bad. As Caldercraft use CNC for cutting there materials I need to use a small needle file next to remove the round bottoms of the slots on the axle parts and the carriage sides so they sit flush. I think the 4 pounder barrels look very nice although can’t vouch for size or accuracy but looks good.
Cheers
Slog
-
 Landlubber Mike got a reaction from augie in Licorne by mtaylor - 3/16" scale - POF - TERMINATED LOG
Hi Mark, so sorry to hear about your dog. They are like any other close family member in my book.
Nice job on the repair - I am really enjoying your build and learning a lot.
-
Landlubber Mike reacted to texxn5 in Niagara by lb0190 - Model Shipways - 1/64
Hi Larry, the sails should look real nice. I'll see if I can find more pictures with sails. Internet has been real "iffy" most of the time lately, and it takes about 6-8 minutes to upload 3 pictures which is all I can send at a time provided it doesn't kick me off and I have to start over. Some of the models at the museum had sails, and I'm sure I have some pictures.
-
Landlubber Mike got a reaction from augie in HMS Agamemnon by mobbsie - FINISHED - Caldercraft / Jotika - 1/64
I fight my Admiral about that orientation all the time!
Really nice work Mobbsie!
-
Landlubber Mike reacted to augie in HMS Agamemnon by mobbsie - FINISHED - Caldercraft / Jotika - 1/64
Well done on the stern and I like the catheads. I also approve of the orientation of your paper towel roll. I like them coming over the top as well
-
Landlubber Mike reacted to 1492 in Why not paint your ship?
Why not use both? This is an old photo of my version of AL's Swift. I use paint for bulwarks, wales and masts (not shown). Then I tried to blend the finishes so it looks 'natural'.
-
Landlubber Mike reacted to tarbrush in Why not paint your ship?
BassicBill, sorry about the slow response, my internet has been out since yesterday. I just went and snapped a couple of pictures of the old girl, she got knocked around pretty good on my cross country move and I have repaired her yet. shame on me. but here a couple of pics.
-
Landlubber Mike reacted to lamarvalley in What are these tools and how are they used in ship modeling specifically?
First off, most of these tools would be used most by scratch builders, not so much by the kit builder. All of these tools machine lumber (wood) into usable pieces.
A router is a high speed tool that spins a chosen sharp steel or carbide bit. The wood is either pushed into the spinning bit or with the use of a collar, it guides along the edge. It can make profiles like mouldings.
A thickness sander takes thicker wood and sands it down to a desired thickness with sandpaper. A planer does the same thing only more aggressively (if desired) with blades rather than sandpaper.
A band saw is a saw, with a circular (band) blade that rotates from top to bottom above a table. It moves through the table in a slot and if you put a white dot on the blade you would see it rotate around and around... get it? It is used to shape or cut out designs or parts from larger pieces of wood.
A grinder grinds steel or metal. A sander usually is for wood only although I'm sure there are exceptions.
A contour sander sands contours... like the contours put on wood with a router.... for example...mouldings.
I assume you mean a 'dremel'. I cannot advise which bits are important becasue I don't know what your desired result is.
Having said all this... all of these tools can hurt you if not used appropriately. I advise you to investigate all of these and more regarding what is right for you and learn the right way to use them.