


Martin W
-
Posts
1,412 -
Joined
-
Last visited
Content Type
Profiles
Forums
Gallery
Events
Posts posted by Martin W
-
-
Simply amazing, Nils. Those chairs go beyond fabulous!
- Piet, Mirabell61, mtaylor and 2 others
-
 5
5
-
Thanks for the nice compliments guys -- they really add a lot to this hobby (read: mild obsession).
Mike-- I'm doing without the decorations. The kit has a photo-etched piece for that, but -- and here is the Puritan in me again -- I like the plain look of the boxwood (I really like the look of boxwood). Like you, I'm trying to do as little painting as possible; so far, I've only put a brush on the wales, the gunport frames, and the gun carriages. I'm hoping that I can put that fine camel hair away for a long time.
BE -- I think the only way I've seen you express any Puritanism is by making that poor one-handed sailor work as hard as you do. Your hances are pretty clear in my mind, and I'll be consulting them again. And again.
Peter -- The darkness calls, but my clumsiness has made me stumble enough times that I still walk in the light of plain old kit building (with the odd bash now and then).
Thanks for checking in Bob, your build is an inspiration!
And thanks for all the likes.
Cheers,
Martin
- flyer and Landlubber Mike
-
2
-
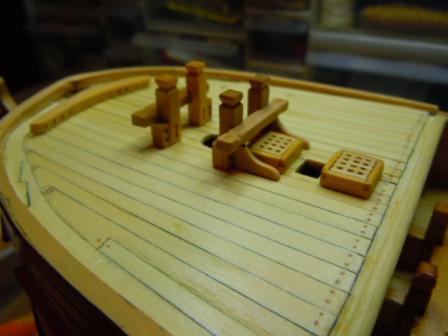
Work on the fo'c'sle continues:
In the six weeks (ahem) I've been silent, I've managed to drag my weary self into the boatyard a few evenings to get some of the fo'c'sle details done. The steam gratings took a surprisingly long time, mostly because I kept making them the wrong size -- first too big, then too little. The problem is that they're pretty doggone tiny, so that just about any size looks big. In the end, I decided to go with consistency, and made the coamings the same height as those of the hatches.
In between the gratings goes the chimney. Now, FFM shows the sort of chimney that I would expect on a wind-powered vessel, namely with a forward bent flue to let the smoke pass to the bows. But, the NMM plans show a straight vertical structure. Torn between aesthetics and "accuracy" I chose, this time, to go with the plan.
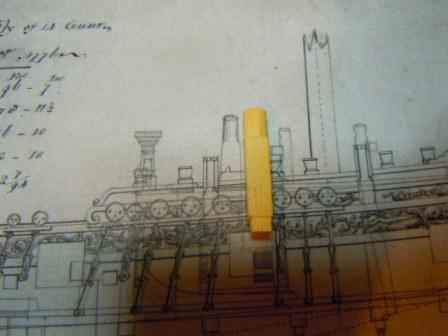
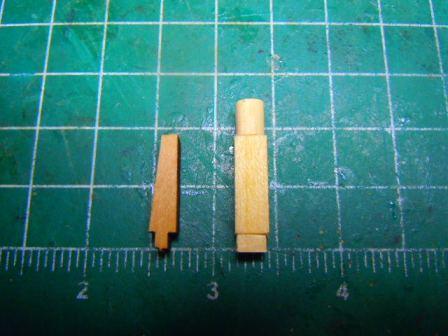
To make the chimney, I attached a length of dowel to a squarish piece of stock. You can see it lined up alongside the plans (reduced to 74%, which is just about the right size for this scale).
The kit's version would also end up with a vertical structure, but undersized:
After sanding the wood to conceal as much grain as possible, I put on a coat of sealer, followed by some black stain. Next I set 2 pieces of bent wire into the top, and attached a round piece of blackened brass on them to give a baffle of sorts:
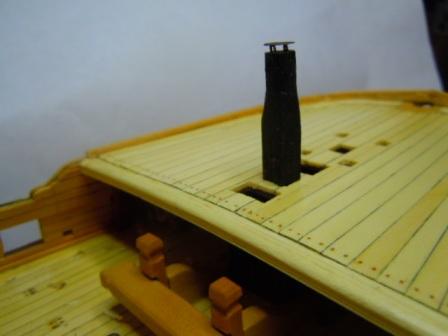
And here it is between the steam gratings:
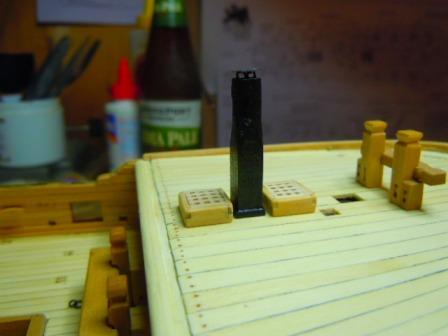
You can also see the base in this view. Many people have added coamings around the chimney, and I think they do give it a finished look. I can't quite make out if the NMM plans show those or not, but I am thinking of adding them -- very thin versions.
Next come the bitts. Theoretically, the fore topsail sheet bitt standard extends down to the main deck, providing ample strength for the belayed rigging. Because I simulated those extensions when I made the manger, I was able at least to set the standard into a solid base with brass pins.
To make the pins, I used 3/16 stock, and cut timber heads in the tops., making measurements for consistency, then using an x-acto to make the angled cuts.
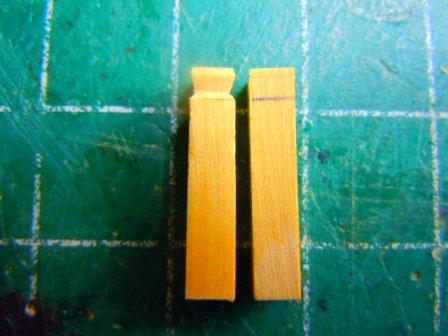
These also have a sheave cut into them, and cheek blocks sitting outside each one, made from 5/32x 3/32 boxwood. To make the sheaves, I used my milling machine, drilling the holes with a 1mm bit (the smallest I have, which seems a might oversized here); then I used the same bit to run a shallow groove between the 2 holes. I would have liked to angle the holes a touch to give the appearance of roundness, as for the working part of the block; but I just couldn't figure out that technique.
I've noticed on a few other builds that the cheek blocks have angled tops. Mine do look pretty plain -- even puritanical; but I'm hoping there will be enough other Baroque decorations to distract the eye.
The cross piece is shaped from 5/32 x 3/32 stock. It doesn't take much shaping, just some chamfering, and general light sanding.
Only the fore jeer bitts have standards.
And wouldn't you know, those steam gratings had to get in the way. These standards have the curious detail of a groove cut into them for access to the block fixed into the pin. I tried filing my standards down, to get around the gratings, and I considered pulling the gratings up and redoing them at a smaller size. In the end, I chose the path of least difficulty, and used thinner stock for the standards, thereby eliminating the need for that groove as well. They definitely look undersized, but my justification is that these don't seem to provide that much support anyway.
You can also see in this last picture that I've fashioned something of a breast hook, which is lying on the deck awaiting placement. According to FFM, there are four iron bolts on each wing of the breast hook holding it on the bulwark. These bolts I simulated with drops of glue touched with black paint (I used the tip of a needle dipped into paint).
Next up is the drift rail, described by Antscherl as "the most challenging rail to make." I've decided to make mine out of boxwood -- maybe that puritanical strain is growing?
But then, again, I took a look at BE's belfry last night, and started thinking that might have some anti-puritanical fun hidden in it. So maybe I'll go with the curve.
Meanwhile, the September 1 deadline that was keeping me from posting regularly has passed, and I got my work in (a close run thing, but I did get it done). So now I'm hoping to keep more up to date with my log -- though very often the only progress is to hear myself using language I'd never thought I knew.
Cheers,
Martin
- rafine, ccoyle, Mirabell61 and 3 others
-
6
-
Nicely done, Mike. That redheart looks fabulous. Did you put polyurethane or any other finish on it? The capstan I made from redheart has about 4 or 5 coats of poly on it, and it's faded a bit less than other pieces I have.
Cheers,
Martin
- mtaylor and Landlubber Mike
-
2
-
I can really begin to understand the interest in America -- as the copper goes on, her lines become more apparent . . . . and she is a beauty!.
Iceland is a beaut too, but I honestly don't know why anyone would leave the Alps, especially during this time of year.
Happy equinox!
Martin
-
Great work! Congratulations on building such a fine ship, you'll get years of pleasure looking her over.
I built the Rattlesnake using Bob Hunt's practicum. I'm glad to hear he's gone back to producing kits -- which he's stopped doing for a while.
Can't wait to follow your next build
Oh, and thanks for the link to Kettle Moraine -- hardwood suppliers are always a good source (I have 3 carving projects going at the moment, and am always looking for affordable sources of wood)
Martin
- mtaylor, Canute and zoly99sask
-
3
-
-
Hi Doug -- That's a nice looking bulkhead. The knobs & hinges make for attractive details Can't wait to see more.
Cheers,
Martin
-
Just to add one more voice to this already insightful discussion, I'll reiterate that you can make precise measurements, but then as you eyeball the wales, you might just find that they sweep up too much. That seems to be the tendency, and it's also why LL Mike's idea of using tape instead of a batten works well, since tape is easier to adjust. In the end, I think everyone's wales ends up in a slightly different alignment.
Cheers,
Martin
- Landlubber Mike and herbgold
-
2
-
Hey Jon -- I feel for you -- the rigging gets so very complicated at this stage, and everything under the mast tops is crowded, and you repeatedly realize that you should have done something earlier. But it will come together, and look fabulous (then you can worry about the knots coming loose, or your cat knocking something off
 ).
).I remember the problem with the kevels, and I had to add some myself just as you did. Like you, I learned a lot from Bob's practicum, but in the end felt that I could learn more from MSW, NRG, and FFM -- how's that for a list of acronyms?
Cheers,
Martin
- CaptainSteve, WackoWolf, Nirvana and 1 other
-
4
-
-
Well done, Mike. You've got my admiration using that redheart like that. "Crumbly" is right, that's exactly what it does. When I was working on my capstan, I had to throw out half the pieces I cut just because they fell apart (and usually just as I was getting them to look right). So I can understand the strategy to lay single pieces for the quickwork & the spirketting -- the wider the better.
And that shot gives a nice view of your handsome planking. The taper toward the hatch makes an eye-appealing touch.
Cheers,
Martin
- Landlubber Mike and mtaylor
-
2
-
-
-
Hi Mike -- I'm a huge fan of tung oil, and slathered it on the blanket chest and rocking horse I made. I think for your deck you might want to consider what you'll be making the furniture out of -- will the comings be boxwood, walnut, or what? and how will it contrast with or complement your decking? As I recall, your maple looked quite striking as is.
Cheers,
Martin
-
Ach! Here you are, Peter, and it's good to see you at work. I can definitely understand your interest in this elegant yacht -- she's a beauty!
If there's ever a choice between fine weather and ship modelling, I'm afraid I'd have to go with the weather.
Can't way to see more (fine weather and your modelling!)
Cheers,
Martin
-
-
Thanks you guys.
Ha ha, Spy, I think that if I started removing bits and pieces I might not stop till I removed everything down to the bulkheads.
 I know it's hard for you to send off your Pegasus, but I think it's found a good berth, and I know all of us Swans will be cheering her progress.
BE -- Those pictures do help. Especially seeing where you've painted the inside planking -- that shows that only the merest sliver (sort of like the Quarterdeck bulwarks) pops up at the breast beam. In my case, there isn't even a sliver.
The plans show about a 3 mm rise at the bowsprit partner; that I have. But it also shows maybe 1.5 mm (my eyes have turned into little raisins, I'm sure of it, so that seeing those tiny marks is not so definite) at the breast beam. So I think your idea, BE of doing the inner planking then adding a strip might do the trick.
I might just be able to squeeze in a few moments in this evening before the dinner gong.
Cheers,
Martin
-
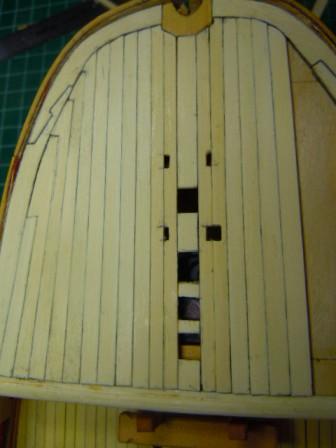
A brief update and another question:
For better or worse, I kept the hooked planks and scarph joints, telling myself that I would take one step and consider how it all looked. I took several steps, and eventually they led me to a fully planked & treenailed fo'c'sle. And they led me to a bit of a perplexity.
This picture shows the starboard planking, largely identical to the port, and my problem.
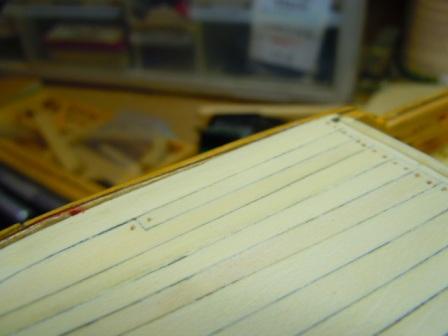
You might be able to see that the planked deck comes all the way up to the top of the bulwark. On other Amati Swan builds I've studied, the bulwark extends a little -- not very much, but a bit -- above the deck. (And the scratch-built Swans seem to extend significantly more). I can only attribute this problem to my placement of the gunport strips -- I believed I aligned them with the tops of the bulkheads, but perhaps not quite high enough.
At any rate, I now need to raise the bulwark somehow. My question: How? And by how much? Since the combination of inner & outer planking on top of the ply strip constitutes 3 layers, I suppose I could replicate something similar. But the height seems minimal enough that I don't know how stable such an addition would be.
Suggestions?
-
Hi Mark -- Great work, and an interesting jig, which I want to try to copy. As for cutters, you might check out Proxxon's store, run by Texxn5 (one of us guys on MSW). I've bought some of his cutters that have worked very well -- in fact the Proxxon attachments are the only ones I've had any success with.
Here's a link
http://www.proxxontoolsdiscount.com/store/c12/Accessories_Lathes%2FMlls.html
Cheers,
Martin
-
Hi Mike -- Work has kept me from being able to respond in any way to your interesting thought process, for which I apologize. The badges on the NMM Fly plan look just as flat as the one on your Pegasus plans. That makes me think that historically these were nominal, 2-dimensional, carved appliques. That notwithstanding, I think Alistair's effort looks terrific. If you go with the rounded 3-dimenional version, I would have to believe the problem with the dolphin spacing would work itself out as you see the actual pieces fitting together on your workbench. (I'll just add the side note that that weird looking creature with the lips and bulging eyes seems to have been the conventional depiction of a dolphin/dogfish for quite some time; I've seen the same creature in paintings from this same era, and even recall - vaguely - seeing it in some of the taxonomies. The stern carving on the Fly also has that creature; I really think that these Baroque designs just loved those curves.)
As for the rails, the safe progression to my thinking would be to keep them off as long as possible. BE recounts having to repair his. Here's a question I have for you, though, since I'm also thinking ahead (well ahead) to the rails: what wood do you have in mind for them? I thought of using something to contrast the boxwood (castello), but don't care for walnut, since its open grain conflicts with our scale. Then I thought of pear, but worried that it would look too pink (a handsome wood, but pink nonetheless). Ebony has too many health problems. So I will probably use boxwood. With your contrasting woods, I'd be very interested to hear what you have planned.
Cheers,
Martin
- Landlubber Mike and mtaylor
-
2
-
Hi Mike -- You've pretty much summed up the two horns of the dilemma. Will the planking annoy in the future? or will it either be covered or cease to matter. Hmmm.
Since I'm back into the work week, I'll have a few days away, and I'm hoping that when I look at it next weekend I'll see it with dispassionate eyes.
Thanks for your comments, they'll help me think this though.
Cheers,
Martin
-
-
I have made some progress on the Fo'c'sle decking. But I'm not sure I want to keep what I've done. Here's the problem: I wanted to put a pair of scarph joints in the margin plank, but I ended up putting them too far aft, since the catheads would cover them up if they were at the curve where they logically belong.
This led to the bigger problem: the hooked planks now line up right at the scarph joint, which essentially puts joint up against joint. So here's a question: should I rip it out and do it over?
All opinions are welcome.
Cheers,
Martin
- Landlubber Mike and rafine
-
2

Rattlesnake by JSGerson - FINISHED - Mamoli - 1:64 - Using Robert Hunt’s practicum
in - Kit build logs for subjects built from 1751 - 1800
Posted
Jon -- This is when the slow and steady build really starts making the builder feel good! Nicely done all around.
I went through the same business as you with those t'gallant hallyards -- that's when I really had to develop the skill of using long tweezers to reach through all the rigging. Congratulations on getting through that challenge without pulling off other lines!!!
And I like your workbench well.
Cheers,
Martin