


Martin W
-
Posts
1,412 -
Joined
-
Last visited
Content Type
Profiles
Forums
Gallery
Events
Posts posted by Martin W
-
-
Hi Nils -- I have to share in the chorus of delight over each step of your progress. I also want to add my thanks for your diligence in keeping us posted on your work. Your images and your narrative are always a delight.
And of course I have to label myself one of the most desultory posters around!
Cheers,
Martin
- FriedClams, mtaylor, mmdd and 3 others
-
 6
6
-
Nice looking stern, Doug. That position on hands and knees seems to be one we all grow accustomed to. Generally I find what I was looking for months later when I'm looking for something else.
Cheers,
Martin
-
Terrific Jon! It won't be over till it's under the plexiglass case, and you're well into your next build (Constitution?), and looking back at this with feelings of nostalgia for a job well done. The Rattlesnake is a lovely ship, and you're bound to get loads of compliments.
Cheers,
Martin
- Nirvana, CaptainSteve and KenW
-
3
-
-
-
Nicely done, Doug, nicely done indeed. I would have been afraid to use spray paint, but your strategy of laying a coat under the tape sound ingenious. Spy's right about those fittings, and they don't get any better.
We all miss Alistair's contributions to the Fly/Pegasus community. But as a working man myself, I know how hard it can be sometimes to get to the boatyard for any extended work.
Cheers,
Martin
- Dfell and Old Collingwood
-
2
-
Hi Peter -- You've been working pretty diligently since the last time I looked. That cockpit is intriguing to say the least, and the other deck furnishings all catch the eye. Your question about the strops around the deadeyes takes me back to my Rattlesnake, where I had that very problem. I ended up having to glue the strops around the deadeyes, and in some instances try to find an unobtrusive place to wrap wire around the strops to hold them in place.
On the matter of die Schweiz vs the Pacific Northwest, I have to say that the Alps represent the archetypal mountain range with their awe-inspiring granite faces. But a year ago, I flew into Vancouver BC and saw some mountains that took my breath away. As a displaced Oregonian, however, I have to recognize that the Alps, unlike St Helens, don't tend to explode.

Cheers,
Martin
-
Hi Nils -- Fantastic! I have to think that it's a good thing this ship is so enormous, with all the detail you're putting into it, you'd run out of room on anything smaller!!!
Cheers,
Martin
- Mirabell61, FriedClams and mtaylor
-
3
-
Looks good, Glenn. Spy's got a good point there. The first planking doesn't have to look terribly tidy, and I wouldn't worry too much about the gaps yet. This is the step where you can really see what happens at particular points along the hull, where gaps do want to appear, or where the planks tend to rise too high. That's the knowledge you can put to work on the 2nd planking (detailed notes help). And you'll be sanding this layer quite a bit, and that's where the smoothness appears.
The rows just below where you've gotten in these last pictures are the ones I had to work with the most, as that area along the stern makes for a sharp twist. It's a real education . . . and loads of fun!
I'm looking forward to your progress!
Cheers,
Martin
-
Har! I don't know if it would count in the category of "Life as We Know It," BE, but it's my life (at least till I retire to colder climes).
Peter, I think this guy was looking for some jogging shoes. And the good thing about the "Wind sweeping down the plain" is that it sometimes blows the detritus off the deck (and then generally blows it back on again the next day).
- Blue Ensign and flyer
-
2
-
Thanks for the support, Mike and Peter, it does make diving into those tiny details seem actually less daunting.
Peter -- on almost any given day, cows can be heard mooing from my back porch (no bells, I'm afraid); and at night, along with the owls, coyotes can be heard howling. And then yesterday, we got a visitor who decided that our front porch made for pleasant perch:
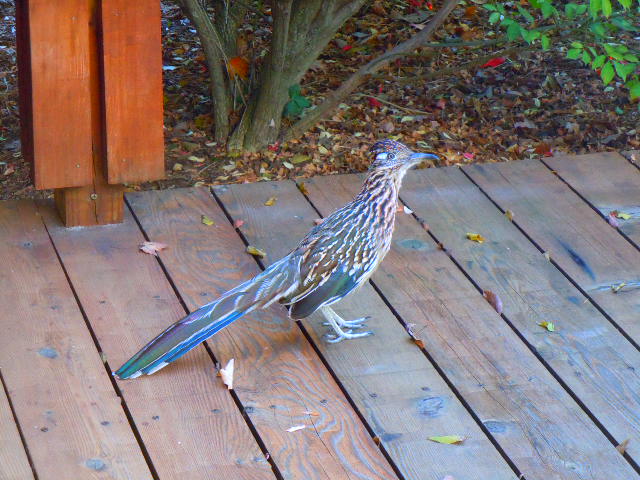
I don't know if you see many of these roadrunners in Switzerland, England, or even DC (unless you're inclined to watch cartoons).
- Gahm, Angarfather, Landlubber Mike and 5 others
-
8
-
Thanks for the nice words, BE and Bob. And thanks for the likes.
BE, the last elephantine creature to pass through here said goodbye during the ice age. And most of the corn I see usually reaches only about as high as a spaniel's eye, since our annual rainfall is what you'd expect in a week. Just about 2 miles in the direction opposite to the photographic view is the Indian Meridian, where all the land rush pilgrims lined up in 1889. From there on out to the Sangre de Cristo Mountains in New Mexico, the land is about as flat as you could ever imagine.
I guess I've deferred that Drift Rail long enough. The next few evenings will probably find me just trying to visualize it.
Cheers,
Martin
-
Hello everybody -- Since it's Halloween, I have to present my version of the Olde Play, Bats in the Belfry. (Or maybe just bad joke
 )
)The lovely Georgian Belfry did catch my fancy after all. I began with the stanchions, based fundamentally on those shown in FFM.

The base is no doubt too wide (as will be proved below). But this is what I'm going with.
Next I devised the curved canopy, simply by starting with some thick stock, measuring to the center, then two points equidistant out from there, and cut out the curved shape.

To cut the molding in the canopy, I first used my mill to cut the lower panels, in a graduated series. That gave me the basic pattern which I could sand lightly to round over the edges. For the curved molding, I simply set my thumbnail against the canopy's curve, found they matched pretty well, and then traced the outline of the nail onto the wood, and lightly, ever so lightly began scraping with the backside of an exacto blade. For the headstock, I followed the same strategy as the belfry, but in simpler, stockier form. I used blackened card for the iron straps, and the kit's bell. Here's the finished belfry:
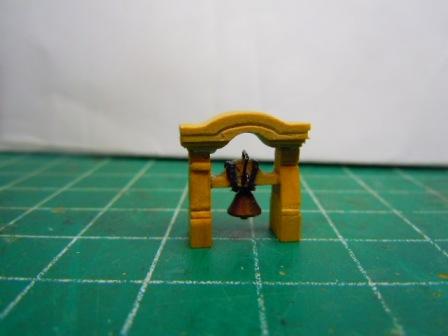
Actually, this is Belfry 3.0, the first few tries finding a better home in the scrap pile -- but I'm discreetly drawing a veil over those details.
Now the spar racks teased me a bit. I couldn't really work out a solid basis for any dimensions. The kit plans don't show the rack, but simply an inner railing. What I came up with is based on the overall length of the breast railing/belfry/spar rack configuration, allowing room for a scaled seaman to pass by (in the fuzzy video of Master and Commander that runs through my head).
In short, I worked out these two:
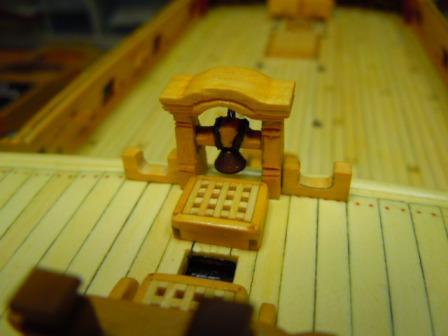
After a bit of consideration, and the simple test of laying a spar in the rack to see how it fit, I found that they needed some filing and refining.
Then came the slow process of the rail. The stanchions were easy, as I cut the timberheads with the exacto, and the sheaves with the mill. The railings required careful measuring for the placement of the stanchions, cutting the mortises for the stanchions, then scraping the molding on the edges. I followed the advice of FFM of gluing a thin (molded) strip along one edge to close in the stanchions, and it worked brilliantly. Until I found that I needed to file the ends off the rails a bit since they overlapped the spar rack, at which point the ends fractured at the out corner of the mortise. Repeatedly. Finally, I just took the bit that had broken off and glued it onto the stanchion as it stood in the rail:

If you look more closely than politeness dictates, you'll notice the gobs of glue on the port stanchions. And those were there until they became solid enough to scrape away.
I don't know what's next. Work is, well, work, and lots of it. As the weather cools, I find being outside very desirable, so my modelling time is even shorter than before. But Fly still calls to me.
Meanwhile, following Peter (aka Flyer) and BE's gestures of presenting lovely views from their different treks, I thought I might offer a view from my study window:
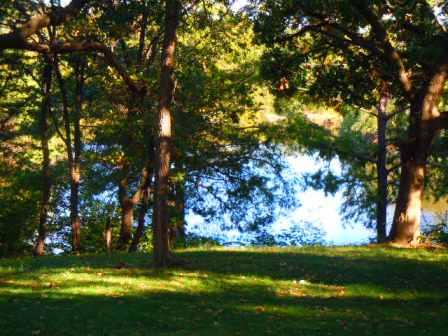
It ain't the Lake District, it ain't Iceland, but it's what the Southern Plains has to offer on a mild day.
Cheers,
Martin
- Dfell, Beef Wellington, flyer and 5 others
-
8
-
That top gudgeon is a hoot! When I tried putting the rudder in place, I felt the chill of, Oh No, My Measurements are Way OFF. But it's true -- if you look at lots and lots of pictures of the Swan sterns, you'll see that the top gudgeon just disappears, or the modeller did something clever.
You're making great progress! I like that blue you chose.
cheers,
Martin
-
Ah, Bob, it's that shackle simulation that really makes the chainplates look terrific.
Well done!
Martin
- mtaylor, Altduck, popeye the sailor and 2 others
-
5
-
Congratulations on getting those gunport strips on. From your photos, I have to say they look well aligned. The back of the quarterdeck seems to tilt a bit to starboard, but that just might be a fluke, since the tilt doesn't show up in the other pictures. I also have to be impressed that you got the jigsaw joint line up without any big gap.
Well done!
Martin
- Landlubber Mike and Glenn-UK
-
2
-
-
-
-
Hi Doug -- The wales look good to me. Bringing them back to the stern is tricky, since there's such a sharp inward and upward curve. From your picture, though, I'd say you finished it off well. And remember that you'll have some trim running along the bottom of the counter to make everything fit together.
Cheers,
Martin
-
-
Fabulous, Nils. As Carl says, she is long. And it's good to see those long shots, just to remember that as you're working on one area, there's still a whole heckuva lot on either side.
Cheers,
Martin
- Mirabell61, cog, mtaylor and 3 others
-
6
-
-
Terrific set-up, Jon! I'd have to guess you've got a mind geared toward problem solving.

You might find in some places that if you shape the coil with a bend at the top, you'll be able to fit it over the pin -- assuming you have a set of very fine & long tweezers, a steady hand, and a considerable amount of patience (remember to breath!).

Cheers,
Martin
- CaptainSteve, Nirvana and Jack12477
-
3

SS Kaiser Wilhelm der Grosse 1897 by Mirabell61 - FINISHED - scale 1:144 - POF - first German four stacker of the Norddeutscher Lloyd line
in - Build logs for subjects built 1851 - 1900
Posted
The biggest and fastest -- well, I have to believe that. She is big, and she looks sleek.
Happy Holidays, Nils. Stay warm and keep modelling!
Cheers,
Martin