


Martin W
-
Posts
1,412 -
Joined
-
Last visited
Content Type
Profiles
Forums
Gallery
Events
Posts posted by Martin W
-
-
Hi Guys -- I just saw this thread, and am very excited about it. Carving at small scales has many challenges that simply don't show up in full size carving -- and one challenge is that, as people have already mentioned, there just aren't many tools small enough. The Dockyard chisels are of low quality, in my opinion, and once dulled can be very tricky to sharpen. Two Cherries, a German company, makes some small gouges and V-tools out of a much harder steel and with more solid handles. Even the 1mm gouge has proven too large for carving at 1:64, however.
Two of the best carving instructors that I know of are Chris Pye from England, and Mary May in one of the Carolinas. They both have websites with on-going projects that you can learn a lot from. They both require a membership fee, however. Mary May's sharpening videos are probably the most informative for carving tools, and even better than Lee's book, which is good for chisels and planes, but not so much for gouges. Chris Pye has several books with clearly mapped out lessons that can give you a sense of the steps involved in working out designs and dimensions, as well as using tools properly. They are all available on Amazon.
As for wood, I love castello for all sorts of reasons. But I just recently got a sample of Alaskan yellow cedar and -- WOW! -- it was really nice. Just as Chuck say, nice tight grain (it sands up nicely), soft, and with none of the issues of basswood.
I also have to say that I only wish I had the natural artistic ability that Chuck demonstrates over and over in all his projects!
Cheers,
Martin
-
Cheers Guys, thanks for the input, it will help me decide which way to go, though I'm still brooding on the matter.
Bob -- I've promised myself that this weekend I'm going to take the time to go back and look at your gangway.
BE -- My idea was that the lower post would complement the upper newel post, especially if I shaped the newel into a lovely and elegant (
") ) shape creating an upwardly moving line. Hmm.
) shape creating an upwardly moving line. Hmm.
Peter -- The key phrase in your comment is "somewhat out-of-place." The reason I asked you guys for your opinions was that I realized my objectivity had faded with the desire to make the posts. If to the non-builders' eyes they look out of place or awkward, then that tells me plenty.
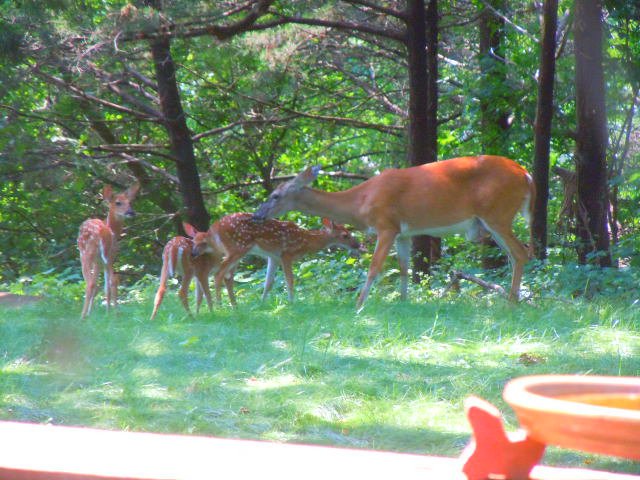
As for the deer, well, I've given up having any pink dogwoods in my yard (let's see, I think I tried around 5 or 6 times to get one through a summer). And every year the peaches mysteriously disappear the night before I plan on harvesting them (I think the squirrels might be playing a role in that prank). The curious part, though, is that the weeds remain untouched -- haven't those ungulate ever heard of "Symbiotic Relations"? I grumble, but then end up saying, but they're so very pretty. The raccoons on the other hand . . . .

Thanks again for your comments, they really matter.
Cheers,
Martin
-
Finishing up on Gangboards and Gangways --
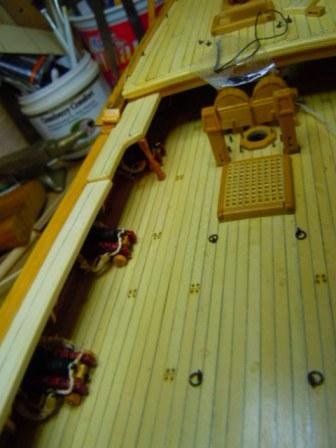
Setting in the knees proved to be both easy and tricky: the three that go in the open area of the waist were the easy ones, and the two that sit under each side of the fo'c'sle deck were the tricky ones, since they required angling the tweezers in just right way and then getting the glued edge of the knee up against the bulwark in the perfect alignment. It took several goes, but I finally got them in (and forgot to photograph them in plain view).
Setting the gangboard on top of the knees was cause for a bit of anxiety, since that would be the test of how accurately the knees were lined up. . . .

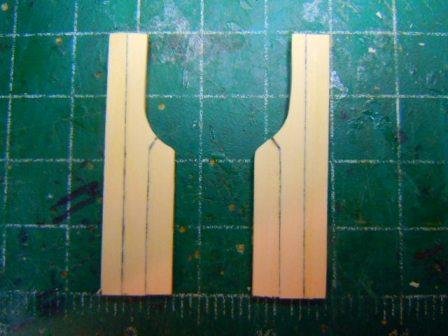
Ah, success. -- You can see how much the gangboards had to be shaped to fit the curvature of the waist. It would have made sense to have used a scarph joint to accommodate the curve, but that seemed somewhat elaborate for a structure that was in theory just tacked up.
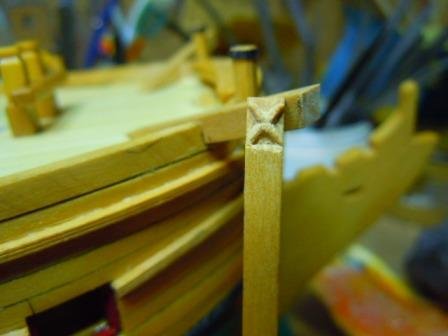
The next step was to set the gangways in. The forward edge of these sit just on top of the aft-most bit of the gangboards. And I've been considering putting a support post under the gangway. I turned a pair of posts out of cherry, and offer these views of the starboard gangway & post dry-set just to give an idea of how they might look (if glued they wouldn't be askew as they are here):
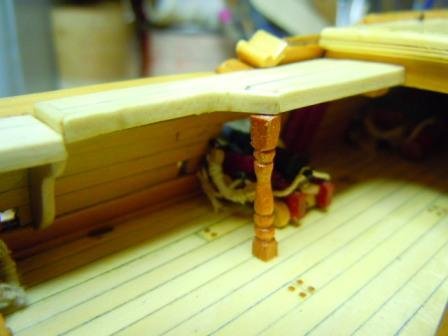
So, I'm still not sure about the post (and I apologize for the blurry pictures -- they looked a lot sharper in the MS Picture Manager, really). So I hope you guys will offer your honest views. If I put them in, it'll be because they make a nice decorative touch. If I scrap them, well, at least I enjoyed the opportunity to use my Proxxon lathe.
Meanwhile, here's the latest addition to my neighborhood:
Cheers,
Martin
-
Bravo, BE, that was a tricky problem that you solved nicely.
- Estoy_Listo, Blue Ensign, Tigersteve and 1 other
-
 4
4
-
Thanks for the link to your case-making, Nils. I've thought about trying my own hand at making a case, since the custom models are pretty expensive. But I've mostly been intimidated by the 3-dimensional framing. I'm going to study your work, and maybe I'll give it a try -- my Rattlesnake and Prince are getting TOO dusty!
Cheers,
Martin
- Omega1234, Piet, Mirabell61 and 1 other
-
4
-
Hi Doug -- Nice work all around. I've been contemplating the pumps on my own Fly, so seeing yours done gives me plenty to study.
Cheers,
Martin
-
Ahoy Alistair -- Great to hear from you! I often wonder how your work is going, so it's good to hear that you're doing some modelling. Airplanes were my focus as a boy and up until I left home, so I can understand their appeal.
Your Fly log continues to provide me with answers to the many, many questions these Swans pose. And I fear that one reason I'm still at it is that I'm probably the slowest builder out there.
On another note, you might be interested in the fact that the trees in my neighborhood are filled with Orioles, who have a very distinctive song. They generally stay for about 6 weeks, but in the past few years have hung longer and longer. I see them only seldom, but they definitely make their presence known.
Thanks for dropping by, Alistair -- you're always welcome!
Cheer,
Martin
-
Hi Bob -- It's in a build like this that your skills in joinery come to bear. Those joints look nice and tight -- and if they didn't come out right the first time, or third time, then who's to know. This is genuine ship-modelling, and I have to admire it!!
Cheers,
Martin
- mtaylor, Elijah, popeye the sailor and 1 other
-
4
-
To quote one of the great polo players: It just might be done.
Go for it!
-
BE -- You've called my hand, and I'll come clean: the main reason I'm thinking of the post is that I'm dying to use my lathe. Maybe all that will come of it is that I'll make some posts, look at them, admire them, and then lay them aside. Dunno how it'll work out, but it's part of the adventure!
Thanks for checking in. And thanks to all who clicked on the like button.
Cheers,
Martin
-
I promised that I would post a picture of the guns when I got them rigged. I had thought I would have them all done by Sunday, but they took a bit longer. I tried finishing off the rigging of the first two while leaving the carriages un-cemented, as Peter suggested. What I found is that the gun would move as I tried setting the eye & ring bolts in the bulwark, and pull the bolts out (blame my unsteady hands). That served as more evidence that I saved many lives when I decided not to be a surgeon.

So, here they are:
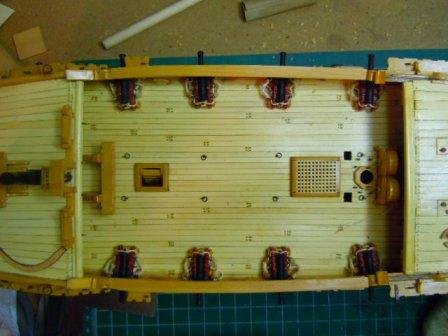
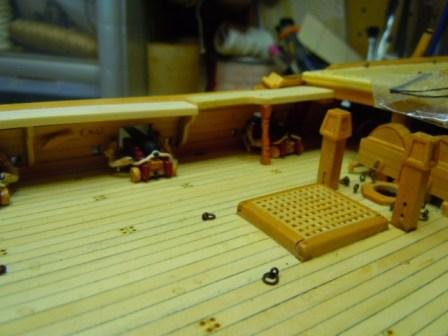
I've started on the gangboards, simply planking the kit-supplied thin plywood:
These will need some kind of molding along the edges to finish them off (and to conceal the plywood base). You can also see that the wider end is lacking the tab that would fit under the quartedeck beam. I'm following BE's lead here in cutting the tabs off in order to abutt the gang boards a bit higher. The purpose is to keep the forward ends a bit above the covering board in the waist, to allow the gangway to sit under the gang board.
One question I've asked myself involves the support of the gangboards. FFM shows a knee -- either metal or wood. These knees would be right up against the first knees of the gangways. I am thinking of departing from that structural arrangement and supporting the forward inboard corner with a post. Logically it would be an interference for the gun crew; but in my mind's eye a post seems more elegant. And it would follow the line created by the newel post above.
The knees for the gang ways will go in, however. I've cut and shaped all eight of those. Here is a sample of three:
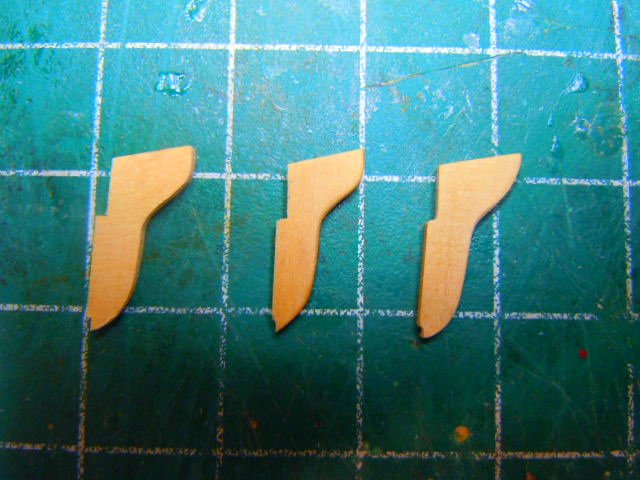
The tops are angled in order to accommodate the shape of the bulwark.
I do wonder if I should perhaps hold off on the gangboards until I've taken care of the pumps and other details. Hmm, I'm not sure.
Cheers,
Martin
- Blue Ensign, Mirabell61, rafine and 2 others
-
5
-
Terrific work, Bob. I couldn't see any sign of damage or repair, and wouldn't have even guessed (or tried to find it) if you hadn't spilled the beans.
Cheers,
Martin
- Mirabell61, Canute, Landlubber Mike and 2 others
-
5
-
Hi Nils -- What an astonishing array of models! And what's most impressive is the wide range of styles, from the 18th-century Pegasus, to the racing yachts like Bluenose and America, to the working boats, and that amazing KWdG. Whew! You could fill an entire museum with your own builds.
And I also want to say that your picture of the KWdG showing all boats up on the top deck is fabulous -- I simply love the view of the boat lining up along the rail.
Cheers,
Martin
-
YIKES! I tried out some chain way back when I first built the carriages, couldn't find any that was small enough, and gave up (ok, maybe I was a touch eager, but I knew I'd met my match).
One gun left to get the side tackle on, then I'm moving on to the gangways! (Actually, I've already started shaping the knees.)
Cheers,
Martin
-
Hi Mike -- I don't envy you working with ebony -- it's an odd sort of wood. I have never tried bending it, and was strongly discouraged from using it for the wales on Fly. Be sure to keep in mind that it's one of those woods whose dust is toxic when breathed. And keep your tools ultra sharp.
Looking at what you've done so far, and what you've done on Pegasus, I have to think you're up to the tricky task of stepping down the planks.
Can't wait to see it!
Martin
- mtaylor, popeye the sailor, Elijah and 2 others
-
5
-
Hi Mike -- that is an interesting detail with the planking appearing on the inboard bulwark. It looks handsome. That's also curious that the number of planks drops so drastically. l couldn't make out in your detail of the bow where those planks end -- what strategy did you follow?
Stay cool!
Martin
- popeye the sailor and Elijah
-
2
-
Thanks for the suggestions, you guys.
Spy -- those all look like good strategies, except that my barrels are all in place on the carriages, so there's no way forward but to deal with the gun in its entirety. (Mem to self: for future builds, leave the barrels off till later!!!!!)
Peter -- That's an intriguing idea. Like Spy, I have to confess that my boatyard can often develop rough seas in which the vessel under construction goes through wild rolls and turns. If the guns aren't cemented into place somehow, wouldn't they end up looking uneven, with some sticking out all the way, some pointing forward, some aft, and some -- who knows? Maybe I'll experiment with one or two and see how they go. Hey, I'm always eager to try out something.
BE -- Don't even ask about me how I learned the truth of that rule (hint: it involved a handsome sweater knitted by Mrs W OTP, and a top gallant yard).
Mike -- I think DC is just about one or two degrees north of my own latitude. The summers I spent in Middleburg, VA let me know that the weather there is HOT, HOT, and HOT. I'm planning on heading over to your Charles P Morgan log right now -- see you there!
Cheers,
Martin
-
Hi guys -- thanks for checking in, and for the encouragement.
BE -- I do recall that you drilled down through the carriage (it's been a while since I read that part of your log). And I recall that when I set the guns in under the quarterdeck, I realized too late that I should have taken that step before putting the barrels on the carriages. Hence the epoxy.
The bigger problem with the guns has been that I keep nudging the protruding barrels while I'm working on something else. One of them has already worked loose, and I haven't figured out a way to secure it back.
The temperatures are rising steadily down here on the prairie, and summer will soon close in to keep us house-bound. That's traditionally been the time I make my biggest advances on Fly.
Cheers,
Martin
-
Hello folks -- Too much time has gone by since I last posted an update. I wish I could say that I've secretly made great strides during the silence, but, alas, I have not.
I spent a fair amount of time trying to work out some sort of decoration for the end of the catheads. After tracing the star pattern shown in FFM, I tried cutting it in with a small chisel, then with a micro burr on the dremel, and then with an exacto. Here's the pattern traced onto the stock:
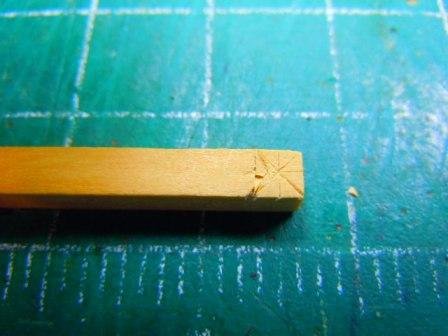
In each case, the detail just proved to be too small for me to cut any detail. The best I managed was this:
The possibility of getting eight points in, or even six proved to be beyond skills and visual acuity, so I took comfort in the fact that the NMM plans show that FLY is one of the Swans without decoration on the cathead, and moved on.
Next I debated whether to include the gangways, or to leave the waist guns exposed. I had always pretty much assumed I would include gangways, but then began to think that it might be nice to see the guns clearly. But then there's that nagging issue of the ladders to the fo'c'sle. The kit plans show them bang up against the #2 gun, and there really isn't any other place to put them. Nor is there a ladder way in the fo'c'sle deck. The logic here was killing me, so I've decided to go with the gangways.
That means I need to install the waist guns, which means I need to finish their rigging -- just the frapped side tackle, which does require the somewhat tedious process of frapping 16 tackles, seizing the eye bolts and the blocks. I'm almost finished with that process (and when it's done, I plan to open a beer, sit back, and say to myself, "Whew, at bloody last!"). And then I'll epoxy the guns in place. I tried BE's method of setting the guns in with pin through the deck, but just couldn't figure out where to place the hole for the pin, so I'm using epoxy.
Once the guns are in, I'll post pictures of the little darlings, and then start on the gangway, gangplanks, and q-deck ladders.
Cheers,
Martin
- flyer, rafine and Landlubber Mike
-
3
-
-
Ah, BE, so we meet again...... Nice start on your new new build. Hi to William -- it's been too long since he made an appearance.
So what is that actual measurement of the pinnace right now? (I'm definitely an Imperial Measures guy, in fact, I don't know how you could even bring yourself to stop thinking in Pounds Shililngs, Pence -- that was a beautifully baroque monetary system).
Cheers,
Martin
-
Ahoy BE -- I've just returned from a trip and find that you've put the final punctuation on your "Seven Year Adventure." Beautiful book, BE (I wouldn't have imagined you'd do anything less). Wonderful case, pleasant Work Shop, Handsome Builder (what's all this nonsense about your age?! you can't be over 28
). Most of all, a fine, fine Pegasus, one that would put a sparkle in the eye of any eighteenth-century modeller!
Onward!!!
Martin
- Blue Ensign and Mirabell61
-
2
-
Fantastic, Peter, absolutely fantastic. Your assessment of the kit is fair, and is something that we should all make clear so that kit companies can improve their offerings. A build like this is such a beauty that it only make sense that companies should upgrade just a few of the fitting or design.
Bravissimo!
What's up next?
Cheers,
Martin
-
That's a neat touch, Peter. They make the America look alive and active. But I don't recall anywhere in your log that you stowed any grog -- could that explain the sullen attitude of your helmsman?

Martin
HMS Fly by Martin W - Amati/Victory Models - 1/64
in - Kit build logs for subjects built from 1751 - 1800
Posted
Thanks for the compliment, Mike, it makes my day. And, hey, we've all had to take time away from our ships for one reason or another. Pegasus has patience.
Enjoy your bonsai!
Martin