


Martin W
-
Posts
1,412 -
Joined
-
Last visited
Content Type
Profiles
Forums
Gallery
Events
Posts posted by Martin W
-
-
-
Thanks for the input, guys. I hadn't thought at all that it would be proper for the planking to be visible, but what you say certainly makes sense, especially for a 6th rate.
And thanks, Dwight for the suggestion of Dull Coat. I'm definitely going to check it out.
Cheers,
Martin
-
Hello Everybody -- This isn't an update, but rather a question. As I work on the quarter badges, I wonder about how the windows are going to look. The hole I cut way back when for the window is far too small, and rectangular, to fill out the 3 lights. I'm thinking of painting the area covered by the quarter badge black, so that the lights won't show the boxwood/castello planking. Any thought, recommendations?
Cheers,
Martin
-
The son of the father fisherman has already begun to develop a questionable posture. That's a good recipe for neck problems down the road!
")
-
Hi there, Bob. It's good to see you back at it. I for one have missed your updates and the chance to see a true craftsman at work.
Cheers,
Martin
-
Hi Folks -- Thanks for all the kind words and for the encouragement. You're a great bunch, and I have to say that you've convinced me to have a try at the rounded version. And let me say further that the reason is that I know each of you understands first hand what it means to test your skills.
Peter -- Your logic of giving the skipper a view makes absolute sense. It's one of those insights that seem perfectly obvious when someone points them out. Cheers.
Mike -- I'm right there with you: it's the angle of the whole design, and lack of actual symmetry that has had me biting my lip. But I think if I keep the decorations to a minimum, a bare minimum, maybe even just the glimmer of a thought, I could work out the curves and angles. The key, I think, will be lining it all up with the angle of the stern. (Gulp.)
Toni -- Your advice seems sound, and couched in such generous is irrefutable. I do have FFM 2, and have used it to shape the (first version) of the lower stool on the starboard side. Holding it in place helps me see that even at a light 3/8" it could be a bit too proud. I think I might do a mock-up off-ship and see how it looks in terms of scale, integrations, and so on.
Grandpa Phil -- The Prince will always hold a special place in my heart, because it was my first build. And, OH! the fits it gave me. But it's also what led me to MSW, so it was all good.
The bad news is that the weather here in Oklahoma has been strangely pleasant (apart from the minor detail of 3 floods in 2 weeks). So, it's been a bit hard to confine myself in the windowless boatyard (which doubles as a safe room and beer storage). But the Quarter Gallery has become a problem to be solved, so I'll be thinking of it at the very least even while I'm outside wondering if this could really be June on the Prairie.
Cheers to all, and I'll post regular updates of my various efforts.
Martin
-
Thanks for checking in, GrandpaPhil -- what are you working on?
Having taken the stern decorations about as far as I can, and then finishing off a few other details, I think it's time to turn to the Quarter Badge, something I feel a bit intimidated by. I've looked over as many builds as I can think of, and I'm pretty well torn over whether to try the slightly rounded version or to take the safer route and put flat badges on. It's pretty much impossible to tell if the NMM plans show a rounded or flat badge for the Fly, so either way would stand an equal chance of being historically accurate. FFM notes usefully that even the rounded version should not extend outward any farther than the quarter pieces, which on my build would limit it to 3/8 inch. With the decorations, that would be essentially flat.
Here's a tracing from the NMM plans to show the rough placement of the badge (I've actually placed this much too high):
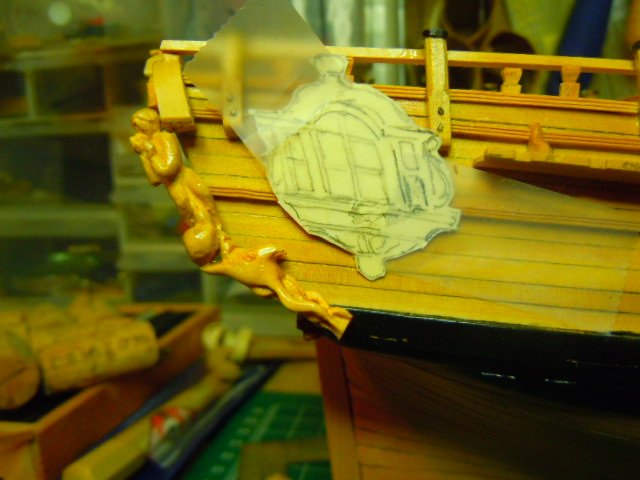
This tracing doesn't show the decorations, just the general outline.
I'm leaning toward the flat version. And that then raises the question of whether to cut out the pieces and then apply carved decorations, or to cut the pieces from thicker stock and carve the decorations into them (I'm also thinking that Plain is Good). There's also the question (perhaps a bigger question) of the three lights: there's only one window cut into the hull here, and because of the furnishings in the Captain's Cabin I can't cut any more. So I'd have to simulate lights with black paper or something.
Any suggestions or guidance would be more than welcome!!
Cheers,
Martin
-
That's a fascinating technique. I never imagined that it would be even possible to plane wet wood; I thought it would seize the blade. I'm going to have to try that out.
Cheers,
Martin
-
Nice work, Peter. You're wise to find ways to escape occasionally from rigging the guns. Did you use adhesive lettering?
The English language is intentionally confusing, that way we can employ lots of lawyers.
Cheers,
Martin
-
I also have to say the coins add a nice detail. Well done as always, BE, and as one of the many who follow your work, I have to say thank you for sharing your historical knowledge and your skills. Your logs have inspired us all.
But why no final picture of William?
cheers,
Martin
-
-
Sandpaper only! That's a technique that requires a steady hand (no merlot!) and a thick glove. Coincidentally, I was on my Proxxon mini-lathe last night, and reached the conclusion that I really need to develop better skills at sharpening my tools. And now that I see what precision you've accomplished, I'm seriously miffed.
Cheers,
Martin
-
The primary reason I have ever hiked, walked, or biked is so that I can eat heartily and drink a beer when I stop.
Cheers,
Martin
- FriedClams, Mirabell61, mtaylor and 1 other
-
 4
4
-
New techniques to learn! That's great to hear, since you've already impressed all of us with your vast array of techniques. Can't wait to see you get to work.
Cheers,
Martin
-
I can certainly understand the interest in leaving your Cheerful unrigged: there are lots of details to look at here, and if space is an issue, an unrigged build definitely has its attraction. This is a fine piece of work, BE, and IF I ever finish my Fly, I'll return to this log as a tutorial in what might show up next on my work bench.
Any thoughts on your next project?
But I wonder that you didn't shape the belaying pins on your lathe?
Cheers,
Martin
-
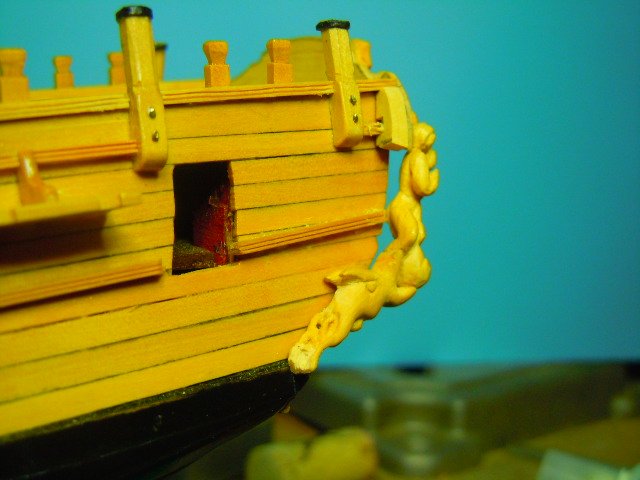
So, it's been some four months since I updated here. Well, I have been working at it, but, in my usual fashion, which mostly means making a piece, scrapping it, making it again, realizing it was even worse than the first version, and so on. My problem in this case had to do with the fact that the lower quarter piece had the size & shape restriction, it needed to support the upper quarter piece, and at the same time it needed to allow the upper piece to stand slightly away from the bulwark.
I decided to follow the pattern I showed above of the Kraken/Squid/Monster, and to make it pretty much of a round carving instead of a relief. The latter option prevented me from showing any detail at all, and it caused problems with the requirement of supporting the upper quarter piece.
At some point, after carving a fair version and working out a few ideas, I realized the trailing legs needed to look interesting from three different angles, which meant that I had to make each leg look separate from the others, without losing any strength. Carving that detail -- of the separate trailing legs -- took a surprising amount of time for the simple reason that they kept breaking, so I had to start over.
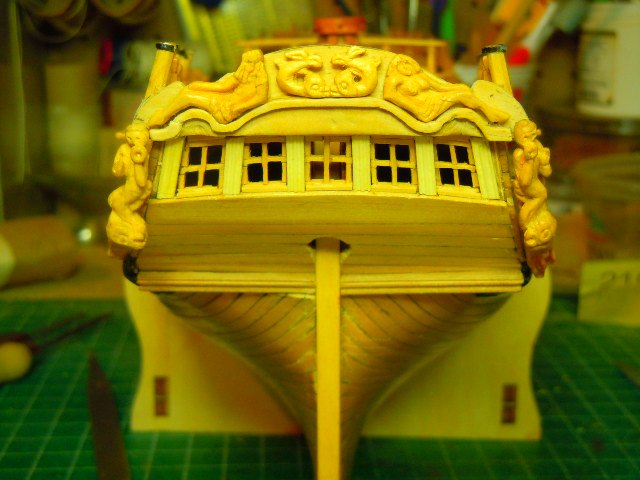
So here's the result:
First straight on of the Stern in its entirety.
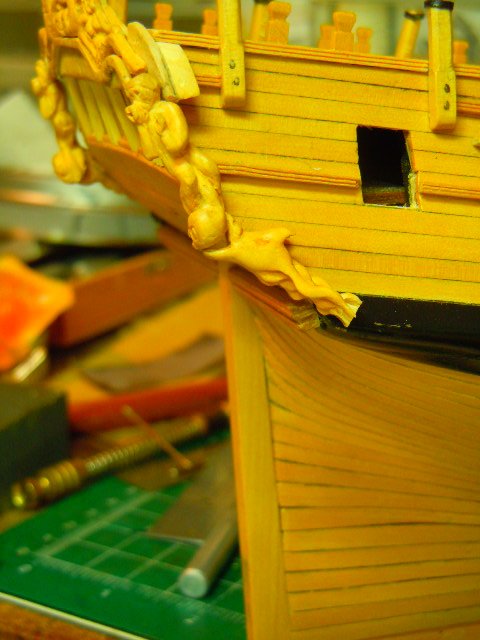
And next is the view from starboard:
And the same from slightly forward, to show the separation of the trailing legs:
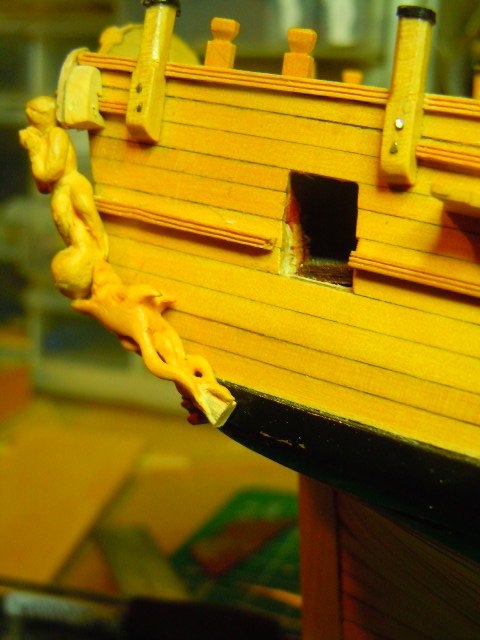
The very tail of the legs revert to a kind of relief, and that's because the tips of the legs broke off too many times to leave them as a round carving. I'm hoping that after I apply the poly that will be less obvious.
Next is starboard from below:
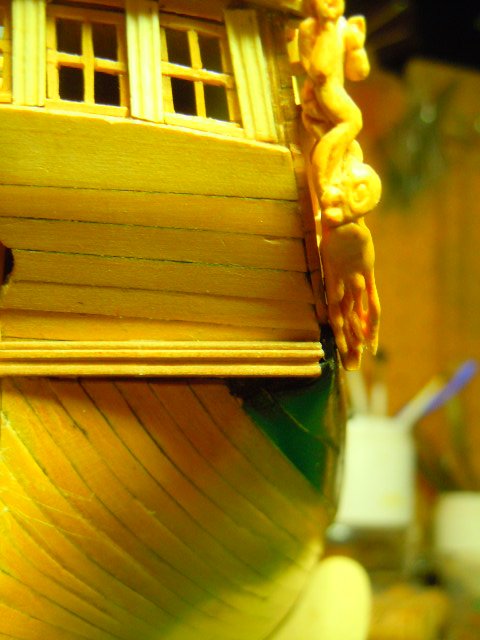
This image might be a bit confusing, but what you're seeing is the head of the dogfish that twirls around the Triton's legs (its eye is mostly what you see), and below that is the Kraken/Squid's lower jaw and trailing legs. So, here you can see the separation of the legs.
And next is the Port version:
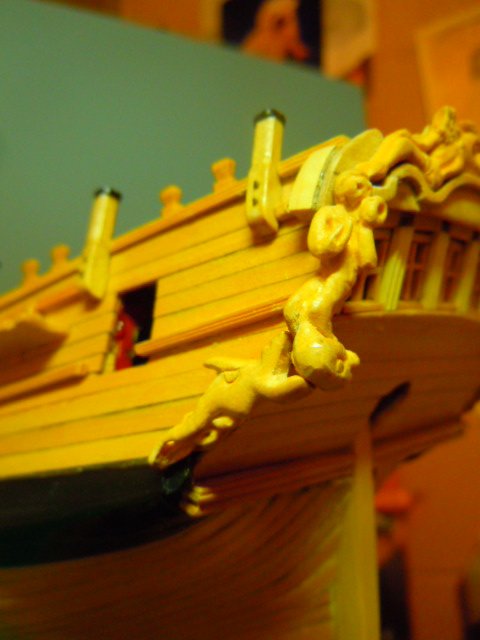
And with this, you can see how far the upper quarter piece stands out from the bulwark of the stern:
As for the fastening: I used 2 pins, one connecting the Triton's head to the tafferal, and another connecting the Kraken/Squid's head just below the horns.
And in shaping the lower piece, I tapered it on the outer surface so that the outboard side of the mouth is the farthest distance from the bulwark and the outboard side of the tip of the trailing legs the closest; and I tapered the inner, gluing surface just the opposite way, with the trailing legs close and the mouth far. In that way, the gluing surface of the inside surface of the Kraken/Squid remains flat but angles the entire carving outward. And even though I think the Kraken/Squid's "head" (they don't really have heads, after all) is a touch large, I am reasonably satisfied with the appearance of Curvaceous Baroque Ornamentation and delicacy/bizarreness.
There's a covering board that goes over the tafferal, followed by the rail running along the tops of the turret mounts (forget the name). And those are up next, before I take on the challenge of the quarter badge.
Cheers,
Martin
- davyboy, Dfell, Beef Wellington and 6 others
-
9
-
The Captain should be pleased. That bulkhead is impressive with the pilasters and glazed windows. I also have to like the door knobs.
Cheers,
Martin
- chris watton, flyer and mort stoll
-
3
-
Wow! You knocked those out in short order. You must have a sense of how to do gun rigging, eh?
Cheers,
Martin
-
Hi BE -- That look of the side-tackles is something that bothered me on the guns for Fly, and the problem, in my view, is that the blocks are either too big, or they have to come up too closely together. In the end, I used smaller blocks, no hooks, and I frapped the rope around some wire that enabled me (at least in the better instances) to get a decent curve. Tedious work, needless to say, but it seemed effective. One advantage to having a quarterdeck & fo'c'sle, however, is that at least some of the guns get covered -- and invariably, those are the ones that get knocked loose.

Cheers,
Martin
-
Peter -- You've been busy! All those details do add up to make this a handsome build.
Cheers,
Martin
- flyer and mort stoll
-
2
-
-
Add an exclamation mark to my like!!!!
The fine wire is a brilliant solution.
Cheers,
Martin
-
Hi BE -- I went back and looked at a photo I took of a gun on the Constitution. Unfortunately, it's a bit unclear to upload here (and I'm sure you've seen more guns in real life than land-locked I have). But from what I could make out, the key bolt was proportionally only the merest smidgeon shorter than yours. In other words, simply the fact that you've made the effort to add that detail will make up for a micrometer's difference. I admired your addition of these details on the Pegasus guns so much, that I gave them a go, and only learned that a) I couldn't find chain fine enough, and b,c,d,e, &f) I lacked the skills to fabricate and install such items neatly enough. In my view the guns are always one of the most tedious parts of a build. But I say, keep at it, and when they're done, they'll impress any 12" viewer.
Cheers,
Martin -
Ahoy Peter -- I know the experience of seeing flaws everywhere! But after a glass or two of merlot, the eye begins to soften a bit, and the full beauty of the build stands out!
She's looking pretty good to my (sober) eye. And the captain shows just what a big girl she is.
Cheers,
Martin
Zeesboot by Mirabell61 - FINISHED - scale 1:24 - wooden fishing vessel c. 1876 - small
in - Build logs for subjects built 1851 - 1900
Posted
Hi there Nils -- I've been limping along several days with only a provisional computer and so have missed your latest updates. Great work on the Zeesboot, which shows off your usual high quality craftsmanship.
And let me also say that you are very lucky to have your new little friend -- a handsome fellow indeed! I've been pining for a dog more than I can say, but Mrs W insists we can't have another until we leave the Prairie. Needless to say, I am green with envy. Make sure to include him in many of your updates!
Cheers,
Martin