HOLIDAY DONATION DRIVE - SUPPORT MSW - DO YOUR PART TO KEEP THIS GREAT FORUM GOING! (83 donations so far out of 49,000 members - C'mon guys!)
×

kirill4
-
Posts
910 -
Joined
-
Last visited
Content Type
Profiles
Forums
Gallery
Events
Everything posted by kirill4
-
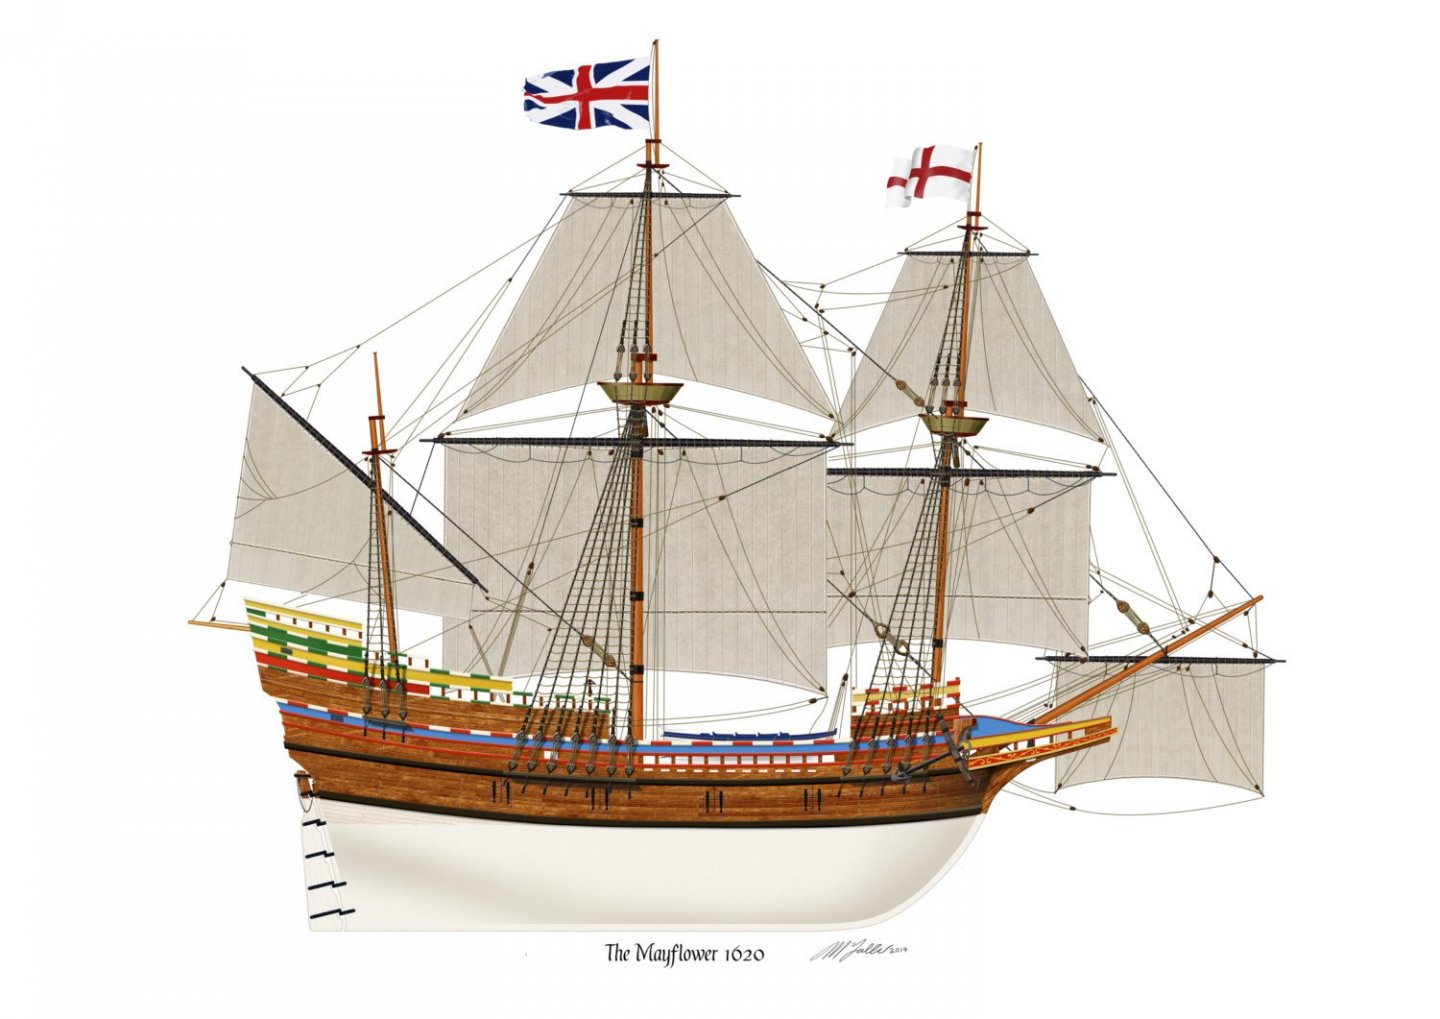
 Good day, Dear Bill By my opinion, there are two ways, A if You making exact model of replica Mayflower II , than bottom part need to painted as You did, as they did it on real replica B if You making just hystorical model of Mayflower , as piligrimm vessel , than entire botom part of the hull need to be painted white... No, not white but let's say white-grayish ... - this white -greyish color will simulate color of protecting substance which used in 16-17 centures to protect under water part of the hull against ''sea worms''... of cause this will be very simplified simulation of protection coating, when model will be painted this white-grayish, while real underwater coating consisted of several layers of different materials finished with thin wooden planks or even ,more often, lead sheets... I think creators of Mayflower II replica did this white color painting for hystoric acuracy only, but real underwater modern protection layer has this red-brown color... I don't think we need to reproduce it( this two color painting underwater part) on the model... And as I know, in this time there it was not ness-ry to draw waterline in modern style yet... just to paint grey-white entire hull till first strake... detailed and very interesting information about construction Mayflower II and 17 centure shipbuilding You could find in this book , writen by creator of Mayflower replica
-
Good day! Nice painting job, very accurate! Нave question about under water part color... Never see before such color scheme for underwater part, white-black? ...as I know in Tudor time under water part usually covered with a dark, black-brown compound- such color You could see on Antony roll fo example, but later on ,starting from Elizabethuan period , components of this compaund were changed,and color became white-greish color... on the model it could be shown as white ( with add of grey and ochra color...) This combination of both colors looks very unusual... Why did You use such two colors scheme?

-
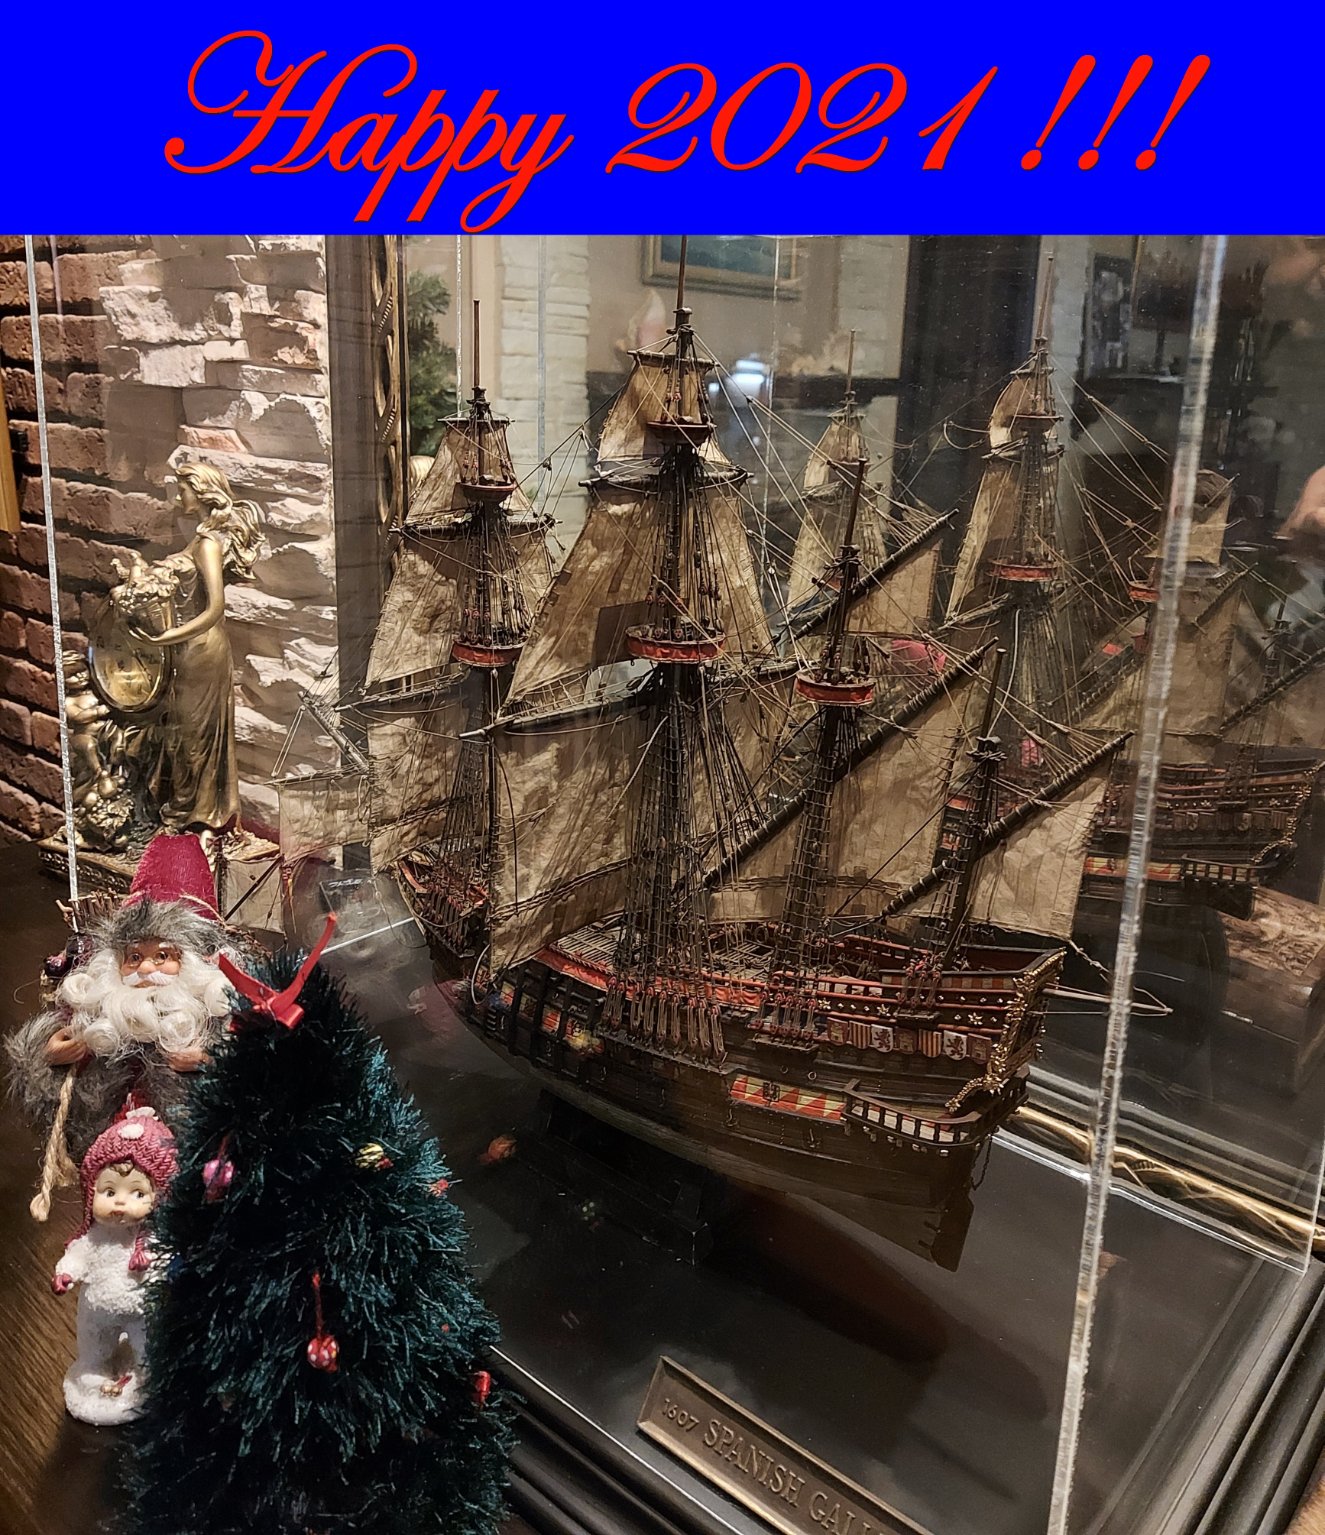
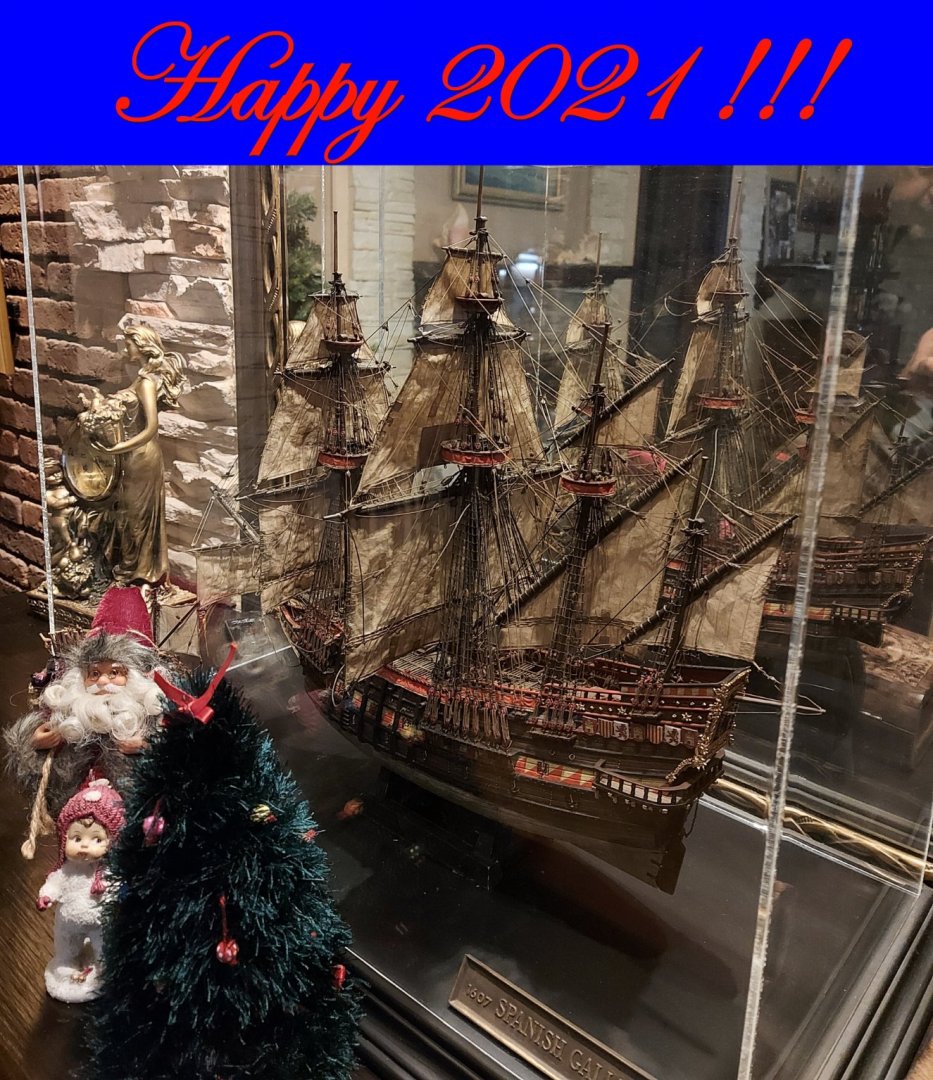
Dear friends, To All of you, Merry Xmas and happy New Year !!!
- 228 replies
-
- 8
-

-
- spanish galleon
- lee
- (and 1 more)
-
some considerations about rigging coloring... in the begining, when I didn't know too much ... I did it paint, treads, by mix of acrylic paints and acrylic varnish... I used syntetic treads " gutermann" without furs... but this acrylic coat is not too resistant stays on treads, and need to be restored again and again after intensive manipulations with rigging trough the blocks... But later on I 've found more interesting technique to use oil artistic painta and oil for coloring model rigging how it looks like You could see on D.Shevelev models/// https://www.shipmodeling.ru/phpbb/viewtopic.php?f=65&t=71120 posts 284 -286 https://www.shipmodeling.ru/phpbb/viewtopic.php?f=65&t=71037&start=270
- 265 replies
-
- 2
-
-
- Golden Hind
- Airfix
- (and 1 more)
-
And... if You don't know yet... there is one more recent recearch made by our collegae,reconstruction based oj Aker/s ideas https://www.segelschiffsmodellbau.com/t6619f952-Alternative-Rekonstruktion-der-GOLDEN-HIND.html I could guess it will be interesting for them of us...who interesting in galleon models :))) https://www.segelschiffsmodellbau.com/t6619f952-Alternative-Rekonstruktion-der-GOLDEN-HIND-11.html

- 265 replies
-
- 3
-
-
- Golden Hind
- Airfix
- (and 1 more)
-
Yes!!! Agree!! And there is one more briliant book abt May Flower ,in my opinion, of couse ... may be, not only my

- 265 replies
-
- 2
-
-
- Golden Hind
- Airfix
- (and 1 more)
-
Good day, Fully agree with that ! Need to make some precautions to avoid bend them...!!! when I was busy with standing rigging I tried don't apply tension at all, or did it: *as minimum as possible just sufficient to keep lines of stays and shrouds strait but no more. I used preliminary painted treads by mix of acrylic paints and varnish... but later on I knew that much better to paint treads by mix of artistic paints and artistic oil... sometimes it was very usefull to paint treads such as crowsfeet of mizzen lifts for example, after installation -this way it will be much easy to make them strait and aplly paint after final fixation... *some stays(mizen and bonaventure masts and some top masts stays) I fitted at place in reverse order for convenience- started to fitt them from lower stay parts and complete installation and final stay tension adjustment on the mast top... in my version of galleon stays it was possible due to I didn't use stays mouse but imitation of seized or spliced eyes... *all running rigging I try to show slacked wherever possible. To have rope making machine - great idea !!! treads will looks more realistic and You will have all rope sizes You need on your model !!! some type of rope making machine, of very simple construction,could be made at home even from cartons sheet and pieces of thick steel wire without gears...
- 265 replies
-
- 2
-
-
- Golden Hind
- Airfix
- (and 1 more)
-
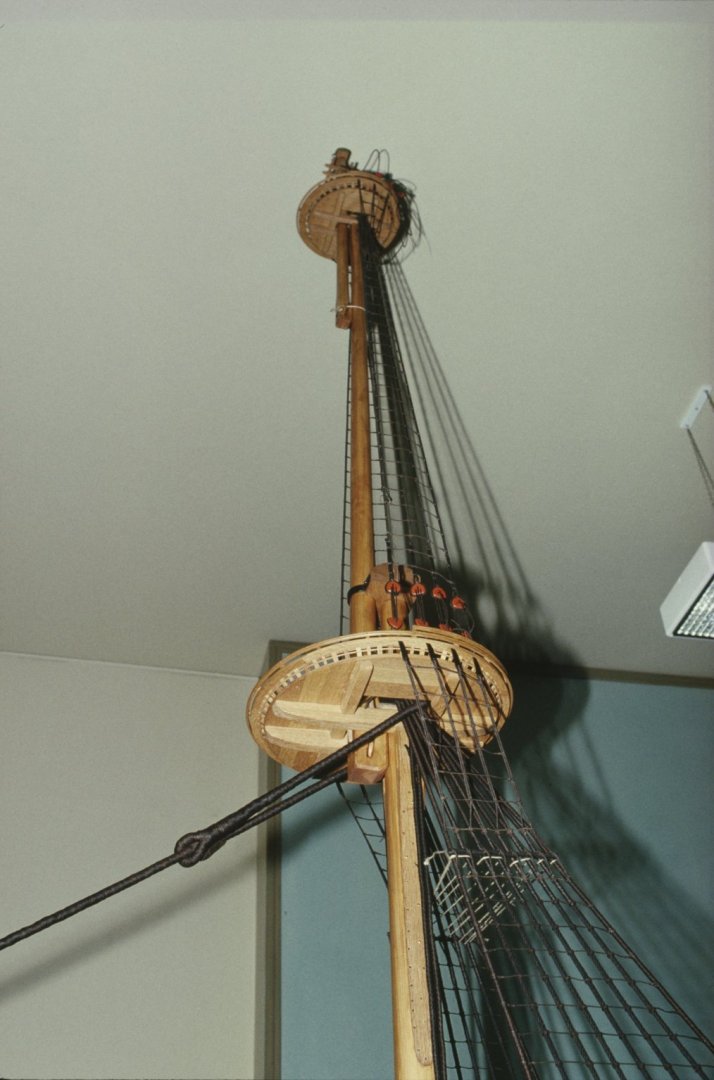
there are a few pictures of museum 's Vasa rigging reconstruction - You could see positions of the shrouds and stays loops above masts tops ... more or less similar rigging arrangements could be reproduced on the GH model ... just will be less sails and ropes, but basic remains the same! 7_b rigg rekons.pdf 6_b riggfästen mm.pdf

- 265 replies
-
- 3
-
-
- Golden Hind
- Airfix
- (and 1 more)
-
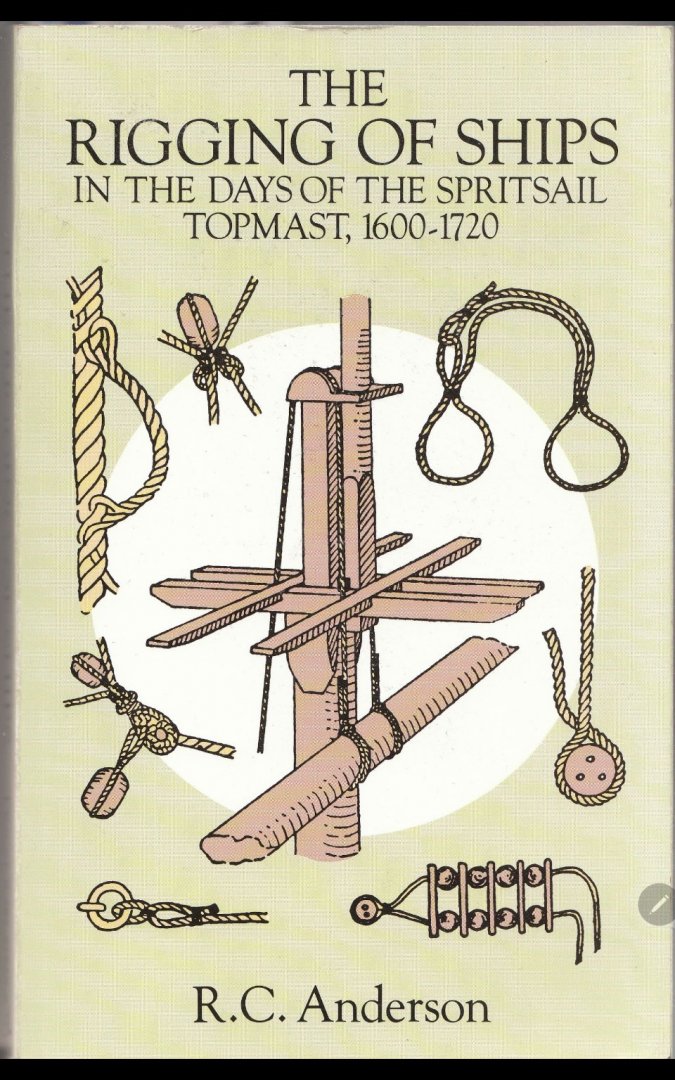
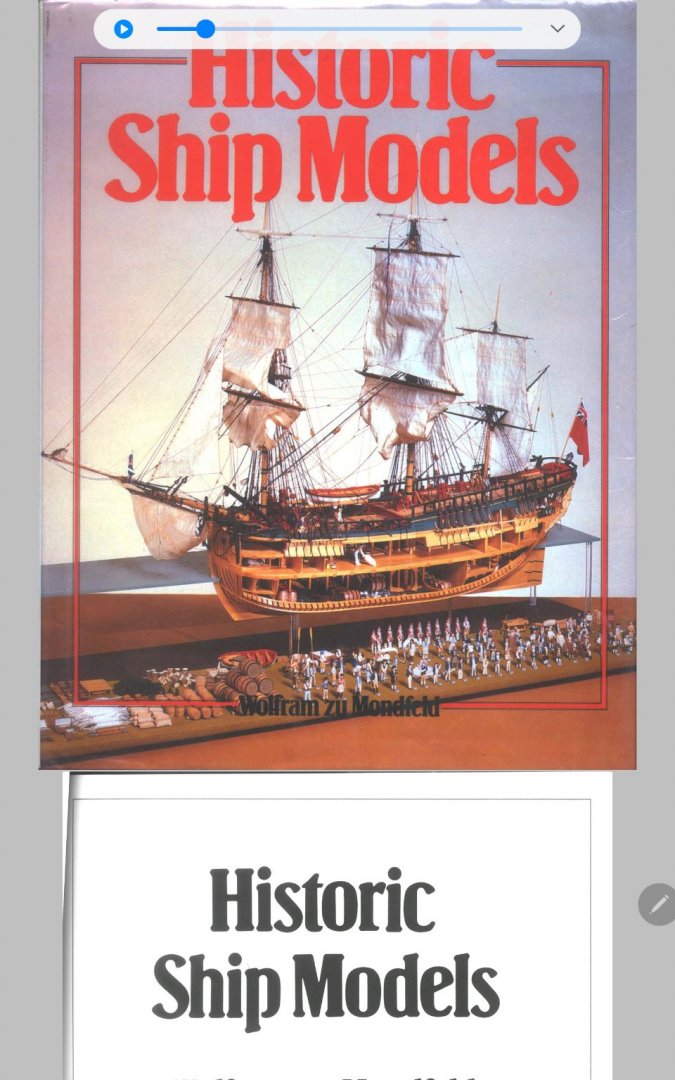
Dear bosco72, Thanks for the link! I see there are more interesting books available , Thanks! Regarding your model, my remarks most probably just about one of your "...do I have an eye for detail..." in this particular case - details of rigging, I could say, basic rigging details Actually there are a few basic rules for making correct rigging, there is a certain sequence in rigging which need to be followed. I think making rigging according these rules will be not more complicated(I mean time consuming and manipulations with treads) job than You already did now ,with installed shrouds and stays , in this part which You shown us. The only difference will be in corectness, from this point of vew , may be there is sense to start making rigging in correct way strait from begining, don't spend time for irregularities, irregularities which need to be corrected later on , on the next model? or they could be learned like first experience and than reproduced on the other models again ? :))) I understand we make a lot of simplifications in plastic model rigging, but general rigging appearance on the model should be correct by my opinion...at least it should be interesting to make it correct way not less than... accurate assembling or painting for example...:)? I remember , before start rigging my model ( let's say first and only one my model where I tried to understand galleon rigging,how it could be arranged, how should it work...and reproduce my "understandings " in model rigging :)))) I 've spent a few weeks to read R.C. Anderson book(book which I knew a few days before start galleon project), and later on start making my rigging plan on paper follow information page by page from this book, and third stage it was making model rigging...which is continue till present time :))) Sorry for that lirics Back to your model, I think book of R.C. Anderson will be more suitable for galleon rigging than Mondfeld book which is almost about everything in model making and nessesary information need to be trawled, in this respect Anderson talking more specific about 16-17 rigging. In my opinion Mondfeld could second source of information in priority...
- 265 replies
-
- 1
-
-
- Golden Hind
- Airfix
- (and 1 more)
-
Good day, Dear bosco72, Studing your model pictures I saw You did your standing rigging in some wrong way... sorry for that stupid question,may be You did it in purpose or why? *it looks like You did all shrouds and stays of the same thickness( sizes),normaly they must be different in sizes! *wrong way of location shrouds loops and stays...normaly it should be secured above tops plarform,on the mast tops, but You placed them under top platforms... If there is intention to make rigging in more right /correct way, I would like to recommend You to read this easy for reading books( Anderson and Mondfeld), in this books You could found condenced information practically regarding each important rope of rigging of 16- 17 centure vessel. A few readen pages will serve you very good when You will be busy with rigging your model. There You could find information about purpose and sizes of each important ropes and rigs of the old fasion vessel as well as tables( in Mondfeld book) with rope sizes in proportions to rigs/or main mast dimension/ diam. Below I gave some simplified picture with precalculated rigging rope sizes, calculation based on information from this books. There is exell table for automatic calculation ropes sizes of standing rigging as well Main stay size( diam) calculated in proportion to main mast diam. 0.166 of main mast , all other ropes sizes calculation based on main stay diam. Wish You all the Best! Kirill on the pictures dimensions given in mm roughly says , they could be used for the your model scale, strait from pictures standing rigging thickness.xls
- 265 replies
-
- 4
-
-
- Golden Hind
- Airfix
- (and 1 more)
-
Good day Marc, Totaly Agree with Mike🙂!!! This is fantastic project, such deep research of the subject and than brilliant reproduction findings on the model!!! I deeply admired for your work and this approach to business ! All the best!!! Kirill
- 2,697 replies
-
- 6
-
-
- heller
- soleil royal
- (and 9 more)
-
Good day Cpt_Haddock! Your Vasa looks very artistic!!! Good job !
-
Thank You very much Ron for attention and warm comments , I 'm glad You like it :)))
- 228 replies
-
- 1
-
-
- spanish galleon
- lee
- (and 1 more)
-
Dear Bill97, I'm sorry for delay with answer , for some period I didn't have access to the net... this kit is not rare, I saw a few firms did repack of this kit -AOSHIMA- IMAI series Large Sailing Ship No8;No12, LEE 0886, scale 1/100 even russian Modelist repack it - Моделист 110016 1:100 Spanish Galleon (Испанский Галеон), in case of difficulties to find it ,than most easiest way to find rare models - wisit Radek site https://www.hismodel.com/articles-category-5 ... sometimes it looks like he has everything I could wish to find( regarding plastic models of sailing vessels) !!! :)))
- 228 replies
-
- 2
-
-
- spanish galleon
- lee
- (and 1 more)
-
Good day Ron, Your Victory look nice, and bowsprit quite strait///atleast I don't see it is bended, some blinde spars on the bowsprit a little bit curved yes... Make Victory rigged- it is high pilotage I could say!!! :))) My respect!!! I didn't give my galleon build log thread - actually ,it is in my signature,You can follow it strait from here :))) All the Best!!!
-
Ron, If You didn't see that, I guess this thread of eugen.t alternative reconstruction GH will be very interesting for You (there need to be registered and You can change language frm German to English to read threads/there is button google auto translator in the lower left corner of the main page)... especialy in the part of rigging-see final drwngs\as source of information abt galleon rigging https://www.segelschiffsmodellbau.com/t6619f952-Alternative-Rekonstruktion-der-GOLDEN-HIND-11.html
-
Good Day Ron! #Recently I've checked content of the box with this kit, and I saw that masts and spars made from very soft plastic... worry there could be a problem with rigging, when we will reach this stage/they easily could be bended even without apply any forces during installation standing and specialy running rigging , such a braces,lifts etc... may be there is a sense to replace them for wood? I based my observation on experience of building my previous model of spanish galleon///in that kit plastic was twice harder than in this GH kit, but even than I had to replace bowsprit( as much loaded parts of rigs) for wood( made it from artist brush)...all other rigs were left original plastic... But in this kit I've strong feeling that atleast bowsprit( consider in that period there was no bobstays in use), and upper rigs all, exept fore and main masts probably(mean lower parts of masts), need to be replaced for wood🤔🙄 #regarding opening my GH build log...ah, need first to complete my previous project of spanish galleon and than start new one :))) Wish You All The Best! Kirill
-
Good day Ron! Nice and acurate job You did! I have this kit also and plan to build it someday in future( I want to make some small corrections of this kit - to add 4th mast and realign pozition of cannons ports, will try to make it more looks like famous Elizabeth Jonas model), and now it is very interesting for me to watch your building and see this kit "in action" :))) Wish You All the Best! Kirill
-
Hi Mark, When I have opportunity , I always watch Your studies and building reports with great interest!!! For me it is an example of excellence of workmanship! Great!!!
- 2,697 replies
-
- 3
-
-
- heller
- soleil royal
- (and 9 more)
-
Thanks Jonathan, I'm glad You found it interesting ...:))) Wish You all the best! Kirill
- 228 replies
-
- 3
-
-
- spanish galleon
- lee
- (and 1 more)
-
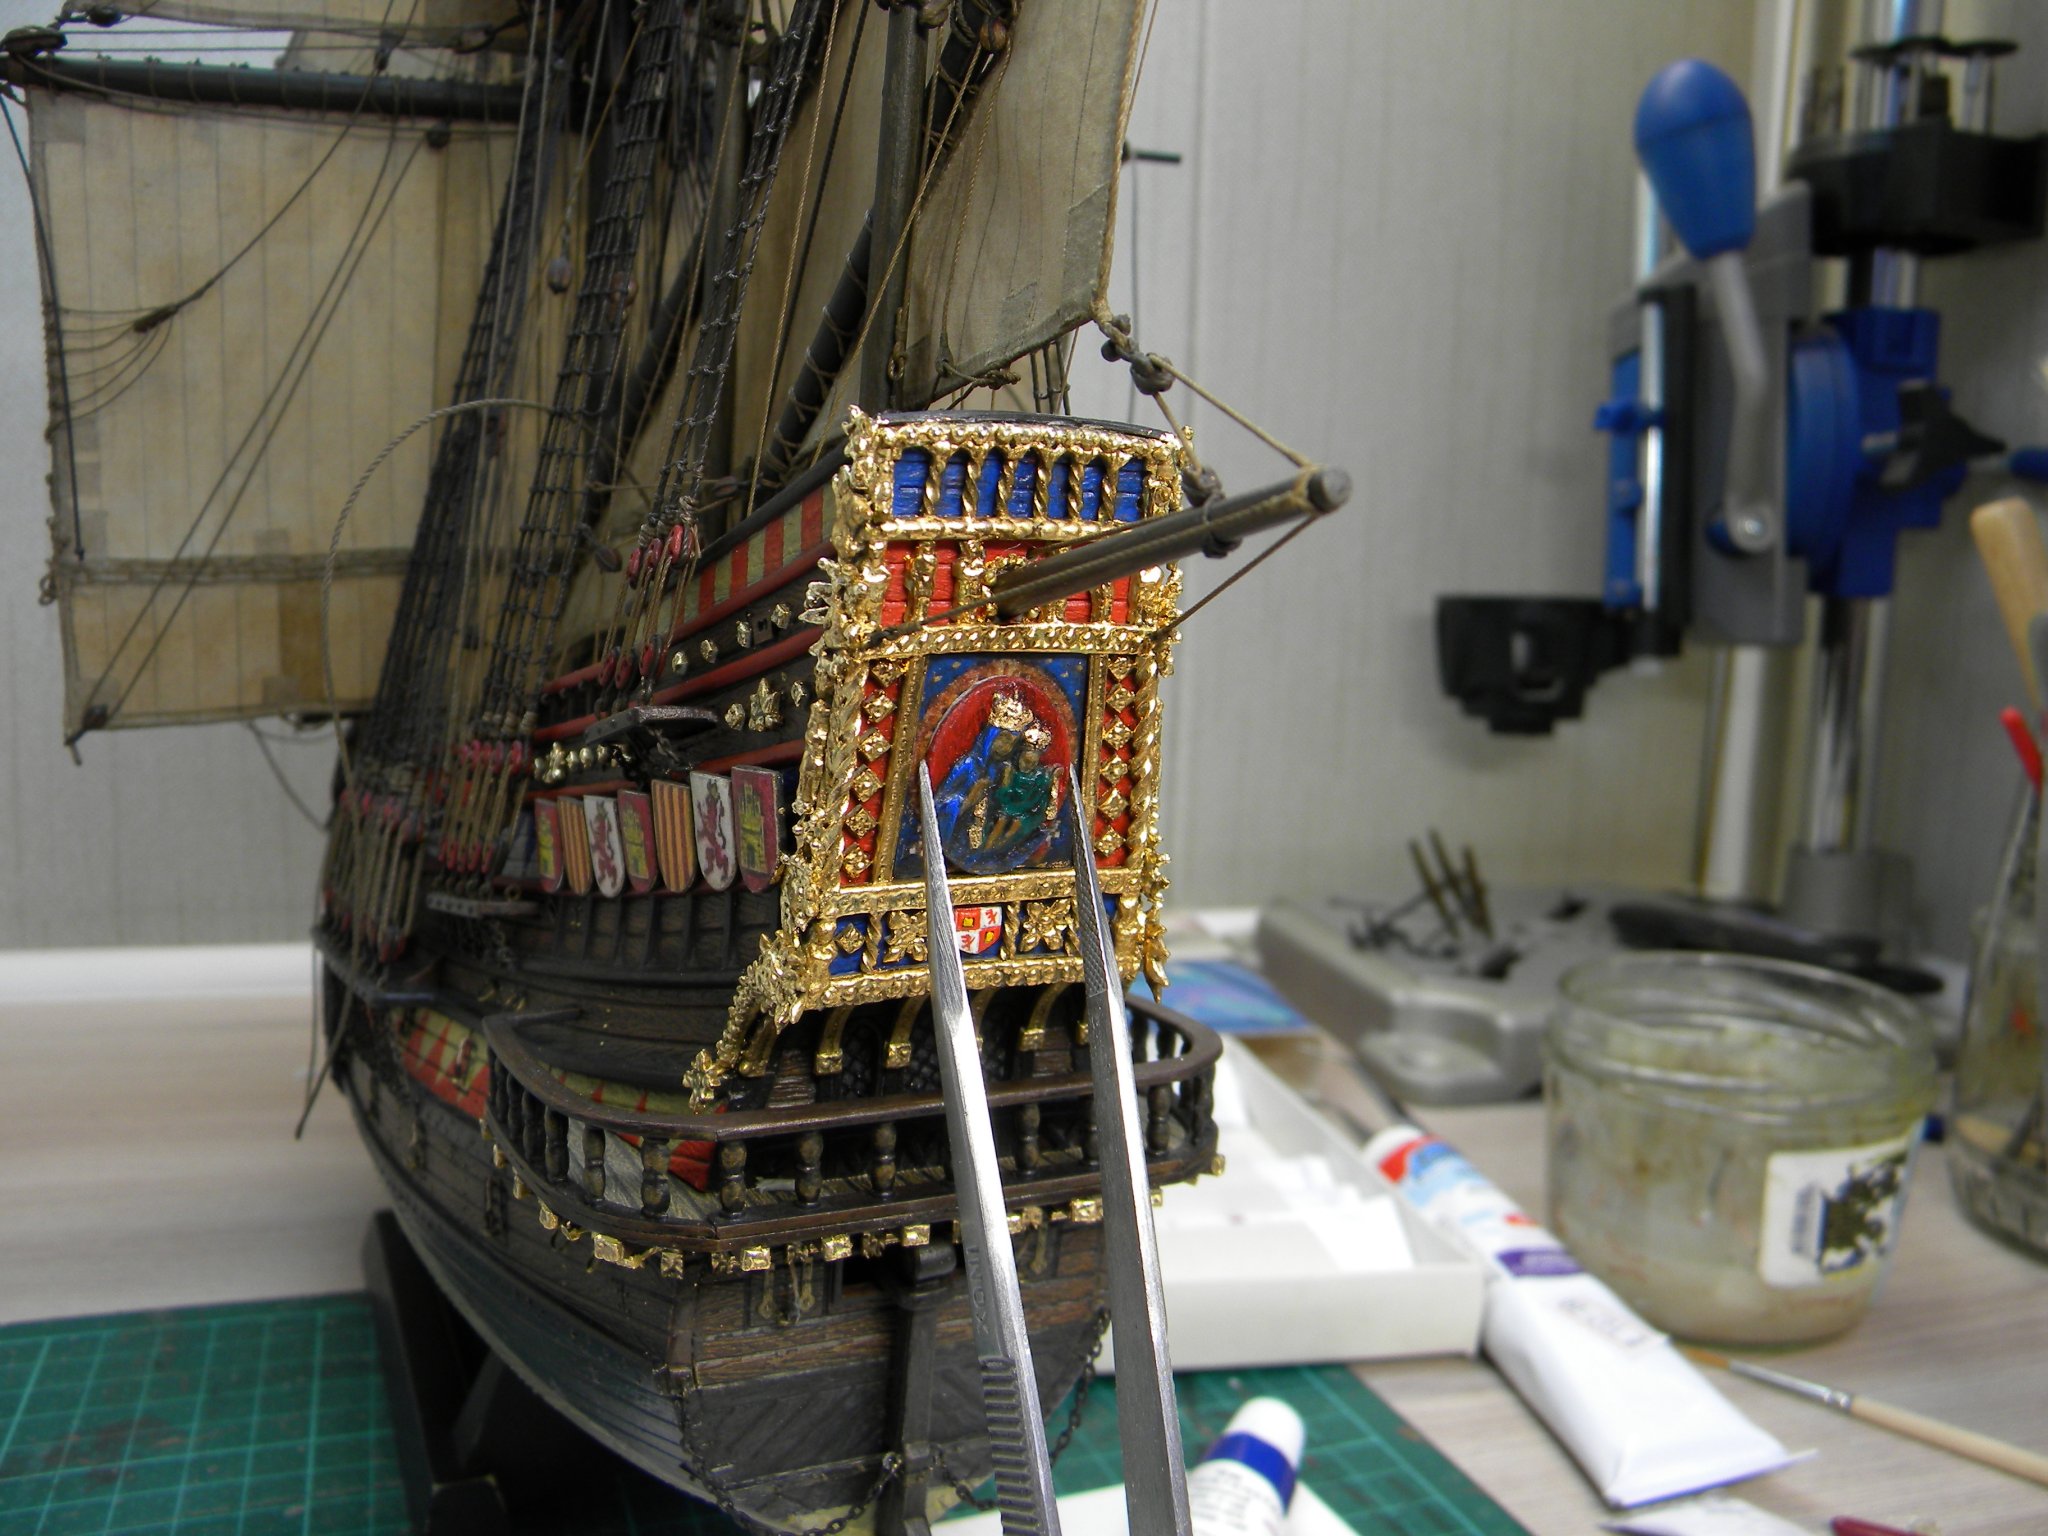
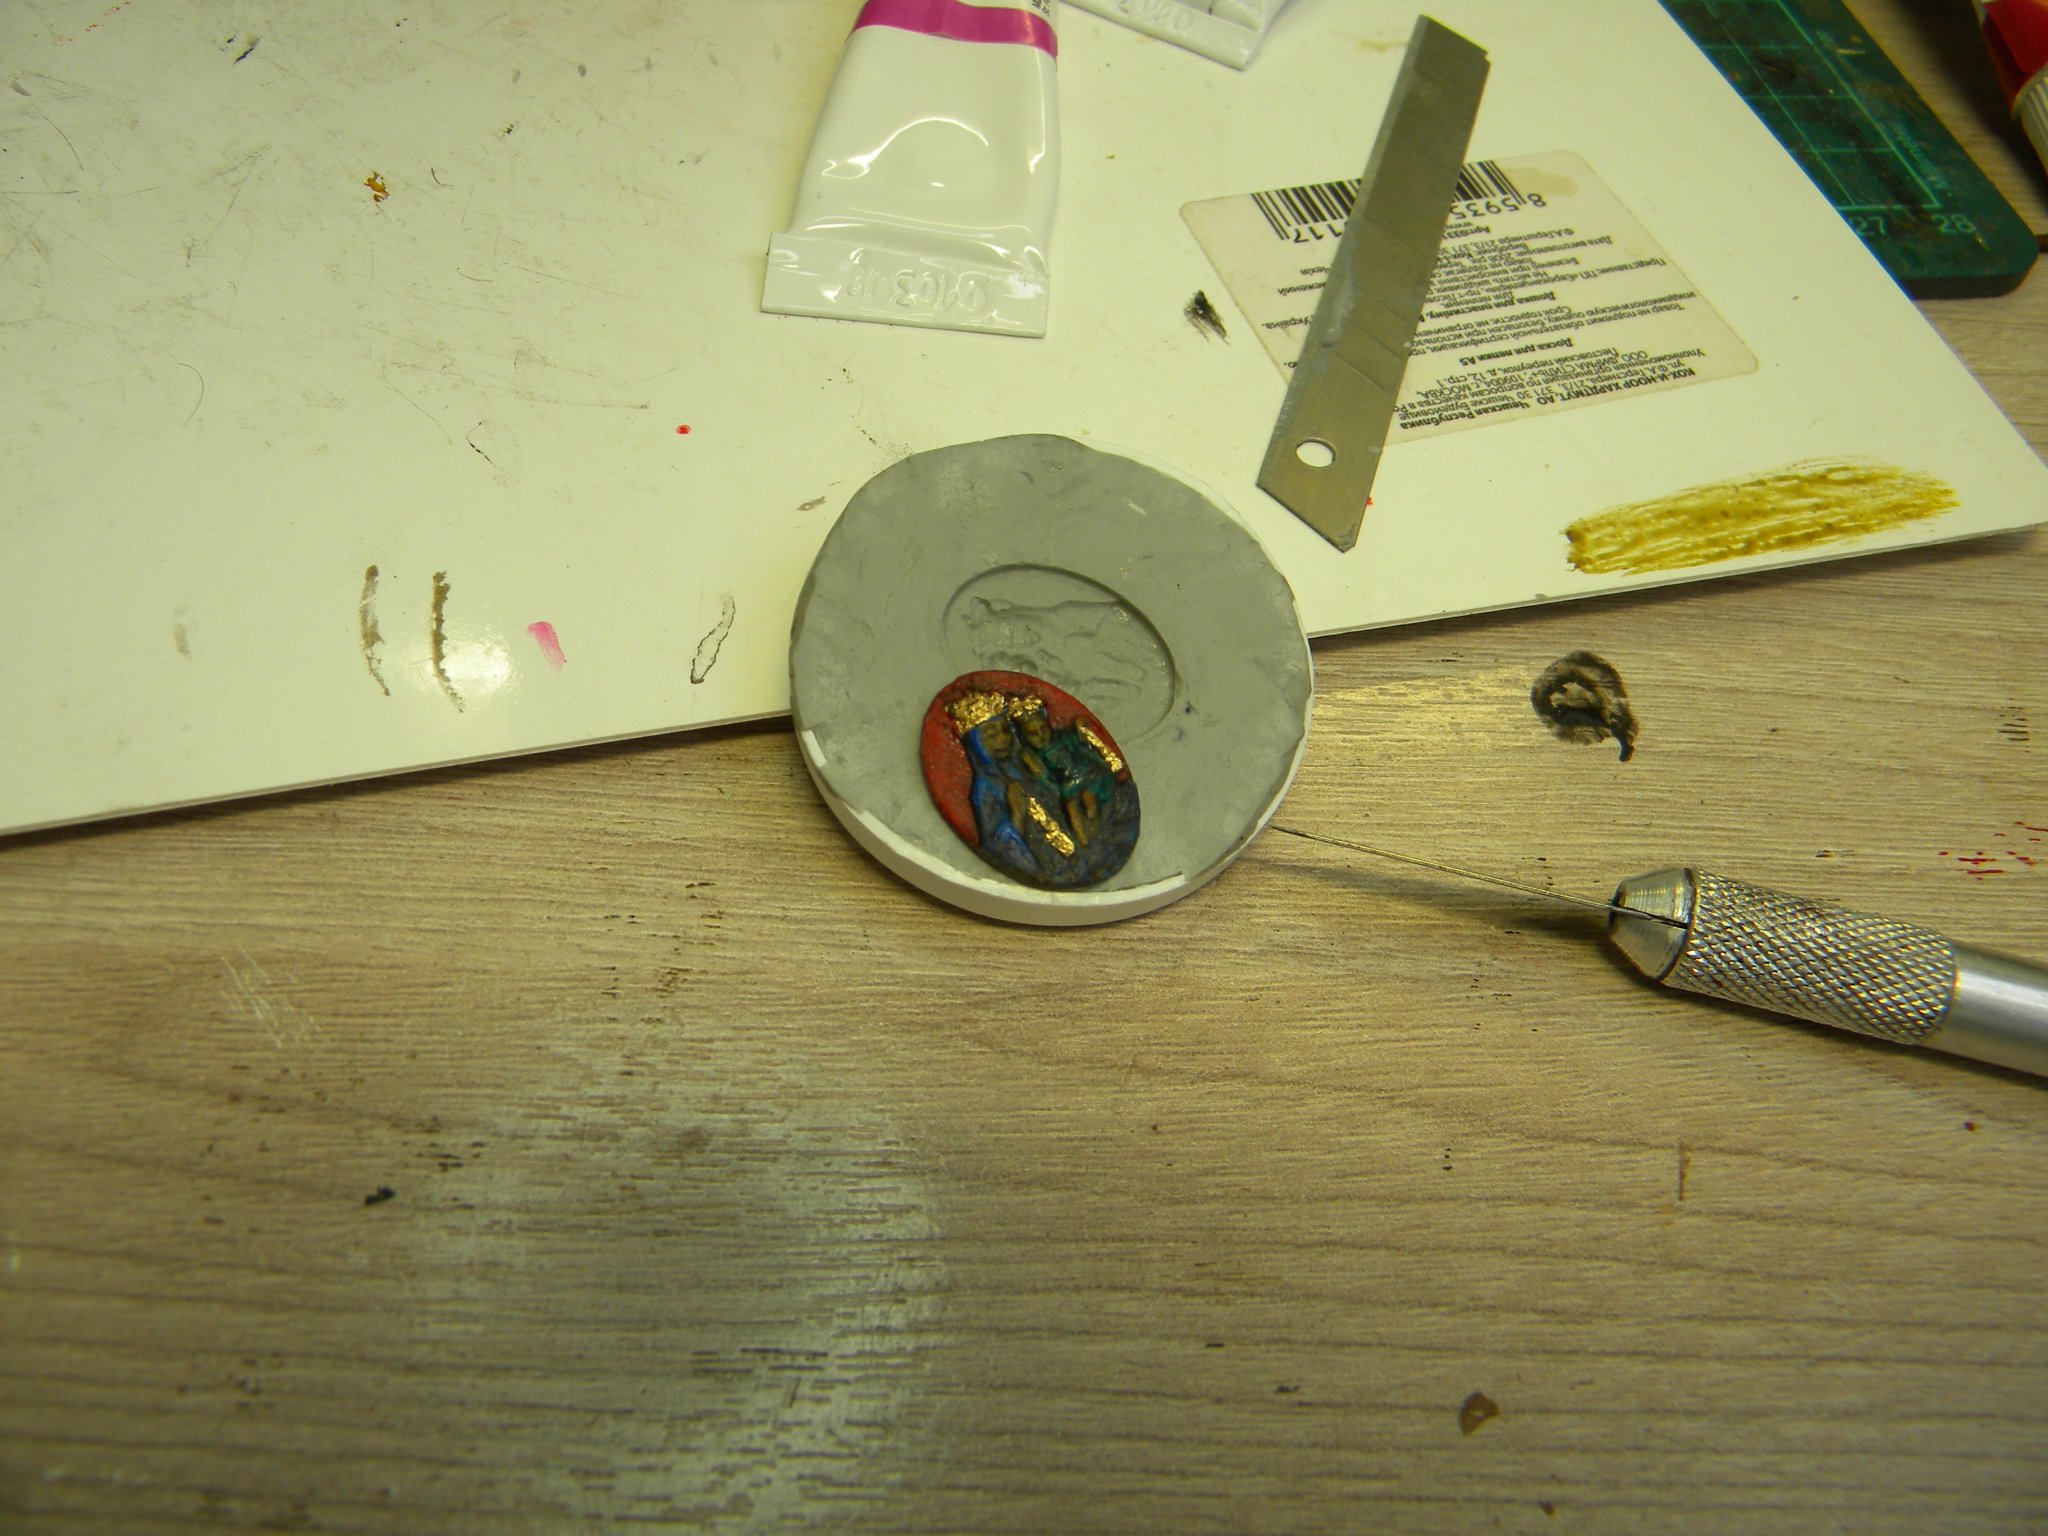
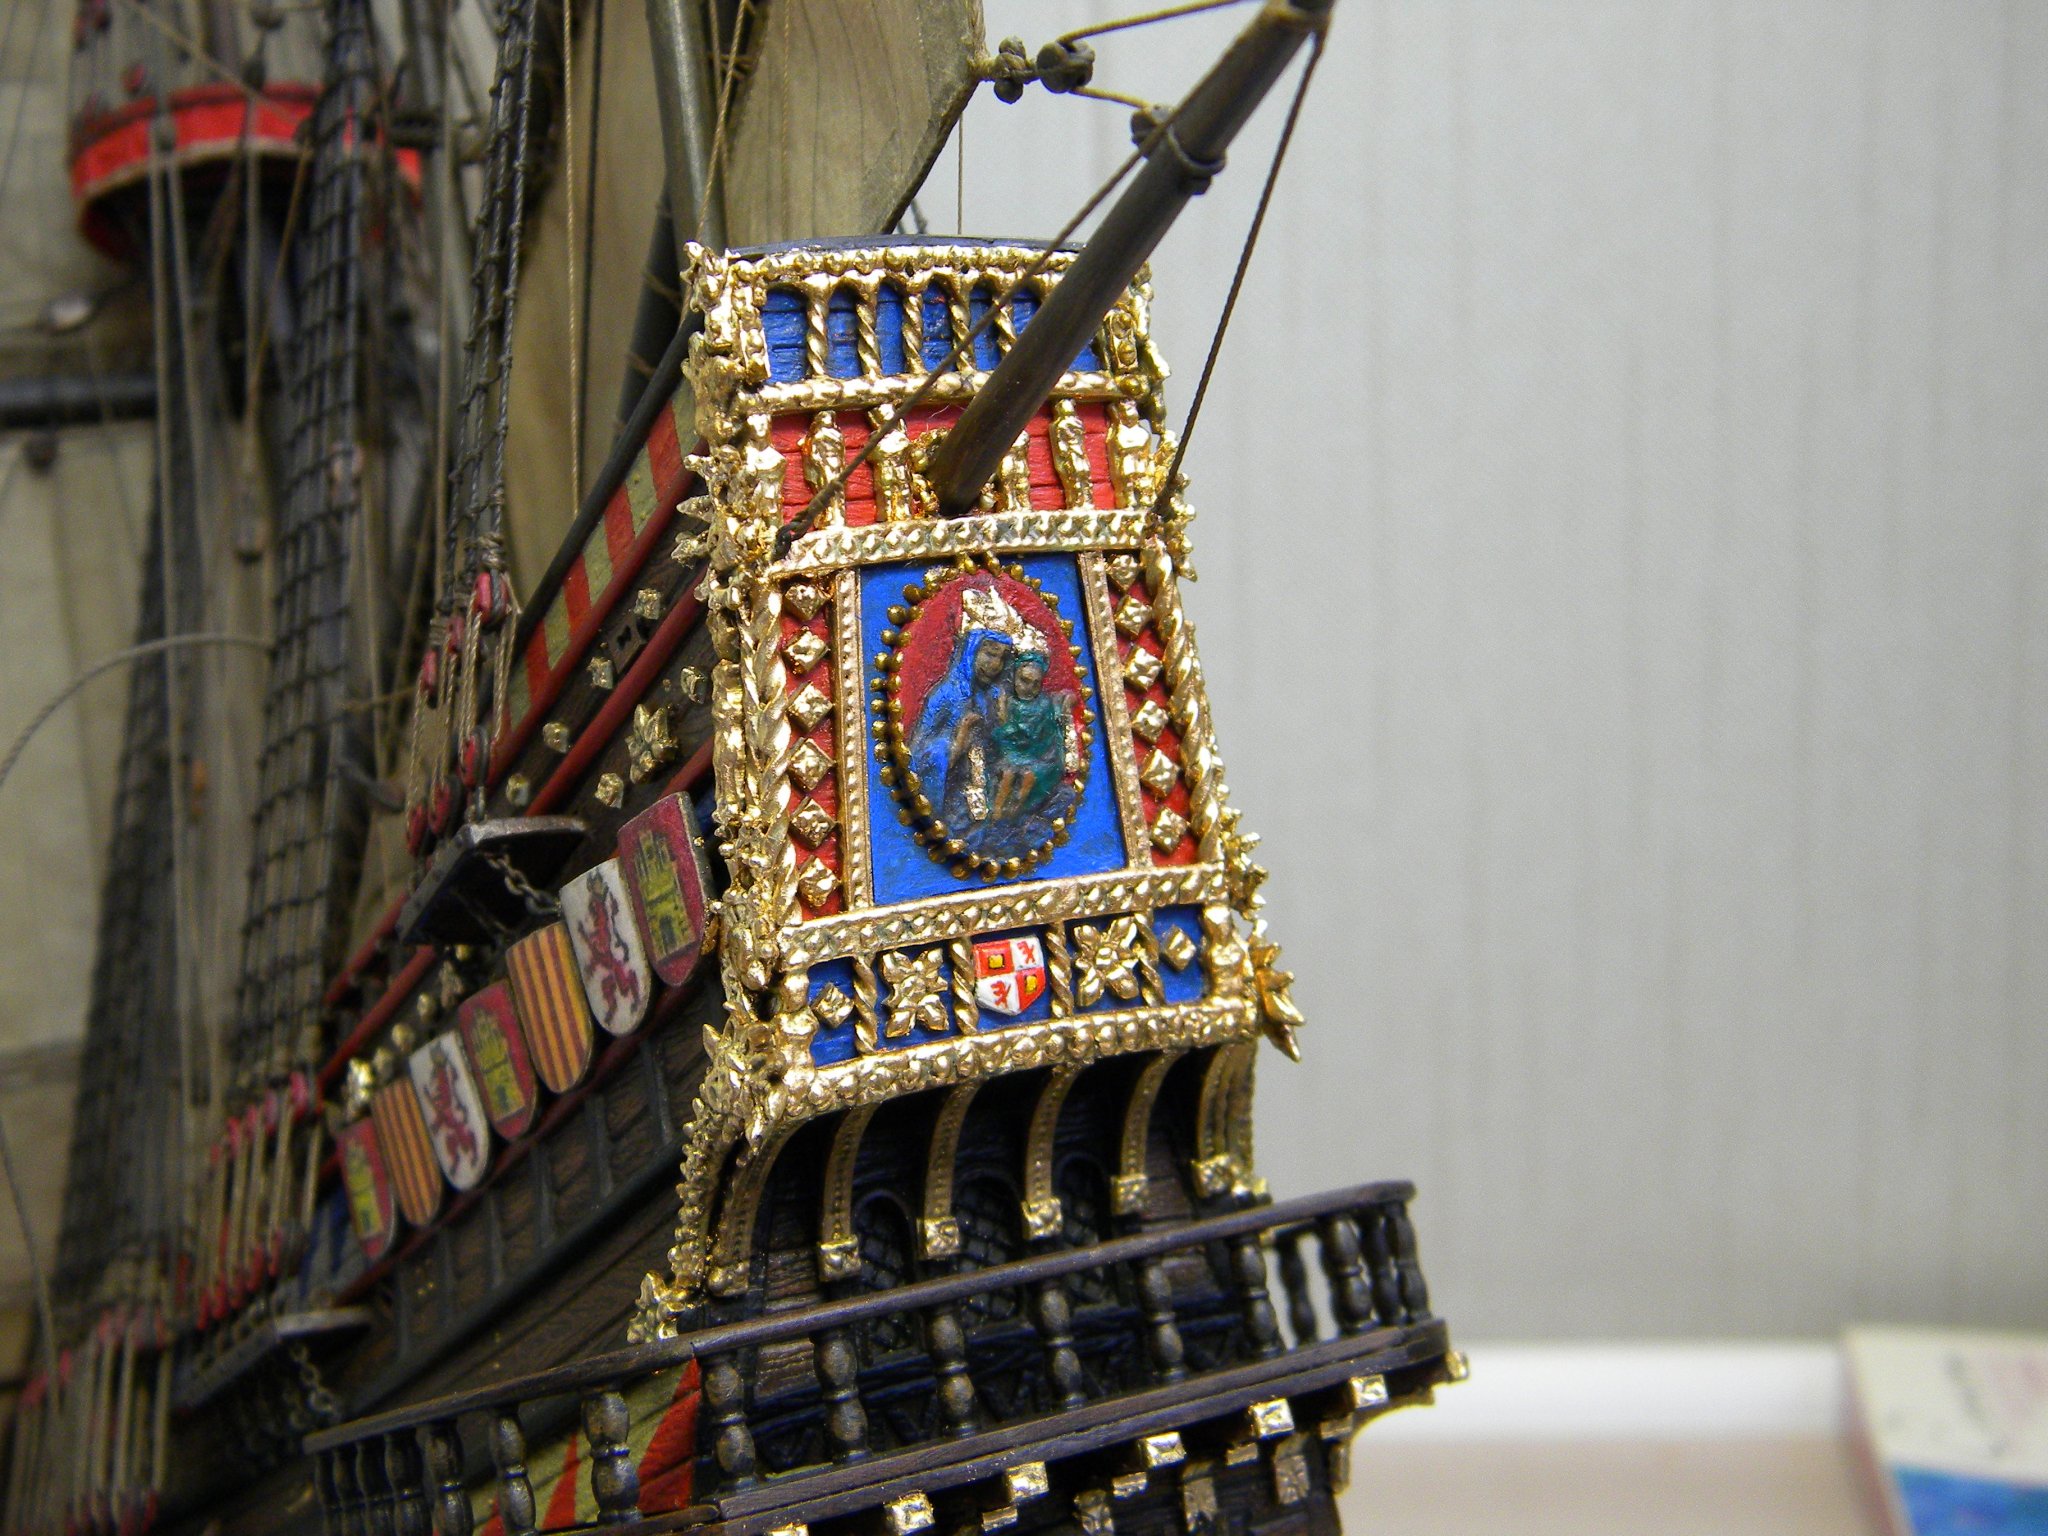
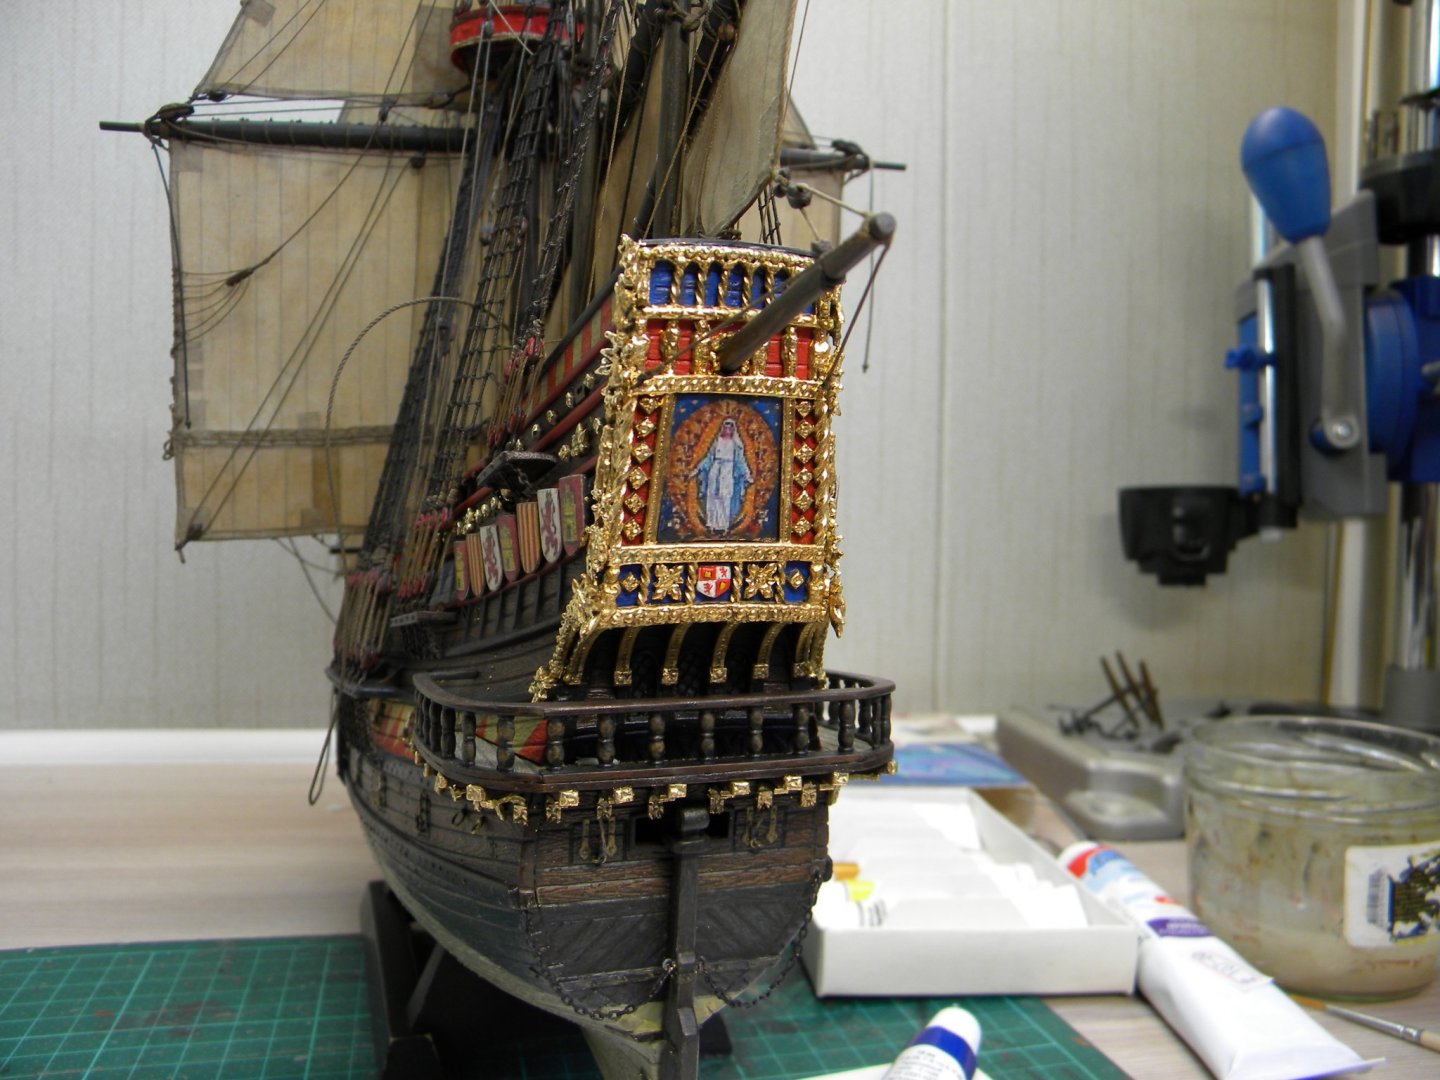
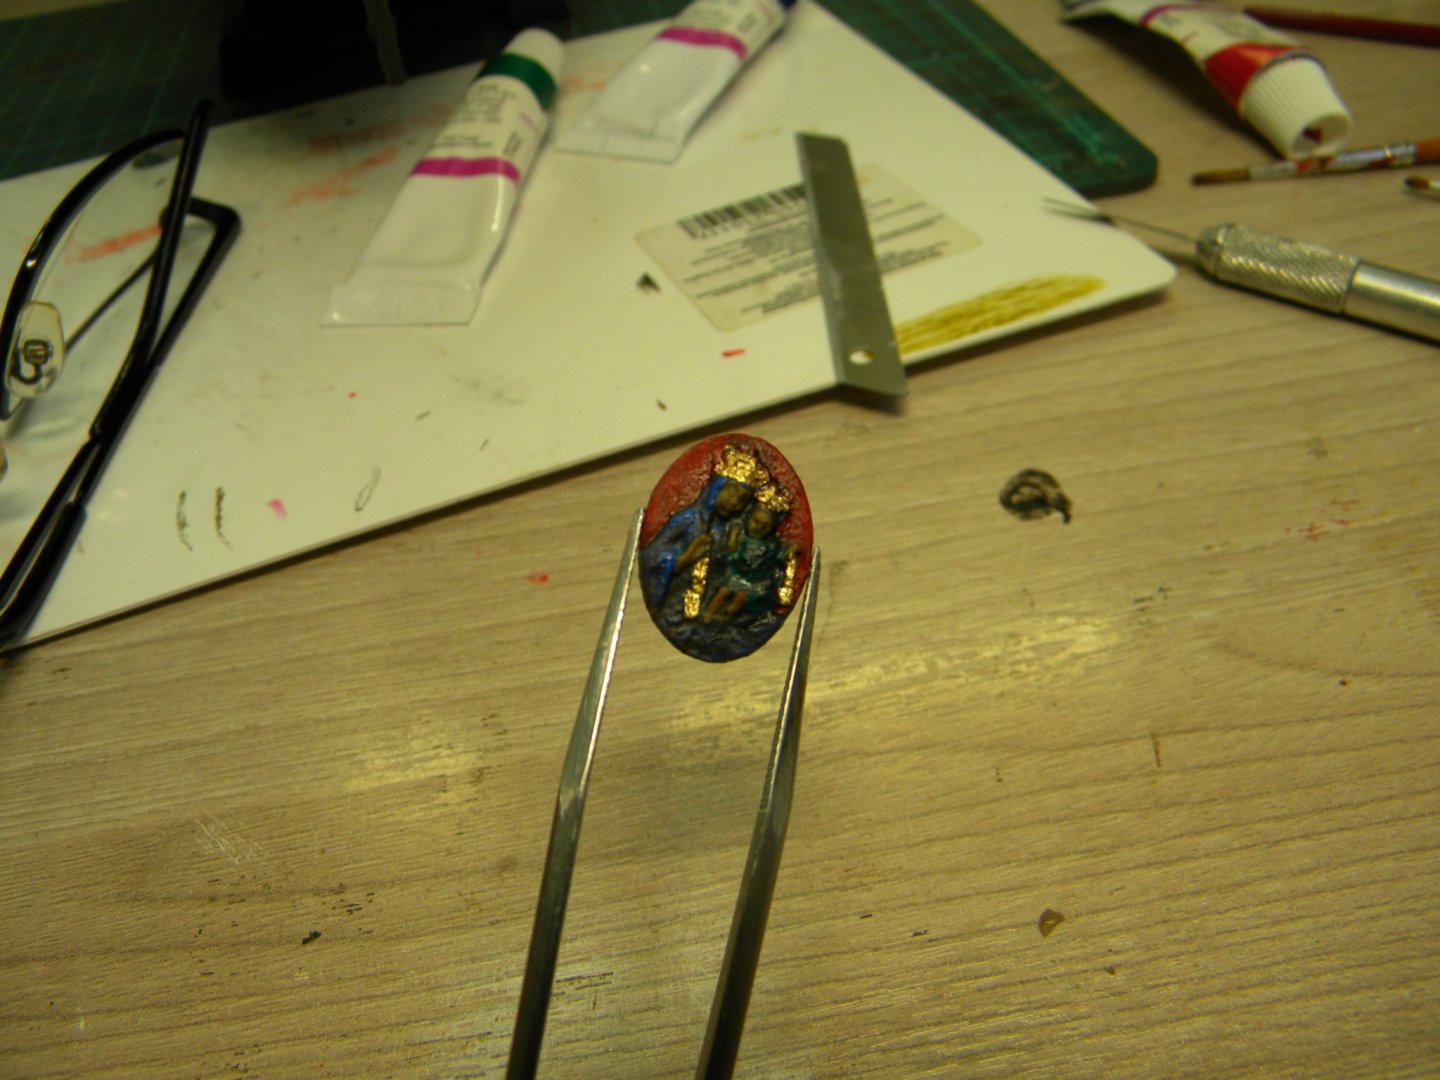
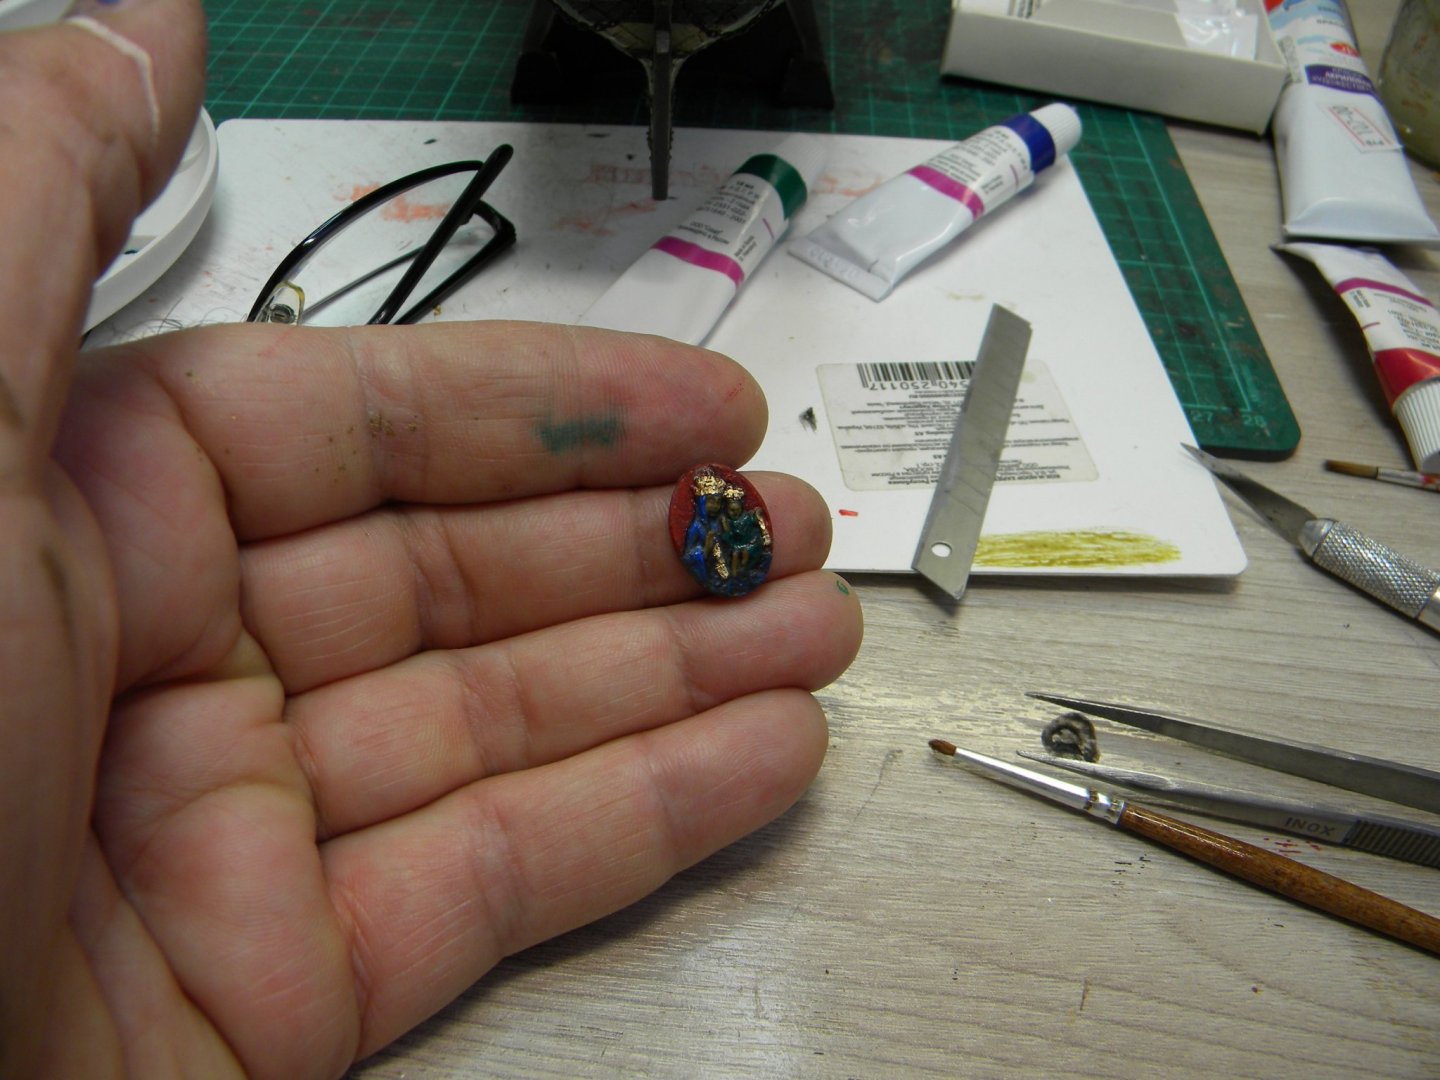
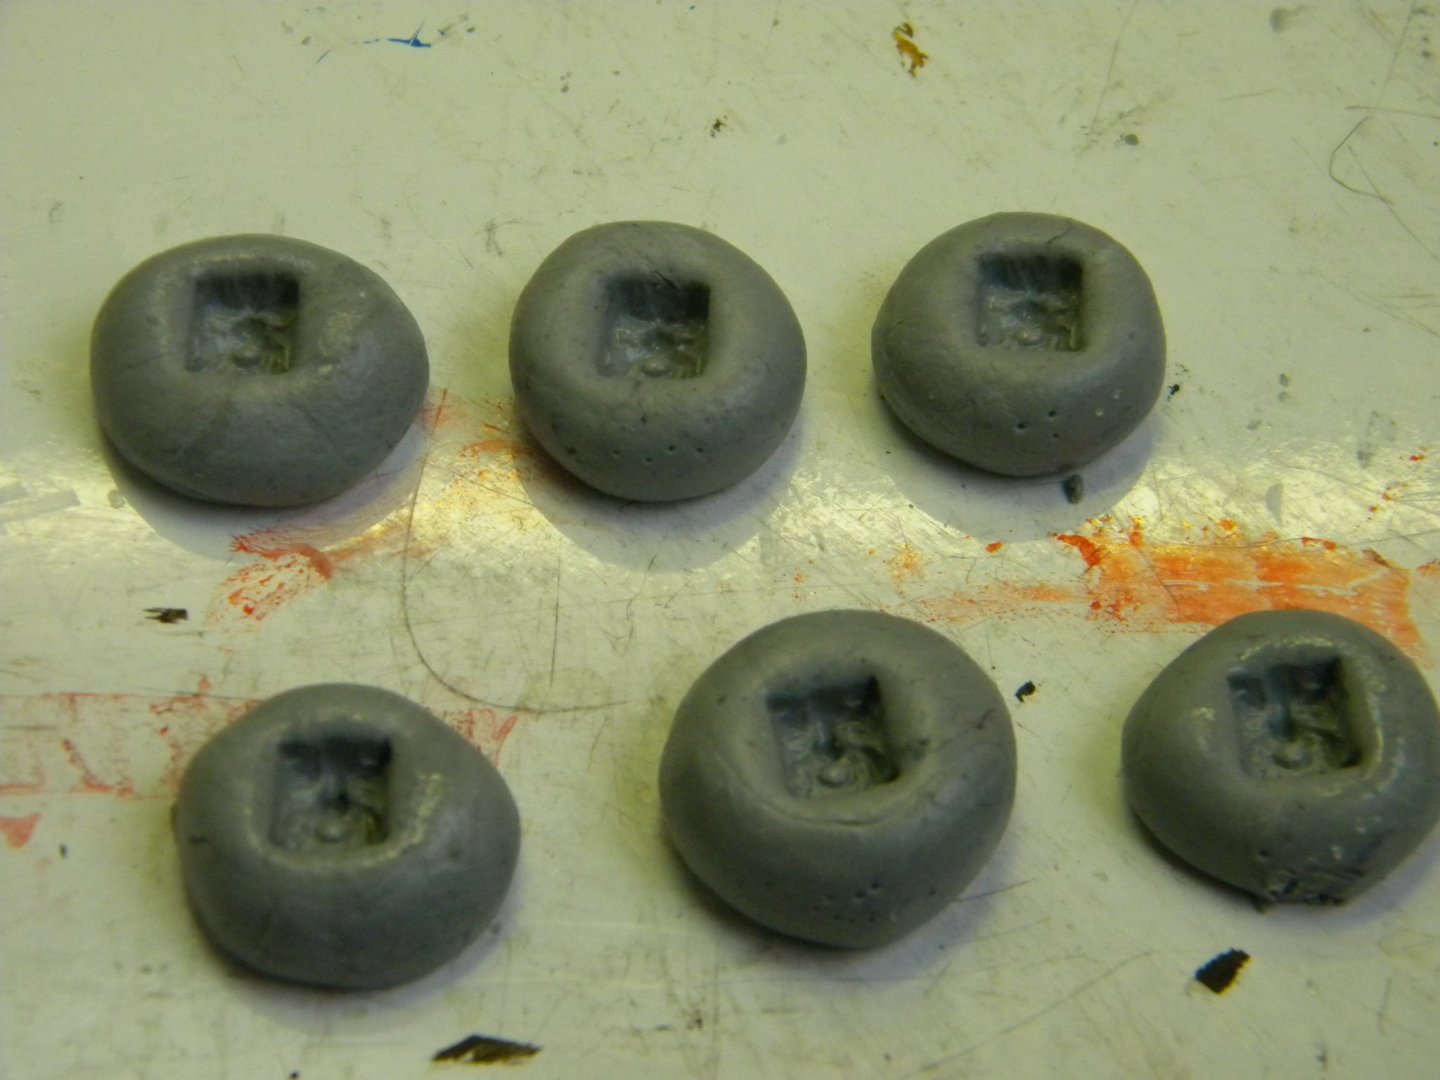
Hello Marc, Thanks , :))) To preserve potal luster, it need to be varnished or lacquered... there are many special liquids for that effect on the market(decoration hobbies) ... after almost 5 months, I found that it became a little bit redish in color, but remained same luster ...so better to protect it presently I covered all with glossy acryl lacquer. For making medalion... as "donor" ,for this tafferal medallion served ordinary chip /less than dollar price /plastic medalion ... I found it somewhere years ago by ocasion in some small shop on the street , that time I liked medalion picture quality as all smallest details were nice visiable , I bouth it just for case - and now this case happened :))) for making negative mould I 've used two components epoxy , like a solid paste, they call it "cold welding"here in Russia, actually it was not designed for this use, but for making small repair of leaking pipes for example , etc... I used it because it just was under hand, lets say :))) and didn't want to spend time for waiting special components delivery from internet shop... but quality of the casting , as You could see < not very good... small details missed during "casting" process but for better result I think spesial staff need to be used - rubberized mould medium +resin casting- something , as Dafi used when reproducing nessesery copies in his VICTORY project In my case , for making copy of this medalion, first, I made negative sculpt in this two components "clay" and than ,using same staff again, I made positive sculpt - to separate positive and negative substanceses, I used silicon grease.
- 228 replies
-
- 3
-
-
- spanish galleon
- lee
- (and 1 more)
-
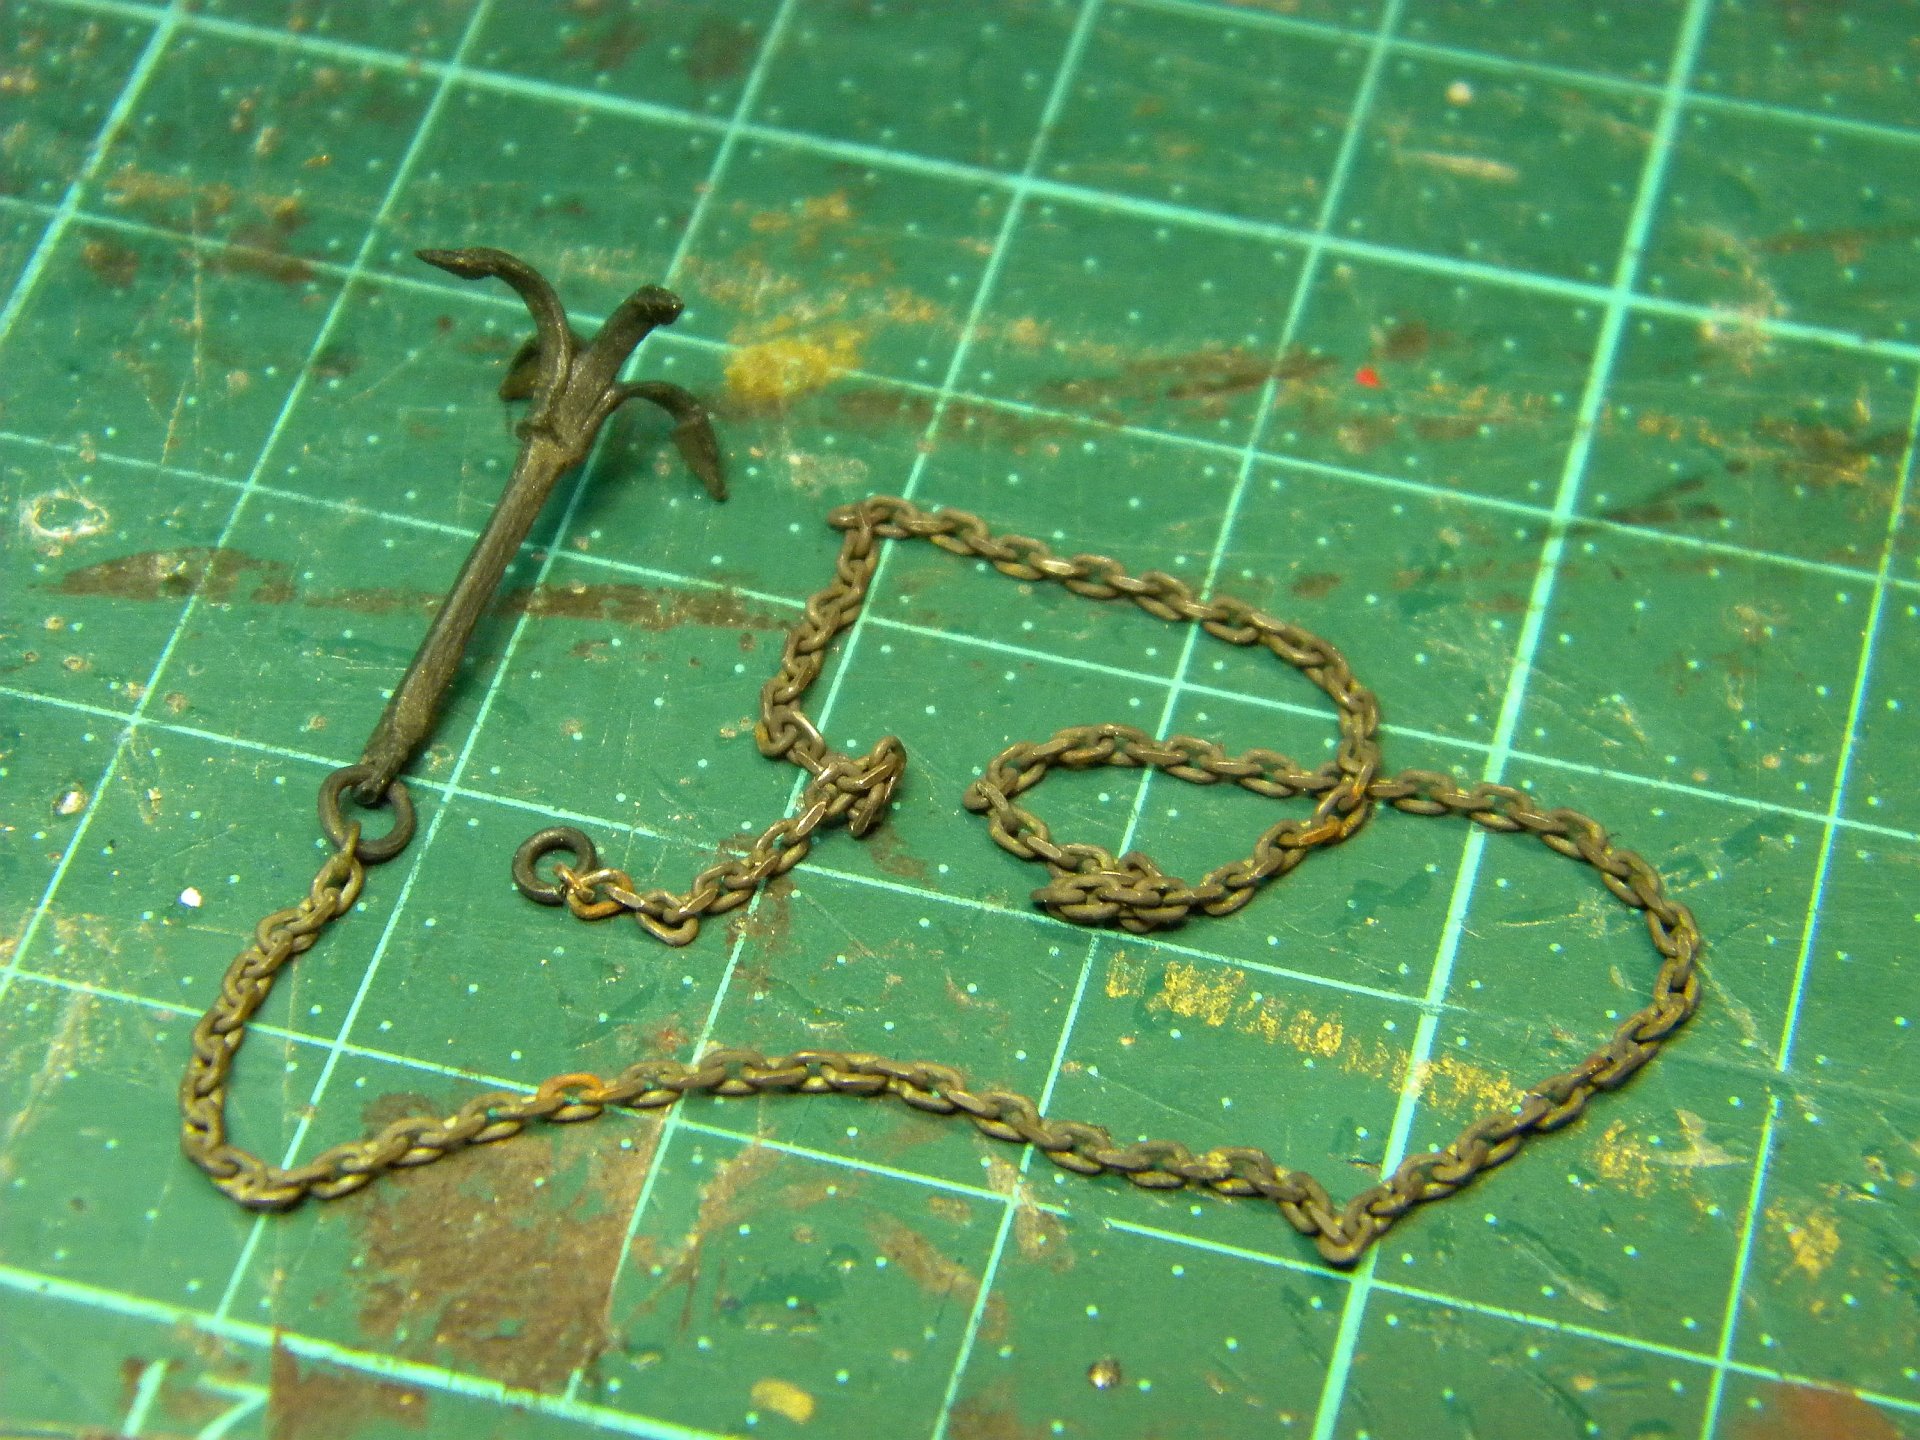
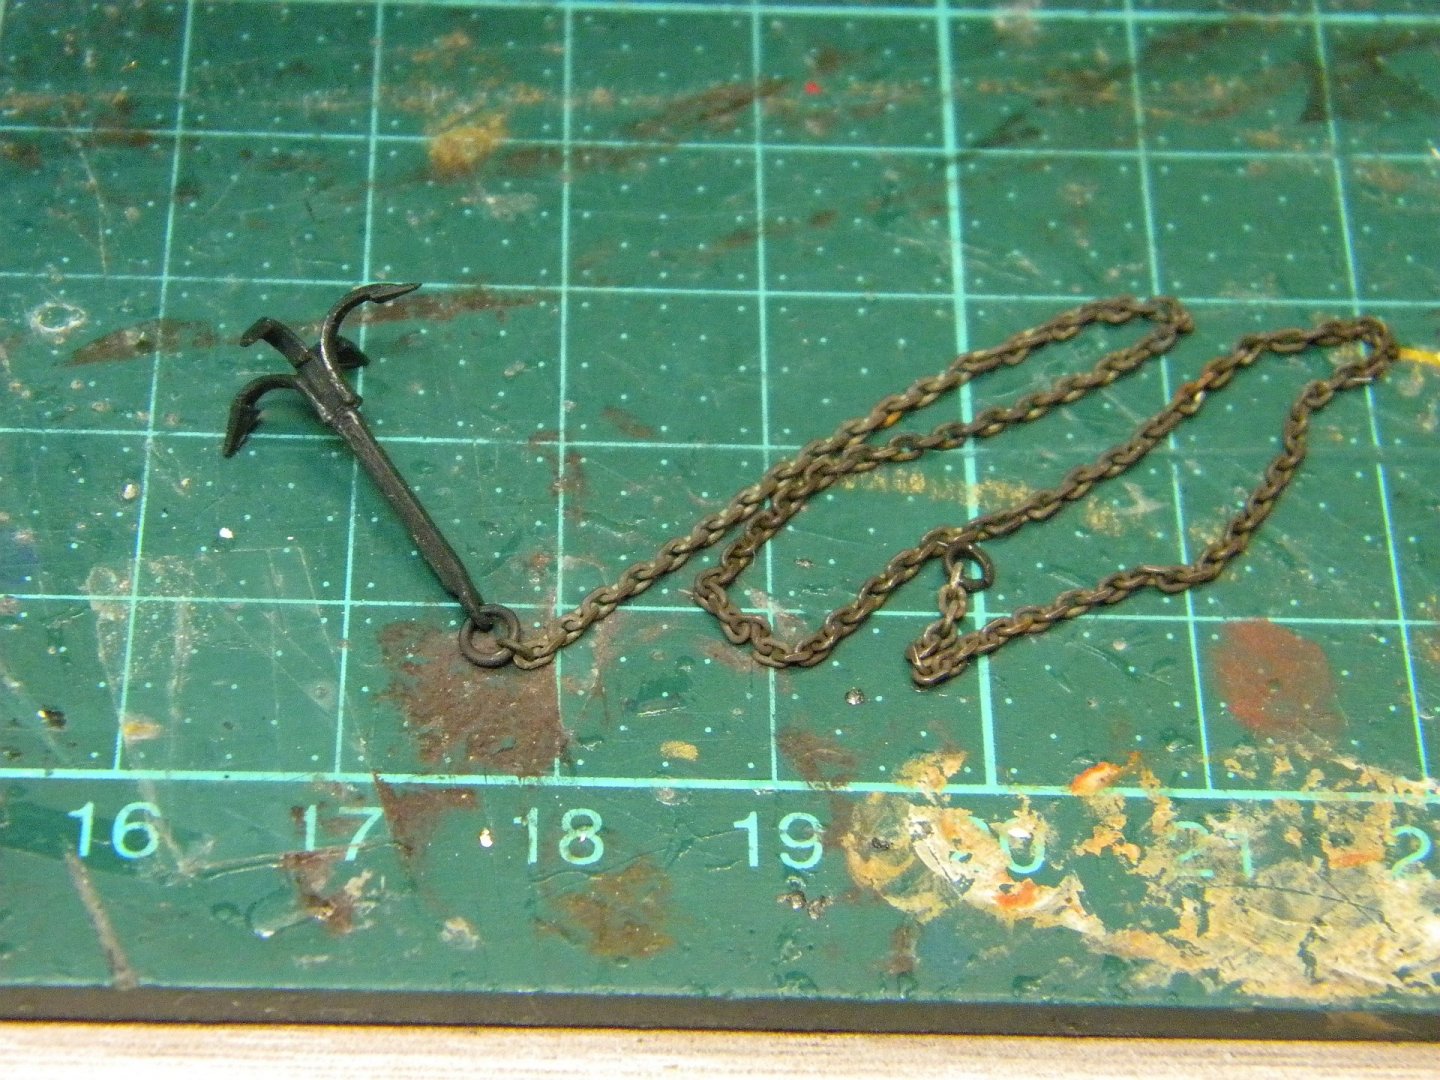
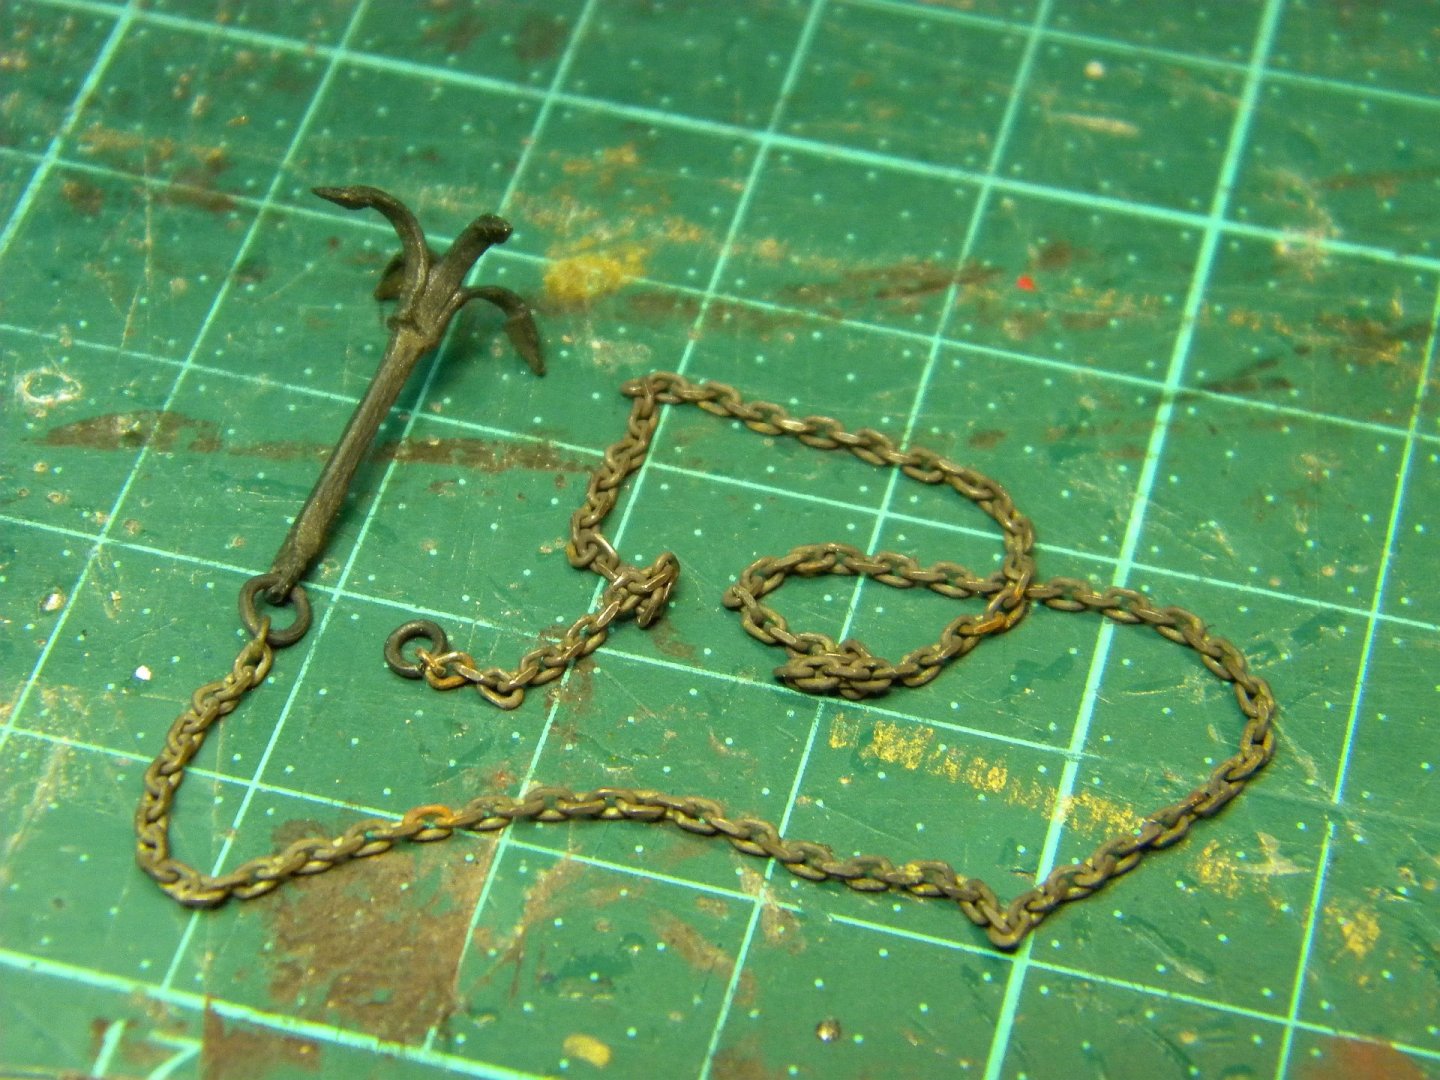
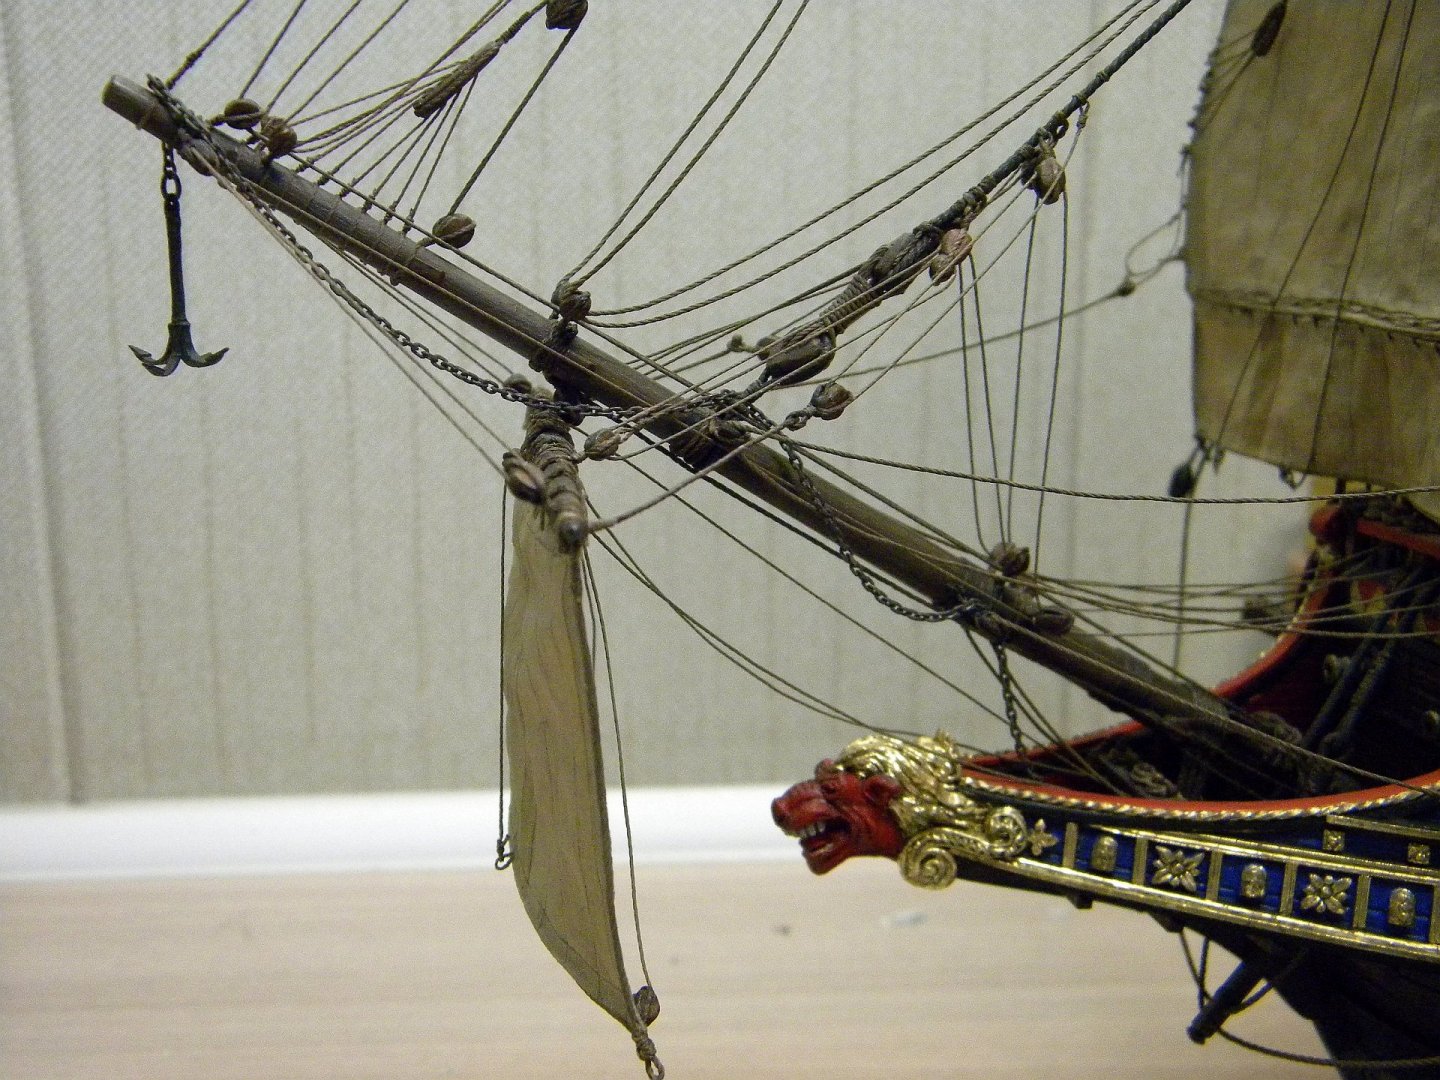
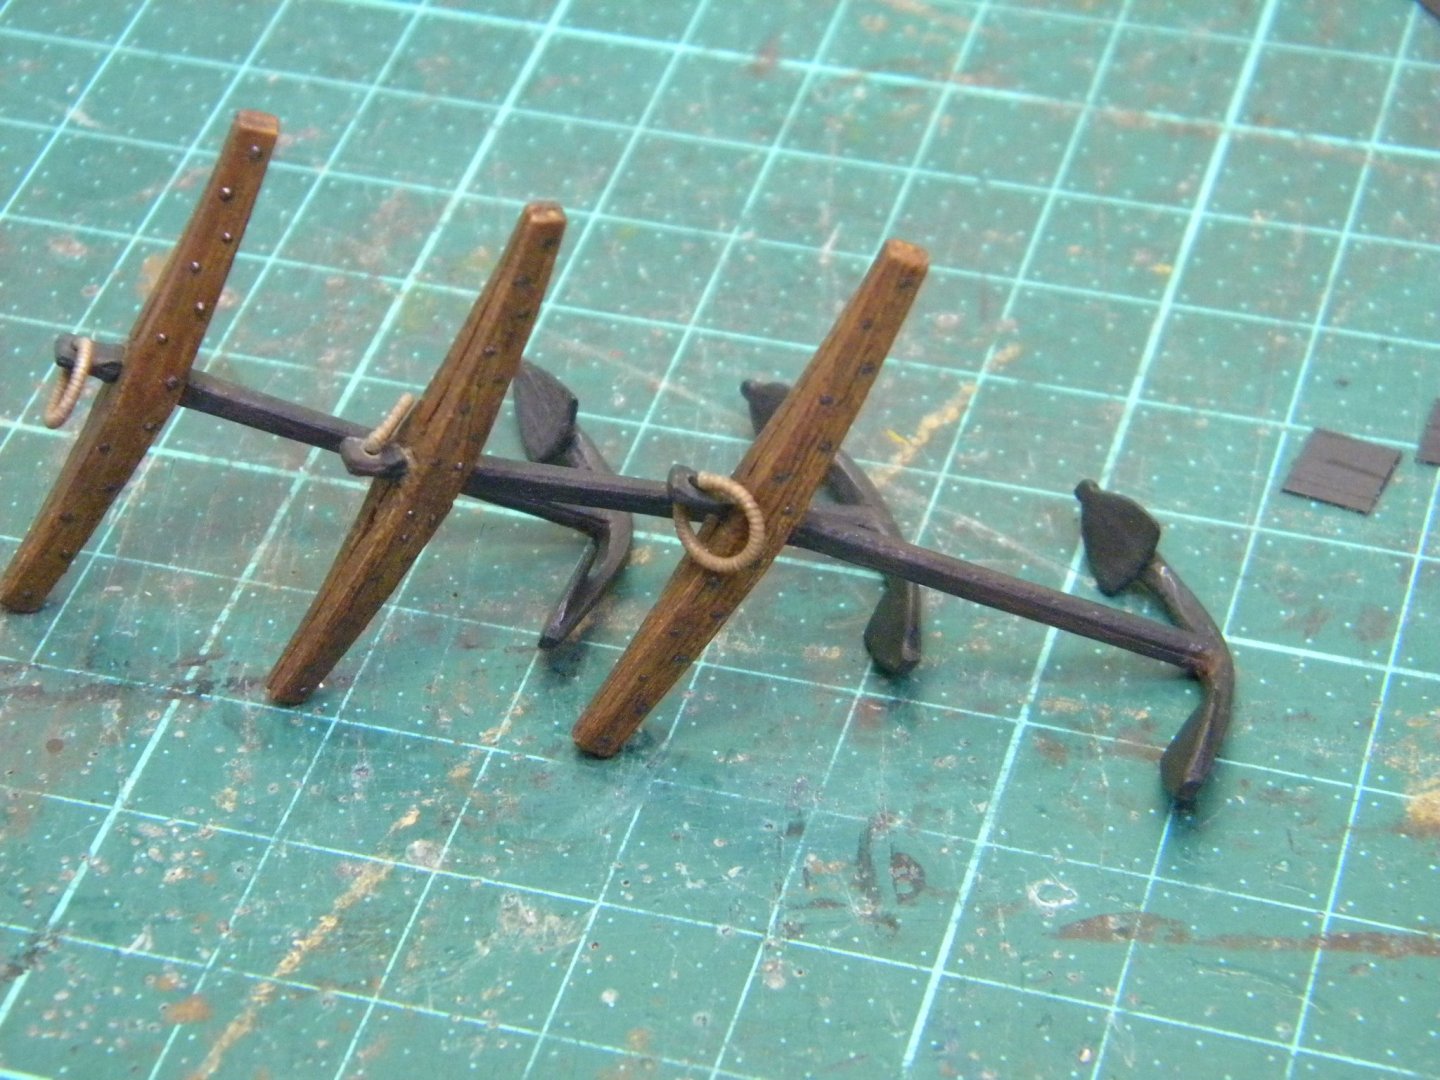
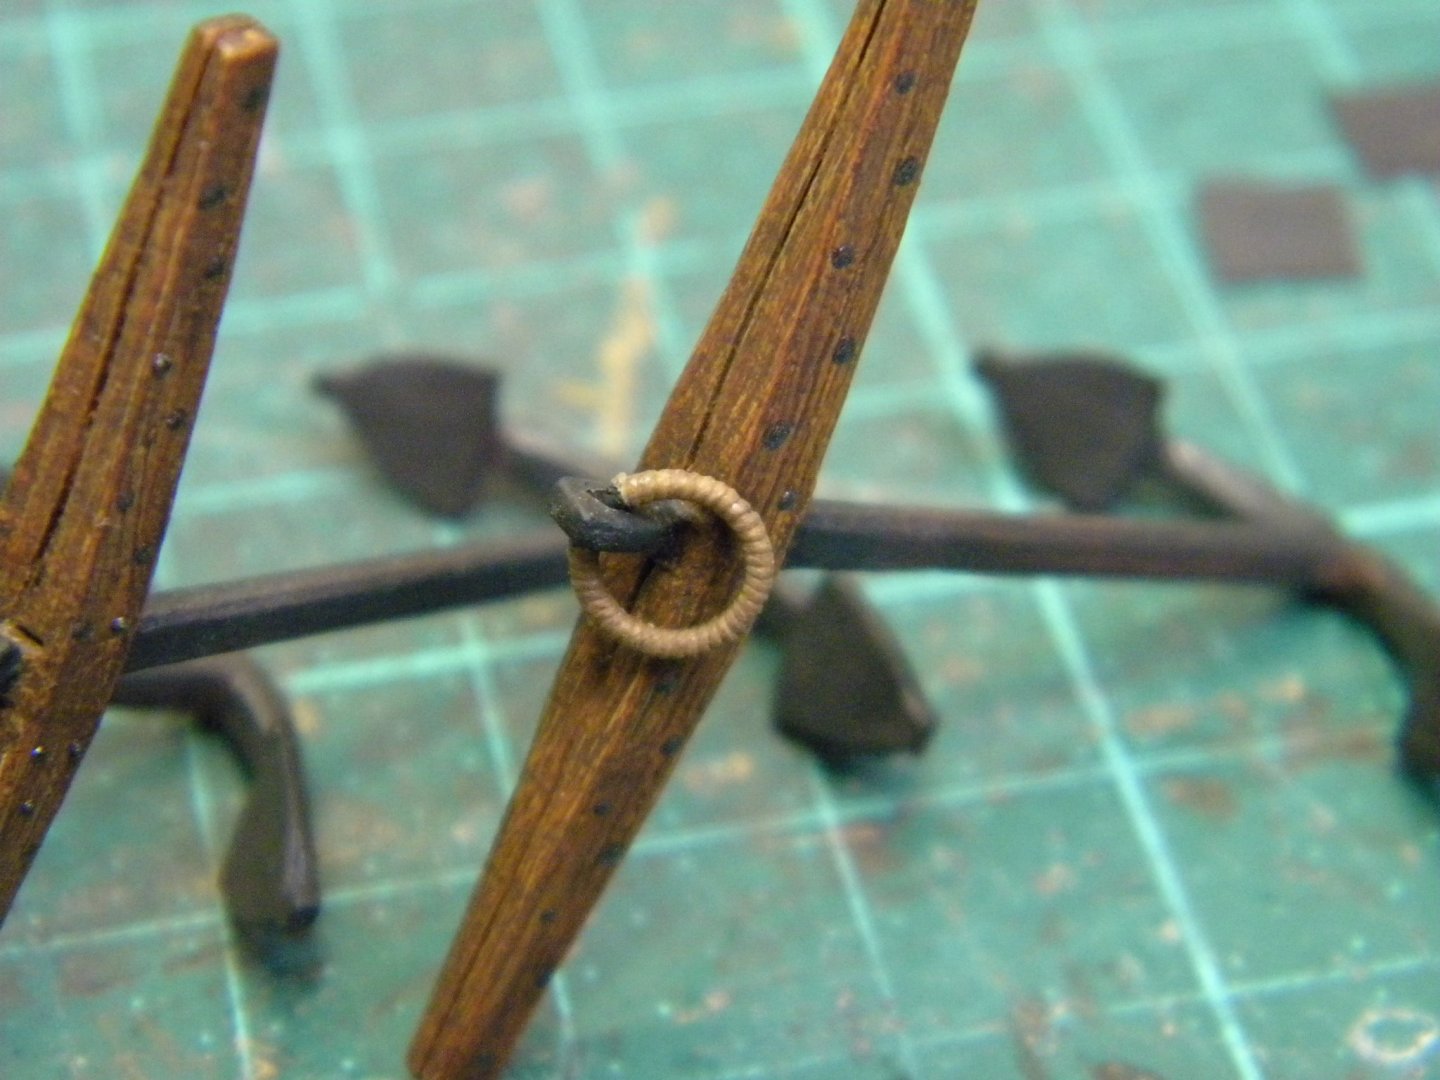
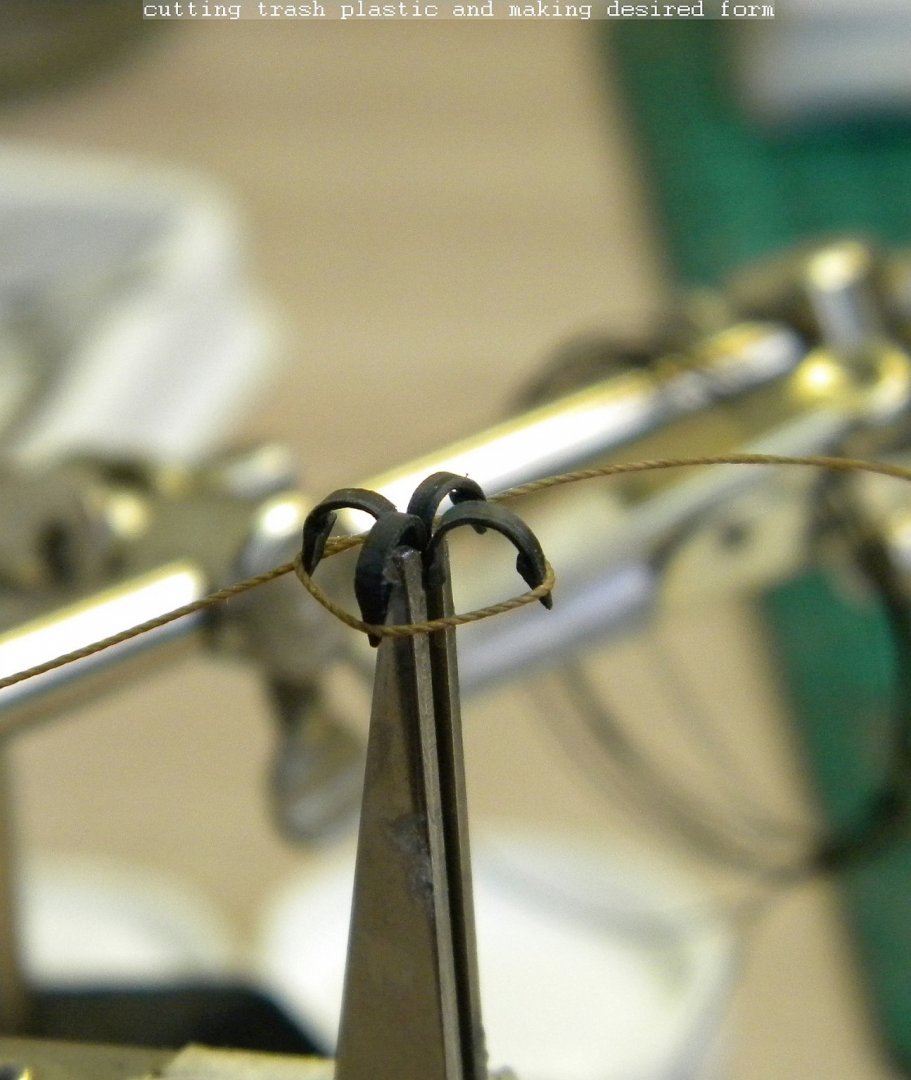
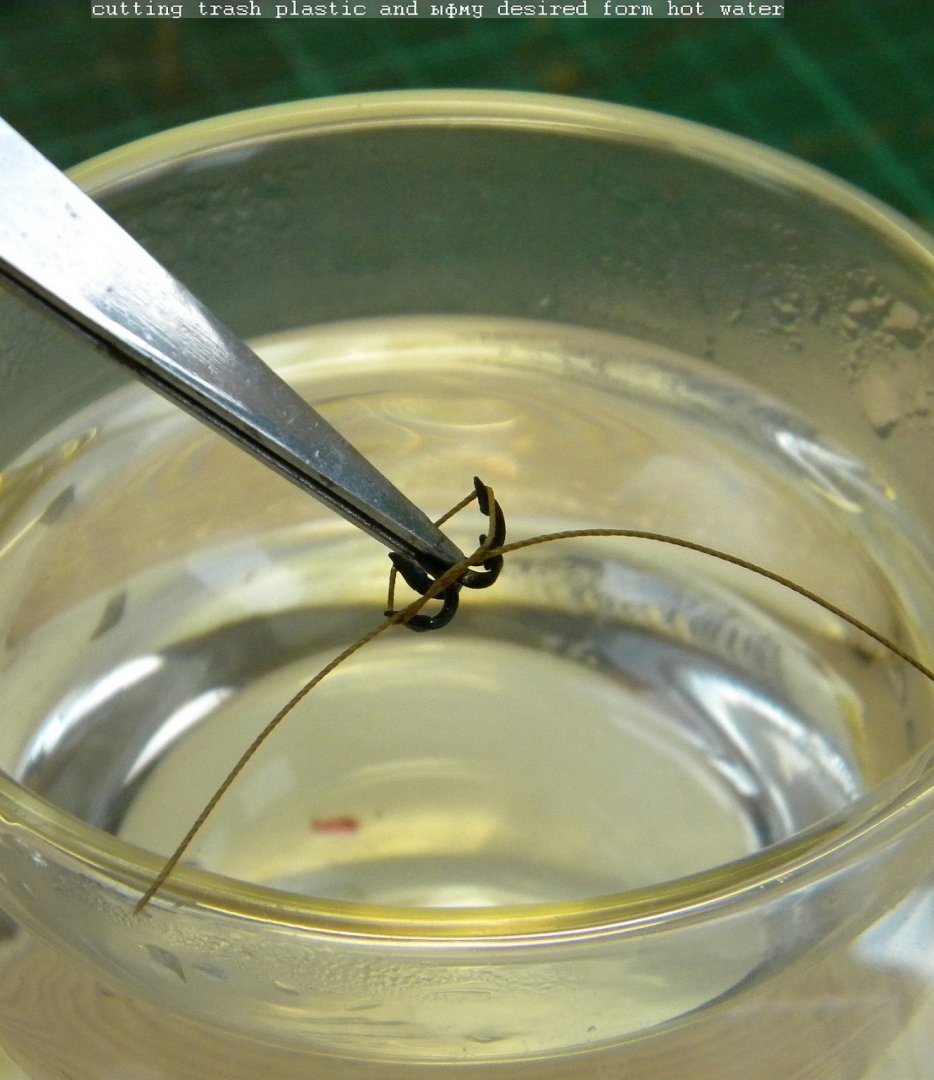
Good day, Dear friends, there is small updates - I prepaired grapnel for installation... on the foto , it isn't fitted yet, just try to see how it will looks like at place. Will be continued in march 2020... Wish all of you All the best in coming 2020!!! :)))

- 228 replies
-
- 9
-
-
- spanish galleon
- lee
- (and 1 more)
-
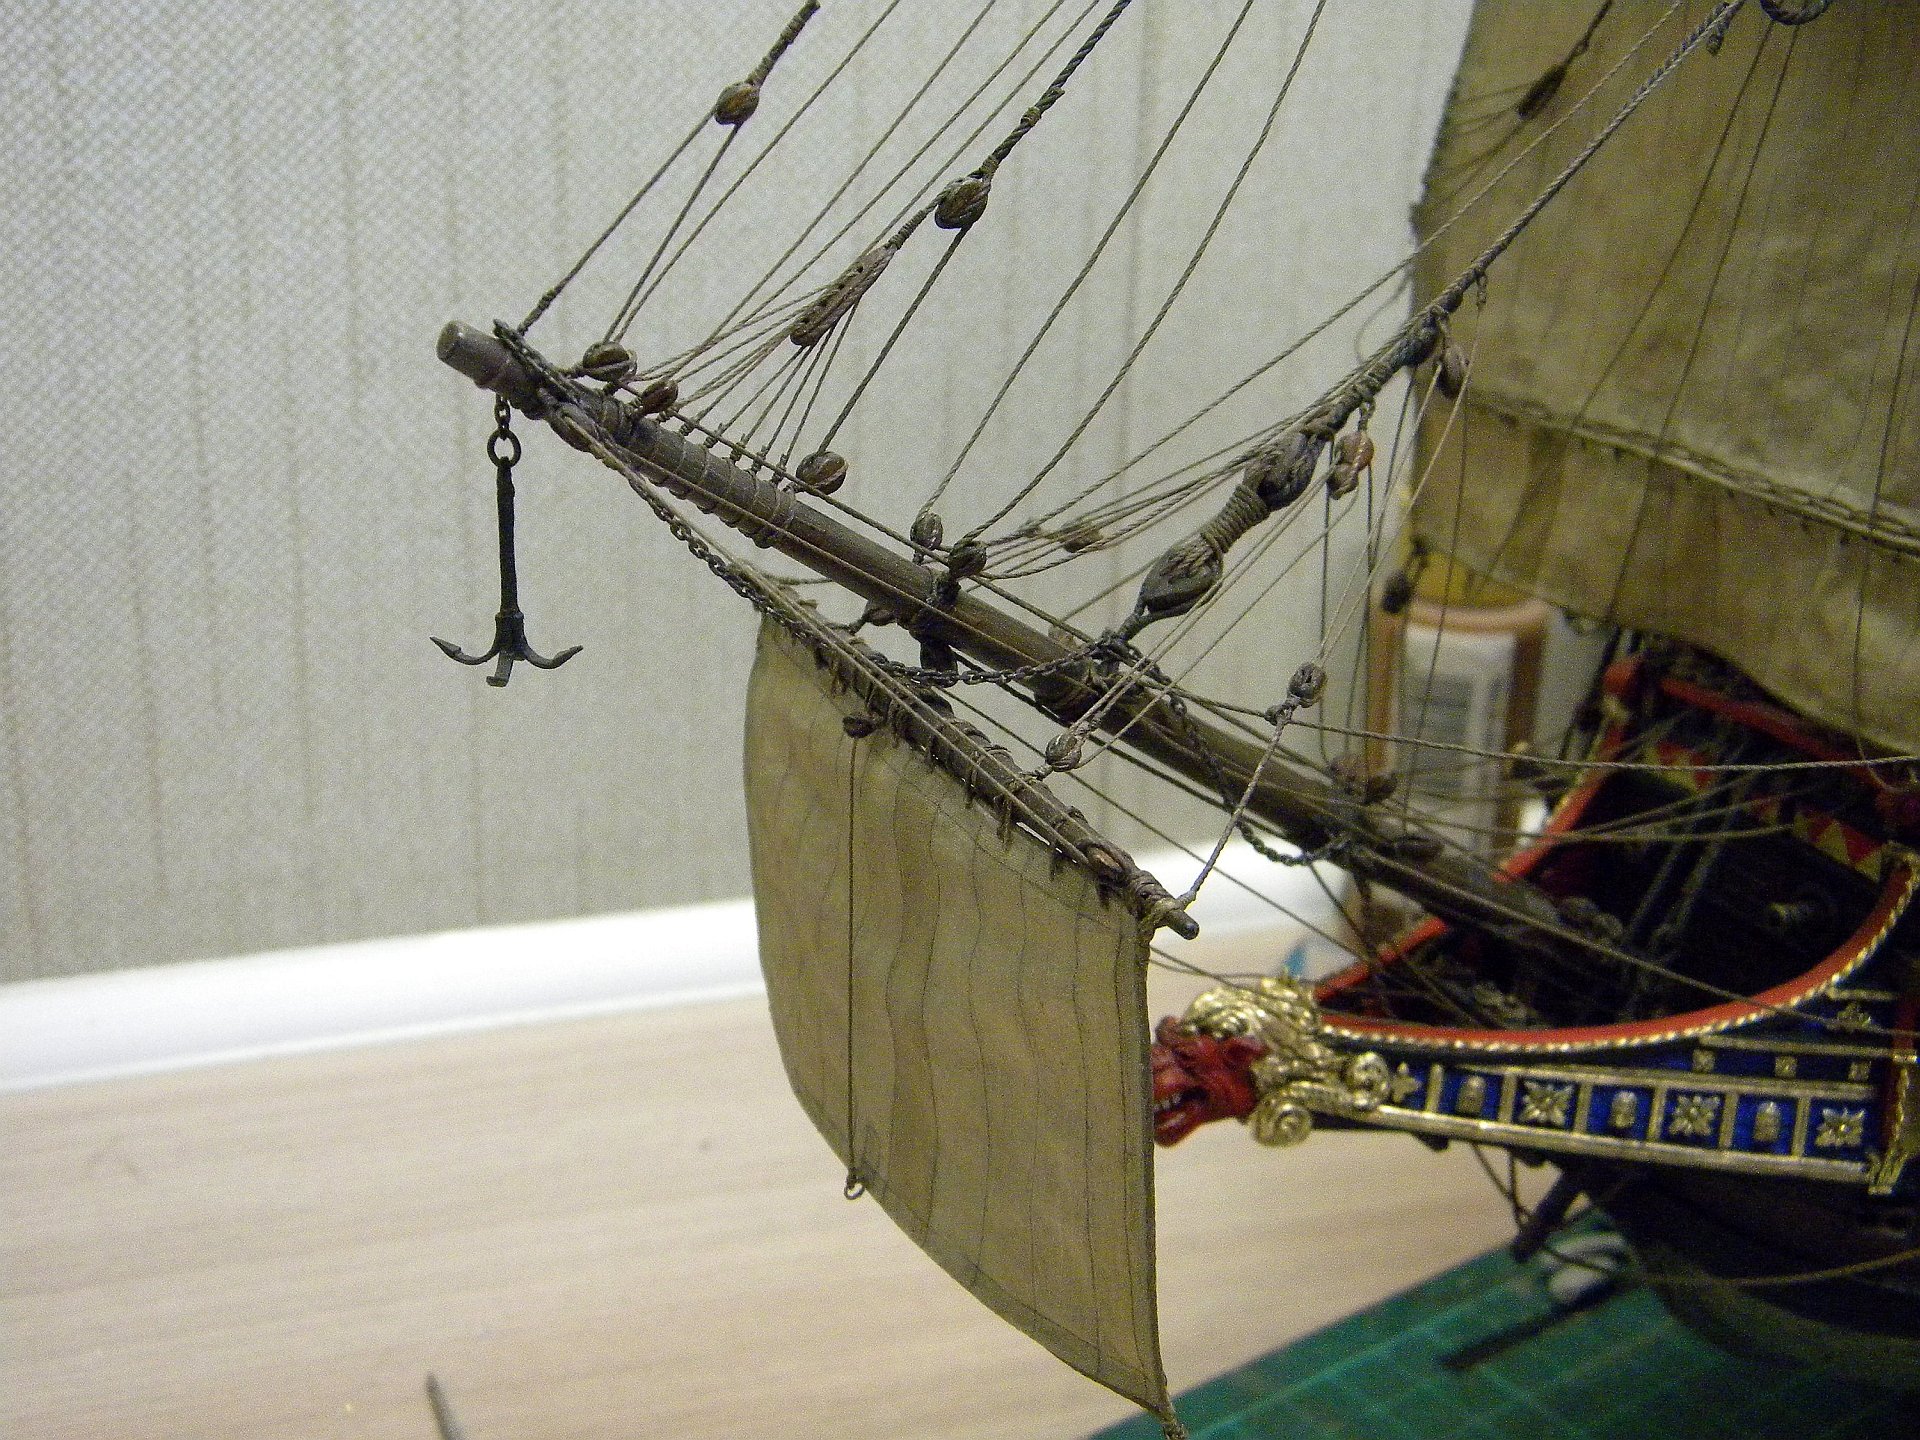
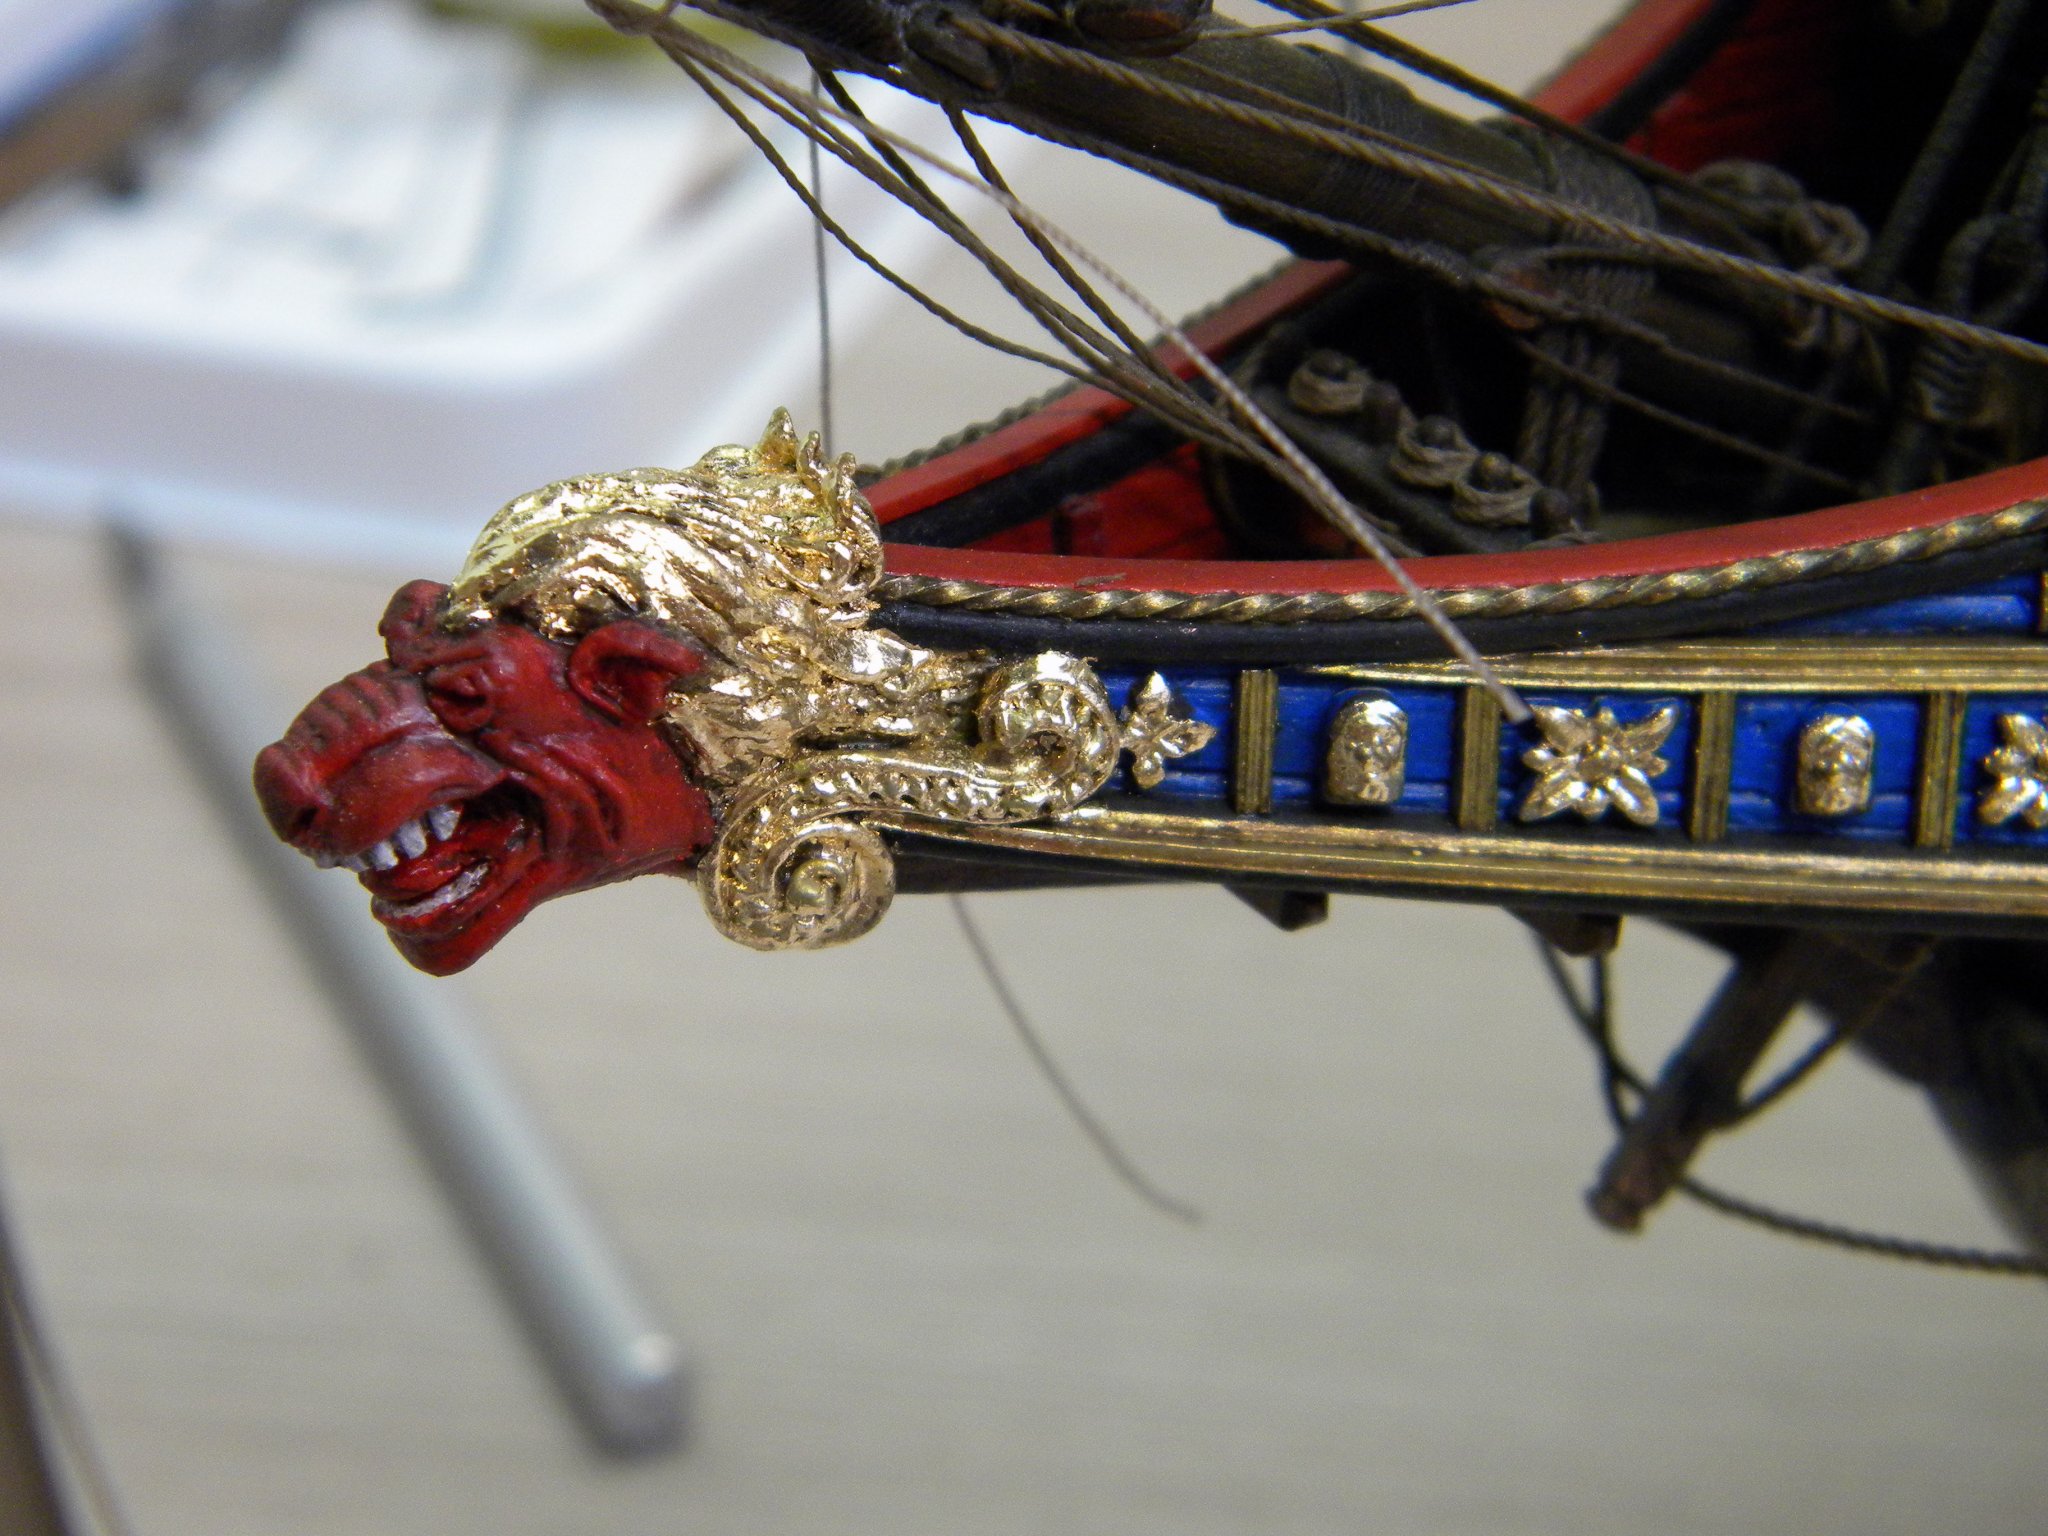
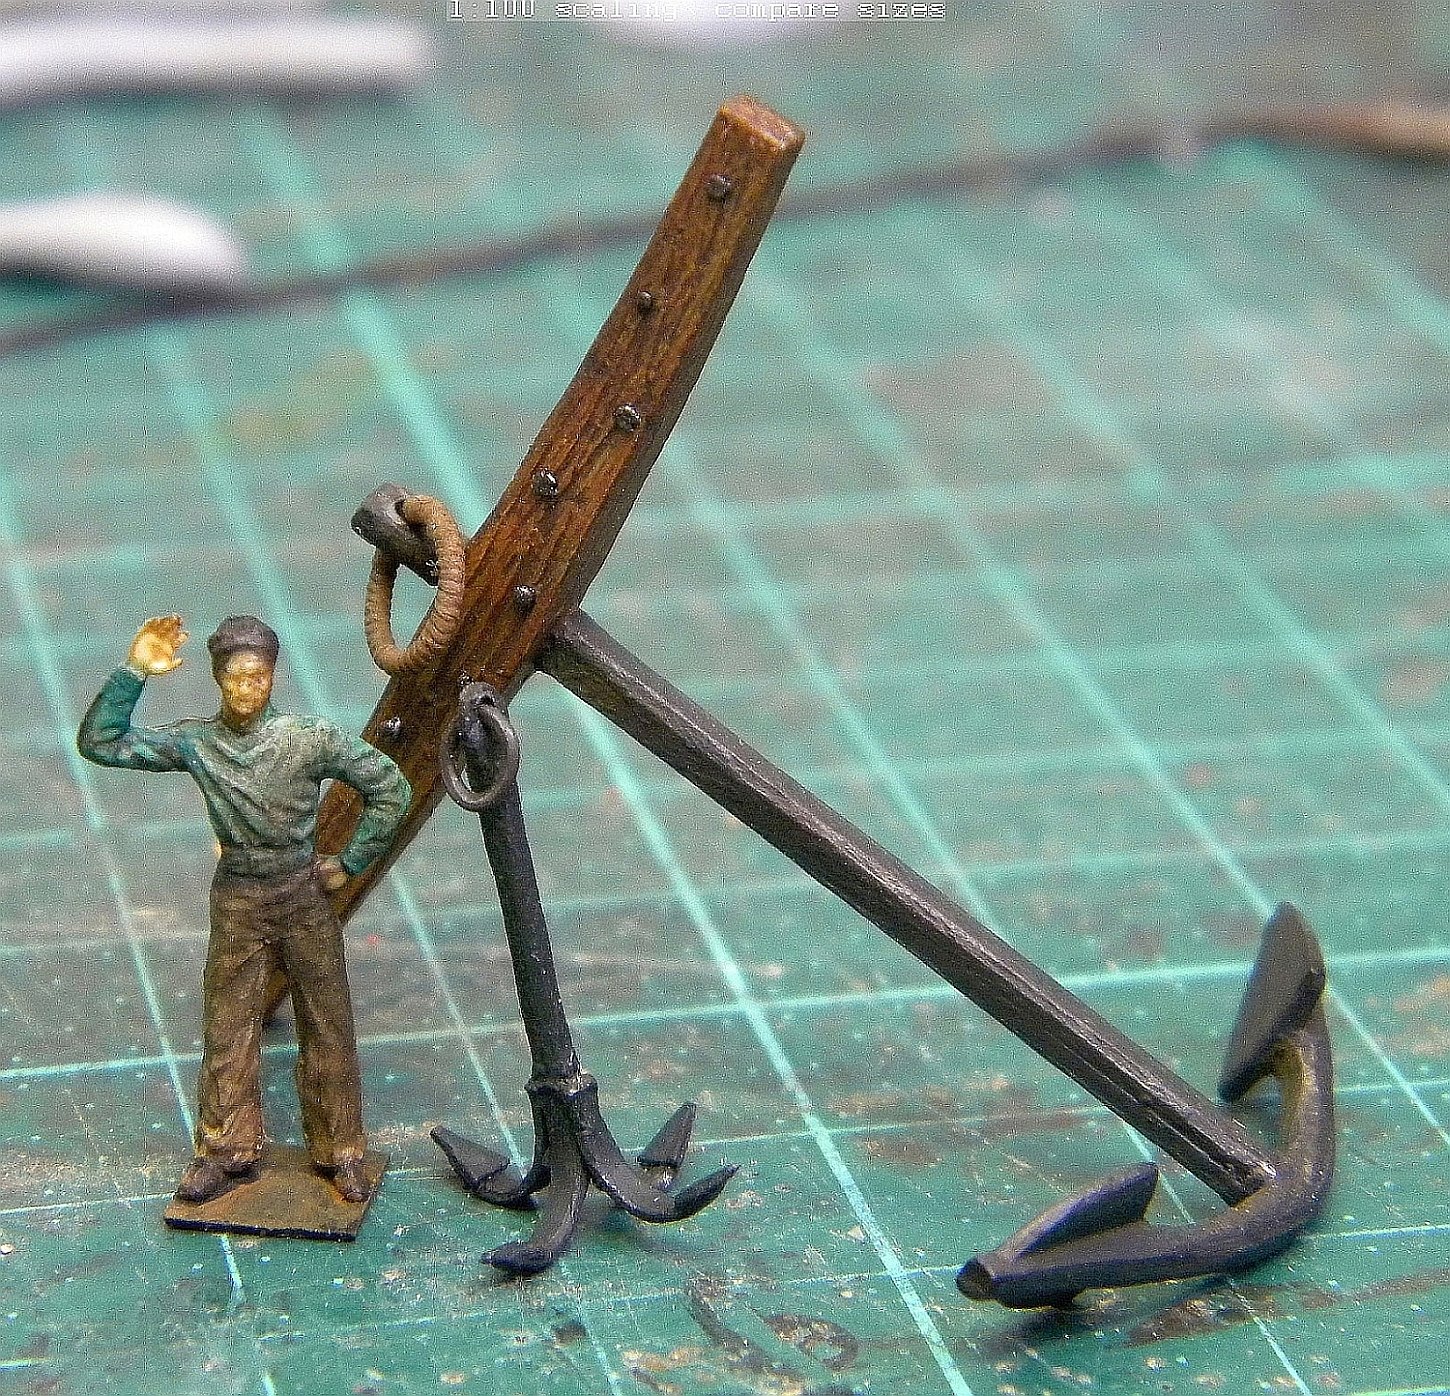
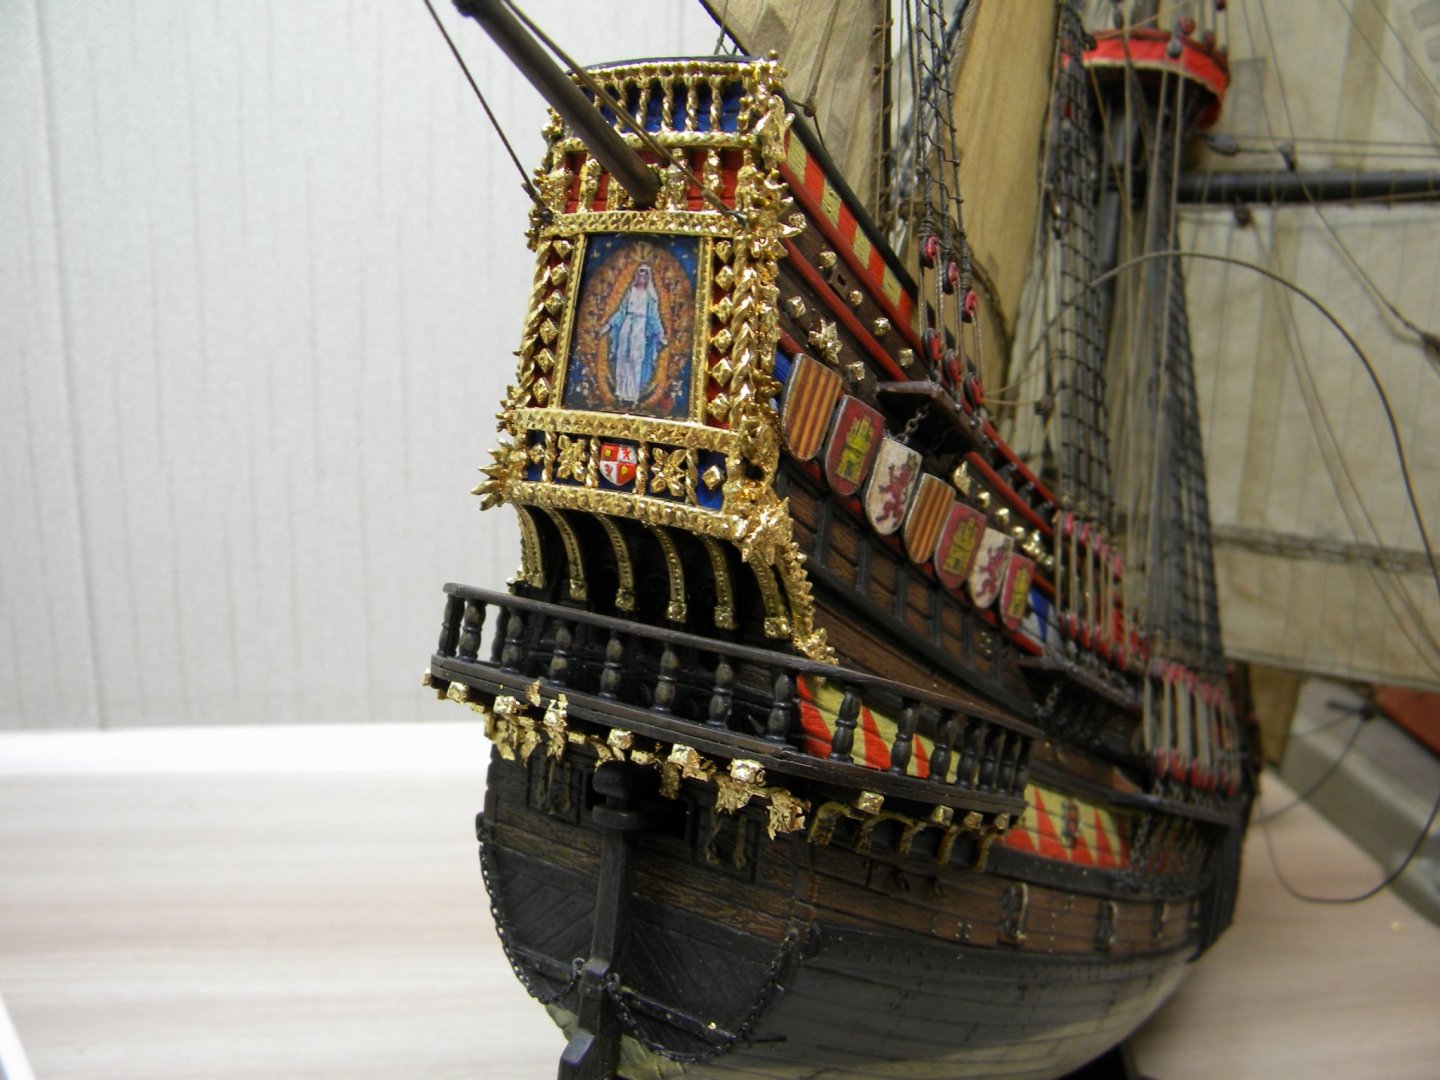
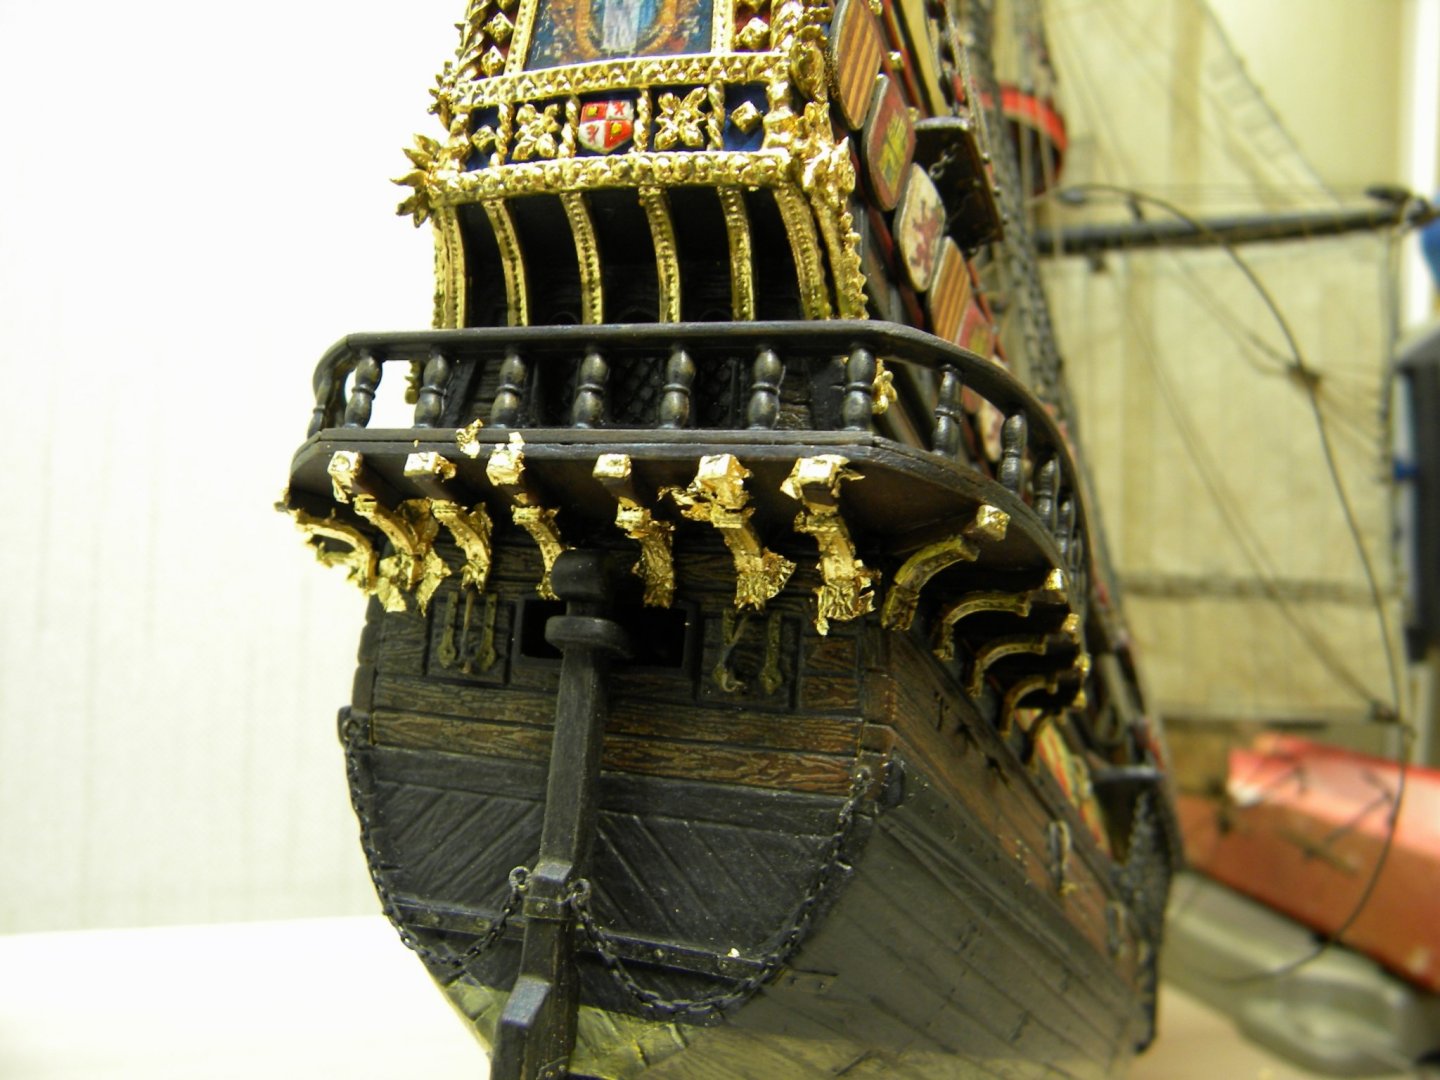
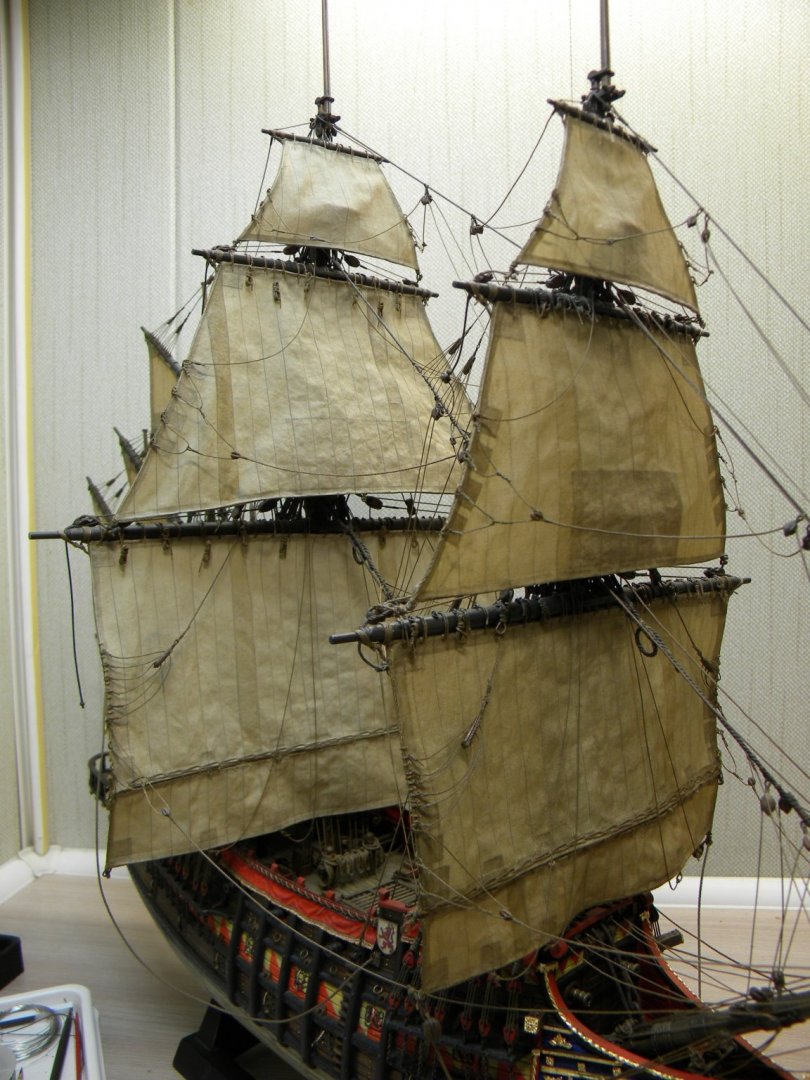
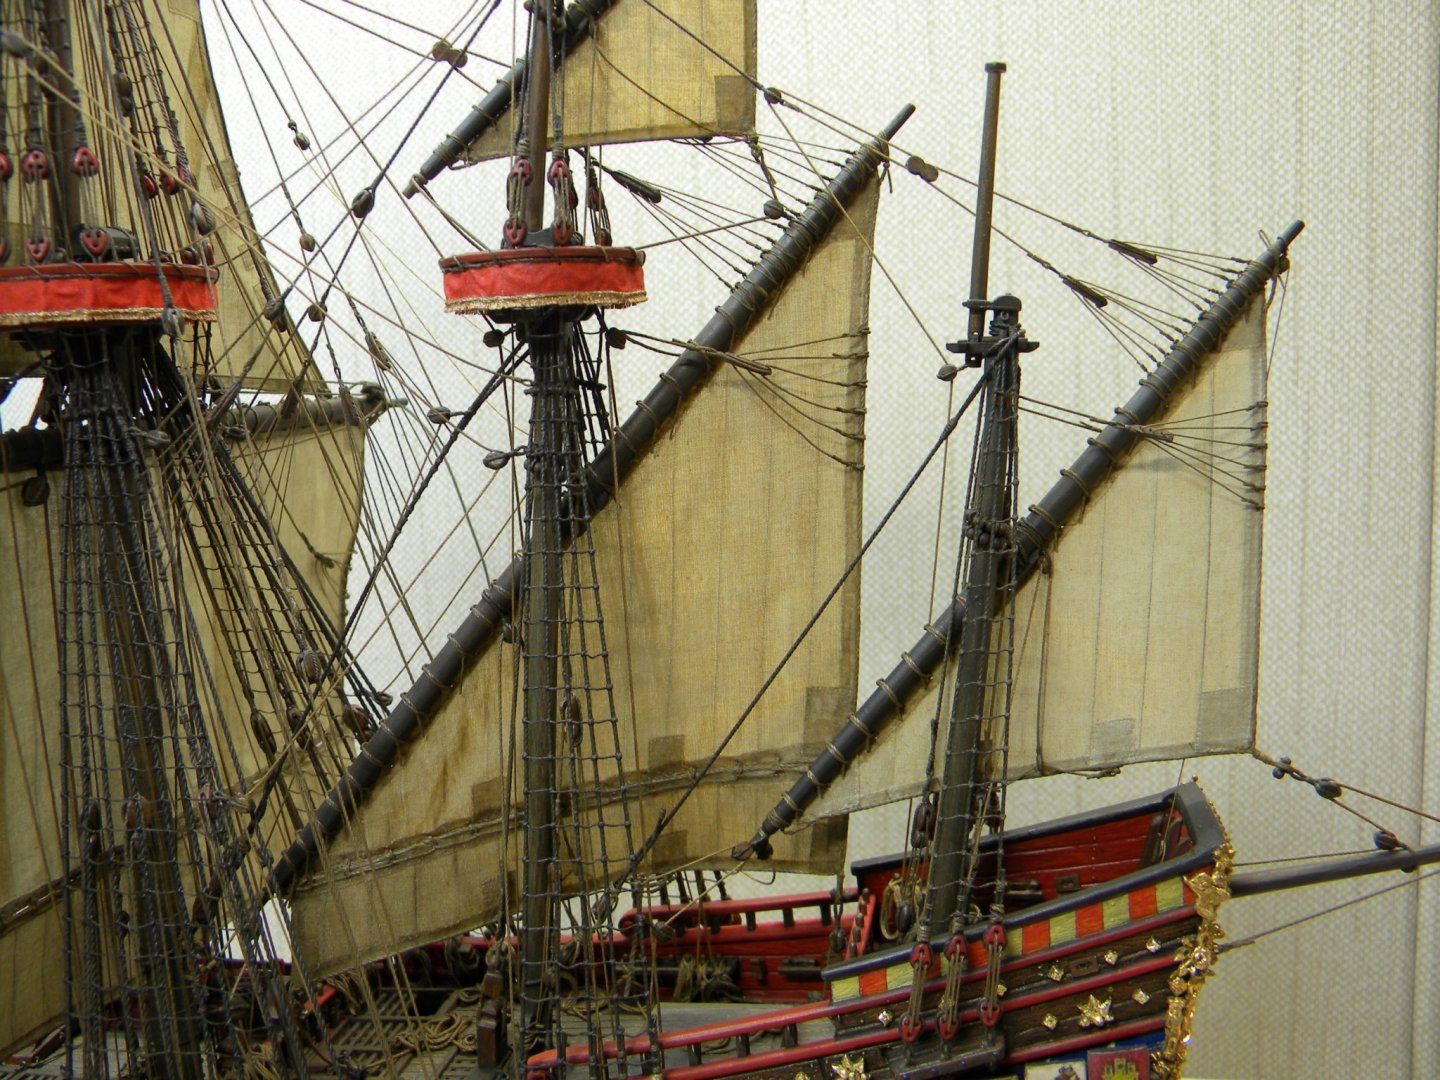
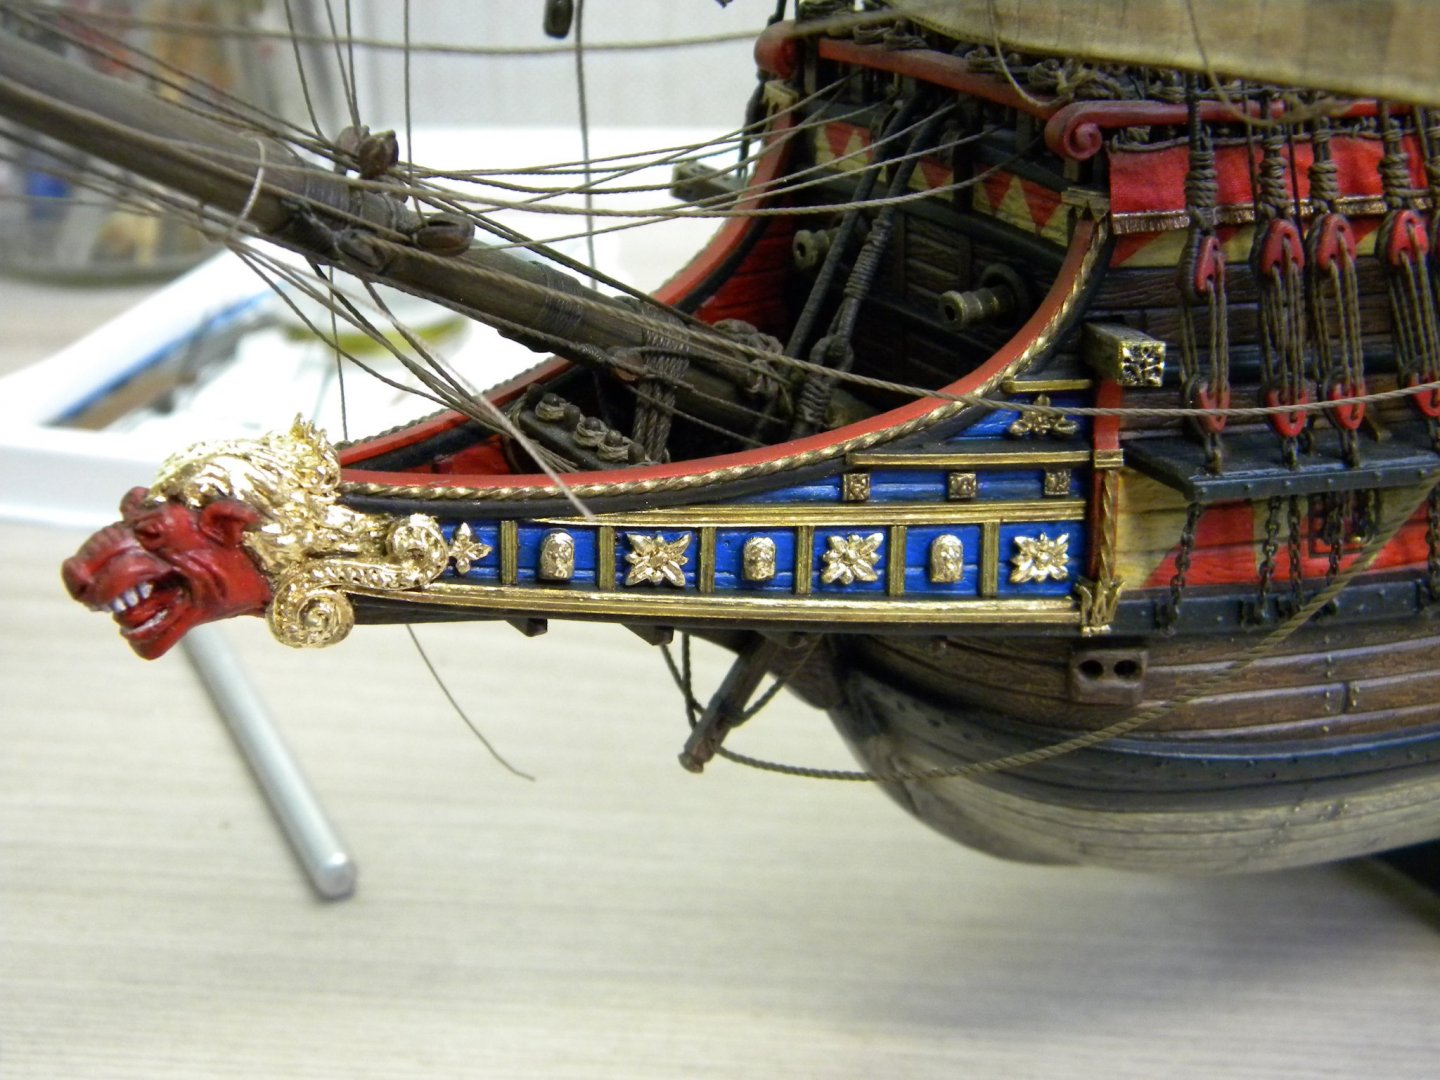
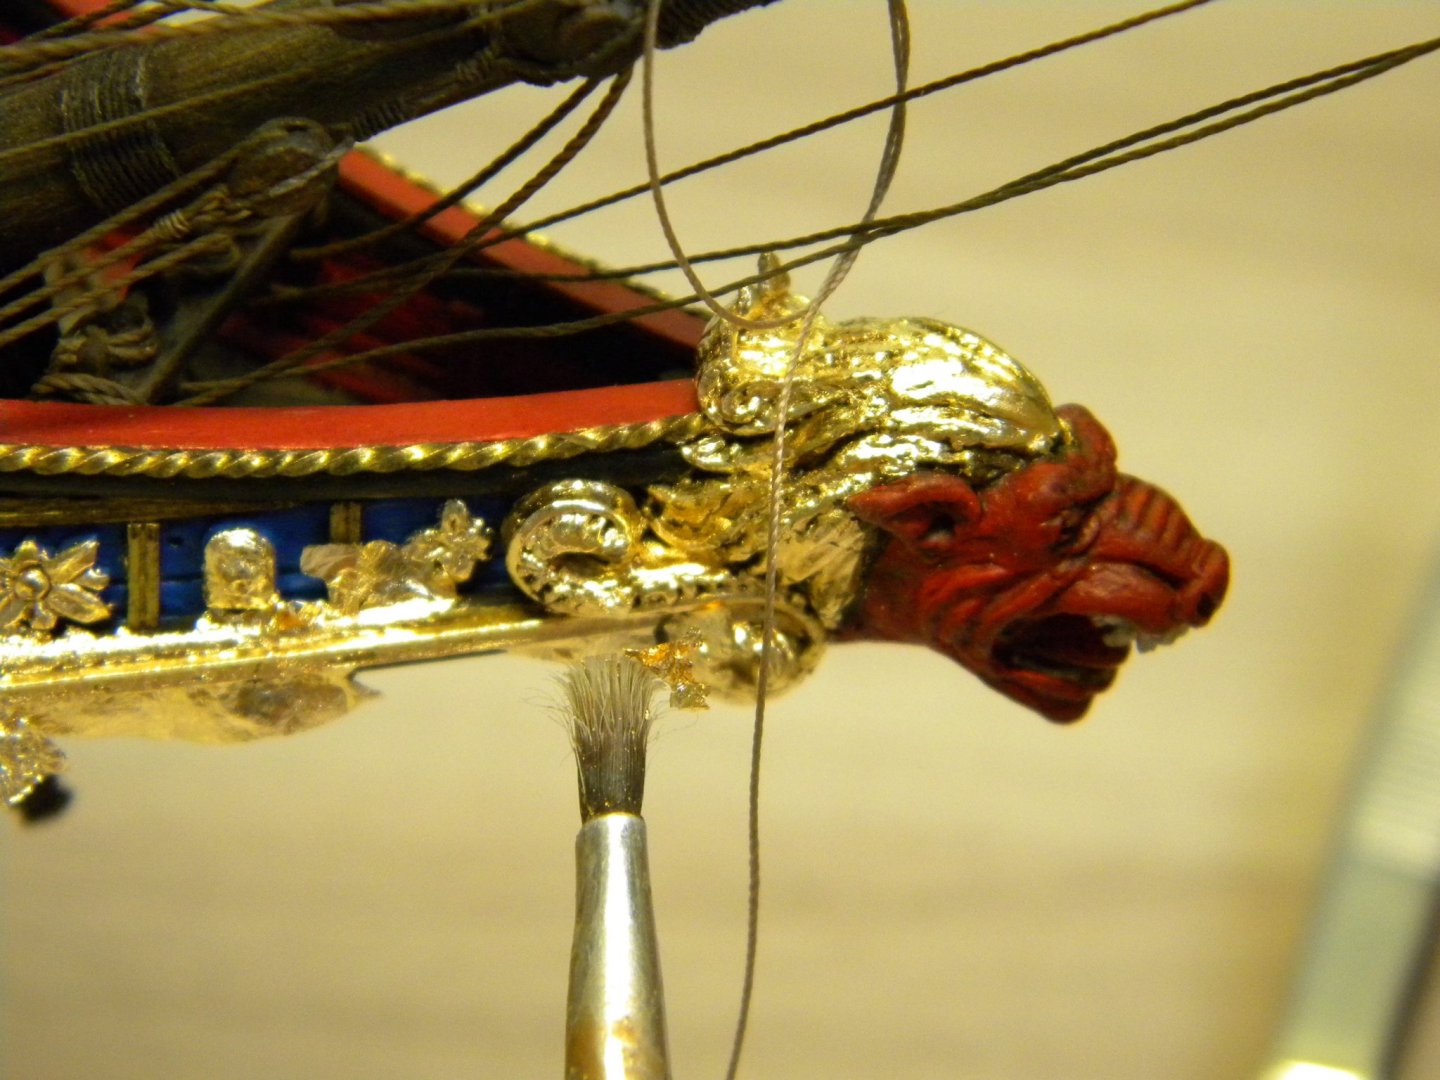
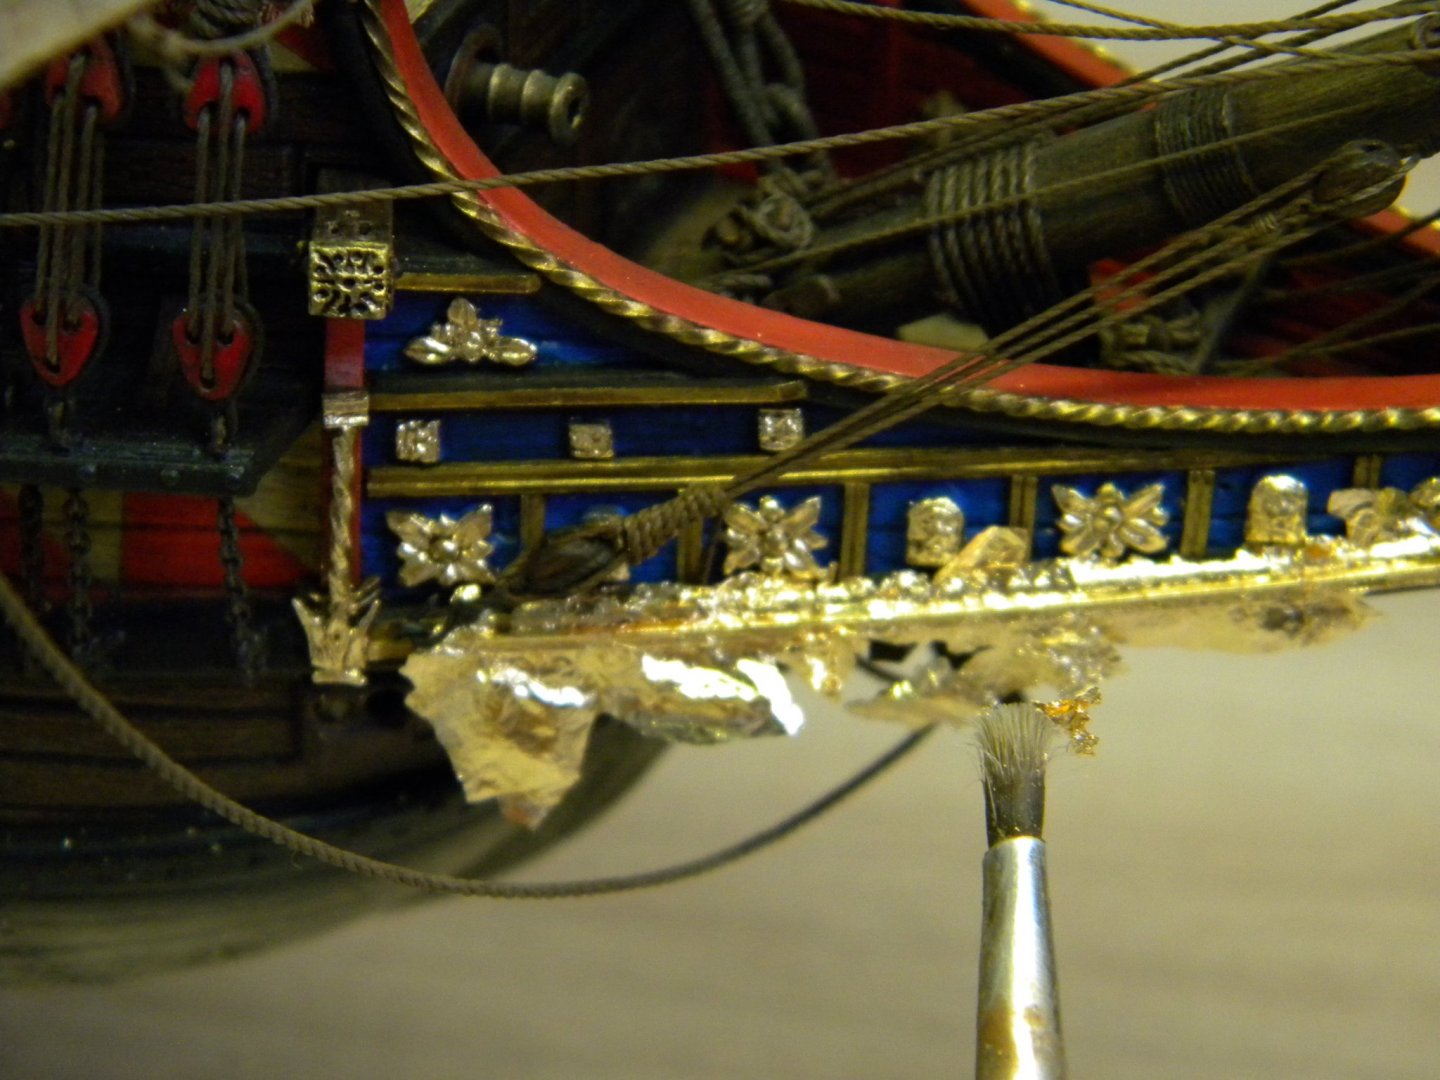
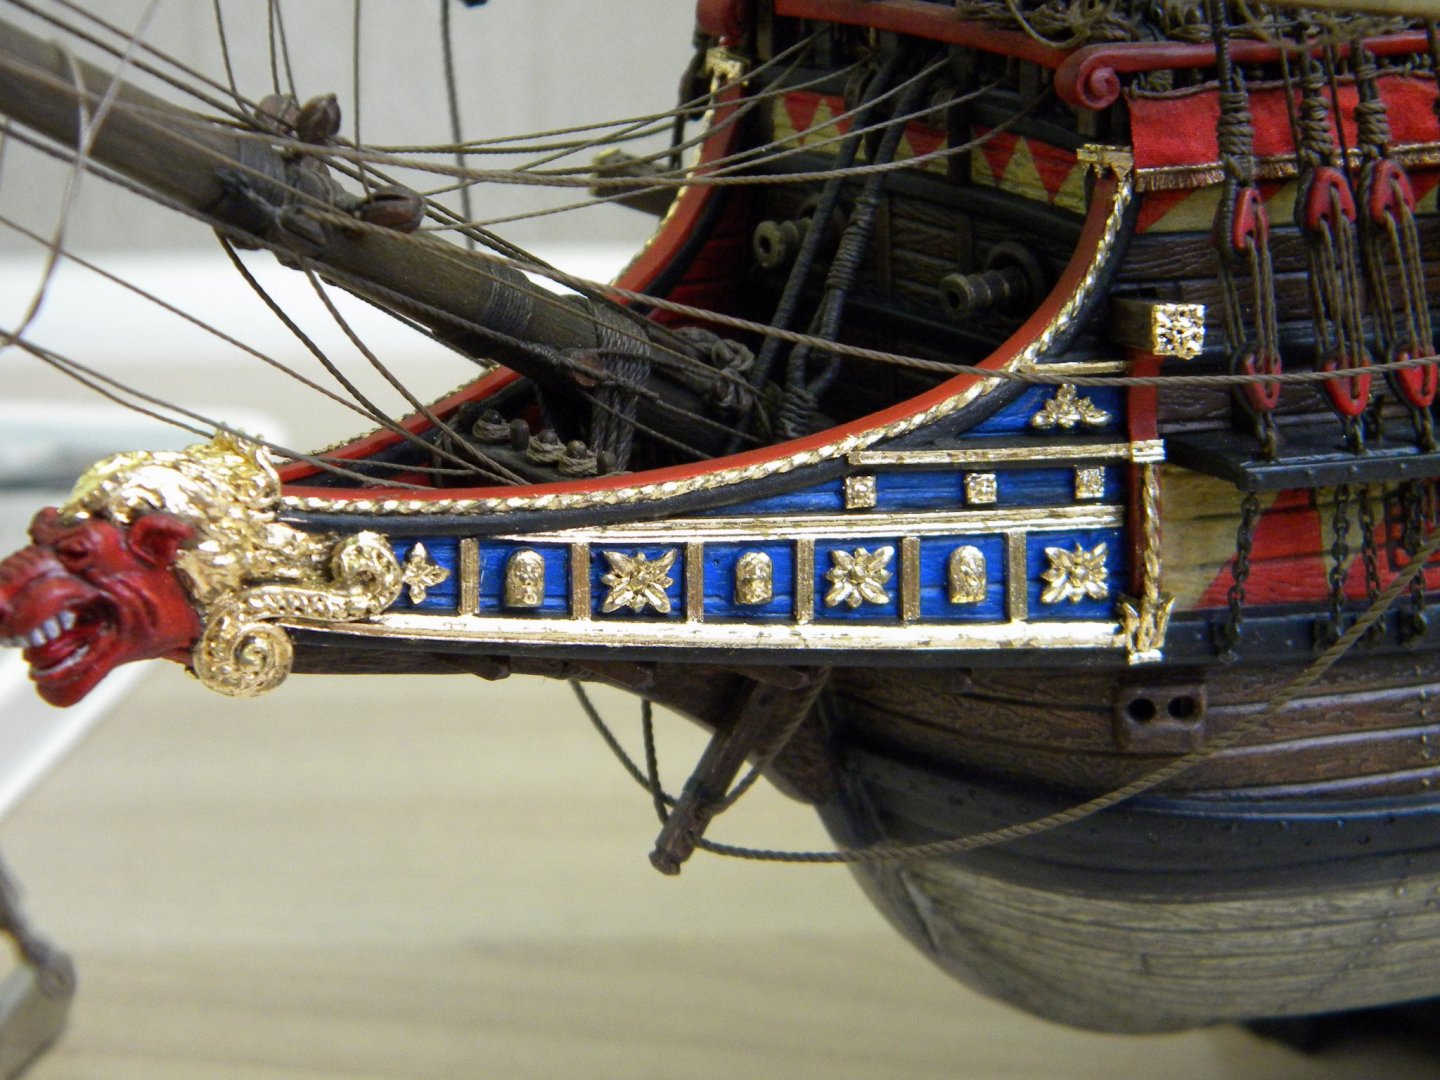
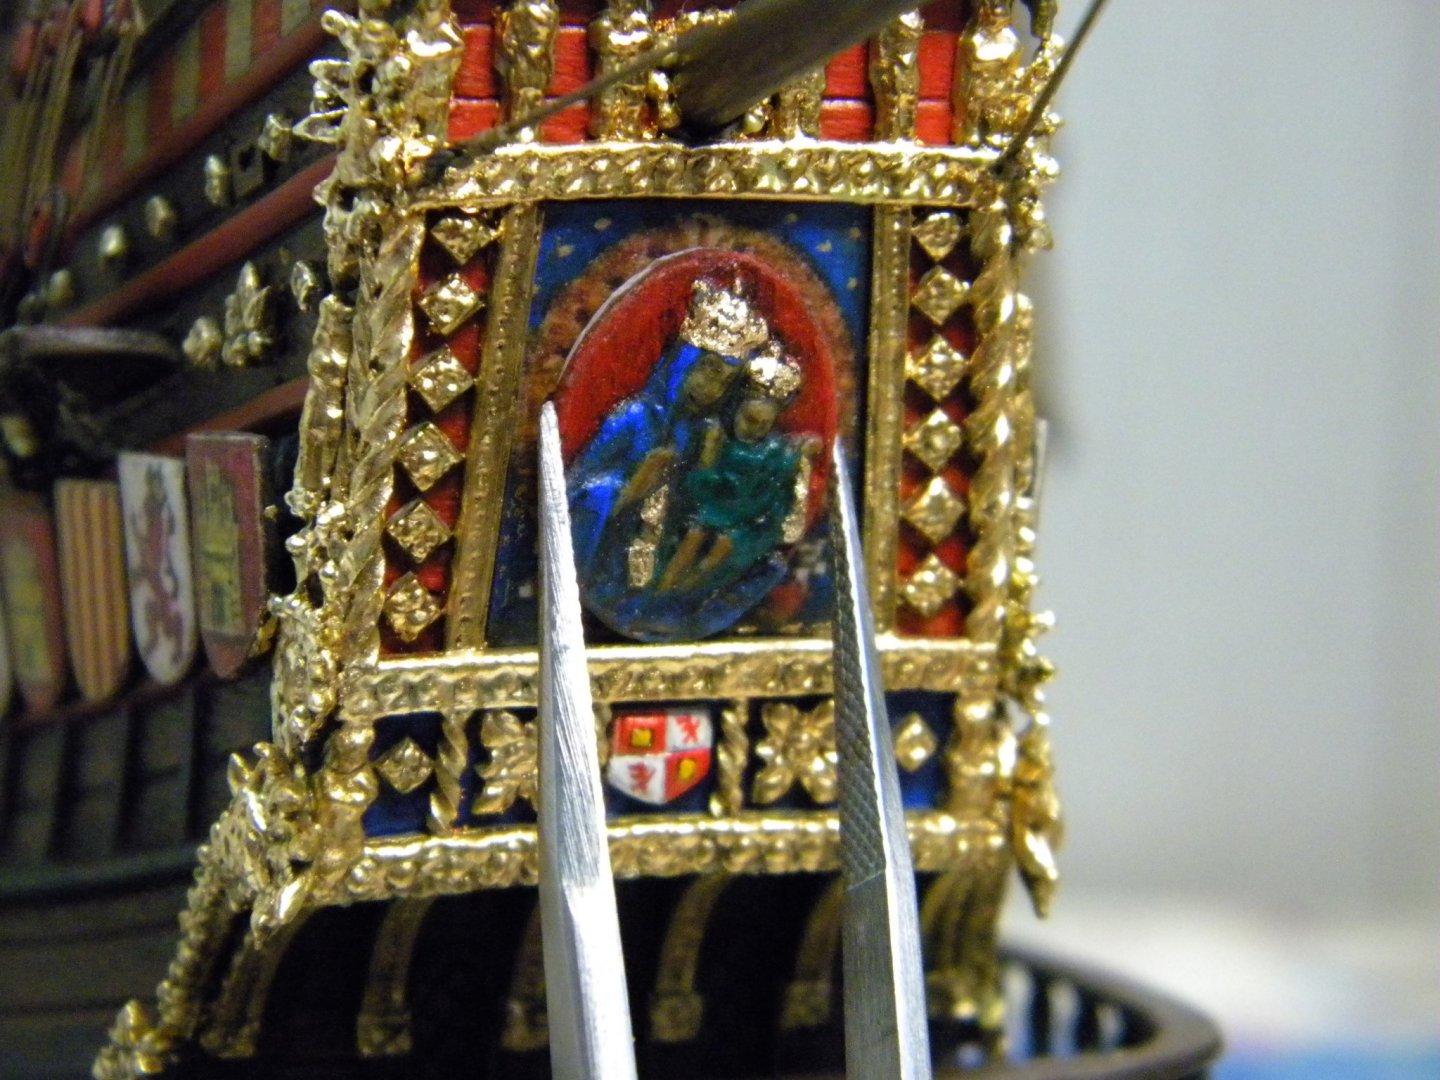
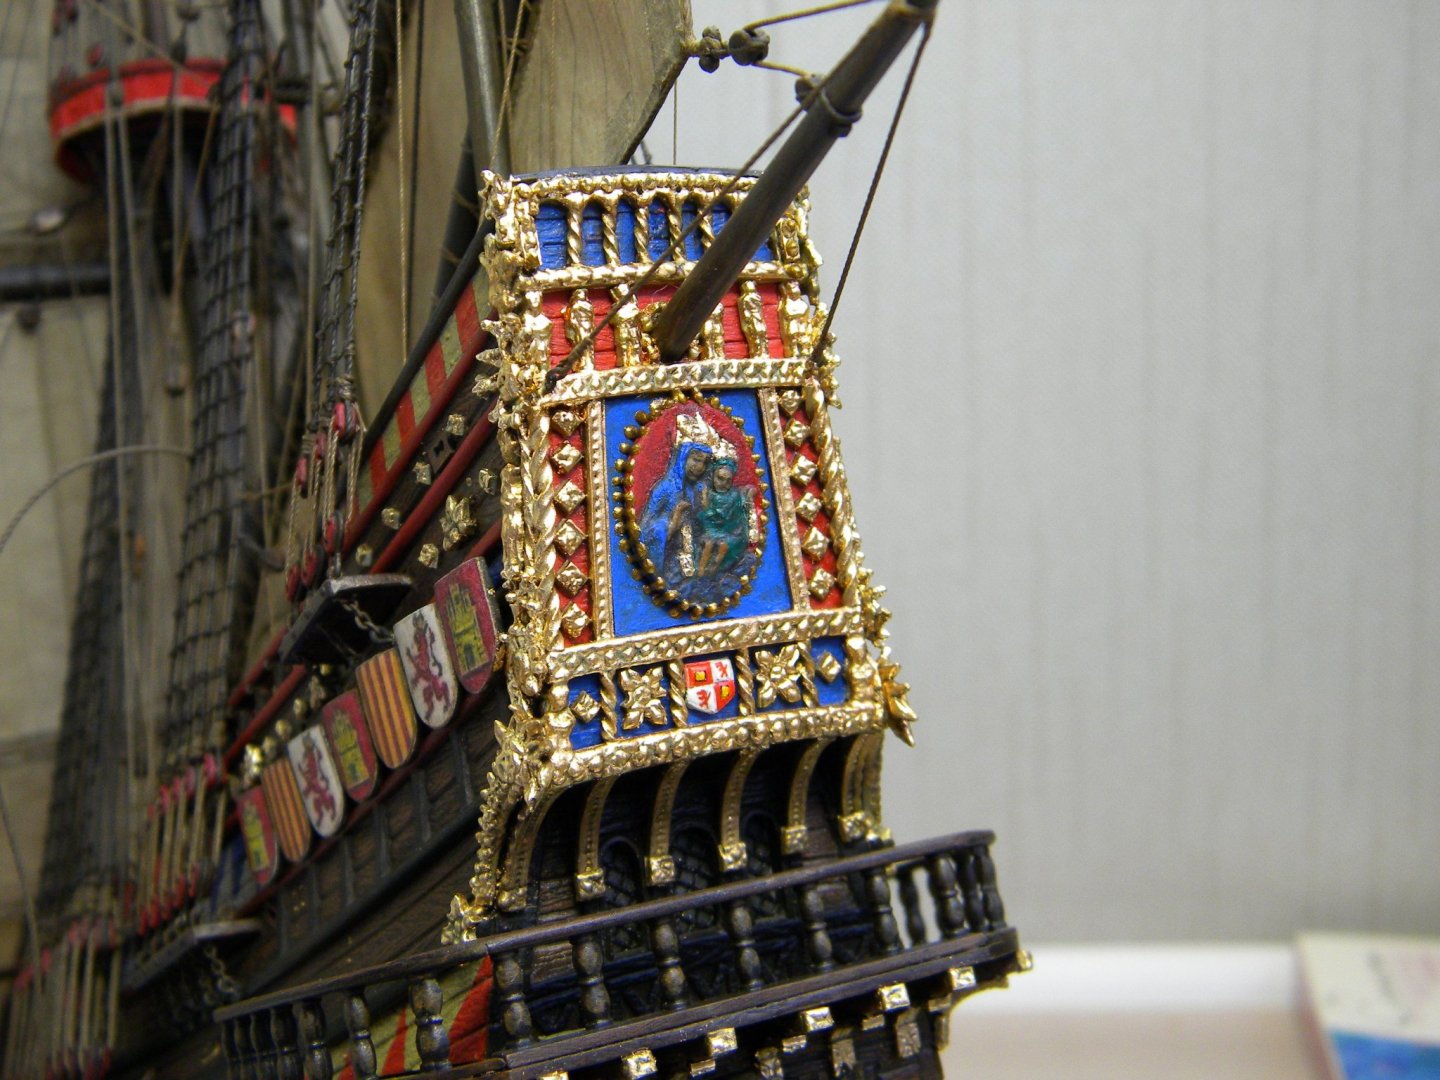
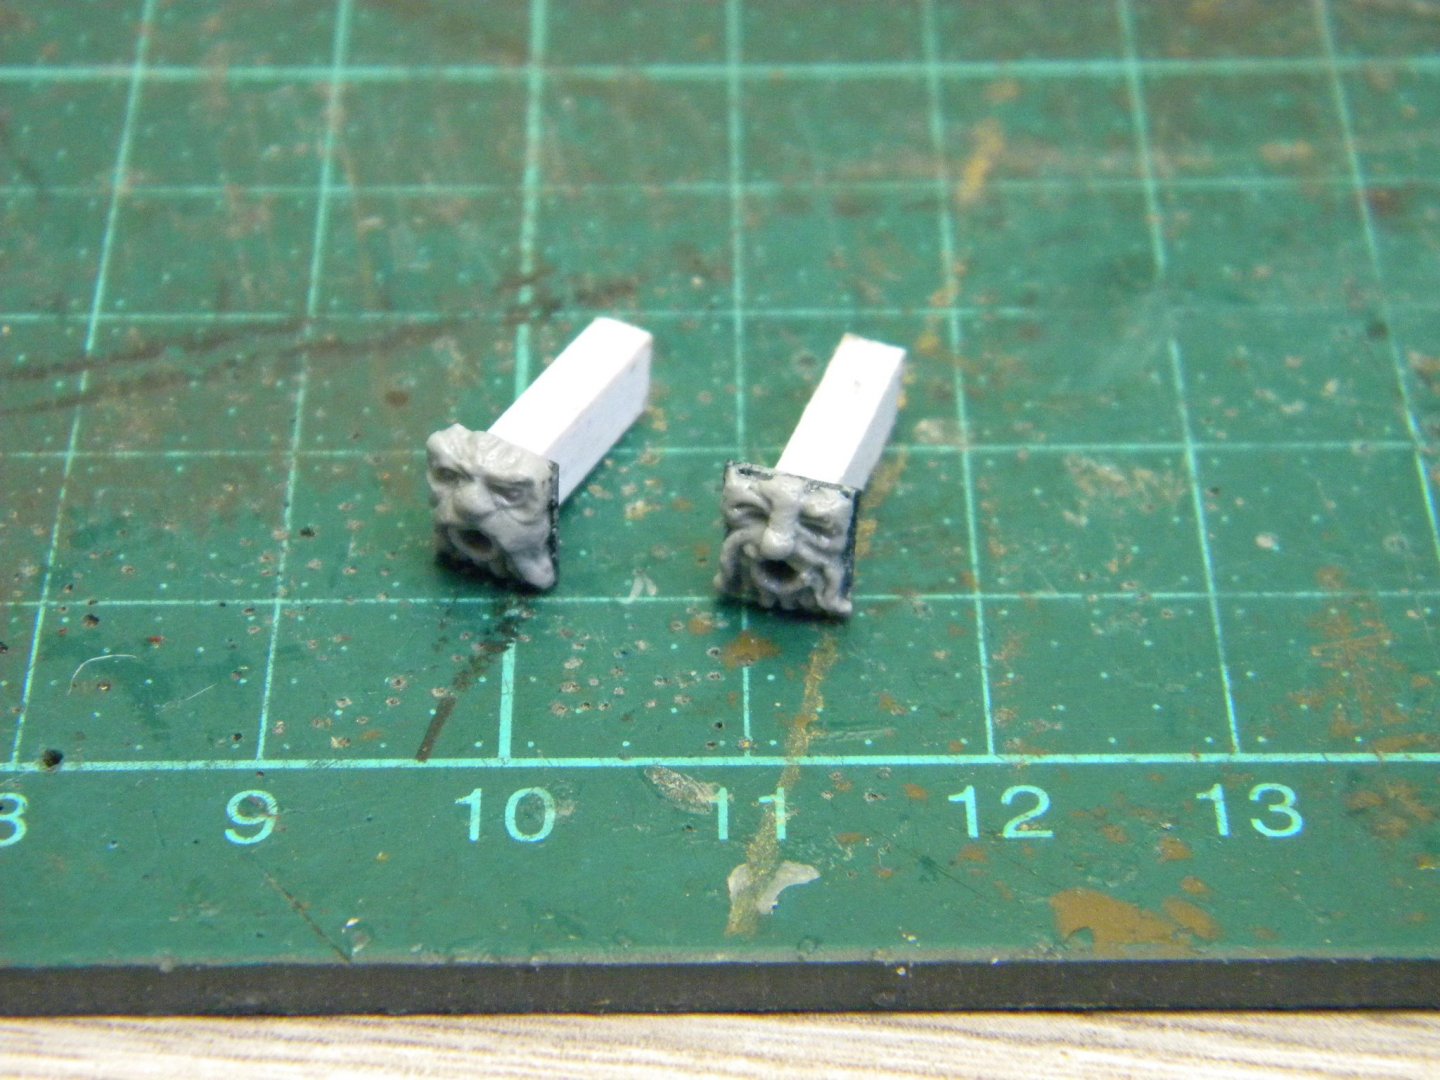
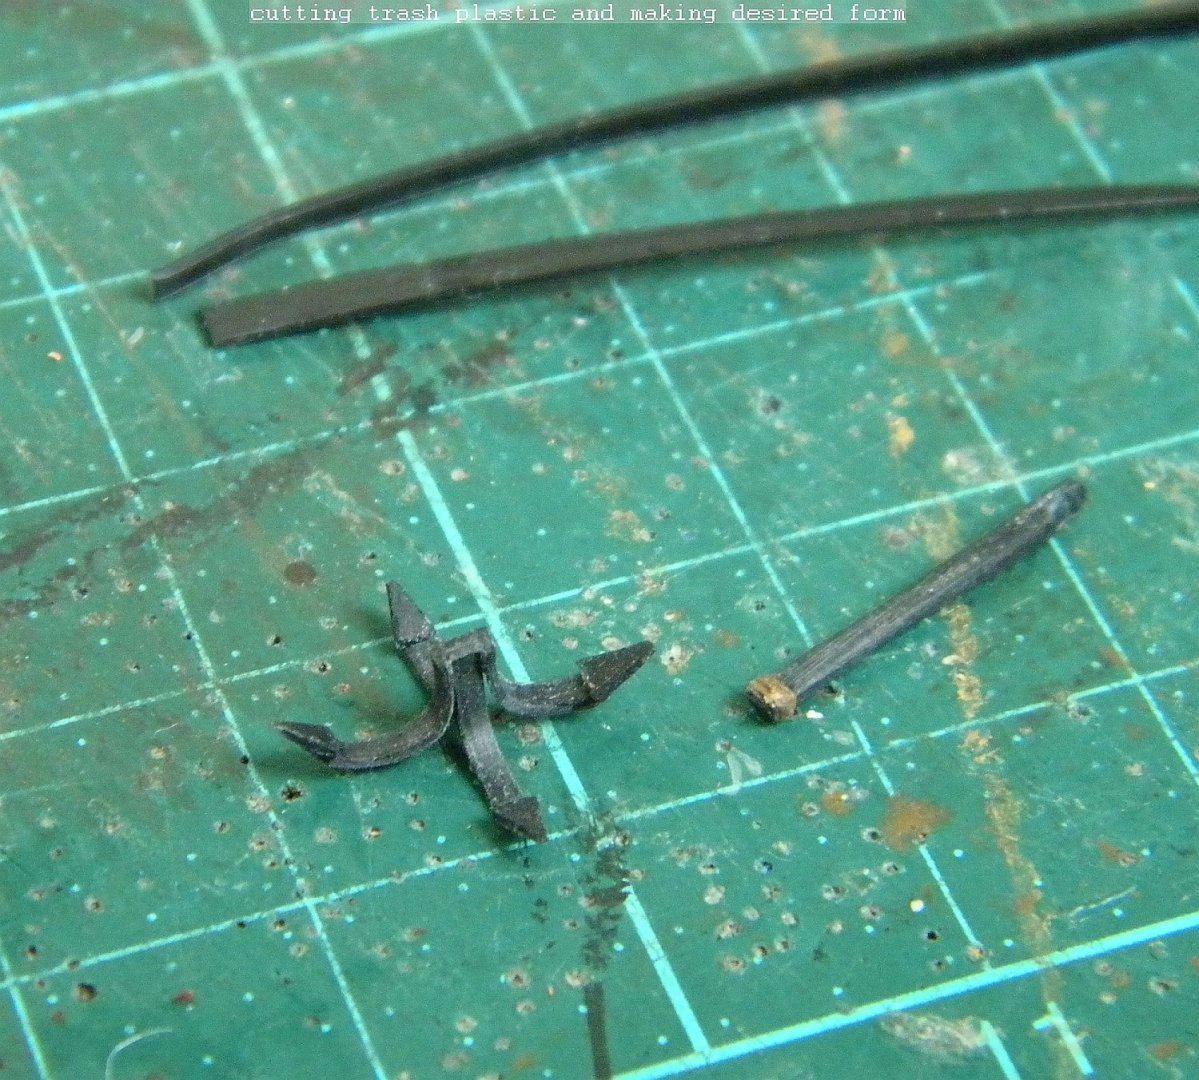
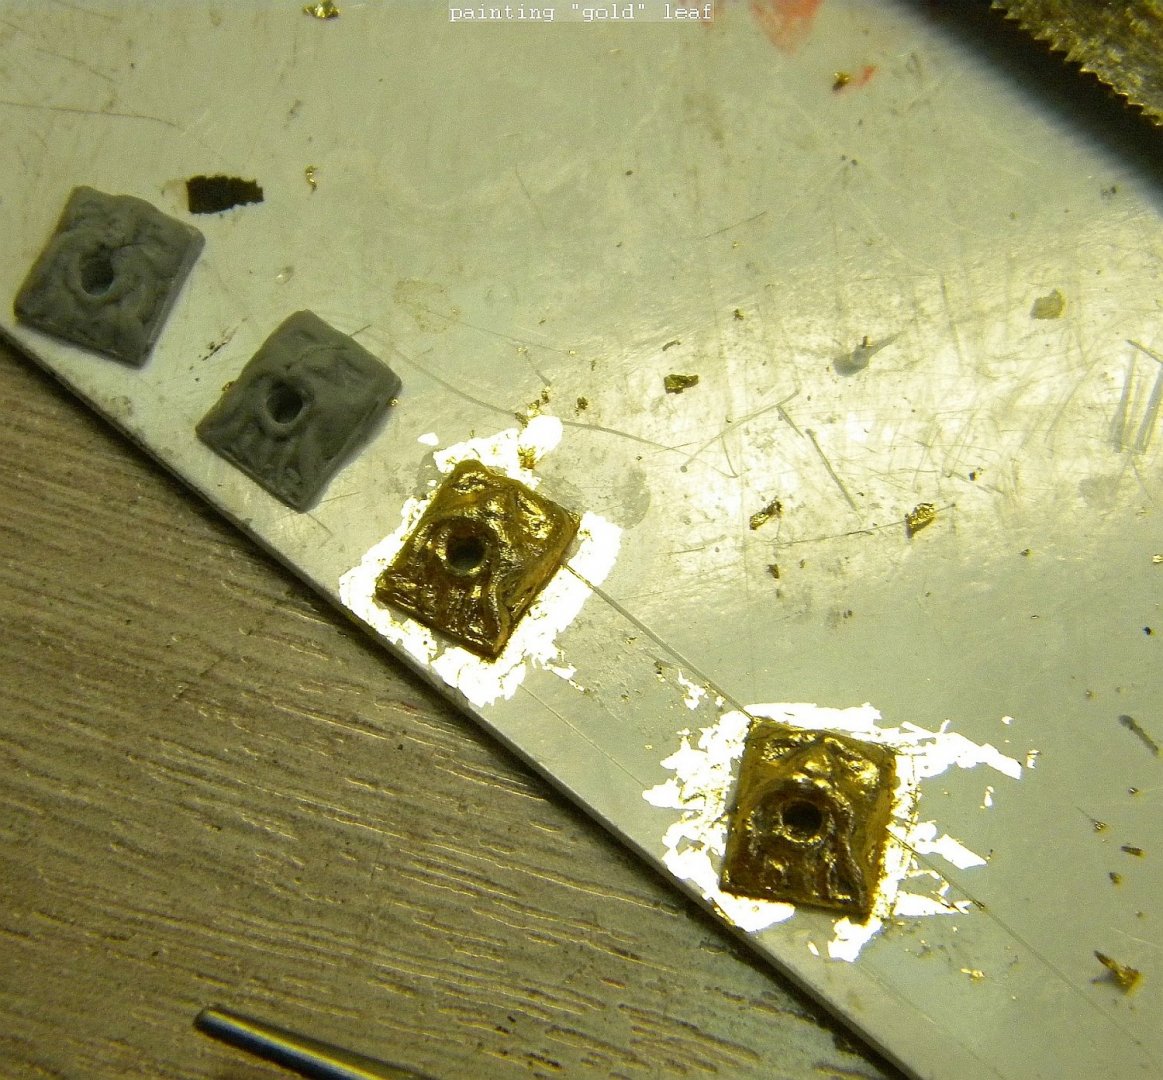
Good day Dear Community! I’m continuing experiments with using" potal"( fake gold) instead of gold paint (maybe this idea will be useful for someone to use "potal " for gilding decor on the model.,and ...and not only decor ... It could be used for guilding model's stands ... some other parts on the model which surfaces need to be looks like " metal" On the first foto you could see difference between gold acrylic paint and "potal leafs" Presently I’ll try to replace paintings of all decorative elements. which were painted by gold paint in the past (the first photo shows the difference between the gold paint and potal leafs) ...and repaint them with "potal"... As You could see, I changed a little color of my sails...made them more dark - on the foto you could see difference in color between mizzen and bonaventure sails and main and fore sails as well Also I repaint anchor's wooden parts partuatly and rearange imitation fasteners which joining two wooden halves- bolts imitation made from acrulic contur paint and I prefabricated " plates " for main tacks and made "boarding" anchor, which later on will be fastened to the bowsprit ... and yes, I decided to replace Stern Shields,and made it in relief but not flat picture (foto print) as before... as example boarding anchor /approx size compare to human body you could see on these pictures ..


- 228 replies
-
- 8
-
-
- spanish galleon
- lee
- (and 1 more)
-
Good day, Lanyards looks nice! "Mara " serie, I didn't try...but on your foto it looks good,means it must be suitable material for ropes making, as well as gutermann " scala" and " tera"... regarding trying to find suitable color No ... I don't know... I prefer to use white or very light color and than to use paint for making desired rigging color...as seems to me, if not paint...than some kind of stain need to be used and matt varnish... but this of cause very personal feelings about right model appearance :))) # Regarding rope coil making... I used almost same techniques as Gregory, and deluted white clue as well to keep desired coil form...for making process faster, I use hair dryer. The only difference - I make rope coil in two parts,and than assemble them in one piece...You could see it on the last few pages in my thread abt galleon building- link in my sinature... When placing prefabricated coils , I use small q-ty of CA gell, to make some additional" gravity" effect to the rope in coil...