DaveRow
-
Posts
691 -
Joined
-
Last visited
Content Type
Profiles
Forums
Gallery
Events
Everything posted by DaveRow
-
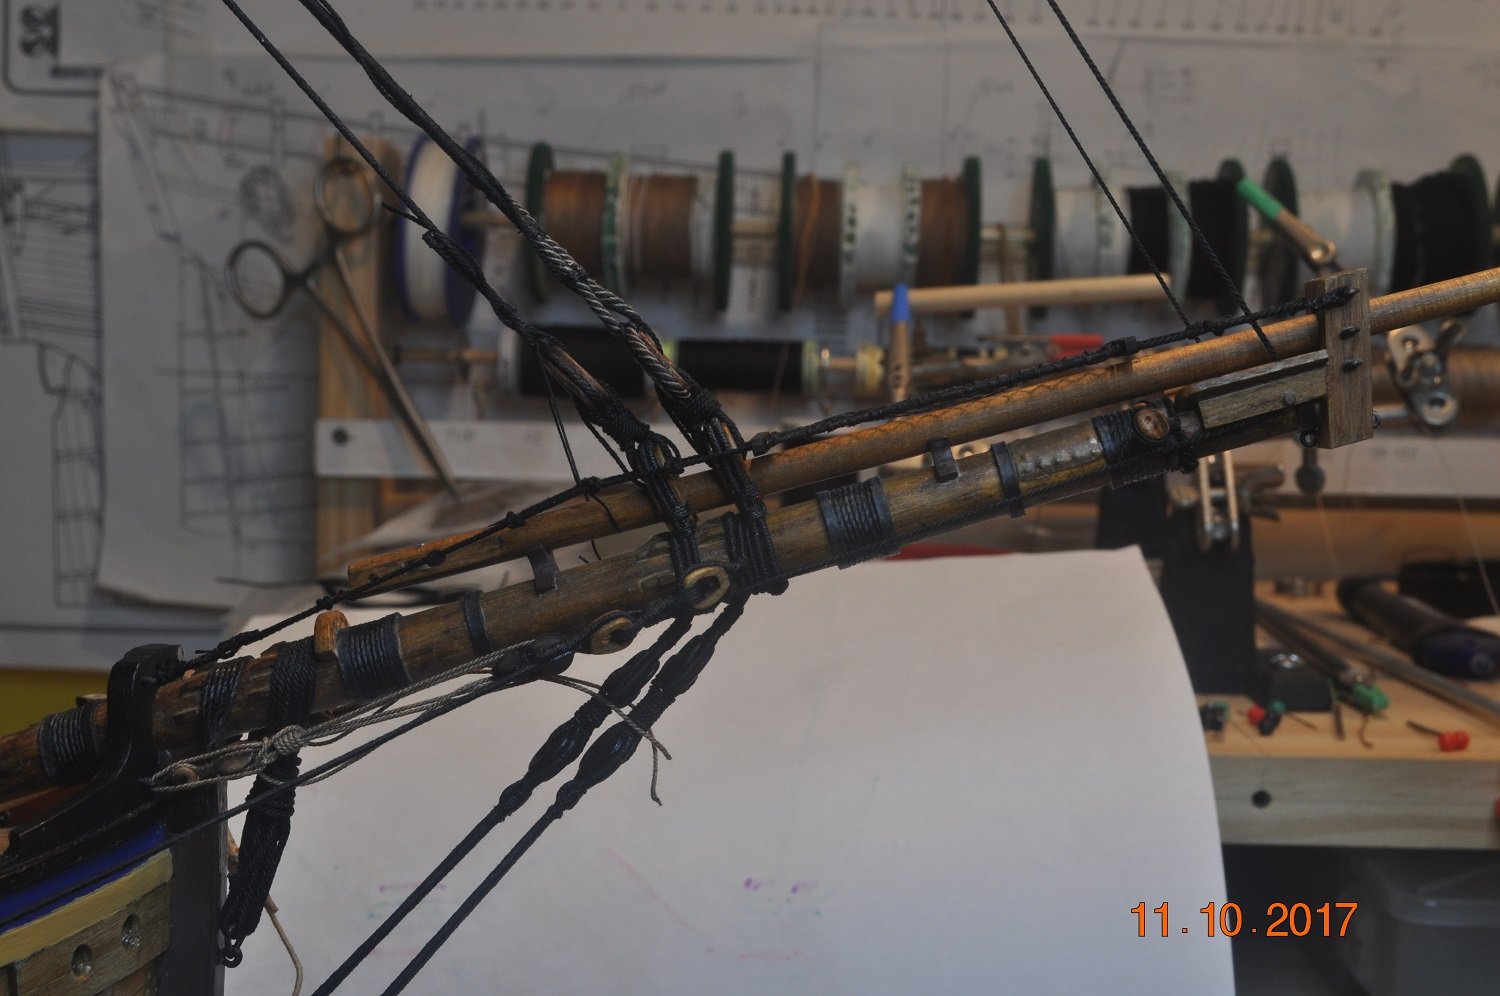
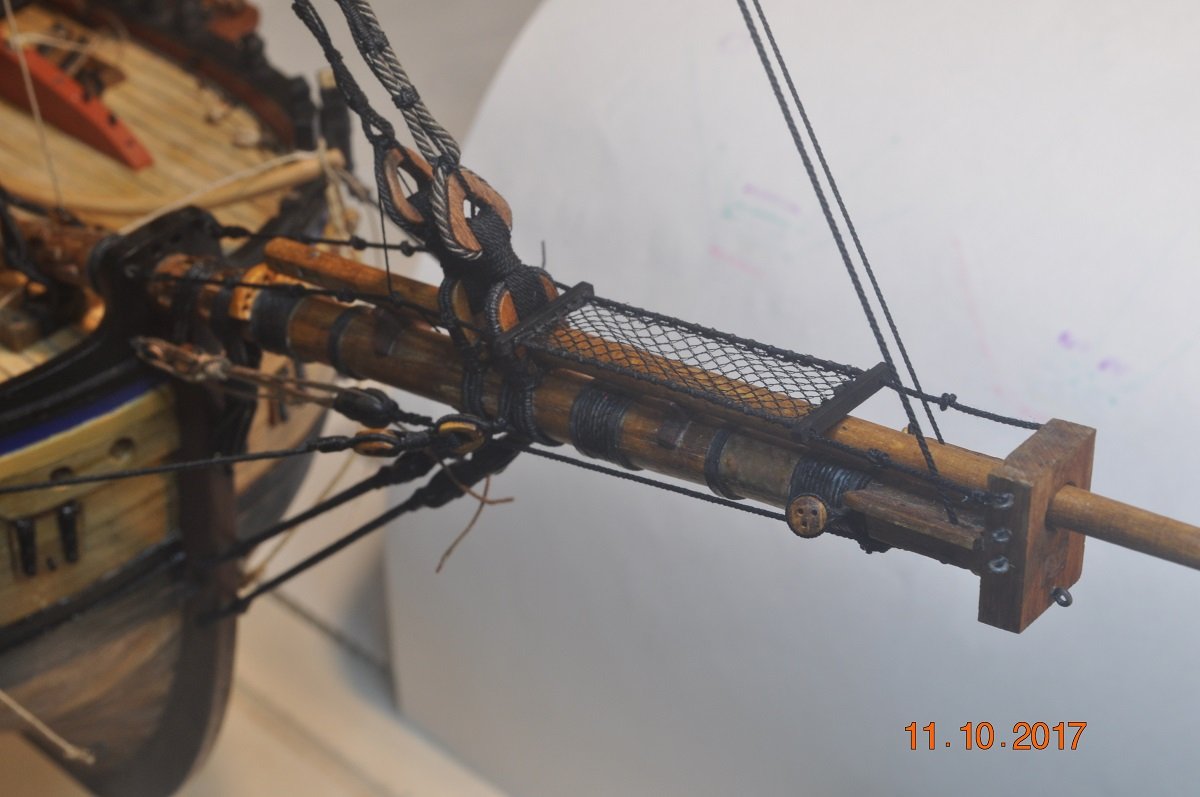
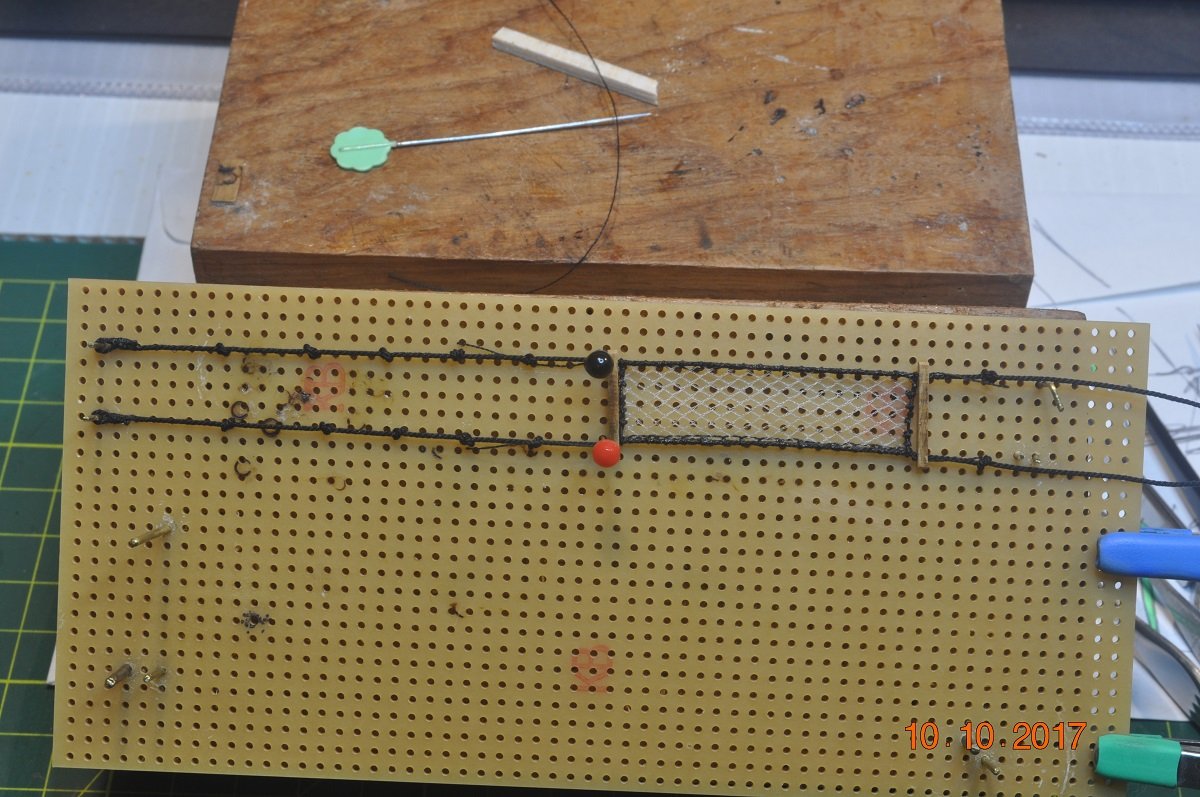
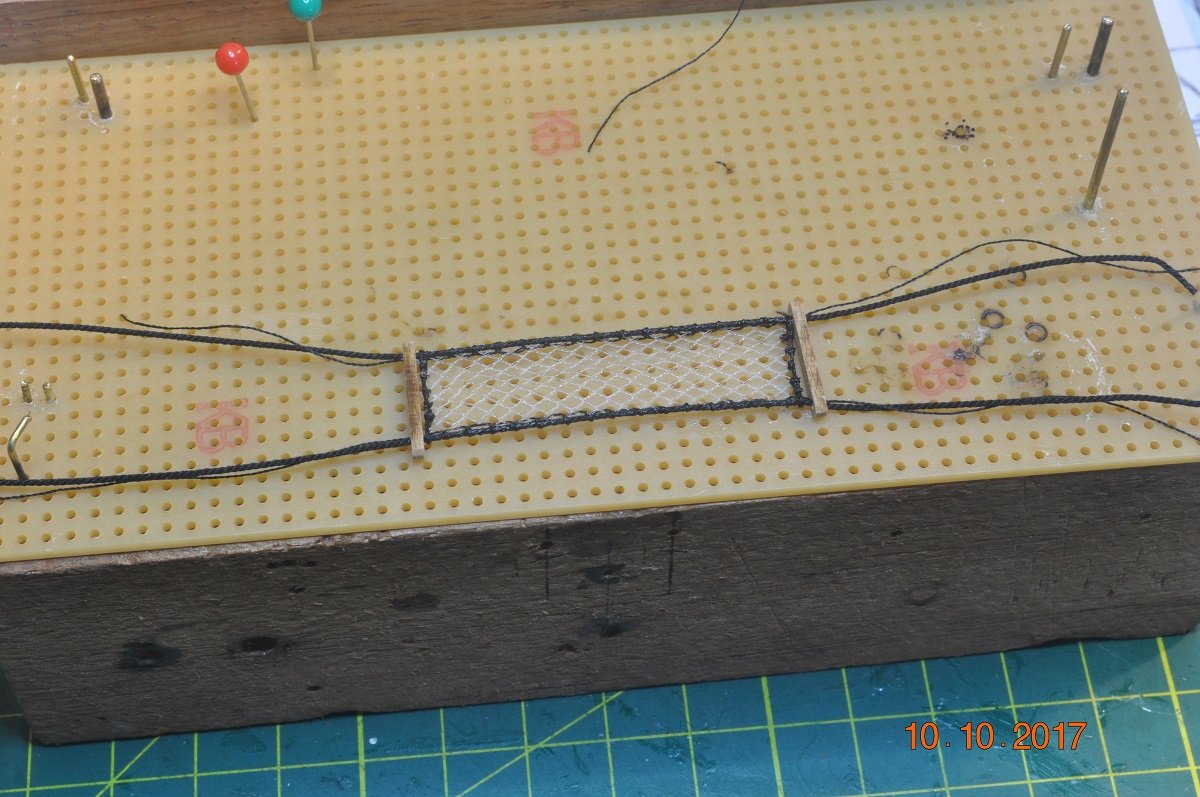
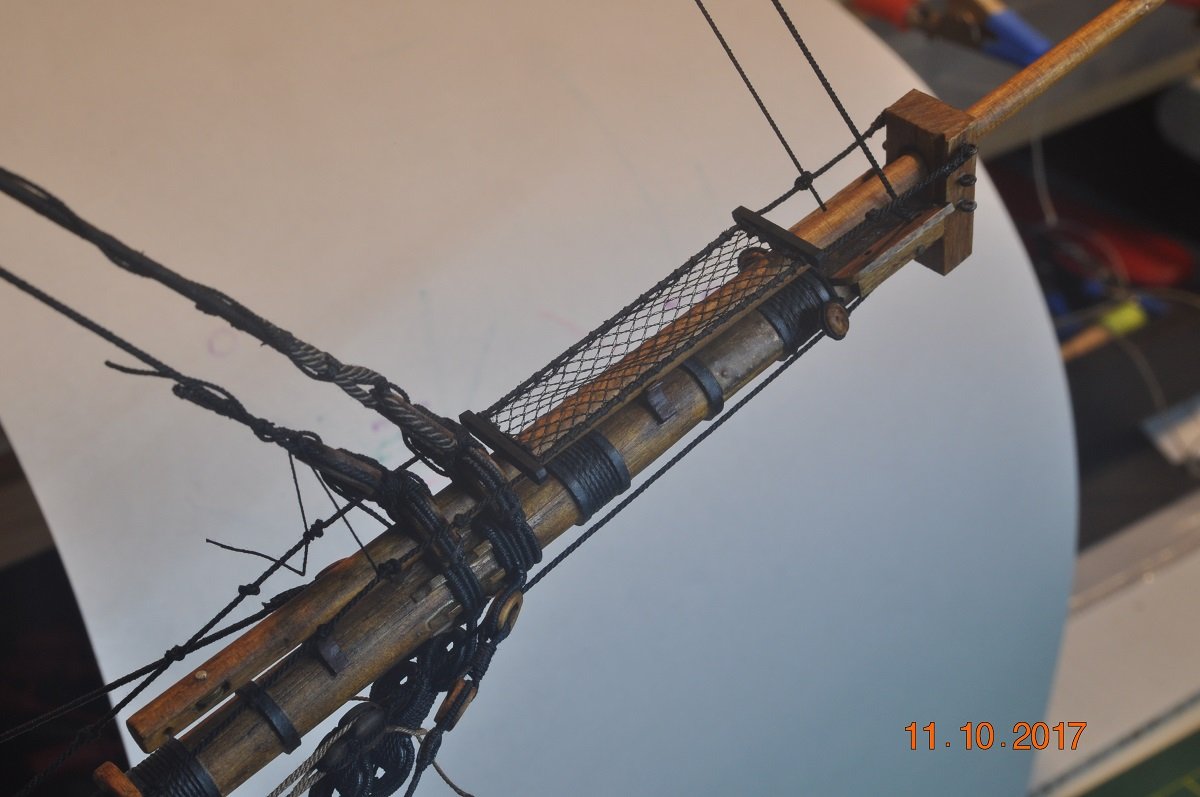
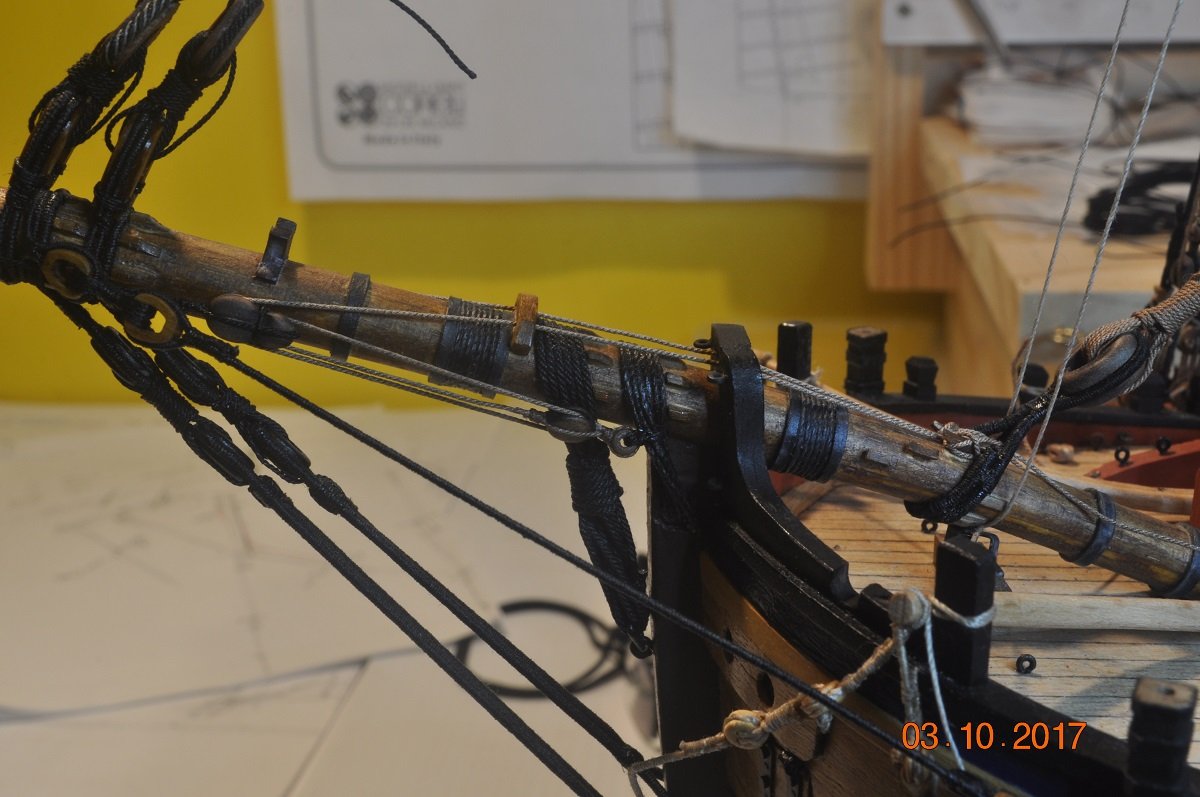
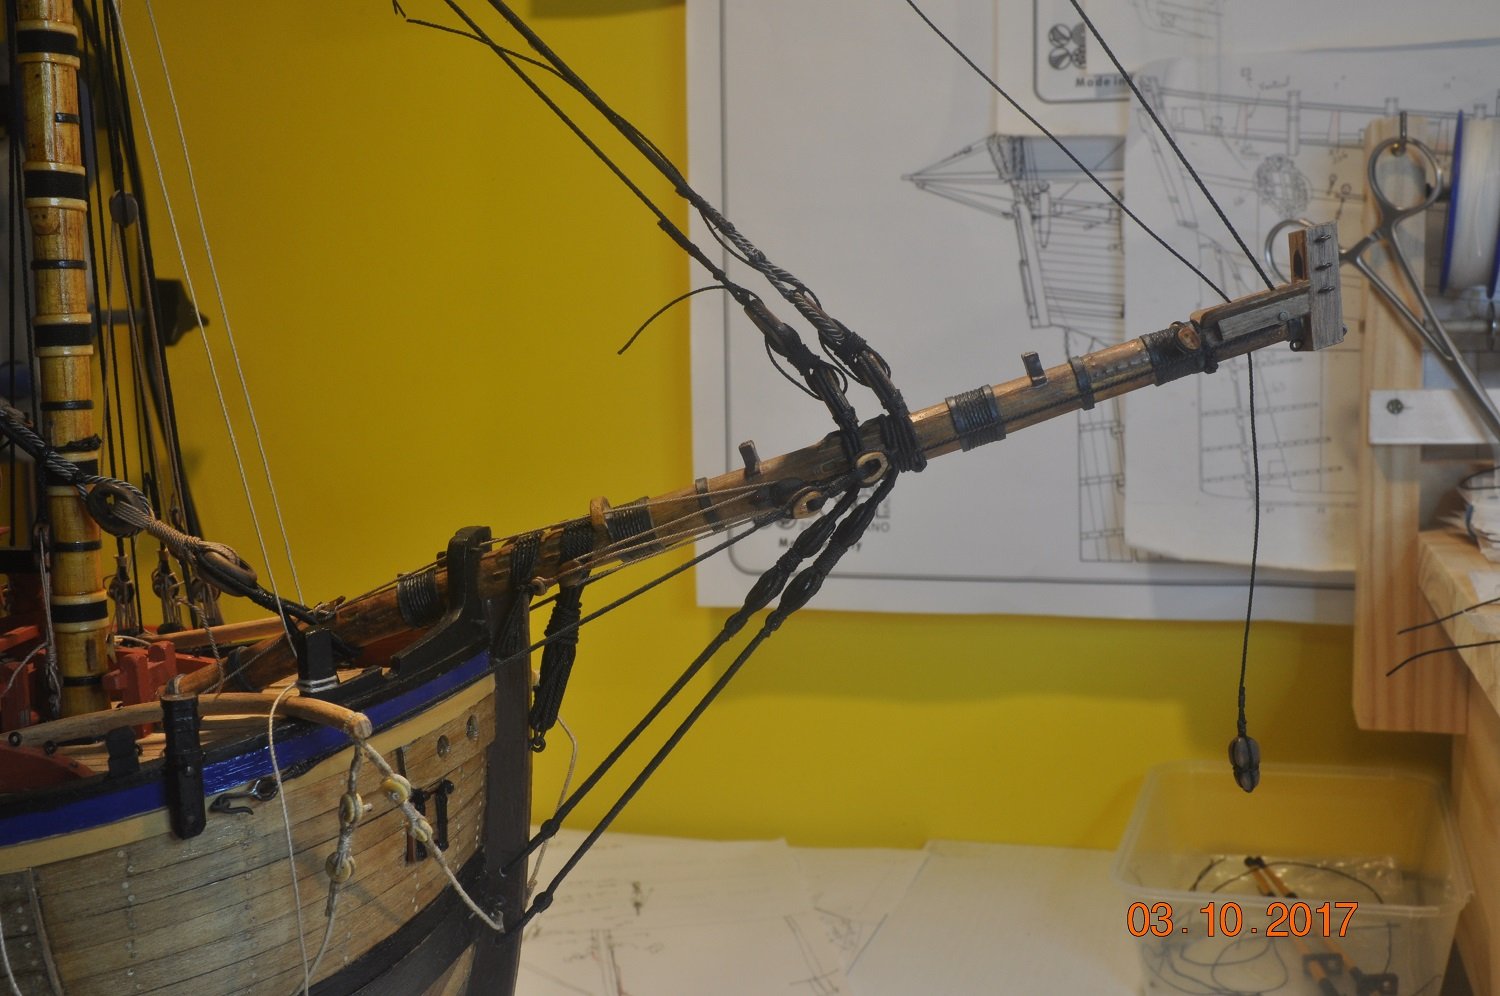
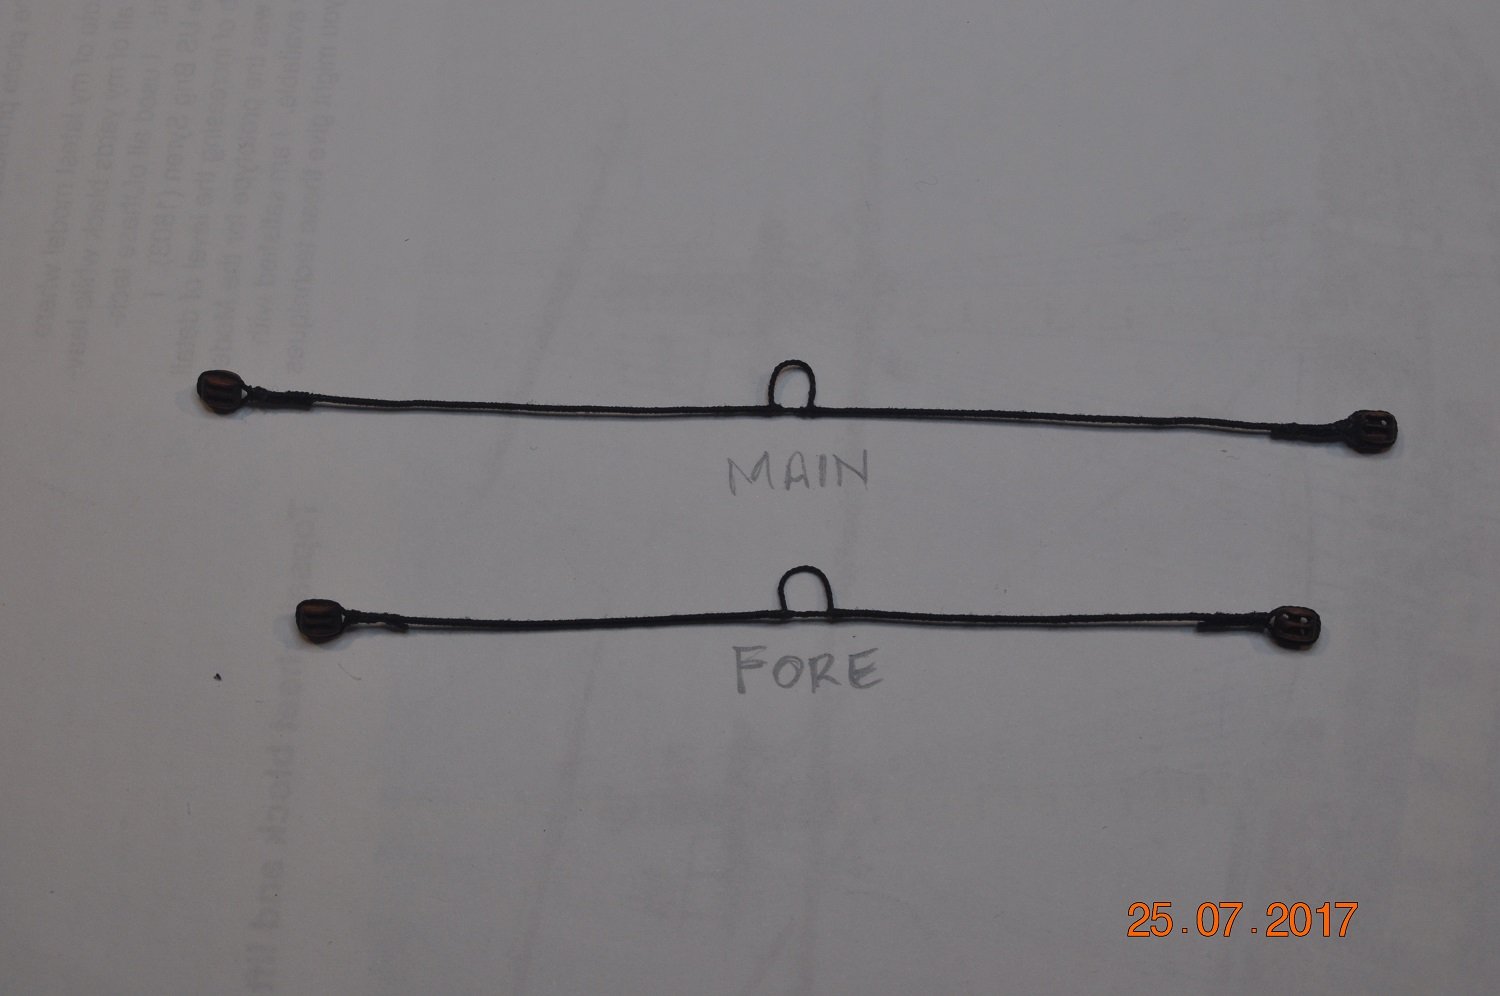
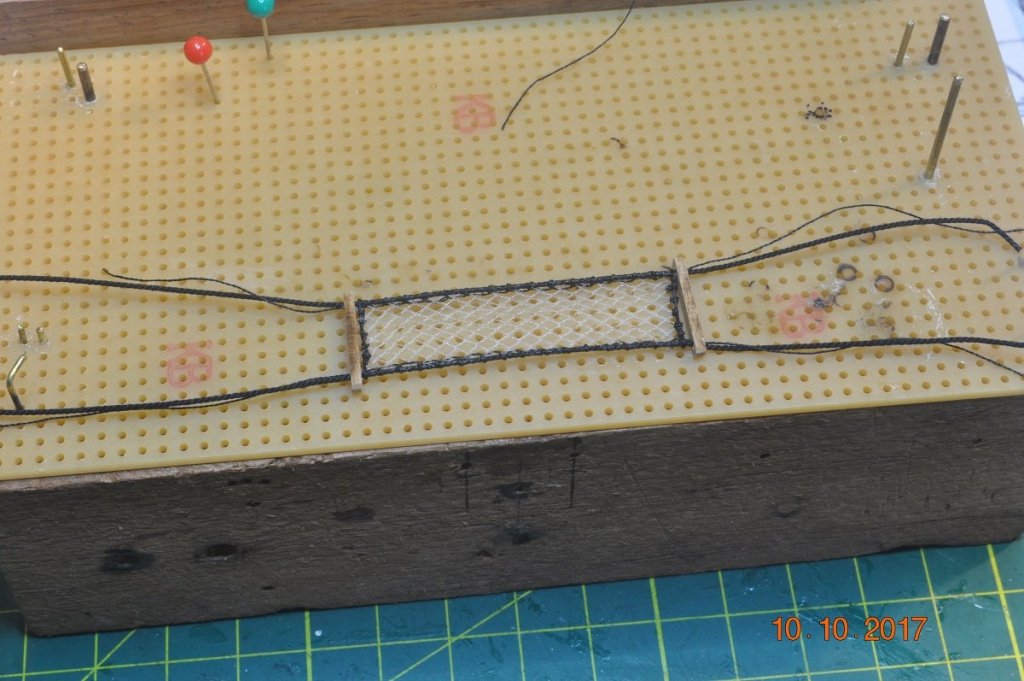
 Shipyard Update Bowsprit Horse and Stay Sail Netting: Put together the above as an off-boat construction. Mix of AoTS and Replica details. Thanks to Steve "Shipaholic" for sending me the netting some time back. Above is the netting sewed around the rope sides with timber ends (overall 45mm long x 11mm wide) Added knots along the ropes either side, and loop at lower ends for lashing to bow head eye-bolts. The electrical board comes in use for "pinning" items to work on. Lashed in place. The Bowsprit Boom in it's "pull back" position whilst all this going on to make sure the horse and net cleared. Added a lift behind the Fore Preventor Stay. Might try the Top Gallants next.


-
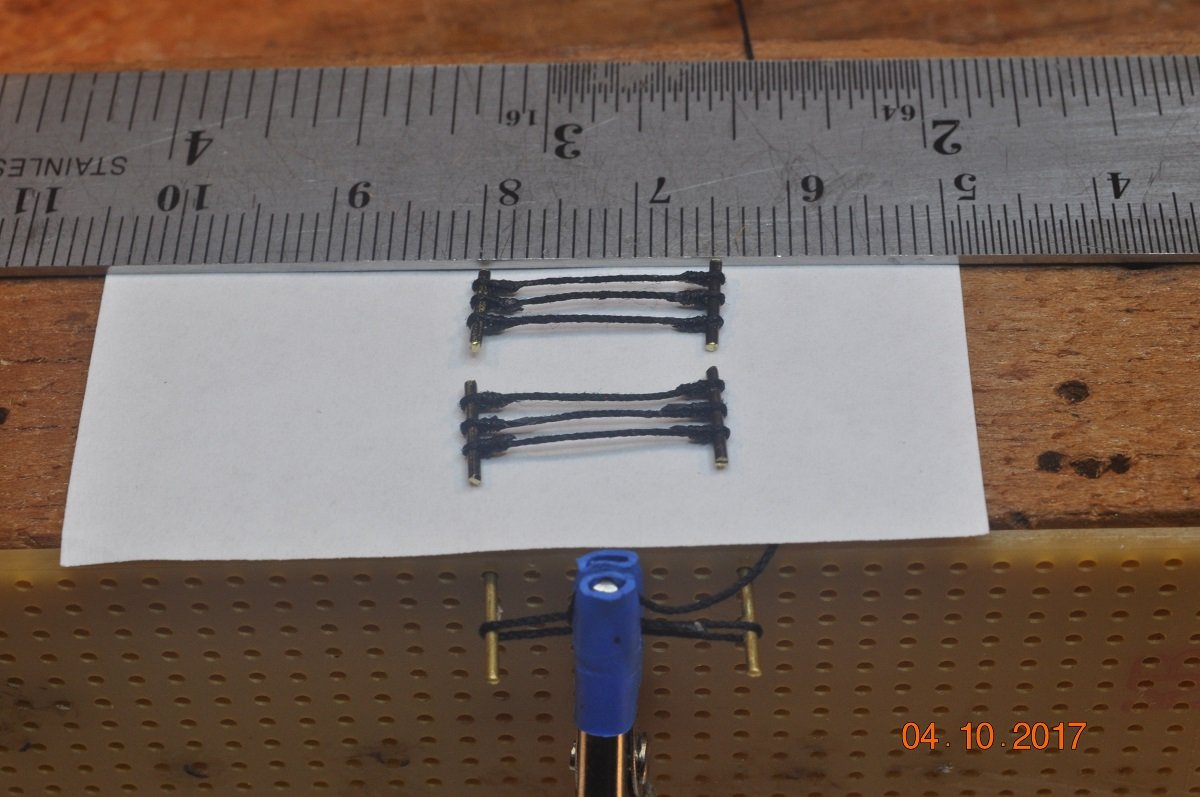
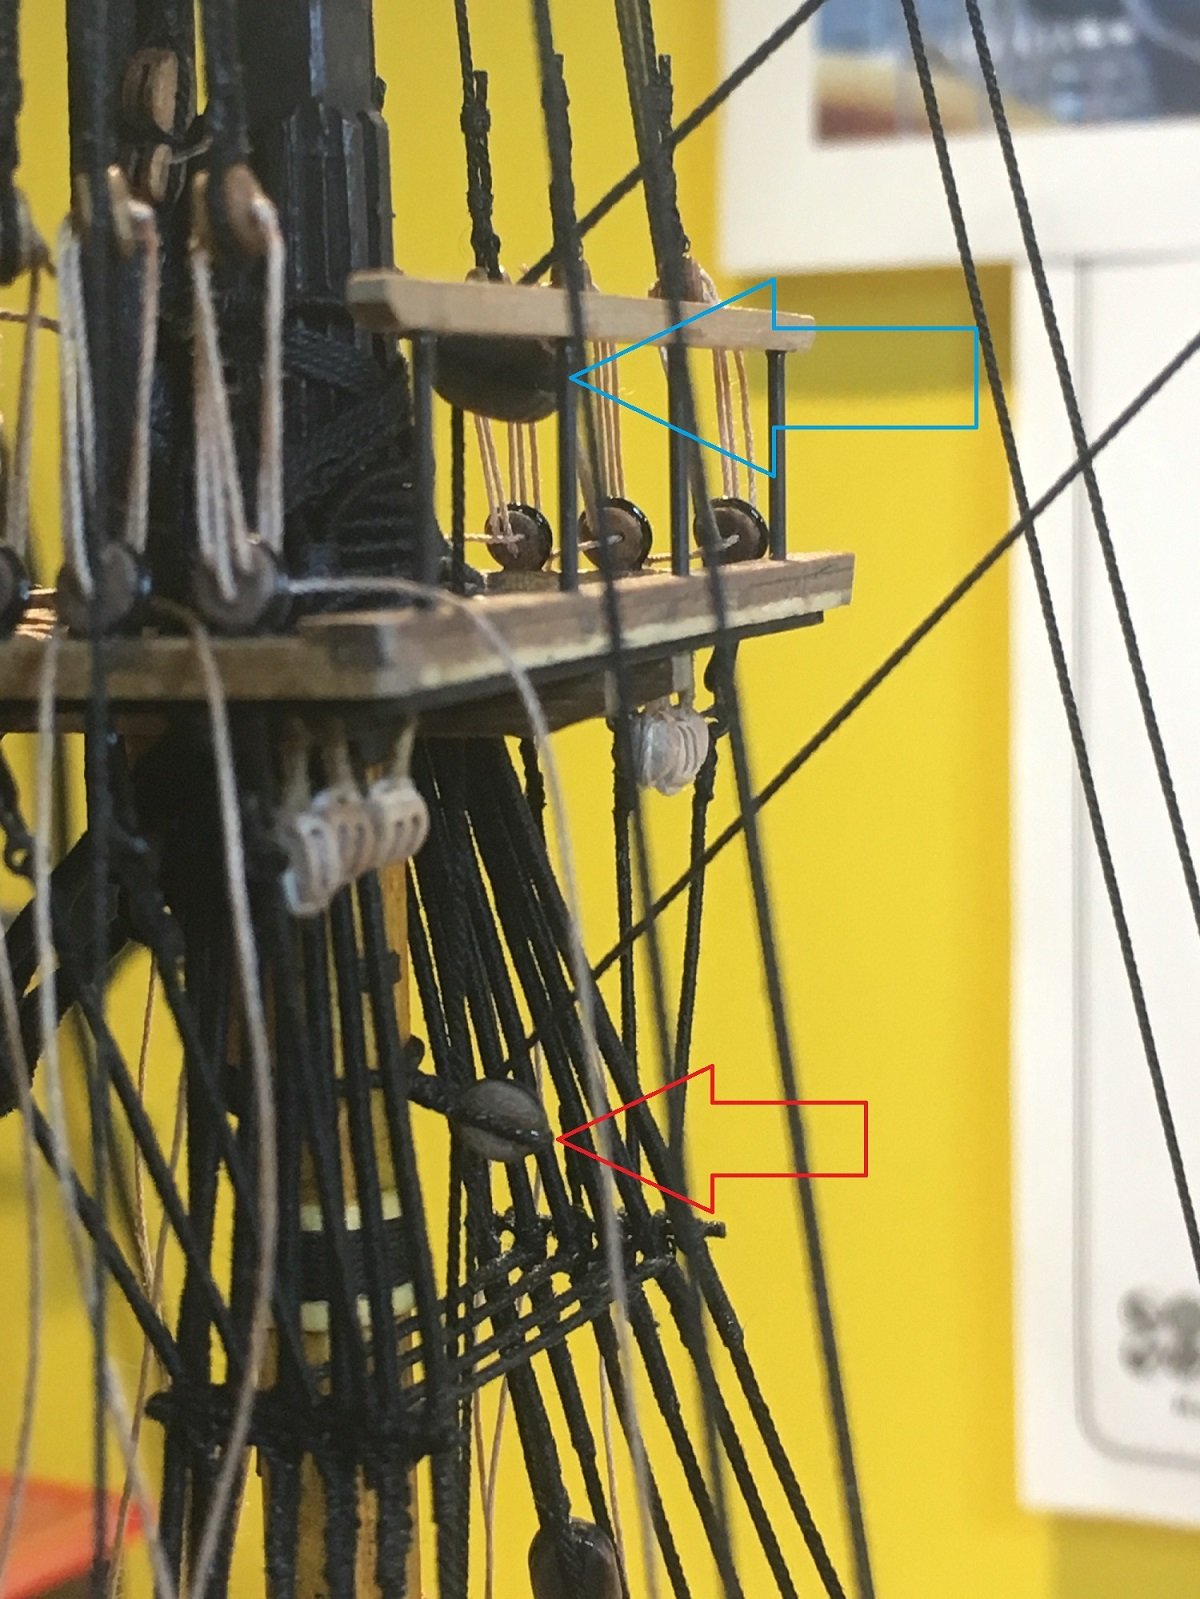
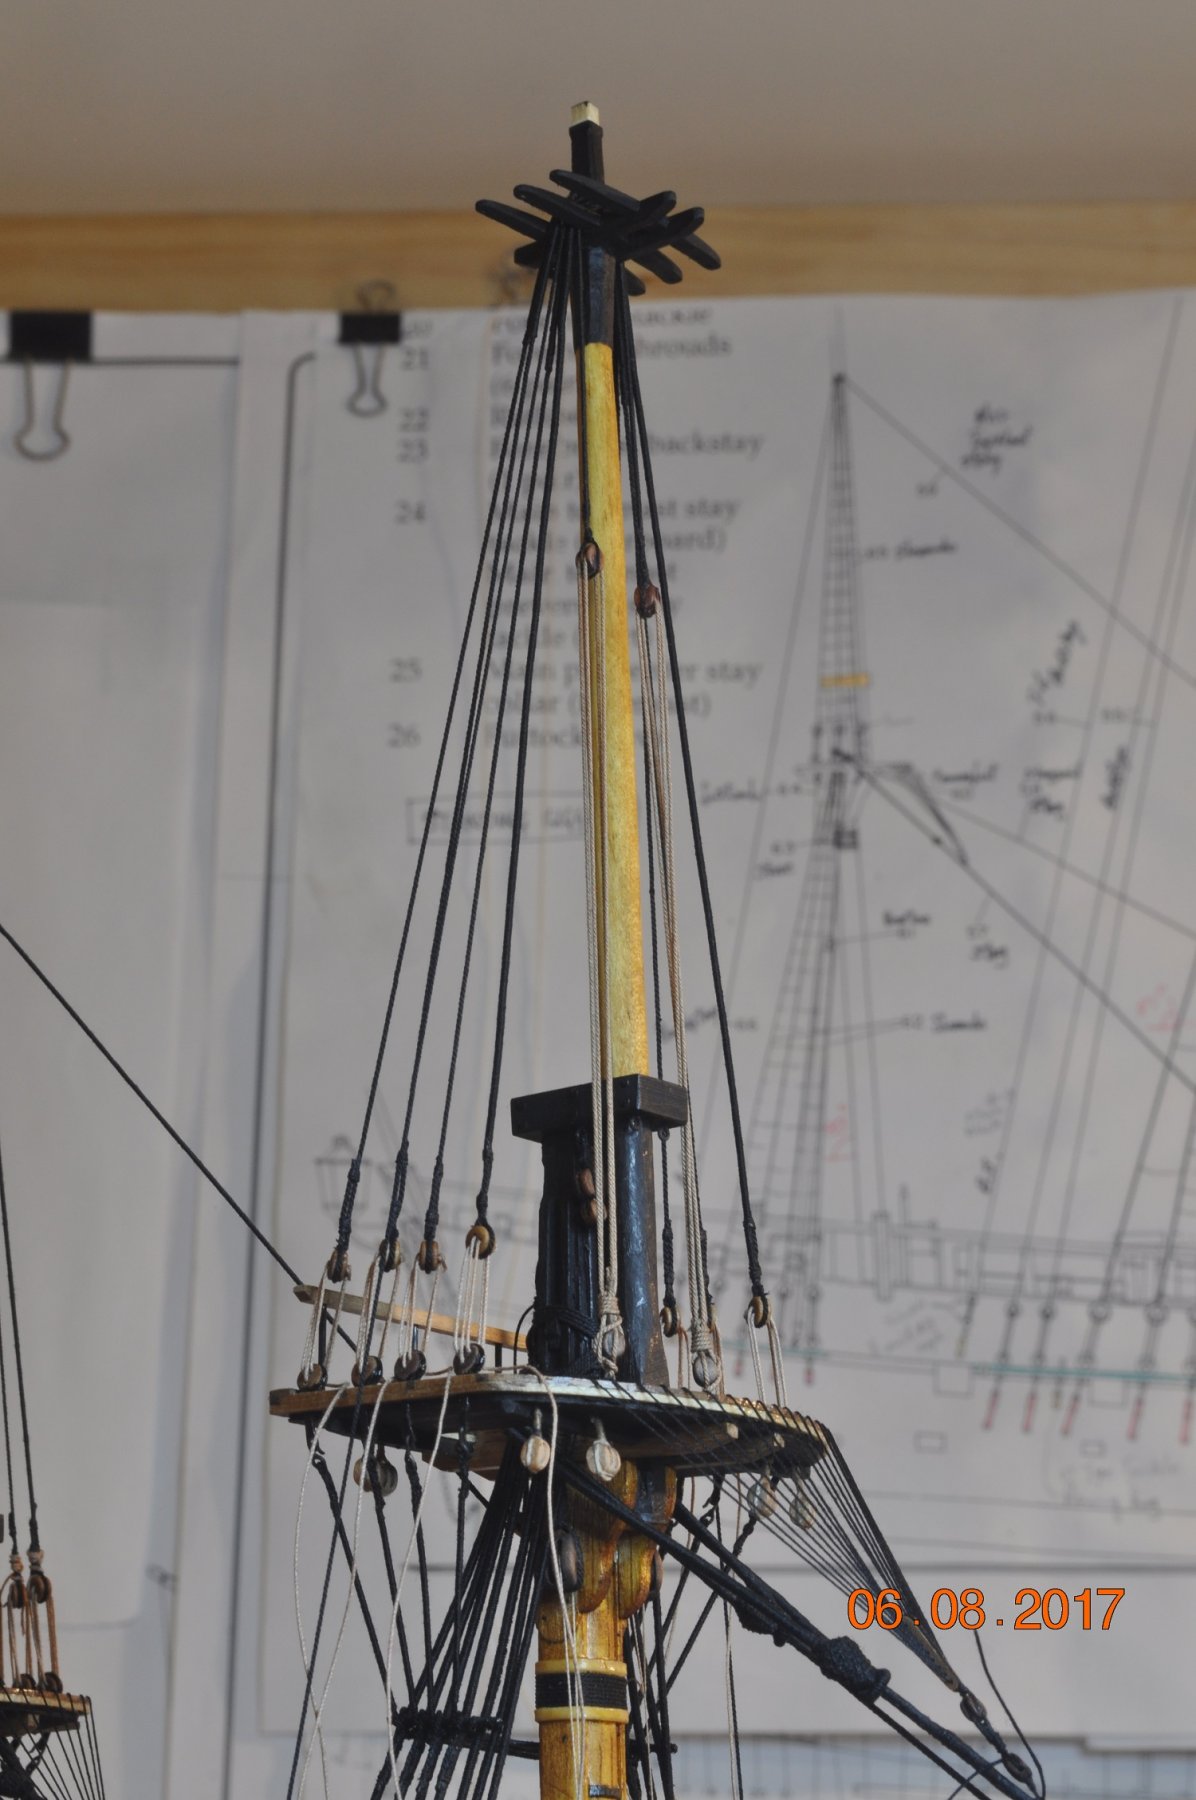
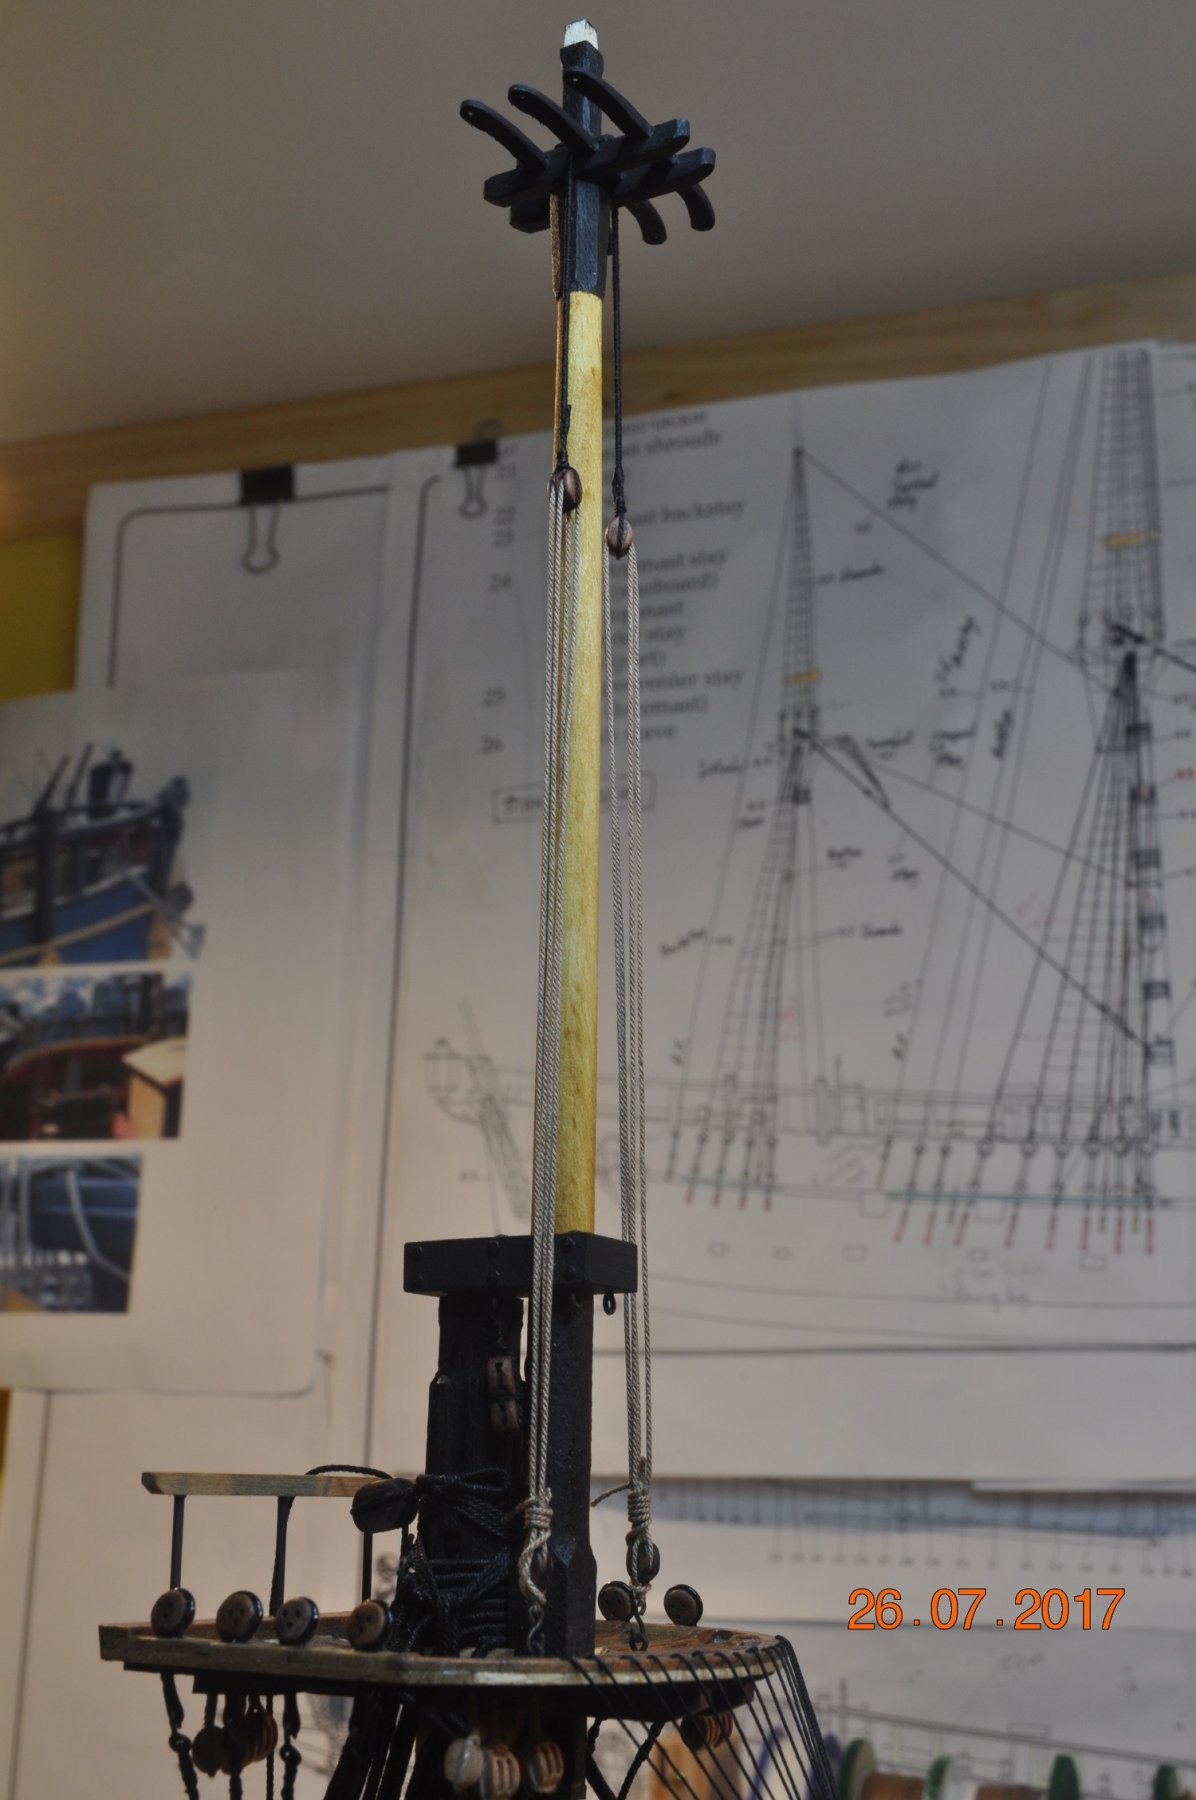
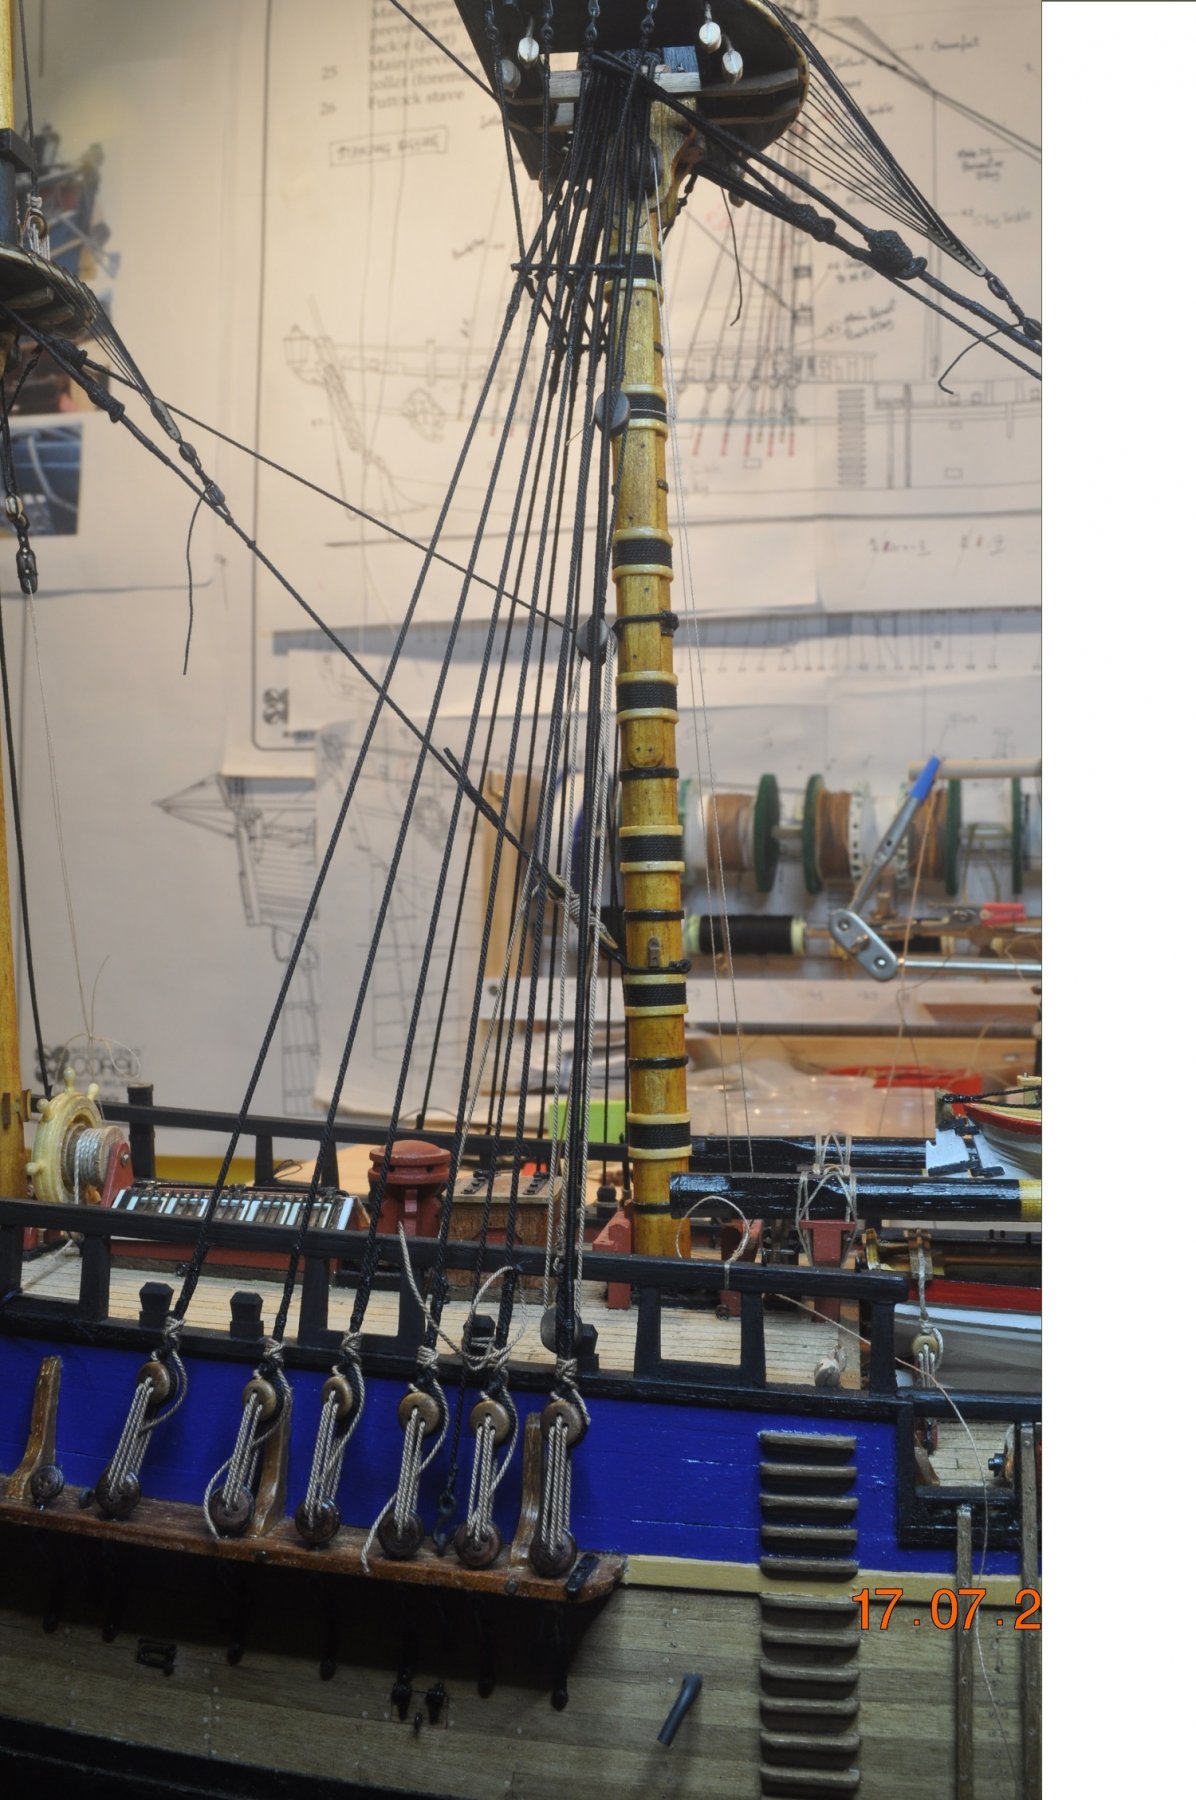
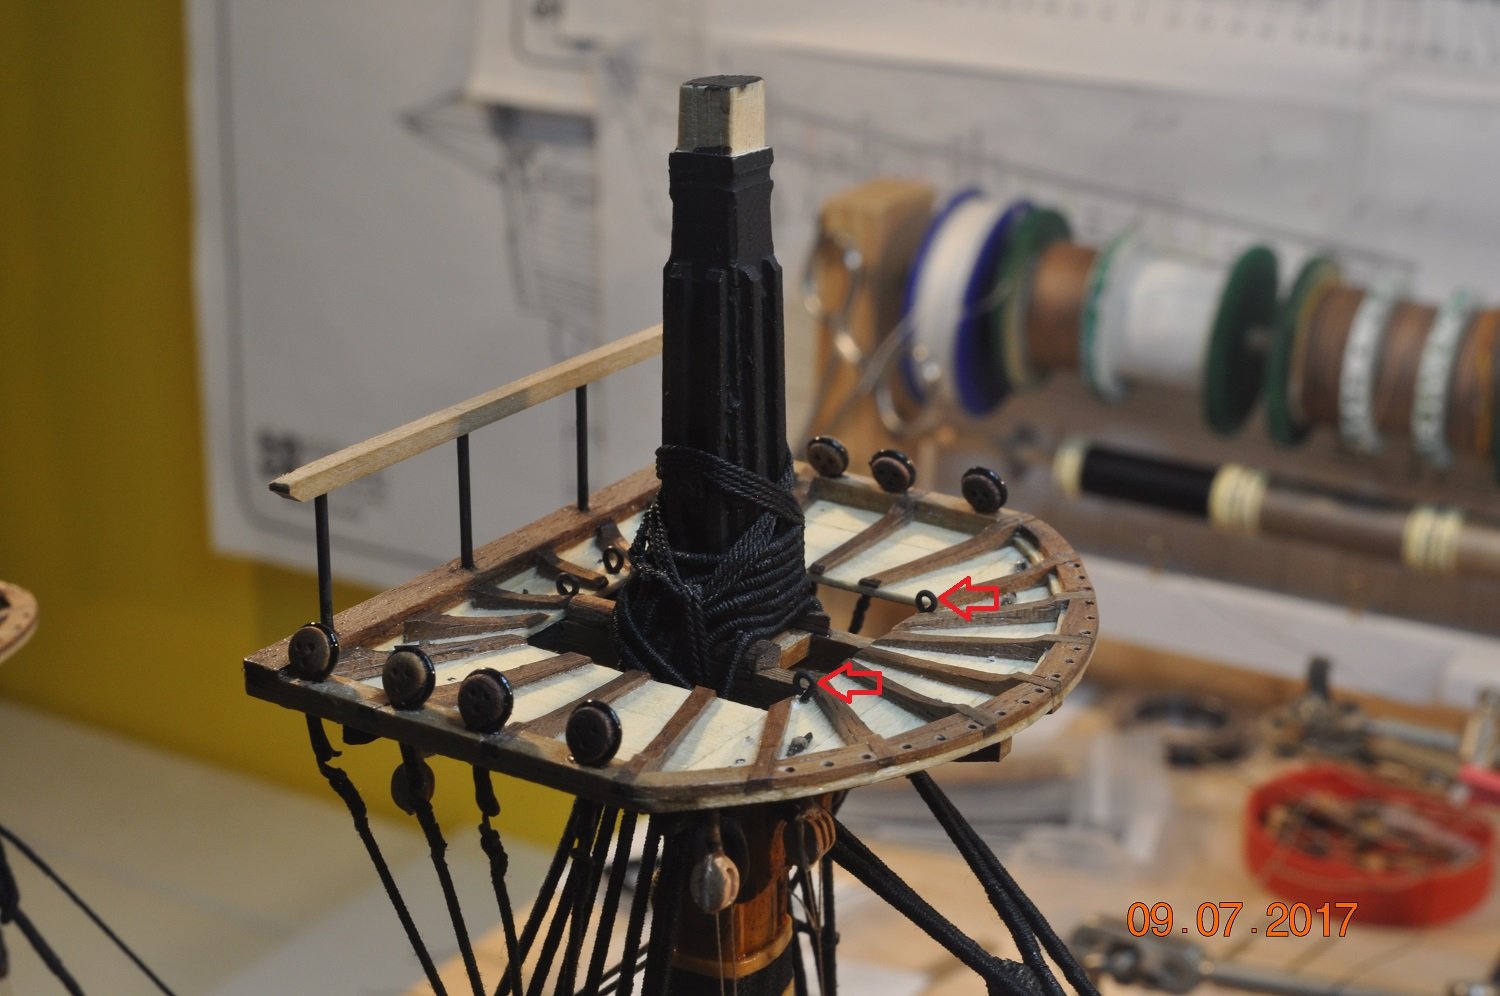
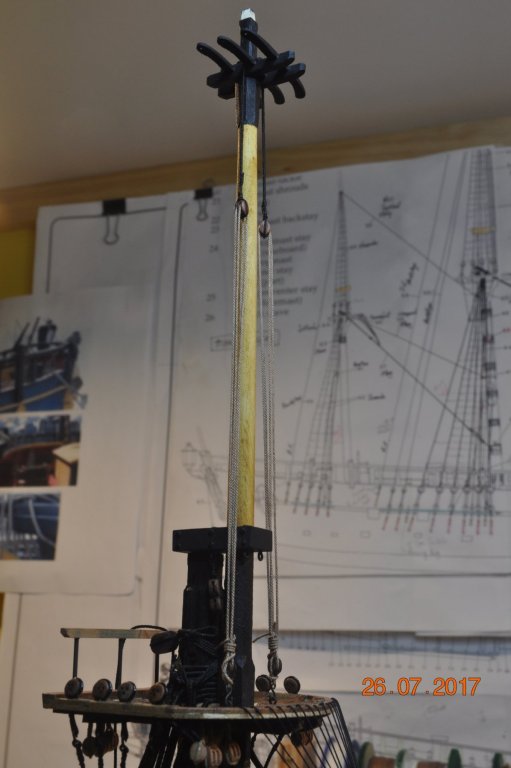
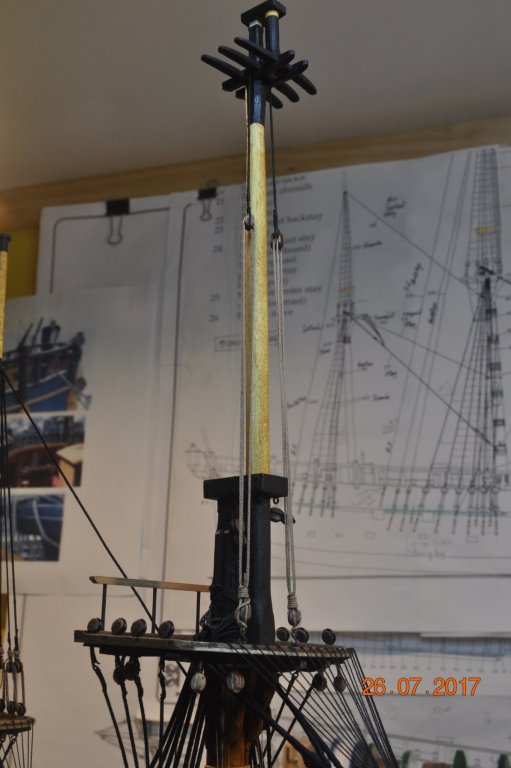
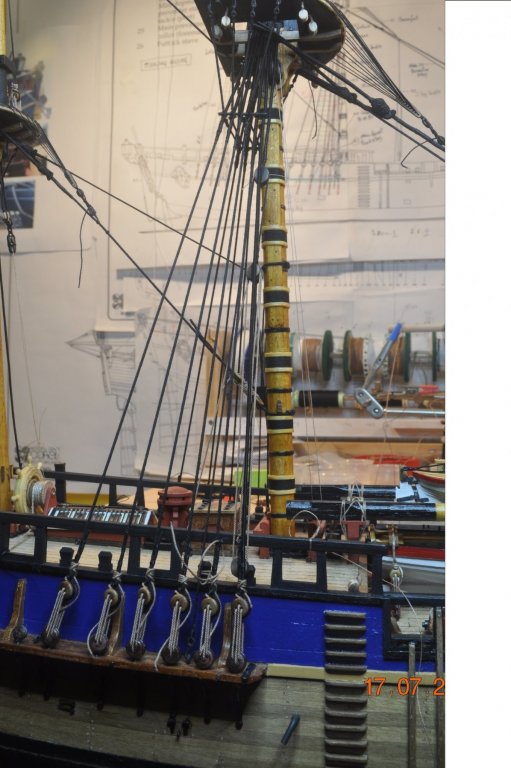
Shipyard Update Topmast Futtock Stave and Catharpins: As others who have reached the dizzy heights of rigging, I am sure realized things get tight and busy. When the lower mast Futtock Stave and Catharpins were added, thye caused me enough tired arm syndrome. They we each added individually, tied in place. For the Topmast sets, I devised the plan to "pre-build" them as much as possible, then hoist them up and tie into position. So the picture below shows the 2 sets, each with 3 catharpins to match the Gallant shrouds. Each is just on 16mm wide to fit between the shrouds. The lower section of the picture shows how I made each of the catharpins on 2 pins, seized each end and cut the ends. Each Stave is 7mm long, a tad bit too long so I found out when they were hoisted up. But they both at this length give some latitude to feed the Gallant shrouds between the Top Mast shrouds, around the Stave when that task takes place(soon I hope). What is not shown on the picture is, I added a good length of twine(looped) at each end of the brass Staves. So when each was hoisted, I had something to immediately tie to the relevant shroud. Fore Topmast Futtock Stave: The Stave being a bit too long pushed the rear shroud out, not going to change it now. Main Topmast Futtock Stave: What to do next ??


-
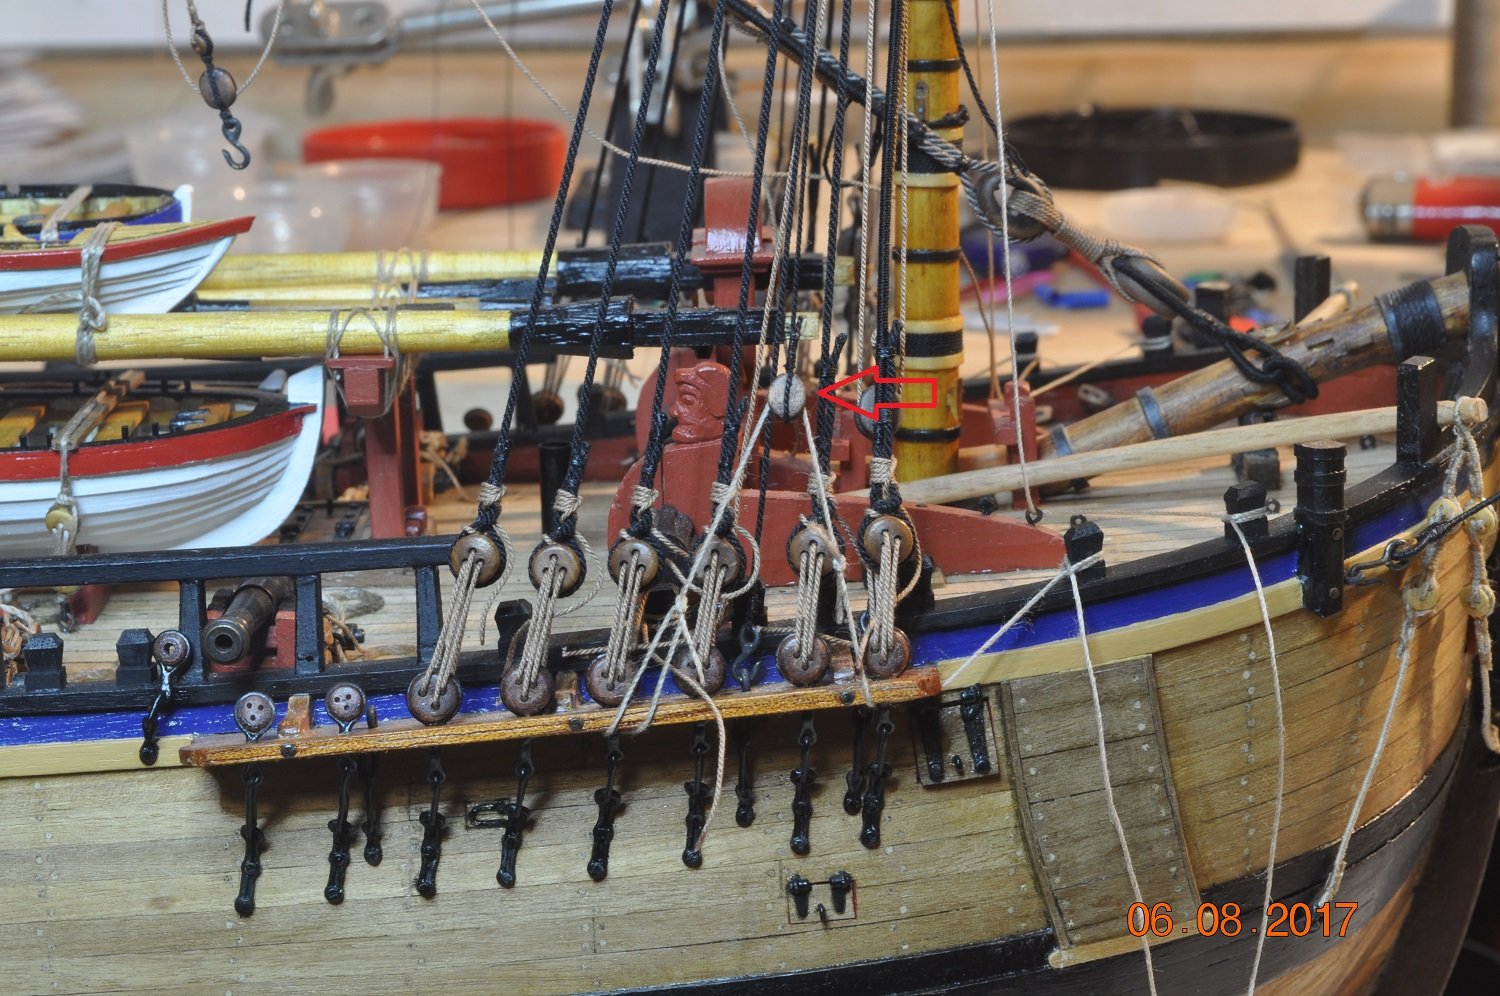
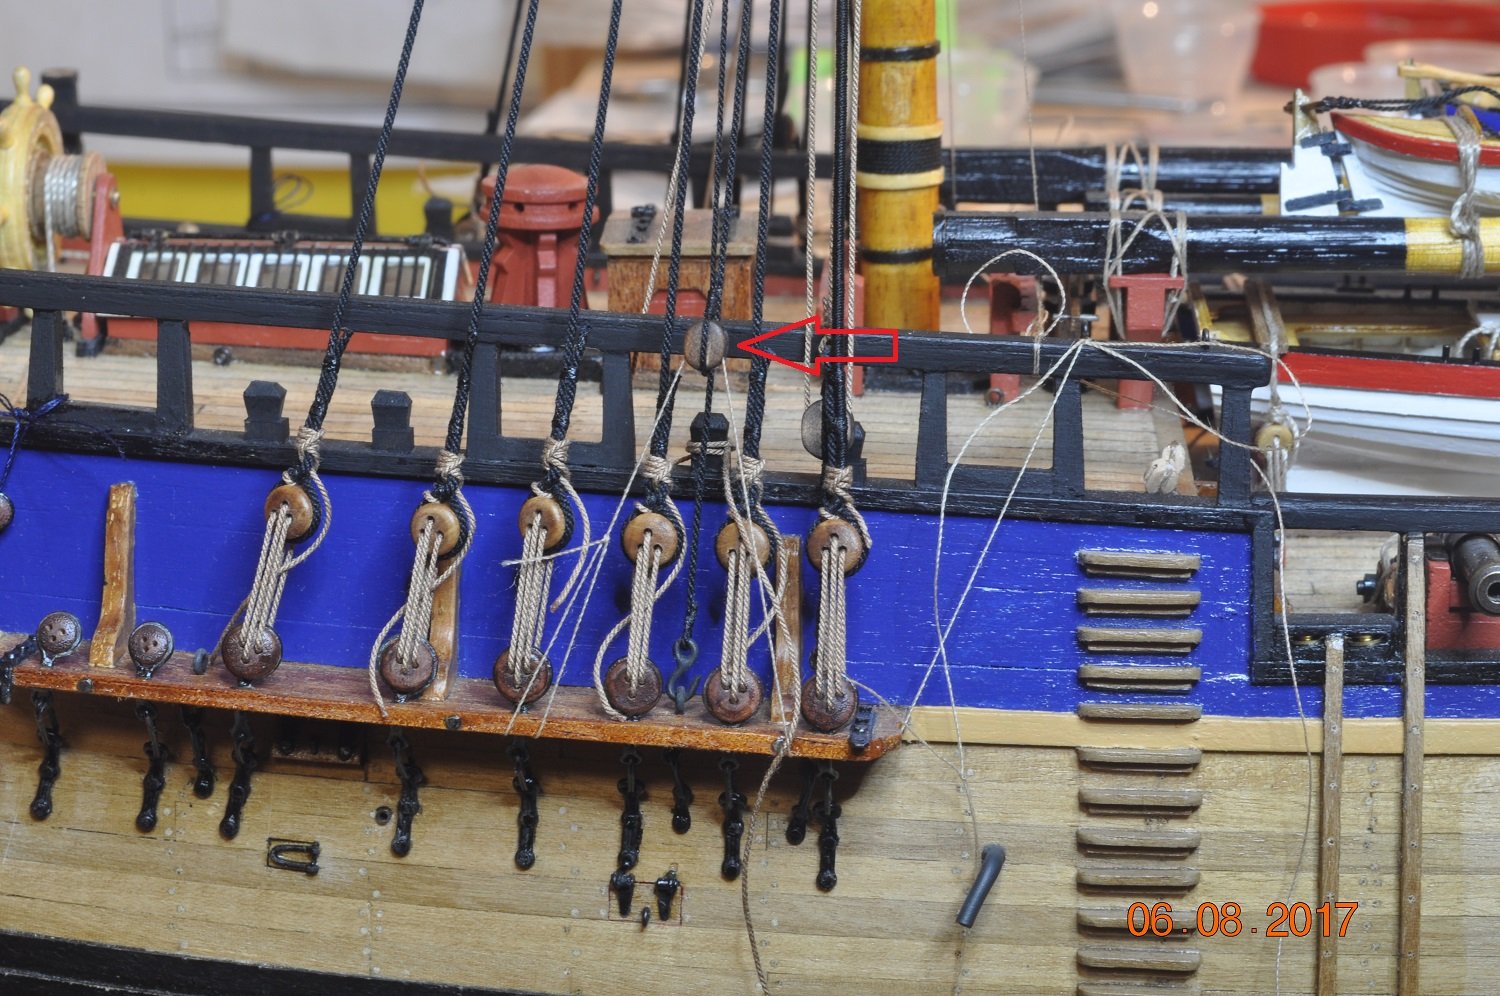
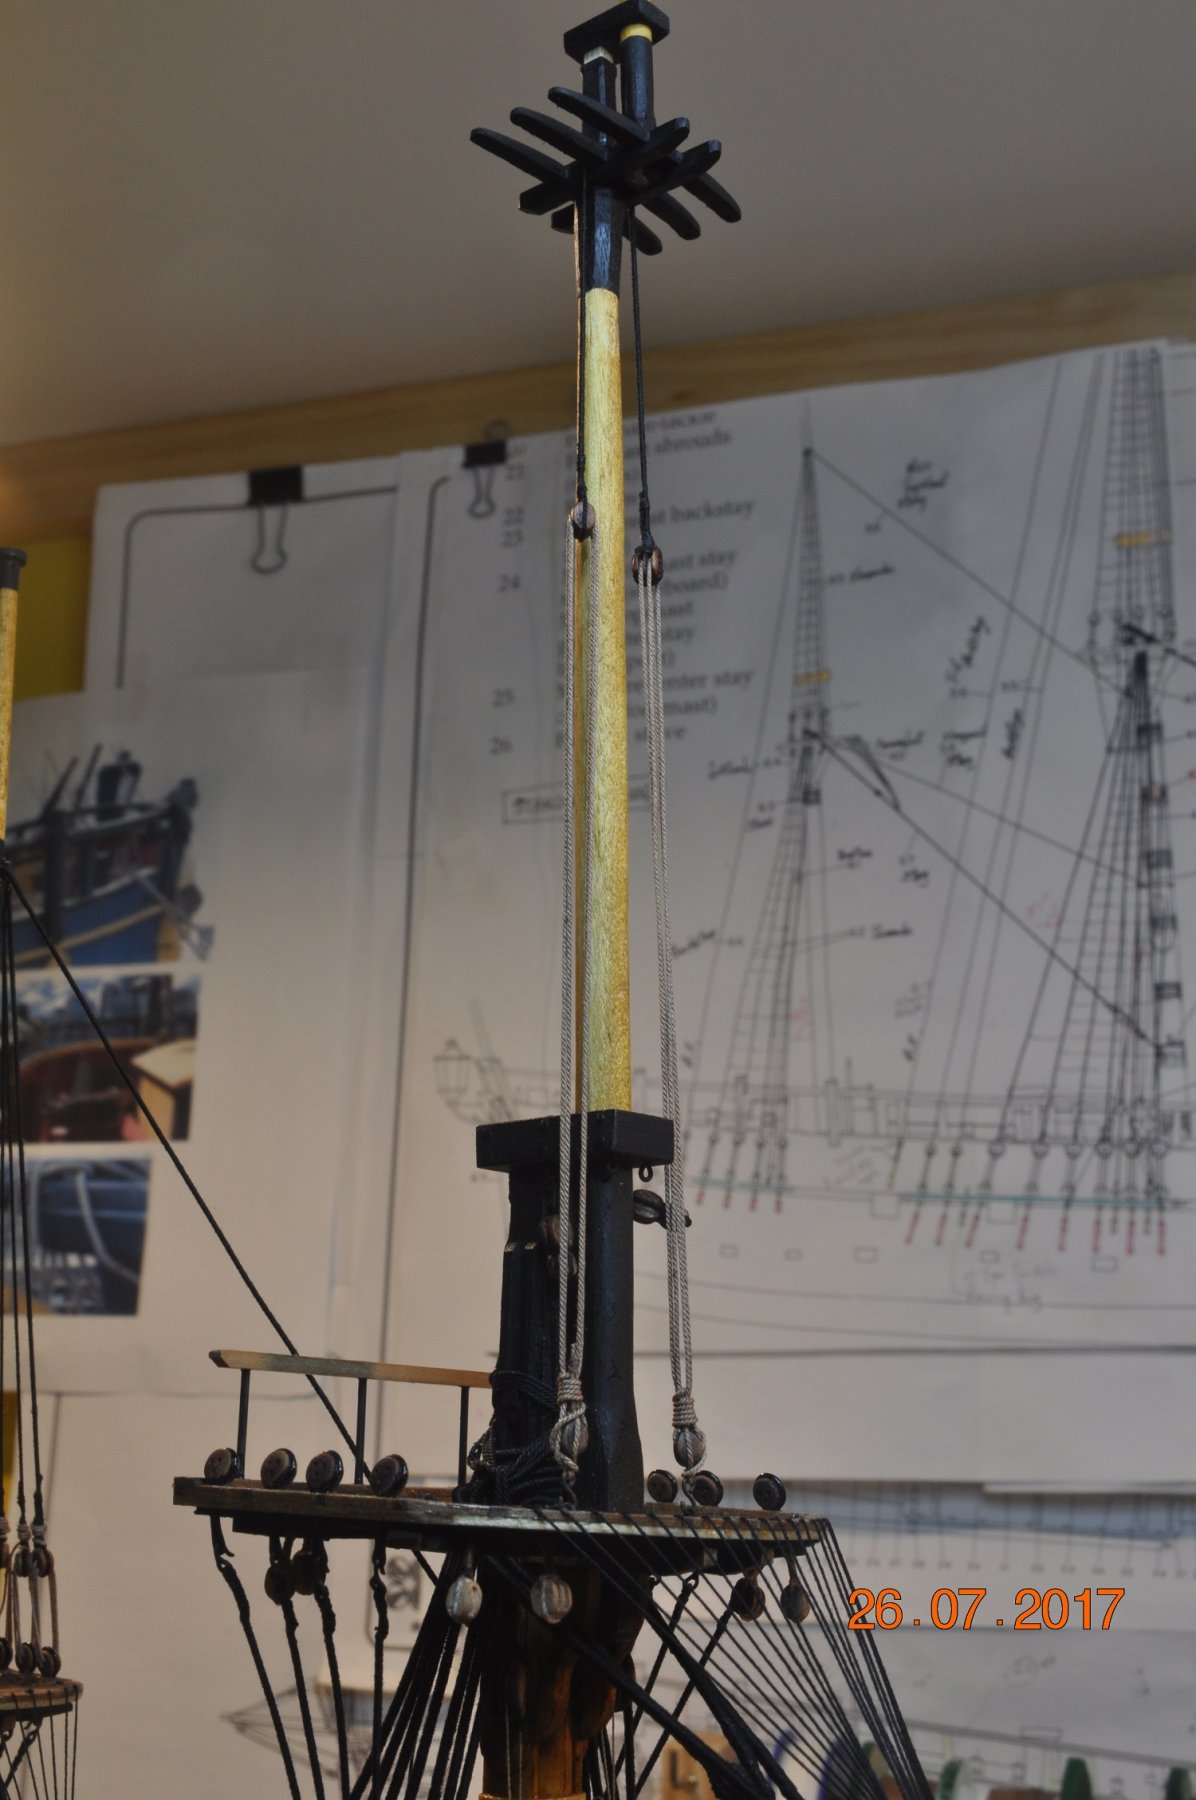
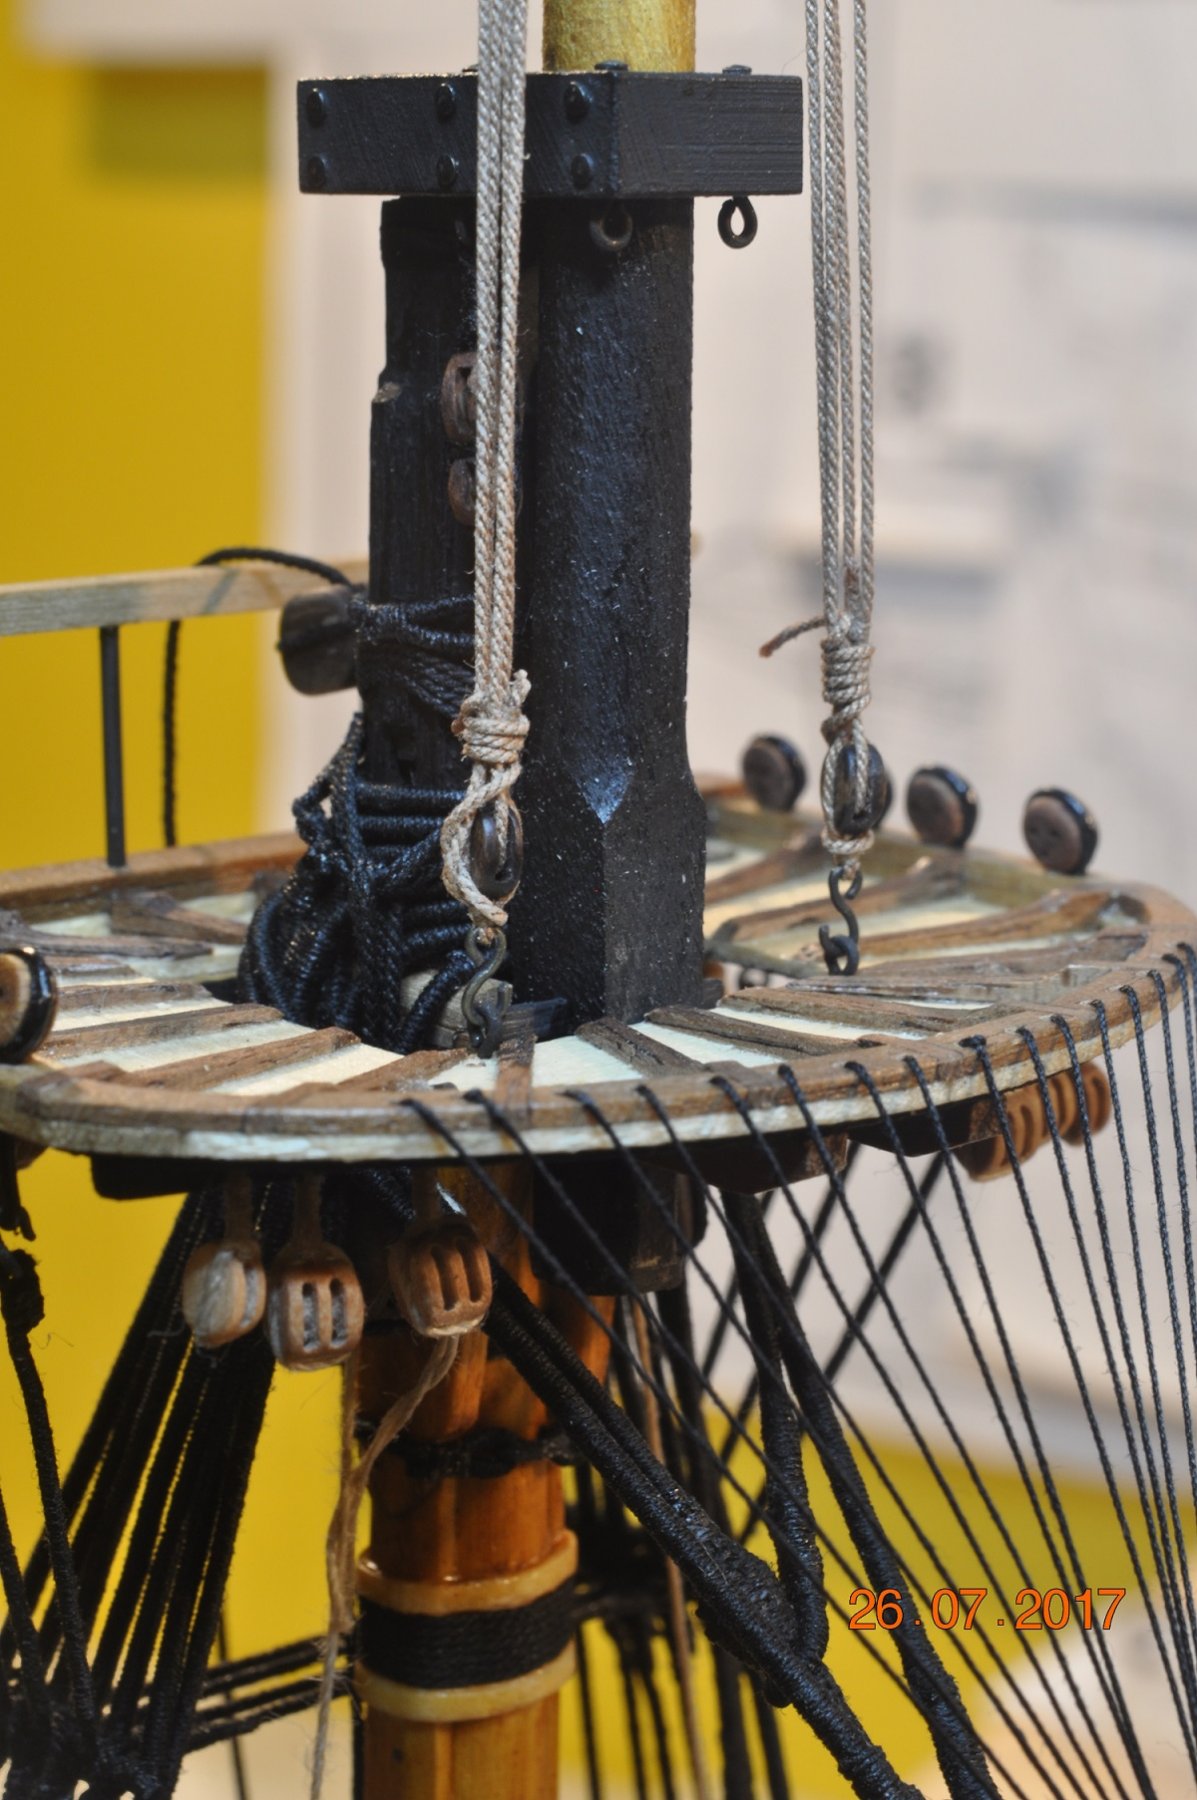
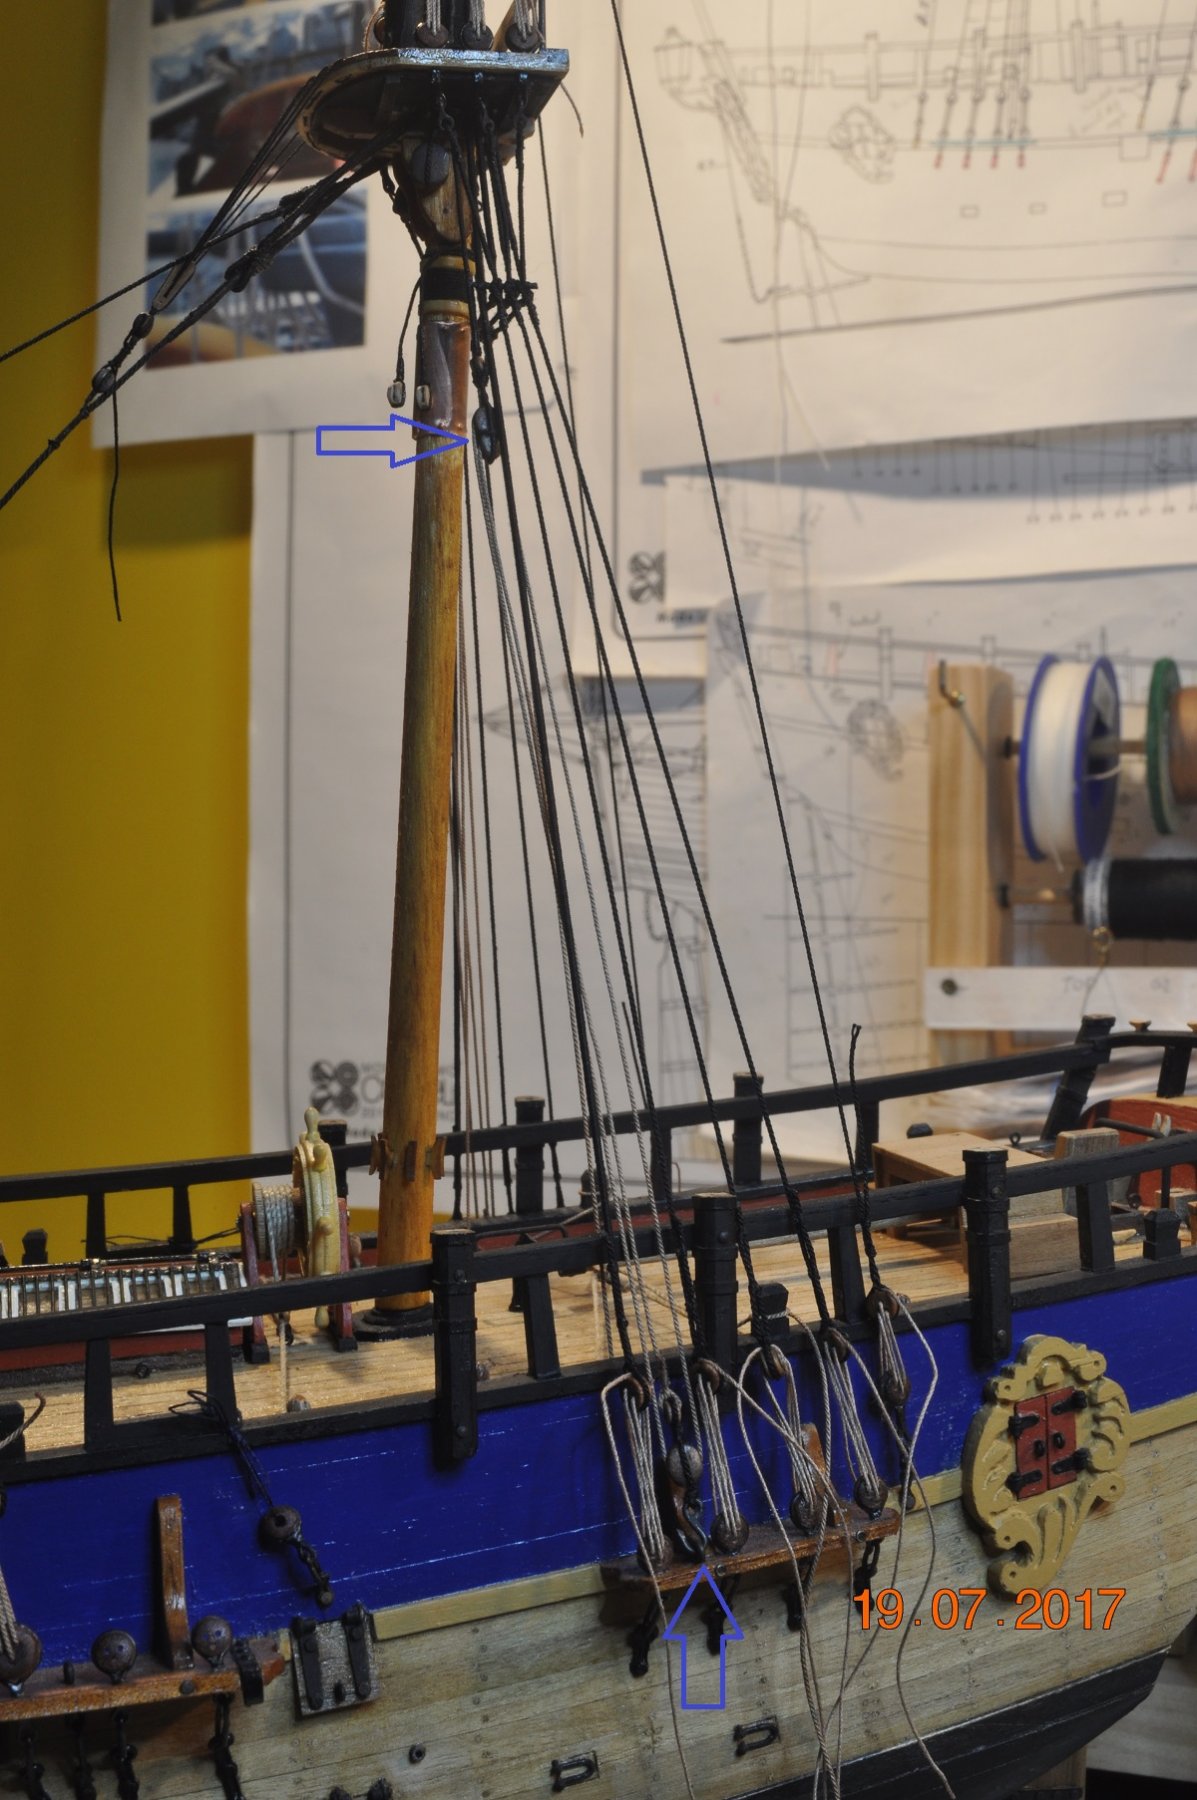
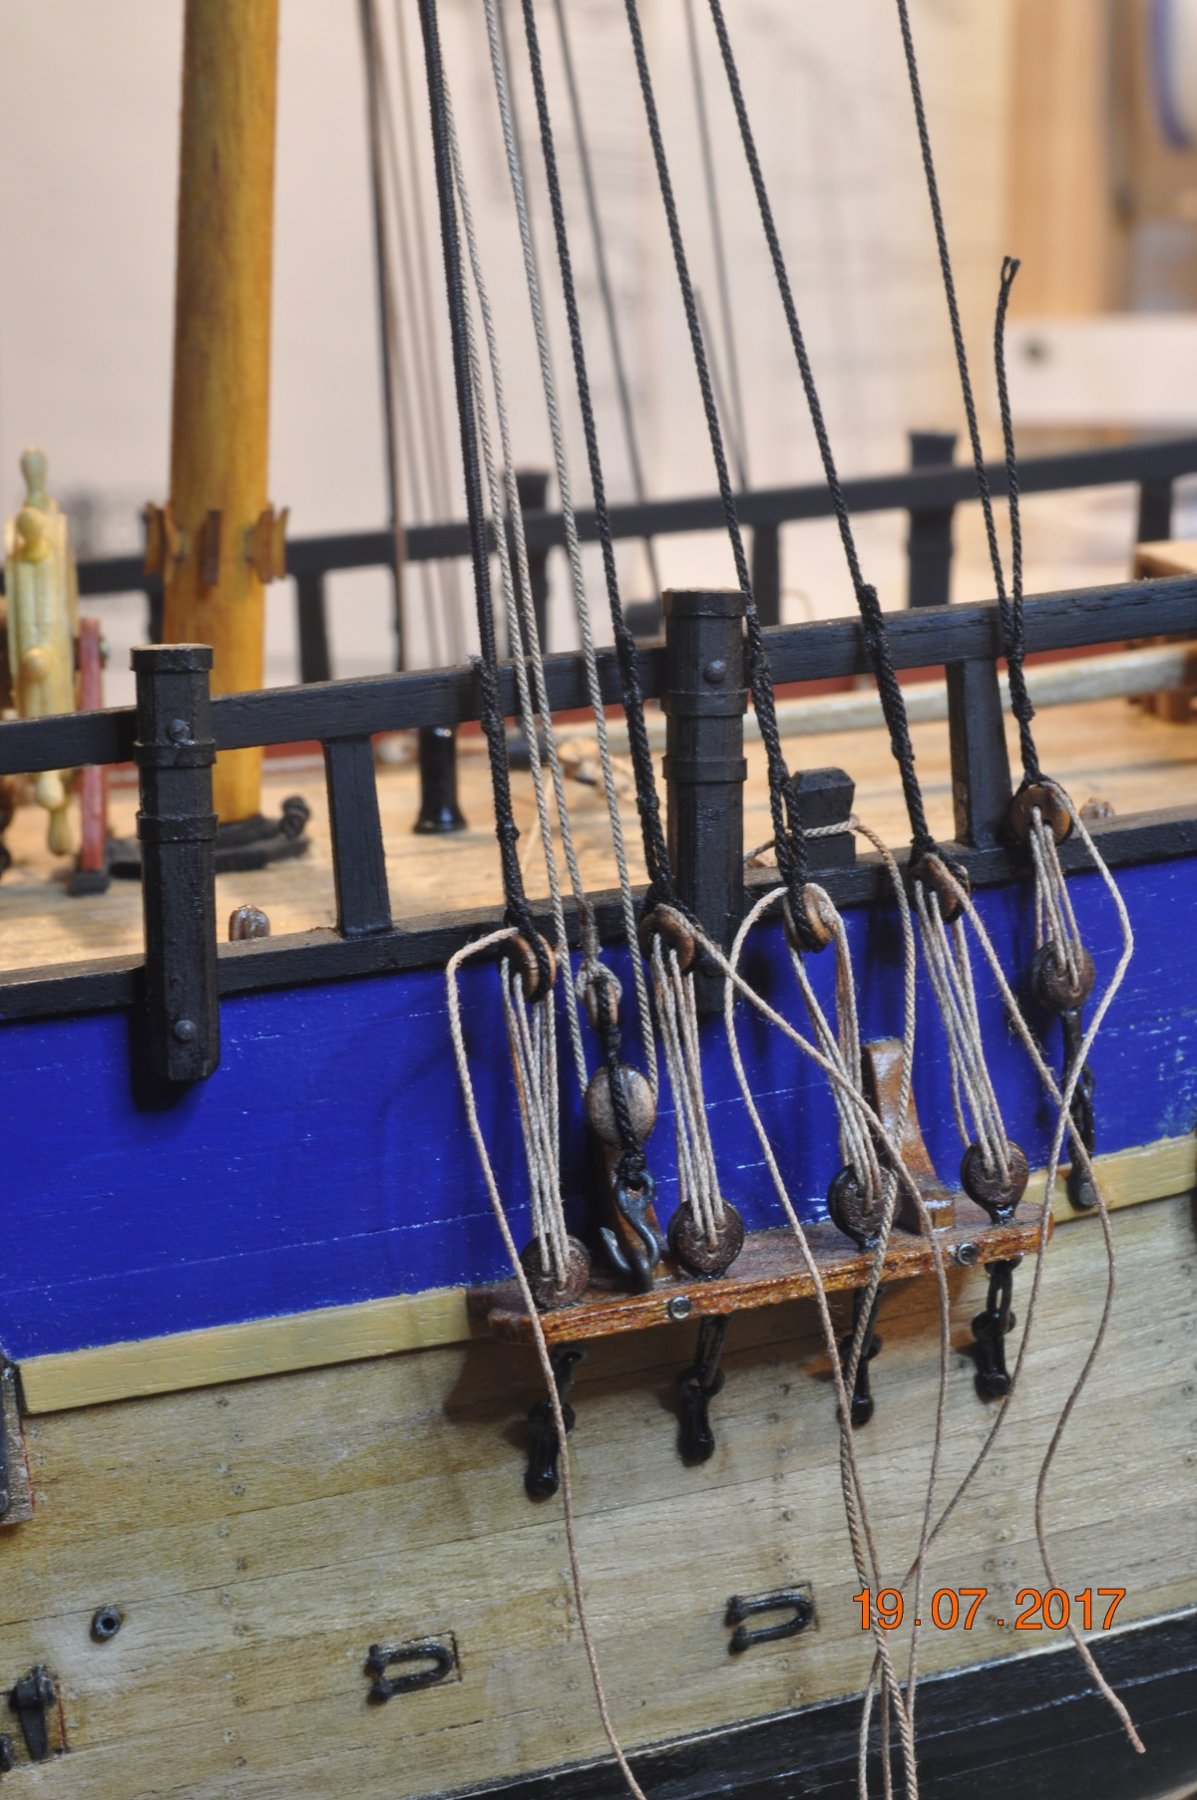
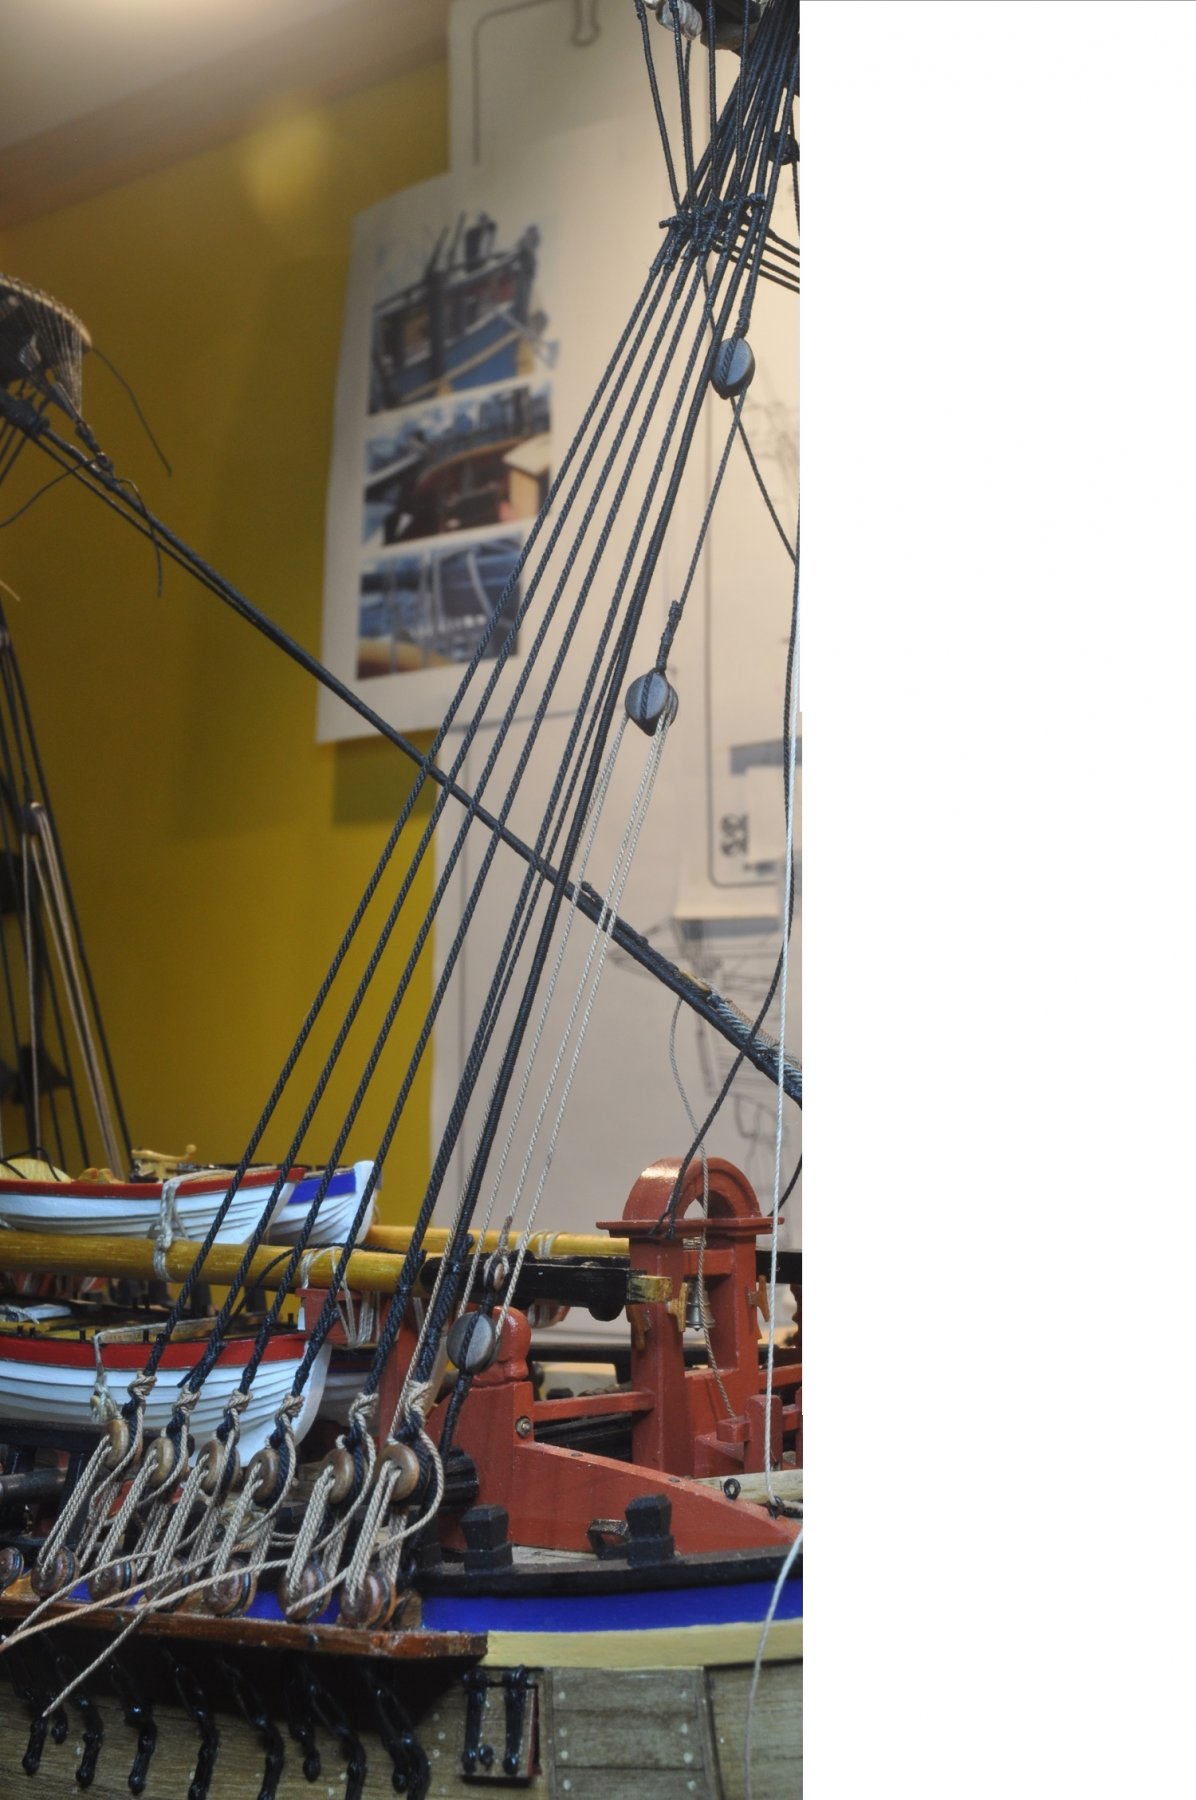
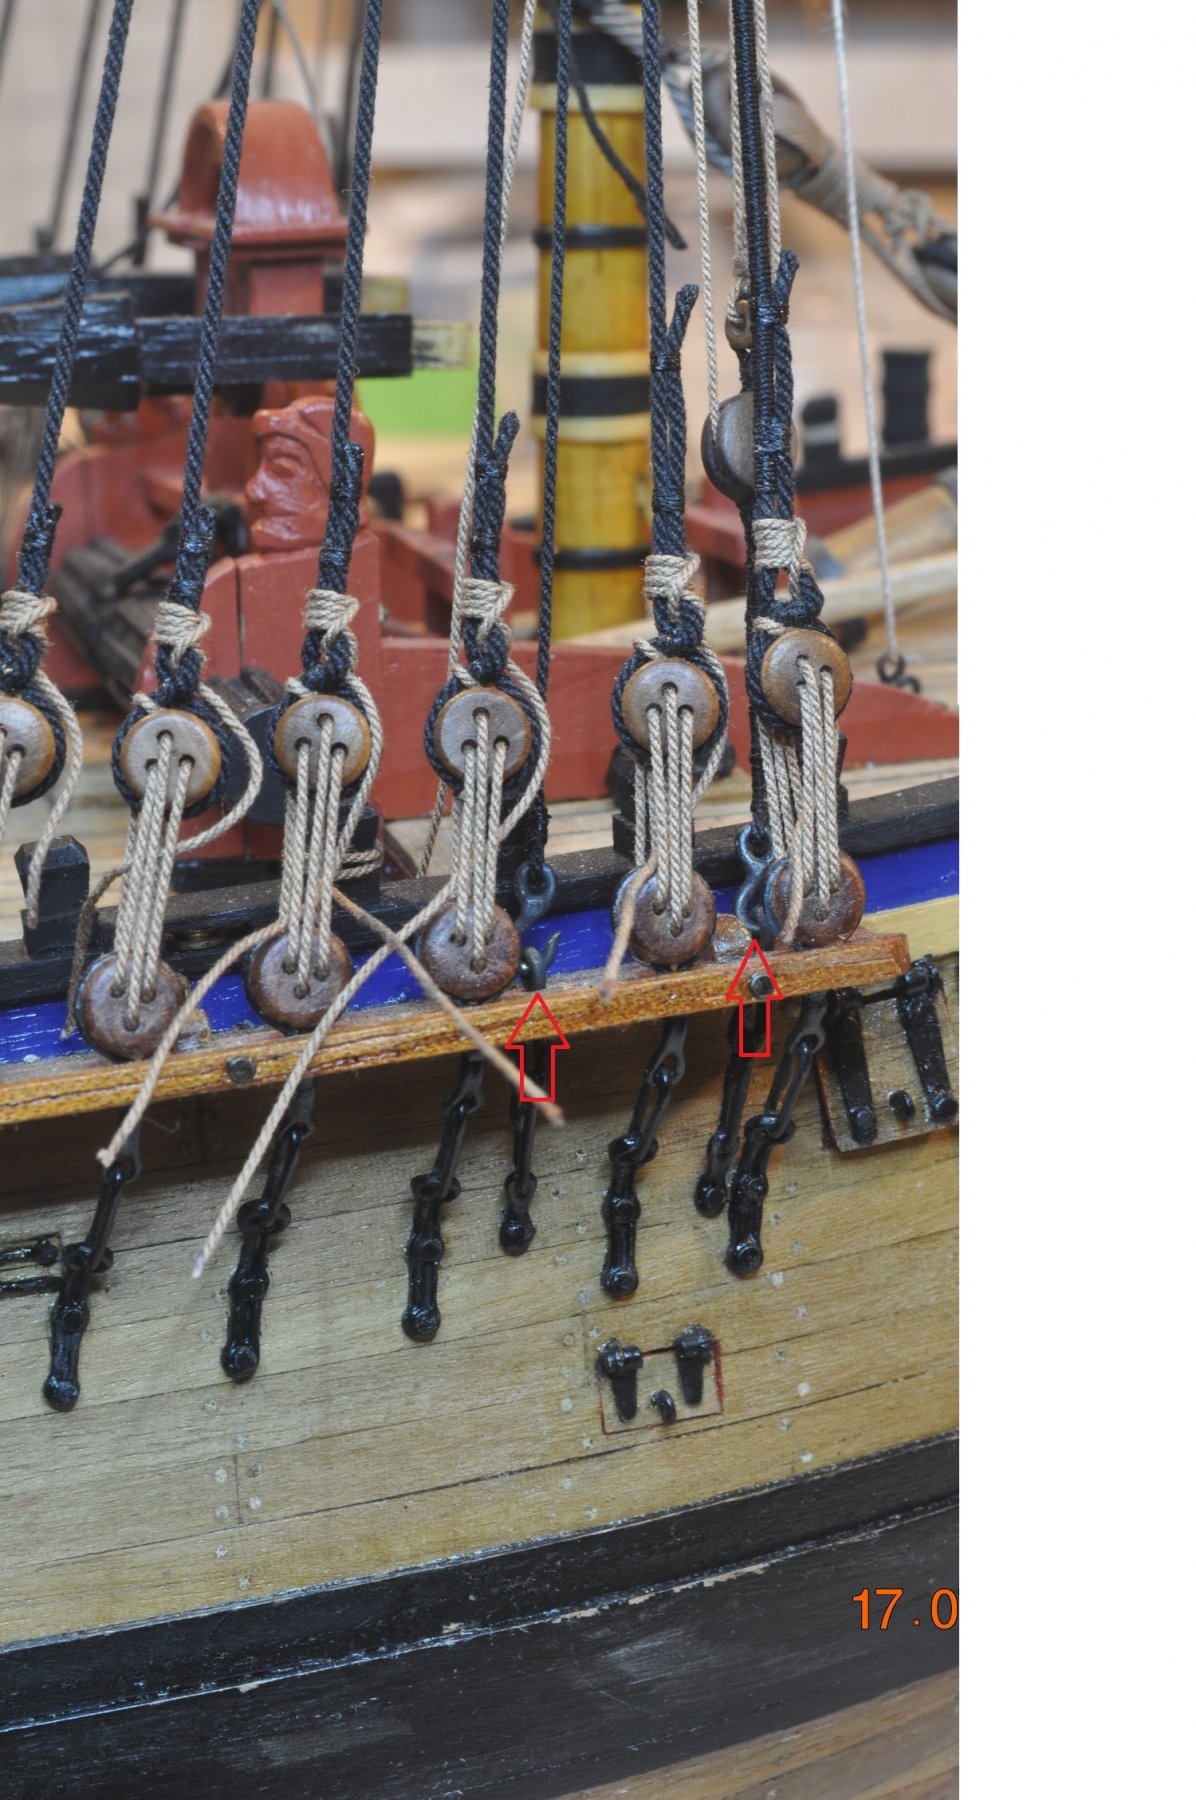
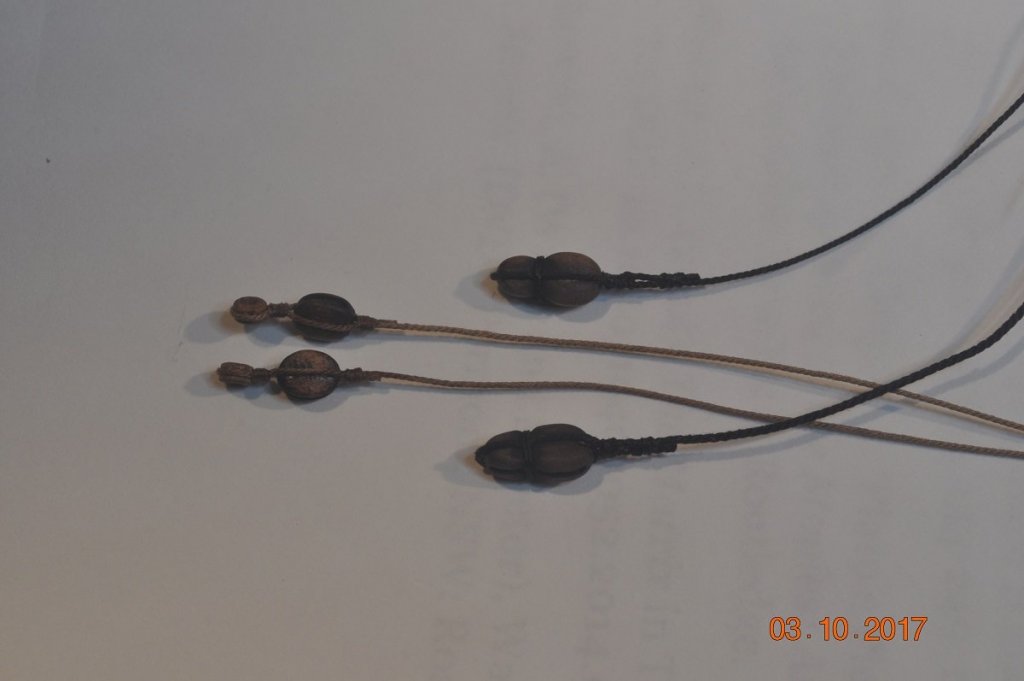
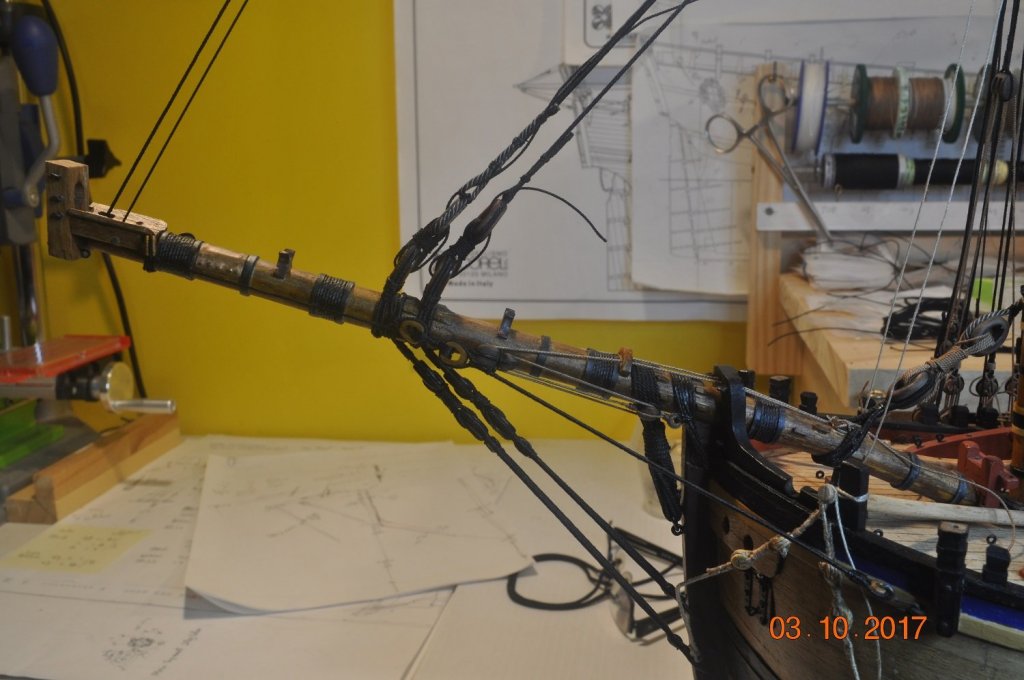
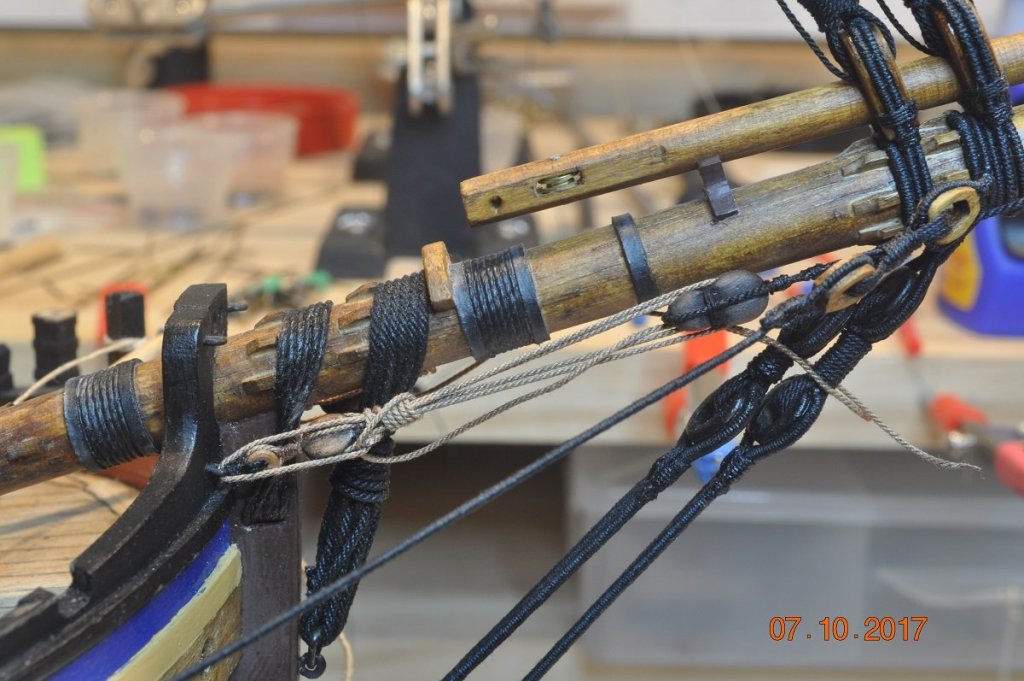
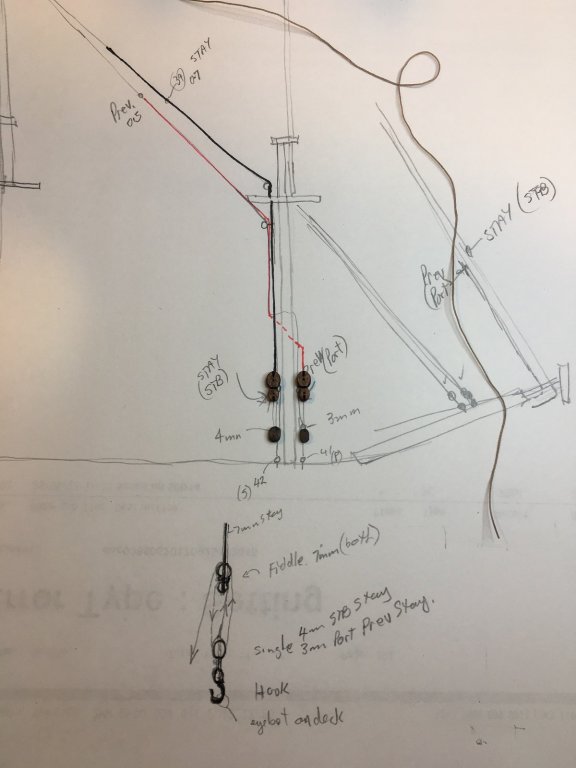
Shipyard Update Fore Topmast Stays: Tackles The tackle for the Fore Topmast Stays have been added to the Bowsprit. For the 2 tackle sets I used 7mm Fiddle blocks, 5mm single blocks with a 4.5mm rope. I lowered the Stays from the cross trees to do the rope work about each block. The Fore Stay on the Starboard Side of the Bowsprit: Close up of the Tackle fixed to the inner gammoning and tread'd back to the rear cleats on the Bowsprit. Similar for the Preventor Stay on the Port side of the Bowsprit. Update to the attachment of the Tackle. I changed the Tackle end onto the eye-bolt for both sides. The replica and "Petersen's" has it this way and seems the way to go. Once the Fore Stays are tension'd, no need for further adjustment, leave the cleat for the running lines. Next task: Skimmy up the Fore & Main Top Masts and add the Futtock Staves & Catharpins >> be ready for the shrouds to the Top Gallants.


-
HMCSS Victoria 1855 by BANYAN - 1:72
DaveRow replied to BANYAN's topic in - Build logs for subjects built 1851 - 1900
Hi Pat, I also love the way the rudder has shaped up. You have done a great bit of workmanship on it. I'll keep looking in from time to time, whilst I finish off my little project.- 993 replies
-
- 3
-

-
- gun dispatch vessel
- victoria
- (and 2 more)
-
Thanks for looking in Nils, Nigel & Pat. As for detail, just trying to make it look authentic as I can. Which is a challenge at times with the scale at 1:60 !! The mast collar were one of the few "metal" items I used from the original kit.
-
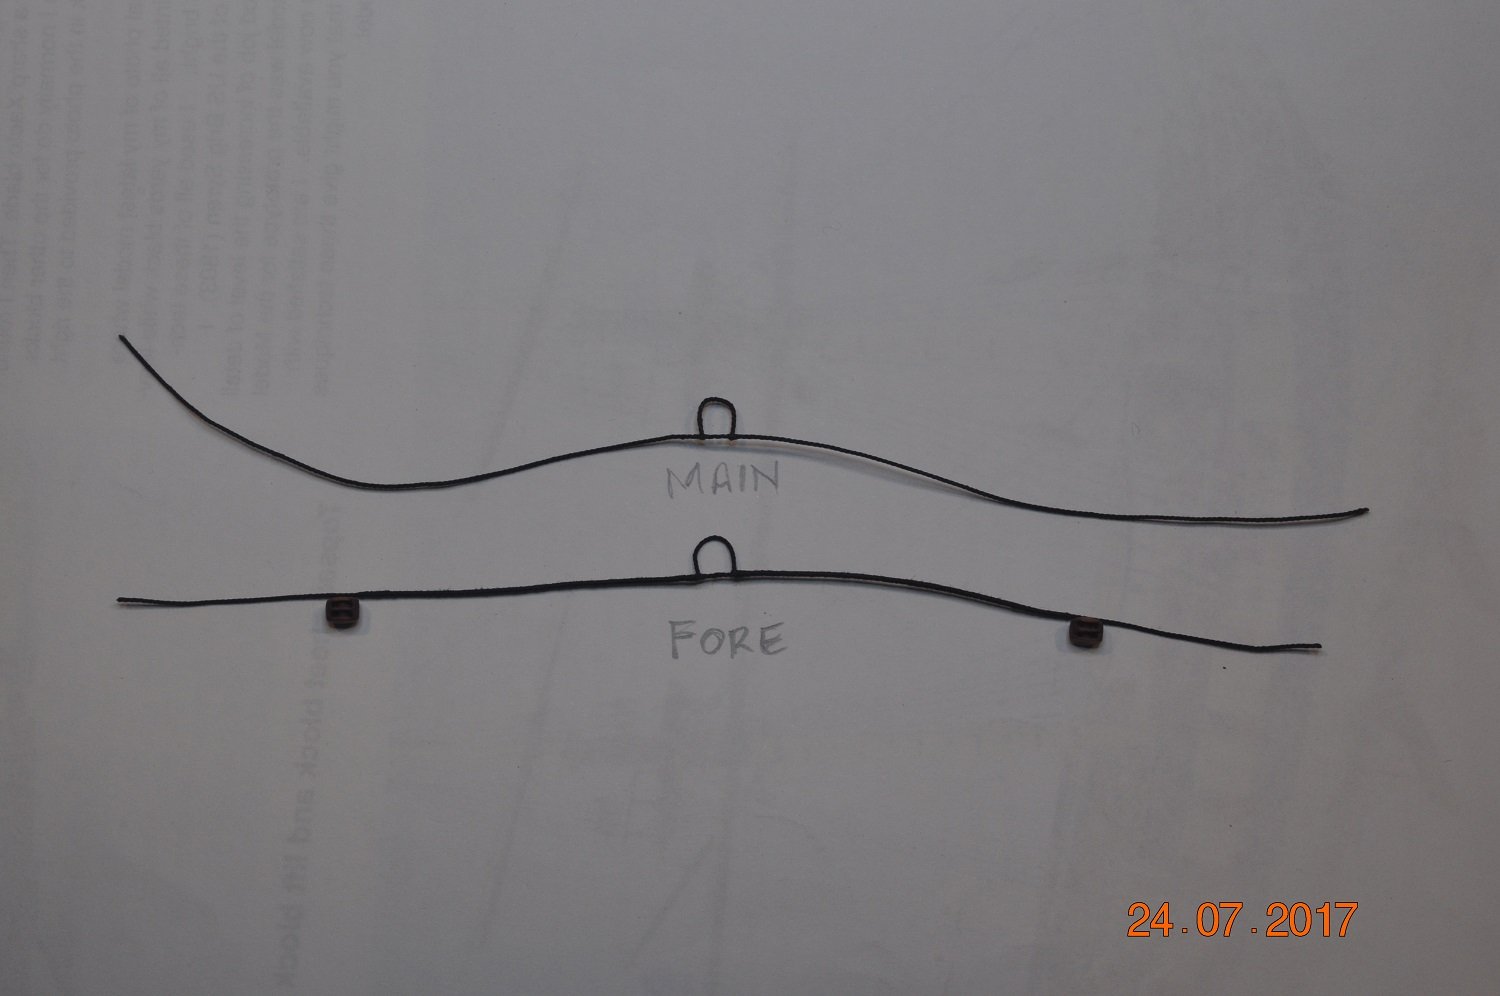
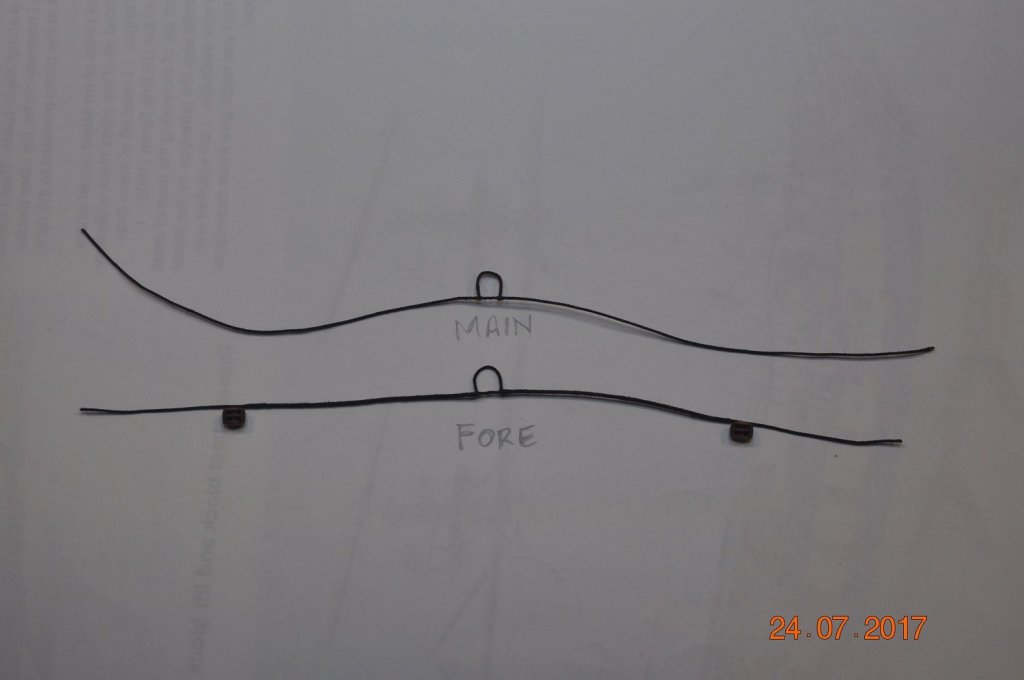
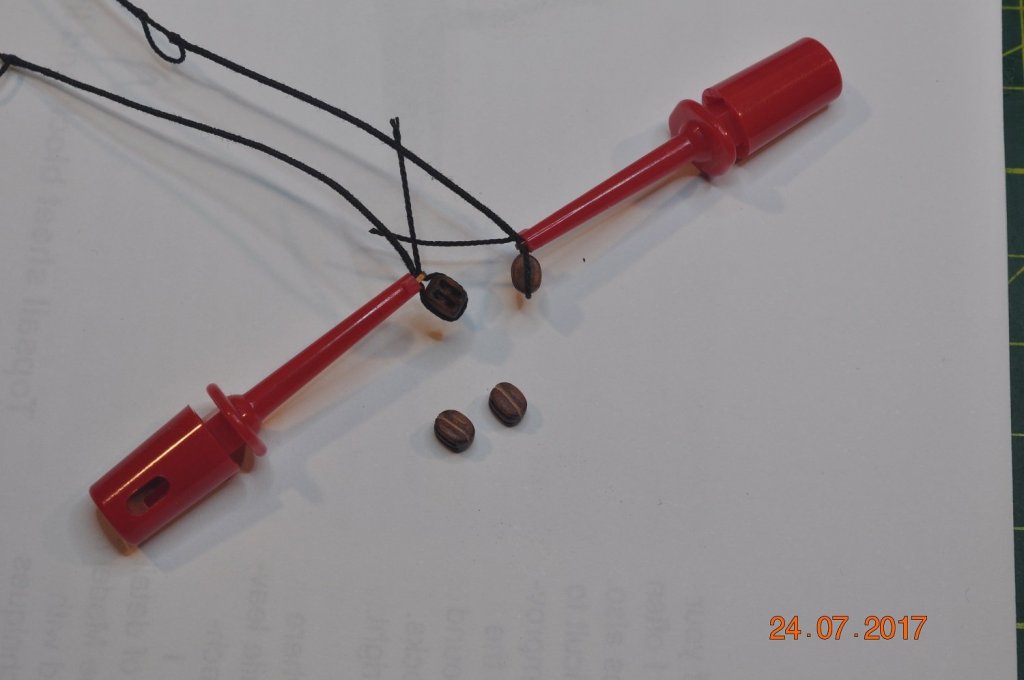
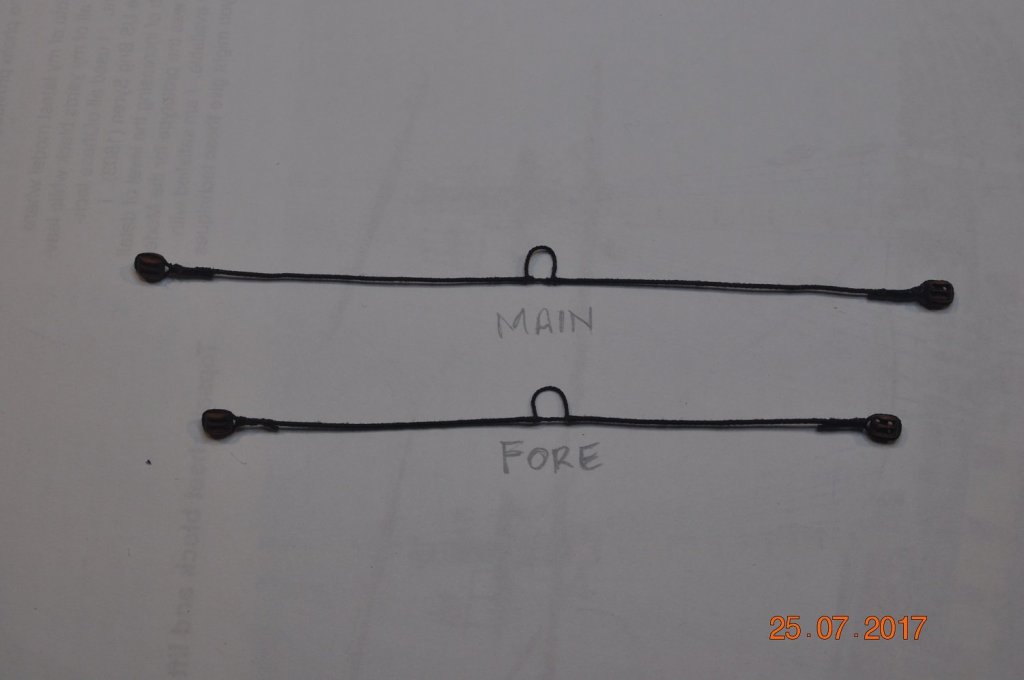
Shipyard Update MainMast Fore Stays: So just before I left for holidays, I'd made the Fore and Main TopMast Fore Stays(mouse + loops). Today I ran the Main TopMast Fore Stays onto the Fore Mast blocks and with tackle fixed to the base of the Fore Mast. Little sketch below I used to map out the runs and blocks, rope to use. The run of the Fore Stays through the Foremast Blocks: The Main Top Mast Fore Stay Tackle runs to the Starboard side of the Fore Mast: The Main Top Mast Preventor Fore Stay Tackle runs to the Port side of the Fore Mast: It took me a little while to work out where I was on the rigging. Being away form the model desk for nearly 2 months, I needed to refresh the brain as to where the build was at. Next I'll probably tackle the Fore TopMast Fore Stays.


-
Hi All, Hope everyone has been well and made progress on their projects. Well I made it back from Italy, great adventure and enjoyed it immensely. Hope to get back to the Endeavour rigging shortly. Just a bit of house keeping to do after being away. Dave R
-
Thanks to all who have looked in recently. Hope you have enjoyed my posts. The shipyard is now mothballed and on holidays. Will be back from Italy in 5 weeks time to resume construction.
-
OMG Greg, So much detail, but what a beauty. How are your eyes ?, I'd go blind working on all those small parts.
-
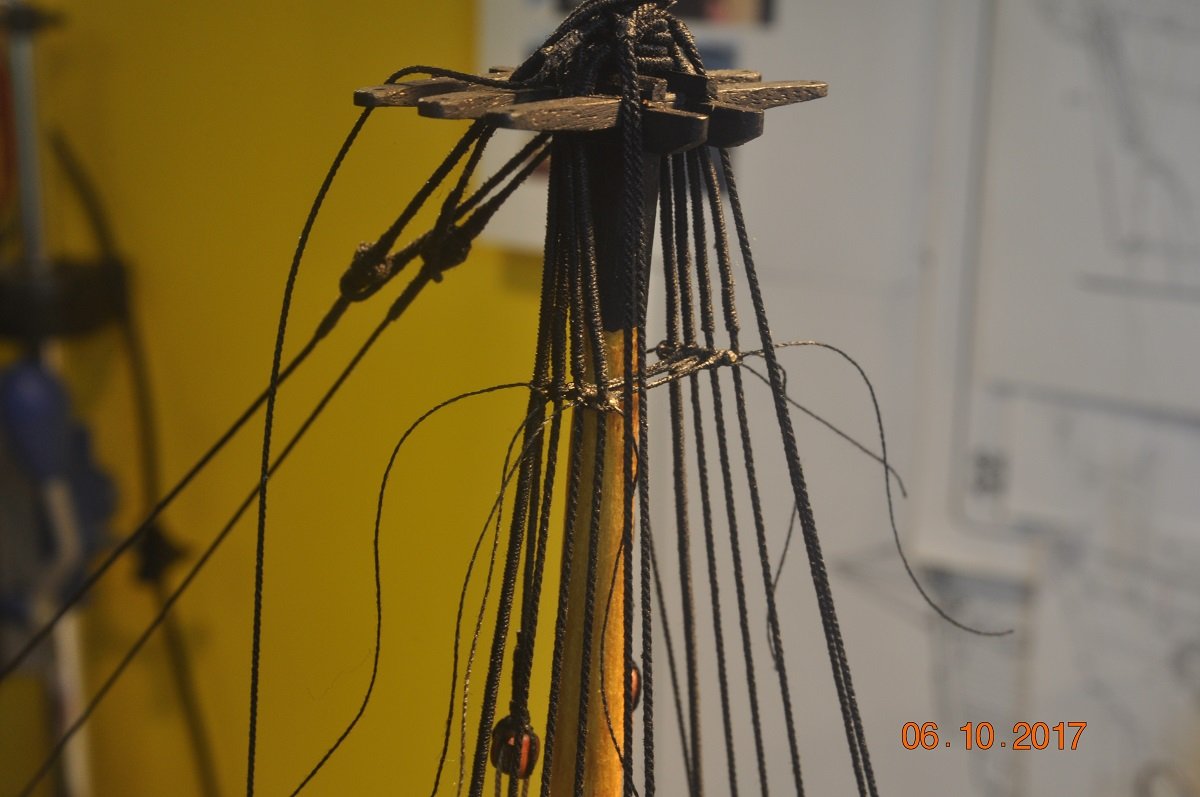
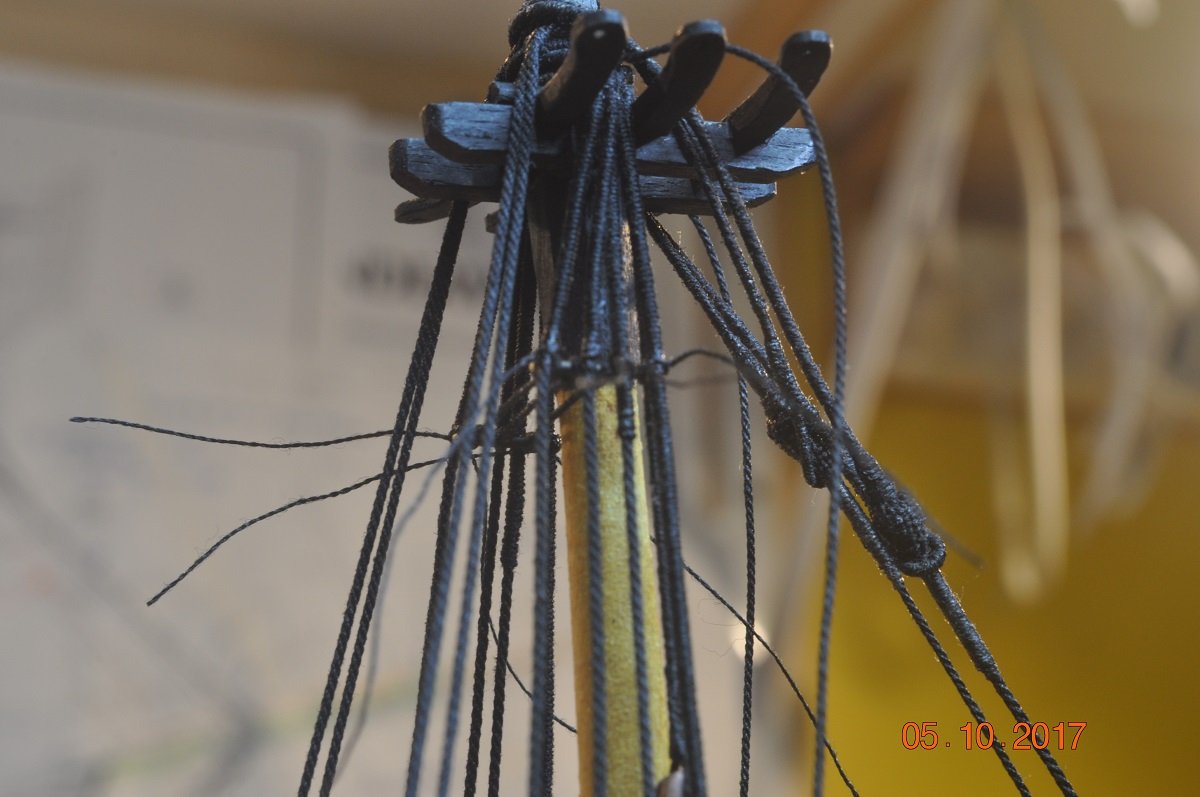
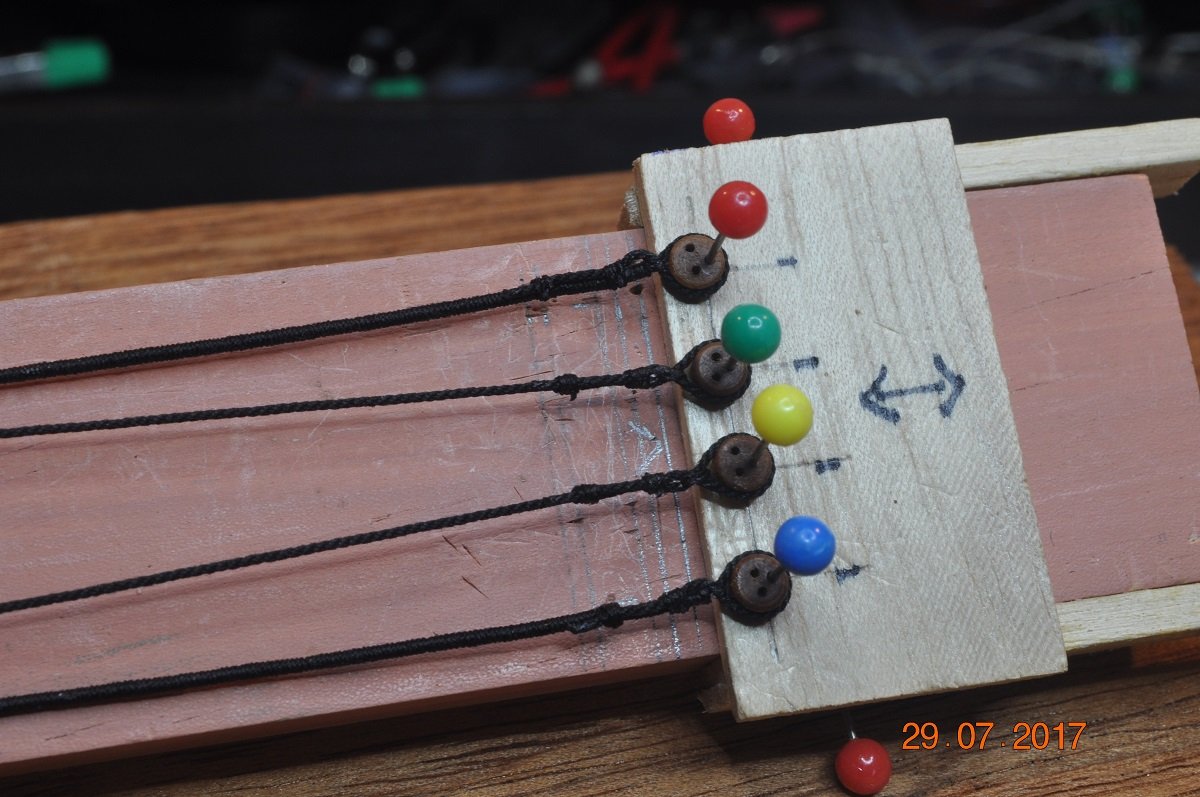
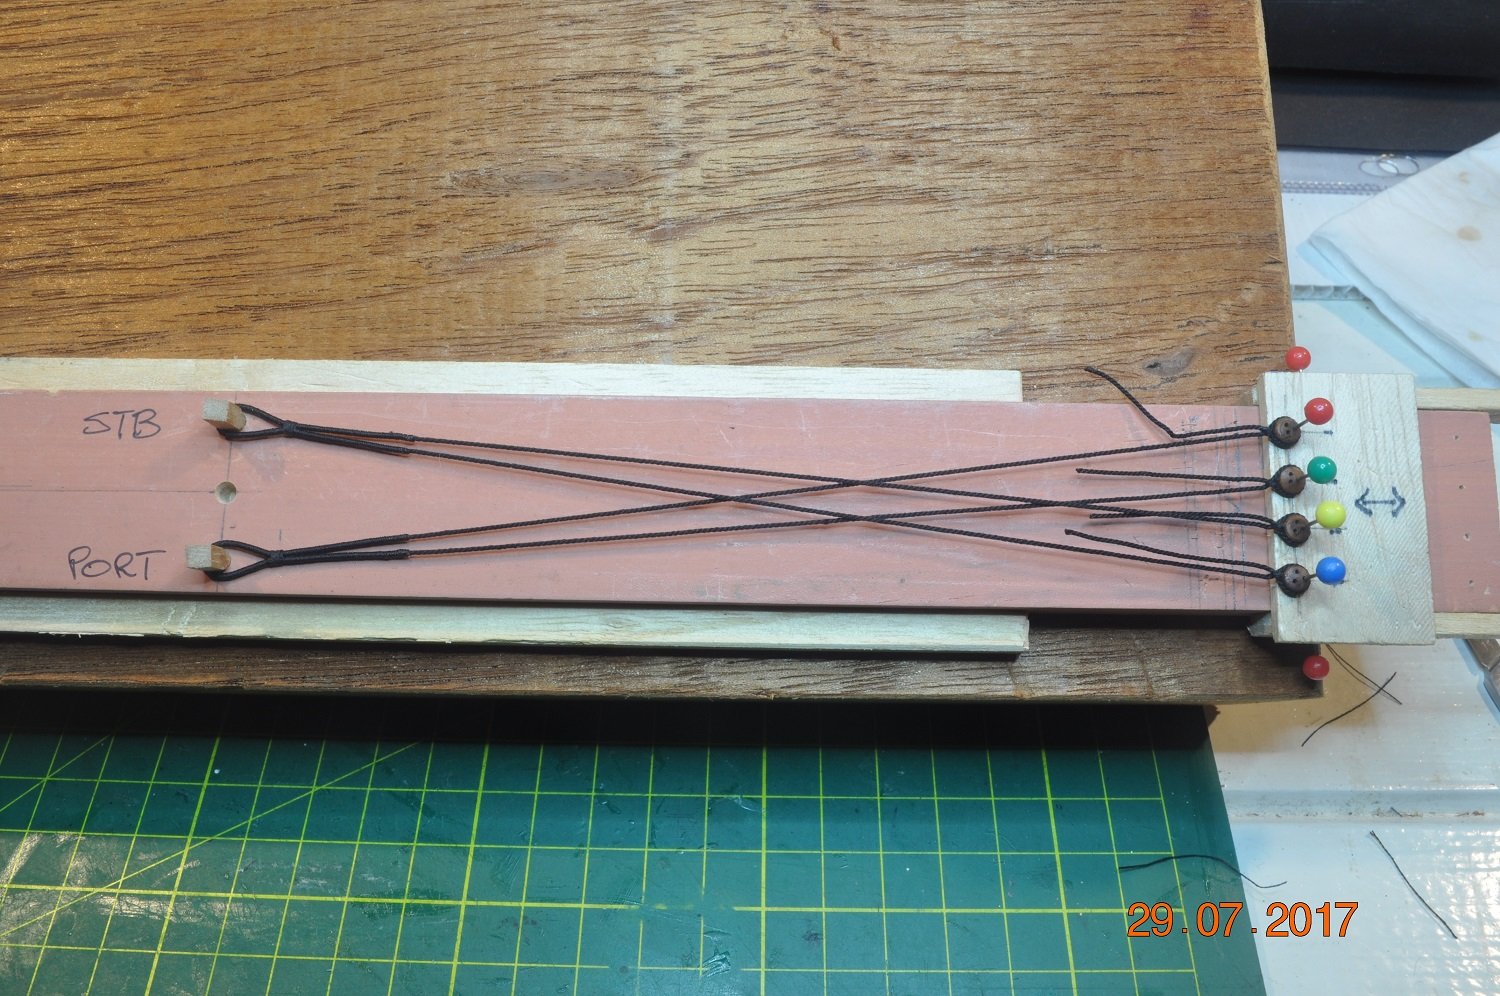
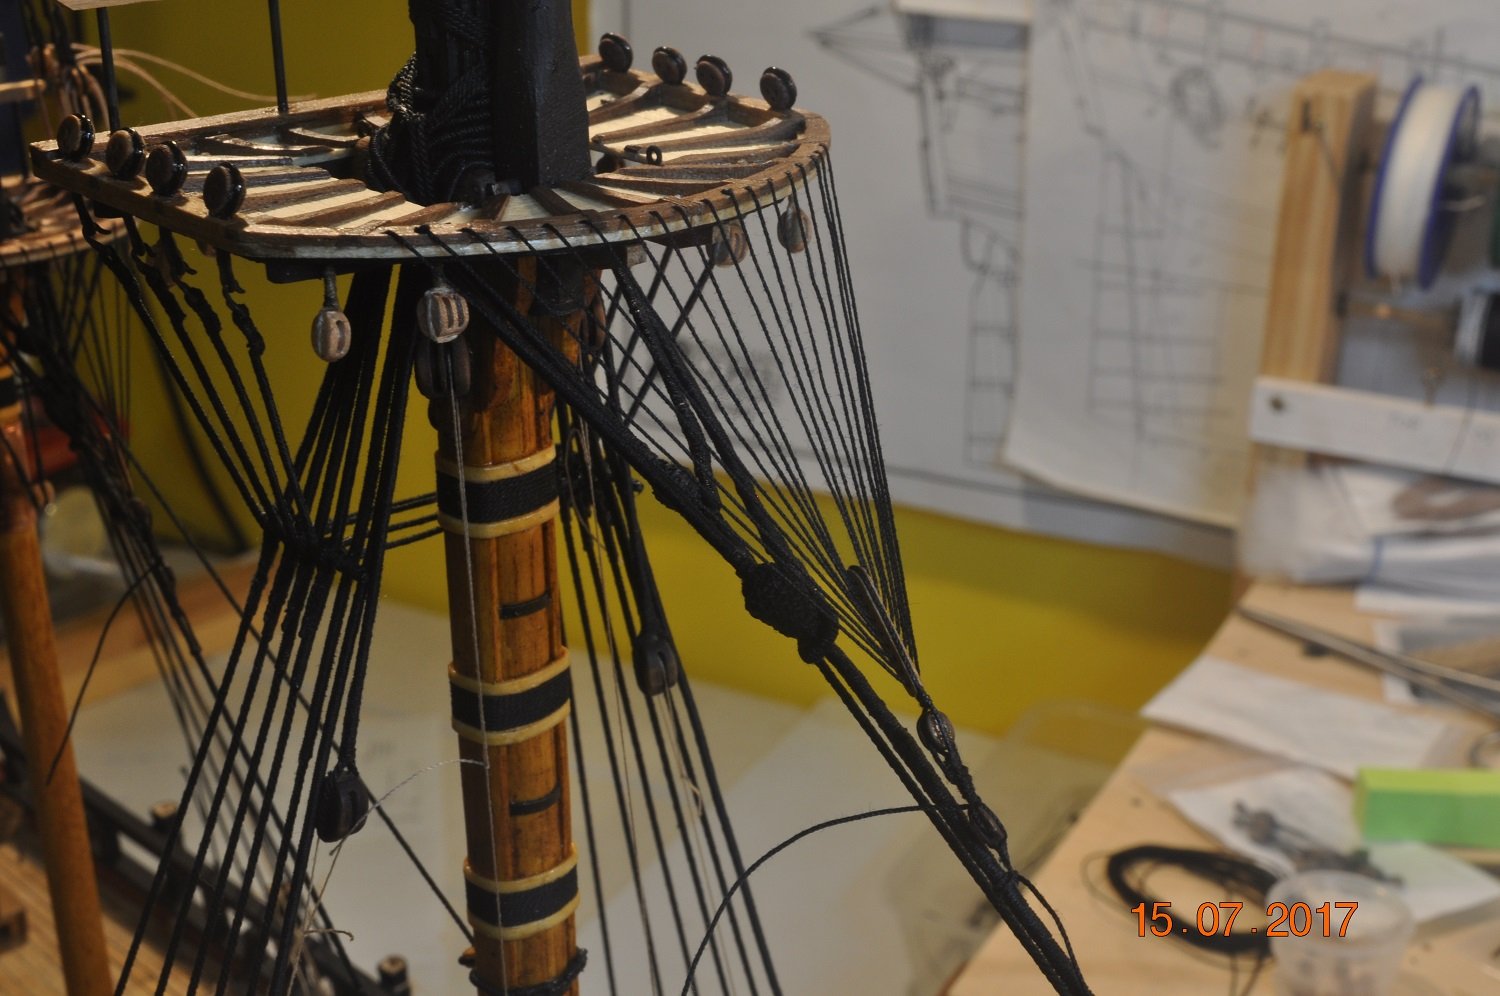
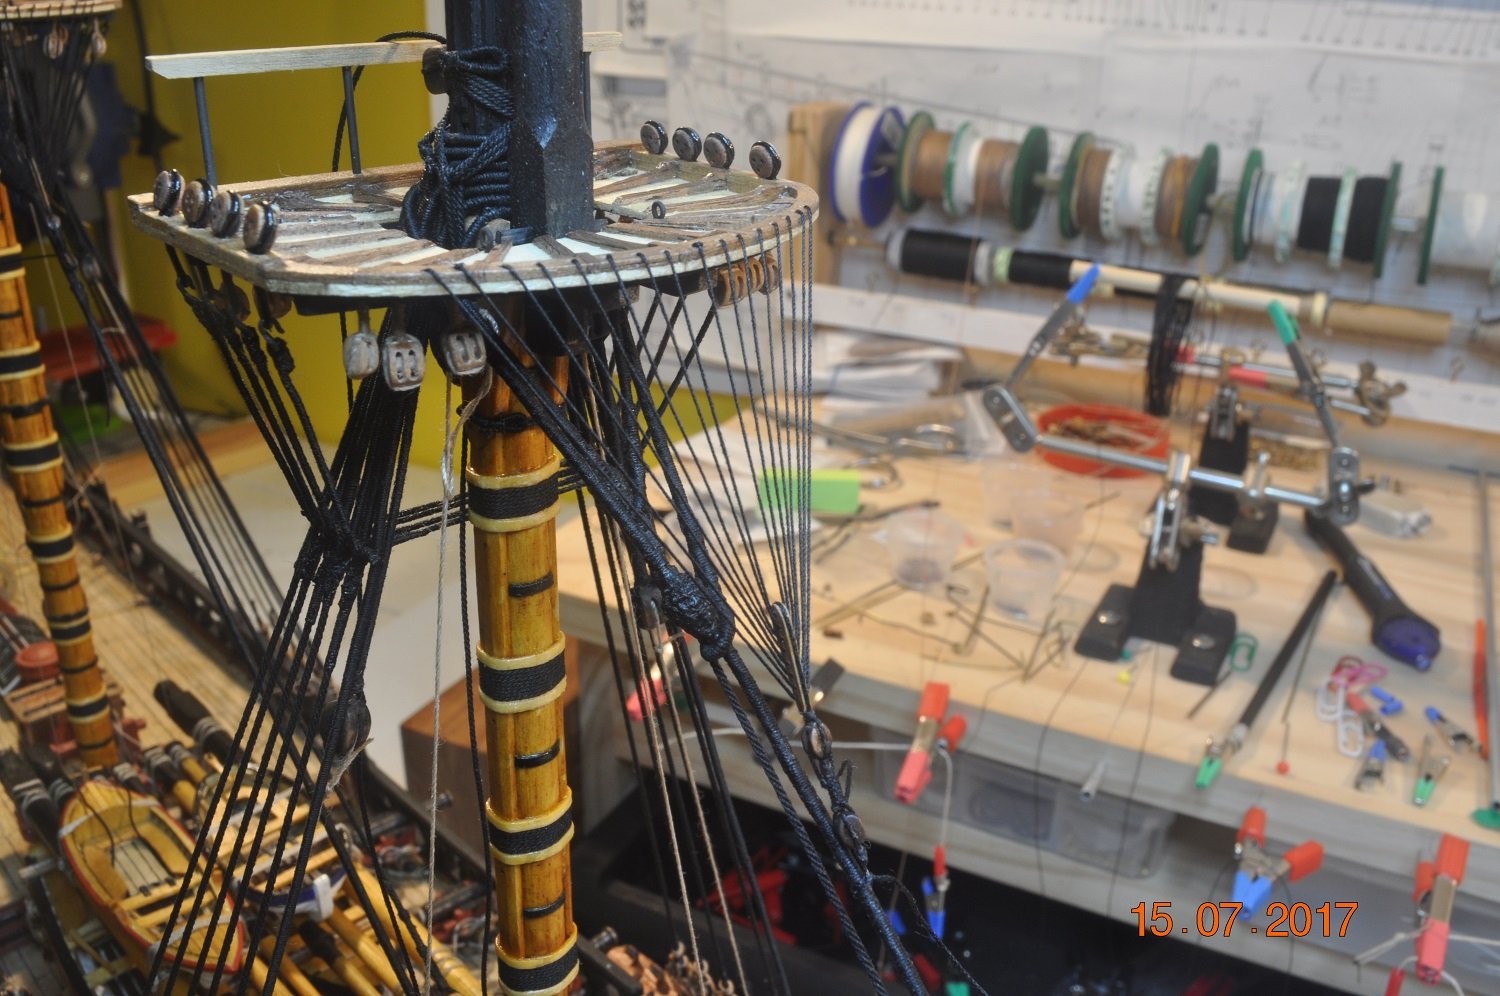
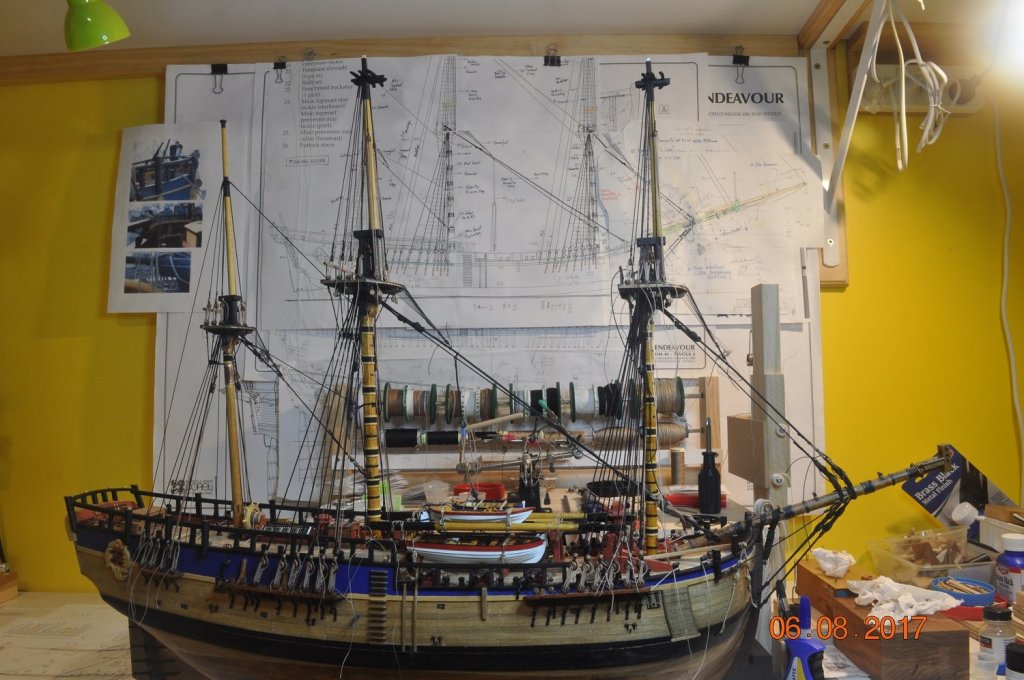
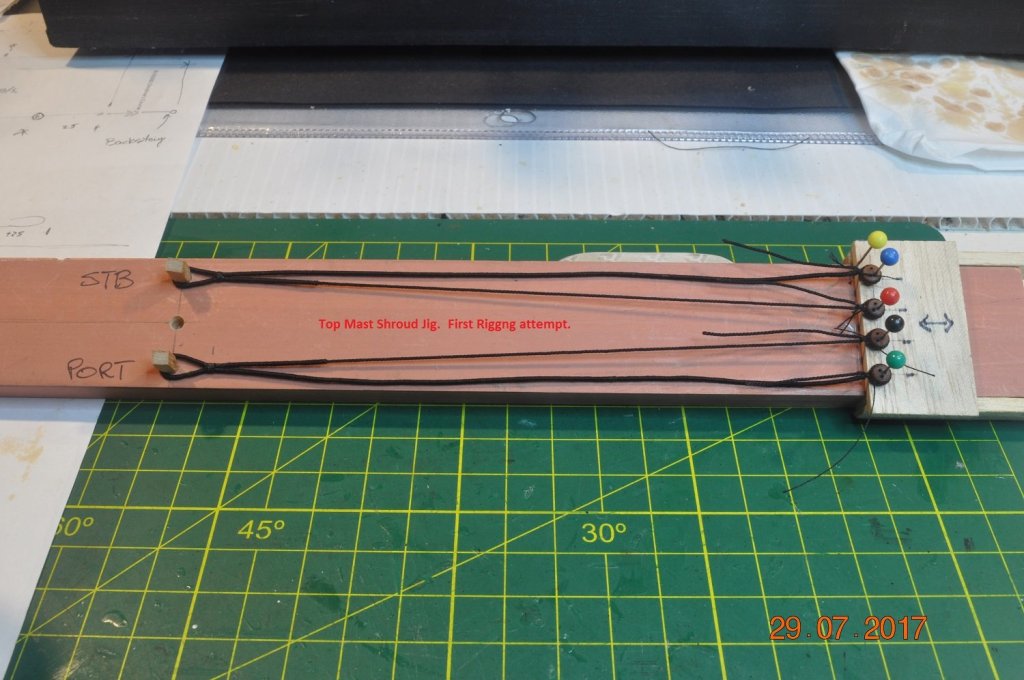
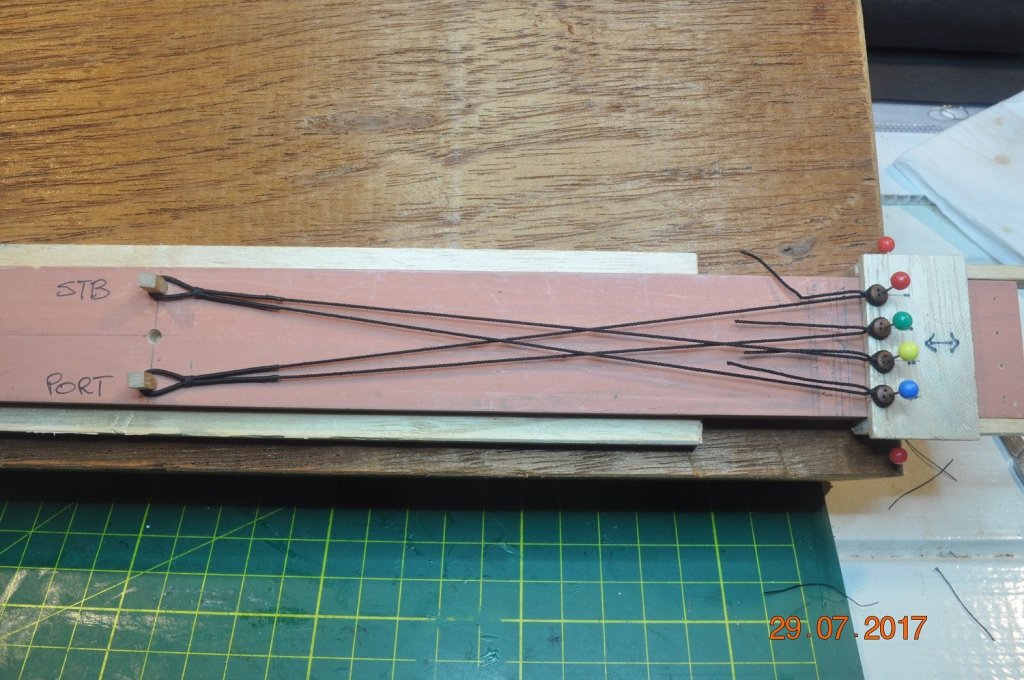
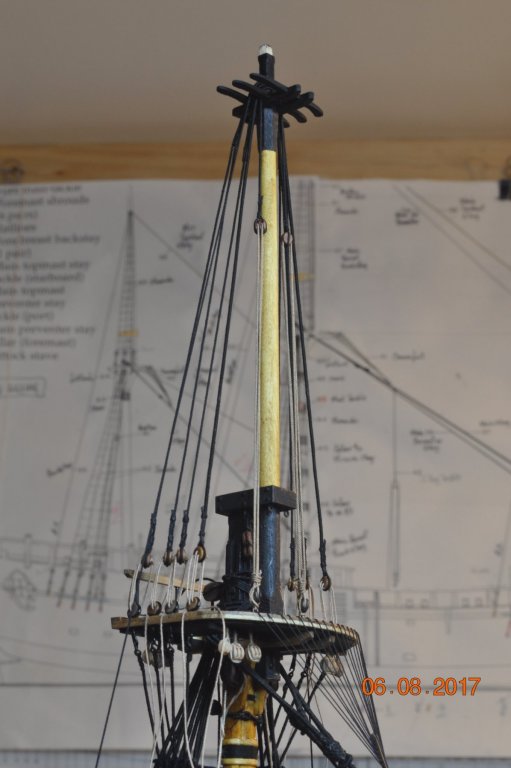
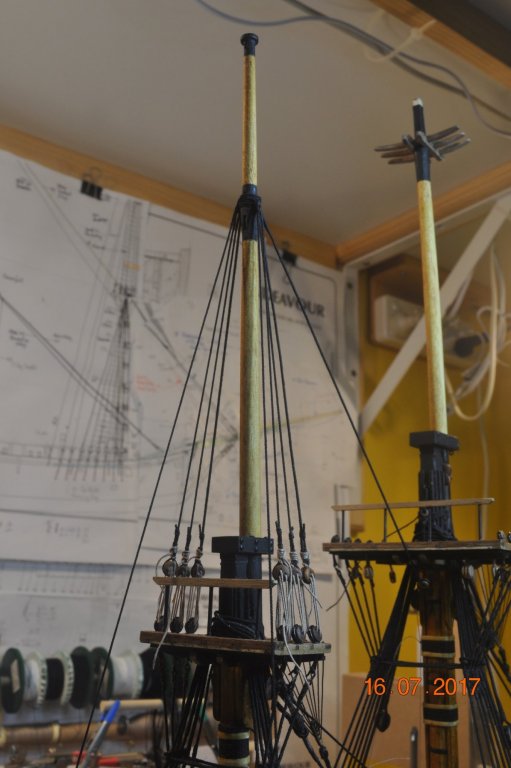
Shipyard Update Top Mast Shrouds and Breast Stays: View of how she looks so far. So what has been added since last post ? Checked the rake of all 3 Masts. The Mizzen is not raked enough by approx. 1 maybe 2 degrees. Not sure how I got this wrong, as I checked it was right before I glued the collar in at the deck. And that is where the error crept in, and now too late to rectify. TopMast Shrouds. Shroud Jig: My arms and hands got so tired when I fitted the lower shrouds, in-situ, I decided to try "off the boat" using a jig to make the shrouds. First step was to make all the shrouds with the loop at the top. Second was to mark the length of the leading shroud of each pair and transfer to the jig. Third, I transferred the shroud(pair) to the jig and tied off(do the rope work) the end to the dead-eye. Some pictures of the Jig below. The front pair from the Port and Starboard sides of the Fore TopMast. On the left I have some "pegs" in holes that I can move to simulate where the loop is in relation to the dead-eyes below. On the right I have a sliding plate which moves accordingly with the length of the shrouds. Close up of the dead-eye end. The small board was not very stable, moving about when I made the first set above. Upgrade to Jig. So I attached the small jig board to a large piece of wood, fitted snugly between 2 runners, so it can slide left/right. I did this so one could get your hand around the dead-eye end. The next pairs of shrouds(stern side) with the shrouds crossed to simulate the rake aft. It might not be perfect but at this scale pretty much close enough. Saved my hands being up in the air for ages trying the knots. View on Fore - Top Mast View on Main - Top Mast Breast Stays: Either side of the TopMasts are Breast Stays leading down the the channels. 5mm single block on the lower end of 0.45mm rope. Fore TopMast - Breast Stay fall Just got temp. lines holding the block, so I can take it off when I do the Rattling lines. Tackle to go on after the Rattlings. And the Main TopMast - Breast Stay fall Again temp. lines holding the block, so I can take it off when I do the Rattling lines. Next jobs for the shipyard to look at: - the Fore & Main TopMast Backstay pairs - Fore & Main Stays(main and preventor) forward. - then onto the Rattling Lines to all the Shrouds. Can't wait for that little task to start. However, most of the above will have to wait, as the Admiral and I are off on a holiday to Italy. Bwon a sera Arri ved erci


- 869 replies
-
- 10
-
-
Welcome on board Martin(Aussie). I have found the site extremely helpful with lots of information and members seem to pop up to offer excellent advice on all sorts of building topics. Stick with it. Dave R
-
Love your ropes Chuck. Dave R
-
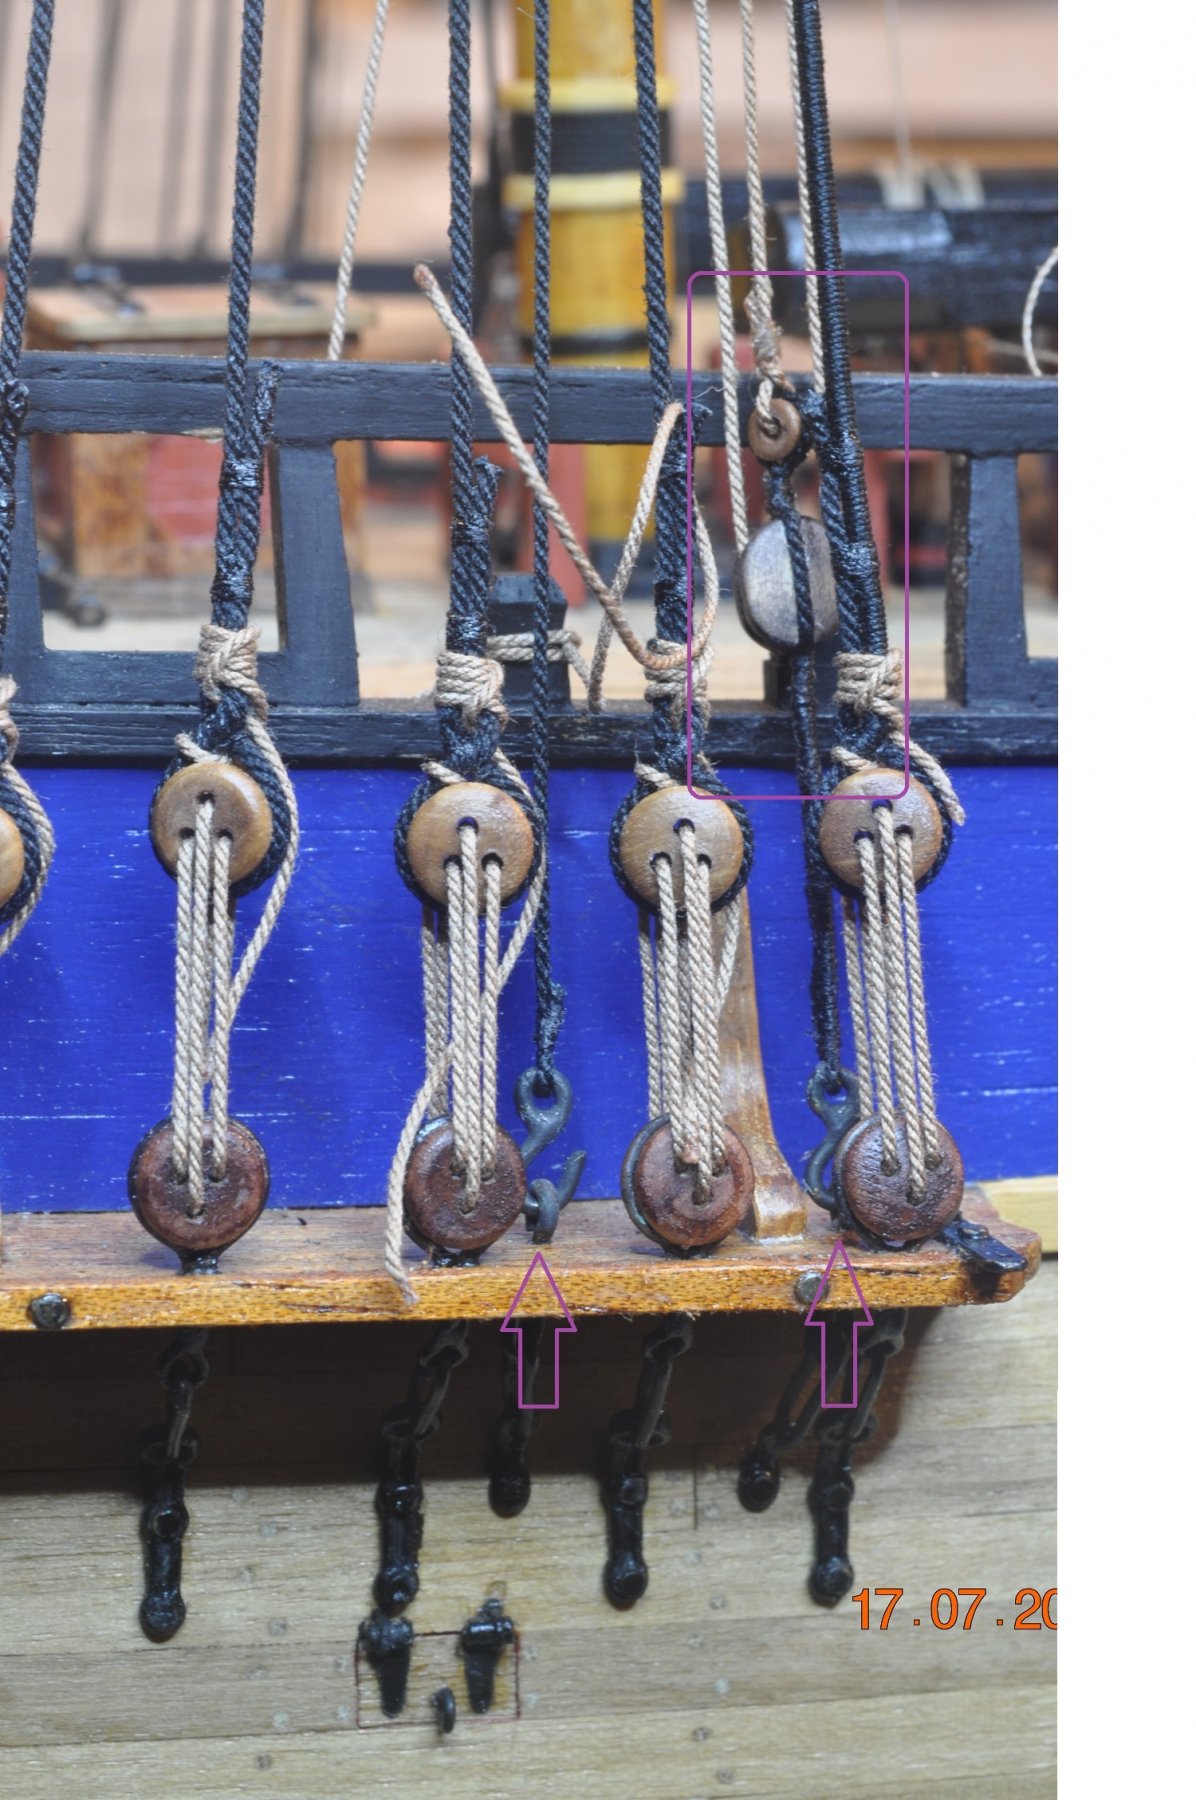
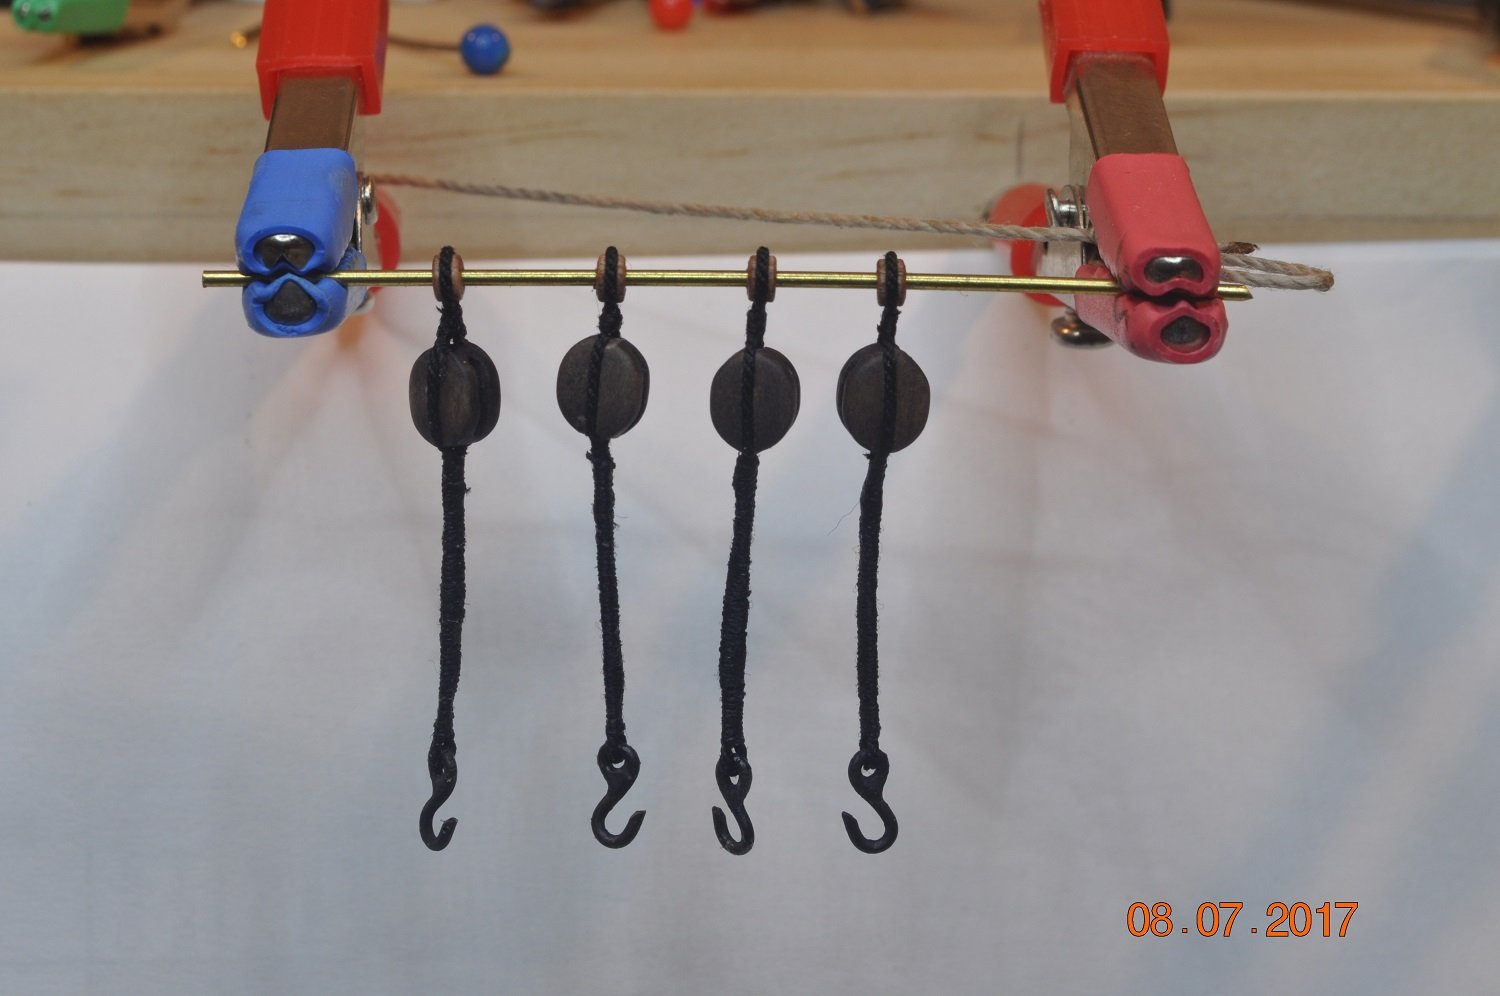
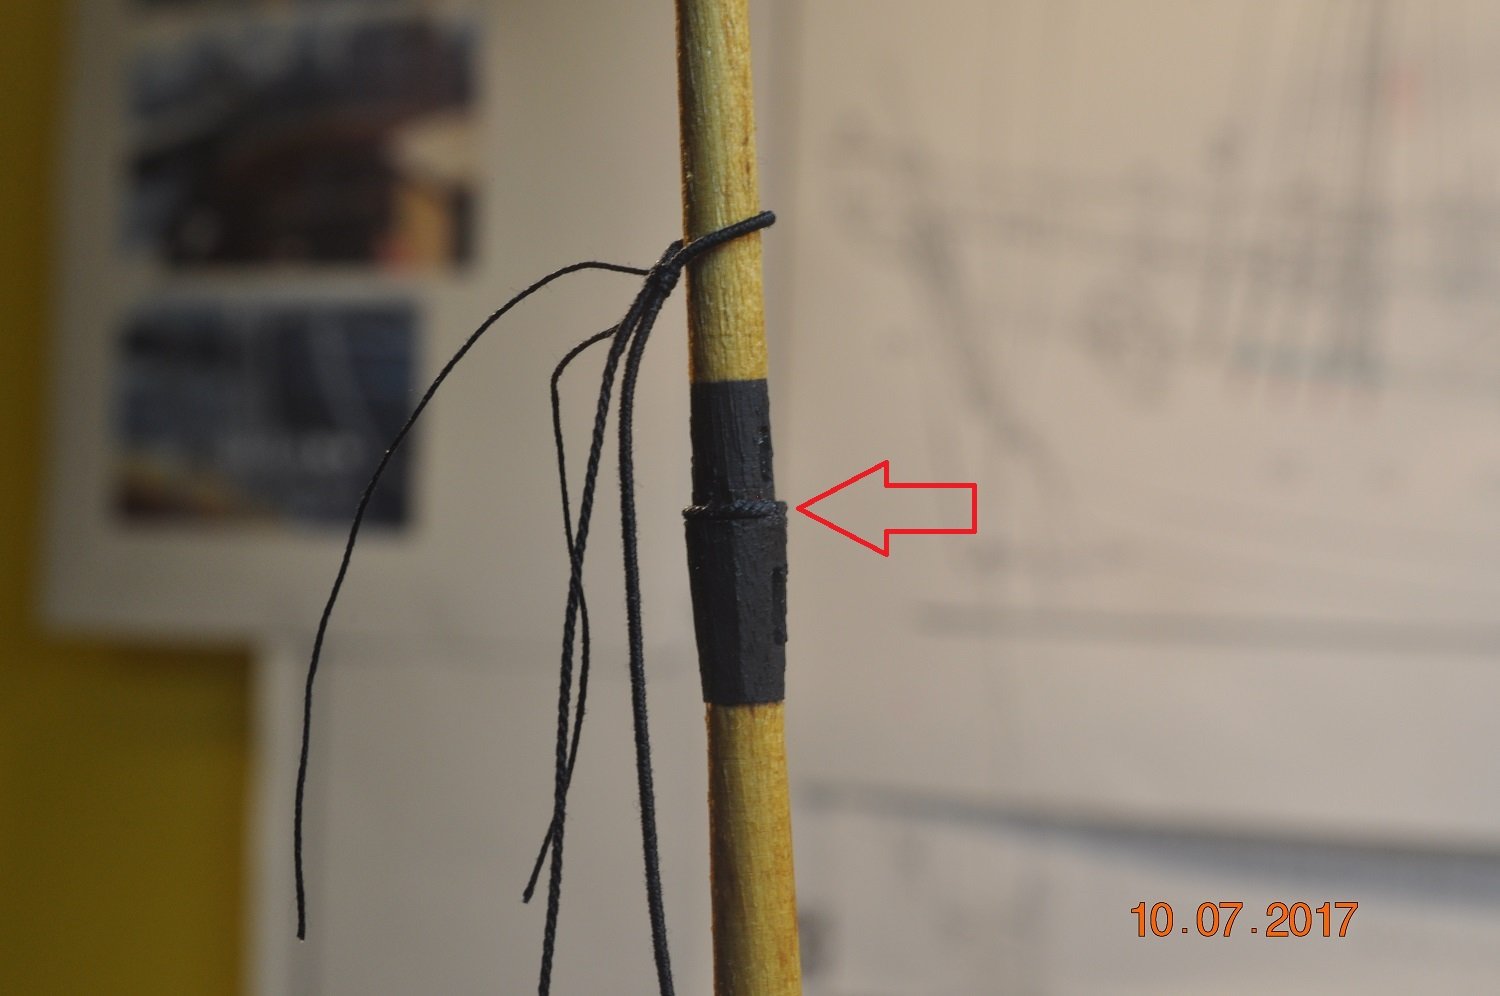
Shipyard Update Top Mast Burton Tackles: So for the Burton Tackles we used 4mm double and single blocks with 0.45mm tan rope. First step we made the 2 pendants. Each with a loop to drop over the top mast(holds the rope in place). The "loop" was from same 0.45mm rope threaded through the main run and CA glued used to hold in place. The outer leg cut when dried. The legs of the pendant seized from the loop to the start of the dead-eye off the mast top(20mm). We cut a groove in the cheeks of the 4mm double blocks, for the rope to drop in. Completed Pendants. The Main Burton being longer than the Fore Burton. Below the Fore Top Mast with Burton Tackles in place. Below the Main Top Mast with Burton Tackles in place. Below a closer look at the bottom of the Tackles: > the rope end finished/wrapped up. > small hooks were made to hook into the eye bolts. Next the Shrouds Dave R
-
HMCSS Victoria 1855 by BANYAN - 1:72
DaveRow replied to BANYAN's topic in - Build logs for subjects built 1851 - 1900
Hi Pat, Got yourself a beauty to spend your time on here. Like the research and outcomes. I'll keep an eye on the progress.- 993 replies
-
- 2
-
-
- gun dispatch vessel
- victoria
- (and 2 more)
-
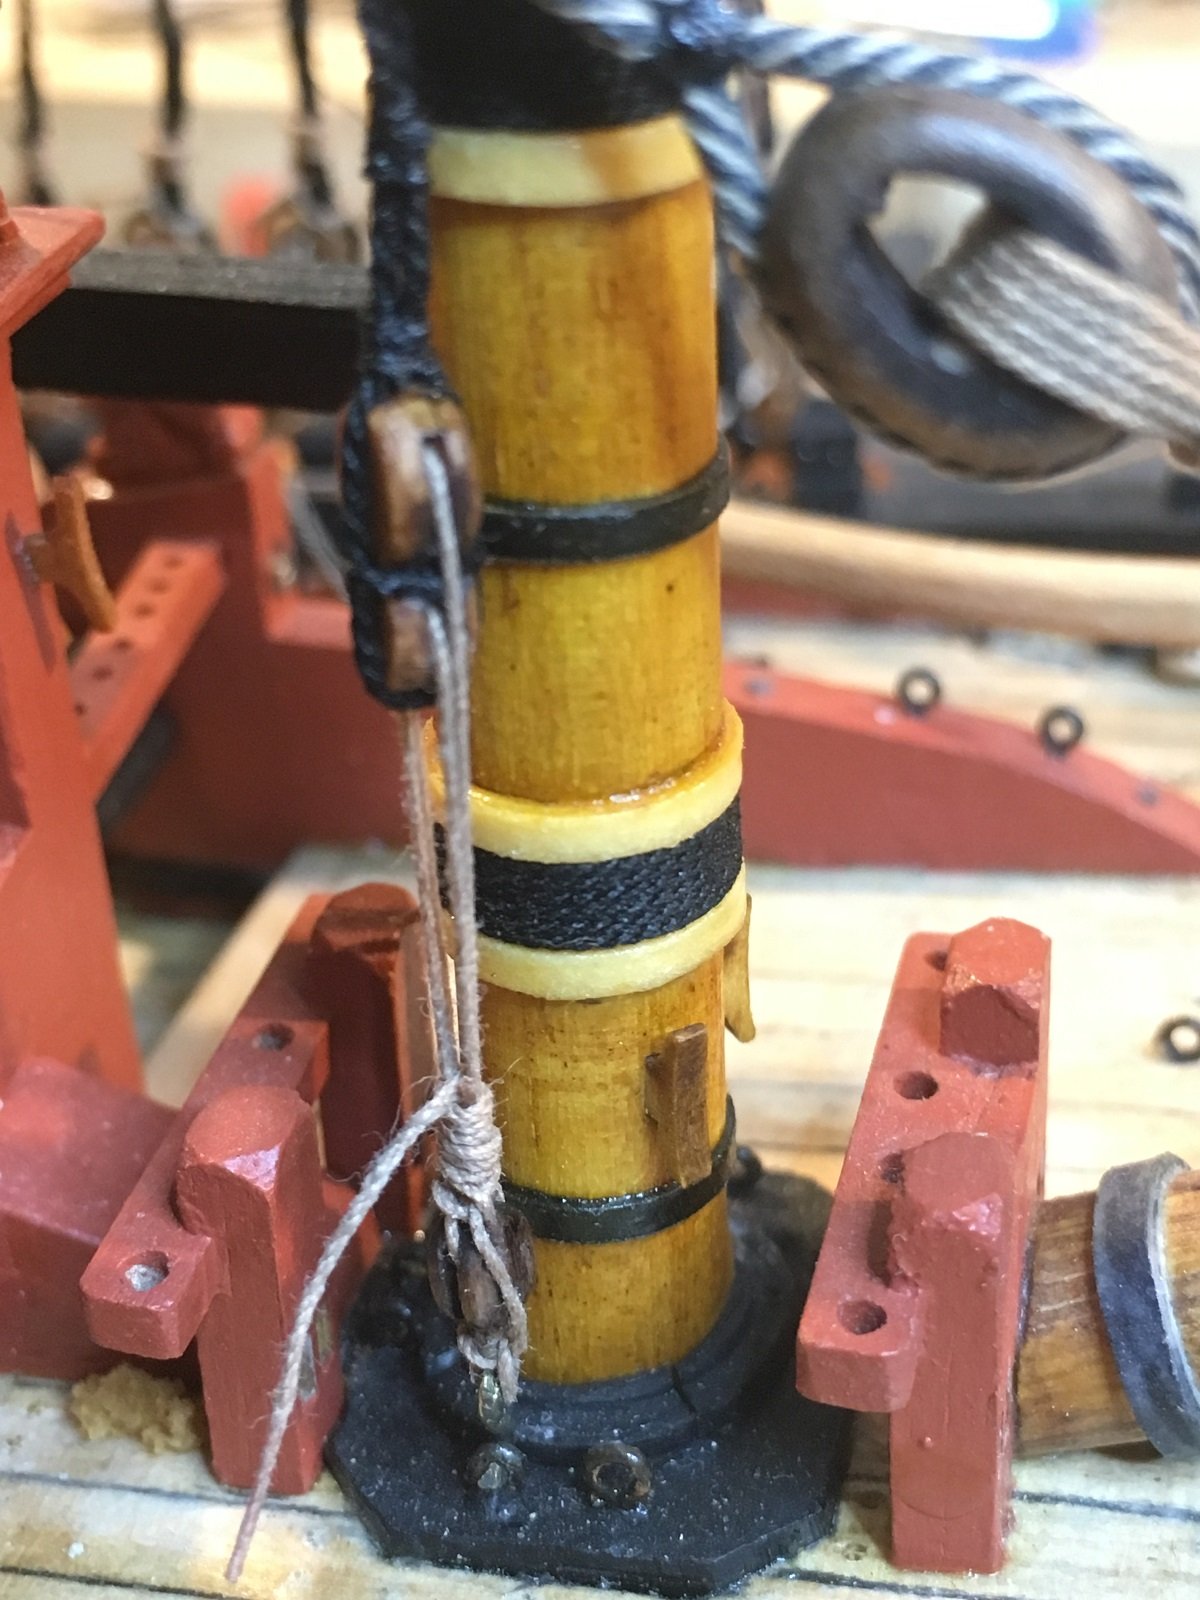
Shipyard Update Mizzen - Burton Tackle: Not that I am owning up to shying away from the Top Mast shroud works. The crew in the shipyard pointed out I could also add the Burton Tackles(port and starboard) onto the Mizzen Mast(done this morn'in). Close up Pics of the top and bottom below. Probably no excuse to start the Top Mast #ropeblockwork now.


-
Hi Pat, Re: Deadeys. Pity they are not the same, as easy to spot the difference. The deadeyes on the channel, are ones which come with the kit(which upon close examination, I should of drilled out the holes a bit). The other(on end of shroud) are from other supplier, slightly different. Learning a hell of a lot from this built. Dave R
-
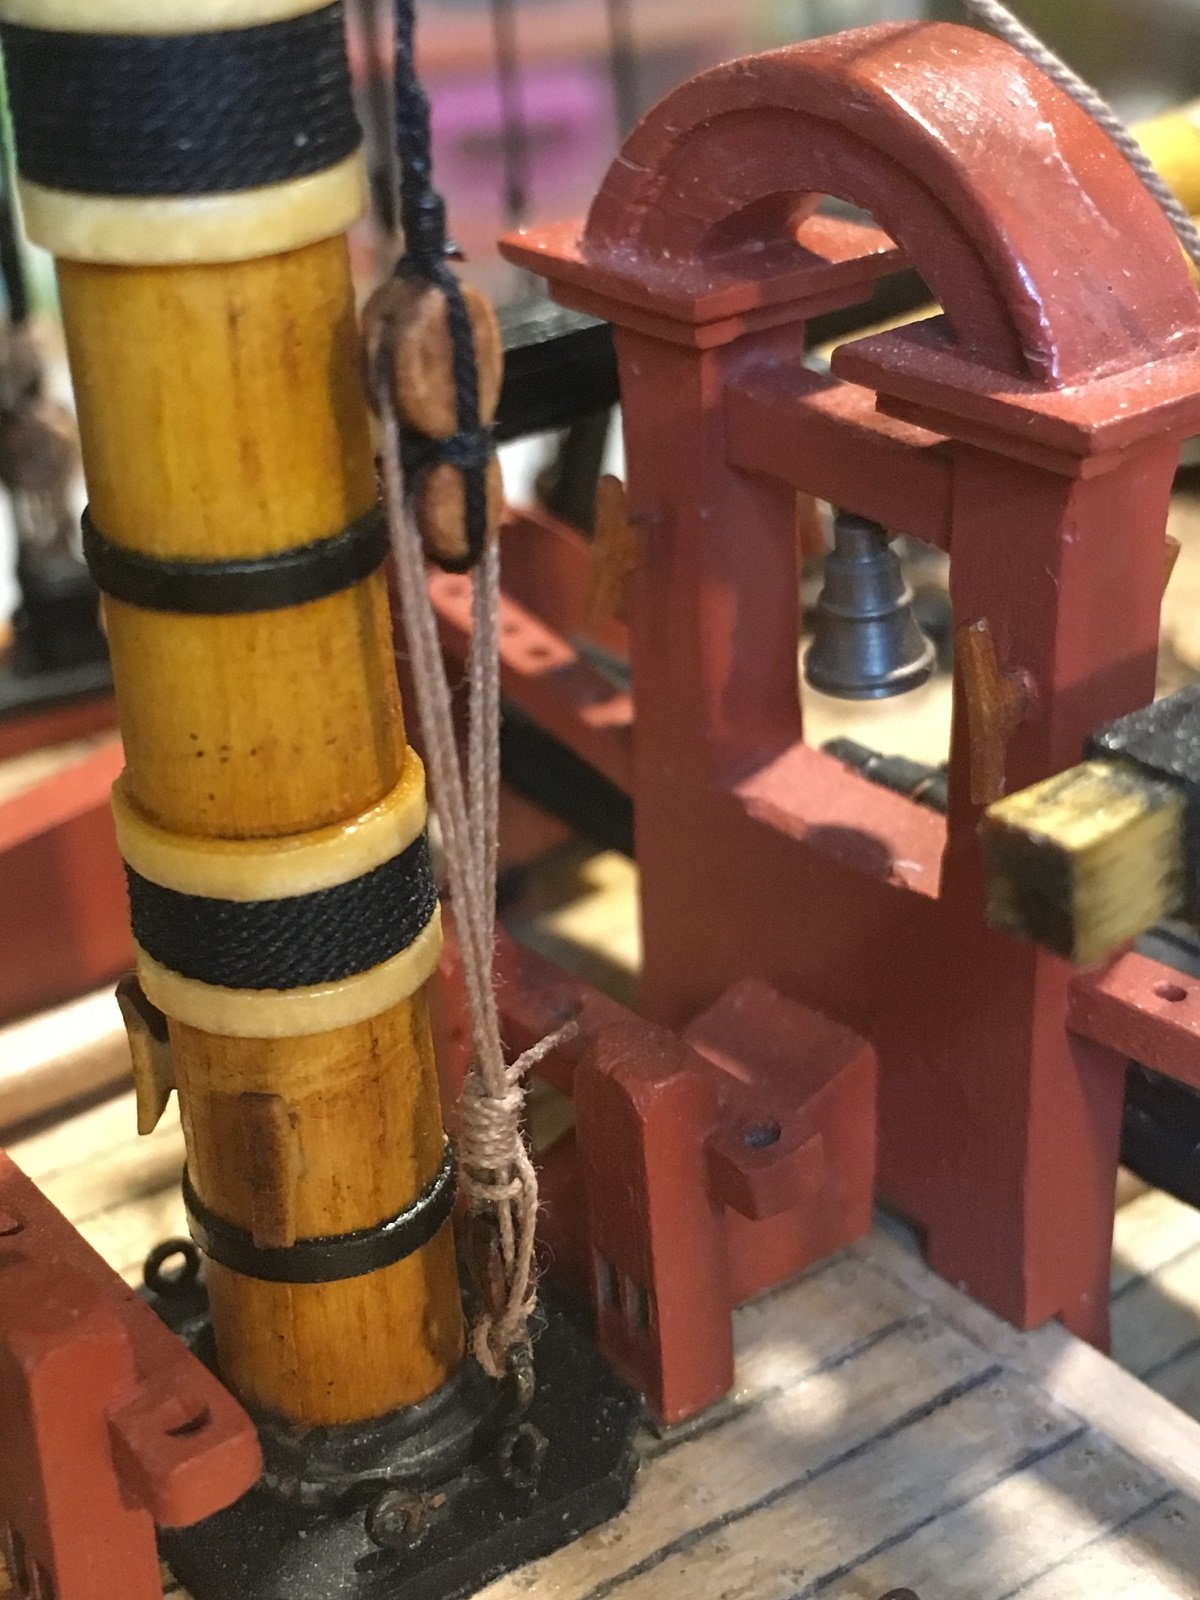
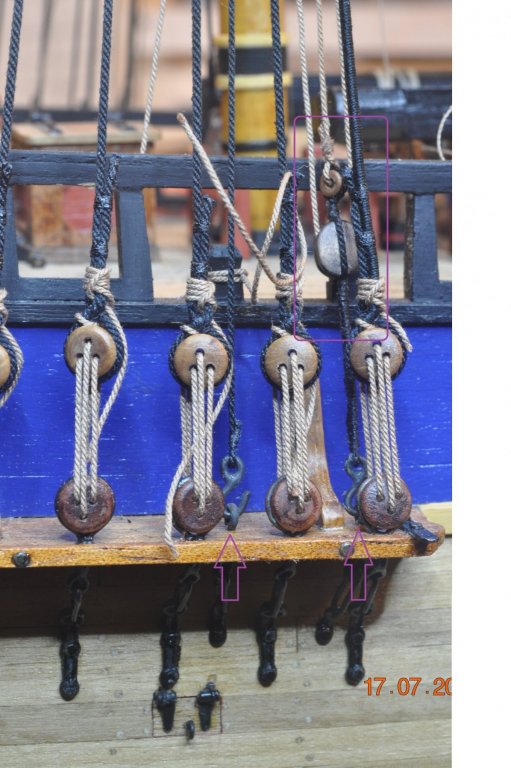
Shipyard Update Thanks for all that have checked in. The crew in the yard appreciate your comments and likes. Mast Tackle: I had the blocks and Strops for the Main and Fore mast tackles prepped , so added these on today. Fore Mast: Starboard View Finally after years, the channel eye bolts come into use. Main Mast: Starboard View Tackle hooks to the channel eye bolts. bottom end of the tackle. Dave R


-
Michael, I'm on a roll. Dave R
-
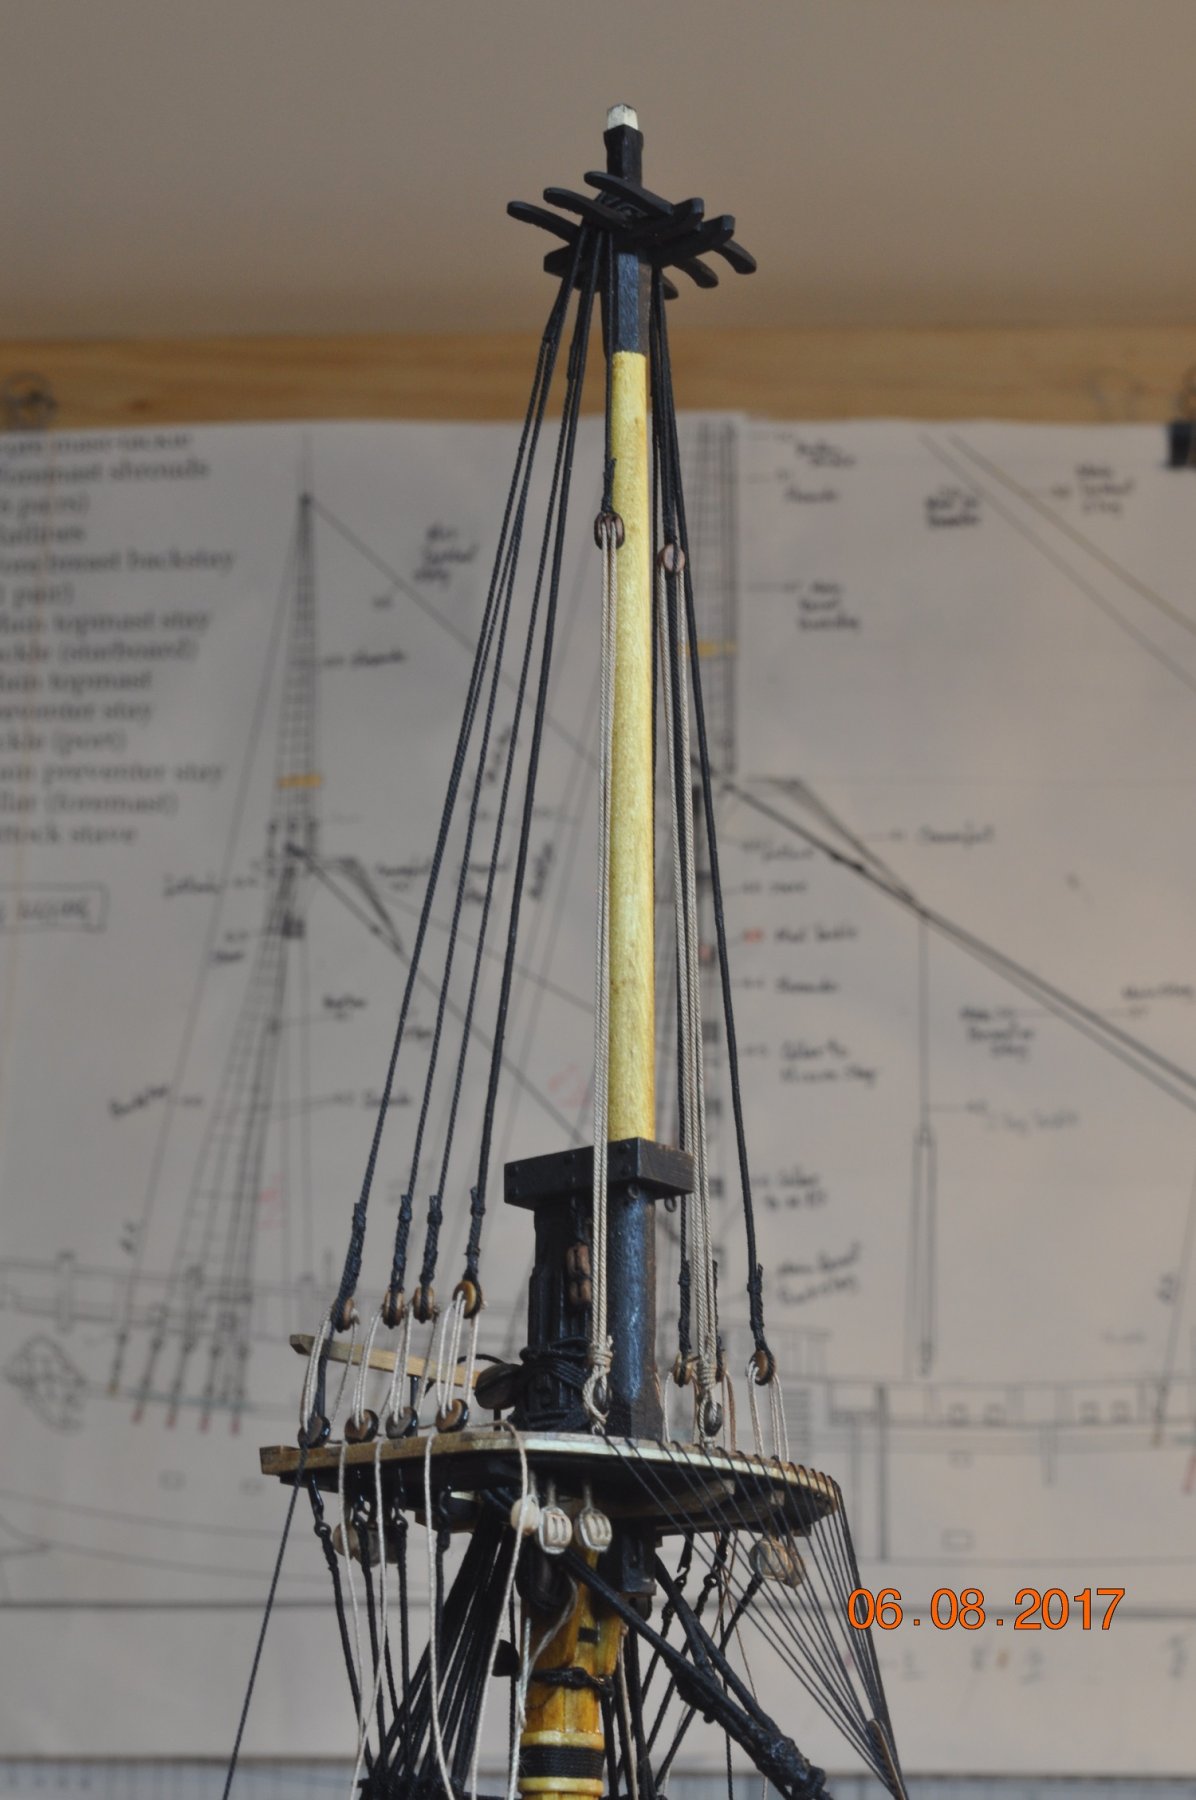
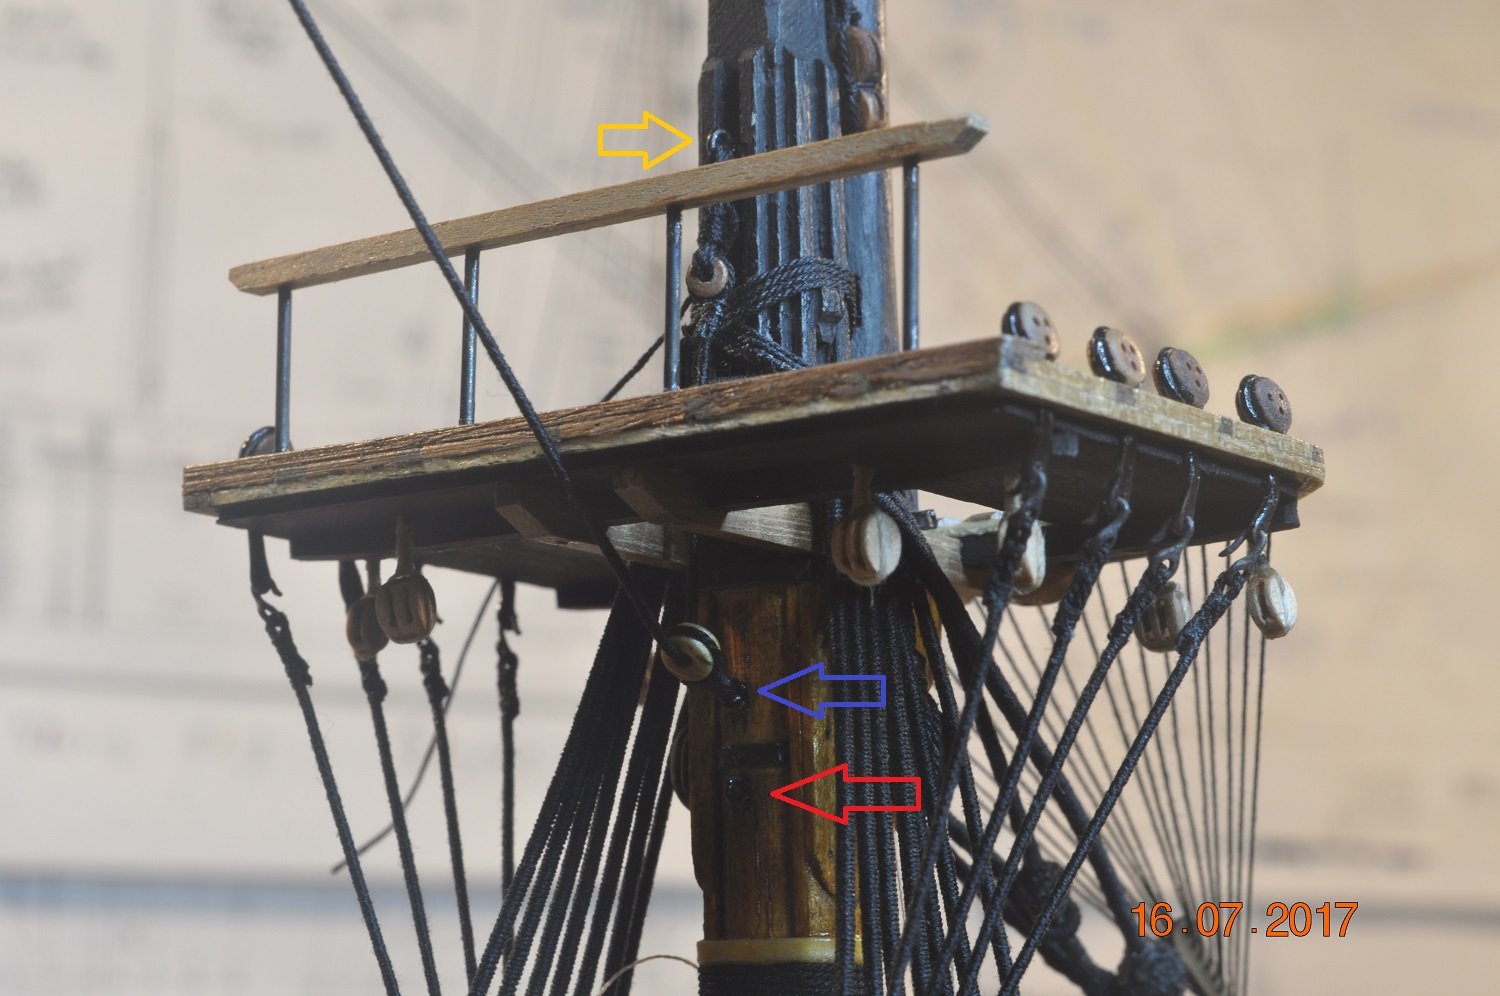
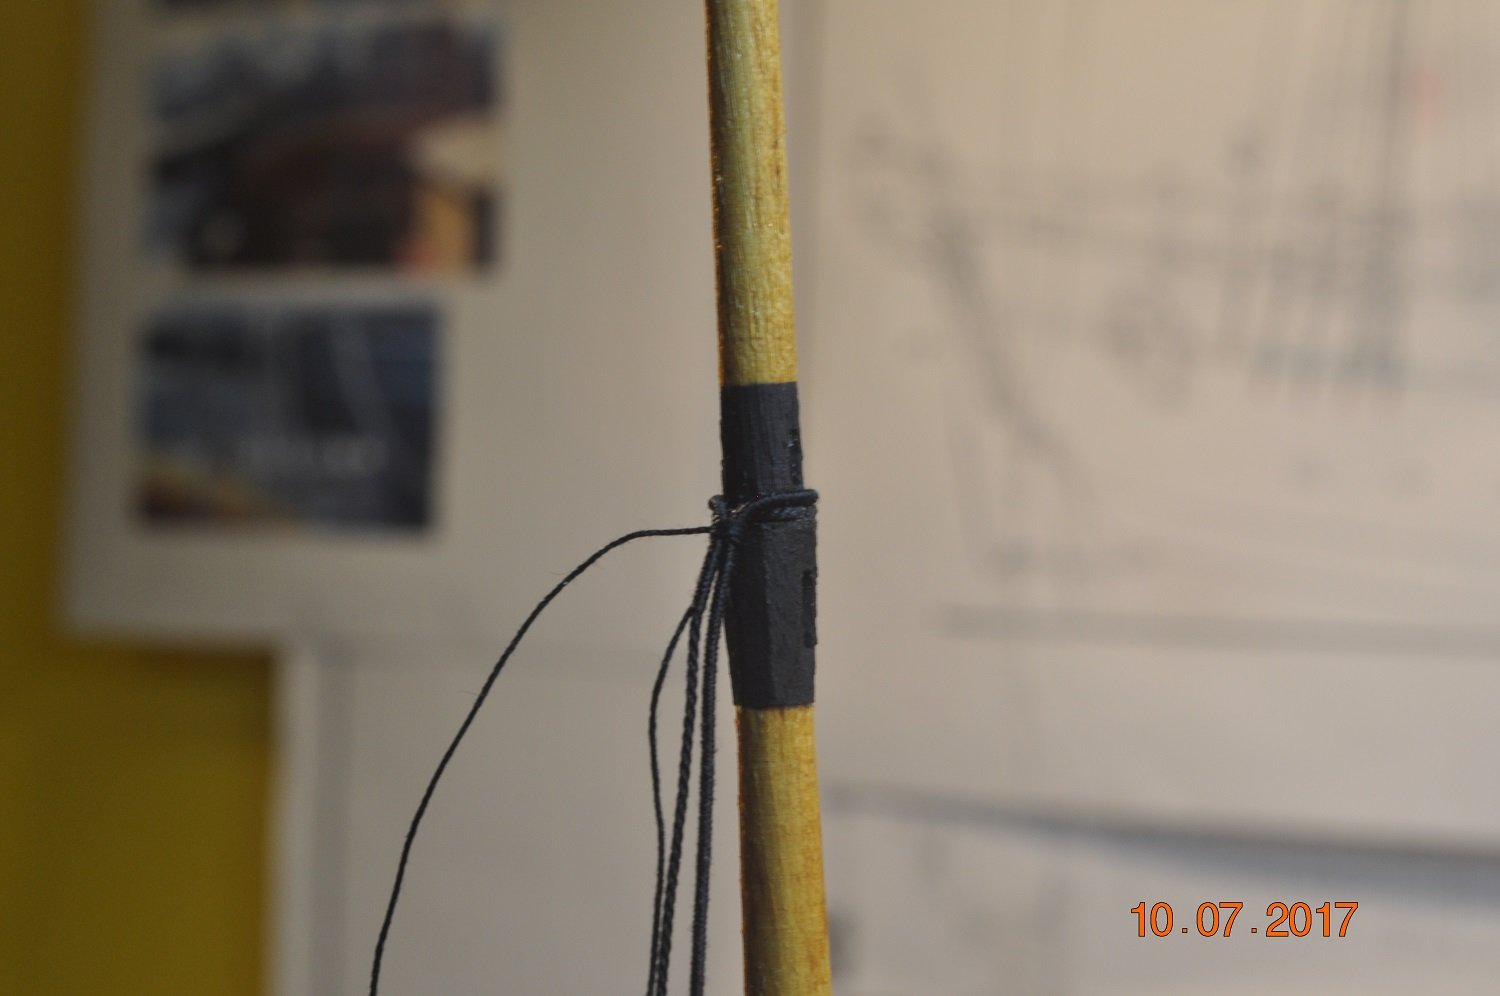
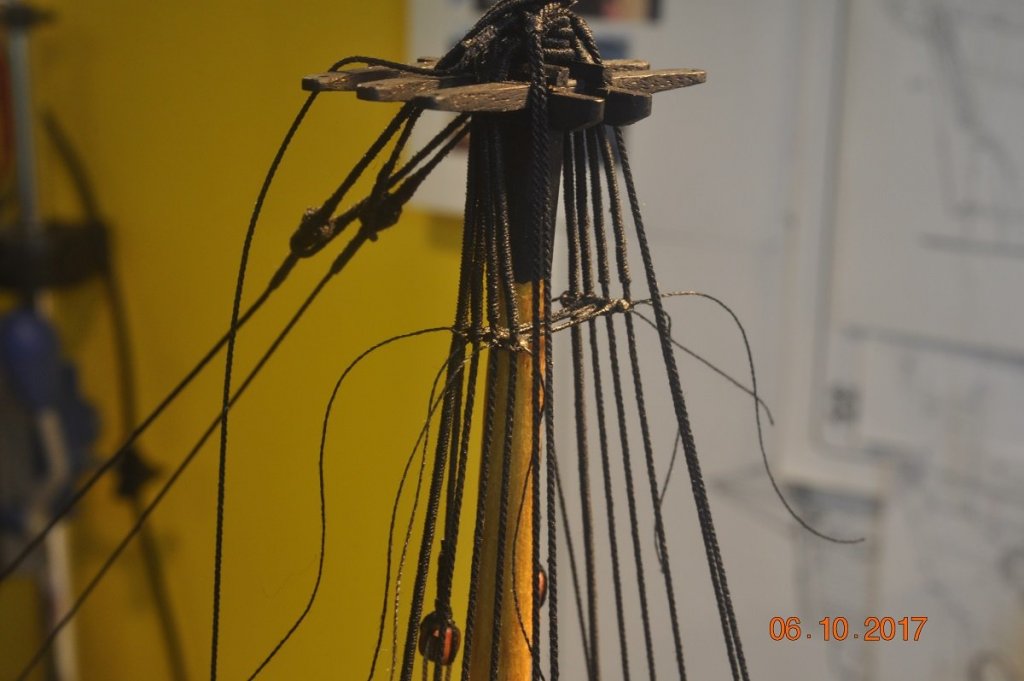
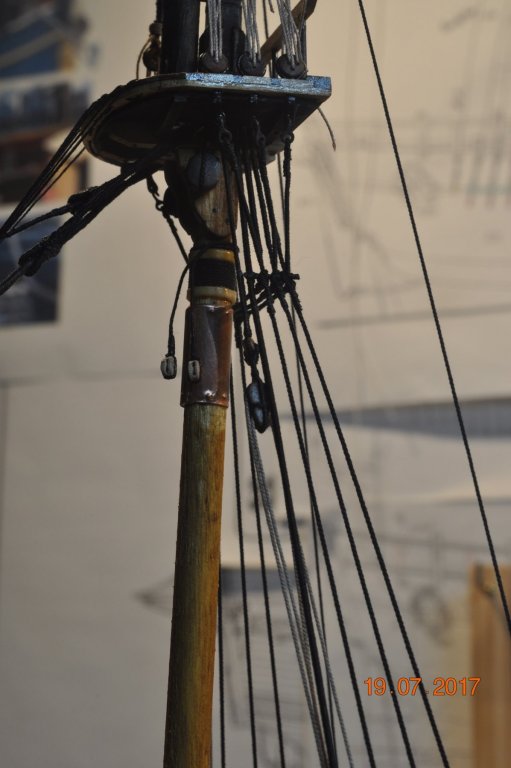
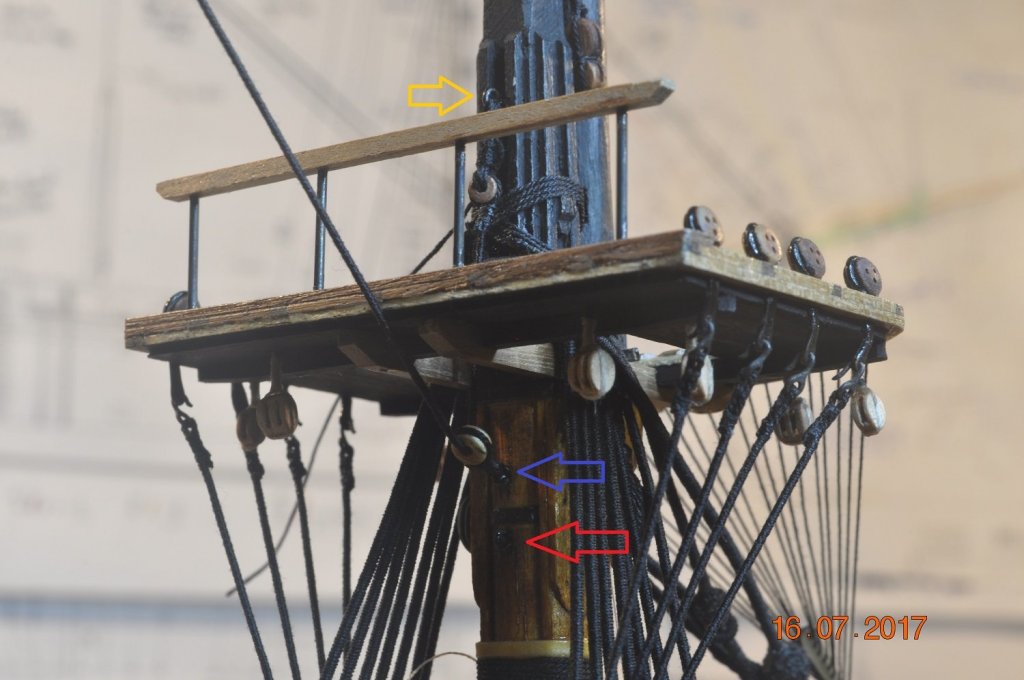
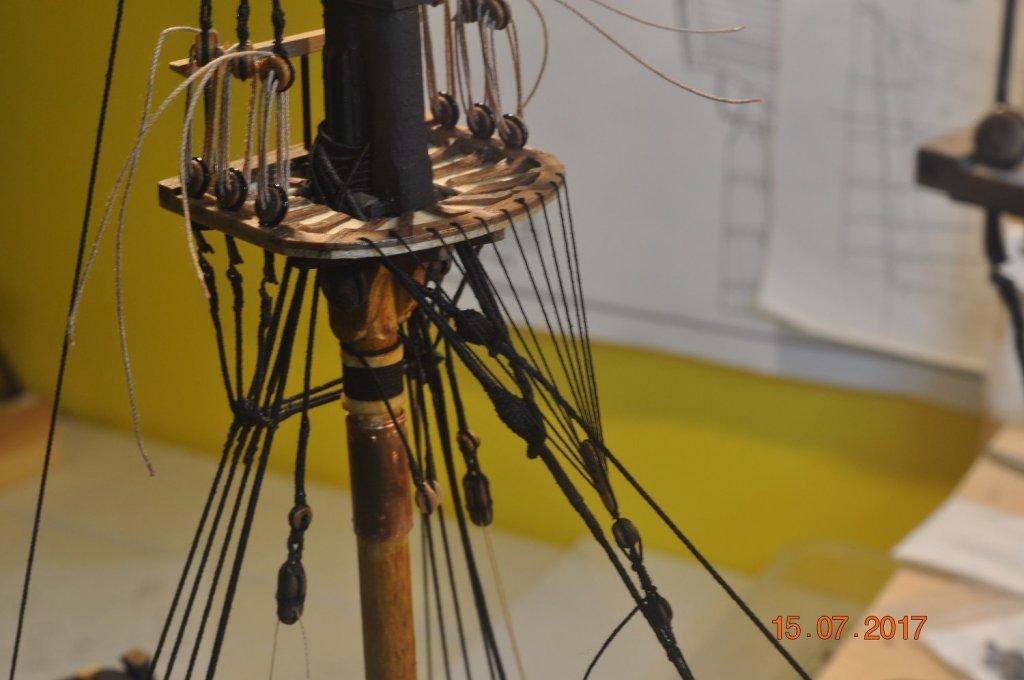
Shipyard Update Mizzen Top Mast: The lads in the shipyard got busy and finished installing(rough-in) the shrouds to the Mizzen Top Mast last evening. No overtime pay though. As with other lanyards, I have left the ends long to finish off(adjust) after all rigging installed. Close-up of the shroud lanyards The Top Mast Stay I ran down under the Main Mast Top, to a eye-bolt(blue one), so the stay just missed the back of the mast top. I moved the block up from a previous eye-bolt(red one) I had added on, but a bit low. Another eye-bolt(yellow one) was added to lash the stay end. Enough for Mizzen Standing Rigging for now. Move onto the Main and Fore Top and Top_Gal Mast shrouds and stays. Dave R

-
Wow. So much detail Greg, and looks real. Where do we sign up for the maiden voyage. Dave R
-
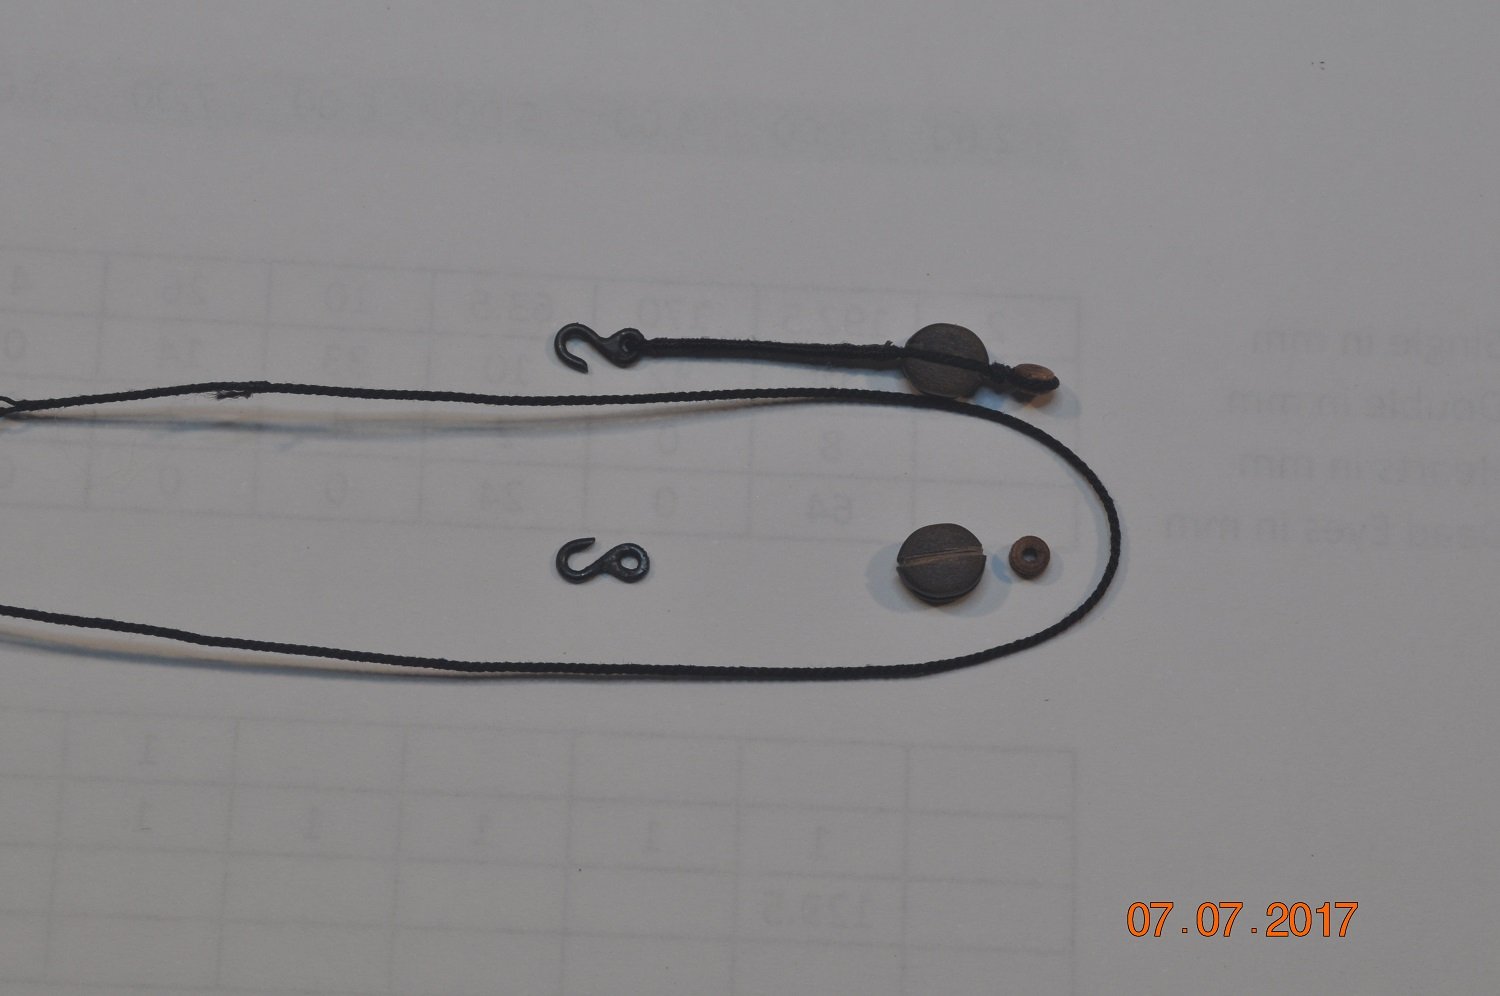
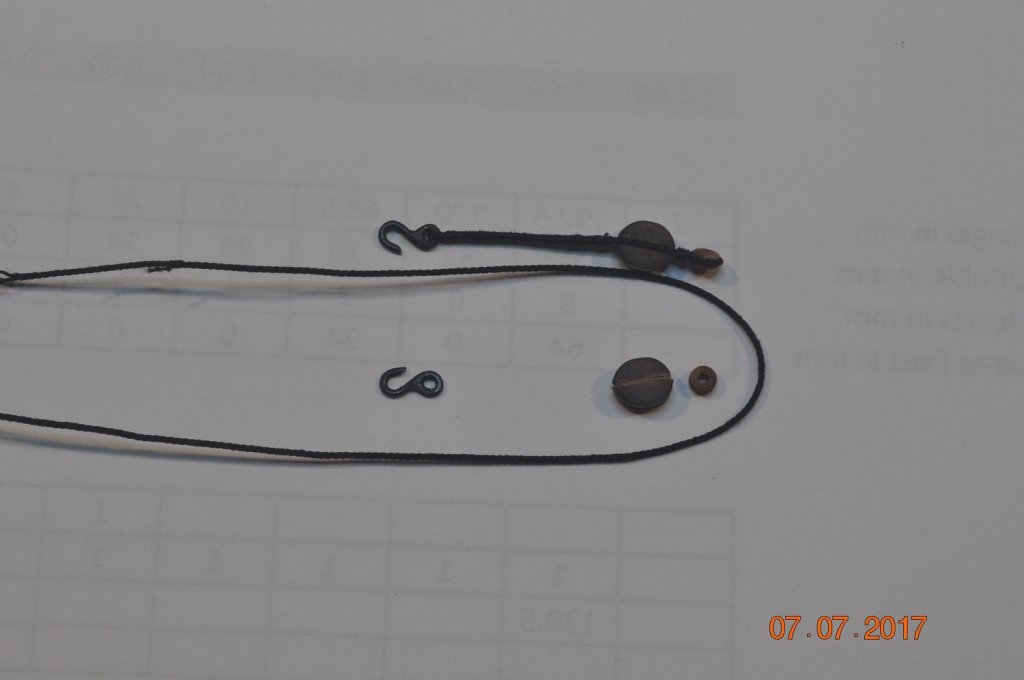
Shipyard Update Mast-Tackle: I've made the lower strops for Fore and Main mast-tackles in preparation to add late/soon. Each is made from a set of components: - thimble - 5mm block - fabricated brass hook - rope 0.63mm Holding the components whilst a black thread is wrapped around to hold all in place. The arrow shows the joint, where the rope ends meet. 4 strops completed. I lashed all the way from the hook to the block, which in hind sight probably should of just done each end. As you can see from the dates on the pictures, been making the last few items in the recent posts over last couple of weeks. Dave R


-
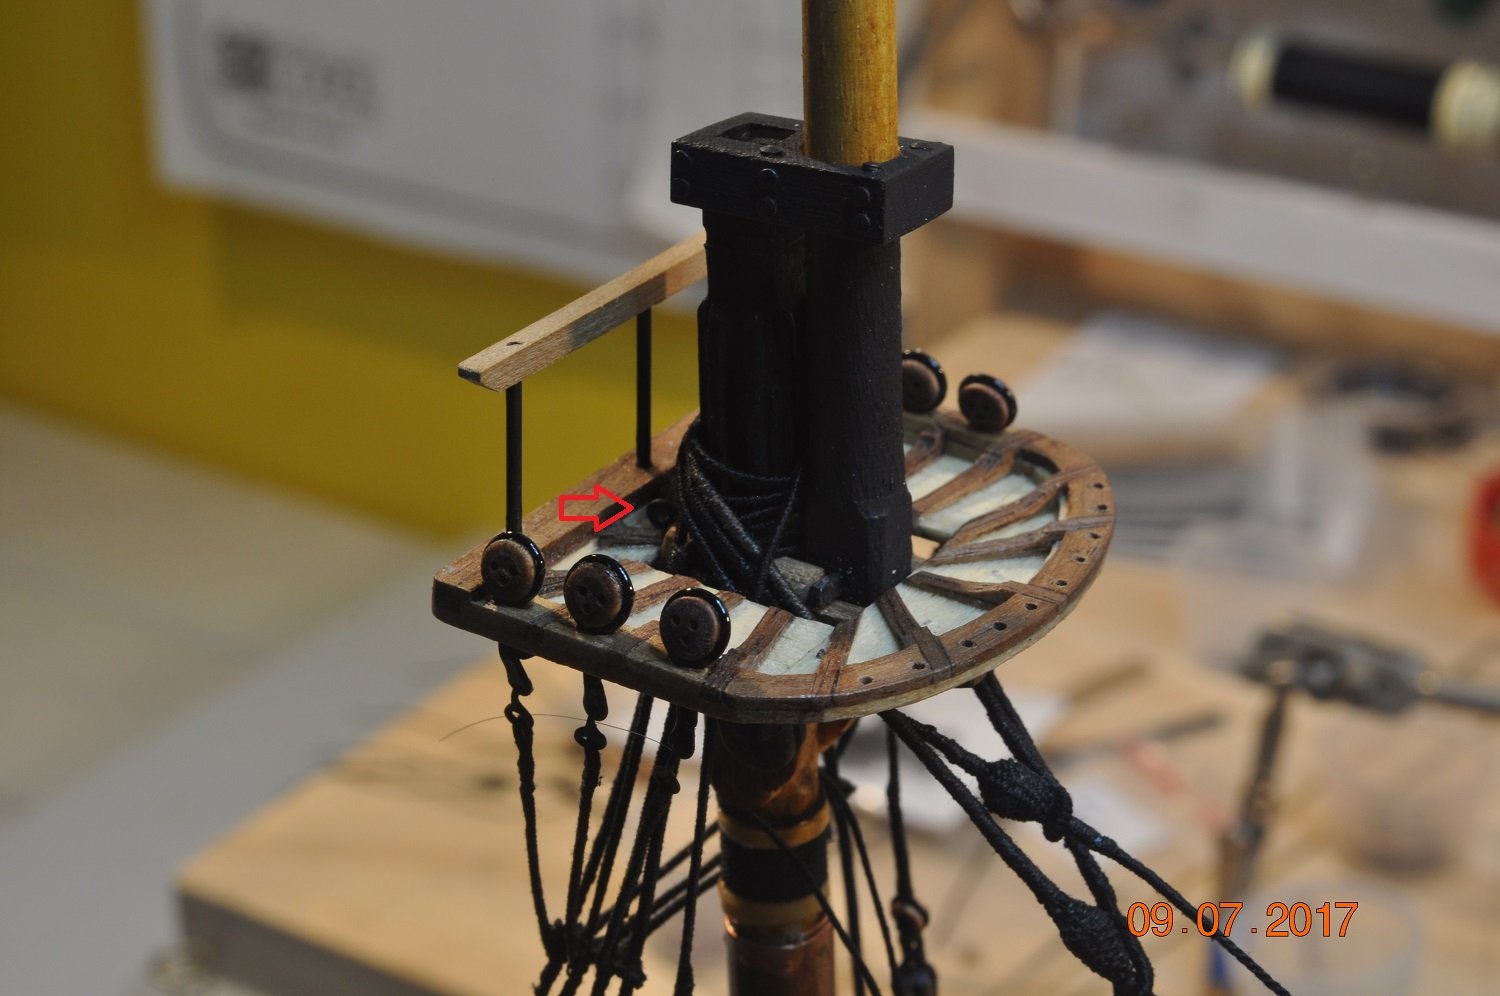
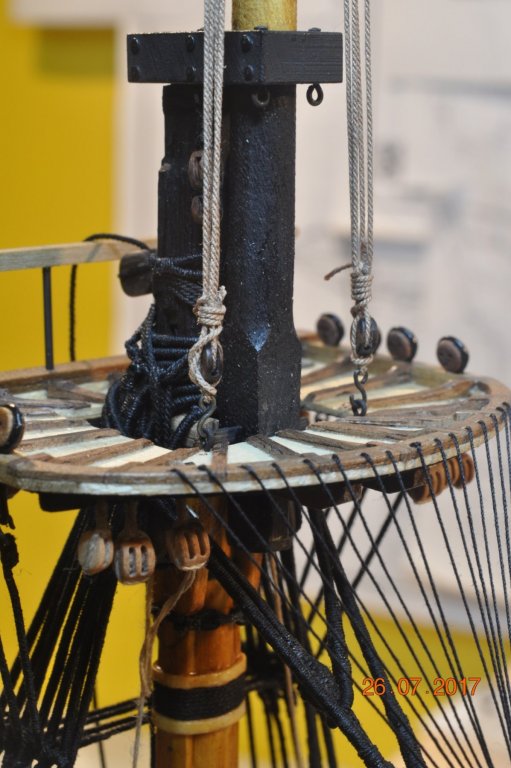
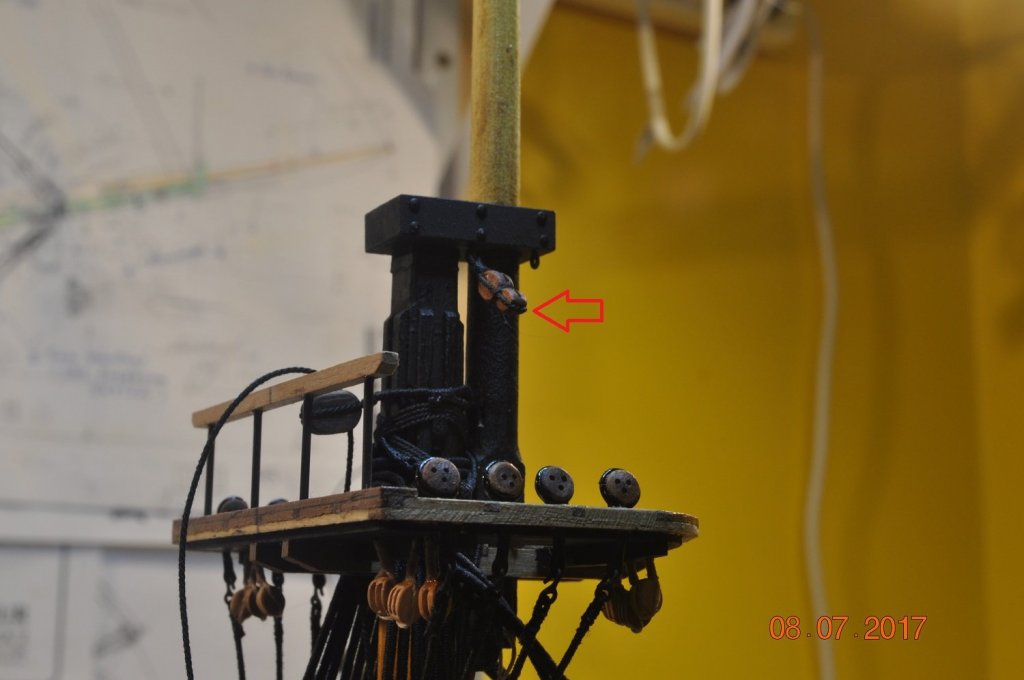
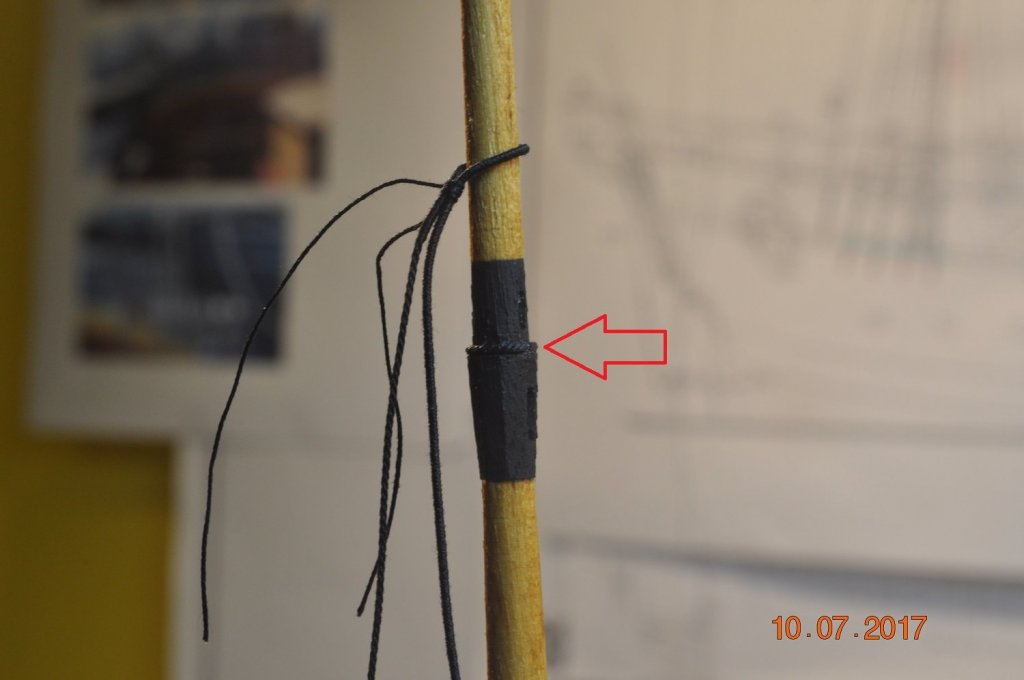
Shipyard Update Mast Caps and Top Masts: We have started to erect/raise the three Top Masts in place. At this stage I checked what blocks ropes/tackle may be added from future running rigging work. Added Fiddle blocks to the Mast Caps(Fore and Main): Added eyebolts for the Burton Stays to the front of the Fore and Main Tops. Above are eyebolts added on the Main Top, Fore similar. Added one(1) per side just to make sure. Mizzen Mast - eyebolt for the Topsail yard tye fall Mizzen Top Mast: Grommet around the hex section. Stay slide down and rest over the Grommet. Dave R


-
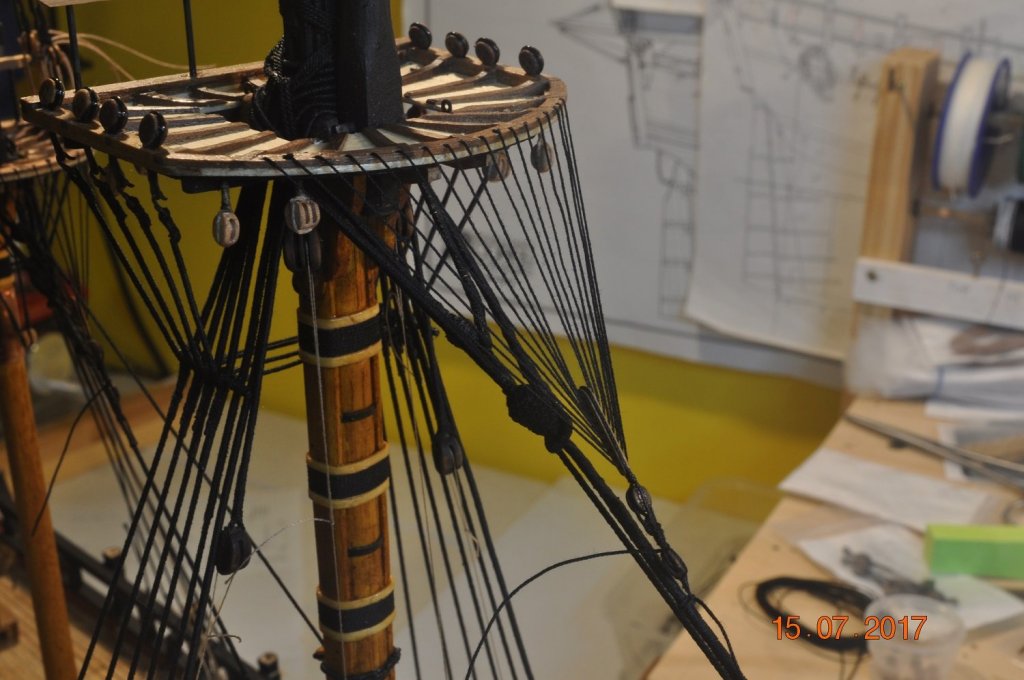
Shipyard Update Crowsfeet 2: We have added the crowsfeet to the three(3) mast tops now, 0.2mm rope looped through front of mast top, with blocks and tackle lashed to stay. Fore Mast: Main Mast: Mizzen Mast: Dave R

-
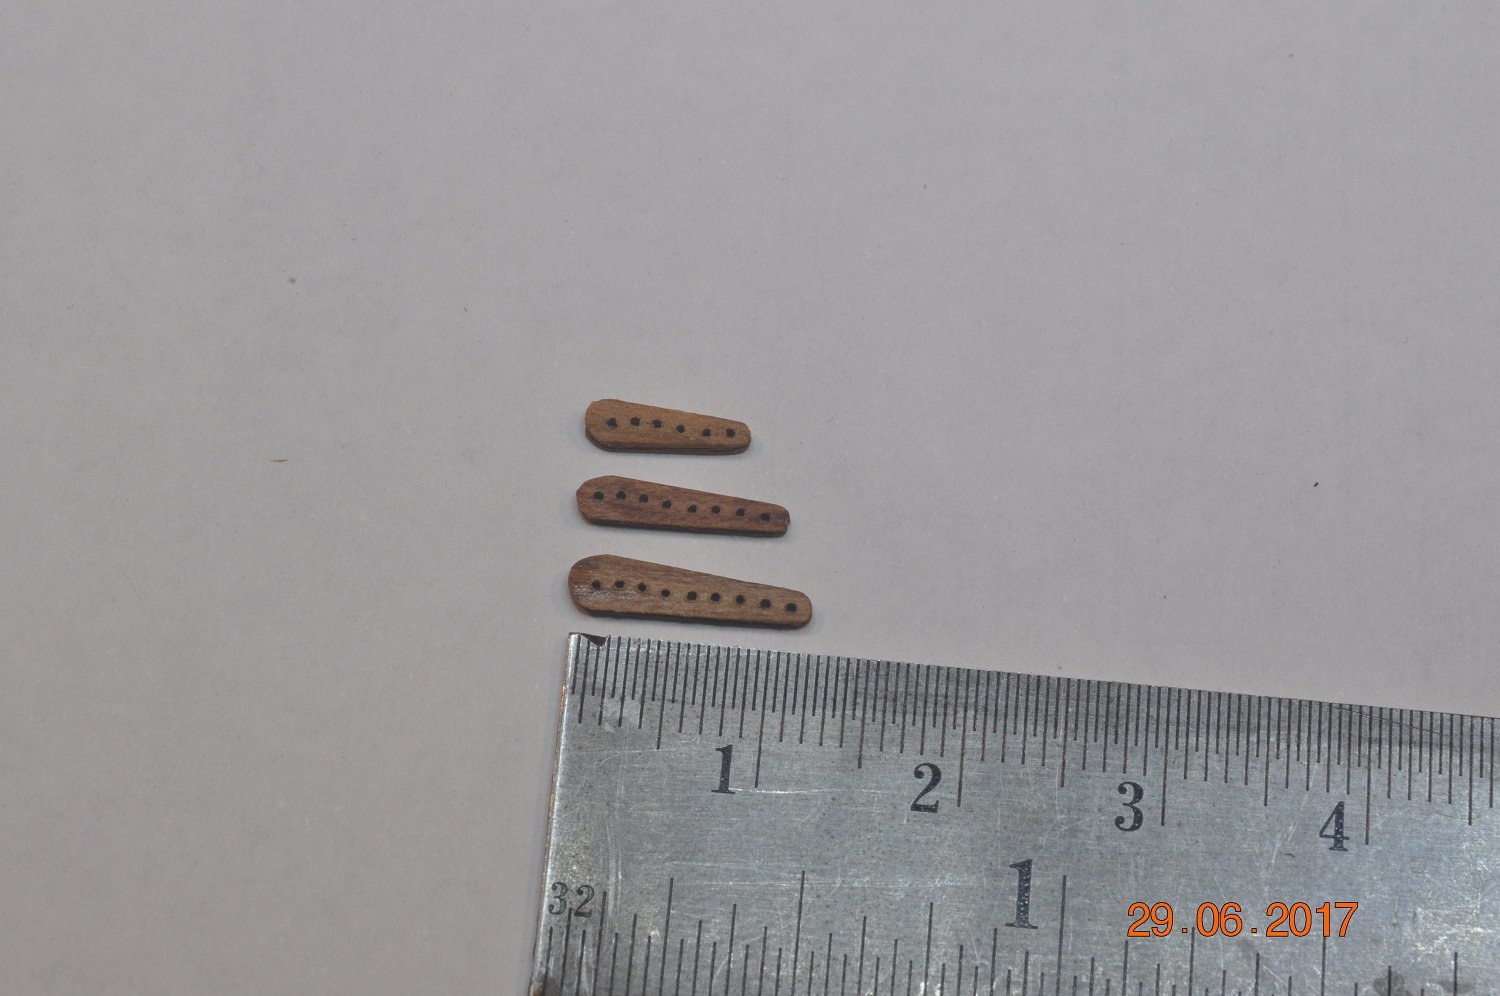
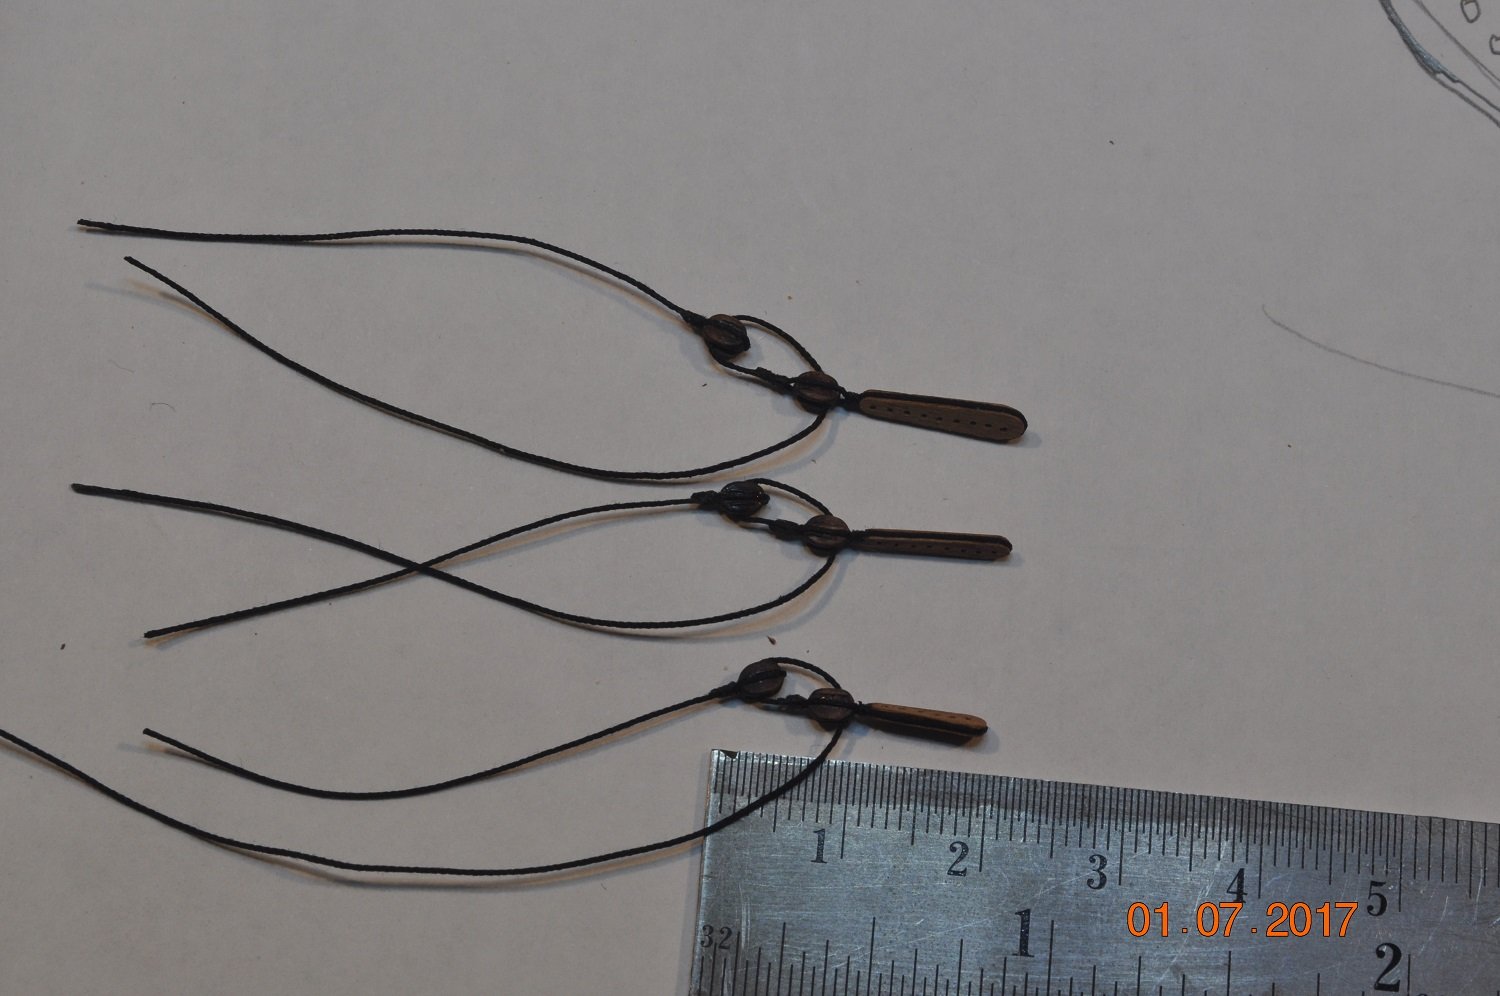
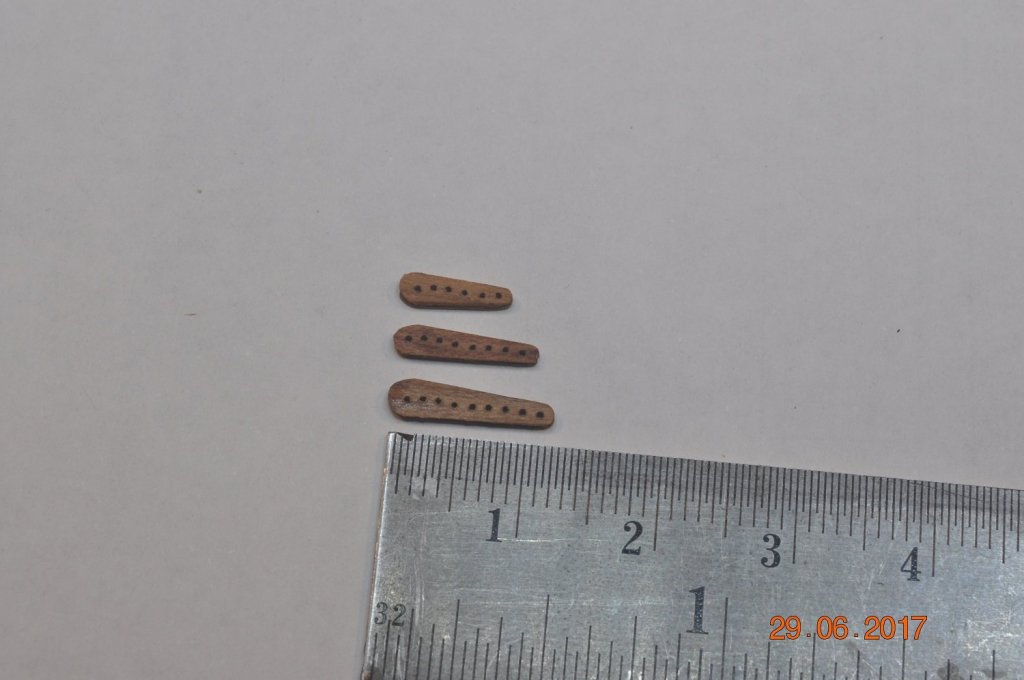
Shipyard Update Crowsfeet: The shipyard has made the 3 Euphro's for the Mast Top crowfeet. 3 sizes, 1 for each mast top. Made from pear wood. Holes not exactly lined up, but at the scale and when rope through, paint black, probably not be seen. Strapping about the Euphro with tackle(blocks and sheet) added. Will be added to the masts when I get some rope from USA. Dave R

-
Hi Steve, Just trying to understand a bit more for the new-bee(me) on this rigging business. So the pendant you mention is a Burton Pendant ? with a double block, possibly with another thimble(lashed) or hook attaches to the hanging thimble? AoTS does not indicate thimbles, however I suppose it depends on how much detail one wishes to add to the realism of the model. David Steel's Rigging..... Main & Fore Top-Mast > Burton Pendants(1 pair): has a thimble on the pendant(hanging I assume, like yours) thimbles 1 each on the double block and single block(which would make up the tackle) All the above now makes sense to me. However, I don't understand the pair of blocks in the shroud ? Probably something i have not come across yet.! Cheers Dave R