Piet
-
Posts
3,568 -
Joined
-
Last visited
Content Type
Profiles
Forums
Gallery
Events
Everything posted by Piet
-

Mayflower by SawdustDave - Finished
Piet replied to SawdustDave's topic in - Build logs for subjects built 1751 - 1800
Beautiful work my friend. I can't wait to see them in real life and the Sovereign plans. Cheers, -
That looks rather splendid Ian, just lovely work! Looks like you think like me, if I make a detail it better works You might be right in it looking odd having two pumps from different time periods. However, the later one could be there for operational trial reasons. Cheers,
-
Ah yes, they are looking rather smart John. Cheers,
- 2,250 replies
-
- 2
-

-
- model shipways
- Charles W Morgan
- (and 1 more)
-
Hey Carl, stamina I have alright, but not that many years ahead though. This coming April 15 I'll be 81 years young Thanks for the compliment, does my old heart good Yeah Popeye, for now I'll keep it simple so as not to detract from the model. I think that the main focus should be on her. I'll just have make an oil painting of her in full sea, somewhere in te tropics. My father loved the tropics. Cheers,
-
Beautiful work John! Cheers,
-
Ah yes, John, much, much better! That looks rather acceptable to me, great job. Cheers,
- 2,250 replies
-
- 2
-
-
- model shipways
- Charles W Morgan
- (and 1 more)
-
@ Dave: I assume the question partains to the model ? Without the display board she weighs about two feathers Light enough to easily carry with two hands, which is needed because of the length. If the display board is completed they can be carried separately. No fork lift needed. @ Carl: Yeah, it would really look nice to do it that way but then the display board needs be a lot wider to do it justice. It'll be more like a diorama. Well, one never knows. Another build? Well, I have to finish the VOC ship and a VOC jacht or botter in a lamp. Then my father in law's shop the "Musie." I have too many irons in the fire and not getting any younger to complete everything I still want to do. Cheers,
-
Hoi Chris, I wish you a speedy recovery and the flag looks great. Cheers,
-
Hi John, well, "stuff" happens and I can sympathise with Frankie regarding having a hard time being on the receiving end of criticism. When I looked at the ratboards I thought that's the way they were supposed to be. Hey, what do i know about old sailing ships - - - being an airplane guy I have bought a spool of sewing thread that's EXTREMELY small, cotton wrapped polyester. When I unwrap the cotton from the polyester I wind up with a very - very thin polyester and cotton thread. I daresay that they are slightly thicker then a hair. Gwen agreed with me when i showed it to her. I used that to tie the antenna wires of the O19 to its support cable. I don't know if they still sel cotton wrapped polyester sewing thread but it may be with your wile to check. It may even be thinner then Chuck's cable and may scale up or down great for your ship. Just a thought. Cheers,
- 2,250 replies
-
- 3
-
-
- model shipways
- Charles W Morgan
- (and 1 more)
-
Fantastic metal work Ian and a great tutorial. Cheers,
-
Some time ago when I started to think about the display board I mentioned to Remco via private e-mail, that I had the idea of building a mooring dock on the starboard side and simulated sea on the port side. You know, with resin wave action. But that's carrying things too far. Besides, I have other things to do, there are a few more build and paintings and drawings to make. So, i'll just leave it at all that - it being a nice thought. Did go to the DIY store to see what they have for the display board. Home Depot has a nice looking 1/4 inch oak veneered plywood. $30 bucks for a 4 X 8 foot sheet and I only need a 10 inch by 66 inch piece . Question is, what do I do with the rest. I also checked to see what I have in nice wood for the mounting blocks. I have a nice chunk of 1 X 3 X 30 inch box that'll make the two blocks I need. The framing will be 1 X 1 inch pine. Looks like I can start making the display board soon. It needs to be ready for the trip up do Sawdust Dave's place for the Wounded warrior program. Cheers,
-
Thank you very much Anthony for your kind words. Rijksmuseum eh? I don't think they want my model though, perhaps the Navy Museum in Den Helder. I'm going to visit the Netherlands with my wife, daughter and grandson this June. We are planning to also go to that museum and I'll try to get a word with the director. However, IF they want to have it and IF my daughter or grandson don't want it then they can come and pick it up here. I'll bring a nice glossy photo of the model with me. We are also going to pay a visit at the Maritime museum in Amsterdam. Cheers,
-
Thanks Freek for your very nice accolades, truly appreciated coming from you. Yeah, I thought doing that but what I'm after is as she was in service when my father sailed on her to the Dutch East Indies. No, no reef diorama either - - - what a shame, loosing that boat due a stupid navigational error. Hi Carl, yup, that frame will be sturdy. I plan to reinforce the corners with metal corner pieces inside and I'll put a longitudinal strip in the center with cross pieces. The cover plank should tie it all nicely together. I hope I can find a nice piece of wood planking. Don't know yet what kind, or a nicely finished piece of plywood. I'll be doing some trial pieces as far as the two mounting blocks are concerned. Hello Dave, man alive - - - what have you been smoking Not such a bad idea though and to tell you the truth, I did think about making a small diorama with a miniature sub in a bottle, submerged at periscope depth. Okay, I still need to plan-out the materials to get and make a sketch with the measurements. Busy, busy, busy Cheers to all,
-
Hey Carl, what a brilliant idea! Thanky, thanky, thanky! Why didn't I think about that one Not seeing the forest through the trees, perhaps? But, that's why you make the big bucks I'll certainly pursue that, seems rather simple and will result in a very nice looking display board. Stained in a light oak? I'll make some plans and visit the local DYI store for lumber and needed hardware, unless I have enough brass screws to nail it together. I need to go there anyway for some other stuff. Next question is - how to mount the model. With the keel on the board or elevated some on 2 brass pins or 2 wooden blocks. The mine bin "side-sadles" kinda hide the pins but nicely shaped blocks the width of the keel may work too. I think I should raise her up from the board a little - like maybe 2 cm. That'll also give me the opportunity to demonstrate the mushroom anchor hidden in the bow keel. Oh yeah, I forgot to mention another detail I could have added - - - the mine drop-down doors on the bottom - - - - - - Forgetaboutit!!! Cheers,
-
Holy chiwawa Sjors, she's looking mighty fine! Cheers,
- 1,616 replies
-
- 2
-
-
- caldercraft
- agamemnon
- (and 1 more)
-
Fantastic detail Kees, looks real! Hey, I like the Gulden too! I have a few left over myself Cheers,
- 205 replies
-
- 1
-
-
- kw49 antje
- trawler
- (and 1 more)
-
Awesome! I like it when you hold her in your hand, gives us some sense of perspective. Cheers,
-
Very nicely done John, the research paid off! Cheers,
- 2,250 replies
-
- 2
-
-
- model shipways
- Charles W Morgan
- (and 1 more)
-
Thanks again to everyone who stopped by for a look-see and to those who clicked the like button. Today I spend sorting out my notes and pictures. I removed most of the ones I taped to the wall in the garage but the O19 is still there I also made a start in making copies to put into a binder that'll go with the model. I really like to show the progress of the original build to her trip to the Netherlands east Indies. The problem is - where do I stop making copies. At least I have two pics with my father on them, which makes me happy. Rummaging through all the papers I have I dug up a letter from the then Queen Wilhelmina of the Netherlands and the Overseas' possessions. It is a charter of issuance of the silver medal of the "Orde van Oranje-Nassau." We received several nice writings and medals from the Ministry of the Navy, which I'll also make copies of and include in the binder. Hey Remco, I'm glad you concur with my choice of the grey to indicate the fake hinges. Yes, they are less obtrusive this way. I can spare you a few brain cells in coming up with another detail project. How about the bow torpedo tubes with working doors???? And while we are at it, why not do the stern tubes as wel ???? Forgetaboutit!!! No way Jose! Hmmm - actually - - - - - no - no - no - won't happen Enough is enough. Yeah Dave B, I propped up both hands to have a steady rest and took a break between port and starboard sides. Lunch to the rescue. Actually it went quite well, better then I thought. I have also been thinking what to do with the final display board. I was going to use the same build board and dress that up nice with a coat of paint and edge moulding but it is a piece of 3/4 inch plywood of 72 X 12 inches. It's heavy as all get out and difficult to handle. I could make it narrower by 2 inches or go for some 1/2 inch shelving planking. I guess no matter what I use it'll be heavy and still awkward to handle. Still thinking about it. Then there is how to mount the model. Raised from the display board or like I have it now, with the keel pinned to the board. Whatever I wind up doing has be simple and not distracting. I have to wait taking pictures till the weather warms up some. We are expecting a good freeze tonight and tomorrow. So, till the next post I bid you all happy modeling in good health. Cheers,
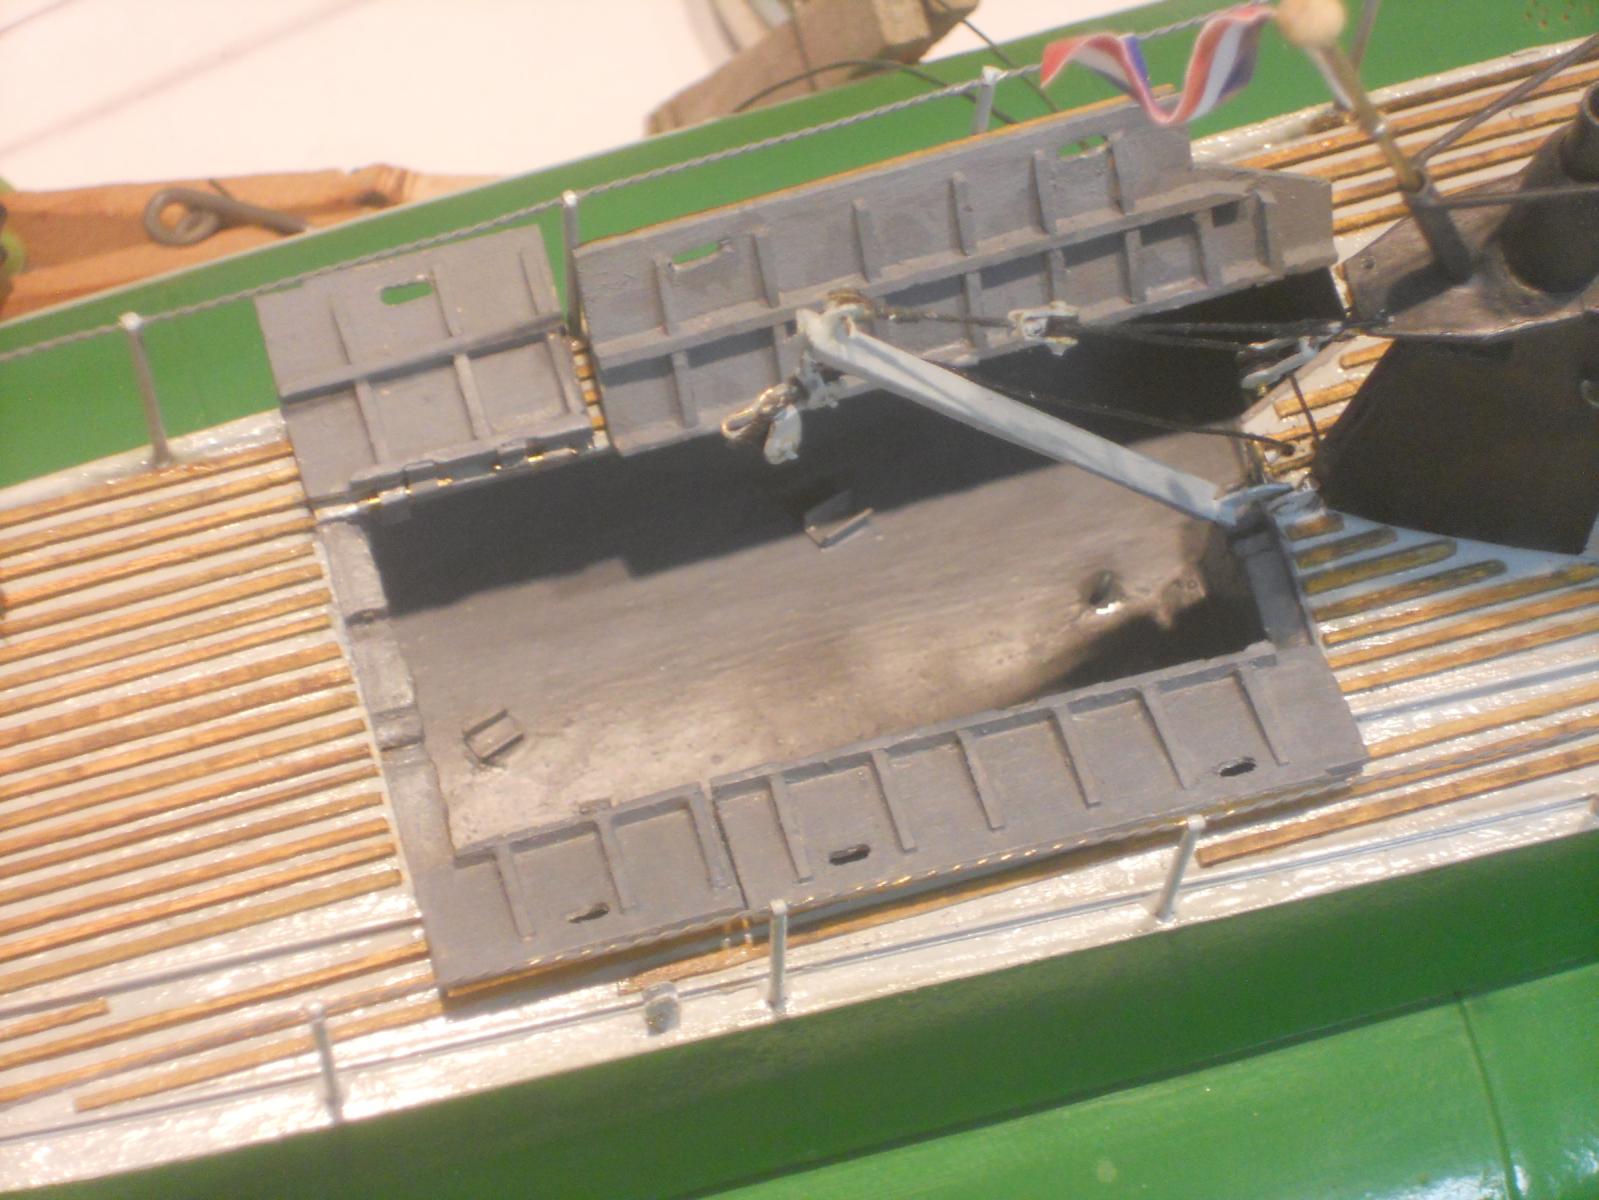
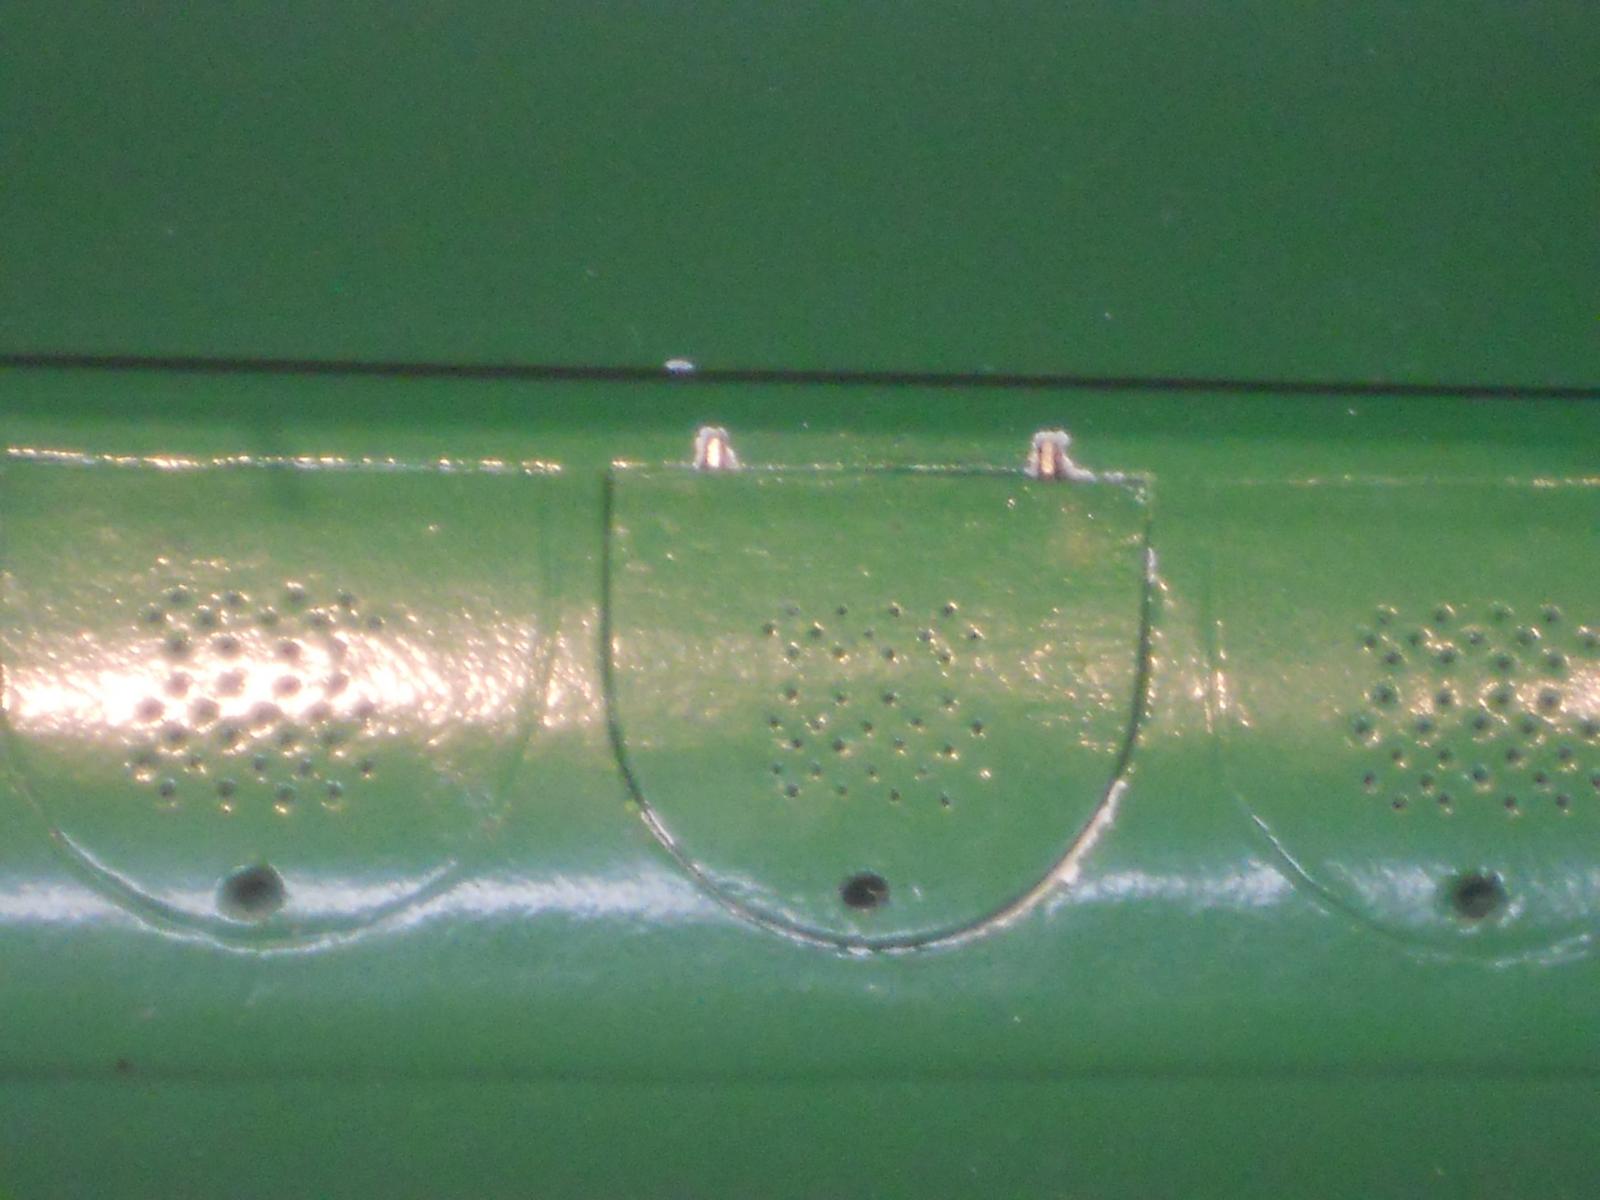
-
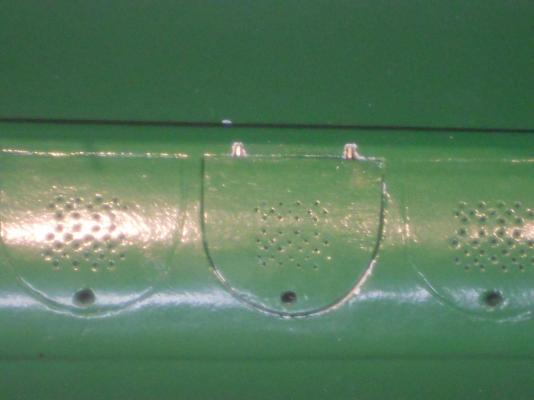
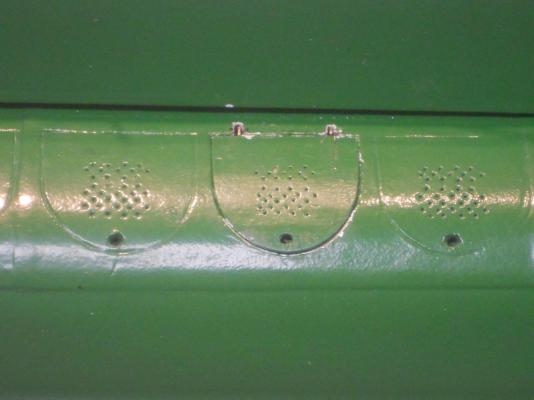
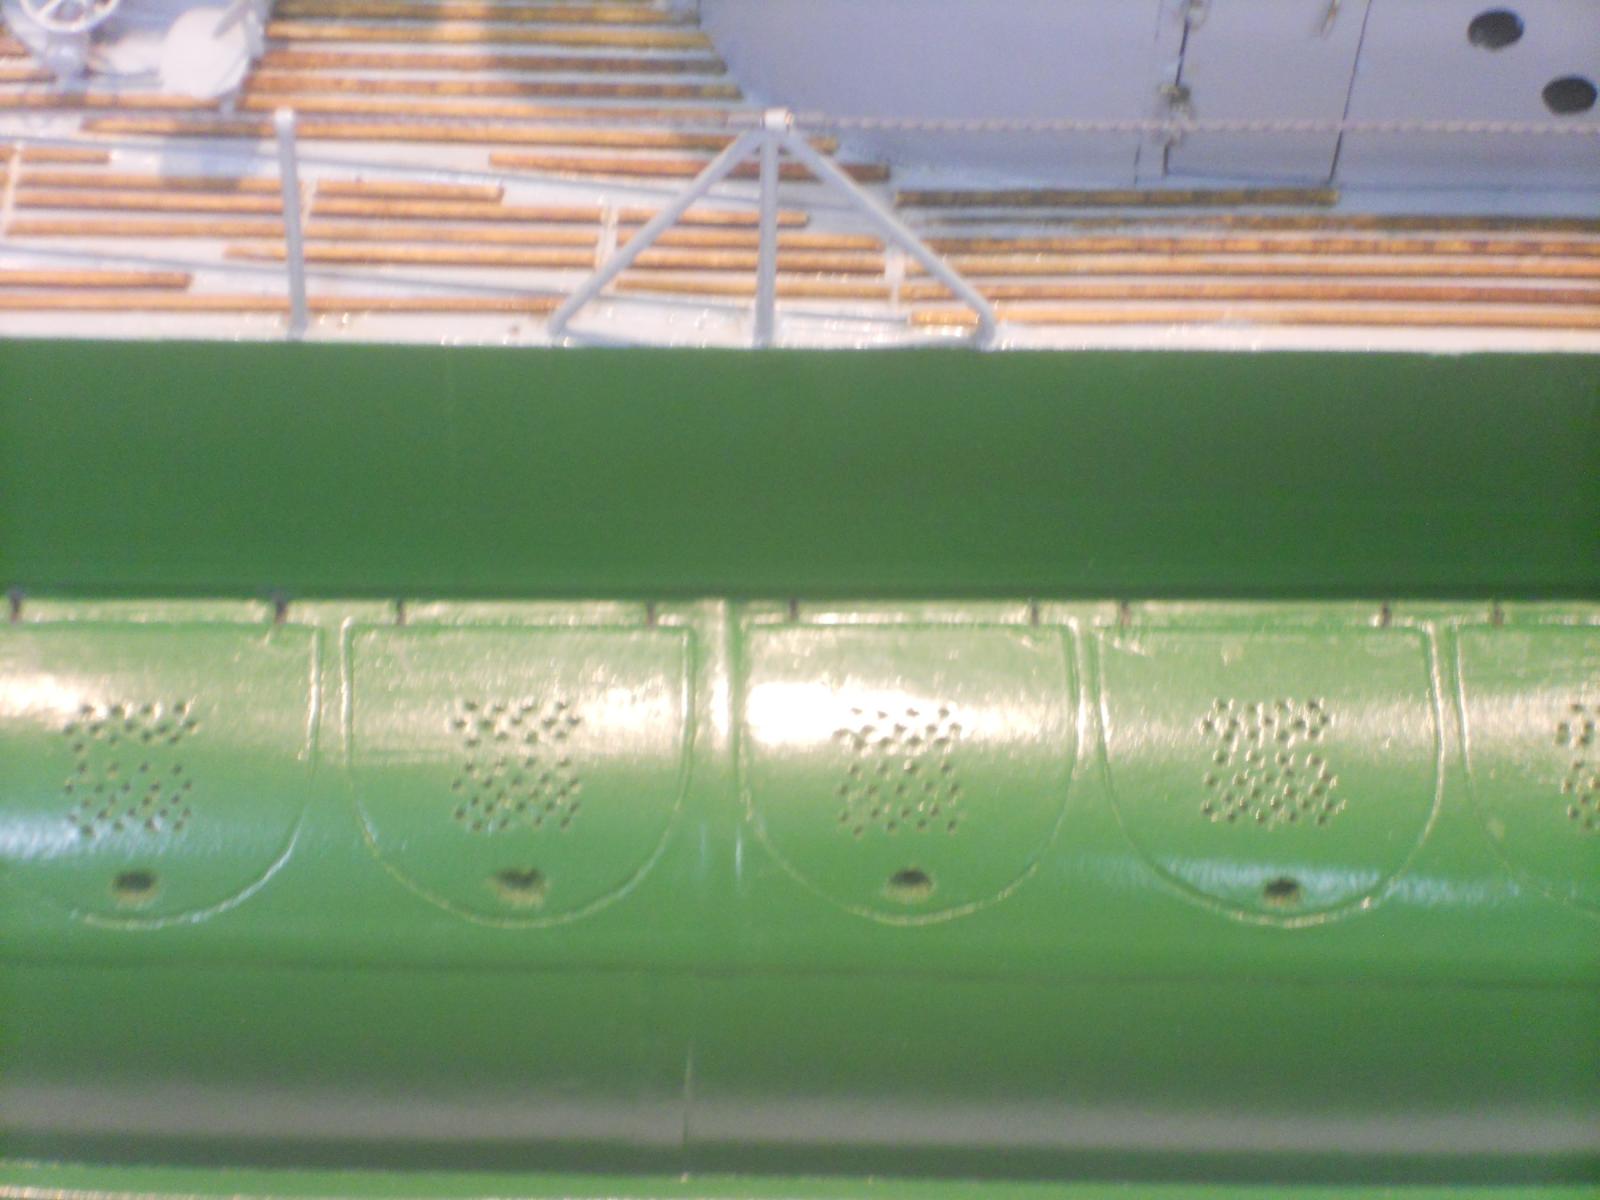
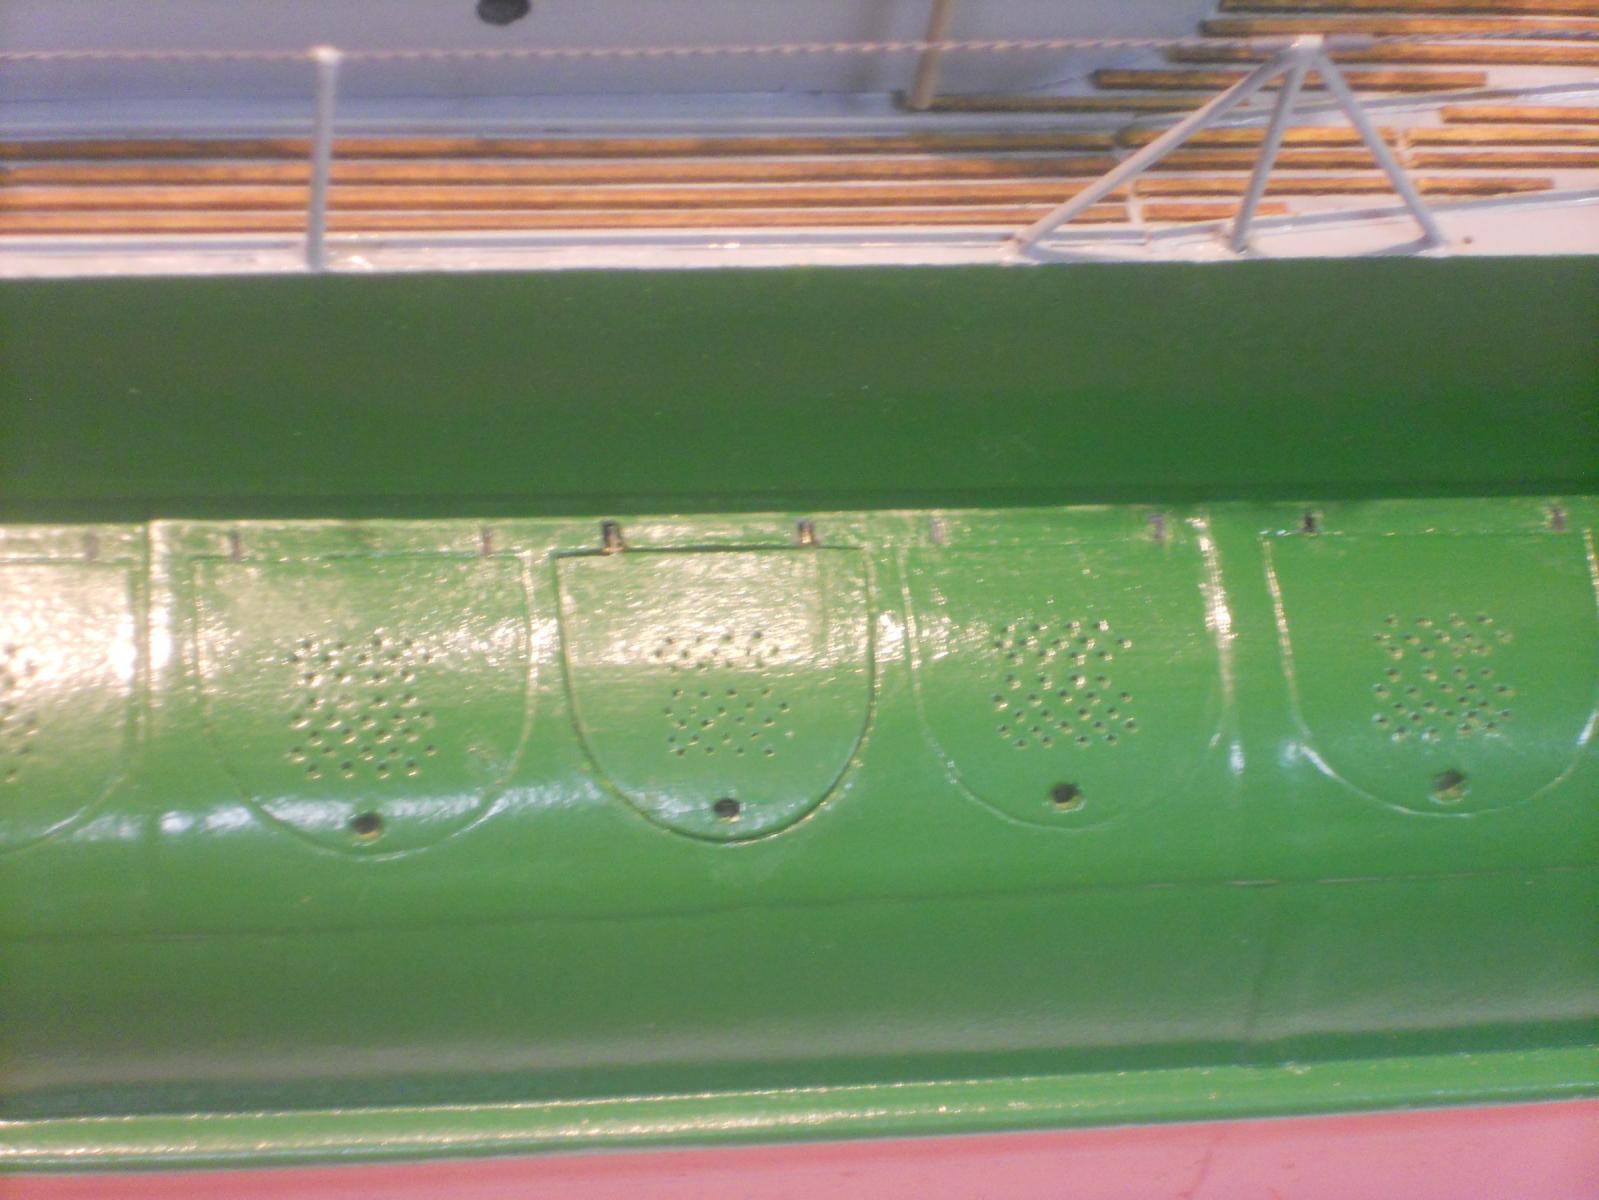
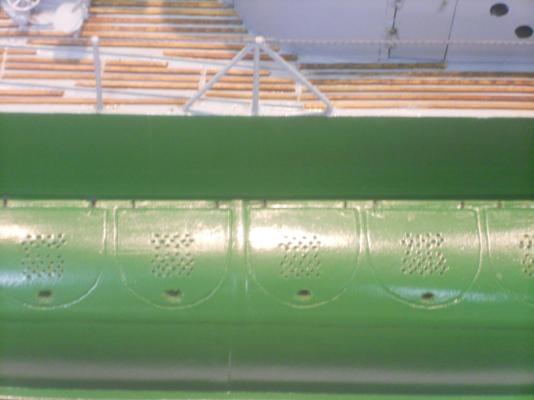
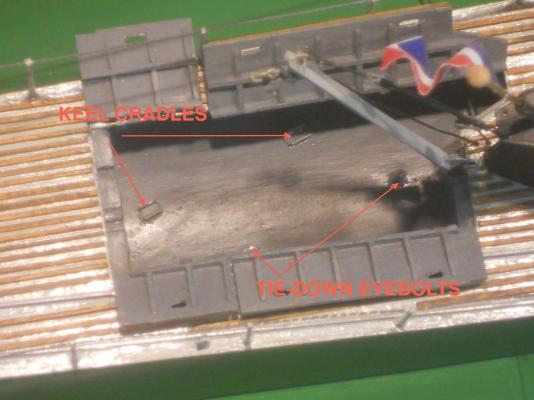
Well - - - today I took Remco up to his challenge - - - the mine bin door hinges First I tried using a #11 Exacto blade but that proved to be too dangerous, could not get a good angle on it. Hmmm, a "router bit" would be better Soooooooooh - - - I took that revamped broken 0.5 mm drill bit in the Proxxon moto tool and carefully let the side flutes do the routing first horizontally and gradually rotating the tool vertical. I didn't go all the way through the hull plating, which is 2 mm thick but the slot is deep enough that with some dark grey pain in it it looks acceptable. Had to do some touchup with the green paint and presto - - - we have dummy hinges on all the dummy mine bun doors. Doesn't look too bad actually and I'm happy with it. In the course of "routing" these slots my optivisor got caught in one of the antenna wires and dislodged it from the antenna mast and also stretched it. So I had to fix that before I could work on the dinghy cradle. Yeah, dummy me, didn't think about it and had to pay the price but it was fixed in no time flat What I decided to do for the dinghy cradle is to bend up two small U pieces of brass sheet stock that'll fit the keel. I located the dinghy center line and cemented these two U channel pieces to the pressure hul inside the dinghy "hangar." I also made a few eye bolts to tie the dinghy down with and cemented them into the pressure hull plates. This may not be how the original dinghy is secured below deck but it'll have to suffice. Again, it's a victim of afterthoughts, but for display purposes the dinghy will be hanging in the loading boom. This then may very well be the last of the details I'm going to add to the O19 - - - at least for the time being. As I have mentioned before I'll continue to add some spares and crew members. The next task is the display board and final pictures for the gallery, so don't go away yet Here are a few pics of today's efforts: Here we have the dummy hinges on the mine bin doors Port side. I elected to use dark grey instead of black, the grey is less conspicuous. I tried the black but that was much too bold. This is the starboard side, not too bad a blend. Standing at arm's length from the model you can hardly find the real door. Here is the dinghy cradle arrangement I finally came up with. I also installed a few eye bolts to secure the dinghy in its cradle. Cheers,


-
Thanks everyone, your participation in this build is highly appreciated! Thanks also for all the likes. Hi Dave, thank you and your dear wive for the compliments, it's very sobering. I'm also looking forward seeing you, your wife and your builds - - and of course all the other participants. Hope Jesse Lee can make it and the others from MSW. Hope you don't mind me making a correction with what you call this model - U-boat. She is a Dutch submarine and in the Duch language it's called an O-boot. The O stands for "onderwater," in the German language it's Unterwasser boot," hence the U. In both languages the word boot is pronounced as boat in English. Ah, those crazy languages, no wonder I struggled with them in the Dutch school system, failing grades in all three of the foreign languages, French, German And English . Hoi Carl, Yes indeed, that sly John . But others have also stirred the pot in egging me on to add some more detail here and there. Remco is at the top of the list, he has been a great help in making this model what she has become. Fact is that without Remco it would not have been possible! Then there is Amateur Jan and Gino den Ridder and Boris in Saint Petersburg and a few more with their suggestions, you included. Then all the moral support I received. I truly hope that all who have followed this build have indeed brought the best out of me. Although, I think I could have done better yet. This build has been an emotional roller coaster ride for me and am looking forward seeing her on a shelf in my studio / office. Cheers to all,
-
Mayflower by SawdustDave - Finished
Piet replied to SawdustDave's topic in - Build logs for subjects built 1751 - 1800
Nice work Dave and I LOVE those close-ups! It's almost like being on the ship. Cheers, -
Thanks everyone for your comments and likes, it's humbling and truly appreciated. @ David B: Yeah, patience I have but being a saint ????? Just ask my wife - - - - on the other hand - hmmm - - better not @ Mark: Or glued it shut @ George: Thanks! Yeah, spare parts is what we need but way down in the bulges? When I break a drill bit and still see some side lands on them I safe 'm. And to answer David B's question how I sharpen these small bits - - - if there are still some of the side lands on them I first file the broken end flat, then find the spot where the land hits the filed top and file down at about a 60 degree angle so I get a cutting edge on the land. I needed my optivisor with the extra magnifier to see it. Most of the times I luck out. @ Remco: Hey man, are you psychic? You read minds now too besides building magnificent models? Yup, after looking at the rest of the fake doors I guess I have to do it, but am a bit nervous though. I'm afraid in ruining the boat. But I'll have to bite the bullet and go ahead with it, otherwise it won't look right, showing only one door with hinges. @ Carl: yup, we are coming close now. But Remco just dumped another project on me @ Nenad: Thank you CS magician Nenad! Let me clue all of you in who the instigator is for the mine bun door and hinge. His initials are Texxn5 John. When he and his dear bride Diane came to visit he just casually dropped that one on me. At first i didn't really wanted to do it but hey, I'm always up for a challenge and here you are John, a workable mine bin door with hinges. Are you happy now???? Cheers,
-
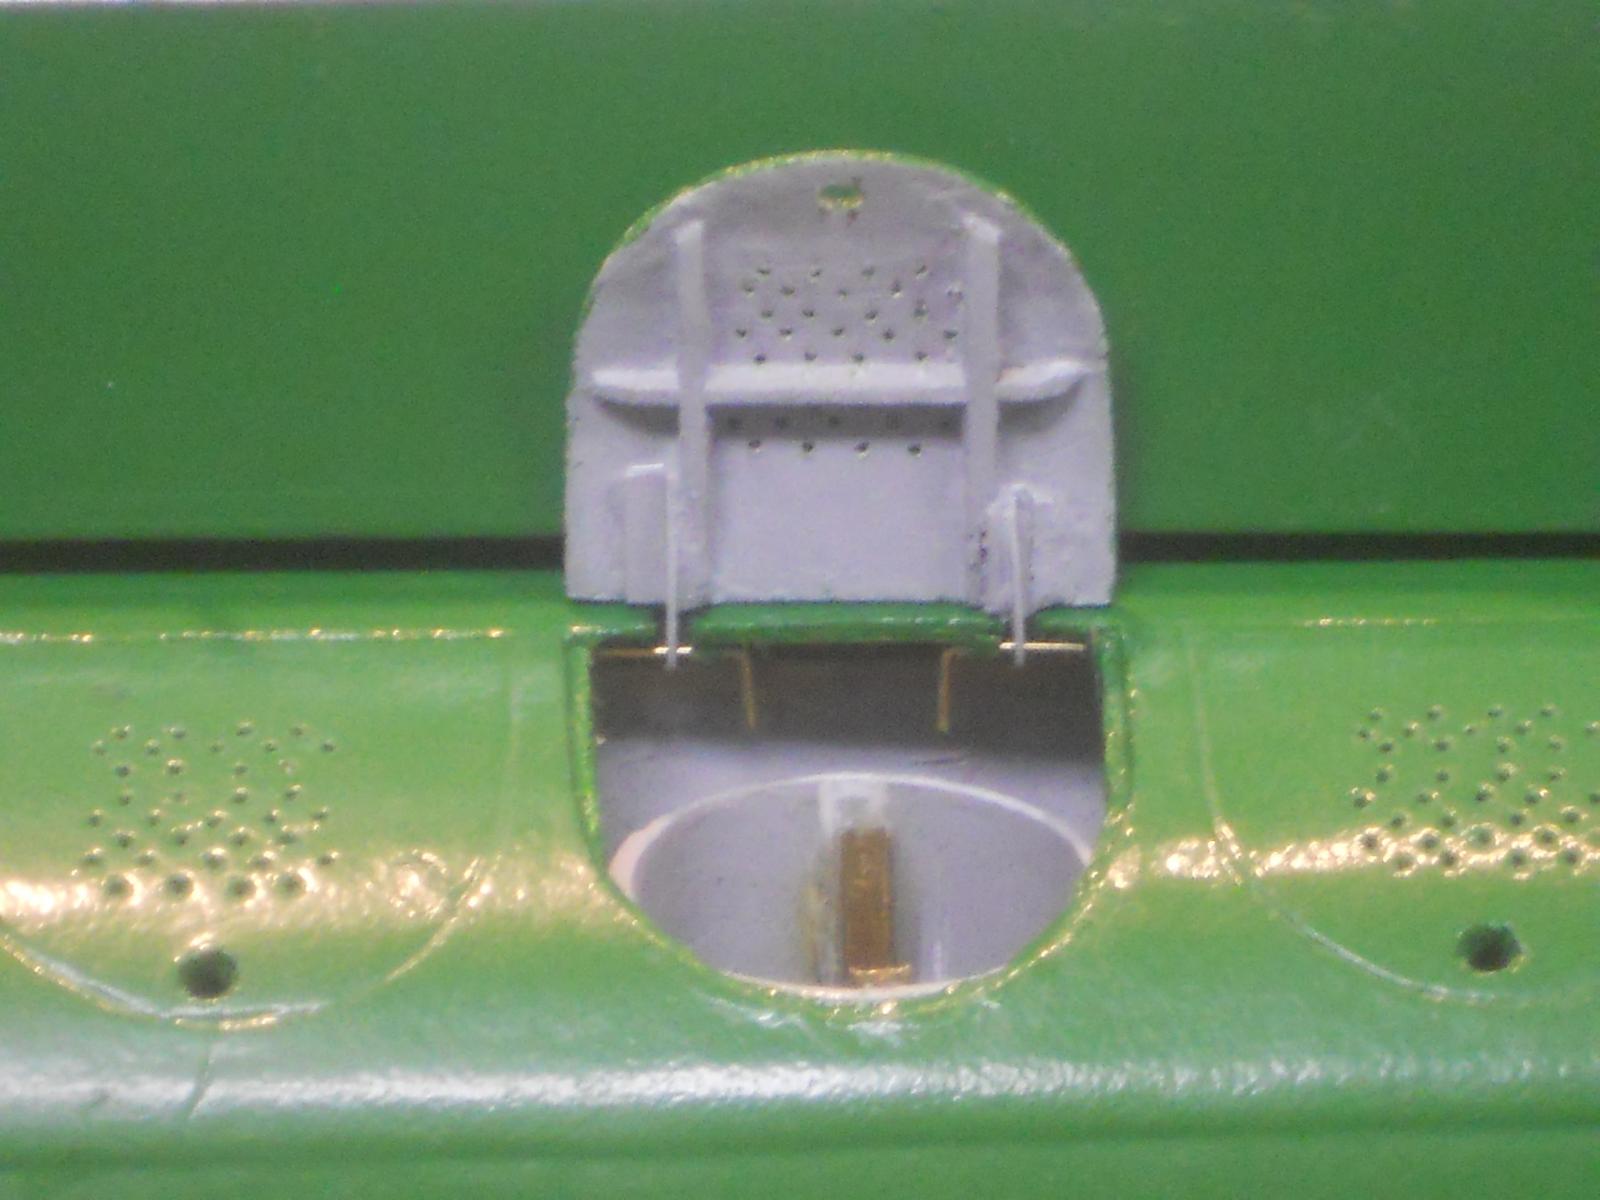
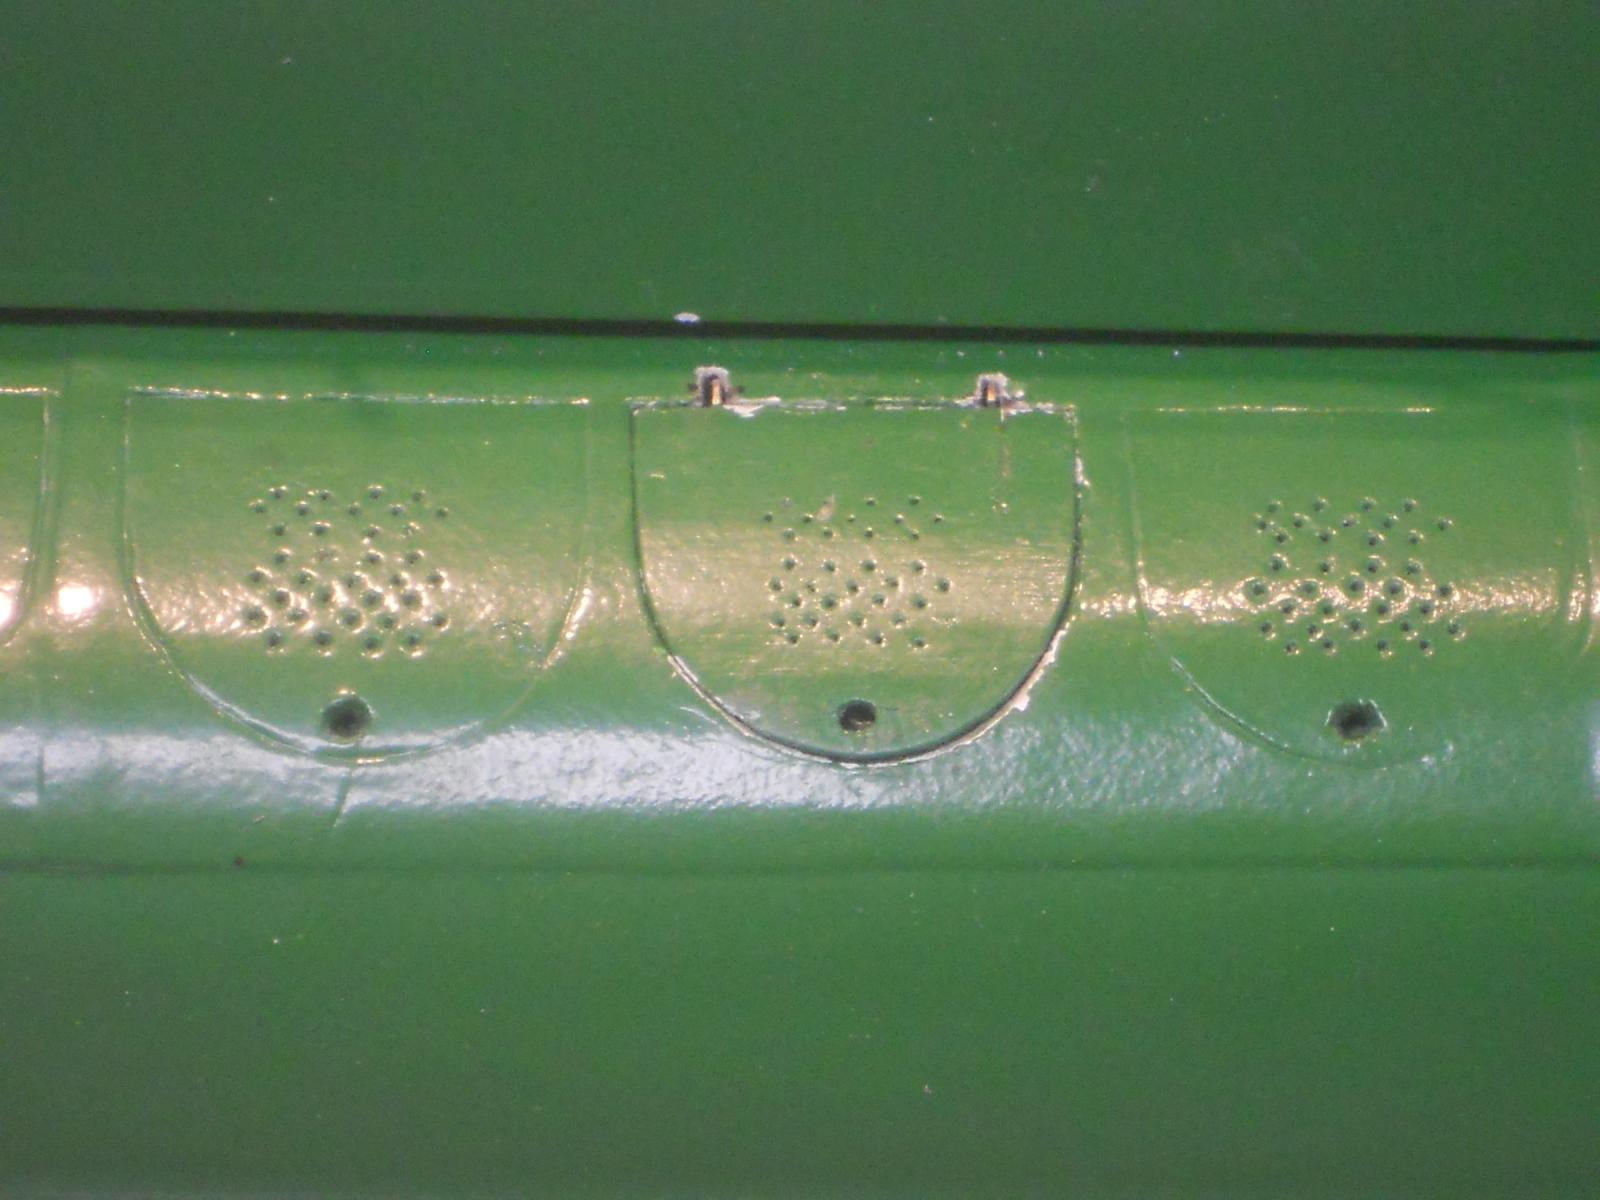
WOW, I'm overwhelmed by all your likes, much appreciated! Hi Carl, thank you for your keen interest in my feeble endeavors. I try my best to make her look as close to the original boat as I can, otherwise my father will be mighty unhappy Well today I made a valiant effort to complete the mine bun door hinge project and we won! One last project to go, the dinghy cradle thingy and then the final display board and make the install the mounting brackets in my studio / office. Her house a ka dust cover will come later as with some other details to be added in due time. The first order of business was to dress the door hinge parts. Unfortunately - - - I took a little too much of the aft bracket so the hinge pin didn't have enough meat No prob, just being a little careless. I made a new part and then fitting it to the boat I had a case of butterfingers and dropped the thing down into the bottom of the ballast tank. I tried to fish for it with a bmaboo skewer with some sticky stuff on the end but no dice. So - - - I made another new part and with all this experience it only took 1/2 hour. Problem is that I had to wait half a hour for the 5 minute epoxy to cure. So, in the meantime I made a part for the dinghy cradle and mixed some more 5 minute epoxy and cemented that in place. After the epoxy had cured enough on the door hinge I could proceed to trim that one to size and dry fit it. I had to do this several times, being careful this time not to to over do it. Next step was locating the holes in the door hinge brackets. I made two hinge pins and inserted them into the fixed hinge tubes so I could see them through the slots and marked the hull plate. Then measured down to find the approximate center of the pins. Transferred all this to the door hinge brackets and drilled the holes. Here too I had a problem. The correct drill bit of 0.5 mm was broken as were all the other small drill bits. Hmmmm, what now???? Well, I used an old machinist trick and with my optivisor I filed the broken end into a semi point, as close as I could to how a drill bit shout look like. Many, many years ago I could hand sharpen drill bits on a carborundum grinder as good as those DrillDoctor machines. Well, it worked! It will most likely not work too well on steel but wood, brass and aluminum works okay. Okay, long story but If one is caught short you have to be inventive. Now it was time to install the door. I made a 90 degree bend in the 0.5 mm brass pins to have some sort of a handle. Installed the one and then the second - - - oops - - - dropped that one too down to the bottom of the ballast tank domkop, he mumbled No prob, quickly made a new one and this time it went right in. Tried the operation and had to elongate the holes in the door brackets but after that was done the door operated just fine. This time I didn't loose the hinge pins Ouch - ouch, twisted my arm patting myself on the back Now it was time to touch up the paint and call it a day. I think I'll try to make the hinge pin in one piece. I can slide it in from the center one way and then back the other way. That 1/2 mm rod is flexible enough to allow me to that, it's also much better to lock it in with some CA and besides, it also looks better. Here are a few pics of this project. This shows the dry-fit of the door without hinge pins. This shows the door hinged in the open position. You can see the temporary hinge pins. This shows the hinged door in the closed position. Even with your eyeballs right over it the door fits nice and snug. Cheers,