HOLIDAY DONATION DRIVE - SUPPORT MSW - DO YOUR PART TO KEEP THIS GREAT FORUM GOING!
×


Piet
-
Posts
3,568 -
Joined
-
Last visited
Content Type
Profiles
Forums
Gallery
Events
Everything posted by Piet
-
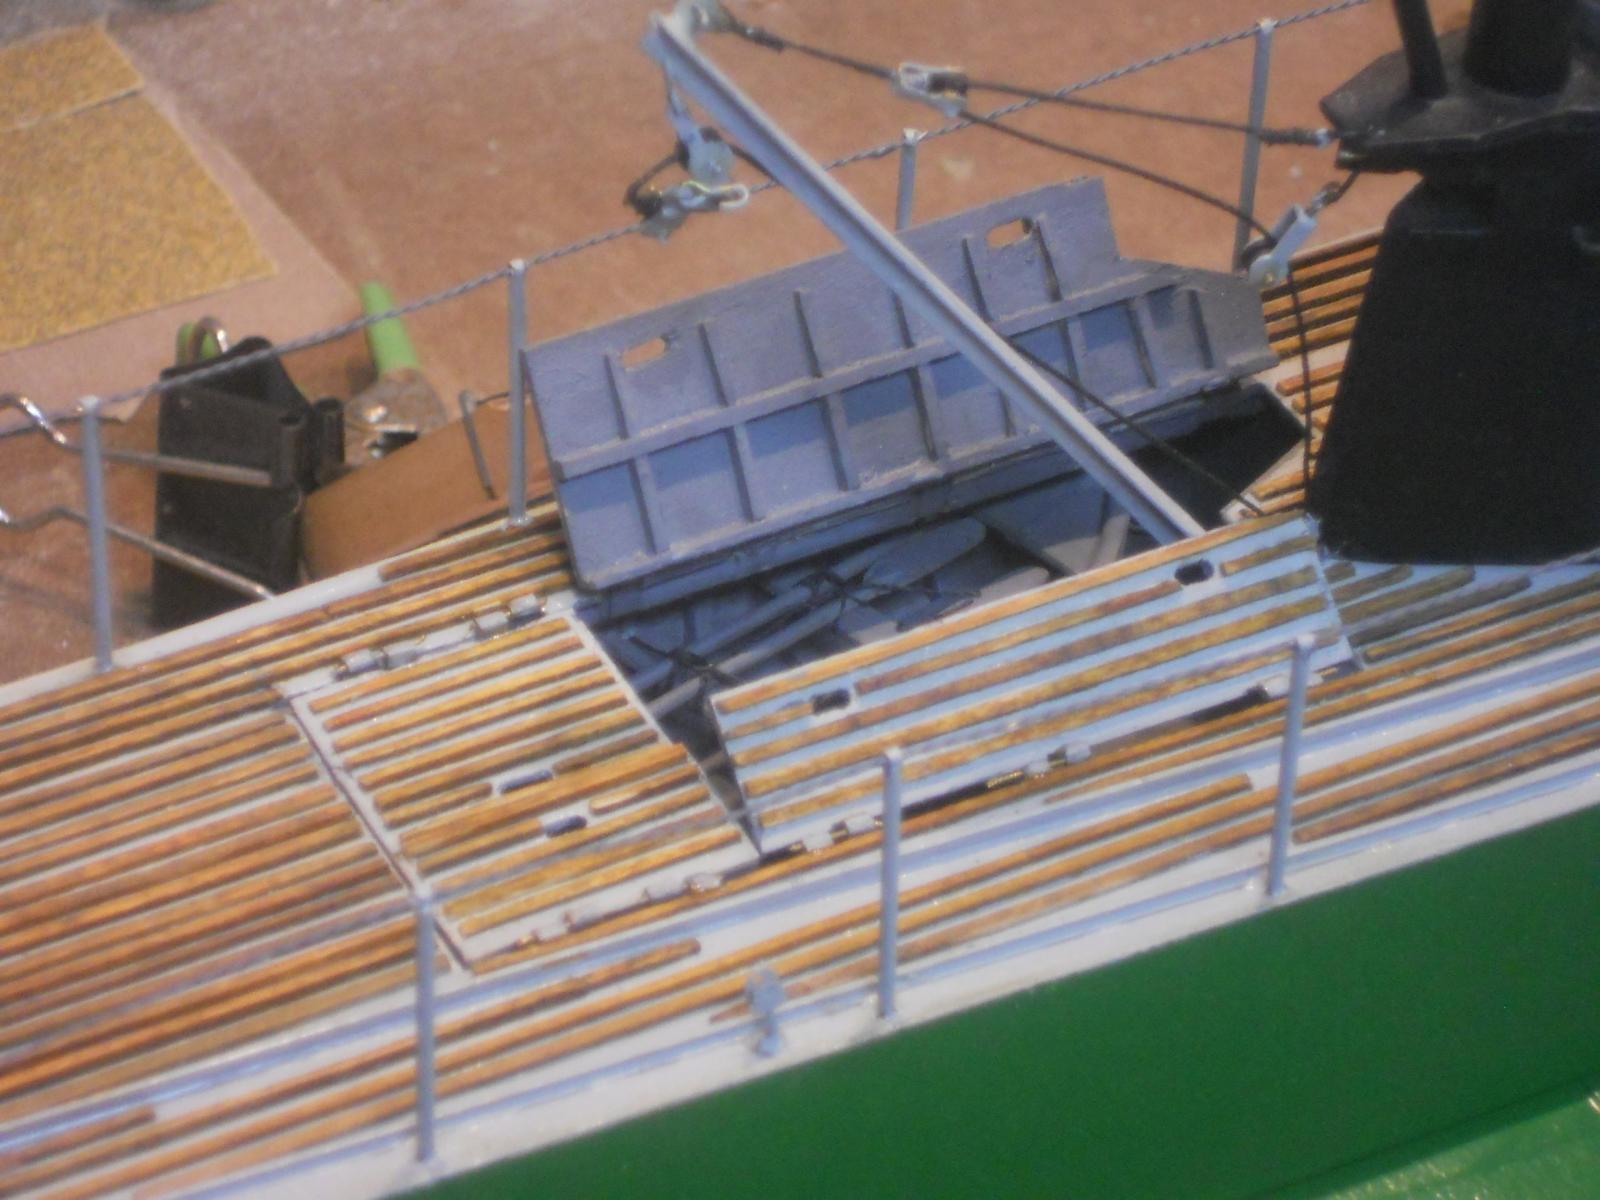
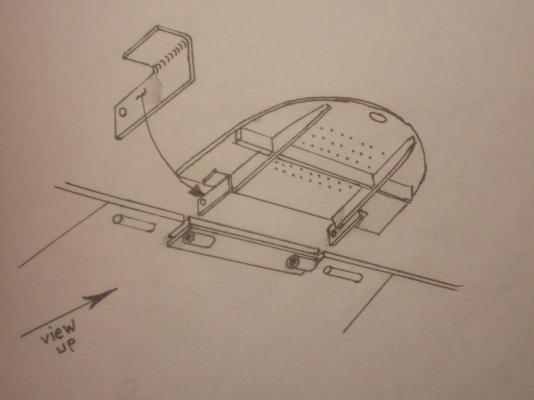
 Hey Daniel, I think I worked around the upload problem. Here are the two pics of the dinghy inside the deck area. I didn't want to remove the dinghy loading boom so the hatches are not all closed but I have tried it already and believe me, the hatches close up real nice and snug. Cheers,
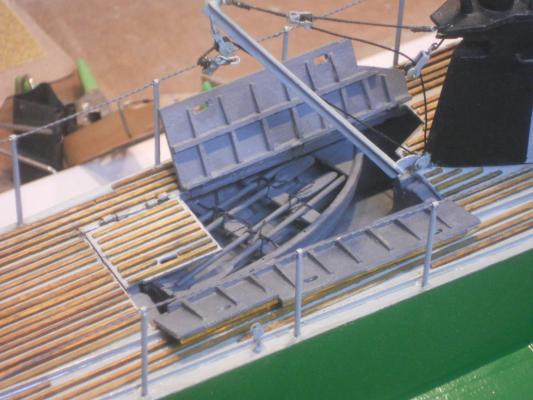

-
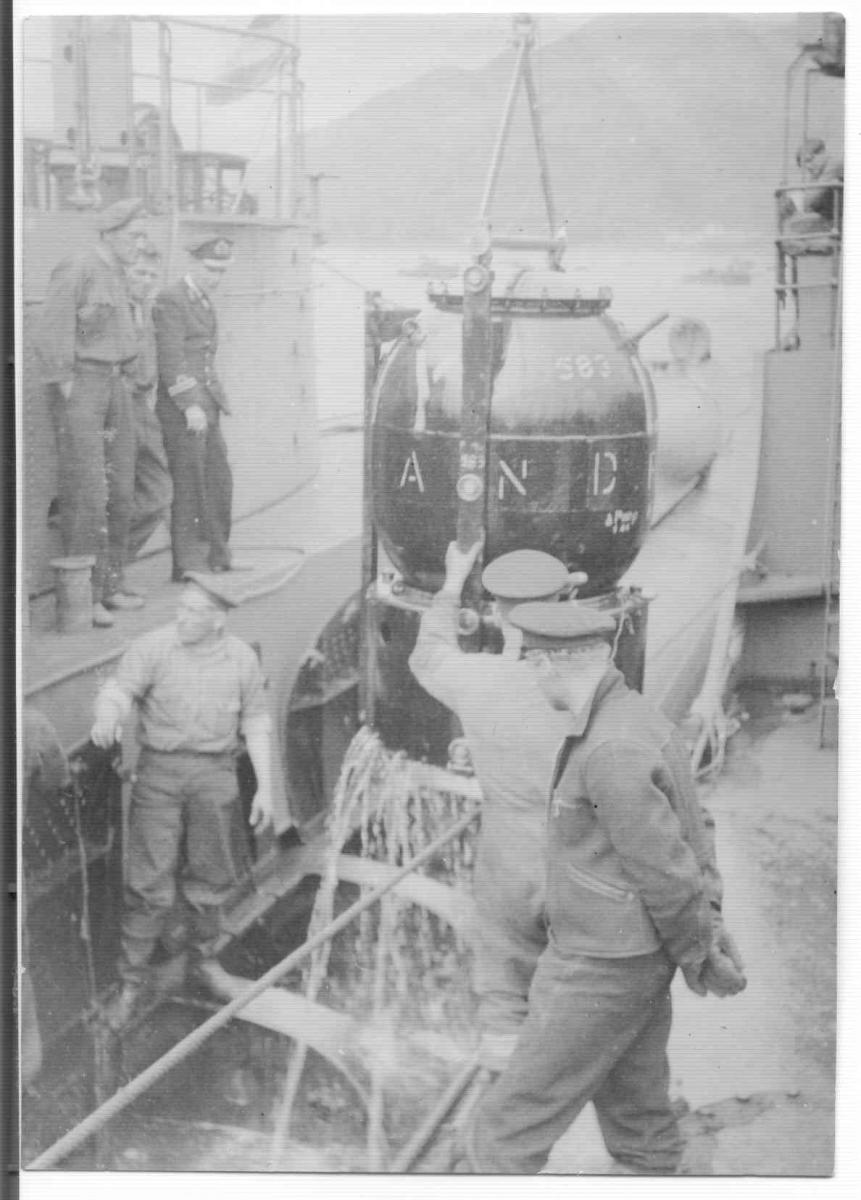
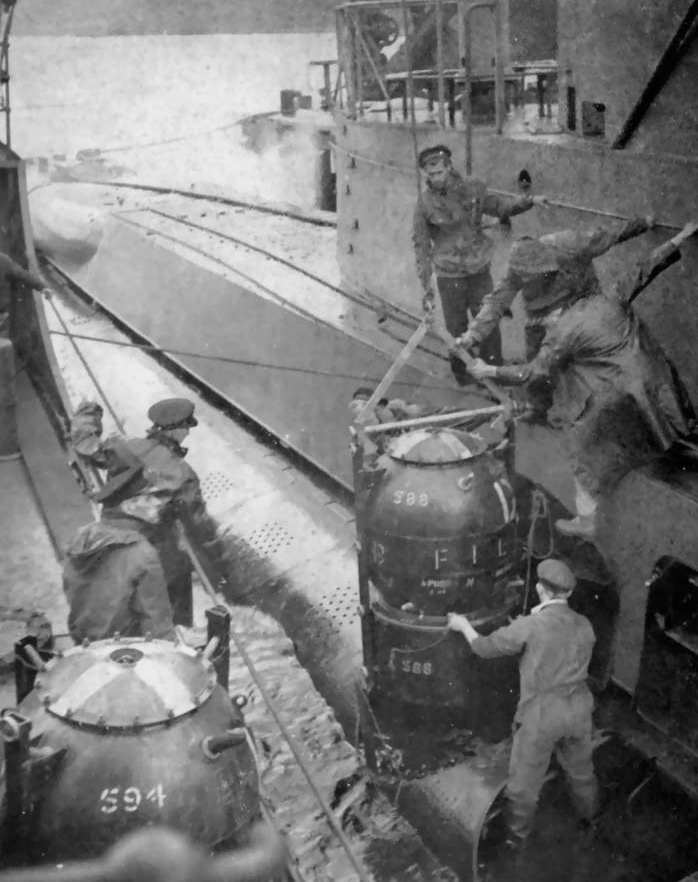
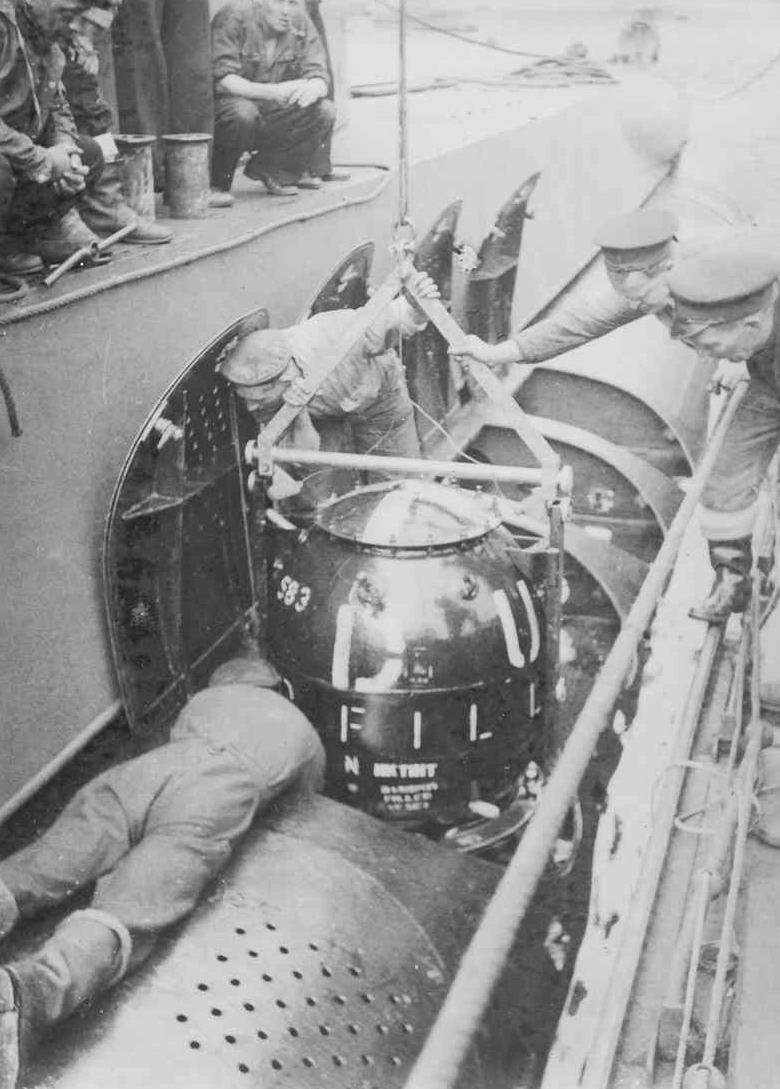
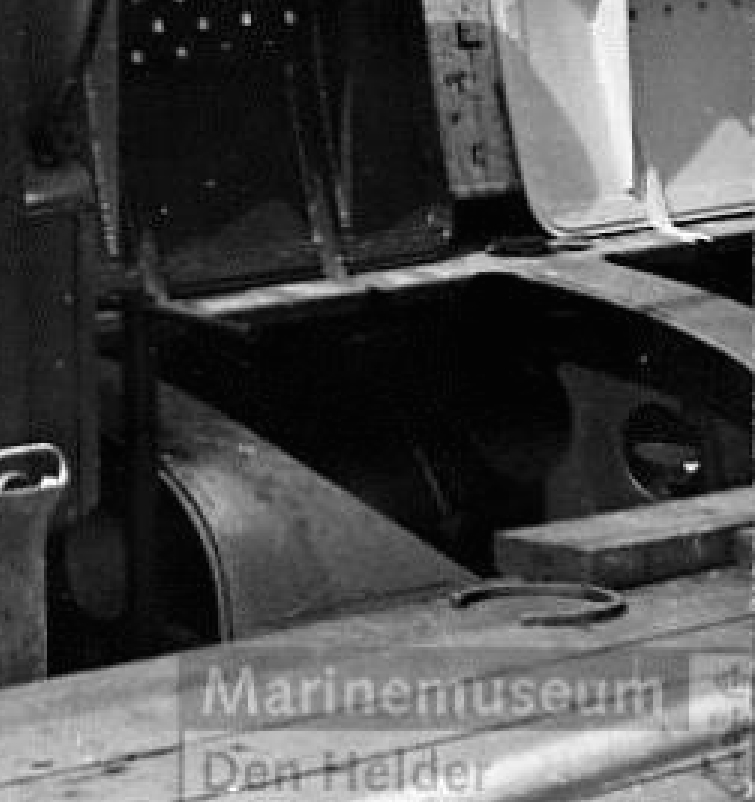
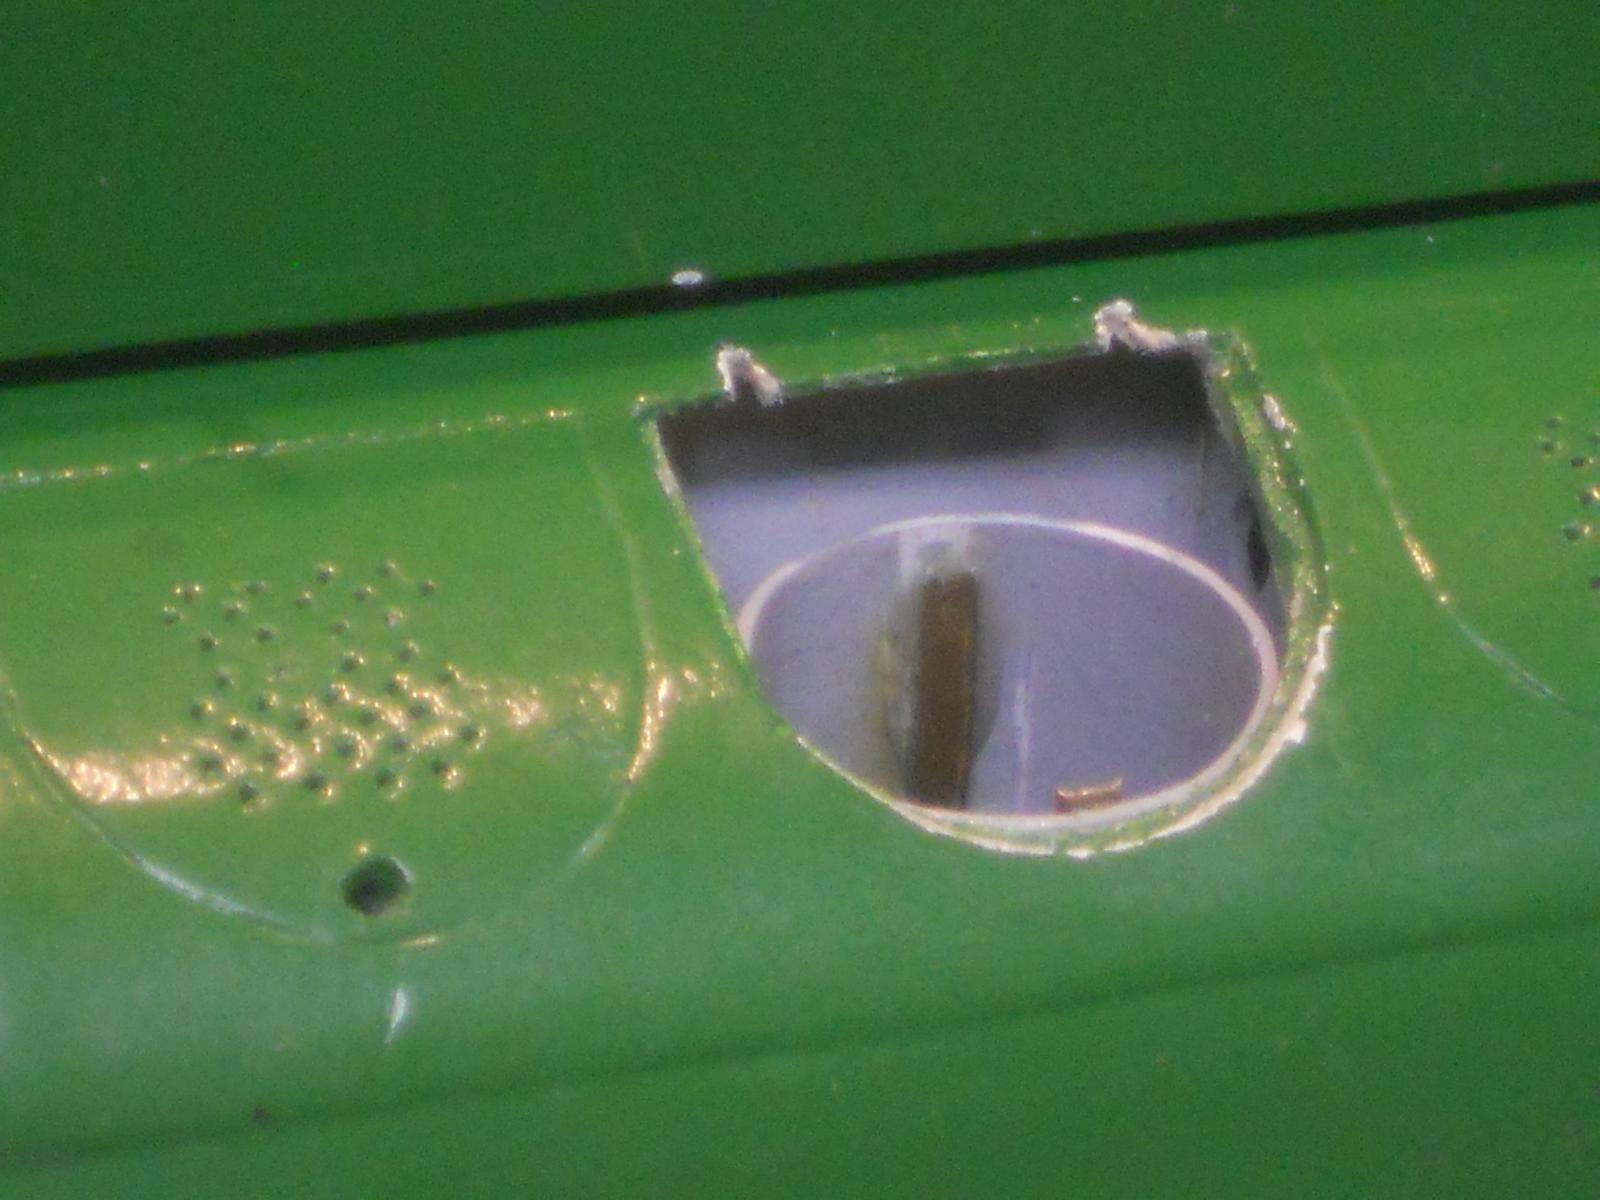
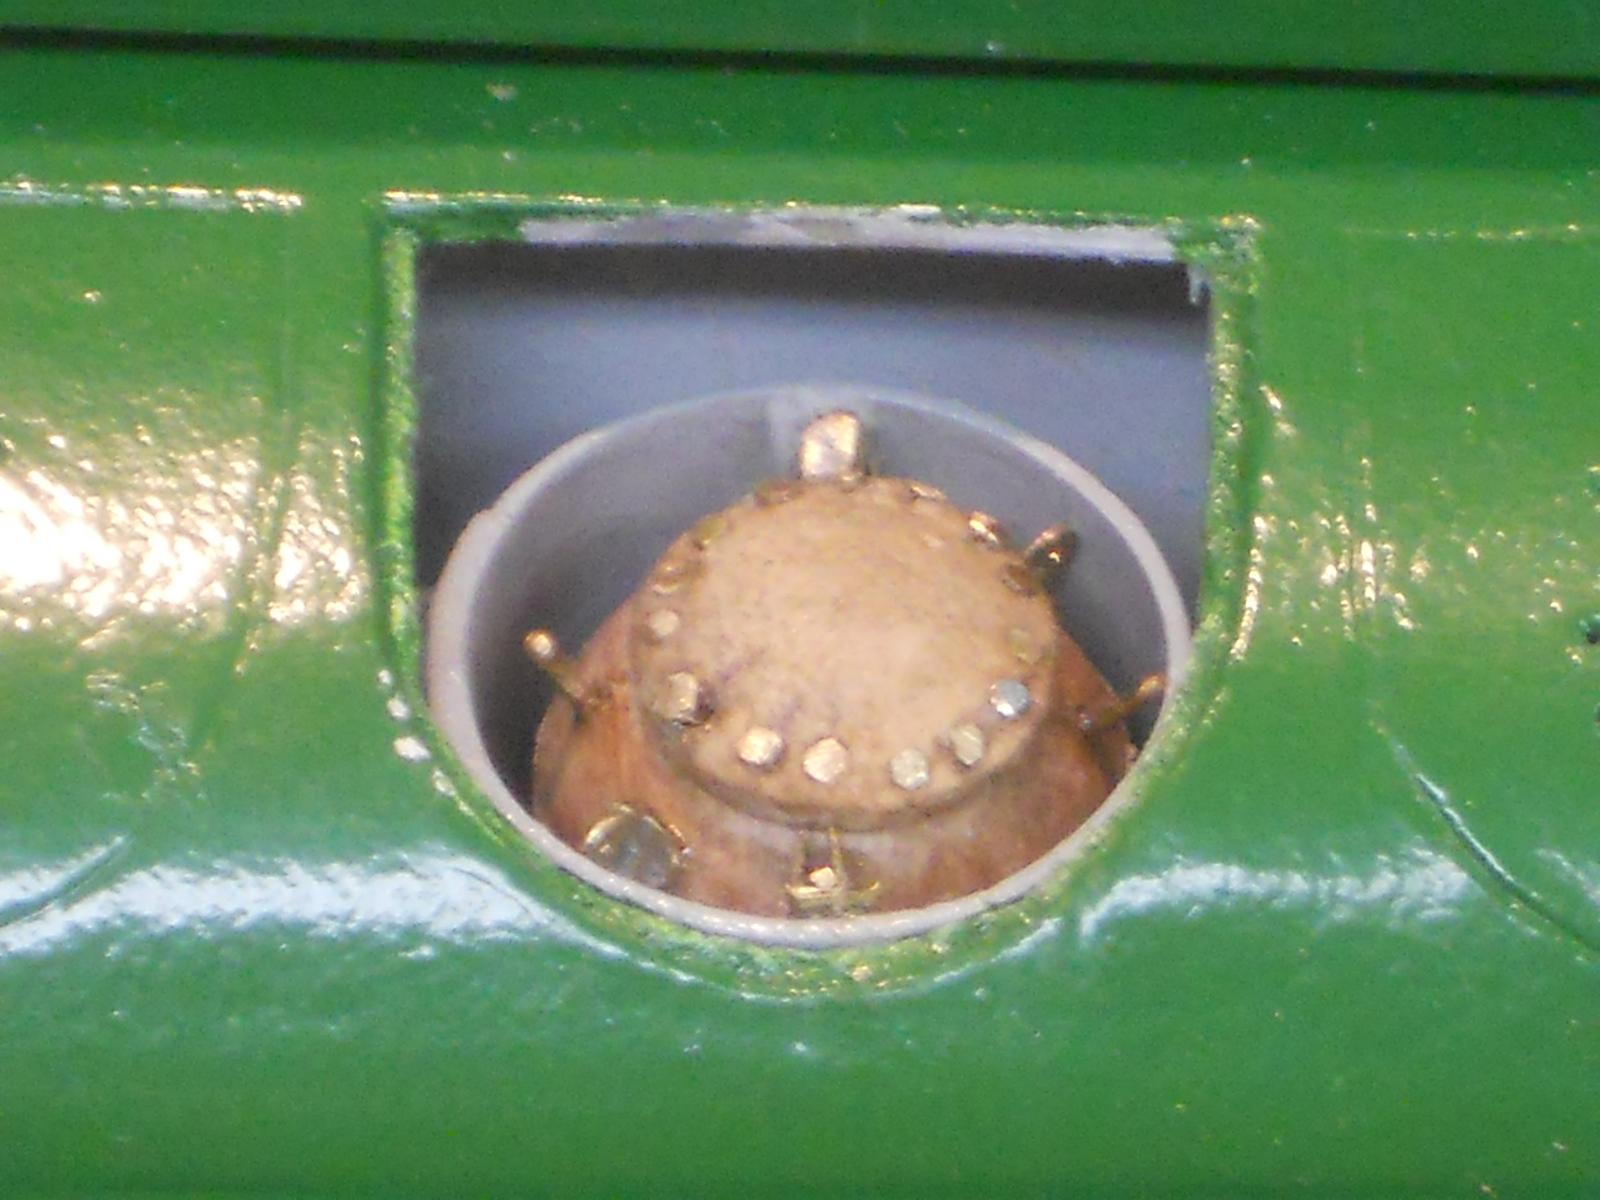
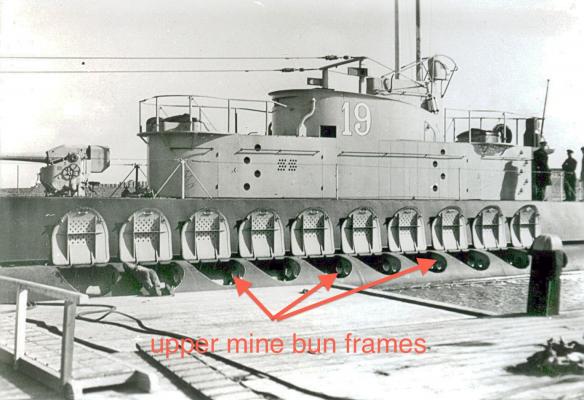
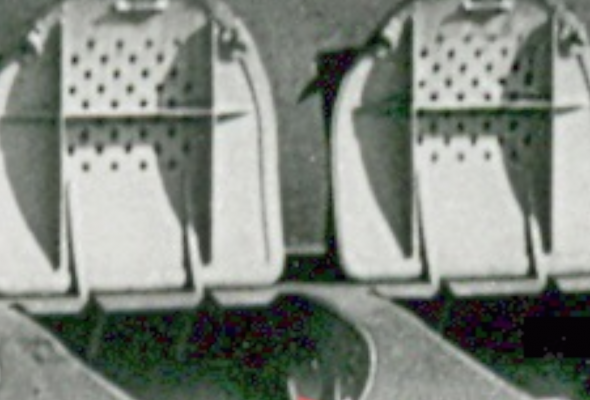
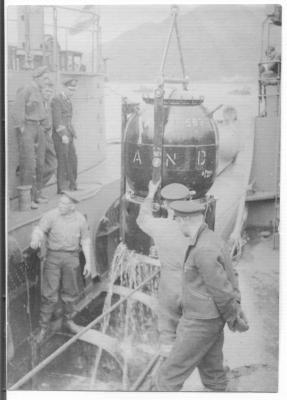
I have pulled a few photos of the mine bin doors out of my O19 archive to you all how they look like on the original boat. As yuns can see they have a rather peculiar type of hinge arrangement, which reminds me a lot of those I have encountered on some airplanes. The reason why I went the route I did was to emulate the looks as close to the original as possible. Also don't forget that I am battling scale here. The original steel plating was rather thin for the ballast tanks because they are all outside the pressure hull. I have reduced the thickness of my ballast tank "plating" in the hinge area to 1 mm and the bin door is also 1 mm. This would work out to 50 mm thick steel on the real boat, which is way too thick. I cannot really reduce my thickness anymore and keep some structural integrity and have to work with it. I am making a test arrangement to see how a slightly modified system works. My thinking is that with the stationary part set back 0.5 mm and a slightly longer hinge tab on the door there'll be enough play for the door to clear the tank plating. I may even have to elongate the hinge pin hole in the door tab so it can be pulled out and then hinged up. Right now the door fits nice and snug in the opening and like to keep it that way. The edge of the fixed part, the tank plating part, can also be rounded off slightly to aid the door in opening up over it. I'll be playing with it in the next few days and take pics as I go along. I have already cut the slots in the tank plating for the door tabs, which have also been made from 0.5 mm brass sheet stock. Cheers,


-
Thank you all for visiting and your kind comments, help and of course for all the likes. It's great to be tinkering with the sub, although it's a little slow going right now. Hello George, as always, thanks for your kind words - - - your seat in the shipyard has your name on it Well, funny you mentionef NASA, I do have a fix for their foam shedding problem but that's another story. Nah, they don't what to talk to me. Hi Ian, good to see you again and thank you too. Well, my drafting table is rather cluttered right now with some colored pencil drawing stuff. These sketches will have to do. I'll be adding the measurements as I get to that stage in the work. It's a one of a kind project anyhow. Hoi Carl, thank you for taking the time to scrutinize my plan and your input, I really appreciate it. I did take a second look my plan, which drove me back into my photo archive of the original build and in-service pics of the mine bin doors. I knew that, if I was going to make this door hinge, I wanted it to look close to the original boat., i.e. flush hinged. I already rejected two methods because it would not be like that and in that case I'd rather not even bother. That's why I came up with this idea, which is kinda similar to aircraft doors that also have hidden hinges. Right now I am in the process of making a test hinge and see how it'll work for me. It's not quite the same as my sketches picture it but close enough for government work Hey, I'm a stubborn Dutchman with Friezian blood too. The van Warmerdam clan goes way back to before the mid 17th century. Hi Popeye, thanks and yes, I'll give it a good try. Carl's suggestion triggered the old engineering mind - - - again. Hi Dave, you give me too much credit my friend but thanks for your kind words. I'm certainly not in the same league as Ed and many others here on MSW. Hello Patrick, thank you, but what book are you talking about? The one our daughter wants me to write about my experiences as the guest of the Emperor of Japan? No, I guess not - - - yeah, I still need to sort through all the photos I have of the original build and many others to put into a binder or two. Hey Daniel, there you are, welcome back. Ah my friend, give it a try. You'll find that scratch building is a lot easier then you think. It just takes patience, planning and research. With your CAD abilities you can make some very good drawings to help you. Yup, the dinghy does fit inside the deck and the hatches do close over it. I made two pics this afternoon to show you but for some reason they don't want to upload into this post Hoi Kees, good to see you too and hope all's well with yo. Thank you also for your kind words. Yes, I'm still plugging along with the O19. It almost seems like I don't want it to end but I do have to finish her one of these days - - - soon. Cheers to all,
-
Beautiful, just beautiful Bob. So neat and clean. Cheers,
-
Sorry to hear about your problem with MS, hope it gets straightened out, soon. Rigging looks really nice John. Cheers,
- 2,250 replies
-
- 2
-

-
- model shipways
- Charles W Morgan
- (and 1 more)
-
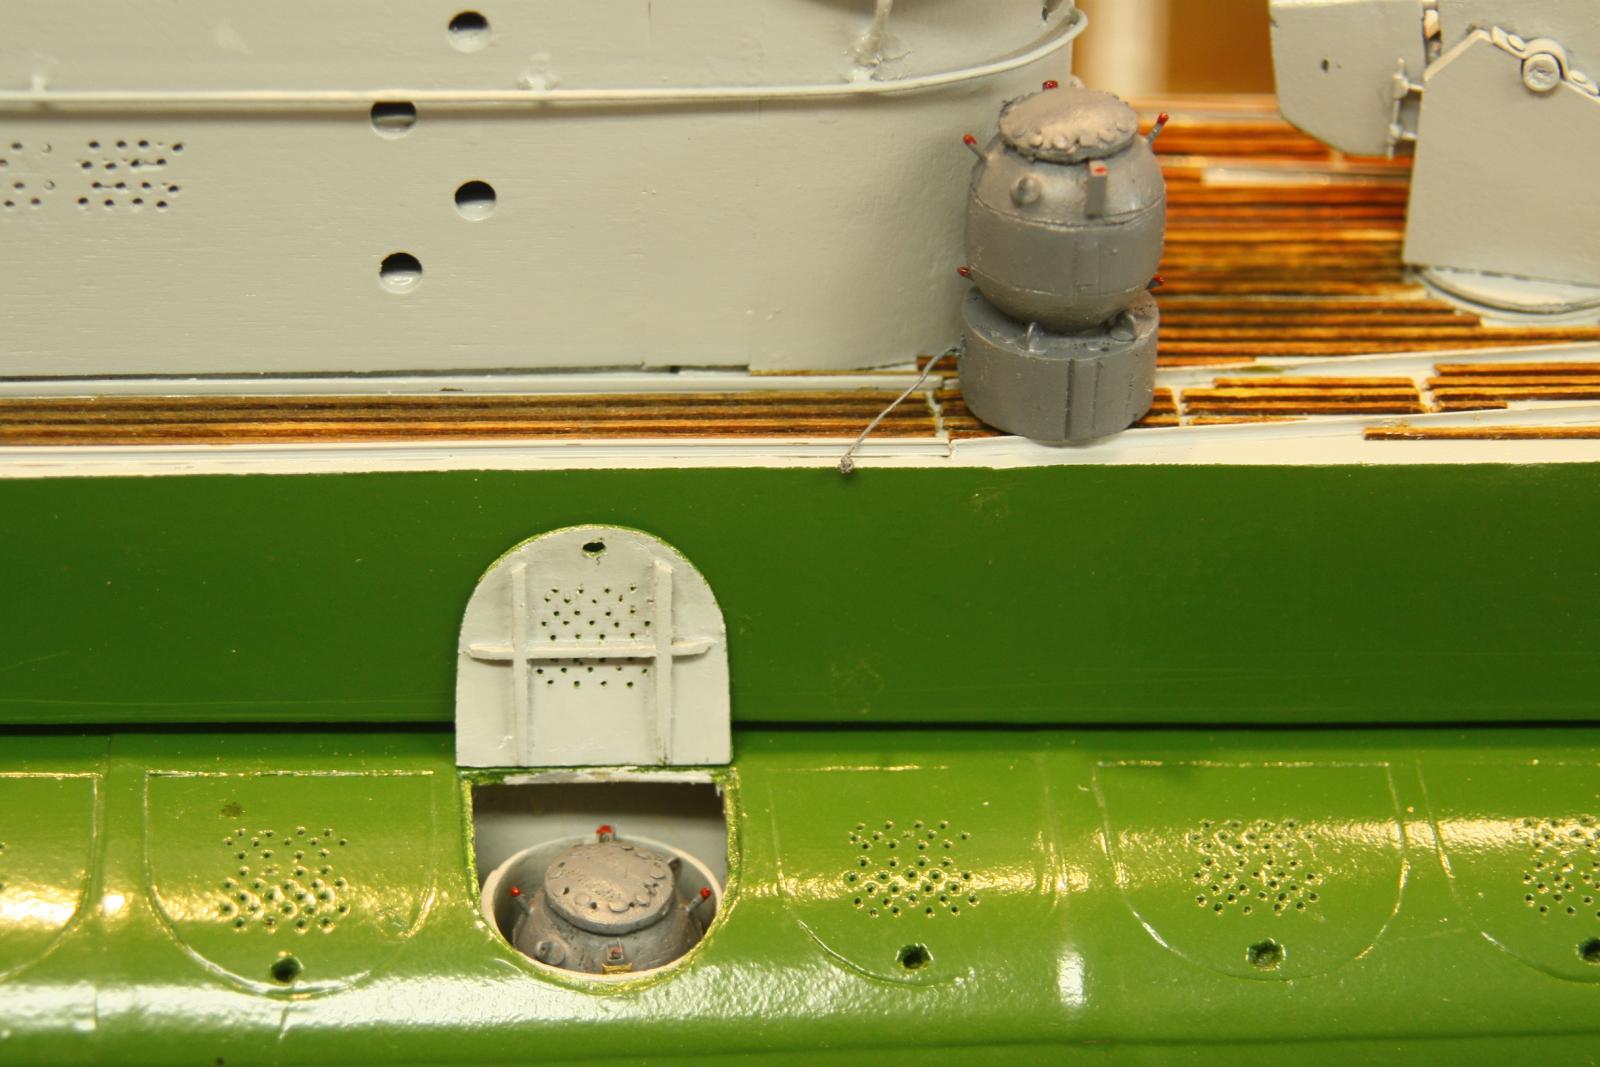
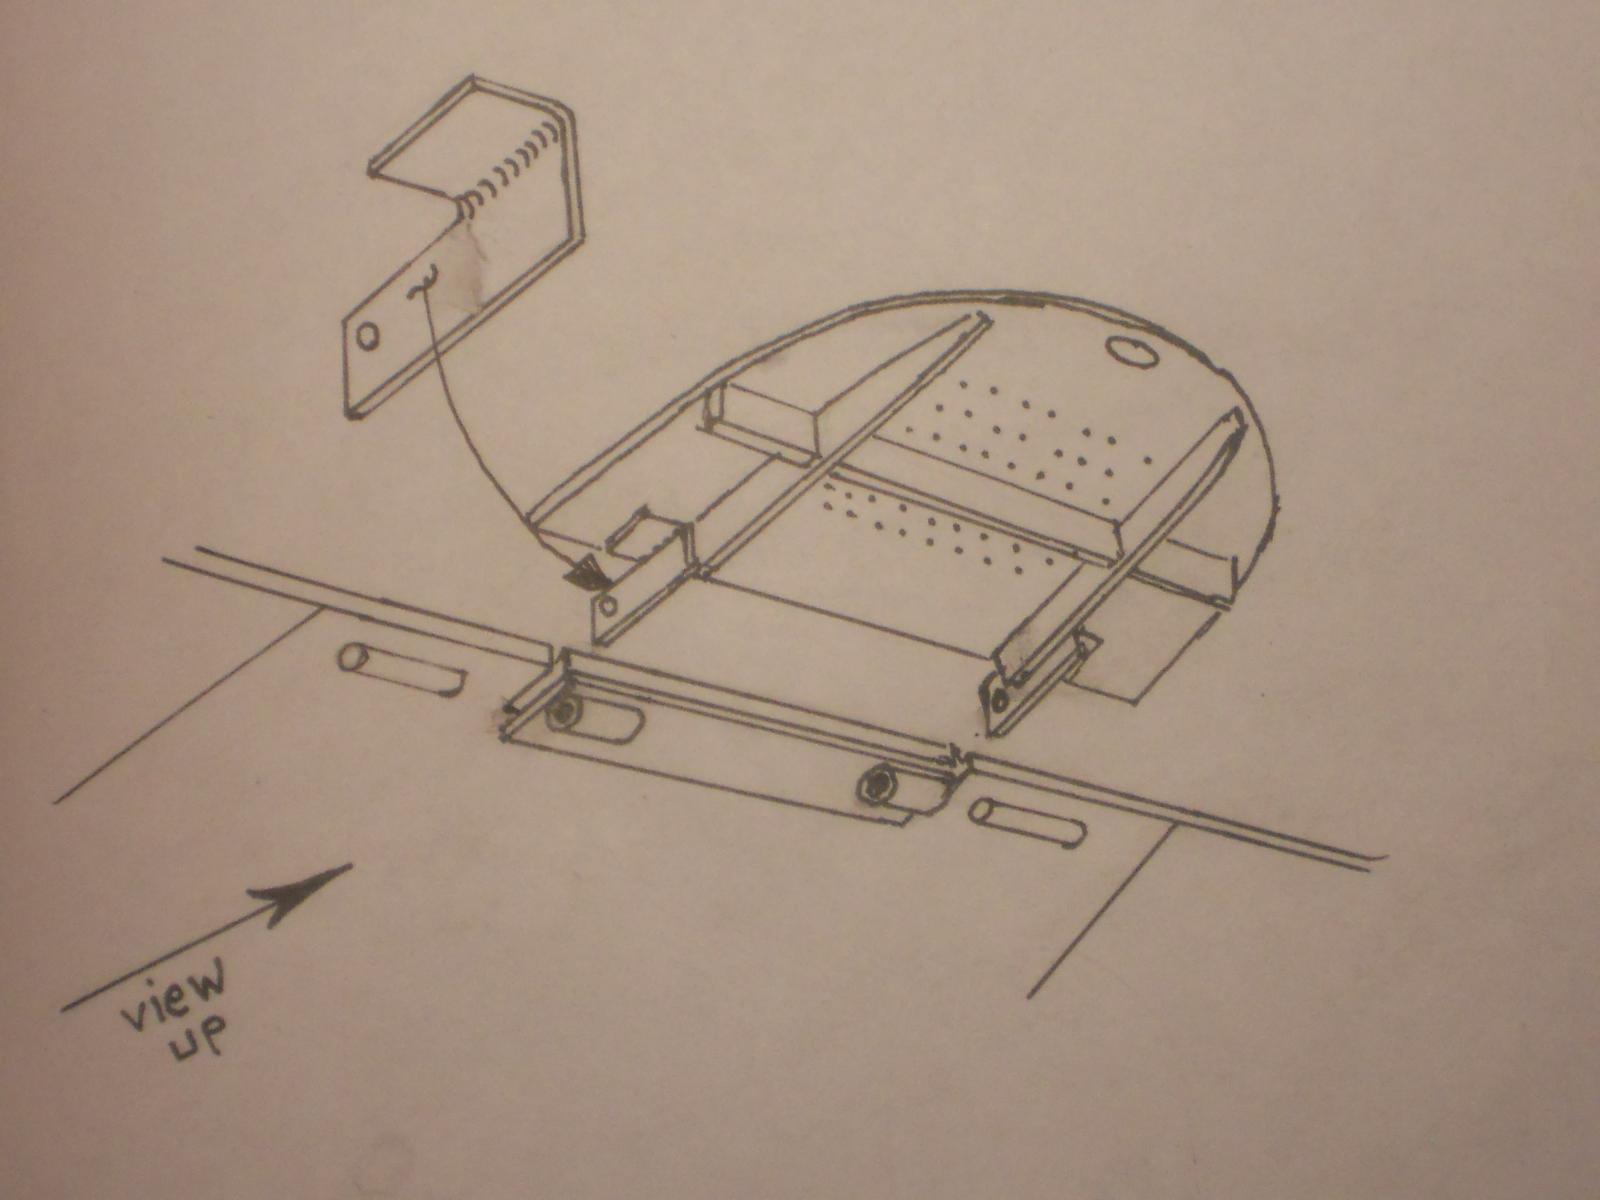
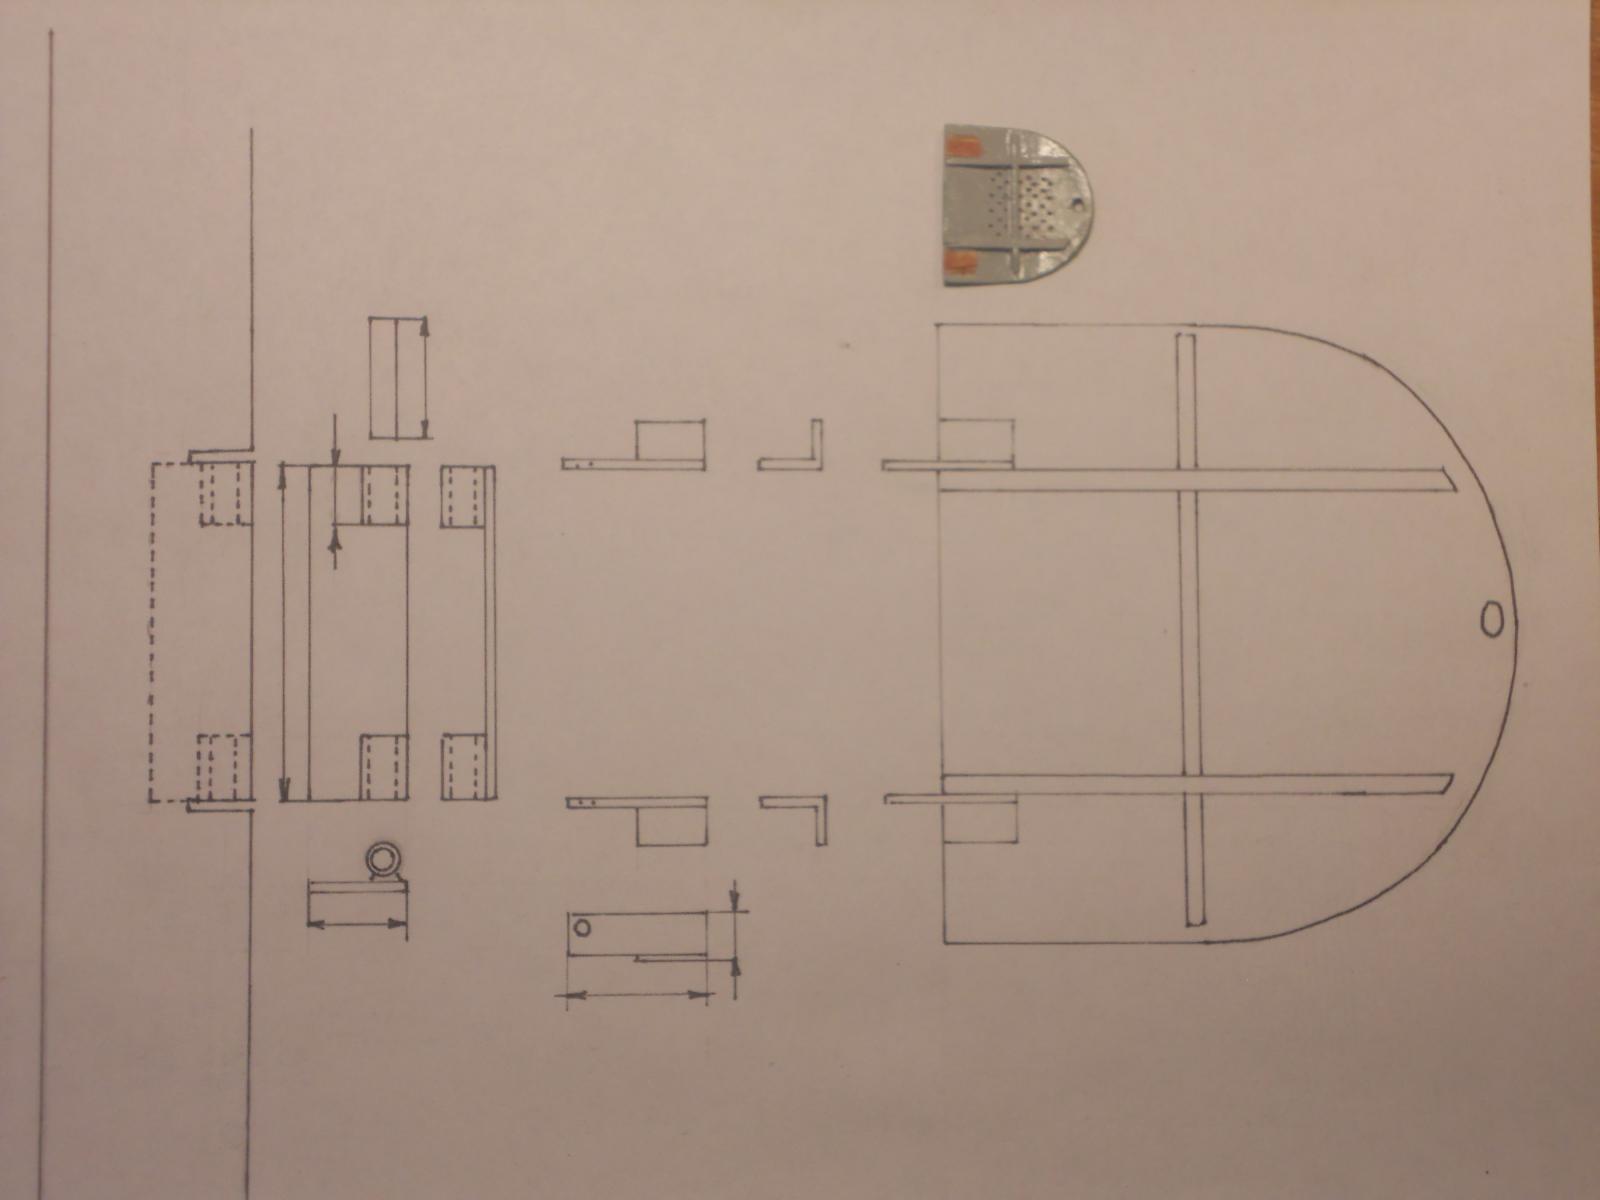
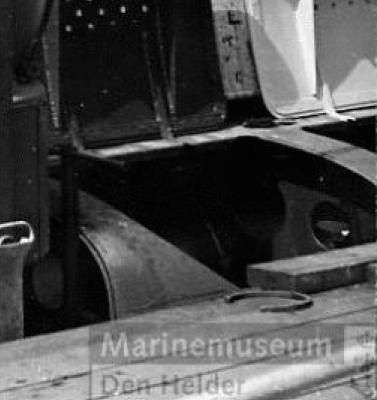
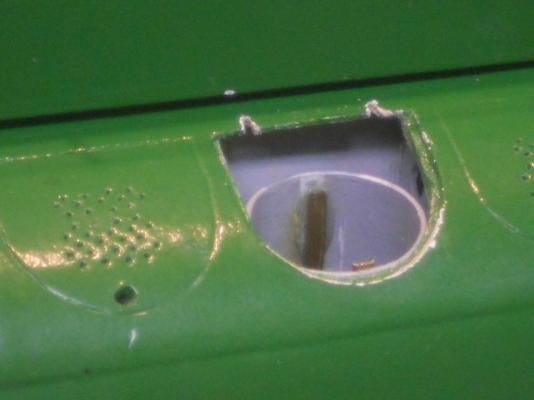
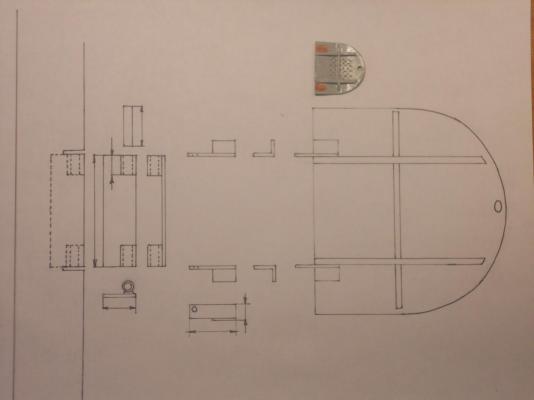
Hello everyone, I'm back working on the O19. The little lobster smack is completed so I can work on finishing the O19. There are two details left I want to incorporate but one of them is really taxing me. That's the hinges on the mine bin door. As the pictures below demonstrate access to the fixed hinge part under the plating portion of the ballast tanks is impossible with the door closed. This is necessary to be able to correctly position and cement the door part of the hinge and install the hinge pin. Thoughts of removing a narrow strip of plating inboard of the hole is an option that'll be the last resort. Even then it'll be difficult to make the door close properly. What I think I'll do is to cut slots into the plating inboard the hole for the door hinge part to slide through. A fixed hinge part consisting of a 0.1 mm brass plate with two small 1 mm brass tubes soldered to it to accommodate the hinge pins. This part will be cemented with 2 part epoxy to the underside of the ballast tank plating just inboard of the hole and between the slots. Before I can cut the slots I'll have to make the door parts of the hinge and cement them to the left and right of the door reinforcing strips. This is so I can mark where the slots are to be cut. The sketches will make this clear. The slots will be cut with a fine jeweler's coping saw blade of 0.15 mm wide having 85 teeth per inch. I tried it on a piece of scrap and it works on the upstroke. I have to do this by hand, holding the blade in my right hand pulling up for the actually working stroke while holding the blade against the wood with my left whatever works for me finger, probably my thumb I only hope that it'll cut 90 degrees to the longitudinal part of the hole opening. The biggest problem will be finding where to drill the hole in the door part of the hinge because I can't see it with the door closed. I think that when I put the hinge pins into the brass bushings of the fixed hinge part I can then mark the hull plate on top and then measure how far in from the edge of the hole. It'll still be a lucky shot if I get the hole drilled okay enough for the hinge pin to engage properly. It doesn't matter much if the hole is a little larger then the hinge pin diameter as long as the door closes snug and opens to clear the hole so the mines can be loaded. Okay, that's the plan - - - for now. I still want to draw up a step by step sequence of events in assembling all the parts. This has taken quite some time agonizing over. I really don't want to start cutting planking away but if I have to do it just to add this little detail then I may just do it. This is even a greater challenge then the bow trim planes and anchor hole. Like I have mentioned now several times before, I never intended to add any detail to the build, just make a model without all the extras. Most all the detail work I have put into this model are afterthoughts, which makes it double difficult. If I could rewind the years and start anew I would certainly do things quite different to make it easier. However, it is what it is and like with all te other challenges I have to fight and conquer this one too. The next detail is the dinghy cradle. That'll be a lot easier - - - he says with a straight face I have already made one part but the rest is for after this "little" job is done. Okay, I'll add a few pics to show what I have been talking about so yuns understand. The first two pics are from last year, June 6, 2014. The last two are my rough sketches I made mainly for me to put my thoughts on paper. Here you can see part of the original planking . I had to cut some wood away with a #11 blade and a chisel to make it a little thinner for the hinge to fit better. There are bulkheads to the left and right in this picture. The slots I mentioned will be cut towards the inboard, probably no more then 4 mm or so. The first sketch below is seen as if you are inside the ballast tank on the left in this picture and looking up and to the bow of the boat. Yeah, there is not much room there but I won't close the lid Here you see the door or lid just put loosely on the ballast tank plating. Okay, I tried to draw a perspective pic of how I perceive it be, if all goes according plan. To orient you, your back is towards the pressure hull, the bow is towards the right in the picture and you are looking up. I hope you understand what I am talking about and the problem I face. This is a lay-out of the parts and how they should look. I have not yet made any measurements, that'll come as I go along when making each part. Here the top of the picture points towards the bow and to the left is the pressure hull. The extreme left part of te sketch is looking down from the outside, then the break-down of the individual parts. Cheers,


-
Magnificently done Jesse, bravo! Okay, what's next?? Cheers,
- 607 replies
-
- 3
-
-
- scottish maid
- artesania latina
- (and 1 more)
-
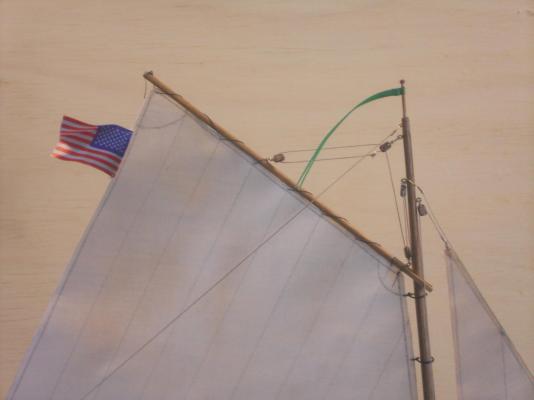
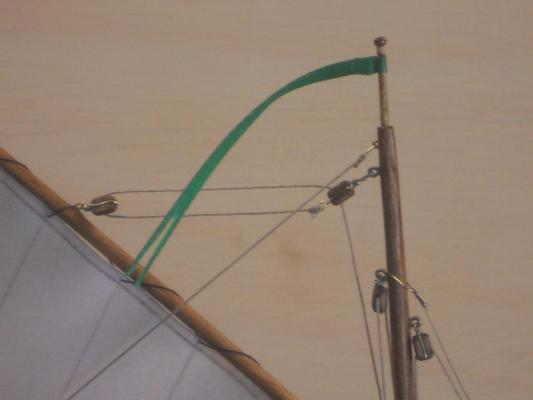
Yeah Carl, I have to stop thinking of what else I can add. This is the final thing - - - I hope Now I have to find out how to move the hot link to the completed part in my signature Well, I thought adding a pennon or pennant to the top of the mast. This is an old Dutch tradition, especially on royal birthdays or other national festivals. But then the pennants are orange in honor of the Royal House of Orange. Some are in the National tricolor. However, this being a true Yankee boat painted with green trim, I thought making a green pennant to match. I could also have made in yellow for our troops but hey, green is a mix of blue and yellow! Okay, here are two pics to show all yuns how the pennon looks. Cheers,
- 176 replies
-
- 10
-
-
- muscongus bay lobster smack
- Midwest Products
- (and 1 more)
-
Very nice rope work John. That serving machine pays off handsomely! Cheers,
- 2,250 replies
-
- 2
-
-
- model shipways
- Charles W Morgan
- (and 1 more)
-
Mayflower by SawdustDave - Finished
Piet replied to SawdustDave's topic in - Build logs for subjects built 1751 - 1800
Impressive! Cheers, -
Very nice progress Popeye. Sorry about the truck adventure, been there too and have the T shirt Cheers,
- 956 replies
-
- 3
-
-
- andrea gail
- trawler
- (and 1 more)
-
Fantastic work Patrick. btw, I understood what Mike ment with scots! Seeing he is from Switzerland. The Dutch word for bulkhead is schot, therefore Cheers,
-
Ah yes, the sides with gun ports are going on. Next will be the guns ?? Yes? She's really taking shape Adriaan! Cheers,
-
Thank you all for your very kind words and I'm glad to have been of some help and hopefully inspired a few. There is one more item I'm going to add to this little boat, it's a Dutch thing Will show when it's installed And here I thought she was completed Cheers,
- 176 replies
-
- 2
-
-
- muscongus bay lobster smack
- Midwest Products
- (and 1 more)
-
Outstanding work John. Shrouds look great. Cheers,
- 2,250 replies
-
- 2
-
-
- model shipways
- Charles W Morgan
- (and 1 more)
-
That's looking very nice Nenad. Cheers,
- 4,152 replies
-
- 2
-
-
- cutty sark
- tehnodidakta
- (and 1 more)
-
Love the colors Popeye, very good choice Try to scrape the cockpit floor to remove most of the glue spot. At least it may reduce the area somewhat. Cheers,
- 956 replies
-
- 2
-
-
- andrea gail
- trawler
- (and 1 more)
-
Fantastic find Bob and great looking benches too! Cheers,
-
Oh yeah, that looks nice John and you had to mention the the difference of the yellow ochre, I didn't even see it. It may lighten up in time. Cheers,
- 2,250 replies
-
- 1
-
-
- model shipways
- Charles W Morgan
- (and 1 more)
-
Outstanding Jesse, just outstanding. I love the bow shot and the one above it, beautiful woodwork. Oh heck, I love everything about this ship! What makes your sales is their rustic appearance, as sails should be. Having been in use for a long time, all weathered. I am looking forward to seeing your models next April. Cheers,
- 607 replies
-
- 1
-
-
- scottish maid
- artesania latina
- (and 1 more)