-
Posts
3,568 -
Joined
-
Last visited
Content Type
Profiles
Forums
Gallery
Events
Everything posted by Piet
-
Hey Dave, thanks for dropping in. Yeah, I figured to play the KISS game, keep it simple stupid First I was toying with turning fancy brass stanchions on the Unimat or buy them. But I wanted to be able to lift the boat off the display and these blocks will give her some steady footing and look nice enough but not distracting. I glued the top cover plate on to the frame and did use "liquid nails" or - - as it is officially called "Structural Adhesive." It's water proof and weather proof. Right now it's resting on the garage floor with a bunch of 12 X 12 X 1 inch pavers on top. I'll check it out Sunday and prep it for cementing and screwing the blocks to it. Then I'll cement the bottom cover plate to it. Cheers to all,
-
Thanks for the pics Anton and the history. Yes, my father also received the Willems Order, personally given to my mother by Queen Juliana. She managed to tell the Queen "this doesn't bring my husband back." Yeah, there was some bitterness but a short time later Queen Juliana personally bailed us out of a difficult situation. Cheers,
-
That's looking real good Nenad. Yup, understand your brush techniek, I use the same when I have to. Cheers,
- 4,152 replies
-
- cutty sark
- tehnodidakta
-
(and 1 more)
Tagged with:
-
Fantastic work Tallship. Love the detail you put in and for a static model should be there, at least as much as possible. re my father on the Java, yes, he was killed in action during the battle in the Java Sea. According to an officer of that ship who survived and I spoke with, his battle station was at or below gun #9. That's the part of the ship that blew up. I have posted a few pics on one of the pages of my O19 log. Cheers,
-
Nice going Popeye. Love the map. Will you give the AG an ooga ooga horn - - - to warn other ships and for a fog horn? Cheers,
- 956 replies
-
- andrea gail
- trawler
-
(and 1 more)
Tagged with:
-

Papegojan 1627 by mati - FINISHED - 1/48
Piet replied to mati's topic in - Build logs for subjects built 1501 - 1750
hey Matt, I'm following your build too Great work on the details, love it! Cheers, -
Hi Tallship, a model of Hr. Ms. de Ruyter would be great. I mentioned under my signature that I plan to build a model of Hr. Ms. Java but will most likely not do it. My father was killed on that tub and he hated her. In retrospect I think he'd keelhaul me if I did. Really like what you are doing with the Leeuwin! Cheers,
-
Thank you all, John (Texxn5), Jan, Tallship, Patrick, Sjors, George, Popeye and Carl and of course all those who clicked the like button. Yuns are just too kind heaping all those praises on me but I really appreciate them. @ John: Yup, I understand you being busy, mostly with your Morgan. She's really looking very nice. @ Jan: When I started the build I made the so called dock keel first with the vertical center keel frame on top of it. In order to secure the build to the build dock I drilled two 1/4 inch holes through te dock keel and the vertical frame. Then I installed two corresponding 1/4 dowels in the dock frame and planted the model on it. The holes in the sub are about 1/2 inch deep and when the sub sits on it she's nice and secure. The mounting blocks will mate up with the holes in the sub keel. @ Tallship: Welcome to my build. Thanks for the info on your dad and uncle, sorry to hear he didn't make out in time. I'm sure that your dad and uncle had known my father. He was rather well known in the submarine service, some would say "infamous" . It's also possible that my father served on the K XII sometime in his navy career. It looks like our lives are connected through your dad's and uncle's. Small world indeed What's your given name? Your uncle's actions are appreciated as well as what so many others did. I hope the Dutch government awarded him a citation of sorts. There is a story about a sailor who gabbed a machine gun at the end of the wharf in Soerabaja harbor and started shooting at the Jab Zeros, ignoring them shooting back at him. Needles to say he was killed in doing so. I take it you must still speak Dutch? @ Patrick: And to top it all off, as I mentioned to Tallship, that he and I are personally connected through his and my father, not only being in the Navy but submarine service. I just remembered the story about that sailor shooting at the Japs, that at that same time a bunch of buildings and "stuf" blew up behind him. The actions of Tallship's uncle perhaps? @ Sjors: Yeah, sorry for having been absent but certain domestic chores seemed to have taken priority. @ George: Always good hearing from you and yes, I think she'll look pretty on that "cheapy" display board. @ Popeye: Well, as I mentioned to George, it's not fancy wood but I think that when it's finished it'll look presentable. Perhaps not museum quality but so what, it's for me. When i showed Gwen how I made those concave ends to the blocks, she just nodded her head and said, yeah, that'll work. I have completed both blocks today and they look pretty good, they are 98% mirror image of each other, lucked out again . @ Carl: A sub builder and a carpenter??? and I'm a metal guy One has to to what one has to do to achieve the end result. A little Dutch ingenuity helps Thank you for the compliments, I try. Not too bad for an airplane fixer I'll be plodding along with the display board in the next coming days and will report back to all yuns. Be good and happy modeling. Cheers,
-
Hey Sjors, you can send those 1 mm blocks to me! I can surely use them on my VOC ship. While you are redecorating your house can you make a guest room for me when i come visiting? Cheers,
- 1,616 replies
-
- caldercraft
- agamemnon
-
(and 1 more)
Tagged with:
-
Wow John, what nice work on all the rigging. Yeah, most if not all kit supplied rope and blocks are a joke. I'm glad that Chick is around to supply us with some serious rope and blocks. Hmmm, comes to think about my VOC ship, a gezillion blocks - - - translates into mucho dinari - - - for me. I'll have to make my own I guess Cheers,
- 2,250 replies
-
- model shipways
- Charles W Morgan
-
(and 1 more)
Tagged with:
-
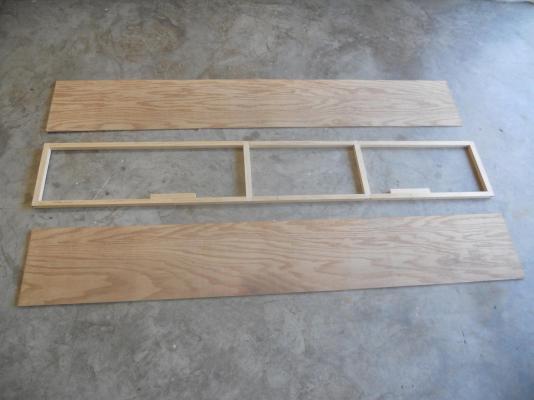
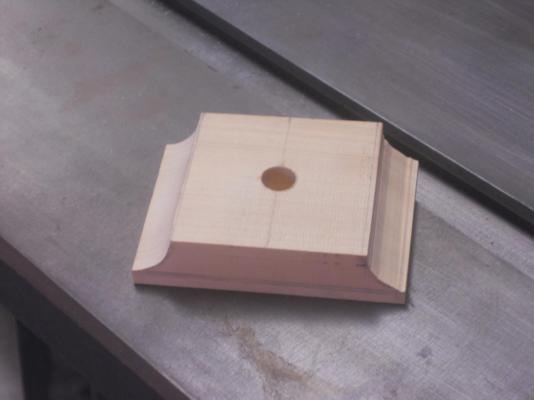
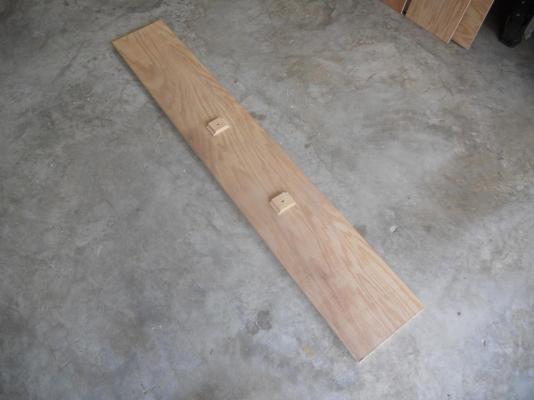
Hello everyone! Yeah, I'm still alive, just been too busy with other things that needed done. In the meantime I bought some wood for the display board for the O19. The build board is much too heavy, not long enough for the future lexan cover and too wide. I figured by making it lighter I'll make a frame and cover it with 1/8 oak veneer plywood. I used a 3 X 1/2 inch pine plank and rip 3 strips of 3/4 X 66 X 1/2 inch out of that for the frame parts. Forgot to make pics of that process but the short pieces are 10 inches long and joggled to fit into joggled cutouts in the long pieces. Today I glued the frame together as shown in the photo below. I had the DYI store rip the plywood. I held my breath as the guy ripped it because he went much too fast to my liking. I was afraid that I would wind up with parts of the oak veneer shattered. Fortunately it worked out okay, just a few spots on the bad side that'll be hidden by the frame. I had to cut them down to my required 66 inches but used an old fashioned handsaw which made me a nice cut. I also cut two blocks of boxwood for the mounting blocks where the O19 will sit on. Marked and drilled the 1/4 inch diameter holes for the dowels that'll secure the O19. I intend to keep her loose so I can lift her off whenever I need to do that. She's not going anywhere when sitting on the shelf in my studio. I thought I was going to run into a dilemma with the mounting blocks. I wanted to make concave curves on the outside parts of the blocks but don't have the router bits for it. So I used the bend saw as a rasp file to remove most of the wood. Then I used a round grinding disc to finish it off. i could only do one of the four ends, time was running out and had to close shop. Now I need to figure how to cement these long pieces of ply wood to the frame. I don't have enough clamps by using the all-weather Titebond or Elmer's carpenter glue. I'm thinking of "Liquid Nails." Will check with the experts at the local hardware store what the working time is. On the other hand I have plenty 12 X 12 X 1 inch concrete pavers I can lay on top. Something to consider. All this work has to be done on the garage floor, which means that Gwen's car mas to stay outside for one day. Okay, here are a few pics for yuns to see what I'm up to. Here you see the glued up frame with the top and bottom plywood covers. The two center cross members are for support for the mounting blocks. They'll be glued to the plywood cover and screwed from the bottom through the cross pieces. This shows the boxwood mounting blocks. You can probably see the saw blade marks in the concave curved sections. It's still rather time consuming to grind the rest to how I want it. This shows how the display board will eventually look like. I'll see if I can find some nice finishing moulding for the sides. I plan to stain it with a "White Oak" stain and finish it with a clear and mat poly urethane. It should look half way presentable. Cheers,
-
That's looking extremely nice Nenad! Cheers,
- 4,152 replies
-
- cutty sark
- tehnodidakta
-
(and 1 more)
Tagged with:
-
Yup, they do look much more gooder Dave. I'll pick your brain on that Sculpy stuff next month. Cheers,
- 962 replies
-
- sovereign of the seas
- ship of the line
-
(and 1 more)
Tagged with:
-
Glad you are feeling better and that things worked out on the AG. She's looking great. Cheers,
- 956 replies
-
- andrea gail
- trawler
-
(and 1 more)
Tagged with:
-
She's looking better and better Sjors, great job on the planking! Cheers,
- 1,616 replies
-
- caldercraft
- agamemnon
-
(and 1 more)
Tagged with:
-
Fantastic work Kees, looks like steel alright! Cheers,
- 205 replies
-
- kw49 antje
- trawler
-
(and 1 more)
Tagged with:
-
Progressing nicely Joh, she's looking great. Cheers,
- 2,250 replies
-
- model shipways
- Charles W Morgan
-
(and 1 more)
Tagged with:
-

De Zeven Provinciën 1665 by Dražen - Scale 1:45
Piet replied to Drazen's topic in - Build logs for subjects built 1501 - 1750
Beautiful work Drazen. What wonderful looking lines she has. Cheers,- 487 replies
-
- ship of the line
- 80 guns
-
(and 1 more)
Tagged with:
-
Looking good John and a good thing you lucked out with that Britannia stuff, it can be brittle. Cheers,
- 2,250 replies
-
- model shipways
- Charles W Morgan
-
(and 1 more)
Tagged with:
-
Yeah, I bet it was monotonous work but now that all the boards are on you can sit back and admire your handiwork. It's looking very nice John, great job. Cheers,
- 2,250 replies
-
- model shipways
- Charles W Morgan
-
(and 1 more)
Tagged with:
-

Mayflower by SawdustDave - Finished
Piet replied to SawdustDave's topic in - Build logs for subjects built 1751 - 1800
Beautiful work my friend. I can't wait to see them in real life and the Sovereign plans. Cheers,
About us
Modelshipworld - Advancing Ship Modeling through Research
SSL Secured
Your security is important for us so this Website is SSL-Secured
NRG Mailing Address
Nautical Research Guild
237 South Lincoln Street
Westmont IL, 60559-1917
Model Ship World ® and the MSW logo are Registered Trademarks, and belong to the Nautical Research Guild (United States Patent and Trademark Office: No. 6,929,264 & No. 6,929,274, registered Dec. 20, 2022)
Helpful Links
About the NRG
If you enjoy building ship models that are historically accurate as well as beautiful, then The Nautical Research Guild (NRG) is just right for you.
The Guild is a non-profit educational organization whose mission is to “Advance Ship Modeling Through Research”. We provide support to our members in their efforts to raise the quality of their model ships.
The Nautical Research Guild has published our world-renowned quarterly magazine, The Nautical Research Journal, since 1955. The pages of the Journal are full of articles by accomplished ship modelers who show you how they create those exquisite details on their models, and by maritime historians who show you the correct details to build. The Journal is available in both print and digital editions. Go to the NRG web site (www.thenrg.org) to download a complimentary digital copy of the Journal. The NRG also publishes plan sets, books and compilations of back issues of the Journal and the former Ships in Scale and Model Ship Builder magazines.


