MORE HANDBOOKS ARE ON THEIR WAY! We will let you know when they get here.
×


Keith_W
-
Posts
1,145 -
Joined
-
Last visited
Content Type
Profiles
Forums
Gallery
Events
Everything posted by Keith_W
-
 Splendid work as usual, Mark. I hope you took note from VinceP's log that he felt he made a mistake constructing the poop deck before the stern. He had to trim his back. As you know from my build log, I haven't constructed my poop deck yet, yet it is apparent to me that the deck will have to be trimmed. It sticks out by at least 1cm. My advice is to allow space for trimming when you get to constructing the stern.
- 652 replies
-
- 2
-

-
- royal william
- euromodel
- (and 1 more)
-
Not really Mark, all those topics are clustered in a single thread instead of in a subforum where it would be more convenient. But if this is the decision by admin i'll respect it. Anyway, here is another one. A 1/32 scale Mitsubishi Zero fighter, made entirely from metal and weighing 1.7kg. Most of the parts are photoetched: http://www.detailscaleview.com/2016/02/ladys-view-imcth-132-mitsubishi-desktop.html The manufacturer of the kit is IMCTH, which has a number of other kits in its website. I was surprised to learn that the Zero fighter above only costs just above 30,000 Yen (that's about AUD$380!). Very cheap! I might go buy one. http://imcth.co.jp/english/product/own/
-
Not sure how I missed your build log till now, but I have spent a very enjoyable hour looking through every page. Your work is incredible, an inspiration to us all. Well done.
-
This looks like it will be a fascinating build. I can't wait to see you start on the steam engine. Hope you don't mind if I pull up a chair.
-
Very nice, Vince. I noticed that the cast decoration pieces were larger than the plans indicated when I lay sticky taped them to the side of the ship to test for fit. I suspect Euromodel left them longer to allow for trimming in case of building errors. I myself am quite looking forward to this stage of the build ... i'll get there eventually. In half a year perhaps
- 593 replies
-
- 5
-
-
- royal william
- euromodels
- (and 1 more)
-
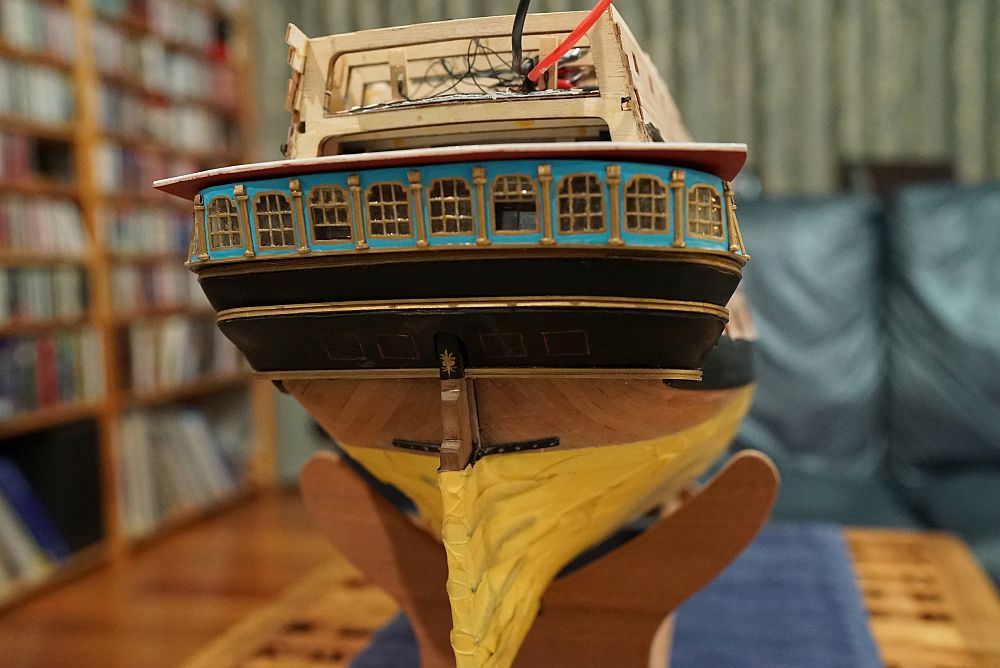
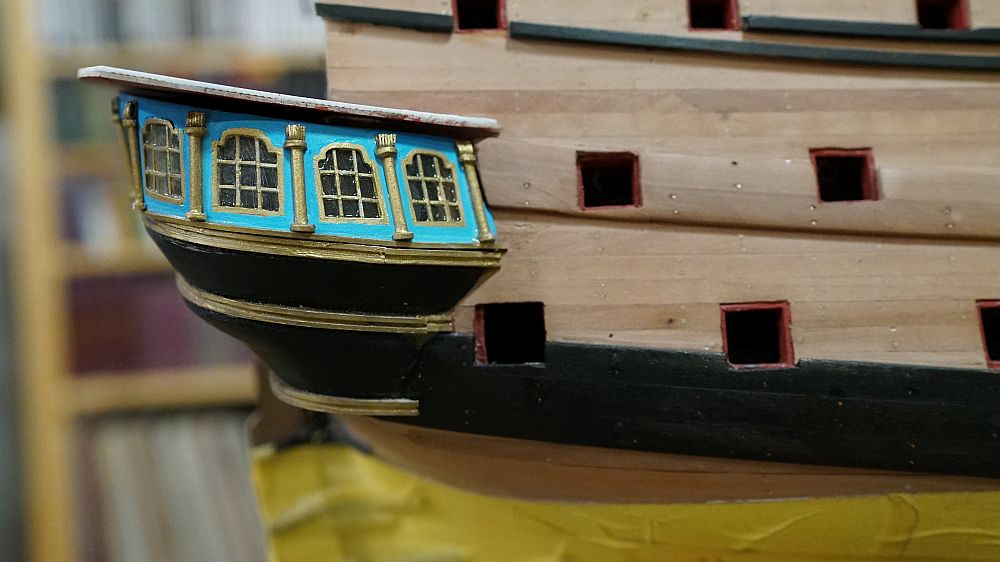
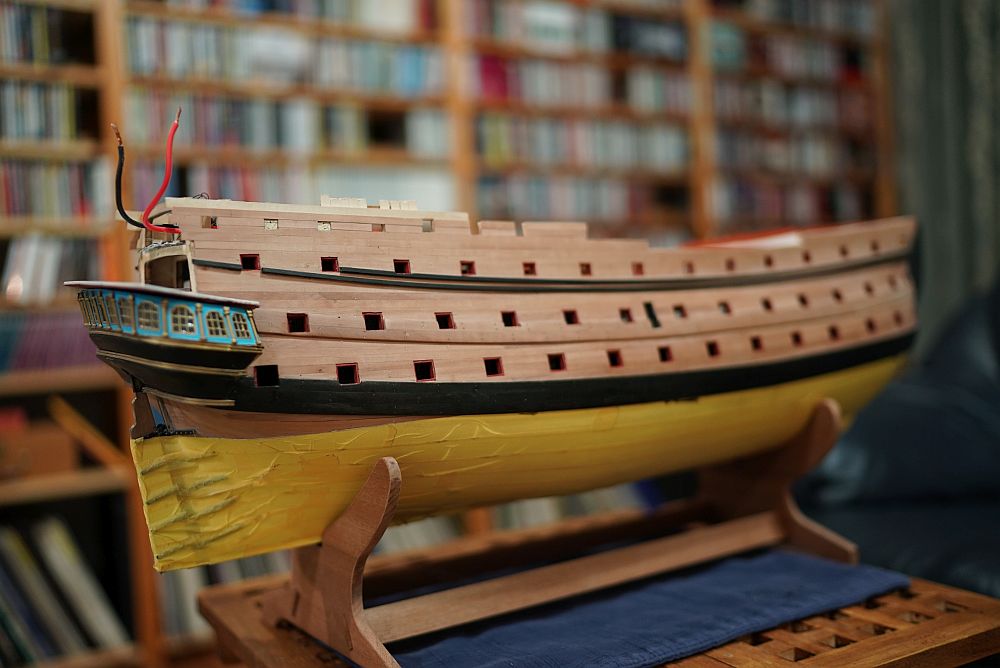
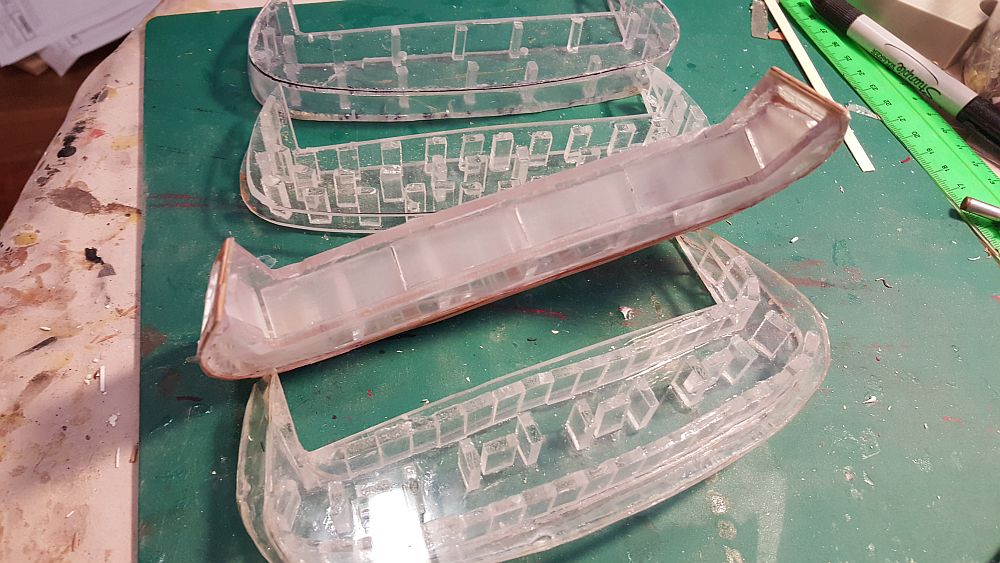
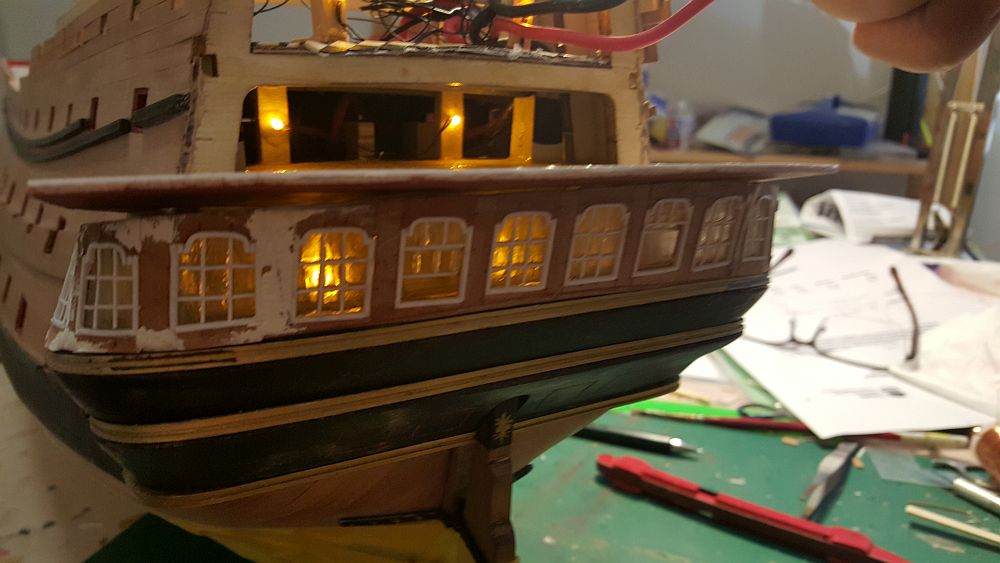
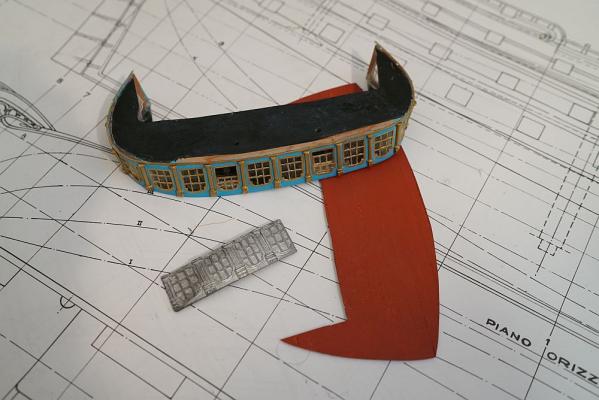
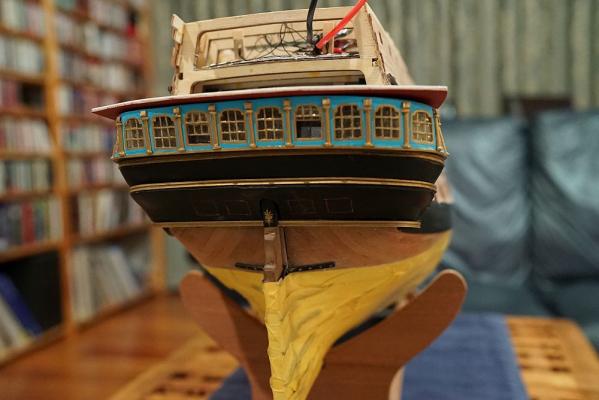
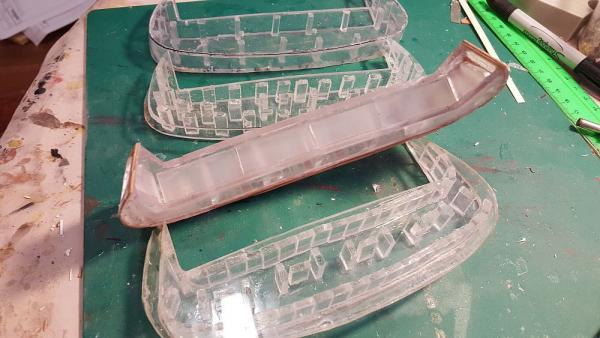
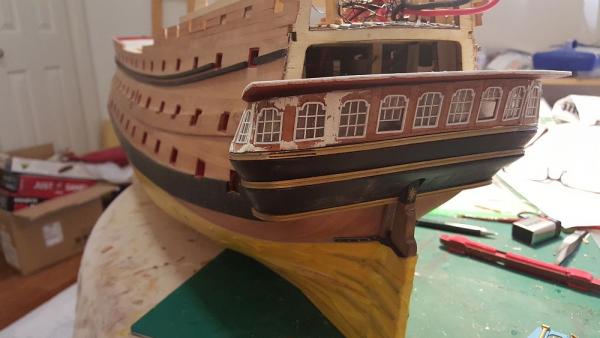
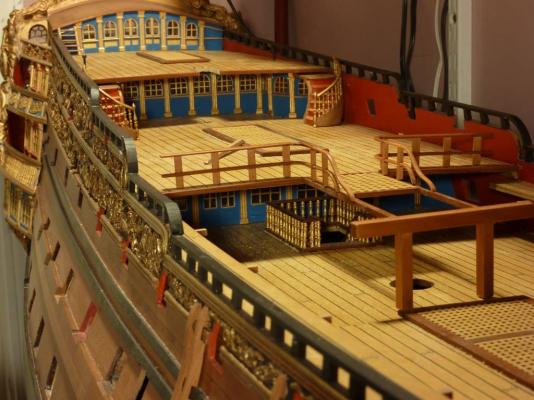
FINISHED!!! Well, just finished that stern piece. Here it is, compared to the Euromodel part. The piece painted red is the deck above it: Fabricating this piece alone has taken me longer than it did to build an aircraft carrier when I was a kid. For those who are curious (and have not been following the build log), this was the process: - make paper templates. Bottom reference is the top of Piece 54. Top reference is the deck above, which I had to make first. From the deck above, a template was made to ensure the windows had the same inclination as the transom. - use paper templates to cut out acrylic pieces. Cut out acrylic spacers, then glue both pieces together. Sand the two pieces so that the correct inclination/slope is obtained. - using acetate sheet, veneer the piece in sections. - to make windows, route a U-shaped channel through a block of wood. Slice cheeks off with a table saw. Arrange the cheeks on the acetate sheet. Use styrene strips to make the windows. - sand all the above and paint. The rear of the ship shows the columns. These were made in two parts: - a dowel was drawn through a thickness sander to give it a D-shape. Styrene strip wrapped and glued around the column. Each window has a slightly different height of column, I had to measure every window and adjust. - the decoration on top was made by soldering six 0.5mm brass rod together to make a flat piece. Sections were then cut out and bent to shape. Precise, tight fit between the rear piece and the rest of the ship! This is a dry fit, and there are no gaps. Bodes well for later. What she looks like at the moment. The lighting for this deck has also been completed. Oh yes, and please welcome my new camera - a Sony A7S2 with a 35mm f/1.4 Zeiss lens. I haven't bought the Macro lens yet, but it will come! I sold the 5DMk3 a couple of months back. No regrets, the new camera is awesome!


-
By the way John, I visited the Maritime Museum in Sydney a few weeks ago. I was hoping to catch you in action, but alas there were no model makers there! I did get to see your boat, safely tucked away in a glass case. She is a beauty.
- 745 replies
-
- 3
-
-
- francis pritt
- mission ship
- (and 1 more)
-
Mark I am still overseas. When I get back, I will check my stash. From memory, they did supply two different diameters of dummy guns.
-
Brian, I am not sure if he is referring to the same salt dough that I know, but: salt dough is what Chinese cooks use to make a dish called "beggars chicken". It is a mixture of 2/3 flour, 1/3 salt, and enough water to make a cement-like dough. It is rolled out, then the chicken placed inside with herbs and flavourings, then the whole thing is sealed to make a parcel, then baked. The chicken cooks in its own juices, and no moisture or flavour escapes. When it comes out of the oven, it is rock hard and needs a hammer to break it open, revealing the tender chicken inside. The story goes that a beggar stole a chicken. When the farmer came looking for his chicken, the beggar wrapped the chicken in mud and threw it into the fire. This resulted in the most tender, juicy, and intensely flavoured chicken he had ever eaten, so a new dish was born. I still get excited whenever I am served this. I had never thought of using salt dough for modelling. Salt dough is easy to handle, softens with water, easy to clean, and holds details well. The only question is - how durable is it?
-
I'm glad I took a break and let you get ahead of me in the build. Watching you do all these things is instructive for me. Thanks Vince, keep it up!
- 593 replies
-
- 5
-
-
- royal william
- euromodels
- (and 1 more)
-
Thanks Victor and George
-
@ Pat, George, Brian, and Victor - thank you! @ Greg, off to Malaysia for my cousin's wedding, then off to Japan for a food holiday. Have a number of nice restaurants lined up! @ Mark, no problem rigging the cannons at all. I rig the cannons on a jig - to mount them, I simply push the pins into the pre-drilled holes and glue it in place. I have tested it to make sure I have enough clearance. No problem! To be honest, this piece has been bugging me ever since BEFORE I bought the kit. Brian C will tell you that I came up with a plan to deal with this before deciding to buy the kit, because I decided early on that I did not want to use the metal plates. The most beautiful part of this ship is the stern, and I am sure that people who look at the model will spend a lot of time looking at it. Those kit supplied metal plates are, sorry to say, plain ugly. Tackling this part was my greatest fear, and it is a relief to have pulled it off. My second greatest fear will be coming up next ... that is, installing the railings for the next level. I have a plan for that, and a few backup plans. We will see!
-
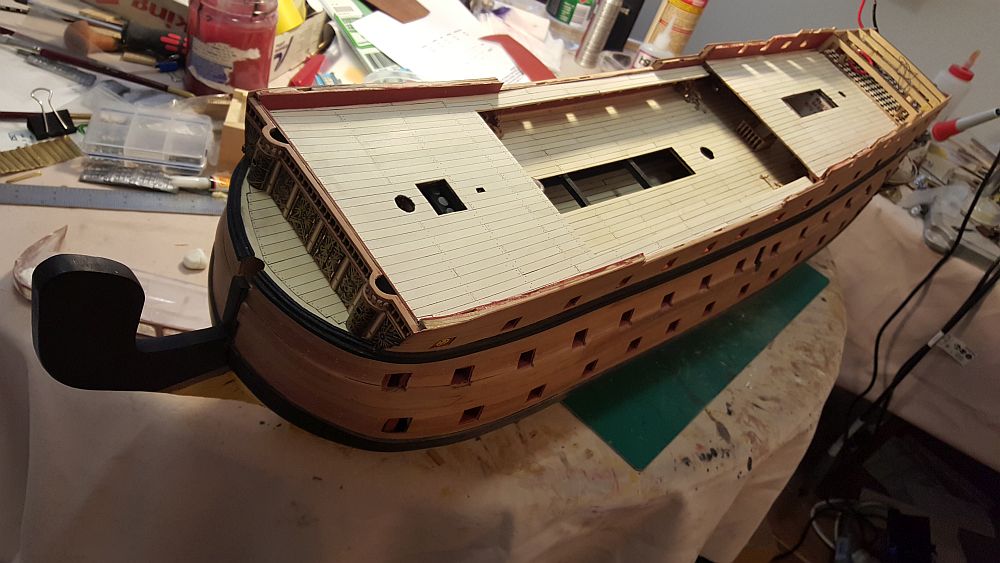
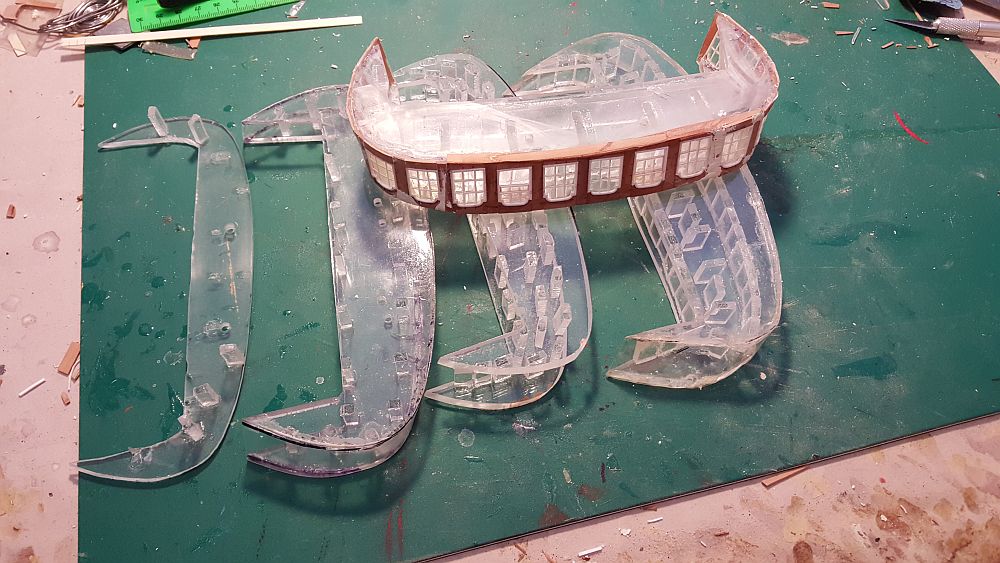
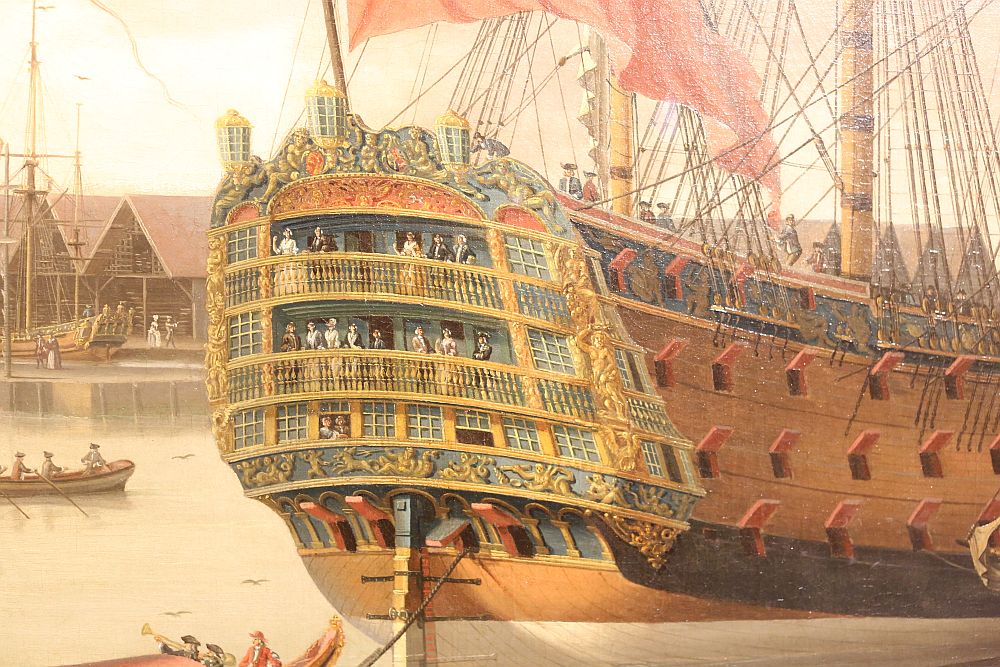
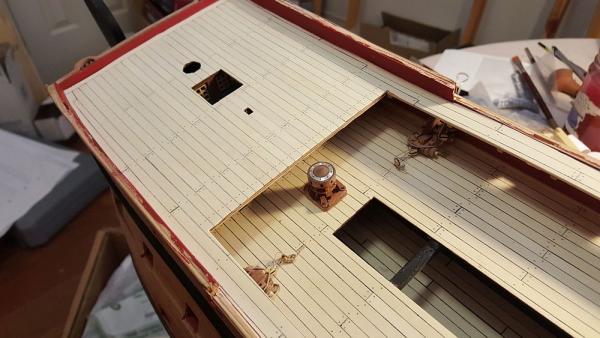
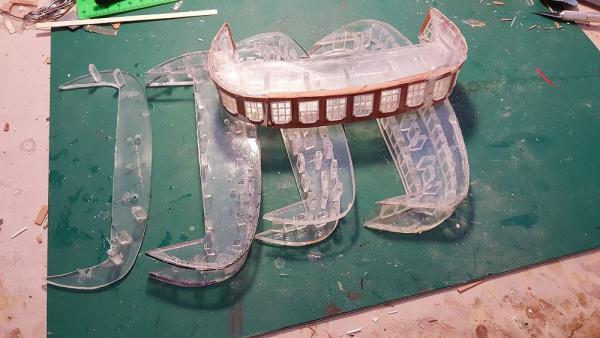
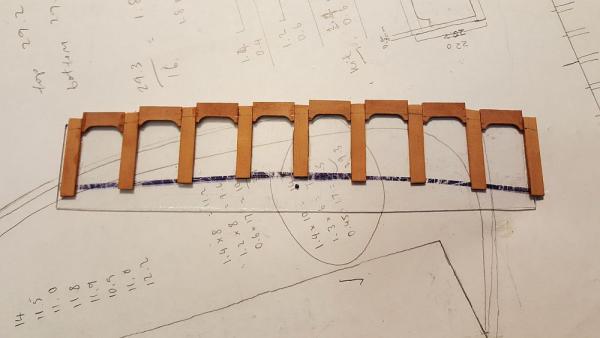
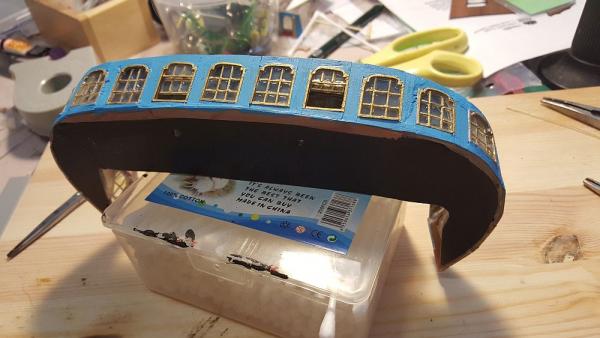
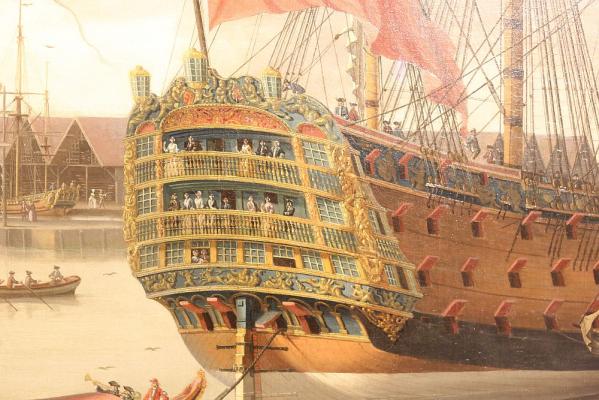
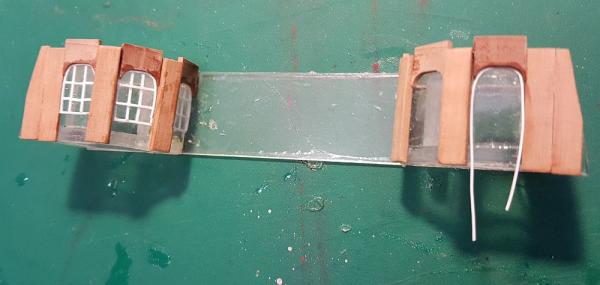
I will be going overseas for a few weeks tomorrow, so no ship modelling. I thought I would post a quick update on stuff i've been working on. The fo'c'sle deck has now been planked. Note that the marine walk is integrated into the fo'c'sle deck and has been planked with the deck. I am not installing any deck furniture until the ship is fully built up, which is why the deck looks so sparse. Only things that need to be there are there. In my previous post I said that I had made four attempts at making the acrylic transom piece. Well, you can make that five attempts. After the last effort, which I thought was "definitive", I discovered several errors. The most serious was that the top piece was far too curved. Quite subtle and not seen in pictures. I only noticed it when I made a final inspection prior to commencing work on it. So I had to fabricate another one. A new feature of the new transom piece is that the acrylic supports are sanded to make them cloudy. This will help diffuse the light from the LED's better. This shows how the galleries in the transom piece are made. The entire piece has severe curves, so it is best built up in sections. The sections are then glued to the acrylic support. The advantage of sections is - if I make a mistake, I can just ditch the section without having to re-fabricate the whole part (which I have already done - five times!). Also, it is easier to bend sections around the curve. You can see the pencil guides I use to help align window frames. The curved tops of the windows were made on my mill - I milled out a channel from a block of pear, then sliced off slices with my table saw. The windows curve severely around the side of the transom piece. I decided to hide the split under a column. Once it is sanded, painted, and the column decoration goes on, the split will be invisible. Completed, with wood filler to disguise holes. Whilst waiting for the putty to dry, I thought i'd test out what it would look like with lights on. If we count all the failed attempts at transom pieces, it would have taken me about 10 days work to get to this point, on this piece alone! Progress as of now. A number of flaws are evident - but nothing some sandpaper won't fix. The windows look slightly opaque - that's my layer of Kristal Kleer drying. Kristal Kleer helps hide any marks on the window - smudges from superglue, accidental cuts, etc. Also, it clings to the side of the frames by surface tension and makes each window pane slightly curved. Note there are a couple of open windows. I took a photo of the painting below when I visited the National Maritime Museum in Greenwich. It is of the Royal George, but I have been taking reference off it: The painting shows that the windows open by sliding upwards. I did the same with my transom piece. Hey - it's scratchbuilt. May as well show off. Right now I am racking my brains to come up with a solution for making the column decoration. I have a few ideas. Watch this space, I will update it when I get back from holidays and try out a few things.


-
There are enough half cannons (dummy cannons) and full cannons supplied in the kit to build the RW as indicated in their plans. However, their plans indicate that the dummy cannons should be used under some of the open decks, where they may be visible. Also, it appears that Mark is doing what I did (hack through some frames to open up more holes for cannons). If you do that, you will end up with a shortage of cannons. I had to order more cannons from Euromodel.
- 652 replies
-
- 2
-
-
- royal william
- euromodel
- (and 1 more)
-
So this is where you are! I was wondering why I haven't seen any Royal William updates for quite a while. Nice job you are doing so far.
-
Buying an Expensive Kit and throwing most of it away
Keith_W replied to pirozzi's topic in Wood ship model kits
Old Man, burnt parts are standard for anything that is laser cut. And yes, you need to spend time sanding them off. It's part of the deal. -
I might point out that not all plastic modellers like to weather their models. This kind of practice is most common in those who make armor models. Many people who make cars like to present them in showroom condition. As do some plane modellers, especially those who make passenger aircraft. And - dare I say, many plastic ship modellers also like to present their models with no weathering. If you have ever seen a real life ship berthed in a harbour, you will see that they are impeccably maintained - especially military ships. As for our sailships, all those sailors had to do in their idle time was to scrub the decks and keep the place clean. So - I will apply weathering where it needs it (sails). But given I am modelling a military sailship, the hull and deck itself should look impeccable. This is not a slovenly merchant ship!
-
Buying an Expensive Kit and throwing most of it away
Keith_W replied to pirozzi's topic in Wood ship model kits
I suspect that Vince P started this thread with reference to my build. To answer your question Vince, the reason I am chucking all those metal pieces away is because: when I bought the kit, I was not ready to scratch build. Did not own the tools, was not mentally prepared, lacked confidence. Prior to the Royal William, my most ambitious build was the HMS Bounty, and even that had its fair share of mistakes. I was not sure I could tackle something like the RW, let alone scratch build it. I decided to purchase the RW. I would try my hand at scratch building as many pieces as possible - and if I fail, I could always use the kit supplied parts. As it turns out, my attempts at scratch building most of the pieces seem to be working all right. I like the results more than the kit parts anyway. Trust me, I am completely objective and unsympathetic towards my own efforts - if something I make is inferior to the kit part, it goes into the bin and I use the kit part.- 72 replies
-
- 13
-
-
I didn't realize how big this build was ... until I saw the clamps on the frame. Holy moly, this thing is HUGE!
-
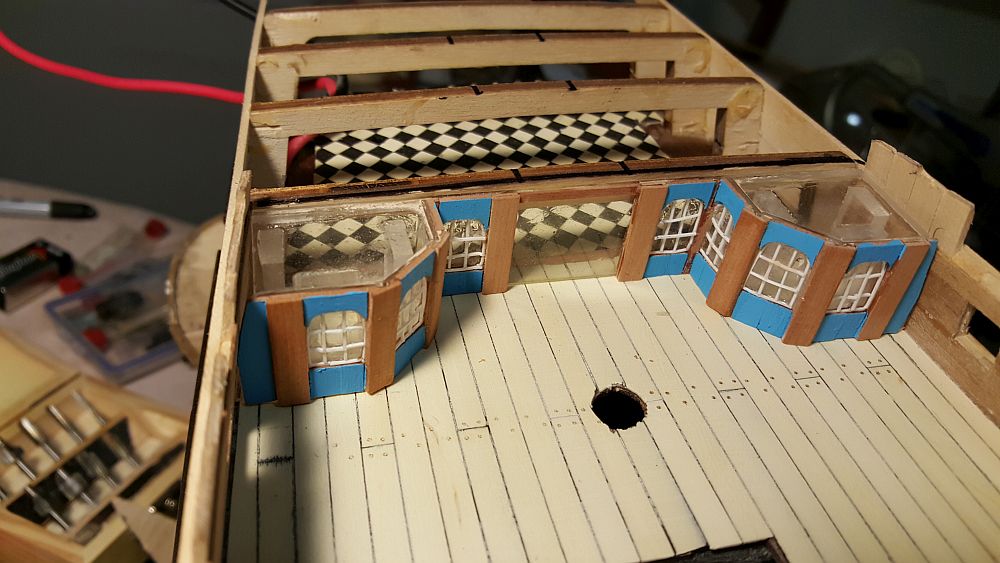
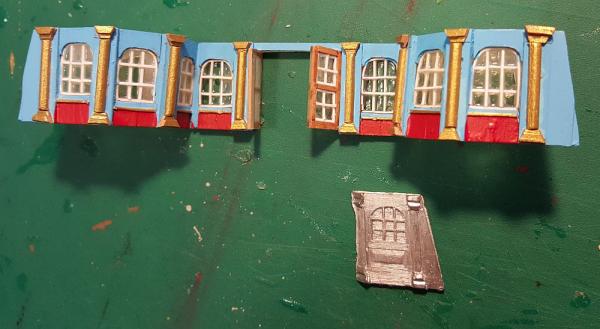
After Victor, Greg, Pat, and Mark suggested the columns ... I went ahead and made them. I flattened a dowel by passing it through the thickness sander, then made the feet out of pear. Painted the whole thing gold, and mounted them on the panel. I think it DOES look much better! The whole thing has a more pronounced 3D effect than the part supplied by Euromodel. I have also mounted the doors. Yes, I know there are no doors in the plans. Call it artistic license. I have to show off the parquetry floor somehow. Dry fitted on the deck.

-
Dreaded short thwart problem on Bounty Launch kit
Keith_W replied to PAnderson's topic in Wood ship model kits
There was no problem squeezing the hull back into shape, Paul. A pair of strong clamps took care of that I installed the thwarts, then cranked the clamps until it all came together. -
Dreaded short thwart problem on Bounty Launch kit
Keith_W replied to PAnderson's topic in Wood ship model kits
Paul, I think that once the model is popped off the building jig, it "wants" to spread out. I solved my problem by squeezing the hull together and installing the thwarts. As they went on one by one, they held the hull in shape. -
Yes Victor, you did paint yours gold. Here is a picture of your ship: I went to the other forum and downloaded every single picture you uploaded. I reference them constantly! OK I will go make the columns then.
-
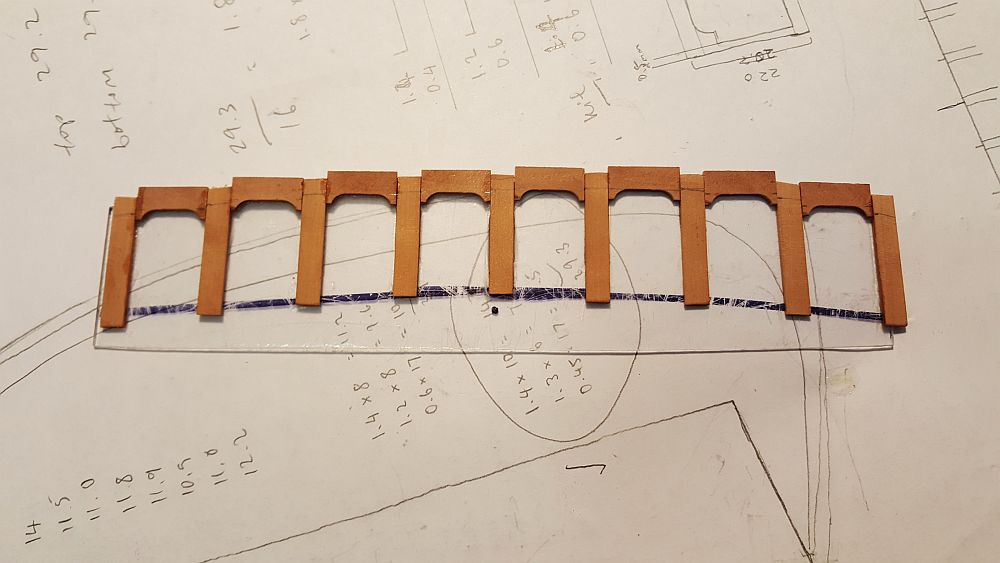
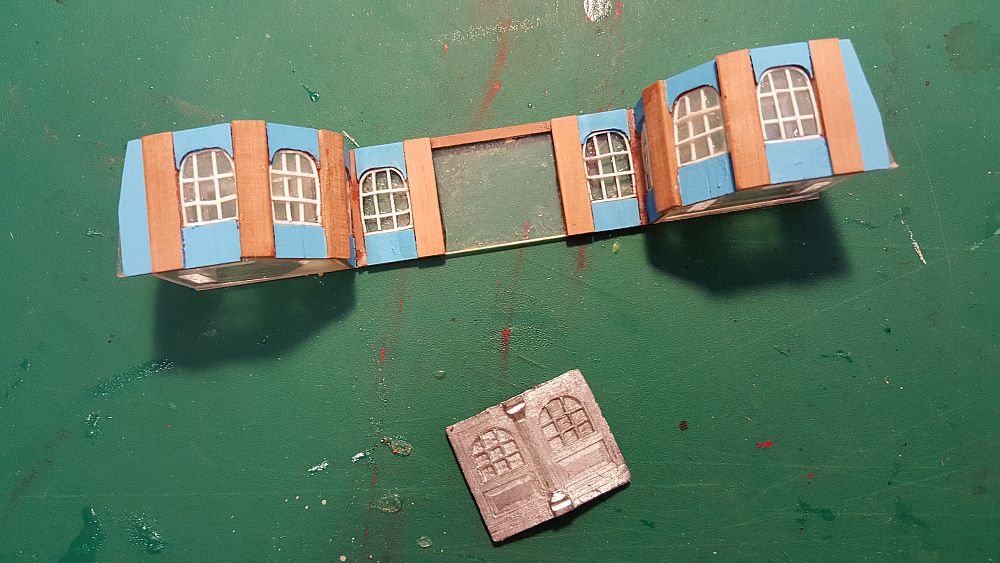
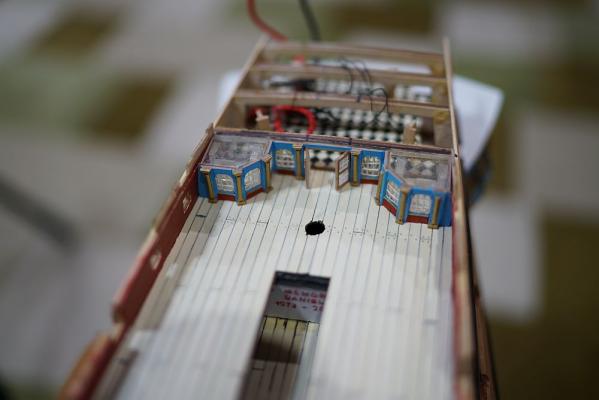
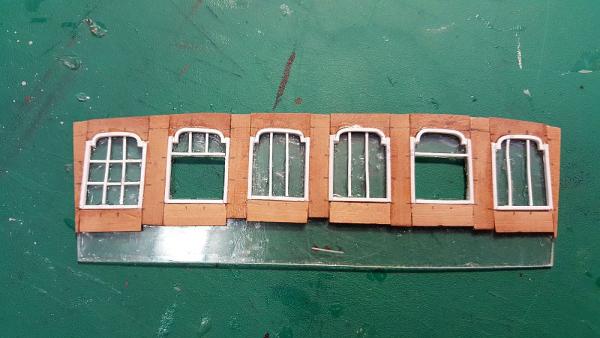
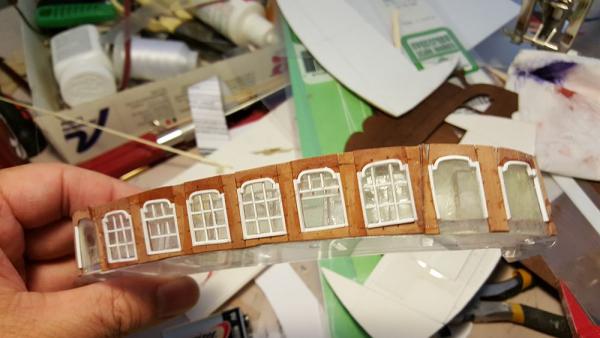
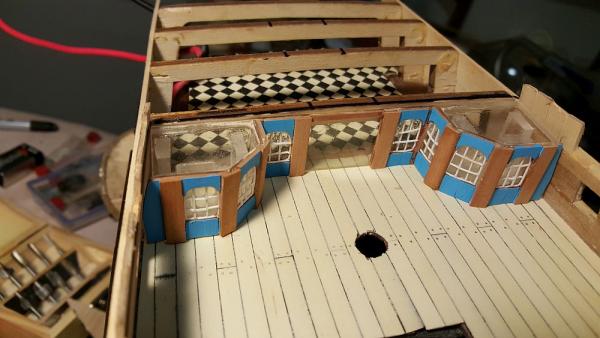
Thank you for following my log and all the likes, everyone. Greg: I should thank you also for all the messages you've been sending me throughout the year, pestering me to restart my build log. Life got in the way, and life will get in the way again. That's what happens when you're NOT retired and you have to pay off your mortgage! Mark and George and Victor: I can tell you it was a major pain in the ***. As you can imagine, the angle of the windows is adjusted by moving the top plate relative to the bottom plate ... but if you do that, the side curves (the horn-like things which curve from the transom to the hull) are no longer in alignment. Even my carefully made card template got me "roughly" in the ballpark. Each successive iteration was a refinement of the previous. Rick: I read that book when I was a teenager Anyway, I worked on a dummy cabin plate as "proof of concept" before tackling the stern. This part will by partially hidden by the deck above it, so any mistakes here won't be so visible. Here, the acrylic master is being covered by veneer plates. You can see two methods of constructing the windows - on leftmost, I cut out each cross member and glued it in place (VERY time consuming). The window next to it, I simply laid the cross member across. The difference is not visible if you are looking at the window straight on, but if you look at it at an angle, you can see that the window is not quite right (see later). The scratch made part compared to the Euromodel supplied metal plate. I have yet to make the doors. Like the other cabin plates, the doors will be shown partially open. Installed in situ. I COULD make the column decoration, but I think it looks nicer unadorned. What do you think?

-
Jim Byrnes Model Machines
Keith_W replied to Mahuna's topic in Modeling tools and Workshop Equipment
Well, if you want to hear something bad about Jim Byrnes, I will tell you that postage to Australia is almost 1/3 the purchase price of the product itself. This is not Jim's fault though ... it's US Post.