MORE HANDBOOKS ARE ON THEIR WAY! We will let you know when they get here.
×


Keith_W
-
Posts
1,145 -
Joined
-
Last visited
Content Type
Profiles
Forums
Gallery
Events
Everything posted by Keith_W
-
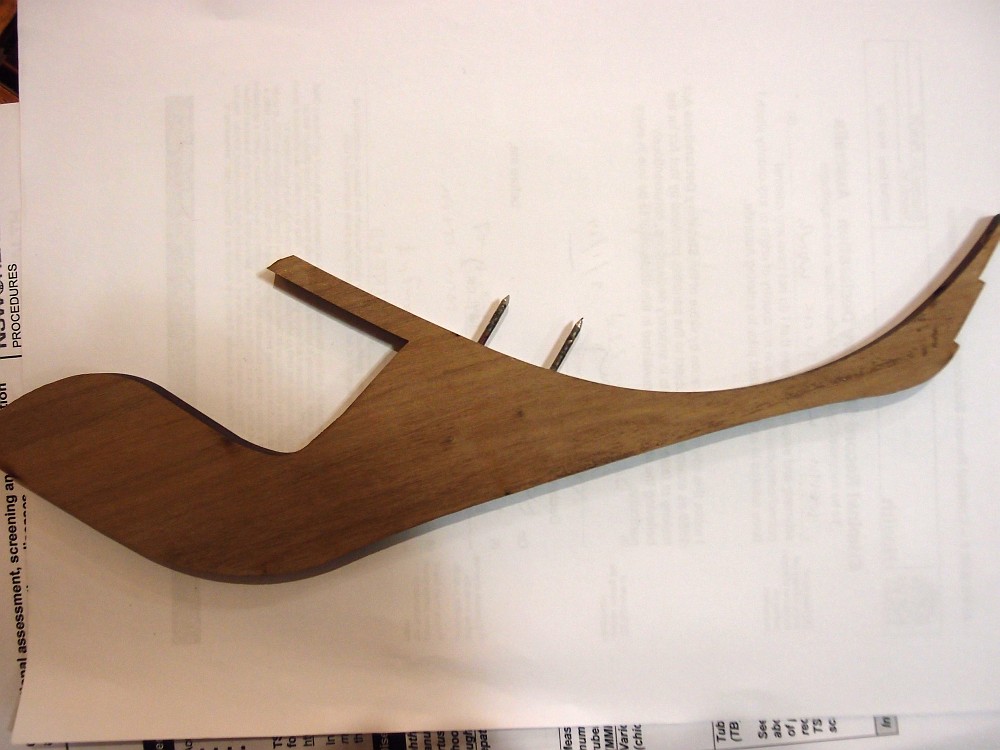
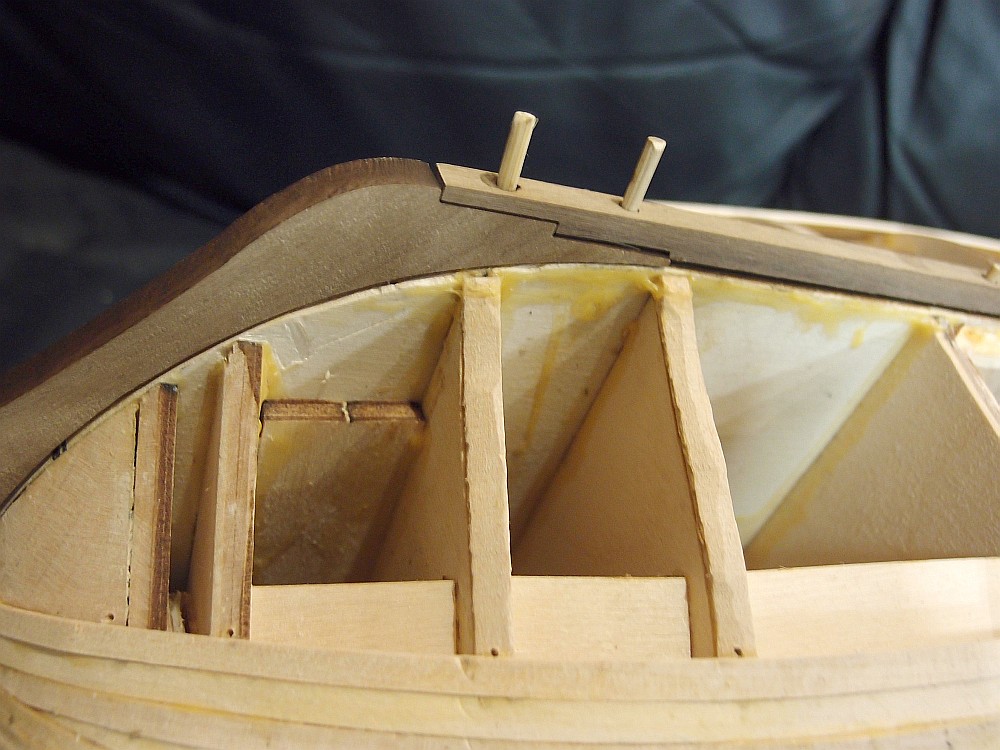
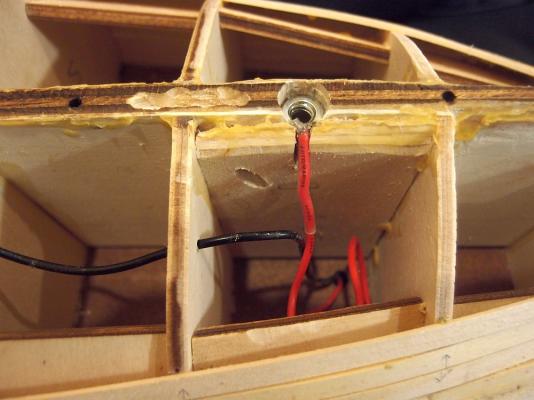
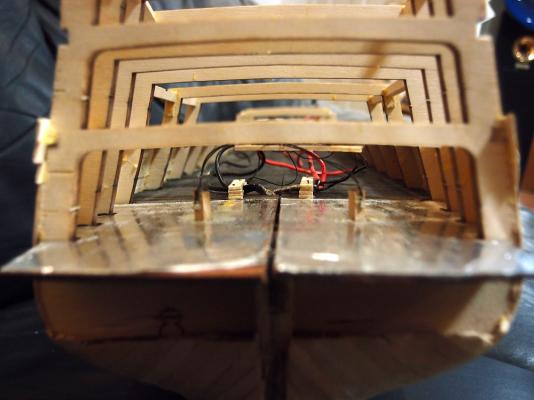
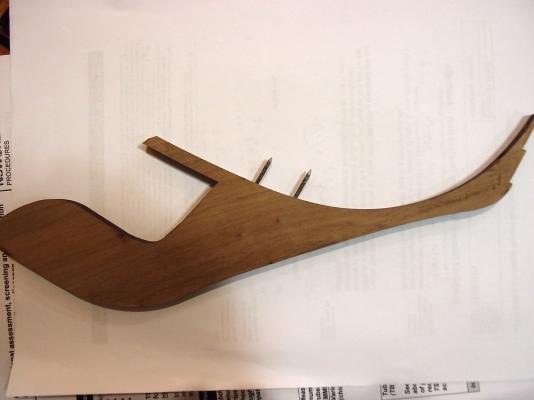
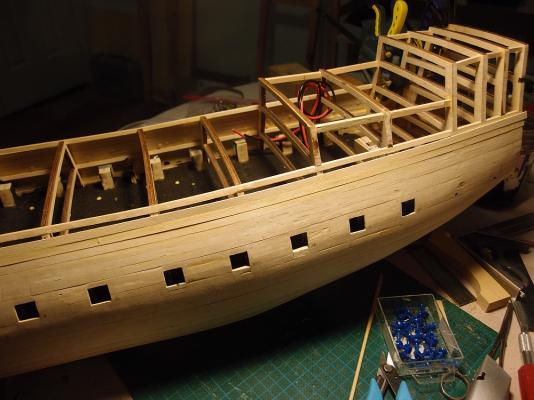
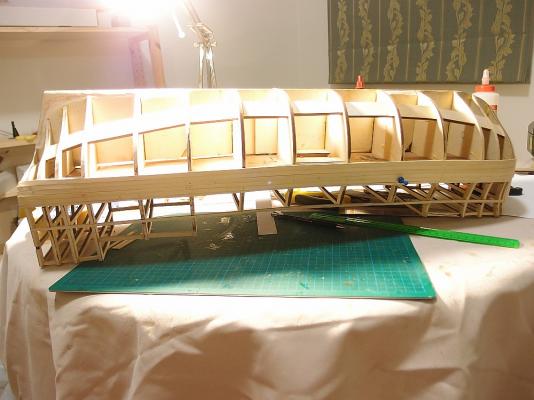
 Thanks for all the likes, everyone! It's a nice feeling to have more likes than posts Anyway, work continues. As per other build logs, I installed some nails into the keel to keep it stable because a great heavy mass of metal decorations will be cantilevered off the beakhead. The keel is also attached to the false keel by means of wooden dowels. Even with no glue, the whole shebang is rock solid! Planking has now proceeded to below the level of the wales, and up to the second deck. Not shown are the blocks to support the dummy guns. These things are virtually impossible to photograph, because they are painted black against the entire lower deck, which has also been painted black. This is a good thing, because I don't want to see the dummy blocks. It IS a bit difficult trying to locate the holes for installation of the dummy guns when everything is black though. BTW, the second deck fit perfectly a few weeks ago when I was fettling it. Now, with all the planks in place, somehow the deck won't fit! After quite a bit of cursing and a lot of anxiety (did I somehow distort the shape of the ship when I planked it?) ... it all measures correctly. Phew. As you can see, the second deck is also painted black. The rear section has been covered with foil for lighting. I was not sure how to route power into the ship. You can see a little excavation which I dug out on the false keel because I was planning to put a connector there. Then I hit upon a simple idea - why not simply electrify the support rods that I was planning to install anyway? I soldered the wire unto a nut and installed it. We have no lights ... AND NOW WE HAVE LIGHTS! EUREKA!! The idea worked!!! As you can see, the LED's are SMD's (surface mount diodes) which are absolutely tiny. I glued them to a block of wood and then angled them outwards slightly. Yes, I know that Euromodel supply metal plates in place of windows, so you will never see the LED's if you build the ship as per the kit. However, I plan to fabricate my own replacement windows. I'm not sure how i'm going to do that, given that I have never made windows as small as this before, but time will tell ... I'll think of something! I hope! That's it for now. I will install the garboard planks and then work the planking upwards to close the gap.
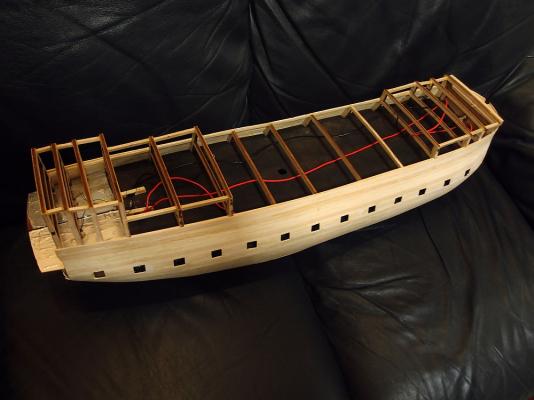

-
She looks great, Denis. Are you planning to furl all the sails? I am a big believer of sails on a sailing ship, somehow the ship looks incomplete without it.
- 555 replies
-
- 1
-

-
- sovereign of the seas
- mantua
- (and 1 more)
-
Amazing effort if this is your first wooden ship! I have made quite a few and my models don't turn out as nice as yours!
- 227 replies
-
- 3
-
-
- syren
- model shipways
- (and 1 more)
-
Keep going! I'd like to see how you make the winged keel
-
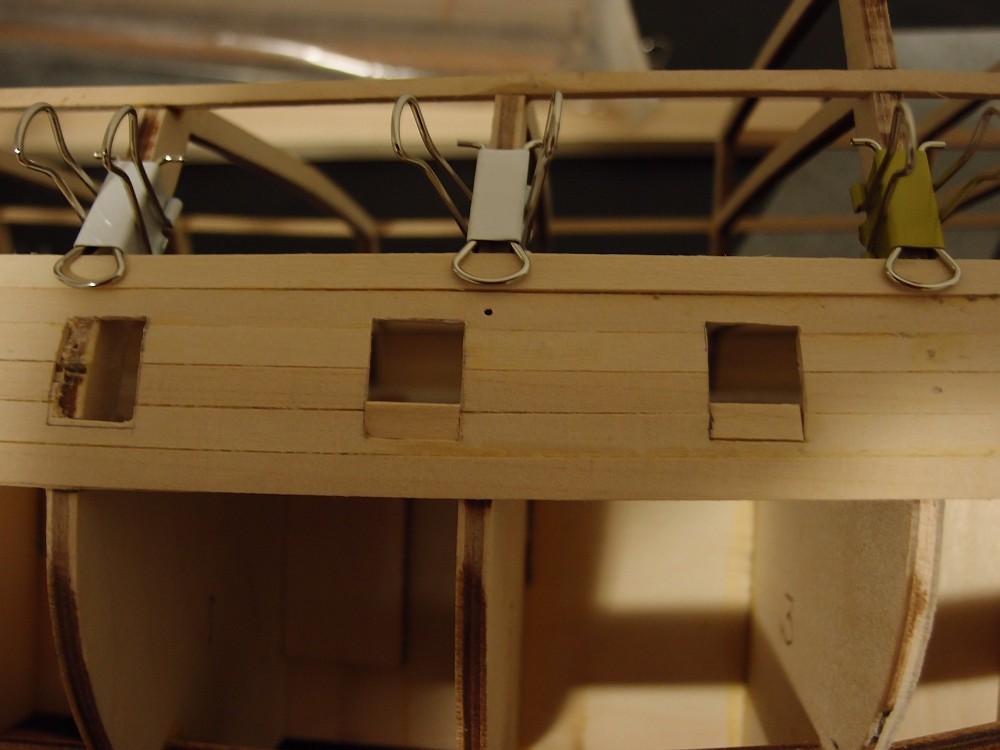
Planking continues. The lower deck gunports have been cut out and the dummy gun supports have been installed. The lower deck has been painted black.
-
Treenail detail option?
Keith_W replied to S.Coleman's topic in Building, Framing, Planking and plating a ships hull and deck
dgbot I think that the needles on those Lovenox syringes are extremely fine, they are subcutaneous needles and usually about 25 Gauge (0.5mm). That's tiny, and may not be suitable for simulating treenails unless you are trying to simulate very small ones. -
Hey RMC, just a quick note to let you know that I have been enjoying your build log. I know what you mean about heart stopping moments ... I have much to look forward to (heart stopping moments that is) on my own build!
-
Great work as usual, Vince. Keep it up! Actually, what I said was that no mention of different gunport sizes was made on other build logs, and that the Euromodel I-I only mentions two gunport sizes. Re: the dimensions in the plans - which plan sheet are you referring to?
-
Jack, you are doing superb work. Re: how to make the nails, take a look at this: http://modelshipworld.com/index.php?/topic/3315-making-small-nails-with-round-head/
-
Yes, she looked different at different periods in her history. Prior to her outfit in 1797, she had open rear galleries and lacked the black and ochre stripes, as depicted in this painting from 1793. In 1900, the black and ochre stripes looked radically different.
-
wq3296 I wouldn't be so quick to dismiss Chinese products. You would be surprised how many items you use in everyday life are made in China. Granted, there is a lot of garbage that comes from China, but it all comes down to quality control. A friend of mine has business dealings in China where a Chinese factory manufactures items for his company. The stuff that comes out is as good as anywhere in the world, but he says that you have to inspect each shipment carefully to make sure that standards are maintained. The two largest laptop manufacturers (Lenovo and Apple) are both made in China. Nothing wrong with my Lenovo, it is four years old and still going strong. BTW not everything made in the USA is good, either. Just look at the cars.
-
THE BLACKEN-IT TRIALS
Keith_W replied to Erebus and Terror's topic in Metal Work, Soldering and Metal Fittings
Can anybody with a chemistry background please explain how metal blackening works? I don't understand how it works across different metals. I have an undergraduate level understanding of chemistry, so I don't mind looking at chemical equations. I know there is at least one person here with a chemistry background -
Besides the fumes from the gasoline and the fire risk (which can be managed by sealing it in a can), why is it dangerous?
-
Hi Pops, the instructions and parts list for the Bounty are available through Model Expo's website. Instructions: http://www.modelexpo-online.com/images/docs/MS1850/MS1850-Bounty_Launch-Instructions.pdf Parts list: http://www.modelexpo-online.com/images/docs/MS1850/MS1850-Bounty_Launch-Parts_List.pdf Not violating copyright if they publish it themselves
-
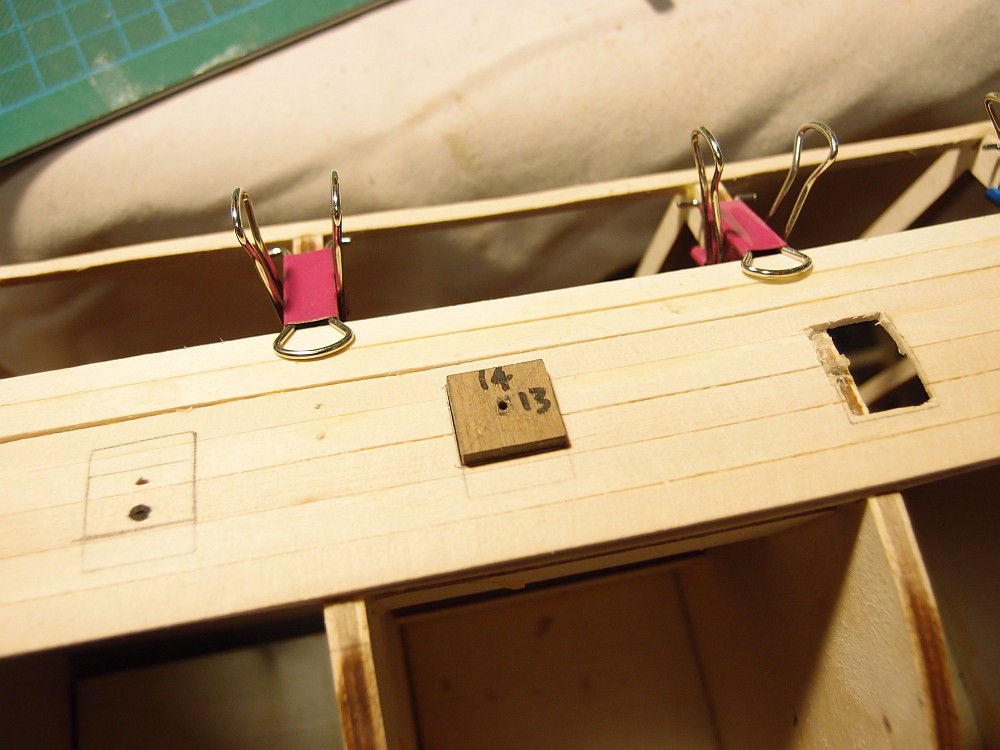
Thanks Brian and Sir Charles. I decided to cut the gunports vertically. Thanks to me not reading the (*&^(&^&% plans properly, I cut the gunports 4mm too low! This is me correcting the mistake. This is my gunport cutting jig. The hole in the middle is where a pin goes through. I mark the position of the gunport with a pin, then place the jig on top. I trace the outline of the gunport, then cut it out using a knife and a drill. If I can pass the gunport jig tightly through the hole, it is the correct size.


-
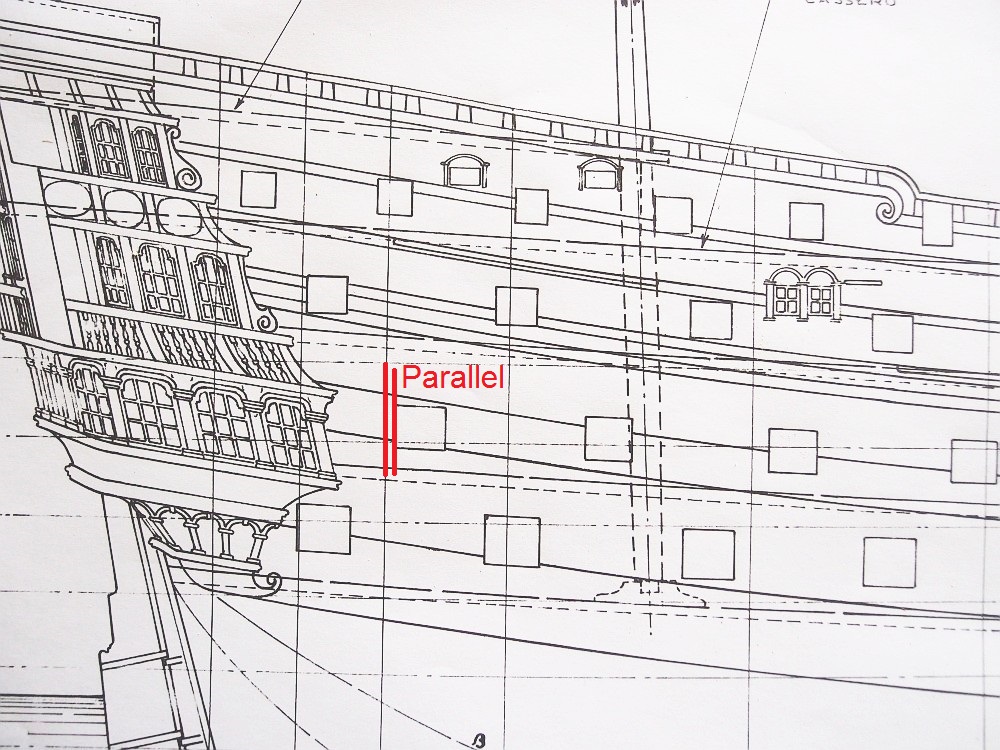
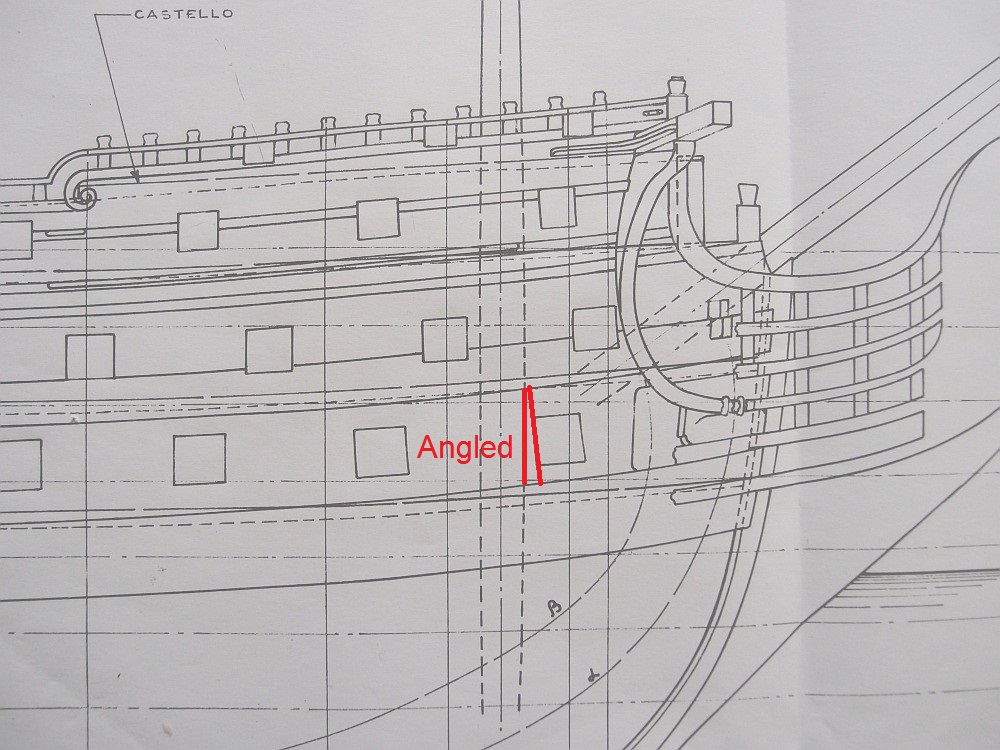
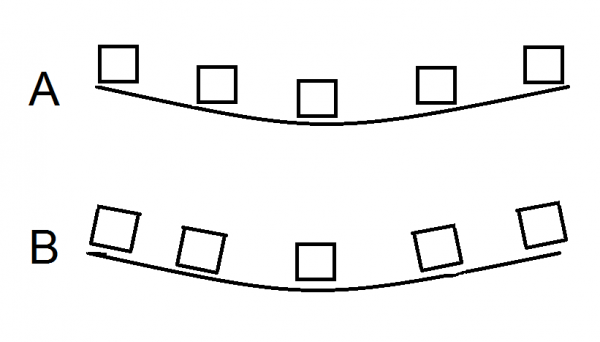
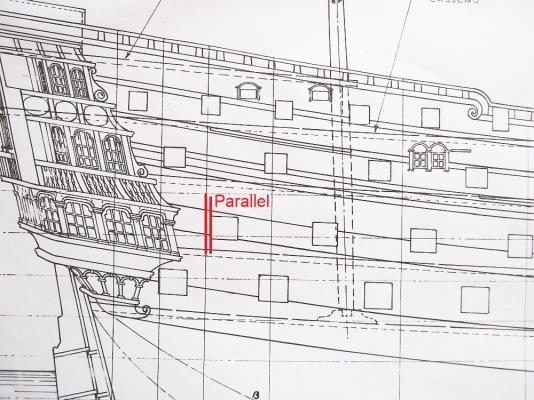
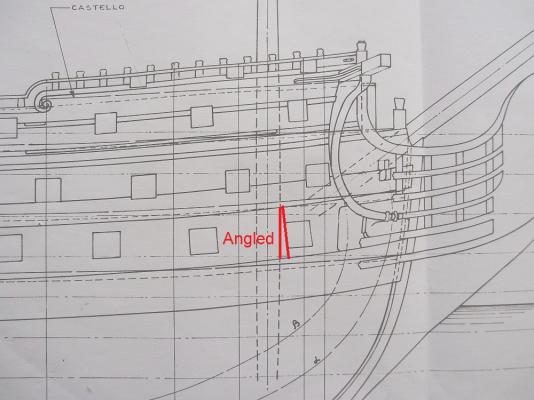
Hey guys, I have a question!!! Please refer to this diagram: When gunports are aligned on the ship, are they aligned vertically (A) or do they follow the curve of the deck and wales of the ship ( ? I would have thought that (A) is correct. The reason why I ask is because the Euromodel plans show both. At the stern, you can see that the gunports are aligned vertically. However, at the bow, the gunports seem to slope up to match the curve of the deck? I think this looks really odd. Which is correct?
-
Yes, Sir Charles. The closed gunports are located directly on the bulkhead. I do have a plan to add additional structural reinforcements around the gunports. I was going to do it all today but unfortunately I had to take the wife to the city!
-
Very nice, but it looks as if your deck is going to be completely flat? How are you going to install the little depression in the deck for the crewmen (not sure what you call it), given that your bulkheads rise to the level of the deck?
-
Thank you for your comment, Sir Charles. I am actually putting together an inventory of things I would like to request from Euromodel. I haven't yet done a block count, and in fact I dread doing it. I have noticed that my ships wheel is missing too. I was also going to order additional dummy guns, because I plan to display guns where the kit suggests the gunports should be closed.
-
Looks good, Vince. How are you going to add the trunnion bands? The brass wire supplied in the kit isn't even wide enough in diameter to fill the notch in the carriage. If you add a trunnion band, it will sit flat against the top. I have been thinking of ways to thicken trunnion - most probably drill out a larger hole and install a larger diameter rod.
- 593 replies
-
- 1
-
-
- royal william
- euromodels
- (and 1 more)
-
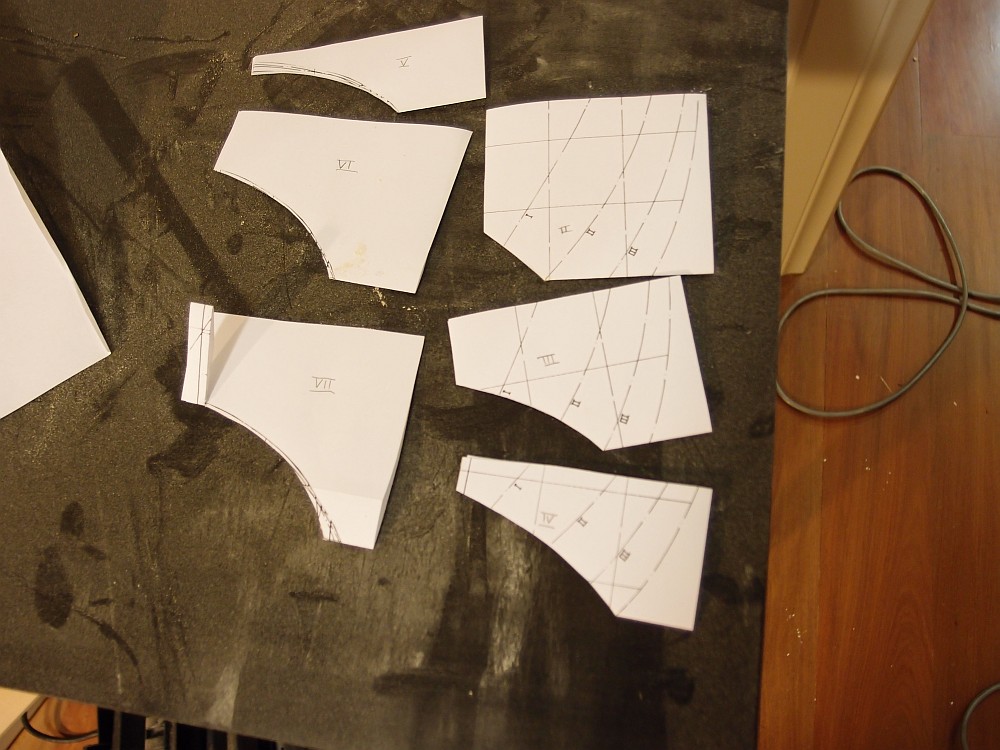
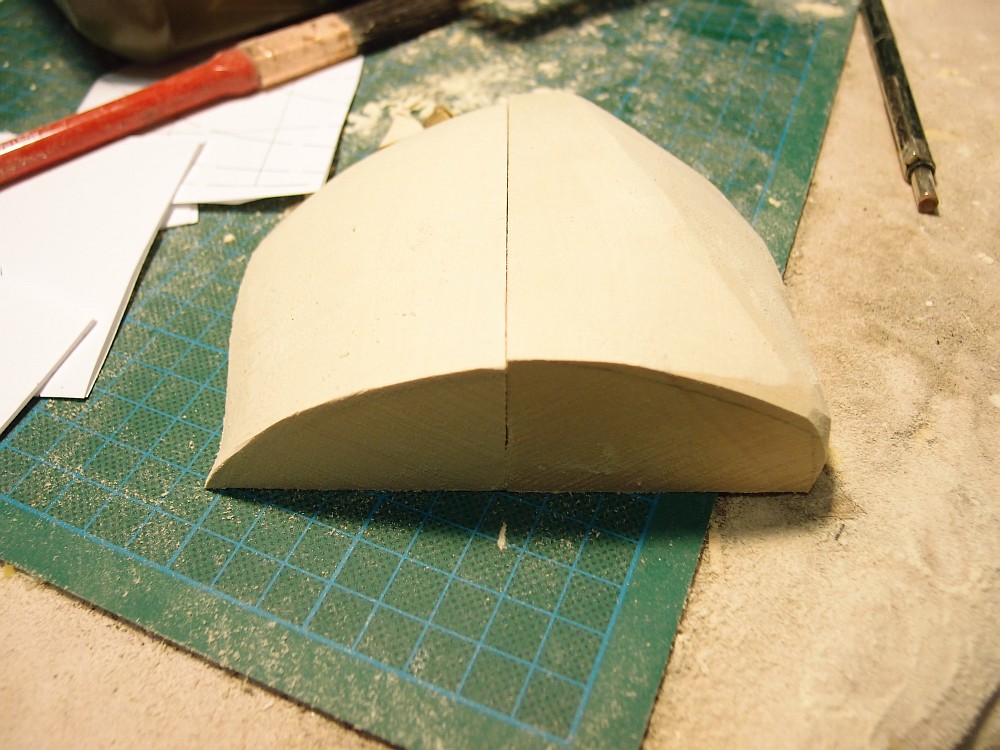
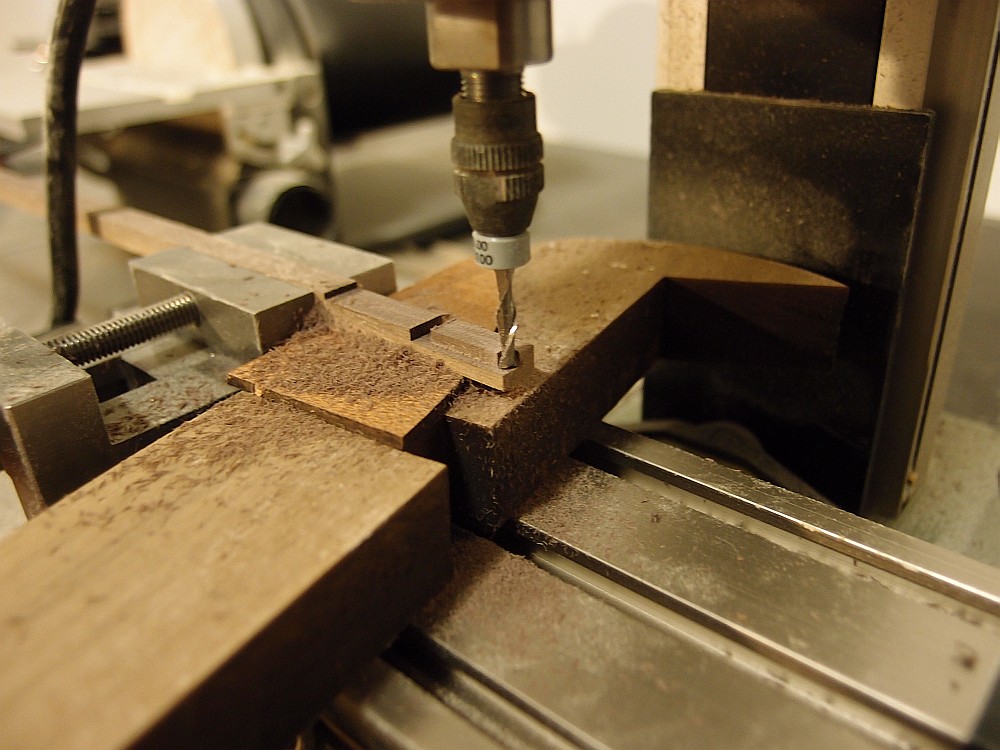
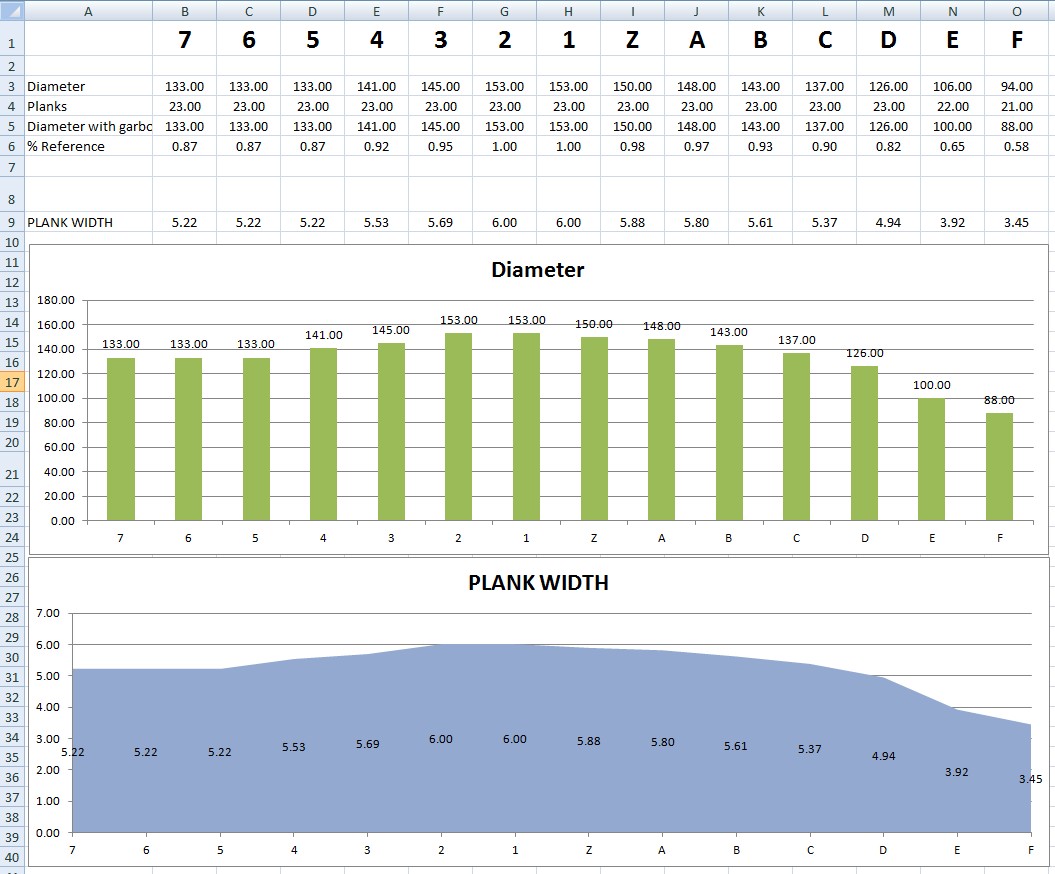
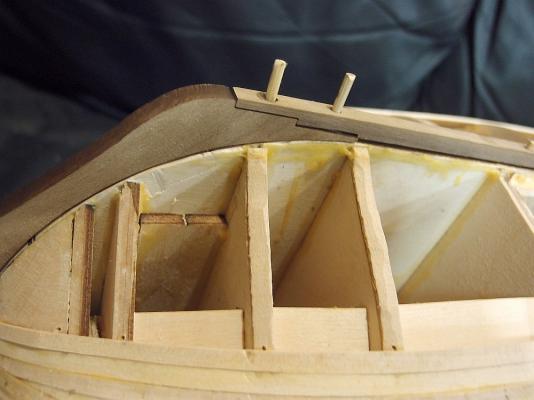
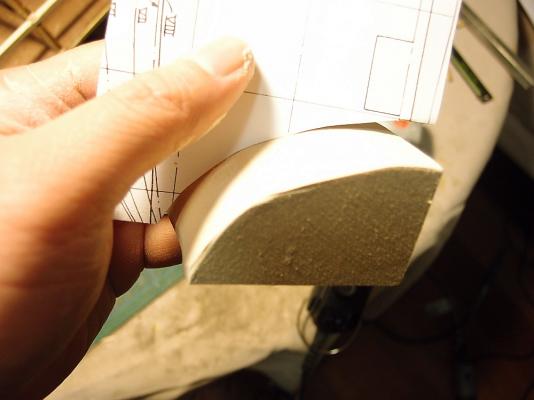
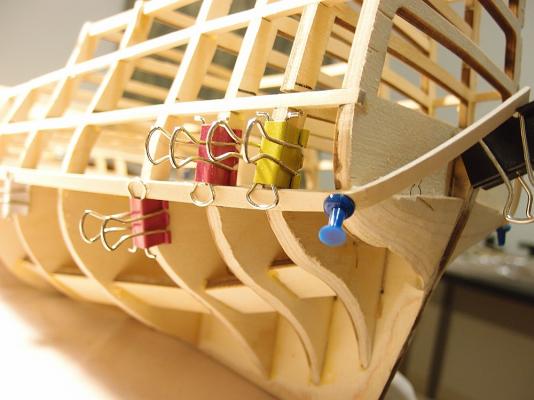
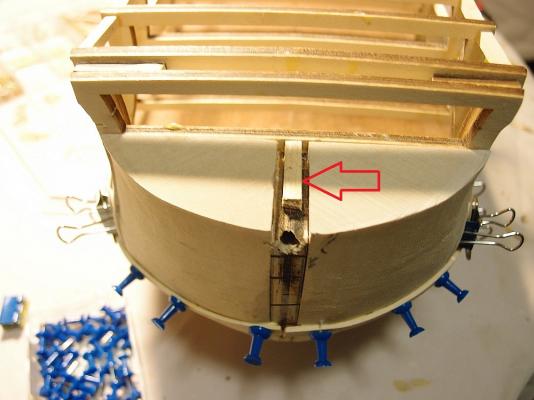
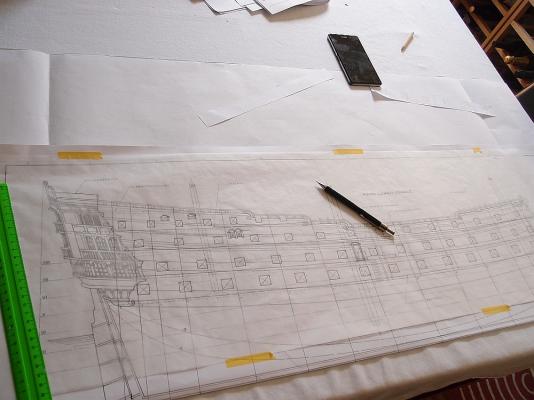
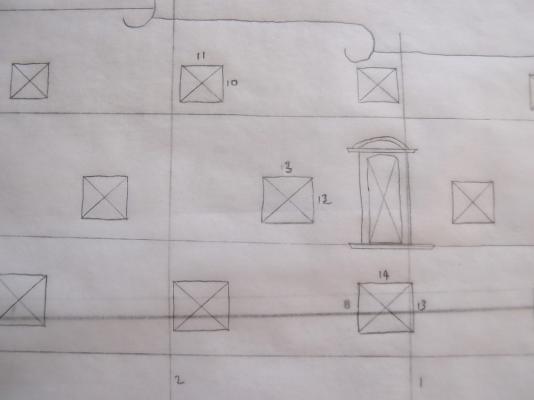
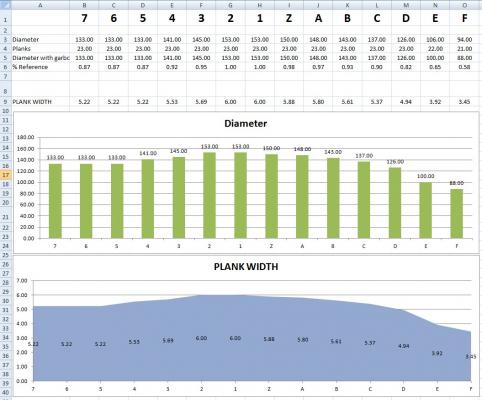
Time for an update, as well as a few other notes on building this magnificent ship. The bow filler blocks were a real pain to fabricate. To help get the correct contour, I photocopied the plans and cut out guides to check the shape at different levels. It really helps that Euromodel's plans are so detailed - by far the best I have ever seen. It more than makes up for the scanty instructions. Completed bow filler block (left). The one on the right was roughly shaped with a belt sander. I used my Proxxon MF70 mill to shape the keel so that they fit together. Start of planking! I decided to start at the lower gun deck and go both upwards and downwards. As you can see I managed to get a really tight bend at the stern. The bow, with the bow filler blocks installed. The plans are rather sketchy regarding how they should be placed, but it made sense to bring them up to the level of the main deck. If you do so, there will be a gap in the middle because the false keel does not rise high enough. I installed a block (arrowed) to help support the main deck which will be installed later. I then started tracing the gunport pattern out onto some tracing paper. Note that there are FOUR different sizes of gunports. Interestingly, none of the other build logs mention this. Pete's Interpretive Info on the Euromodel website suggests that only TWO different gunport sizes are present (14mm x 14mm, and 13mm x 13mm). The gunport sizes I measured out were: 14mm x 13mm <-- lower gun deck 13mm x 12mm <-- middle gun deck 11mm x 10mm <-- main deck 9mm x 9mm <-- hindcastle Perhaps Pete would like to check his plans (I used Plan sheet #7) and amend his I-I accordingly? I have now installed five planks on the lower gun deck, all without tapering. This weekend I will cut out the gunports. I also took some measurements of the bulkheads below the lower gun deck - these will all have to be tapered.I used these measurements to calculate how wide each plank should be at each bulkhead. Disappointingly, the lower graph (a graphical representation of the shape of the plank) suggests that shaping these planks won't be so easy!


-
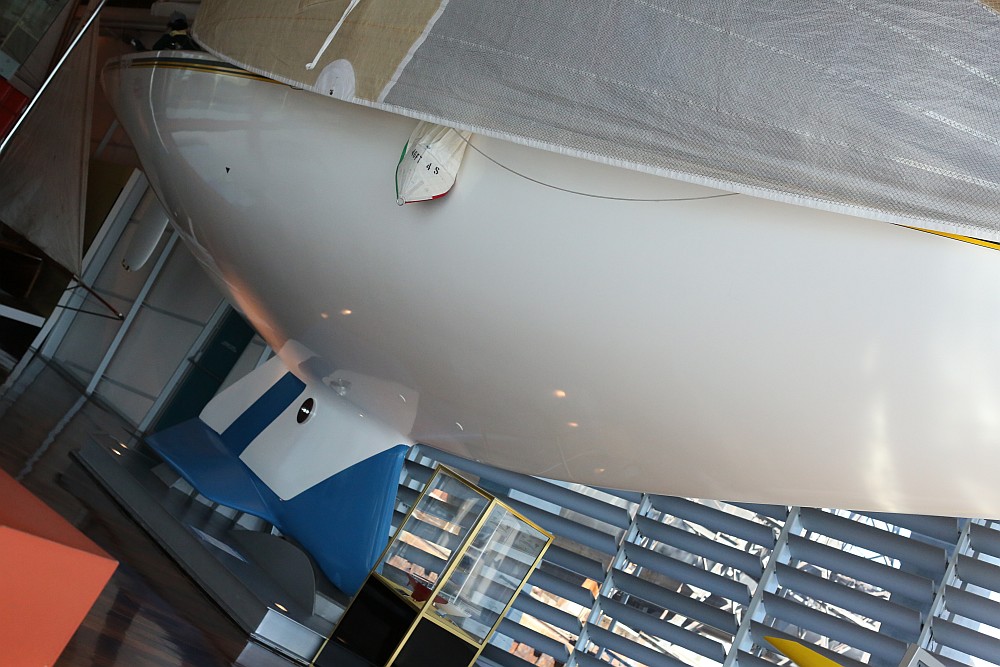
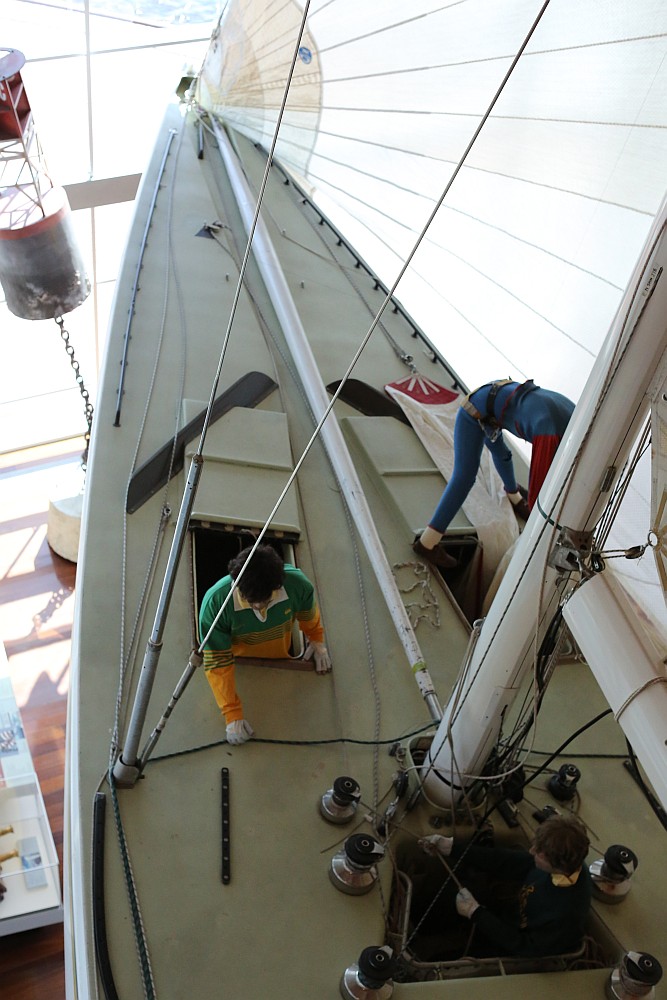
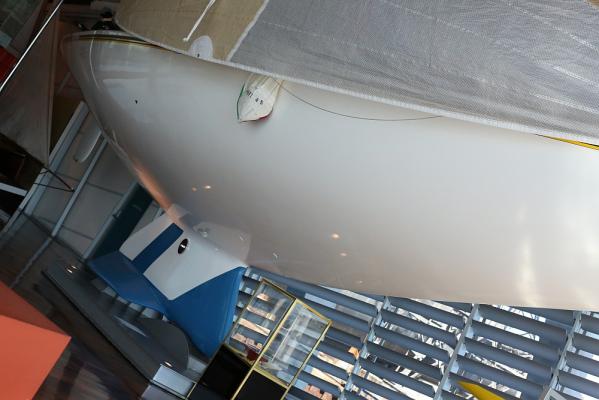
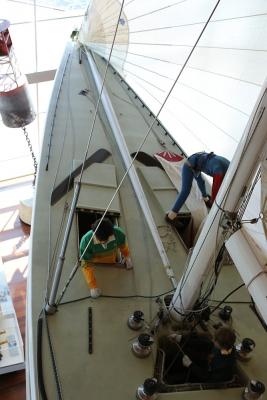
What an exciting project, i'll be sure to follow this one! BTW, you might like some pictures I took of Australia II when I was in Fremantle earlier this year.


-
Installing gun ports
Keith_W replied to richardpepi's topic in Building, Framing, Planking and plating a ships hull and deck
Most people cut out the gunports after the first planking. It is much easier to mark the wood and make mistakes without your mistakes being on show because you have ruined the veneer layer. -
You are doing a great job, Vince. Thanks for posting a detailed build log. Although I haven't made any comments before, I am actually following your progress very closely and learning from your mistakes. Thanks to you, I have avoided making quite a few mistakes already!
-
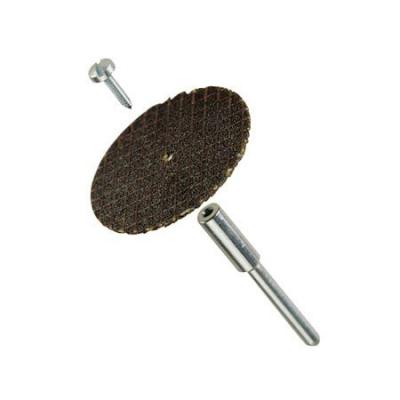
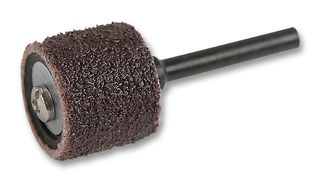
First: all the accessories are interchangeable - as long as the maximum diameter of the shaft of the accessory does not exceed the size of the collet, your rotary tool will be able to hold the accessory. I did some googling for you: Dremel - maximum collet size 1/8" (3.125mm) Proxxon - maximum collet size 3.2mm Foredom - maximum collet size 1/4" (6.35mm) Second: I don't like cordless tools, because they are heavier (thanks to the battery) and more awkward to hold. Also, it is annoying to have to charge the battery because it will inevitably give out when you need it most. I prefer corded tools, with an extension shaft to a small tool holder you can hold like a pen. Foredom is designed like this, and you can buy a Flex-shaft accessory for the Dremel and Proxxon. Third: the rotary tool accessories I use most often are: The cut-off wheel. This is mounted on my Dremel 90% of the time. The sanding drum. The collet set, for holding various sizes of drill bits. Fourth: other add-ons. Not necessary, although some people find the drill press attachment for the Dremel to be quite useful. Having said that, you already own one.