BobG
-
Posts
3,109 -
Joined
-
Last visited
Content Type
Profiles
Forums
Gallery
Events
Everything posted by BobG
-
Congratulations, Hake, on completing this wonderful, historic, ship model! You've done a superb job and your build log is one of the best as always. This is a ship that I could see building someday since the book about the Endurance is one of my favorite accounts of early arctic exploration. Can't wait to see what you decide to build next. Do you have any ideas yet?
-
Thank you Tim, Theodosius and Mike for your kind comments and thanks to everyone else for the likes and stopping by. I had my struggles with the gunport patterns for sure but, all in all, it was a good experience for me to stick with it when I wasn't completely sure if I was doing it entirely the right way. Chris has done such a good job of making the parts in this kit fit together so well that you almost begin to think that everything should just snap perfectly into place if you are doing it right. However, there's still room for a lot of individual variation introduced by each builder that affects how things fit together. What I've learned is that each step may not go as smoothly as you would like it to go but if you take the time to read about what others have done, work slowly and stick with it, things will probably turn out ok.
-
I love your attention to the tiniest details, BE. You really take the kits you build to a different level of authenticity.
- 857 replies
-
- 3
-

-

-
- Sphinx
- Vanguard Models
- (and 1 more)
-
Nice work, Daniel. This is going to be a very nice model.
-
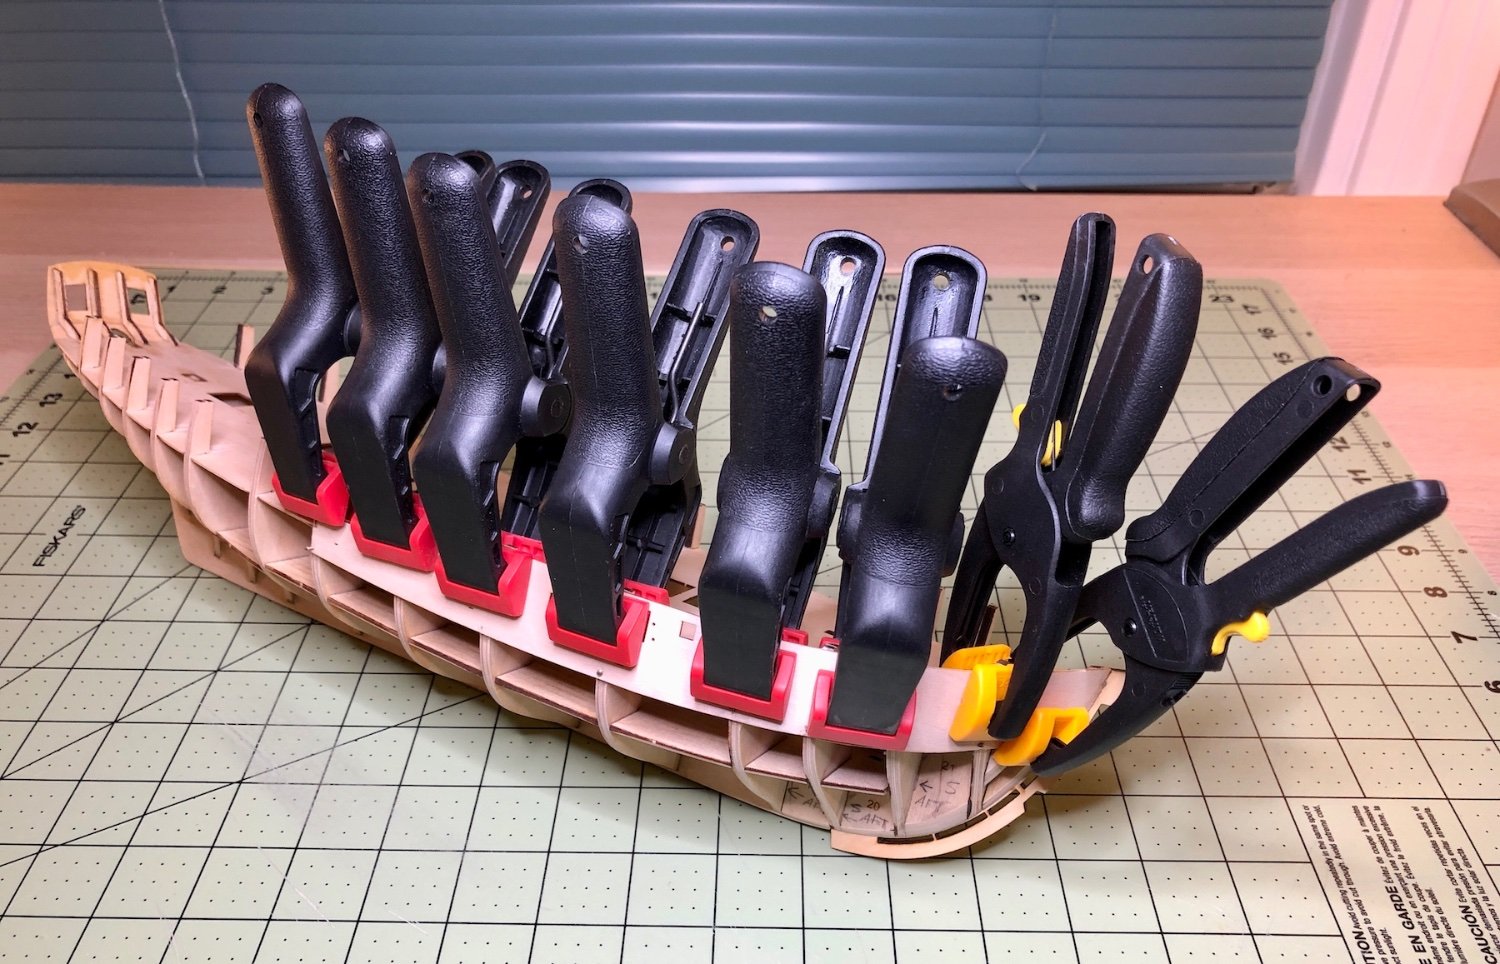
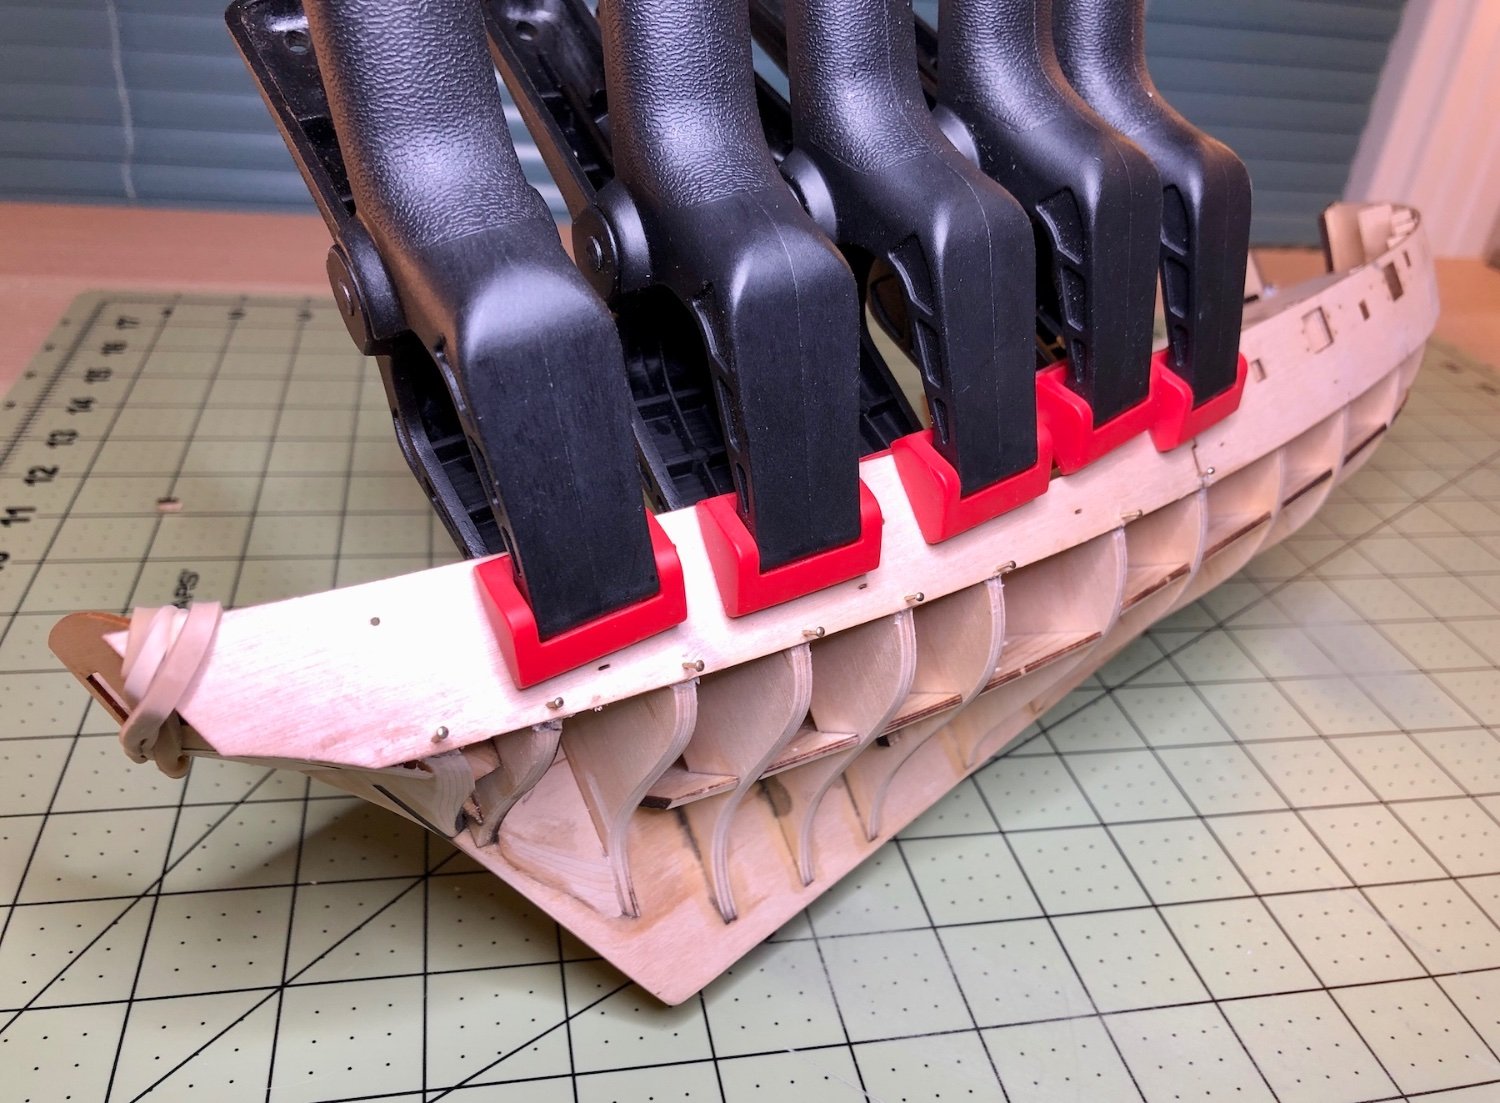
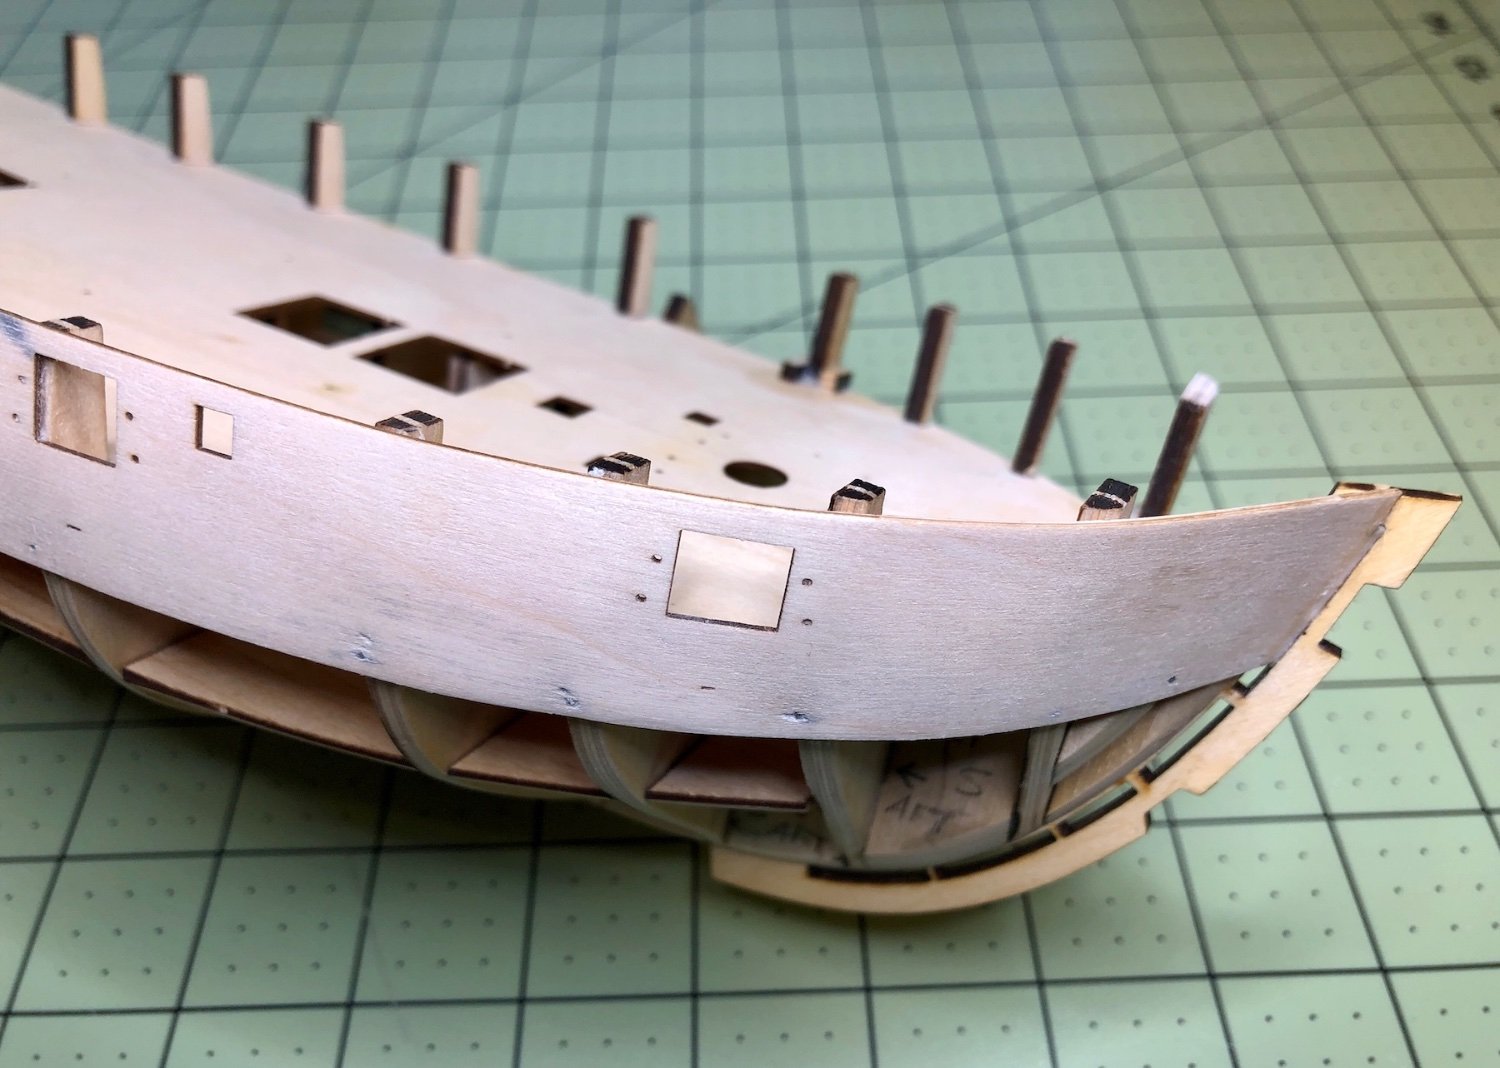
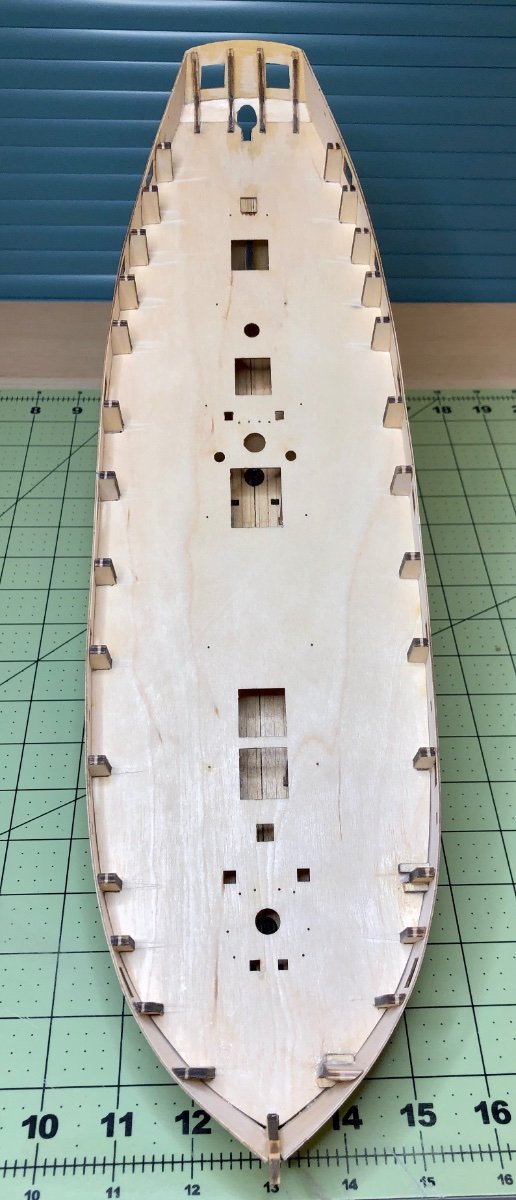
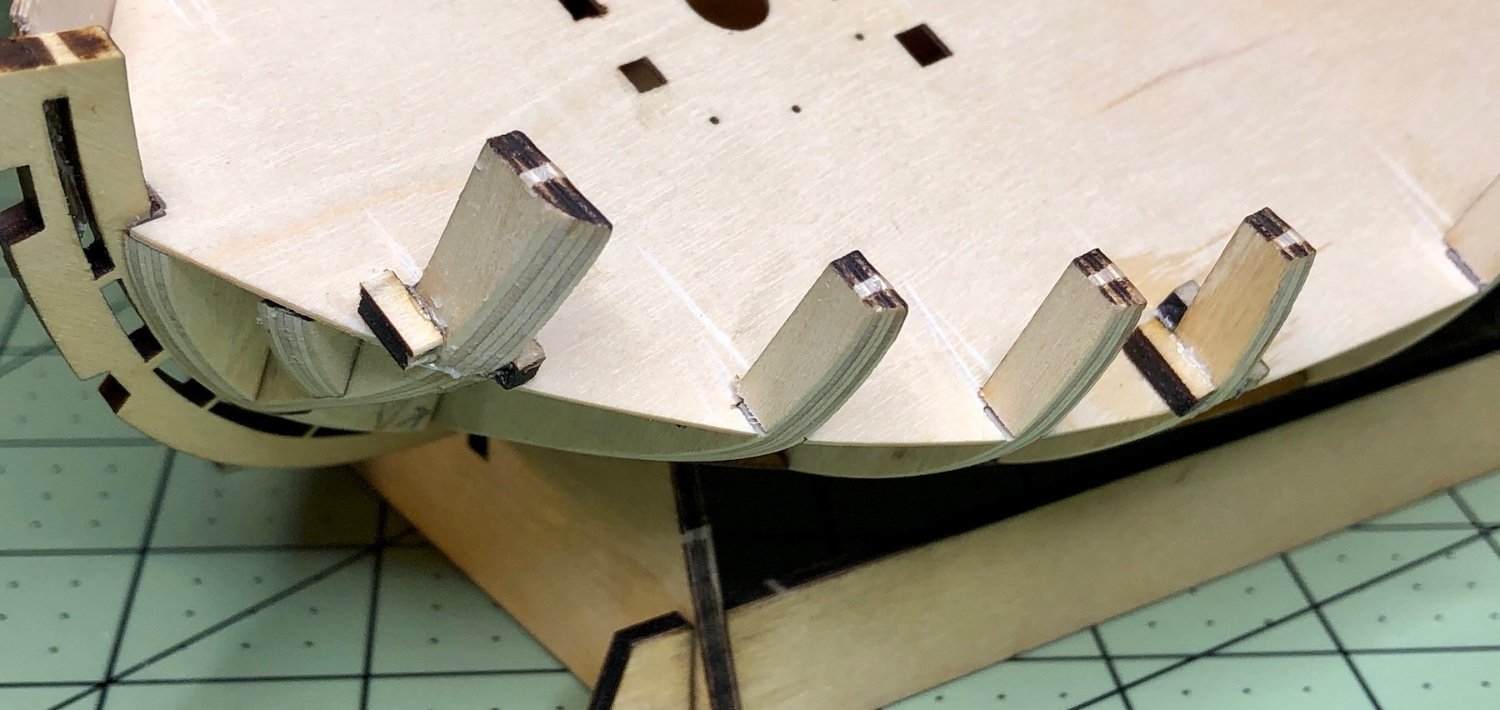
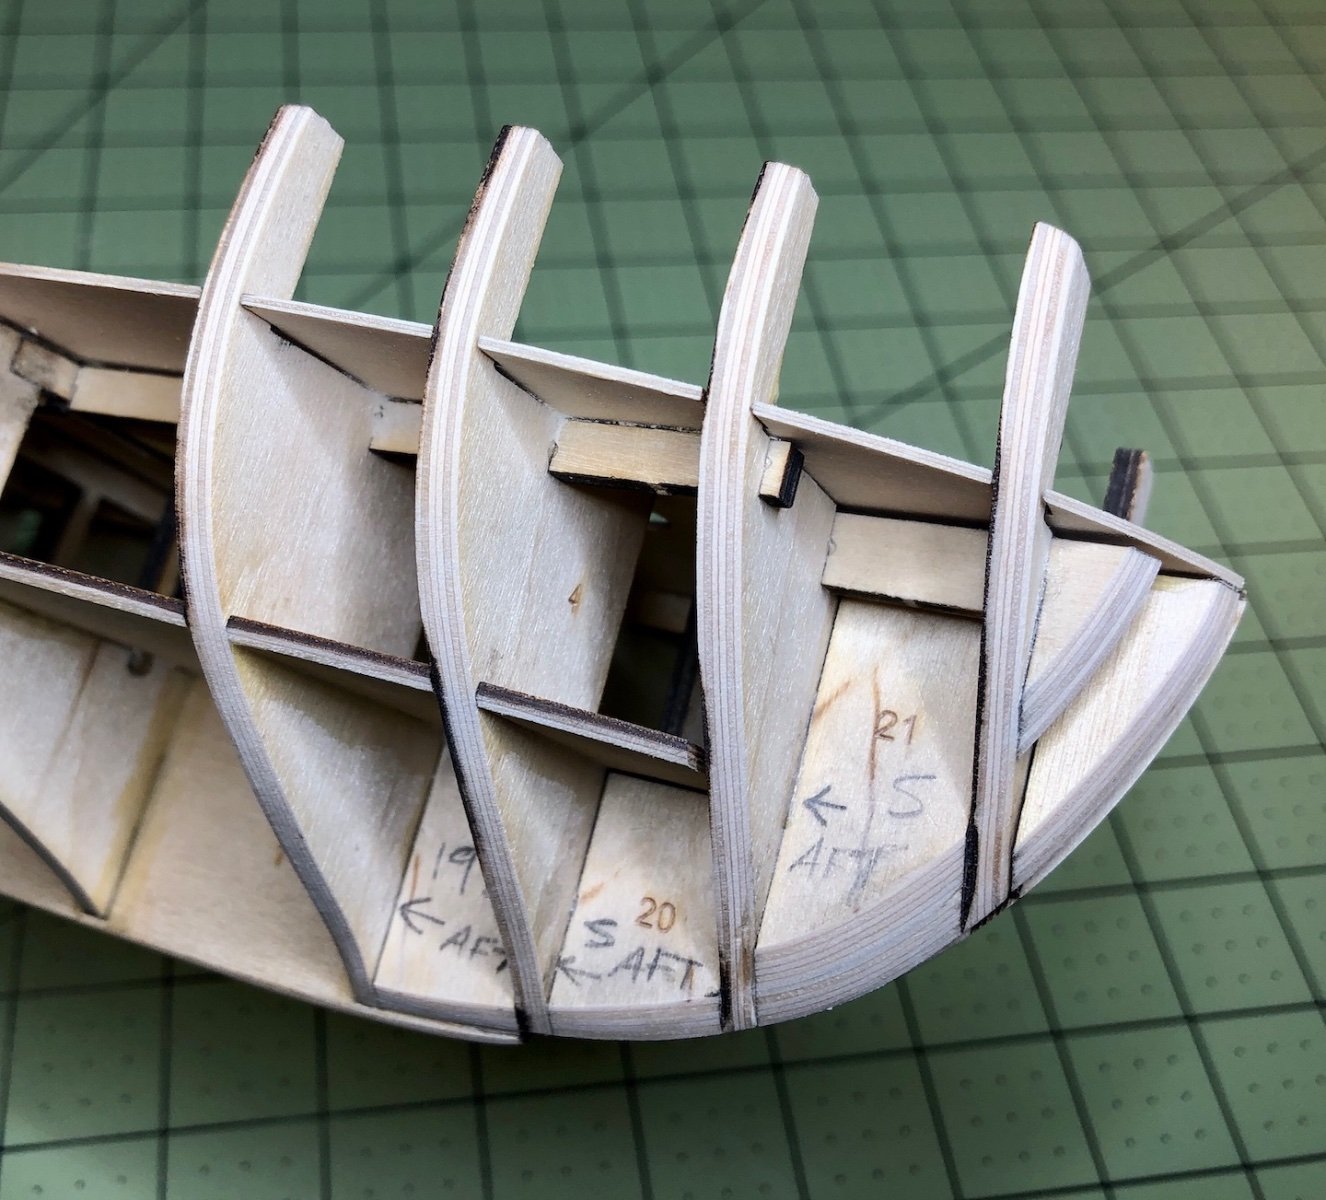
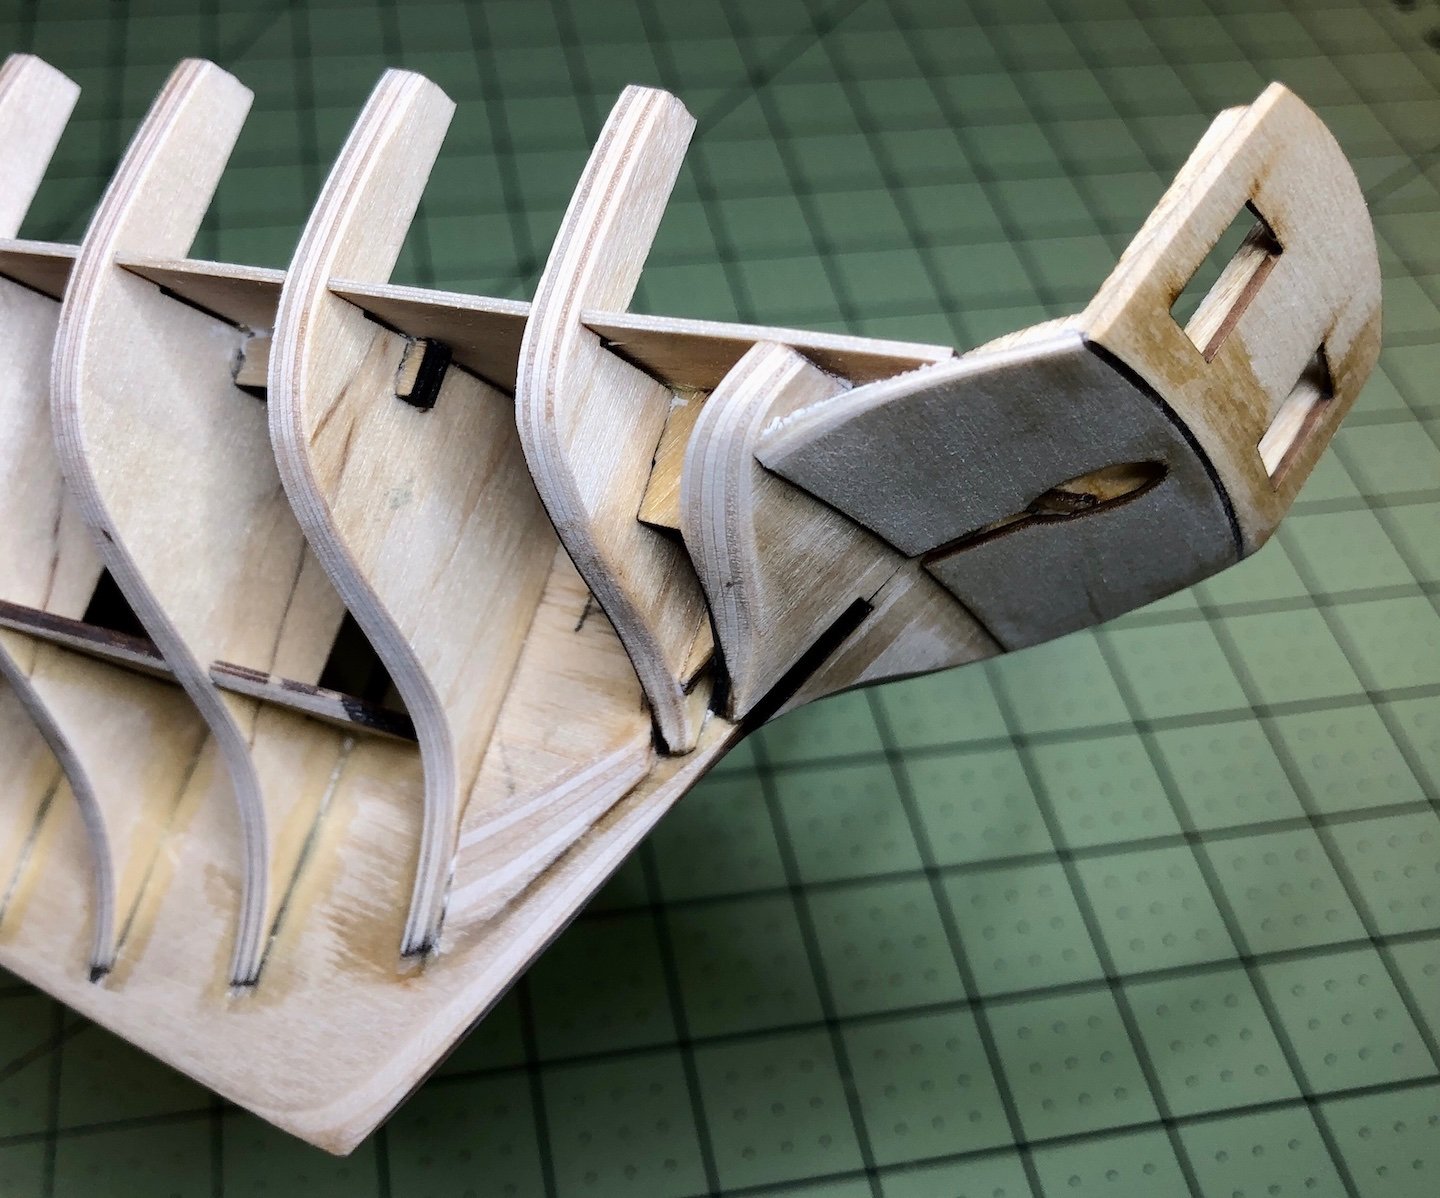
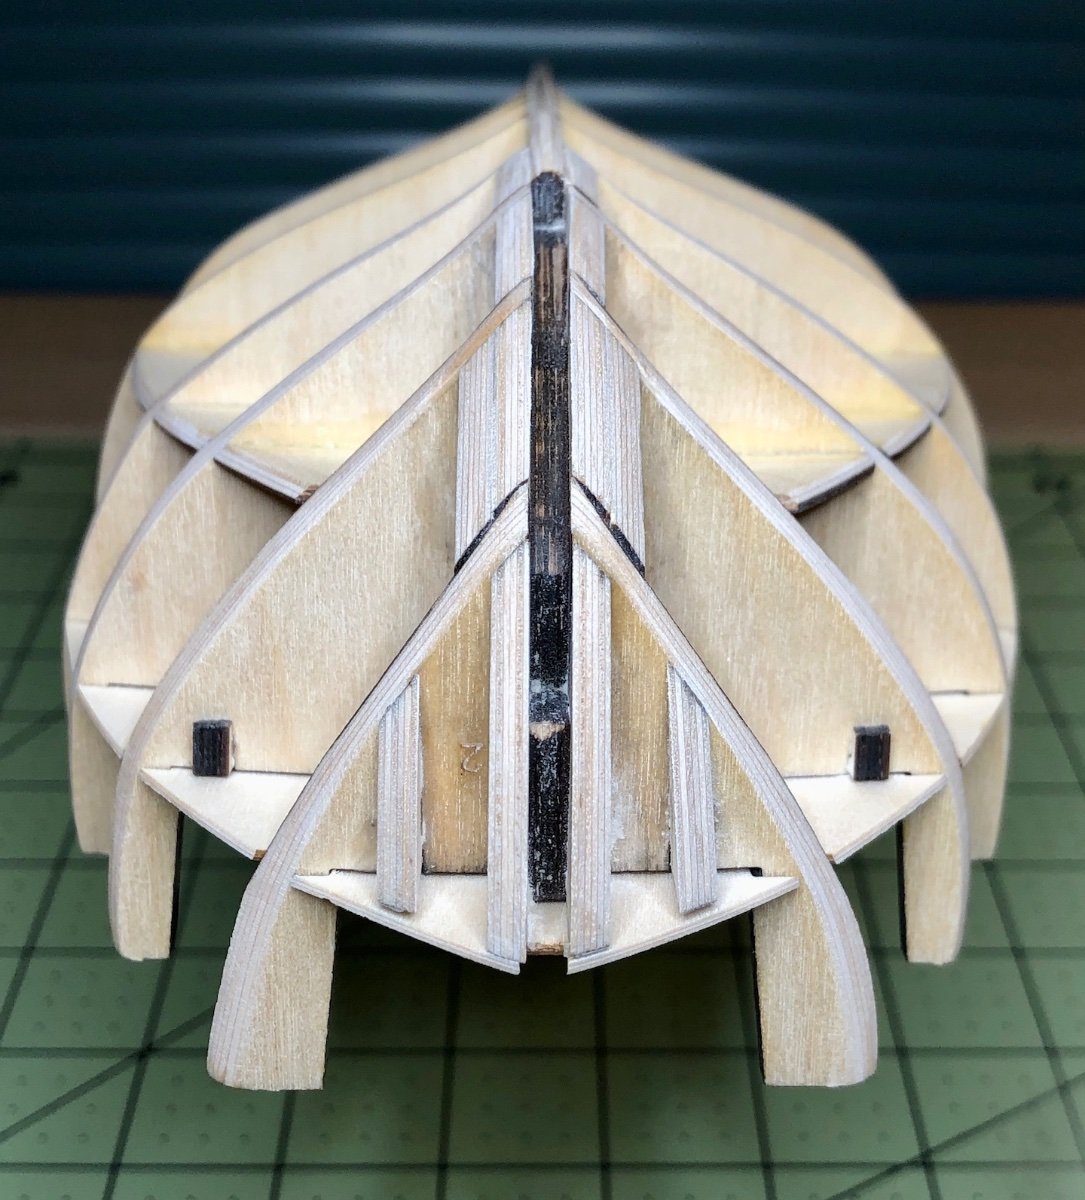
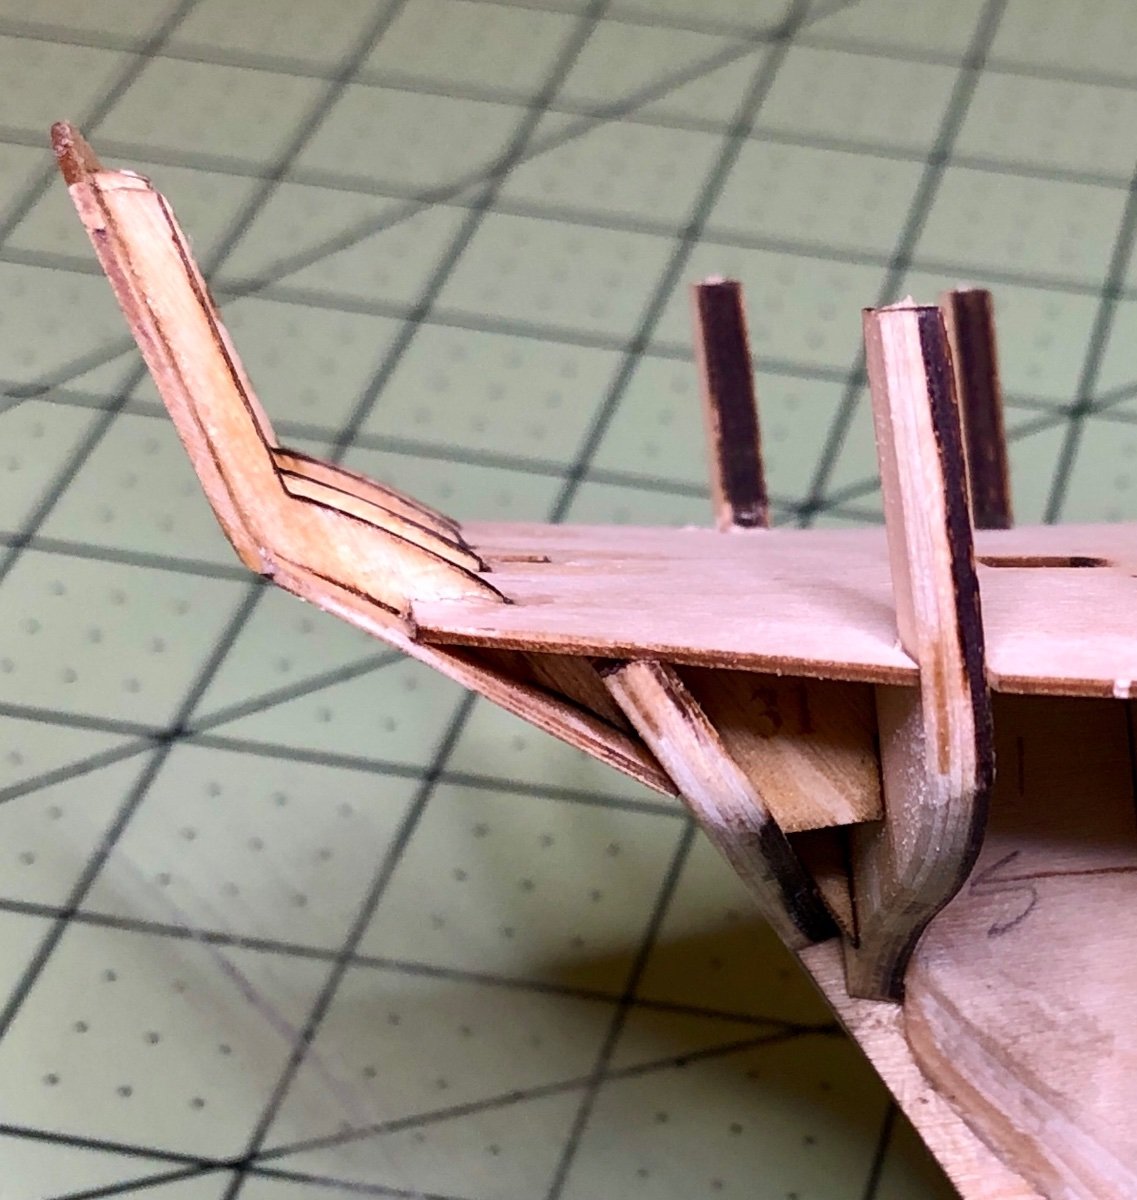
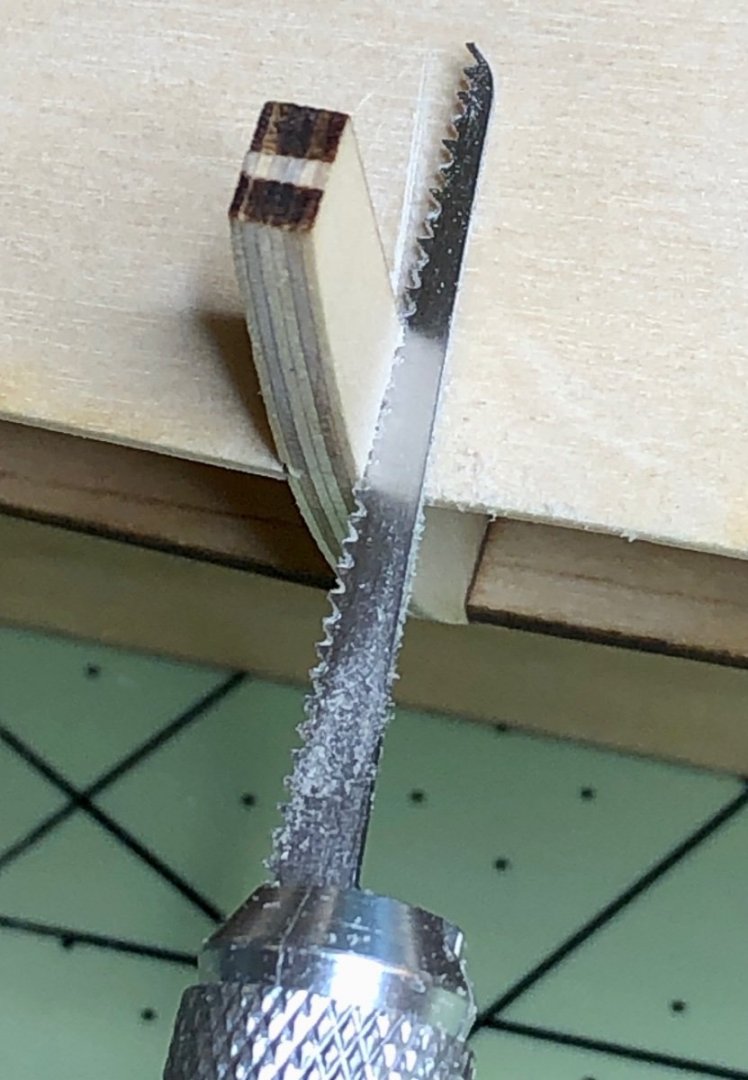
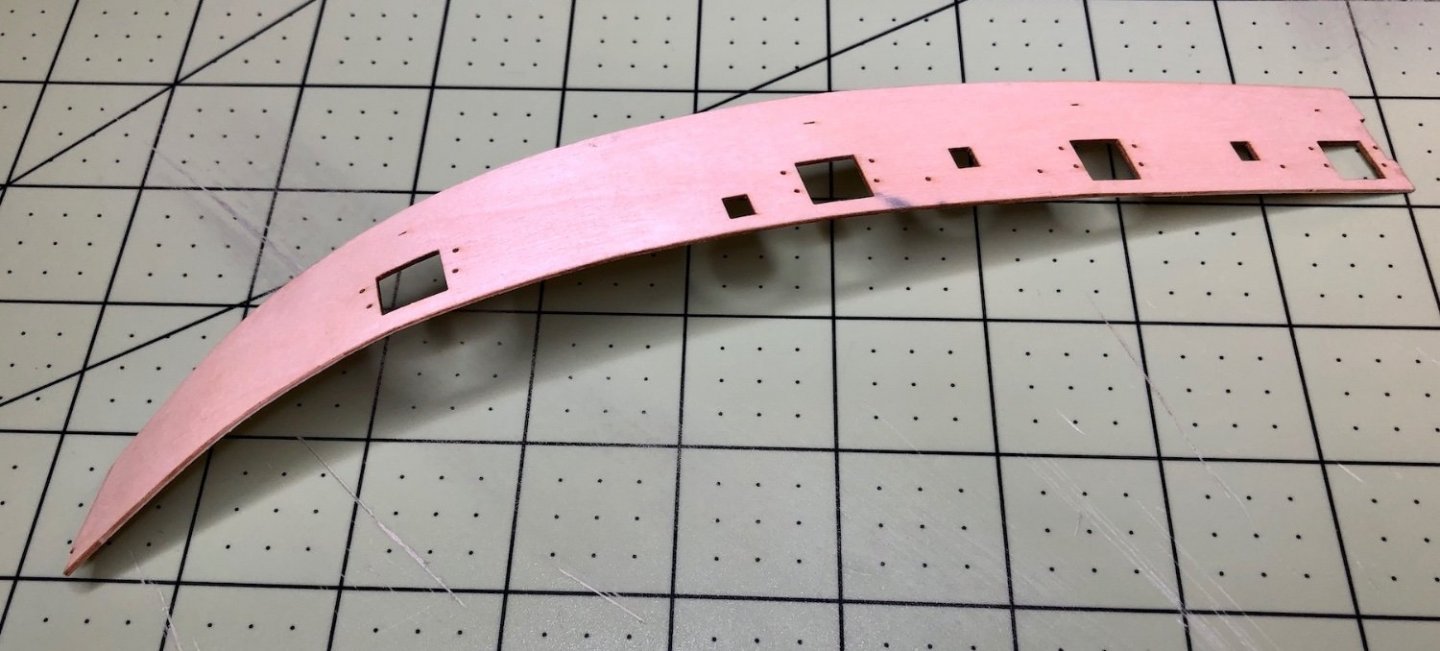
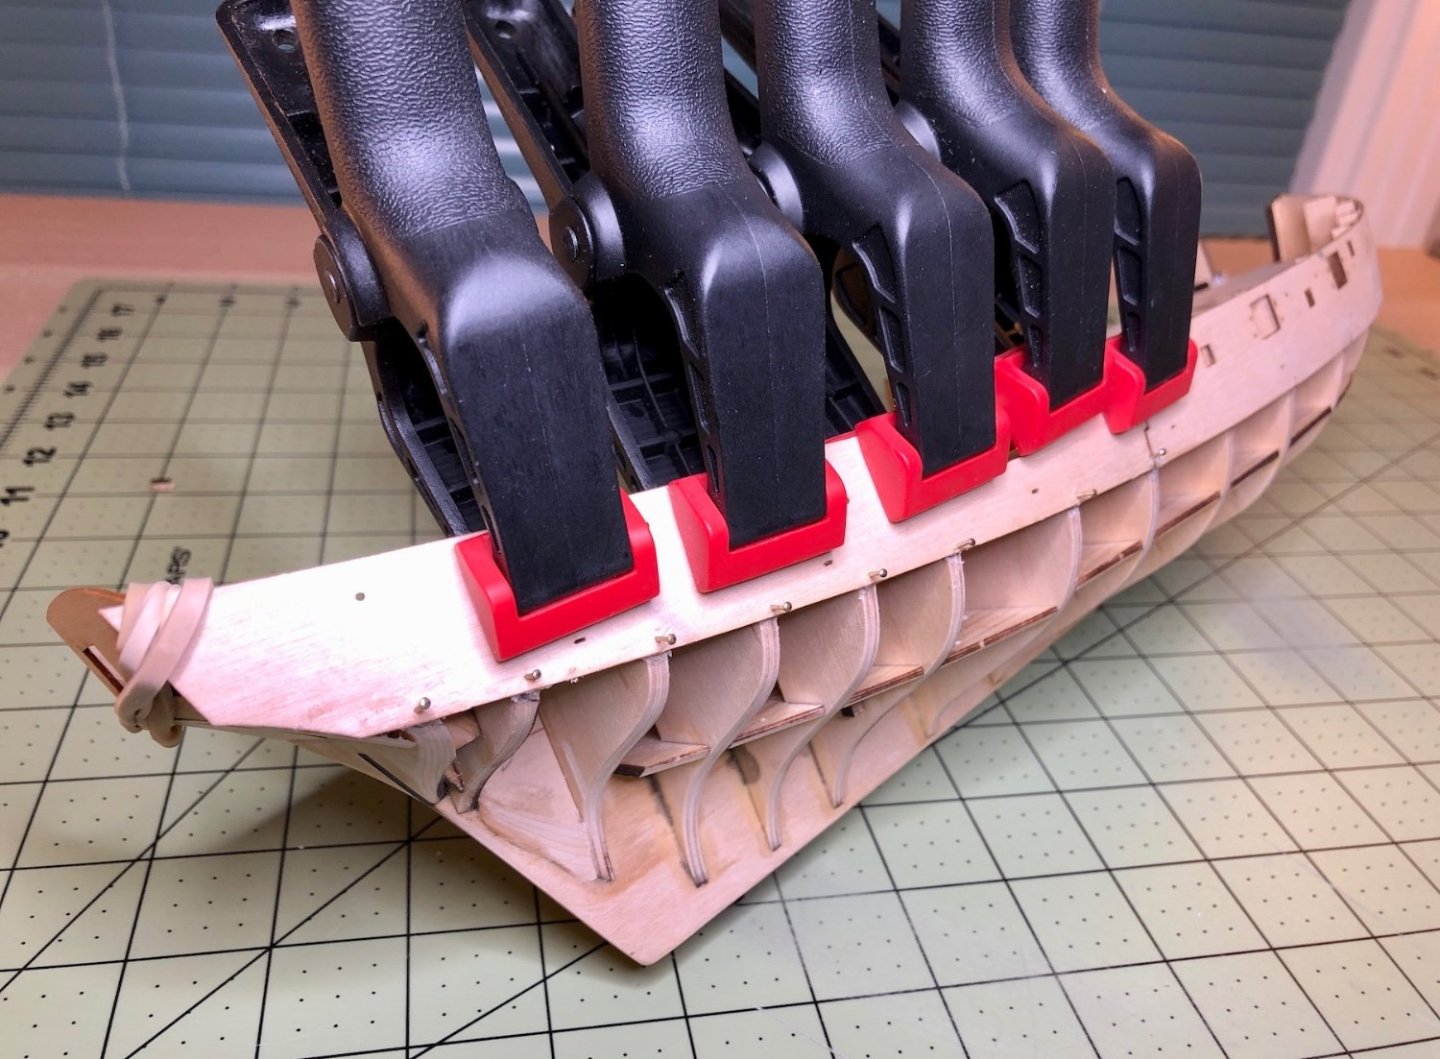
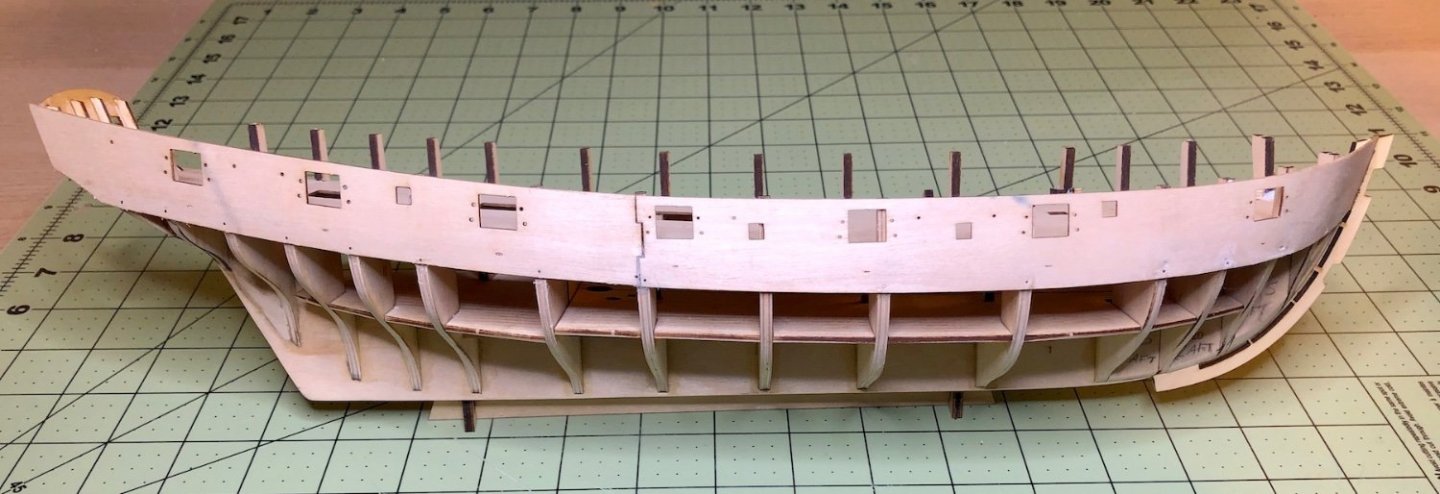
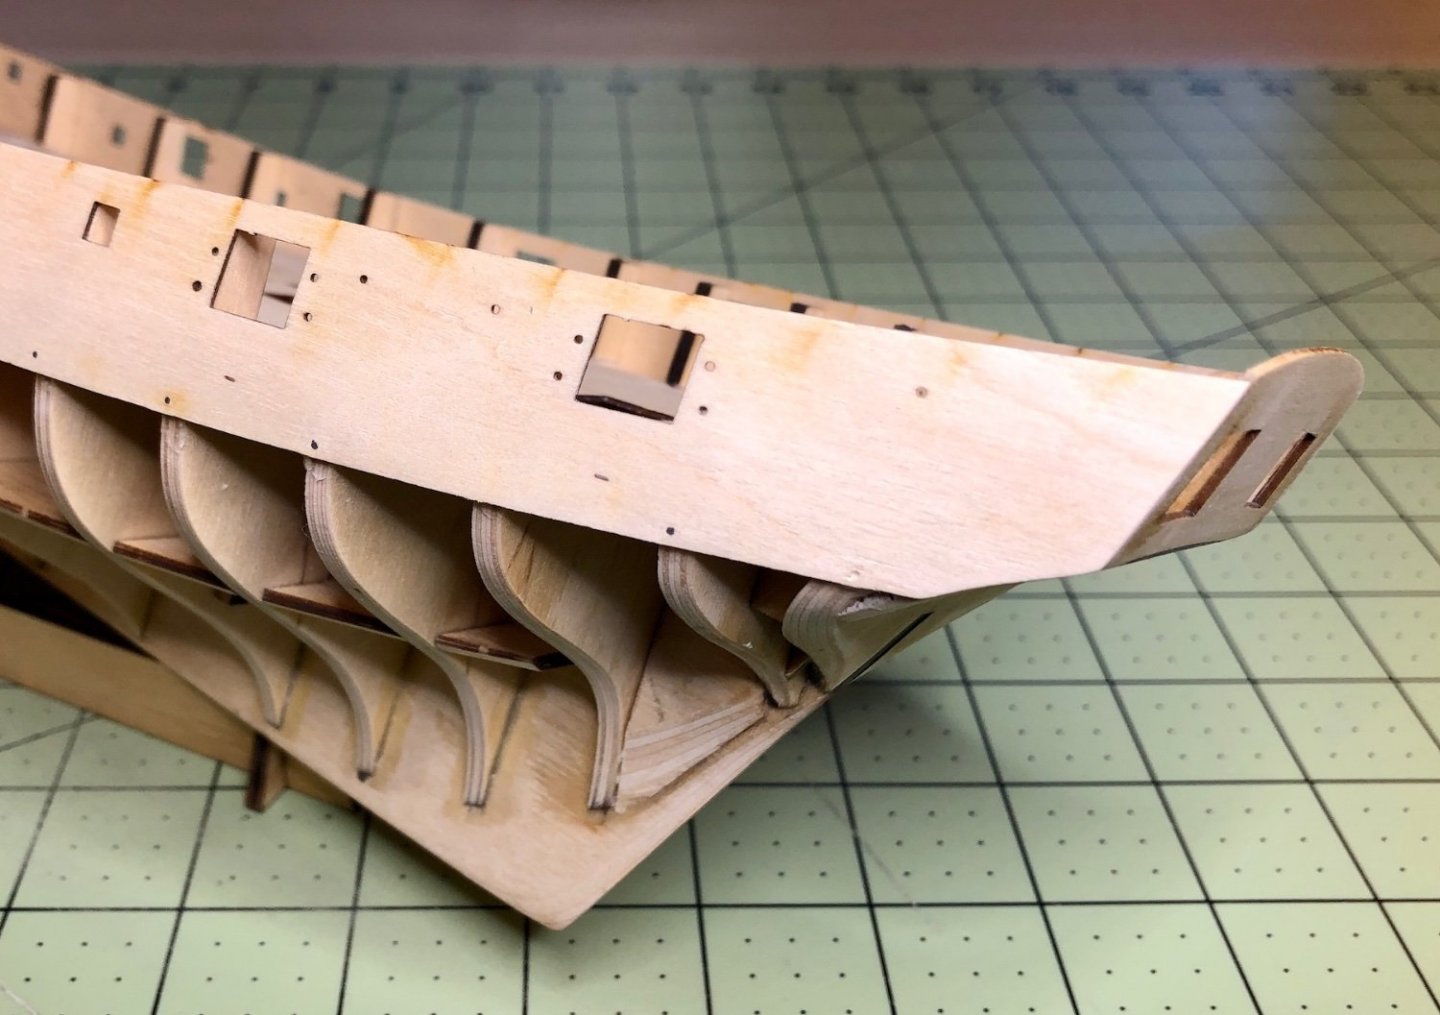
The next step was to add the stem and the bulwark patterns (or gunport patterns) and, like many other Flirt and Speedy builders whose logs I have read, I found this step to be challenging. They say "all is well that ends well" and, fortunately, in the end, I think all is well. 🤞 However, it didn't come without lots of fiddly fitting and bewilderment when trying to to get them to conform properly to the bulkheads. Oh, and I continued my penchant for breaking fragile parts and repairing them as you will see below. 🙄 I started off by scoring the bulkhead tabs that are to be removed later. I had read in gbarlow's log that this can help with their removal but to only score them "lightly." The birch plywood is quite hard and I thought bulkhead tabs might be tough to remove cleanly and so I got a little overzealous with the scoring. Consequently, I broke a couple of them later as I was pressing the pattern up against them. I was able to scrabble together a fix by adding two small support pieces on each side of the tabs and glue them in alignment as best I could. I had trouble getting them to set firmly with PVA so I used some CA and sprayed it with Insta-Cure while holding them in position and this locked them tightly in place. This photo below was taken before I sanded the repaired tabs flush with the edge of the deck: I soaked the patterns in hot water for 30 minutes to make them more pliable and I used a blow dryer to dry them in place to conform with curve of the bulkheads and with slight upward twist towards the bow as best I could. I was able to get them shaped as seen below: Now the fun began! Try as I might, I couldn't get the pattern to stay in the stem and follow the tops of the bulkhead tabs while laying firmly against them. When the pattern was seated tightly in the stem, it would stick up over the tops of the tabs as it ran aft. When I pushed it down so that the aft end was flush with the top of the bulkhead 9 tab, it would pop out of the stem. Then, just to add a bit more complexity to this juggling act, there were gaps under the pattern at the forward bulkheads 3, 4 and 5. You can edge bend a plank to conform to this area but you can not edge bend these wide patterns. At this point, I was second guessing myself thinking that I had messed up the fairing because of the gaps. Then I went back and looked at the Flirt and Speedy logs hoping to gain some tips on how to manage this step. I was relieved to read in one log where James H had had replied that he had some gaps under the patterns also and that there was no need to worry about it too much since the problem would be taken care of by the width of the double planking and some sanding. I also noted that the manual says to align the patterns "as closely as you can with the tip of the bulkhead tabs." So the patterns didn't need to be perfectly flush with the tops of all the tabs either. It was a relief to know that the gaps under the bulkheads 3, 4 and 5 were manageable and the alignment of the patterns with the tips of the tabs didn't have to be perfect so I continued on. It took a lot of fidgeting and making adjustments while gluing and clamping. Once I got all of the clamps on and a rubber band around the stern counter, I decided to nail the bottom of the patterns to help close the gaps. The nails that come with the kit a very tiny and, without pre-drilling pilot holes, they would bend when I tried to tap them into the tough birch plywood. So I used some slightly fatter nails that I had and they worked well. I had to drive some of the nails all the way in and others were left partially out. I ended up removing some, cutting others off flush and then sanded them flush with the patterns. You can see the small indentations around some of the nails after I cut them off but they won't be a problem since the whole area will be planked. I filed them down until the whole pattern felt completely smooth. The patterns extended about 3 mm beyond the counter at the stern so I sanded them flush with the counter. I had a slight amount of waviness where the patterns bend more sharply at the bow. I had read where these could be "ironed" out by using a travel iron. So I took my iron, dabbed some water on the problem areas and, voilà, the waviness pretty much disappeared! This was a very challenging step for me and it tested my confidence about what I was doing but, in the end, I'm happy with the results. The patterns run smoothly and the port and starboard sides appear symmetrical to each other to my eye. I'm glad to have finished this part of the build and I'm really looking forward to start the planking. I want to learn how to do the planking by lining of the hull to determine the shape of the planks. Now if I can only stop breaking things...I'm up to 6 now! 😏 As always, thanks to everyone for taking a look and for the comments and likes. Always much appreciated! Cheers!


-
I searched for these tools on Google and can't find them. Do you have a link for these tools?
-
Being able to carve such a small, delicate and intricate pattern is amazing, Peter! It may take a long time but it will certainly be one of the finest details on your model and it will make your model very special indeed. What tools do you use to do the carving at this point? Do you use a rotary, engraving tool with tiny bits?
- 208 replies
-
- 2
-
-
- kitbashing
- Woodcarving
- (and 4 more)
-
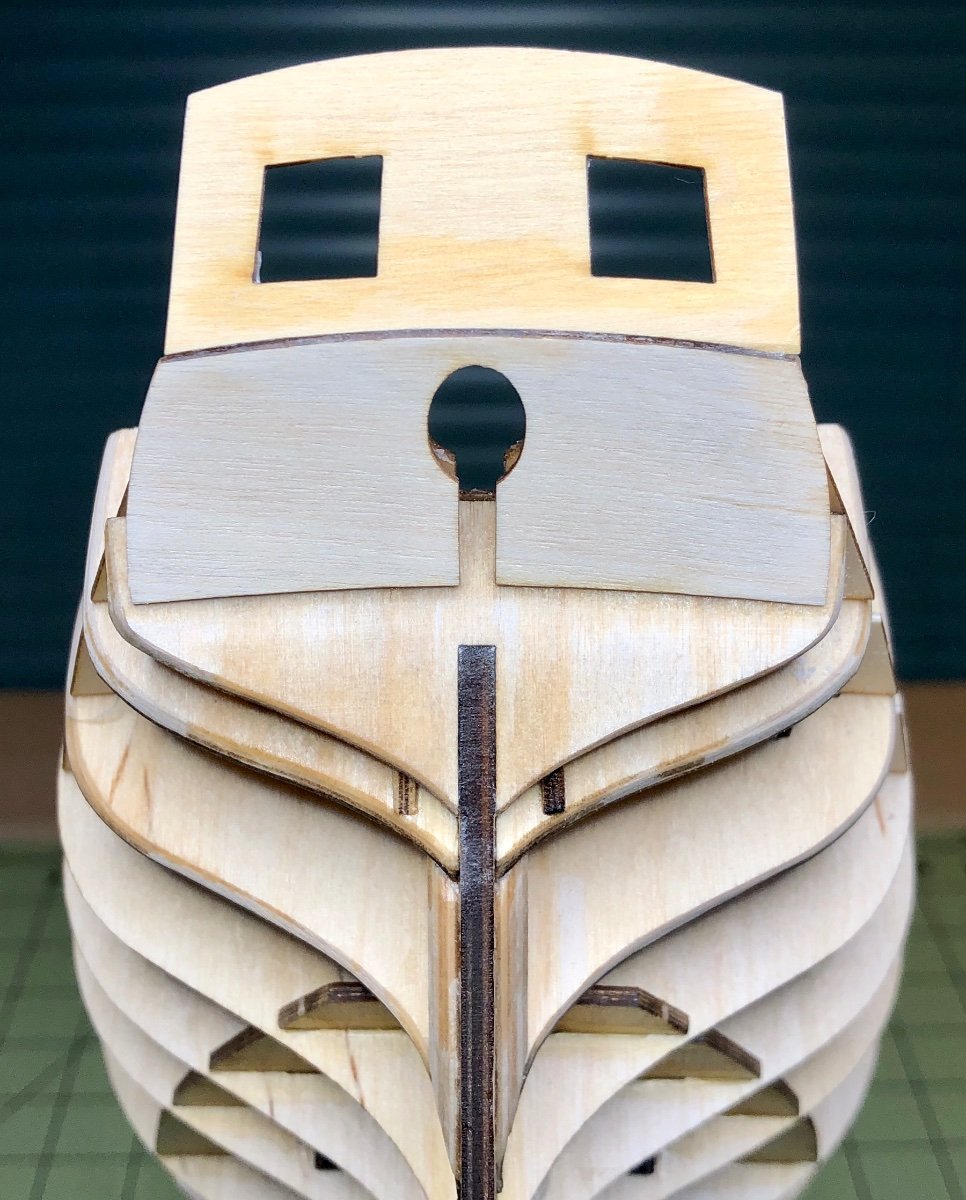
You are correct, Theodosius, the right side of the upper stern counter could use a little more curve. It is sitting flush up against the stern frame patterns so apparently the repaired joint on the most starboard stern frame patter is not in perfect alignment after my repairs on all 4 of the broken stern patterns. Consequently I lost a bit of the curve on the starboard side of the stern counter. I thought about removing it and trying to correct it but I would have had to use acetone to loosen the CA I used and that would have dissolved the repaired joints on the all of the repaired stern patterns as well. So this is one of those times where I decided to leave "well enough" alone. Any further attempts to improve it would have made thing worse, IMO. I may be able to add a little bit more curve on the starboard side with some very careful sanding. I'll address that when it comes time to plank the counter. I've looked at every build log for the Flirt and the Speedy and it seems like everyone ran into some issues when adding the gunport patterns. As you will see in my next post, I've run into the same difficulties that the other builders have experienced also. Stay tuned to see the next episode of my "Bob's Ship Modeling Errors and Repairs." 🙄
-
I just read through your log, Theodosius, and you've done a great job of overcoming the problems you've had along the way and your model is looking really good at this point as a result. Good job!
-
Thanks very much, Will! This is very helpful. I'm interested to see the rigging of the gaff when you get to it also. I actually like doing the rigging but it helps to clearly understand where the all the lines go and how they are secured to the masts and the deck. The Vanguard plans are so clear compared to many other model kits where the drawings are so hard to decipher.
- 77 replies
-
- 1
-
-
- Erycina
- Vanguard Models
- (and 1 more)
-
Welcome, Derek, and thanks for coming along. I'm learning to "enjoy" fixing my mistakes as long as they actually can be fixed adequately!
-
Beautiful, BE! All of those hours you have spent crafting this lovely model has paid off grandly!
- 857 replies
-
- 2
-
-
-
- Sphinx
- Vanguard Models
- (and 1 more)
-
Welcome aboard, Harry. I hope you enjoy following my little journey.
-
Very nice, Will! I feel like the rigging brings the model to life. I'll be very interested to see how you rig the topsail. I'm building the Pen Duick and I can't figure out the rigging for the gaff topsail from the vague instructions.
-
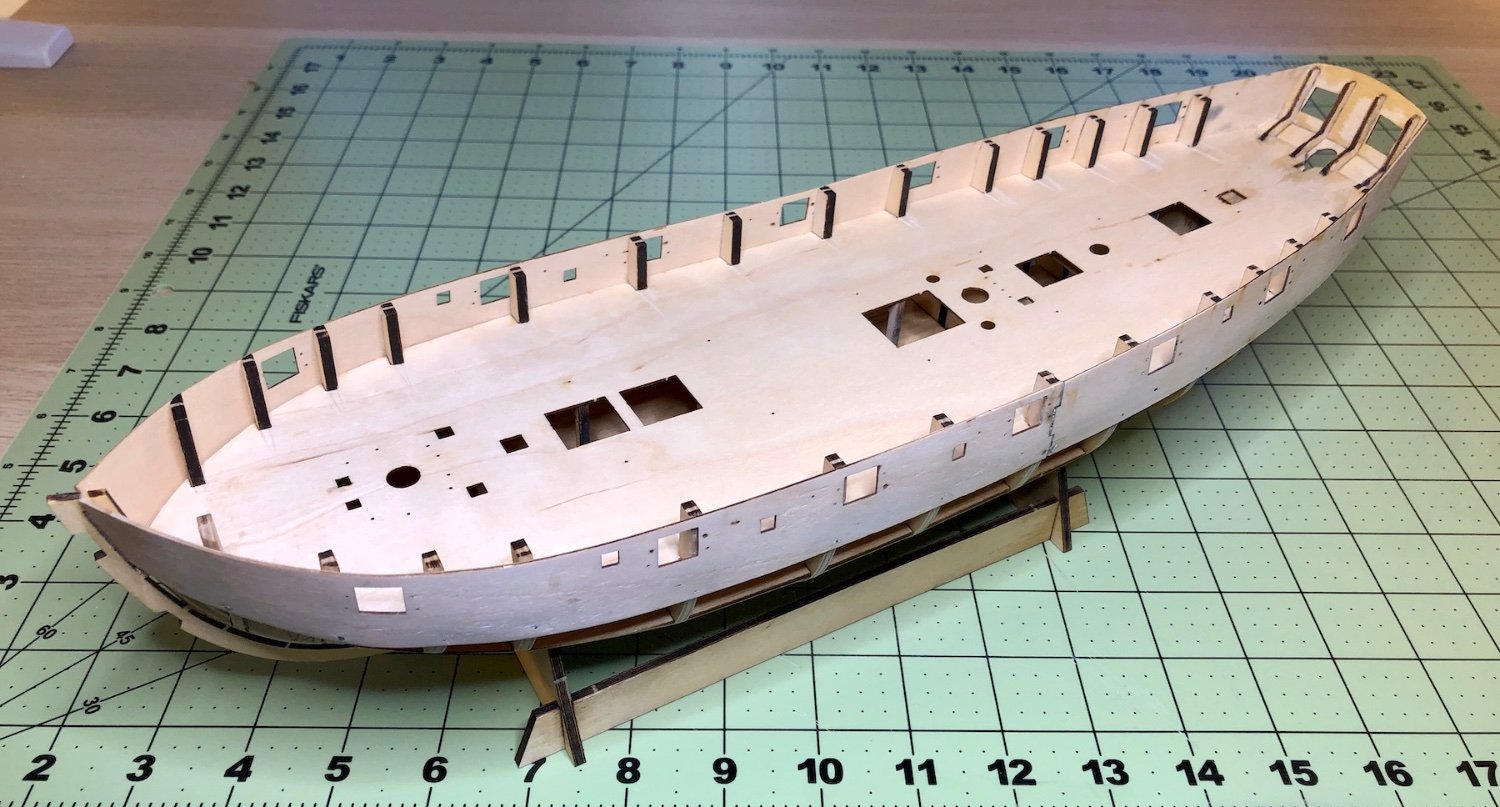
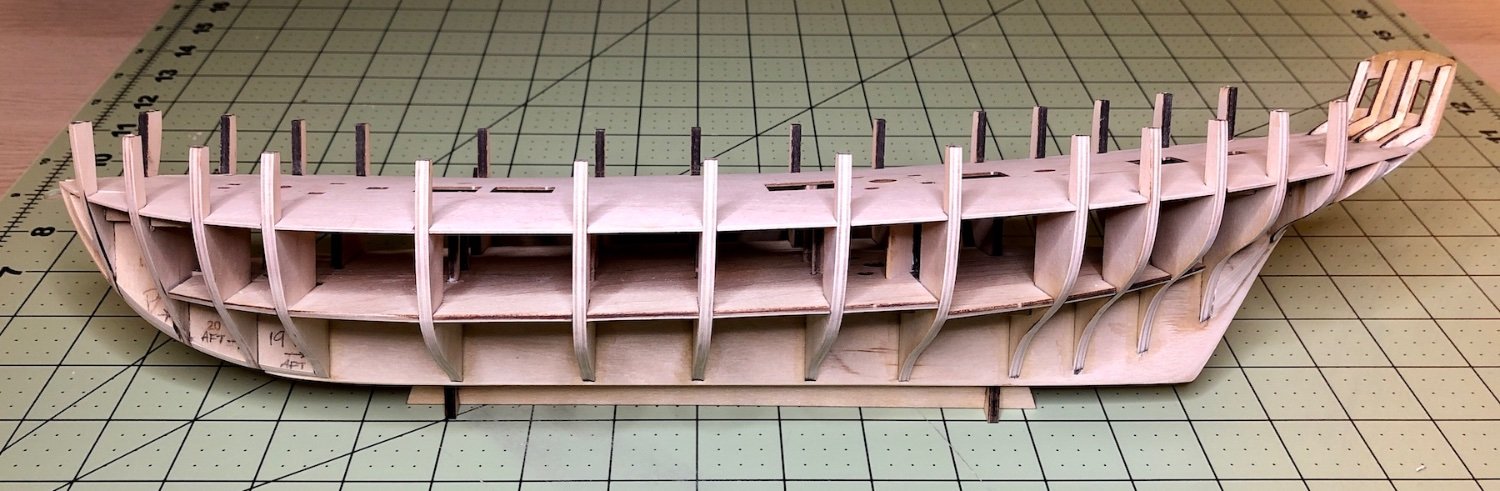
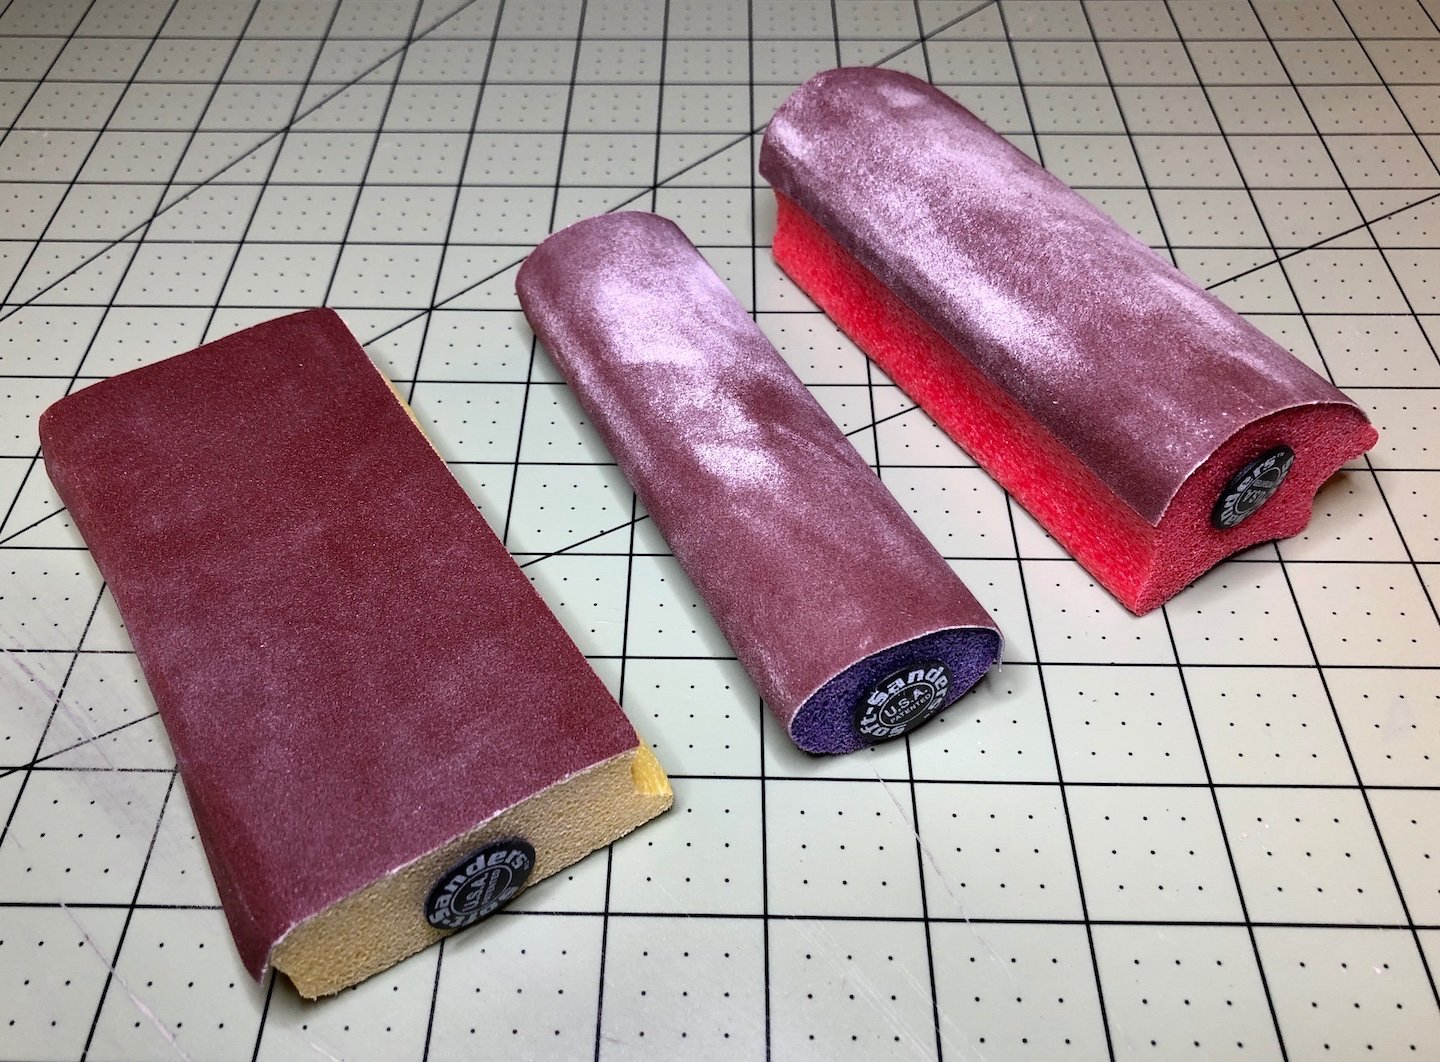
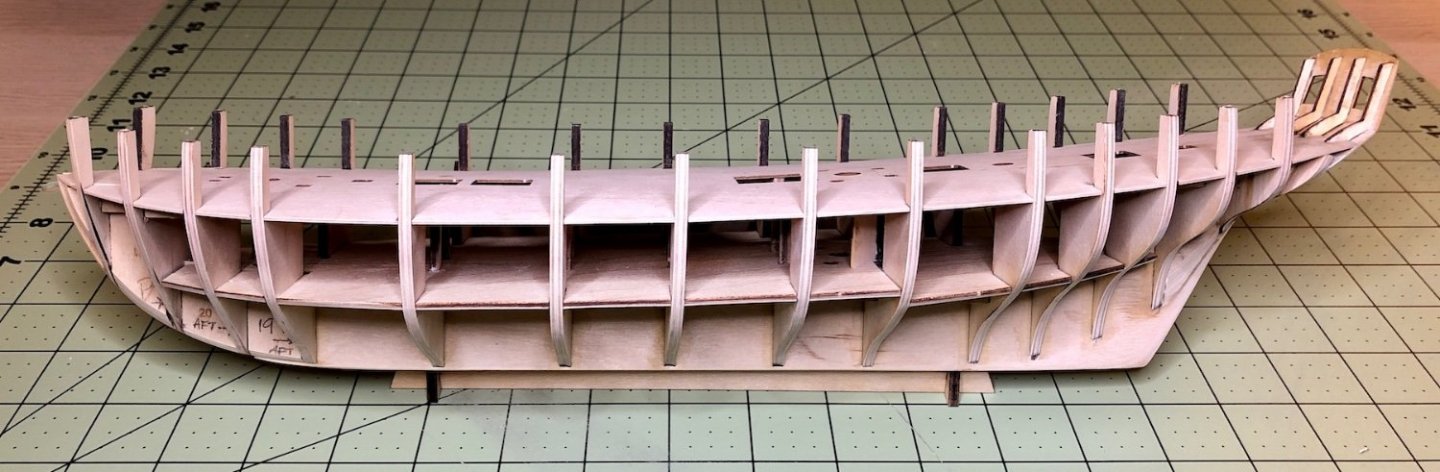
It was a beautiful day here in Sacramento today so I pulled up a yard chair, put on my shop apron, grabbed my soft sanders and began fairing the hull. I actually enjoy sanding and shaping just about anything and I really enjoyed the whole process today. It took me 5+ hours of sanding and constantly checking my progress with a thin batten until I decided I was done. The run looks fair everywhere I lay the batten spanning 3-4 bulkheads at a time with no noticeable bumps or dips and with the batten making good contact with the bulkheads. Of course the bow and stern areas took much more time. I find the most difficult area to fair is from about bulkhead 4 to the bow where the curve is more severe. It took quite a bit of sanding in that area until I was happy with it. The stern area from bulkheads 13 to 16 also requires more attention. I found my round and curved soft sanders worked really well in that area. I tapered the false keel where the stern post will be added to about 2 mm in width along with the deadwood area from bulkhead 13 to the stern. One thing I did notice while I was fairing is that there was a bulge in the deck near bulkhead 6. On closer inspection, I could see that the deck was not seated into the notch in the bulkhead. I tried to press it down but it wouldn't budge because the of dried PVA glue in the gap between the deck and the deck beam. Luckily, I was able to take a scalpel and clear out the dried up glue and then snap the deck down into the notch. I'm getting pretty good at fixing my mistakes! Next up are adding the bulwark patterns which everyone seems to "fun" with! 😏 Thanks for coming by everyone. Cheers!


-
Does the entire length of the bottom of the false keel get faired down to 2 mm just like the stern and deadwood areas get thinned as you continue to sand and fair along the the bottoms of the bulkheads from stern to bow? In other words, will the entire length of the false keel be about 2 mm think from stern to bow? I hope this makes sense... I can't quite tell when I blow up your photo showing the entire keel on your build but it looks like the 2mm thinned area around the deadwood gradually flows into the full, original, 3mm width of the false keel with maybe a little tapering into it from the bottom edges of the bulkheads. Is this right?
-
Remarkable soldering on those tiny brass pieces, Bug! I need to learn to silver soldering.
- 419 replies
-
- 3
-
-
- Victory Models
- Pegasus
- (and 2 more)
-
Easy peasy! 🤣 Seriously though...thanks for the tips and the encouragement, Glenn. 👍
-
I like sanding and shaping but my problem is that I'm never quite sure I'm getting the shape correct especially on the forward bulkheads in the bow area . I'll be checking the flow of the fairing often with a thin batten and hope for the best. Thinning the deadwood the area where the stern post attaches to the false keel is new to me also. 🤞
-
Welcome, Katsumoto, and thanks for following along. The Xebec you are building is a work of art!
-
Like you, I'll be more conservative doing that too.
-
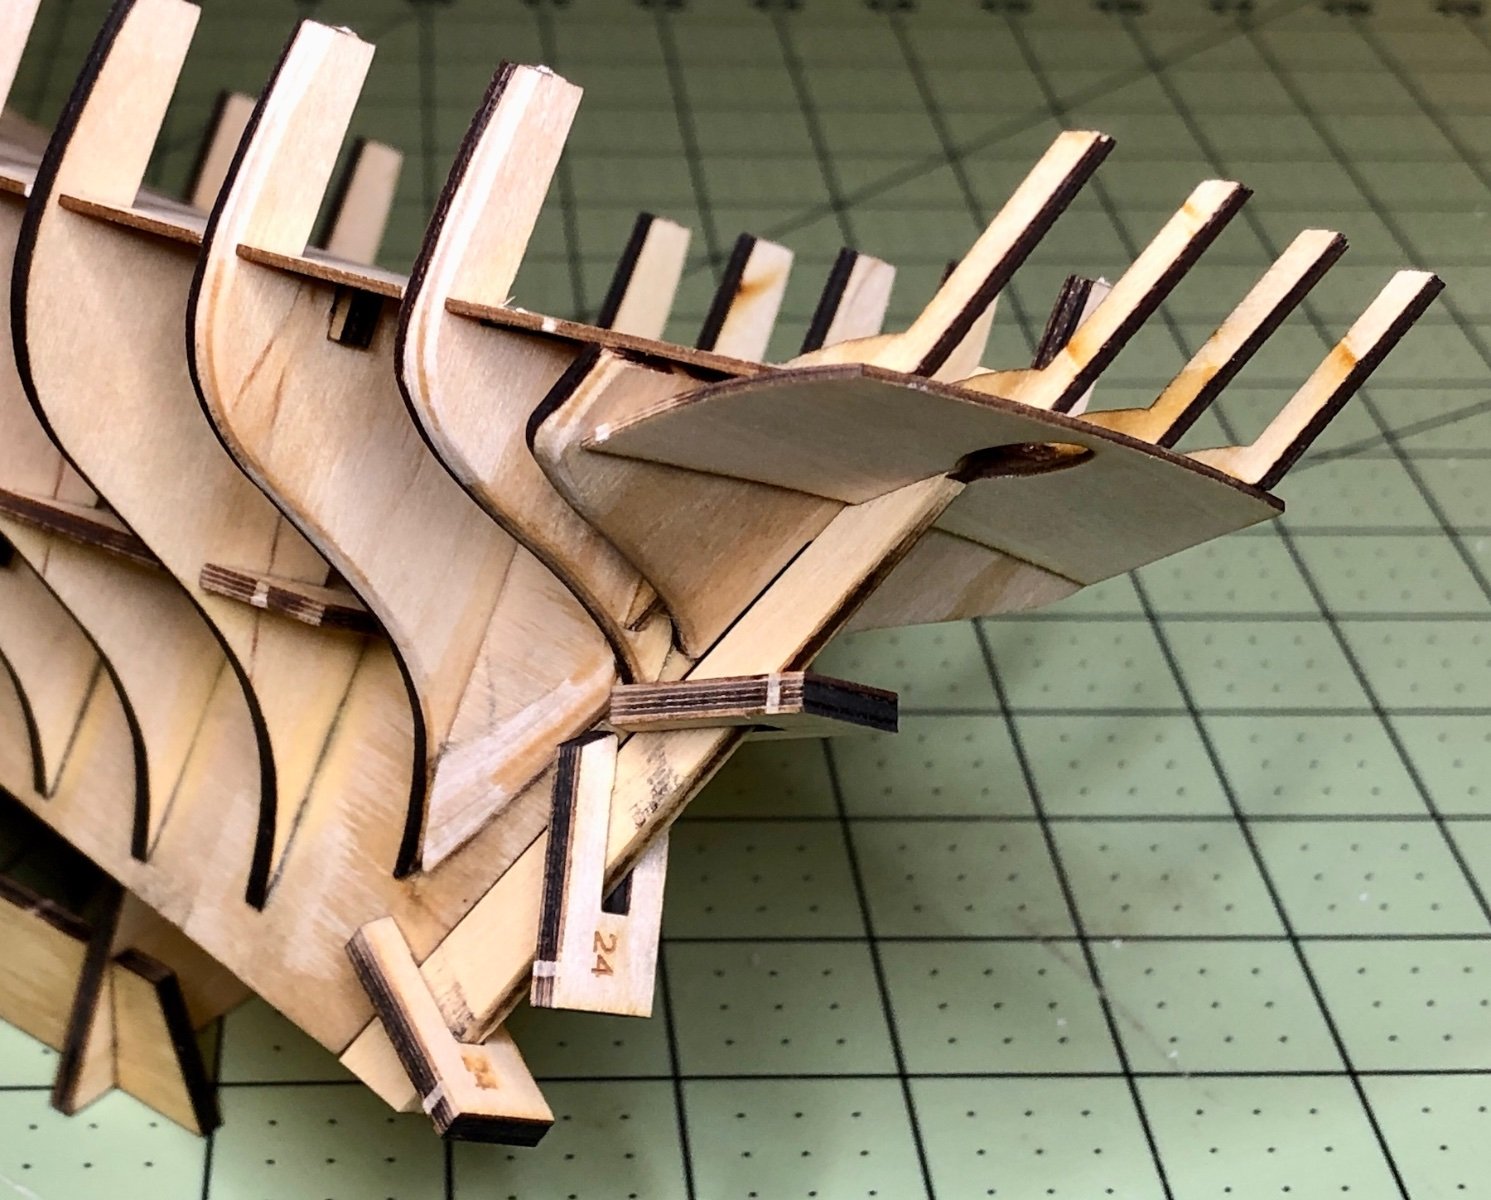
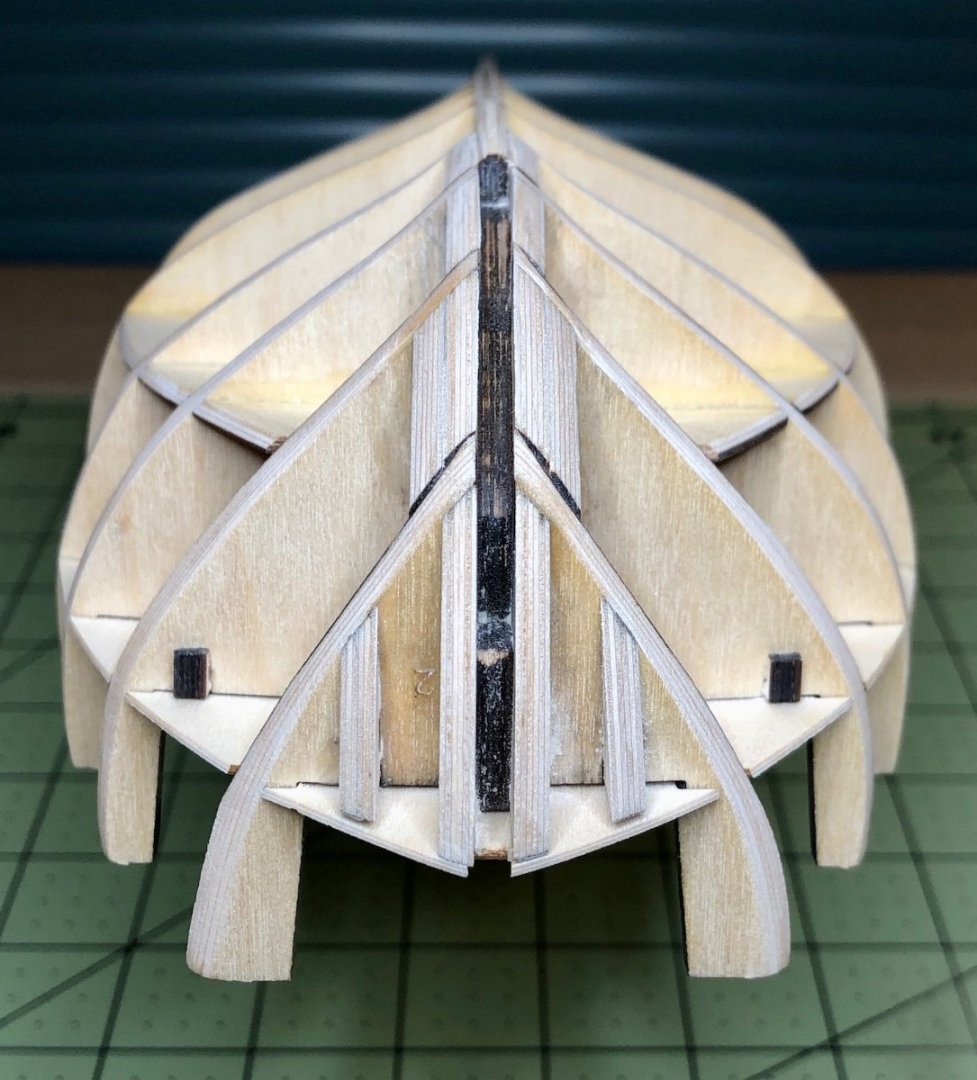
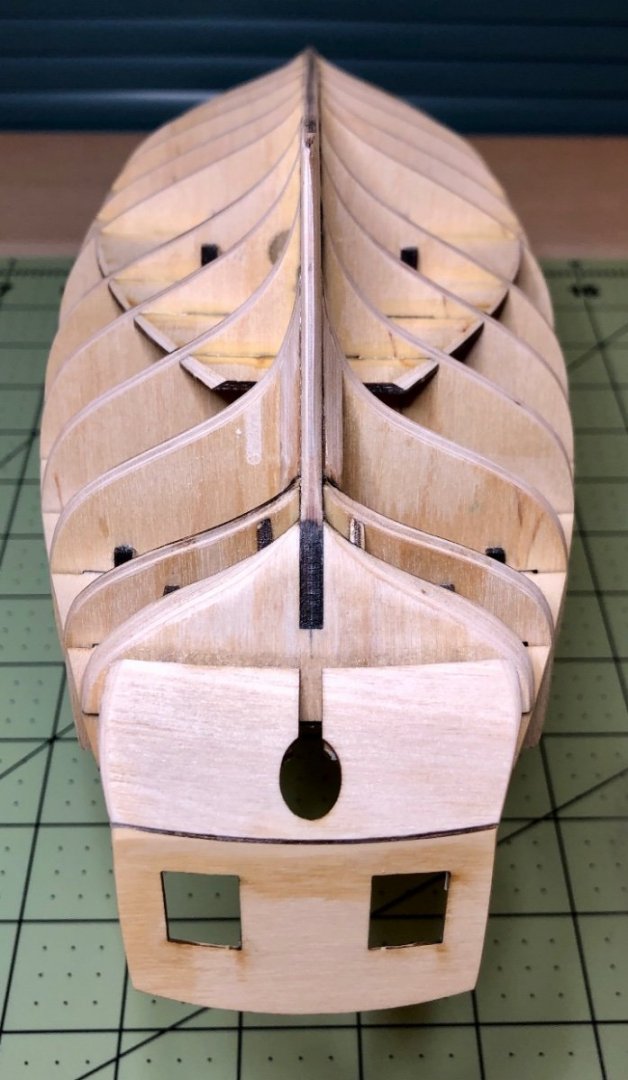
I added the stern counter and the stern board to the stern frame patterns today and, unlike yesterday's ordeal, I was able to get this done without breaking anything! I used the securing pegs to temporarily hold the the rudder post in the correct position as illustrated in the instructions. This is a great idea and it worked really well. The stern counter lines up nicely this way. There's a very slight curve to the stern counter but it's only 0.8 mm so it's quite flexible. I was able to simply hold it tightly onto the bottom of the stern frame patterns while using medium viscosity CA to glue it on. The medium CA gave me enough time to make adjustments as needed. I practiced my "moves" a couple of times before doing this though! 😅 I added the stern board next that sits on top of the stern counter and attaches to the back of the stern frame patterns. I used Titebond Thick & Quick for this step so I'd have more time to make adjustments. Again, I practiced my placement and eyeballed the stern frame patterns so I knew which ones I needed nudge slightly so that the spacing looked correct in relation to the windows in the stern board. I was able to complete this step by just holding the stern board in place with my fingers and adjusting the stern frame patterns as needed so that the spacing looked good but many modelers prefer using clamps. The Titebond Thick & Quick starts getting tacky fairly quickly and provides enough hold at that point that I can still make small adjustments before holding everything in place for a couple of minutes until the glue is set firmly. I often will drizzle a drop or two of thin CA into any tiny gaps and apply some pressure to close them also. Just be mindful of gluing your fingers to the model Thanks to everyone for their comments and likes and for taking the time to stop by and take a look. Cheers!


-
Thanks, Theodosius. I'm getting better at covering up my mistakes! Are you still working on your Flirt?