


Thistle17
-
Posts
1,054 -
Joined
-
Last visited
Content Type
Profiles
Forums
Gallery
Events
Everything posted by Thistle17
-
 Finally we have been given the drawings from the Naval Surface Warefare Center for the PBR Mark I. We have been given 3 of the 4 the drawings suggested to us by our design contact. I suspect the drawing held back was the armament detail. The drawings given to us are configuration drawings of deck, mid section and propulsion subsystems. There is more detail than the Maryland Silver drawings. They, along with the Maryland Silver plans should facilitate our build. We are thankful to the Navy Carderock Division for their generous support. We have some study sessions to compare the plans but finally it appears we are on our way. Joe
 -
You are a "trip" Rusty! Your work makes my heart skip a few beats when on dispaly! Your work speaks volumes for your craftmanship and due diligence. Joe
- 310 replies
-
- 3
-

-
- cheerful
- Syren Ship Model Company
- (and 1 more)
-
Saw blades for Byrnes saw
Thistle17 replied to mikeaidanh's topic in Modeling tools and Workshop Equipment
I believe his saw blades originate with any manufacturing company over there that makes screw slitting blades. Over here one company is Thurston. Hope this helps. -
Hard to communicate this way Doug but I will try. If you have not already done this look at page 120, the Backlash Upgrade procedure, in the manual mentioned prior. It also refers to Page 11 in the mill assembly instructions to facilitate the adjustment, if that helps. Joe
-
Doug there is a "kit" in the catalog that allows one to retro older mills. P/N 5011U for the inch version. I found it in the book Sherline Accessories Shop Guide. The book is loaded with how to info as well. The metric one is 5111U. Joe
-
Looking back to our recent meeting I can't believe we missed the rigging problem Bob highlighted. Many eyes were present but few were seeing as we were focused on the model beauty. Knowing your demeanor I assume you took it in stride with little frustration. And with your usual expertise and dispatch you have moved on! Great work Rusty! Joe
- 310 replies
-
- 2
-
-
- cheerful
- Syren Ship Model Company
- (and 1 more)
-
Atlantis by Thistle17 - FINISHED - Robbe
Thistle17 replied to Thistle17's topic in RC Kits & Scratch building
Thanks for the feedback Stephen this paint saga really set me back weeks. I was so angry with the outcome I even had to walk away from the project for a few days. I will never use the Rustoleum product again for something like this. As I search the web I find we are not alone on this problem. The folk's advice at the auto finishers store is the way to go. Please join in here if you are so inclined. It is helpful to hear from others. Also if you don't have a genoa kit I have one by mistake and will sell for a reasonable price. It is complete and unopened save the shipping box. See the ad on this web site under items for sale. -
This is an update as of 10/29/17. I received another call last week confirming that 3 of the 4 drawings will be released to us. I was not told which one was not released but I speculate it has something to do with the armament. In this day and age it is small wonder that it could be as I suspect. The drawings will be released to us as soon as the office that controls this type of transaction gets instruction on how to bill us. Is it any wonder that nothing in the US Government moves along with any reasonable pace? Joe
-
What oil to use for Proxxon TBM220 drill press
Thistle17 replied to vaddoc's topic in Modeling tools and Workshop Equipment
Sherline recommends this for their mills and lathes so I too don't see why this isn't a good choice. Joe -
Atlantis by Thistle17 - FINISHED - Robbe
Thistle17 replied to Thistle17's topic in RC Kits & Scratch building
The next stage is to finish paint the inner bulkwarks and begin attaching some of the deck fittings. I have all but decided that I will start from scratch to build all the deck furniture. The die cut pieces are inferior in size and the material quality is equally poor. Some parts are even missing and don't show up on the drawings I do have a side project related to the model. The client wishes to display the model in her year round home away from home. It's resting place is on a second floor loft area that dictates a special table. I will incorporate the stand as part of this table so as i think of it I have to set the model aside and begin that aspect of the project. -
Atlantis by Thistle17 - FINISHED - Robbe
Thistle17 replied to Thistle17's topic in RC Kits & Scratch building
In another thread on this site I said I would pay more attention to the pictures I take. I fibbed a bit. I wanted to record a milepost for the client (and any one else interested for that matter). The model hull has reached a painting milestone. If you have been following along on this thread you know I didn't hide my failures on this stage of the project. The painting journey was awful. There is no better word for it. I did finally overcome the crazing/wrinkling by spot priming the areas of concern and repainting that entire surface again. I was going to paint in the gold waterline but I lost my nerve as a result of the previous set backs. The waterline is 3M Scotchcal Striping Tape (1/4 inch). It is so easy to work with. Just pull back the backing paper (as you go) and purposefully lay it down. Press firmly only at the beginning and continue on. If you have any misalignment it lifts relatively easily and can be reapplied. The directions indicate that you must rub it down at the end with a soft cloth and over a short period it will fuse to the surface. There is a top clear layer that can be peeled back. It is there to protect the tape during application.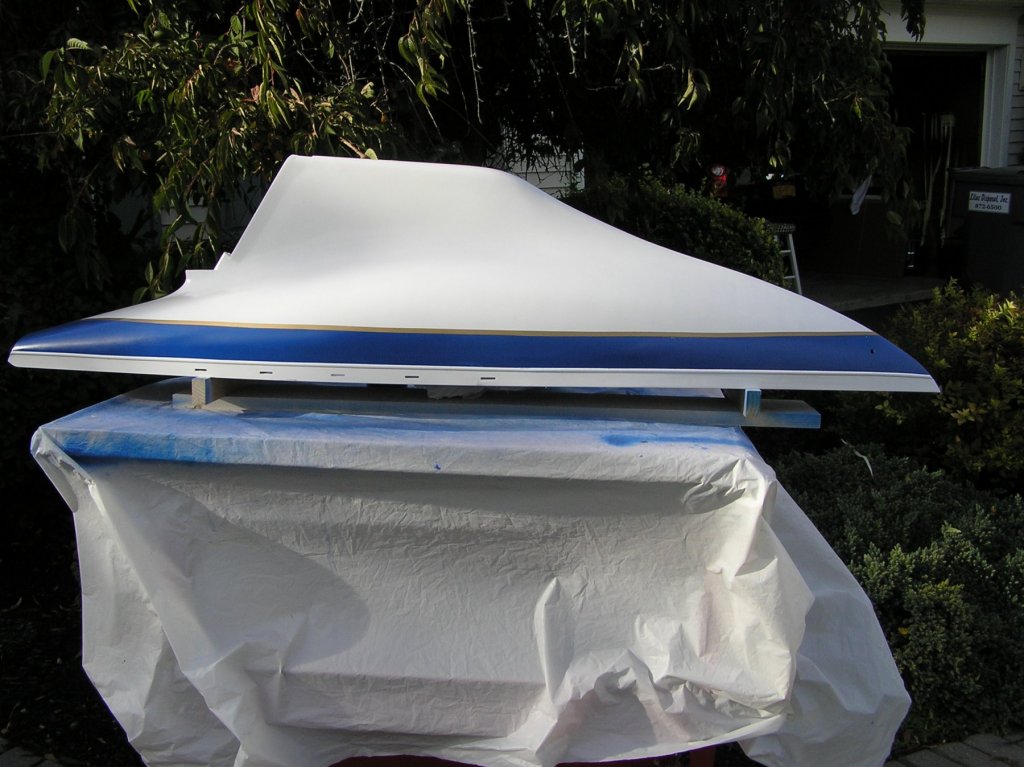
-
Pretty impressive work Cliff. May I ask what saw blade (teeth per inch and width) was used and if you noticed any after market blade guides such as Carter? Joe
- 19 replies
-
- 1
-
-
- milling wood
- echo cross section
- (and 1 more)
-
Atlantis by Thistle17 - FINISHED - Robbe
Thistle17 replied to Thistle17's topic in RC Kits & Scratch building
This is a further update. I had success doing what I thought was logical. I wet sanded the affected areas, applied the Rustoleum primer and let it sit for 3 days. I painted these areas this AM (70+ degrees, low RH). It worked!!!!! Why their customer support didn't suggest that is beyond me. I'd like to pass on something I learned about automotive masking tape. In all the masking/unmasking and repainting I find I much prefer the following: - 3M Precision Masking Tape #06525 (this is 1/4 inch)(light green in color). It has a semi transparency to it so when laying it down one can see the correct placement point through the tape if the colors are contrasting. - 3M Automotive Refinish Masking Tape (No # on roll)(Yellow in color) These exhibit excellent line separation with no "leakage underneath and they are relatively thin in thickness so there is a very fine ridge at the intersection of colors. I found the Scotch Performance Masking Tape 233+ of lesser advantage in comparison. Joe -
Atlantis by Thistle17 - FINISHED - Robbe
Thistle17 replied to Thistle17's topic in RC Kits & Scratch building
Well here is the latest. Rustoleum Customer Service was of no help at all. So here is what I am trying at the moment. I wet sanded down the 2 areas that crinkled. I then waited 2 days and applied a primer coat over these areas. I will now try an overcoat(s) of color. If that doesn't work. I am going to wet sand the whole hull and start again. Only this time I am going to use automotive paint (likely enamel) and reapply both base color and accent. I will then over spray a clear coat finish. I have spoken with the automotive paint shop folk and this is what they recommend. They can mix custom color and charge the cans. The reason I like these cans is they also have a much better paint nozzle for wider spraying. Not a cheap solution as it is about $30 per color. The lacquer route is not recommended as it may eat right through existing coats. -
Recommendations For A Good Milling Machine
Thistle17 replied to Thistle17's topic in Modeling tools and Workshop Equipment
Frank I must say i really enjoy your build of Kathryn. I'm not much on responding with the "Likes" but I certainly do like what you are doing. Joe -
Recommendations For A Good Milling Machine
Thistle17 replied to Thistle17's topic in Modeling tools and Workshop Equipment
I would like to share with all of you what I have experienced with Sherline Manufacturing and their Customer Support Team. My mill came damaged in shipment from California to New York State. The Z axis column lead screw/wheel was found to be bent when the unit arrived. Needless to say I was dismayed. I have been dealing with Kat Powell in the Sales/Customer Support office. I sent a photo of the problem and she immediately responded with an offer to replace the Z axis assembly. It arrived today just 2 days since the problem was discovered. Her customer first attitude was simply outstanding. Thought I should share this with all and give others in the market for their products another reason to purchase from an American company. Joe -
Recommendations For A Good Milling Machine
Thistle17 replied to Thistle17's topic in Modeling tools and Workshop Equipment
Indeed the photo is odd in its appearance. I'll comment this last time. I took the picture on the kitchen counter w/o flash and at a slight angle i.e. not head on. When I tried the flash it showed extreme glare coming from the reflection of the speed control label. Without the flash the overhead lights cast a shadow area beneath the head stock. That makes it look as though the Z axis column is forward of the X/Y table. It is not. Hope this clarifies it. -
Recommendations For A Good Milling Machine
Thistle17 replied to Thistle17's topic in Modeling tools and Workshop Equipment
Tom: This machine is such a fine tool and for me it is going to be a "hill climb" to learn to use it to advantage. I was looking at the accessories catalog last eve and realize as I progress I will be in need of some of them. There is no doubt this is a well thought out product family with expandability and upward mobility. Please, as you progress share your experience. Joe -
Atlantis by Thistle17 - FINISHED - Robbe
Thistle17 replied to Thistle17's topic in RC Kits & Scratch building
Tim I chose this paint because it was touted as a plastic paint and secondly it produces a pretty good volume of paint. Th coats elsewhere need only a mild rub out as the applications are decent. I did not use an air brush as I would have had a supply problem. I kept thinking that I should get a good detail/model brush like Iwata but then I shrunk away because I thought my paint supply (autobody paint) pigment size mught trip me up. Joe -
Recommendations For A Good Milling Machine
Thistle17 replied to Thistle17's topic in Modeling tools and Workshop Equipment
Wefalck: You made me chuckle about the drawers. Indeed if I didn't control myself I would need a rolling cabinet instead of this base. These drawers were intended for loose small items. I have another work table/bench planned that will address such items as a rotary table plus the lathe etc. As to you observation of the photo. It is my weird camera angle and awful iighting that makes it look as it does. I'll try harder to be more deliberate in future pictures. Joe -
Recommendations For A Good Milling Machine
Thistle17 replied to Thistle17's topic in Modeling tools and Workshop Equipment
Well I finally made the plunge and ordered the Sherline 5400 DRO. It came last week. I must say it is a beautiful well executed design that yields a very special product. I spent a good deal of time reading over the assembly and instruction manual as it is not an RTF (Ready To Fly parlance from the model plane industry) machine. The base with the X,Y table is an assembly. The headstock column is an assembly that includes the "saddle block" to mount the motor/headstock assembly to. The motor, belt guard and headstock must be assembled and since this unit includes the DRO it must include placement of the optical sensor for the speed encoder. The motor assembly in turn mounts to the Z column "saddle block" that has a bar guide alignment and centering stud that draws the assembly tight to the column. One surprise to me is these later units allow rotation of the headstock/motor at an angle to machine facets on material. Older units did not have this feature. I did spend some time making a small portable base for the unit. Two drawers help store wrenches, cutters, chuck etc. I always had misplaced wrenches etc. with my Unimat lathe so i thought I would head off a similar problem here. I thought this would be good to share as an opening statement before I get into its use over the next few weeks. I did not purchase Joe Martin's book on its use yet but will very soon as I am a rank amateur machinist. Joe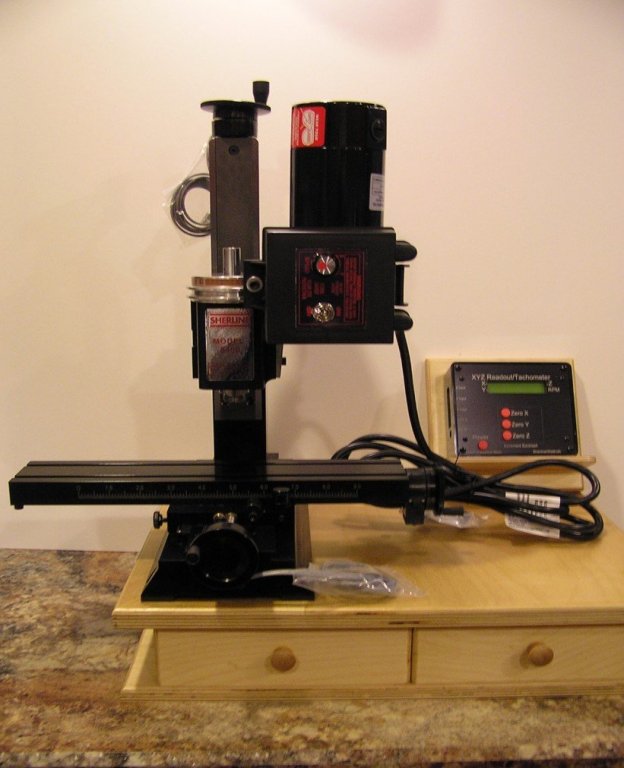
-
I have carved lettering in a woodworking class and I can relate that it is an art form not easily acquired by the casual user even in full size. Have you considered laser engraving, done by others? I have seen some pretty convincing results. If that doesn't work because of resolution or other factors you may want to try a decal like application you make with a copier and some bold font reduced sequentially until scale is reached. Joe
-
Atlantis by Thistle17 - FINISHED - Robbe
Thistle17 replied to Thistle17's topic in RC Kits & Scratch building
Mark I just don't know at this point. I have once again gone back to Rustoleum Help Center and they will be contacting me shortly. Intuitively I had thought, before this application of the trim color, that after wet sanding I should spot prime this area. I didn't and I think at this point it was a bad decision. I don't think it is the hull material for 2 reasons: (1) the transom (was missing when I received the model) is wood. I didn't say it on the previous entry but it too crazed/wrinkled badly and (2) the under coat is a Navajo White which was too creamy so I top coated with the Gloss White, that under layer did not craze. I am going to rub out the final coat with a mild rubbing compound before a top coat of clear gloss. Thanks for offering the suggestion. I must say my blood pressure is rising as I am stalled until this is solved. Joe -
Atlantis by Thistle17 - FINISHED - Robbe
Thistle17 replied to Thistle17's topic in RC Kits & Scratch building
What a disaster! This is probably the last time I use this paint (Rustoleum 2X Ultra Cover). It did it again! Per their instructions I sanded it down, washed it with a little dish detergent and water, waited 5 days and reapplied paint on a 74 degree day with low RH. I am now back to Rustoleum Customer Support for answers. What a set back.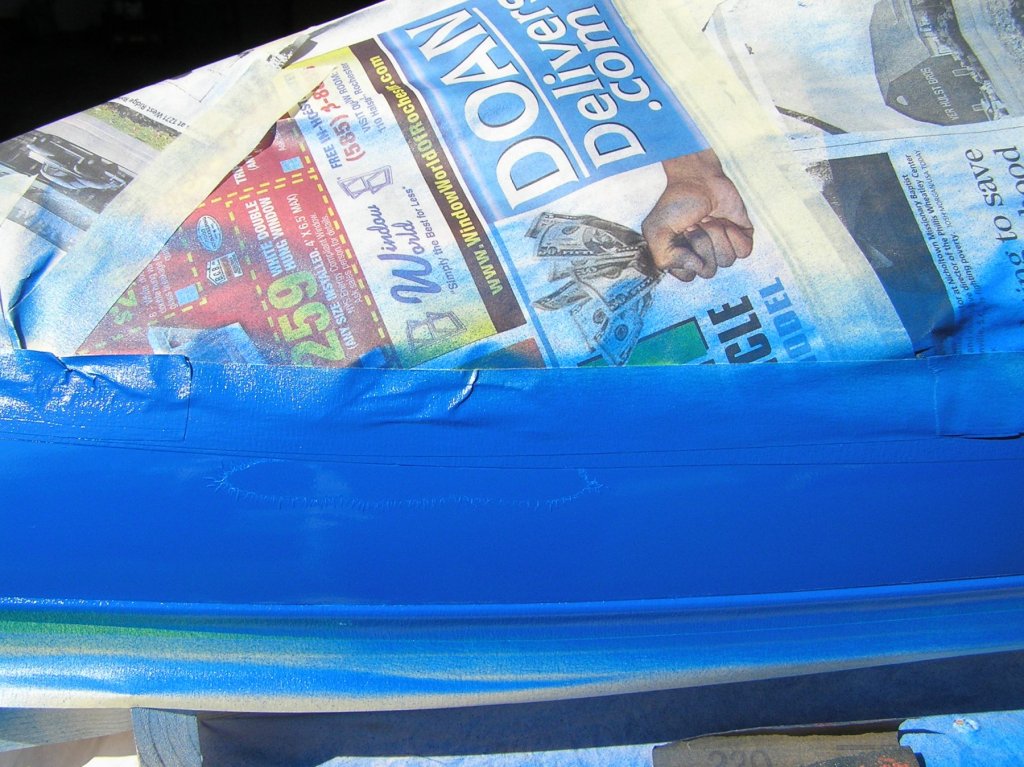
-
Anxious to see your work in person this week. Knowing your work whether in photographic form or up close and personal is always an inspiration. Joe Joe
- 310 replies
-
- 2
-
-
- cheerful
- Syren Ship Model Company
- (and 1 more)


