MORE HANDBOOKS ARE ON THEIR WAY! We will let you know when they get here.
×


Canute
-
Posts
6,303 -
Joined
-
Last visited
Content Type
Profiles
Forums
Gallery
Events
Everything posted by Canute
-
 Neat looking little fishing boat there. Will be fun.
- 215 replies
-
- 1
-

-
- convulsion
- caldercraft
- (and 1 more)
-
I agree with Eamon about the balsa bulkheads. May work easy, but it's weak. Another wood may be basswood; it comes in sheets. And yes, Dee_Dee's French sloop looks very good. Check it out!
- 215 replies
-
- 2
-
-
- convulsion
- caldercraft
- (and 1 more)
-
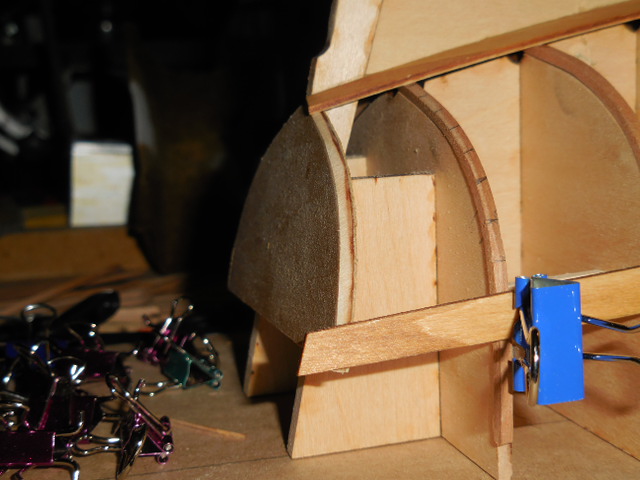
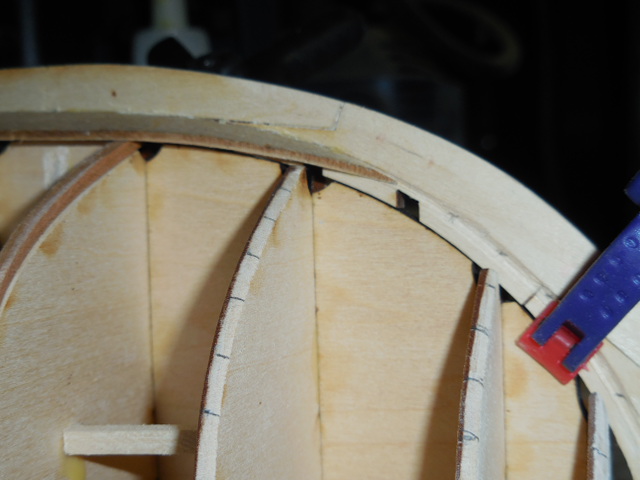
Well, a bit of progress today. Glued up the larboard sheer plank and garboard strake. Garboard hood end fitting into the stem. Fit looks good. Sheer plank. Had to use that binder clip to hold the hood end in the rabbet. Transom end I hope the rest of the planks lay in like these.


-
Cap'n, I just finished reading your tales of hard trials and great tribulations on the ships boats. Quite the saga! I await the commencement of this iconic ship build to follow along.
-
Blacken Brass
Canute replied to sailor jim's topic in Discussion for a Ship's Deck Furniture, Guns, boats and other Fittings
Jim, if you use acetone (readily available at the big box hardware places) be advised to use breathing protection and rubber gloves. High concentrations of acetone are hazardous, whether thru breathing or on your hands. I recommend using vinegar to clean your parts. This thread goes through the whole process: http://modelshipworld.com/index.php/topic/6977-the-blacken-it-trials/ Read through itbefore you decide which products to use. -
Congratulations to you and the Admiral on your anniversary. Arr, matey! Spiced rum. A personality enhancer if ever there was one. Enjoy it. And outstanding on your latest, HMCutter Sherbourne. That's a beauty.
- 215 replies
-
- 1
-
-
- convulsion
- caldercraft
- (and 1 more)
-
The clamp looks good with the black fasteners and poly, Grant. I would think bolts would be stronger than nails to hold the clamp in. Would the force of the mortar firing translate into pulling the fasteners out? Did the crew have to get down under the mortar to check those fasteners every time they fired the mortar? P.S. I didn't read Mobbsie's post before I wrote about the bolts.
- 456 replies
-
- 1
-
-
- finished
- bomb ketch
- (and 2 more)
-
I salute PFC Harrison Nutz and his merrie men for jumping on that task. And the wood looks good in the hold. Wow, I haven't fought over Bud and Old Style beer since Viet Nam! I think my taste buds have improved since I was a young Leftenant.
-
Cap'n, like the thole pins; they look good. I hope you break that lathe out soon. I got a little dough to spend and I think a lathe might be the thing. Need some hands-on, first person experience with this Proxxon jewel.
- 625 replies
-
- 3
-
-
- bounty launch
- model shipways
- (and 1 more)
-
Ah, the joys of domesticity! This from the guy about to take his Admiral out for her birthday dinner.
- 215 replies
-
- 1
-
-
- convulsion
- caldercraft
- (and 1 more)
-
Tuff, like the carriage color. Looks very good. And the remodeled carriages themselves are excellent.
- 113 replies
-
- 2
-
-
- constitution
- mamoli
- (and 1 more)
-
Ditto for me. Can't have too much light or magnification, even for young eyes.
- 967 replies
-
- 1
-
-
- hahn
- oliver cromwell
- (and 1 more)
-
I'll second Jason's recommendation for the Hypo glue. It's watch crystal cement. I've attached clear styrene window glazing to wood and plastic without any crazing. Beats the CA, which causes the clear styrene to fog up from the fumes.
- 215 replies
-
- 1
-
-
- convulsion
- caldercraft
- (and 1 more)
-
Mobbsie, the poly really makes it pop. Looking good. Thanks for sharing.
- 255 replies
-
- 1
-
-
- granado
- bomb ketch
- (and 2 more)
-
Jon, careful with your repaired back, mate. A technique I read about, but haven't tried yet, is to draw up the ratline diagram on some white paper/card stock and place it under the shrouds. Tie the lines with your preferred knots. I favor white glue, since it dries clear. The CA may discolor with aging.
- 215 replies
-
- 2
-
-
- convulsion
- caldercraft
- (and 1 more)
-
I'm very interested in how you will make this treenailing process happen. I'm still a noobie in this field.
- 255 replies
-
- 1
-
-
- granado
- bomb ketch
- (and 2 more)
-
Matt, the Alert and Granado AOTS books have 1/24 scale drawings of 4 & 6 pounders. Might they be of some help?
-
Cap'n, glad you're back. Follow the doctor's orders for healing up. Nice work on the rudder gudgeons and pintles.
- 625 replies
-
- 3
-
-
- bounty launch
- model shipways
- (and 1 more)
-
Bill, they do insert a block under the aft end of the barrel to adjust elevation. That's called the quoin, the triangular block or, as Tuff calls it, the cake shaped block above the rear wheel. Two gun crewmen, one per side, used crowbars to allow changing the gun's elevation. The quoin is slid forward to lower the gun's mouth and slid back to raise it.
- 113 replies
-
- 1
-
-
- constitution
- mamoli
- (and 1 more)
-
The rudder and tillers look good, Cap'n. And your base looks great.
- 625 replies
-
- 3
-
-
- bounty launch
- model shipways
- (and 1 more)
-
Hang in there. Time plan and plot your other work on the bomb.
- 215 replies
-
- 1
-
-
- convulsion
- caldercraft
- (and 1 more)
-
Matt, have you looked at the AOTS Alert book. It's a somewhat older ship, but a nice looking cutter. Lots of detail for you.
-
I had forgotten many old kits had raised detail, so yes, no washes. Although, you may want to sand around the deck furniture to remove the raised grain effects on the deck "wood". It would go a ways towards making the plastic deck look like wood. I looked at the kit instructions for a railroad flat car I did a while back. Plastic was gray to start. Washed it in "Dawn" to remove mold release agents; paint sticks better to clean plastic. I painted the plastic an enamel earthy/woody color - light tan. Let dry a day or so. No paint odor. Sanded the boards to remove maybe 25% of the tan paint. Dry brush - streak the boards - with a darker brown enamel. Let dry (no odor), maybe 30 minutes. Lightly sand again. Could add a black acrylic wash to bring out the caulking. Lightly steel wool the deck with 4 ought wool to even out color.
- 42 replies
-
- 2
-
-
- Constitution
- Revell
- (and 1 more)
-
It makes sense to do so with these cutters. Shallow draft, packs a punch. It will be interesting to see how the bulwarks get reinforced. And increasing armament to 12 3 pounders. Bravo Zulu, little squirrels!