russ
-
Posts
3,086 -
Joined
-
Last visited
Content Type
Profiles
Forums
Gallery
Events
Everything posted by russ
-
B.E.: I can and would scribe the scarph joints. That goes without saying. However, the question is will I make the rail up out of separate pieces to have the grain running on the proper direction. I think that when I have the shape I want out of this single piece, I will use it as a template to cut new sections with the grain running in the right direction for each piece. I can nail one end of a scarph into one stanchion and the other end of the scarph into the next stanchion. Russ
-
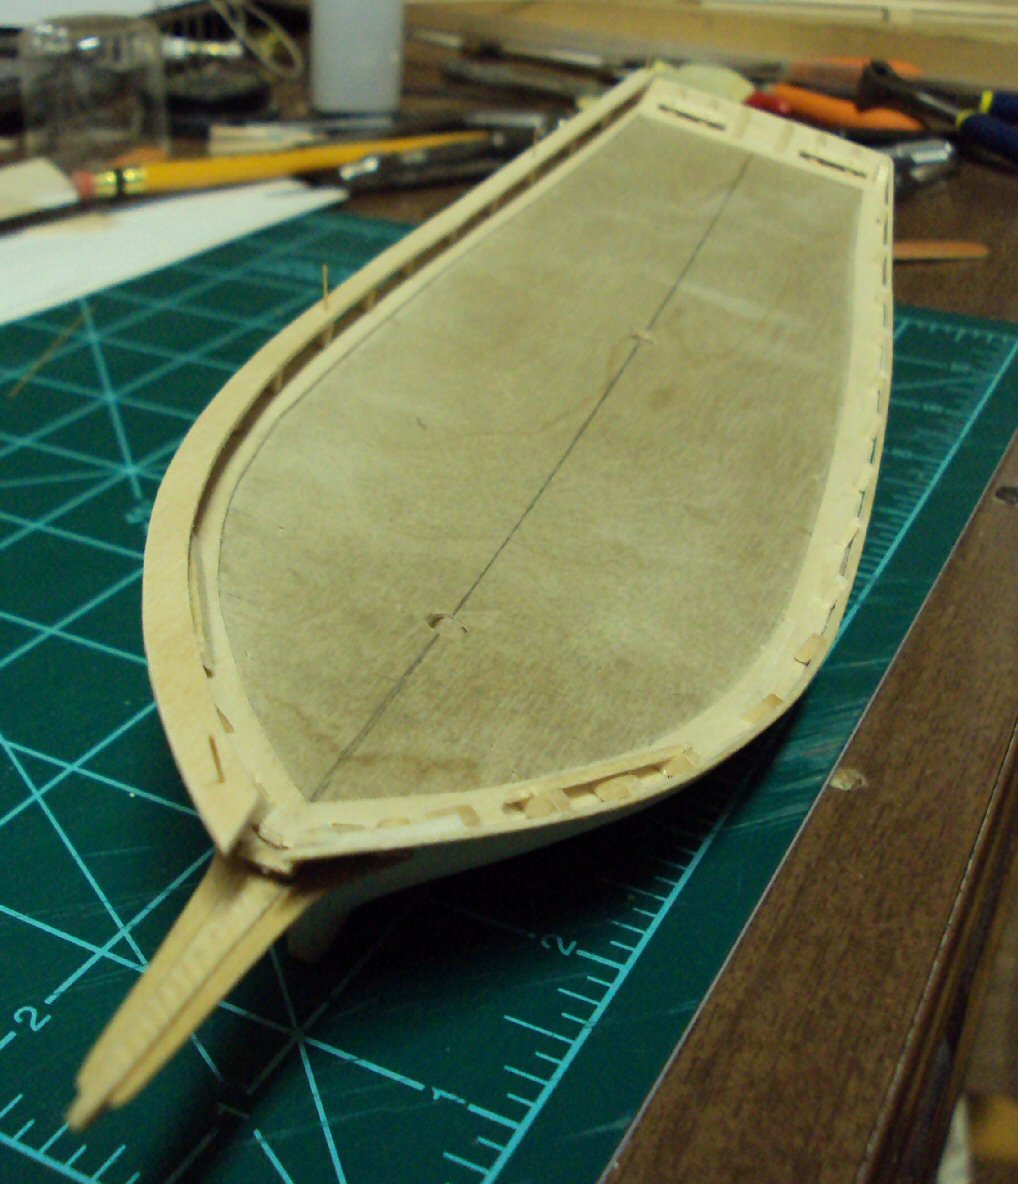
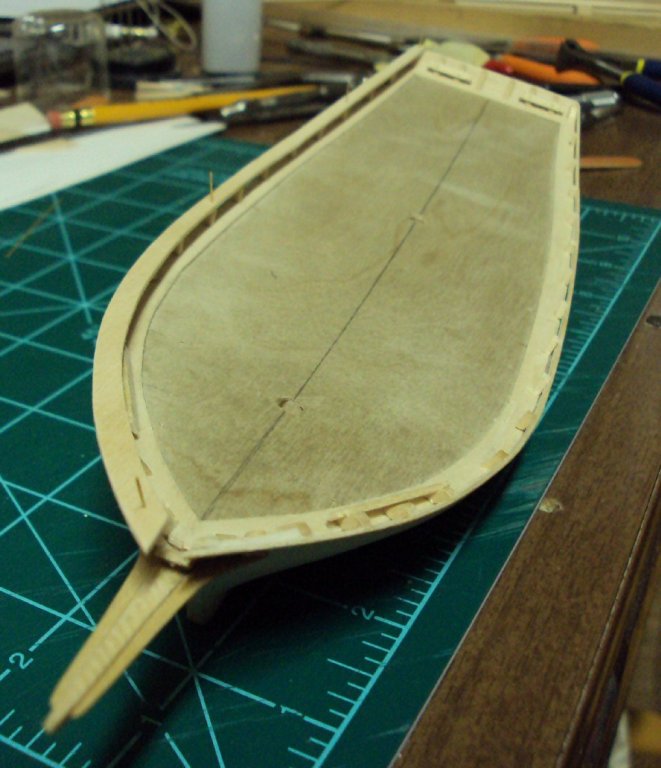
I made some progress tonight as I begin to shape and fit the rails. I am going to try and get each side's rail on in one piece. It is not my first choice and it may not work in any event. It is certainly more difficult getting it all shaped in one piece, but I am worried that the stanchions may not give me enough support for proper scarph joints. Questions and comments welcomed. Russ

-
A fully Rigged Model Shipways Confederacy.......
russ replied to yvesvidal's topic in Wood ship model kits
Mark: There is a list of spar dimensions from the British. Chapelle took those dimensions and produced a spar and sail plan for the Confederacy. On that plan, he lists the spar dimensions from the British. Russ -
Plank Beveling and stealers
russ replied to bigpav's topic in Building, Framing, Planking and plating a ships hull and deck
Druxey: On a "tubby" hull would you need stealers or drop planks? I agree that planking can and should be run without stealers. Russ -
Plank Beveling and stealers
russ replied to bigpav's topic in Building, Framing, Planking and plating a ships hull and deck
Ideally, they should be used down lower in the hull and most likely aft where the planks want to widen out as they approach the sternpost. Russ -
Request for Help- Soldering with Paste
russ replied to PopJack's topic in Metal Work, Soldering and Metal Fittings
That is a mast band. Here is how I make it. Take a strip of brass and then wrap it around a dowel of the appropriate size. Butt one end of the band against itself and solder it. Now, you have the strip with the band formed in the end of it. Drill a hole in the strip just a little ways out from the band and then you can trim the strip to form one of the lugs. The lug has the hole in it and that is where you will attach the rigging gear. Now, drill a hole in the band on the side opposite the soldered joint and make up another small strip with a pin cut on the end of it. Place that pin in the hole you drilled with some paste and solder it. Now, drill a hole in the second strip that you just soldered to the band and trim that strip to form the second lug. You can reach in with some nippers and trim the pin on the inside of the band and then carefully file it down flush. You can use this same technique if you want to have four lugs on a mast band. Harold Underhill describes this in the second volume of his book Plank on Frame Models. I have used this on several ocassions and it works well. It will save you having to solder long pieces of the brass strip together. Here is one rather poor example of my mast bands. Russ
-
Plank Beveling and stealers
russ replied to bigpav's topic in Building, Framing, Planking and plating a ships hull and deck
Scott: There was a thread about stealers a while back. http://modelshipworld.com/index.php?/topic/2512-planking/?hl=stealer#entry65273 As for the beveling you describe, I think you mean back beveling. That can be done with sandpaper or an emory board, depending on the wood you are using. Back beveling will make any joint fit a bit better. For matching that curve of the preceding plank, what you could do is called spiling. You are creating a curve on the edge of one plank so that it matches the curve of the preceding plank. I use a compass (the kind with a pencil on one leg and a metal point on the other leg) to transfer the curve onto a piece of wood that will become the next plank. Then I use a hobby knife with a scalpel blade to cut along the curved line. Leave a little outside the line and then sand that to final shape after some trial fitting. Once the spiled edge is a fit, then you can mark off the taper for that plank on the edge opposite from the spiled edge and cut that with the knife, again leaving it a little full to allow for final sanding. If your model has solid bulkheads, then that is called plank on bulkhead. The matter of single versus double planking has nothing to do with plank on bulkhead versus plank on frame. You can single or double plank either POB or POF models. Plank on frame models will have frames built up out of (generally) several pieces and plank on bulkhead will have (generally) single piece solid bulkheads. Hope that helps. Russ -
Request for Help- Soldering with Paste
russ replied to PopJack's topic in Metal Work, Soldering and Metal Fittings
I did not put up a link, but here is a direct link to the soldering tutorial. http://modelshipworldforum.com/resources/materials_and_tools/SilverSolderTutorial.pdf Russ -
Request for Help- Soldering with Paste
russ replied to PopJack's topic in Metal Work, Soldering and Metal Fittings
The article is in the article downloads section. Go to the top of the page and click on it and then look in ship model materials and tools. You can download it and have it on your hard drive for future reference. I do not know what you are making though. I have not heard the term yolk in shipmodeling. If I could see what it looks like, I might have some suggestions on how best to solder it. What you showed earlier looked like a simple loop in the end of the brass strip. That can be done with a butted joint easily enough. I do that to make eyes in wire and brass strip. Russ -
A typical pattern for that era would have been either to have three or four planks between the butts on a given beam. There is no record of what was used on the Triton in particular, so we have to rely on what was typical. Russ
-
Request for Help- Soldering with Paste
russ replied to PopJack's topic in Metal Work, Soldering and Metal Fittings
I never quench mine at all. Just let it cool. I like to bend it before it completely cools. Russ -
Request for Help- Soldering with Paste
russ replied to PopJack's topic in Metal Work, Soldering and Metal Fittings
I use that paste with no issues. You really do need to anneal the metal first so that it will be easy to bend. Then when you create a joint, overbend the material to create a joint that will spring against itself. That will create a solid mating edge. You need to do all of that forming before ever reaching for the torch. The easiest joint to make is a simple ring such as in an eyebolt. So, on your soldered eye with the brass strip, instead of trying to solder the entire width of the strip to itself, just bend the end of the strip back to itself and create a simple butt joint to make an eye. That will be a much simpler soldering job. When you finish your joint, the test is to put some stress on it. If you can bend it, twist etc without the joint coming loose, then it is good to go. Russ -
Jay: Thanks. I will get back to it in a bit. Chores first. Russ
-
Very nice cabin decor. The table is nice bit of wood work. Russ
-
The standing rigging looks very good. Everything look taut and nothing has been pulled out of alignment. Very neatly done as well. Excellent work. Russ
-
Bob: 99% of the time, I agree. There will be so much going on up in the bow that these lips may not even be seen once they are painted, the anchor chain installed and so forth. I am weighing it today to decide. Russ
-
Augie: Thanks for the support. Russ
-
B.E.: Thanks for the kind words. The hawse lips are carved from boxwood. Not that difficult to make once you get the hang of it, but I sized the port side lips a little better. I may change the starboard side lips, but I will look at it later to day and see what I think. The difference is not that much unless you are looking at it under magnification. Russ
-
Bob: Very nicely done. So long as you can get it to fit correctly, I see no reason not to assemble the deck as you are doing. Russ
-
The finished model is outstanding. It is a beautiful piece of work. However, how about a few more photos of how you got there? I am sure everyone would relish a few more progress photos. Russ
-
What Mark and John said. I am out of words. Those blocks are just unbelievable. Russ
-
"Chaulking" on deck planks
russ replied to 4whelr's topic in Painting, finishing and weathering products and techniques
I use a number 2 pencil rubbed along the edge of the plank at smaller scales to indicate caullking. I have never had any smearing or any problem doing that. It looks good at 1/48 scale and smaller. Russ -
A 4 inch circumference would be about 1 1/4 inch diameter. At 1/48 scale, the diameter would be .026 inches. That would be about right for your nine pounder. I checked a source from about a century later and that number was still used for the nine pounder breeching. Russ
-
Bob: Yes, clever indeed. Russ
-
Very ingenious work with the counter and the rudder. The details are wonderful. I really like your windlass and deck house. There is a lot to be said for large scale models of small boats. You can render just about everything in the boat and they make excellent models. Russ