HOLIDAY DONATION DRIVE - SUPPORT MSW - DO YOUR PART TO KEEP THIS GREAT FORUM GOING! (Only 13 donations so far - C'mon guys!)
×


NMBROOK
-
Posts
2,305 -
Joined
-
Last visited
Content Type
Profiles
Forums
Gallery
Events
Everything posted by NMBROOK
-
 Thank you very much indeed Sjors Kind Regards Nigel
 -
Thank you very much indeed Jason Yes there are some quite complex compound shapes in this build.They are challenging but do add to the enjoyment as I am a gluton for punishment I am looking forward to the stern,this will be good fun,as both this and the beak have to be frank,'wacky' design details that are pretty much unique to this vessel.It will also be nice to loose the 'container ship' look I have at the moment.Sadly can't do anything with that until the other side is finished to the same level as the deck transom beam dictates the shape of the round tuck start point. Kind Regards Nigel
-
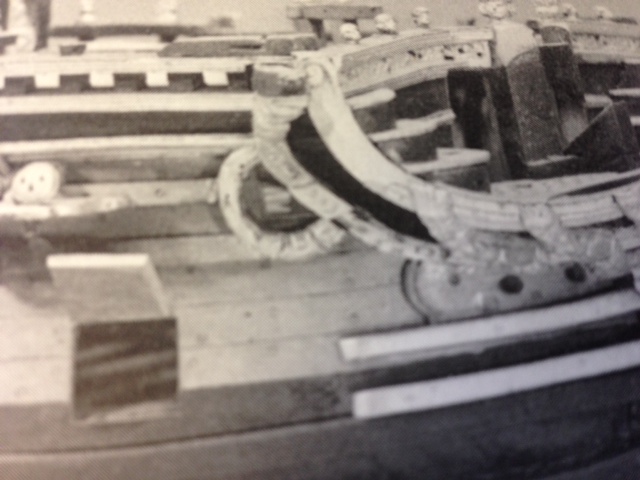
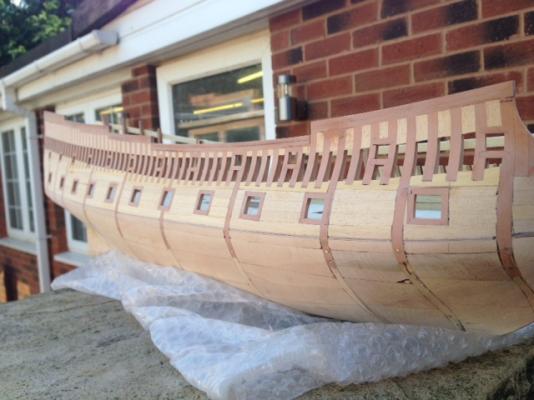
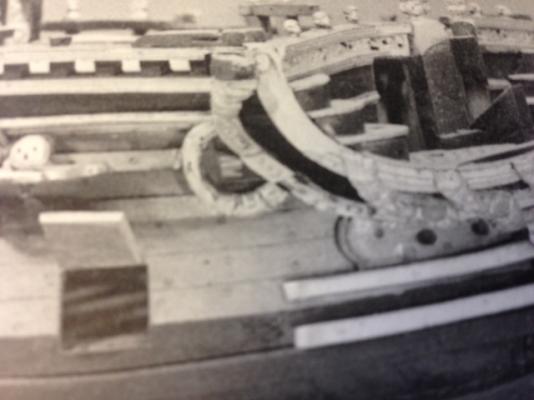
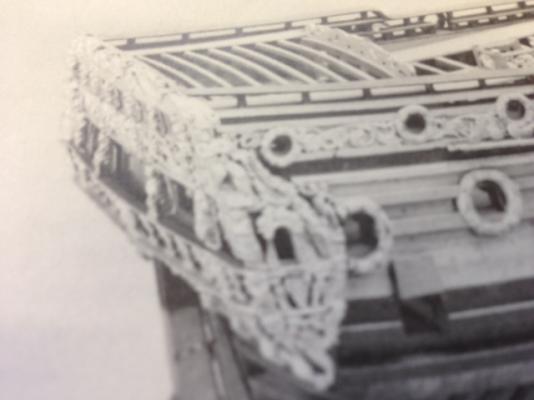
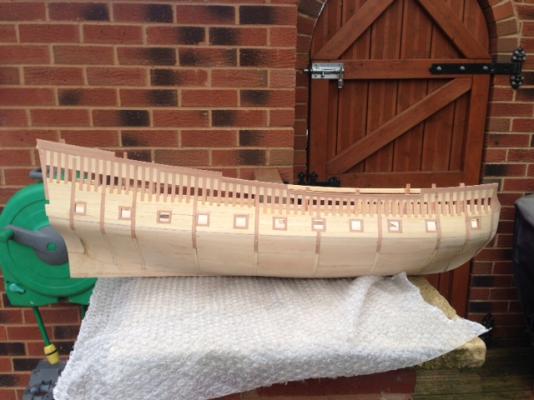
I have now fitted all the upper gunport cills.These have been faired off flush inside and out.The counter side timber has also been fitted,but the lower hull is still to shape at a later date.There is quite a bit of difference between kit and builders model in this area.Franklin states in his book that the stern balcony actually has a grated deck.The carvings below the balcony act as knees to support this deck and to a lesser extent the stern structure.This is not easily visible in pictures but after enlarging the NMM pics as much as possible it became clear how this construction worked. This is a far as I am taking this side for now,work will commence on the port side.There a still some small round gunports to create for the poopdeck,but I am not confident to the actual finished level of this deck at the moment so they will be added a little later. Kind Regards Nigel


-
Just a thought Michael if you haven't had reached the 'gluing' stage.I dare say though,unless you had posted something,none of us would be any wiser.They cannons really do look fabulous. Kind Regards Nigel
-
Painting Brass
NMBROOK replied to captainbob's topic in Painting, finishing and weathering products and techniques
An interesting post Bob.In the UK you can buy tablets that dissolve in water to descale kettles.I would assume this is the same stuff.With my RC builds in particular that have lots of brass handrail that can be slightly bent pondside but restraightened,I blast the soldered components with a Badger abrasive gun prior to acid etch primer.This blasting is only mild,not like commercial blasting,but it does give a minute mechanical key for the primer,plus ensuring no flux residues remain. Kind Regards Nigel -
She is looking fabulous Bob truly great work!When you go for detailing the interior,it really is a 'layering' job of installing all the parts and more often than not part 'A' is best fitted now but part 'B' needs fitting first,and that can't go on until the deck is in place,if you know what I mean Kind Regards Nigel
-
Fabulous work mate I wish you all the best with the stringy bits,but there is more than enough help on here should you need it Looks like it could be Sovereign of the Seas for the next build,she will give you plenty of sculptures to go at Kind Regards Nigel
-
Thank you very much indeed Janos for your kind words I think you have hit the nail on the head.I totally agree,prior to the hull taking shape,all the pics I have seen of this model make her look a little 'slab sided'.Even the photos of the NMM model aren't taken from angles that show the shape of the hull.I am certain it will bring some fun and games when it comes to plank spiling below the waterline,particularly at the bow.Also there is a good chance the front section of the lower main wale will need to be carved out of a solid piece of Ebony.These work out at 3mm thick and as there is a twist in this section,due to the pronounced 'turn under' of the hull,I don't think a will be able to bend it that far. Kind Regards Nigel
-
Having read through your log Bob,I must say seriously impressive work!!No way anyone would think this was your first build without you having stated it. Kind Regards Nigel
- 86 replies
-
- 4
-

-
- muscongus bay lobster smack
- Midwest Products
- (and 1 more)
-
Some wonderful pics of your fabulous model mate in the gallery Great work!I won't post anything other than a like on there,because if you delete old posts when you upload new ones,the comments don't make sense Kind Regards Nigel
-
All will be revealed in due course Nils,it maybe a while away yet,I am quite often a few months in front with the planning stage Kind Regards Nigel
-
Thank you very much indeed Nils Once the ports are complete,I will be building the otherside to match.My thought process is at the deck beam stage.I am thinking of using a technique of Russian master Dimitry Shevelev,in that the deck beams actually run through the hull and would finish flush with the hull surface as it is now.This gives accurate positive positioning and is stronger,but in no way would anything look any different when complete.Obviously the beam ends are covered once the outer planking is fitted.My thoughts are towards building a jig that goes on the miller to possibly machine the radius cuts top and bottom on the deck beams.This would be far more consistent than using the scrollsaw. Kind Regards Nigel
-
Thank you everyone for your very kind comments and thank you for all the 'likes' .'News Flash' re timber order,it is at the sorting office awaiting collection as I was out at the time Postie must be avoiding me Eamonn My timber order reflects the small revision I have made to my plans.Originally I was going for all boxwood with ebony and a little pear detailing.After staring at Frolich's book for hours in the research department,i.e. bath I have come to the conclusion he got it pretty much right.I am retaining boxwood for the decks and below the waterline but using pear instead for above the Ebony 'waist'.This entails another small revision,but it is work I would have to do in part anyway.All the infill will need capping off between the frames on the exposed section.I propose to do this with black marquetry veneer.To use ebony would mean machining right down in thickness and to be honest would probably want to disintegrate at the 0-6mm thickness that I can buy veneer in.I have another cunning plan to ensure this all lines through perfectly That will follow in time,got the ports to finish off and the other side to build to match first Kind Regards Nigel
-
Fabulous work Michael!!! I wouldn't feel bad about the small discrepancies in gun ports,the clearance between the cannon and port is TIGHT to say the least.If you haven't glued everything together yet,a solution for the axle pins would be to cut a small section out of the middle of the axles.This would enable them to sit tight against the wheels.As you have proper axle cutouts in the carriages,gluing the two halves together in situ won't be a problem.This adjustment will be invisible once the cannons are fitted to the deck. Kind Regards Nigel
-
Thanks for the heads up Greg,a definite must buy for me.Downside,not due for release until October Kind Regards Nigel
-
In answer to the scarph joints in the keel you are both correct .On French vessels they were horizontal,on English vessels they run vertically Kind Regards Nigel
-
Thank you very much indeed Ferret,Matti and Vivian for your very kind words I am actually quite happy I have some definitive gunport sizes to work to Matti It is nice not to have to make an educated guess based on a 350 year old piece of art .I think if I were to build Vasa mate,some standardization would have to be adopted for each deck A small high today in that the first of my timber orders has arrived,downside is I hadn't ordered any for a few months and had forgotten how expensive this stuff is I think it will be a while mate before you see her planked as the 'itch' to get stuck back in on Caroline is starting to appear.I did need a little break from her though as my drive was going a little stale.I would have just spent four times longer doing jobs than I would normally.Not only that I have Chucks lovely rope and blocks staring at me wanting a home Kind Regards Nigel
-
Thank very much indeed for your kind words Nils Yes she has wonderful lines,I don't think there is one straight line anywhere Kind Regards Nigel
-
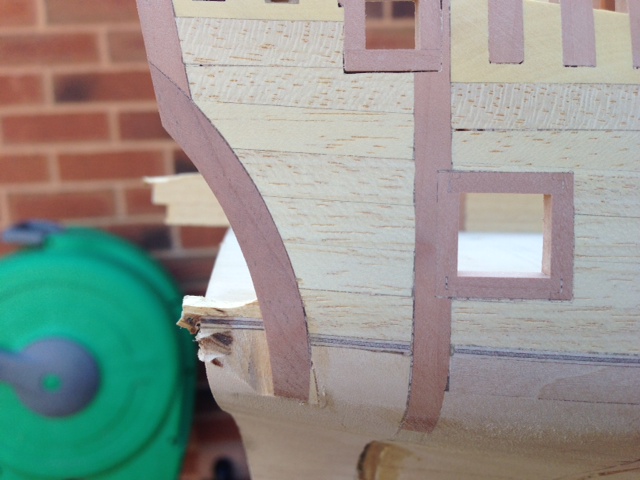
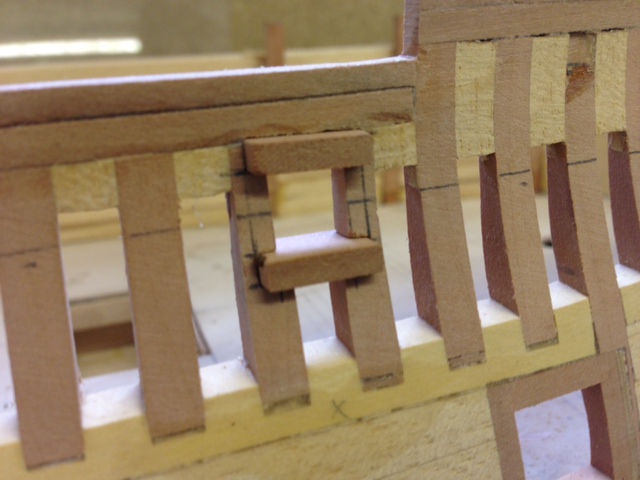
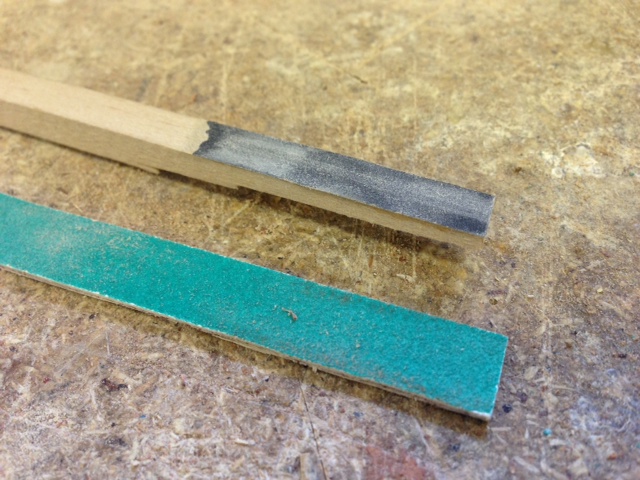
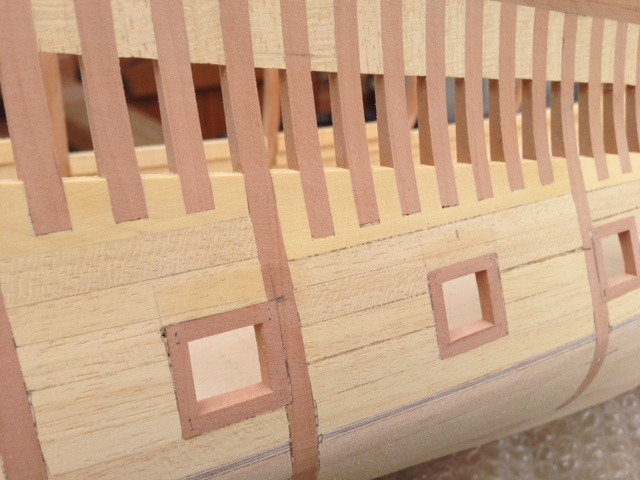
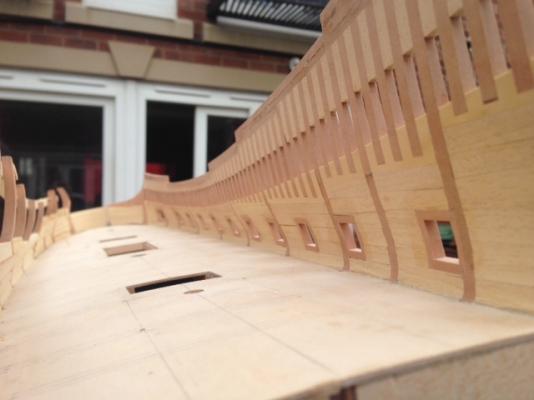
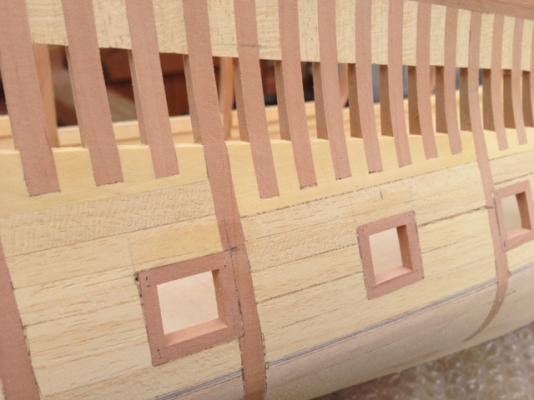
Thank you very much indeed Patrick,Geoff and Matti for your kind words On to the next,smaller update.I decided to carry on with this side as I still hadn't got my timber.I moved on to the gunports on the next deck.These are different in that many fall in the unplanked,exposed frame area.There is no option but to do them properly.An interesting point is that I am following the information in John Franklin's book as to the gunport sizes taken from the builders model,the main gun deck ones work out at 13mm W x 12mm H,the upper ones are 8mm square!!.I made a simple strip to slot between each side to ensure the cills ran true to the waterline athwartships and cut the rebates out with a burr and scalpel.I also made some simple sanding sticks up to ease the process,notably one wide enough to span between both frames to keep each side level.The excess will be sanded off after the top and bottom cills have been glued in place. Kind Regards Nigel


-
Great work Nils,are the internal windows included in the photo etch pack for the kit? Kind Regards Nigel
-
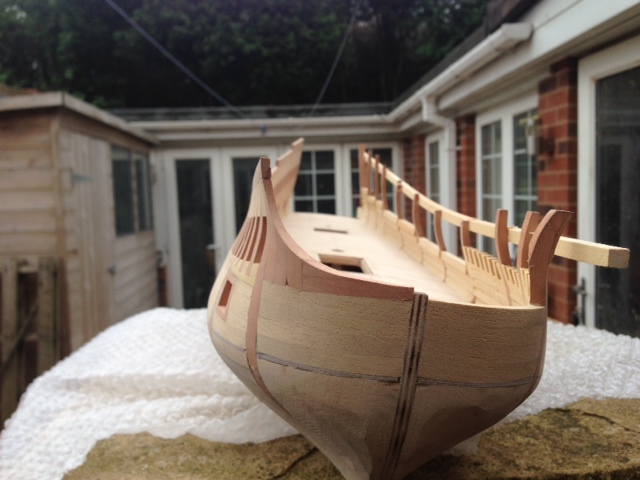
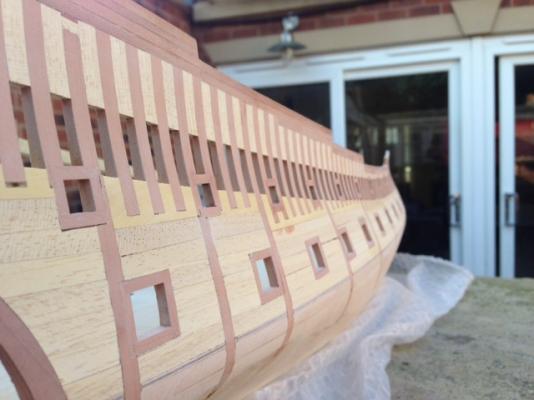
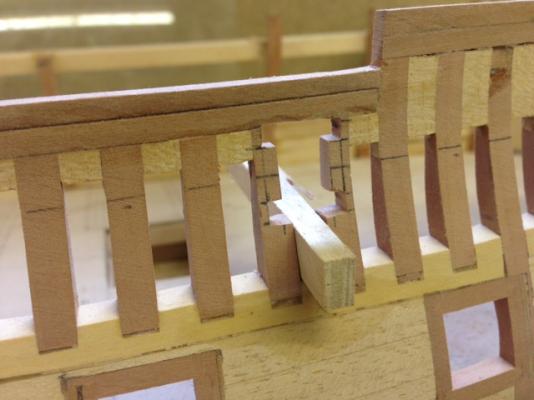
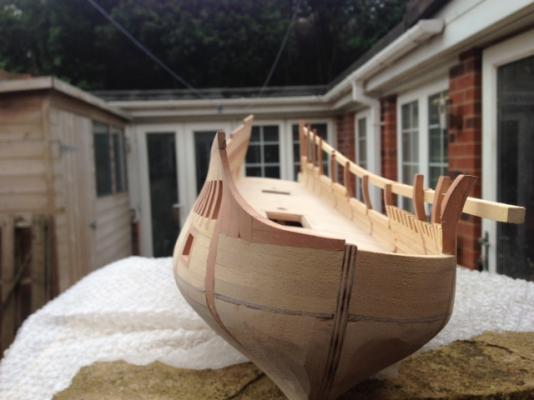
I have completed the basic 'inner' hull structure to the starboard side.As I am waiting for a timber delivery I thought I may as weel sort out the lower gunport linings.After studying Euromodels drawings and also pics of the builders model,it became apparent there were differences not just in the position of gunports but also the height and shape of the top of the hull sides.Because I want to reflect the design of the NMM model I would have to address these areas.The most notable fact is there is a gunport right forward on the museum model that is missing on Euromodels representation.Looking at the design you would probably only get a musket in there,but it is there nevertheless.Also the stern galleries are very different and you will notice the gunports are close up to this.This basically meant starting from scratch and the bulk of the ports were moved aft slightly.An additional port would then fit in at the beakhead,but also the first and last port on the main gun deck are spaced differently.My revised design reflects this. There is a three page article in John Franklin's book covering the builder's model which gives the exact gunport sizes and wale scantlings and spacings.The Euromodel kit design shows upper wales that are too small in comparison.In order to get things to work the top edge of the hull has been increased in height to compensate for this.You will notice the additional pear laminations on the top edge,the bulkheads are too short to run to the top.The lower of the pear strips has been 'dowelled' with 0.7mm copper wire into every pear upright.This has resulted in an incredibly strong hull wall even before planking. Kind Regards Nigel

-
Thank you very much indeed Brian and Keith Originally I had hoped that I would be able to follow the drawings to a much greater extent than I normally do Brian,however because of the simplification of both the stern and beakhead in the kit(there isn't anything wrong with the kit,I just want mine to accurately reflect the model in the NMM)it has had knock on effect.I will cover this in my next post,which is due very shortly Kind Regards Nigel
-
Hi Tony That one is easy,and they have a branch near you I should imagine,WHSmith It was their site that listed the black paper and gave the weight.There were some other sites I looked at,mainly bulk stationary suppliers that gave larger weights.I just bought another 5 packs of tissue yesterday just in case there is a sudden national shortage If you visit their store the tissue paper is next to the wrapping papers Kind Regards Nigel
-
Excellent work mate !!That is a great technique,I am sure practice off the model is necessary,just have visions of hinge stuck to fingers and hand stuck to model I take it you use medium or thin CA? Kind Regards Nigel