Cathead
-
Posts
3,522 -
Joined
-
Last visited
Content Type
Profiles
Forums
Gallery
Events
Everything posted by Cathead
-
 Building wooden kits takes a LOT of attention to detail; it always amazes me what I forgot, overlook, or screw up no matter how much I think I've been paying attention! Just keep your head on straight and plug away. If you're not satisfied with your doors, you could try making new ones from thin pieces of scrap wood. These might be easier to paint cleanly than a single brass piece. You could even consider using a single piece of wood and using a thin pen or pencil to draw in the framing. Beagle is a neat ship and I look forward to seeing how you make this model your own!
 -
Brian, freezing rain here, too, I almost wiped out this morning dumping the overnight ash from my wood stove even though I knew perfectly well there was ice. John, depending on how young you are, ice on that stretch of the Mississippi (I assume from distance you mean around the Rock Island area) probably behaved very differently. Once the Mississippi was lock-and-dammed in that area were relatively few stretches of free-flowing water, whereas the Missouri is entirely free flowing in its lower reaches (from South Dakota down). So it would be hard to get this kind of flowing ice field on that part of the Mississippi because the regularly spaced dams slow the current and intercept the ice, whereas here we're getting a straight flow of ice from however far away it manages to travel on the open current.
-
Steamboats, like another nautical venues, had a lot of terminology that wasn't logical but just...was. The main deck is the main deck, which is logical. The second one is the boiler deck, although the boilers were never there (always on the main deck). The third deck is the hurricane deck. The fourth, if there is one, is the Texas deck. There is no clear answer for any of these, though theories abound, but they were universally known and used. One argument for "hurricane" is that it's high enough up on the vessel to really start catching the wind. But none of these were assigned, they just developed organically into a universal idiom, and language doesn't always make sense. For a loose comparison, think of the orlop deck on a sailing vessel. That word universally tells mariners you mean the lowest deck of however many there are, even though the word itself sounds nonsensical in English. Supposedly it comes from a Dutch word meaning "overlap", and there's probably some organic language development going on there that made perfect sense at one time (I don't know the detailed etymology). But, like lots of jargon, "orlop" or "hurricane" deck let us refer to a specific idea very concisely and clearly as long as we all understand the definition, regardless of how convoluted the origin story is.
-
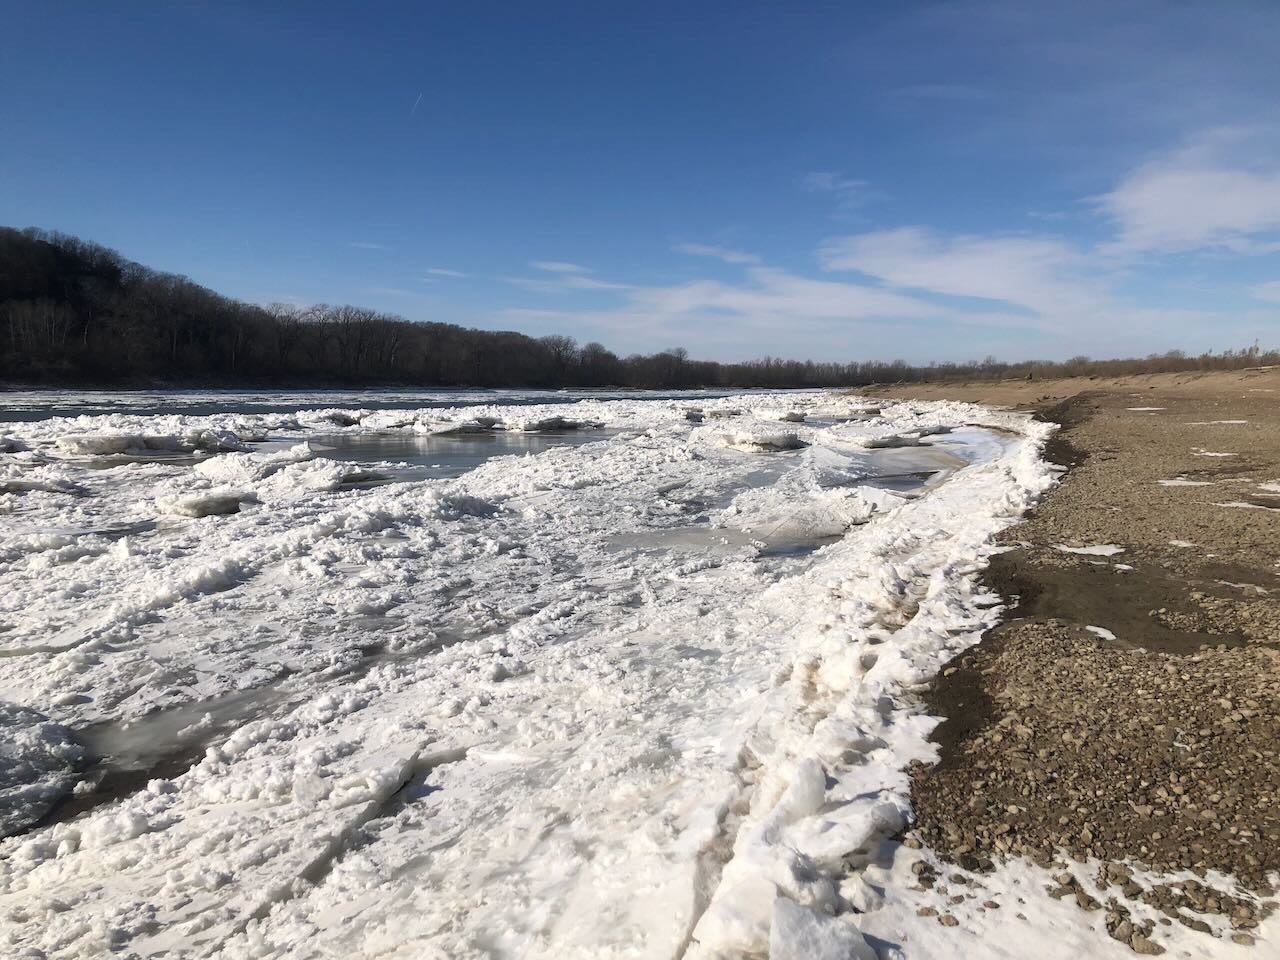
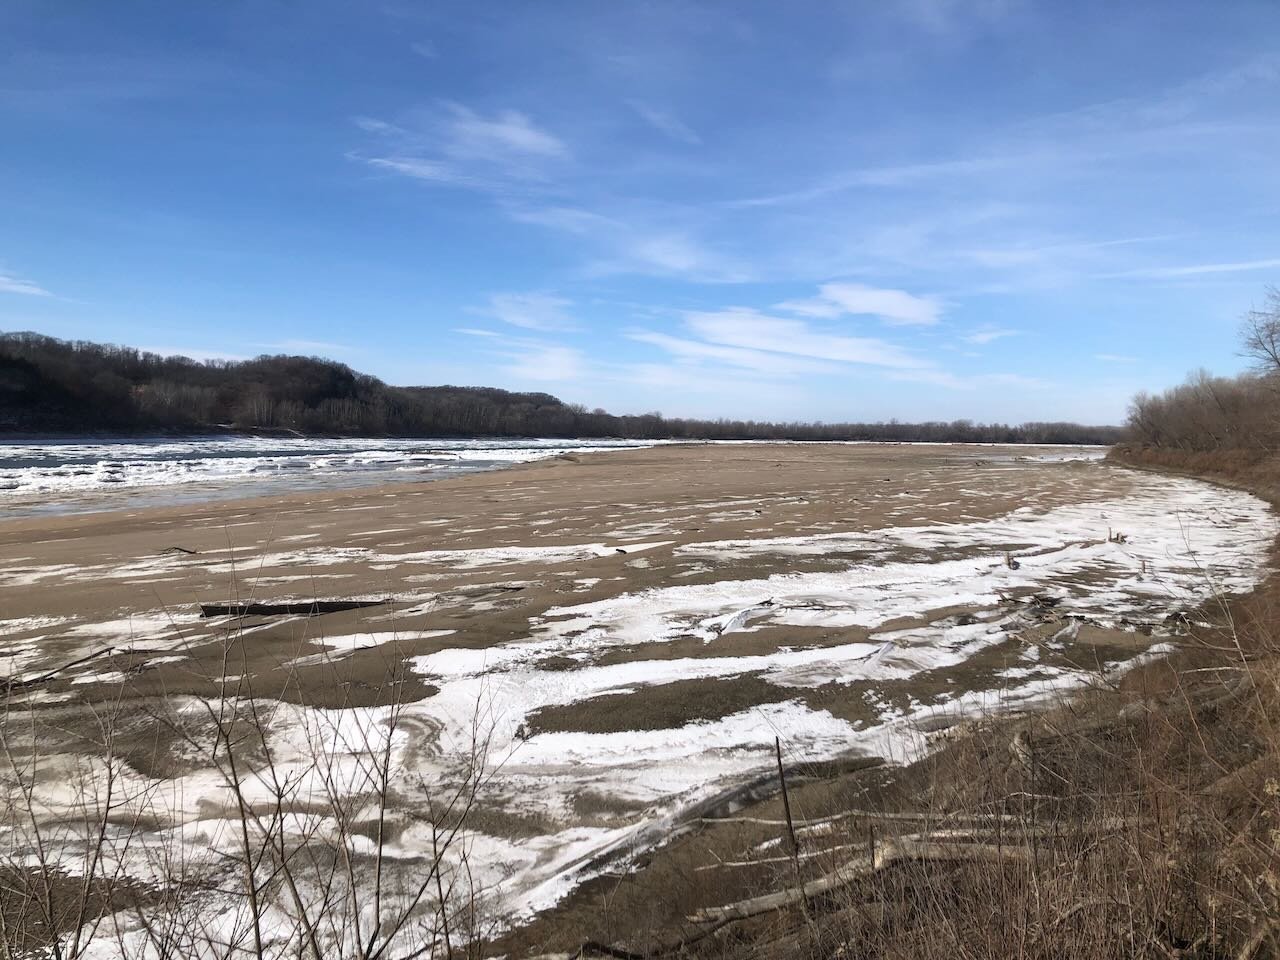
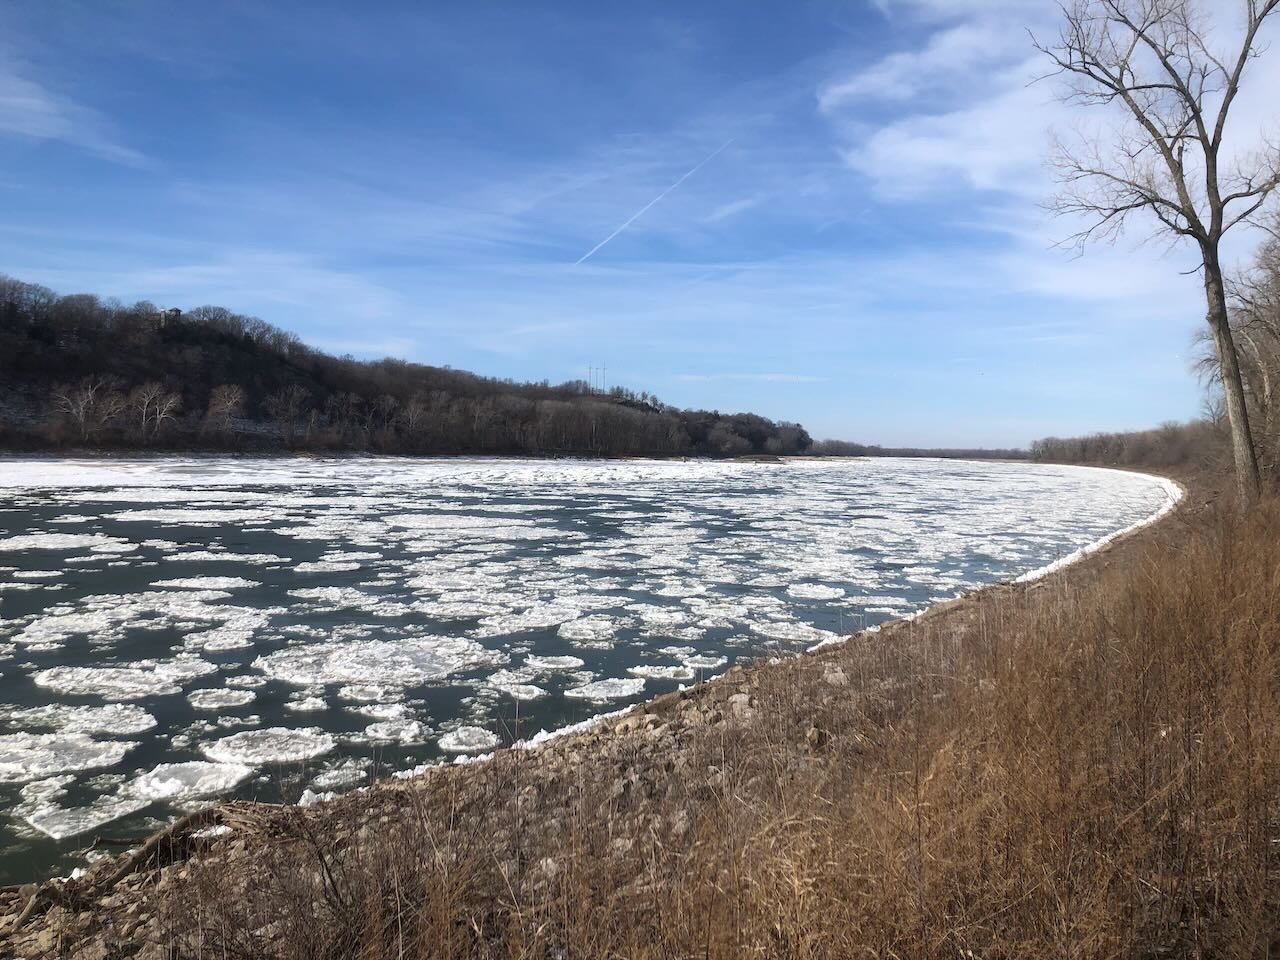
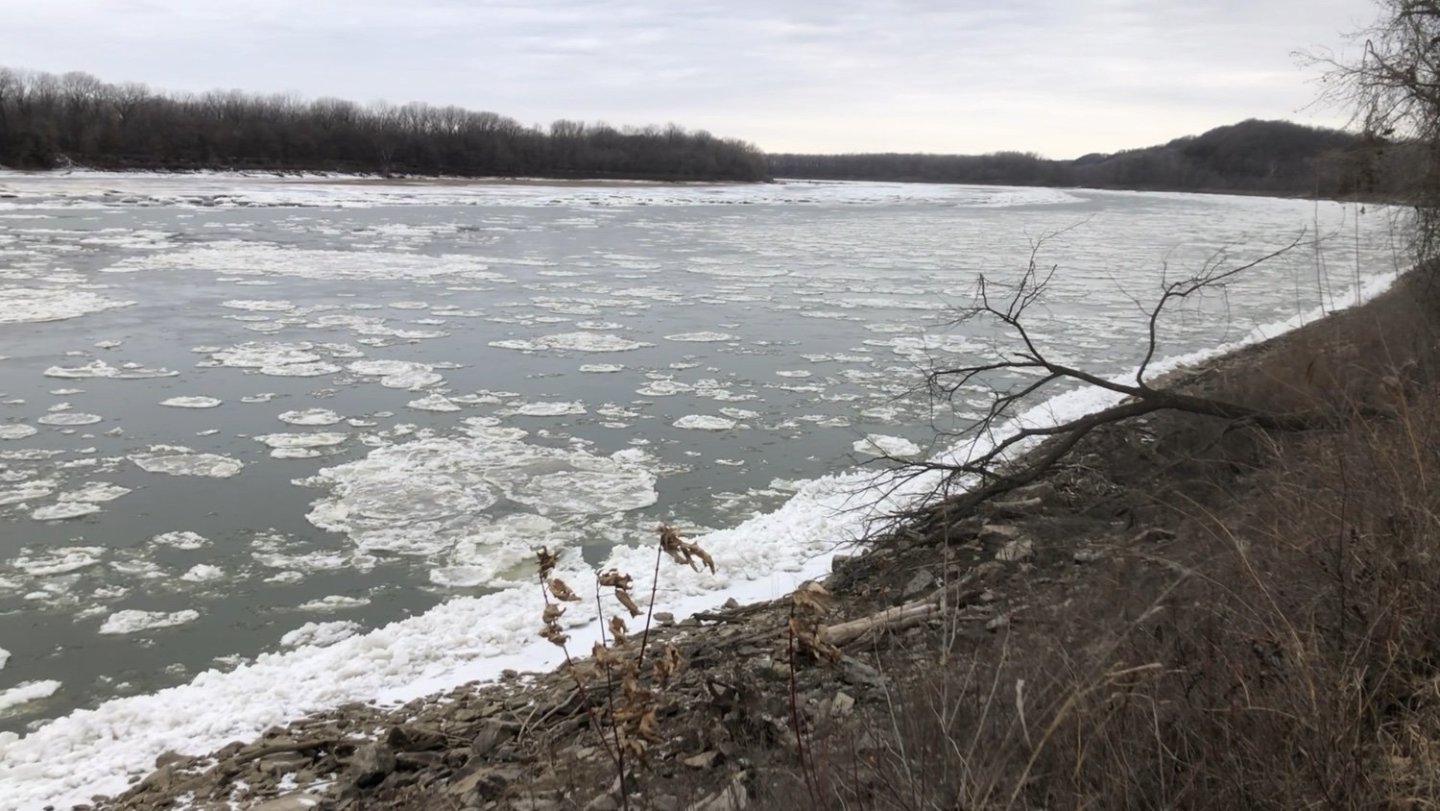
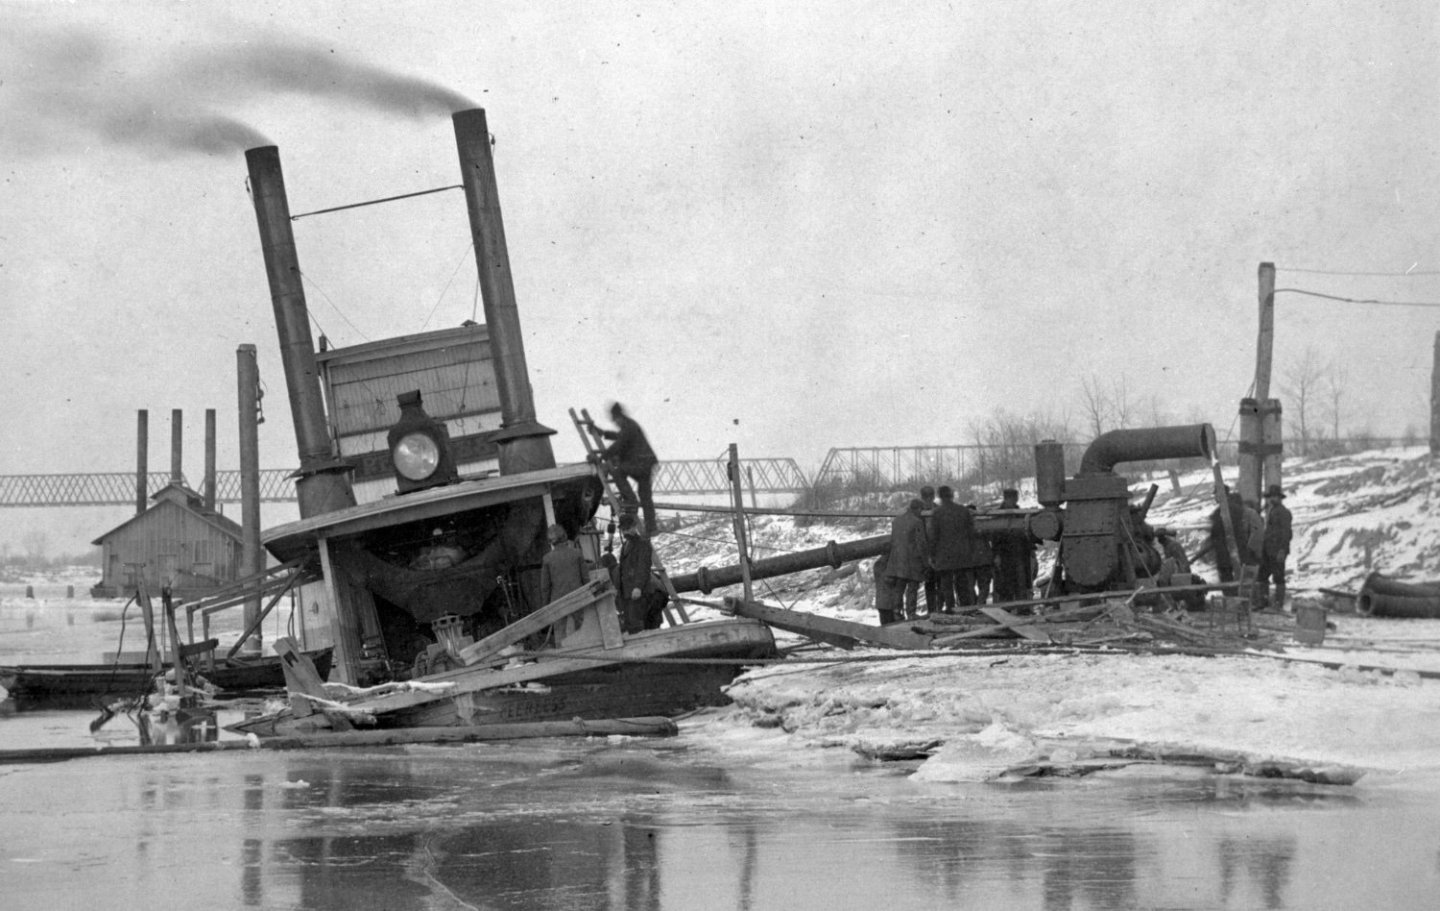
Somewhat off-topic but still relevant, we went out to the Missouri River today in our part of central Missouri, along a stretch Peerless would have navigated many, many times. The river is extremely low right now, not just because we're in a significant drought, but also there's likely an ice jam somewhere in the area. Gage data downstream of us show a major drop in river level that is typical of an ice jam upstream holding back water, and also some localized sudden fluctuations in river level that signify adjustments in the jam as sudden bursts of water are released as the pack adjusts itself. Here's an initial view of fractured ice floes moving downriver (to the left); the current is still pretty swift here, telling us that the jam is somewhere downstream. It's a mesmerizing scene as these all rotate, collide, and scrape along with an unmistakable hissing complexity. We hiked about 1.5 miles upriver to a place that's normally an isolated island in the river, but at these low levels creates a massive sandbar connecting to the bank. In all but the lowest river conditions (like now), the foreground here would be underwater with only the highest point in the middle back remaining above "normal" river level and certainly going entirely under in floods. These conditions give a rare chance to reach islands like these by foot, so we took advantage and explored. The exposed bar itself is about a mile long under these conditions, so by the time we'd explored it all and hiked back to our access point, it was about a 5 mile round trip. Lots of fantastic ice formations along the river itself, with many levels of ice recording former higher water levels that have since dropped, leaving isolated and collapsed ledges. There's some great rock-picking along these bars, too, as the Missouri carries sediment all the way from Montana as well as lots of originally glacially transported material, so the diversity can be spectacular. The temperature hovered below freezing with a biting wind funneling up the valley, but it was a great time to be out! Days like these make it easy to understand how freeze-ups along the Missouri, Ohio, and upper Mississippi could destroy fragile wooden steamboats. The wrecked photo of Peerless I've been showing above relates to ice that crushed her hull on the Missouri River near St. Louis on December 30, 1903. Ice wrecked a lot of boats on these rivers. Today's conditions relate to a few weeks of bitterly cold weather here, but the ice will soon be gone. Toward the end of the day, a shelf of cloud raced northeast, presaging a major warmup that will bring freezing rain on Monday and then relatively warm (above freezing day and night) conditions the rest of the week, so we'll start to lose the ice. Hence why we made a point of getting out there when we could. Here's one more shot from later in the day, after the clouds had moved in, from another point about 7 miles downriver but still above the ice jam because conditions are the same. We never did find the jam, we had to head for home eventually. Hope that little diversion was of interest!
- 393 replies
-
- 13
-

-

-
Technically that'd be called the hurricane deck, though this kit plays pretty fast and loose with reality so you can call it whatever you like!
-
It sounds logical; all I can say is I've never run across any reference to such an arrangement. It's definitely too intrusive for me to add without some evidence. That's what I'm envisioning logically, but like my answer to Brian above, I'm reluctant to add such a prominent detail of something I have no real evidence for. More great insights, thanks for this. The details of propulsion engineering are the weakest part of my steamboat knowledge, I'm just not a natural engineer. It's cracking me up that the detail I knew about and intentionally left out (expansion loop) might not even have been there, while the detail I didn't know about (insulation) probably should be there but won't at this point. I think I can justify some stacks of coal sacks parallel to the boiler (obviously with some separation) even if I leave out details on exactly how it made it into the firebox. But I'm also going to be patient this time and see if anyone else chimes in with ideas. I learned my lesson on not running my steam line plans by the community before plunging ahead; I don't have to solve this detail right away.
-
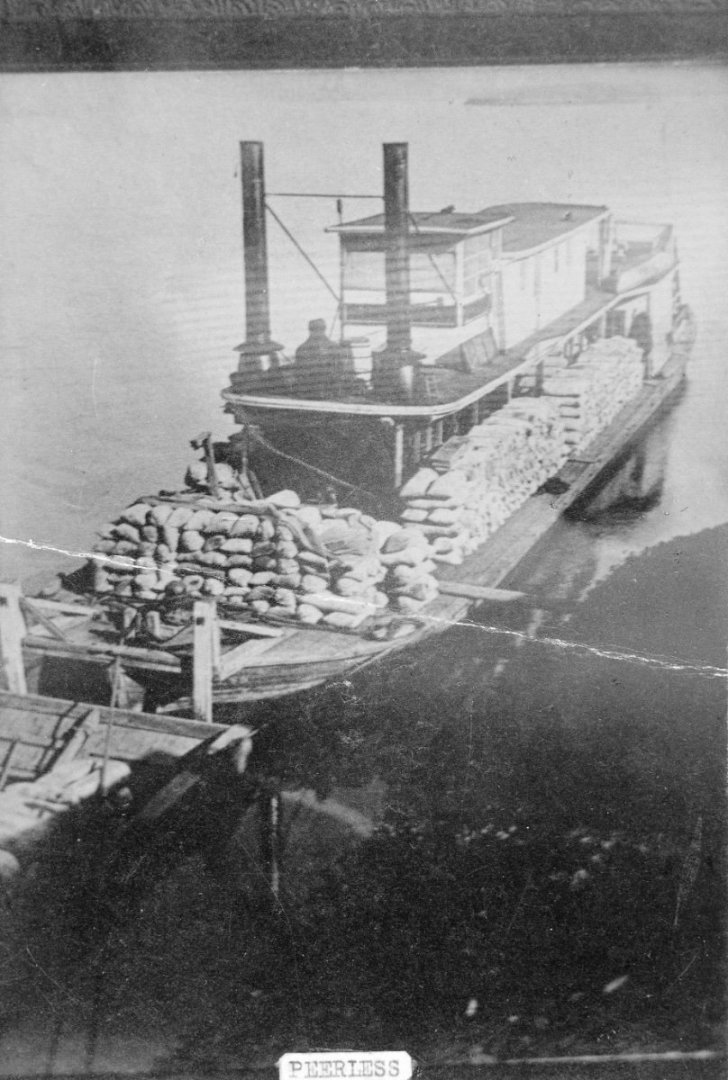
Thanks for the input, John, which reinforces my assumption that the fuel storage needs to be in front of, or very close to, the firebox. But I still need to figure out how to achieve that on Peerless, which being so small has very little room for that. R.E.L. is something like three times the size of Peerless. If you look at the photo of the wrecked boat from the bow, you can see there's no physical structure in front of the boilers; you can see right past the capstan to the firebox doors. And there's not enough boiler deck overhang to protect any fuel storage there from rain. I'm wondering if there were sacks of coal stacked along the posts parallel to the boiler, and maybe they just hauled out a sack at a time to the front of the firebox and dumped it on deck for shoveling into the firebox, or even tried to shovel out of the sack? She's a small vessel and maybe there didn't need to be anything more formal than that? Maybe I make a very small, low, three-sided structure that would loosely corral a sack's worth of coal but wouldn't be high enough to be seen in photos? I might mock that up so people can judge what I'm saying. But I'm reluctant to add completely made-up details. I agree that firewood stacks are quite attractive on a steamboat model, but by ~1900 she would have been burning coal under most circumstances. Wood would seem anachronistic even if they occasionally did so if their coal stock ran out.
-
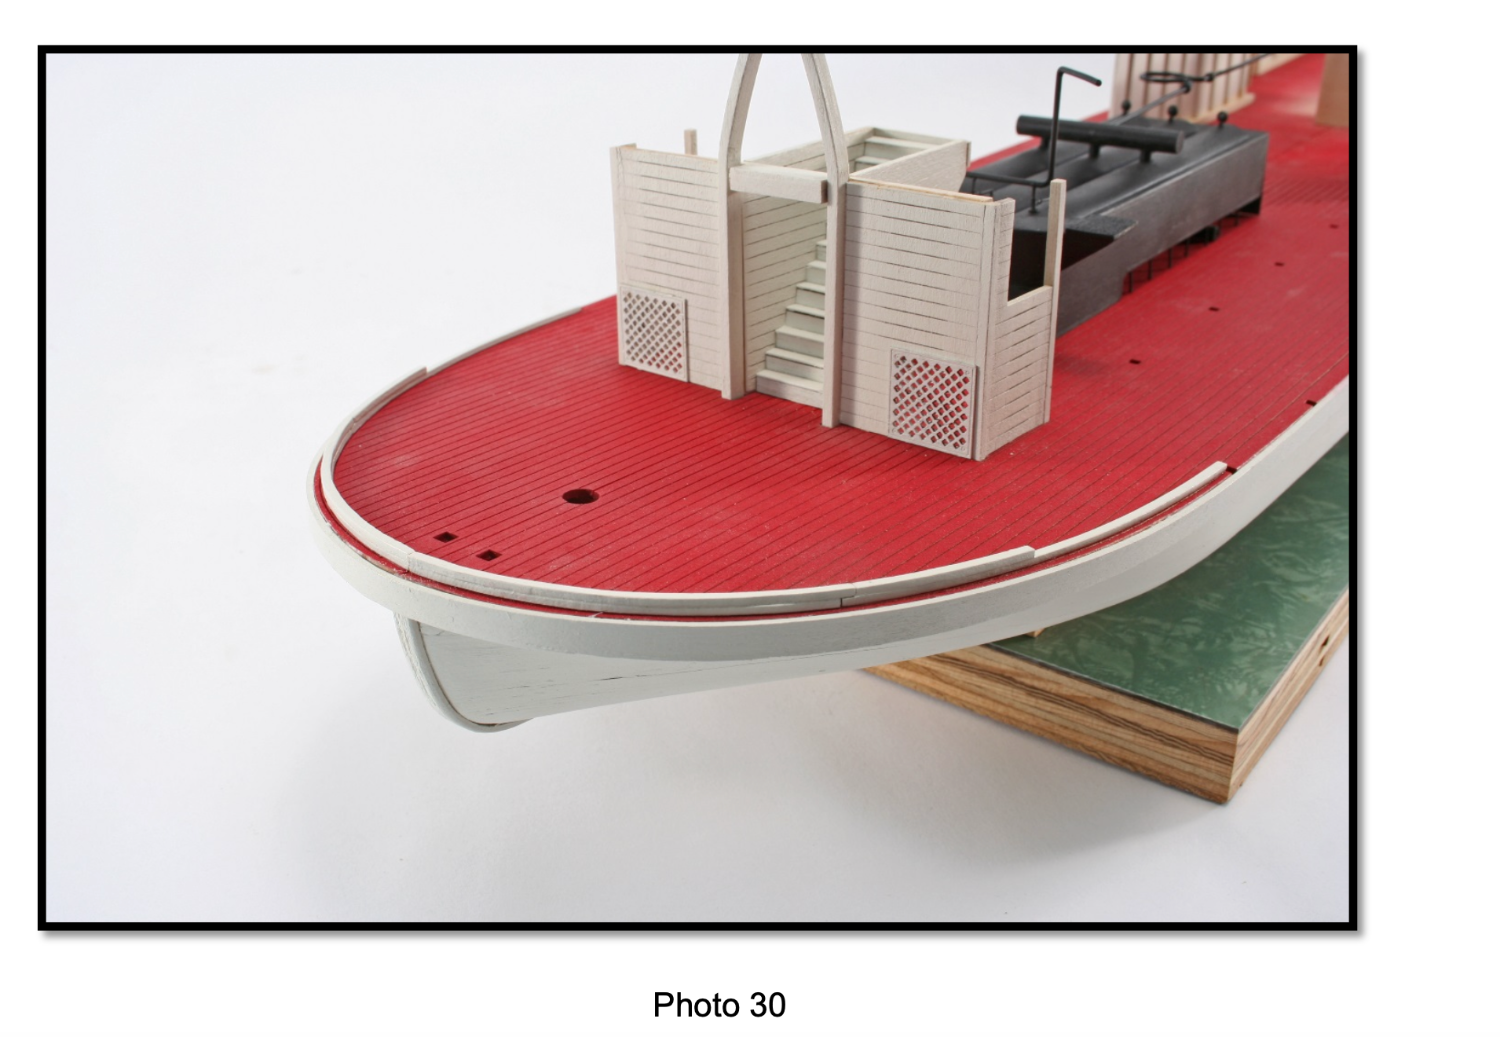
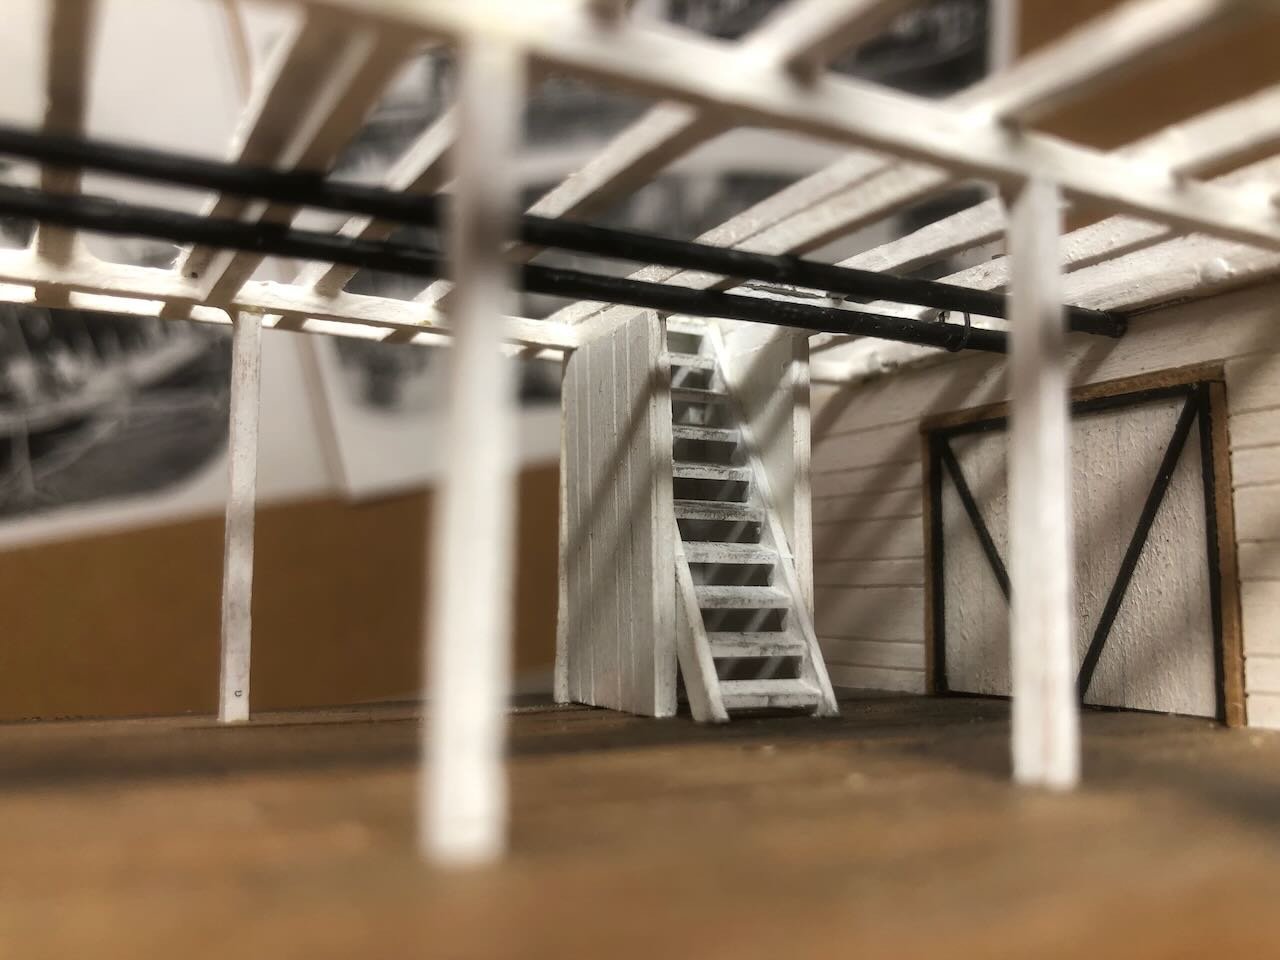
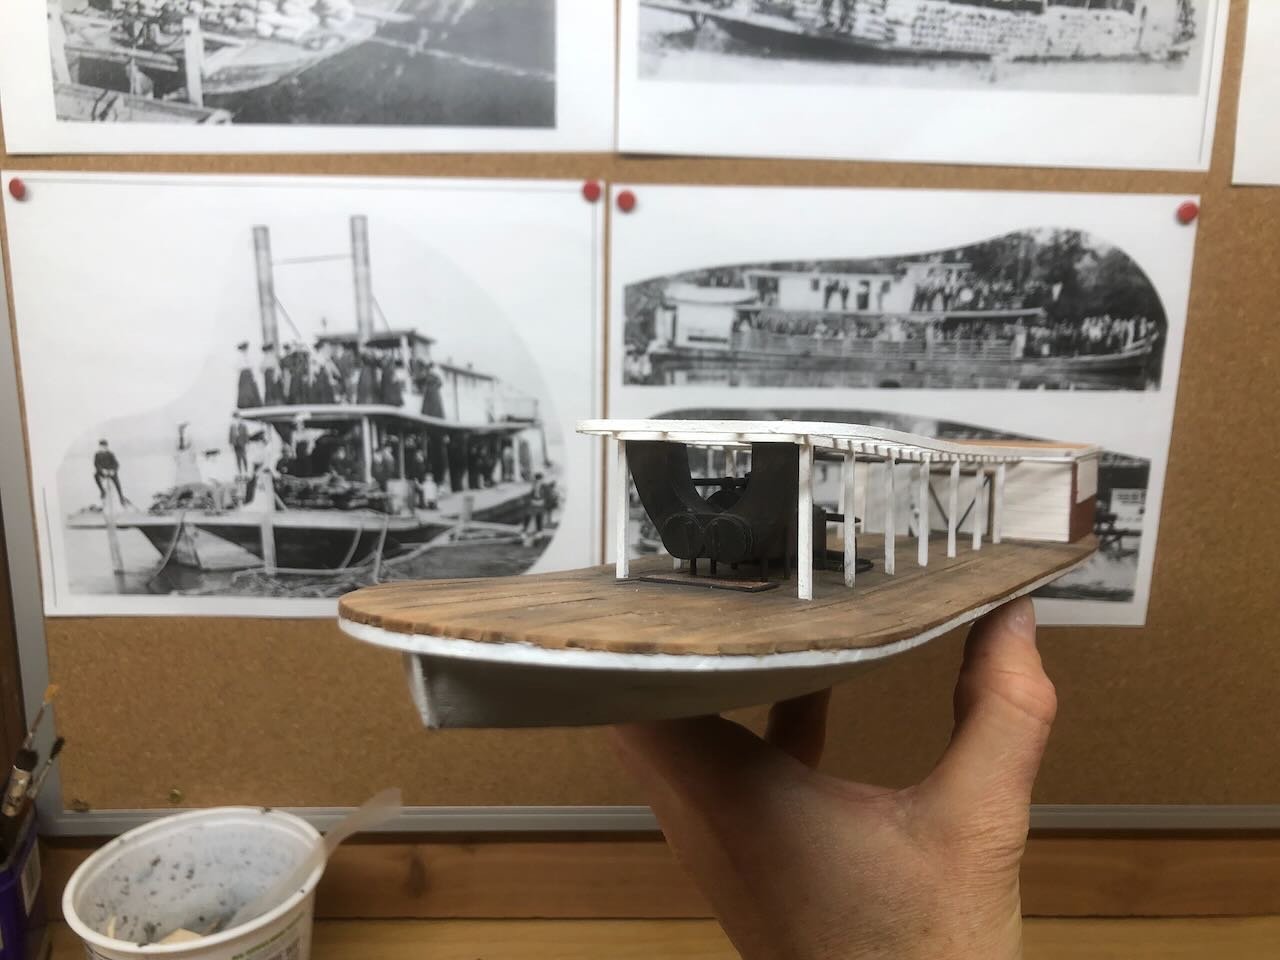
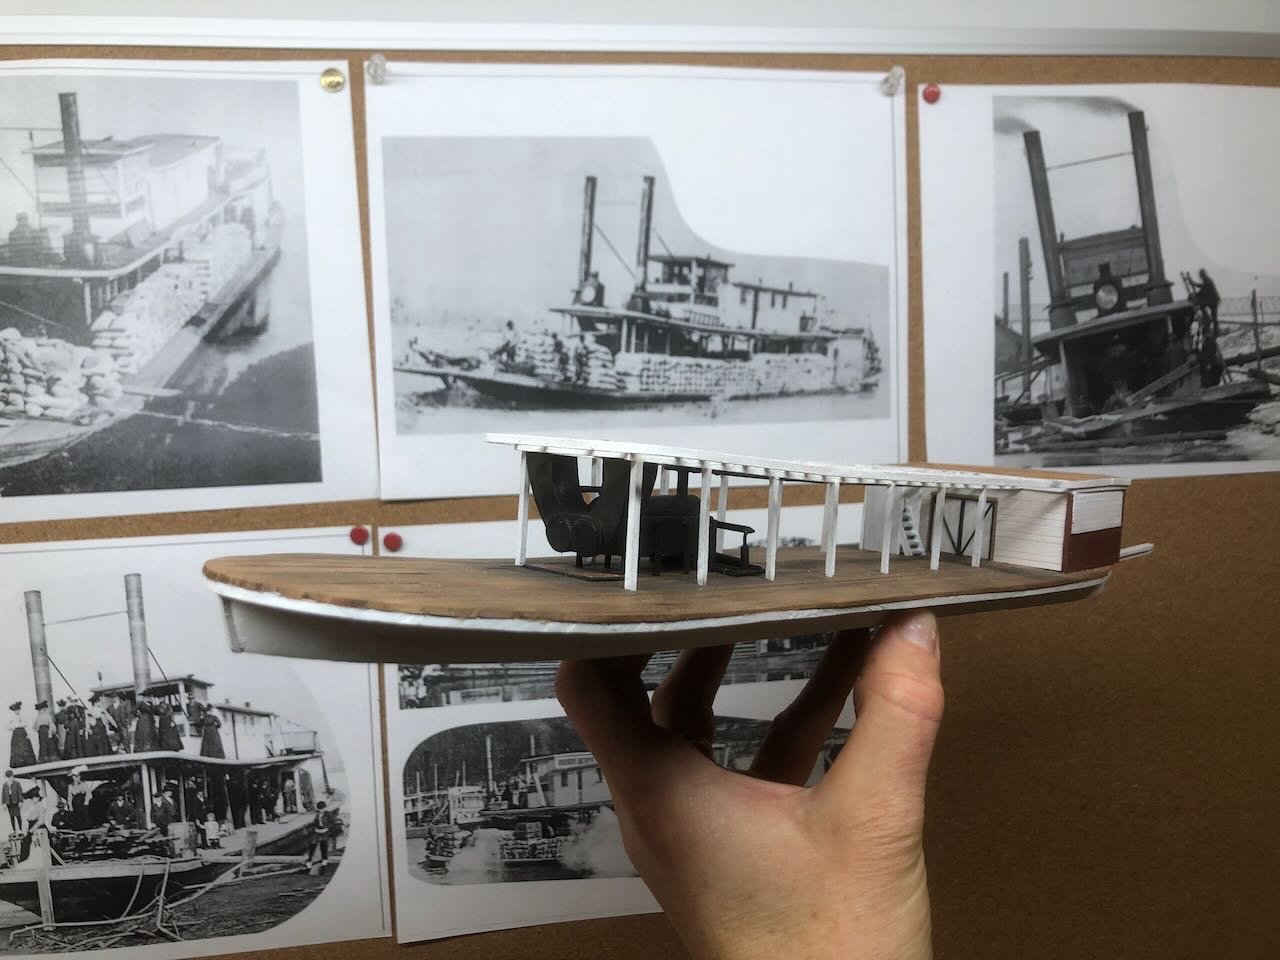
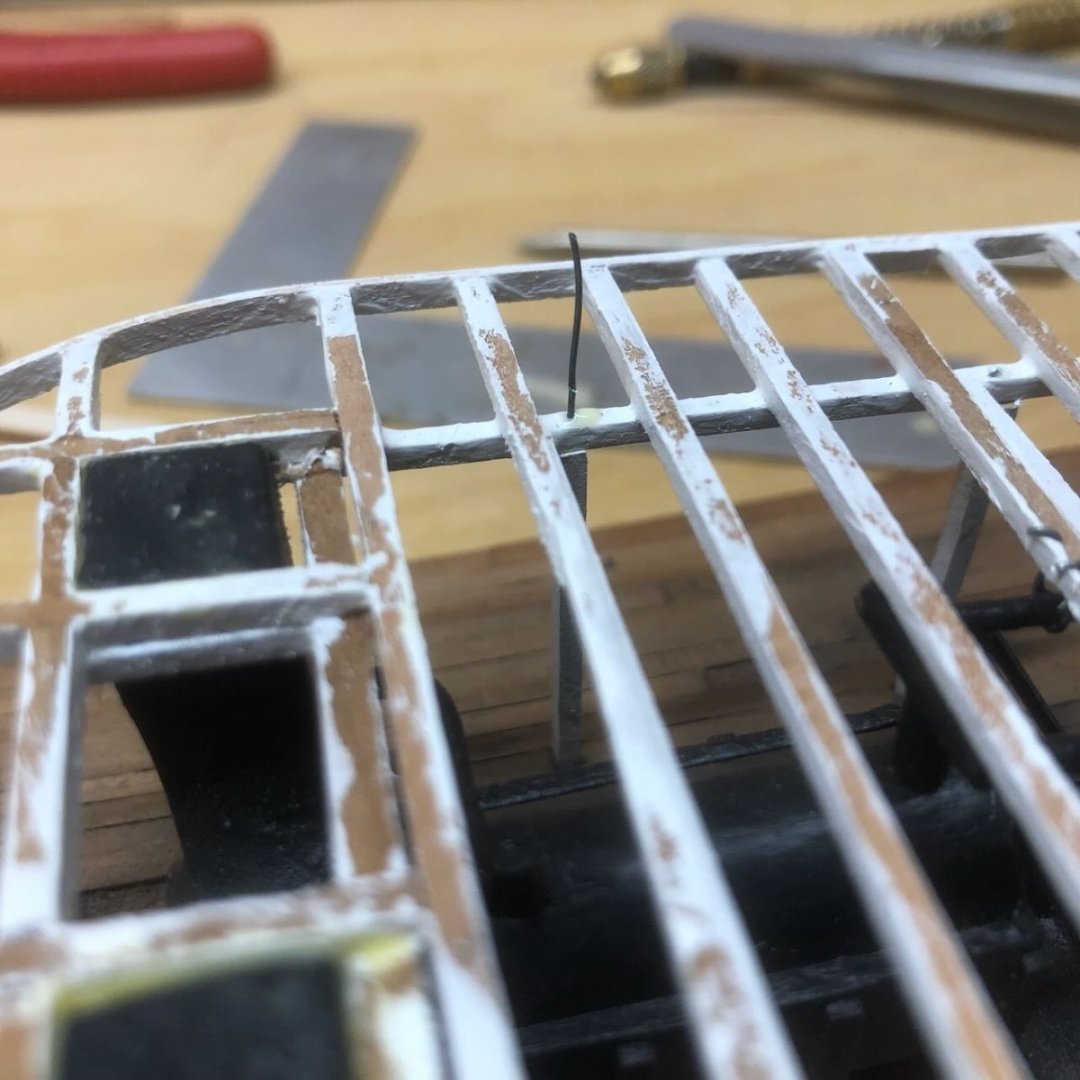
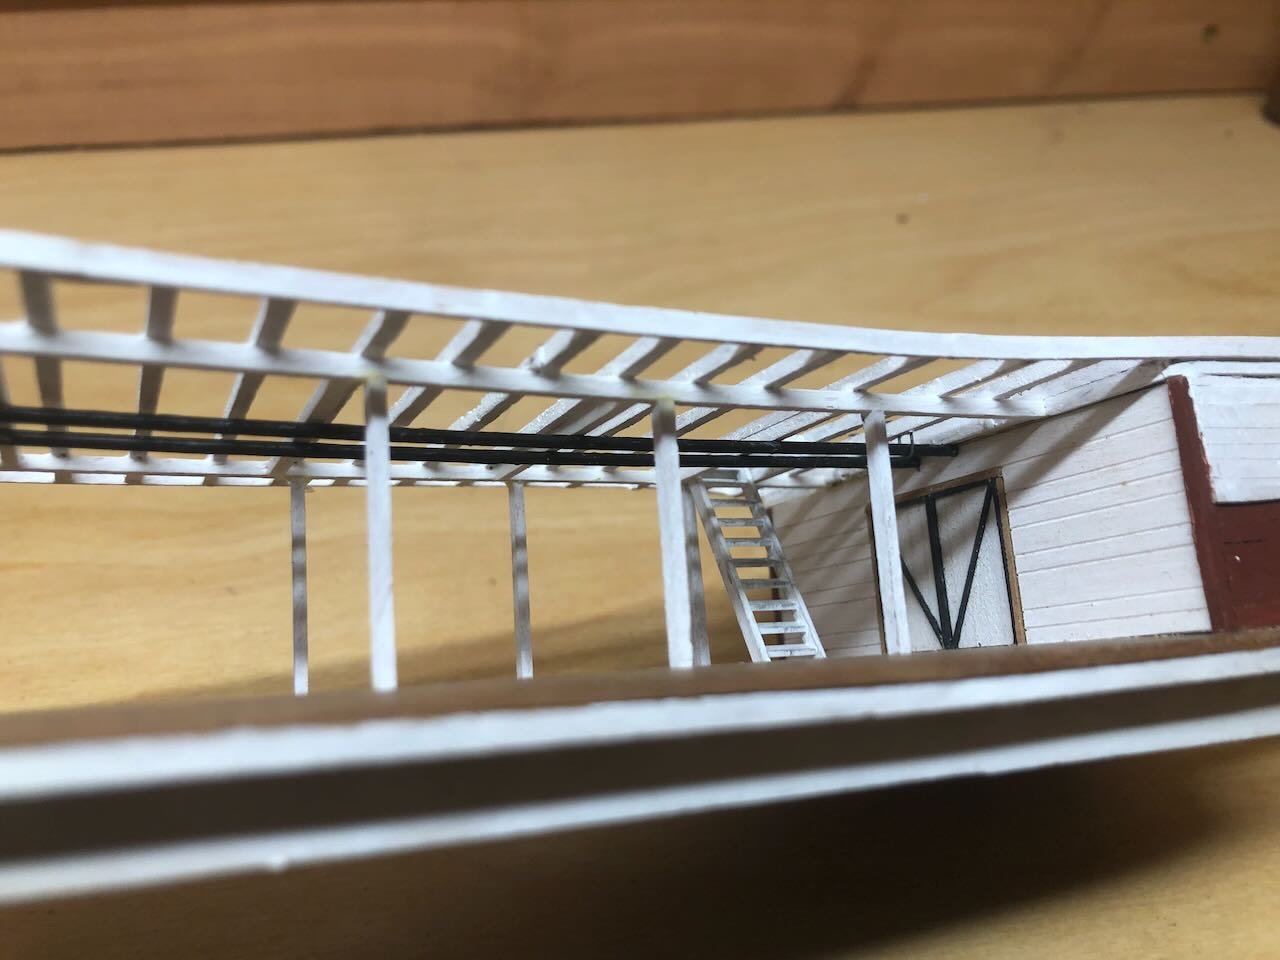
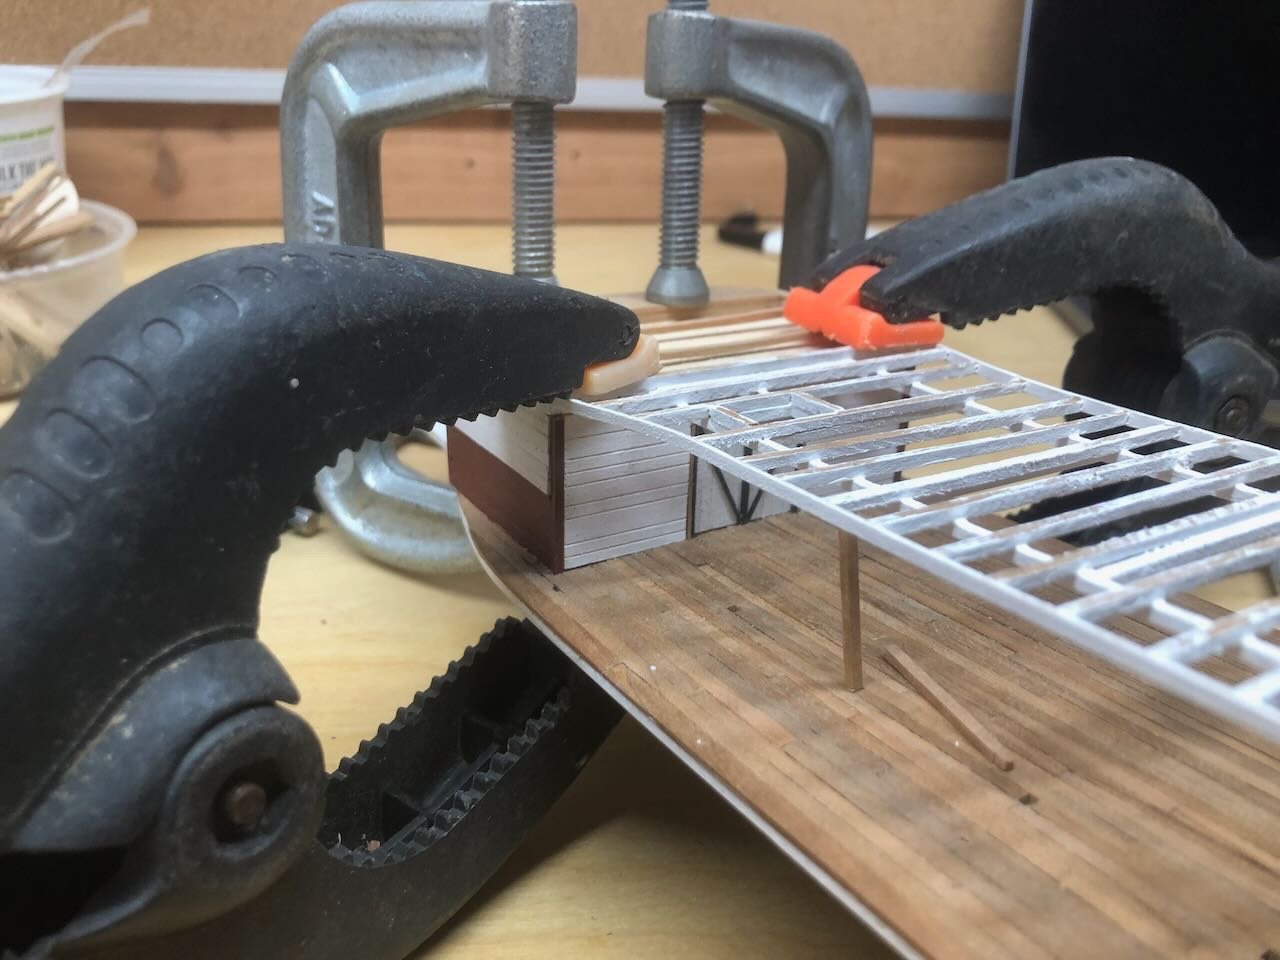
On to this weekend's work so far. I decided not to tackle anything controversial for once and focused on some simpler tasks. I decided to partially enclose the stairs, as was often done on these boats. This was pretty straightforward and I only took photos of the final product. I added a simple door at the back, figuring that the space under the stairs would make a pretty good storage area for something. A close look in the above photos (and those to come) will also show that I did a little deck weathering with brushed-on pastels to make dirtier tracks along likely walking routes for the crew (from doors, around the boilers and pumps, etc.). I also finished installing all the support posts, which really helps bring out her "steamboatness". This is where she starts looking like a proper river vessel and not some awkward barge. Here are two shots with the model held up at similar angles to prototype photos. I think it's bringing out the essence of the original. The glue joints between the posts and the overlying beams are pretty small and a couple have broken free already under handling. So I decided to reinforce them by carefully drilling a very small hole through each beam, down into each post, and running a thin wire down through. I then clipped off each wire. This should add some extra stability; if nothing else a future failed glue joint now won't result in a post tipping over. And now on to the community question. We previously discussed how coal would have been stored, and the general assumption seems to be that there should be some kind of small open bunkers near the firebox, as on Chaperon. But looking at the layout of the model (and prototype) I'm really struggling with how to do this. Here's the area these would have to fit in: If they go inside the posts they're really close to the hot boiler and breeching. But if they go outside the posts they wouldn't be entirely protected by the overlying deck, and indeed one prototype photo implies they weren't there because there's a stack of cargo sacks there: It can't be forward of the firebox, not only because the overlying deck doesn't carry that far, but because another photo shows there's nothing there None of my photos show the area more clearly than these two. So where was the coal storage? I can't figure out how to do it. Thoughts?
- 393 replies
-
- 12
-
-
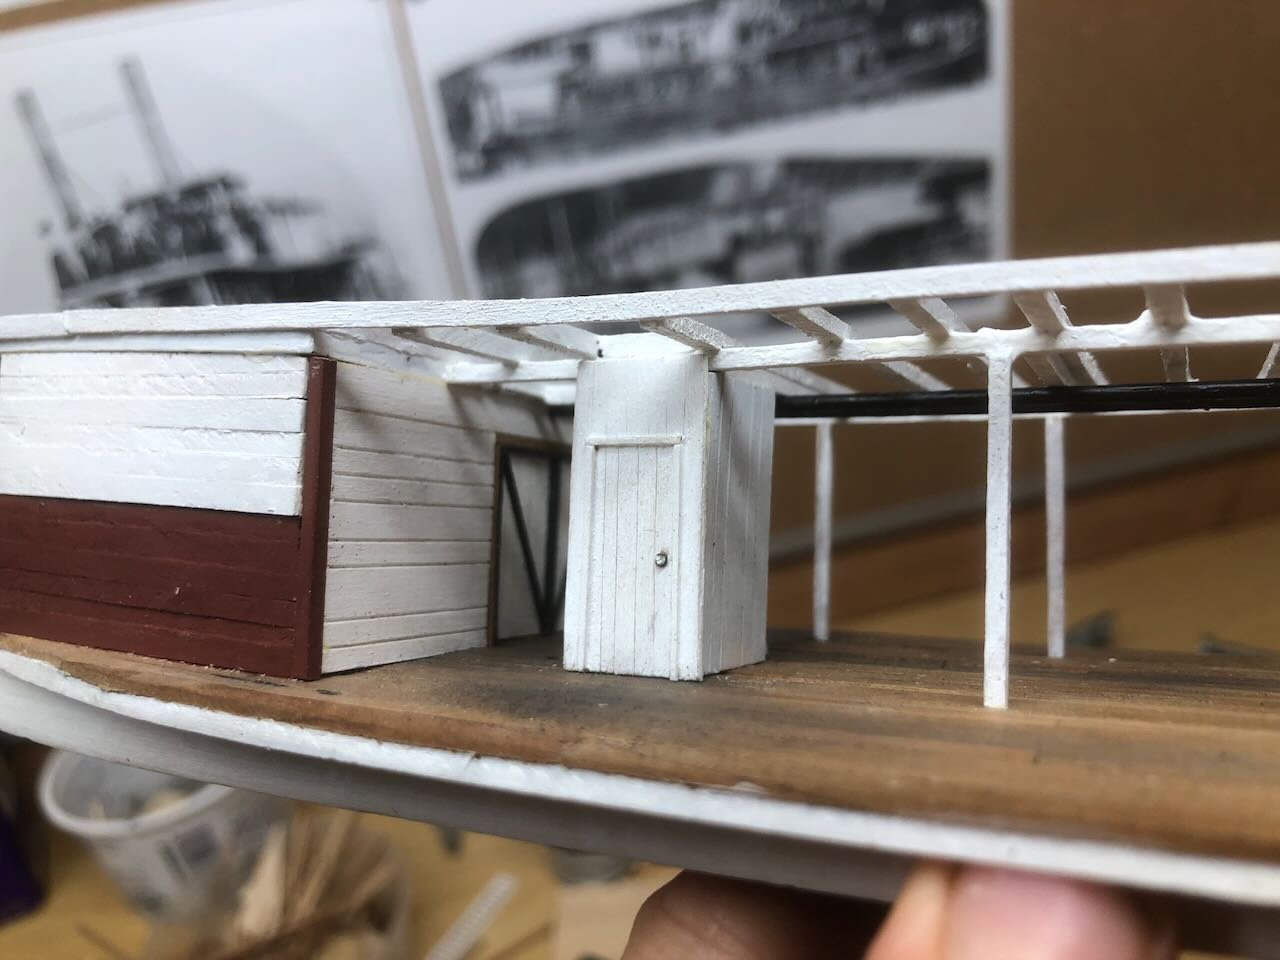
Thanks for the further detail from Roger, Ken, Kurt, and others; I appreciate all the insights. Always more to learn. And welcome, John! I've made the executive decision not to alter anything about the steam lines. I accept the real and potential errors, and that I got ahead of myself there, but I think it would be too disruptive to the model to attempt to repaint or otherwise alter them. To answer my initial trivia question about "one detail that's not quite right, and one I intentionally left out": The detail that's not quite right is the angle of the stairs. I used pre-made stairs from my scrapbox, but their natural angle would have extended out too far and blocked too much of the engineroom doors, so I just installed them at a steeper angle more like a ship's ladder. You can technically see that the treads aren't flat if you look closely at the photo below, but it's pretty subtle, and I decided it was well worth not trying to scratchbuild stairs that would probably look worse! The detail I left out was an expansion loop in the main steam lines. You can see this in the background of the photo from Kurt's Chaperon below: In this case my brass rods on hand weren't long enough to include this and still run the whole length in one piece, and I thought it was too subtle a detail buried up there in the rafters. I'm a little surprised no one else caught this. Leaving this out ends up fitting the level of accuracy for the rest of the steam lines, for better and for worse. Next post will share updates and a new question for the community to help me with.

-
Can't help with details as I haven't built this, but that's a frustrating problem.
-
Great photos, Ian! That machinery looks MUCH more modern than anything Peerless would have had in 1893, and it looks like that version of Klondike operated 1937-1955, so I'm not sure there's much direct comparison to be made. Side note, I think Peerless would have fit within Klondike's boiler deck cabin! Thanks for the input, Kurt. Do you have thoughts on the previous suggestions that insulation would have related to condensing in the steam lines?
-
Useful feedback, thank you. I clearly haven't gotten my head around all the engineering questions even after multiple steamboat models. I've been loosely using Kurt's model as a visual resource, and as he left his steam lines black, that was my assumption as well. I just re-checked Alan Bates, because I thought I'd read him saying that post-1900 boiler insulation was a grey asbestos-plaster mix but black before then, but I mis-read and he actually says boiler tops pre-1900 should be more of a muddy color (due to homemade insulation). Too late to fix that, but again Kurt left his boiler black and I hadn't recognized the insulation question in my previous models, so I didn't really think about it. Not trying to throw shade on Kurt here! Photo below you can see Kurt's black boilers and steam line. I'll be honest, I'm tempted to leave this alone. Leaving the lines black makes them more visible and thus of more viewer interest, and repainting them now that they're installed would be delicate and risk unwanted spotting elsewhere. I'm also realizing that my two parallel steam lines may be a mistake. Arabia definitely had two, but that may be because she was a sidewheeler with a short run between boiler and engines; sternwheelers like Kurt's Chaperon and my Bertrand seem to have had one single main line. I need to think over whether I want to redo this; it would be quite a bit of delicate work, I technically can't prove it isn't correct, and it's a small visual detail hidden under the boiler deck. Looks like I definitely got ahead of myself, enthusiasm-wise, when working over the weekend and made too many assumptions without double-checking them against references.
-
Useful answers, thanks, I hadn't considered sacks although that makes a lot of sense and would be practical to model. Any sense of the volume that should be on board? She could refuel regularly at port stops but I don't have a good feel for what volume of coal would carry her what distance.
-
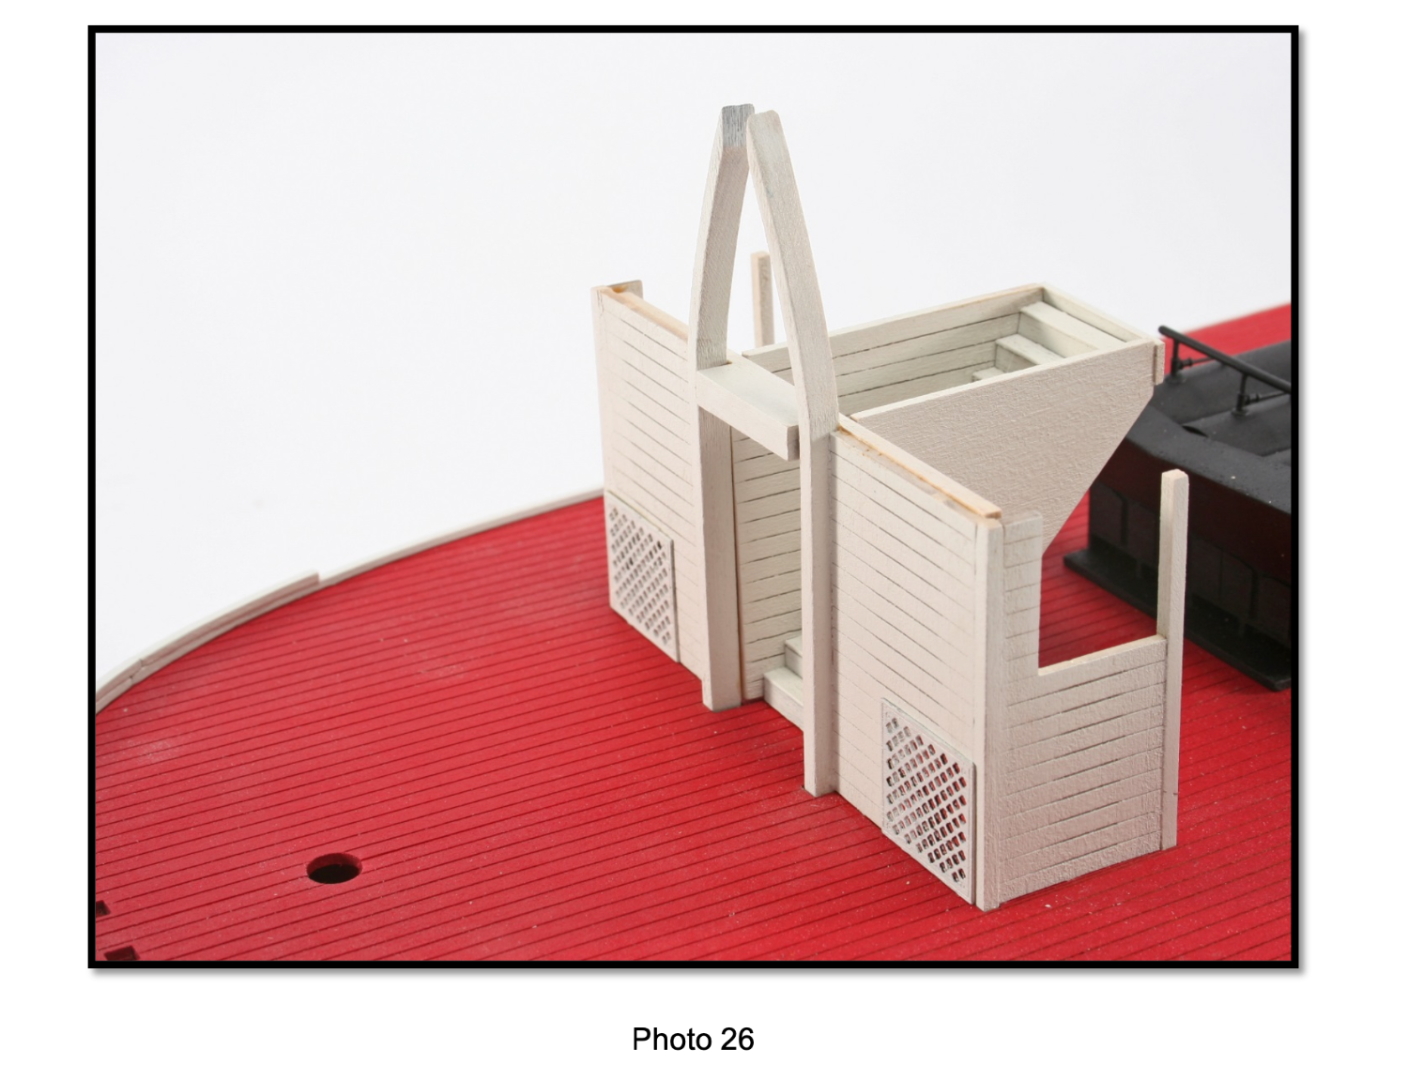
At this late stage I'm assuming coal is the fuel, especially as it was widely available along the lower Missouri River (there's a major coal field in north-central Missouri), but I haven't figured out what I'm going to do about showing that. It's on my list to ask the community about, so we'll just go ahead and address it here. None of my photos show any detail in this regard, and I'm not very familiar with coal-burning boats (everything else I've researched and built has been wood-burning, and that you just stack on the deck). My most immediate reference is @kurtvd19's manuscript on building the Chaperon, another late-era coal burner. Even he doesn't specifically mention coal storage, but I assume the two walled-off pockets on either side of the main staircase in front of the boiler are meant for coal? Kurt? Image from his document, which is well worth buying as a reference if you're interested in these vessels (Kurt, tell me if you'd rather I take this down): Right now I don't have better ideas than to build some kind of storage locker like these, maybe one on each side of the boiler? I can tell from photography that they weren't in front. I don't think they'd be behind, as that's a long way to carry coal around to the firebox doors in front. I would love thoughts on this as.
-
Good questions! A core reason for having the boilers forward is to balance weight. The wheels and engines already place a lot of weight at the very stern; if you put the boilers and chimneys back there, too, the vessel would be going downriver doing a wheelie like a teenager showing off on his bike (and cracking the hull in the process). Especially since these craft didn't have proper keels, their hulls were designed to flex to accommodate shallow-water river conditions. I honestly don't know to what extent steam lines were insulated or energy loss was an issue, but this layout was the standard practice for the entire steamboat era (even for those operating up on the Yukon) so I'm going with the assumption that it worked ok. Energy efficiency was never a hallmark of these vessels; fuel was ubiquitous and cheap. Happy to have someone else weigh in on this one. I don't think boiler heat would've made much difference in the pilot house, which usually had its own stove for comfort. Especially not in the larger vessels where the pilot house was several decks up. On Peerless, the pilot house is mostly set behind the boiler, so there wouldn't have been much direct effect from any heat rising. Keep asking questions, everyone, they make me think!
-
Keith, nice detective work! Unfortunately, one of the features in question isn't shown there (it's further back, not related to the boiler) and the other wasn't added to the Arabia either. The former is a simple question of model accuracy that I fudged for expediency and the latter requires some knowledge of steamboat mechanics to recognize its absence. Ironically, that view reminded me that there are two details shown in your image that aren't on the current Peerless: the safety valve near the breeching, which I had added but was knocked off when installing the boiler (it's super delicate) and the hand-pump for priming the larger doctor pump (which I wasn't planning on including this time).
-
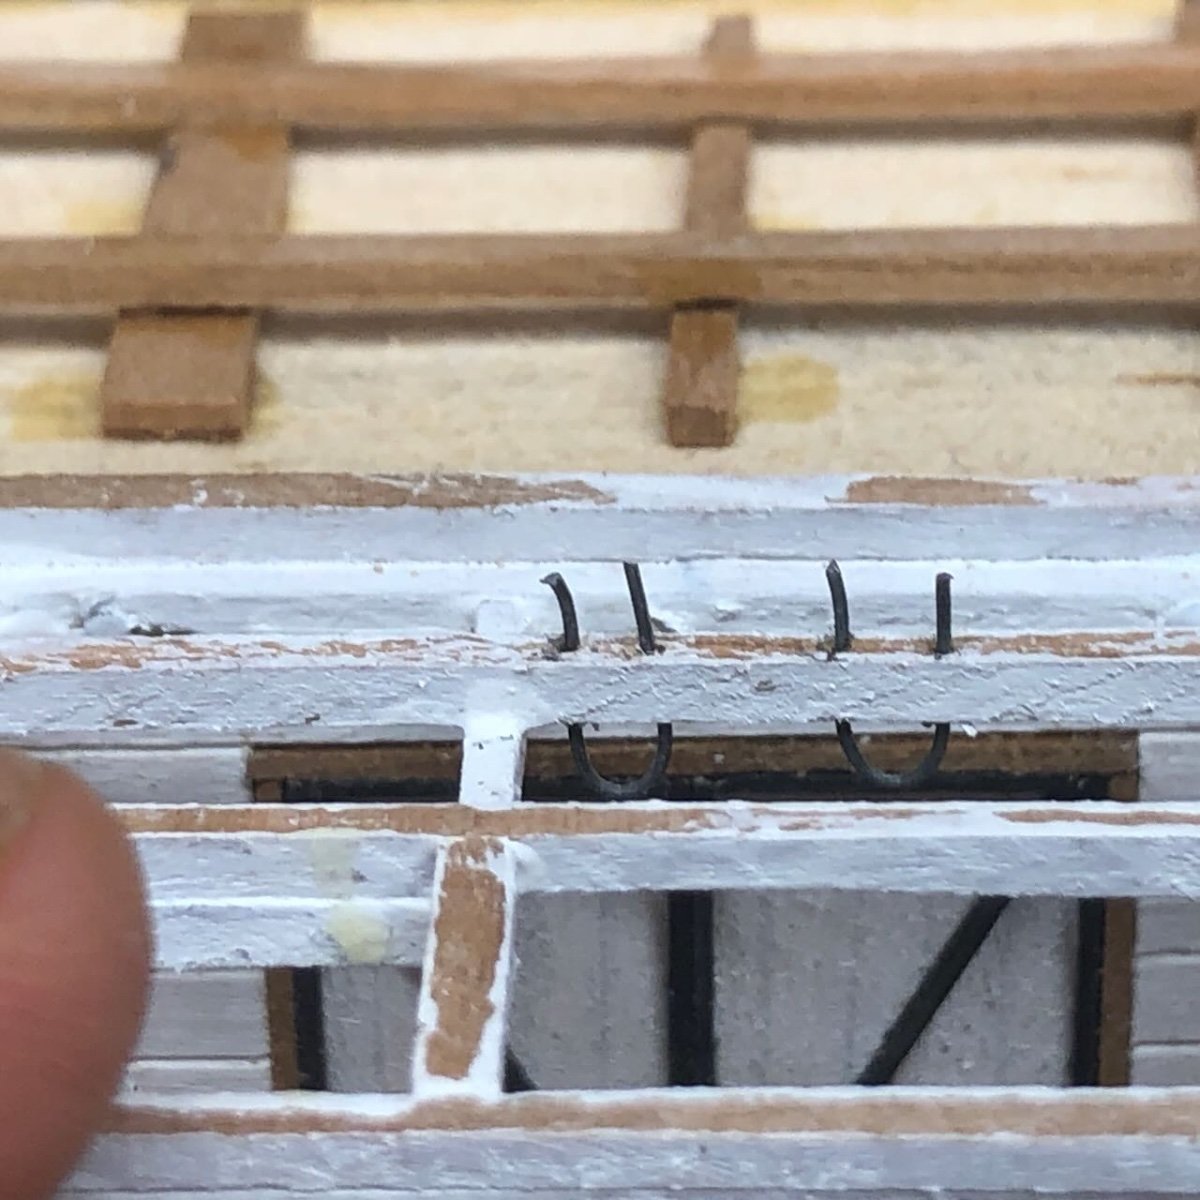
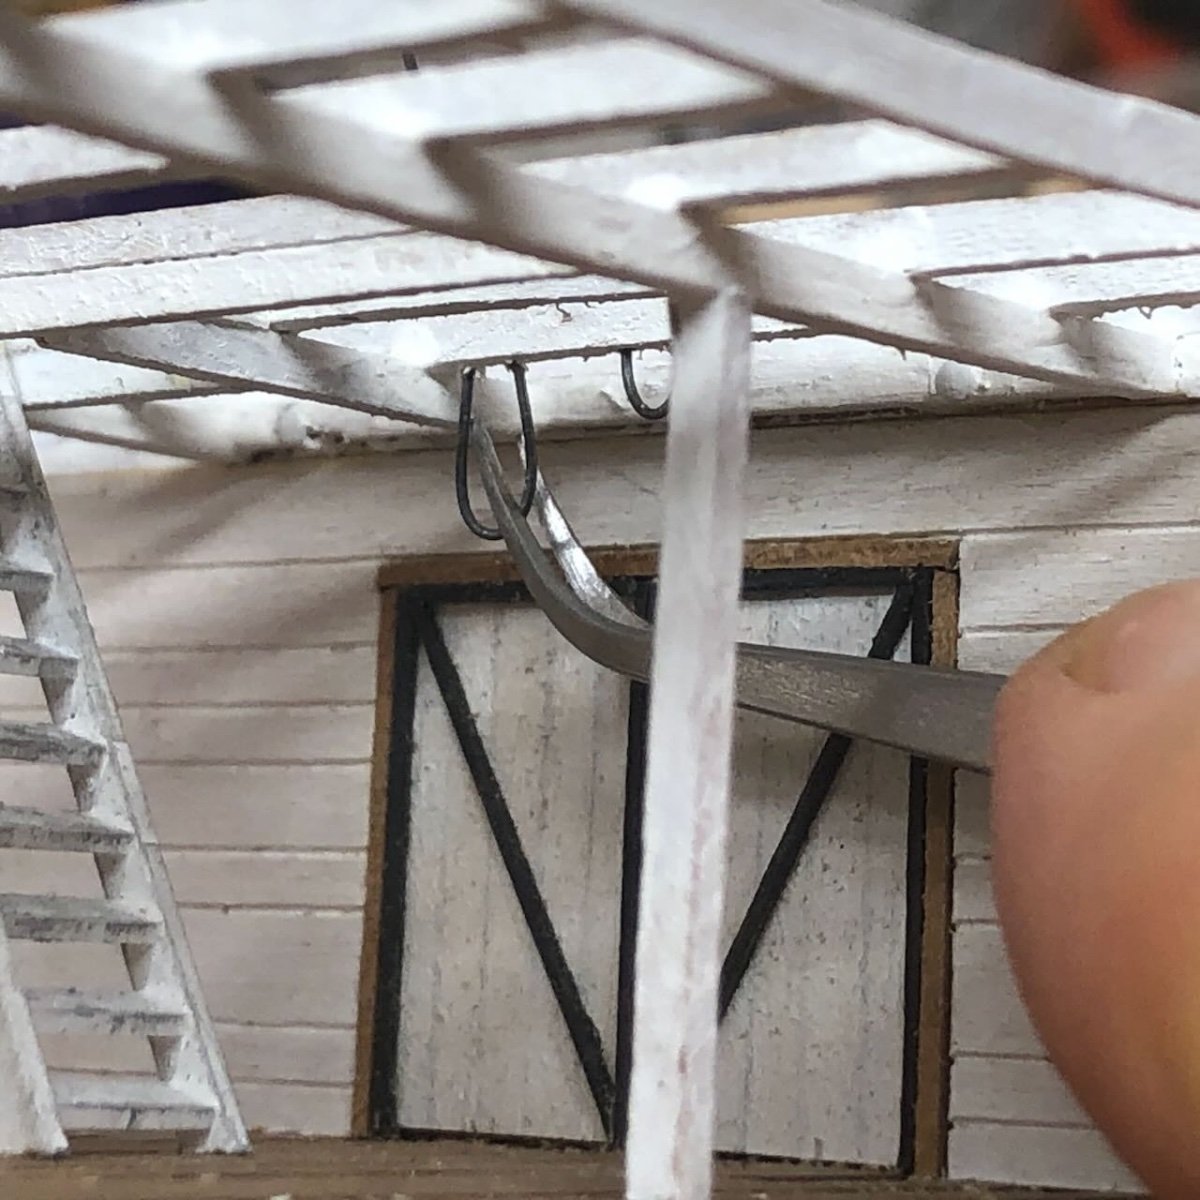
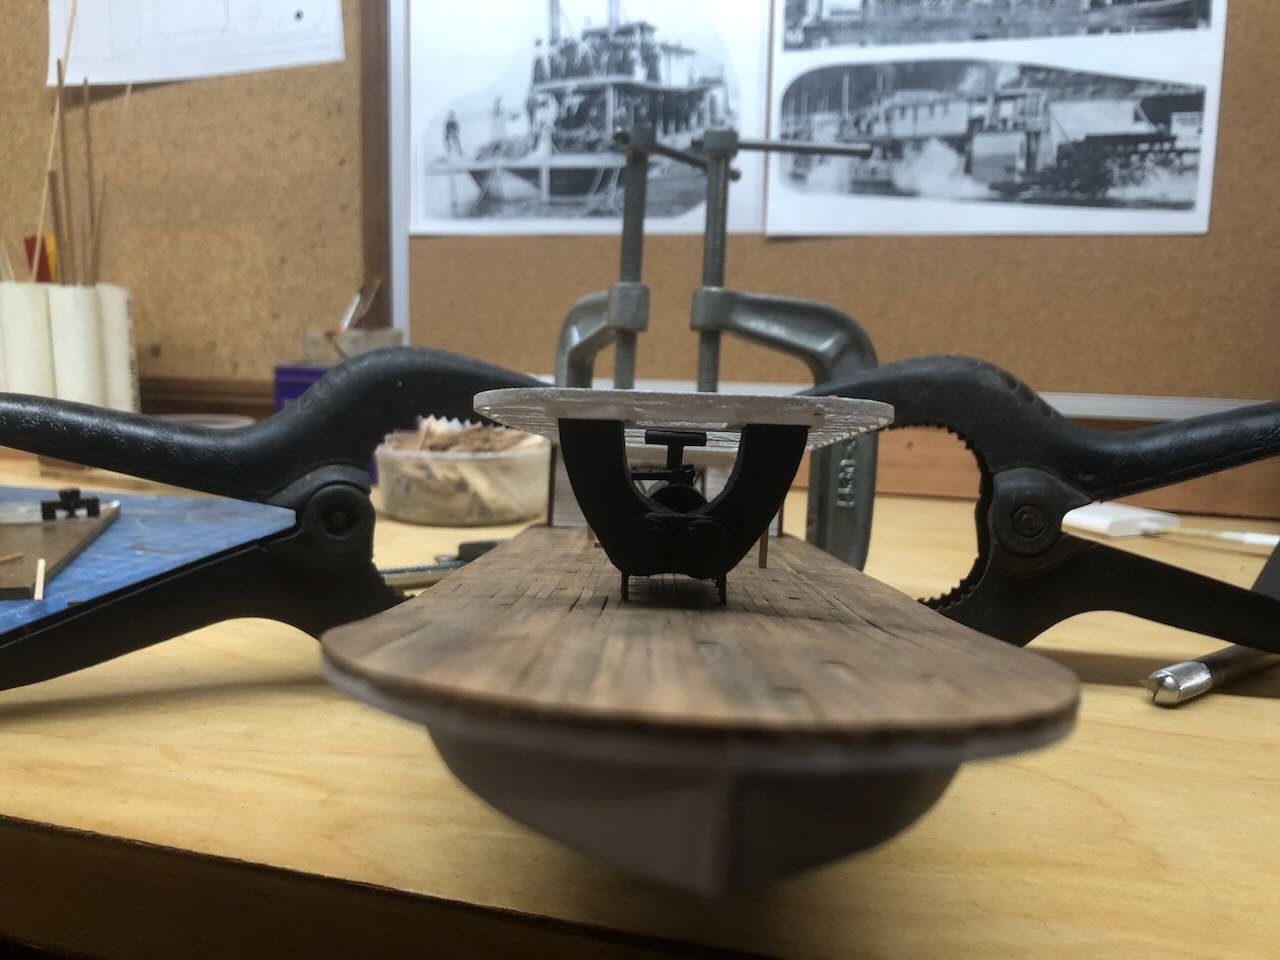
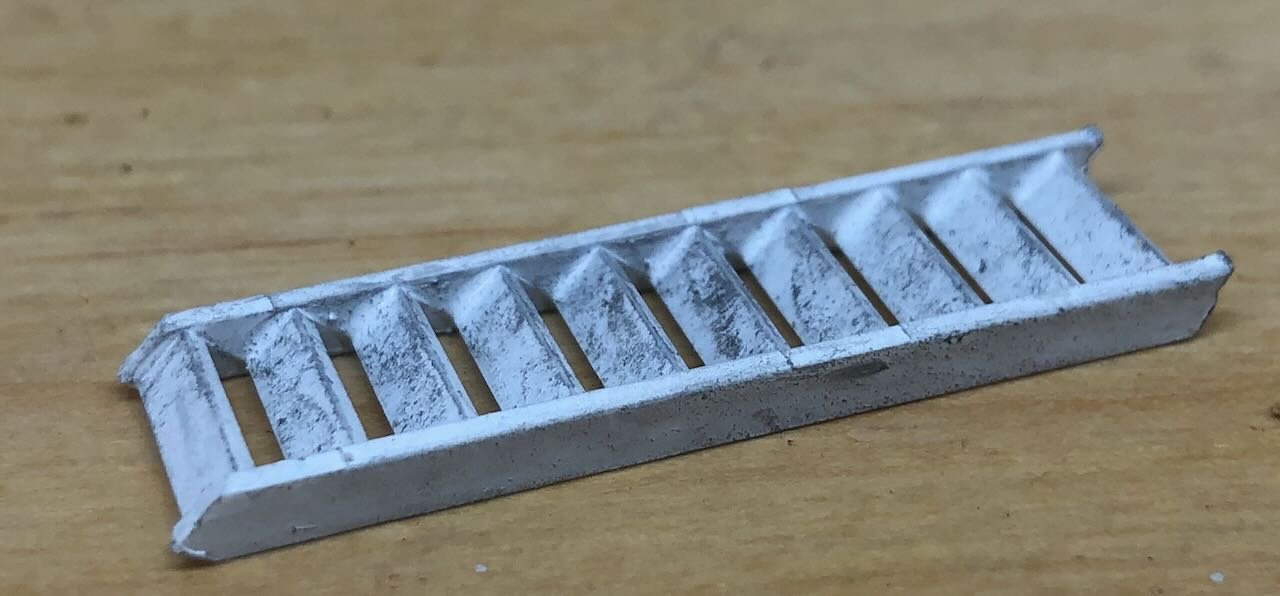
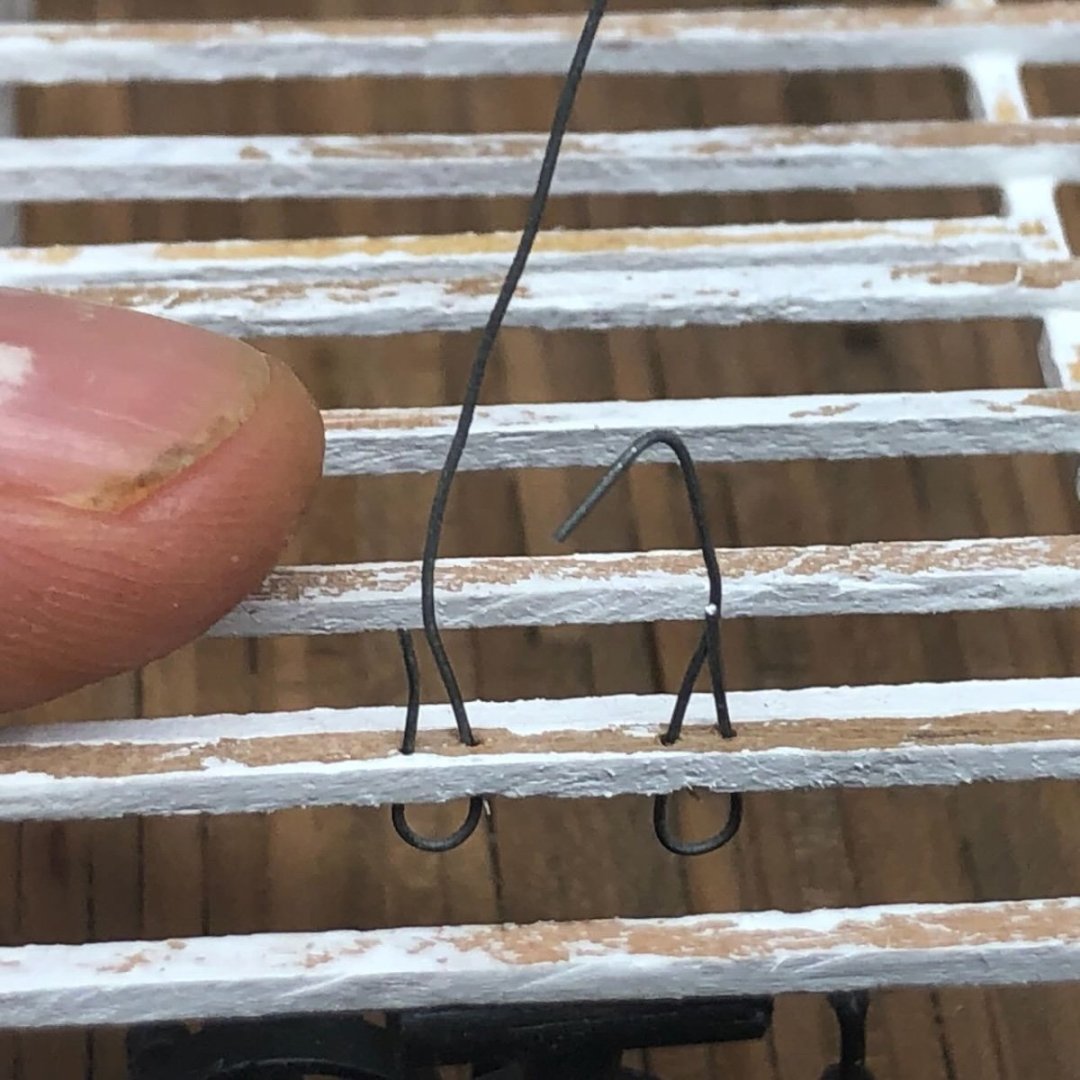
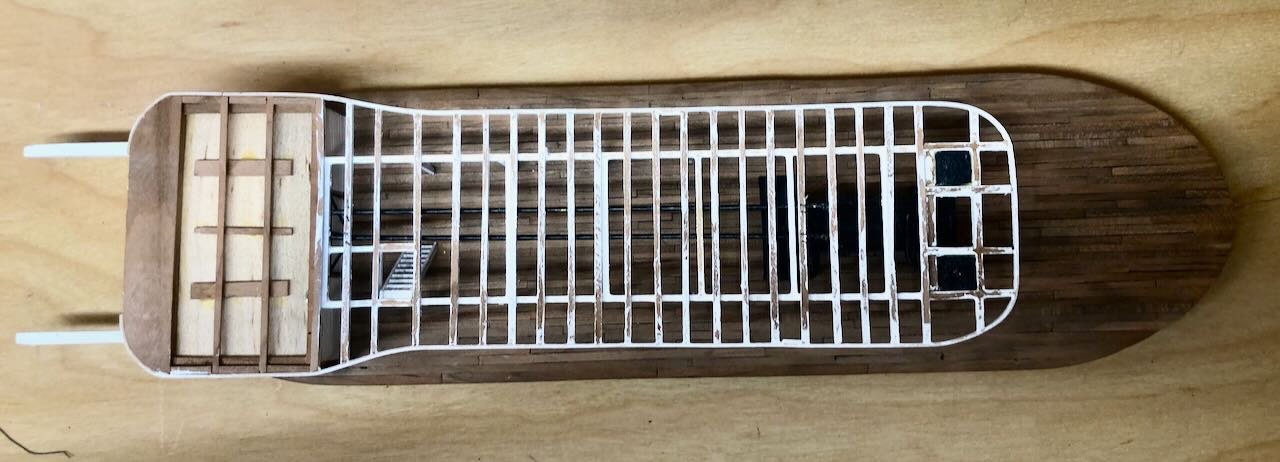
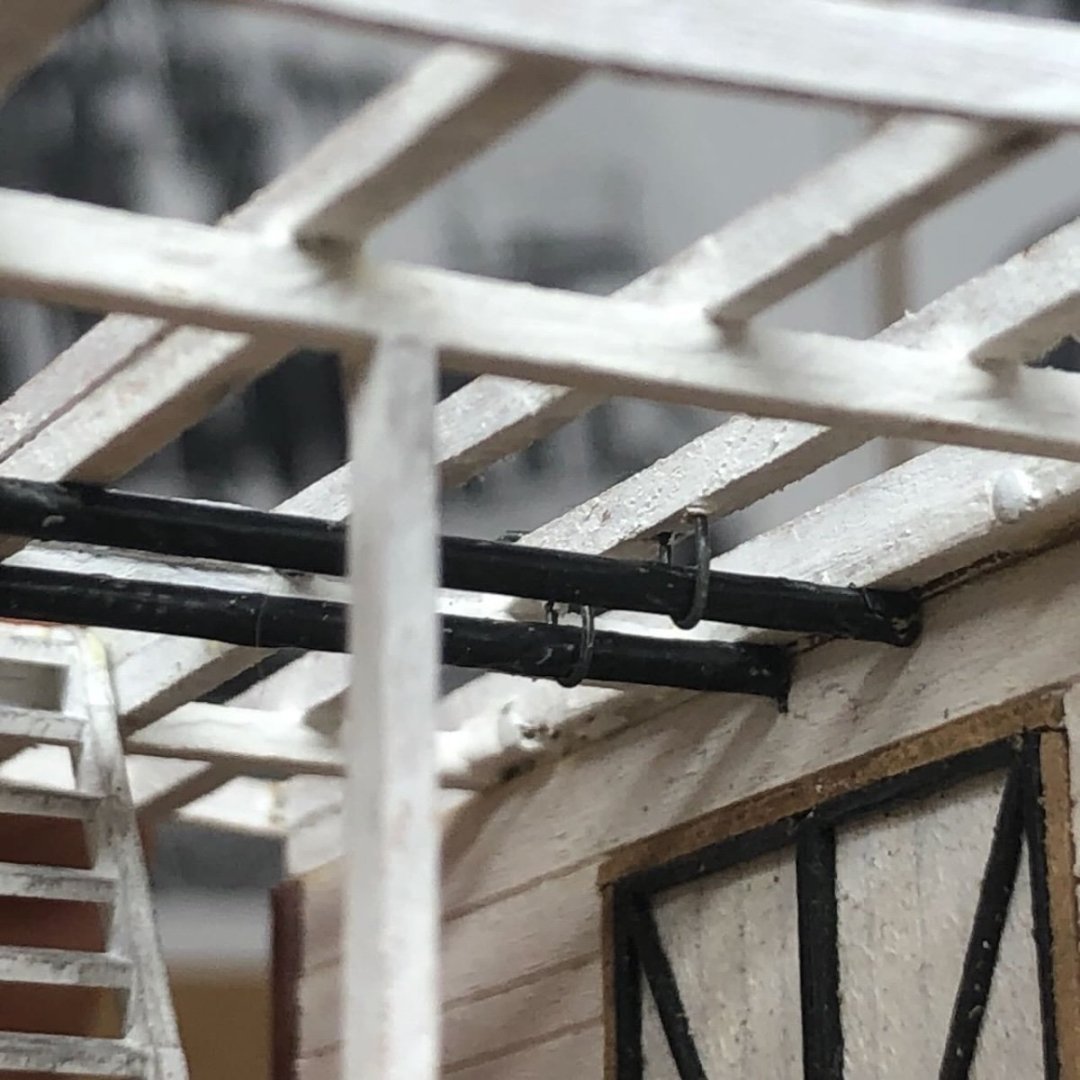
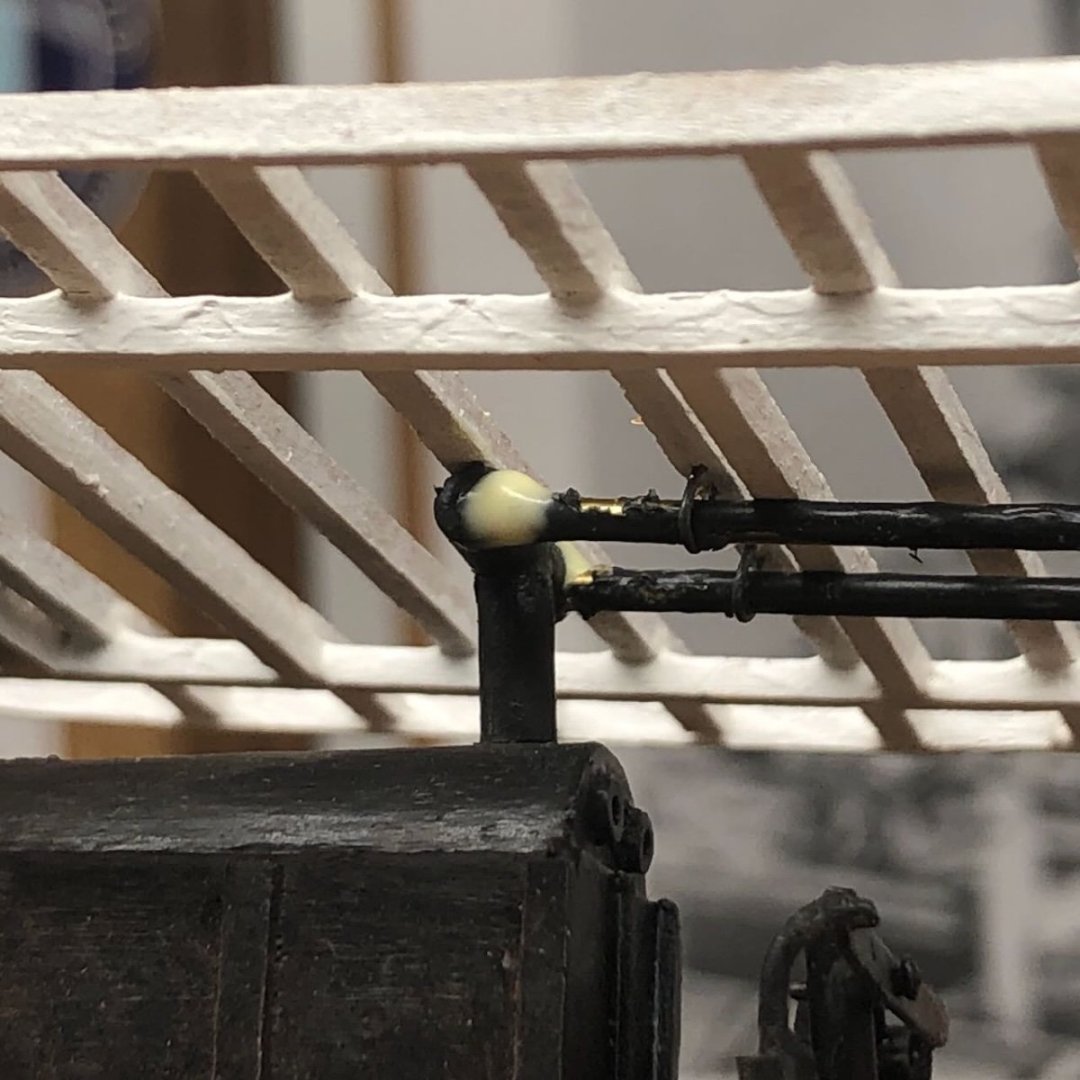
Made some nice progress this weekend. It helped that the outdoor temperature got down to -13ºF (-25ºC) last night and never went above -3ºF (-19ºC) during the day today. Good thing we have a nice stock of on-farm firewood on hand. I made a momentous decision regarding the boiler deck. Having built all the framing off-model, I'd intended to also plank it off-model before installation. But I began to realize that installing a fully-planked deck would make it very difficult to do certain other tasks, and decided to go ahead and install the framing now. I had one shot at doing this right, because I had to glue the back of the framing onto the solid engine room structure, and clamp it down tight, while making sure the rest of the deck was as squarely aligned going forward as I could. Since I'd left holes in the deck planking for the support posts, there was little margin for error; I had to get this lined up exactly right. So I did a few test runs without glue, and convinced myself I could get the alignment right before the wood glue started to grab. So I went for it! Once this was solid, I cut the first three support posts on either side and installed them, along with gluing down the boiler assembly. Now for some of the details I decided were better done before the decking went down. First, the access to the boiler deck. Way back in this log, we'd had a discussion about where the staircase/ladder would have been between the main and boiler deck, and settled on a location near the engine room, just behind where the boiler deck cabin would be. I'd already framed out an opening for this. My original plan was to scratchbuild some kind of enclosed staircase, but while rummaging around in a scrapbox, I ran across a nice package of HO-scale plastic staircases that I decided would do quite nicely since I hate building stairs. So I cut one segment down to size, painted it white, and weathered it with gray pastel. I figured these should be pretty grimy since they'd be primarily used by the crew. You'll see this installed in a minute. Next, I moved on to the steam lines connecting the boiler with the engine room (one line for each engine). These would have been suspended from beneath the boiler deck beams, and I'd realized would be very hard to install after the deck was planked. As it was, this was a very fiddly job that had my nerves all jangly by the time it was done. To hang these, I intended to use very small wire loops run through the deck beams to simulate some sort of bracket. I drilled very small holes in the beams, working very slowly so as not to crack a beam, then ran a longer loop of wire through. Getting these up through the bottom of the holes involved a very small tweezers, a lot of patience, and a diverse vocabulary. I intentionally left fingertips in these photos for scale. I did two initial sets of these loops, one near the engine room and one near the boiler. Then I took two lengths of brass rod, which I'd already painted black, threaded them through the loops, and pulled the loops taut to hold the rods in place. Here's their "connection" to the engine room, where they presumably pass through the wall and then diverse to their destinations on either side. Where these met the splitter I'd installed above the boiler, the connection wasn't perfect, so I used blobs of glue to "seal" the joint. Once this is painted black and in the shadow of the deck, it'll look fine. A bit of paint was scraped off the rods during handling, I'll go back through and touch all this up. Here are wider views of the installed steam lines, ladder, and rear three posts. And an overhead shot: You might also notice in the previous photos that I gently weathered the whole boiler assembly using rust-colored pastels. Further details to install including a couple more support loops along the steam lines, and some form of railing or enclosure for the stairs. Sharp and knowledgeable eyes might detect two nit-picks: one detail that's not quite right, and one I intentionally left out, both for convenience and practicality. Can anyone find them? From here I think I want to do more detailing of the main deck first, adding some cargo and so on, anything that would be easier to do while I can see or reach down through the boiler deck framing. There's no reason to suspect that I'm procrastinating on milling a lot more deck planking to careful tolerances. Nope. Thanks for all the interested comments, questions, and likes that provide such useful inspiration to keep plugging away at this project!


- 393 replies
-
- 19
-
-
-
I get the sense more people build the whole thing off-model, but I've only built one vessel with this feature so am not an expert.
-
Ken, you near gave me a heart attack when I saw the phrase "barn burner" show up in the preview of new posts in this thread, knowing how recently Brian built his new workshop.
-
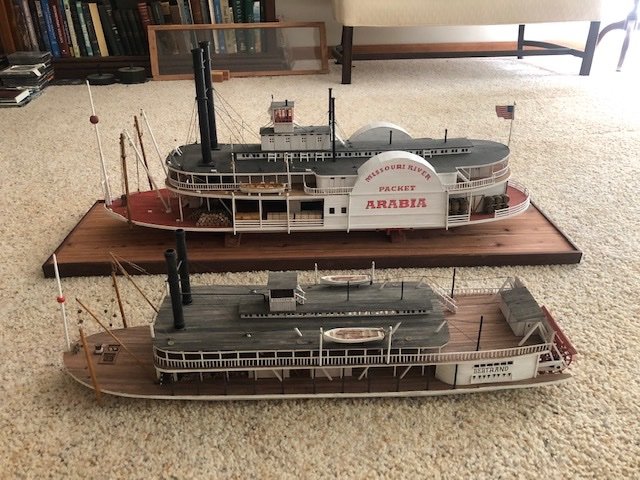
The shots lots of passengers up on the boiler deck were almost certainly special daytime chartered excursions rather than regular packet service. By the early 1900s, boats like this had mostly been undercut by railroads in terms of general freight service, and such charters were a creative way to bring in money. The lack of railings on her boiler deck probably relates to her not being built for regular (especially overnight) passenger service, such that passengers would normally not be up there. I don't think she had any (or more than maybe one or two) passenger cabins, the cabin is just too small. That photo was clearly staged with the vessel motionless; I'd bet they weren't up there while it was in motion, or if they were it was for a gentle day excursion. Most steamboats had railings anywhere passengers were expected to be. Look at this image of Bertrand (foreground) and Arabia (background); both have full railings around their boiler deck, because both carried passengers and had cabins there. No railings on the hurricane deck (next one up) because passengers weren't supposed to be there. Both these vessels pre-date most safety regulations (mid-1800s), whereas Peerless was built ~50 years later when far more regulations were in place. So I don't think it relates to a safety culture (or lack thereof) but more just a different vessel in different service in a different era.
- 393 replies
-
- 14
-
-
I'd agree with the chorus that, for the most part, both examples of weathering are too dark. More like rural barn wood. As for the rest, out of my league, but always fascinating to follow you down the various rabbit warrens of research!
-
Wow…that’s amazing. I didn’t realize you could DIY kit-like parts like that. I also didn’t need to know that (or rather, my wallet didn’t). Great to see more progress!
-
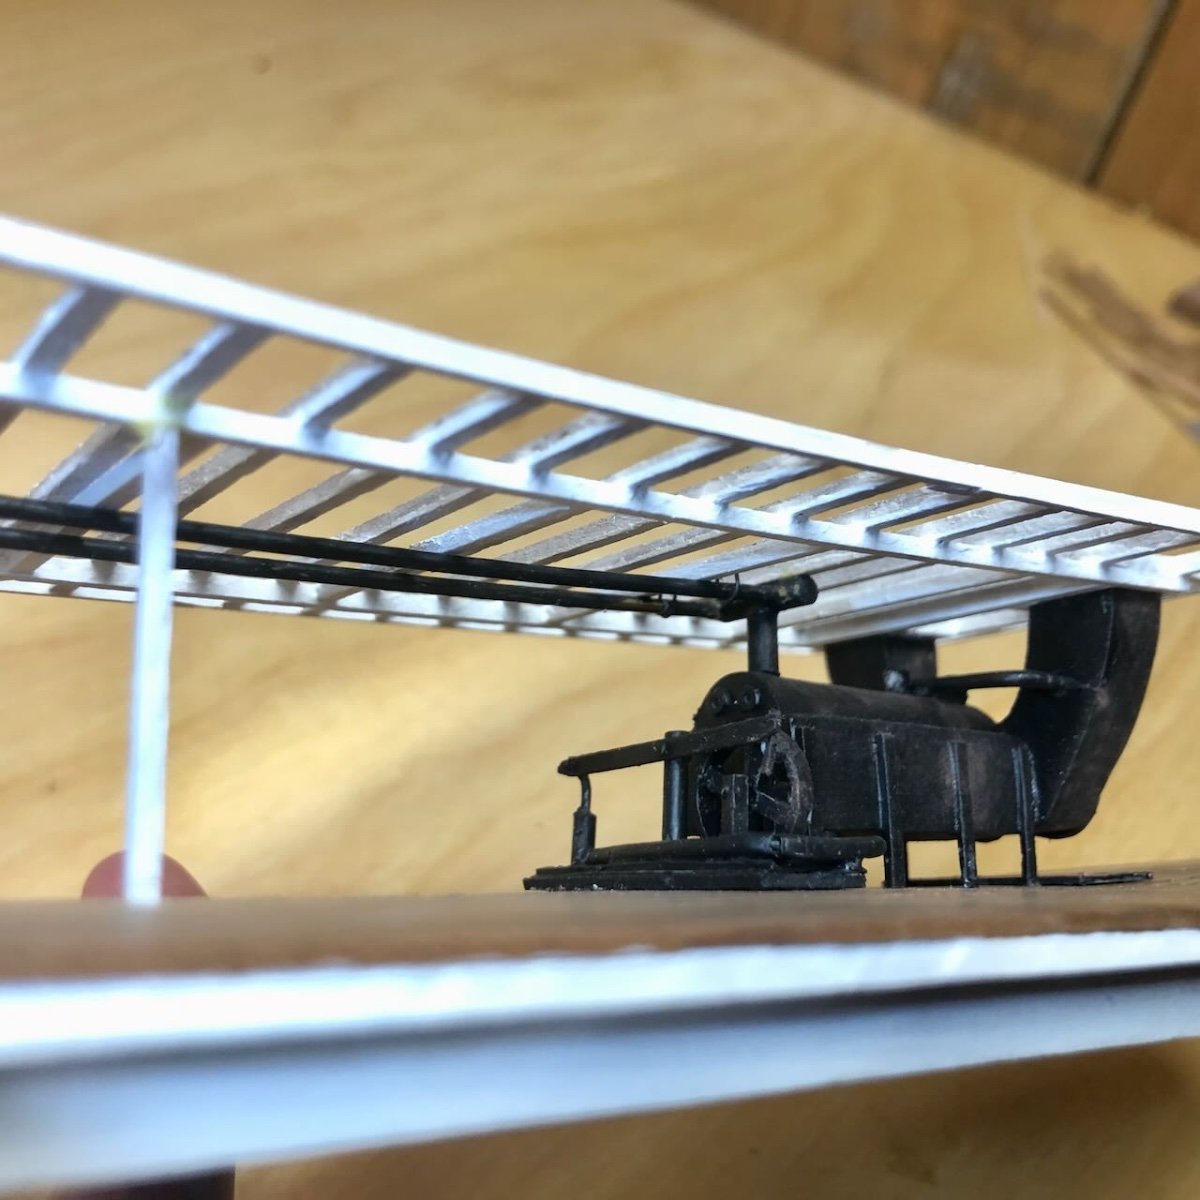
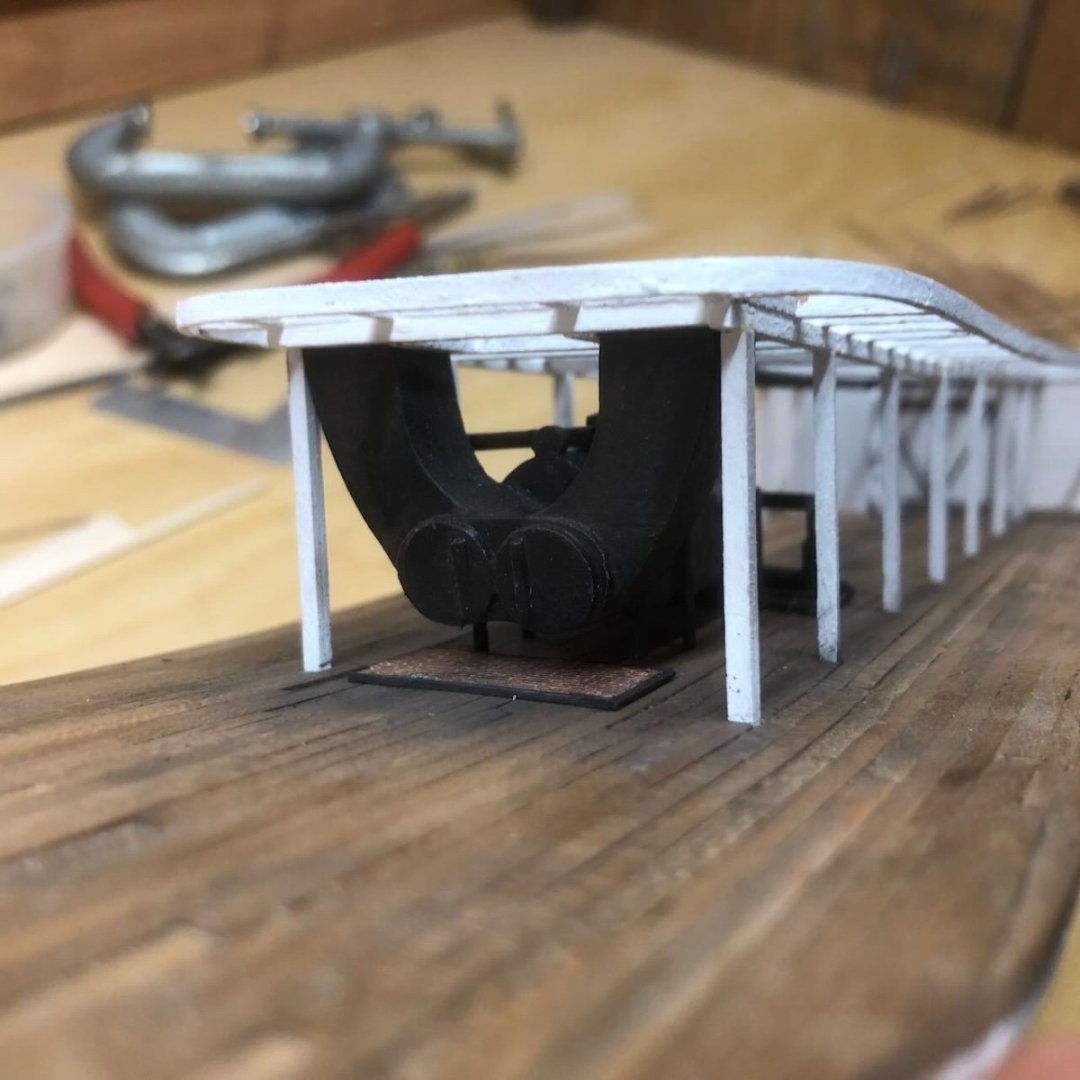
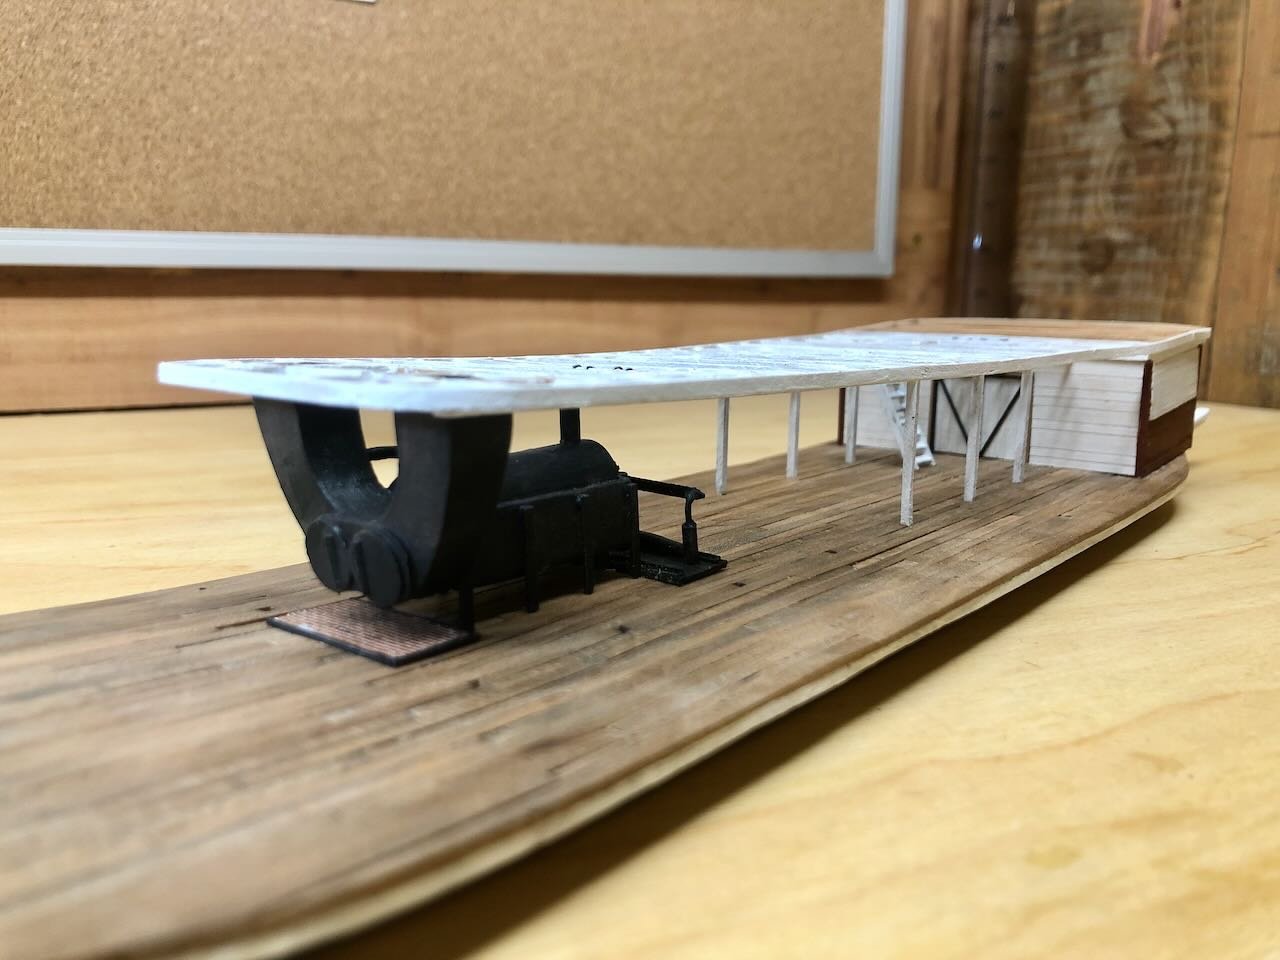
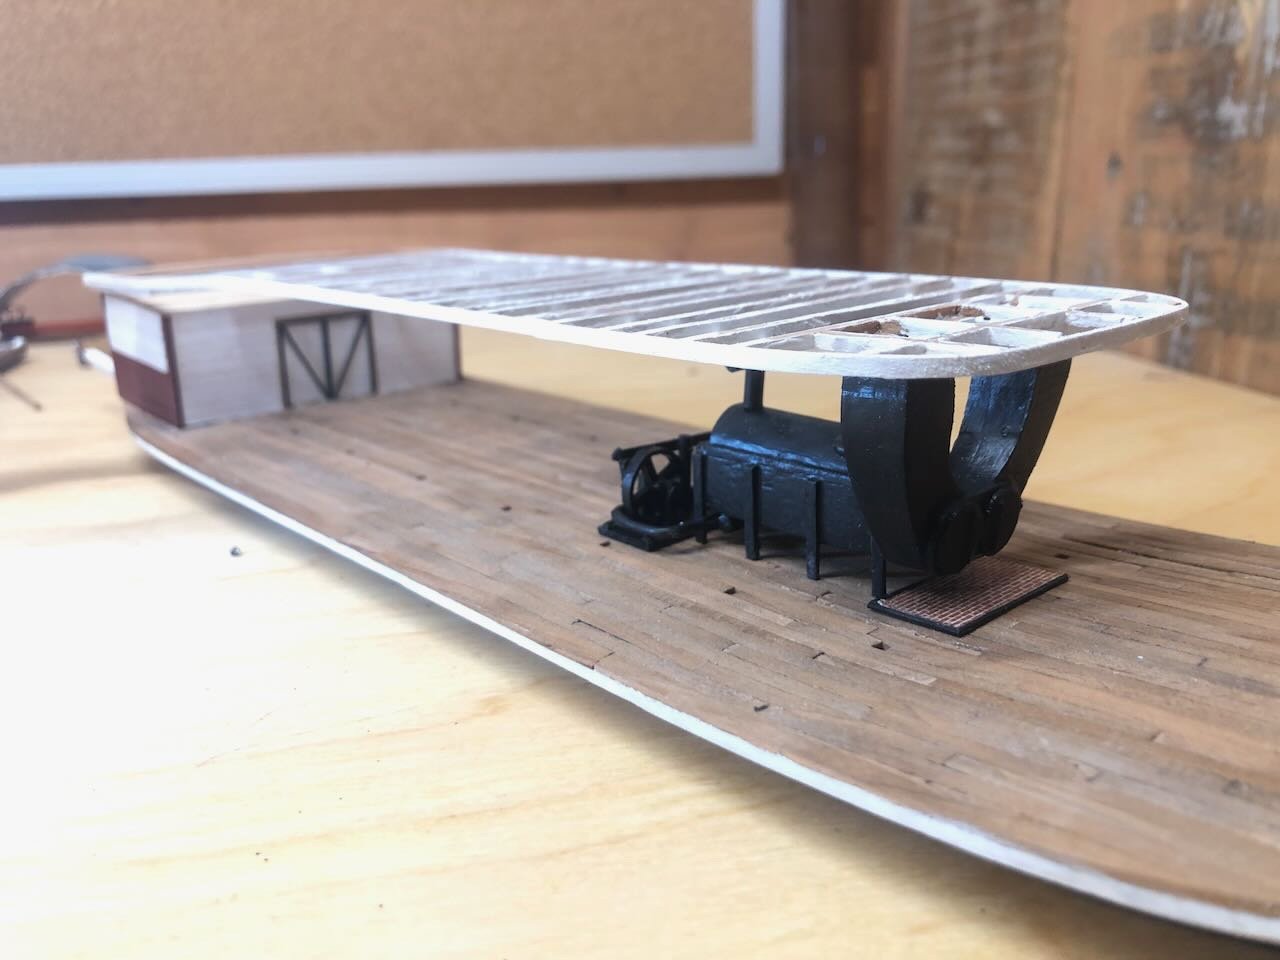
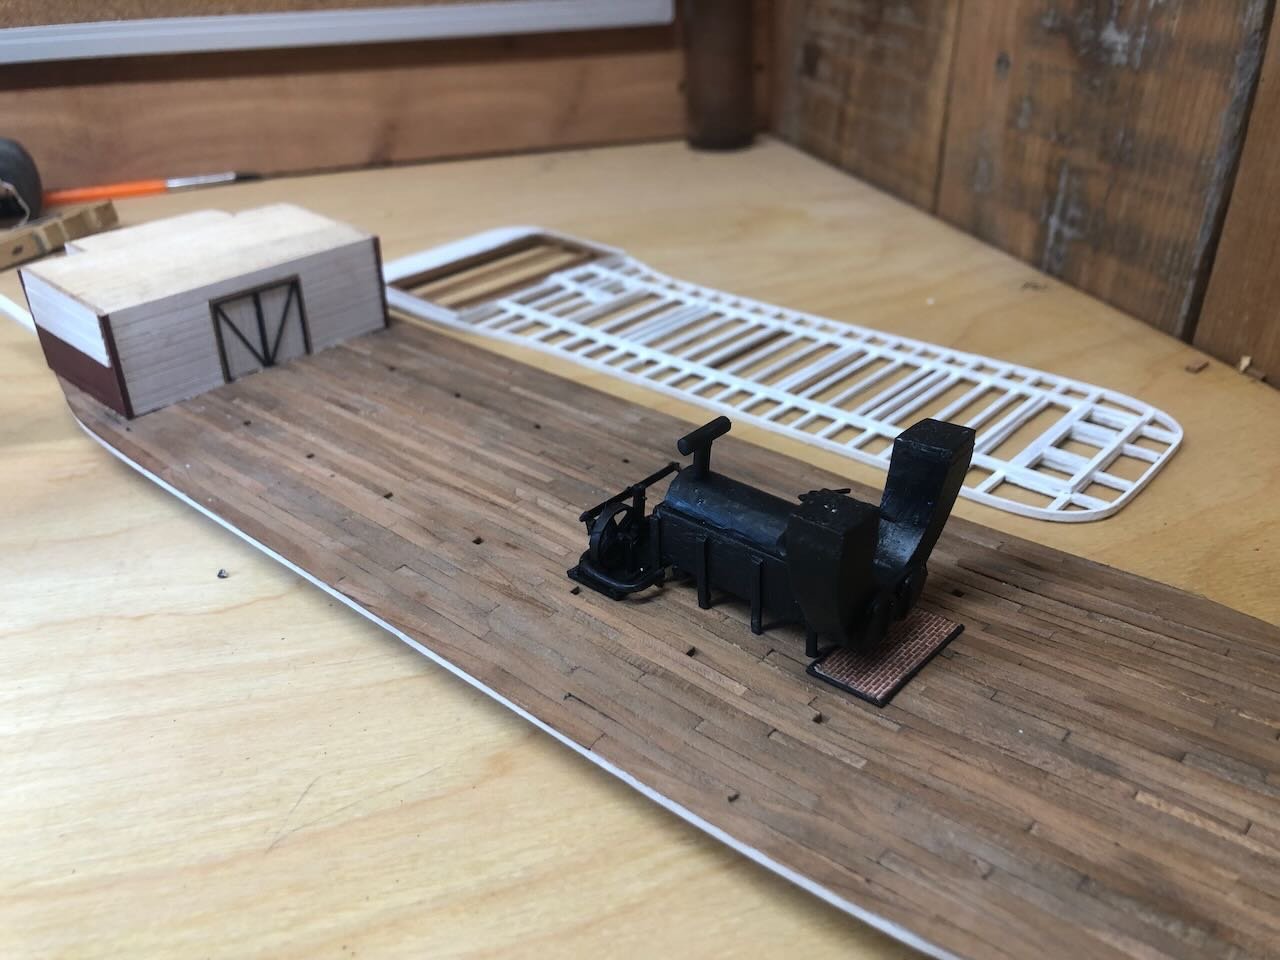
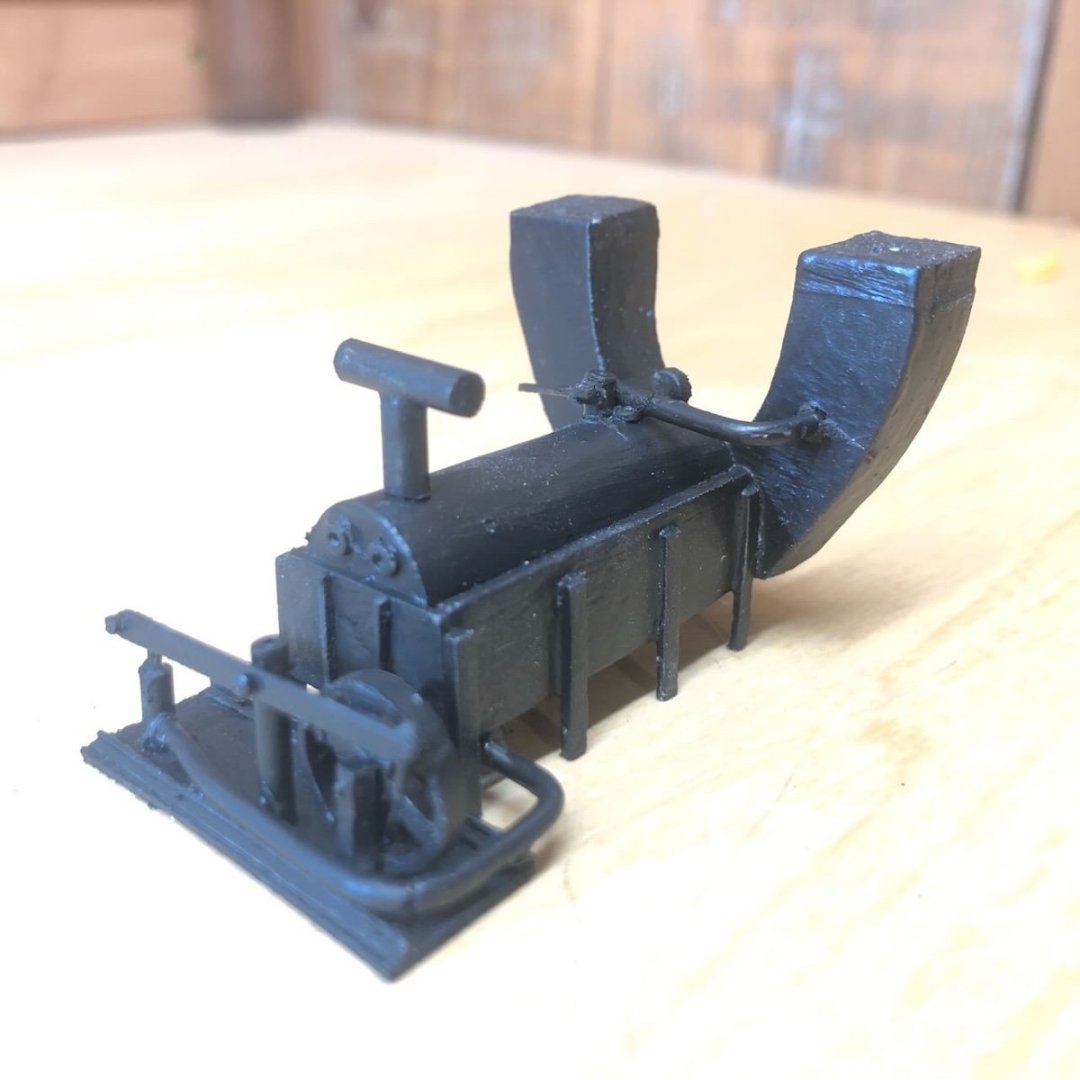
Here's some more progress on the boiler. I took a few of these overexposed to help the dark black be visible. Here I've added the steam vent into the breeching and a representative safety valve, a t-shaped pipe from which two steam lines will run to the engines, and a rough version of a "doctor" pump used to draw river water for the boiler. If you follow the piping you can see that the water runs from the pump around to the mud drum beneath the boiler, where the Missouri River's abundant sediment would settle out before getting into the boiler proper. This is a more simplistic version of the same setup I built for Arabia (see last post), but that was (a) at a larger scale, (b) intended to be a more open model with internal visibility, and (c) I just plain held myself to a higher standard for that one. This will work fine for Peerless. And here it is set in place on the main deck, with a brick-lined ash pan under the firebox doors (for hopefully obvious reasons). First photo without boiler deck, second photo with boiler deck loosely resting on top (but not bent to proper curve). There is no other superstructure to build; unlike all the other vessels I've built (and also unlike Chaperon, one of the few accurate kits out there), Peerless has absolutely no support for the entire boiler deck forward of the engine room, other than two rows of supports posts. I'm repeating myself here, but that's why I chose to have the breechings directly support the boiler deck even though it's not quite accurate. Otherwise it's a long, delicate run of mostly empty space. Also I chose to build the deck framing separately. I've said all this before, but I thought these photos really made the point.
- 393 replies
-
- 20
-
-
-
I'm impressed! Can't wait to see these in place.