


Cathead
-
Posts
3,522 -
Joined
-
Last visited
Content Type
Profiles
Forums
Gallery
Events
Everything posted by Cathead
-
 Huh...I'd never noticed that despite staring at those photos over and over as I designed my version. You're right, that second photo looks like they extend quite a bit out. Which would give me leave to do the same and help with my problem. Did the whole forward deck change shape at some point? Both versions look to me to have a similar spacing between them, but one version looks like it's snug against the deck curve and the other extends outward by a noticeable amount. Shouldn't have gotten ahead of myself and glued them on before asking for ideas. Not the first time eagerness has bitten me! Shouldn't be a big deal to pop them off. Thanks for that observant insight!
 -
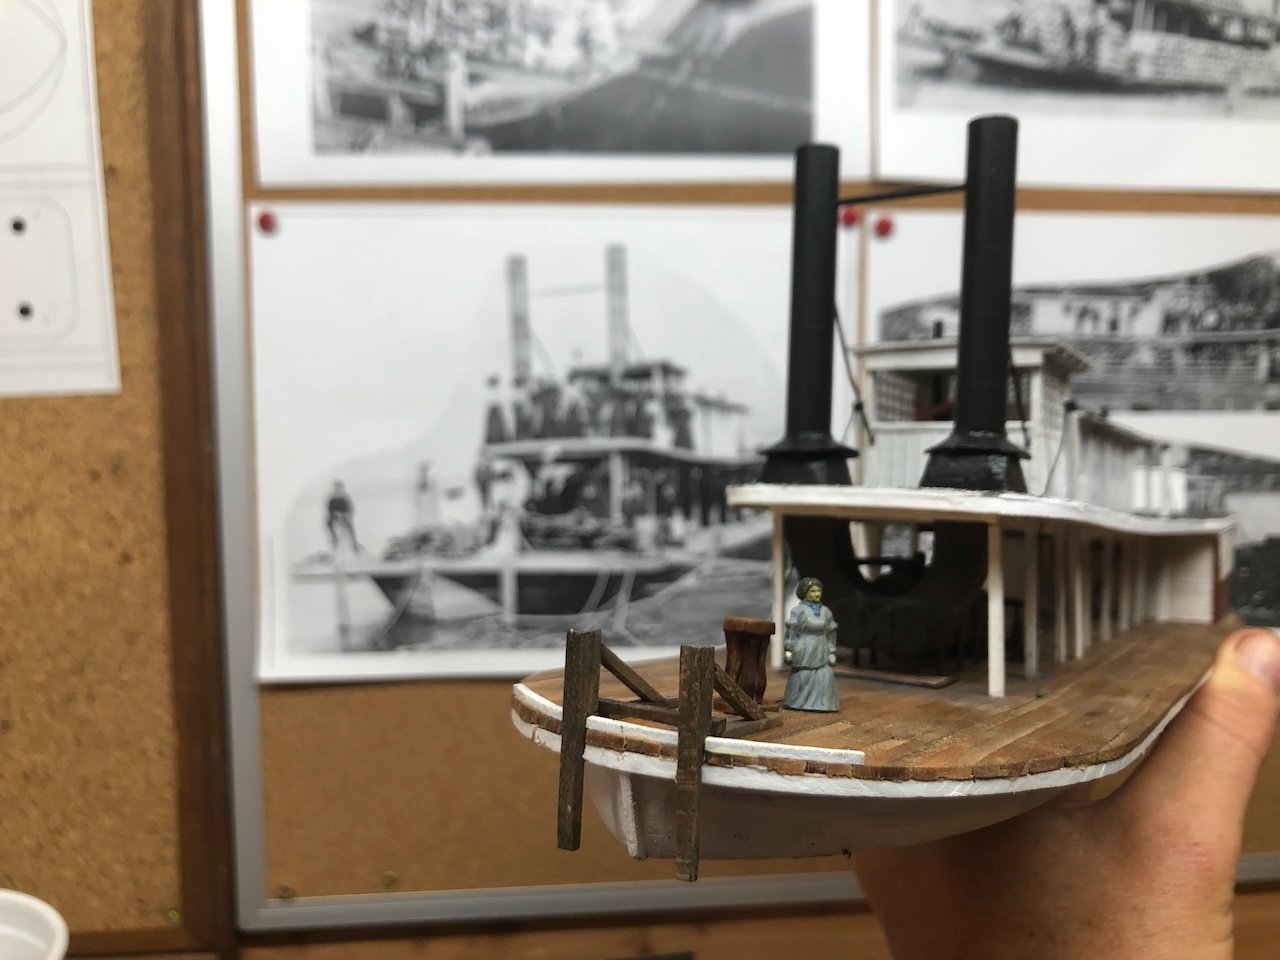
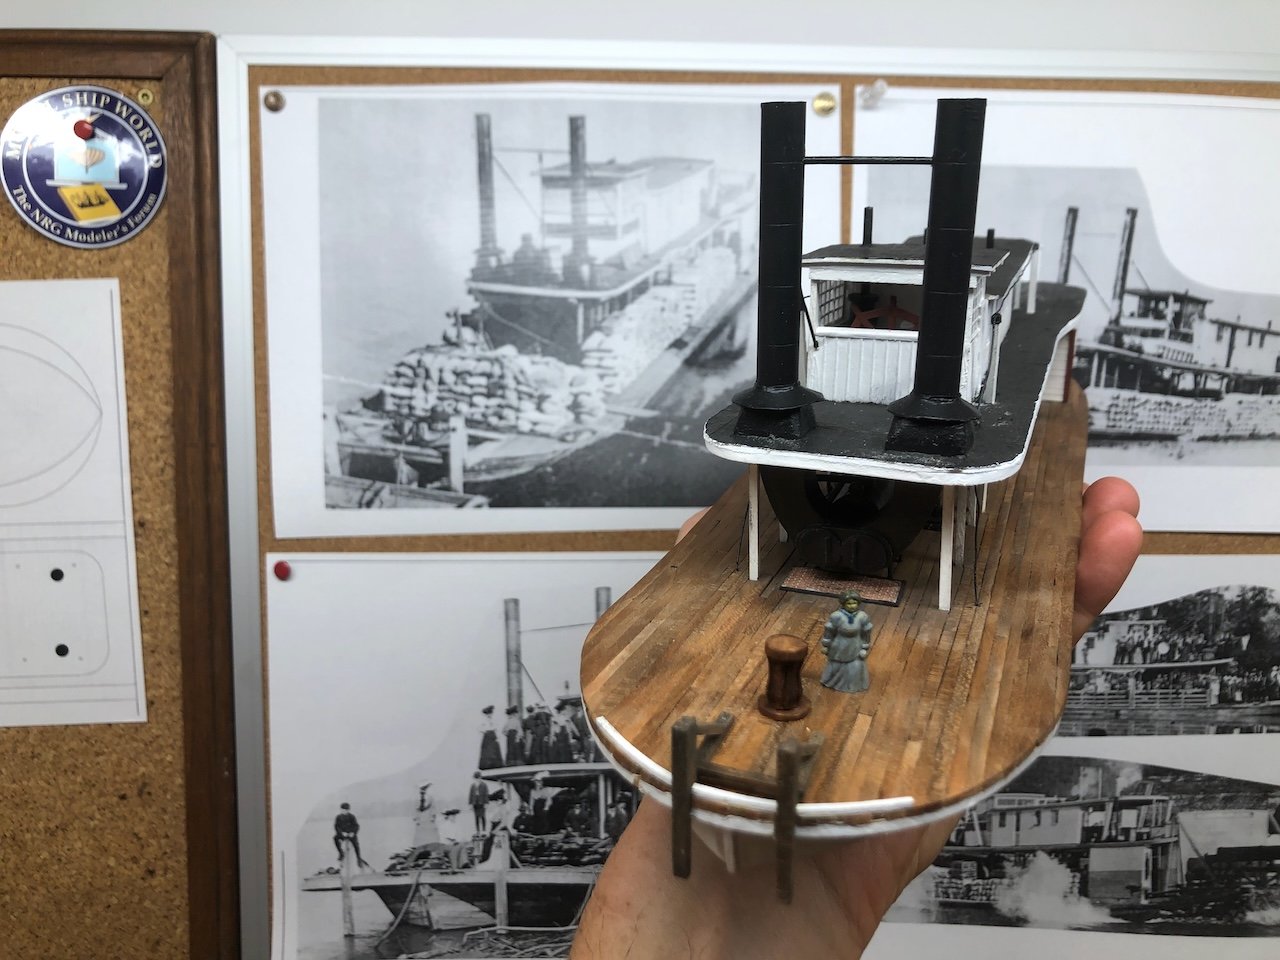
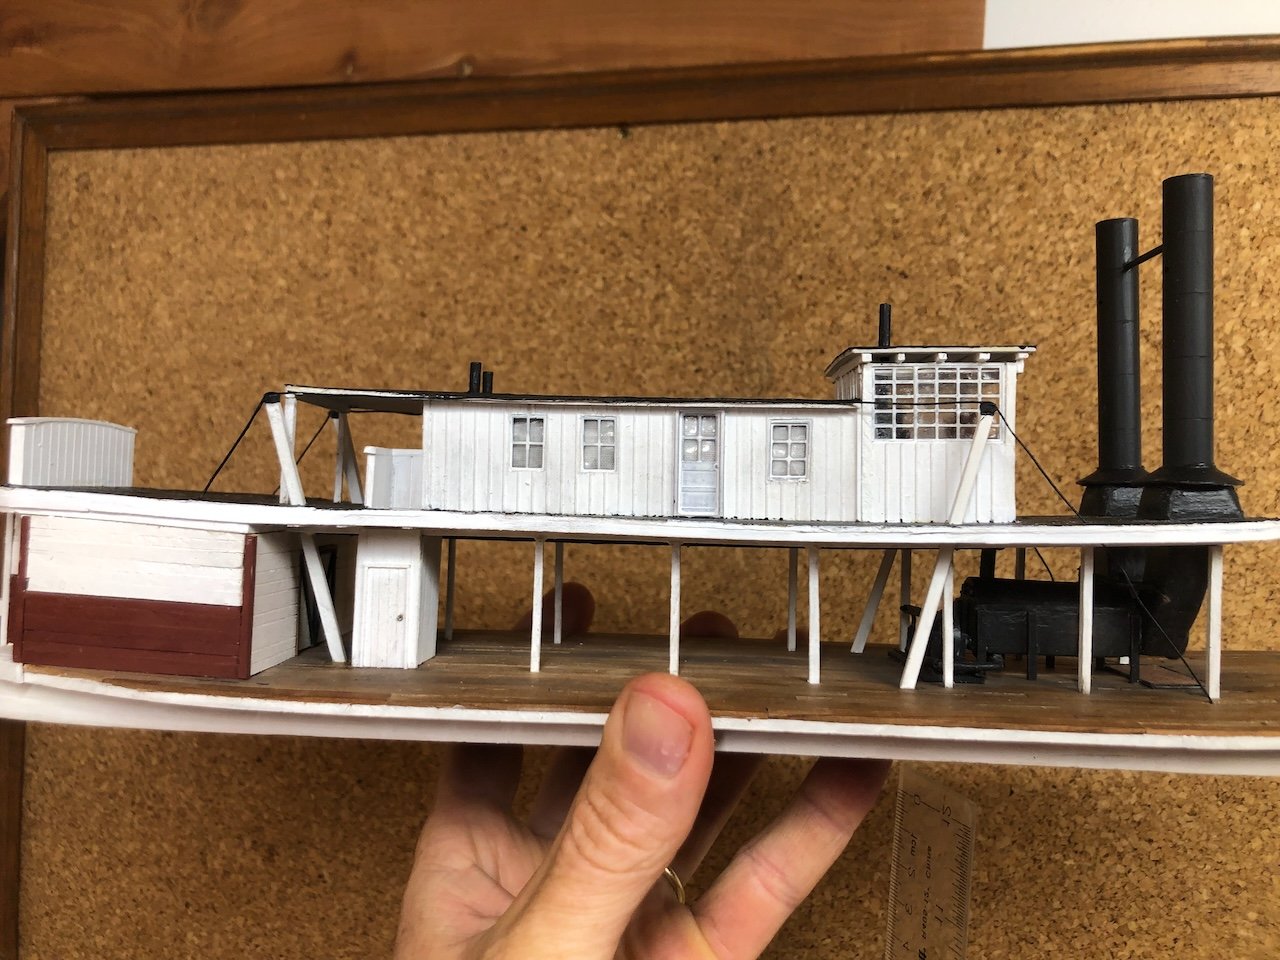
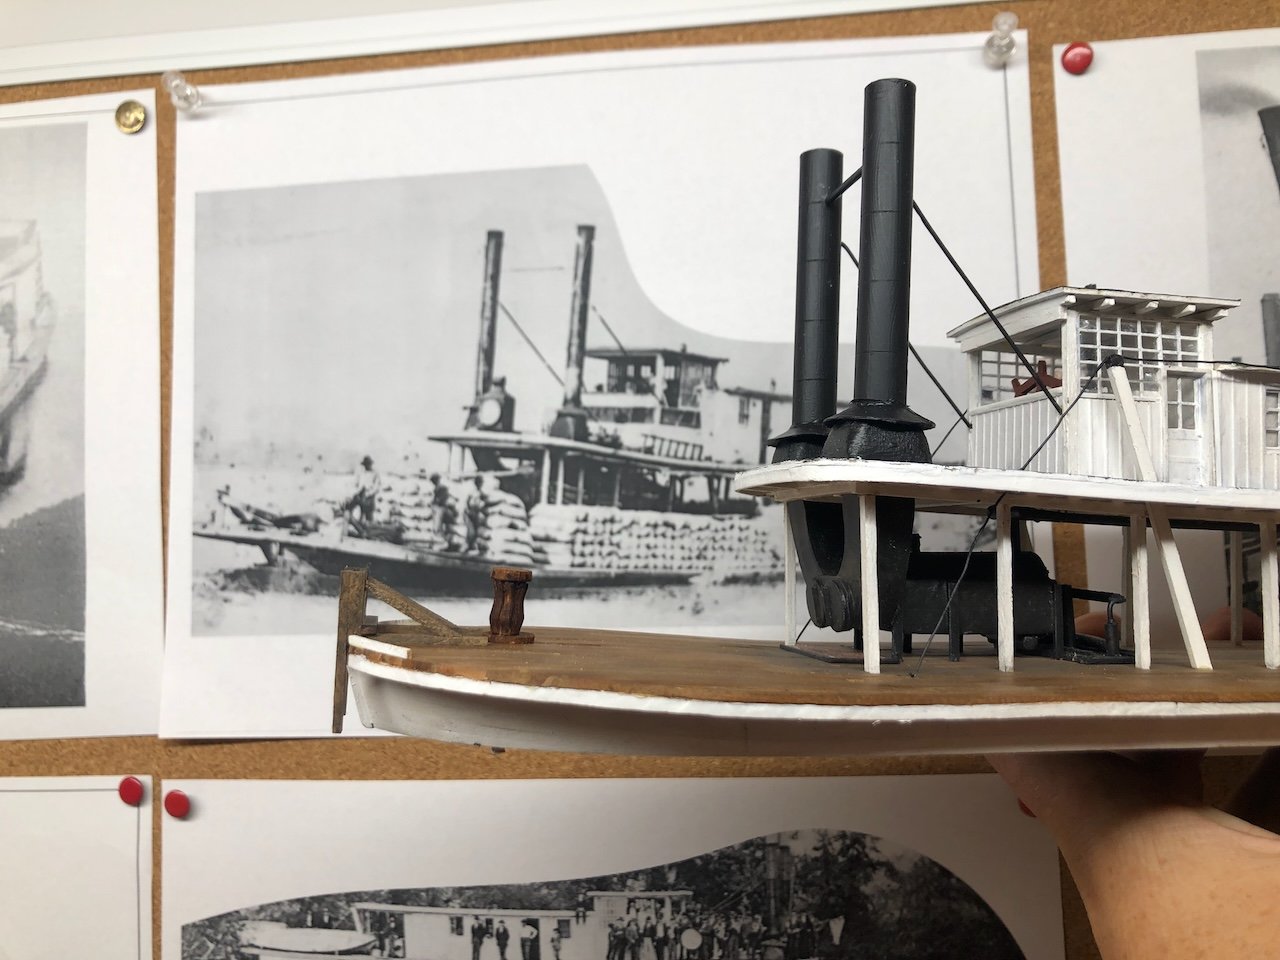
Just a small amount of progress to report. May is not cooperating in terms of free time to work on models. I added the longitudinal hog chains based on some blurry historical image details and logical assumptions about their natural location. I used thin wire, which I couldn't get perfectly straight, but it's another quirk that the camera captures but the eye doesn't really see. Then I got to work on the...not quite sure what to call them, but the timber frames on the bow used to push tows. You can see them pretty clearly here: This is where I found I hadn't thought ahead enough. Those are pretty widely spaced across the bow, which means the bow has very little curvature. When I went to install mine after making them, I found that my bow curves away more sharply than I thought when I first laid it out, so now if I placed them that far apart their fronts fell well behind the bow and wouldn't be able to push anything. So I had the choice of either placing them accurately far apart, but too far back from the point of the bow, or too close together, but accurately forward enough to extend just beyond the bow. For better or worse, I chose the latter, though now I'm wondering if it was the wrong decision because they're more noticeably "wrong" compared to the original photos than if they were properly spaced but a bit too far back. Anyway, see what you think (compare to same photo angle in background): Another view, with comparable angle in background and separate photo below: Changing them would mean popping them off the deck and hopefully not leaving too much glue stain; I could always cover those with a few random timbers or something. Thoughts? In the above photos, you'll also notice I built a version of the capstan that sits just behind those whatever-they're-called braces. Finally, I added the two thick diagonal braces that lead aft from the chimneys to the pilot house: I think I'm getting close to done with the basic details. There are some more thin guy wires supporting the chimneys, though they're very hard to see in the historical photos. I need to figure out where I'm going to get that big locomotive headlight that's so prominent on the front edge of the boiler deck. The biggest single project remaining is the paddlewheel, which I'm going to need some quiet focused time to concentrate on designing. Not going to happen in the next week, that's for sure. But I started this log on June 17, 2023, and there's an outside chance I'll have her done one year later. Thanks for sticking with me!
- 393 replies
-
- 17
-

-
I was a model railroader long before I discovered wooden ship building, and once I did, railroad modeling went dormant, but it's quietly stirring again like a quiescent volcano muttering its way back to life.
-
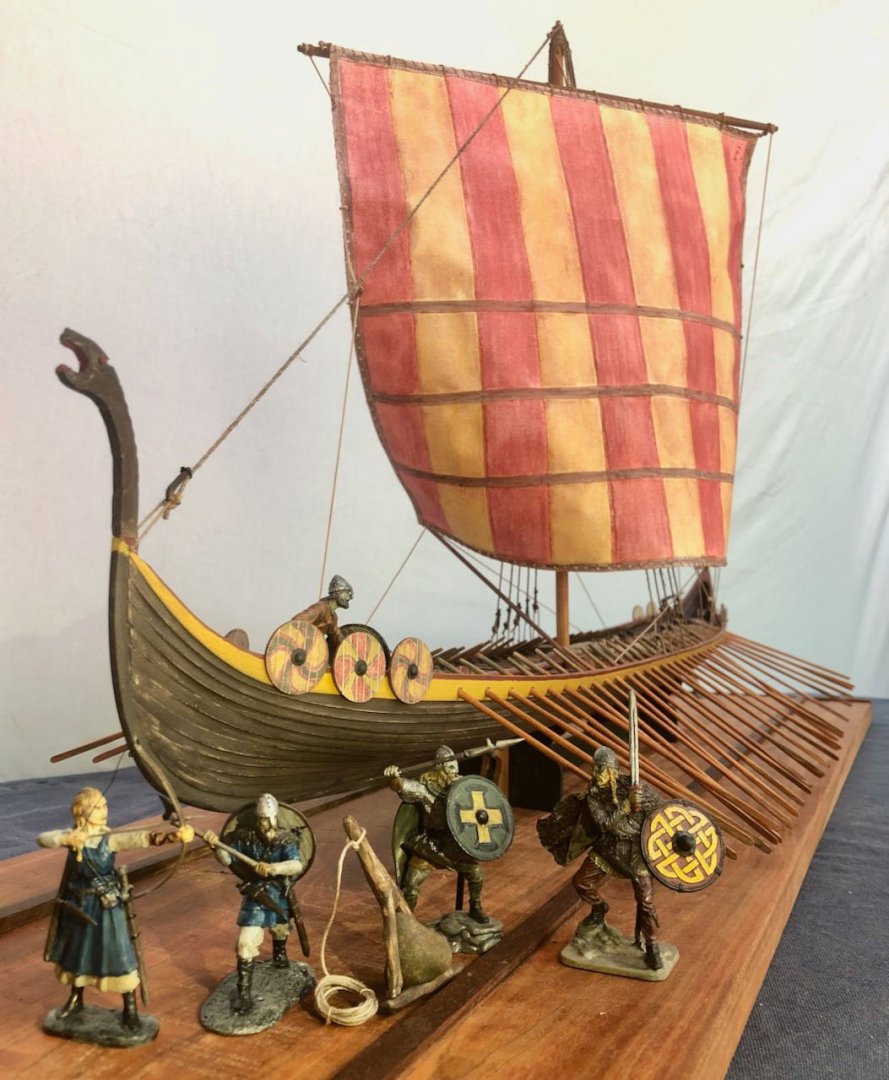
That's essentially what I did with my Dusek Viking longship. Used the model as a base and made lots of changes to improve the accuracy and appearance. The kit still saved me a lot of effort over scratchbuilding but the result was much better than the out-of-the-box version.
- 146 replies
-
- 5
-

-
-
- Roar Ege
- Billing Boats
- (and 2 more)
-
These aren't the only ones, I can point to lots of model kits that are laughably, cartoonishly, unrealistic even when it wouldn't be hard to make them at least reasonably accurate. But my guess is that it isn't felt to pay off to put the extra work into making a model good. Same answer for improved materials.
- 146 replies
-
- 4
-
-
- Roar Ege
- Billing Boats
- (and 2 more)
-
"Tunnel vision" is an English idiom meaning you focus narrowly on one thing. So the idea here is that you focus only on making this model and don't worry about broader concerns. So it's like your model is in a tunnel and you only look at that, and the tunnel walls block out all the other worries beyond the model. I speak some German but am not sure what the equivalent idiom would be.
- 146 replies
-
- 2
-
-
- Roar Ege
- Billing Boats
- (and 2 more)
-
Gute Besserung, Micha.
-
Steamboats and other rivercraft - general discussion
Cathead replied to Cathead's topic in Nautical/Naval History
Yep, Roger, I have those plans you gave me and they're in the someday mental file! I definitely thought of them, and you, as soon as I saw that model. I've been hoping to take a trip on the Badger someday.- 281 replies
-
- 4
-
-
- Steamboats
- riverboats
- (and 3 more)
-
Steamboats and other rivercraft - general discussion
Cathead replied to Cathead's topic in Nautical/Naval History
I'd have no trouble believing that!- 281 replies
-
- 3
-
-
- Steamboats
- riverboats
- (and 3 more)
-
Steamboats and other rivercraft - general discussion
Cathead replied to Cathead's topic in Nautical/Naval History
Neat examples, wefalck! Steamboat ferries were fairly common on the Missouri River for a period of time, before bridges were finally built. But in winter they couldn't operate, so in some cases where the river froze solid enough, tracks were laid directly across the river ice, as in these examples from North Dakota: 1879 photo (University of Washington libraries) 1879 wood-cut print (North Dakota Heritage Center). Notice the steamboat drawn up on the bank for winter.- 281 replies
-
- 5
-
-
- Steamboats
- riverboats
- (and 3 more)
-
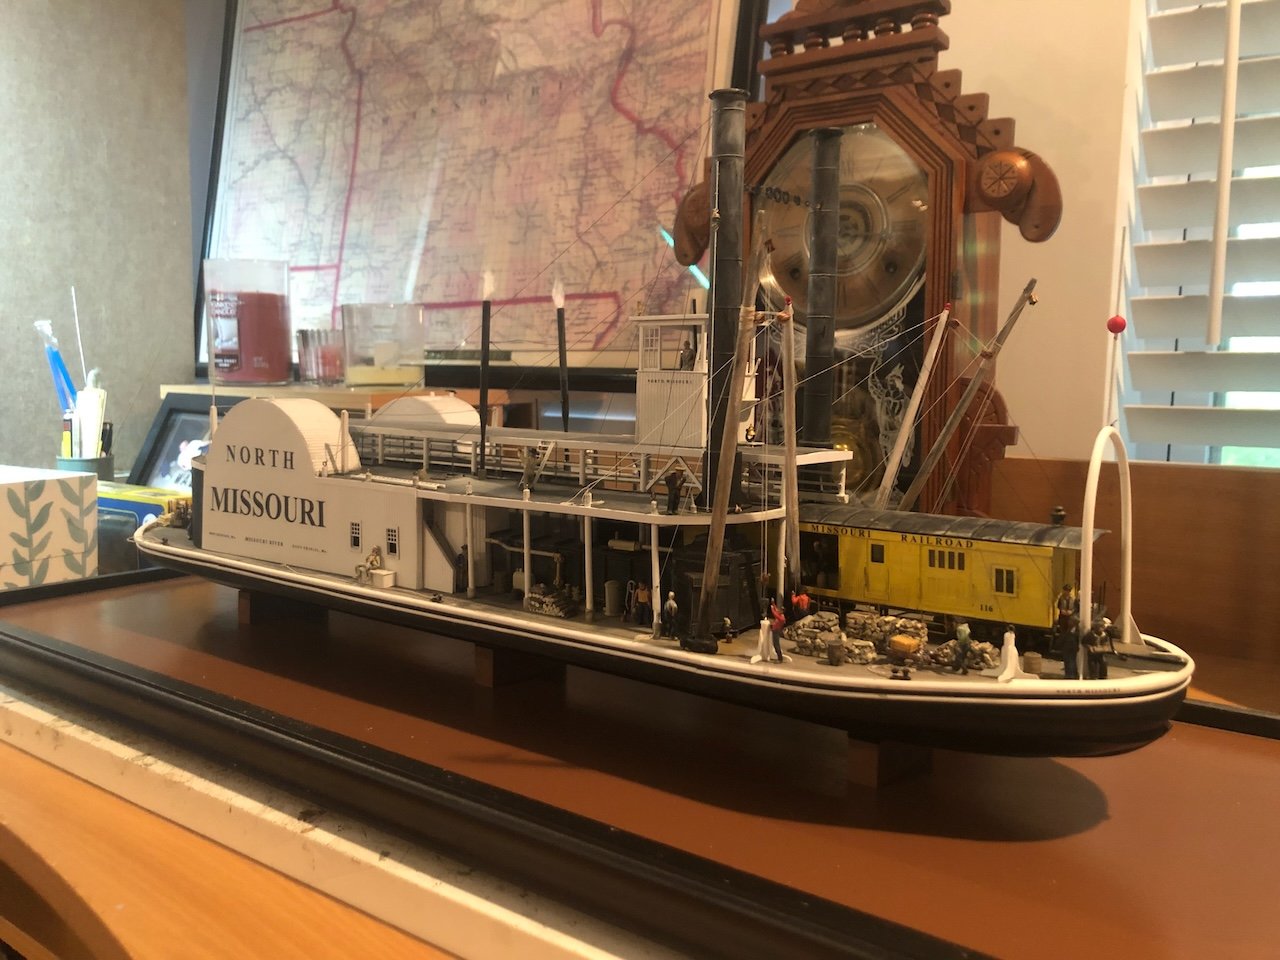
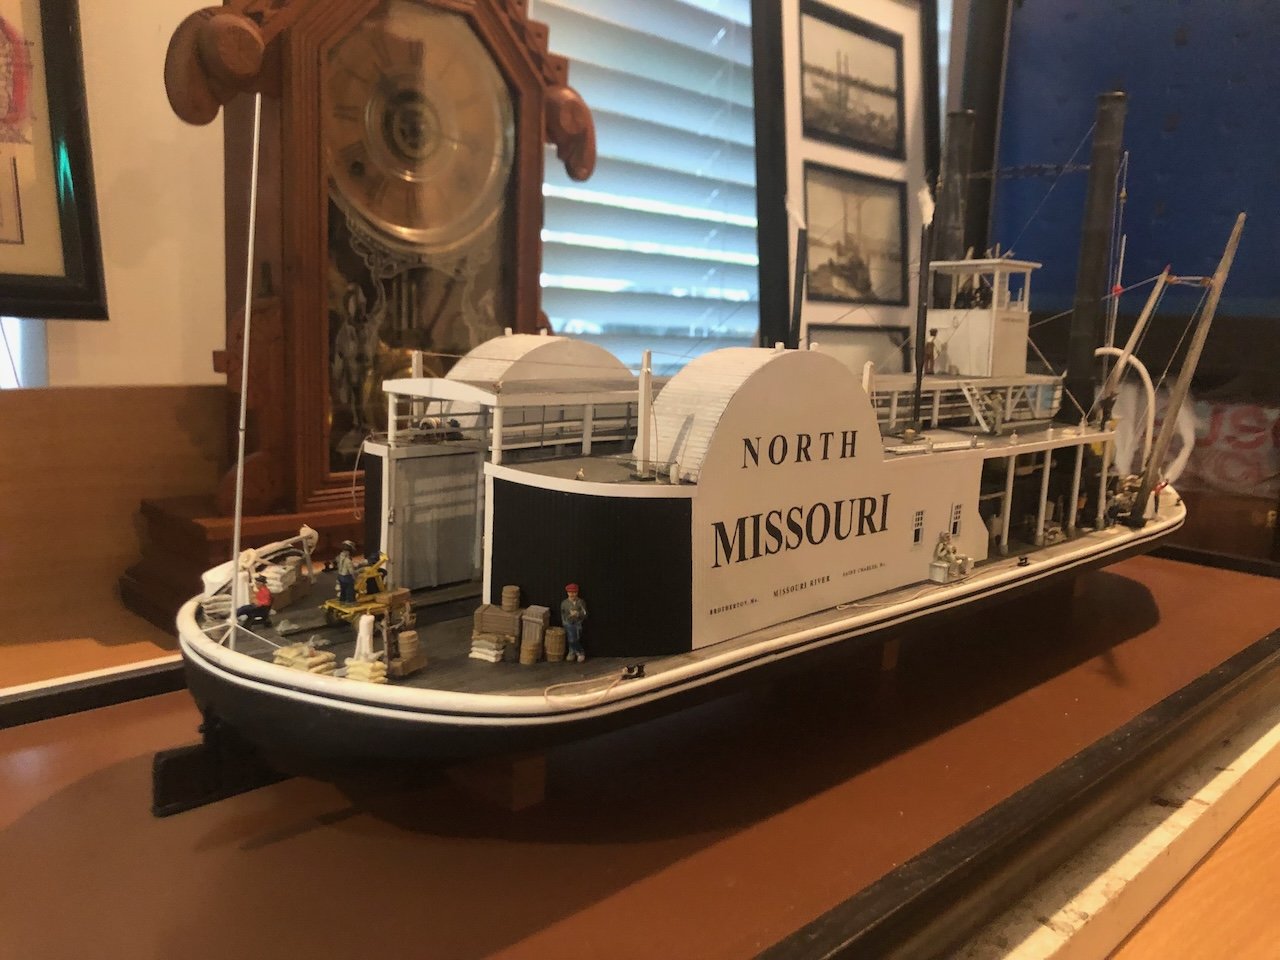
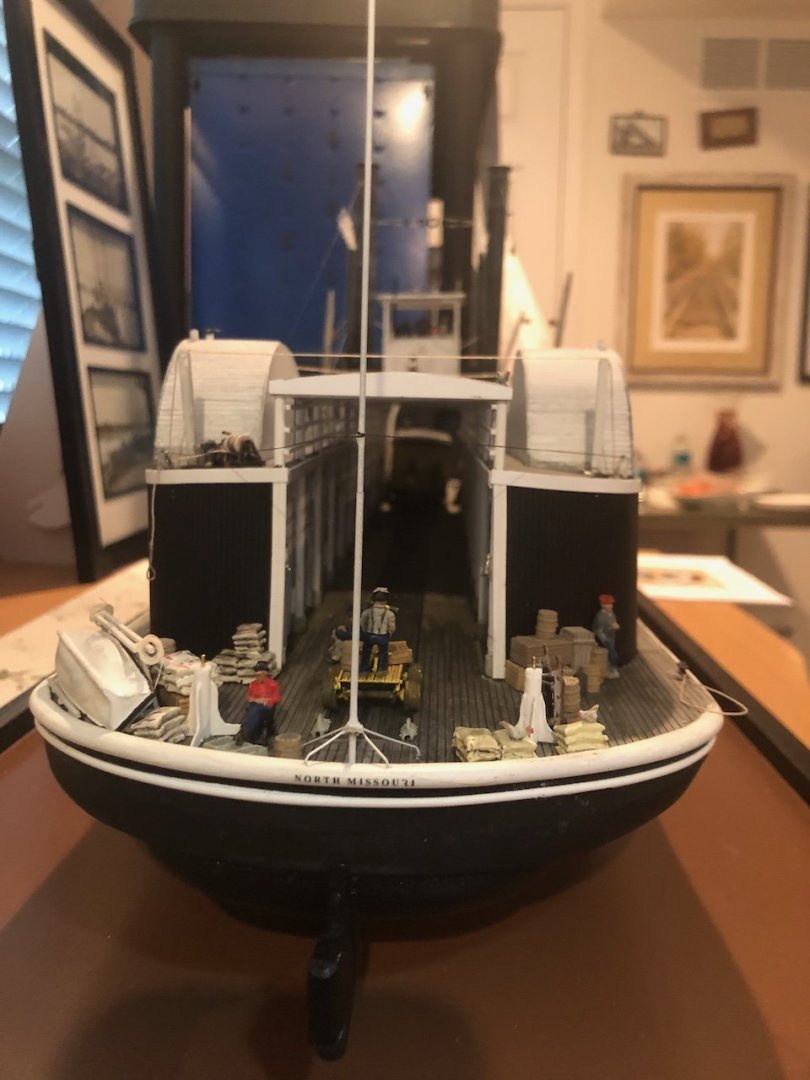
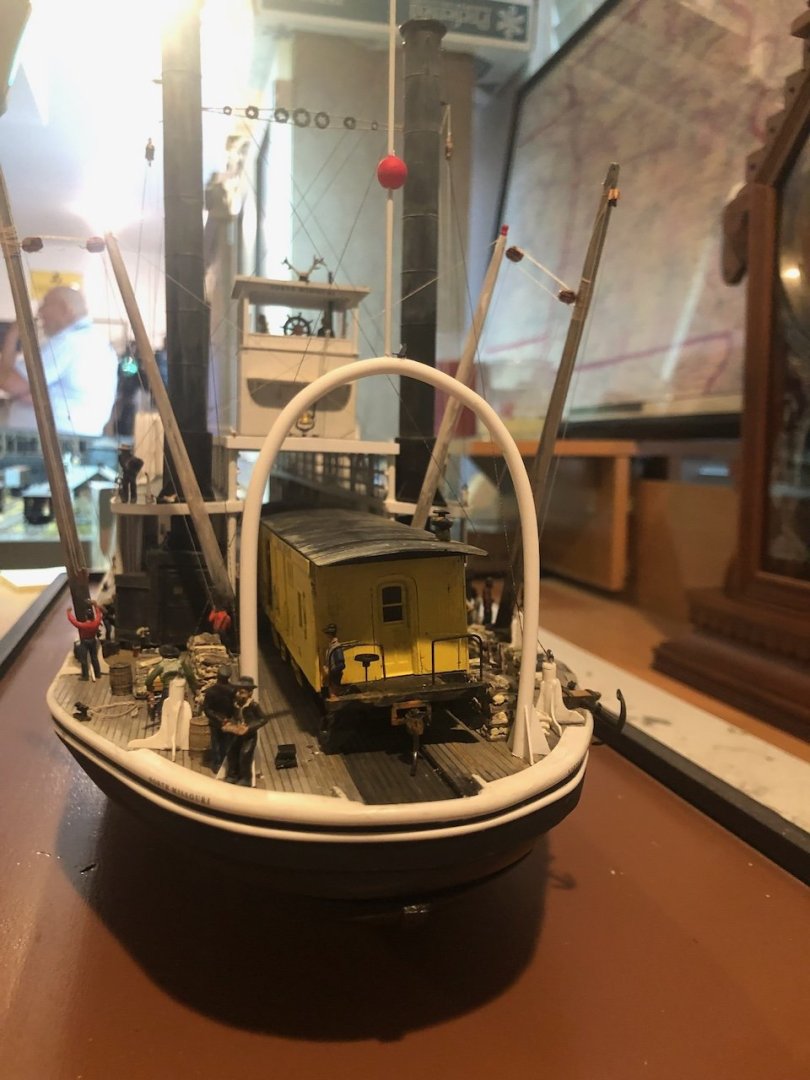
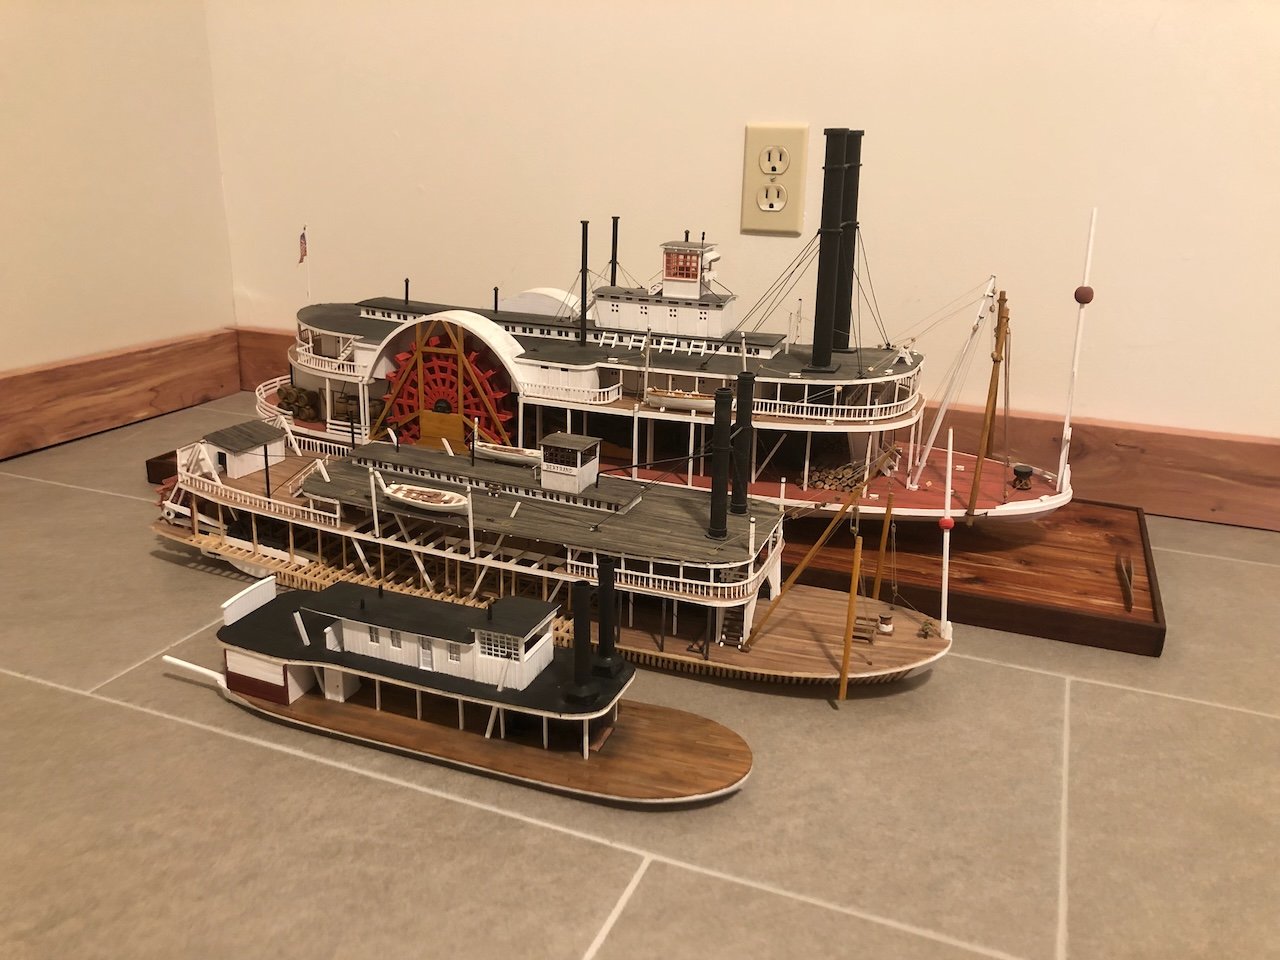
Sorry for lack of progress, haven't touched the model since my last update. But I did have a pretty cool model-viewing experience recently, getting to see a fantastic scratchbuilt Missouri River rail ferry from ~1870 at a model railroad convention. I wrote a full post about it in the Steamboats and Other Rivercraft General Discussion thread so as not to clog up this one, but here's a teaser image to encourage you to go over there and check the whole thing out. This is at the same scale as my Peerless (1:87). Hoping to get back to Peerless soon, but other commitments have had to take priority lately. Thanks for your patience!
- 393 replies
-
- 19
-
-
Steamboats and other rivercraft - general discussion
Cathead replied to Cathead's topic in Nautical/Naval History
This thread has gone a bit dormant but I'm going to revive it with a very neat model I got to see recently. I was actually attending a model railroad convention, which included some personal layout tours. One fellow, in addition to a spectacular layout, had a scratchbuilt model of a real rail ferry that operated across the Missouri River at St. Charles (near St. Louis) in the early days of railroading. He gave me permission to share some photos here. This vessel operated until 1872, when a bridge was completed and its services were no longer needed. This is in HO scale (1:87), the same scale as my current build Peerless (see signature). And for reference, here's one view of his layout, depicting Moberly, Missouri in extraordinary and highly accurate detail. This is on the same rail line as the ferry above served, though the layout is set almost 100 years later. He's been writing a detailed article for the local railroad historical society and I told him about the NRG and encouraged him to submit the article to the NRG journal as well. I thought you all would enjoy this!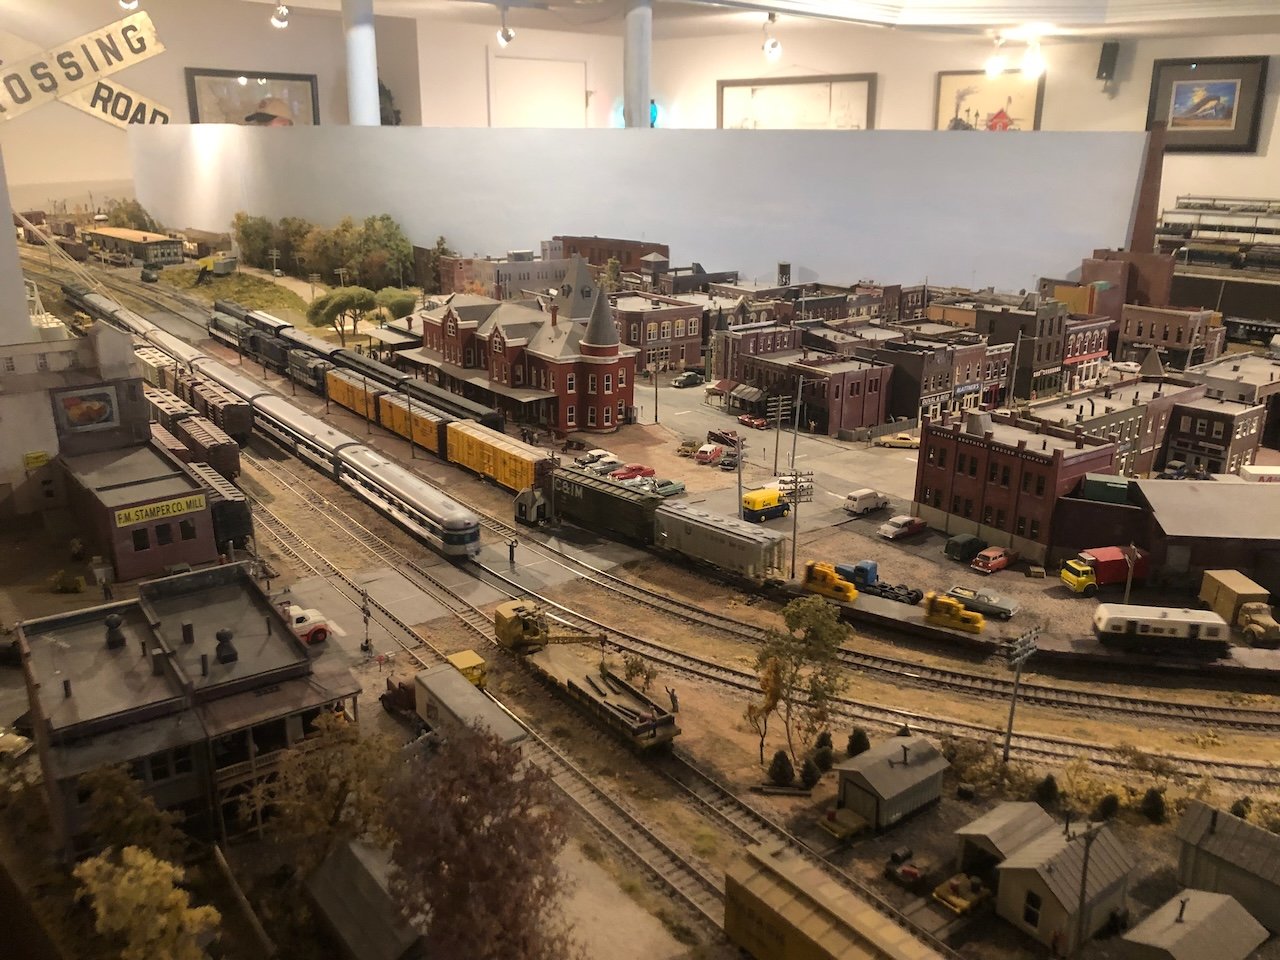
- 281 replies
-
- 9
-
-
-

-
- Steamboats
- riverboats
- (and 3 more)
-
While I've enjoyed this discussion as a novice in this area, I think Steven nails it at one point in observing that some small details that may or may not be in error act as discussion points for the knowledgeable and will not be noticed by the casual viewer. I certainly have a few on my models and it's actually a thrill when someone notices one in person and it sparks an informed discussion. Well done Steven and carry on!
-
Ed, welcome to MSW! The best bet for advice would be to start your old build log rather than starting a separate discussion in a log for someone else's build. That would also be the best place to provide a few photos and/or sketches of what you're asking about and proposing, so we can give you better answers. If you don't want to do a full build log, consider starting a thread in one of the advice sections; there's actually a whole thread about general riverboat questions if you search for it, and that might get you more responses. But my short answer is that this kit is not even remotely prototypically accurate and shouldn't be expected to look real. It makes a very attractive model and people have done some good things with it, but it won't much look like any real riverboat you'll ever find images of, at least to an experienced eye.
-
If cutting an insert into the base is too hard, Brian could also make a veneer sheet the same thickness as the mirror and cut the mirror shape out of that, which is almost certainly easier to do than routing out the base with a laser or regular router.
-
Absolutely. To my way of thinking, not only does it show off your workmanship more effectively, but it gives the viewer a better angle into something we otherwise never see in the real world (details below the waterline). If part of the goal of modeling is education (a core mission of the NRG), then given you've put the work into those normally hidden details, make them as accessible as possible! I'd bet the vast majority of people have no idea that's what towboat propulsion looks like, as opposed to a vague idea of some sort of basic ship's propellor like on the Titanic or something. As for proper lighting, pretty much everyone has a flashlight in their pockets these days, so it's not hard to get light to where it's needed. This is one of the reasons I haven't bothered running lighting into my steamboat models; it's so much easier just to point my phone light in toward the machinery if anyone wants to see it in detail. That and I don't like working with electronics but that's not the point!
-
Those instructions are startlingly bad for an American manufacturer. Not because Americans are any better than anyone else, but because the English in there reads like the non-native gibberish normally encountered in badly translated foreign manuals. You're doing a good job of being persistent and developing new and interesting ways to meet the kit's challenges.
- 146 replies
-
- 3
-
-
-
- Roar Ege
- Billing Boats
- (and 2 more)
-
Even pulled up on a shore, you could have one armed guard (easier to source) watching things while assuming the rest of the crew are off refilling water barrels or taking care of other essential business. Lots of possibilities! I do think a wharf scene would look pretty cool, and same point about a single armed guard.
-
You can build a diorama without crew...perhaps moored to a wharf, or pulled up on a beach with cargo unloaded?
-
Thanks, all, and Keith - I agree. I think that's one the best model I've ever built. Guess I'm going downhill now!
-
Note to self: use a thesaurus to assemble a list of superlatives before Brian's next update. Or switch to a new language; I've always been partial to German's "ausgezeichnet" because just pronouncing it provides a feeling of accomplishment. I totally agree with Keith that the bottom needs to be visible somehow. You may not go this direction, but a great benefit of the larger display cabinet I had built for my models is that the multi-level glass shelving makes it easy to see the undersides, which is especially good for my openly framed Bertrand's hull. It's also a lot more space- and material-efficient than a bunch of individual glass cases. Also, as a fellow Mac user, welcome! One thing I particularly appreciate is the seamless coordination of photos (and other documents) between phone and computer, then up to iCloud storage, so I don't have to think about manual backups or worry about the loss of a device.
-
When I built my longship, I was able to find a whole set of 1:32 bare metal figures that were quite well done. That would be pretty close to your scale, most people can't tell the difference. I had a great time hand-painting them. Here they are displayed with my vessel, whose build log is linked below if it's of interest and use (there's more detail in there about painting them and so on, too).
-
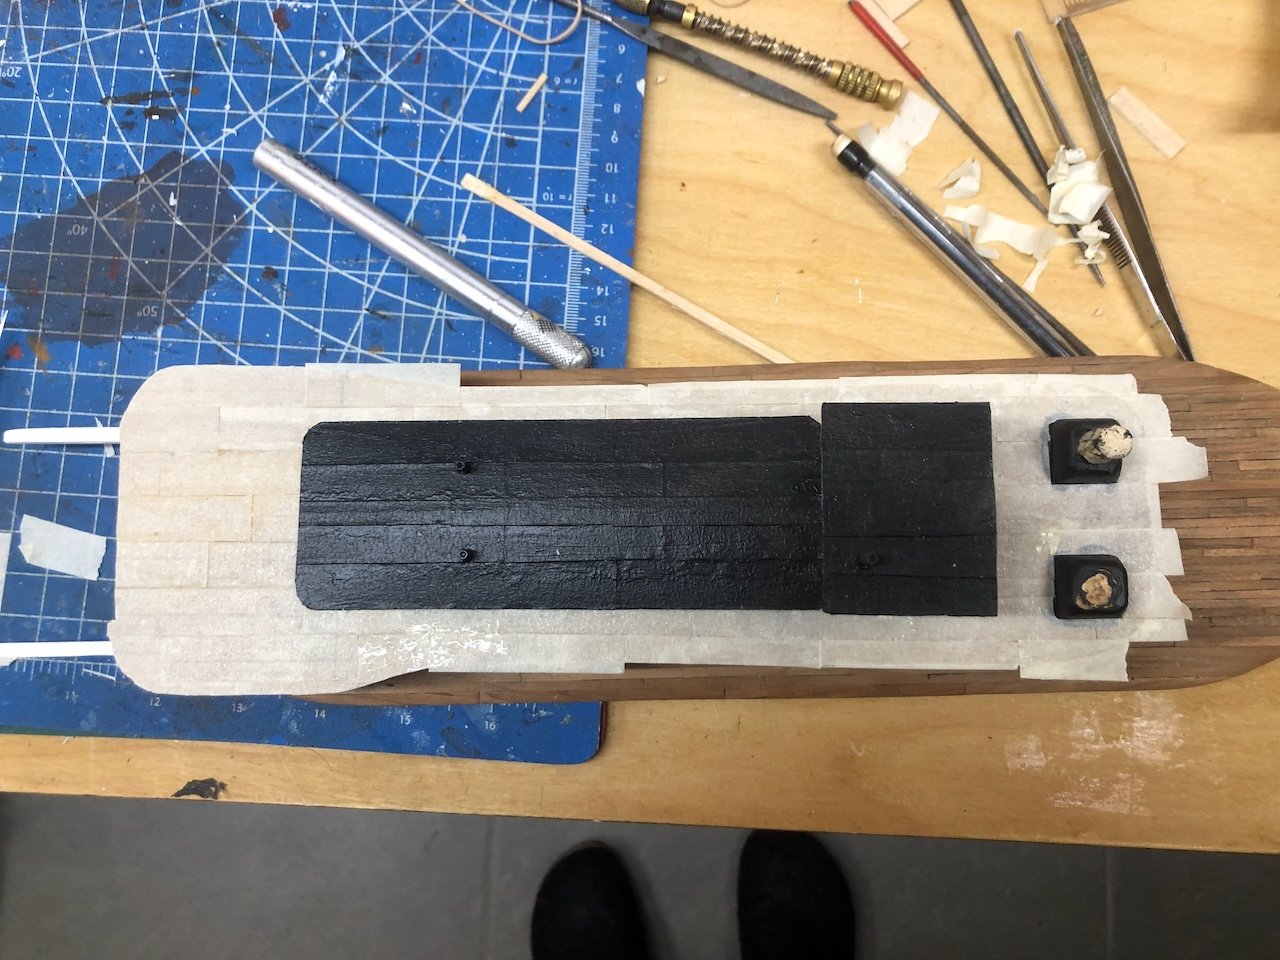
I apply each strip separately. Cut to fit as needed, smear wood glue on the tacky surface, apply, use a strip of wood or my finger to rub smooth and flat (sometimes bubbles get trapped), then move on to the next one. Another benefit to doing it that way is that the tape itself is just tacky enough that sliding it into an exact position is tricky because it catches. A film of wood glue on the bottom means it slides effortlessly and can be adjusted to exactly where you want it, then snugged down with some gentle pressure.
-
Wefalck, I absolutely agree that tape on its own would not be a good idea, but recall that earlier I described how the masking tape is attached with a layer of carpenter's glue once it's cut to fit. The glue soaks into the tape and not only holds it quite solidly once dry, but stiffens it so that it's easier to trim. The paint provides another round of stiffener. The same method used on my Arabia has shown no signs of alteration in ~4 years of the highly variable environmental conditions within my house (from bone-dry firewood-heated air in winter to humid summer air only partly buffered by air conditioning, and temperature variations from the 50s-80s F). So I'm pretty comfortable with the method. The venue is setting up large square tables, one for each model, so people can view them from all sides but they're not easily reachable (especially by little hands). Still a little nerve-wracking but worth it, I think.
-
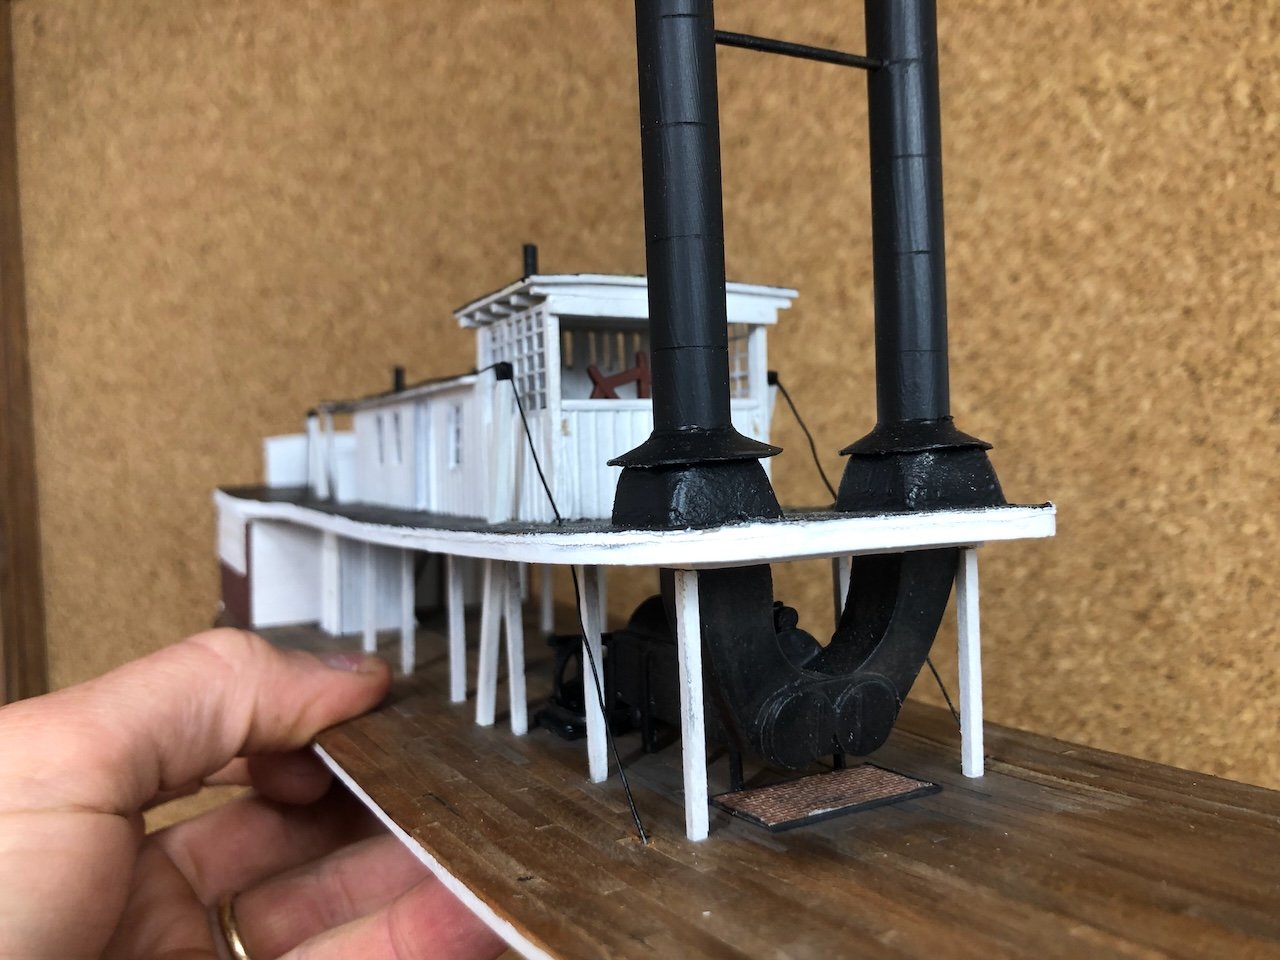
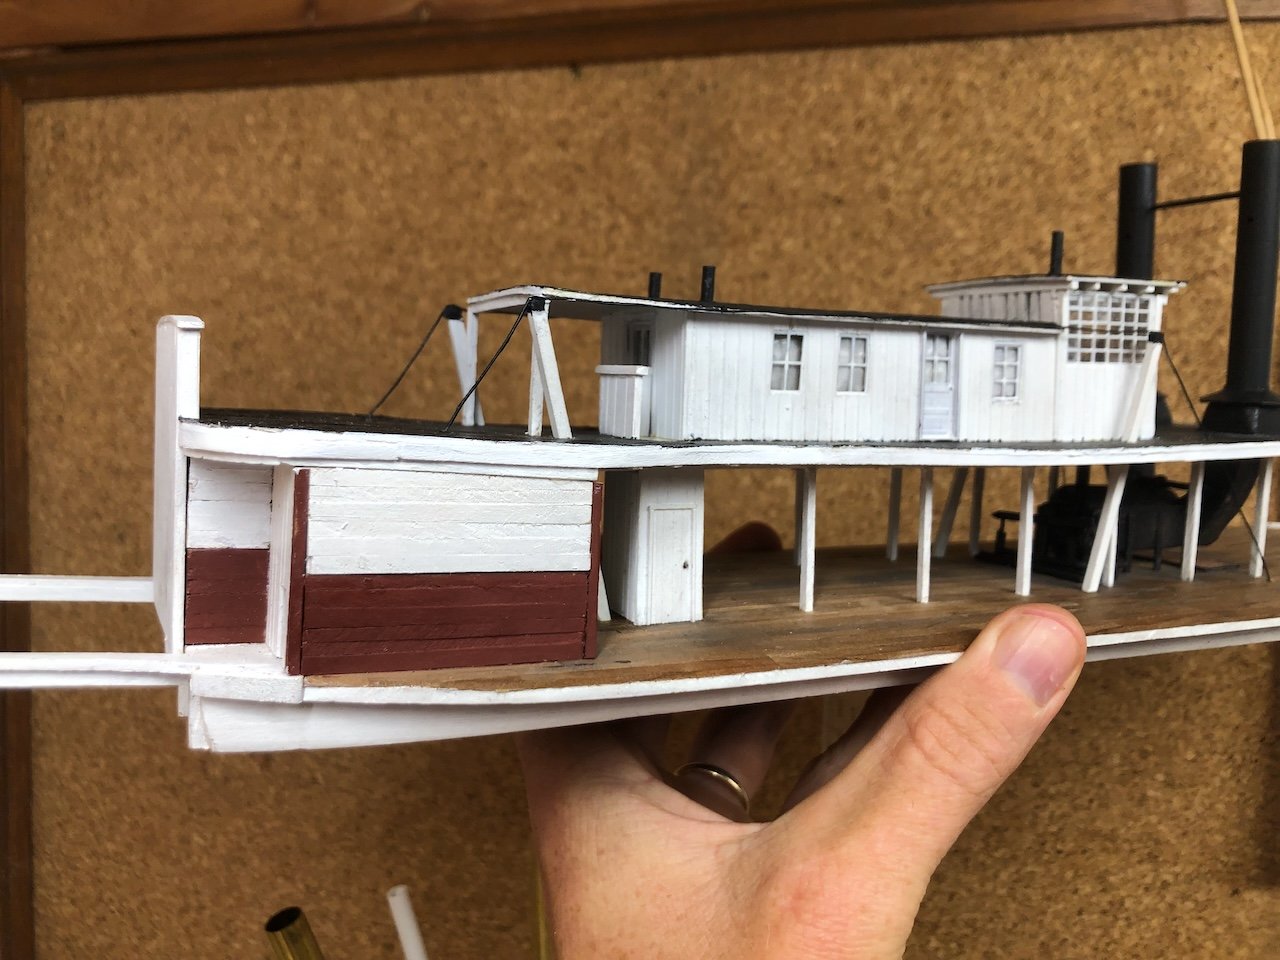
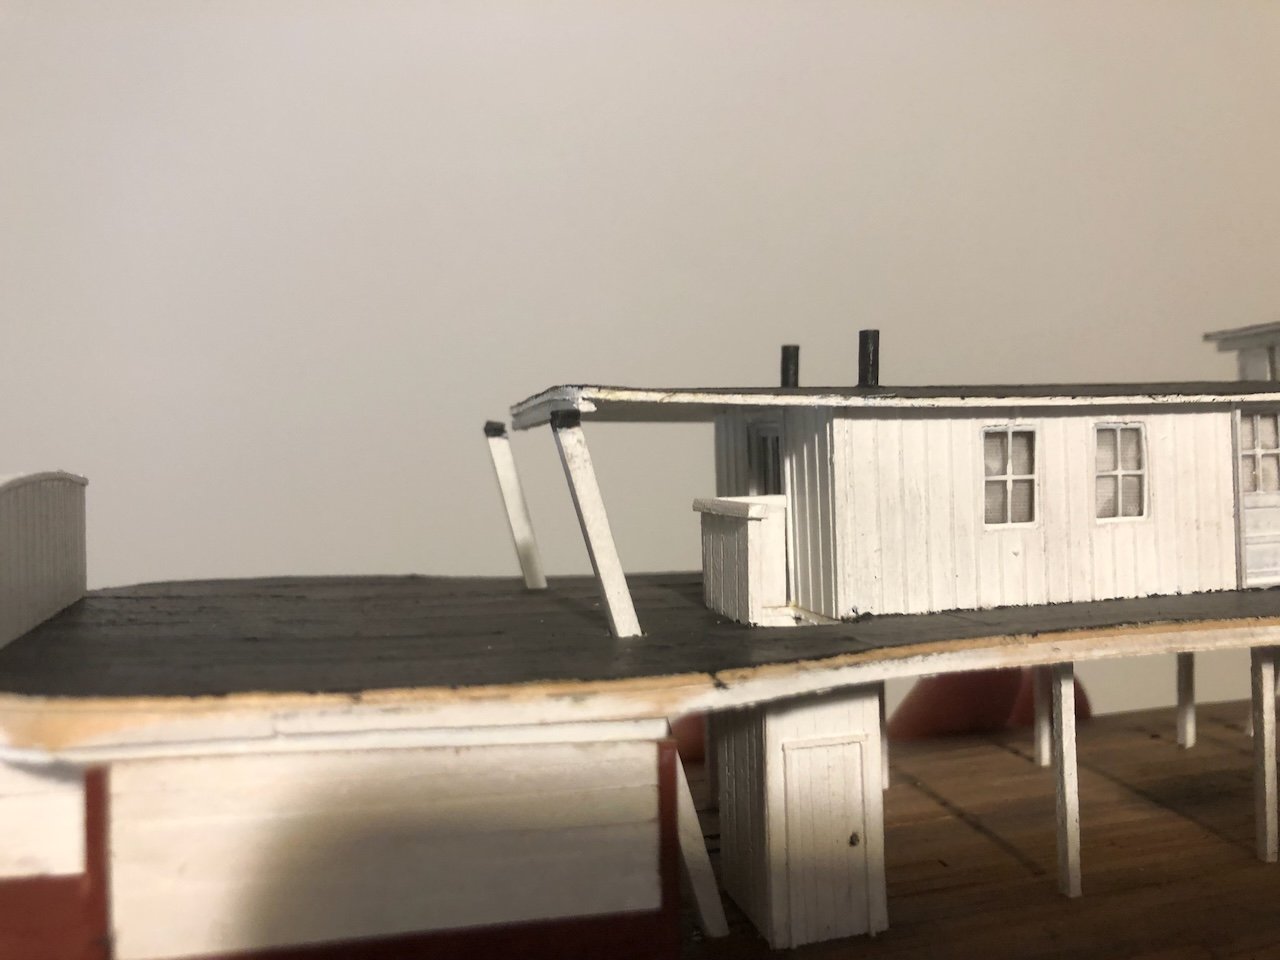
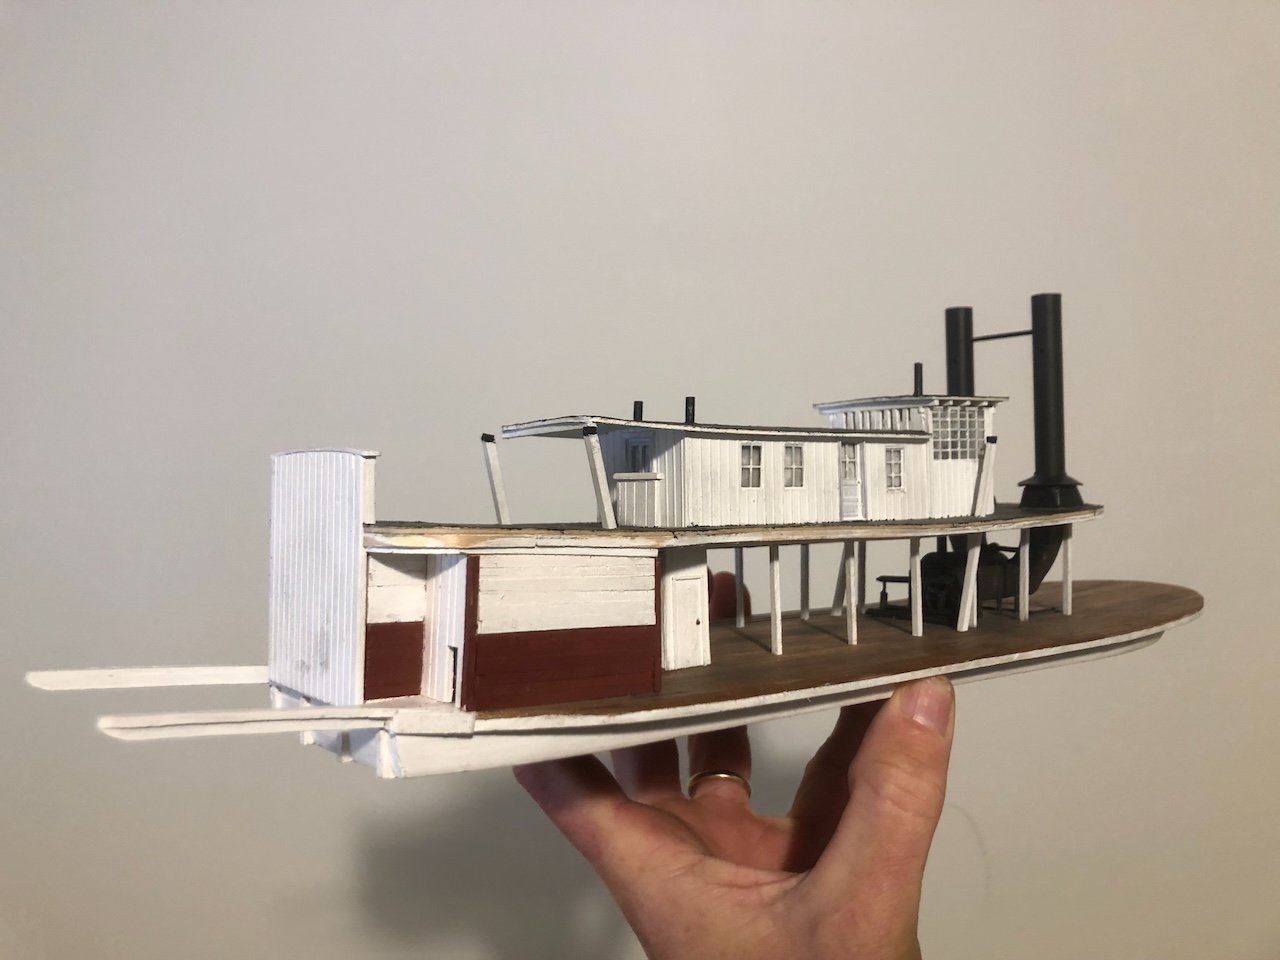
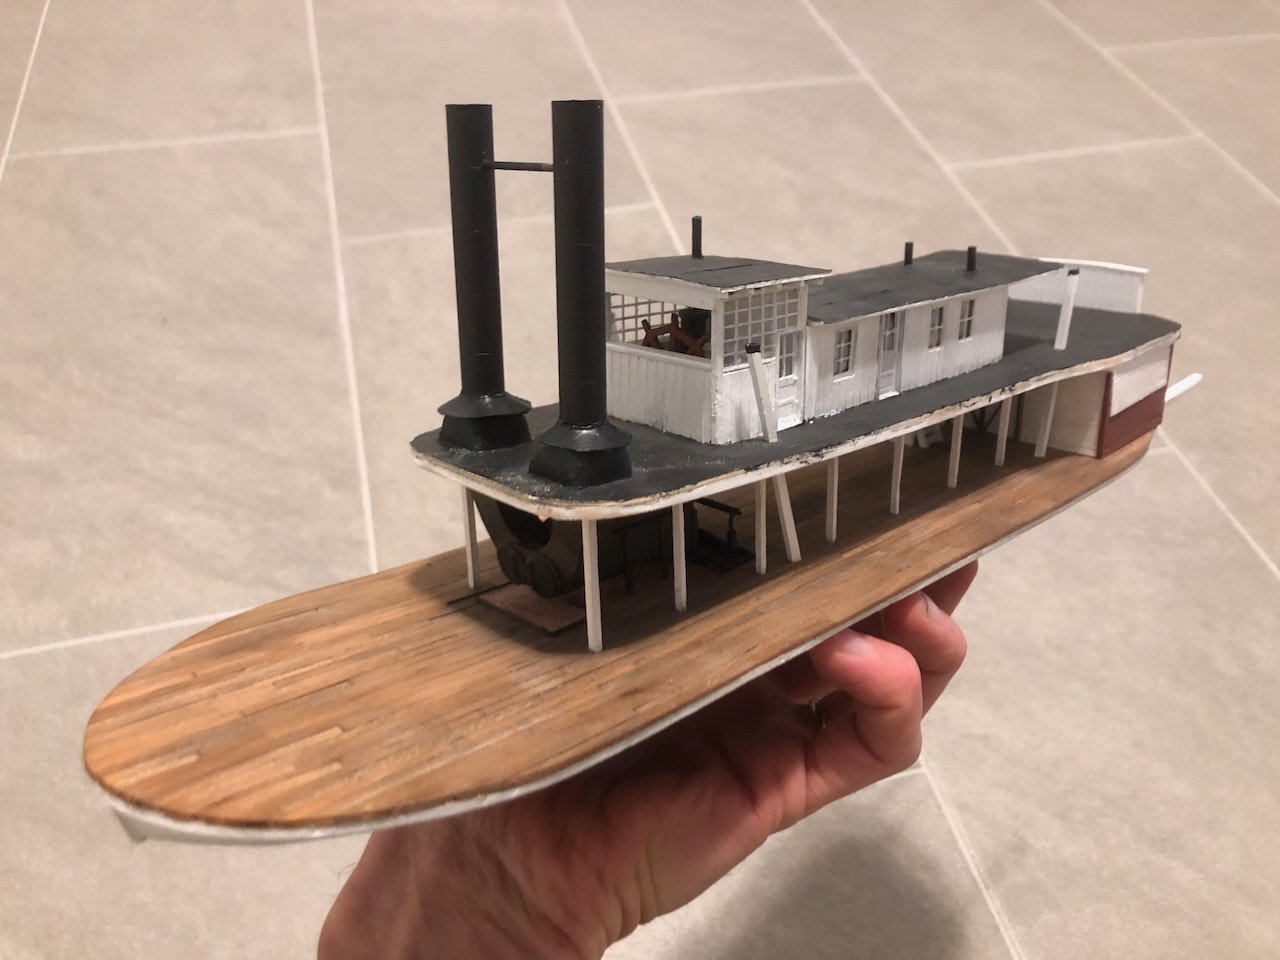
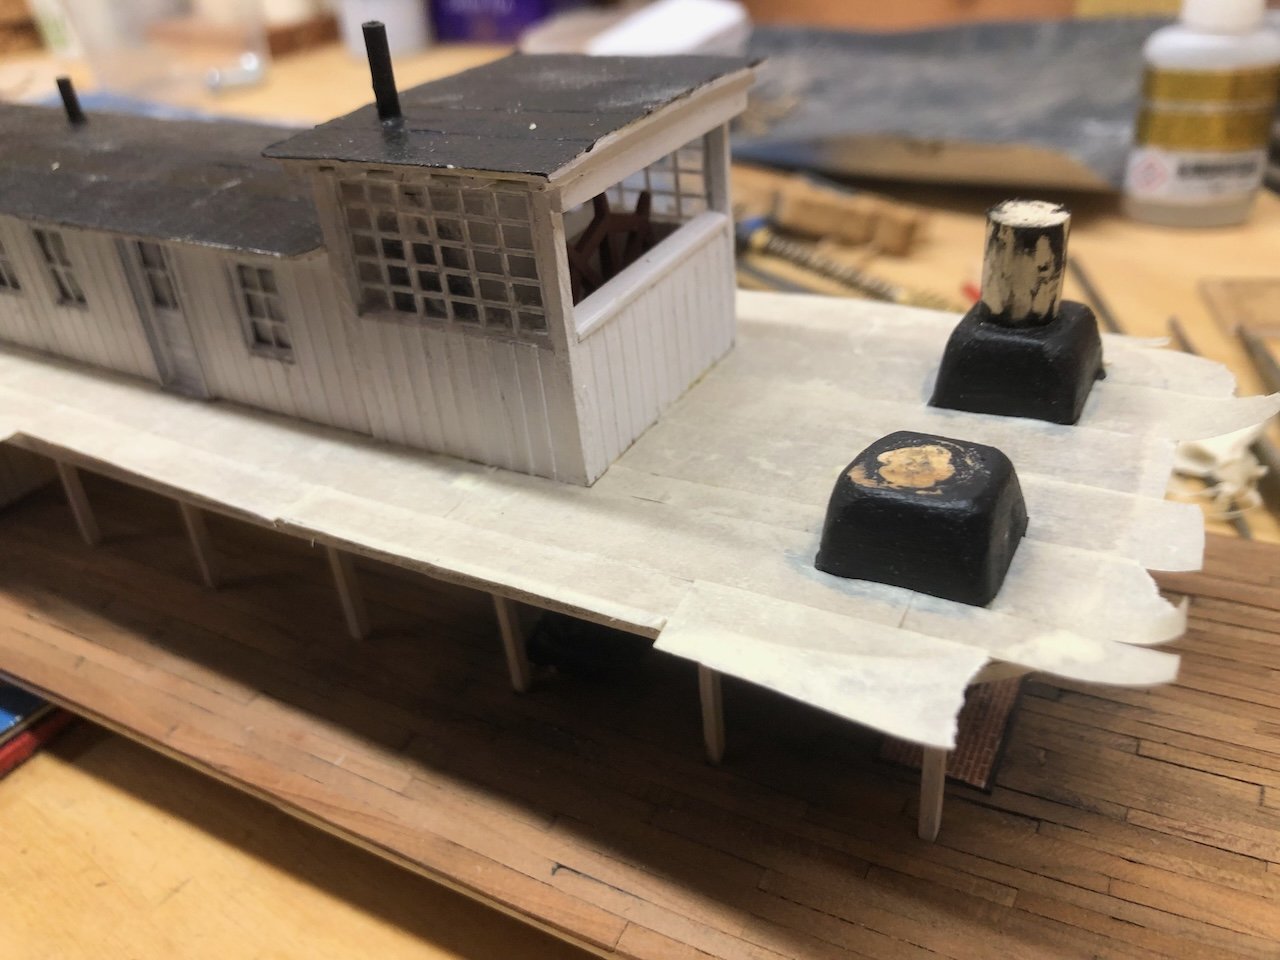
A few shots of carefully working the masking-tape "canvas" around the rest of the boiler deck: Lots of fiddly cutting and fitting here. But another benefit to masking tape is that it holds its shape stiffly and is easier to shape and fit than something floppier like silkspan or tissue. And it's just sticky enough on its own to stay put when you're trying to draw or cut a careful line, while still being easy to move when you want. I finally reached the point where a bunch of these overlapping mini-projects all came together. So here she is with cabins and pilot house attached, deck fully canvassed and painted, hog chain posts installed, and stern planking applied. Careful eyes will notice that I haven't yet installed the support posts for the rear cabin roof overhang, but it's plenty stable for now. I'm not worried about the messy appearance of the boiler deck's edge because that will get wrapped in a thin plank veneer. On Sunday, I'll be giving a talk on the evolution of steamboat design along the Missouri River, at a regional cultural center that specializes in supporting educational and artistic programming. I initially developed this talk back in 2021 as an online lecture for a regional non-profit that works along the Missouri River (you can view the talk recording here if interested), but this will be the first time I've given it to an in-person audience. As a bonus, I'll be displaying three of my steamboat models, the first time any of them have been presented to the public. Here they are all lined up and ready to go: In the back is Arabia (1:64), in the middle is Bertrand (1:87), and of course in the foreground is Peerless (1:87). All three operated on the Missouri River, from 1853-1856, 1864-1865, and 1893-1903, respectively. Model size is misleading, as Arabia is at a larger scale though she's actually very close in size to Bertrand. On the other hand, Bertrand and Peerless are the same scale, so you can really see how tiny the latter was in comparison to her ancestors. This talk has been scheduled for a long time, and I'd originally hoped to have Peerless done for this talk, but when it became clear that wouldn't happen, I aimed to at least reach a clearly presentable and semi-complete stage, which I just barely did! Thanks as always for following along, and helping me get to this point.

- 393 replies
-
- 18
-
-


