Cathead
-
Posts
3,522 -
Joined
-
Last visited
Content Type
Profiles
Forums
Gallery
Events
Everything posted by Cathead
-
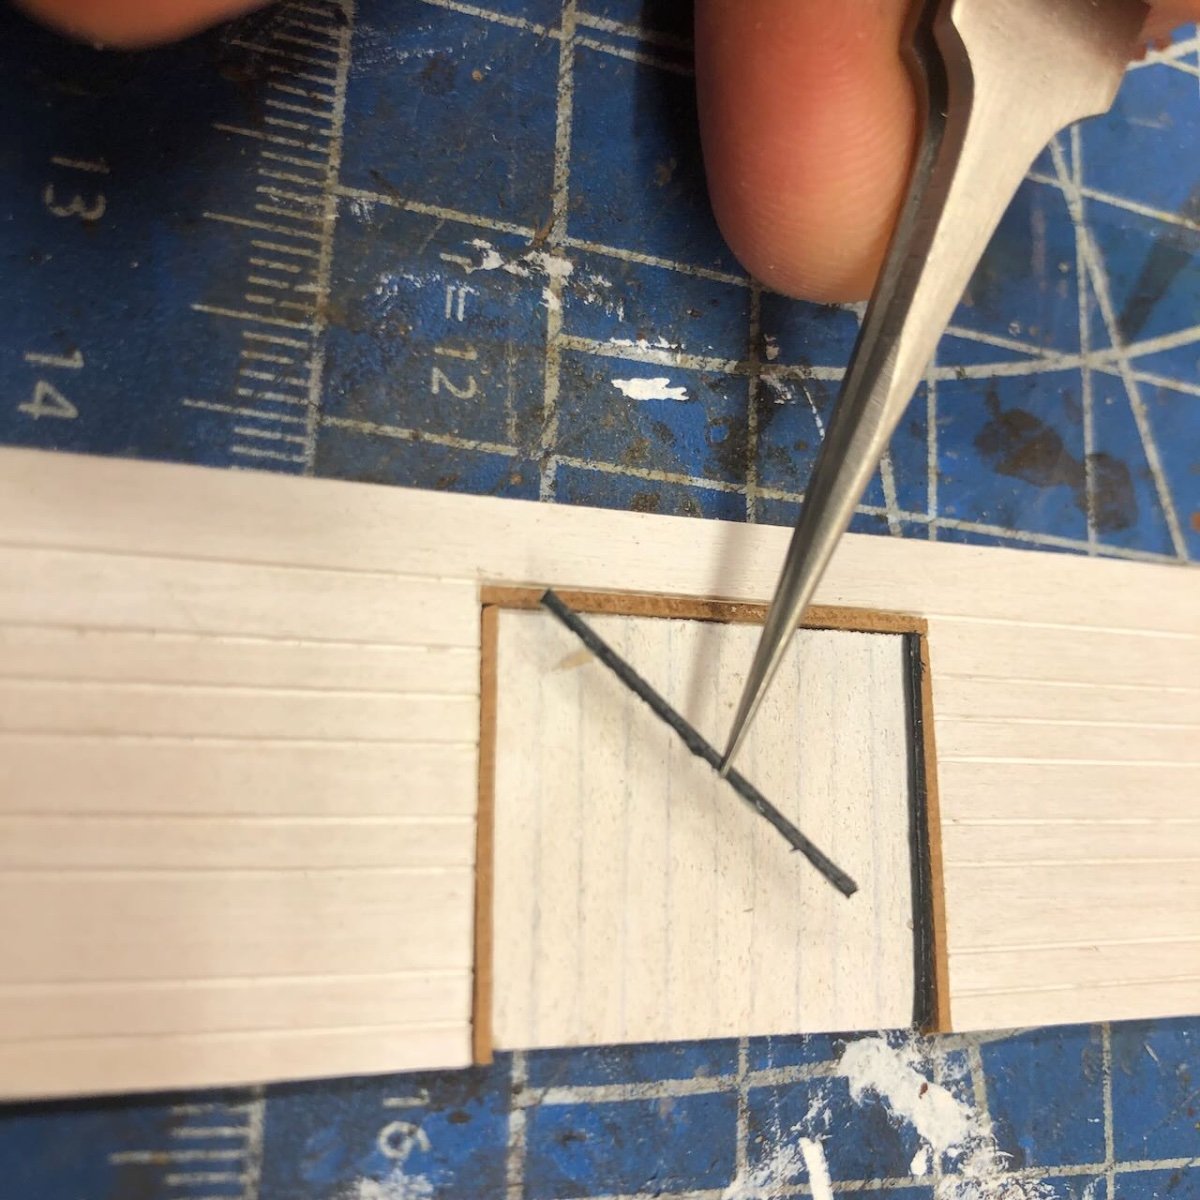
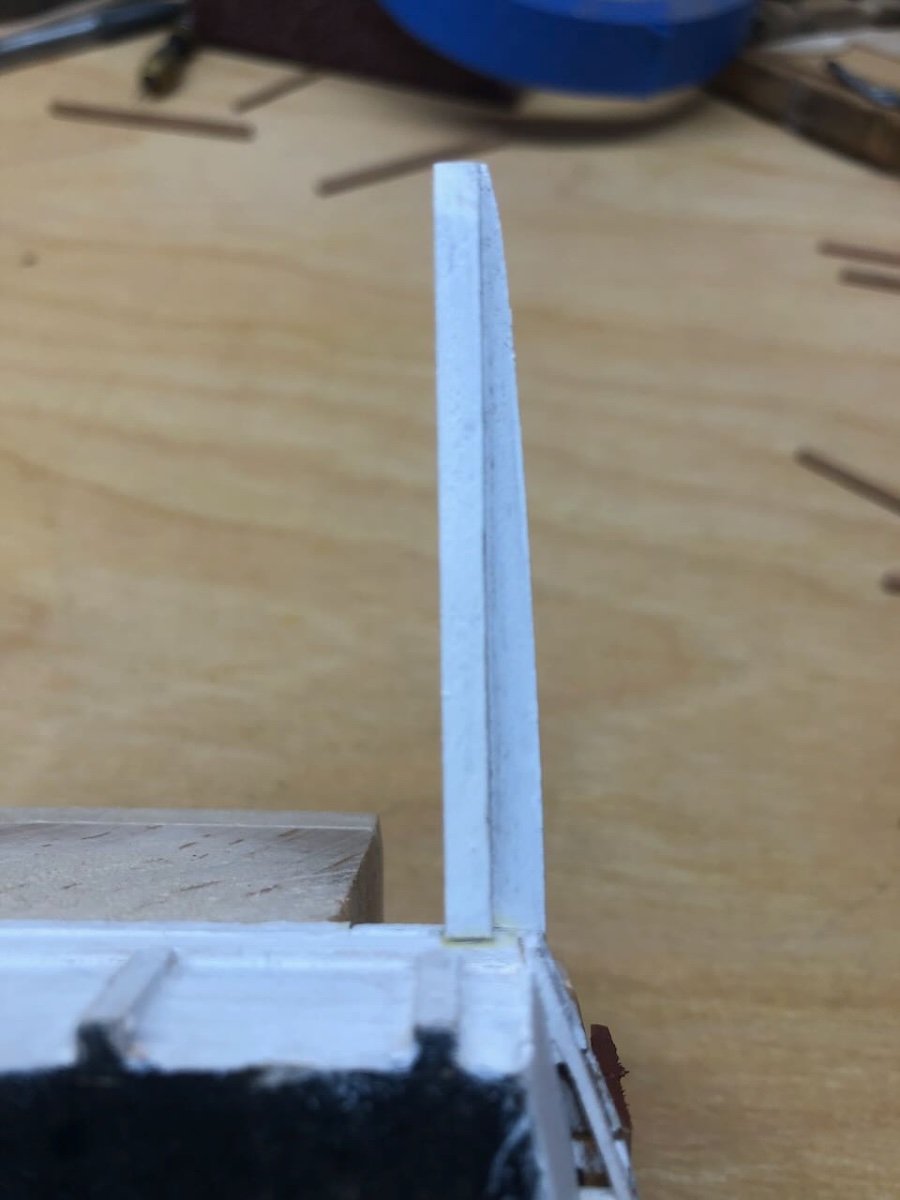
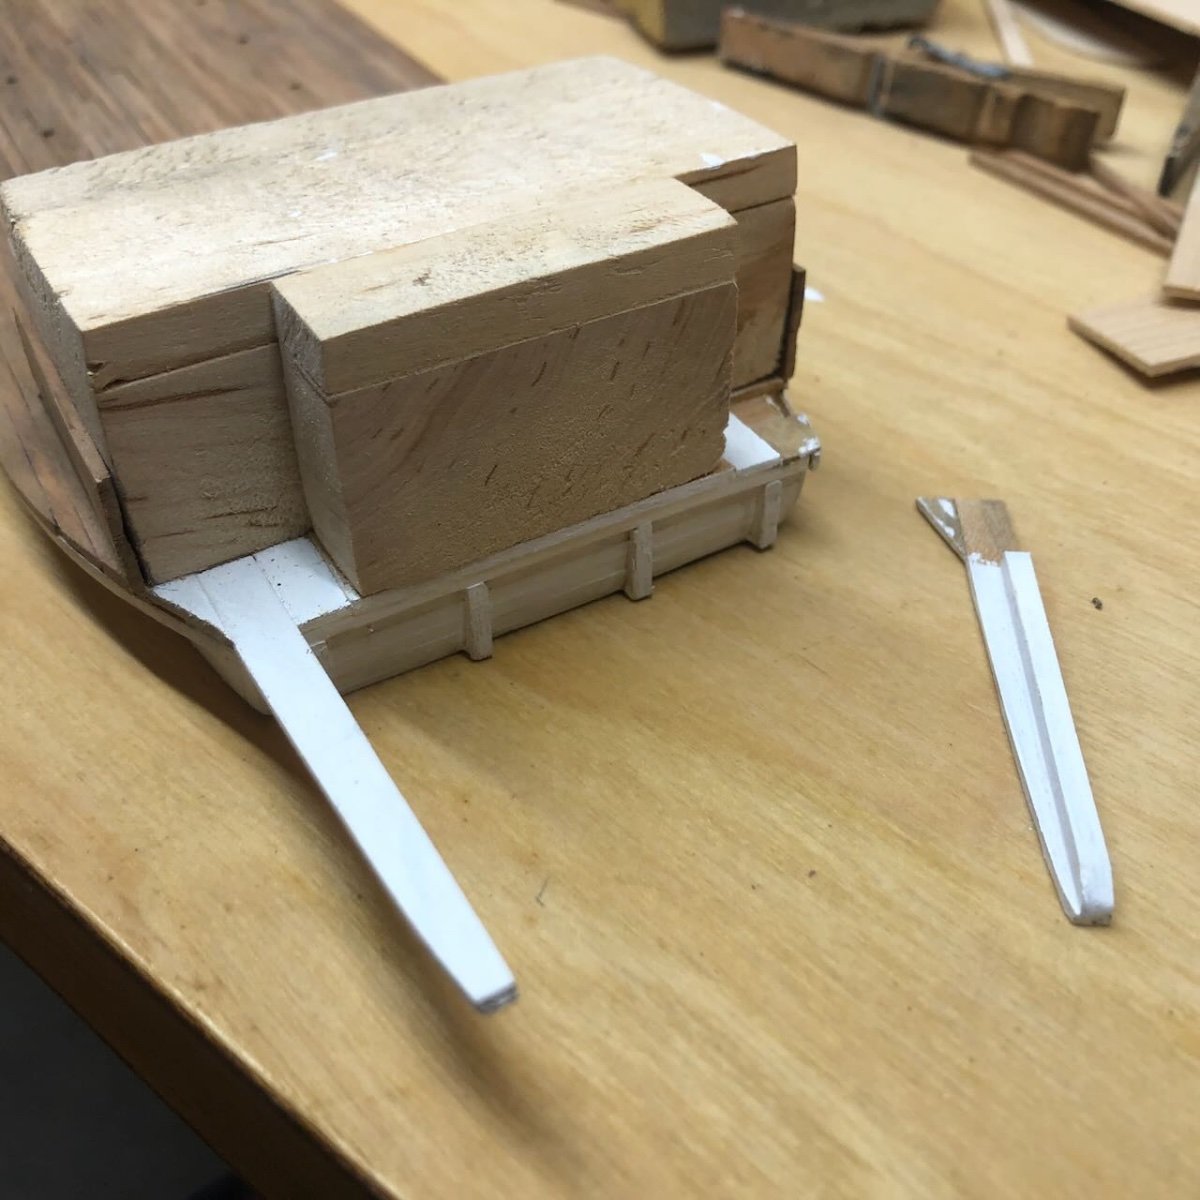
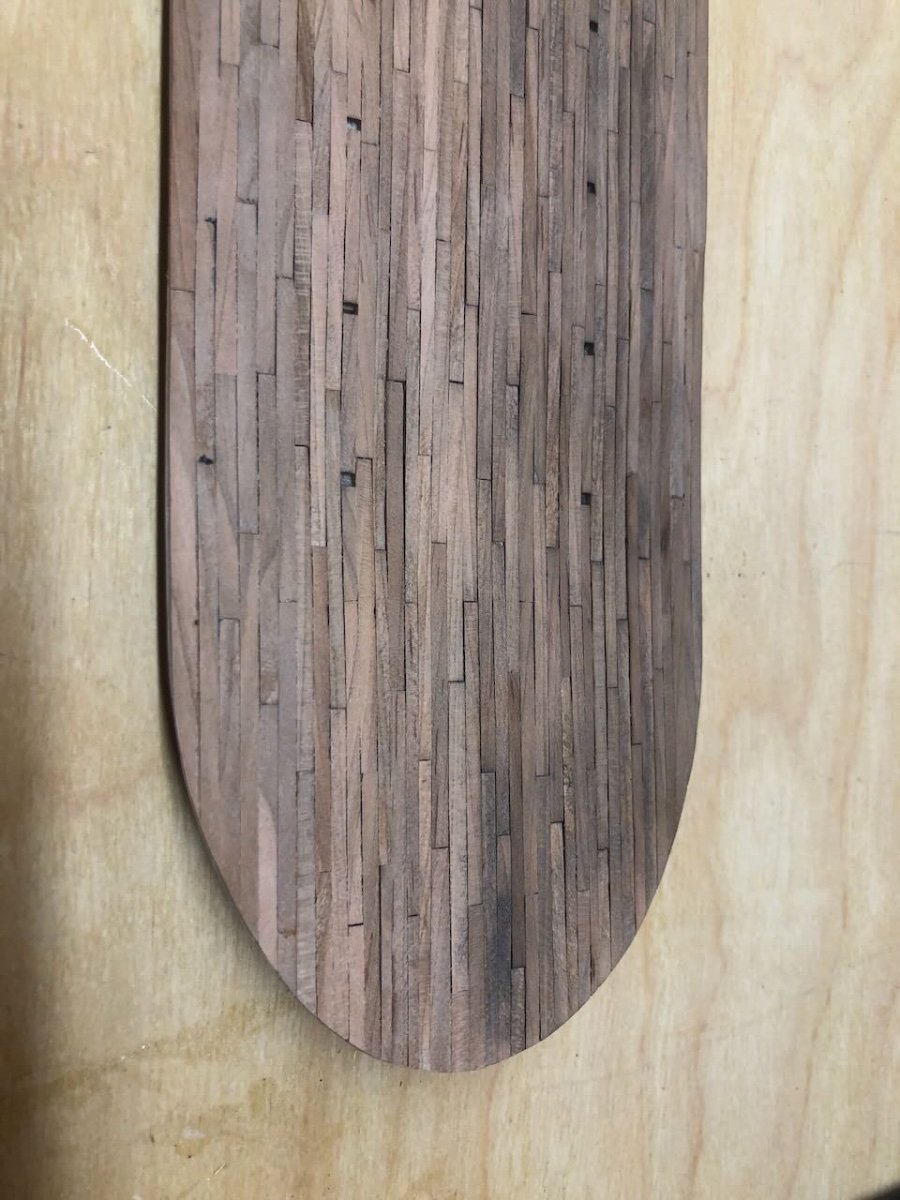
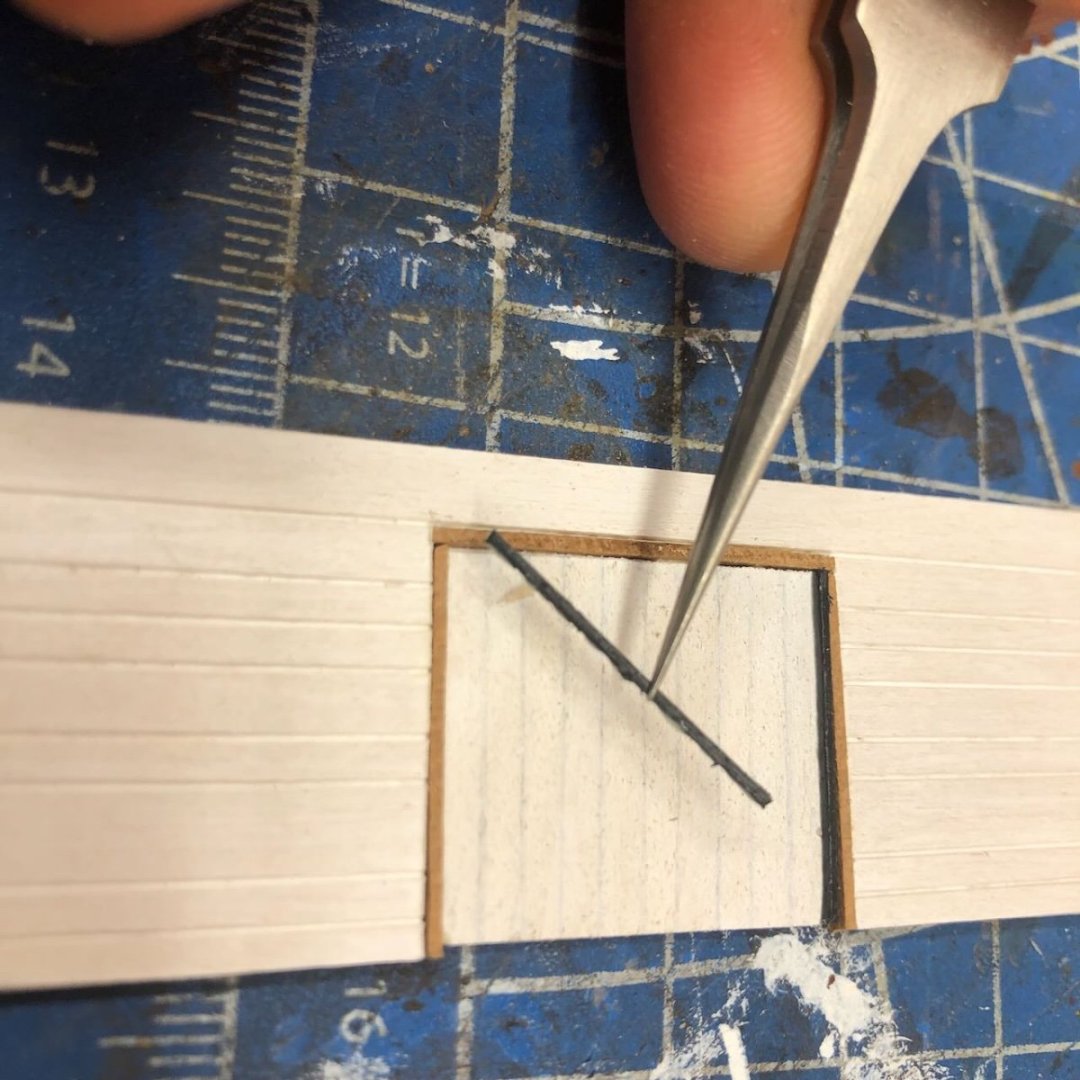
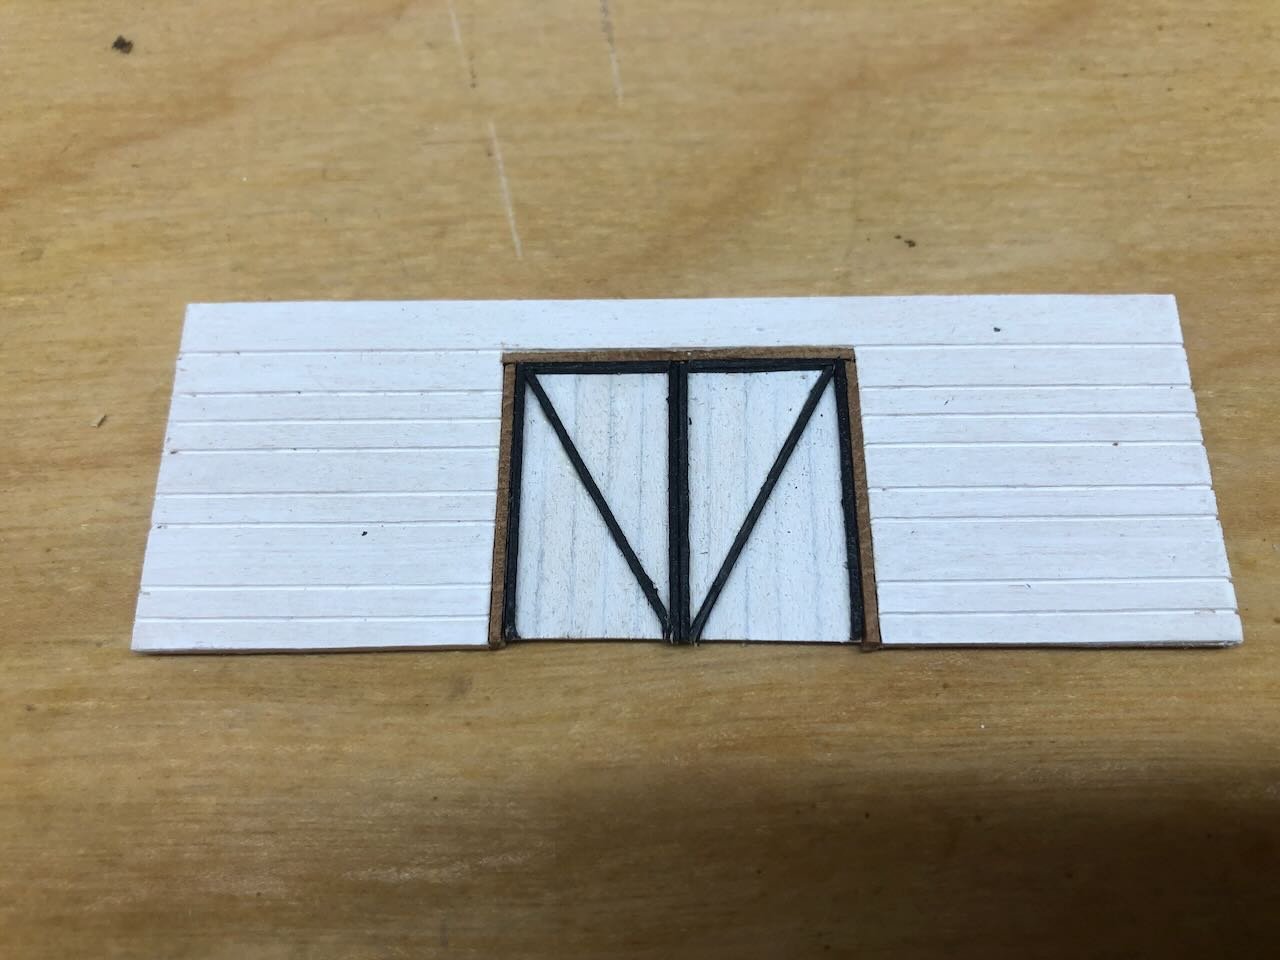
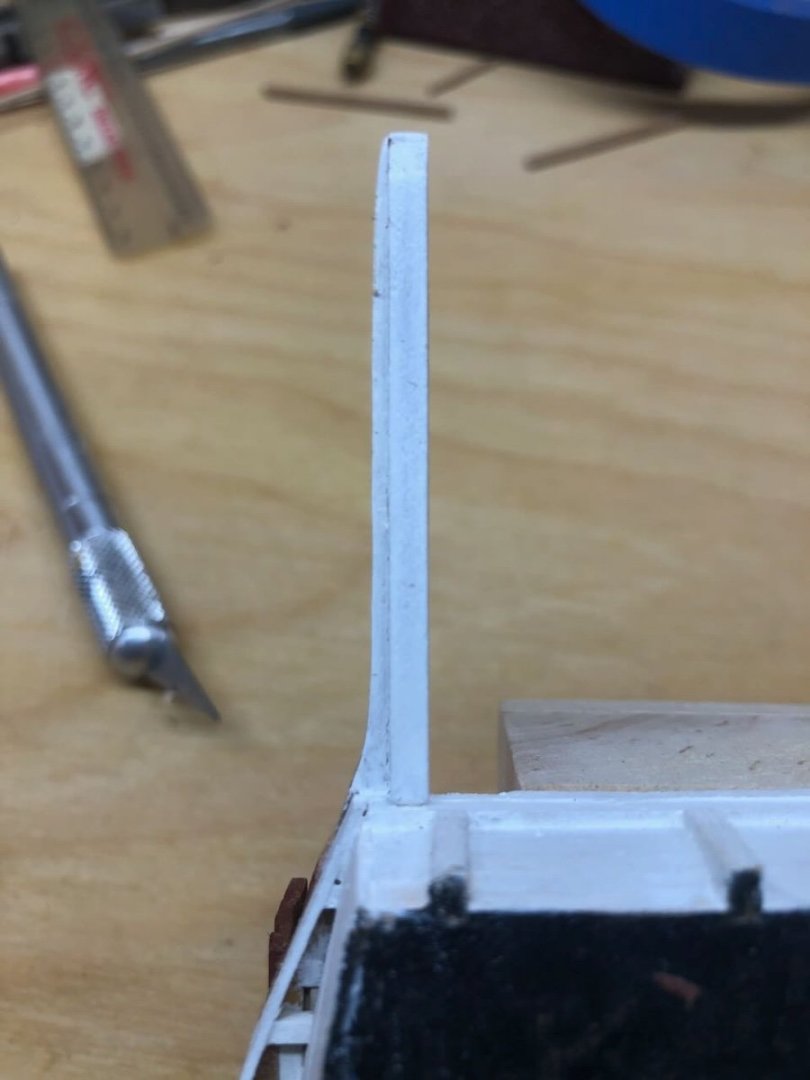
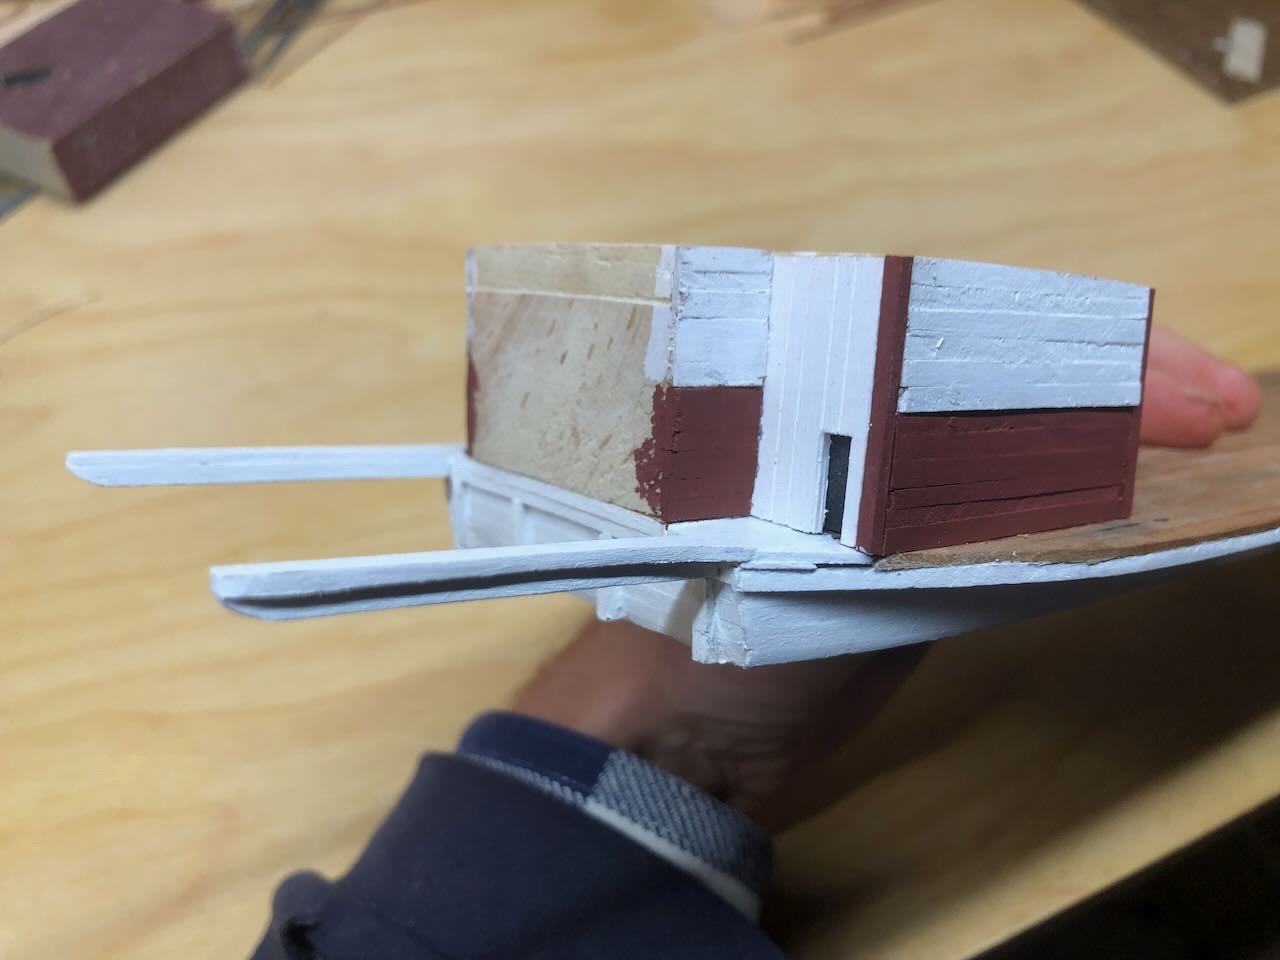
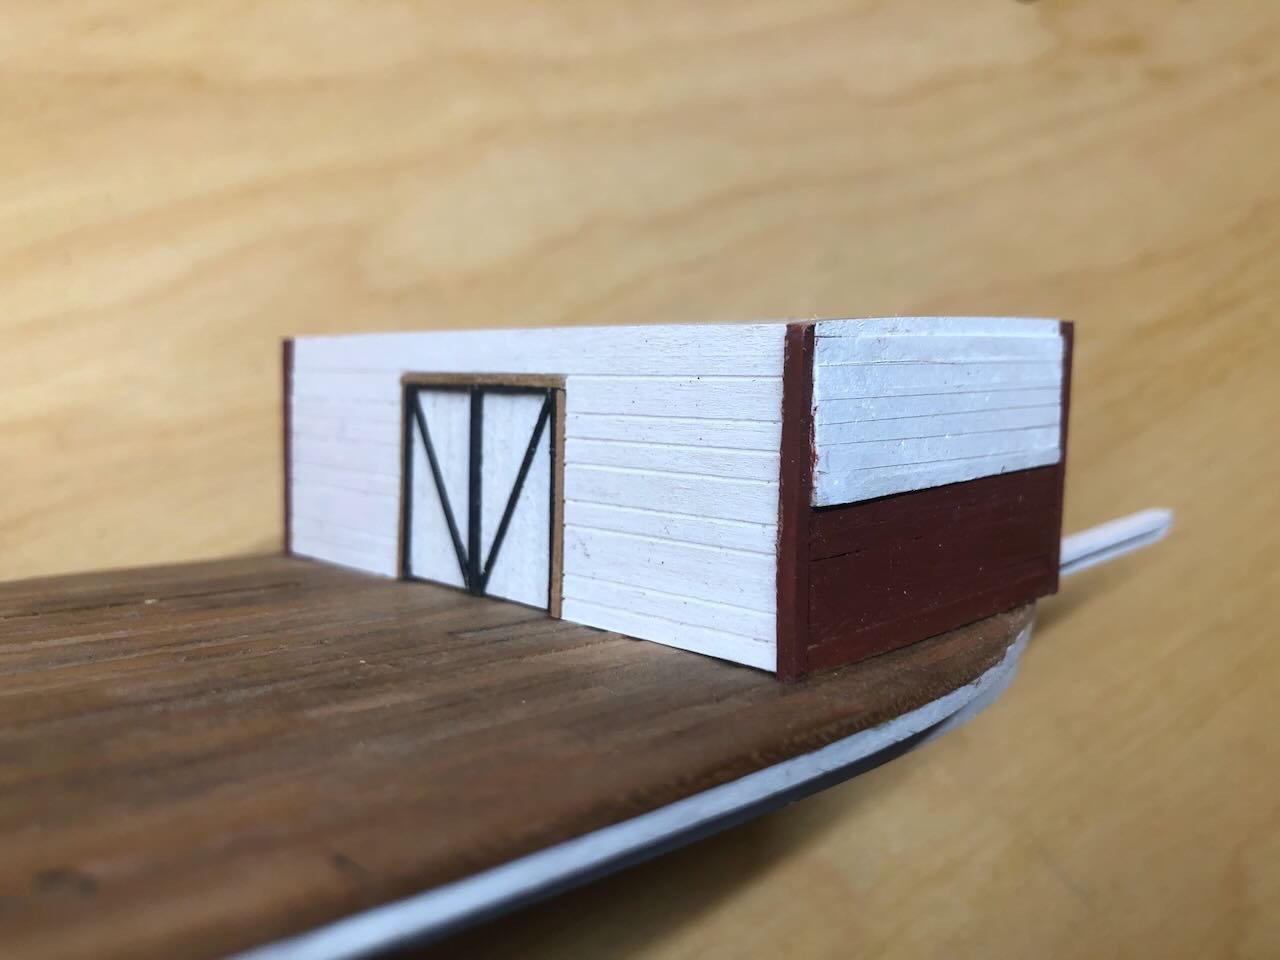
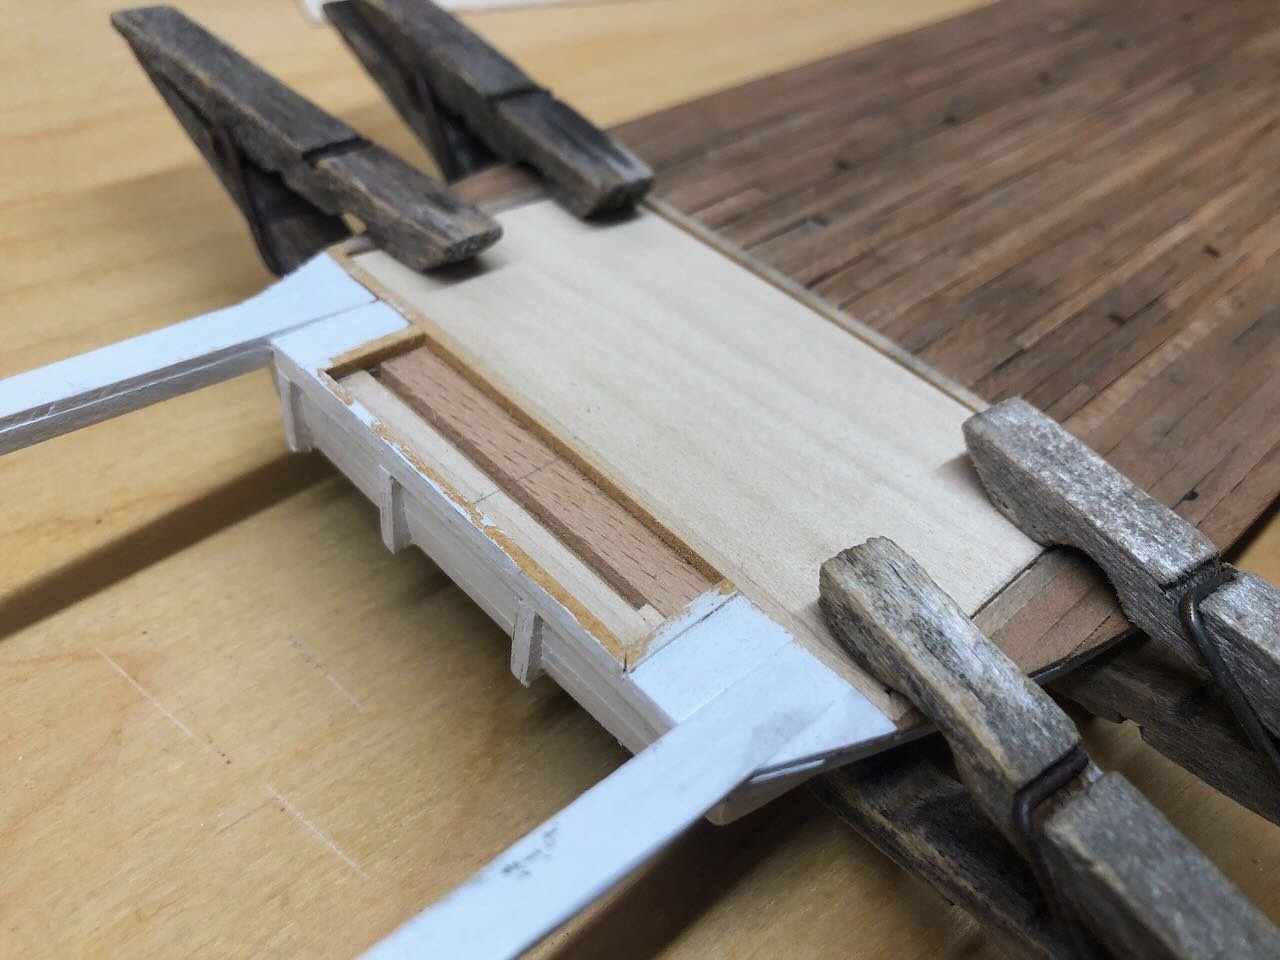
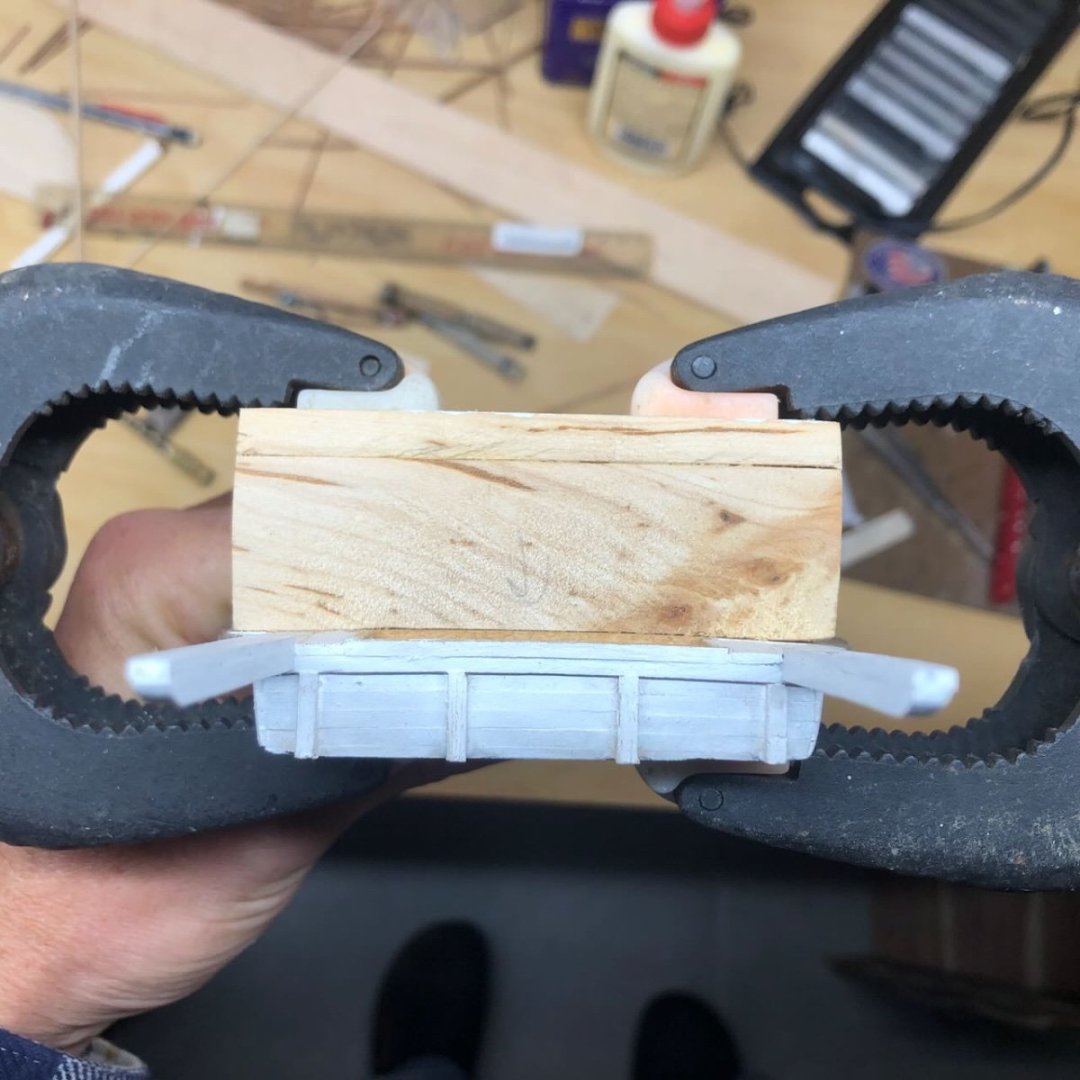
 Next I began building the fore wall of the engine house. I can find no photographic evidence for how this was set up, so just did it the way I wanted. I used a scrap piece of pre-scribed wood, since this isn't as visible under the boiler deck, and cut out space for a large double door in the center. I then carefully framed this with very thin cherry strips and cut a single door piece from thin scrap wood, which I scribed to simulate planking. Next I took some very small scrap wood, painted it black, and began laying out framing and bracing for the doors themselves. And here's the completed front panel with doors. As I began laying out the other siding panels, I realized I needed to alter the support beams for the paddle wheel. I'd made them wider than would easily allow the wheel's driver arm to pass, based on how the engine house structure came together, so I shaved them down a bit with knife and sandpaper. Here's a before and after comparison (from below) of the unmodified starboard beam and the modified port beam. You may not understand quite why I did this but it'll be easier to explain and show later on; trust me for now. Next I began building planking panels for the rest of the structure, the same way already as described above. Here's the outcome: As usual, close-up photos show every flaw and bit of roughness, but this matches my usual level of modeling output and I'm happy with it. Consistency helps tie a model together. In the stern shots you can see two dark slots; these are where the paddle driver arms would pass through the wall of the structure to reach the engines. As this is solid, I'm obviously not modeling the interior, so am just using black paint to suggest a void. It's good enough for this model's purpose and skill level. The very stern isn't planked in yet because it has a different nature. It rises above this structure and the boiler deck (look at the original photo I posted earlier) so I don't want to install it until the boiler deck is in place. This will also be vertically planked instead of horizontal like the rest. At this point I think I can start laying out the rest of the support grid for the boiler deck. The goal, as stated in earlier posts, remains to build this whole thing off-model and get it all nicely sanded and finished before it gets installed. Thanks for reading these all-of-a-sudden dumps of content! It's amazing what finally having a few days free can do.

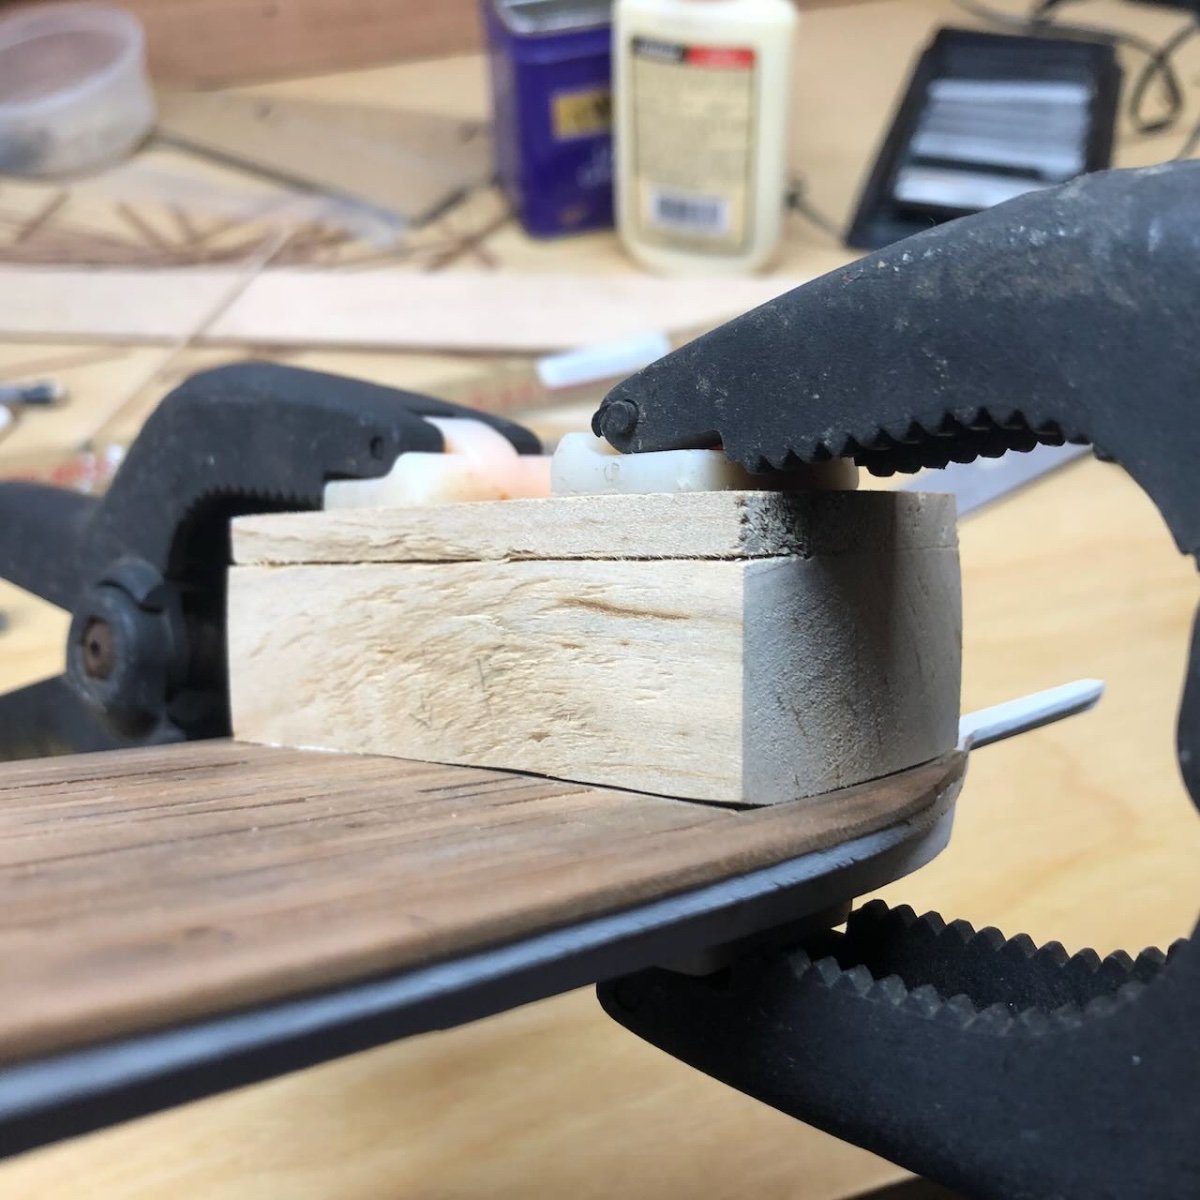
- 393 replies
-
- 17
-

-
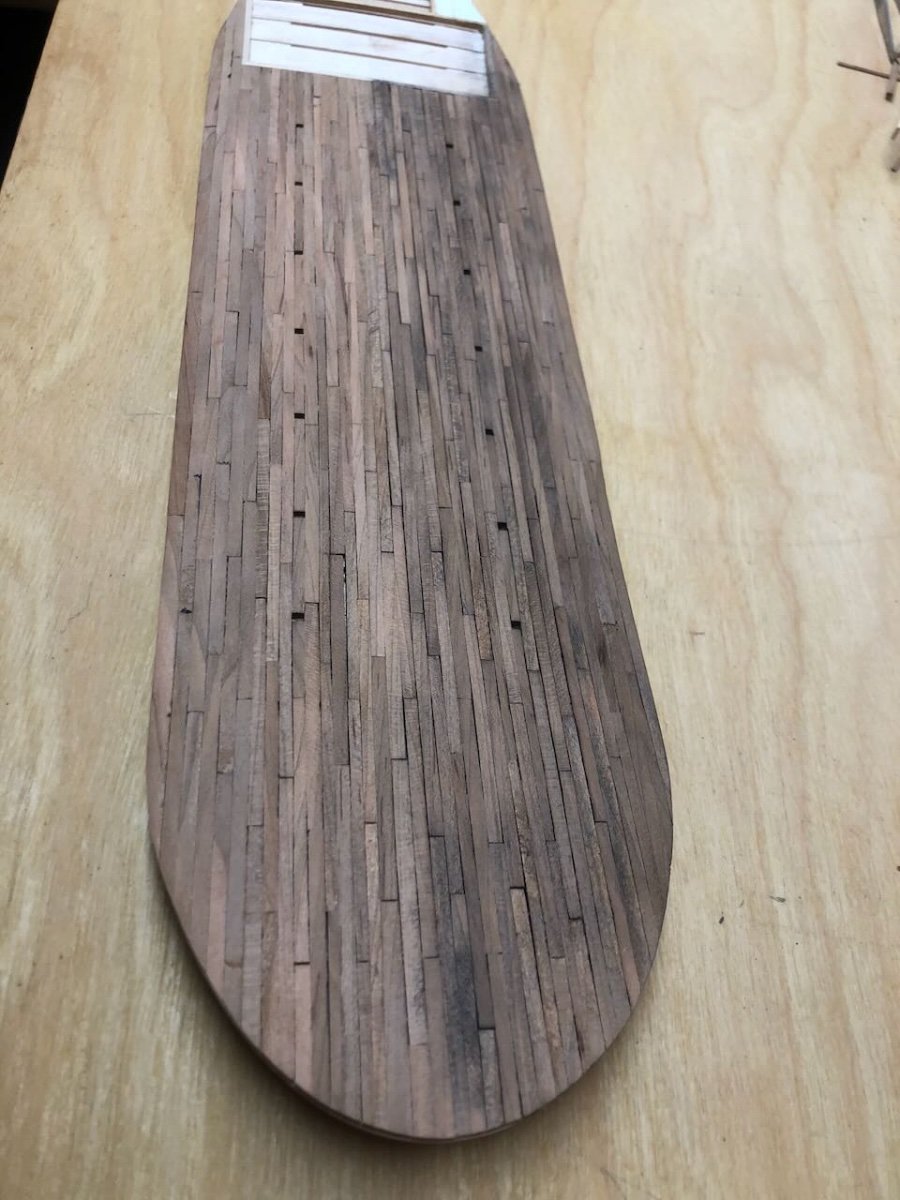
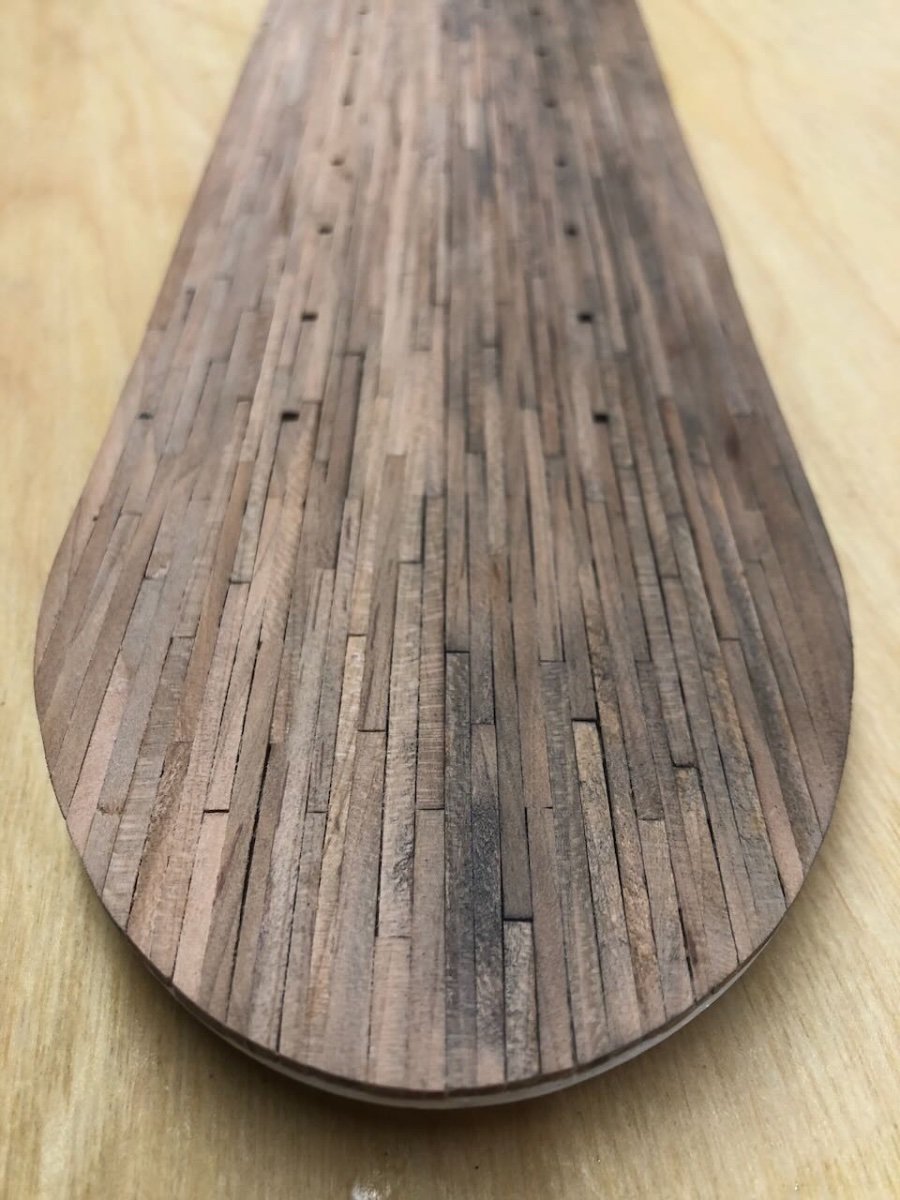
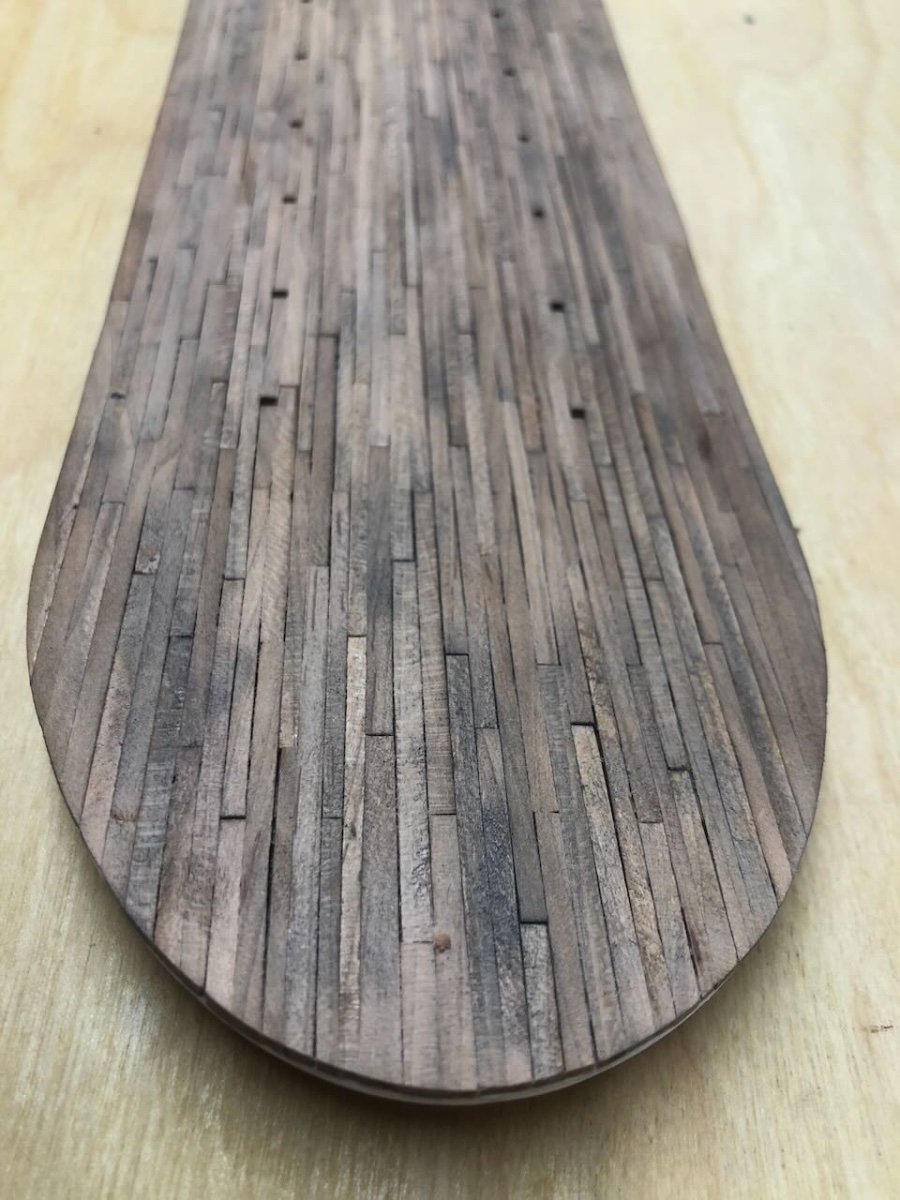
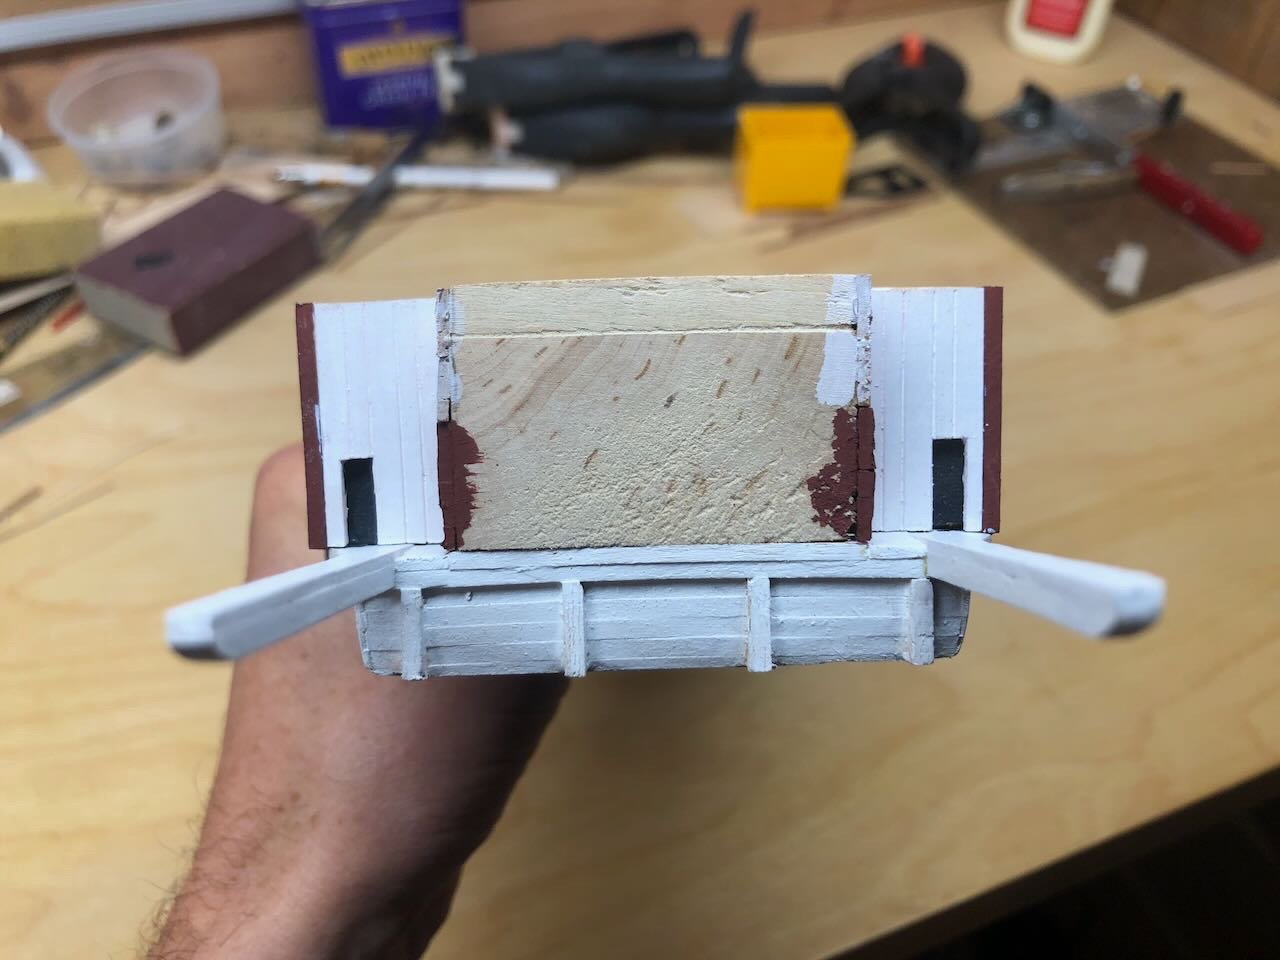
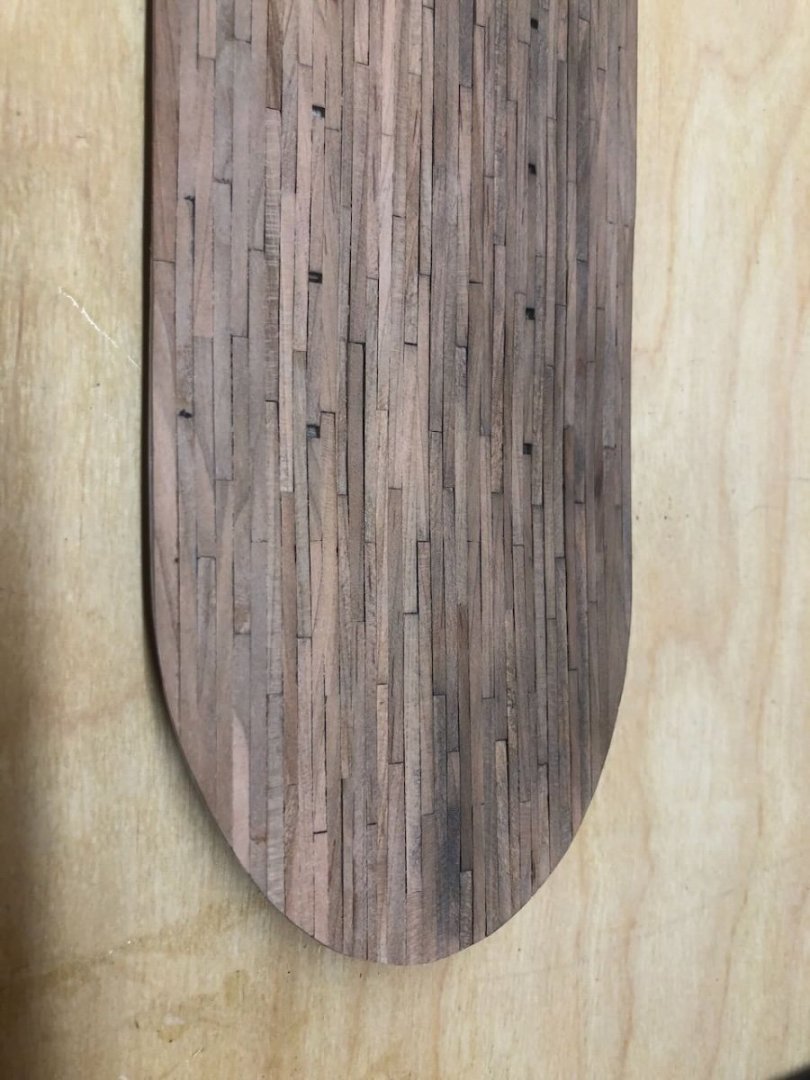
Next, I started on planking over this structure. In the original photo at the top of the last post, you can see that the lower portion of the walls is painted a darker color, but I have no way to know what this color was (probably a dark red?). I decided to try making this segment from the same cherry lumber as the deck, and make the white-painted upper surface from something else. In part, this was because I had leftover cherry strips from the deck planking and didn't want to waste them as making your own lumber is a lot of work. However, as you might recall from the decking, these strips are not as uniform in thickness as purchased wood. So installing them directly on the model would leave a very uneven surface, and I don't want to sand them down on the model. So I glued up some longer panels of about the right total height, using my magnetic jig, then sanded the panels down to a reasonably uniform surface. I then cut two to length and glued them to the outside walls of the engine house. At this point, by now evening, disaster struck when I carelessly banged the model against the workbench while rotating it and broke off one of the paddle wheel extensions: I had always known this was a risk and tried hard to avoid it, but sooner or later one gets sloppy (or at least I do). I glued it back on as best I could, clamped it down, and decided I was done for the night. I may drive in a pin on both sides to provide a bit more structural support. Today I hope to make further progress on planking in this structure. I'm also trying to decide whether to leave the "colored" panels in the natural cherry, like the deck, or whether to paint them a dull red to match the eventual appearance of the paddle wheel. The natural color is still intended to look like a very weathered old coat of paint or other sealant on the deck, but I'm starting to lean toward actual color for the side planking. Thoughts? That reminds me, I also did some weathering of the deck before I started on the superstructure. I use pastels, as I have throughout my modeling "career". Here you can see a side-by-side of the original cherry (left) and after some dark pastel (right): And the full application: I really like using pastels on bare wood as they bring out the texture in a way that paint does not, and that paint prevents if you put pastel over it. Here are a couple more photos showing the bare (left) and weathered (right) deck: I personally quite like the look, but again am leaning toward painting the side panels. In part this is because the rest of the planking above that zone will be painted white, so a more consistent texture across the whole wall will look better (since the vessel didn't actually use two different woods there). Thanks for reading this long-winded update, hopefully more to come later this weekend!


- 393 replies
-
- 13
-
-
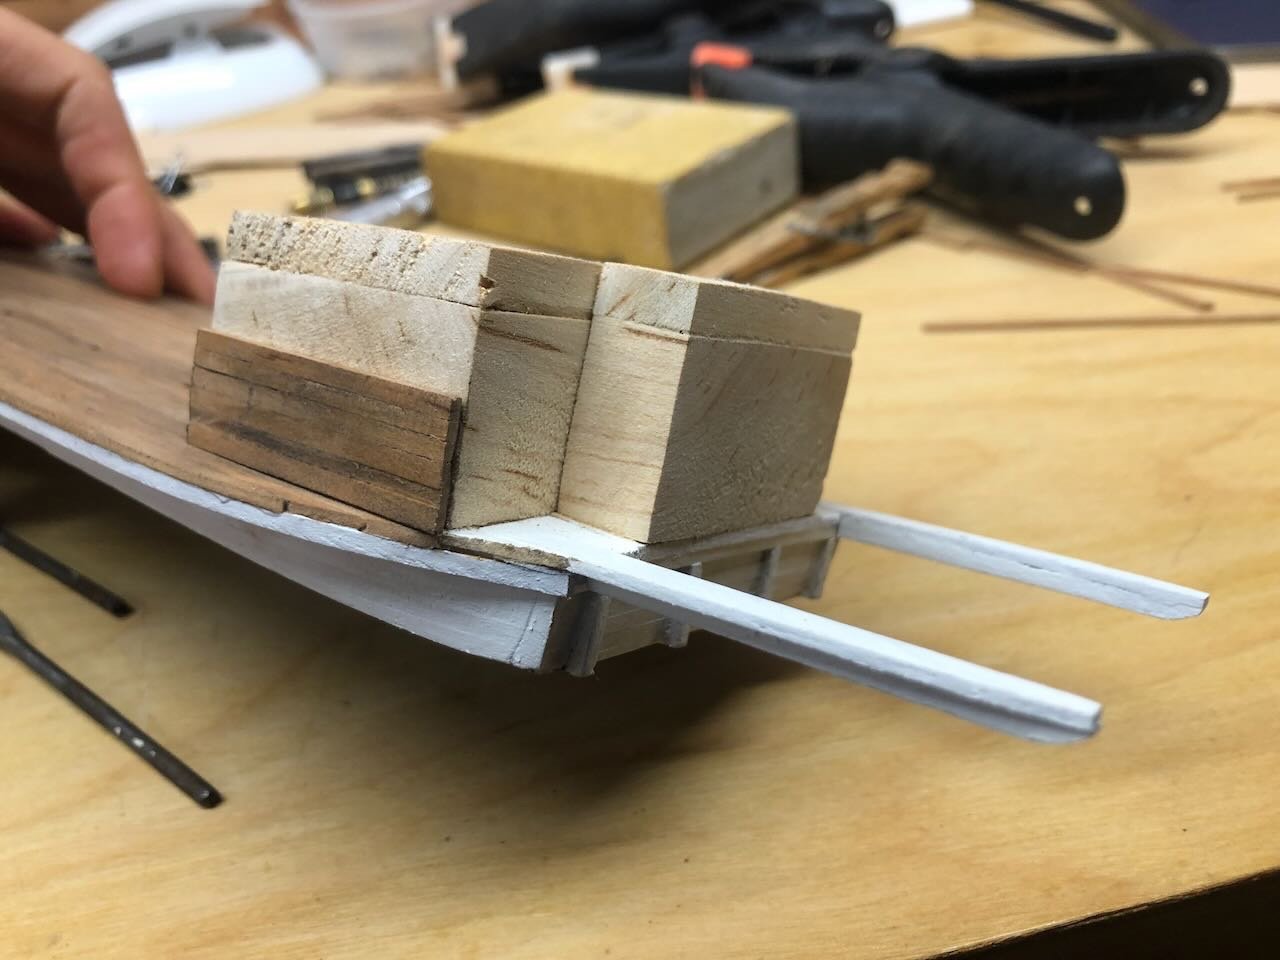
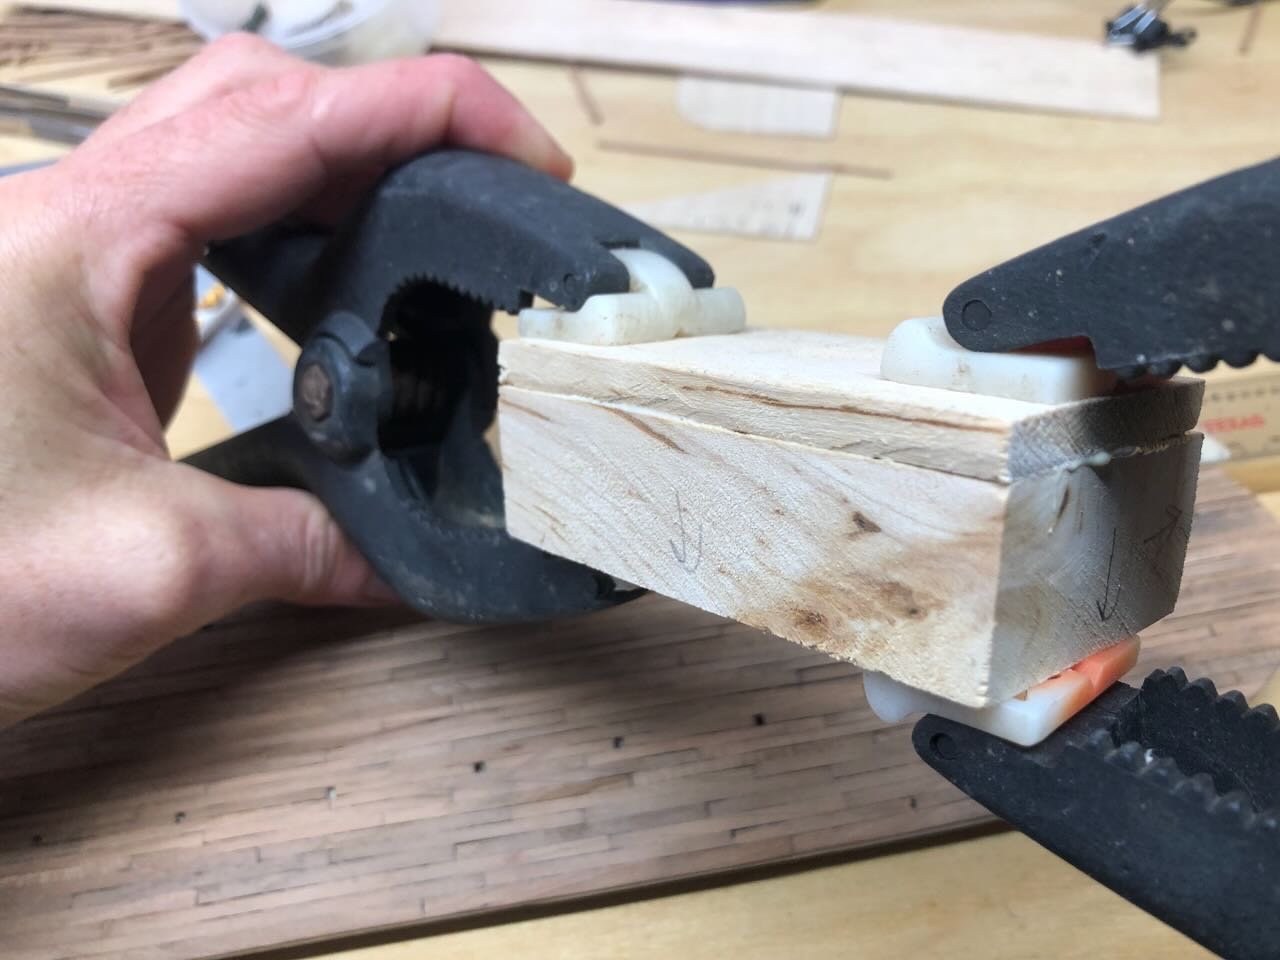
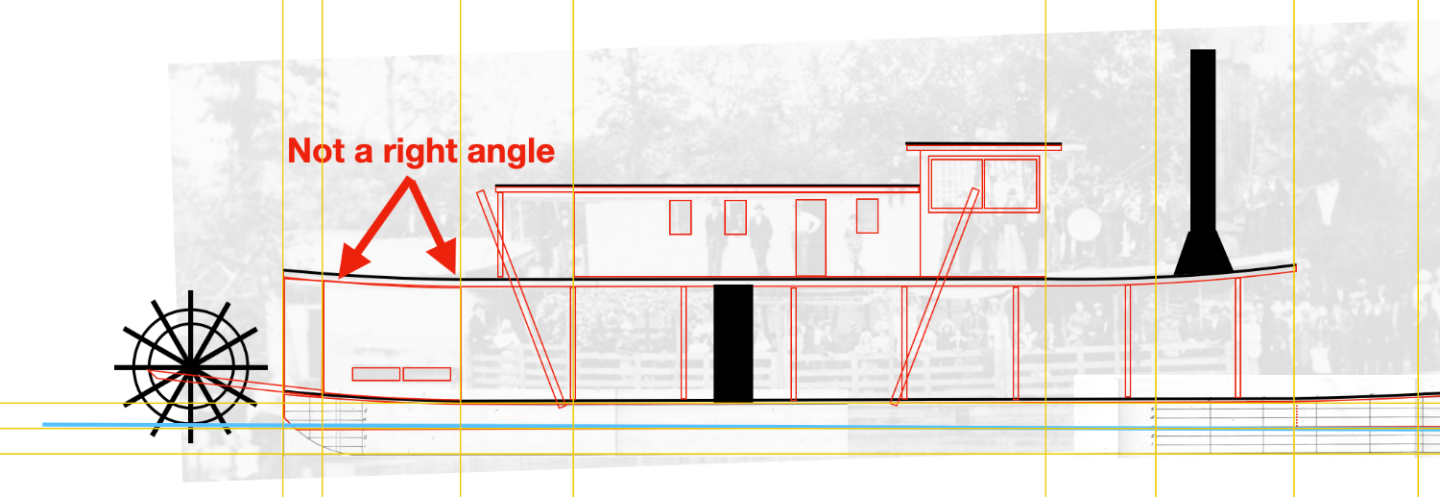
Thank goodness for American Thanskgiving, which finally provided some free time to get back to this poor neglected model. After an excellent Thursday of cooking and eating, I was able to devote Friday afternoon to Peerless. Although I had been working on the framing for the boiler deck, I decided I needed to complete the aft superstructure first (the short enclosed "building" that houses the engines, just fore of the paddlewheel), because the rest of the deck going forward anchors to this. Here's a reminder photo from the beginning of this log: My initial plan had assumed I'd build this as a framed structure that I would then plank over. In part, this was because it's not square. The deck starts to angle upward here to accommodate the wheel, so while the fore and aft sides are vertical, the port and starboard walls are at an angle. I thought that framing this in would be the easiest way to handle that odd shape. This is where I mean: But the more I thought about it, I was worried that a framed structure would be hard to make both strong and perfectly in-shape; even a small amount of deformation would be a problem as this anchors the entire superstructure. So I switched to making this from a solid block of wood that I would plank over. To do this, I cut a rough block from the leftover basswood I milled early on in this build (the same as was used for the hull). I chose this because (a) I had it lying around already, (b) it's quite light so it won't make the stern too heavy, and (c) there's a certain symmetry to using the same method here as I did on the hull (solid block planked over). The basswood wasn't thick enough for the height I needed, so I glued an extra slice on top: When this was solid, it needed to be cut to the proper angle to accommodate the aft rise of the deck. If you look closely at my drawn plan above, you'll see that I intentionally planned this rise to start at this building to make model construction easier. Fore of this building, the deck is flat, meaning I can accommodate this rise wholly within the building and not by having to bend the rest of the boiler deck. To make this cut, I formed a careful pattern of the angle needed, taking it directly off the model sitting on a flat surface and using squares, then used that pattern to set an angle on my table saw, then ran the block through to achieve a slight parallelogram shape. It's barely visible in photos but it's definitely there. Next I had to alter the hull to support this block. I'd built the after superstructure area as an open frame on which I'd intended to attach vertical framing, but that left the interior open, with very little surface to attach this big block. So I filled this with a thin sheet of scrap wood: Next I had to accommodate the port-starboard camber of the deck. This was another reason I'd initially planned on framing this, but it just took some careful sanding to introduce a subtle concavity to the bottom of the block. When I was satisfied it was close enough, I glued and clamped it in place. Not shown, I also set several brass pins in the base of the block to hold it securely in place. I don't care about the mini seams you see, because they'll be planked over. This building has a small extension right at the stern (refer to the original photo at the top of this post), so I followed the same practices to make and install another block: That concludes the basic structure for the engine house. So far so good.


- 393 replies
-
- 12
-
-
Nice hack, it gives a nice "industrial" look to that area.
-
That looks beautiful! You must have cut the acrylic to fit around the hull; how did you determine the waterline shape/pattern to cut out?
-
You could also consider paper. Here's a thread I started years ago to share a method I developed that I personally think works well, looks good, and is much preferable to working with fabric of any kind. Here's what the sails look like on one of my models: Don't know if this would work for you, I haven't seen the movie so don't know exactly what look you're going for, but it's another option.

-
Anything further to share on this project? As well as any background info? Looks sort of like a Missouri River keelboat, is that the intended prototype?
-
Looks like you're getting lots of good practice in problem-solving, and giving some great examples of how to approach it! Looking forward to seeing how this comes together.
-
I'm in no way an expert on this, but on my builds involving exposed wood, I've always used natural food-grade wood oil, the kind you'd use on cutting boards or wooden utensils. You can see the resulting finish on builds like my revenue cutter or NRG capstan in the signature below if you want to assess the look. The oldest model I've treated this way is 9 years old, has gone through lots of temperature and humidity swings in my house, and has been just fine. My strongest reason for doing this is I really don't like using hazardous stuff in my modeling. Poly comes with all sorts of concerns from being an oil-based flammable to needing adequate ventilation for application to not wanting it on your skin. Whereas food-grade wood oil is as benign as it gets. It's probably true that, in the long run, an initial application of wood oil won't protect as well as one of poly, because it doesn't create a hard seal. In other applications (like countertops) you would normally apply more wood oil every now and then to maintain the surface, which isn't practical on a ship model. So down the road it's possible that wood oil would still lead to some level of warping, cracking, etc. But I haven't seen it yet, and my guess is that a well-built model kept in reasonably stable indoor conditions shouldn't see major problems; our models aren't subjected to the same stress as countertops or utensils. At least I assume you aren't planning on eating off the Cheerful's deck! I don't have a deeply educated opinion on the long-term value of one or the other, but I've seen no problems with this approach over multiple models, and really value the simplicity and benign nature of the material. I'd be interested to hear counterarguments from someone with relevant experience.
-
Oh, I agree, you don't want a vessel full of cowboys. But I was referring more to the overall style of dress in the European figures, it still looks distinctly European to me, though I don't claim an expertise in these matters. In the same way that, even today, I feel like American vs. European styles of dress are fairly distinctive, even setting aside obvious stereotypes like cowboy boots. I'd say let's get this thread back on track, but since I don't have any progress to report, I don't have much standing in that regard!
-
Here are a couple HO sets I turned up in a quick Google search. One advantage of these is they're by American manufacturers and follow American clothing designs, whereas I've found that most European figures, not surprisingly, look distinctly European in styling. Which isn't to say you can't use them, it's just something to consider. Heck, maybe your story is it's carrying a bunch of immigrants! https://outlandmodels.com/products/old-west-people-figure-set-20-pcs-1-87-ho-scale https://shop.bachmanntrains.com/index.php?main_page=product_info&products_id=3029 I know there are more out there because I've purchased others in the past, but you can keep looking. These just show it's possible.
-
Hey, thanks for checking in! The 1:87 scale was indeed chosen for a possible model railroad project that remains undecided. If you read through the beginning of the build log, you'll find a post where I explain this vessel's ties to local railroad history and how it might tie into a model railroad project. My previous Bertrand build (see link in signature) was also built at 1:87, for a similar reason, so this scale allows the Peerless to be comparable. Yet another reason is that, as you suggest, 1:87 makes a lot of accessories easier to obtain and use, whether figures, cargo, doors & windows, etc. The math on building in 1:87 is a bit awkward, but as you know, model railroaders manage it all the time. I'd say that using 1:87 figures would be just fine in your case. The 1:87 figures would be slightly undersized for 1:80, which is also good as figures tend to be scaled for modern people sizes but 19th century people were noticeably shorter, so if anything one could argue it's more accurate than modern 1:80 figures would be. Also, the OcCre steamboat kit isn't particularly historically accurate or scaled (though it produces an attractive model), so it especially doesn't matter if the figures aren't perfectly to scale. I don't know about any 1:80 figures, but there are a variety of 1:87 "old time" figure sets available that would be appropriate for a steamboat. I'll enjoy following along on your project and I hope you stick around for this one, which has gone on a longer hiatus than I intended but which is very much not abandoned.
-
Looks like there are two different threads on this, one in Nautical General Discussion and one in Tools and Workshop Equipment, so at risk of further redundancy I'm reposting my response in the other thread because it seems important that there be as much outpouring of memory and support as possible for this wonderful contributor to our hobby. ~~~~~~~ I never met Jim in person but purchasing his table saw (on the strength of recommendations from MSW) opened up all sorts of new frontiers for me in this fascinating hobby and I'll never see it the same way again. Really sad for the deeper loss suffered by all those who knew him personally, and my deepest sympathy for his family. I hope Donna finds fulfillment in keeping the business going so that the legacy continues. As a sort of tribute, and a small example of Jim's legacy in my corner of the modeling world, here's a project I couldn't have done without his tools: the NRG capstan project but made with walnut, cherry, and maple I harvested and milled from my own property, and cut to final dimensions on a Byrnes table saw. My saw has contributed to other builds as well, but I've always thought of this one as a "Byrnes" project because that saw was so integral to its completion and uniqueness. Thanks to Jim and Donna for their roles in helping me become a better model builder, and to Chuck for taking the time to write such a difficult notice for us.
-
Just ran across this, you're doing a nice job so far with crisp work. As to your earlier question I think most peoples' projects spread out to consume whatever space is available. Kind of like how widening highways just creates more traffic in the long run.
-
Frankly, that video channel seems pretty sketchy. Its Cairo video uses a ton of Brian's images without proper attribution. Nothing said or labelled in the video itself, just a tiny link embedded deep in the descriptive text, and that link is just to MSW, not to the actual build log.
- 602 replies
-
- 1
-
-
- Flying Fish
- Model Shipways
- (and 2 more)
-
Great, thoughtful review. So glad you decided to share the journey. Let folks know here when you start a new log for your next project.
-
Basically, these "hog chains" were iron rods anchored into the hull and superstructure that acted like the trusses on a bridge, holding the hull to a certain shape while still allowing some flexibility (much as a truss bridge can still flex or sway). They were tensioned or loosened using iron turnbuckles set partway down each length of rod. This kit is not, shall we say, lauded for its historical accuracy in any way; it's the steamboat equivalent of a Disney pirate ship ride. But it still makes an attractive model with a lot of options for modeler's license, so don't feel constrained by any of the above. Do what looks good and right to you! For example, the lashing in question was quite well done and would look nicely at home on many sailing ships, so be proud!
-
Since you asked, technically, the part you're referring to is the sternpost. The keel is just the horizontal beam at the very bottom of the hull, while the sternpost is the vertical(ish) member that supports the rudder.
-
In terms of historical accuracy, the structural part this kit represents with rope was actually solid iron rods, so it's modeler's license as to whatever knot looks good to the builder!
-
Gotcha, thanks. When you said "support beam closest to the paddle wheel", I thought you were referring to the angled brace coming down from the superstructure, and I couldn't see anything wrong there. It's interesting that the rope there still seems taut; I guess it's just the last bit that warped.
-
Can you clarify what you're referring to in the last photo?
-
Congratulations on a wonderful model. I really enjoyed that time-lapse, what a neat way to summarize the work! I may steal that idea for a future build.
- 602 replies
-
- 1
-
-
- Flying Fish
- Model Shipways
- (and 2 more)
-
Lovely work, something you'll be proud to display and gaze upon. Thanks for sharing the journey.
-
Barncave Shipyard by mbp521 - Scale 1:1
Cathead replied to mbp521's topic in Non-ship/categorised builds
Looks wonderful! Gotta say I'm curious about some of the curios, like the baseballs (huge baseball fan and I have a few special ones of my own). I also dig the armadillo. Very much looking forward to the resumption of your towboat. My own project is on hold for probably a few more weeks at least and hopefully you can beat me to it.