kurtvd19
-
Posts
3,034 -
Joined
-
Last visited
Content Type
Profiles
Forums
Gallery
Events
Everything posted by kurtvd19
-

Painted waterline too thick
kurtvd19 replied to Dave_E's topic in Painting, finishing and weathering products and techniques
When masking and using acrylic paints remove the tape ASAP to allow the paint to self level. When I say ASAP I mean within just a few minutes after you conclude the painting is done. I usually have the tape off well within 5 minutes after the airbrush is hung up. Also, if there is a slight ridge and the paint is dry to the touch you can drag the back side of a fingernail along the line where the two colors meet - sort of like burnishing but using a very light touch - it doesn't take much but the ridge will be be compressed a bit and the self leveling properties of acrylic paints will do the rest. Like Jan said above multiple thin coats will work better than a heavy coat. Kurt -
NRG VIRTUAL WORKSHOP SHARPENING SLITTING SAW BLADES FOR OPTIMAL WOOD CUTTING & PAINTING WATERLINES WITH MINIMAL MASKING Saturday, March 26, 2022 10:15 AM Central Time (11:15 AM Eastern, 9:15 AM Mountain & 8:15 Pacific) The NRG is inviting MEMBERS to a scheduled Zoom meeting. Topic: SHARPENING SAW BLADES & PAINTING WATERLINES Bob Filipowski will demonstrate and explain a way to sharpen slitting saw blades, so they cut wood better and easier. Your Preac saw is not underpowered if you sharpen your blades as Bob will show you. This technique will work for all saws using slitting blades. Kurt Van Dahm will show and explain how to paint waterlines with minimal masking and will provide masking tape tips to help you achieve a flawless waterline. PRE-REGISTRATION IS REQUIRED NRG MEMBERS - REPLY TO THE NRG OFFICE by 3-24-2022 – I will attend the March Workshop - with your name and email to nrghomeoffice@gmail.com There is some time before the workshop starts at 10:30 AM Central so everybody can get settled in. Please do not sign in before the start time shown. The workshop will be recorded so we ask all to observe the microphone muting requirements. Unmuted microphones can cause problems for the audience. Sorry, but if your microphone is unmuted and causing a disruption, we will have to drop you out of the meeting – when you rejoin be sure you are muted. Please note that we will ask for attendees to turn off their cameras and their microphones after joining the meeting. The speaker will explain when questions can be asked. When asking a question your microphone can be unmuted but please mute it again after asking your question. Registered members will be sent the required link to the ZOOM meeting on Friday, March 25, 2022.
-
The ash was scraped and swept into the tubes and gravity took over. No pumps. They were not tiny so clinkers probably were no problem. I barely remember clinkers because we switched from coal to gas when I was pretty darn young but what I remember was they were not big.
-
I totally forgot that the hull was deeper than the riverboat hulls and would flood. These were not capped off at all and would have sunk the boat real quick. As Emily Latilla's Mother would have said "Never mind". Kurt
-
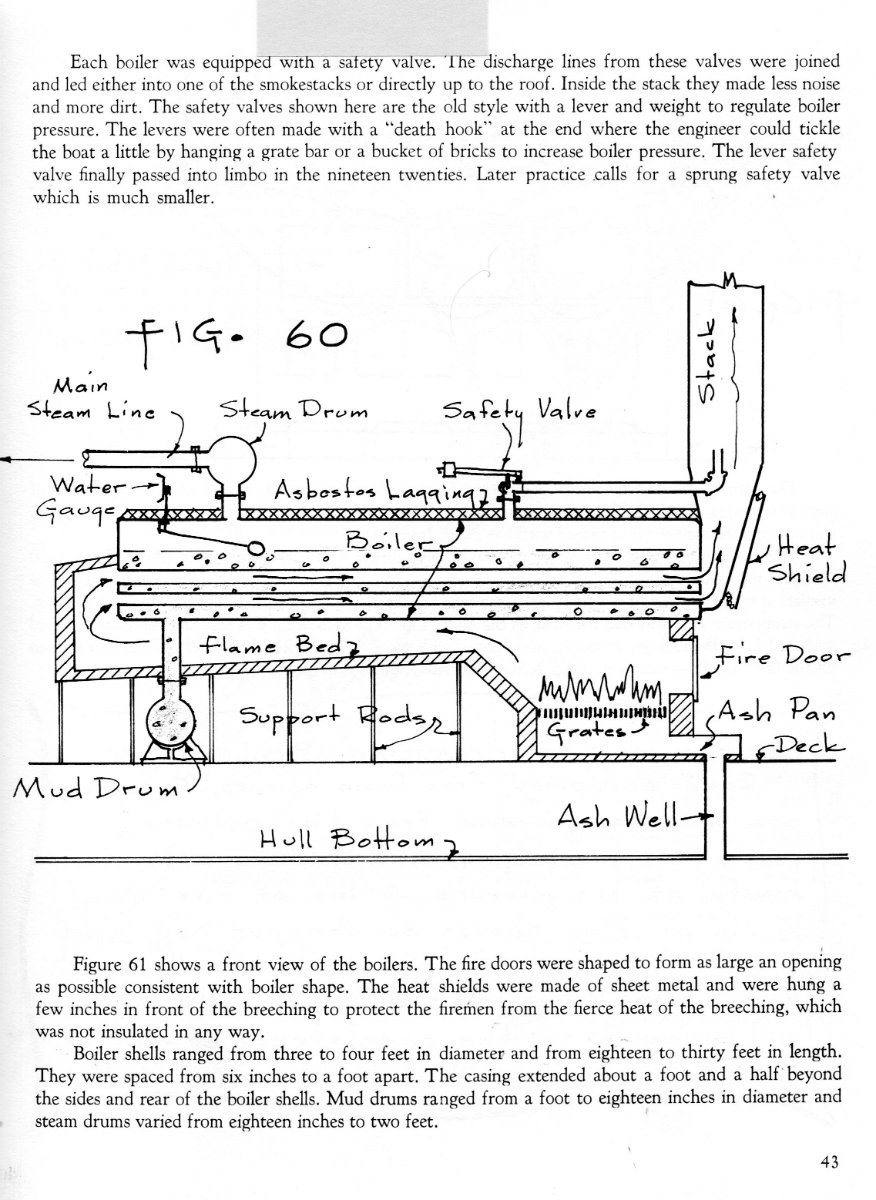
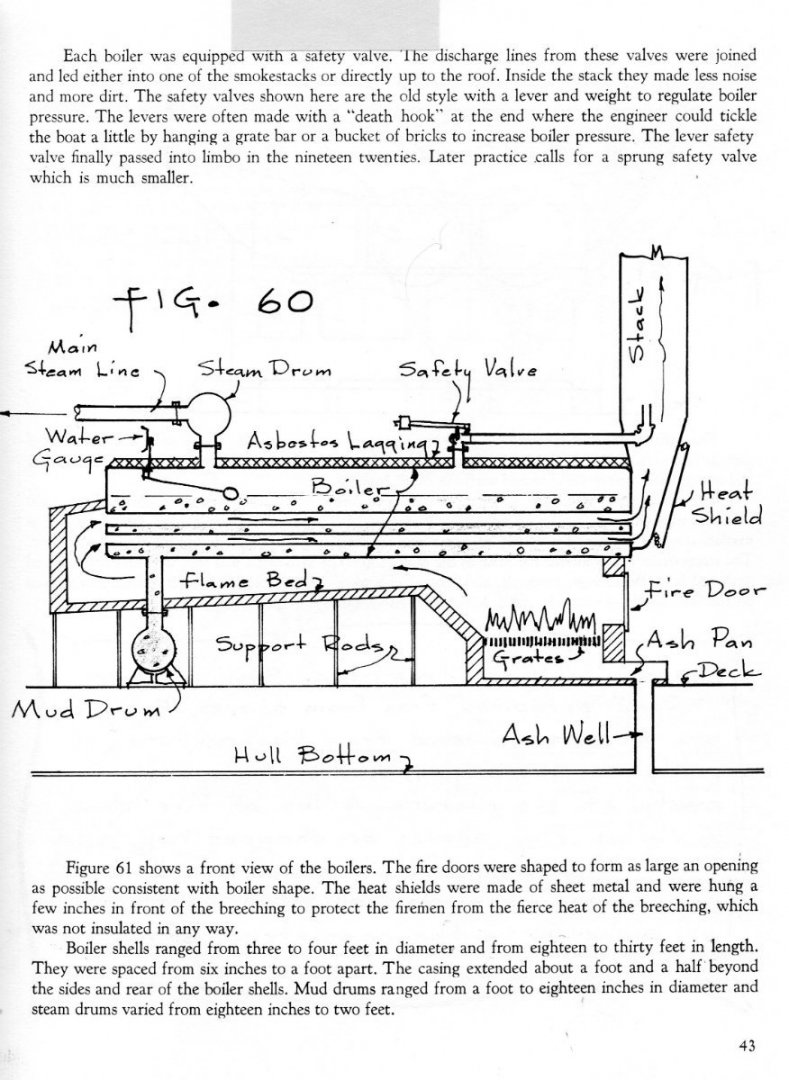
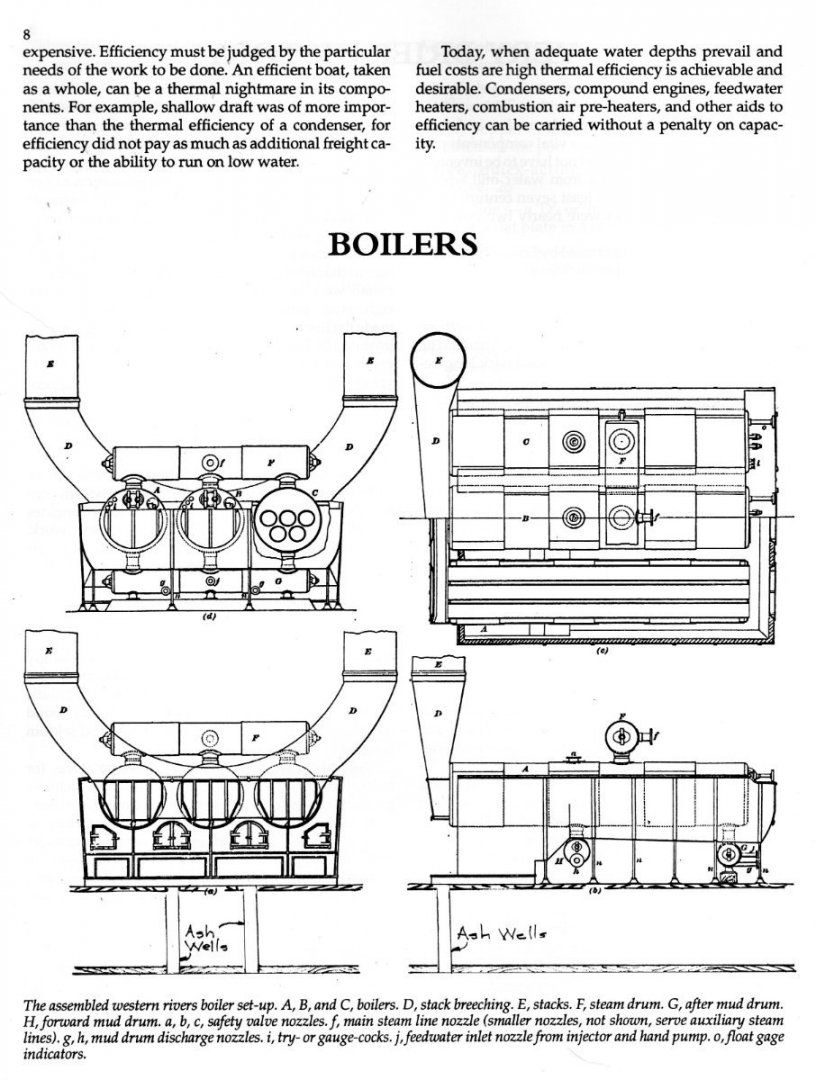
The two drawings below show how ash and slag was disposed of on riverboats of the era and why wouldn't they have followed what I believe was a routine way of handling the hot ash, etc. The dumping of the hot ash, slag overboard was done w/o wheelbarrows or buckets. I have permission from Alan Bates prior to his death to use his copyrighted information for educational purposes. Fig 60 is from his Western Rivers Steamboat Cyclopedium. The other drawing is from his Western Rivers Engine Room Cyclopedium.
-
Artesania Latina is the newest sponsor of MSW. Please welcome them on joining the NRG/MSW family. Check out their banner ad to see all they carry - many more products than I thought.
- 17 replies
-
- 19
-

-
Pencil paint line
kurtvd19 replied to Dave_E's topic in Painting, finishing and weathering products and techniques
Not sure but Denatured Alcohol will do the job. Dampen a clean WHITE cloth and wipe the area and the pencil marks will be gone. Use a white rag because the coloring of the rag may be affected by the Alcohol. The Alcohol shouldn't affect the primer or paint as long as the paint is dry and the rag isn't saturated and rubbed too hard. This works well for pencil marks on bare wood too. -
USCG Harriet Lane - 1:96 1/8" = 1' Model Shipways
kurtvd19 replied to kurtvd19's topic in REVIEWS: Model kits
Donald: I am sure you are up to the challenge. Kurt -
Pencil paint line
kurtvd19 replied to Dave_E's topic in Painting, finishing and weathering products and techniques
Don't make a real dark pencil line and the paint should cover it with no problem. Just able to see the line is adequate and you don't want to disturb/scratch the primer or underlying paint. -
John: As to research all such articles printed in the Journal are peer reviewed. The names in the masthead of the Journal shown as the EDITORIAL ADVISORY BOARD are experts in the world of maritime research and education - the majority are PhD's. How to build and tech tips are not subjected to peer review by this board but the NRG membership as you noted are the experts who review the printed Journal and let us know if and when they find errors - or better ways to do things. We appreciate and welcome the feedback and want more writers to publish articles on modeling and shop notes. Kurt
-
USCG Harriet Lane - 1:96 1/8" = 1' Model Shipways
kurtvd19 replied to kurtvd19's topic in REVIEWS: Model kits
Absolutely can be planked with any material you want. The laser cut planks can serve as templates for cutting you own planks. Note the shape of the planks in the kit - you will be best able to replicate them using sheet wood rather than strips - but if using strips they will need to be much wider to accommodate the bends. Easy to check the widths needed once you have the kit in hand with the planking pieces shown in full size. Noting that you are in the UK, I believe that the Basswood in the kit might be the same wood you refer to as Lime. -
USCG Harriet Lane - 1:96 1/8" = 1' Model Shipways
kurtvd19 replied to kurtvd19's topic in REVIEWS: Model kits
Donald: For what the kit provides it isn't overpriced. However if it appeals to you and you are not rushed keep looking at it as the models from Model Expo are often on sale at good prices... The list price is irrelevant as they are never sold for list price. Being new it might be a bit before it goes on sale but it will go on sale. When you see a sale of this kit grab it then. Kurt -
copyright
kurtvd19 replied to michael mott's topic in Using the MSW forum - **NO MODELING CONTENT IN THIS SUB-FORUM**
NO -
Congrats Ryland. A well deserved reward.
- 263 replies
-
- 2
-

-
-
- Medway Longboat
- Syren Ship Model Company
- (and 1 more)
-
Font Size
kurtvd19 replied to DHS's topic in Using the MSW forum - **NO MODELING CONTENT IN THIS SUB-FORUM**
YES. When you compose a message there is a tool bar at the top - directly above your text. Size is for the size of the font. Font can change the font. Just highlight the text you imported and click Size and then pick the size you want. You can also do this when you start to type and the new font and/or size will be used for the message. -
I asked Toni about this - her answer is below: The width of the wale is constant, so only the top or bottom of the wale needs marking and the other mark can be derived from it. Hope this helps you.
-
Congratulations on finishing the project Eric. I am especially pleased to read your evaluation of the Guild's efforts in developing this project and your opinion that we achieved our goal of getting members to try scratch building and you confirmed our opinion that this project would be satisfying the those who undertake the project. Take care.
-
You might have a tracking number with you acknowledgement of order.
-
USPS. If hasn't arrived by Monday contact the office and Mary can check the tracking. Kurt
-
3d printing crew figures
kurtvd19 replied to highlanderburial's topic in 3D-Printing and Laser-Cutting.
I just attended my local IPMS club meeting - virtual yet - and a guy showed a figure of a Scottish warrior who had plaid pants on - what a paint job it was just on the pants. Hand painted of course and he said it took three tries to do them. The rest was just as impressive. -
Steamboats and other rivercraft - general discussion
kurtvd19 replied to Cathead's topic in Nautical/Naval History
Eric: Don't worry about it. I agree with both Randy and you. But I don't consider my time wasted at all. I know I will need to take things he said with a bit of skepticism but I found several things I found interesting and will do some checking into them as time permits. Those who had little to no knowledge might have been inspired to check things out further and the stuff he got wrong will be discovered if they check things out further. And for those who just enjoyed it as alternative to the Olympics on TV they were better entertained.- 281 replies
-
- 4
-
-
- Steamboats
- riverboats
- (and 3 more)
-
SeaWatch Books announces the business is for sale. If interested contact Bob Friedman at bobcat45@charter.net Please use the email provided - questions will not be answered here. I was asked to post this by Bob
-
- 10
-
-

-
Air brush vs paint & brush
kurtvd19 replied to jefferyt's topic in Painting, finishing and weathering products and techniques
I belong to a local IPMS chapter though I seldom build plastic models. We just had one of the founding members of our chapter pass away. He built airplanes and never used an airbrush. He won many awards at IPMS contests and when people found out he didn't use an airbrush they didn't believe it. His models stood up under close scrutiny at these contests so he was competing against expert airbrush users. A brush in the hands of an expert can produce a great finish just as an airbrush can produce a bad paint job in the hands of somebody who never practices. Both depend on the skill of the user to produce a great paint job. In my opinion it is easier to accomplish with an airbrush but only after a lot of practice - but a lot less than with a brush.- 26 replies
-
- 10
-
-
Steamboats and other rivercraft - general discussion
kurtvd19 replied to Cathead's topic in Nautical/Naval History
Thanks Eric I will attend- 281 replies
-
- 4
-
-
- Steamboats
- riverboats
- (and 3 more)
-
Jeff: Is the rigging line supplied still from Morope? That was what was originally supplied with the kit. Until Chuck made his rope available the Morope was the best on the market in my opinion. Kurt