


kurtvd19
-
Posts
3,048 -
Joined
-
Last visited
Content Type
Profiles
Forums
Gallery
Events
Everything posted by kurtvd19
-
 It appears the link has been fixed - I just tried it and it worked fine.
 -
Don't worry about the names for the photos - one needs the model name and the view - per the list of required photos. Make sure you have renamed the photos to match one of the naming descriptions Eric mentions above - from what your files list it as - a bunch of numbers that might include your name. I am forwarding Eric's post to our web master to check out and fix.
-
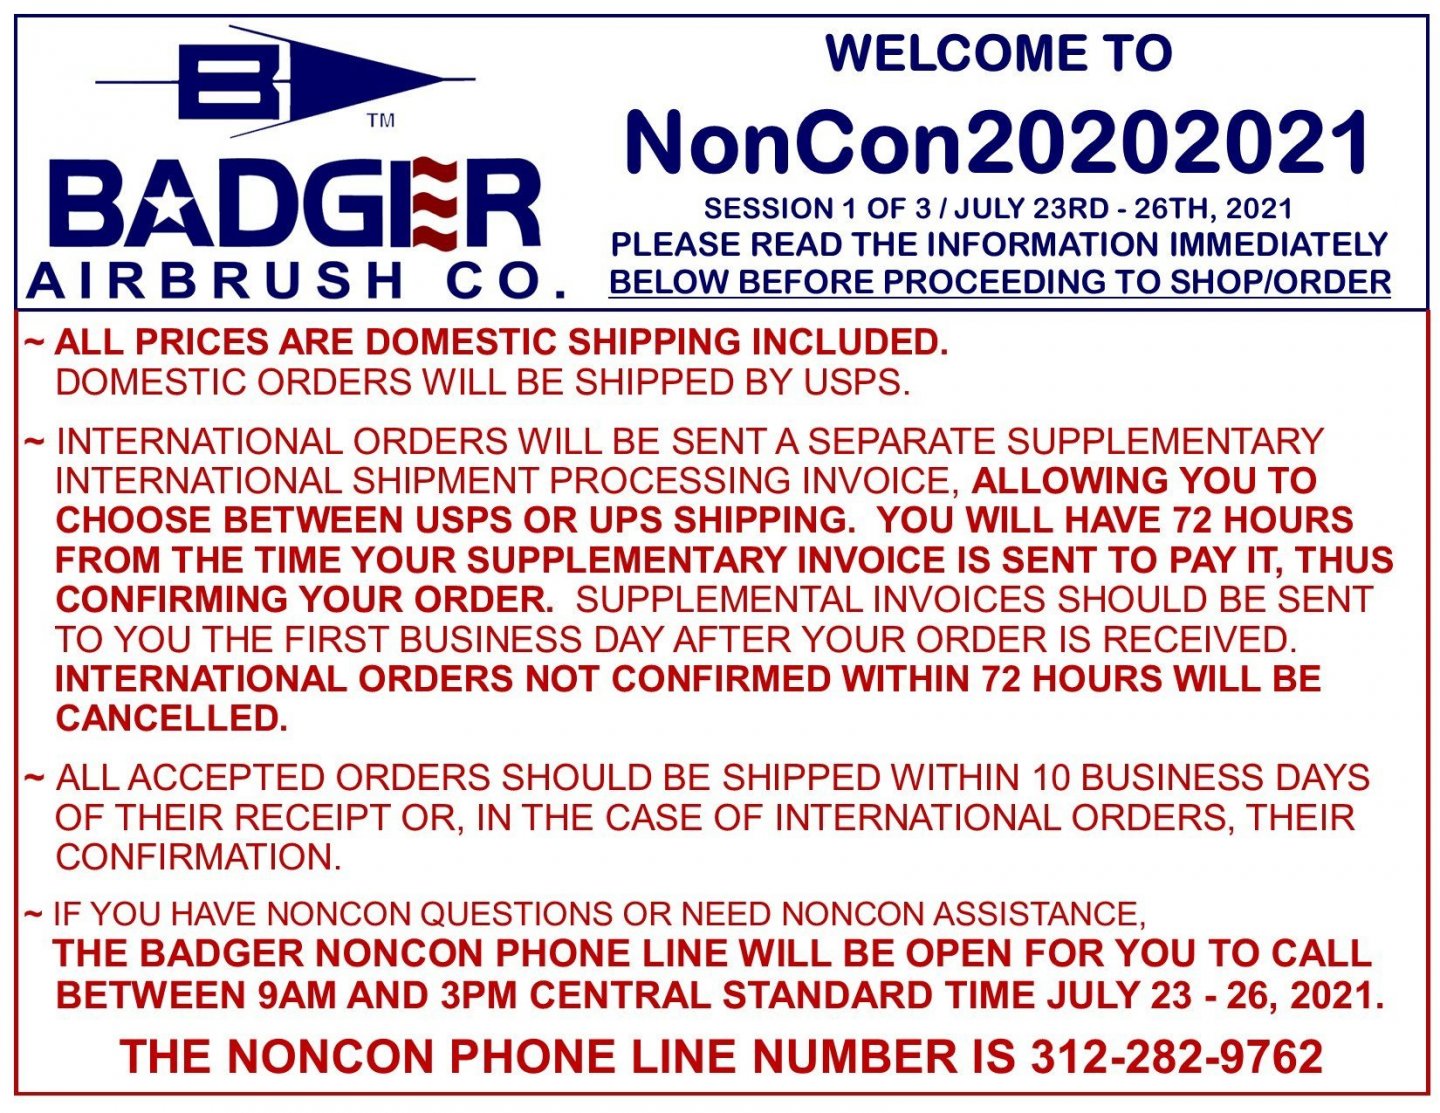
Badger Airbrush Co. is making a special offer for a limited time. This offer will be repeated again - watch their Facebook posts - in case I don't get them posted. Read the info in the box below - note the dates and the requirement that orders from outside the US will need to respond to the email that will be sent upon receipt of the order - limited time to respond. Badger is making this offer because they have not and will not be attending any shows during 2021. The prices shown are what the products would sell for at the shown - prices include shipping & taxes (except foreign supplemental mailing charge). Note the compressor prices - many here have been shopping for a compressor. I have the TC910 unit and it is quiet and will handle any airbrush. Also have the TC908 and it's pretty darn quiet too. http://www.badgerairbrush.com/Special_Offers.asp http://www.badgerairbrush.com/images/NonCon20202021header.jpg
-
There doesn't appear to be much of frame 11 there now. I would plan to reinforce both forward and aft edges of the joint of frame 10 to the hull planks with epoxy - fill in the gaps. As this is obviously a r/c boat and the outside planking has or will be fiberglassed I would think about a layer of fiberglass on the inside of the hull between frames 10 and 12. If the interior of the hull has already been covered with epoxy or resin the joints of frames 10 & 12 might already be strengthened with the application of resin or epoxy making the joints stronger than they appear. And even the addition of fiberglass might be overkill. Either way take the frame down as low as you need.
-
Tom: Thanks for the answer on the scale - I completely missed it in the title of the build log. Duh! Kurt
-
What scale are you going to use?
-
Pin Vice Help Needed
kurtvd19 replied to Ed Gibbons's topic in Modeling tools and Workshop Equipment
Ed: Not discounting the Starrett idea, but the kit tool is not a bad tool. Match the proper holder to the drill bit and it should tighten down just fine. I got that tool when I built and reviewed the Yankee Hero kit when it came out. I still use it. I think I had commented on the quality of it when I reviewed the kit. Most "everything included" kits have junk tools. Bluejacket is a quality company - they don't provide junk. If it doesn't tighten at all call Bluejacket - you might have a defective tool. -
NRG Capstan Project
kurtvd19 replied to tlevine's topic in - Build logs for subjects built 1751 - 1800
Absolutely. -
The model exhibit at the Science & Industry Museum was completely reworked just about 2 years ago. Models cleaned and repaired, some new and models put into dioramas. Big improvement. Kurt
-
Oxy/Butane Micro Torch Kit
kurtvd19 replied to Boccherini's topic in Modeling tools and Workshop Equipment
The cylinders shown are small but one doesn't need a gas leak of any size. My little torch is set up on much larger tanks. Tanks should always be turned off when finished. -
Oxy/Butane Micro Torch Kit
kurtvd19 replied to Boccherini's topic in Modeling tools and Workshop Equipment
Go with the tried and true Smith Little Torch. Quality w/o questions of reliability. -
I was going to mention the lab in Madison but Alan's from Canada so there is probably some requirement for being a US citizen. I spent some time at the lab before I retired and it is impressive. I witnessed a test of a 4 x 4 or 6 x 6 wood piece about 10 ft long to see how much weight/force it could withstand. They do this so the charts in building code and architectural books can be developed so the minimum sizes of wood components can be determined. We were behind plexiglas several inches thick and when the post failed it was very impressive - loud and toothpicks everywhere! Something they had there that is a relevant topic for this forum was a replica of the hull of the USS Constitution. It was about 6 ft long and about 4 ft high and had appropriately sized frames and planks assembled with treenails. It was made by the shipwrights in Boston before the 1996 refit so various electronic means of testing for structural integrity could be tested while in the water to determine what planks or frames might have to be replaced. This is commonly done with metal ships and they did it to see if a similar process would work with wood. The same woods as on the 1:1 ship were used.
-
Model shop bandsaw choice?
kurtvd19 replied to tooter's topic in Modeling tools and Workshop Equipment
Tooter: Do a search here for 9 inch band saws and/or band saws and you will find this is a much discussed subject with recommendations. -
Steamboats and other rivercraft - general discussion
kurtvd19 replied to Cathead's topic in Nautical/Naval History
Randy: Have you tried to find anything at the Mercantile Library at the Univ of MO - St. Louis? They have many records that might help. If you are ever nearby this is a great place to visit. I was given a tour behind the scenes just before they opened the new state off art building - very impressive. At the time they had the absolute state of art fire protection especially for their rare documents. But the library was originally started by the merchants of St Louis for business records so many shiping related records were saved for posterity. https://www.umsl.edu/mercantile/- 281 replies
-
- 2
-

-
- Steamboats
- riverboats
- (and 3 more)
-
Were you disappointed with the poor quality of the cast parts or are they what you expected?
-
I don't like them either, but this isn't a good paint finish and it's not the fault of the airbrush (unless a total piece of junk is used ie: Harbor Freight Chinese rip offs) An airbrush properly used will produce a very fine finish.
-
Do one at a time if the model is built up to the same degree as shown on the plans. The pieces being attached are not going to put any strain on anything. No problem with doing the bulwarks on one side and then the other.
-
I second the idea of using a Dumas type motor but with a 2:1 drive - not direct to the shaft. A tug needs more low end power than RPMs and 2:1 with a Dumas type motor works great fro a tug such as you show. CAUTION - Do not under any circumstances use a Dumas geared drive for this - pure garbage and the noise is very loud - a belt drive is great.
-
The part you showed in post #28 is a simple jack that is placed under the blades shaft housing after it is loosened and moves the blade up or down. It is placed right where the two red knobs shown in post #30 are shown. The two red knobs were a later improvement to adjust the blade height.
-
Use Brass wire. It can be annealed to bend the chain plates and other parts. It comes in many sizes and can be found in hobby shops, craft stores and on-line. It is easily soldered.
-
This has been discussed numerous times. Please do a search of topics and read the prior posts - your question has been answered many times. If you need further information about a glue ask the question in the that topic and you will get the needed information.
-
NRG VIRTUAL WORKSHOP - INVITATION
kurtvd19 replied to kurtvd19's topic in NAUTICAL RESEARCH GUILD - News & Information
Yes it will be. I already have the post it note with "START THE RECORDING" ready to stick in the middle of my screen so I can't miss it. -
NRG VIRTUAL WORKSHOP PHOTOGRAPHING MODEL SHIPS Saturday, June 5, 2021 These Workshops are normally limited to NRG members only. The Board has decided to open this Workshop to members of Model Ship World. Seats are limited and it is first come first served. The Virtual Workshop is Saturday, June 5, 2021 at 10:00 AM CST. The Workshop is entitled “Photography for Ship Models”. Kurt Van Dahm, who is a retired professional forensic photographer as well as a Director of the Guild, will show us how to photograph our models. Kurt has presented variations of this talk at NRG Conferences and Seminars. Use those newly found or sharpened photo skills and add to or start a build log on Model Ship World. This will be a Zoom presentation. The cost is FREE. Preregistration is required. Click HERE to register. Please do not call or email the office – we have automated the registration process. If you plan to attend you must register no later than 5:00 PM CST on June 2, 2021. Early registration is urged as this event is expected to be heavily attended and seats are limited. All registrants will get an emailed invitation with the required link to attend on or about June 3. Please join the event with your video camera off and your microphone muted.
-
The contest was held and the awards were presented at a virtual awards ceremony on May 15th. We have posted the slide show and the award list for the model contest on the museum website: https://www.wisconsinmaritime.org/programs-and-events/midwestern-model-ship-contest/
-
NRG Capstan Project
kurtvd19 replied to tlevine's topic in - Build logs for subjects built 1751 - 1800
Justin: Parts are often drawn at different scales for clarity. Some smaller parts if drawn at 1:16 would be tiny on the drawing so they are drawn at a larger scale so details can be easily seen. Many drawings will show objects at different scales on the same sheet for this reason.


