HOLIDAY DONATION DRIVE - SUPPORT MSW - DO YOUR PART TO KEEP THIS GREAT FORUM GOING! (Only 13 donations so far - C'mon guys!)
×


Jeff-E
-
Posts
699 -
Joined
-
Last visited
Content Type
Profiles
Forums
Gallery
Events
Everything posted by Jeff-E
-
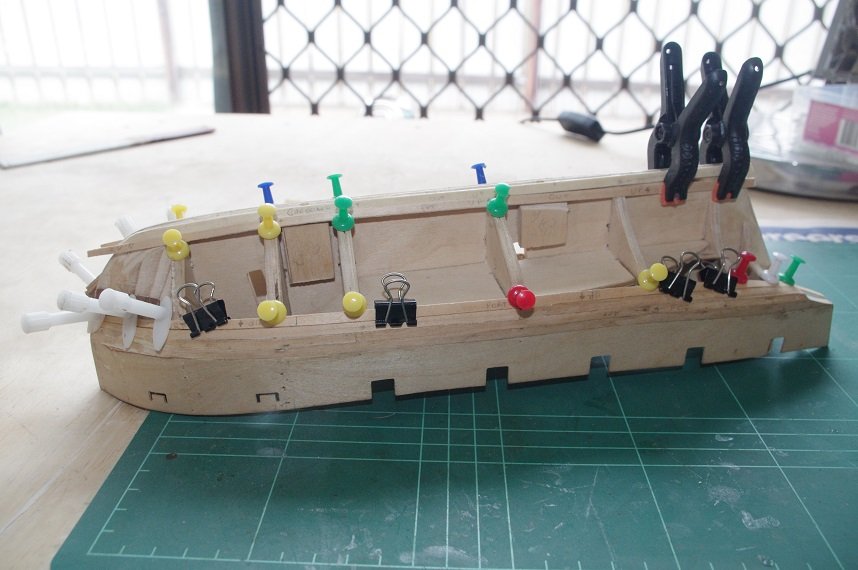
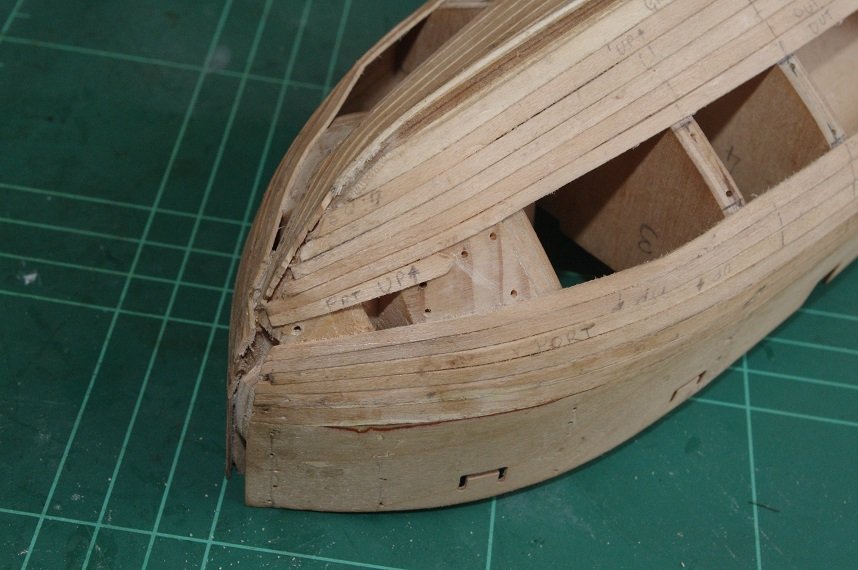
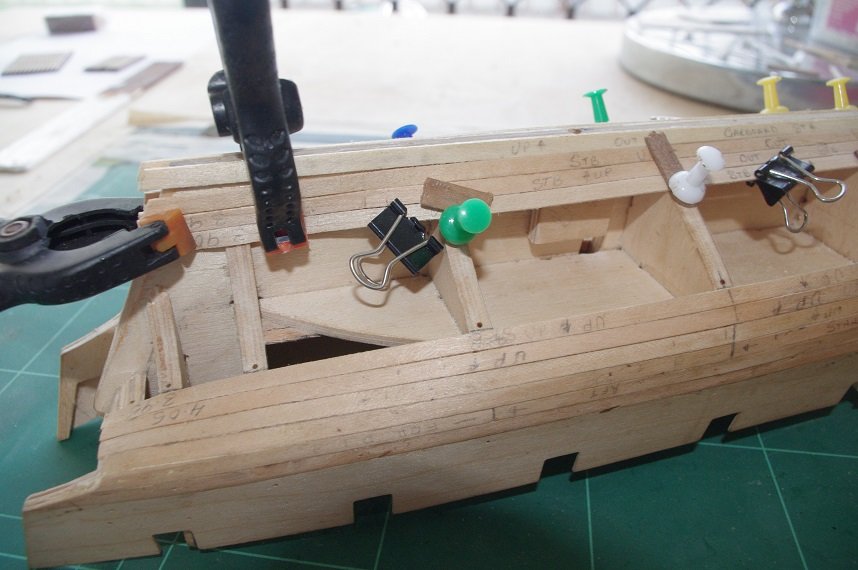
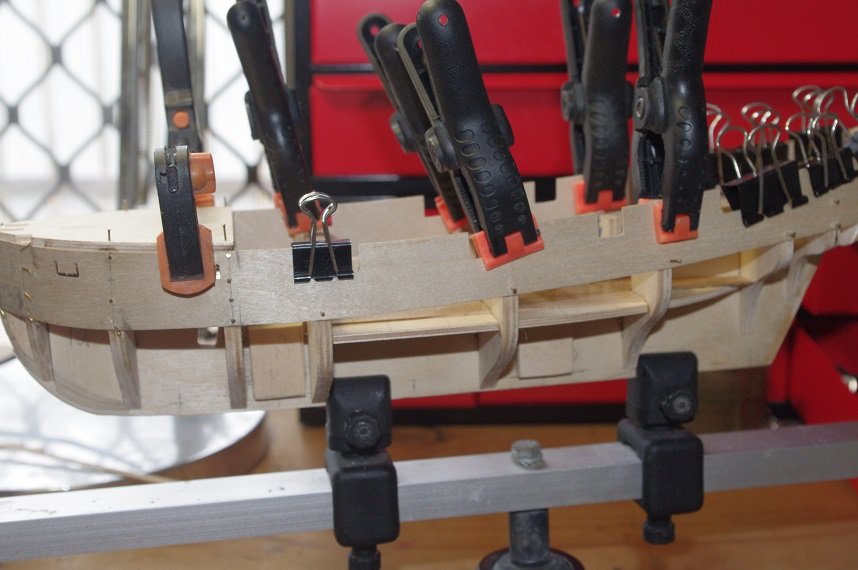
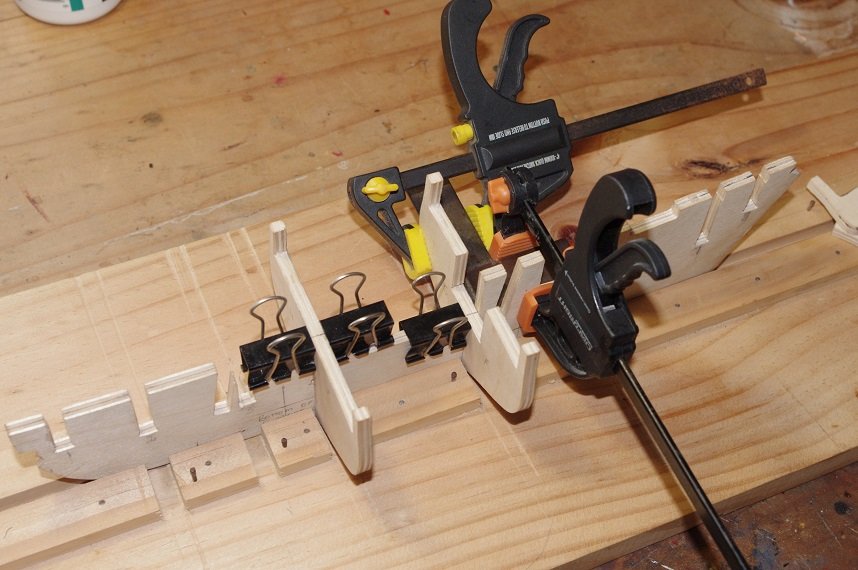
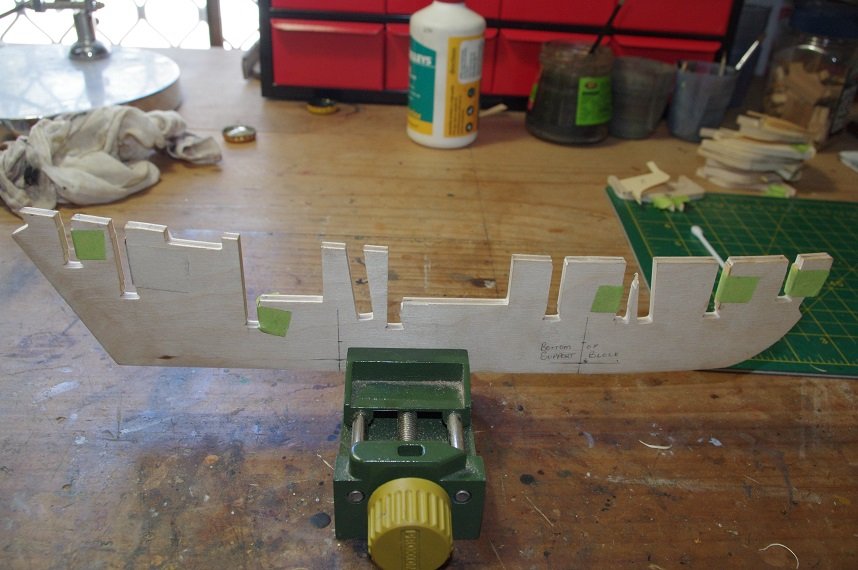
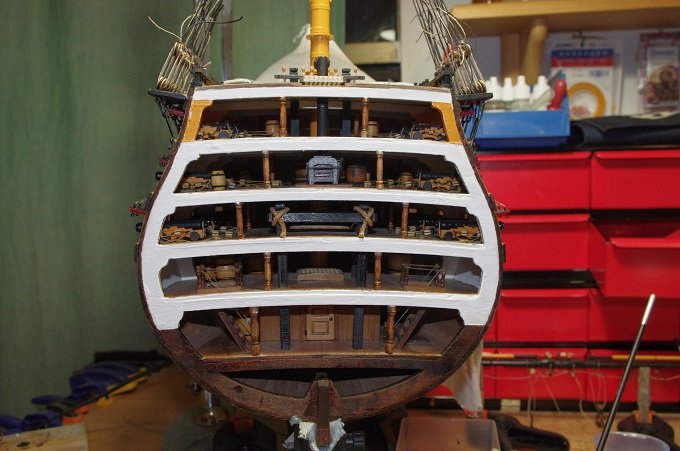
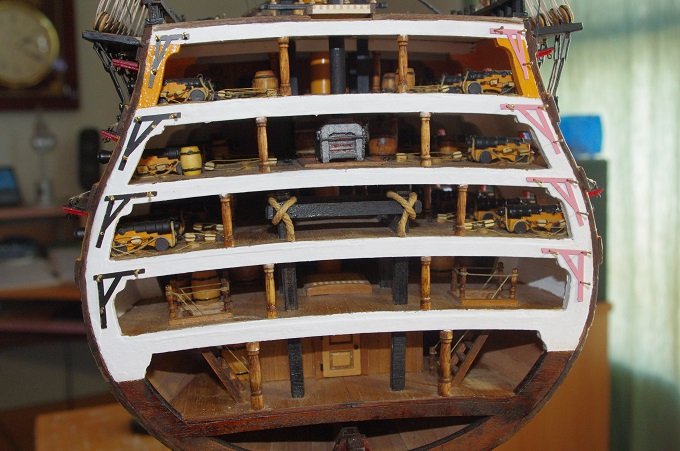
Hello All, The first planking is the next stage of the build. As mentioned earlier, when I restarted this log, this is where my problems began that caused me to shelve the build. The main problem was at the bow as the planks started to curve down towards the keel I noticed a clinkering effect was starting to appear and to get the planks to butt up flush with the plank above it a gap was formed between the plank and the frames, especially on the first 3 frames from the bow. This got worse the further down towards the keel I went and I started to add spacers in between the plank and the frame. I stopped after I had added 4 planks to the starboard side and 5 to the port side. The gap between the last plank laid on the port side and frame 2 was about 1mm was only going to get worse if I continued so that is when it went on the shelf for a while, quite a long while as it turned out. So when I got it out again and had a good look at it the only thing I could think of that would cause the planks to lay as they were was that the frames had not been faired correctly so I removed all the planks except for the first one on each side that sits under the gunport patterns. I made up two bow filler blocks from pine and fitted them in between frames 1 and 2, which I was going to fit in the first place but decided against it because I did not think they would be needed on such a small hull. After fitting them I carefully faired the hull again paying special attention to the bow area and checking the lay of the planks as I went. It turns out I wasn't far out with the original fairing but enough to cause me problems. I decided when fitting the planks this time I would fit the garboard strake and the plank next to it and then plank alternately from the top down and the bottom up. Thankfully Caldercraft supplied enough planks in the kit to cover my mistake. I cannot find any photos of the planking before it was removed but below are a few photos of how the new planks went on. You should be able to see the bow filler blocks in the second and third photo. All of the planks except the first one underneath the gunport pattern and the garboard strake were tapered at the bow, most of them to 2mm (half their width). They were shaped at the bow and the stern by soaking them in water and then pinning them to the model and allowing them to dry and then finally gluing them on. Even after tapering them to half their original width a stealer was still need at the bow. Thanks for looking and the likes.

- 86 replies
-
- 5
-

-
- pickle
- caldercraft
- (and 1 more)
-
Thank you Stuglo for your kind comments, I am glad you found my blog helpful. I basically disregarded the instructions altogether especially the rigging plans, only using them occasionally for reference. Going on the number of completed models in your signature you are a very skilled modellor yourself. Will you be building the bow section soon? As for the display the model currently occupies a lamp table in the living room which the front, rear and the starboard side can be easily seen.
-
Excellent work Bertu, those gunport lids will look stunning when completed with their rigging.
- 527 replies
-
- 2
-
-
- caldercraft
- victory
- (and 1 more)
-
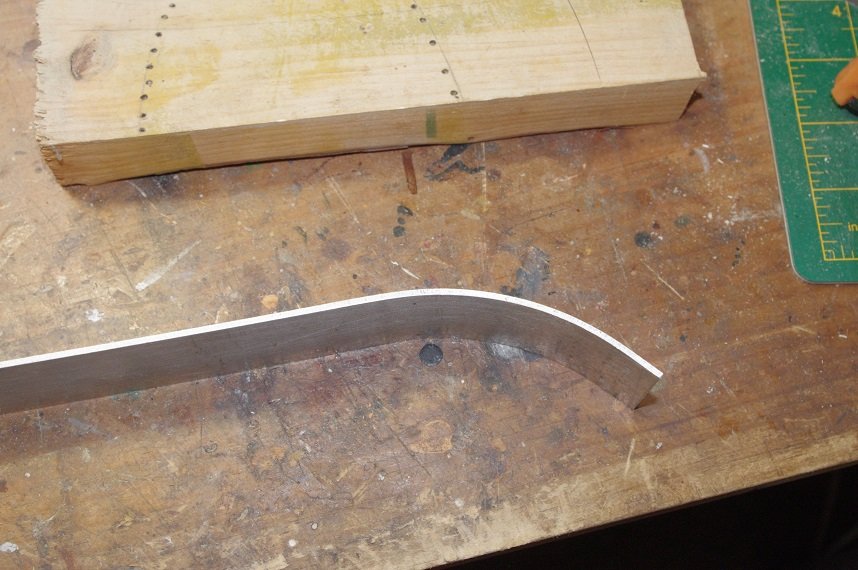
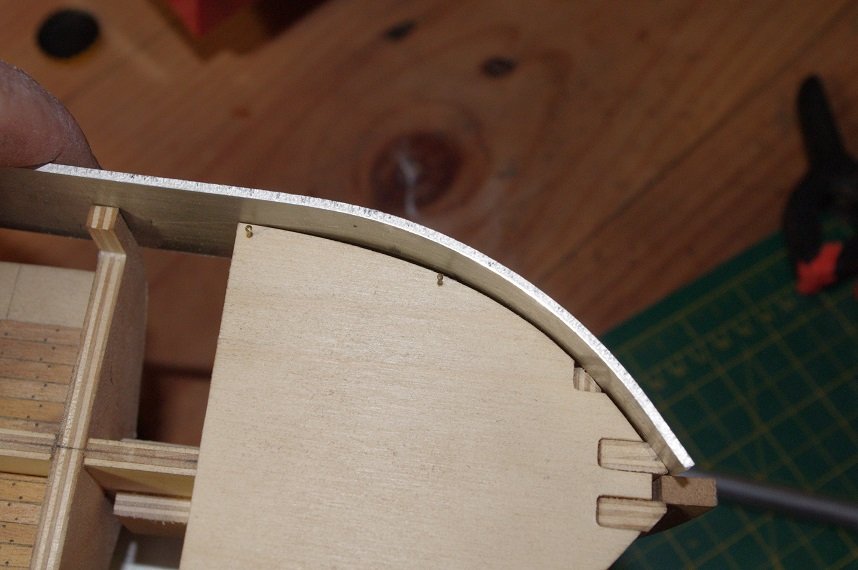
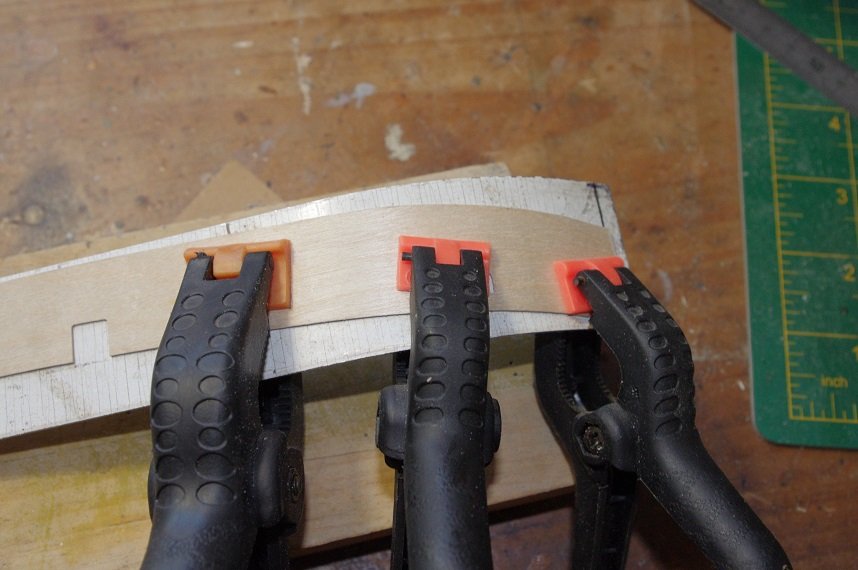
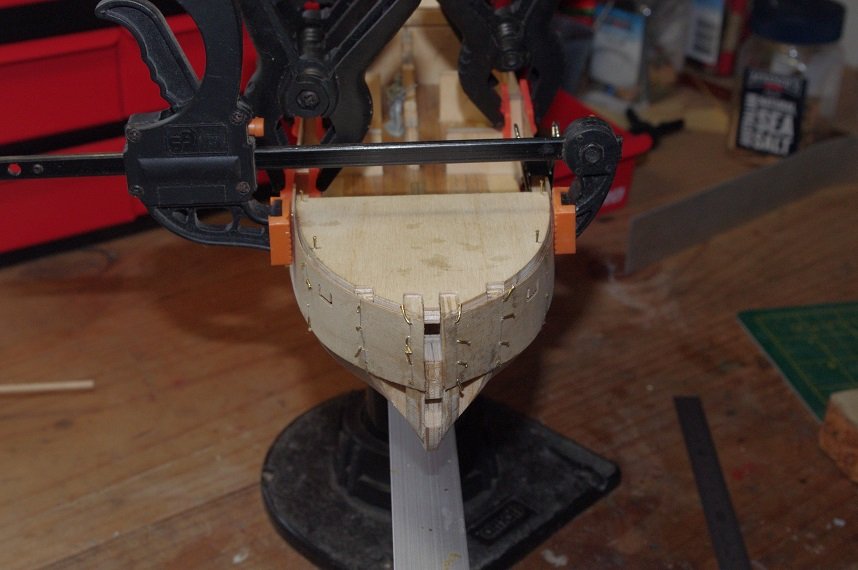
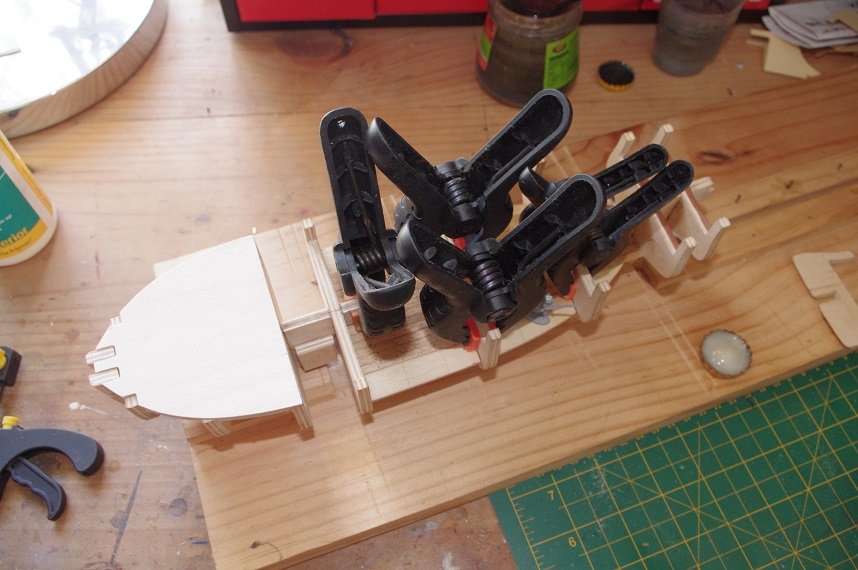
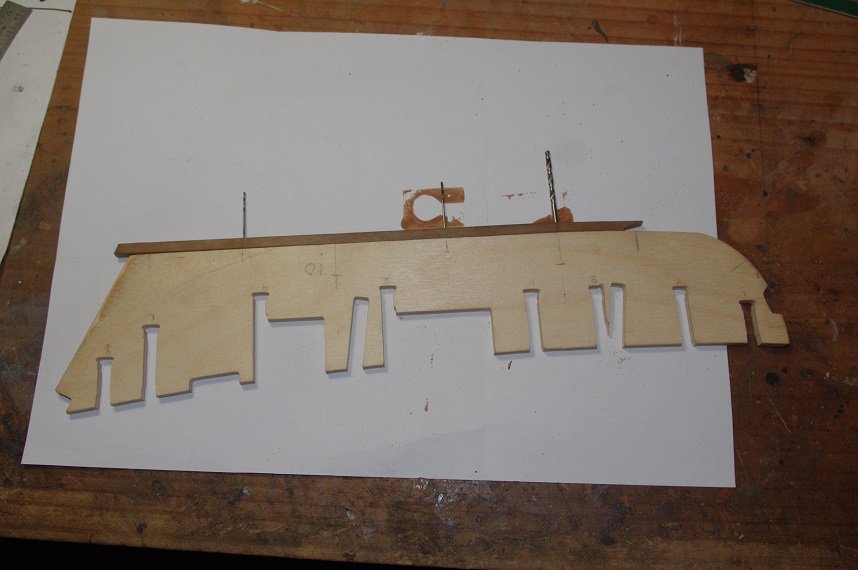
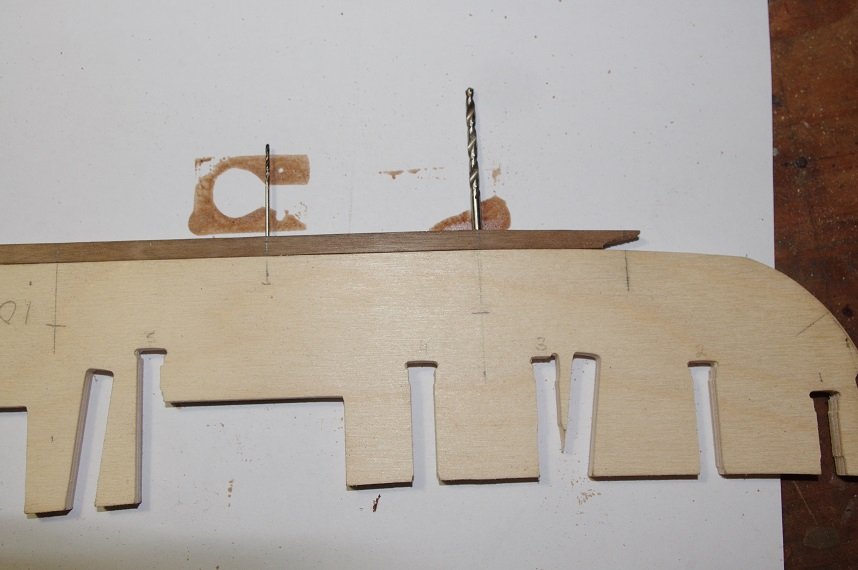
Hello All, After the structure had dried the frames were faired. The stempost in the first photo is only temporarily fitted. I have decided to leave the stempost and keel off the model until the first planking is completed. The next job was to fit the gunport patterns, they are cut from 0.8mm ply and are fairly fragile so I made a jig from a strip of 2mm aluminium bent around the gunport former to give me their shape at the bow. The ply gunport patterns were then soaked in water for about 1 hour and then clamped to the jig and allowed to dry. After they had dried they were glued to the model following the instructions in the manual. The model was then set aside to dry for 24 hrs. All comments welcome. Thanks for looking and the likes.

- 86 replies
-
- 5
-
-
- pickle
- caldercraft
- (and 1 more)
-
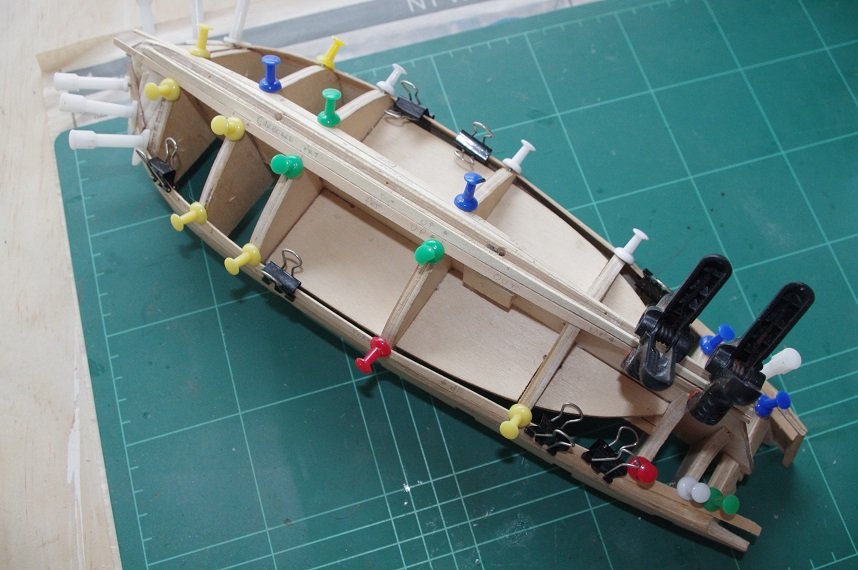
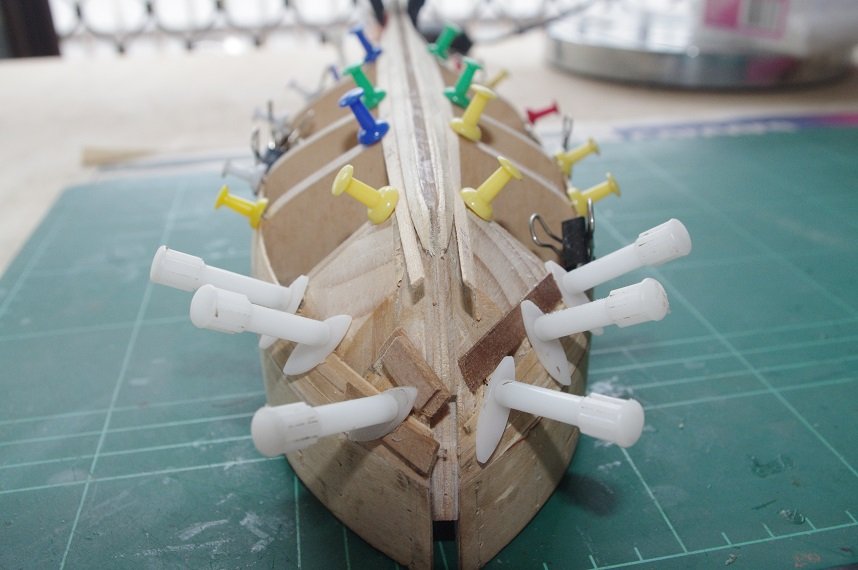
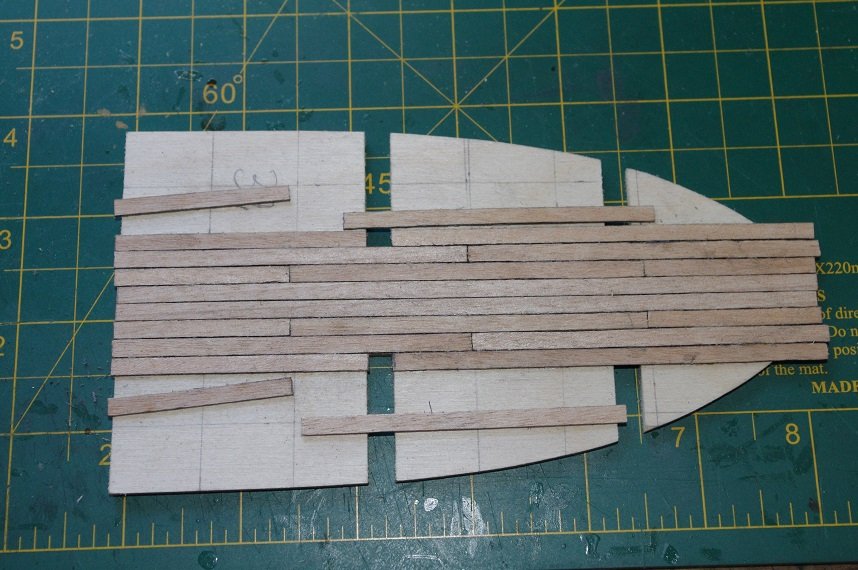
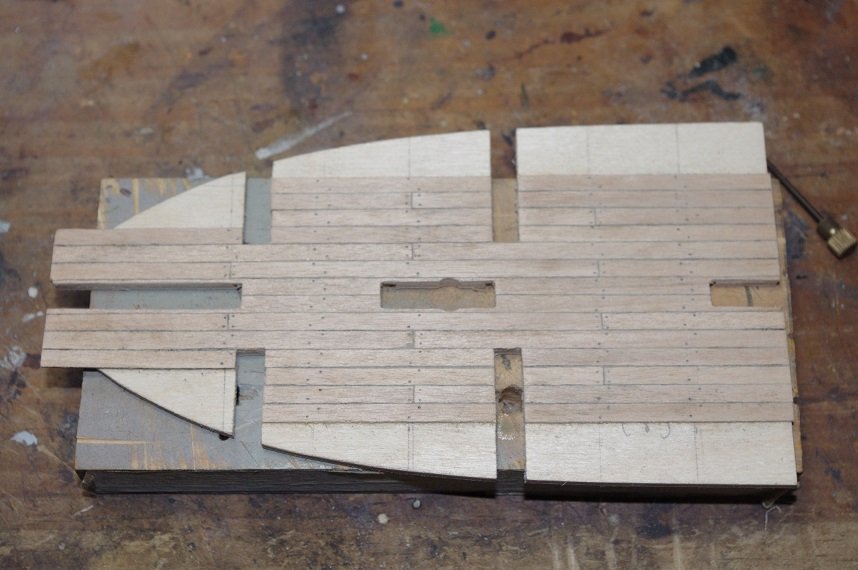
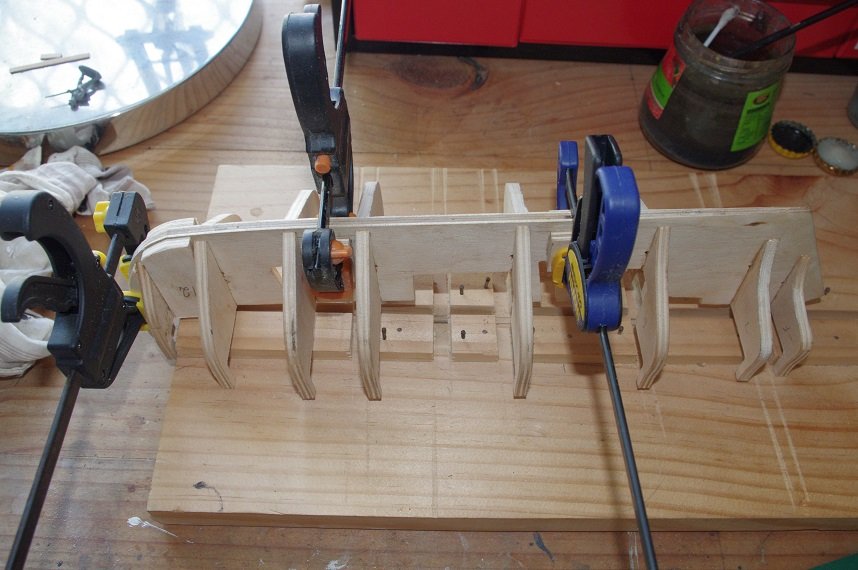
Hello All, After all the preparations were completed on the false keel it was time to glue the bulkheads to it. While they were drying the lower deck was planked. I chose a 3 butt shift pattern for this deck, the planks were cut to length and the caulking was simulated by darkening the sides and ends of the planks with a pencil and the trunnels were simulated by drilling a 0.3mm hole in the plank and touching the hole with a pencil. Once the keel and bulkheads had dried support blocks were glued either side of the mounting holes on the false keel, these were made from offcuts of the plywood held the bulkheads. The lower deck and the gunport former were then glued on and the assembly was set aside to dry for 24 hours. Thanks for looking and the likes.

- 86 replies
-
- 4
-
-
- pickle
- caldercraft
- (and 1 more)
-
Hi Mugje, Thank you, I have had a look at your build and you did a fantastic job on it!👍
- 86 replies
-
- 1
-
-
- pickle
- caldercraft
- (and 1 more)
-
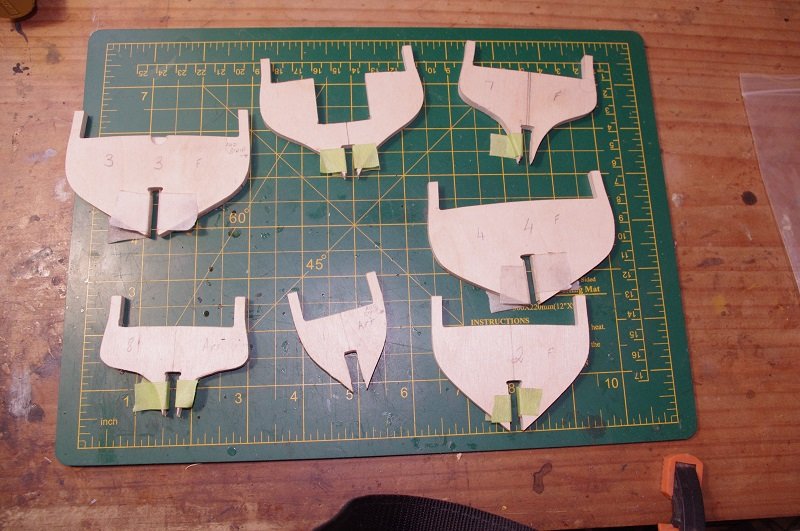
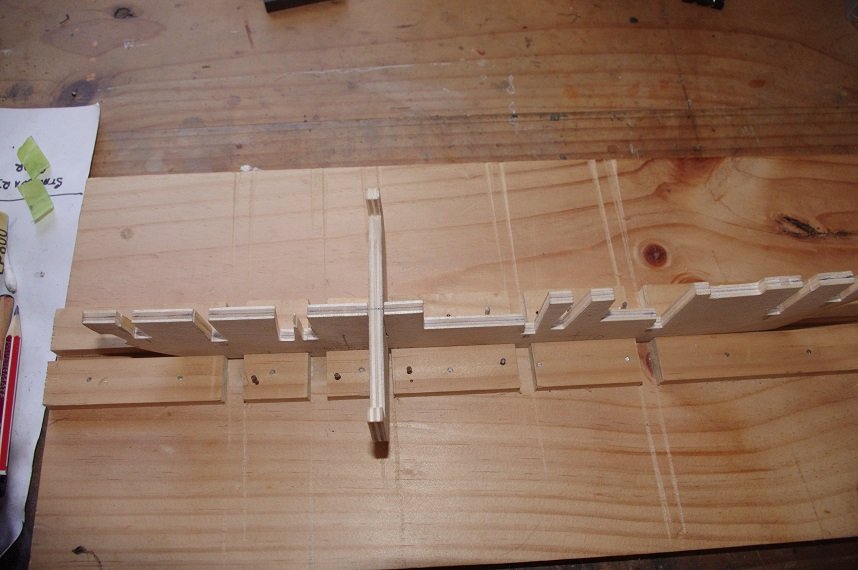
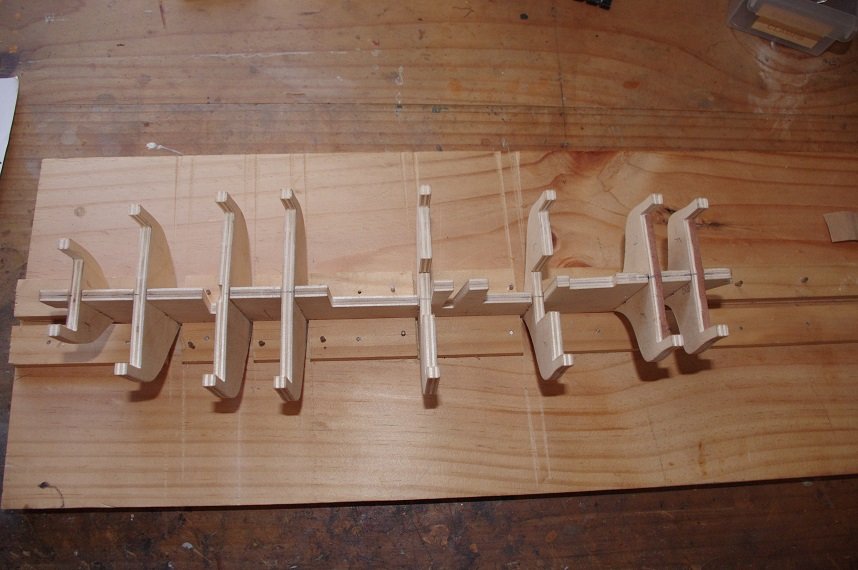
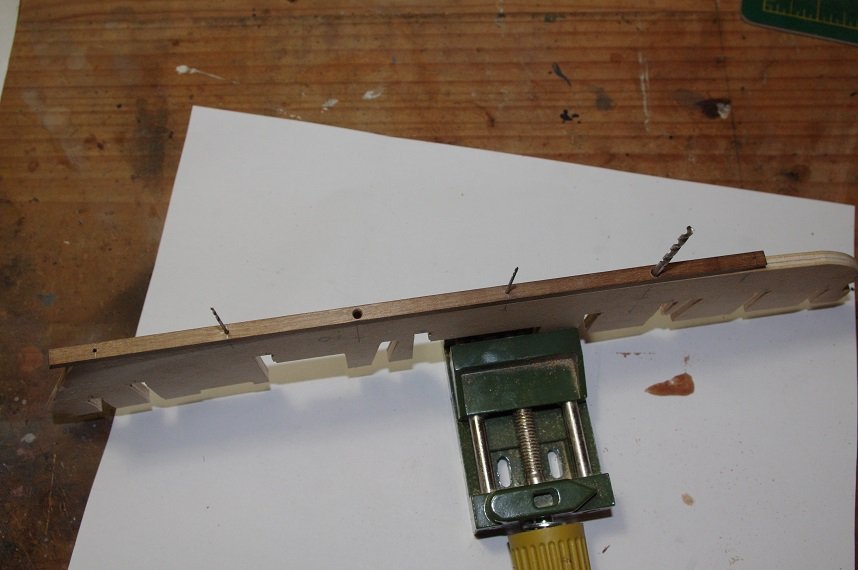
Hello All, As mentioned in post#11 some of the frames were a loose fit on the false keel, both fore and aft and athwart ships. To rectify this problem spacers made from 0.5mm timber were glued to either side of slot in the frame and to the fore or aft side of the slot in the false keel, a centre line was also marked onto the frames and the spine of the keel for alignment purposes while they were sanded. After they dried they were sanded until they were a snug fit on the false keel, being careful to take a small amount off each side of the slot to ensure the marks lined up. They were then dry fitted to the keel again. I decided I wanted to mount the model on pedestals, as suggested in the manual, so the next job was to drill mounting holes through the keel and into the false keel. There are two mounting holes one positioned between frames three and four and the second between frames five and six aft of the slot for the mainmast, also as mentioned in post#11 I intend to not to attach the keel and stem post until after the fairing of the frames is completed, so I also drilled some dowel holes in the keel, stem and sternpost to help align them squarely to the false keel and to strengthen the joint. The size of the mounting holes is 3mm and the dowel holes are 1 mm and will be fitted with bamboo dowels when the keel and stem are fitted. thanks for looking and the likes.
- 86 replies
-
- 6
-
-
- pickle
- caldercraft
- (and 1 more)
-
Hi Jim, thank you for your kind words, much appreciated.
-
Nice start, looking good.
-
Hello All, I thought it might be time to resurrect this build from the shelf. It has been on hold for some time, I first put in on hold to finish the Victory Bow section, then I got it out again after I had finished the Victory after I started to have problems with the first planking not laying as I wanted it to, mainly due to me not taking enough care when I originally faired the frames. So about six months ago I got it out again and had a look at what solutions I could come up with to rectify my problems which I will explain when I get to the first planking but for now I need to edit the first few posts to replace the pictures which have gone missing and then I will post some more pictures of the build to catch up to where I am at with it now.
- 86 replies
-
- 2
-
-
- pickle
- caldercraft
- (and 1 more)
-
Very nice work on the cannons.👍
-
Thank you very much Christos.
-
Thank you Grant, much appreciated😊
-
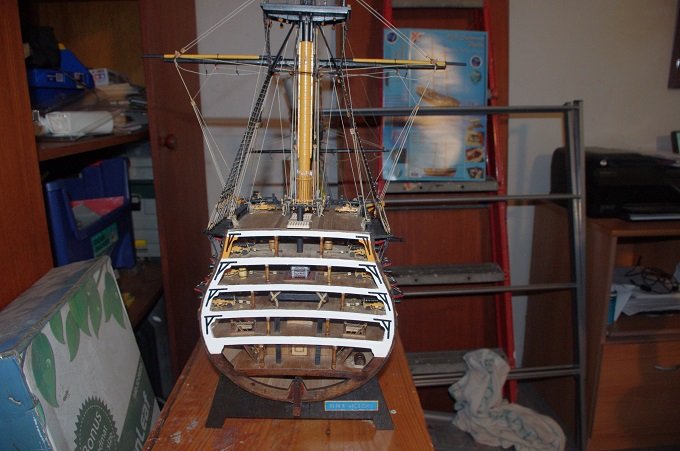
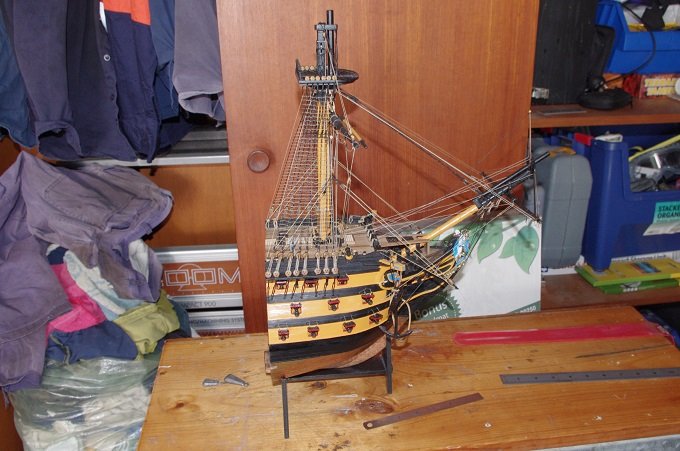
And a few more.... Thanks to all of those who looked in and left comments or likes. I am quite happy with how the finished model turned out with all of the modifications and enhancements I made to the original kit. Thanks again for looking.
- 418 replies
-
- 10
-
-

-
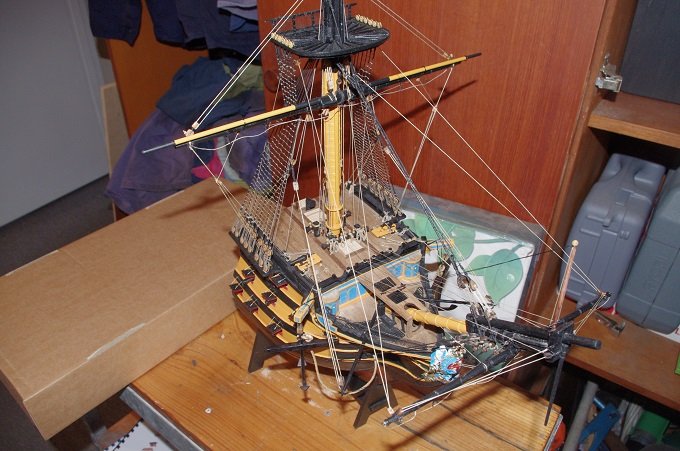
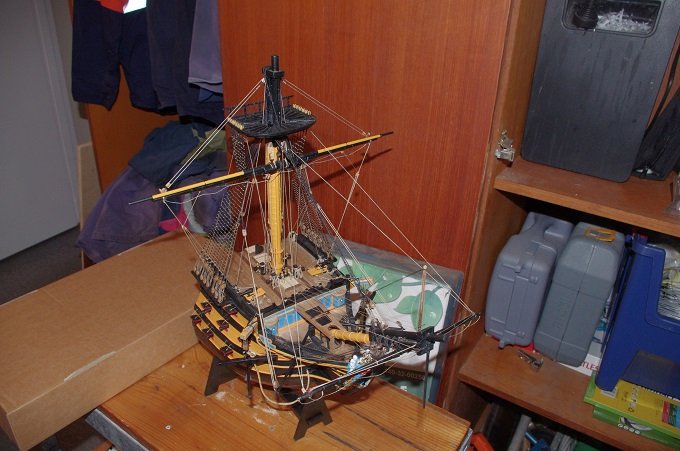
Hello All, The following photos are of the finished model and were taken back in 2016. Please excuse the clutter in the background.


-
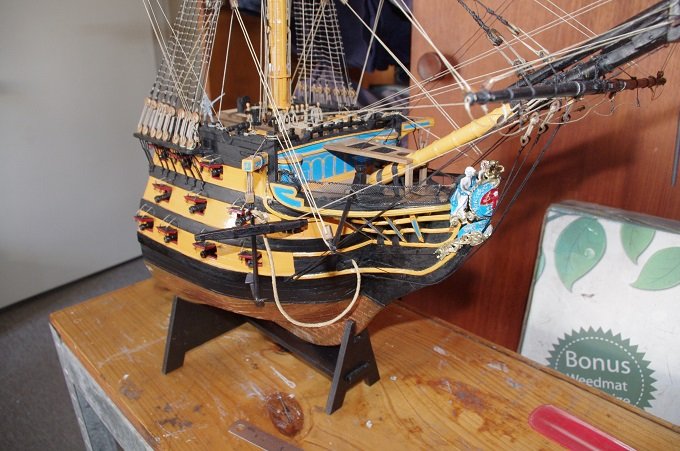
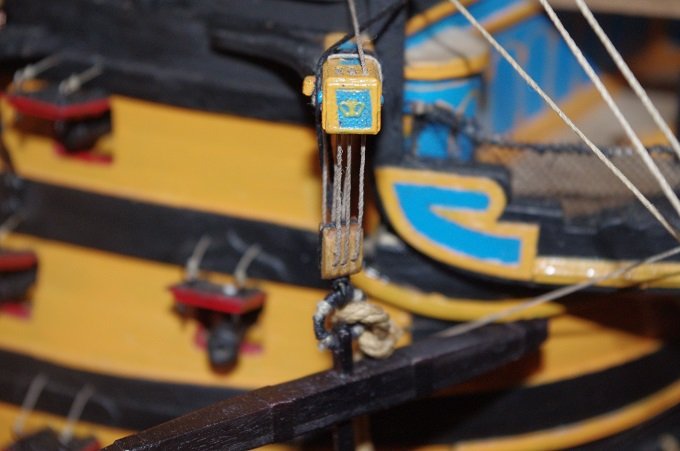
Hello All, The last things to do on the model were to fit the anchors and tidy up the paint work on the cross section and fit the photo etched knee brackets. The first two photos show the cross section painted and the second the knees temporarily in place. The anchors were made up from the kit parts and primed. They were then painted black and the puddening was added to the rings. They were attached to the anchor cable using a clinch knot which was seized with 0.10mm natural thread, they were then rigged and hung from the catheads. Thanks for looking.
-
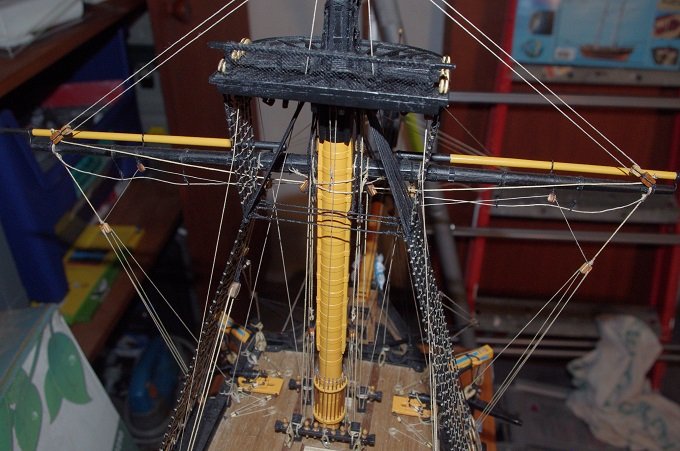
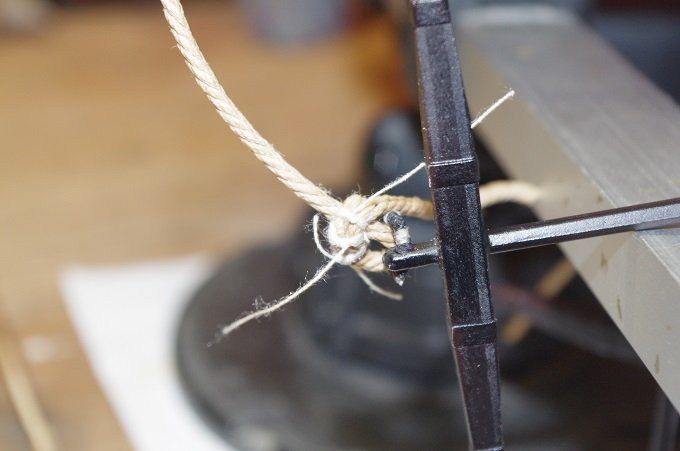
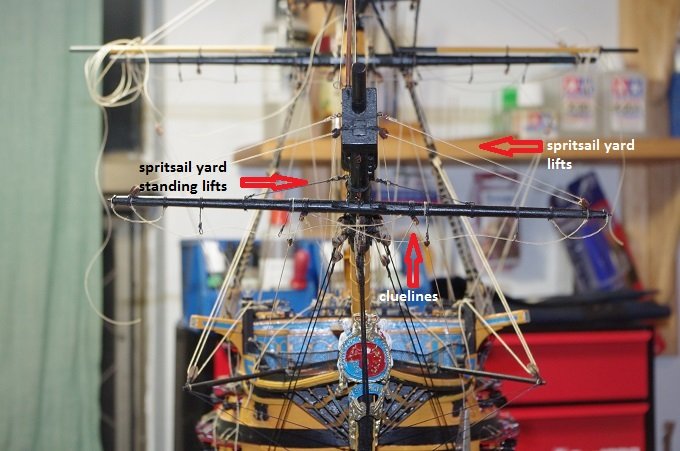
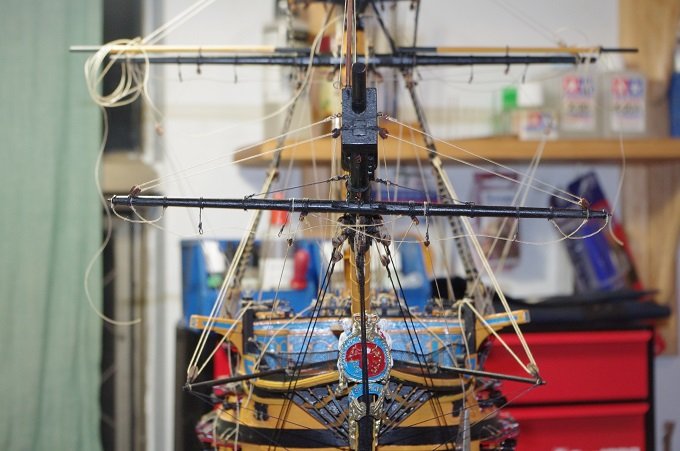
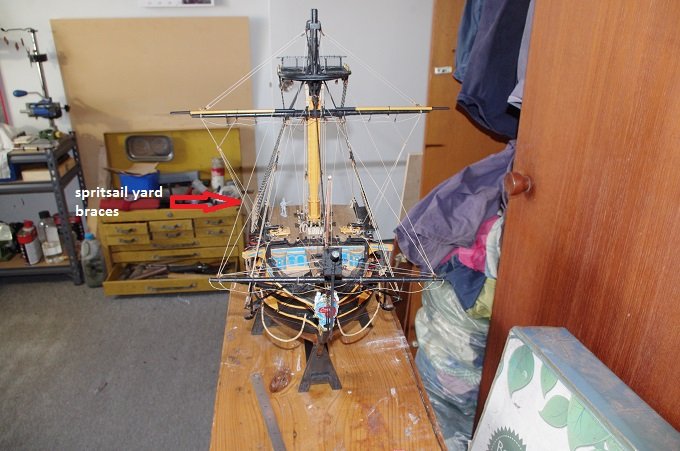
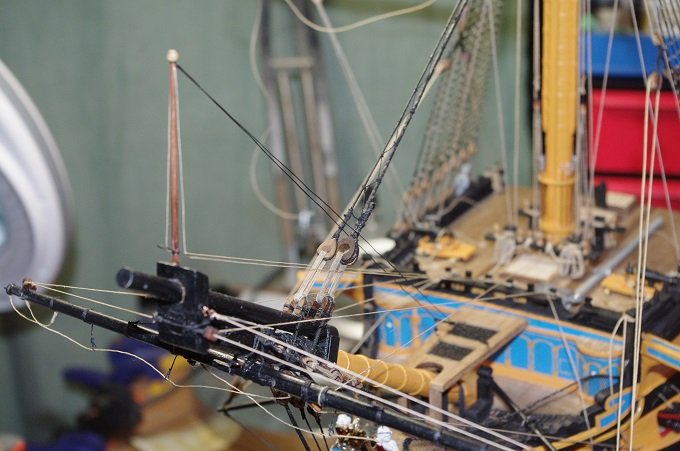
Hello All, The catharpins were fitted next they were made from 0.75mm black thread with an eye formed in each end they are lashed to the shrouds and futtock staves at the fourth, fifth and seventh shroud, binding the port and starboard shrouds together. There are normally 4 catharpins, the fourth fitted to the ninth shroud, but seeing as this model only has 8 shrouds the fourth has been omitted. The rigging for the spritsail yard was set up next. There are two lifts on this yard the standing lift and the yard lifts. The standing lift which has an eye formed in each end, one end being lashed to the yard about 50mm from the slings and the other end lashed to a thimble in a collar on the bowsprit aft of the bees, it is made from 0.5mm black thread. The standing end of the yard lift falls has a hook seized to it which attaches to an eye bolt in the bowsprit cap, the running end reeves through a block on the end of the yard and the through the block on cap and runs down to belay on timber heads on the forecastle breast rail. The cluelines also belay on timber heads on the forecastle breast rail. The standing end of the spritsail yard braces is seized to the forestay just above the mouse and eye, the running end reeves through the brace block on the end of the yard and then up through two blocks fitted under the foretop and down to tie off on a timber head on the side rail. The jackstaff was the fitted to the bowsprit cap and rigged with it's halliard and stays which are anchored with eye bolts to the marines walk. Thanks for looking and the likes.
-
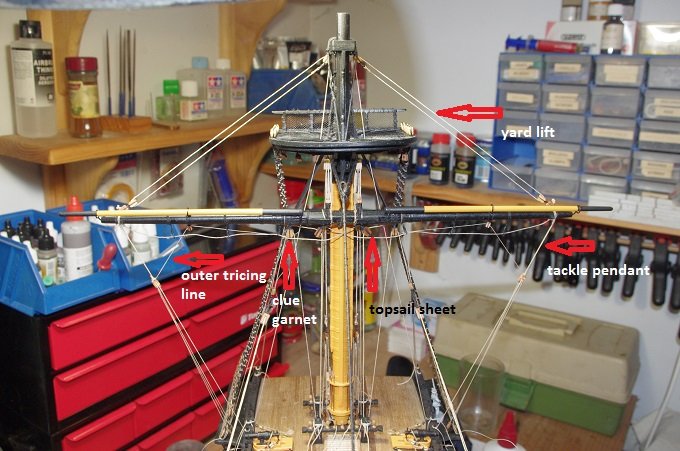
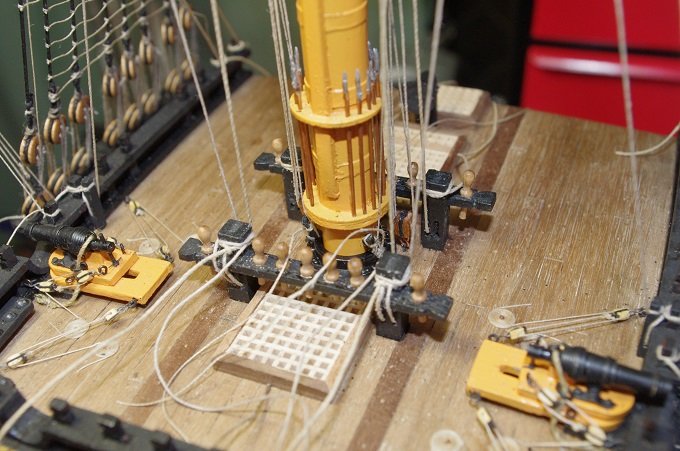
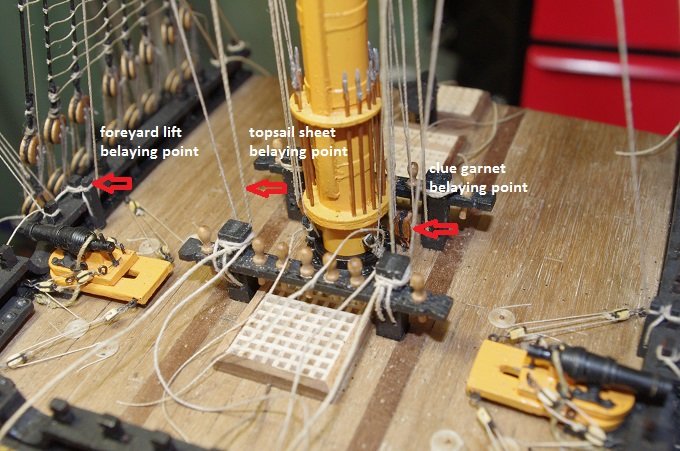
Hello All, The next lines that were attached were the foreyard lifts, the fore topsail sheets, the clue garnets and the yard tackle pendants. Because these photos were taken after all the lines were rigged I have posted two of the same photo, one labeled and one unlabeled, for a bit of clarity, I hope. The first two are a general view of the yard lifts, sheets, clueline and yard pendants and after that a brief description of the marked lines. The yard lifts are made from 0.5mm tan thread and the it's end is seized into the eye on the single block on the mast cap and reeves through another single block stropped to the sheet block attached to the end of the yard then back through the block on the mast cap and down to the deck where it reeves through a kevel block fitted to the inboard rail at the fore end of the fore channel. The topsail sheet line was made from 0.75mm tan thread and was secured by knot in the end of it to the sheet block at the end of the yard and then down through the sheet blocks on the underside of the yard next to the mast and down to belay to inner sheave on the topsail bitts. The clue garnet is made from 0.5mm tan thread and one end is secured to the yard with a timber hitch just outside the clue line block attached to the yard, it reeves through the block attached to the tack blocks and then through the clue line block on the yard and then down to belay on the outer sheave on topsail bitts. I decided to show the yard tackle pendants rigged instead of being tied up to the yards as they normally would be when not in use. Rigging them also made the yard a bit more secure. They are made from 2 double blocks one on a pendant of 0.75mm thread 50mm long attached to the end of the mast the other block has a hook stropped to it and an eye formed in the other end of the strop so that the falls can be attached. The falls were made from 0.25mm tan thread and reeved through the blocks and belayed to one of the posts on the side rail. The outer tricing line is made from 0.10mm tan thread and was used to haul the yard pendant up against the yard when it wasn't in use. It reeves through a single block attached to the yard and then through another single block attached to the first shroud at the futtock stave and then down to belay on deck. The inner tricing line attached to the other double block just above the hook and reeves through a single block fixed to the front shroud next to the block for the outer tricing line and belays on the deck. It is not shown on the model. The next few photos show some of the belaying points and the sheet an tack blocks rigged. Thanks for looking in and the likes.
-
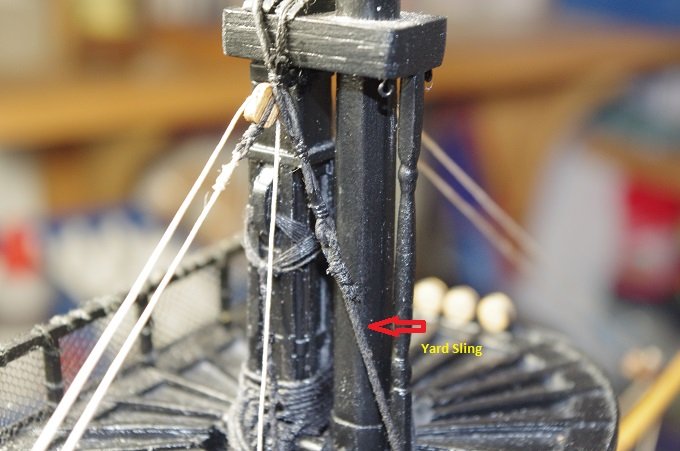
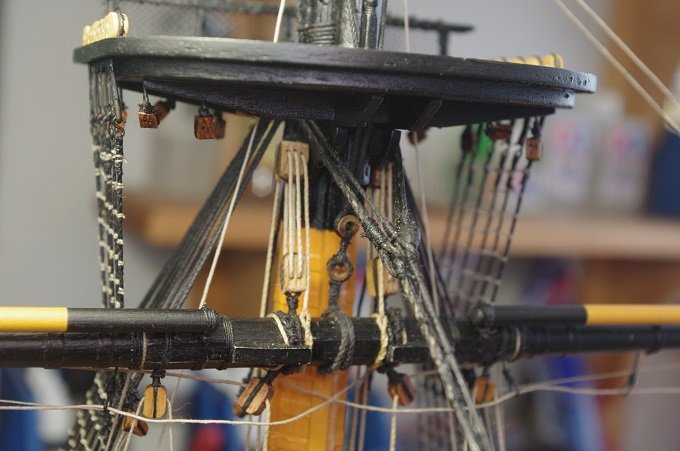
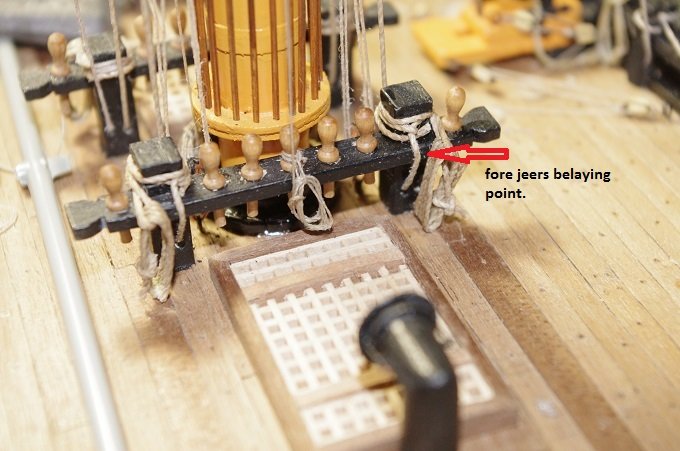
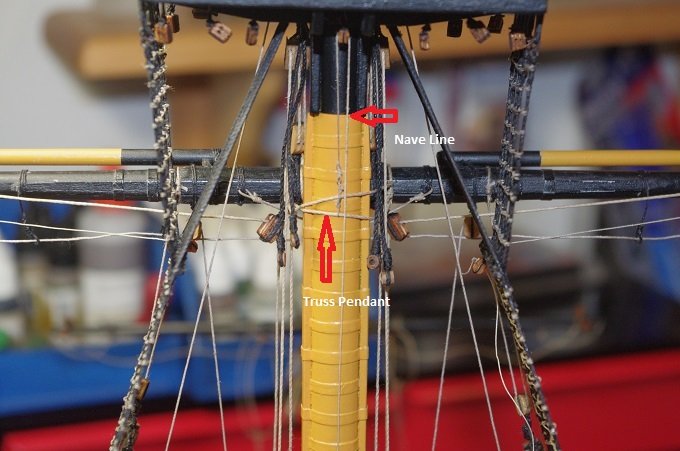
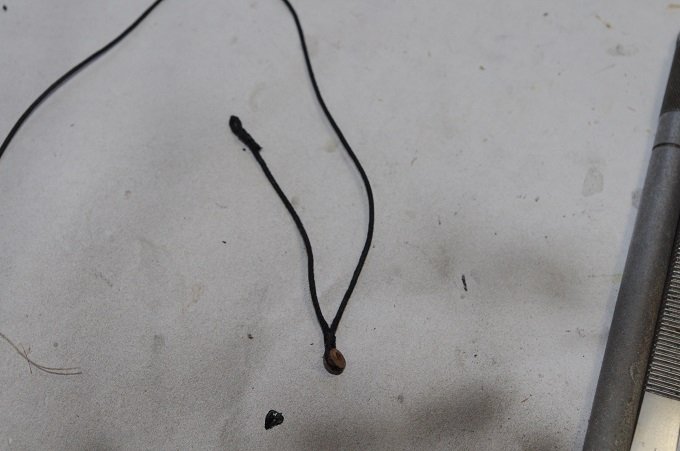
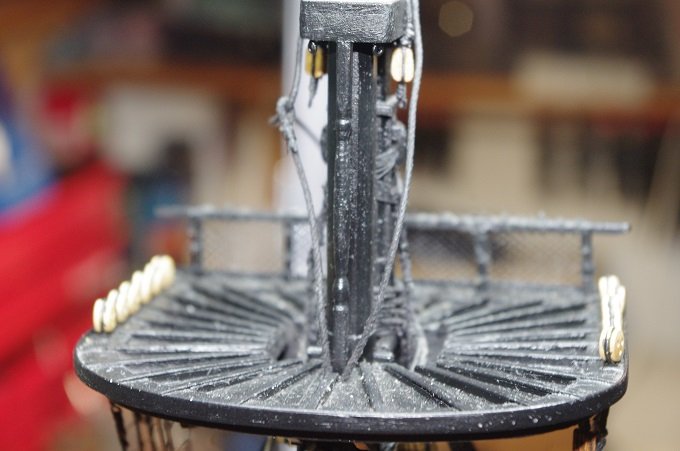
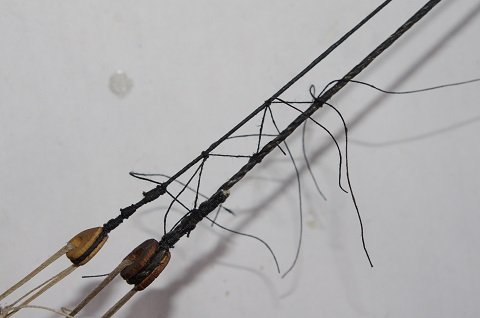
Hello All, The first photo is of the foreyard sling which I forgot to post yesterday showing how the eye and the other leg of the sling are seized together. The thimble on the yard sling was then lashed to the thimble on the yard with 0.25mm black thread. The truss pendants and jeers were set up next. As can be seen in the above photos the falls for the jeers, which is 0.75mm tan thread, is attached to the yard with a timber hitch and reeved through the jeers blocks and down to the deck where it made fast on the main topbowline bits (the pinrail on the aft side of the foremast). Also you can see the lashing for the yard sling. There are two truss pendants on the foreyard, port and starboard, they were made from 0.75mm tan thread and an eye was formed in the end of each one, they were then seized around the yard (which can be seen more clearly in post# 377 on this page) with the starboard side pointing up and the port side pointing down on the aft side of the yard. The running end of the port pendant reeves through the starboard eye while the running end of the starboard pendant reeves through the port eye. Two double blocks are used for rigging each pendant one attached to the end of the pendant approximately 75mm off the deck and the other attached to a hook and eye bolt fitted to the deck either side of the mast just in front of the aft pin rail. The falls are made from 0.25mm tan thread, reeved through the blocks to belay on the cleats attached to the lower front side on the mast. The nave line, which serves to hold up the truss pendants, was made from 0.10mm tan thread. This line is made up in two parts first a short length of line is attached using eye splices to each truss pendant then a length of line is attached to the span using an eye splice and then reeved through a single block attached to the after cross tree and belaying to the centre pin on the main top bowline bitts. Thanks for looking and the likes.

-
Thank you Kmart for your kind words. I am reasonably pleased how it turned out.
-
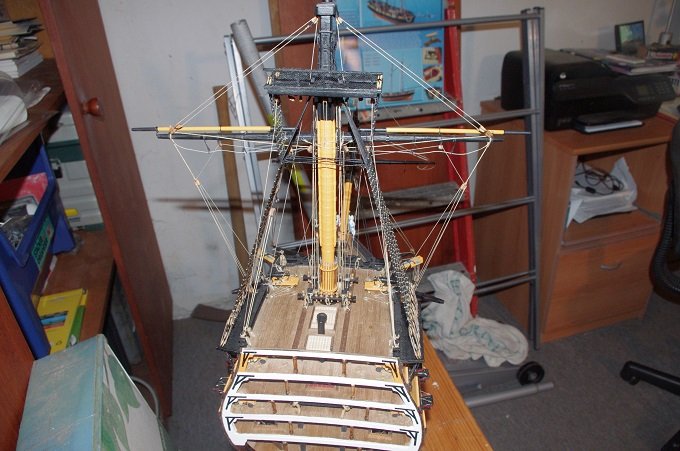
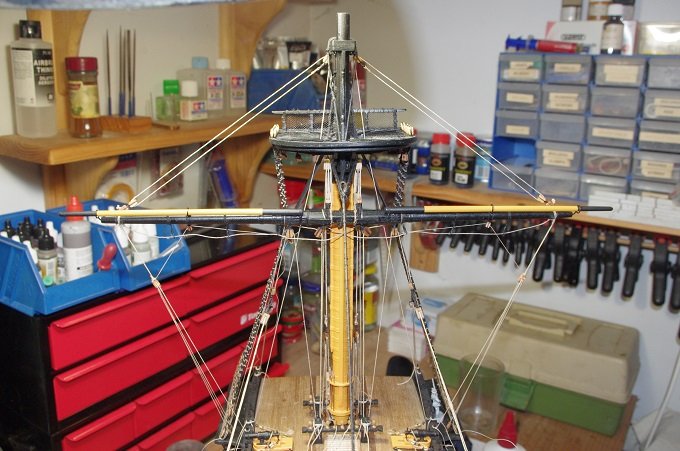
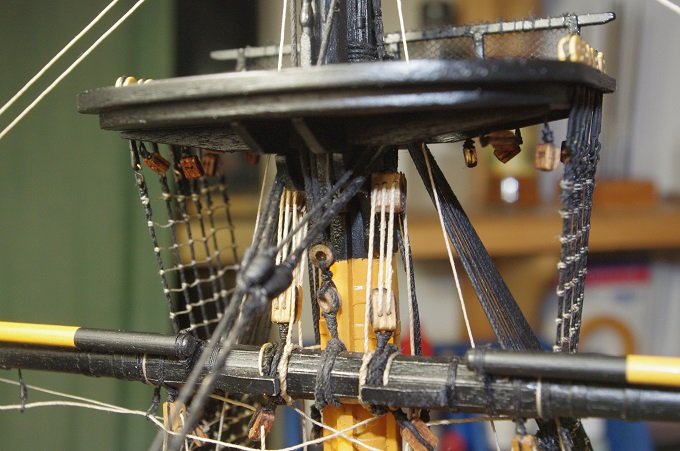
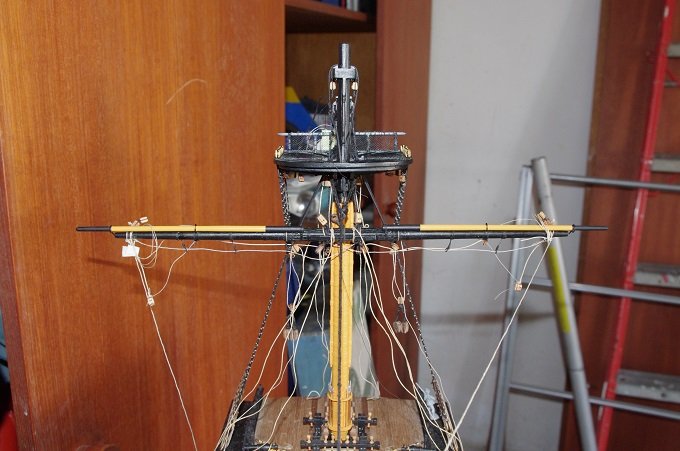
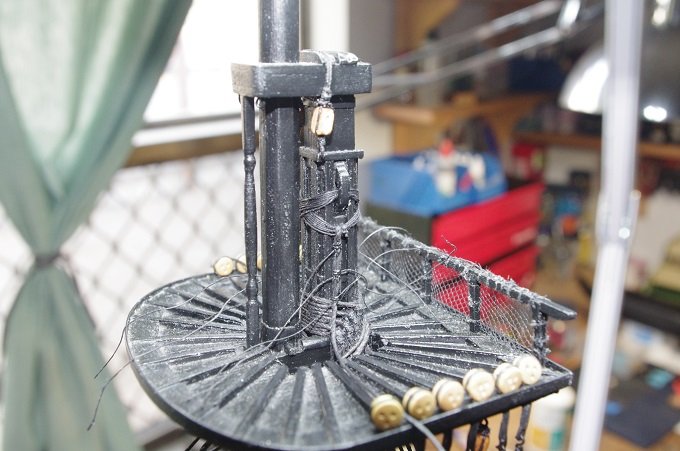
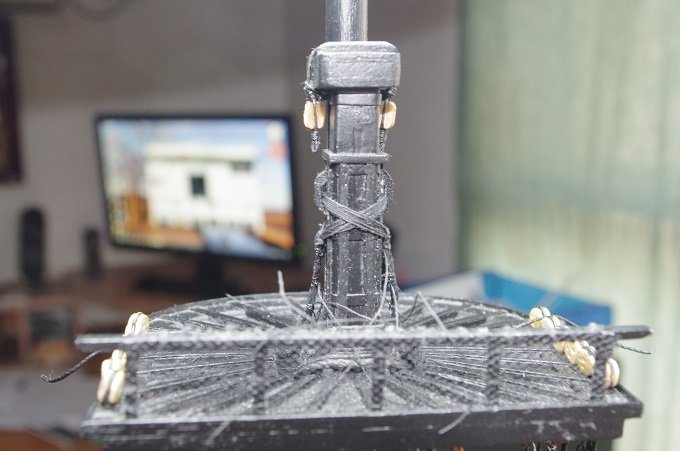
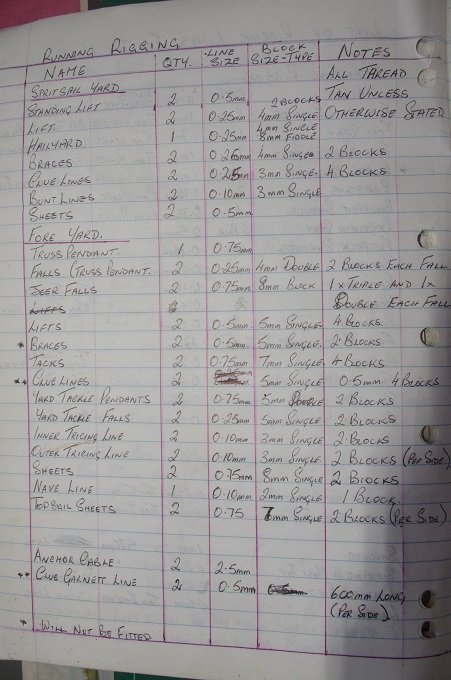
Hello All, The next stage was to fit and rig the yards, unfortunately this is also where the photos are a little sparse, I think it might have had something to do with the excitement of being close to finishing the build as I can find a heap of photos about one part of the final rigging steps then nothing until it's nearly completed, anyhow I will try to post them in the best order I can. The first photo is of the rigging list for the running rigging. The second two photos show the lashing of the jeer block straps to the mast top, the upper eye of the strap is suspended by 7 turns of 0.25mm thread, passing through the cleat on the opposite side of the mast top to it. The foreyard sling was next it is made from 1.3mm thread with a 4mm thimble seized into it forming a long and short leg, the short leg has an eye spliced into it and the longer leg which passes up over the mast cap and through the eye on the shorter leg and is then seized back onto itself with three seizings. The foreyard was then fitted, located on the mast by a brass pin fitted into rear of it and held in place by temporary lines to keep it horizontal and square with the yard while the glue dried. Thanks for looking and for the likes.
-
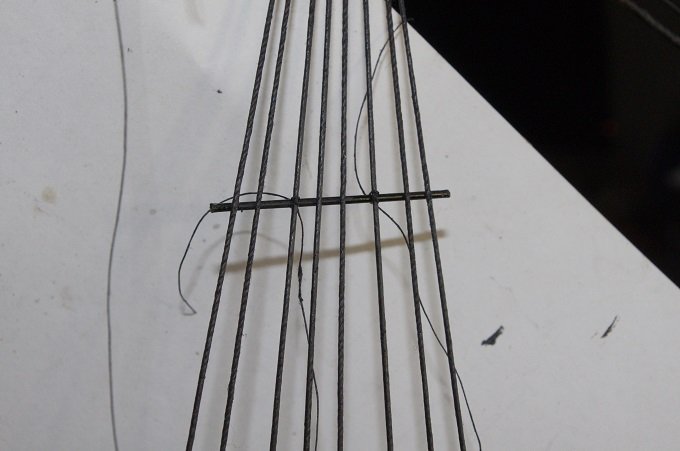
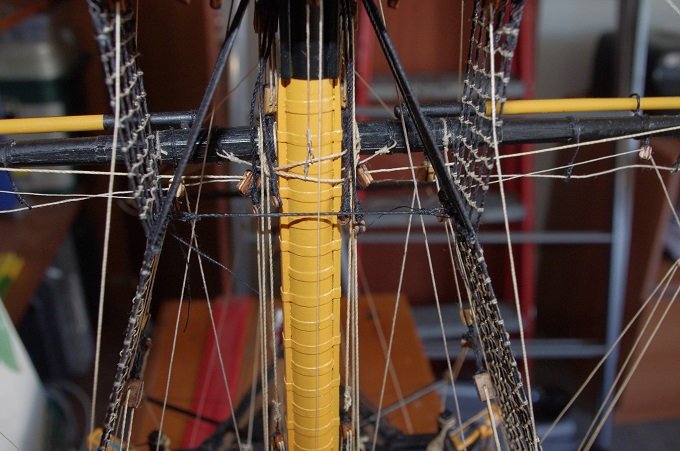
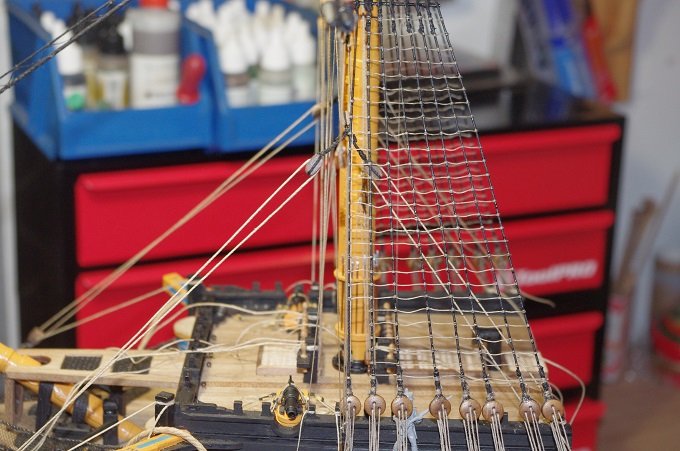
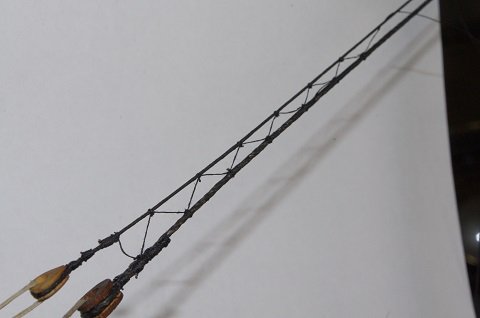
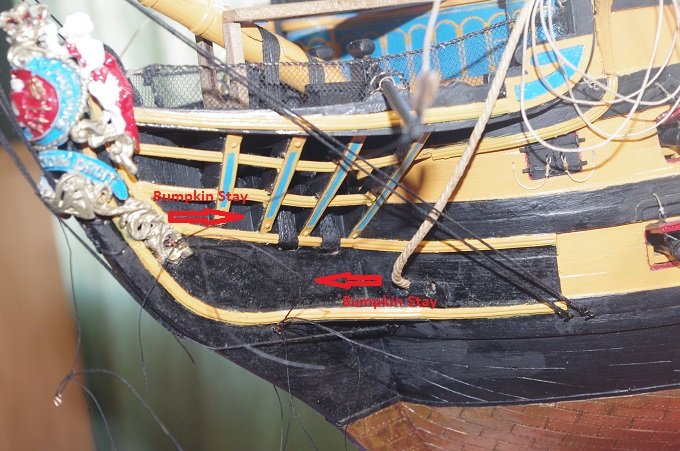
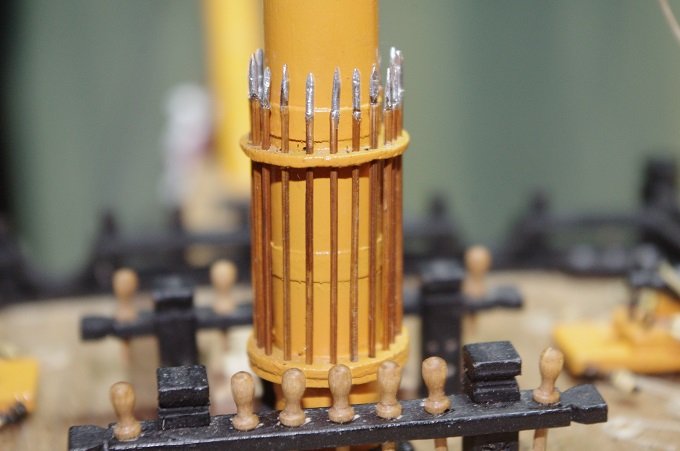
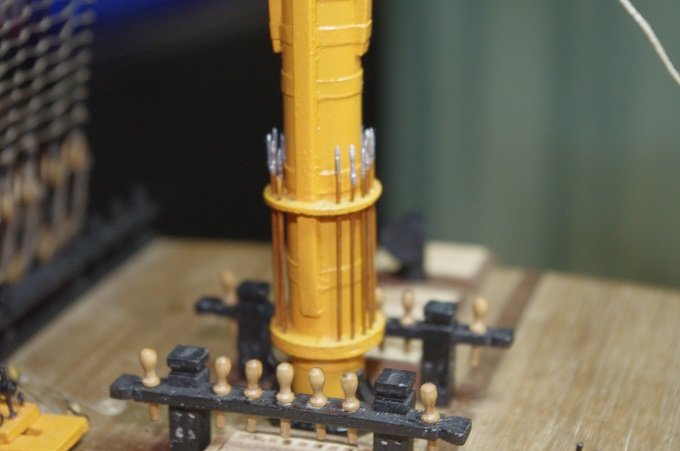
Hello All, The snaking between the forestay and the fore preventer stay was the next job. I used 0.25mm black thread for this, tying it to the stay at the point of each triangle with a length of the same thread and then adjusted them till I was happy with the outcome. They were then glued and trimmed. The ratlines on the foremast shrouds and futtock shrouds were next these were done with 0.10mm tan thread and were left in their natural state, I was going to paint them black but I like the contrast in colours and there are a few photos floating around on the web that show tan or white line used as ratlines even some older ones of the Victory herself at Portsmouth. They were tied on using a clove hitch and then glued and trimmed after that the ratlines and shrouds were given a coat of diluted PVA glue. The bumpkin stays were added next, this is a two legged stay with an eye made in the middle of it which fits over the end of the bumpkin and rests on a shoulder machined on the end of the bumpkin also holding the foresheet tack block in position between it and the shoulder. The two legs have a hook seized into the end of each one and hook into eye bolts located in the stem. The photo is a bit out of focus, sorry. I fitted the boarding pikes to their rack on the foremast next before too much rigging got in the way, the shafts were made from bamboo drawn down to 1mm and the tips from flattened brass nails they were then stained and painted. Thanks for looking.
-
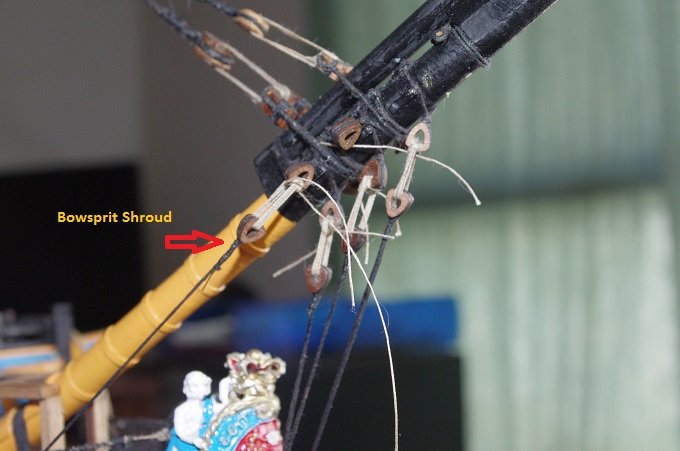
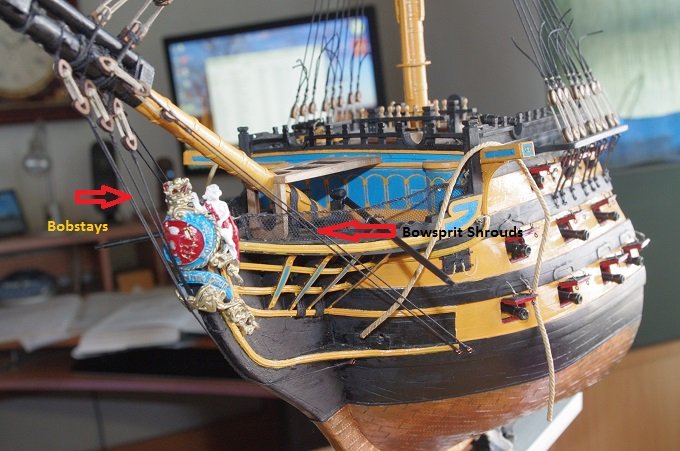
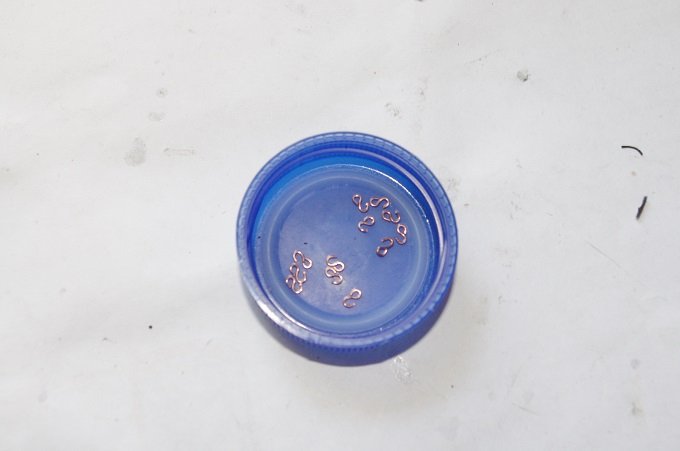
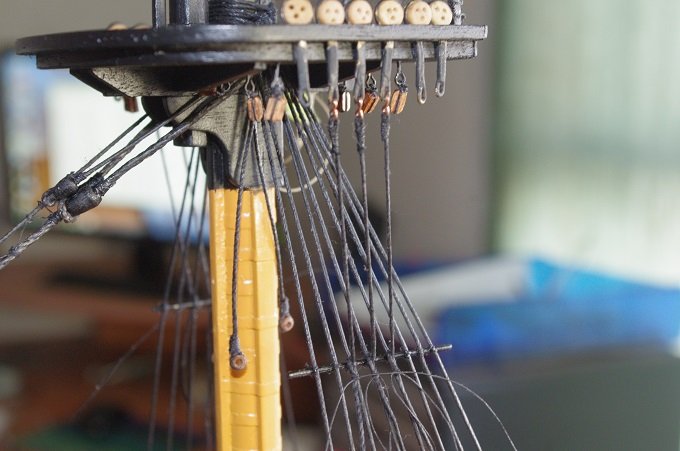
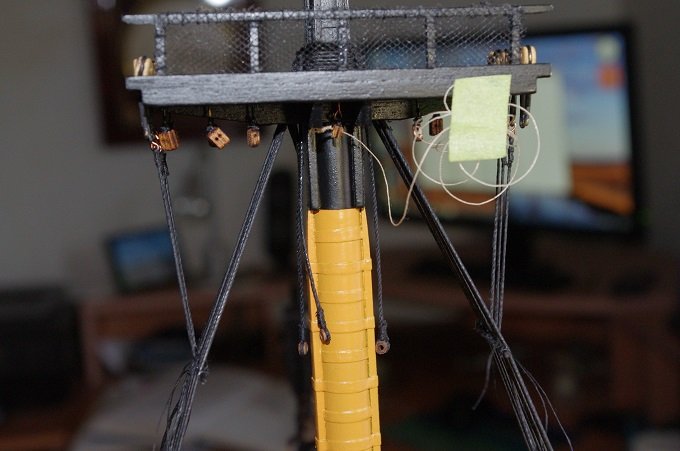
Hello All, The bowsprit shrouds were the next item to be fitted there are two on each side and they are attached to the hull by means of a hook and eye in the lower wale at the bow just outside where the lower stem decoration rail finishes. After all of the foremast shroud, forestays, bobstays and bowsprit shrouds were fitted the foremast shrouds underwent their final tension adjustment and the seizings were finished off and they were glued and trimmed. The futtock staves were fitted next. The rule for fitting these is that they are fitted at a level as much below the upper edge of the trestle tree as top of the lower mast cap is above it. The staves were made from bamboo drawn down to 1mm in diameter. The hooks for the futtock shrouds were made from 2mm copper eye pins bent to shape. The futtock shrouds were made from 0.75mm black thread and fitted and tensioned by passing a loop around the fore shroud and the stave and seizing the tail to the fore shroud. Thanks for looking and the likes