


Izzy Madd
-
Posts
382 -
Joined
-
Last visited
Content Type
Profiles
Forums
Gallery
Events
Posts posted by Izzy Madd
-
-
I'm not sure but I can do a trial if you like and post it. But I would imagine it would as even PVA sends copper black in about an hour. So watch this space.interesting- will bank this idea for later- wonder if it works on copper too

This is the before. Fresh cut and diced. Sorry that was my dinner. Just fresh cut no cleaning so grease oil and whatever the worlds chucked it's way. And we'll see. Remind me though or it could be pickling for a year...
-
Hi ho,
From the insane alchemist.
Just a quick surprise update on the blackening brass front.
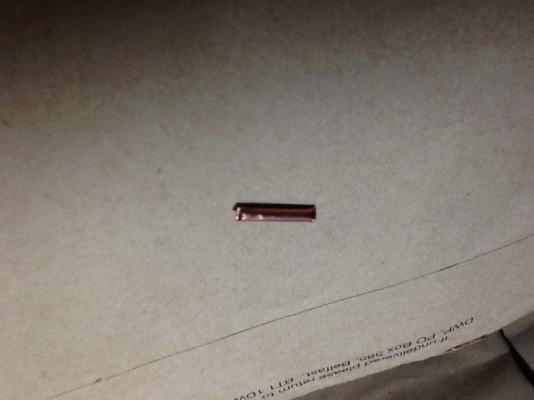
I've just been cleaning some second hand parts up such as cannons. That were painted. So I put them in the neat Detol. And left the for three days. But when I've com to check on the progress.this is happened.
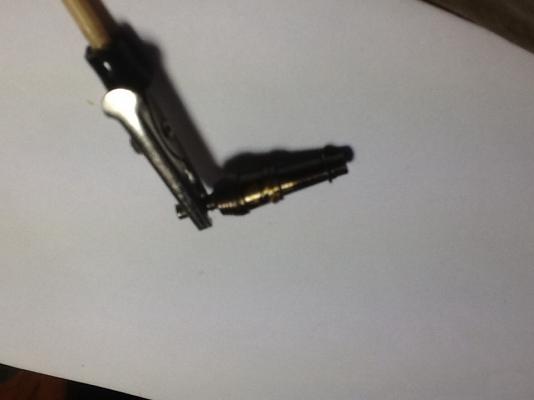

Sorry the first is out of focus its the white paper. I was just trying to show the contrast. The shiny bit is where the CA glue is but that will come of with acetone then back in the Dettol. Cheaper than liver of sulphur.
Just use gloves as there is enough caustic soda in there to blind at least so yet again all suggestion are based upon your own safety precautions and all via the IMO clause. So play safe children.
-
Hi,
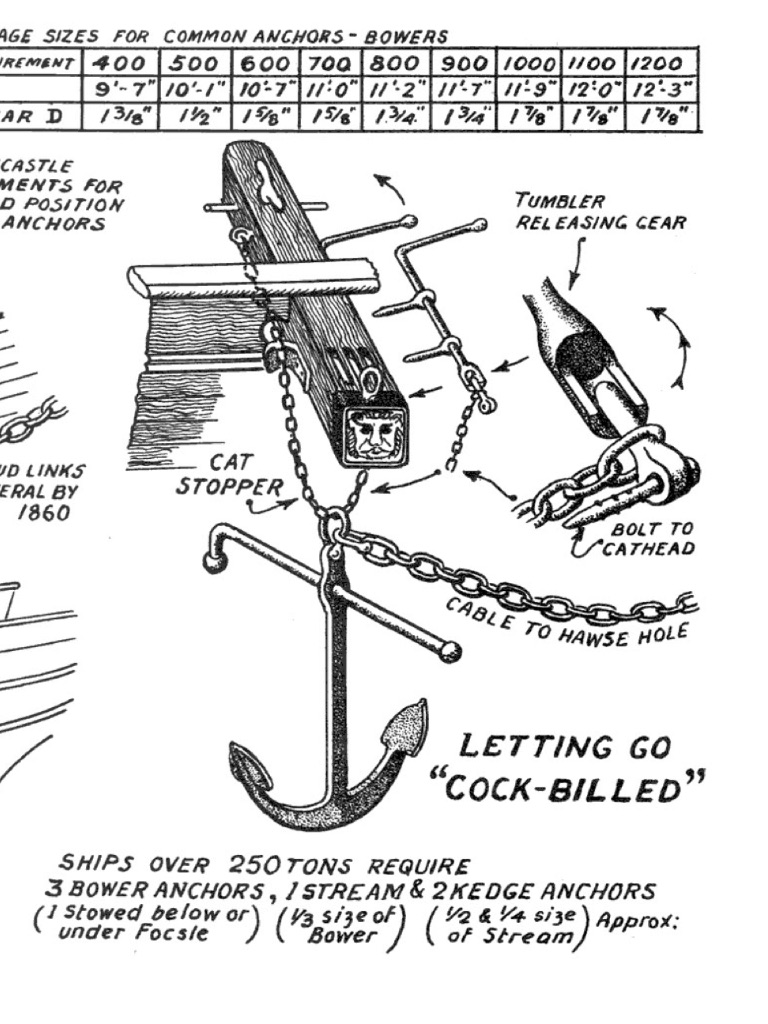
Just been catching up on your great build. And having found this image I wondered if it might be of any use. It's not of any particular ship just the generic design points
Hope it's informative at least.

- 3qq, CaptainSteve, Piet and 6 others
-
 9
9
-
Ahoy there,
Sorry there has been no new updates regards ship building but I'm rather busy at the moment. Sort some issues. But as its just turned midnight here I thought I'd take a moment to ask a question that's been bothering me.
When we start making these models. Which ever they are and out of whatever. We all have intentions of building them as they were when whatever we choose.
BUT
When you consider that even the HMS Victory. Was subject to the whim of whoever was in command. Such that colours could be changed weekly names altered at the drop of a hat, and adornments, weaponry and methods. All of which were far from written in triplicate. Most times they would be lucky if someone said more than "give her a new coat of paint.". Never mind writing it down.
So my question is while we've got a target in our heads. Such as Nenads dilemma regarding the capstan.
Does it really matter if we become captain for the day and decide to alter things a little because they look better on the model. Or perhaps we want a slightly different shade of vomit yellow on our model of the Vicky. Or should we stick fast to the letter of the plans. Even if it means we are unhappy with the finished product.?
My vote is for stuff the books occasionally and just go with what you like. Look at the Vicky. They are still trying to decide what colour she was and we've got more info on that battle than almost any since. Never mind the feathers.
So what's your take on it all?
-
Wow.. that is a problem, Izzy. Which one is the "real" one???? I have no idea but at least you know this is getting read. I hope you get an answer.
Well at least I can now say that if they are wrong it's come from the horses mouth.That sure is a thinker Izzy. It may be one or a combination of all. No one will ever know for sure unless someone invents a time machine. Or can somehow decipher the flags on any of the victory images or photos
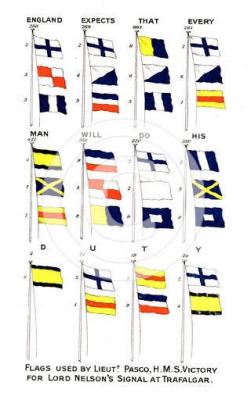
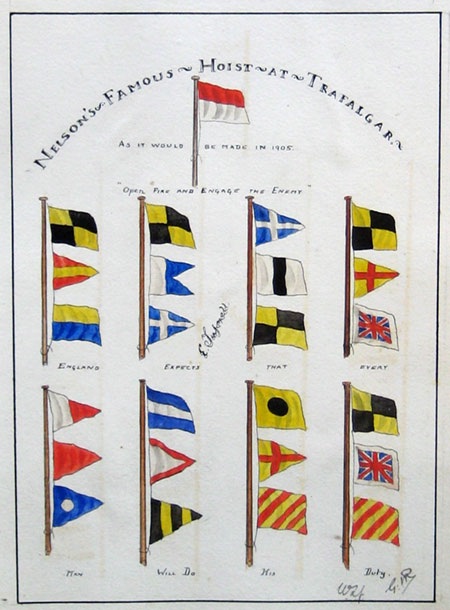
As of ten minutes ago the official response from the offices of HMS Victory. And a gentle man by the name of Giles Gould. Confirms that the signal looked like this image he has kindly sent me.
So here is the correct signal of the day.

And this is the very generous gentleman responsible for solving the riddle

-
Ok. I know I a land lubber. And don't know my Red Duster from my elbow. Well alright I know that last one. My elbow hurts more.
But I've just been looking at the signal flags supposedly used on the day. And how is a Numptie like me supposed to know which ones right..
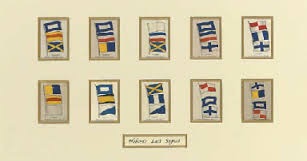
Now an odd discrepancy I can understand but just look at what I got off google...
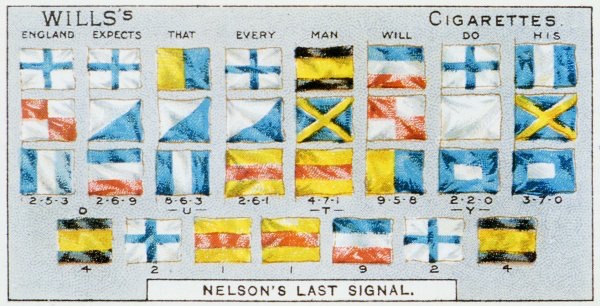

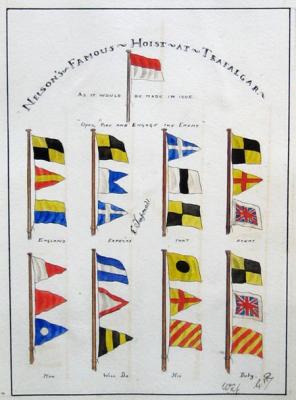
And as someone who lives almost as far from the sea as is possible in the UK how are they displayed/read. As there are as many pictures of the ordering as there are of Nelson. Give an idiot a chance here someone, please.
-
I've just been doing a bit of stocktaking and I think I'm in need of either a dockyard, an Admaril or a shop...
As since March I've got three ships under way, one ship sunk with out a trace. Twenty four waiting in line and a potential three more on order...
Any body know where I can get a bigger home.
-
Ahoy there,
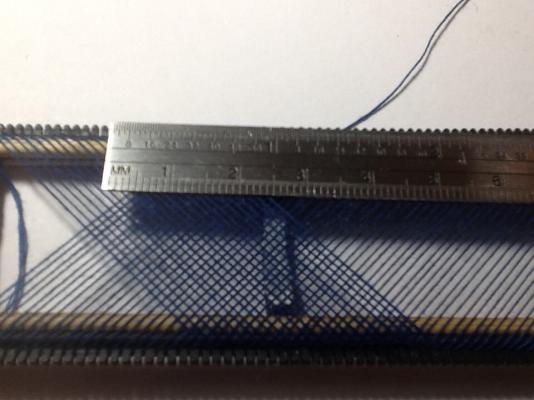
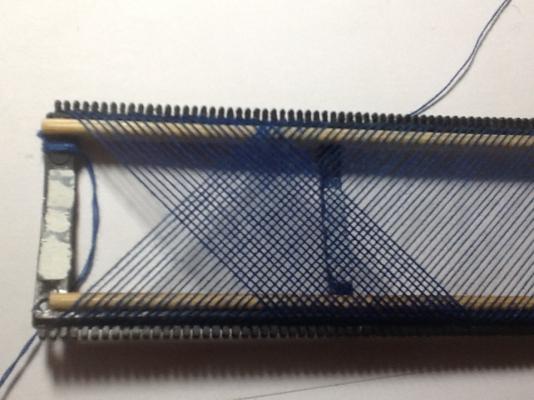
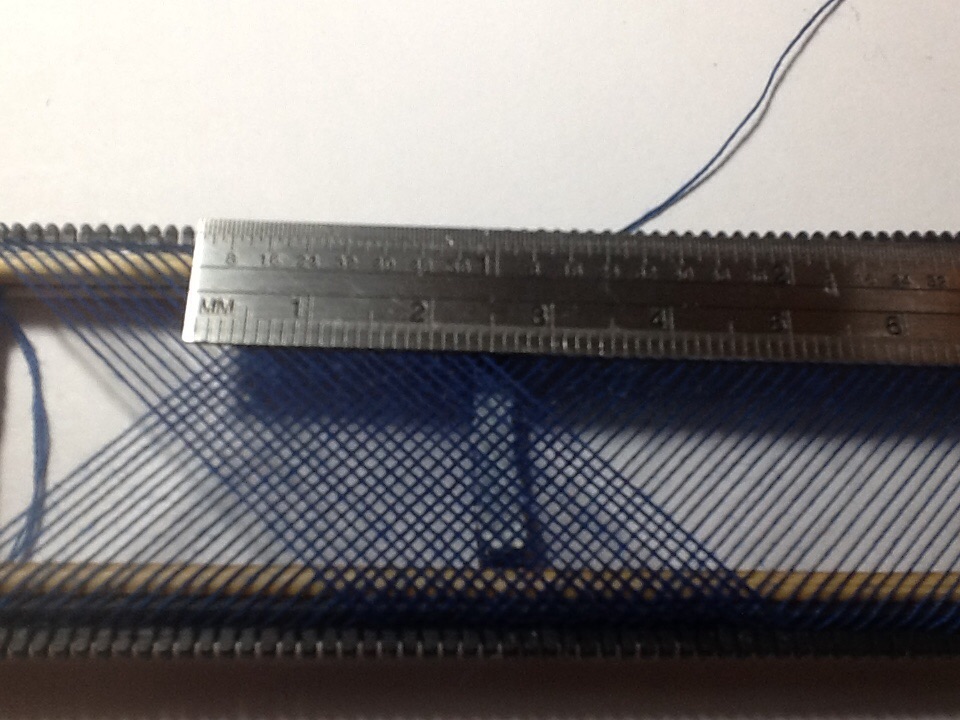
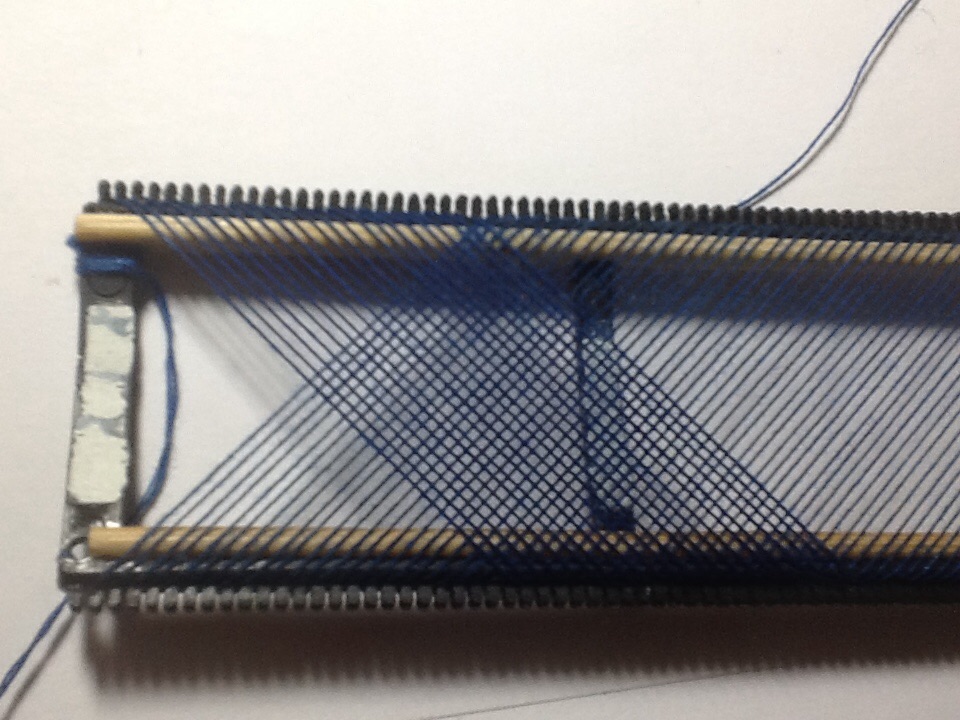
Whilst I'm getting ahead of my self a little. I thought I'd have a go at making the hammock nets.
Well having woven my own full size fishing net. How hard can it be...
Apart from the fact that at 1mm x 1mm square. The rest I'll leave to you're imagination. Anyway after three reels of thread and twenty attempts, and three repairs to the jig. I've got something that's looking good to me.
-
G'day John
The type I get has no fragrances nor soap. I've been using them for about 2 years on both non treated timber and varnished timber, and there are no problems. I can paint etc over it and there is no difference.
Havagooday
Greg
I just use neat Detol. As it doesn't hurt the metal or the plastic and contains alcohol and caustic soda. So removes grease and dirt great. And smells nice as well
-
ATHLETE'S FOOT POWDER...
Sorry slight error for "bacteria" read fungus. Still has the same effect just me getting mixed up.
Yes that's right athlete's foot powder. Welcome to the weird world of my mind.
Ever bought a second hand kit or some second hand spares? Or even dug out some old spare of your own?
Only to discover they have an overpowering odour of damp and mildew. Well this is caused by bacteria. So kill the bacteria kill the odour. And athletes foot is a bacteria. Are you still with me on this.... Good. Place your odourous items usuall sail cloth and rigging thread. In a box. Doesn't need to be air tight just to make it easier. Then give a light sprinkling of powder. MAKE SURE ITEMS ARE 100% DRY. Place the lid on and shake. Leave for an hour or more. Take out. Shake out the excess dust. That's why no moisture. And no smell. Also works on feet I believe...
-
And to colour brass black without dangerous or expensive chemicals see my post on here titled BOILED EGGS. At least I think it's on here if not see my "Will" Everard log...
- mtaylor, GLakie, CaptainSteve and 1 other
-
4
-
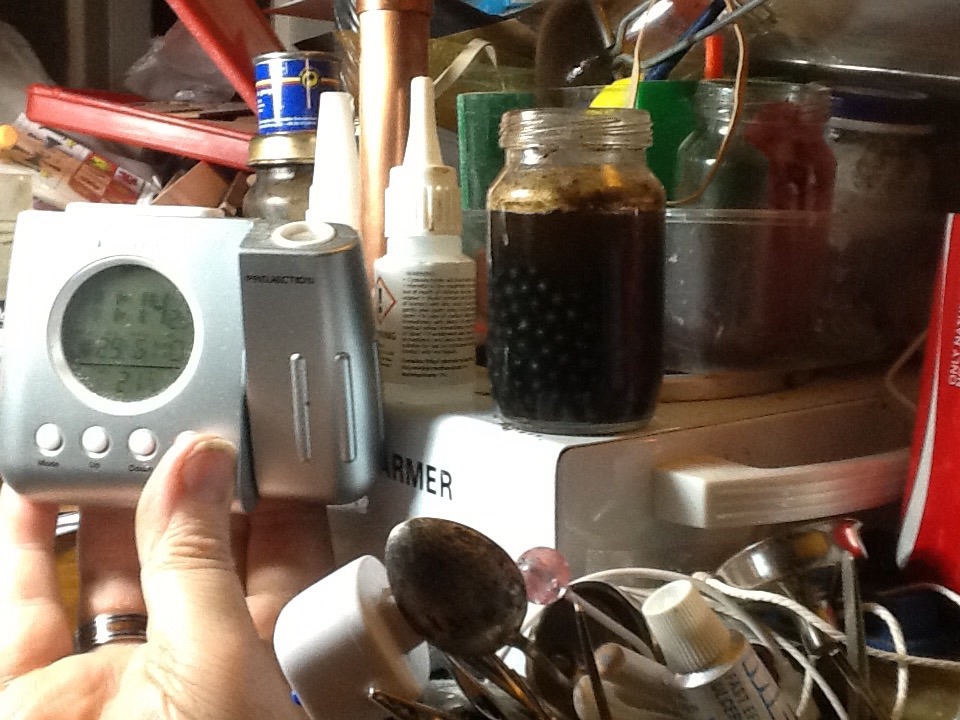
COLA/WHITE VINEGAR
One extra if you prefer Cap'n I'll delete this but for now I'll post
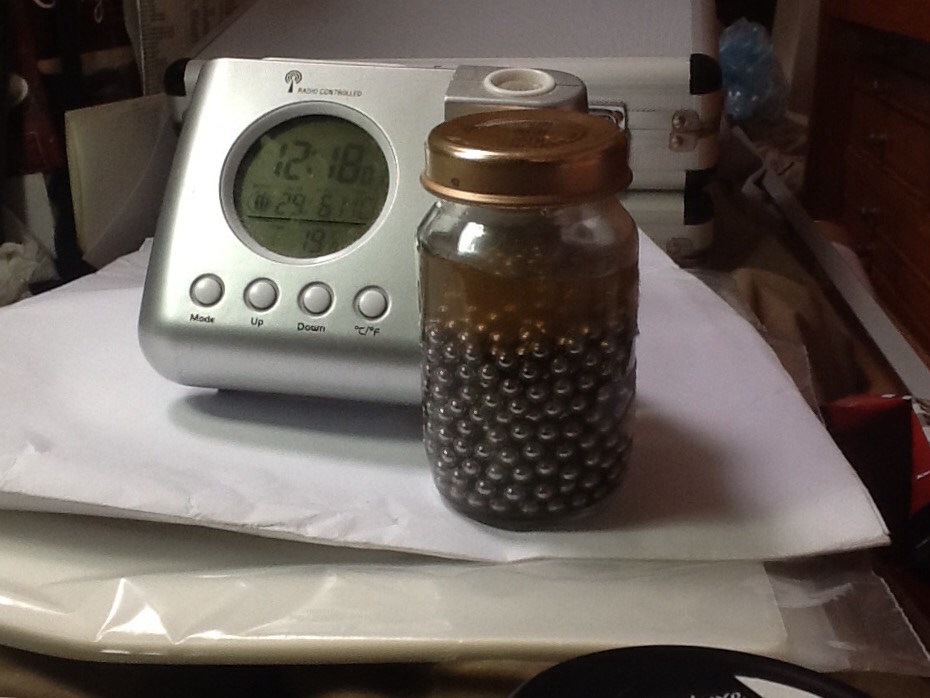
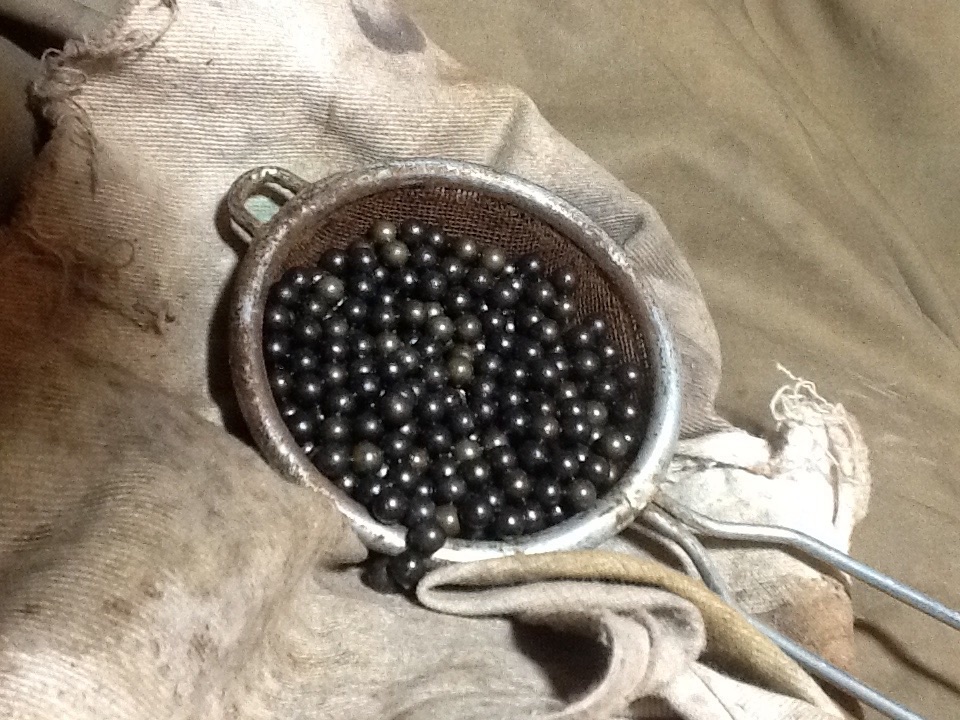
if you are struggling to turn your bright steel black then drop it in some white vinegar works very quick at temps above 20c. Will even remove BZP. This turns them it dark and rust resistant. But due to natural variations may have a varied colour. Also they will be covered in brown sludge. Drop them in cola and the acid and colouring will clean them and stain them more even. All done in 24 hours. Then if you need a shine just rub between some coarse material I use a voil pouch takes about 20 seconds.
This is when I've just put these ball bearings in the vinegar
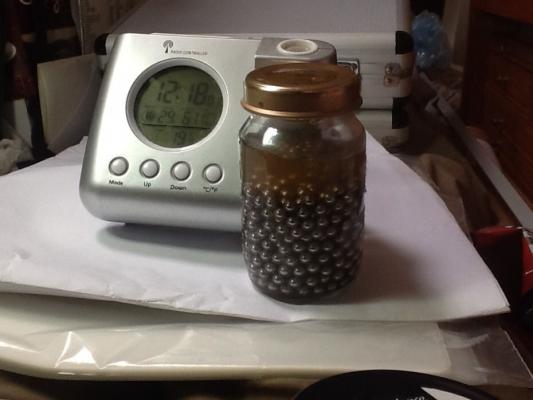
This is ten mins later. The gas bubbles ar hydrogen so be careful with flames.
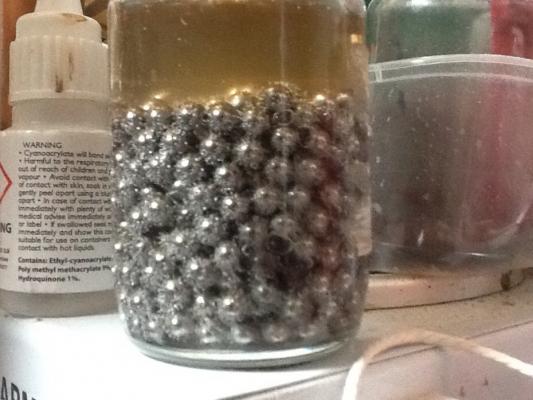
This is 11 hours later. As can be seen by the clock. Also the scum in the jar.

And this is them straight out of the vinegar

Also don't throw away the vinegar. Filter it as it is now ferric acetone. And can be used to create instant jet black stain.
Thanks Cap'n
-
As newer corks don't have this. Fly fishing suppliers sell a pack of self adhesive lead about 100mm x 50mm x 1mm for about £2.50. Looks great and sticks it's self. Good for roofs and such. as its already flat and cuts with scissors.gezz what a load of knowledge.........and I thought I was smart(for about 10 minutes)........please let me add two things.......whenever I get something at a big box store I save the Styrofoam.....it can be shaped to make a great cradle for the hull and if you don't cut it down too far, it makes a handy place to stick your most often used tools. #2......hard to find, but worth it..........older wine bottles had their corks wrapped in lead, this is really useful for mast banding and all sorts of small detail work
my .02 cents
james
-
"Sucuri" problems again. Then not. Then again, Then not. Then hit me out. Then not. Then freeze everything, or slowed to death
Is it really necessary to have such a strong firewall ?
Ok, time to continue with
whiskerscatheads ( satisfied, Mark ?) - if I have success with uploading pictures and posting - two photos were rejected from unknown reason ...First careful drilling holes in foredeck bulwarks, and thinned inner part of
whiskerscatheads to get visual proportion. I think in real ship, they are a half and more of their width under deck, so considering I do not want to digg on deck, I have to thin themNot bad
Comparing pictures from old CS and today, there is a little difference in colors - today, ends are painted white. Anybodu knows reason ?
And I was clever and painted whiskers all black after making, so sanding starts
And thin thin thin paintbrush
And here we are. Not glued jet, because first I have to drill a little holes and make this nice fragile shackle , then to glue, and after that to mount shackle. Dont forget Nenad to make a cat carving on top, and a little ring there !!!!!
And then my regular brain worm appears, and started turning me on devil`s side, to make one sweet detail
And here is simulation of it. Not enough skill to make this on body of
whiskerscatheads which is only 3.5 mm wideObviously I have to play in Photoshop to paint my eyes blue and to change my avatar
It looks like you've put them in the opposite side to where the painting indicates...?
-
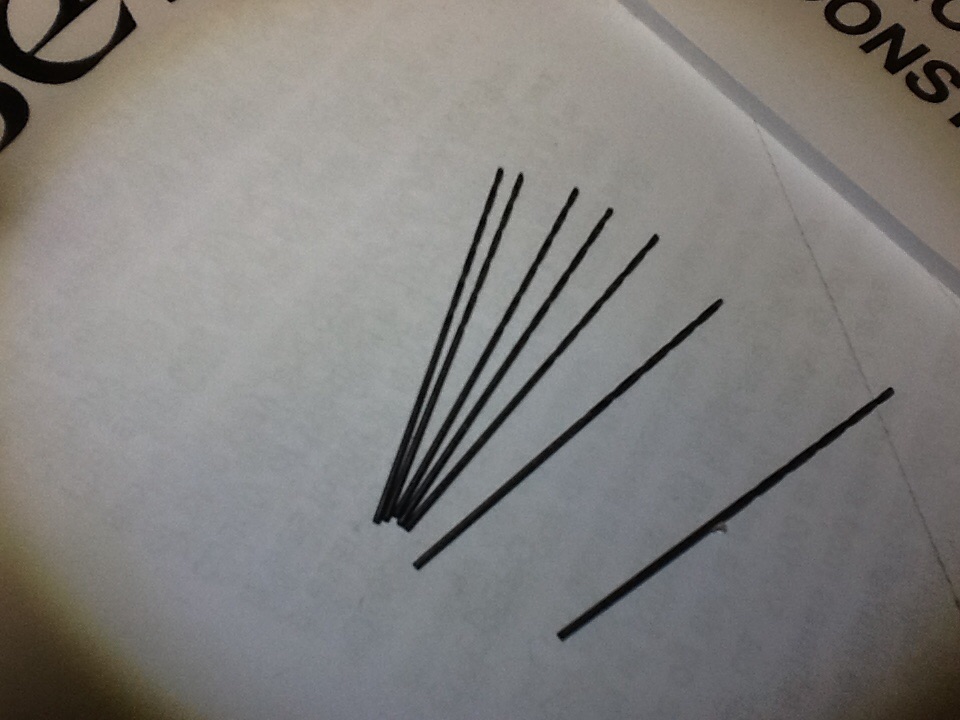
Ahoy,
For those that perhaps tried it yet or don't believe it here is the result of 24 hours soaking in citric acid on 7 brand new HSS silver drill bits.
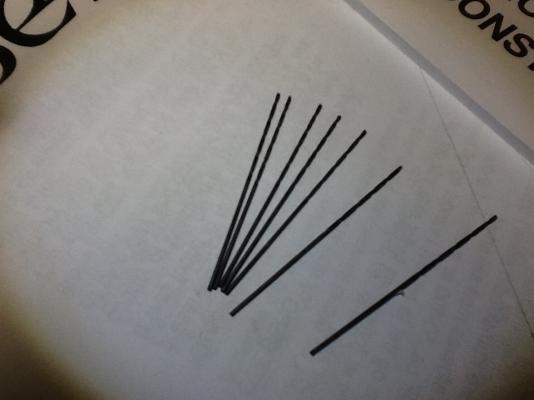
I've done this not to show but to prevent rust. As all they need is a wipe with a dry paper towel and they are done and perhaps a little soak when the coating wears off in the mean time a light covering of mineral oil if you are in a really humid place.
-
And seeing as it's been a while since you've heard from me here's another tip daft tip.
This is for the strong of stomach and those who can't smell.
But used to be the best way to blacken ANY MEATAL And when done this way it stays black. No amount of sanding short of an angle grinder and the only just.
In the past as now rust was an age old problem when it came to tools as was brass looking to new. Yes faking aged brass is not new either.
And before there was so much access all these fancy treatments you had two choices as regards rust oil daily. Brass wait til is tarnished.
But there was on old country method that still works today.
This is for all those feline lovers out there.
Yes cat urine. Guaranteed to Sen: anything blak as pitch. Usually done via the litter tray. But feel free to try milking a cat for it wee wee. Best way is to put you items in a mesh bag if small if not just throw them in. And wait. Within a few hours of the first contact the effects will begin but leave it as long as possible for best results.
Only real down side apart from having to retrieve the items... Smell yes even metal stinks after this so give it a good coating of some sort of varnish. The smell does go but slowly.
IMO
-
Hi, folks I'm back again. Just had to nip and get a few props for this next one.
Perhaps you are building in a bigger scale than map pins will work for or you need lots of lights. Well fear not its nutty time again.
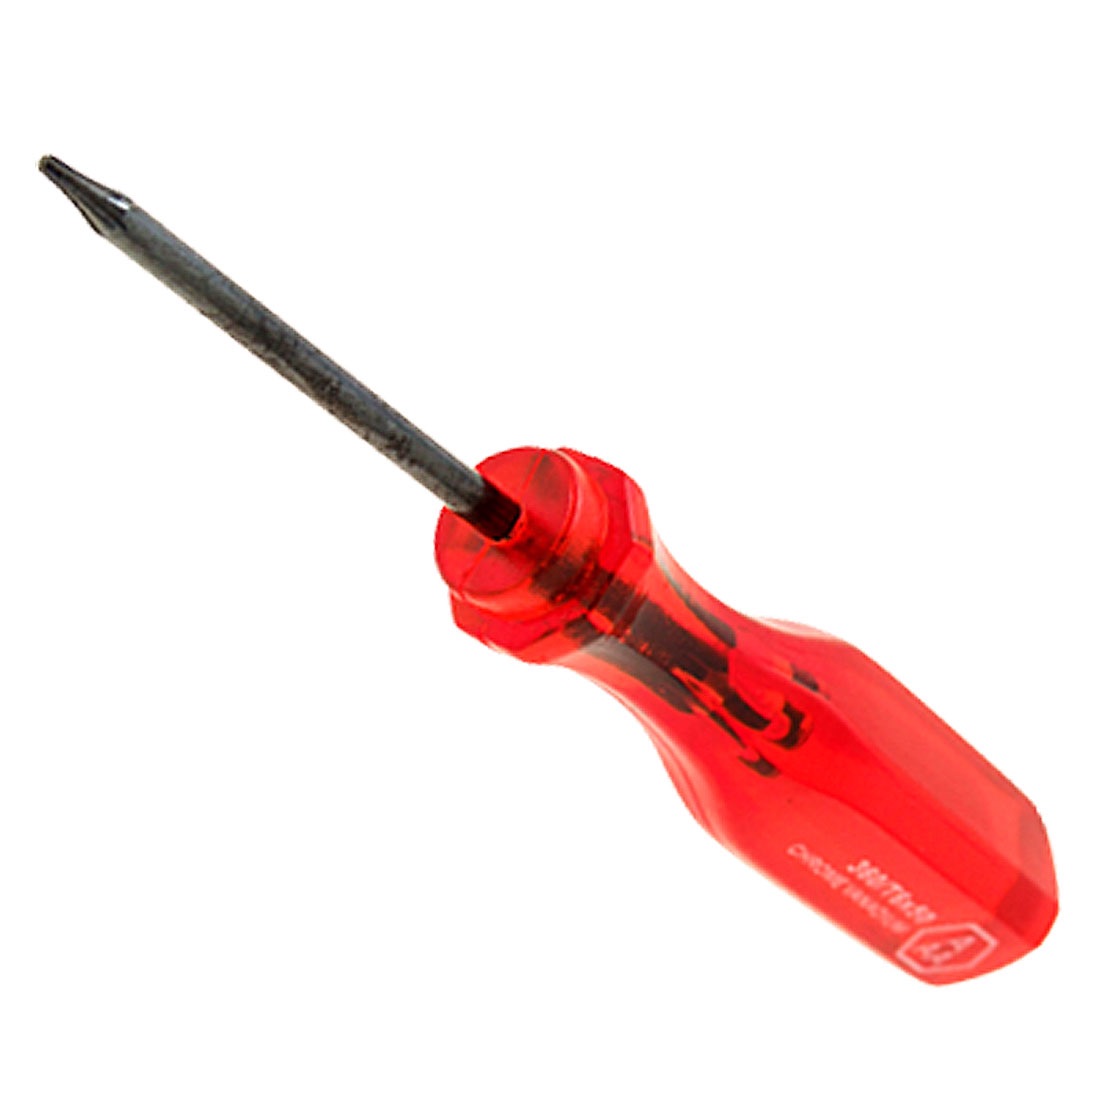
Nip out to your. Neighbours shed and have a rummage through his tool box. You are looking for one of these.

Yes a cheap plastic screwdriver. Don't worry about him next door he'll never notice and your doing him a favour removing the cheap and nasty ACRYLIC handled tools.
I assume you can fill in the rest for your selves if not put down that nice sharp scalpel and go and have a long lie down. As all you need do is put the screwdriver in your lathe blade inside the chuck. And turn the handle down to what ever size you like and the just sand it nice and slow. Same goes for turning not to fast as the acrylic will explode. Then when you've got rid of those big scratches take out you bottle of T-cut and polish that nice new lamp to a beautiful shine.
And yes that's three tips Cap'n
Enjoy safely and remember all tips are covered by the IMO clause so don't blame me
-
Ahoy there Cap'n Steve.
Here's another two for the price of one use of the un thought of.
Struggling to turn your brass black? Or just run out of liver of sulphur and the shops are shut?
Well fear not the nutter is here.
All you need to do is a little home cooking...
Get two or three eggs from the fridge, and boil them for at least ten minutes. Yes that's a rolling boil for ten mins. Then place the edges in a lunch box or air tight plastic bag. And trust me you want it air tight then add you nice shines brass. Probably best if you place the brass in a shallow bowl in the container of choice. Then seal the container and crush your eggs preferably as small as possible without releasing any of the gases. This is why you boil them so long to increase the hydrogen sulphide. Bad egg smell. Then leave. You may need to agitate the brass to ensure an even coverage from time to time. It should not take long for the reaction to begin. But it's up to you how long you leave them. You can if you like just mix the brass in with crushed eggs and wash them off after it depends on the size of the brass. And then take them outside to separate the smelly eggs from your nice black brass. And dispose of the eggs somewhere very safe. Like your nex doors bin.... Back in a moment with part two so don't go too far now..
-
As a few of the most astute of may have noticed I have a liking for the vintage kits. And as such there is always the odd missing bit or two.
Which is fine as Billing put a very handy list of ALL the bits. And an photo that has more in common with Elvis than the actual look of the bits.
So my plea is does anyone know where I can get a decent image cross referenced to the part numbers for billing. As all the ones I've found up to now seem to have been taken with a box brownie from about five miles away. And are either fuzzy or tiny or both.
So any one help please.
Oh and I've tried writing to billing no answer as usual.
-
Well,
I've just got my self a nice new set of A2 full scale drawings curtesy of Mr John McKay. All the way from Canada. And they are far superior to the book and being buggier scale it should be better for rigging. And only took four days to get here. That includes the week end.
If you ask nice and promise not to tell anyone I may let you have a little sneak preview :-)
-
-
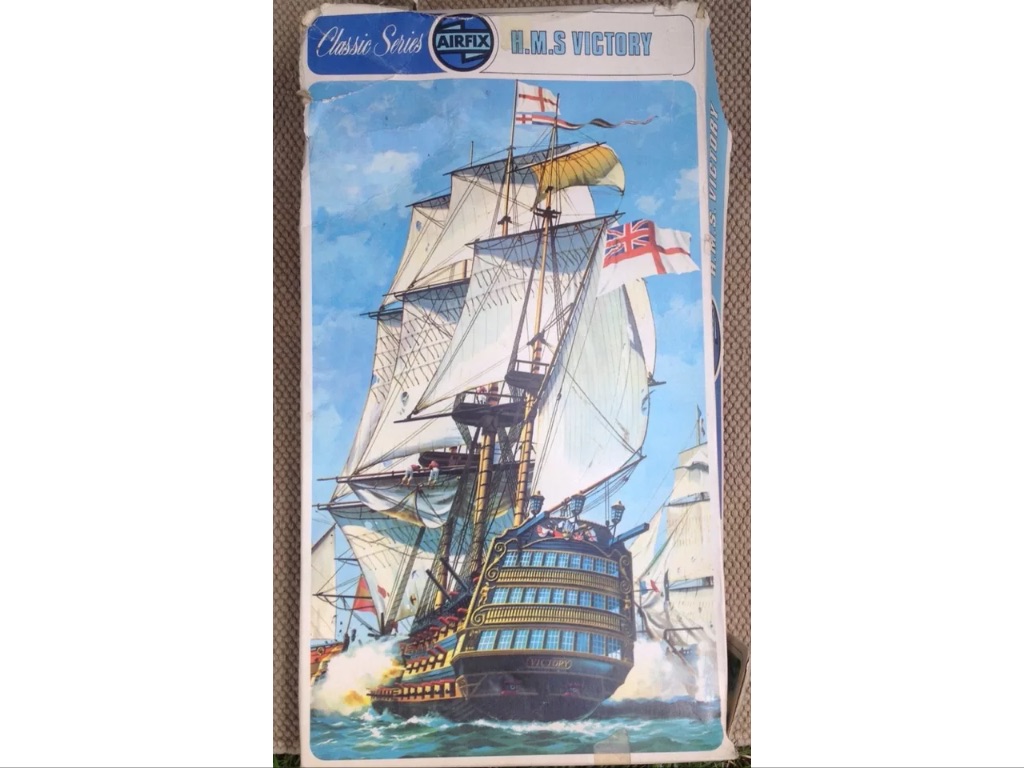
Hi izzy.
Great start my friend, i remember that Airfix Vic kit ...very well
 i built one when i was a wee lad and after i let it get into a battle with all my Airfix 1/72 scale Waterloo soldiers, i set fire to her
  :o not foregetting i was a young lad with a weird imagination and a not very pleased mother
OC
And considering its polystyrene a good job you didn't breath too much of the fumes as well.
Mine just disappeared as that ever present enemy of modelling came on the scene. Girls. Then kids etc. hence the 35 year gap.
And I still don't know what became of it.
As soon as I saw the contents I recognised it as it was about the only one in black as all the others were wood effect brown. Which trying to thread over glued blocks with black thread and awful plans wasn't the best way to keep a pubescent youth happy for long. Not with much better curves on offer anyway.
-
Well,
After many hours nay weeks of wracking my brains and even a few seconds thinking about it. I've finally found out what the last model I made 35 years ago. I felt it was but I've just seen the exact same model up for sale still untouched. Sadly I think I've got enough for now but here it is.
And for those observant enough to recognise her it is...
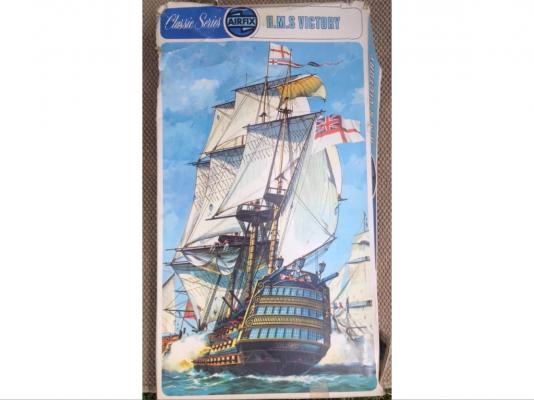
Yes. Nothing less than the good old Vicky.
I think it must be some sort of record though. As I never finished it back then and now I'm about to start. Well working up to it. All over again so if this take me say five years that forty years from start to finish one model...
And back then if you didn't have to go forward to dozen pages to find out exactly where something perhaps should be you had put it in the wrong place. So don't complain about instructions today. It's far to simple.
I don't like being rushed
-
Now, I have to search on MSW to find where I was reading about weathering brass
Don't know if you can get it but I've found "french's mustard" work great as does liver of sulphur. Liquid is best and lasts a bit longer but more expensive. And they all stink which can be bad for you if breathed in for too long so best done outside.
- GLakie, NenadM and CaptainSteve
-
3


Will Everard by Izzy Madd - Billing Boats
in - Kit build logs for subjects built from 1901 - Present Day
Posted
The only thing I can imagine might be an issue. As its a big problem for stripped furniture. That is the caustic soda has been primed. That is its been used to strip paint and that could be how the brass is changing colour. But it's no big deal on this scale as its just as easy to use it to clean either brushes. Removes old colour stains great from them. Or flush your airbrush out with it. Either way it's primed. Then just lable it and keep topping it up. And if that's the reason than it should like a good whisky. Improve with age.