HOLIDAY DONATION DRIVE - SUPPORT MSW - DO YOUR PART TO KEEP THIS GREAT FORUM GOING! (Only 20 donations so far - C'mon guys!)
×


Roger Pellett
-
Posts
4,519 -
Joined
-
Last visited
Content Type
Profiles
Forums
Gallery
Events
Everything posted by Roger Pellett
-
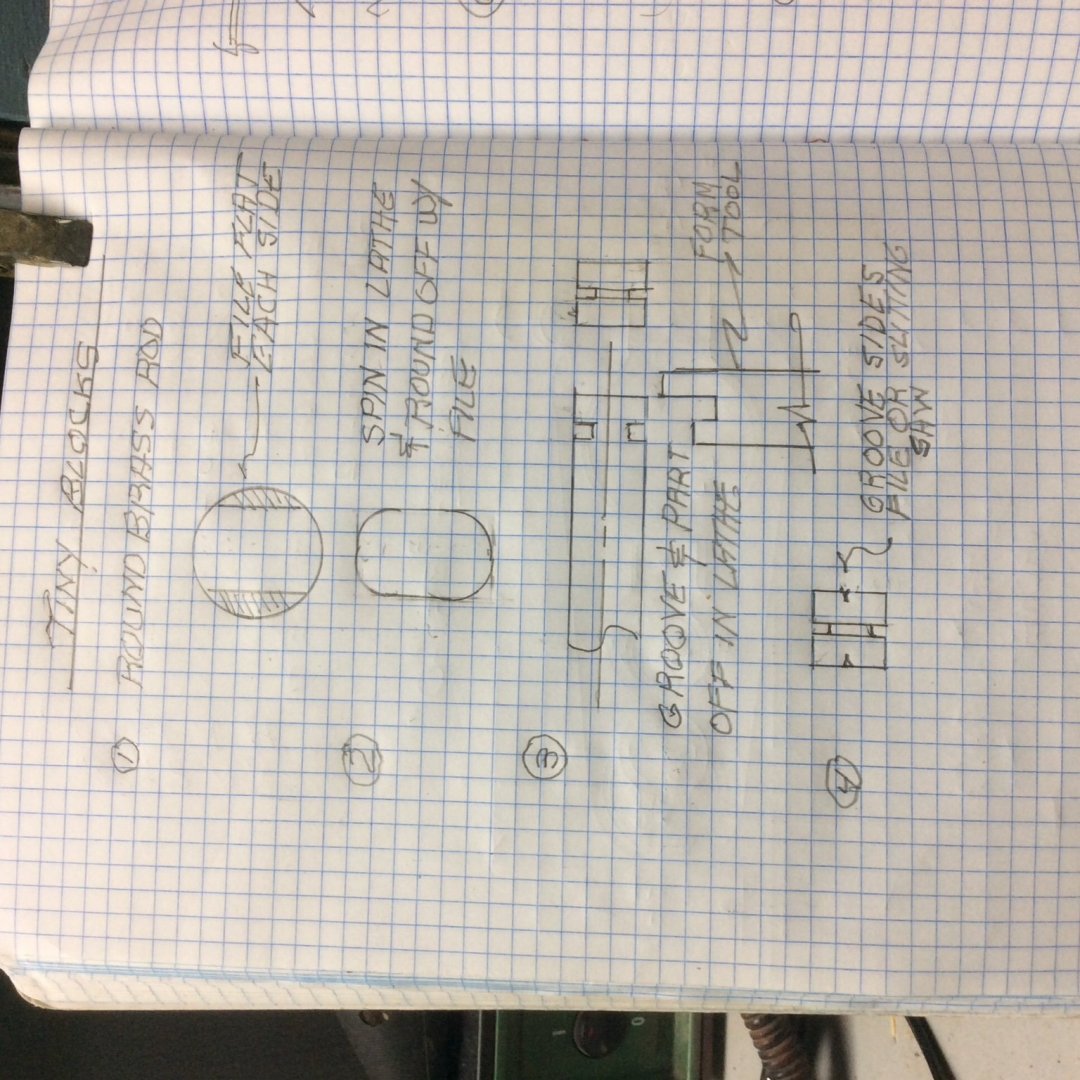
There has been a discussion elsewhere on the forum about scales for models and the subject of small scales lead to the mention of using wood to make very small blocks. The system below was used by the late Gerald Wingrove to make very small blocks for a model of the Pilot Brig Bengal. The blocks produced are probably more like the Late Nineteenth Century internally stropped blocks than the earlier rope stropped ones.
-
According to his book, The Colonial Schooner1763-1775, Harold Hahn did not take up serious ship model building until the 1960’s and began his Colonial Schooner Diorama In 1969. Over 20 years before he had built models using the plans published in Popular Mechanics. I also don’t know of any models that he built that were not Revolutionary War era. Remarkably Hahn’s Grandfather was a deepwater sailor, who left the sea in 1880 to become a prospector in the American West. He died in a blizzard in 1933. Hahn says the he was just entering his teens when this happened and admits that this made little impression on him as they were separated by 2000 miles. This means that the information in the notebook would have to have been compiled 40 years before Hahn was born. I don’t think that Harold Hahn is the Hal on the front page of the notebook.
-
Blair, Welcome to the forum. I’m not a model railroader but sometimes wish that I were. I love those Shay locomotives! Many years ago my wife and I rode up the mountain on West Virginia’s Cass Scenic Railroad. They operate Shays. Shays were also used in the open pit iron ore mines here in Northern Minnesota. I wouldn’t overdo the weathering. Chaperone hauled both passengers and freight in the Evansville, Indiana and NW Kentucky areas. To attract passengers she had to be well maintained. As a coal burner areas exposed to coal dust or smoke would be grimy. Otherwise fresh paint inspires confidence with the traveling public. Roger
-
This might sound odd but it also depends on your situation- age, experience, etc. If you already have a workshop with common woodworking tools, or if you are starting out in life and intend to build up a shop, than you only need to consider what you need to supplement what you already have. If you have nothing, that’s a different story. I would add a decent quality vice, and a razor saw with mini miter box to your list. Roger
-
My compressor that cost about $100 US has a top pressure of about 8 BAR (125 psi). It also has a tank and a built in pressure regulator that allows output pressure to be turned down as needed. These compressors are sold by large home improvement stores throughout the US. It’s noisy, but so are my other full sized power tools. My wife has been putting up with noise and dirt from an in home workshop for over 50 years. My first workshop was the second bedroom of a two bedroom Apartment. When you need a tool, buy the right one and it will last you a lifetime. Roger
-
Bill, Your machine uses about as much power as two light bulbs. The manufacturer of the MM machine tried to overcome this by very high speed rotation. This means that the machine produces very little torque. In a thickness sander high RPM’s are not good since as Jaager points out it can burn your wood. Much better to have a much slower machine with much higher torque. Roger
-
I am reading Homer’s The Odyssey, a modern English translation of the Greek text but in the original Greek Hexametric poetic form. Much to my surprise I am enjoying it immensely. Homer likes to use adjectives as literary devices to maintain the poetic cadence; for example, the goddess Athena is always “Bright Eyed Athena.” With this in mind here’s what he repeatedly says about galleys: They are usually described as Black Galleys and sometimes Well Balanced Galleys. Rigging is always Plaited Oxhide Rigging. They are always moored with their stern to the beach. When they get underway Their Pine Mast is stepped into the Mast box. Roger
- 62 replies
-
- 3
-

-
- amati
- greek bireme
- (and 1 more)
-
Brian, Another tip. On a limited budget buy tools that do double duty. Instead of buying a small engineer’s square buy a decent quality combination square, the kind with the sliding leg. This will be useful for other things. Roger
-
Bill, I agree with Jaager. I still don’t understand why MM would market a 12v. Machine. If you buy the more powerful Jim Byrnes machine I believe that you will be pleased at the additional power it provides, If you don’t feel that you can spend the money why not build one. The only purchased parts in my thickness sander are a pair of pillow block bearings, belt,and pulleys. In my case, whenever I get rid of something, I save the motor. Also, our local landfill segregates that sort of thing and allows visitors to take stuff for free. You might also be able to buy a used motor, or something used with a motor for a fraction of the new cost. I turned the drum for mine from Maple using the sander itself as a lathe. Once the maple block and its shaft are mounted in the pillow blocks, set up a tool rest and spin block with the motor. An ordinary bench chisel works fine. I glue the sanding medium, hardware store belt sander belt to the drum with contact cement. The NRG used to sell a plan set for the tool and are photos of my sander here on the forum. Roger
-
Brian, You must be a newlywed! Wait in the weeds until she needs those cute shoes that she saw, a new handbag, or better yet a new outfit. Then pounce!😏 Roger
-
If you are equipped to paint with an air bush you might want to add an “air eraser” to your tool kit. This is an abrasive blast cleaner, about the size of an airbrush. In addition to mechanically cleaning the surface, it adds a very fine “tooth” to help paint adhere. It is not so aggressive as to destroy details. Here in the US we have a company called Harbor Freight that sells imported tools. While not renown for quality, especially on this forum, I bought my air eraser there. It was inexpensive and sturdy. Maybe you can find a similar unit in the UK. Probably not a good choice for apartment dwellers or dining room table modelers! Roger
-
If this was my machine, I’d buy a small 110v 3600RPM or 1750RPM AC motor and fabricate a new mount. A new fractional HP 110v electric motor sells for as little as $100. Jaager is correct, you’re looking for torque not drum speed, so you may need to play with pulley sizes. I don’t understand why MM would sell a 12v. Machine. My guess that it might have something to do with selling the machine internationally. This could be an opportunity to improve your machine. Roger
-
Bill, Re: Fiberglass Good Point. I suspect that many of us, myself included, first try to “glue” the glass cloth down to the wood substrate. This only succeeds in trapping air between glass and cloth. Spread out the cloth first and then wet it out with the resin. Roger
-
Specifications for Mid Nineteenth US Navy launches and cutters are quite specific in requiring that all thwarts be removable to allow nesting of smaller boats. Photos of these boats show that stern sheets and bottom boards were also fitted with removable “boat shaped” inserts to further allow nesting. The ends of the thwarts were reinforced with iron plates and iron pins slipped through drilled holes into metal flanges fastened to the clamps when the thwarts were put in place. For example see: The Kedge Anchor, William Brady, 1849, Article No. 519 Roger
-
I am unfamiliar with Sparex. Is there any reason why this could not be used to clean brass prior to soldering?
-
An amazing example of miniaturizing the real thing. Well done! Roger
- 55 replies
-
- 3
-
-
- auguste piccard
- submarine
- (and 2 more)
-
Back in the day, Ship model kits were centered on machine carved solid wooden hulls; a technology invented over 100 years earlier to mass produce wooden gun stocks. The model maker finish carved the hull, and added stempost, sternpost, keel, etc. In the hands of a skilled modelmaker excellent and accurate models could be produced from these kits. In the 1970’s-1980’s these kits began to be displaced by European Plank on Bulkhead kits that claimed to allow models “to be built like the real ship,” even though with their widely spaced bulkheads they had more in common with model aircraft. Comparing the two types of kits, it’s easy to see why European kit manufacturers favored their system. It cost them much less to provide and ship strip and sheet stock than large blocks of quality wood. It is also possible that novice model makers found this form of construction less intimidating than finish carving a solid hull, until they began planking, but by that time they had already spent their money. But now the kit manufacturers had another problem. Bending strips of wood around a few widely spaced bulkheads would not necessarily provide a fair (smooth) hull, let alone one that faithfully represented the actual ship. To overcome this problem, they adopted the Double Planking System. By using this system, the builder has an opportunity to fair his hull before adding the second planking layer. Just like the real thing? Hardly! If for some reason I was to build one of these kits, I’d add solid blocks between the bulkheads and properly fair the hull. Then I’d plank the hull with a single layer of quality planking. But if I were going to go to this effort, I’d just rather build a model from scratch. Roger
-
soldering brass cannons
Roger Pellett replied to rich-mar's topic in Metal Work, Soldering and Metal Fittings
Sorry, but your picture is hard to make out. From what I can see it looks silver or grey. Are you sure that it’s brass? If not, there are many metals that can’t be soldered. Roger -
Glen, I’d be interested in the Byrnes sander at $160 plus shipping. I don’t have a Paypal account or any thing like that. I propose to send you a check and you send me the sander when you cash it. Send me a PM with details. BTW, I believe that one of the miter gages goes with the sander. Roger
-
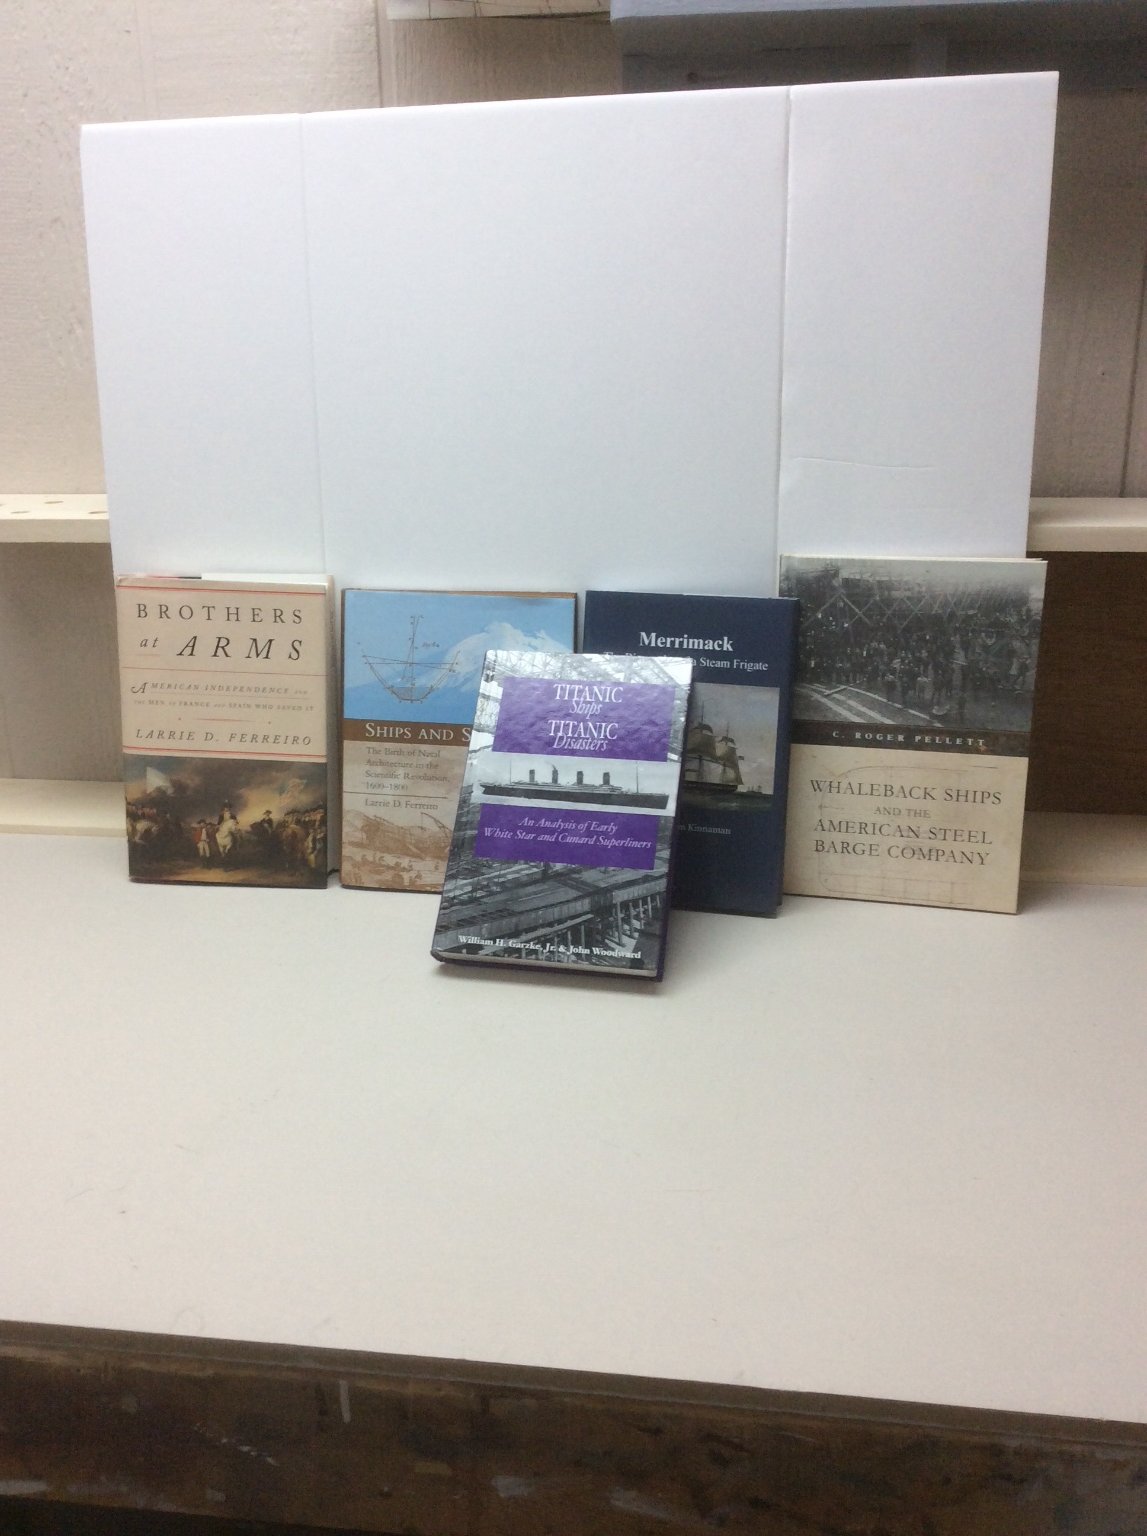
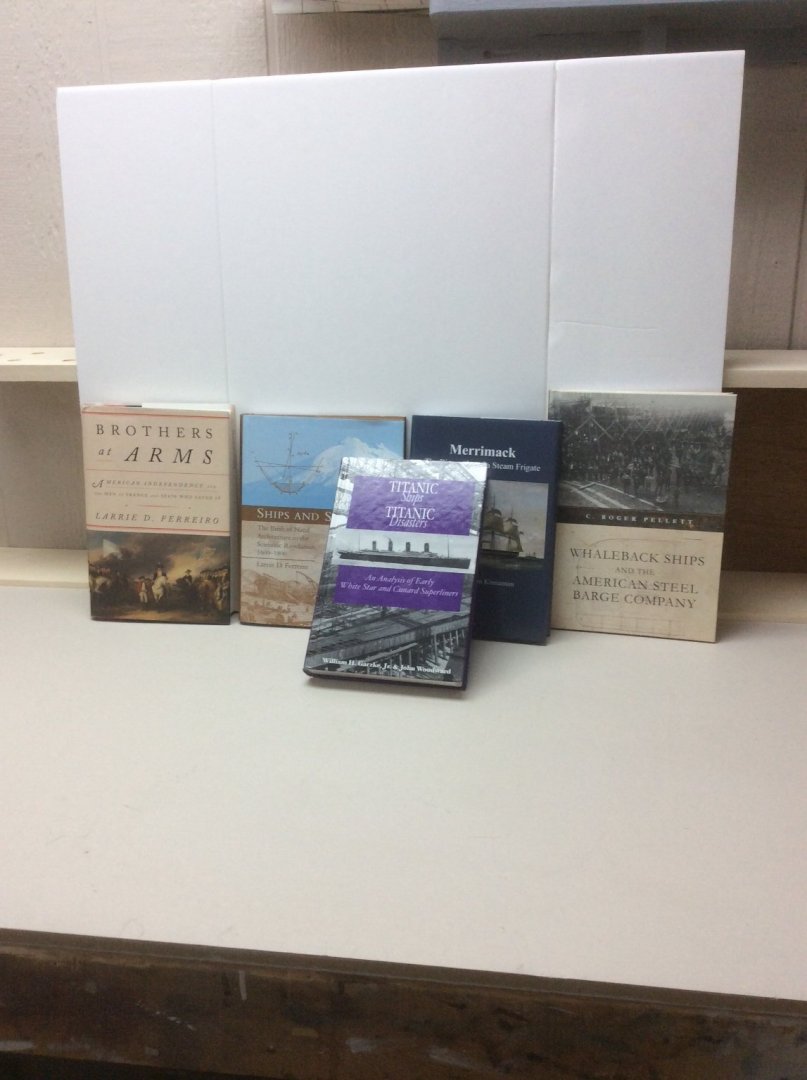
Wayne A great post!, Re: Laurie Ferreiro’s Book They must put something in the water that comes from the drinking fountain of the University of Michigan’s Naval Architecture Department that causes us to write as there are currently a number of published authors who are graduates (Ferreiro and yours truly included). I have never met Mr. Ferreiro but like you enjoyed his Ships and Science. He has recently brought his history of the scientific side of Naval Architecture up to date with a sequel that I have yet to purchase. He has also written an excellent book on the American Revolution that was nominated for a Pulitzer Prize. Titled “Brothers at Arms” it places the Revolution in an international context. I highly recommend it. Current Books written by University of Michigan Naval Architecture Graduates:
-
As an unrepentant thread wanderer I bit my lip when I read the first post above. Since others have uttered the “B” word 😁 I’m now free to add my two cents worth. I have a Miniature table saw (Byrnes) and it’s a beautifully made tool. It can do a great job of precisely cutting small section timbers. The original request was, however, for a saw for “ripping planks and such.” If this means cutting model sized planking from sheet stock, a miniature table saw is a good choice. But, if this means breaking full thickness planks (3/4in) down to scale thickness I would recommend something with more power; either a full sized table saw or bandsaw. A table saw using 8in blades can be used to rip full thickness stock. Then fitted with a hollow ground blade and zero clearance insert can produce model sized planking. Roger
-
Having spent most of my life in or near rural America, my observation is that working farms are messy places- I suppose that when the day’s work is done the farmer does not have time or energy for much landscaping. Vacation visits to Great Britain confirm that working farmers there are not much neater. Another item seen at farms that muck out their barns regularly is a pile of manure waiting to be spread on the fields. Maybe Belgian farmers are different. I don’t know as I haven’t been there. Roger
-
Ras, I also like the PVA glues, of which Titebond is one. I recommend that you use one of the PVA glues for plating your hull. I don’t like the applicator tip on the bottle as when it sits for a while it gums up with dried glue. To solve this problem I bought a cheap squeeze bottle like diners used to use for ketchup and mustard. The top on the bottle screwed onto the Titebond bottle. Roger
-
I have most of the “Two Foot Library” books in my collection, bought when I was much younger. While they are old standbys, their scope is limited pretty much to Eighteenth and Nineteenth British and American Sailing Vessels. As such they would be useful to most kit builders trying to improve the accuracy of their work. The list mostly omits small craft, regional craft, and completely omits engine powered ships. I am a scratch builder that tries to build models of vessels never modeled or at least rarely modeled before. This means that these ships either did not participate in noteworthy historic events, or for which little information is commonly available. This means tracking down information on a project by project basis. Others venturing into scratch building will need to either buy the plan packages available from sellers like Ancre and Seawatch or develop a library for each project as I have done. Roger
-
You gotta wonder how effective that voice tube would have been after the action started?