Chuck
-
Posts
9,726 -
Joined
-
Last visited
Content Type
Profiles
Forums
Gallery
Events
Everything posted by Chuck
-
 Wonderful!!!
 -
Really nice planking progress. I am happy those videos and step by step instructions helped.😀
-
It looks really good. If you wanted to, you could clamp those mis-aligned BF tops when you glue the bulkheads in position. It doesnt really matter but then they will be straight at the top as well. Its pretty easy to do and I did that when gluing the bulkheads in. Chuck
-
In chapter one there is no planking....hence 1/8" at the bow. Once you plank up to the sheer in chapter two, you add the fairing cap which is 3/16" wide because it now has the planking on outboard hull. Chuck
- 1,784 replies
-
- 1
-

-
- winchelsea
- Syren Ship Model Company
- (and 1 more)
-
Bob....that is a great observation.... Slowing down is half the battle. Good on you!!!! Chuck
- 46 replies
-
- 3
-
-
- medway longboat
- Syren Ship Model Company
- (and 1 more)
-
It looks good so far.....but you really should sand the laser char from the edges of the stem assembly. Also dont forget to taper it in thickness as stated in the instructions. That would have been so much easier before gluing it to the BF. Chuck
-
That really is looking sharp!!! Very cleanly and well executed. Bravo!!!!
-
Yes you measure that distance of each tick strip and then divide by 25..... BUT its better to divide the hull into belts because at the stern the planks are narrower into the tuck of the counter than against the stern post. You should line off the hull into belts first......at least separating the hull into two belts. Those that terminate against the counter or those that terminate along the stern post. It may not be exactly half the strakes either. This is not pure math and there is plenty of artistic considerations. Otherwise the run of your planks will be very odd and the widths will be even weirder. What ship are you building? That would certainly help the discussion. Chuck
- 1,784 replies
-
- 1
-
-
- winchelsea
- Syren Ship Model Company
- (and 1 more)
-
Which wood filler to use
Chuck replied to dkuzminov's topic in Building, Framing, Planking and plating a ships hull and deck
Elmers has a series of wood filler that comes in a tube. They have a wide range of color choices and its water based. I found that if you buy all the colors it is easy to mix them like paints and get pretty close. In addition...if you have some weathering powders, you can add small amounts to color it further if needed. -
That may differ.....the important thing to remember is to skip every other bulkhead for the butt joints. As long as you do that from strake to strake you will be fine....even if you have one area that may have slightly longer planks. Its fine.
-
That is correct. That last photo looks pretty good. You have some finish sanding and beveling to eliminate all the tiny gaps but that looks very good.
-
The natural in the tub on the upper right. and yes the wales and black strake are thicker. But not the crazy pronounced amount that you usually see with kits. Its not as pronounced.
- 1,784 replies
-
- 3
-
-
- winchelsea
- Syren Ship Model Company
- (and 1 more)
-
Looks familiar......it will be all done in no time at all
- 137 replies
-
- 2
-
-
- winchelsea
- Syren Ship Model Company
- (and 1 more)
-
Nice start!! It is looking very good.
-
Its there somewhere.....on sheet one perhaps. Dont hesitate to sand the hell out of that planking too. You have quite a bit of thickness there to smooth out the rough spots. Chuck
-
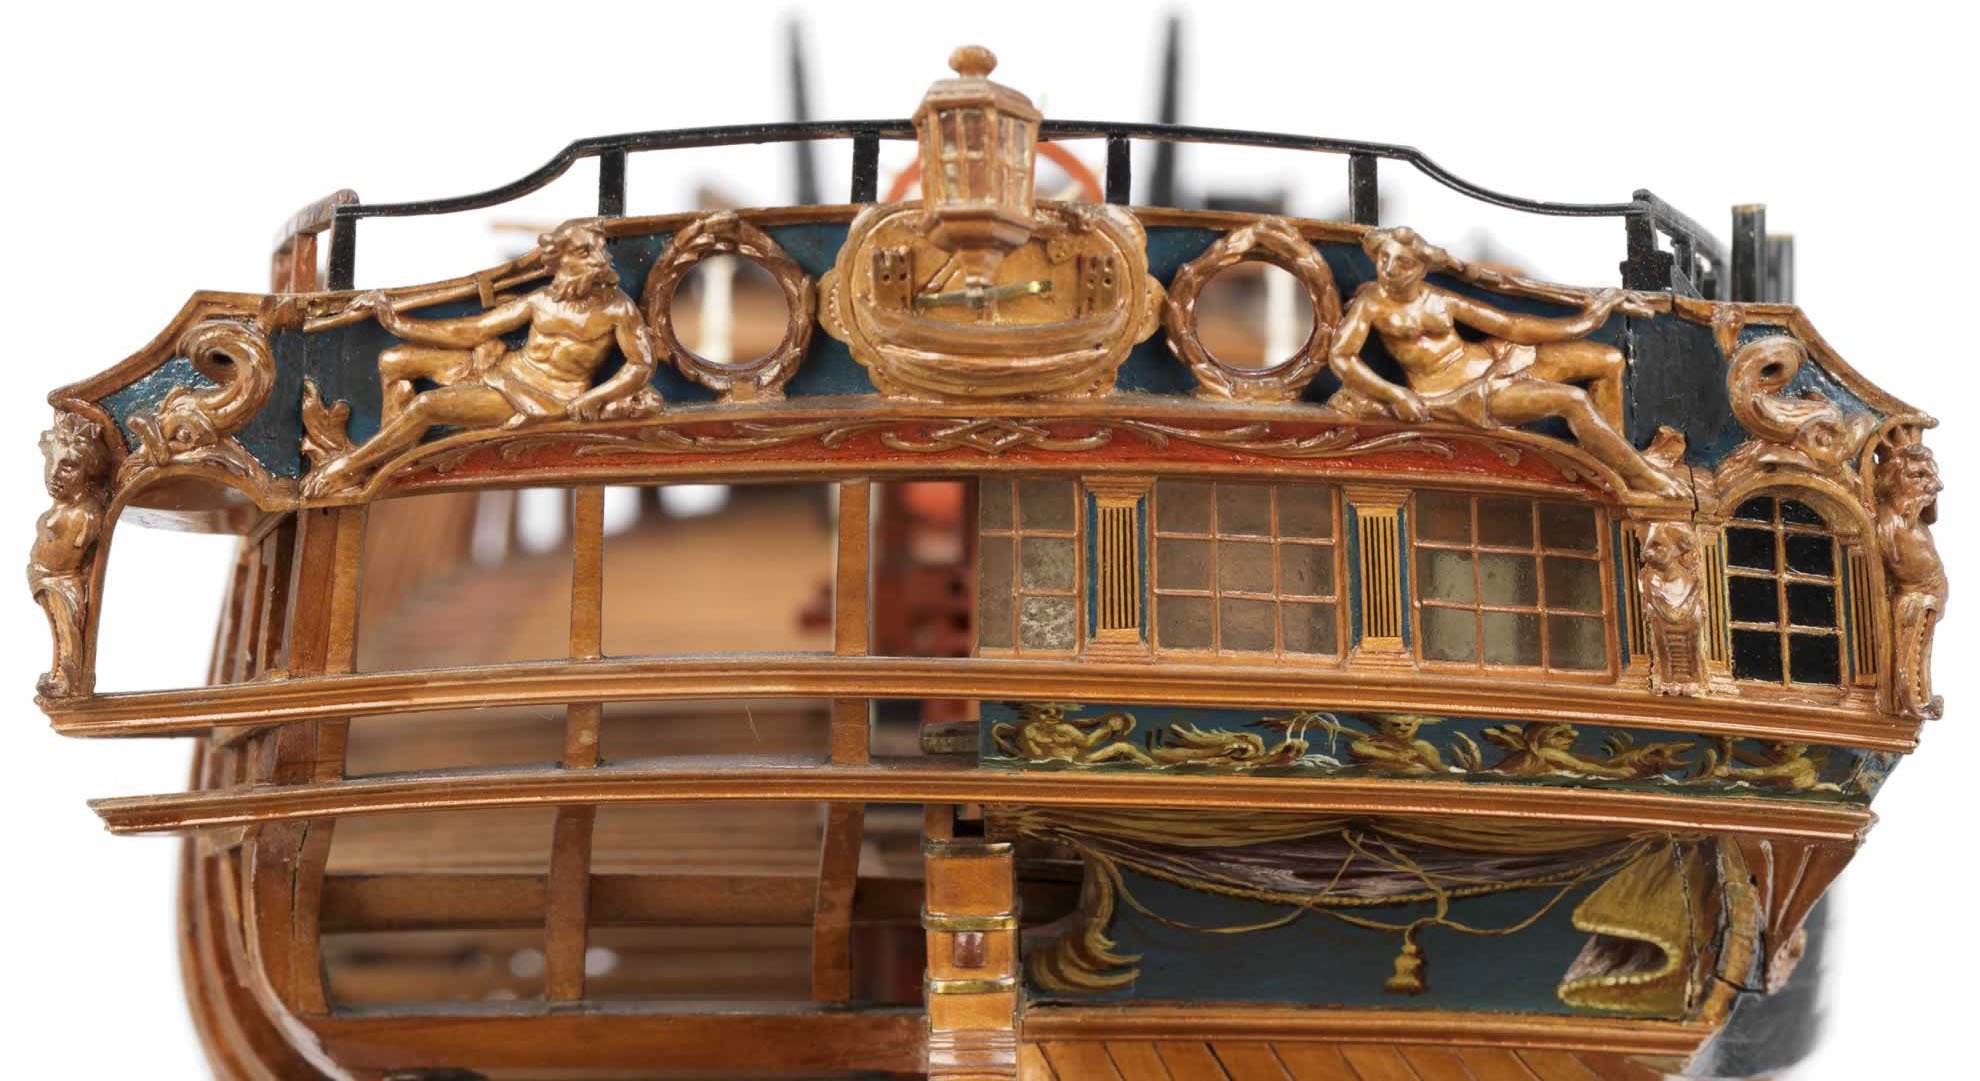
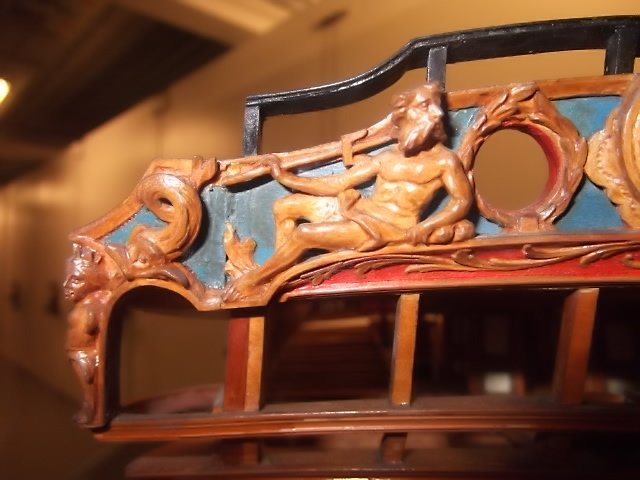
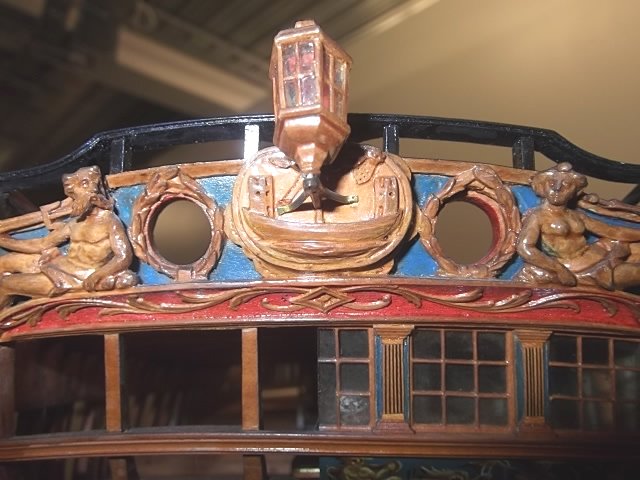
Ok so to get ready for detailing the stern, here are a few images of the contemporary model. There will be a few differences on ours based on the original draft. Here are some close ups for reference. Its pretty crude when you see it this close up and very dirty. Ours will be more refined hopefully. I know Jacks figures are so much better than these.


- 1,784 replies
-
- 18
-
-
- winchelsea
- Syren Ship Model Company
- (and 1 more)
-
Thats ok because the resin carvings can be shaded with the fruitwood gel stain. You just need to put a few extra coats on.
-
Welcome to the party
- 6 replies
-
- 1
-
-
- fairing
- hull fairing
- (and 2 more)
-
That looks so good in cherry. Its nice to see someone building that version. Yours is looking very clean with some excellent craftsmanship.
-
Yes but they could be even smaller.....LOL I ran out of space too, so now I just give them away when they are done. I am sure you will find a good home for yours Allan!!!!
-
Looks very good....good to see this one take shape again. How the heck did you treenail those interior planks...looks like a tight space. How weird is it that you are now in 2020 and I am still in 2019........or 1985 as my kids keep reminding me. Shouldnt you still be sleeping???
-
After building the Winnie at both 1:64 and 1:48, I am always leaning towards the larger now. Its just more enjoyable given the there are fewer teeny tiny parts that lack detail. Building quarter galleries in both scales sealed the deal for me. Chuck