Chuck
-
Posts
9,704 -
Joined
-
Last visited
Content Type
Profiles
Forums
Gallery
Events
Everything posted by Chuck
-
 Here is another tip..... I know this may waste some wood. BUT it is much easier to bend a strip not so close to the end of the strip. You can get a much nicer and smoother bend a bit farther back. Obviously then the excess after bending will need to be trimmed and discarded. But that is OK. It is very hard to bend a strip edge-wise so close to the end of a strip. So this is just another option you might want to try when a tighter bend is required.
- 43 replies
-
- 10
-

-

-
I only sometimes glue the edges. If edge gluing will possibly close a gap then yes I will do so. But if there isnt a gap then why bother. I found that if I edge glued every plank, should I not like that plank after positioning it, it will be very hard to remove without also damaging the planks it was edge glued to. I only use PVA for my models....except when planking. When planking I use CA. I place a small drop in the center of each bulkhead to glue each strake into position while making sure it is tight against the plank next to it. I only glue it on if it fits tightly and no gaps are seen after a test fit but sometimes I dont see the small ones and have to remove the plank after and try again. Finding where to place the "top" of the bend and how severe to make the bend is a learning "curve". No pun intended. Its something you will learn to find as you practice this technique. You will get much better with that after a dozen or so attempts. Most times you will likely underbend in the beginning. Then after that you may even over bend. But that is what allows you to learn what shapes are best. I would even go as far to say that you should sacrifice a few strips of wood and simply go nutty with some test bends. Try over bending and try under bending as well. Try moving the "top" of the curve forward or aft just as a test to see how it looks when test fitting. Try a tight bend and then try a more "longer" and subtly bend. Just examining the gaps after trying these different scenarios will help you learn a lot. Its what I do on every model when starting this exercise because once I have a good idea what curve is needed its pretty similar for all of the other strakes.....more or less for the hull shape you are working on. Hope that helps.
- 43 replies
-
- 15
-
-
Yes it is actually....but not of the Pegasus or Swan class. I will be doing one of the Winnie. I think that will be a nice compliment to the POB full hull. I have also since made some improvements in the framing process that will make it even easier to build. I will begin making it as soon as the Winnie full hull is completed. Chuck
- 130 replies
-
- 10
-
-
That is looking very, very good. 😀 Your careful planning and lining up at this stage will pay off so much later when you get to the later chapters.
- 399 replies
-
- 2
-
-
- winchelsea
- Syren Ship Model Company
- (and 1 more)
-
That looks super fantastic....well done.
-
Dont know off-hand but the easiest way to tell is measure from the plans. I think they were around 11/16"
- 421 replies
-
- 1
-
-
- medway longboat
- Syren Ship Model Company
- (and 1 more)
-
Definitely the quality and with far less detail and accuracy. Having said that it wouldnt be any easier. So i would say something like the badger by caldercraft or even the Alert by Vanguard. Or even the Armed Virginia Sloop by MS. The medway longboat is an actual plank on frame model with floors and top timbers. I would suggest a more traditional pob kit like those i mentioned first....but there were a few guys in the group that actually did a fantastic job with the Medway longboat as their first projects. So it really depends how excited you are about it and if you are a slow and careful builder. For a first build its especially important to take it really slow and take your time. No matter what you choose. Either way, I am willing to help in any way i can while you work on any of them....as well as a whole bunch of other guys on the forum. Chuck
-
Hello Chris While I think the Logboat kit is doable I would recommend starting with at least one smaller kit just to get started. It is an advanced kit but nearly everything is laser cut for you. But it requires a bit experience with sich fiddly parts and the hull can be a bit delicate. I would recommend you start with one of the smaller Bluejacket kits first which dont take a lot of time to build. Something with a little rigging. Once done I am sure the Longboat would make the perfect second project. Chuck
-
If it helps you make a decision, the laser etched deck sheet has some issues with the plank shift pattern. There would not be any butt joints in the deck planking between the gratings etc. they werent needed with such a short span and would only make everything weaker. They would have used one length between the fittings down the center of the deck as the distance between fittings was so short. They wouldnt continue the shift pattern at all like its made.
-
Nice work...cant wait to see it with a finish on it.
- 642 replies
-
- 1
-
-
- winchelsea
- Syren Ship Model Company
- (and 1 more)
-
Nice start! Keep going.
-
Also....dont forget to add the sheer strip along the quarterdeck. You should do that before starting to plank.
- 137 replies
-
- 1
-
-
- winchelsea
- Syren Ship Model Company
- (and 1 more)
-
That looks good. You might have to test various gel stains you can get locally. Look for a similar color to fruitwood. test it out on the back side of the resin
- 137 replies
-
- 1
-
-
- winchelsea
- Syren Ship Model Company
- (and 1 more)
-
Very nice. They look really good and i know how tricky they are to make.
-
It looks really good....BUT,,,if you decide to add treenails, you need to go much much smaller. Try a #78 bit. Chuck
-
Thank you so much. I appreciate the kind words
- 1,784 replies
-
- 1
-
-
- winchelsea
- Syren Ship Model Company
- (and 1 more)
-
Thanks guys.....finished the carvings today. All that is left to do now is the fluted columns between the windows and the last two carvings. Hopefully get to that next week. That will finish up chapter 3. Then I have to make all this stuff for you guys which might take a while including writing that 3rd chapter. Thanks again Jack!!! This wouldnt be possible without you!!! Fantastic work!!!

- 1,784 replies
-
- 33
-
-
- winchelsea
- Syren Ship Model Company
- (and 1 more)
-
Thank you guys!!! I appreciate the kind words. For everyone..... Its not too late to join in with the group and build your own Winnie. Chuck
- 1,784 replies
-
- 5
-
-
- winchelsea
- Syren Ship Model Company
- (and 1 more)
-
No its a bit darker. I posted them for download so go ahead and download them and print them out. Set your printer on the highest print quality. Its hard to say. It looks different in photos depending on the lighting. For example this photo was taken with my Iphone. It looks different than the blue in the photo below it. But its the same model.....taken a few minutes apart. Its probably somewhere between the two in reality. Although my camera takes better pictures. Thats the bottom photo which is what i use for my log photos.

- 1,784 replies
-
- 19
-
-
- winchelsea
- Syren Ship Model Company
- (and 1 more)
-
Thanks guys... Painting techniques!!! Another loaded question. It really depends in who you ask. But i will explain my preferences. I like sand the surface with 400 grit. Then I seal it with wipe on poly. Then i apply the Acrylic paint in very thin coats like water color. Building up many layers. Now unfortunately you will get many who say this is not the right way. But it has always served me well. I'm sure you will get many other suggestions about how it should be done.
- 1,784 replies
-
- 6
-
-
- winchelsea
- Syren Ship Model Company
- (and 1 more)
-
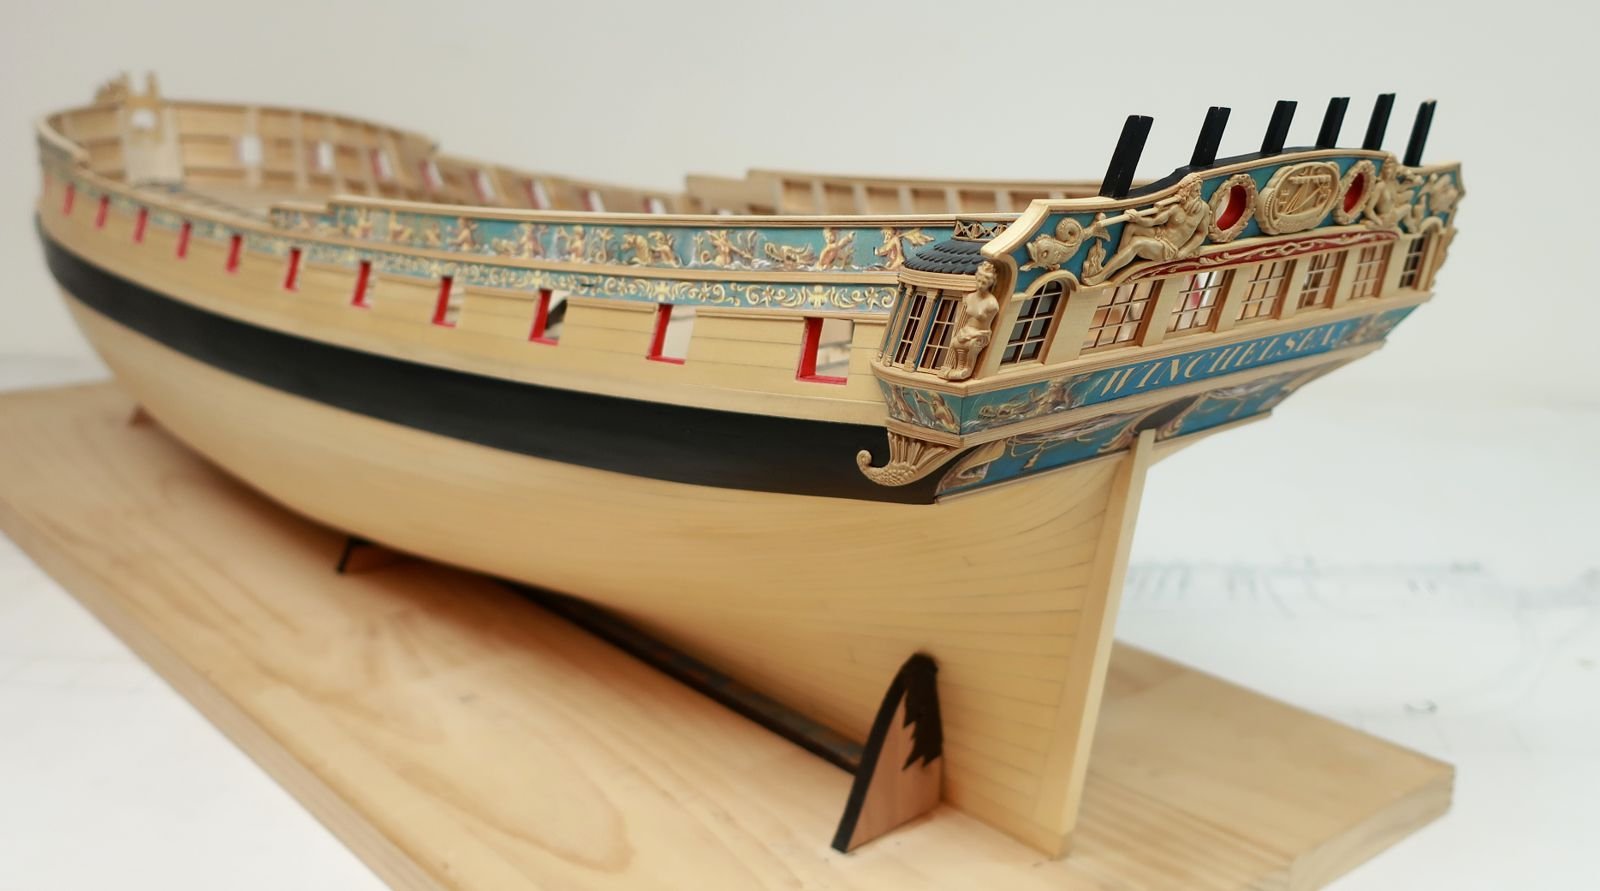
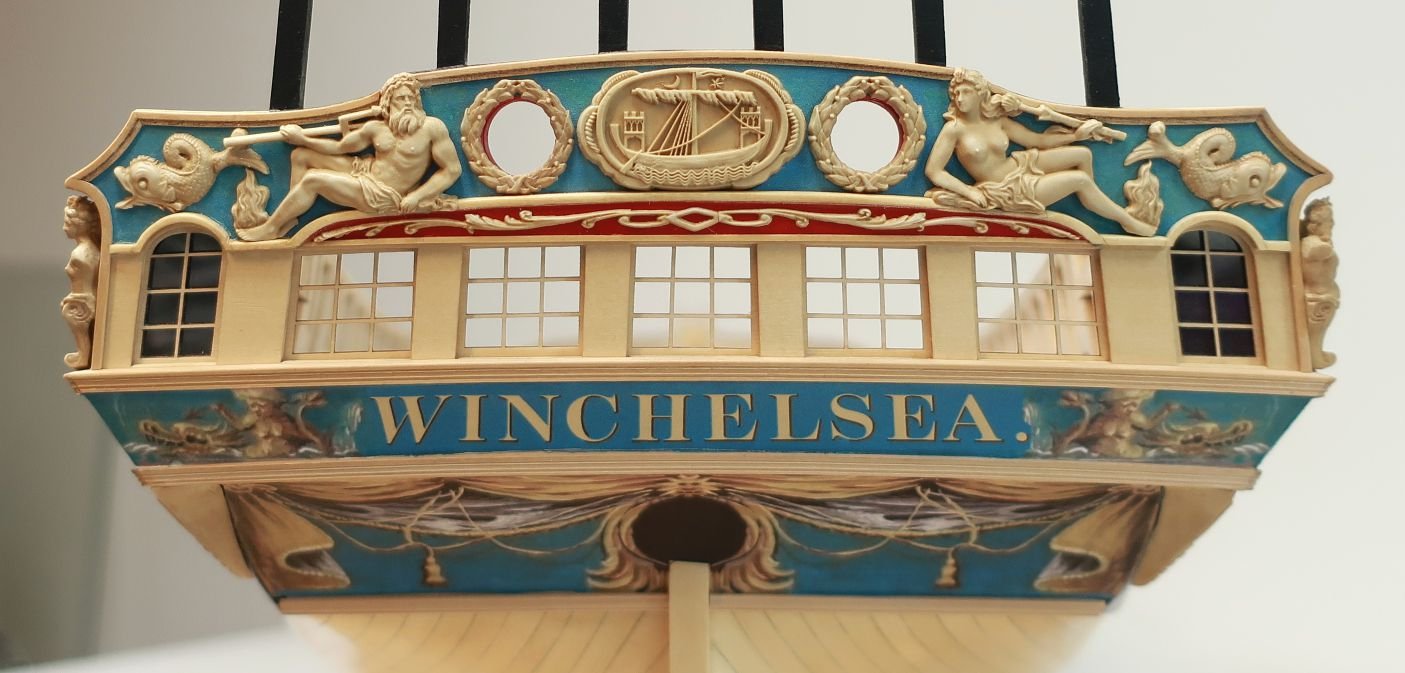
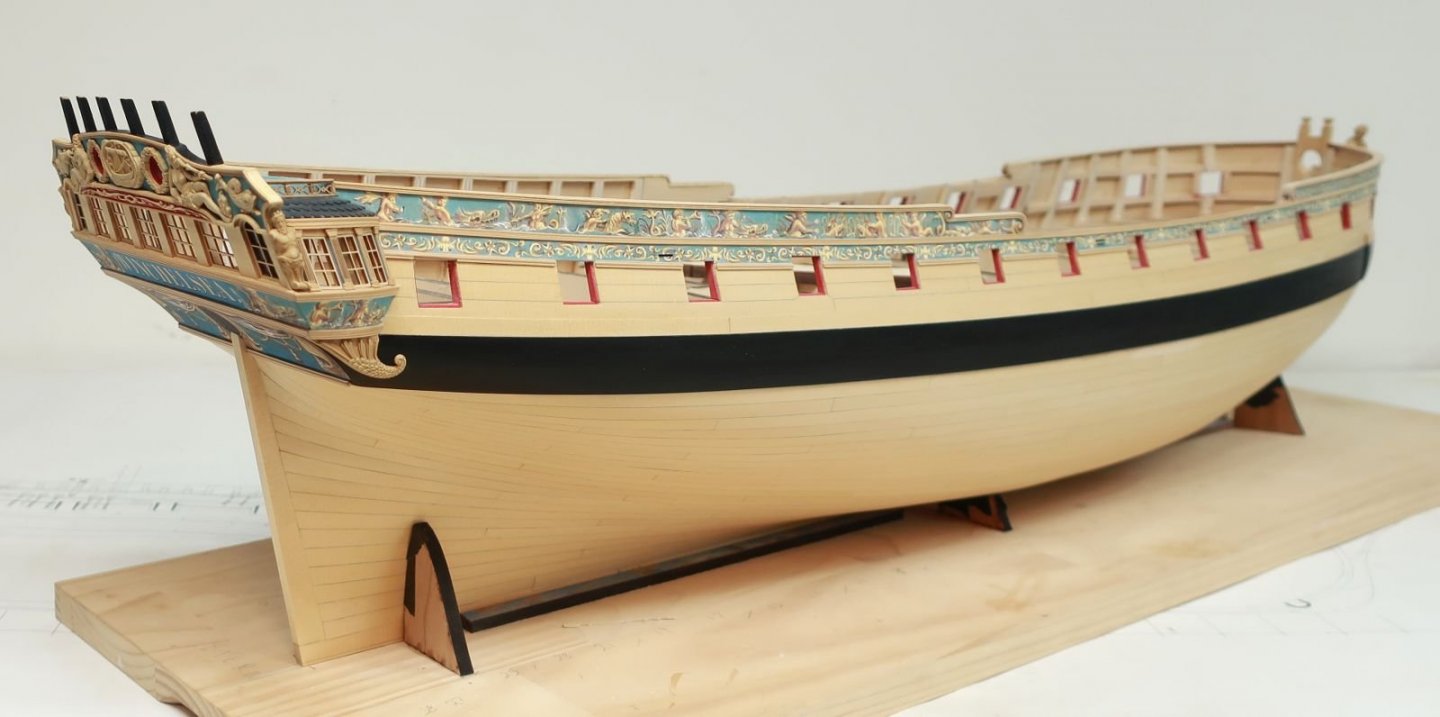
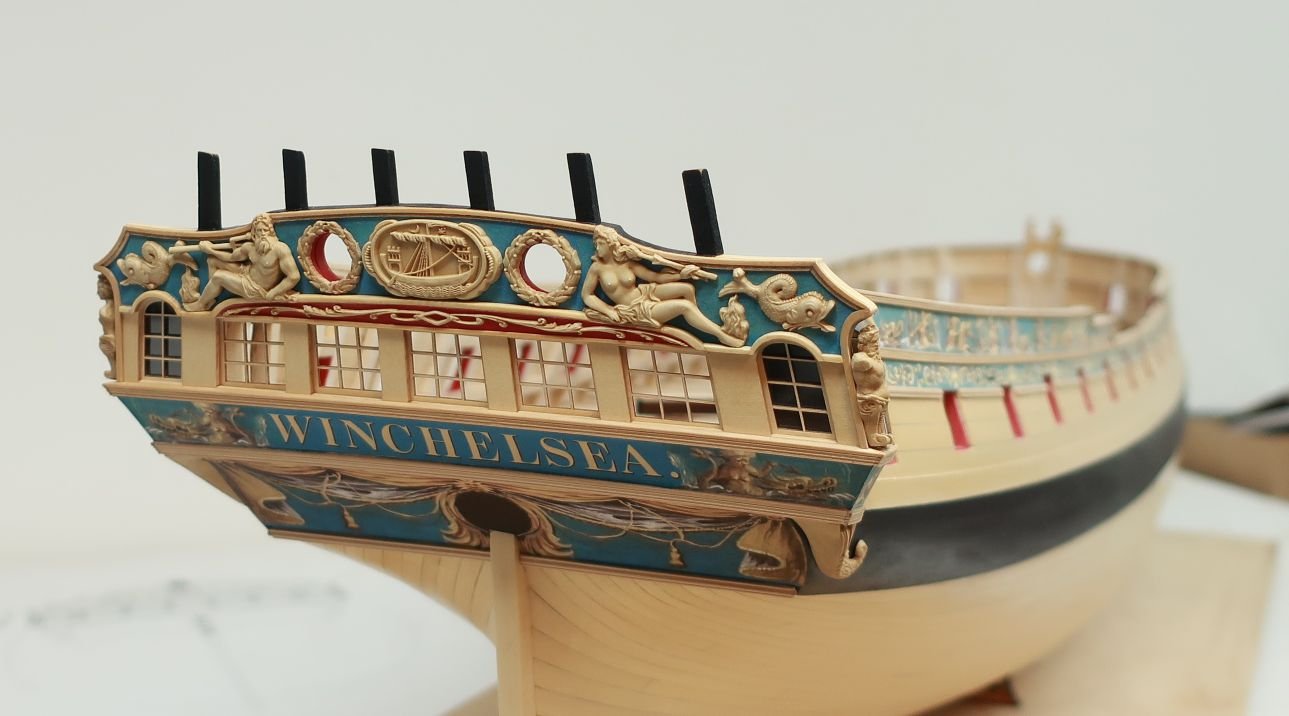
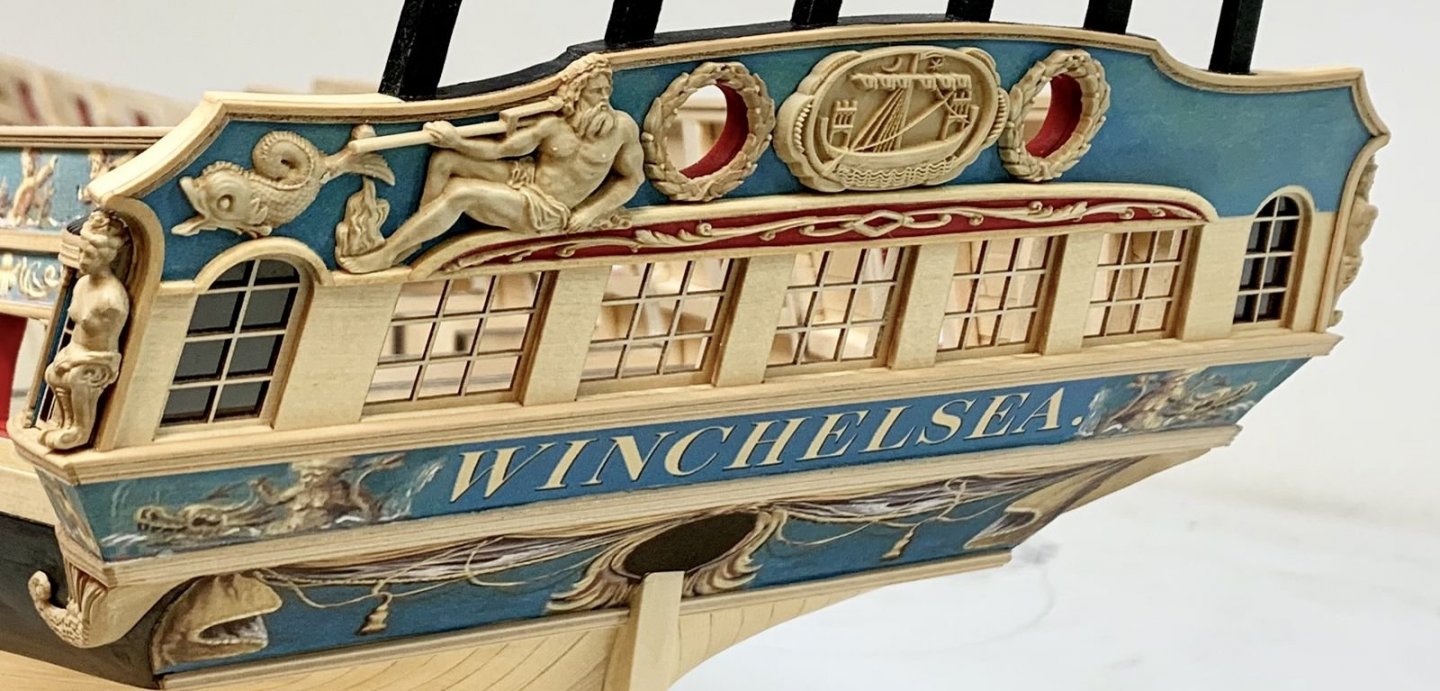
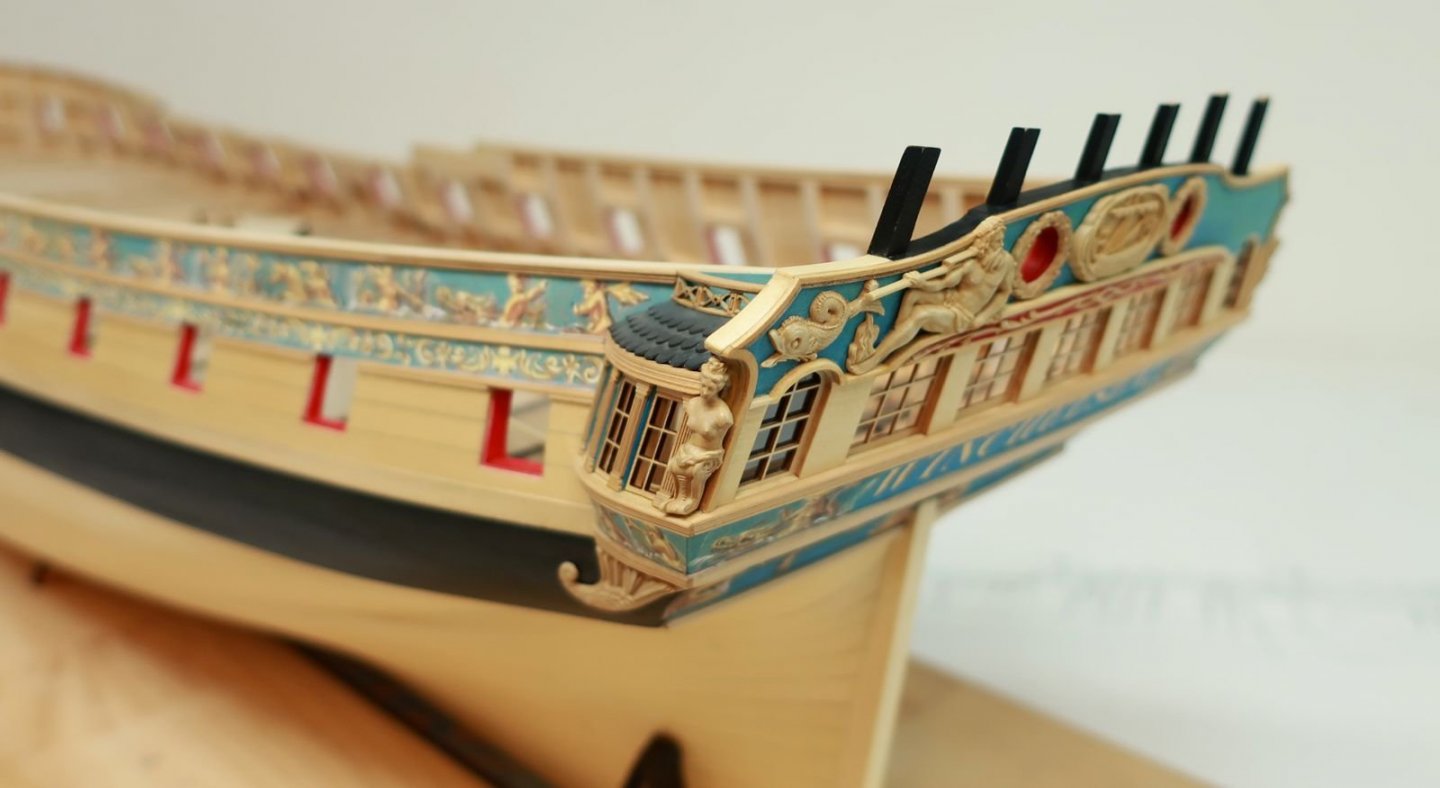
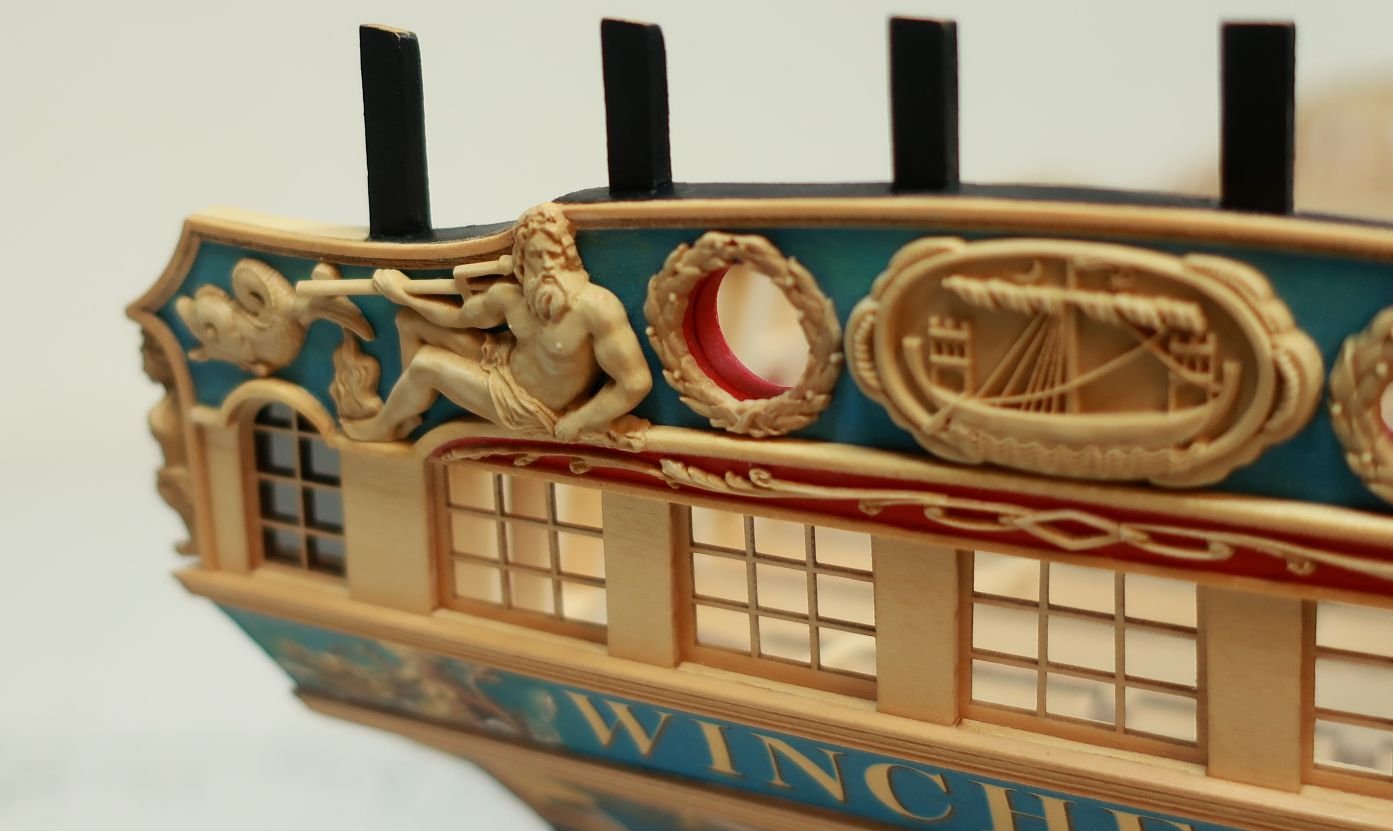
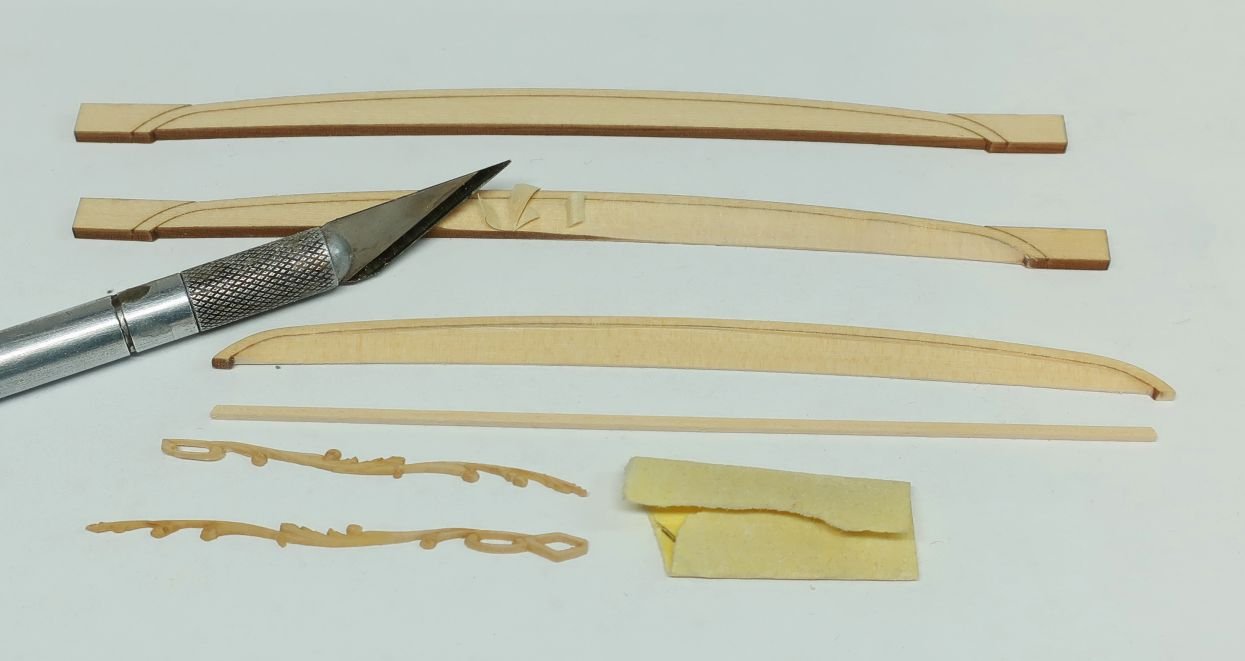
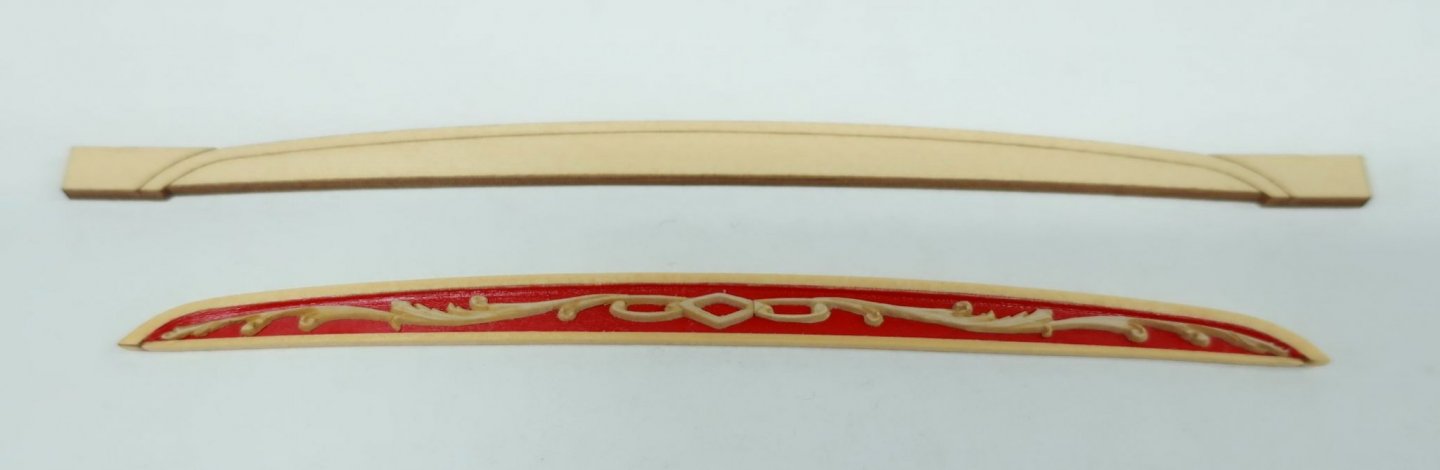
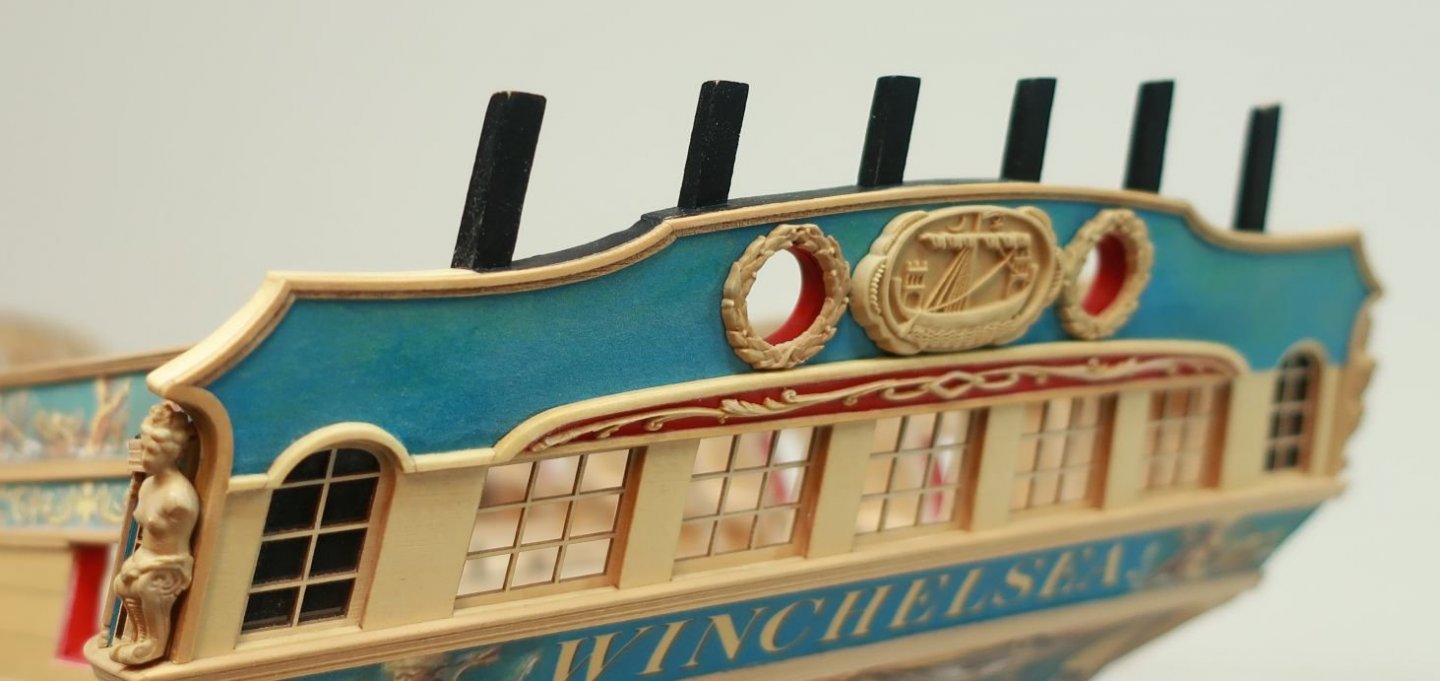
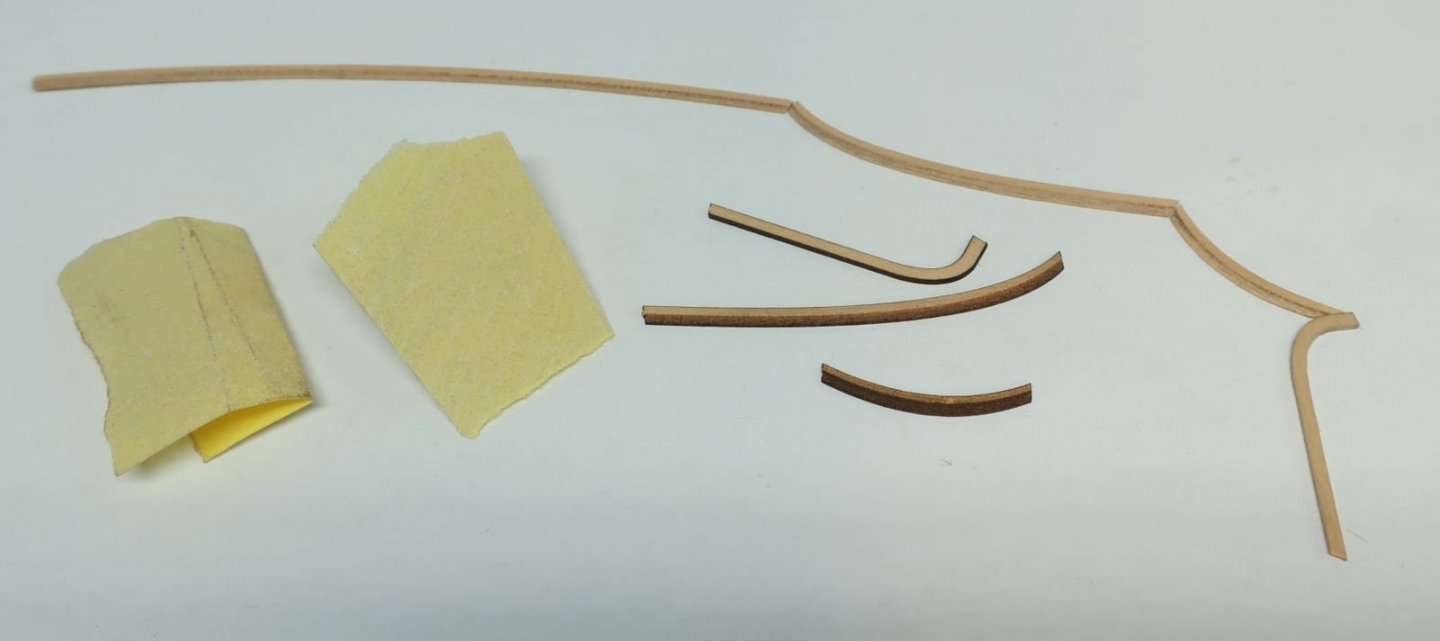
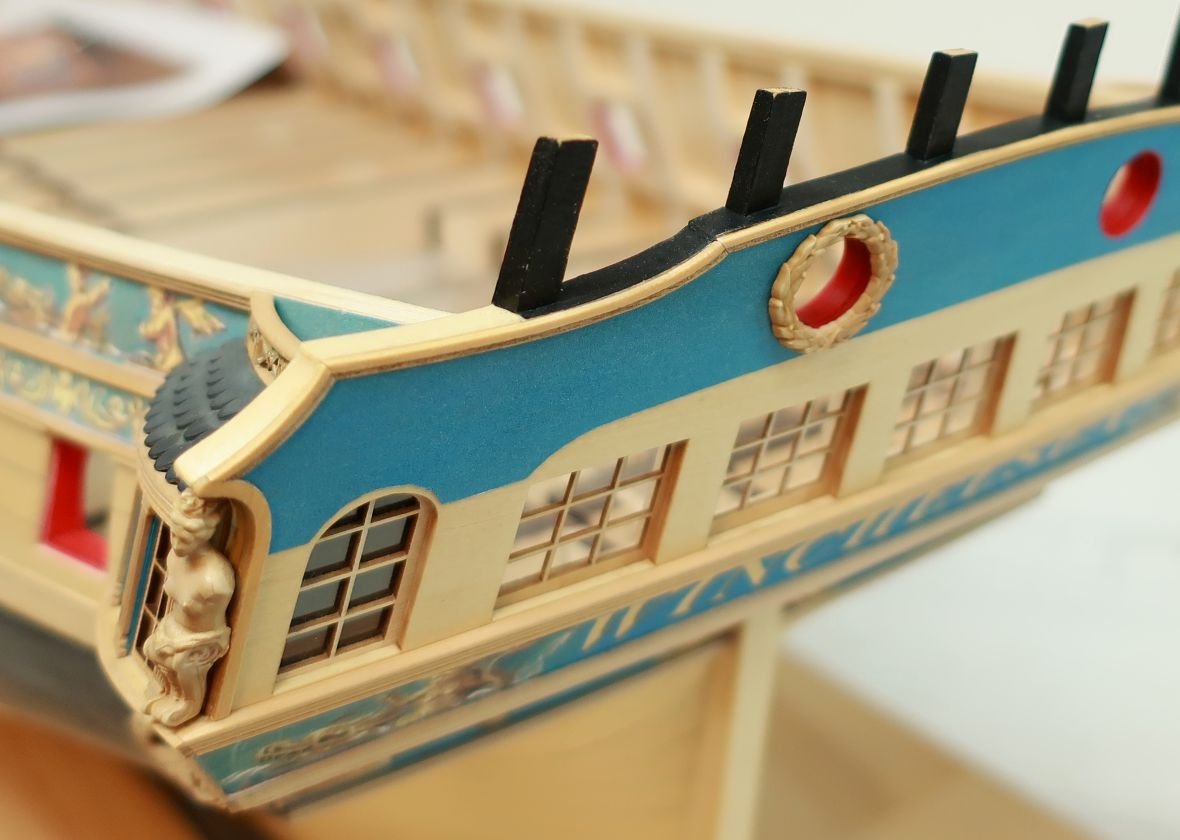
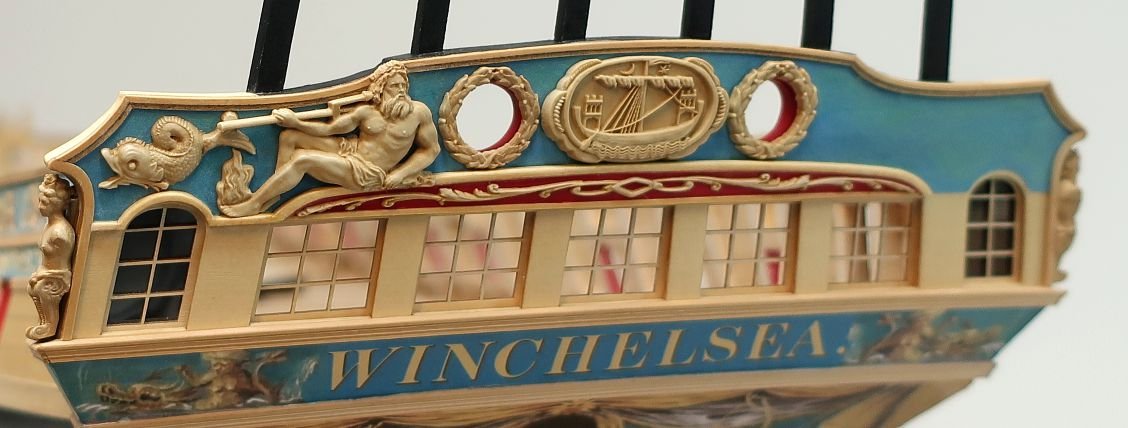
Work on the transom details has begun. The first thing to tackle was the fancy molding around the top of the transom. Its a very typical shape which makes scraping them a bit difficult. I remember doing that on the 1:64 version of the Winnie. So since I was happy with the results of the laser cut molding on the sides of the hull, I decided to try and make these with the laser cutter also. Its a simpler profile but it meant laser etching the bottom half of each molding segment. In the photo below, you can see the molding that is finished. I sanded off the laser char with some 320 grit sandpaper. I also had to sand the char from the bottom half by folding small pieces of sandpaper and cutting a straight sharp edge on it. This allowed me to clean up the face of the etched area. You will never get it all off. Dont worry about that. Get most of it clean and what remains will give a good effect when you apply some poly. You can also see a few pieces I havent sanded yet. In the next photo you can see I have added the molding. Try and get some tight joints between each segment. But before I glued them into position, I had some painting and prep work to do. First - you must paint the top of the transom black along with the stern frame extensions. The outside of the transom top edge (port and starboard) is left unpainted as shown. Second - paint the insides of the two round ports red. Third- You can paint the upper transom blue. Cerulean blue to be exact. Paint it above the cove and windows for now so after adding the molding you get a nice clean edge. Now I know some of you hate the thought of painting. It will also be hard to match the blue of the friezes exactly. So I also provided a paper backing to match the friezes. Personally I would prefer to paint this area but I did use the paper version. Just leave a small gap all around the perimeter so you can glue the molding and coves on and still get a clean edge. You can see in the photo the paper version and the nice clean edge you get when the molding is glued on. If you have to touch up the paint on the round ports just be careful. When you cut the paper around the ports you will probably mar the inside of the ports a bit. But no worries as the wreaths will cover any paint mishaps. Just as mine did as you can see. When adding the molding I started with First - the two segments port and starboard with no etched detail. Then I added the center piece on the top of the transom and worked my way out towards the sides. This is important because of the way the etched molding intersects with the non-etched pieces along the sides. Hope that makes sense. Then I needed to make the cove which is what the carvings sit on. It is a laser cut piece that still needs a bit of carving work. See below. I will explain the steps. The photo above shows the cove in stages. The top shows the untouched example straight off the laser cutter. Notice the laser etched line to indicate the molding along the top. There are also some handles on either side which will eventually be removed. In addition, along the bottom it is notched out so you can add a strip of wood which will become the moldong along the bottom of the cove when you are done shaping it. The first step is to take a chisel or in my case a sharp #11 blade and bevel the inside up to the etched line. Do this slowly. You are basically creating a straight bevel under what will be the molding along the top. It should thin down to about 1/32" thick along the bottom if not even thinner. Step two is to use some 320 grit sandpaper or even a curved chisel to sand the inside round or concave. The cove is only 5/64" thick so it wont be to rounded and it wont take that long. Just try and maintain a consistent molding along the top. Try and define that molding pretty good across the top. The bottom image in the photo above shows the cove shaped. Its somewhat concave. I cleaned it up with some fine sandpaper so I could paint it red next. The trick is to try and define the top molding and make it slightly concave. Then I painted the inside carefully. I tried to leave a consistent width molding along the top. It worked out pretty good actually. By the way this is cedar so its soft and sands and carves like butter. To finish it up....you need to add the 3/64 x 3/64 strip of cedar along the bottom edge. Glue it on good. But this molding is thick......height-wise. So I sanded it to around 1/32" thick so it wouldnt appear too heavy on the model. Then cut off the two handles on each end and sand them clean as indicated by the etched lines. The photo below shows the carvings glued on top in the center. A few additional notes on the cove which is actually a very complex piece!!! The top edge must be beveled. If you glued this on now the top edge would be sloped downward in the wrong direction. The top edge actually needs to follow the slope of the deck believe it or not. So you must sand an angle or bevel it down towards the back. This gets complex as the curve of the cove means that bevel is not consistent as you work your way towards the sides. But do the best you can with this so your carvings will sit properly on top of it. In that same photo below, you can see that I have glued the cove into position. But before I did, I also glued the wreaths and center medallion in position. This helped me position the cove properly almost right up against them. Then I continued by sanding and adding the smaller cove on the false lights and the small lengths that connect them. These three pieces are also laser cut. They are thicker than you need so you can really sand off the char and get them clean. But make sure they are the same thickness as the molding along the top of the center cove when you are done. They need to look like one continues even thickness molding across the transom. Hope that makes sense. They are also not as deep as the center cove. I only finished one side so far. With those pieces completed, you can add the other carvings. This may sound easy enough but there is some prep work to do. The reclining figure for example. Note how the hand and clothing hangs over the front of the cove. To do this, you must file a slot or notch on the back side of the carving. Be careful.....these are small and delicate. In addition, note how the head intersects with the molding. Rather than file the back of his head, I cut away the molding instead. This takes careful planning. You must do this in order to have the figure sit properly otherwise it wont fit. Finally, Jack did a fantastic job on these carvings as you can see. But because CNC machining is a violent process, some f the items were left thicker than needed so they wouldnt break. This is true of the castings as well. So you should thin down the trident so the handle is rounded and delicate. I probably should have gone more delicate. You may also want to round off the legs and other areas so they arent so flat. I am talking about the back edges. Look at the arms and legs. This thins them a bit and also creates an undercut of sorts to help the illusion of a fully rounded carving. This photo really shows how the hand and clothes look as though they are draping over the cove. You can see how I filed a notch in the back so it would look like this. I am sure I left out a lot of details!!!! But feel free to ask me any questions. I think it looks pretty good at this point. Jack really did a masterful job on the carvings. These are the resin versions. I treated them with the gel stain as I mentioned earlier.....really makes them look nice. What do you guys think???
- 1,784 replies
-
- 41
-
-
- winchelsea
- Syren Ship Model Company
- (and 1 more)
-
Im not feeling any pressure.....everything will be fine.
-
Welcome Fred.....Enjoy the project. That scroll saw is money well spent. It opens up a world of possibilities for you now. I just gave you one more view....so you are catching up!!!
-
That looks very good. Nice planking!!!